Hi! I’d love to for you to follow me on Pinterest Her Tool Belt and if you love instagram, you can keep up with me there too!
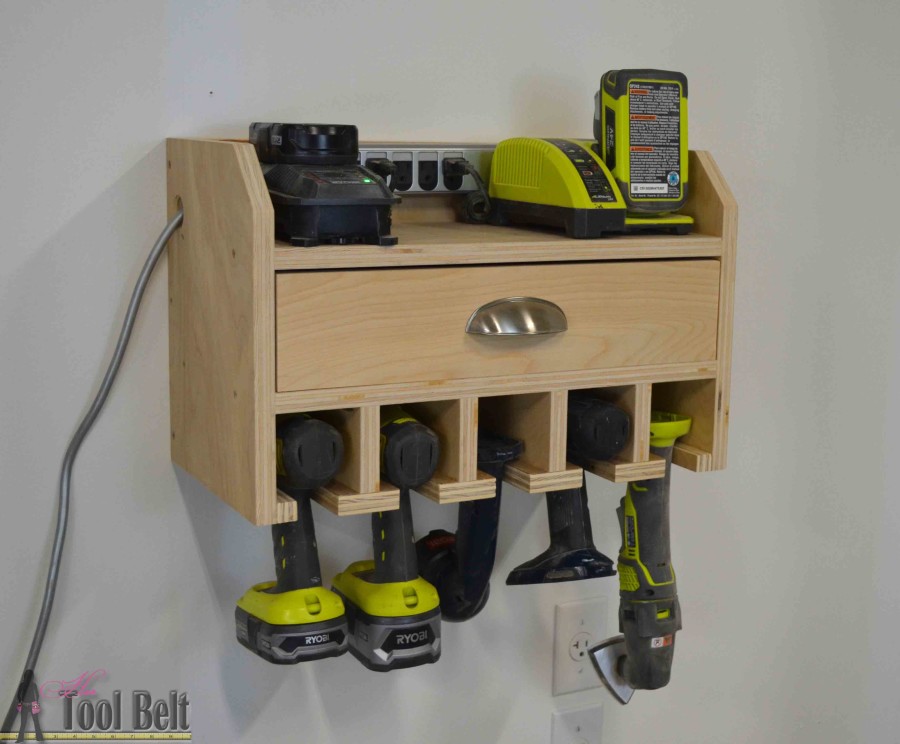
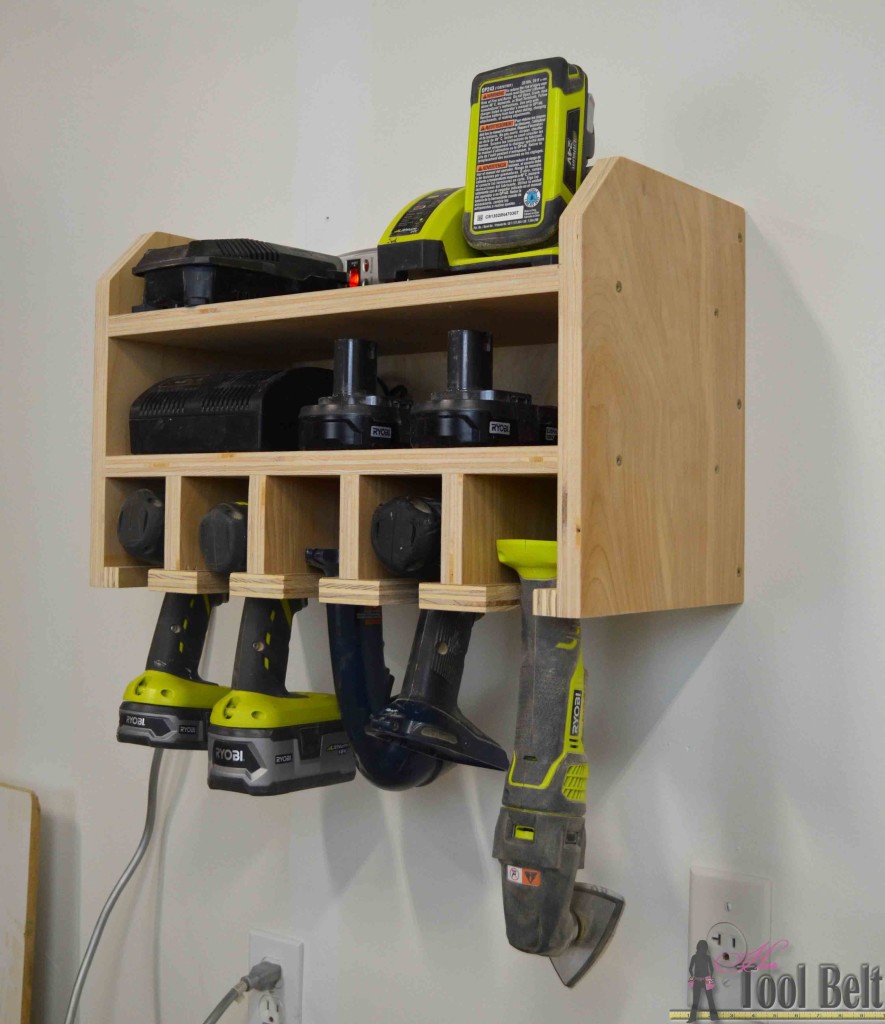
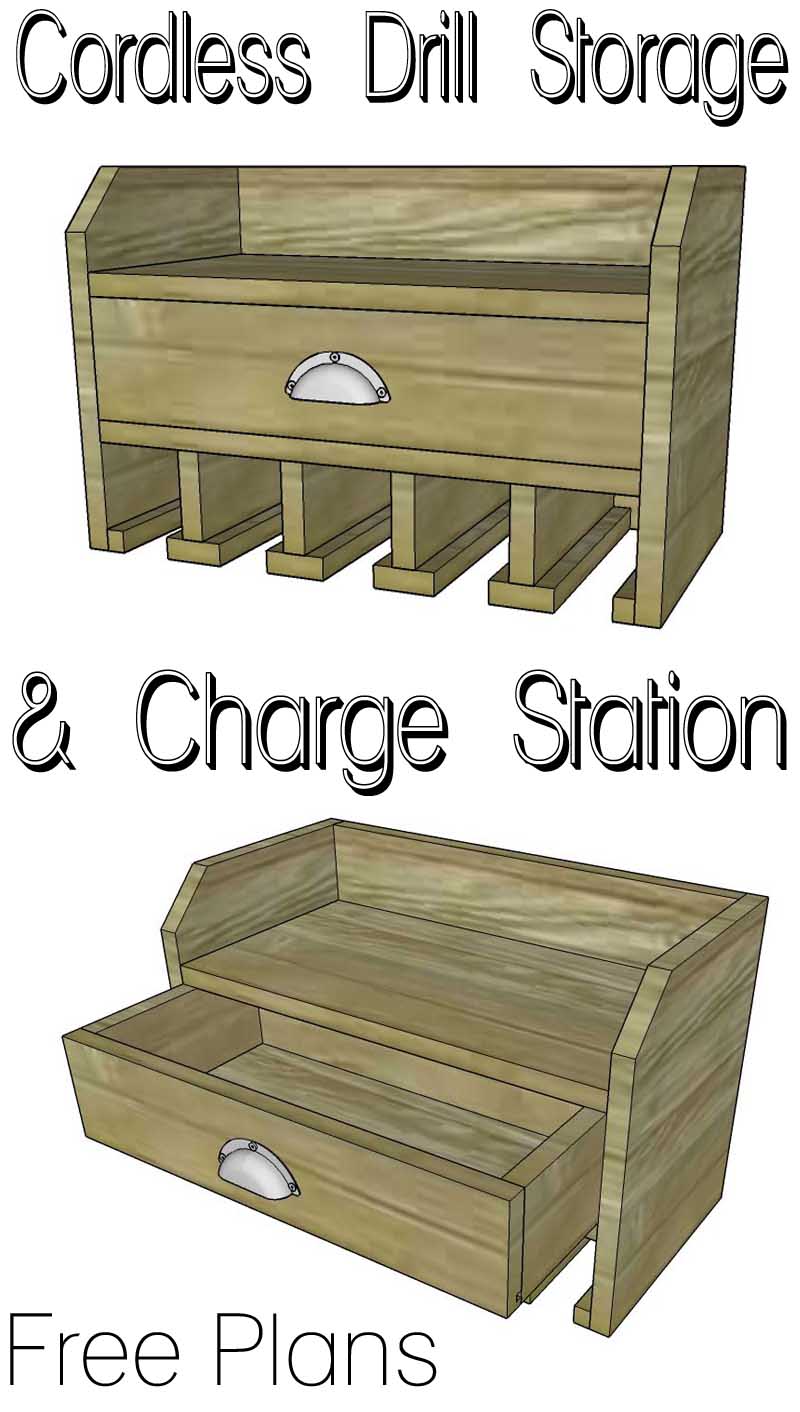
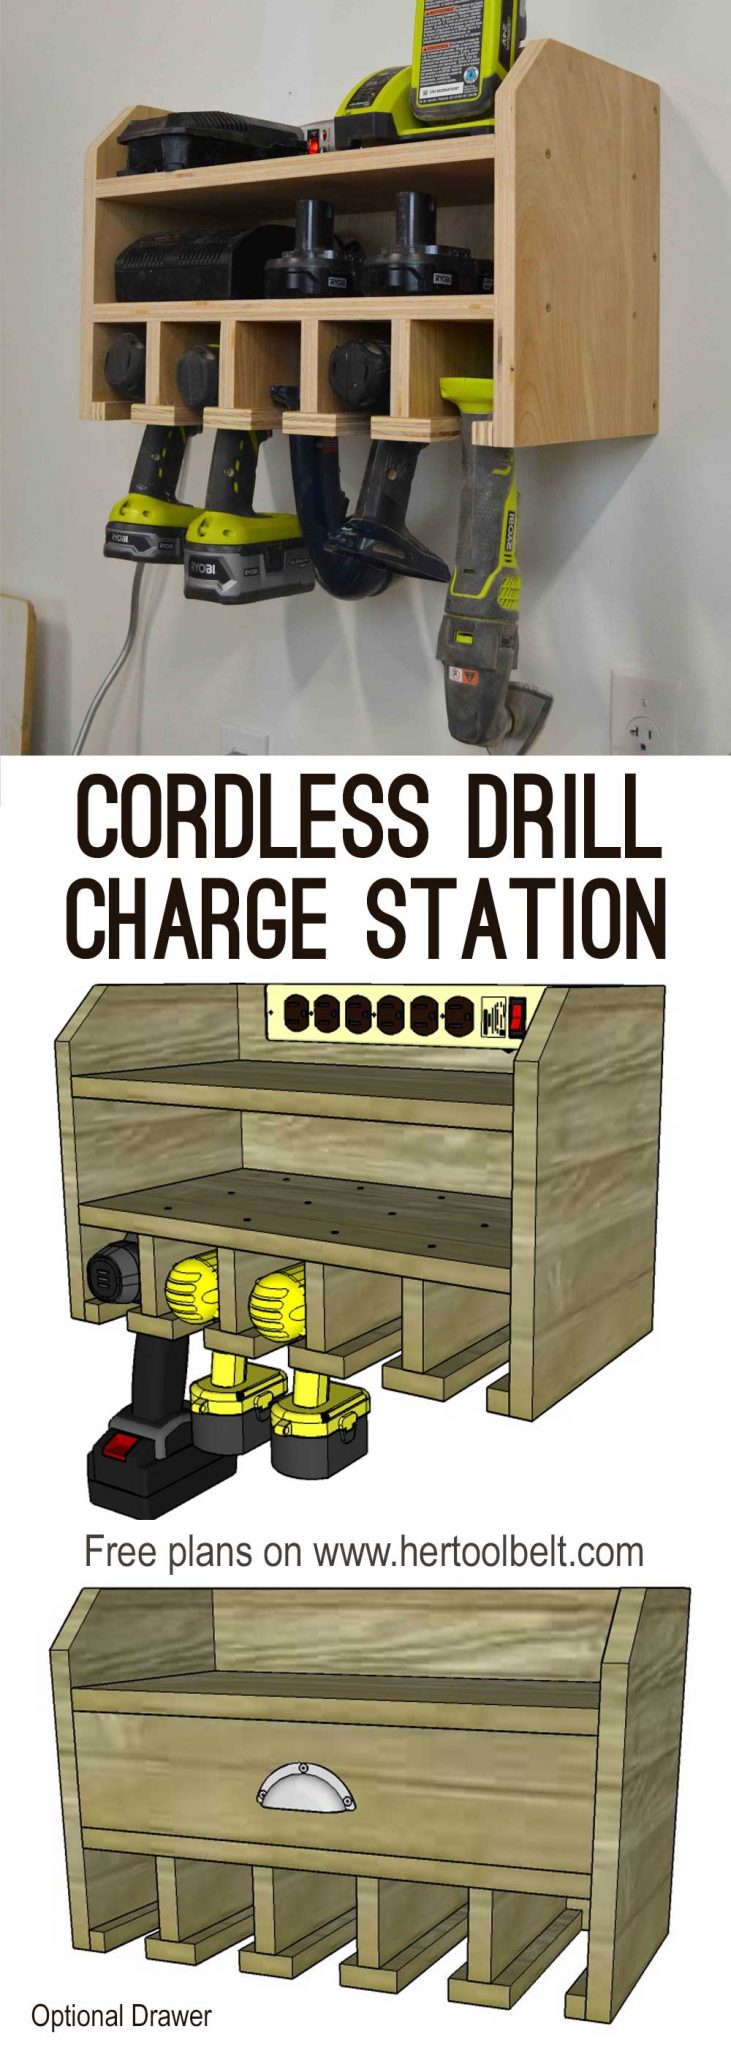
Our first monthly Reader Request Plan comes from Justin! He wants a 5 dock cordless drill storage and battery charging station, that can hang on his garage wall. What a great idea to corral your drills, batteries, and battery chargers in one place. I thought it would be handy to include a drawer for drill bits and stuff.
See it built
Please Subscribe
Need and different number of tool stalls? Or an easier build?
Check out these updated custom cordless drill organizer plans –> here <–
How to Build a Cordless Drill Organizer and Battery Charging Station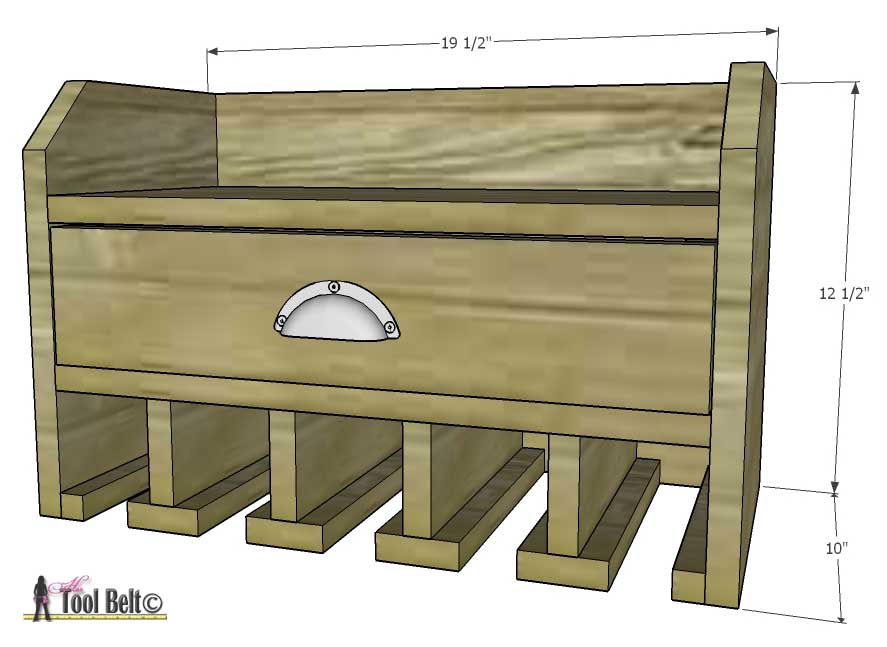
This post contains some affiliate links for your convenience. Click here to read my full disclosure policy.
Materials
- 3/4″ plywood (1/2 sheet 4’x4′) *can be substituted with 3/4″ wood
- 1/4″ or 5 mm plywood
- 1 1/4″ screws
- wood glue
- sandpaper
- 3″ screws
- drawer pull
Cut List
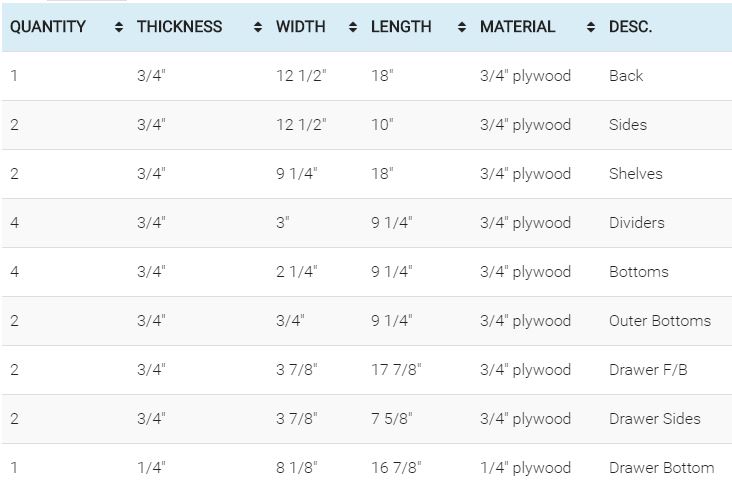
*Note: This organizer fit perfectly with my Ryobi drills (old and new). If the top of the handle, just under the head of your drill is larger than 1 1/2″, adjust the width of the bottoms (2 1/4″) accordingly.
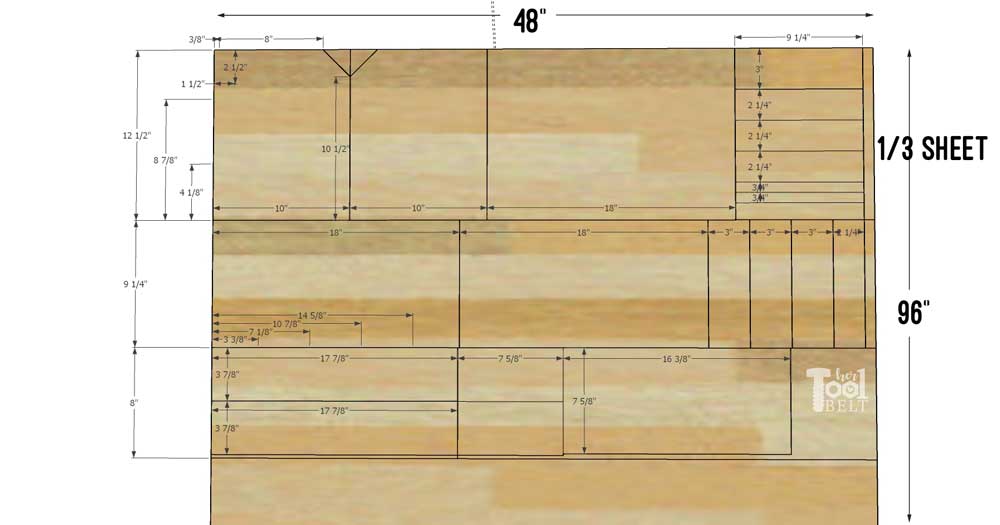
Cut Diagram
This organizer is great for using up scrap 3/4″ plywood pieces. If you’re making it from a sheet of 3/4″, you can get 3 organizers from 1- 4’x8′ sheet.
*Note you can either make a traditional drawer bottom with dados and 1/4″ plywood, or you can kreg jig a 3/4″ bottom on. This cut diagram has a 3/4″ bottom in it (7 5/8″ x 16 3/8″)
Step 1
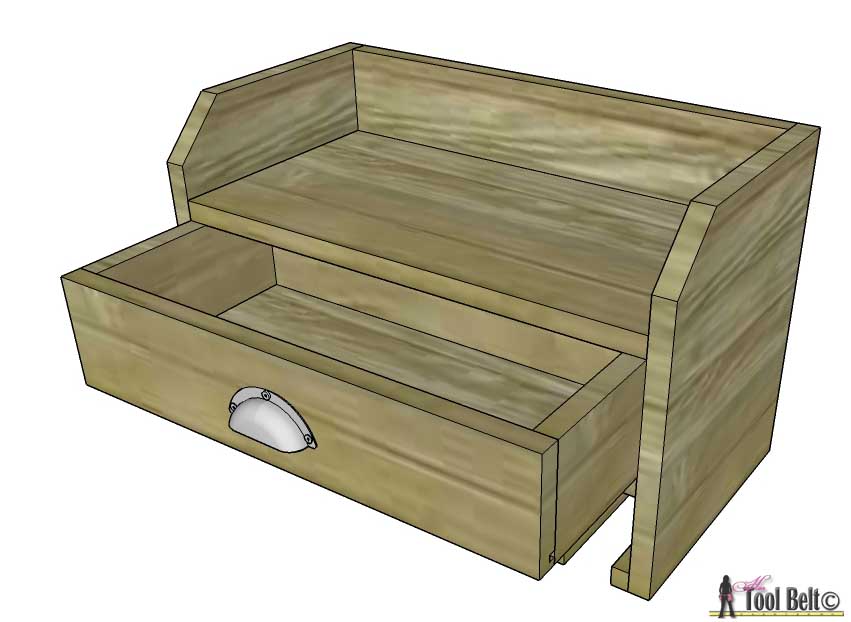
Cut out all pieces according to the cut list. Get the 4 dividers and bottoms. Mark 3/4″ in from each side of the bottom, to center the divider. Pre-drill the bottom piece, unless you are using self tapping screws. Apply a bead of glue and secure each divider and bottom together with 1 1/4″ screws.
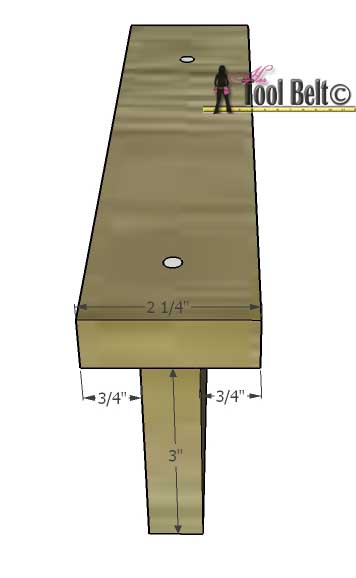
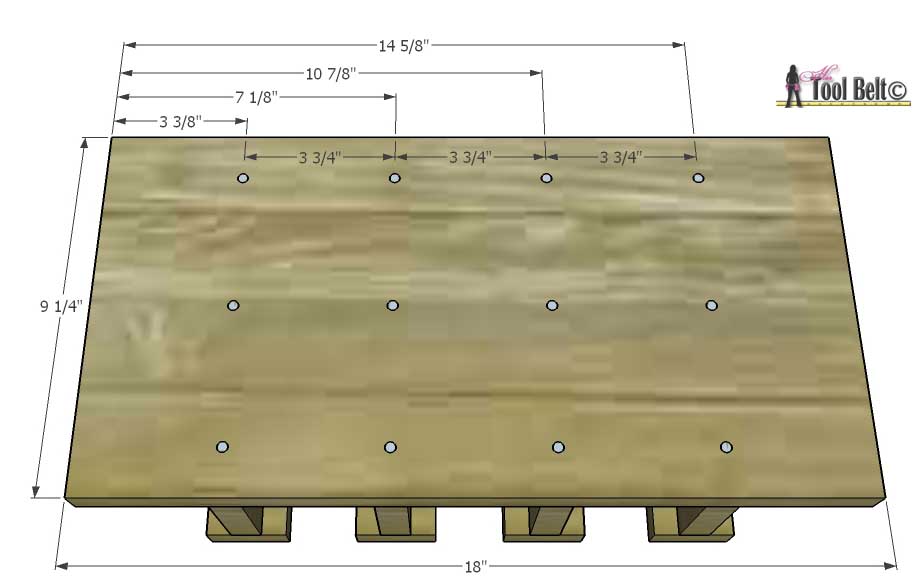
Take one of the shelves. Mark and pre-drill holes to attach the dividers to the shelf. Glue and attach the dividers to the shelf with 1 1/4″, make sure the screws are flush or lower with the wood surface. The gap between each divider is 3″.
Step 2
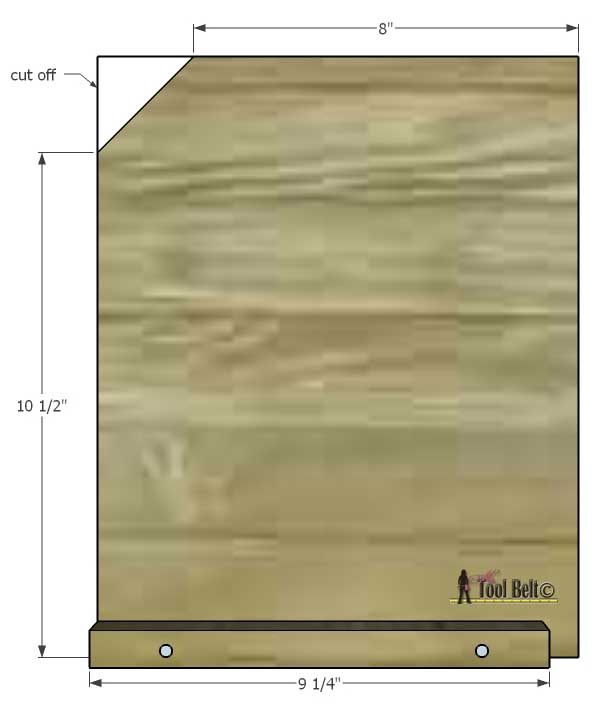
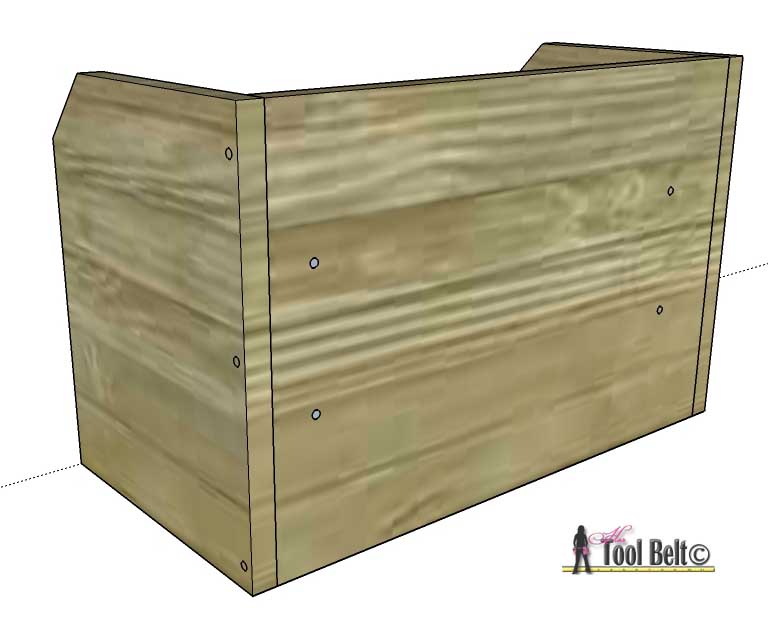
On the 2 sides, measure over and mark 8″ and measure up 10 1/2″ and mark. Cut between the marks, removing the excess triangle. Attach with glue and screws, the bottom side piece at the bottom inside of each side, flush with the front and bottom.
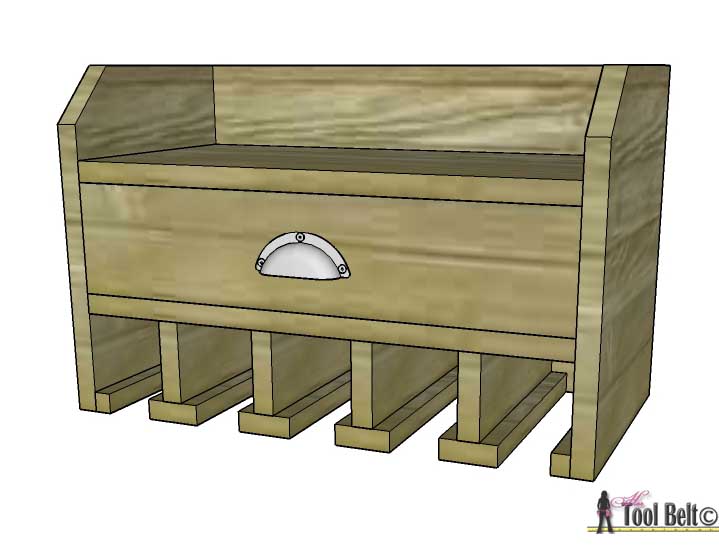
On the sides measure up and mark 4 1/2″ and 9 1/4″ from the bottom. The gap between the shelves is 4″. Pre-drill the sides, glue and screw the shelves between the sides.
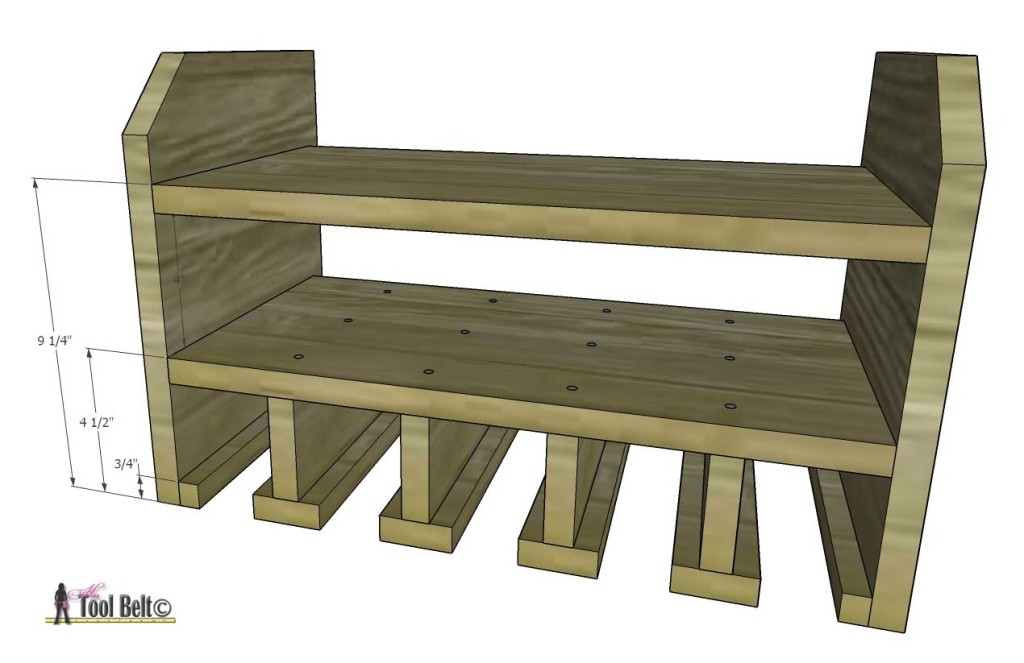
Attach the back, between the sides. Secure with glue and screws.
Step 3
Dado Drawer Bottom with 1/4″ plywood
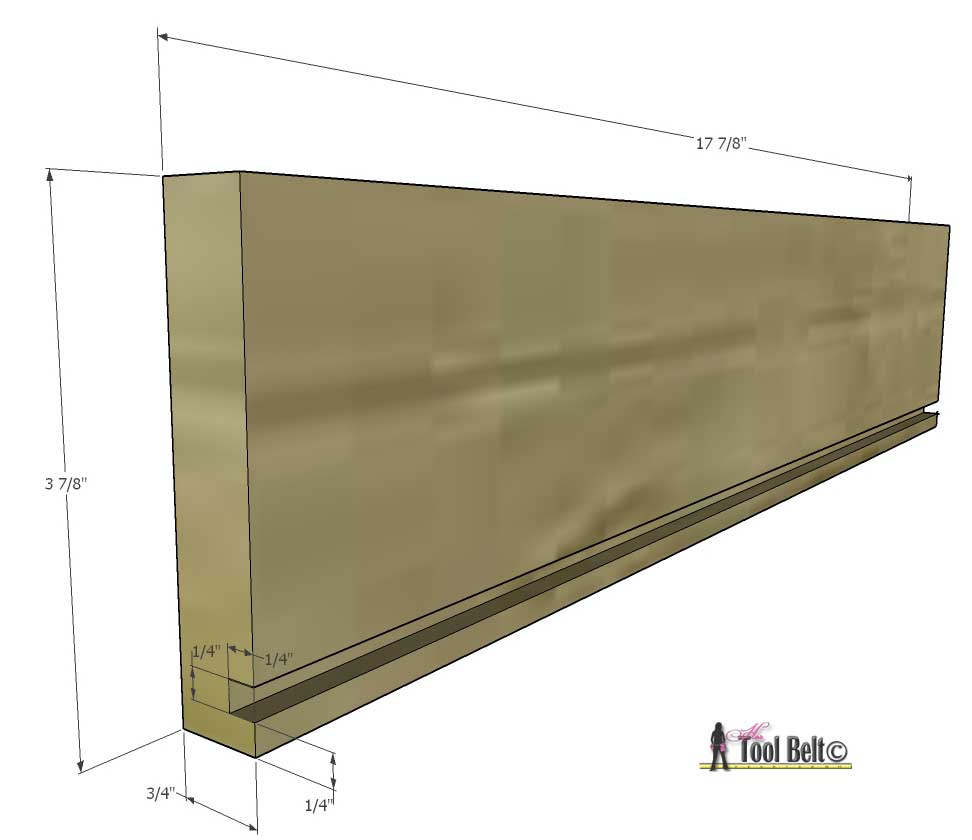
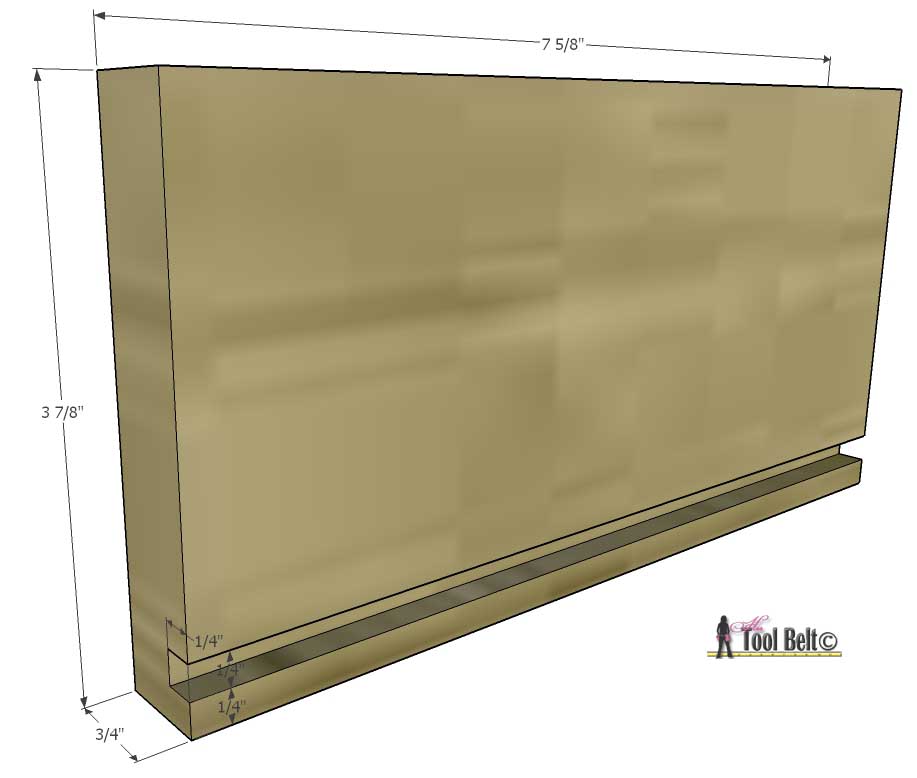
Grab the 4 sides of the drawers. Make dado cuts 1/4″ from the bottom, 1/4″ deep and 1/4″ wide.
 If you have a Kreg Jig® R3 , you can make pocket joints on each end of the drawer sides (outside) to attach the drawer together. If not, pre-drill holes through the drawer front and back.
Dry fit the drawer around the drawer bottom, check that it will fit in the drawer slot, trim as necessary. Use glue and 1 1/4″ screws to assemble the drawer together.
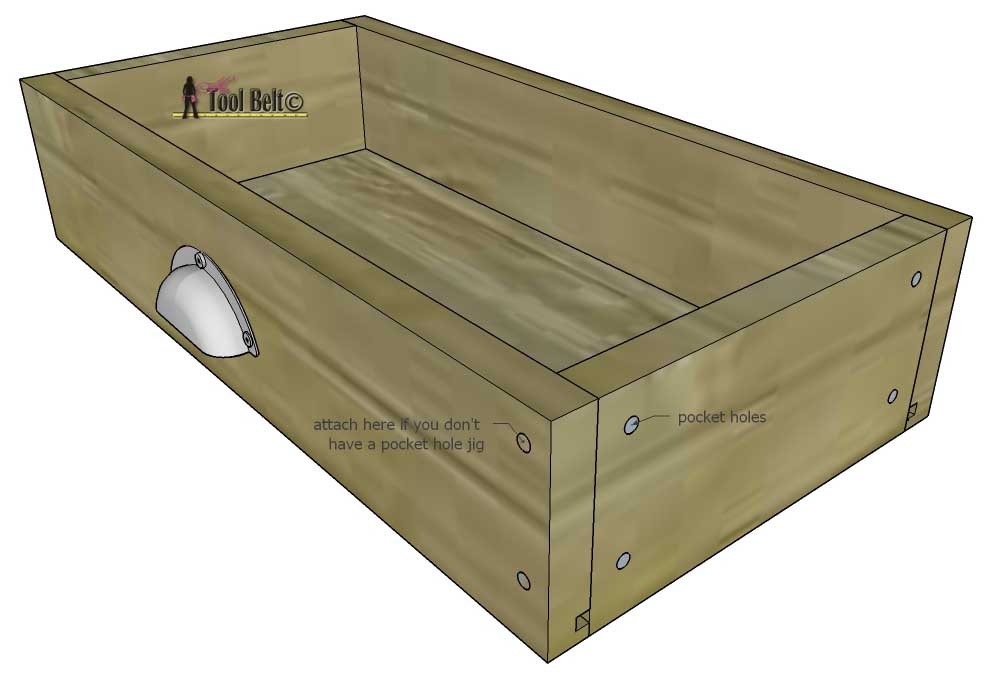
Attach a drawer pull to the front of the drawer. Sand the cordless drill station as needed.
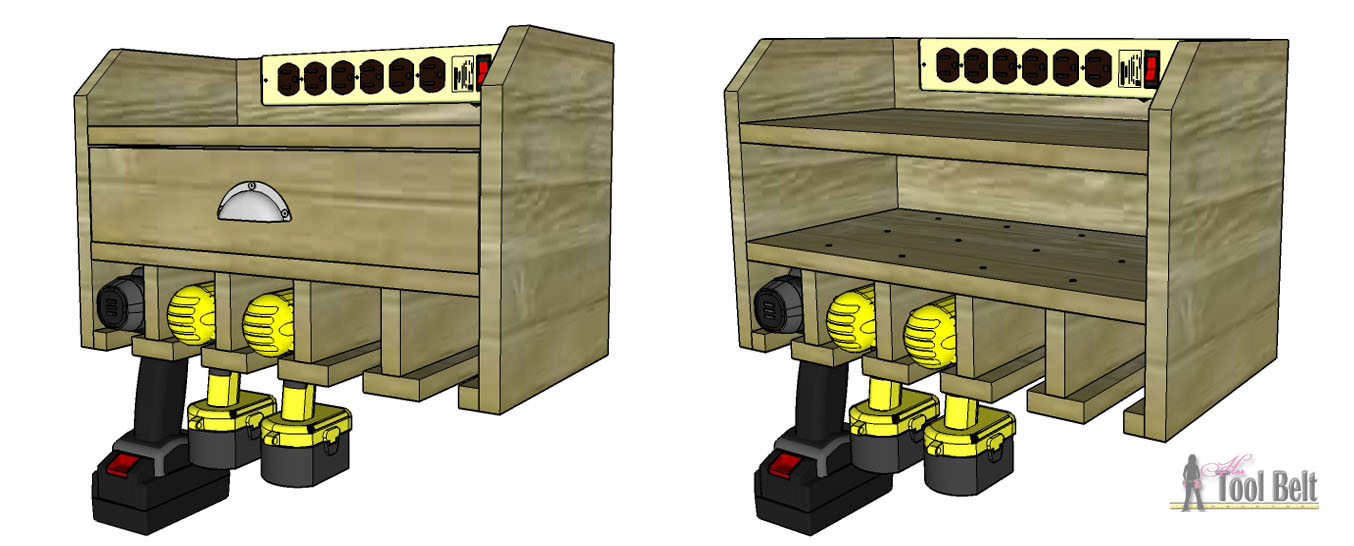
To attach it to the wall, first locate studs in your wall. You’ll also probably want it accessible to a power outlet. Once you decide where to hang it, pre-drill holes in the back and attach it to the wall/studs with 3″ screws (2 minimum places).
Add a surge protector/power strip if desired and stock it full of your tools!
Download the Plans
click here–>Cordless Drill Organizer Charge Station Plans<–
Thanks Justin for the great project idea, have fun organizing you garage!
pin it for later, please
Made this today! Love it! Took roughly 3.5 hours. Did not make the drawer, just left it as a second shelf. Also did not cut off corners on front. Liked the square look better. Plans were very easy to follow. Thanks for sharing!
Awesome, Happy Organizing!
Do you have the cut list, I can’t find it and I want to try to make this
It should be right under Materials, here’s a link to it though https://www.hertoolbelt.com/wp-content/uploads/2014/11/cut-list.jpg
Happy Building!
Can’t wait to try.
This is a great item to store cordless tools. Changing the dimensions slightly allows cutting all the needed parts for FOUR units from one 4×8 sheet. Ive made two today and have the components for the other two already cut.
~ Phil
Awesome, thanks for the info!
Amy – GREAT PLAN
Phil
what changes did you make in dimensions? – would love to get 3 out of a sheet.
thanks
Steve
If you want to sell one let me know thanks
Hi Phil – Are you able to post the details of the changes you made? Thanks.
Great plan, Amy.
Phil G
Thanks for this item, I believe I could really use it in my shed. It would be great if the dimensions were in metric measurement too as I don’t have any way of working in inches..
Ok, I’ll see what I can do.
use the conversion formula inches multiplied by 25.4 will give the metric unit of millimeters
Hello Robert Trott take the measurements and multiply by 2.54 will give you centimeters
hello Robert Trott take the measurement and multiply by 2.54 that will give you centimeters
I incorporated this drill organizer feature to my workbench. The drills hand below the table top. Thanks for the idea. You can see some picture on my blog – http://www.woodworkingfourdummies.com/blog/workbench-with-down-draft.
Ian
Great idea Ian, love how your bench turned out!
Hi there,I find this project to to be a very good for saving space and I might add , a very nice design. thank you
Thanks
Great plan, made my own custom one a few years ago, no where nice as this, I made mine with scrap MDF, but it still serves the purpose (until I just ran out of space) My question is, what is the dimension between the divider bottoms? My math is showing 1.5″, if it is 1.5″, I’ll have to make some modifications, I have 10 tools to hang and need 1.75″ opening. Thanks
Hi Dennis. Yes it is 1 1/2″ between the divider bottoms.
Are any of these racks sold anywhere online as I am no good at woodworking ? The idea is GREAT and would solve a lot of headaches !!!
Don
I have seen some on Etsy that vary in price from $50 to $120. On Etsy.com search drill organizer and you should see a few options pull up.
I made this from the instructions I printed off and it was rather easy but I ran into a problem, my son-in-law suggested I make it about half the size (to hold 2 drills) as he needs one in his shop and I need one in the garage so I will change the plans to accommodate 3 drills and I rounded all the corners because I hate square corners. So now I have one made the same size as the directions (will fit 5 cordless drills) that I don’t need and might just sell this one.
Would like to have the plan. I don’t plan on posting it. That would be like giving away your favorite fishing hole to your cousin who will trash it.
Thanks ahead,
Aaron
Hi Aaron, are you talking about the printable plan or Sketchup model? If it’s the plan you are after, you can download it here https://www.hertoolbelt.com/wp-content/uploads/2014/11/Cordless-Drill-Organizer-Charge-Station-Plans.pdf Happy fishing…or building 🙂
What a neat idea!
I’m going to make two of these, one for my cordless drills and a second one to store my five nail/stapler air guns..
Thanks…
-Rich
Estupenda idea.
Lo he descargado para realizar el proyecto-
Mo hay como tener las herramientas a mano, pero organizadas.
Gracias por permitir copiar la idea.
Felicitaciones.
Hey LOVE this and really want to do this for my husband for Christmas. Only problem is I have no way to make the cuts. Do you sell any of your projects like this? Would you be willing to? I’ve checked Etsy as a previous post suggested but I’ve only found two that are available and I don’t like their design as I do yours. Any suggestions?
Just made this today!! Perfect!! All the instructions are perfect. Thanks! Took a few hours to complete.
Wow! Thank you for being my life saver today! I was panicking trying to find a good gift for my husband and dad for christmas that didnt cost hundreds of dollars i dont have. This is perfect! the kids and i are going to have a blast making this…then trying to keep the secret! thanks again! you saved christmas!
Yes it makes a great Dad gift. Have a Merry Christmas!
1st I must admit 2 days ago I built some PVC holders — YUCK. So I began to look at wooden ones, man not only did you build a very nice unit, you took the time to share your design with out most details, and a PDF to boot. Today was your project, all went smoothly with the great directions, and OH so much better than PVC holder, not only stronger, but looks allot better on the wall.
Awesome! So glad that I could help 🙂
Thanks for these plans! Worked out great. I have been scratching my head trying to design something like this. I have used peg boards, hooks, etc. This is a nice simple plan that gives a novice a chance to try Dado’s, I used a router. Also used my Kreg Jig for the first time. ? I through it together using a bunch of different thicknesses of plywood salvaged from pallets (5\8 and 1\2 inch). This made the dimensions a little different but for anyone looking to do this, pallets are free ?
I made one as well, easy instructions love it.
I made this a few days ago. Great plans, easy to follow cut list and directions. I, too, made it without the drawer (made the whole thing with scraps and didn’t have enough for the drawer). I have a Kreg jig but I feel most of the time it’s a bit cumbersome for me so simple butt joints and glue on this made it quick and easy. Mounted straight to two studs with 4 screws total and sturdy as heck. Thanks for this; I’ve needed to make something like this for a while.
Awesome!
Built the batt drill driver charging station plans great made a bit larger I have 8 dewalt drivers thanhs bunches
Loved this! came out great, thank you!
Ok, I did not know there was different types of plywood. What type are you using for this?
Hi Kat,
Yes there are a few different types and grades of plywood. Any 3/4″ cabinet grade plywood will work for this project. I used 3/4″ birch plywood. http://www.anrdoezrs.net/links/8155781/type/dlg/http://www.homedepot.com/p/Columbia-Forest-Products-3-4-in-x-4-ft-x-8-ft-PureBond-Birch-Plywood-165921/100077837?keyword=3%2F4%22+birch+plywood
Just finished my shelving and charging station. Thanks for the detailed plans…you gave me the basic outline I needed even though I made some modifications. I expanded to 27″ shelves so I could include 7 slots for tools and expanded vertically to 24″ so I could put my small compressor on the shelf (13″ gap) while using a tool slot to house my brad nailer. I had to use a 2″ hole saw because the power strip I bought had a 90 degree plug. I also had trouble getting the 1 1/4″ screws to bind in between the layers of plywood so I ended up switching to 1 5/8″ and didn’t have an issue at all. I pre-drilled any face board with 1/8″ bit and then used 3/32″ bit thru that hole to minimally drill between layers of the opposing board.
I have a quick question, will these dimensions fit a newer set of dewalt drills and drivers or will I need to modify it?
Thanks
Hi Amy, made this today, plans were easy to follow, this is my first actual woodwork project so I’m quite pleased with myself especially as it hasn’t fallen apart yet.
Thanks.
That’s awesome Bob! Watch out, woodworking is addicting 🙂
Hi Amy,
Thanks so much for sharing these plans. Just mounted mine on the wall after a couple of coats of Danish Oil – looks great!
Rob
Great,want to make it but would like plans
I am no carpenter, but mine turned out just fine 🙂 Thank you for the plans. Easy to follow and didn’t take me long to cut out and put together with my tools.
I figured it out! Sorry!!
Sorry for the confusion, 19 1/2″ is the total width including the sides. The back is 18″ wide.
Thank you madam!
well done thank you for the plans and great job.
I made one also but not sure I can post a picture of it. Painted it purple but added no drawer for now. Attached it to a french cleat and plan to put it on a wall in my shop once I finish framing the unfinished wall. Thanks for the plan. Unfortunately, I didn’t make it wide enough for holding my 2 corded drills also (Dewalt hammer drill and dewalt 3/8″ drills). Maybe I’ll build a 2nd one for those.
Love your easy to understand directions and plans. Even for a “rookie” old lady like me. ! I cut my wood tonight and dry fit it . I plan to assemble tomarrow morning. Making it for a Cristmas gift for my son-in-law . I know he will love it. I Did make one mistake but adjusted things to work it out. I kept getting 7 5/8 ” mix up wiith 7 7/8″. Oh well it worked out! Thanks for the Great Job you did on the plan s AND video.
Sheri
I found this on Pinterest and had to make it
I tweaked the plans so I could have mine sitting on top of my rolling tool cabinet instead of hanging on the wall and it turned out great
It works great and saves me tons of space
That’s a great idea!
I only have two drills and the other cordless tools I have weren’t applicable to your bottom plan, so I re-worked your plan to fit my tools
Also, made mine bigger.
since this forum doesn’t allow attachments, FB image tagged below
https://scontent-iad3-1.xx.fbcdn.net/v/t1.0-9/52893641_10218299007297387_3900221679367880704_o.jpg?_nc_cat=100&_nc_ht=scontent-iad3-1.xx&oh=7bfec41c92e5603a90b03c9a4fd5870a&oe=5D61075C
That looks fantastic Jim!!! Great ideas.
I see a hole drilled in the side for the cord but how did you attach your surge protector? I understand that there are many options but I figured I’d see if something particular worked well for someone!
My surge protector had four mounting slots for screws. I just matched the slot pattern with the screws, worked well. HTH.
Thank you Amy!
Hi! I am just starting to build my tool collection and I was wondering if you could tell what all tools you used to build this? Thanks!
if your just starting out i would buy a ryobi tool kit.. I use ryobi all the time and they have been good to me. she used a circular saw, drill with drill bits, tape measure, pencil. hope this helps you
What a clear, easy-to-follow plan, Amy! Thank you. I work a lot with white cedar so I used leftover pieces and finished with some leftover spar varnish. I think the result looks nice and it’s really practical!
–Robert
nice simple. I made one similar before seeing this mounted it with a French cleat