Hi! I’d love to for you to follow me on Pinterest Her Tool Belt and if you love instagram, you can keep up with me there too!
We have an open floor plan, so the family room, kitchen and dining areas are all one large room and it’s the first thing that you see when you walk into the house. Our family spends most of our time in the family room. With young kids, keeping the house presentable is sometimes always a challenge 🙂 We are always looking for great ways to organize the kid’s stuff (and ours).
I am beyond excited to team up with Ryobi Nation to Get Organized. Just what I need!
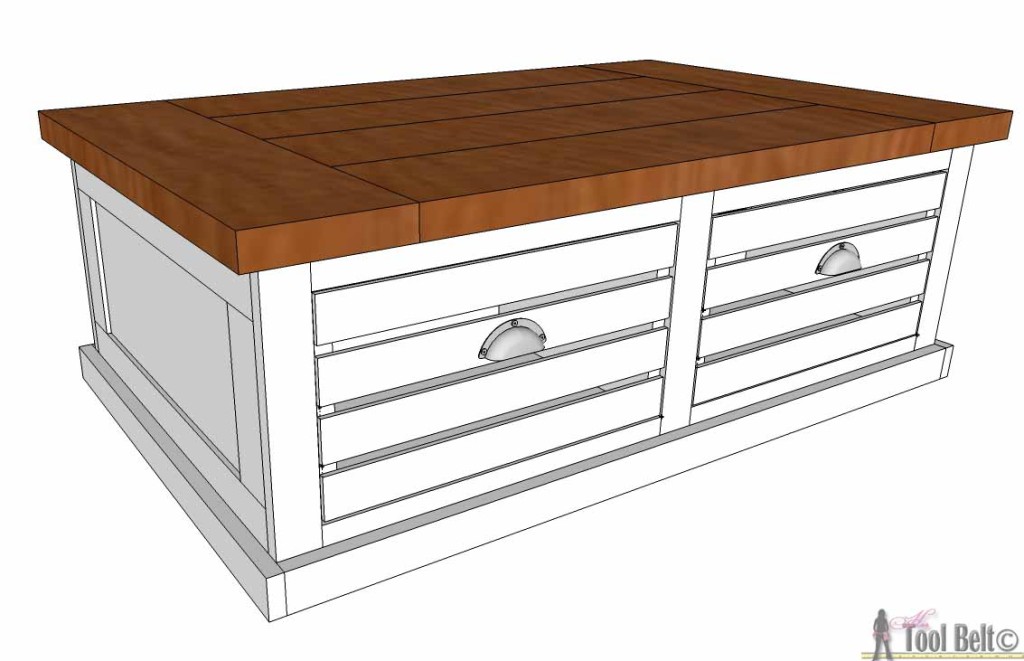
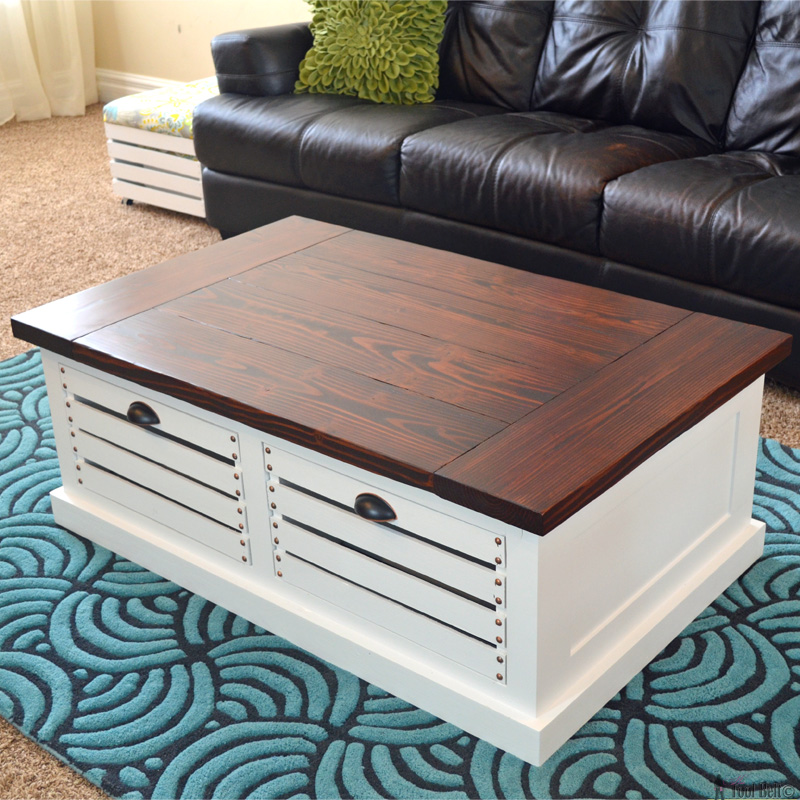
This easy to build and unique Crate Storage Coffee Table and stools are perfect pieces to get organized in living areas. You can build a stylish coffee table with storage, use crates instead of building pesky drawers. The crates for this table are 18″ long x 12 1/2″ wide x 9 1/2″ tall, very roomy.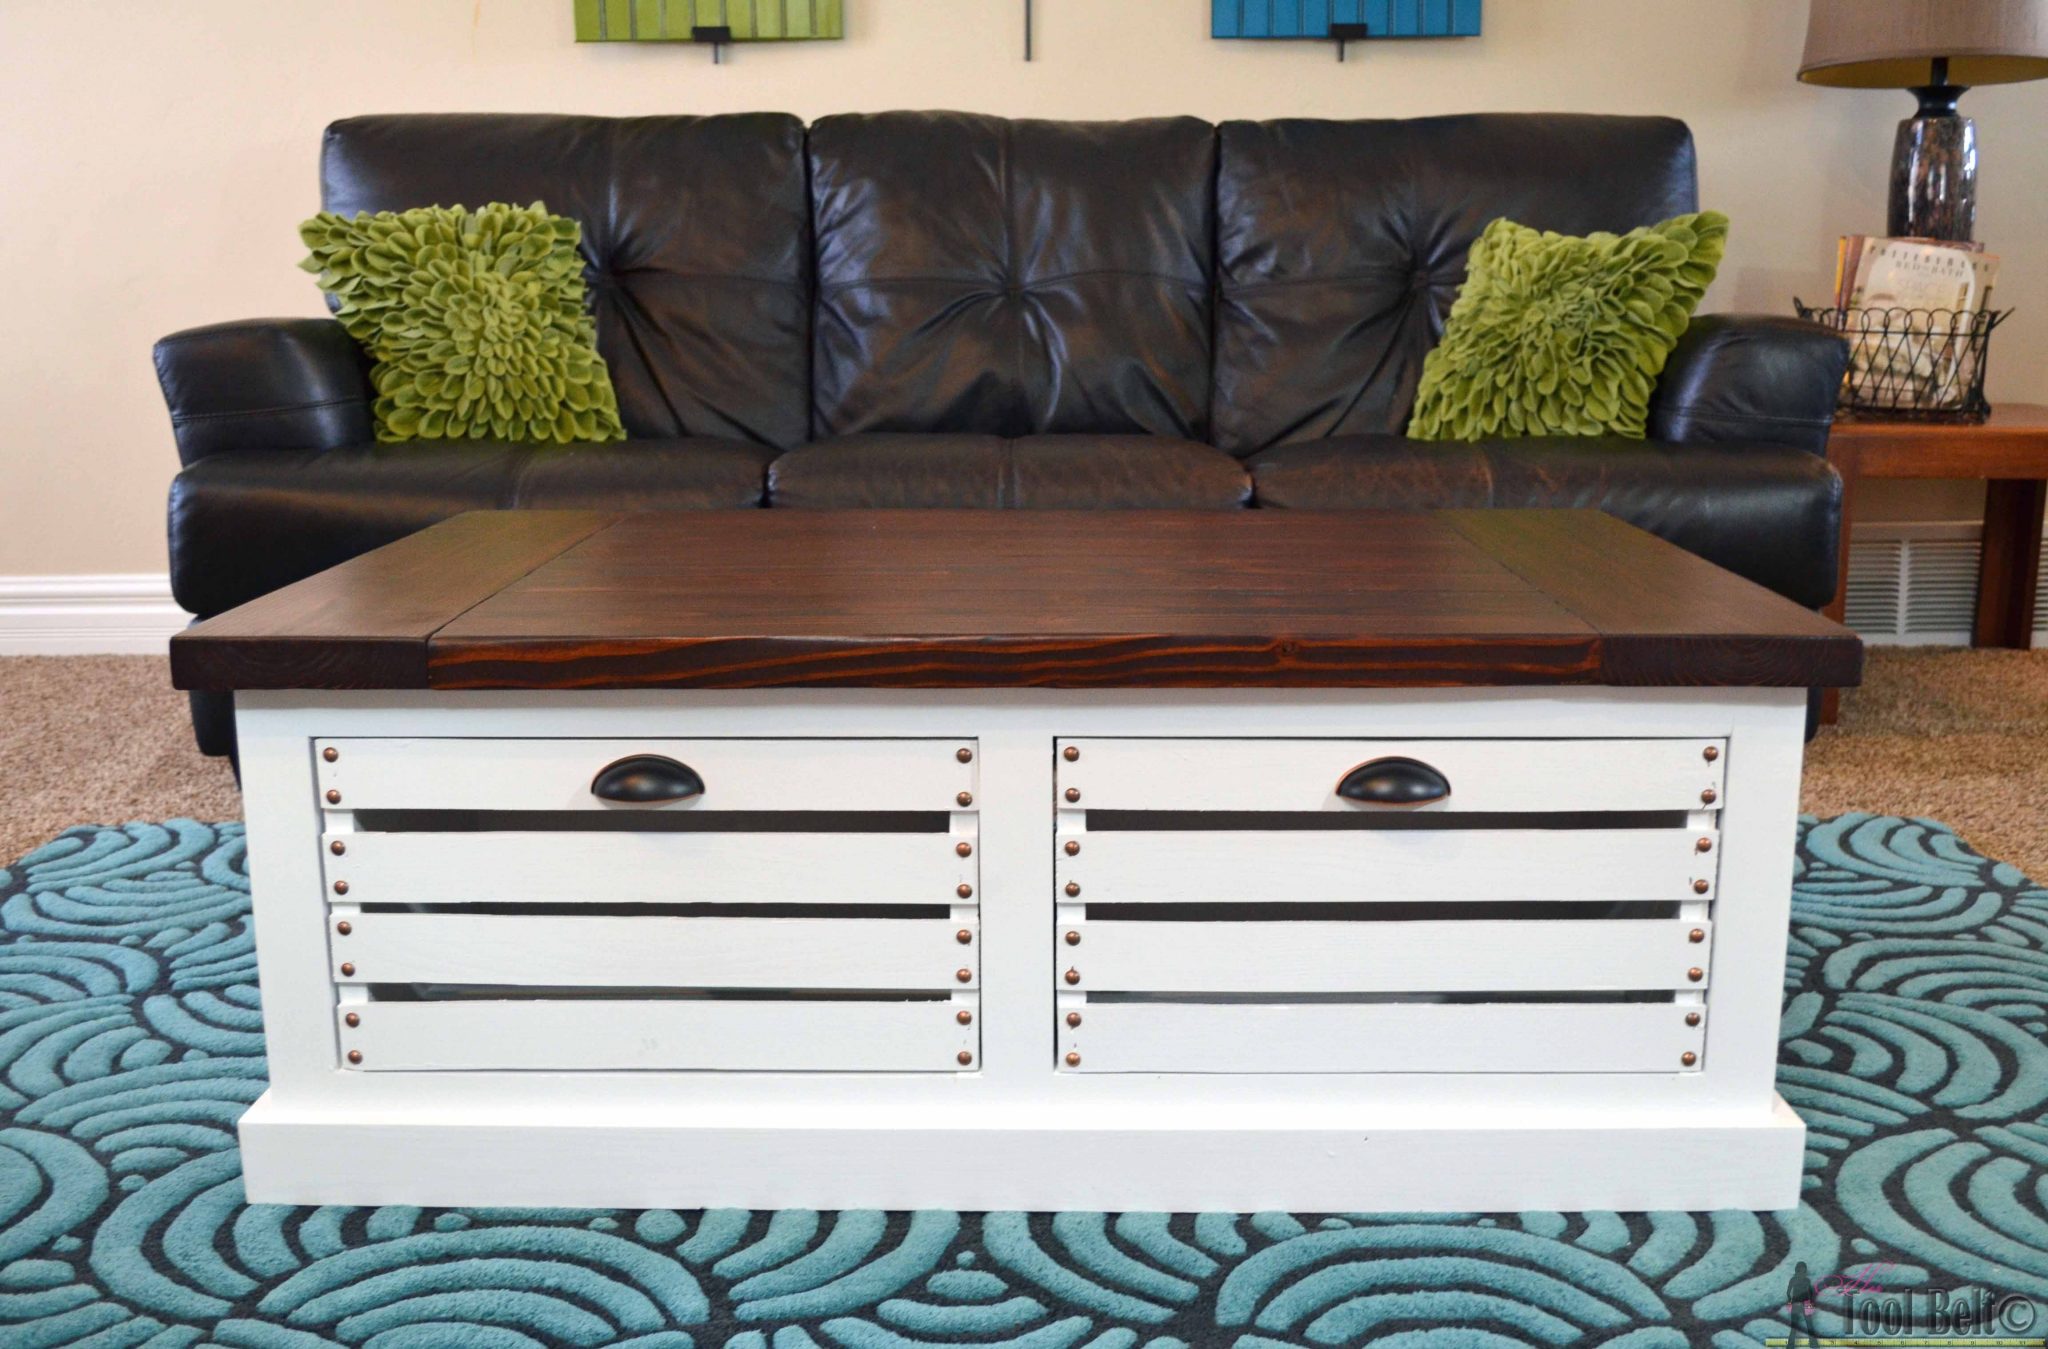
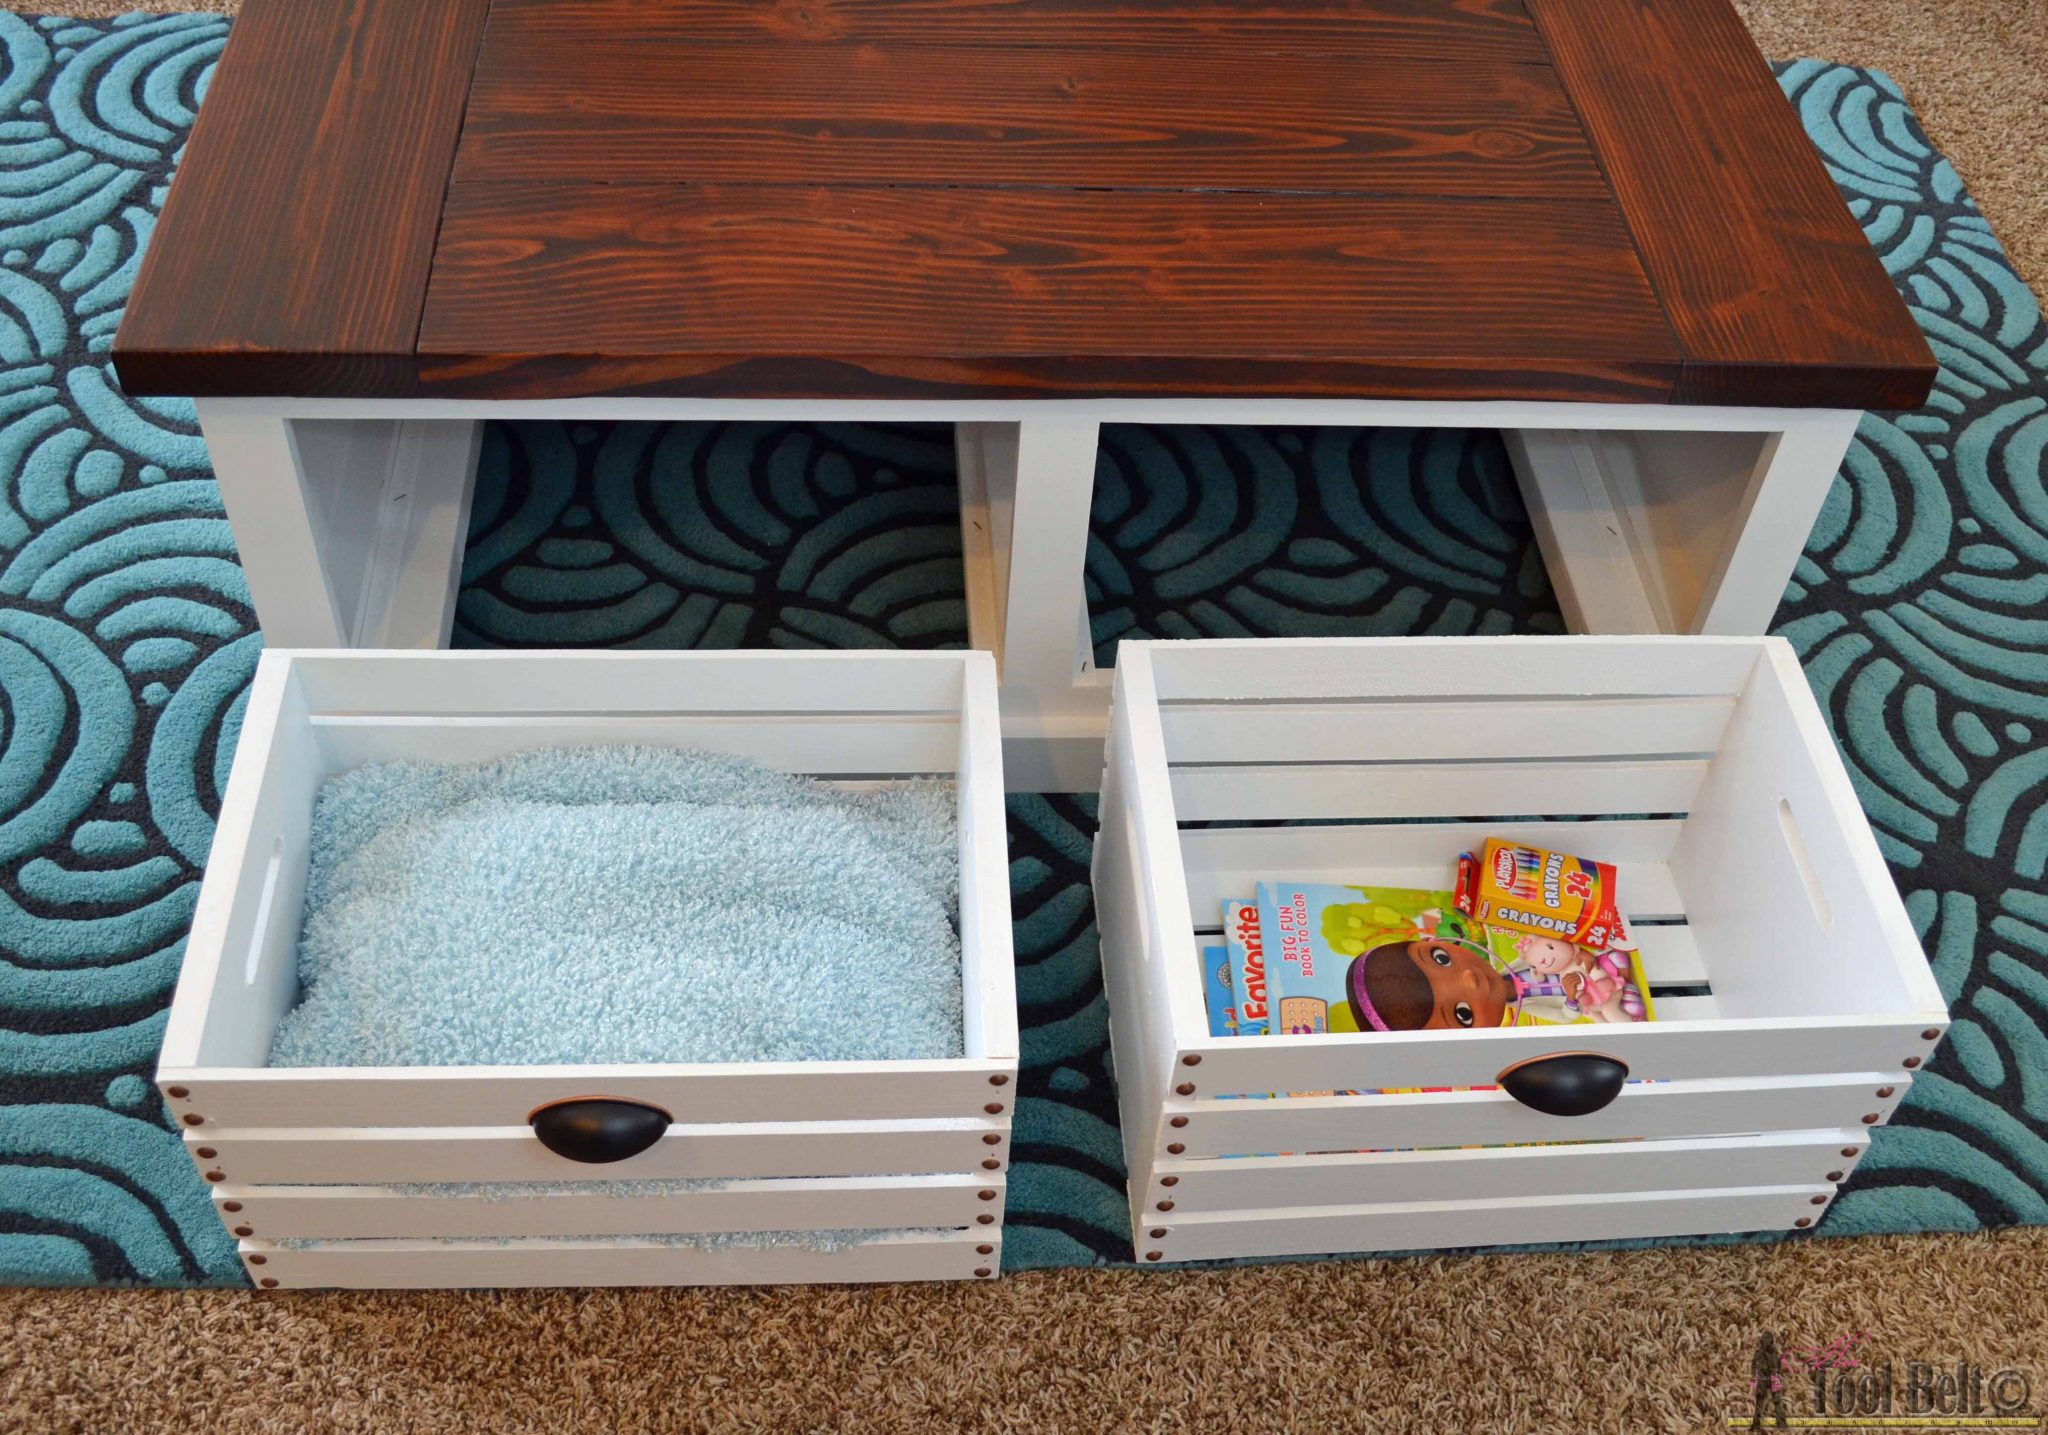
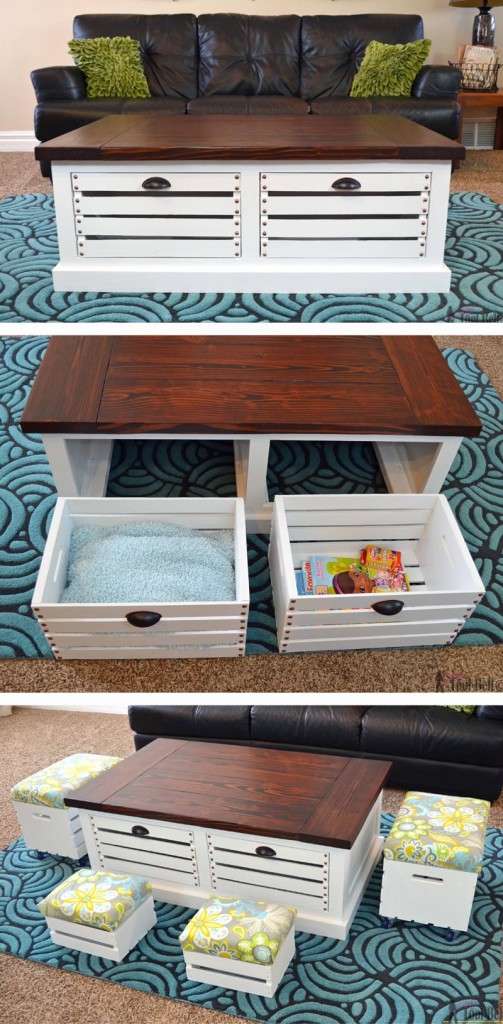
The crates easily pull out to organize kid activity supplies, blankets, magazines, etc. There are 2 crates on each side. The table is on semi-hidden casters, so the table can move easily while vacuuming, etc.
The stools offer extra seating and portable storage space. The cushioned seats flip up to offer even more storage. I kind of love that fabric, I found it at JoAnn’s in the outdoor fabric section. The large stools are perfect for my 5 year old, and the small stools are perfect for my 2 year old. They think that they are so much fun.

Download the blue prints
Her Tool Belt Crate Storage Coffee Table Blueprints update
Materials
- 4 – large crates (18″ long x 12 1/2″ wide x 9 1/2″ tall)
- 2 – 2” x 8” x 8’ wood
- 1 – 2” x 4” x 8’ wood
- 2 – 1” x 4” x 8’ wood
- 3 – 1” x 3” x 8’ wood
- 1 – ½” sheet of plywood
- 3 – ¼” x 2 ½” x 4’ poplar
- Paint/Stain/Top Coat
- Wood glue
- 1 ¼” pocket hole screws
- 2 ½” pocket hole screws
- 1 ¼” brad nails
- Sand paper
- 5/8” brad nails
- 4 – swivel casters (optional)
- 4 – cup cabinet pull (optional)
- 64 – Upholstery nails (optional)
- 8’ plastic hanger strap (optional)
Note: I have found that the cheap 1×4’s, 1×3’s and 1×2’s that I use are rarely straight and the width varies. I like to buy the 1×4’s ($1.98) and rip them down to the correct width, then I have a straight edge to work with and the boards are at the exact width I want them to be.
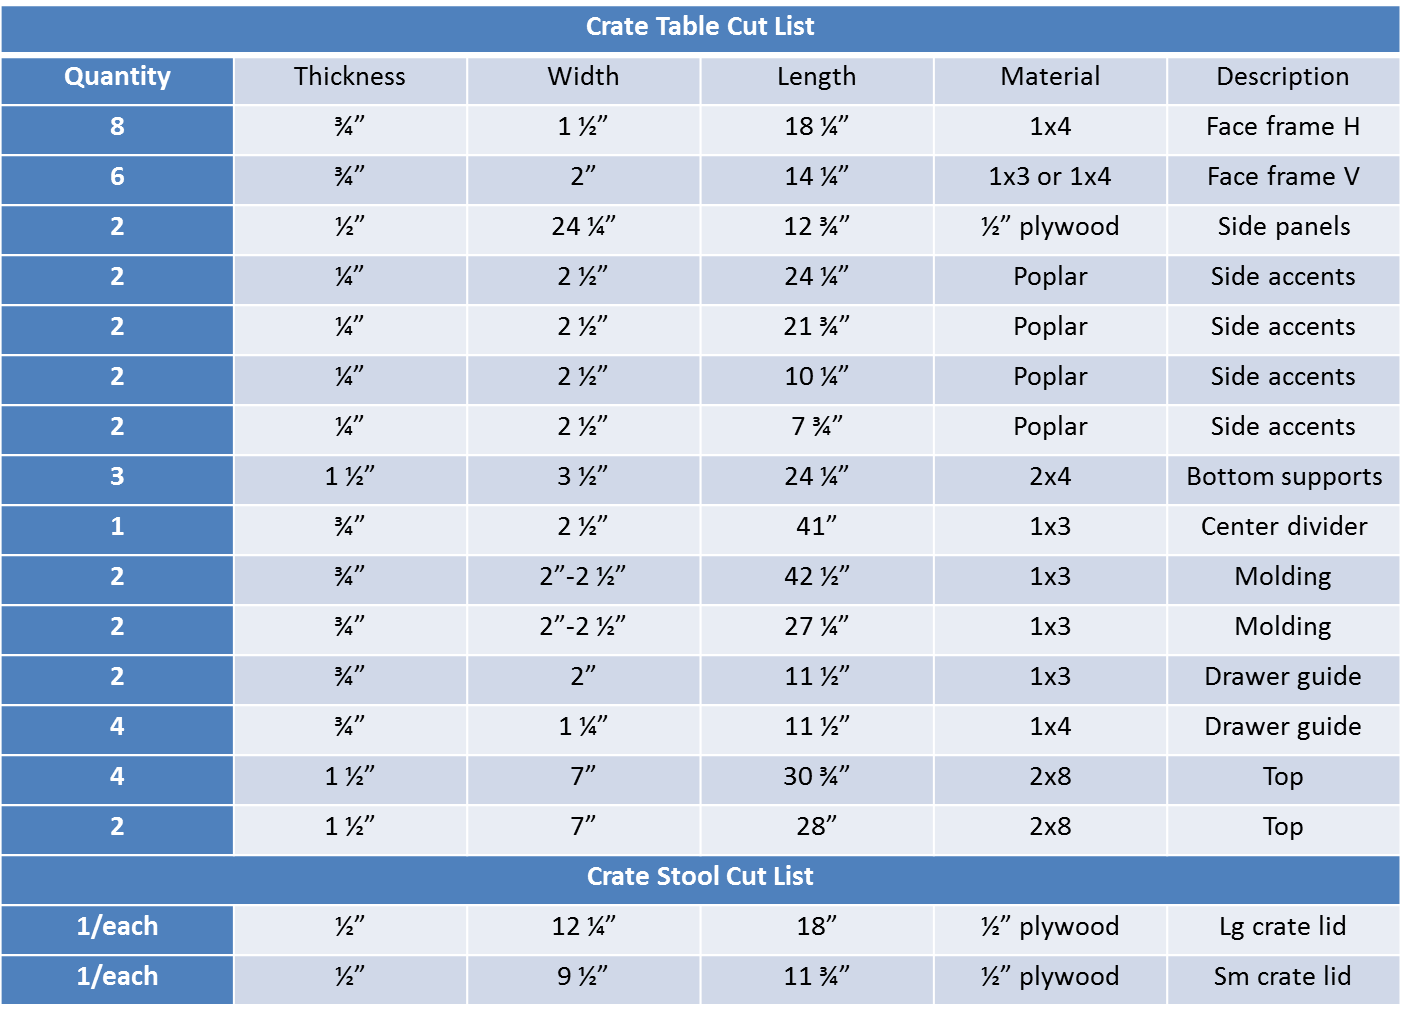
For this table I ripped down 1 of the 1×4’s into 2 boards 1 1/2″ wide and cut the face frame H pieces. Then the remaining pieces ripped to 1 1/4″ for the drawer guides (plus a little of the second 1×4).
Step 1
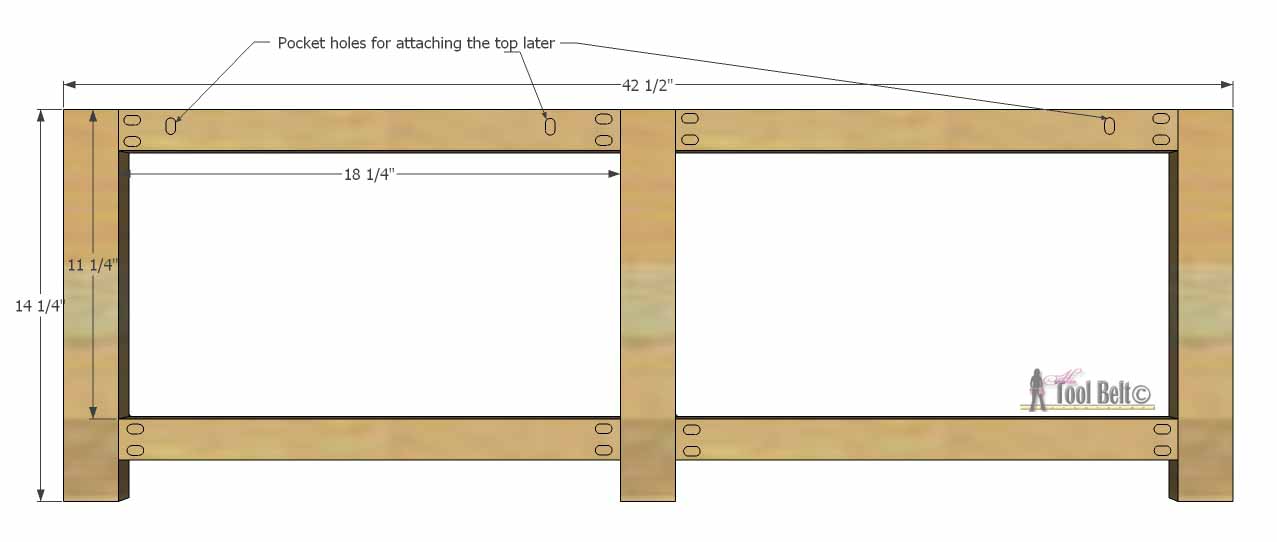
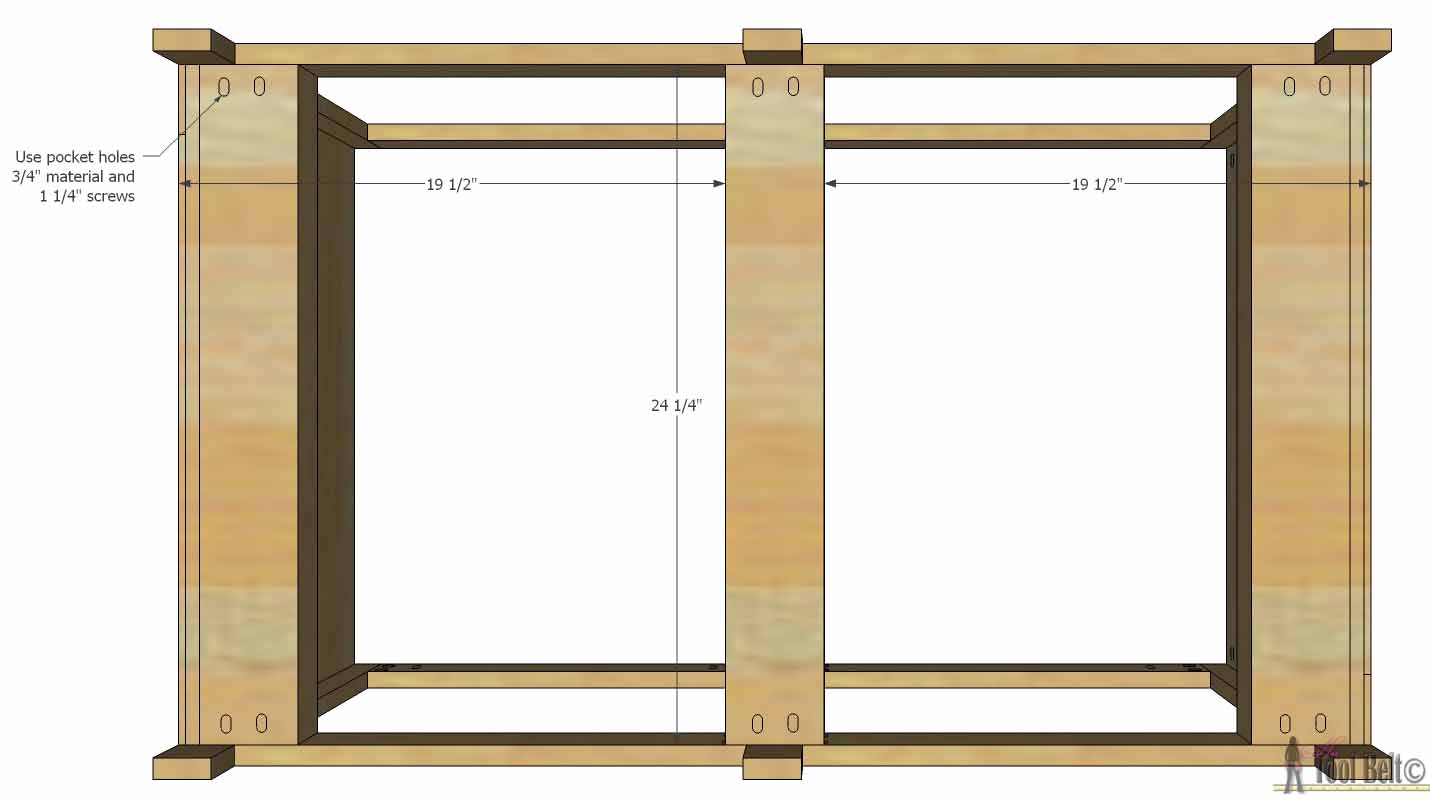
Cut the face frame pieces. On the backside of each of the 8 – 18 ¼” face frame H pieces, drill 2 pocket holes on each end. On 4 of the boards drill a vertical pocket hole to attach the top later. On each of the 6 – 14 ¼” face frame V pieces measure and mark 11 ¼” from the top. Make 2 face frames, 2 – 18 ¼” pieces at the top and 2 at 11 ¼”. Use wood glue and 1 ¼” screws to join the wood together.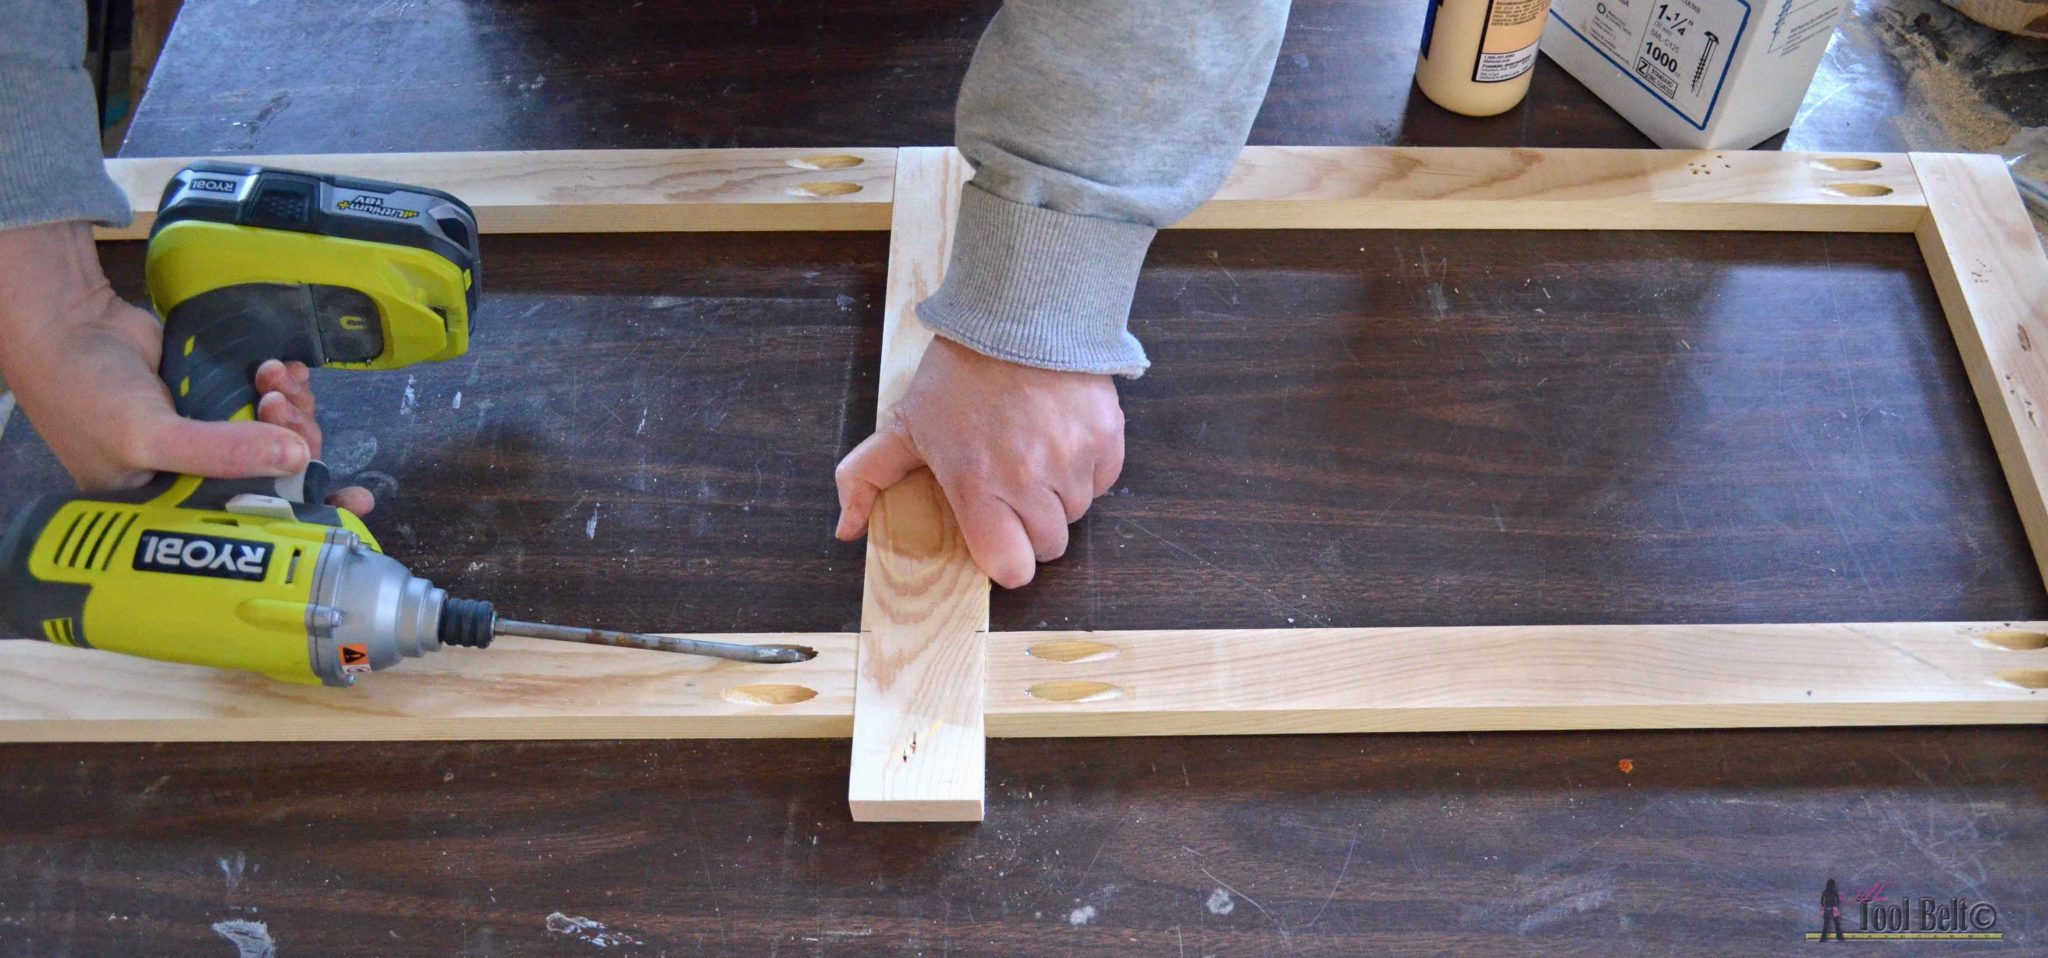
Step 2
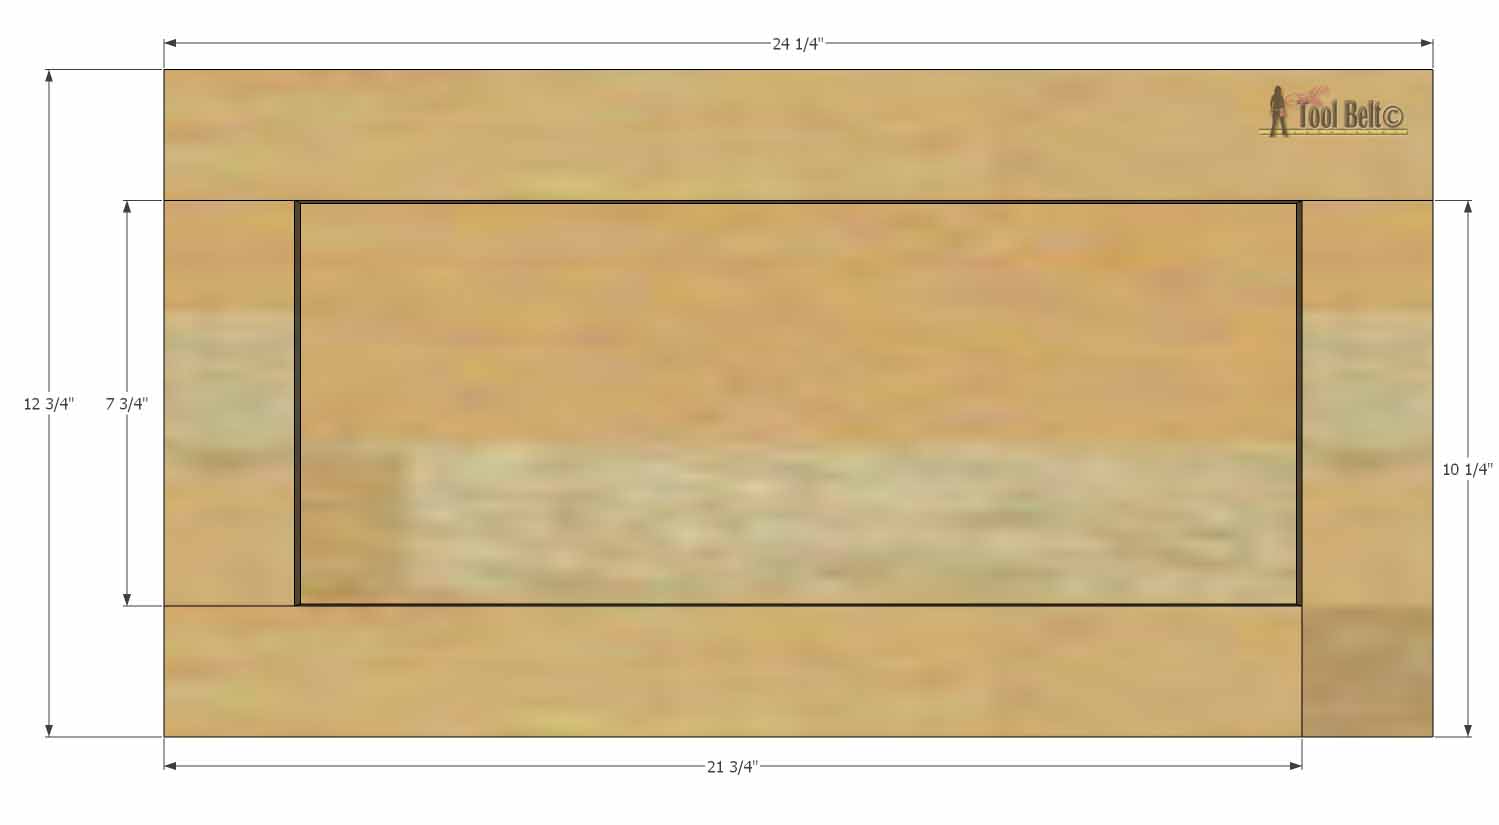
Cut the side panels and side accent pieces. Use wood glue and 5/8” brad nails, add the side accent pieces around the side panels. 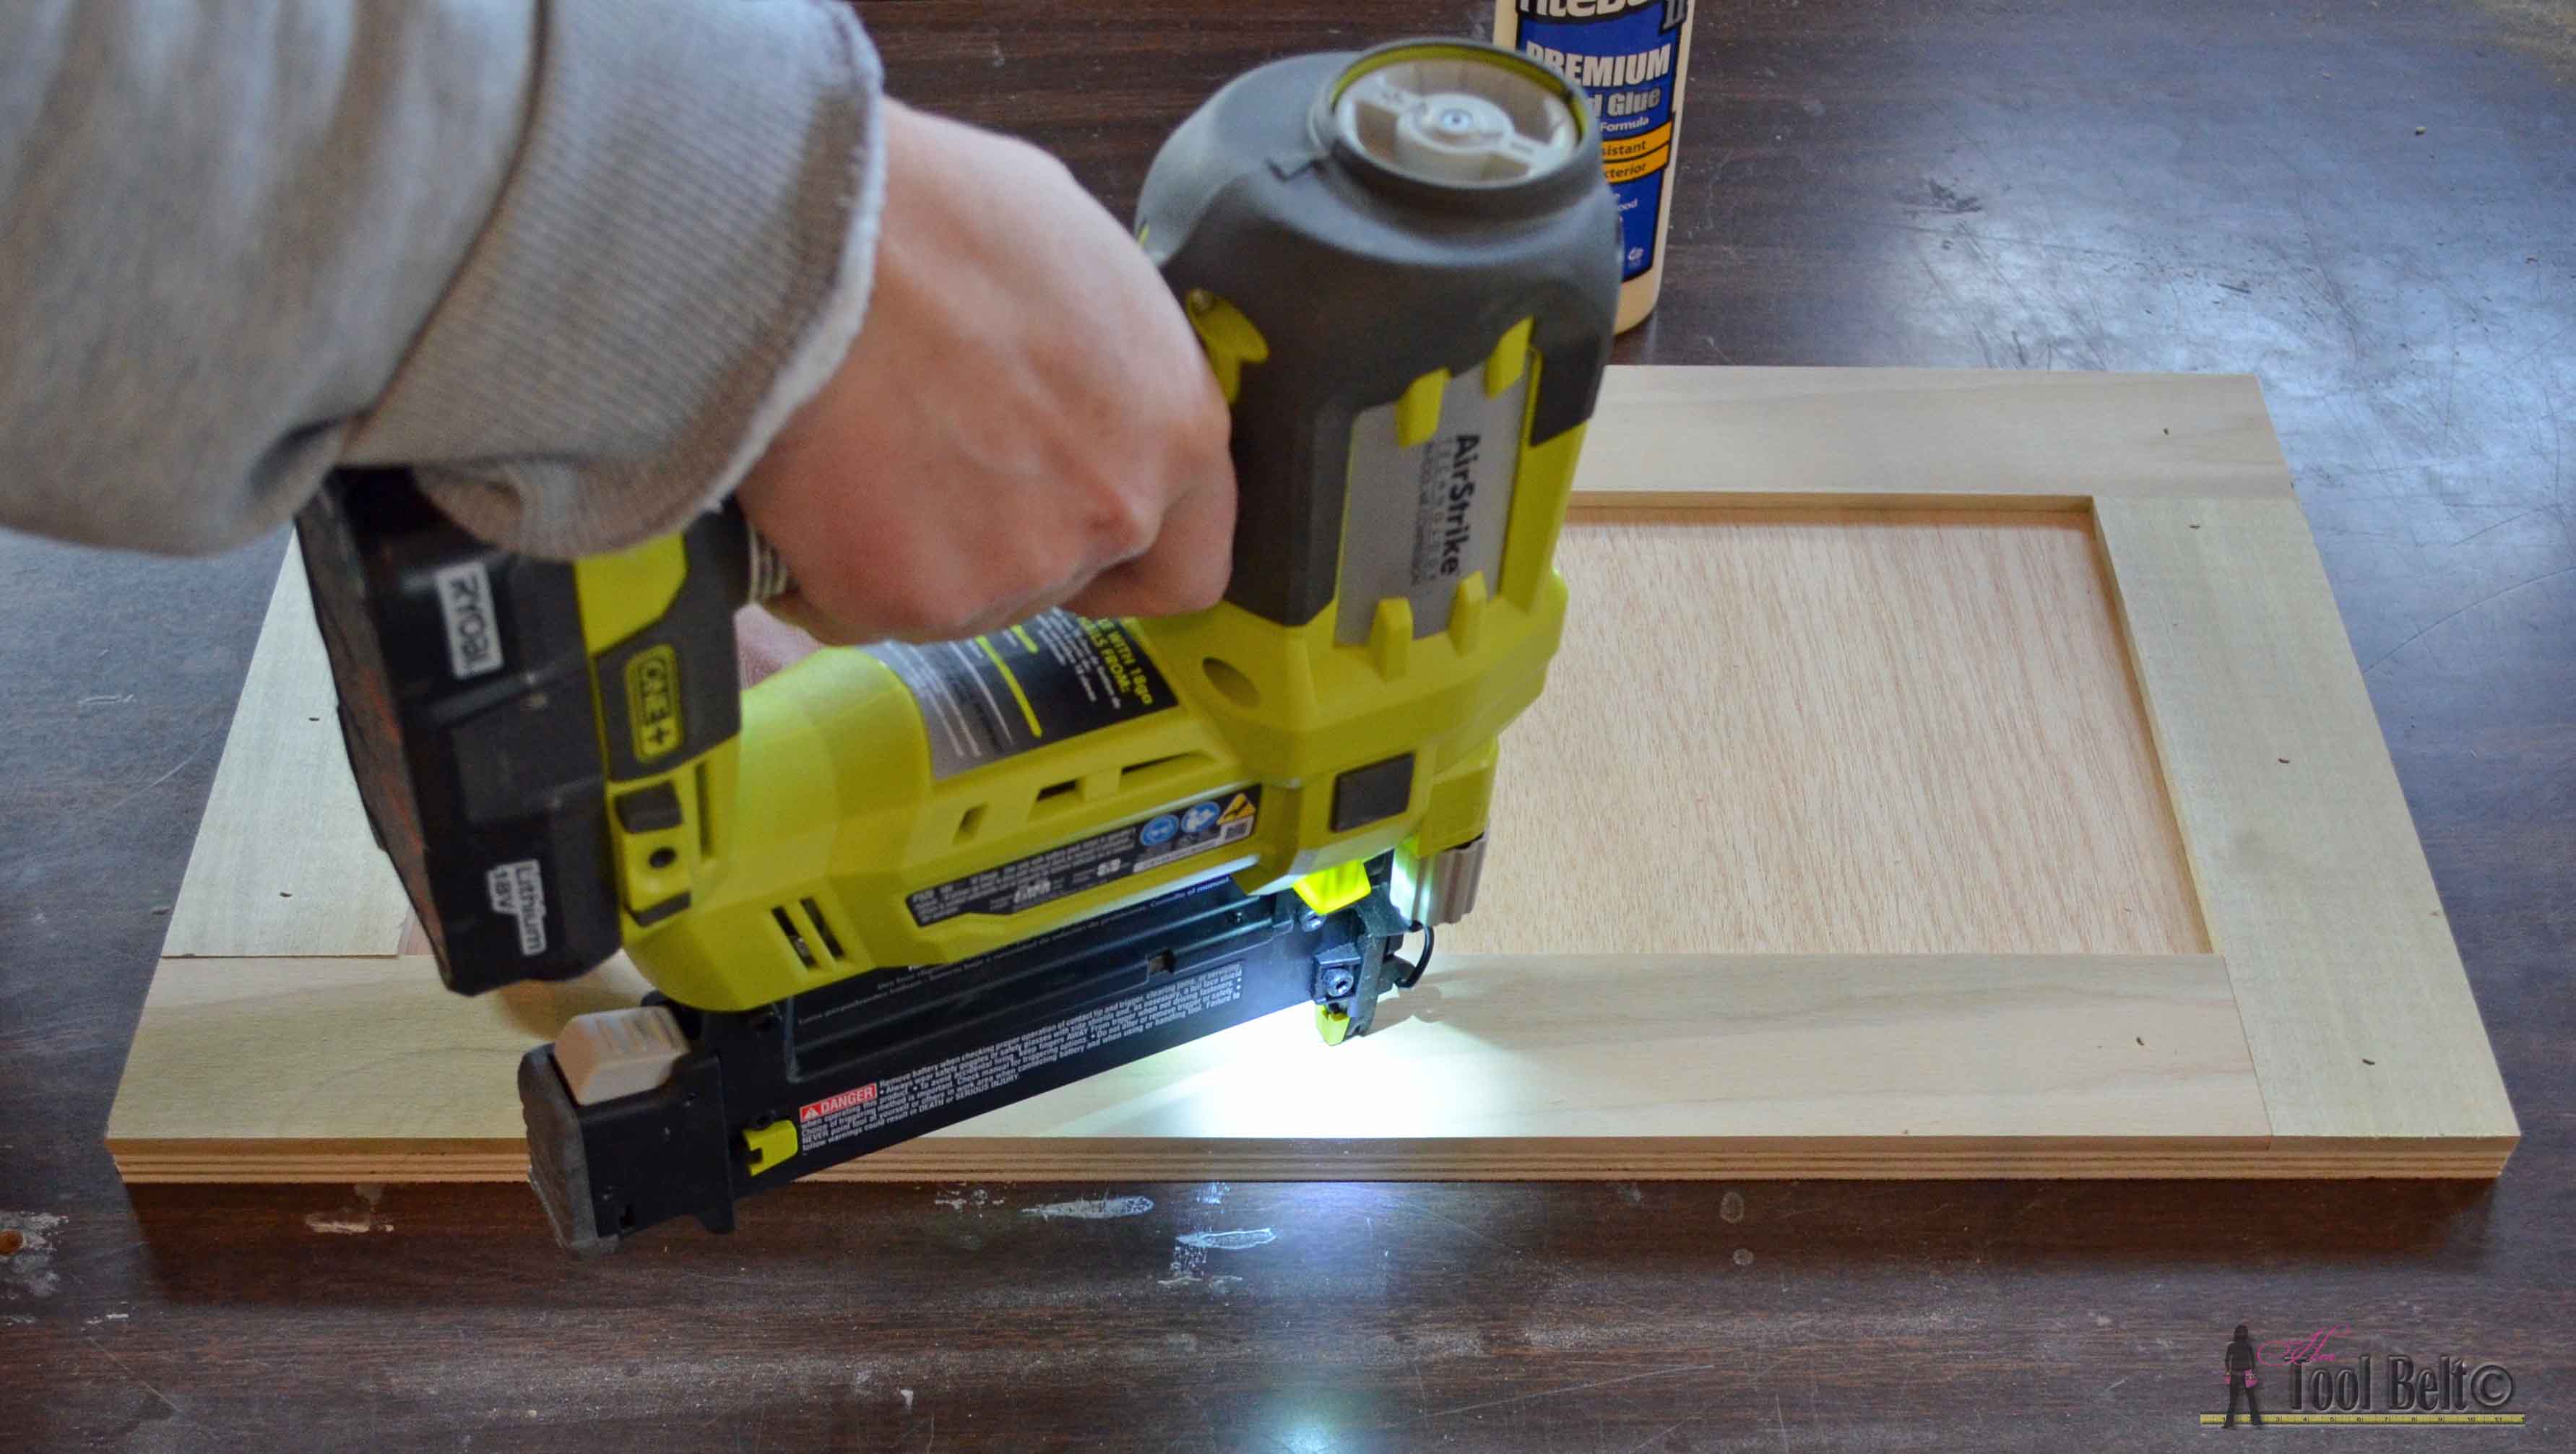
Step 3
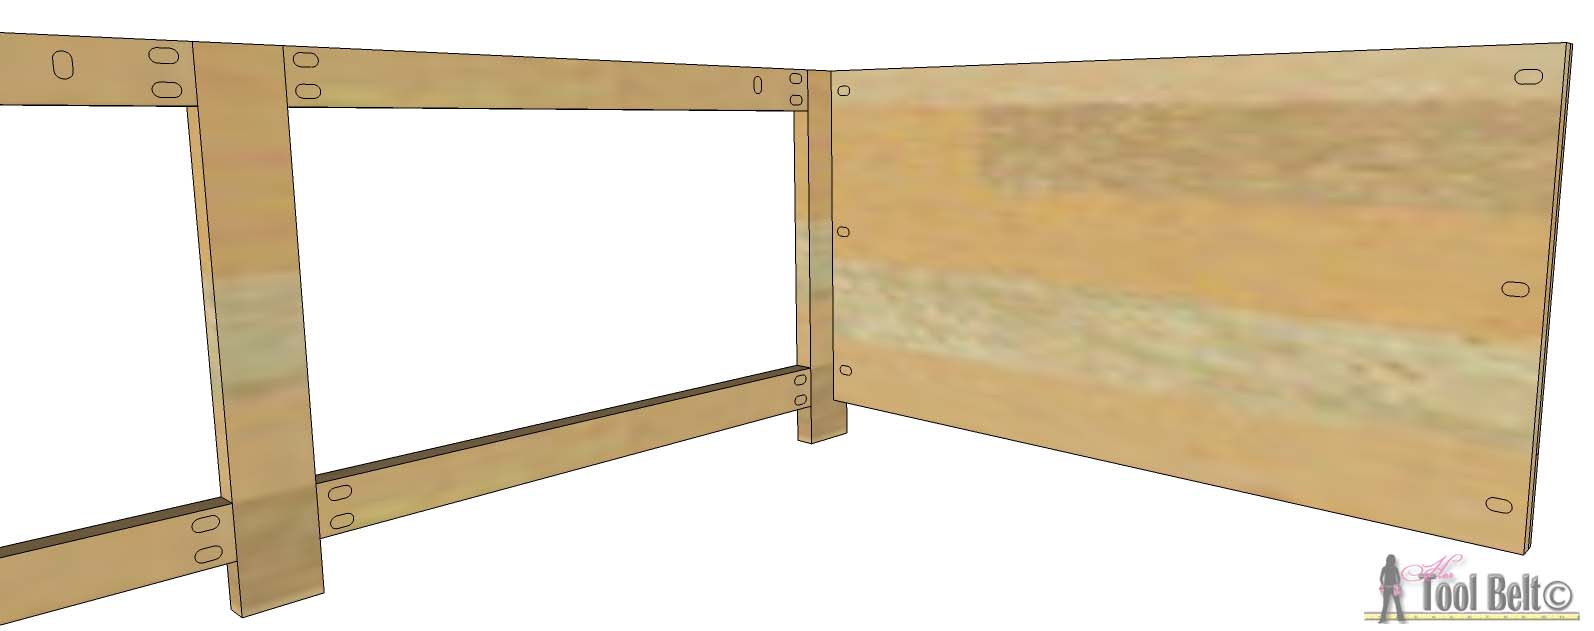
Drill 3 pocket holes on the backside of each side panel end. Use wood glue and 1 ¼” screws to attach one side of the panel to the face frame. Make the tops flush and the front of the side panel flush with the end of the face frame. Repeat for the other side panel. 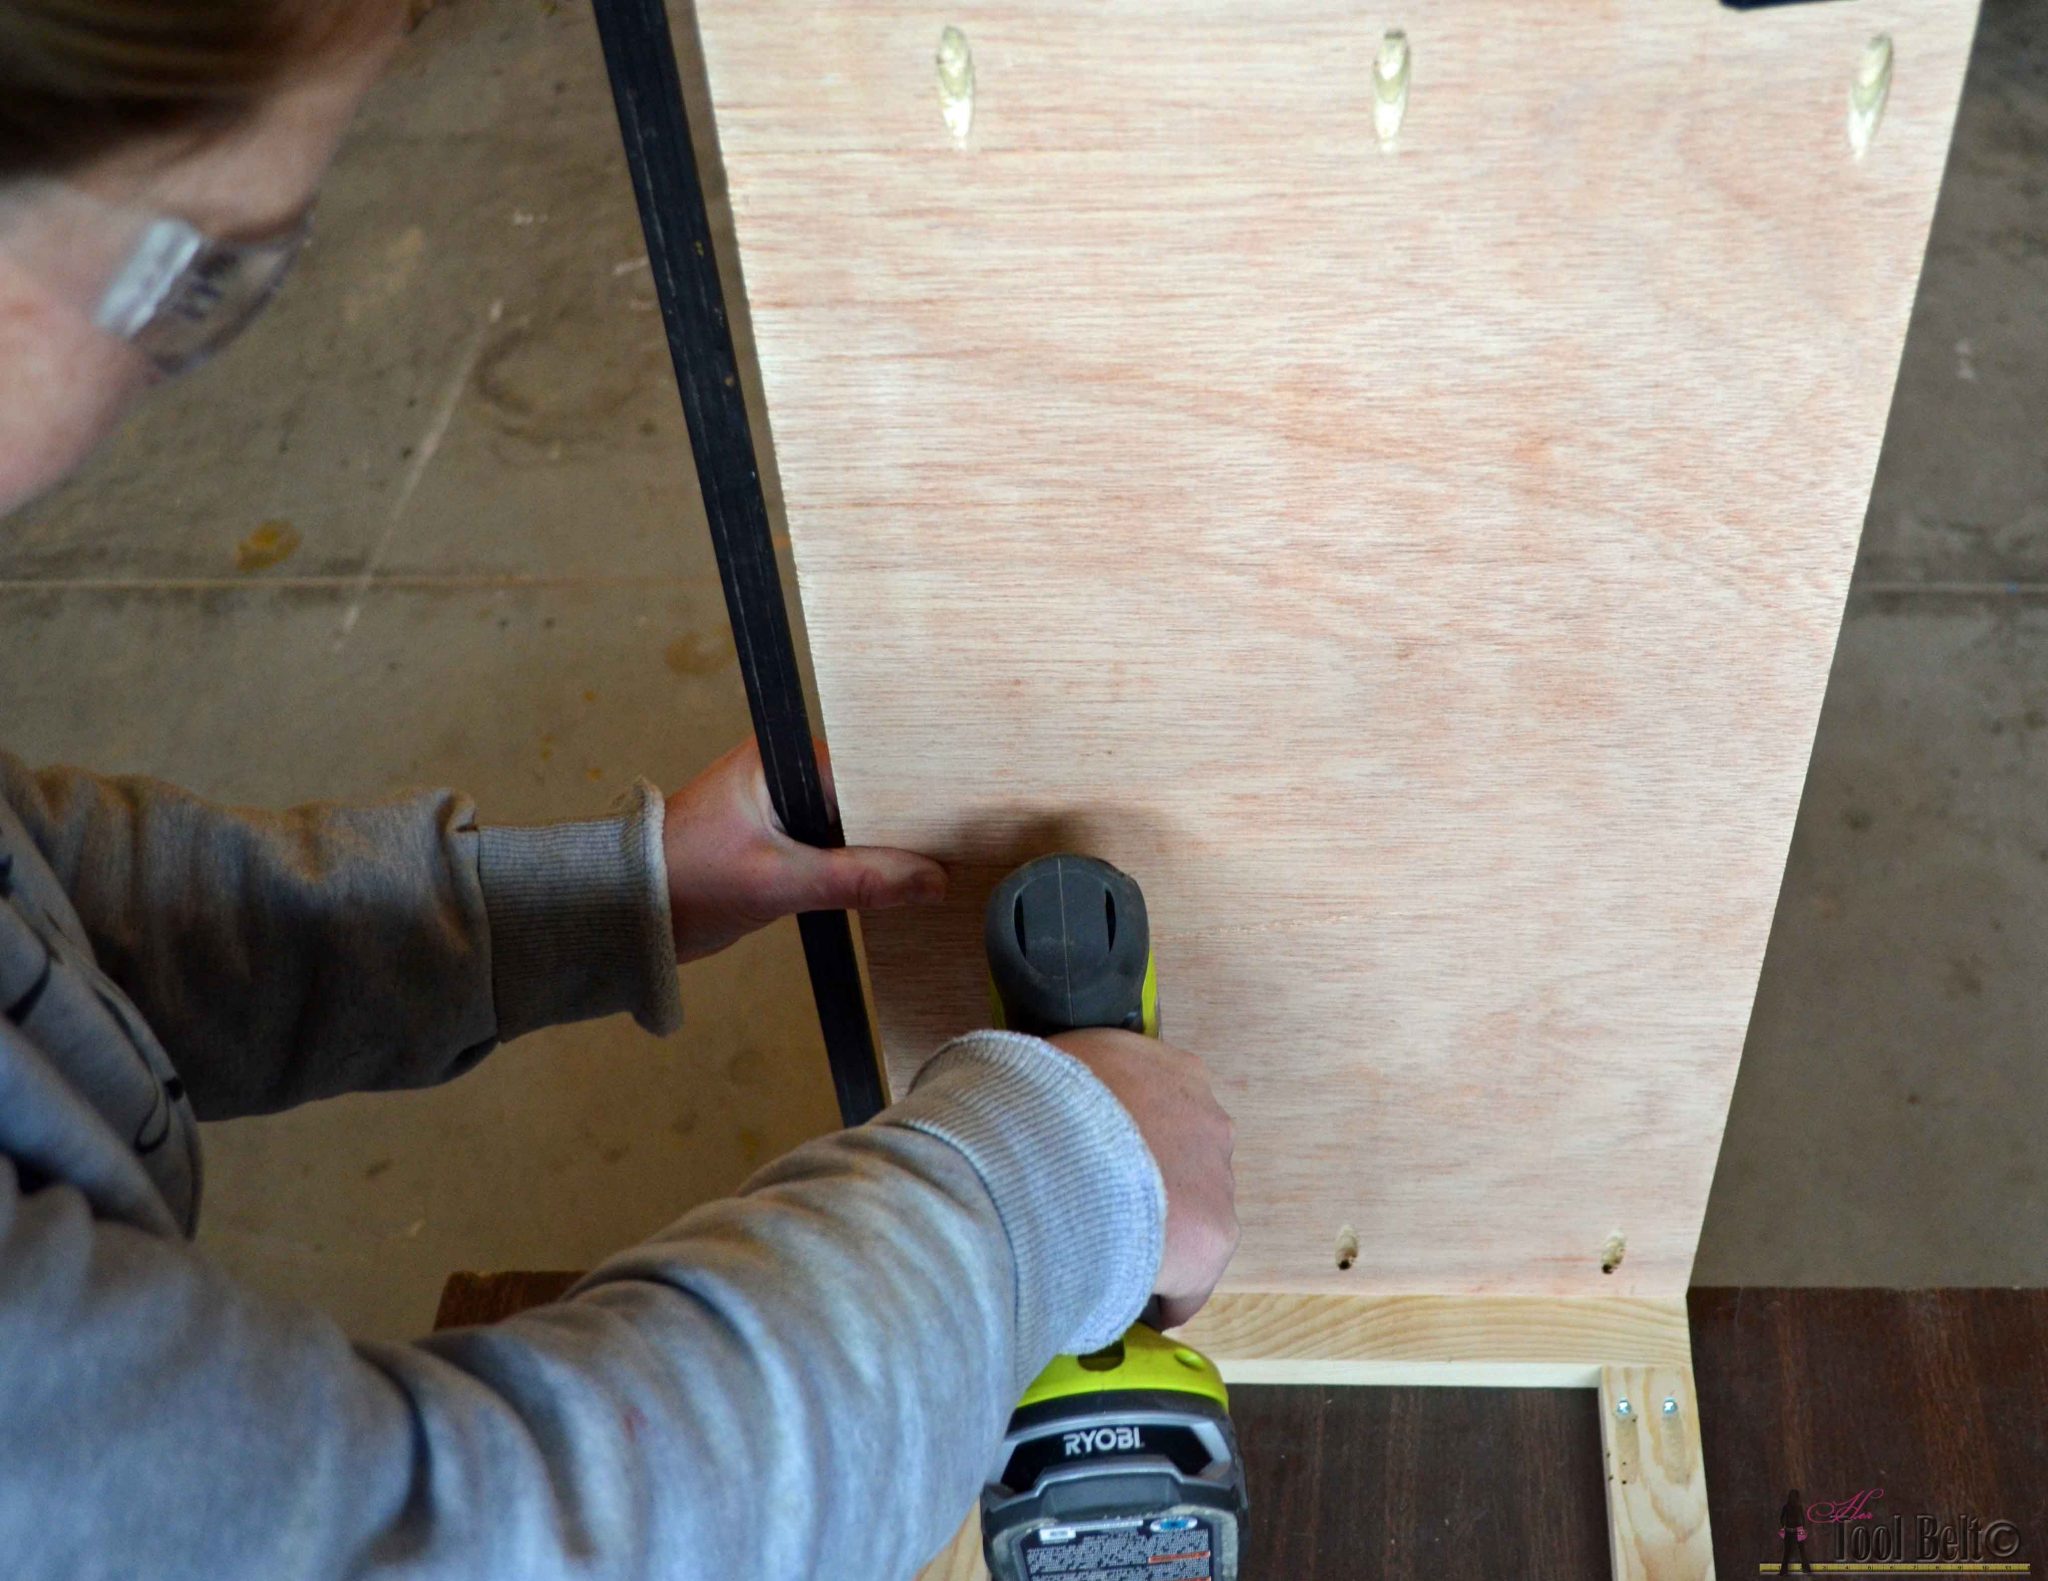
Step 4
Drill pocket holes for ¾” material in the ends of each 2×4 bottom support. Drill a couple pocket holes facing the sides on 2 of the bottom supports. Use wood glue and 1 ¼” screws to attach bottom supports to the face frame and side panels. Center the middle support with the face frame center vertical piece. Make the 2×4 flush with the face frame opening so the crates will slide smoothly. 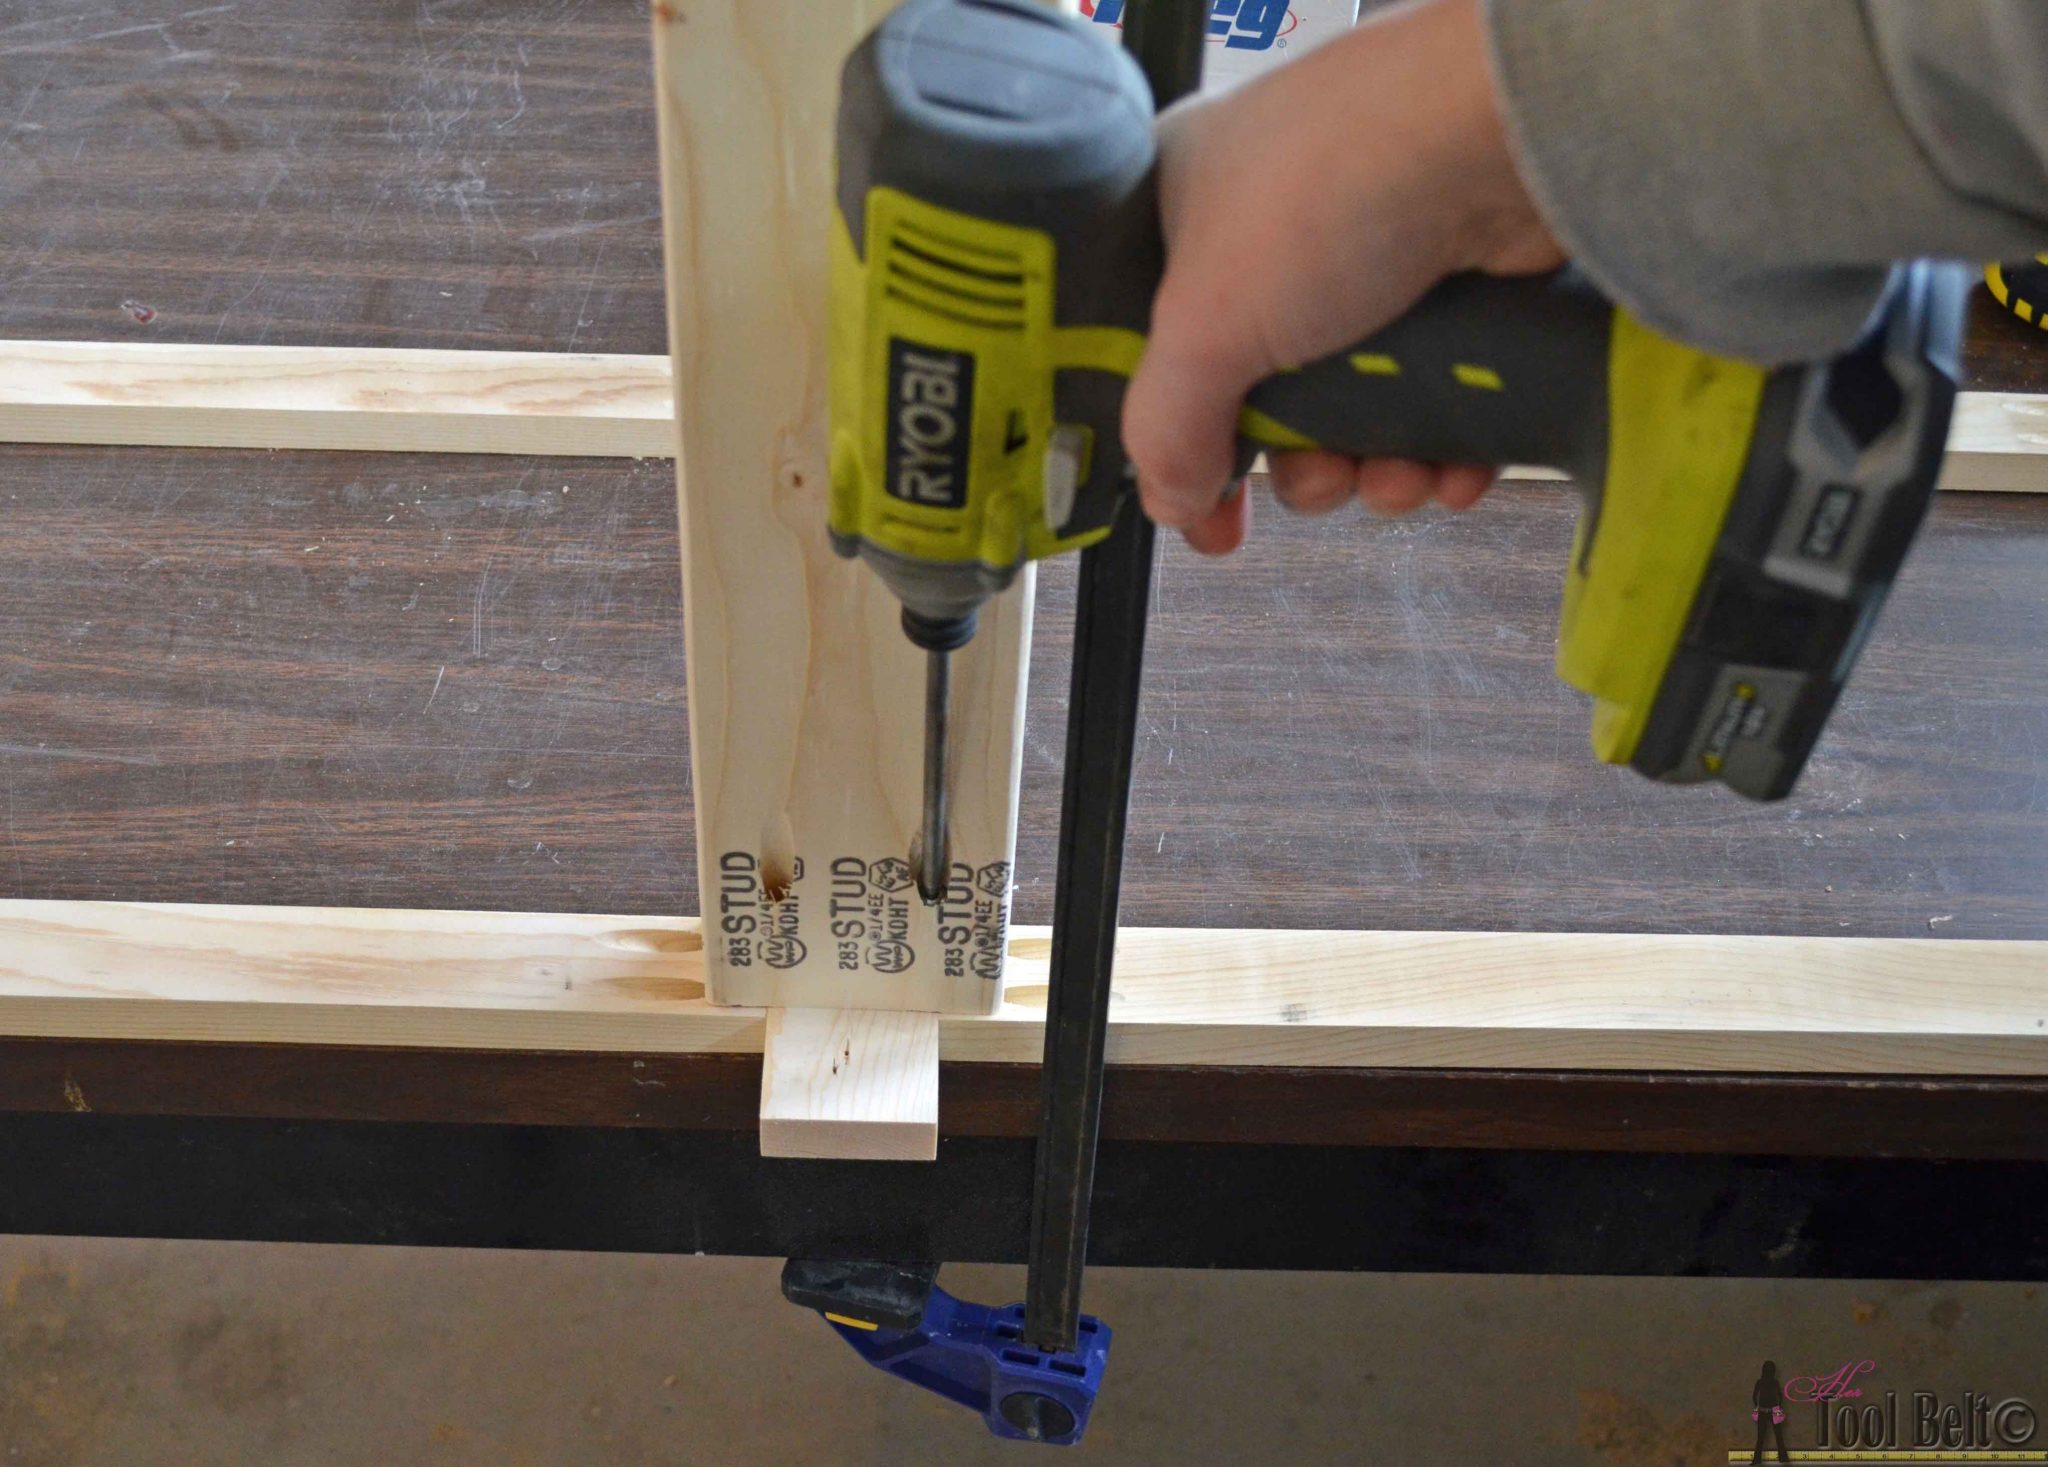
Step 5
Attach the other face frame to the side panels and bottom supports with wood glue and 1 ¼” screws. 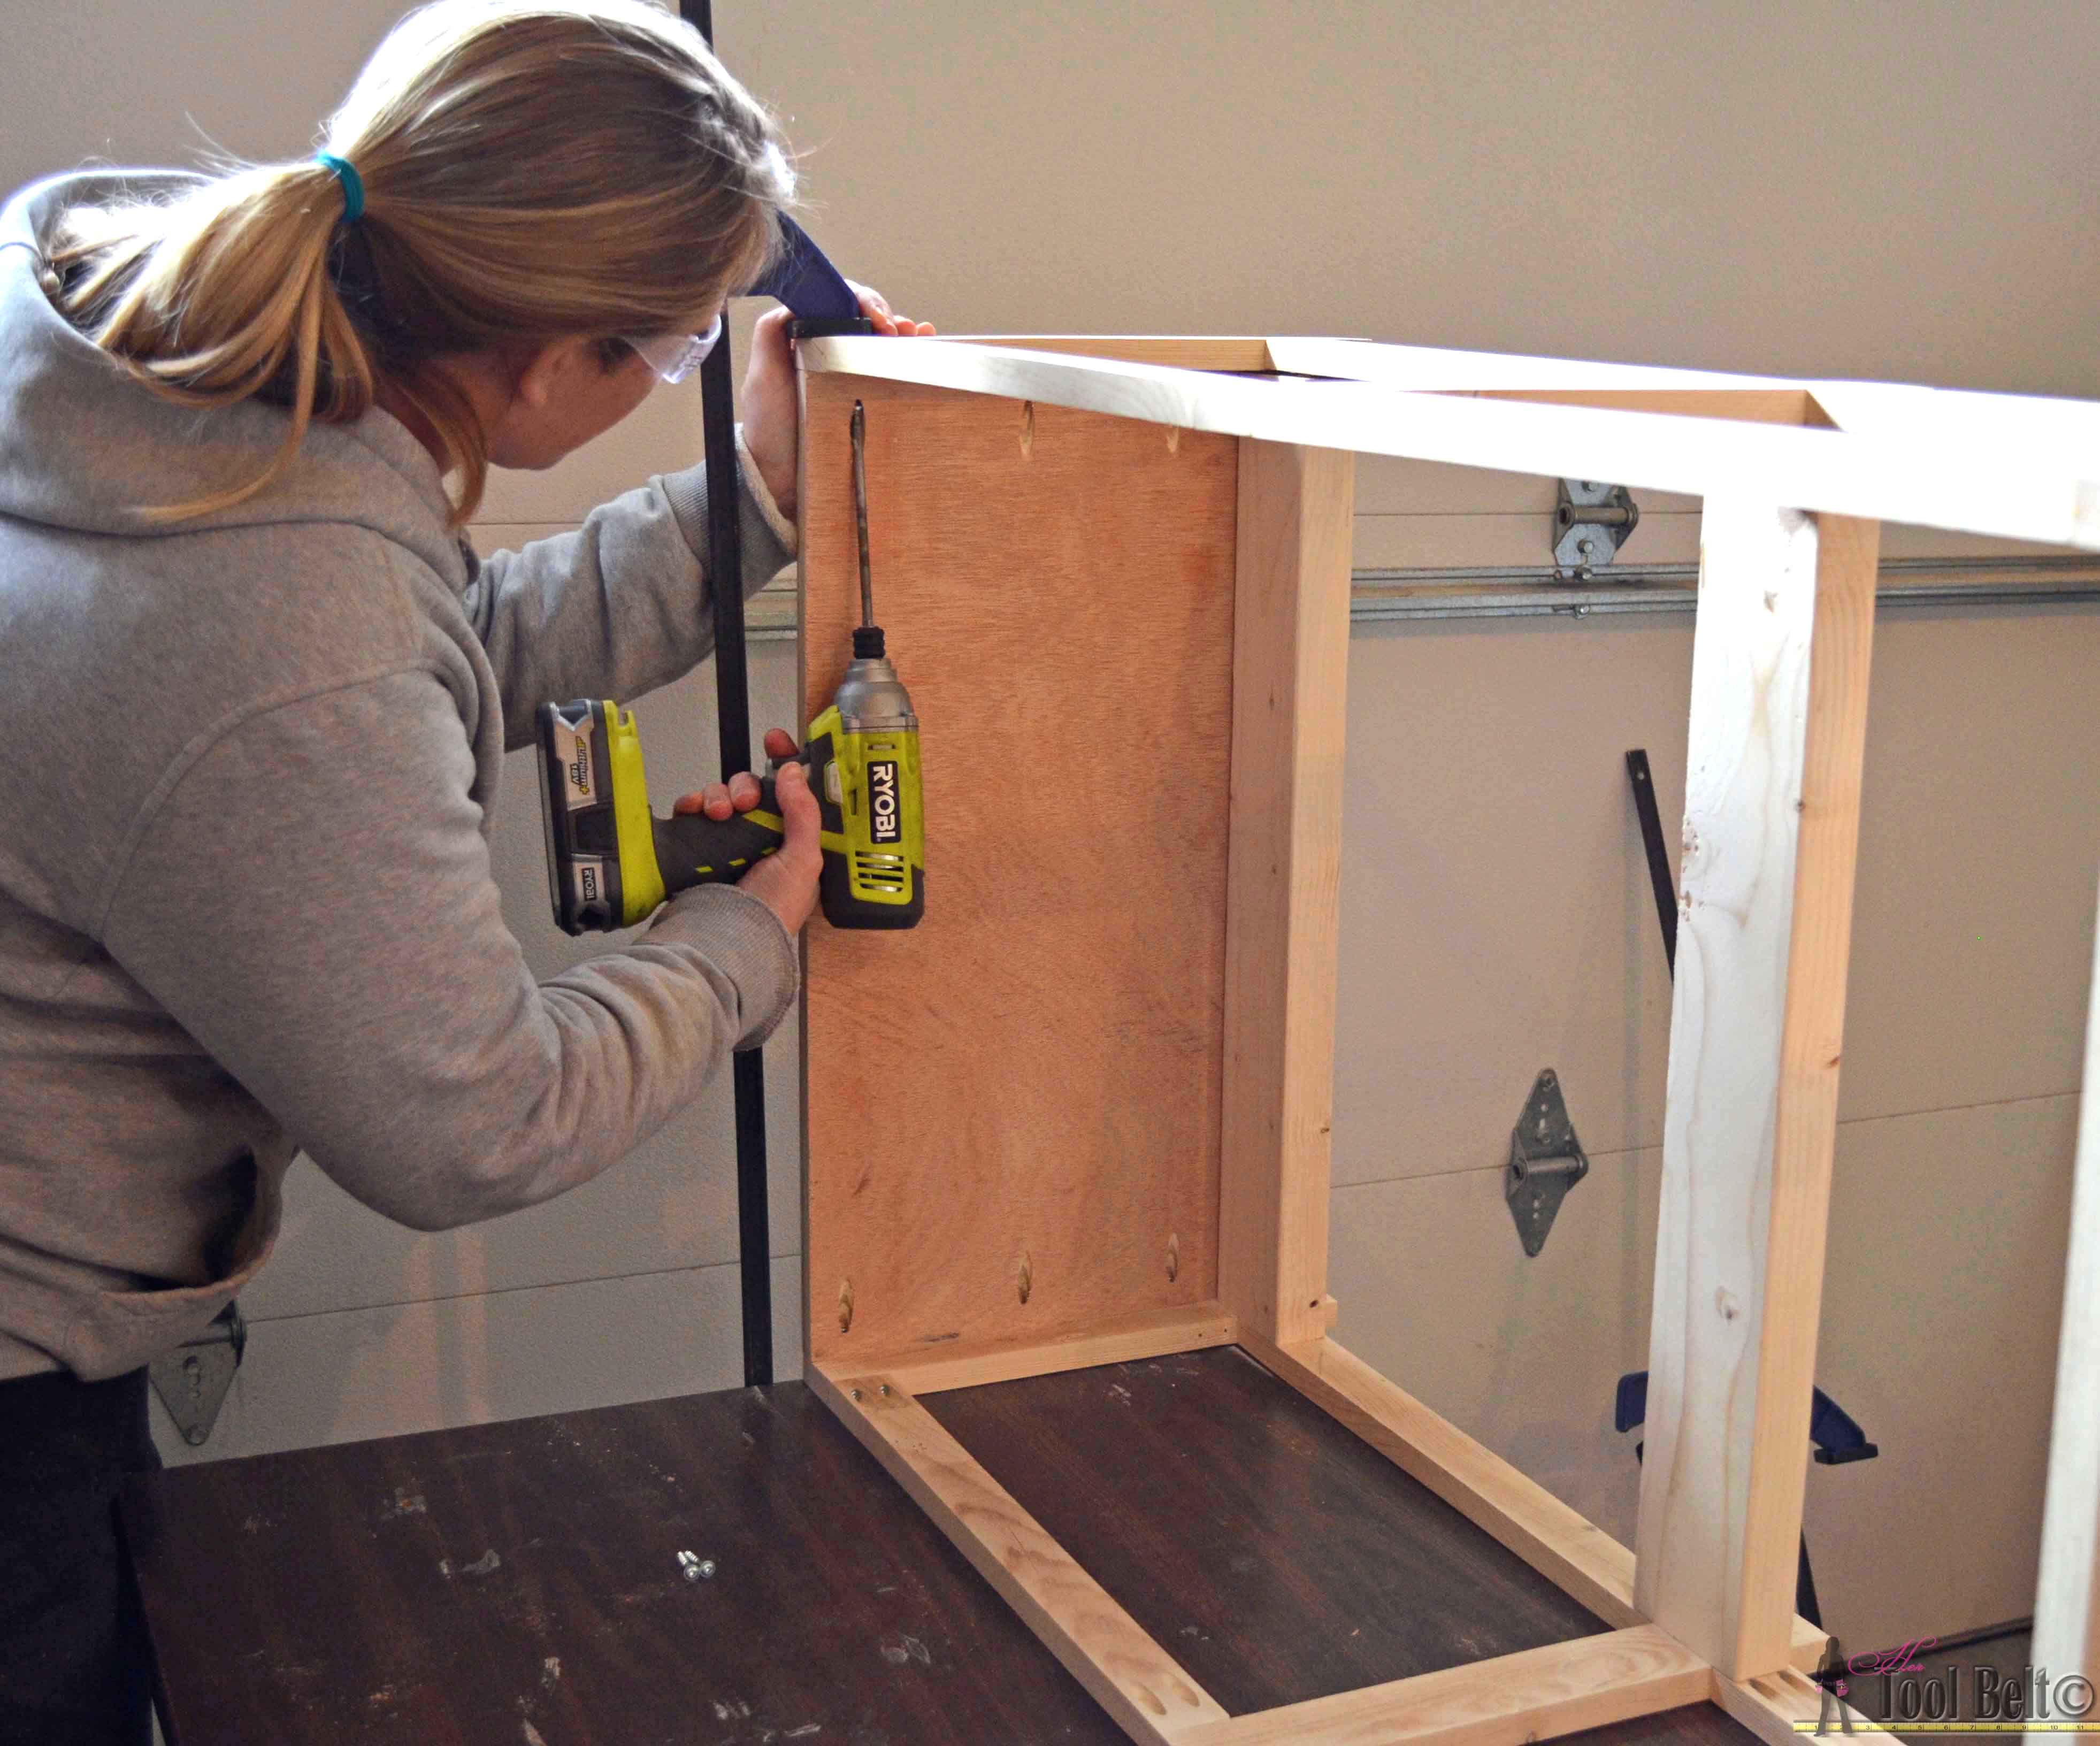
Step 6
Optional – I decided to add swivel casters to my table so I could easily move it while vacuuming, etc. The casters are not necessary, but will be mostly hidden by the molding. Attach swivel casters to the bottom support. Rotate caster around and make sure there is plenty of room for the molding later. 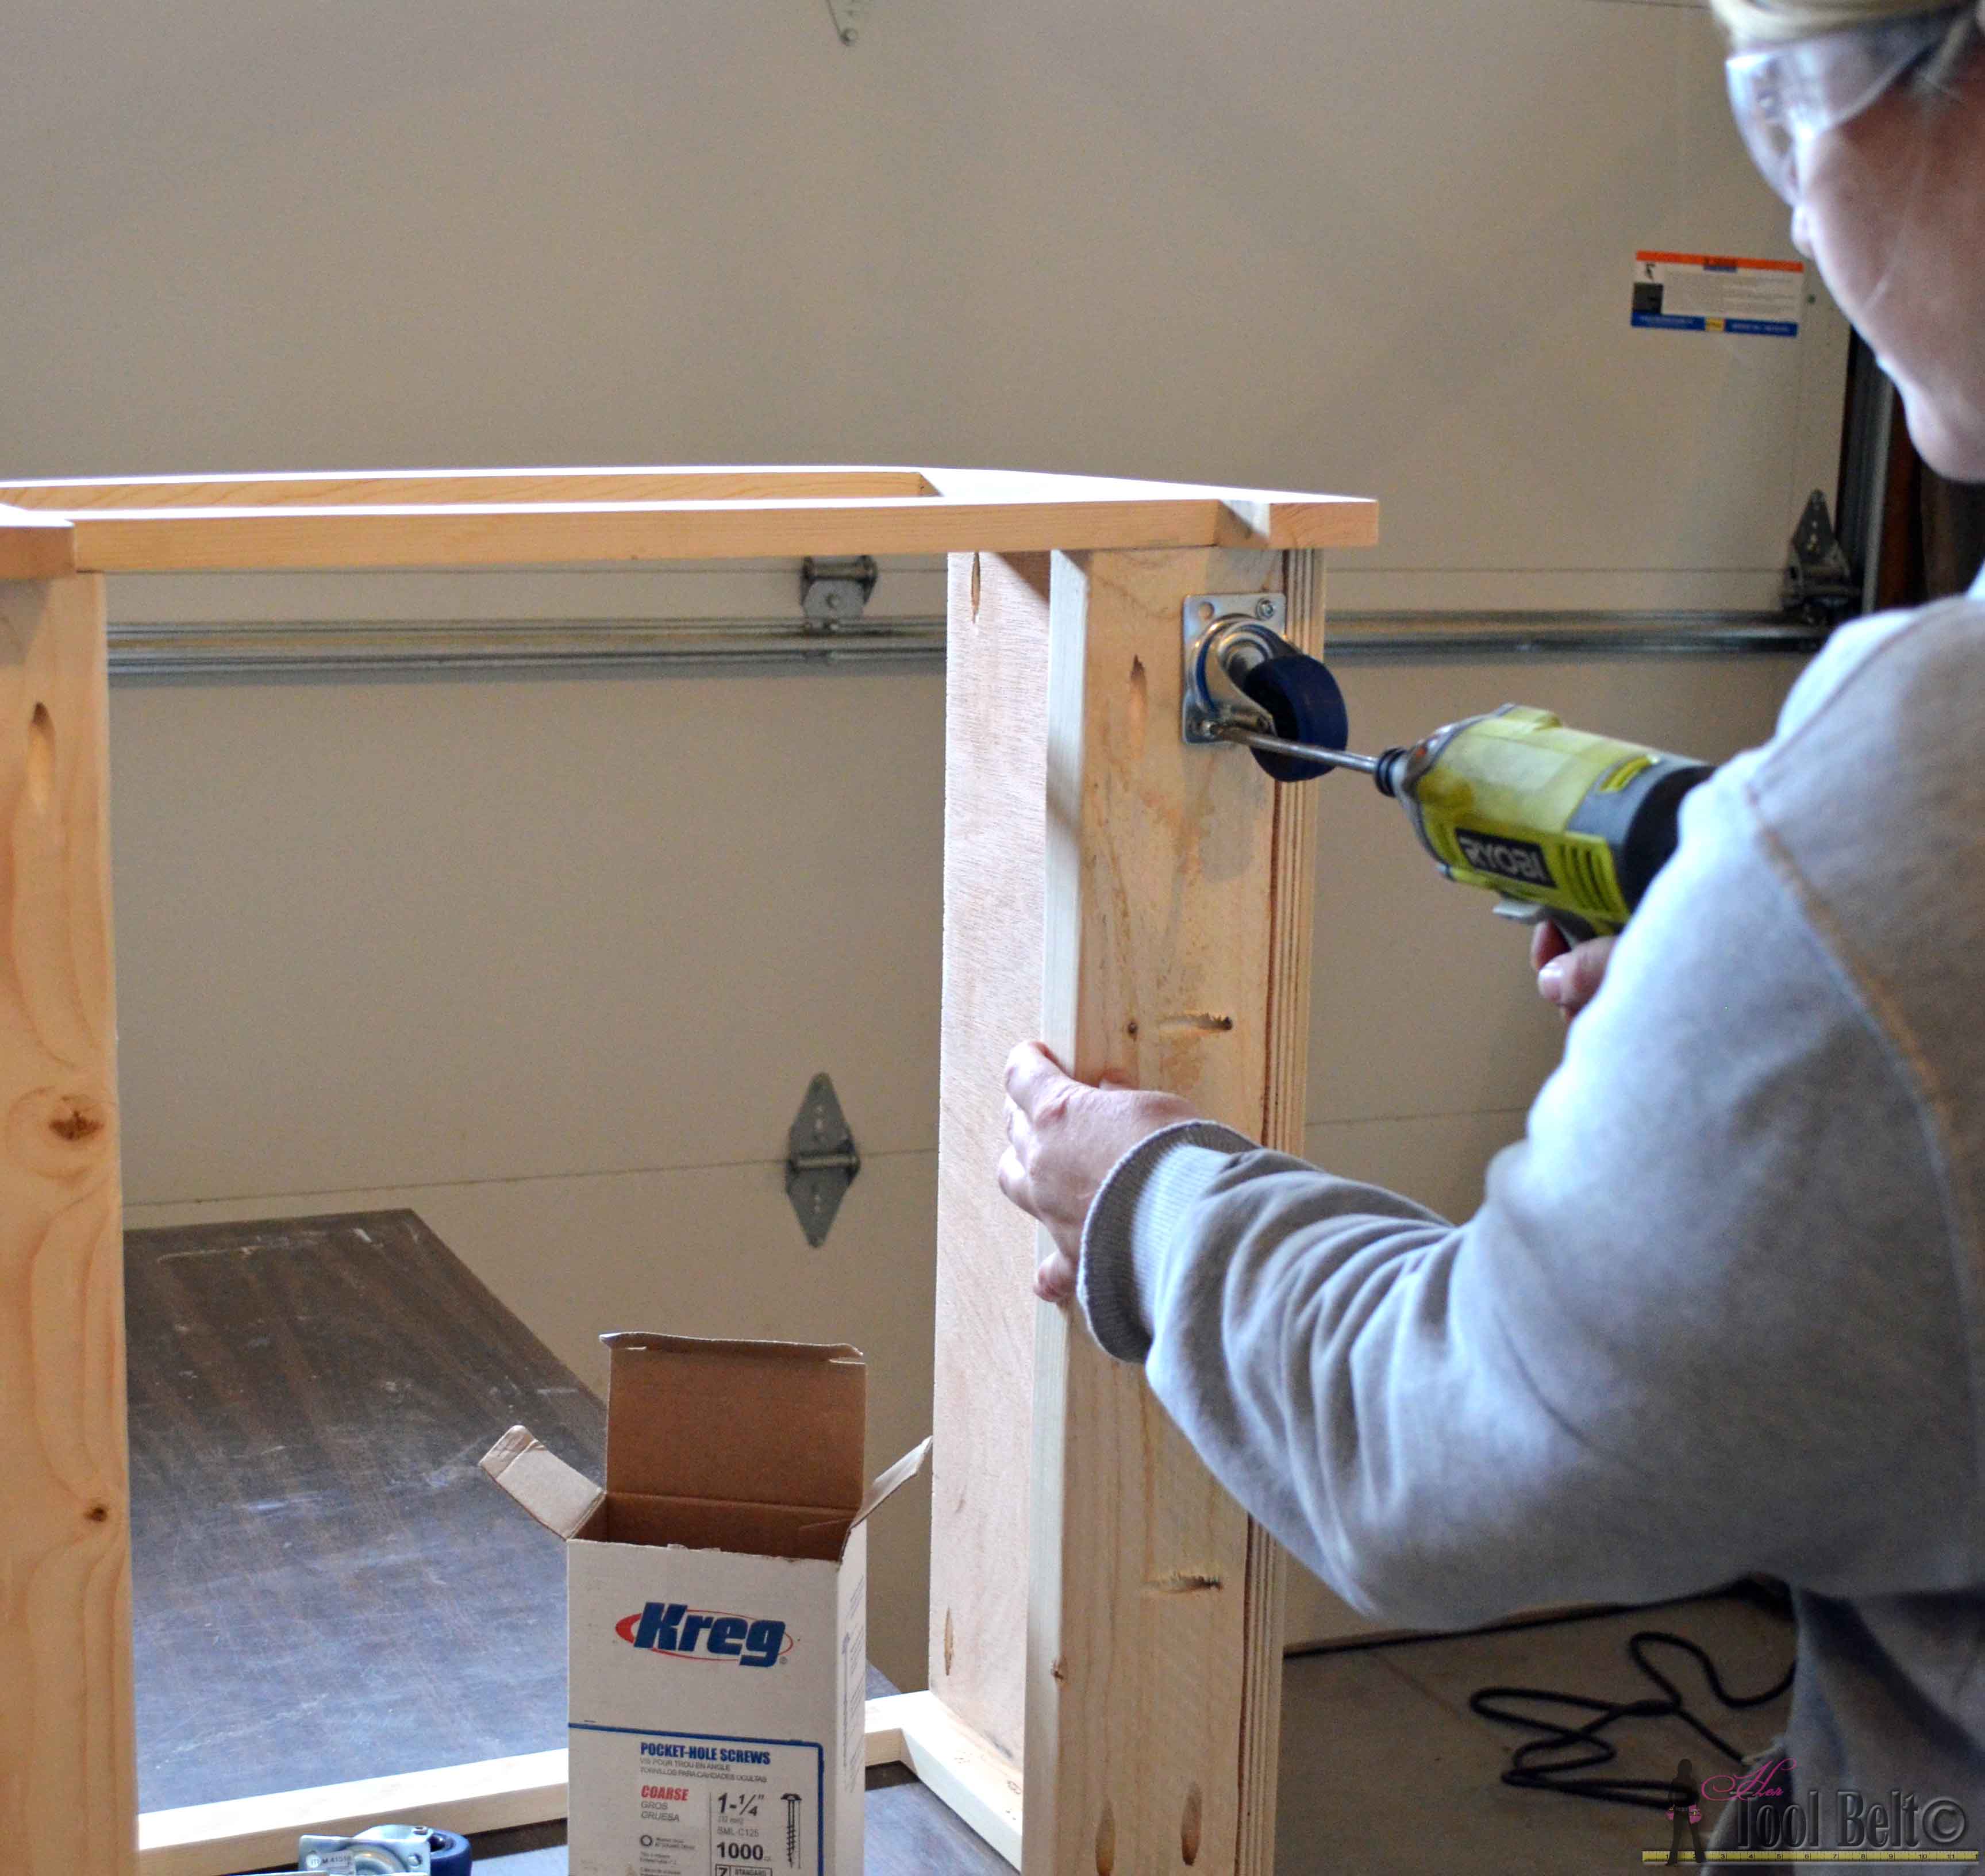
Step 7
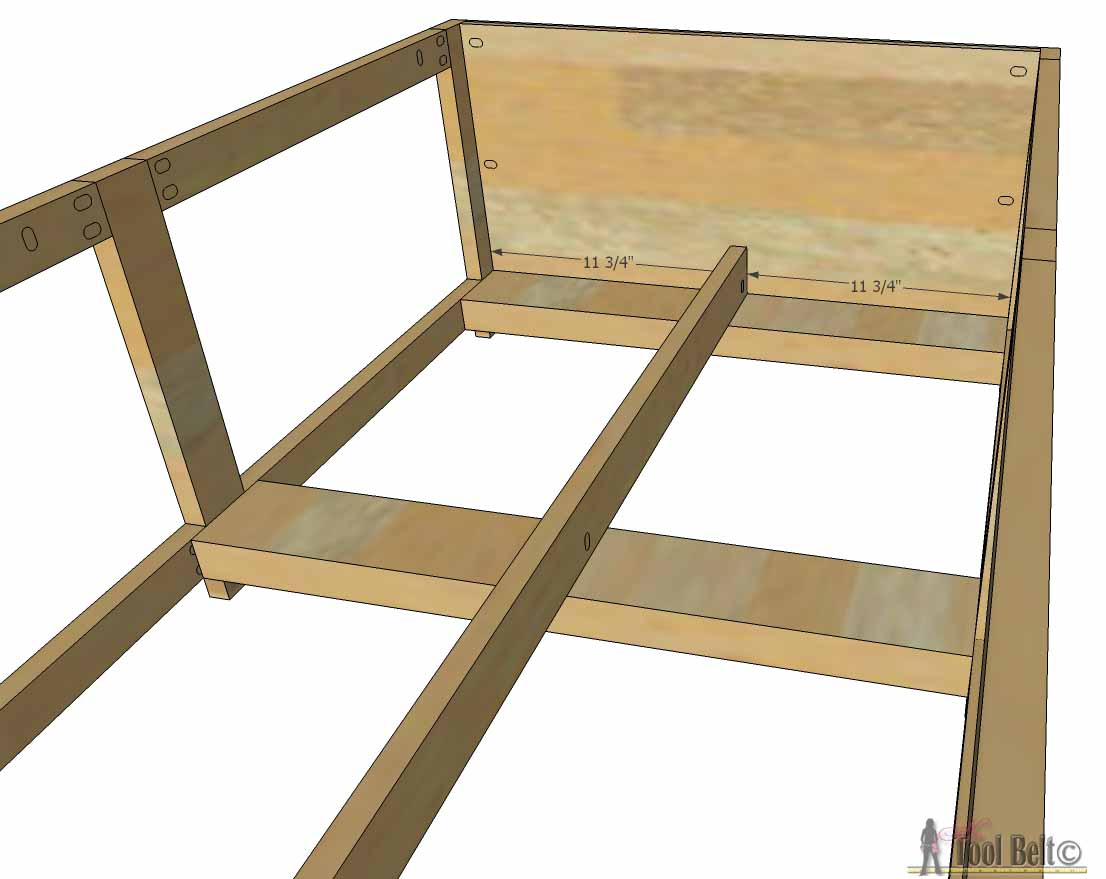
On the inside of the table, measure and mark on the supports from the inside face frame 11 ¾”. Dryfit center divider and trim as necessary. Add 3 or so pocket holes in the center divider to attach it to the bottom supports. Use 1 ¼” screws to attach the center divider to the supports. The center divider is the backstop for the crates. 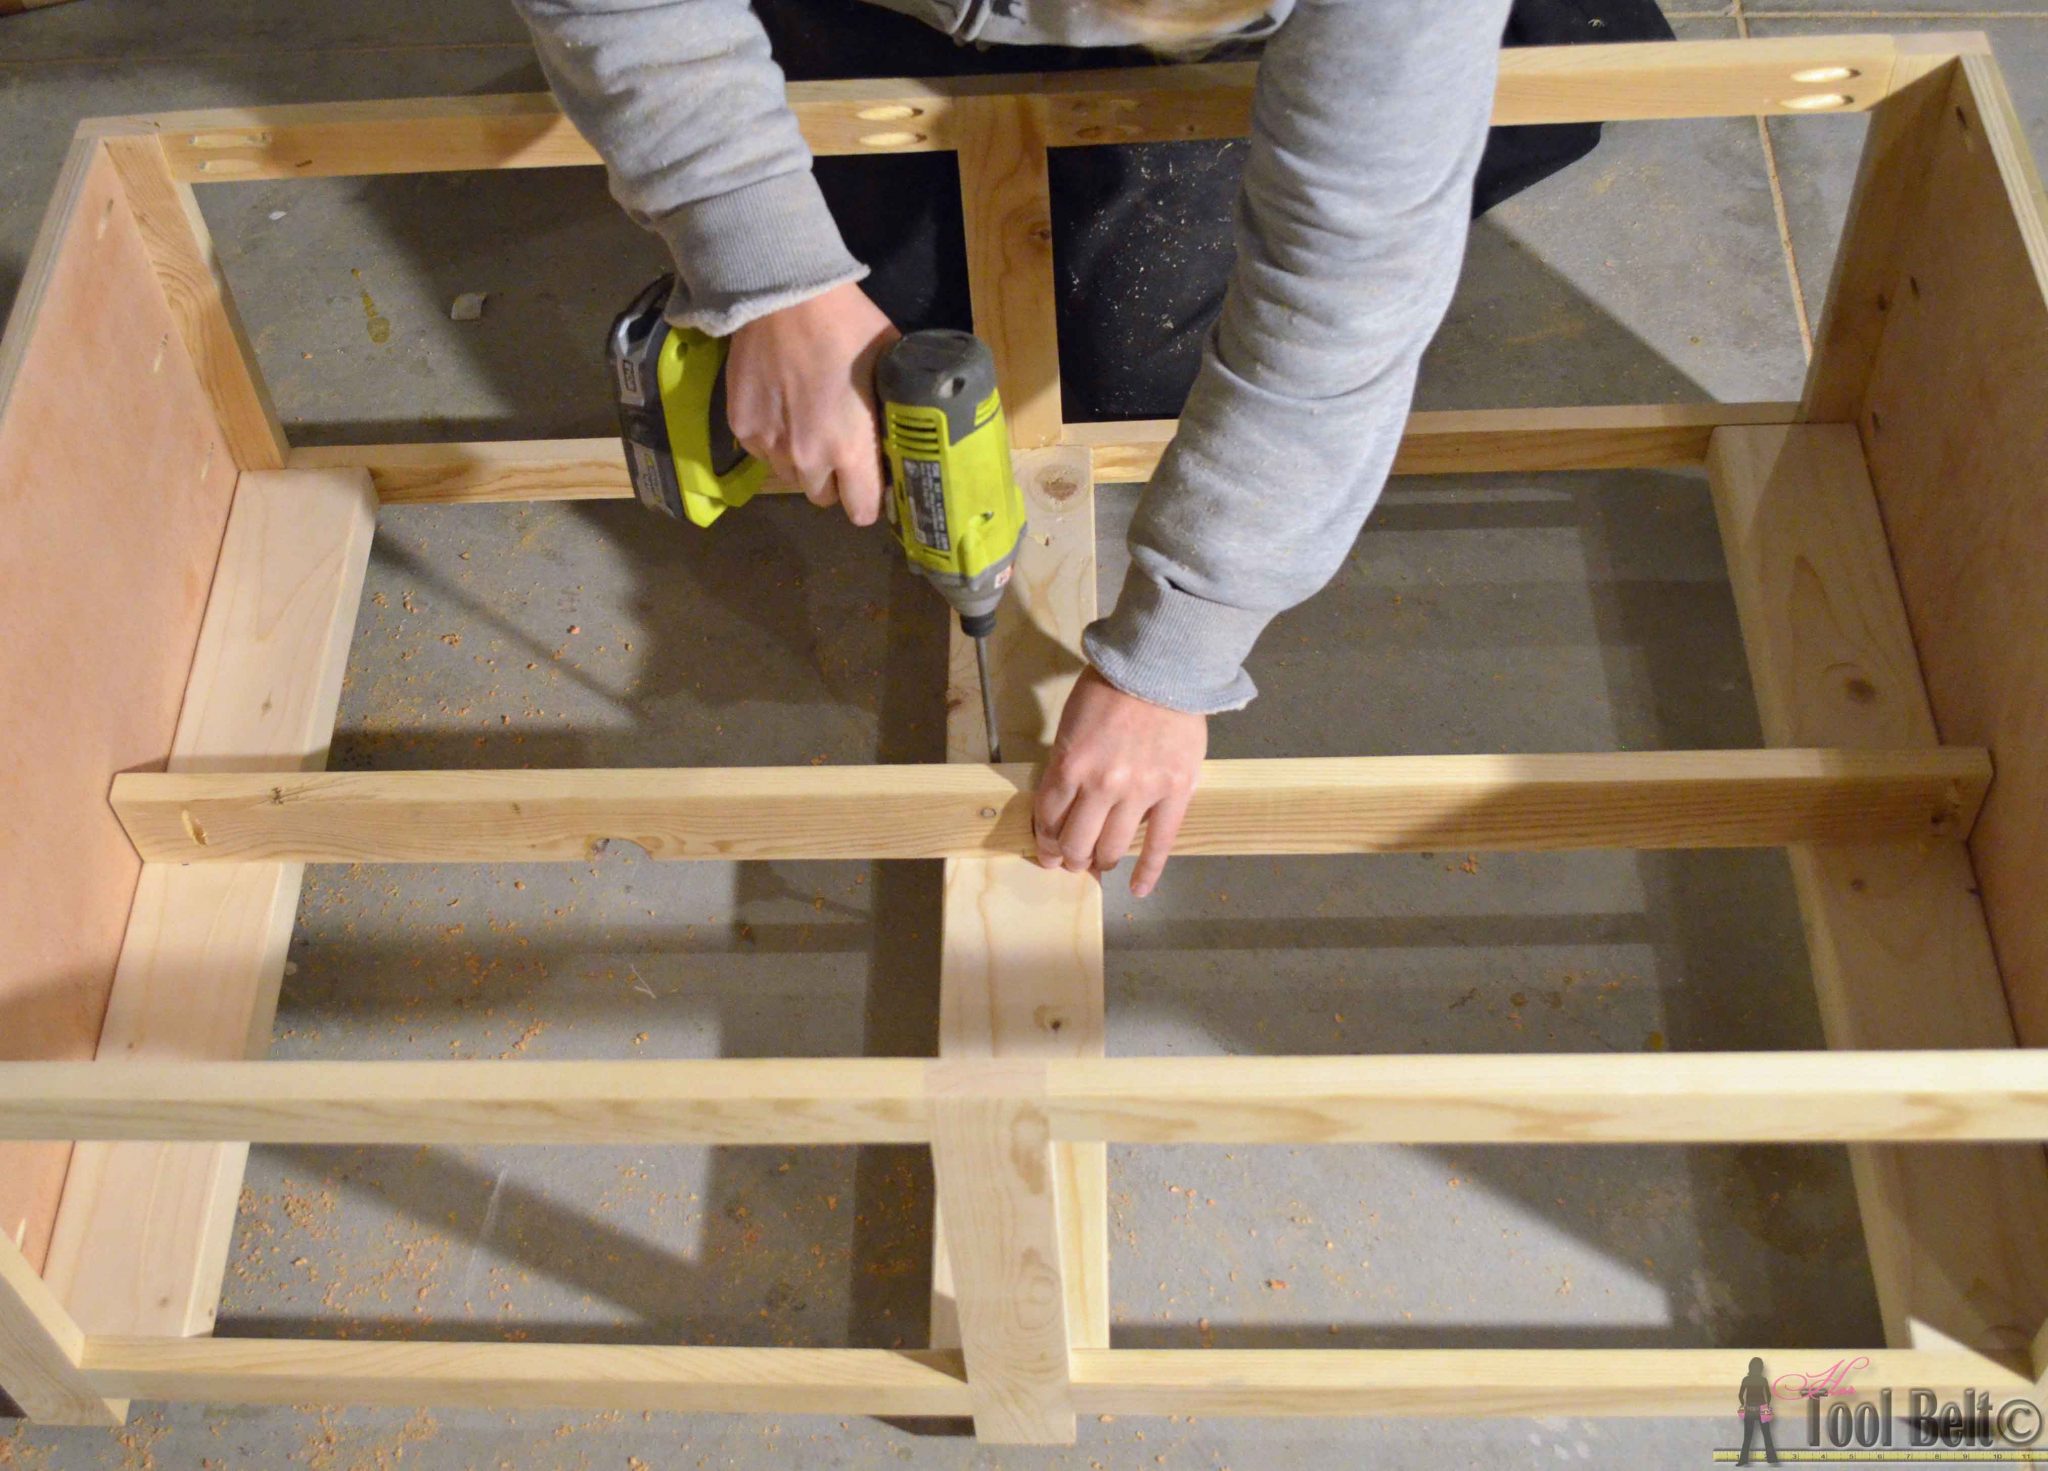
Step 8
Attach 2 -2” drawer guides with wood glue and 1 ¼” brad nails, these should be flush with the center face frame piece and 19 ½” from the side panels. Attach 4 – 1 ¼” drawer guides with wood glue and 1 ¼” brad nails flush with the side openings of the face frame. The drawer guides help the crate slide in straight. 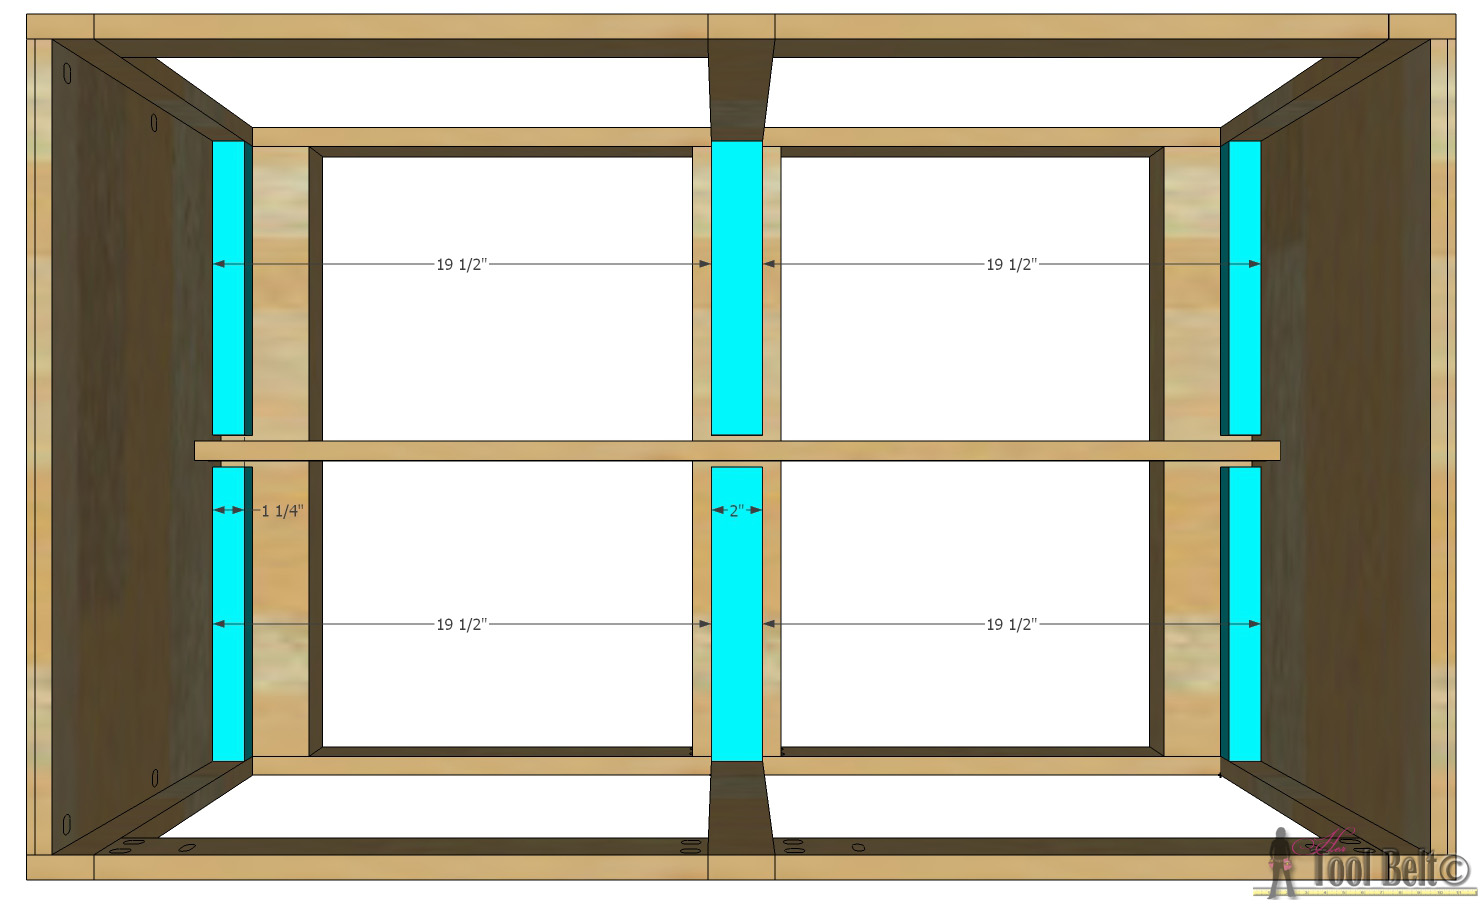
Step 9
From the bottom of the face frame opening, measure and mark 1” in a few places. Use wood glue and 1 ¼” brad nails to attach the 42 ½” molding pieces to the front and back of the table. The molding edges should be flush with the sides, trim as necessary. Attach the 27 ¼” molding pieces flush with the other molding pieces. 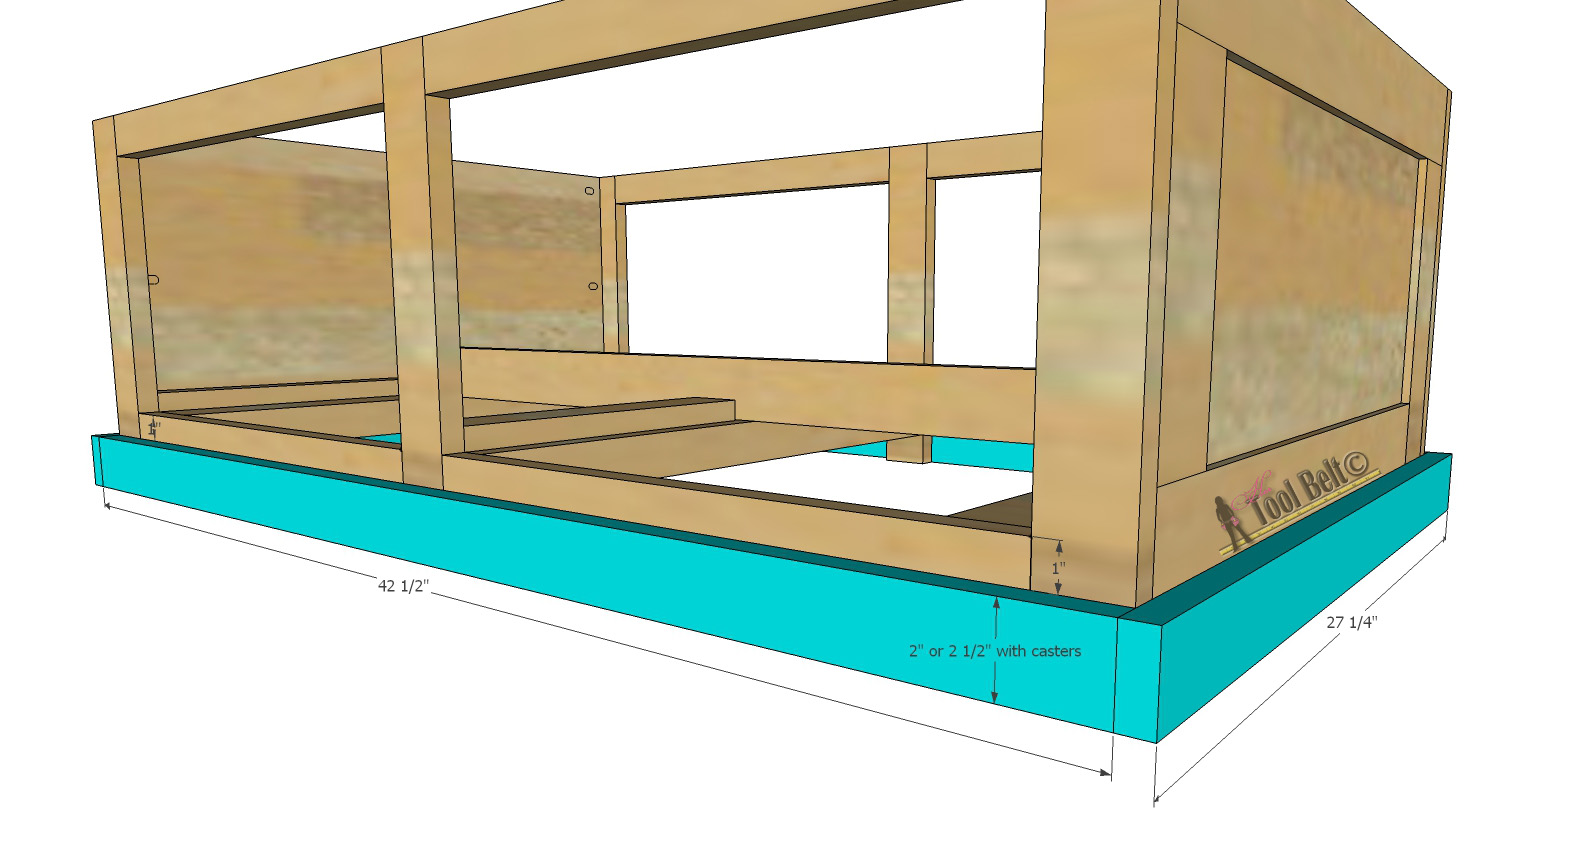
Step 10
Dry fit the large crates and make sure they fit nicely through the face frame and on the bottom supports. Make any adjustments as necessary. (Note: I haven’t installed the molding yet in this picture) Sand, sand, sand finishing with 120-150 grit. Paint or stain the table as desired. I primed the table and crates and painted them with white latex paint. 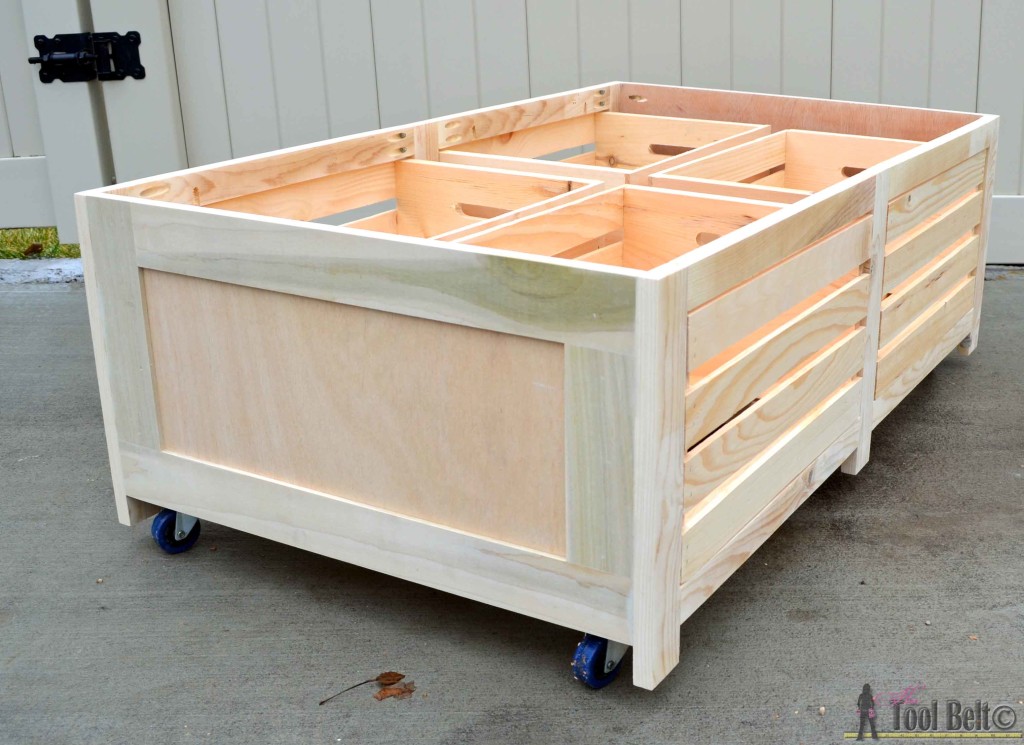
Step 11
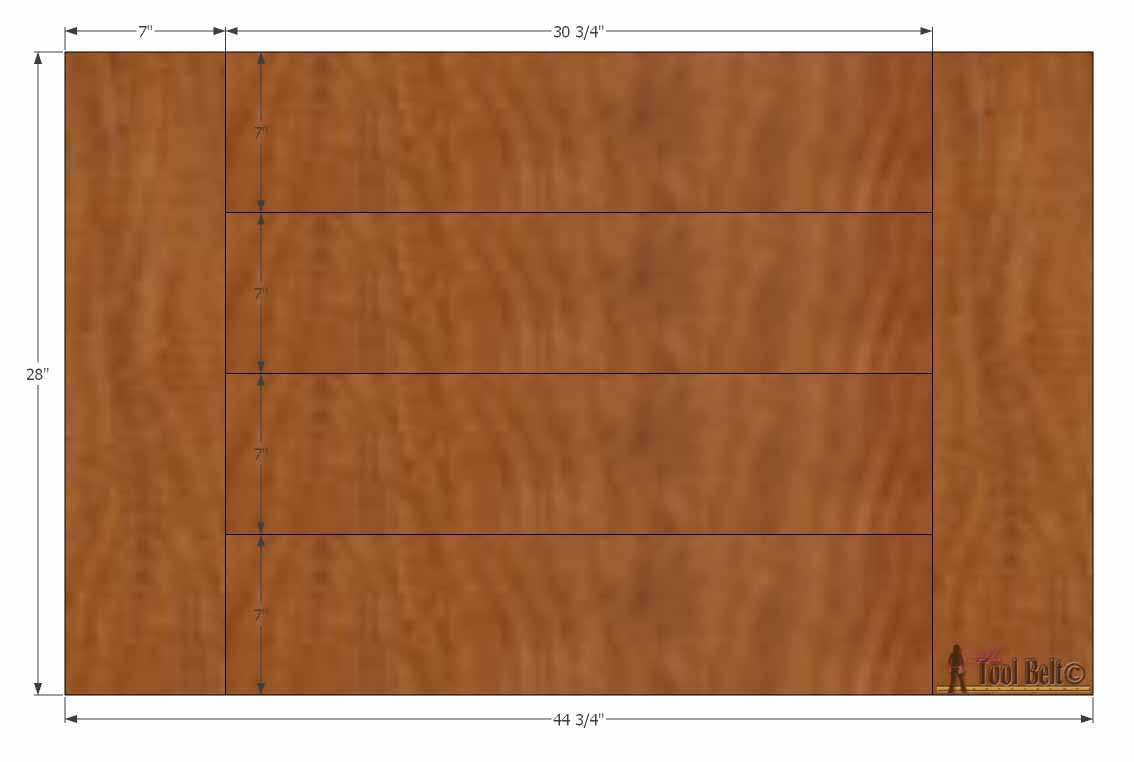
Cut the top pieces, 4 @ 30 ¾” and 2 @ 28”. When using 2 x 8 for tops, I like to trim down the sides with a table saw to get a straight edge. The widths of the 2×8’s are trimmed down to 7” wide. 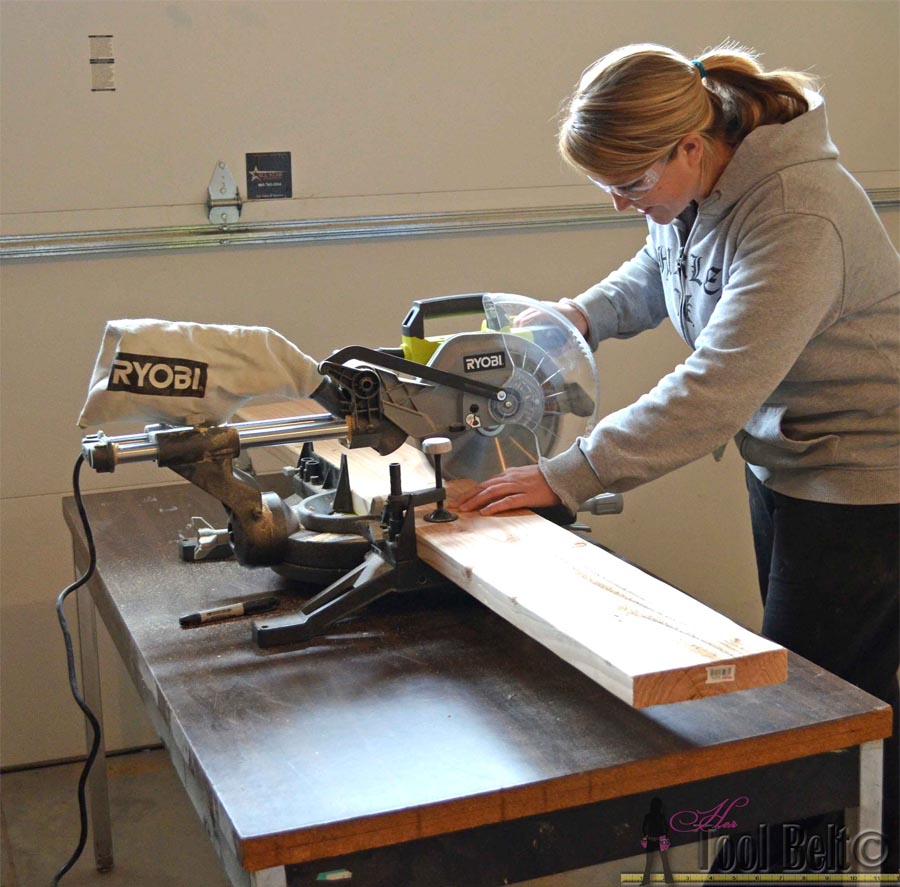
![]()
Step 12
Drill pocket holes for 1 ½” material in the top boards, about 5 holes along each joint, 1 on each end. Use wood glue and 2 ½” screws to join the top pieces together. Sand, sand, sand finishing with 120-150 grit. Paint or stain the top as desired. I used wood conditioner then applied 2 coats of Varathane Carrington stain and finished with Varathane satin polyurethane. 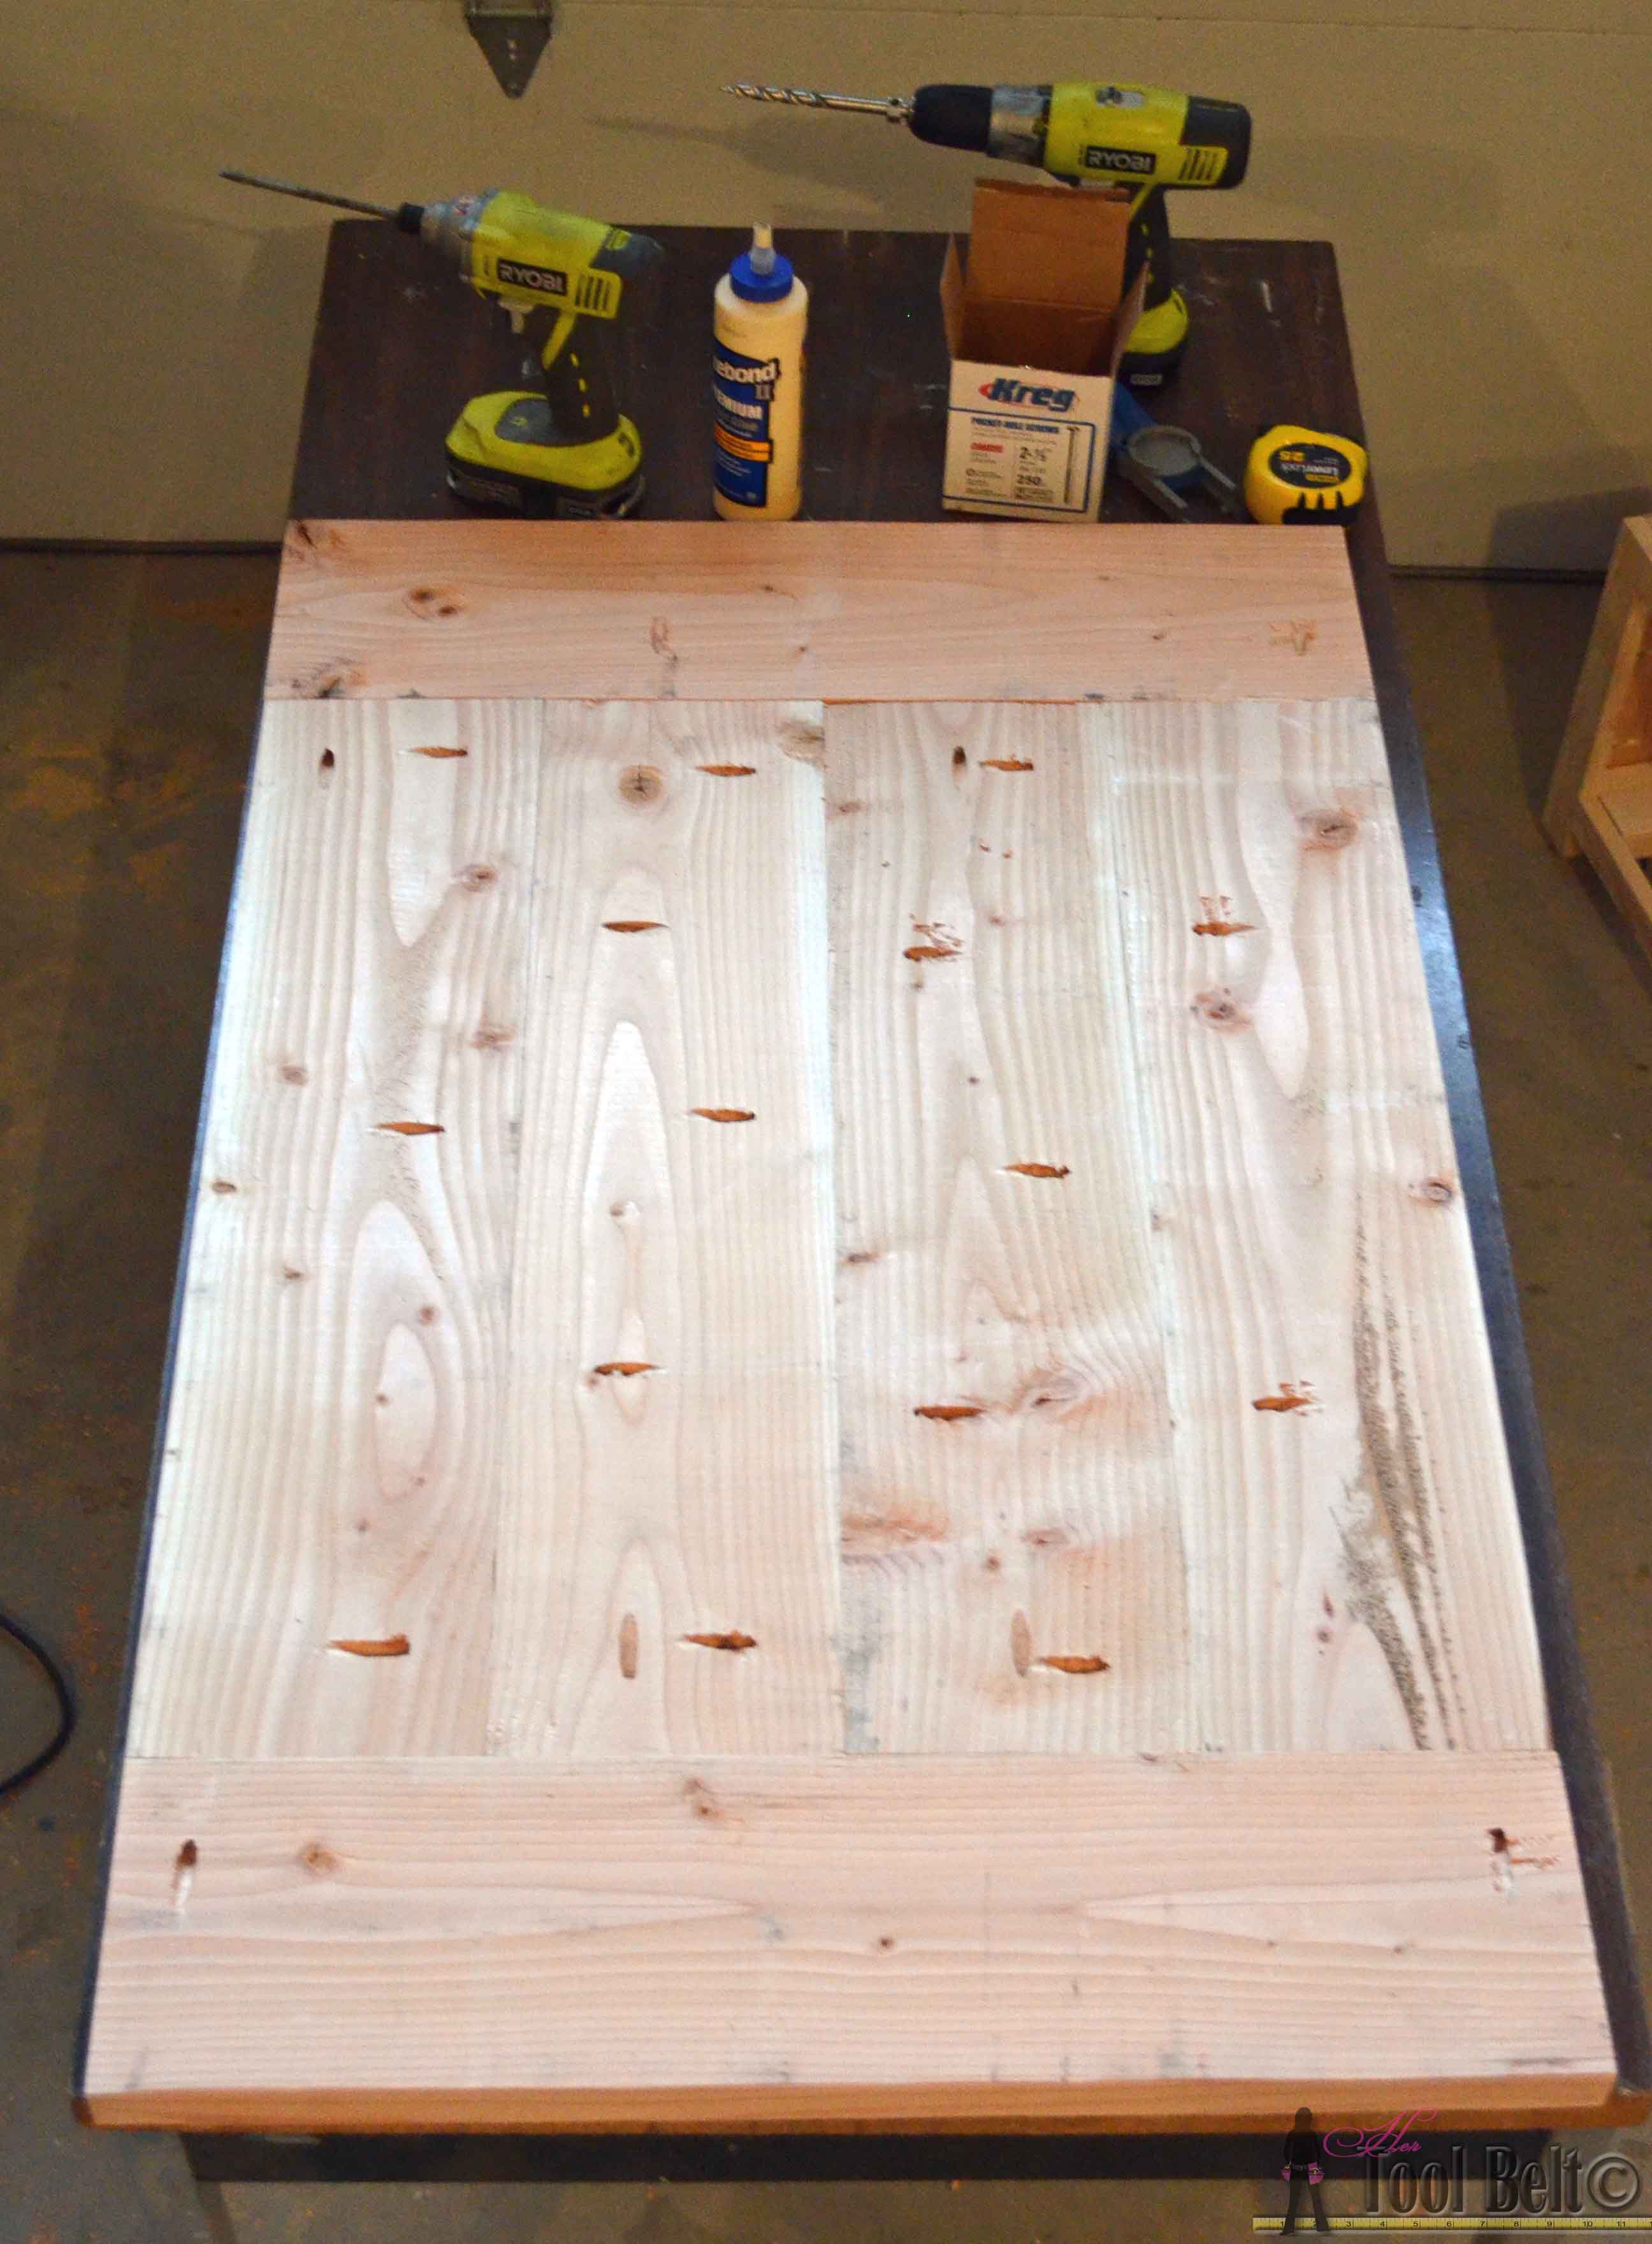
Step 13
Once all of the pieces dried I attached the table to the top with 1 ¼” screws. To help with the sliding motion and save the paint surfaces, I stapled plastic hanger strap on the bottom supports (optional). Cut the plastic hanger strap flush withthe front and if needed hammer down the staples. 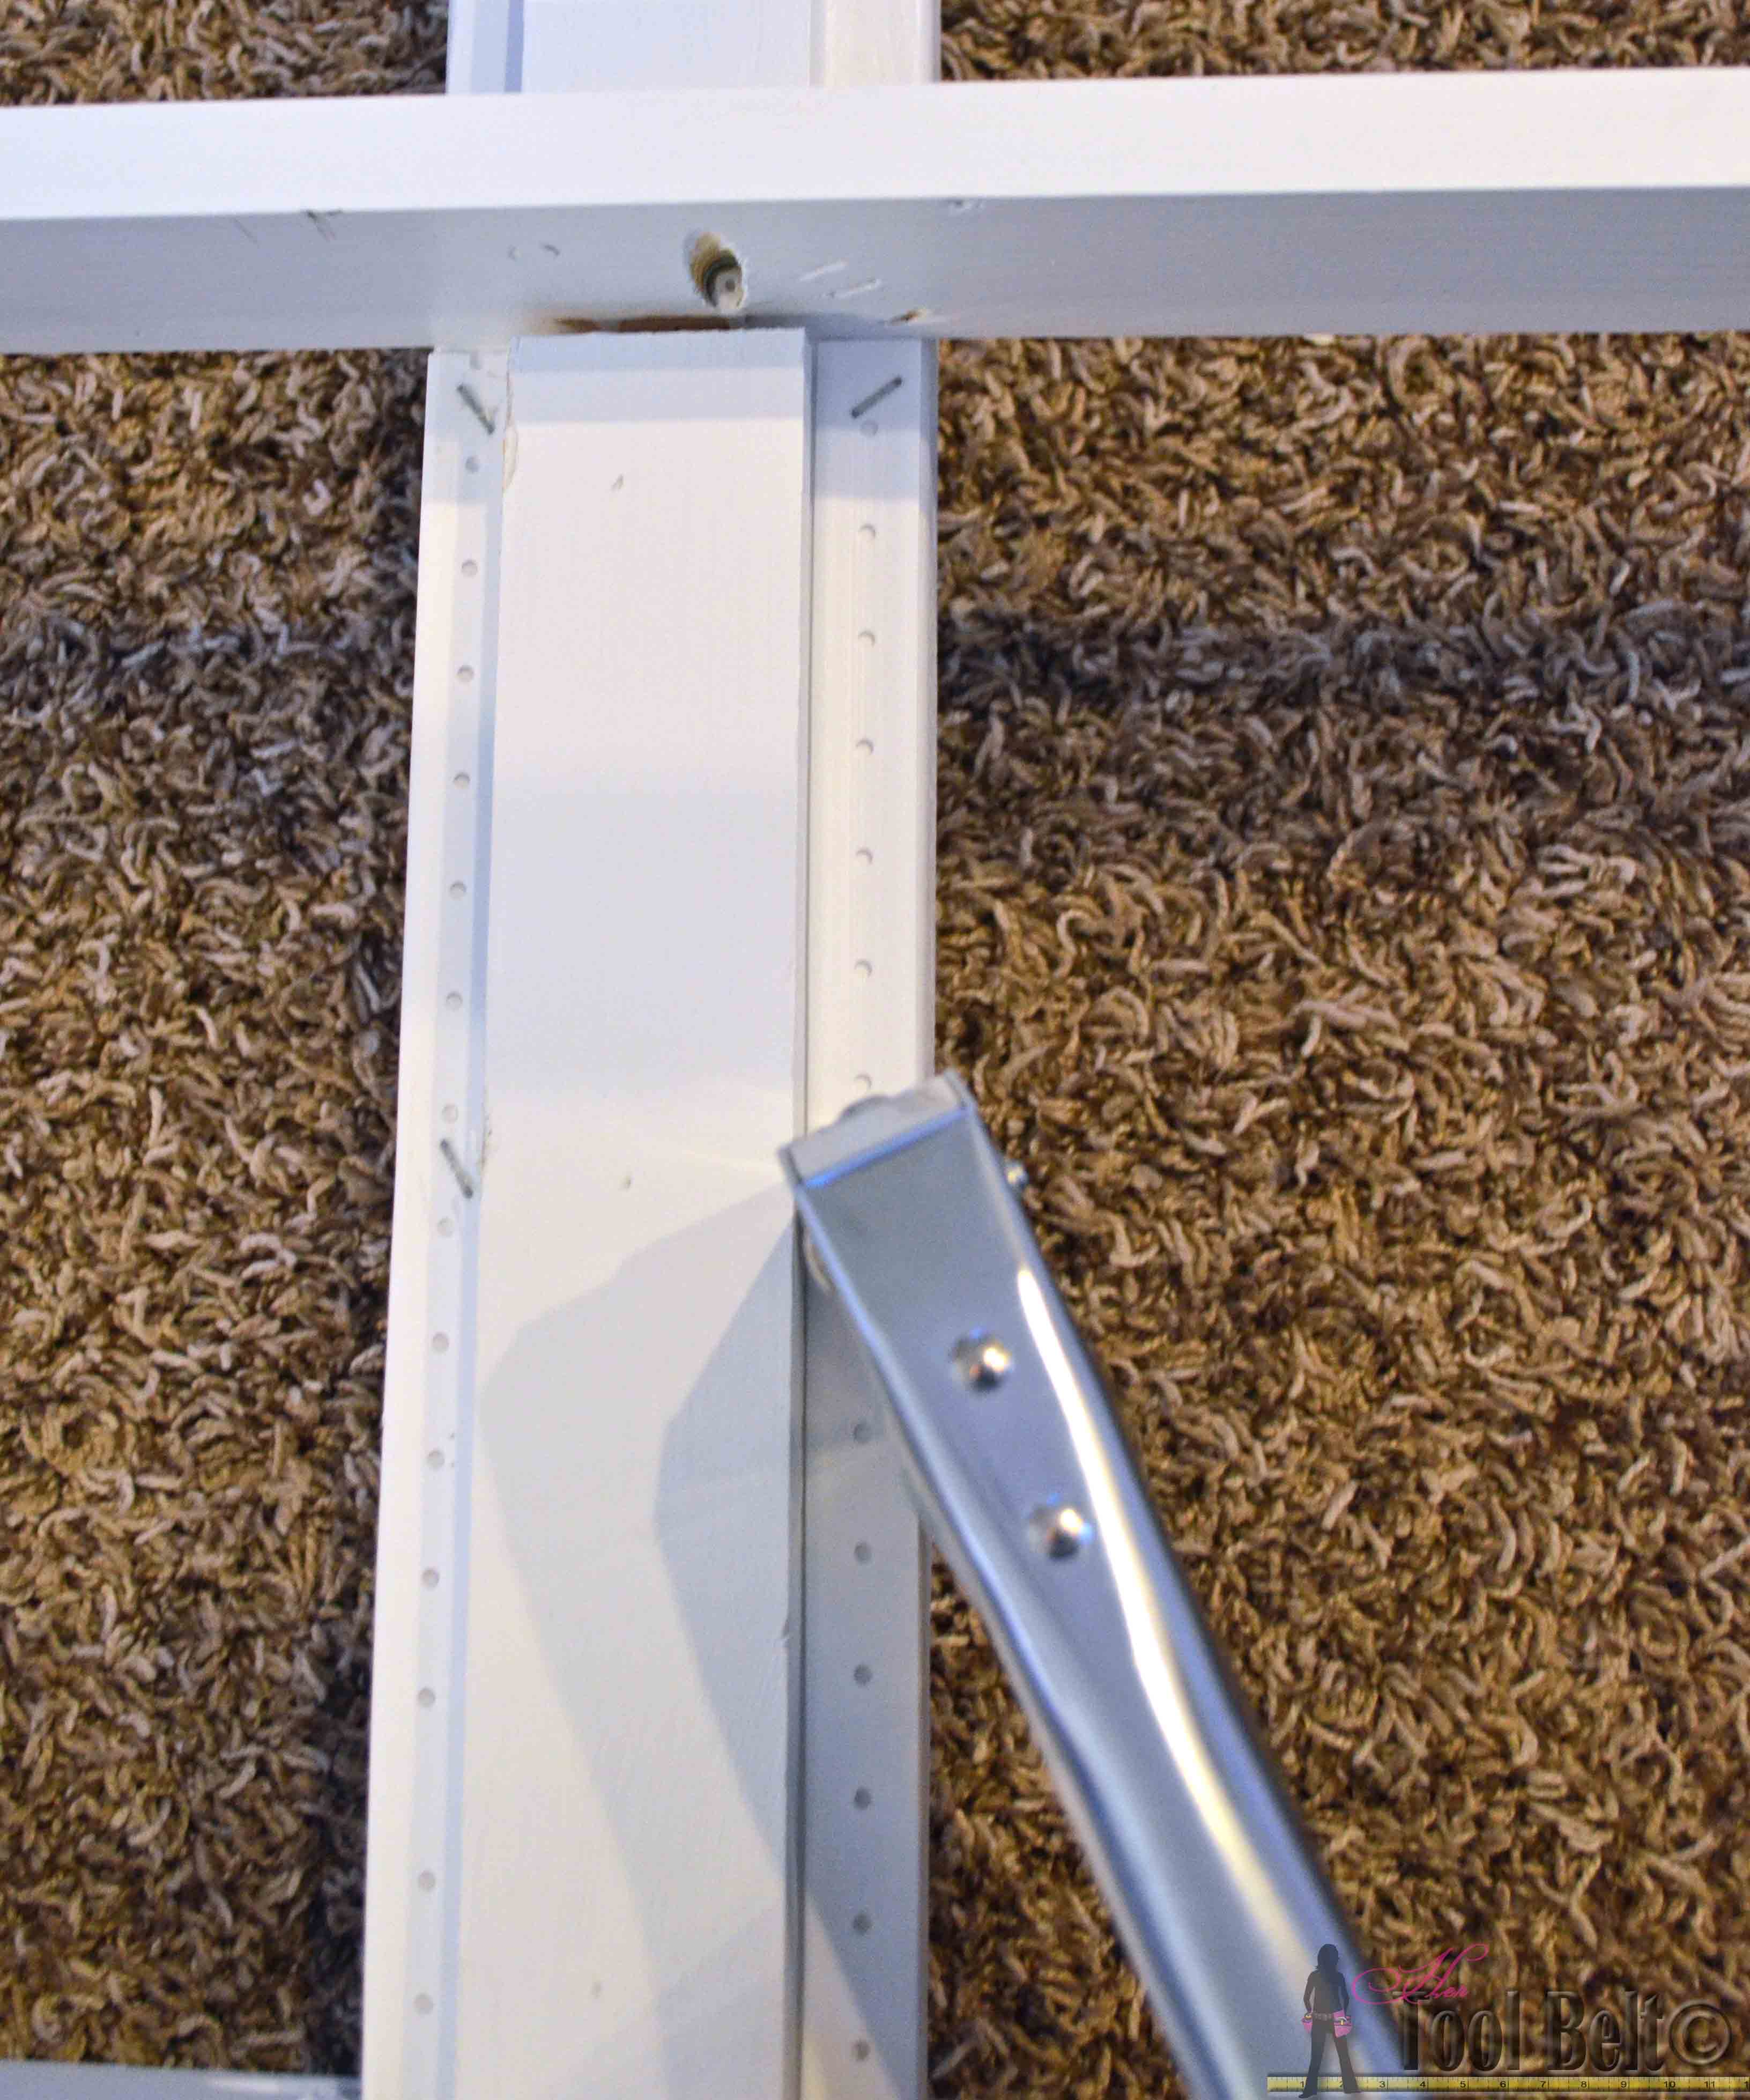
Step 14
I added a cup cabinet pull to each crate and decorated the crates by hammering upholstery nails into each slat. 
This tutorial is also on Ryobi Nation.
Good Luck and Happy Organizing & Building!
Crate Stools
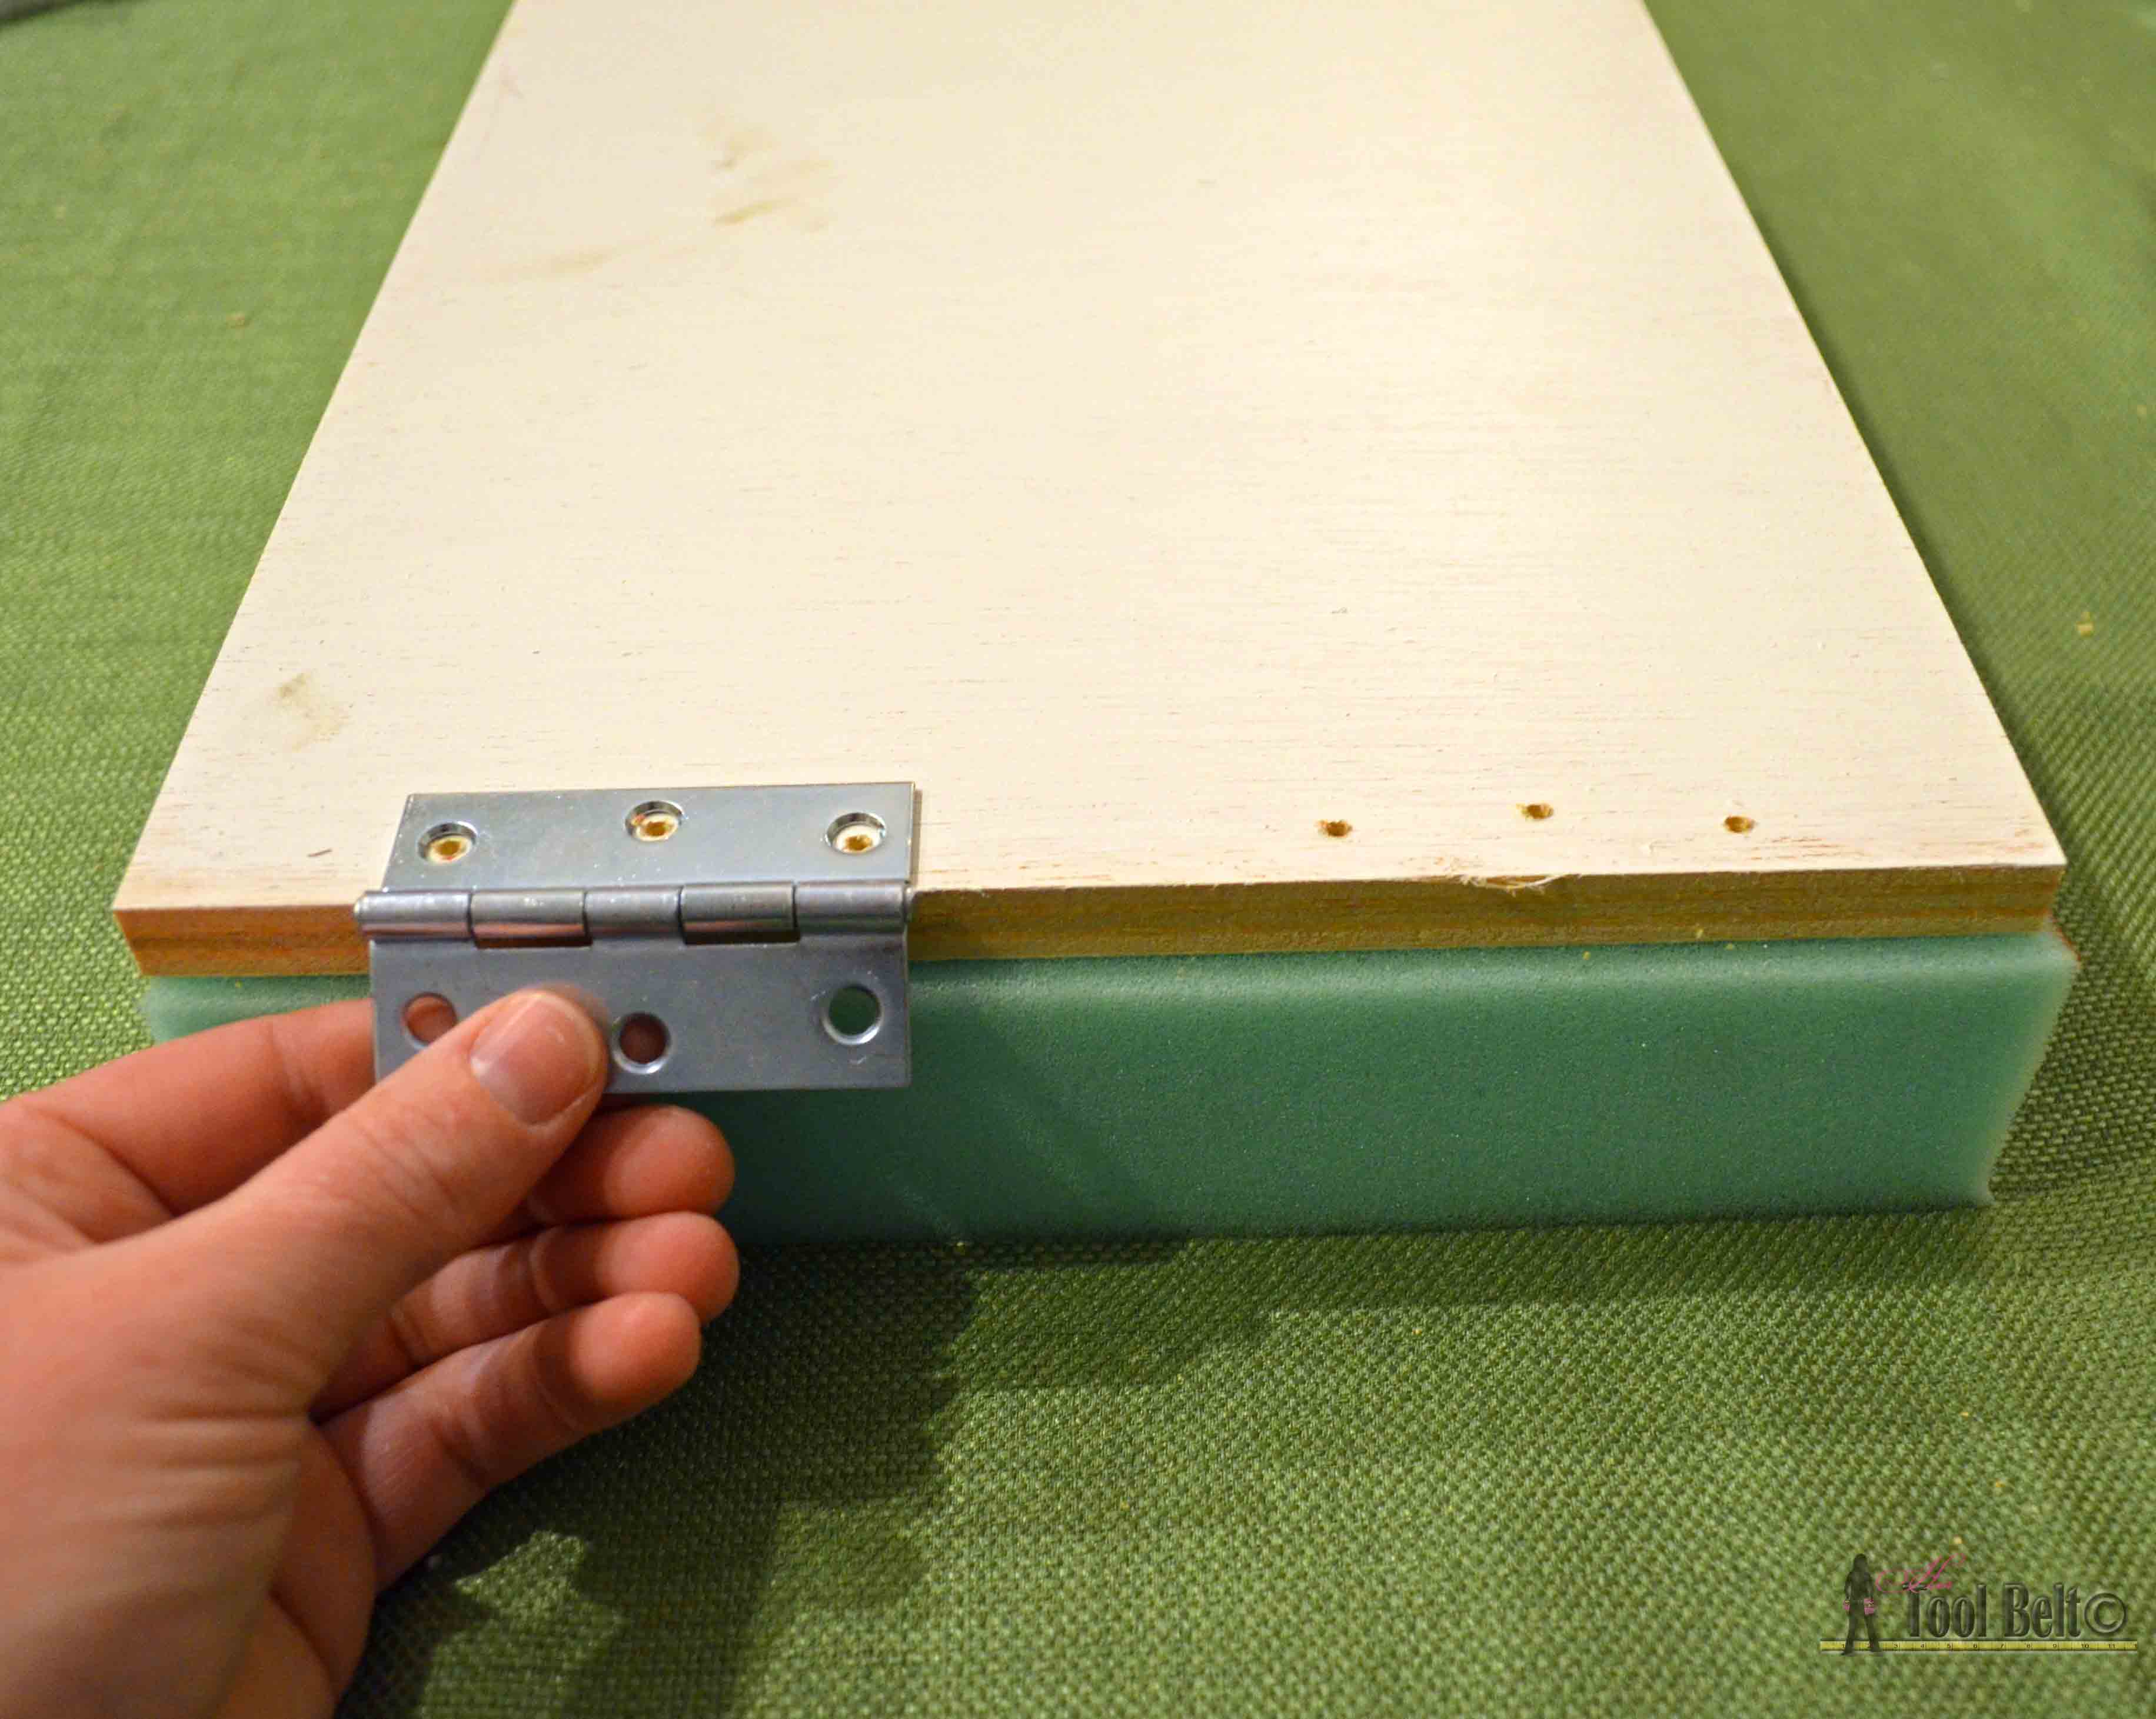
Crate Stools: Paint or stain the crates as you like. Cut the top according to the cut list, paint or stain if desired. Cut 2” foam to the same size as the top. Cut batting about 6” longer and wider than the top dimensions. Line up the 2 hinges with a short edge of the top, predrill holes for the hinge screws.
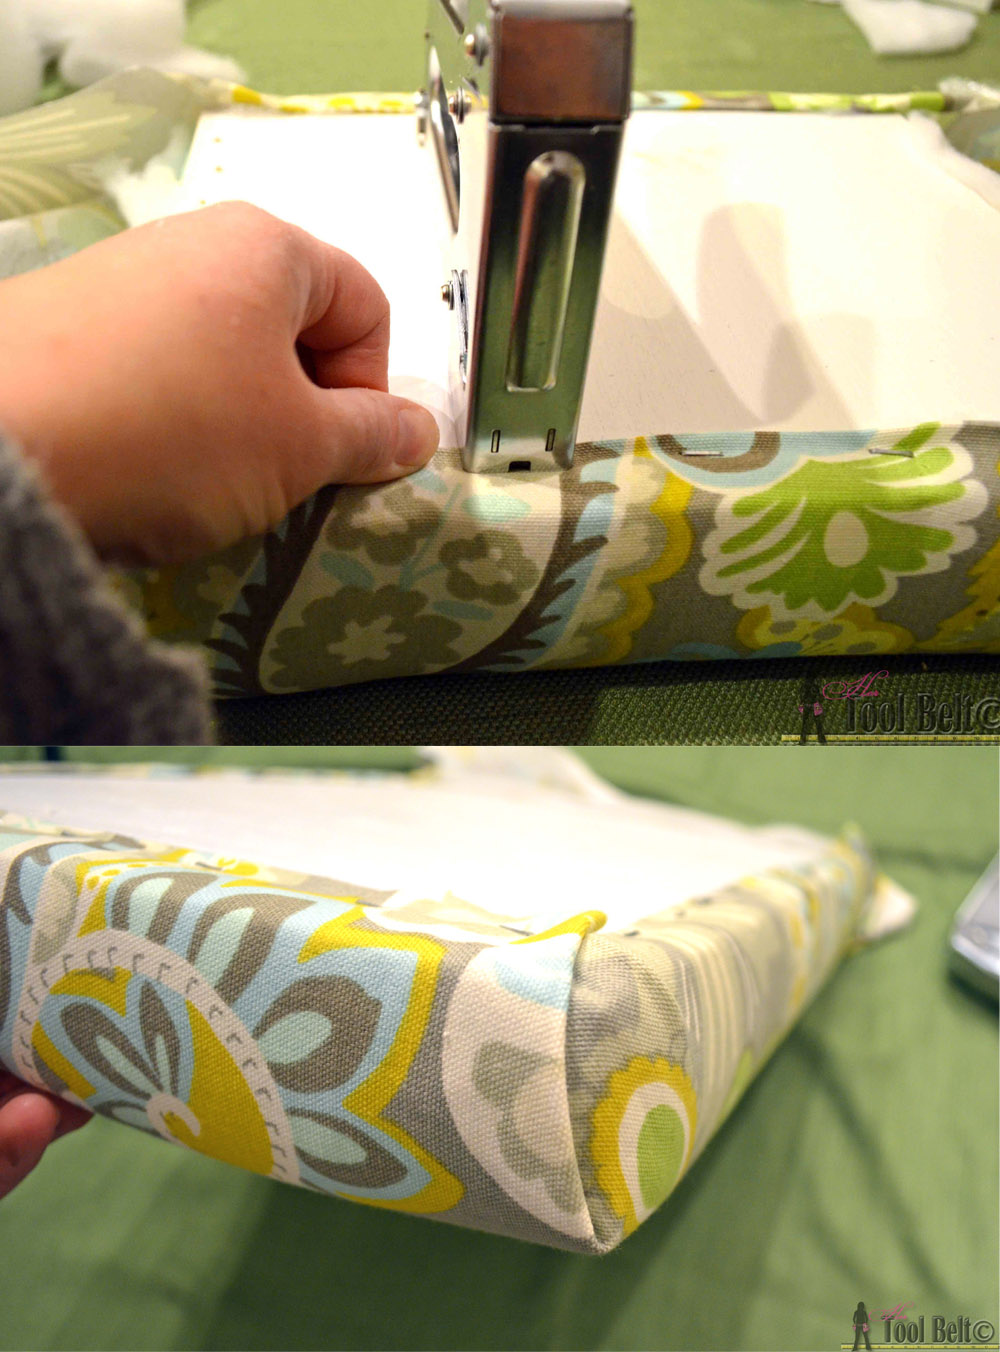
Wrap the batting around the foam and top, tack into place with staples. Trim the batting and the corners, so it’s not too bulky.
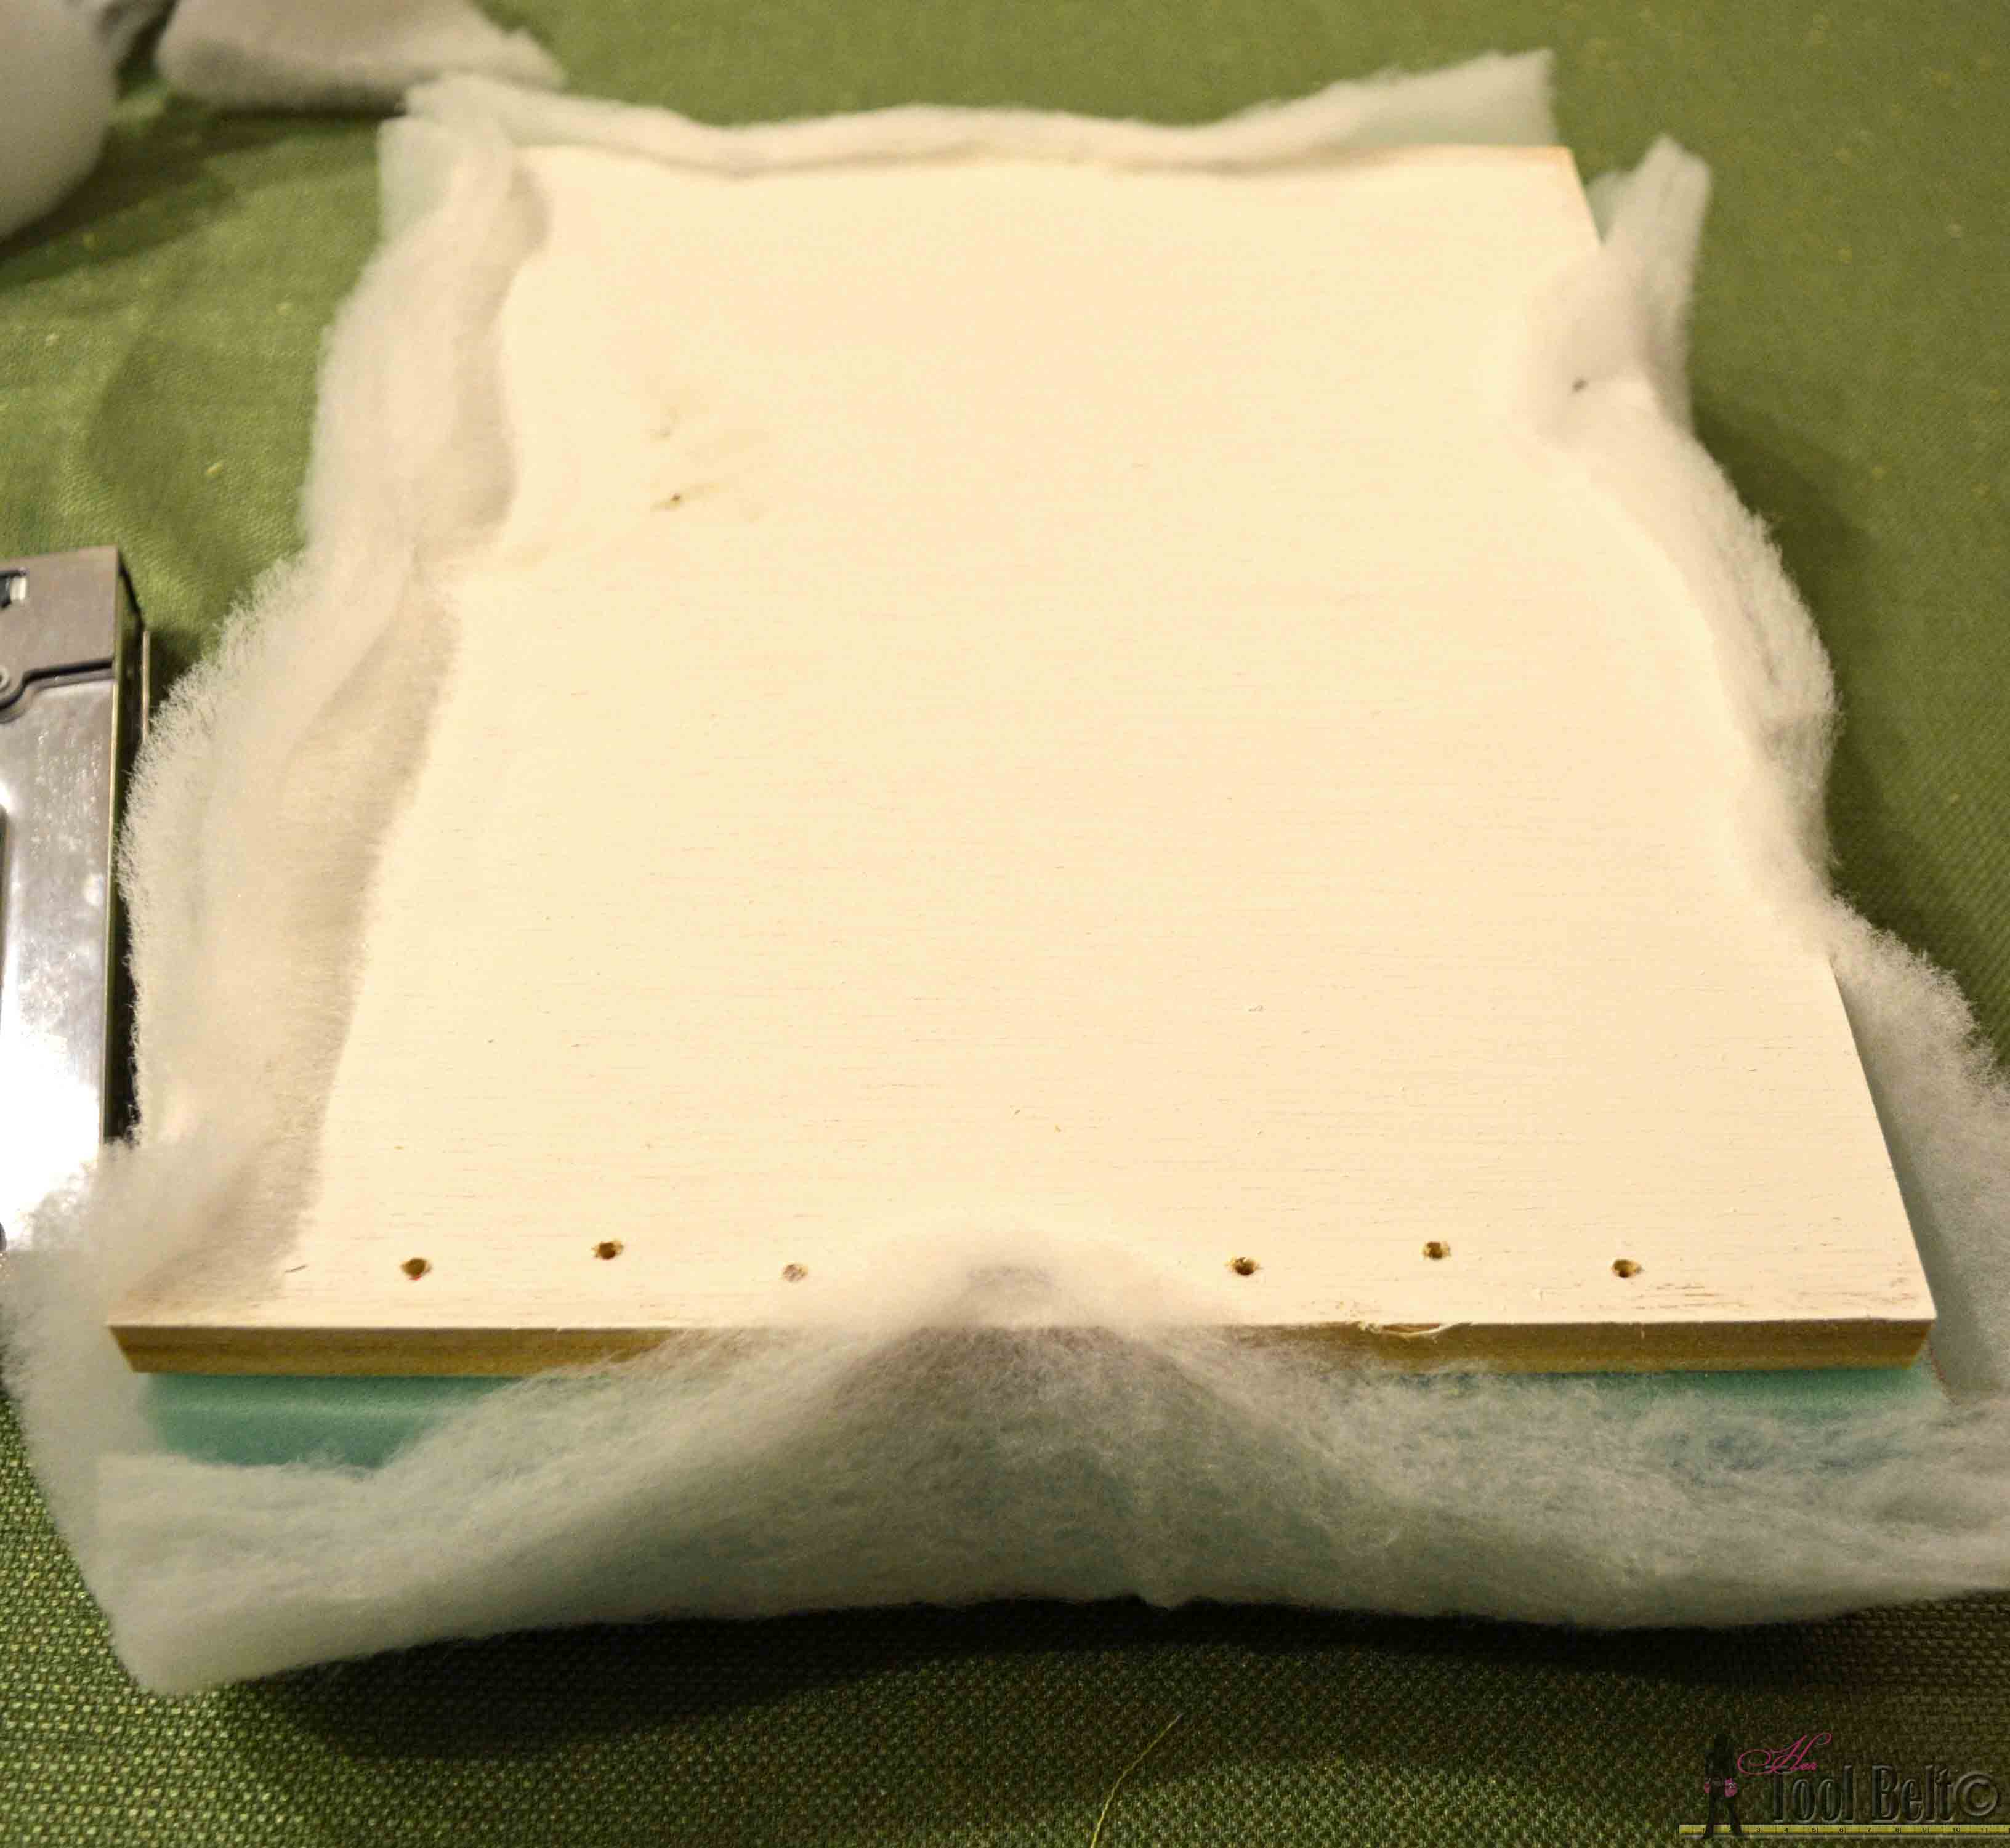
Wrap cloth material around the foam and top, fold a small hem on the material and staple into place. Fold the corners and tightly finish stapling.
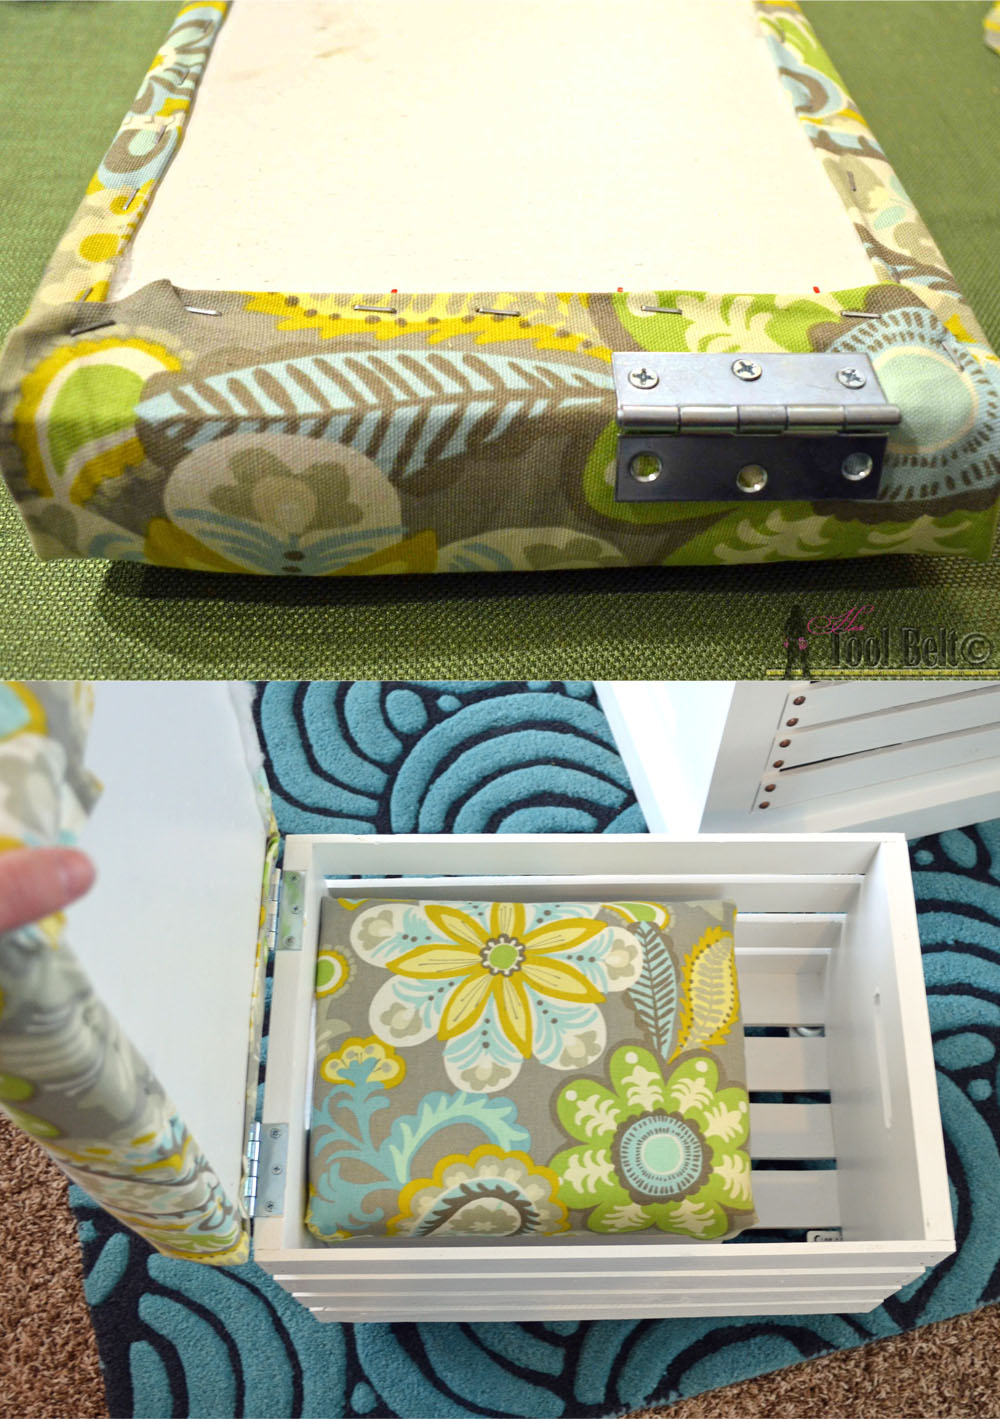
Locate predrilled holes and attach 2 hinges to stool tops. Place the top on the crate and mark and predrill the holes for the hinges to attach to the crate. Attach the hinges to the crate. Optional – attach 4 swivel casters to the bottom corners of the crate.
Linking up to my favorite link parties, remodelaholic, savvysouthernstyle, That DIY Party Homestories AtoZ
Amy great use of crates and another fantastic build. The stools are over the top cute and that nailhead trim is perfect. Love it all.
Thanks so much Jaime!
Your project turned out great
This is genius! Great job! Pinning 🙂
Thanks!
Love this ~brilliant!
love the color of the top, what did you use?
Thanks I used Varathane Carrington
I was wondering if you had an estimate cost when you made this? Or was it a sponsored project? It looks awesome and I am inspired to have my husband do it 😉
Hi Laurel,
Sometimes I don’t like to know what I’ve spent on a project…I just like building stuff 😉 But here is the breakdown of the costs, I bought everything from Home Depot. Wood – $75.42 (by far the most expensive thing was the 1/2″ plywood $38. I bought the whole sheet even though you only need about 1/4, because it is significantly cheaper to buy the sheet if you’re going to use it on other projects later.) I was given the crates to do the project, they should be $11.59 each. Hardware (casters, pulls, and nail heads) – $30.35 (the cup pulls are fairly pricey other types are cheaper). I had the screws, glue, sandpaper, paint and stain left over from other projects. Hope that helps!
Love this!! So genius to use those crates, and to have extra storage. Love those little seats, too!
Amy, You went over the top on this build! I love what you did and now I WANT one! I am glad to be teaming up with you on this Get Organized campaign!
Thanks! Your project is so clever, what a perfect way to store and put away tools!
Wow, this is fantastic! Would love for you to share at Trash 2 Treasure Tuesdays on Kammy’s Korner. I totally need this coffee table!
This is beautiful! I’ve been needing a coffee table with lots of storage. This would be perfect!
Found you on Lou Lou Girls. Thanks for sharing!
This looks fantastic! Do you have the dimensions of the crates you used please?
Thanks, they are 18″ long x 12 1/2″ wide and 9 1/2″ tall.
What a brilliant idea love it love it keep up the good ideas
Amy, Ok, I am a HUGE fan of multi purpose furniture/storage. Love this build. Looks ah-mazing!
This could not have turned out better– I am so impressed!!
You should join my link party, http://www.carissamiss.com/2015/01/outside-box-no-17.html
I love your stuff!
This is so cute!! Love it!! Hey I would love it if you shared your stuff on my new Link Party that starts tomorrow…Thursday! Its called My 2 Favorite Things on Thursday! here is the link…You have great stuff!! Thanks for sharing!! http://www.cookinandcraftin.com/my-2-favorite-things-link-party-1/
Thanks! for linking up today!!
This turned out gorgeous! I love this project. The finish on the top is amazing, and designed so cleverly for a ton of storage. Pinned to remember.
PS. I love my Ryobi tools too!
This is just absolutely gorgeous! What a beautiful and functional piece of furniture! Thanks so much for sharing at Think and Make Thursday 🙂
Oh my! I absolutely love this . Pinned and tweeted. Thank you so much for being a part of our party. We really appreciate you! I hope to see you on Monday at 7 pm. Happy Saturday! Lou Lou Girls
Thank you!!!
I have been looking for a storage coffee table for YEARS! Did not want one that the top opened. I wanted one with drawers or crates. I absolutely love this. I wish I was talented enough to build one.
A fab project, you did an excellent job.
Thanks Dee, plans are on the Ryobi nation site…try it!
This turned out beautiful. Great paint job! I love your above comment about actually telling what the costs are for a project, haha.. I’m the same! I have a much better appreciation for people who build their things, wood is not pocket change! But when you can make and share something so beautiful and creative like this, it does seem not to matter as much 🙂 Thanks for linking up to Think & Make Thursday!
-Karisa
Hello cute lady! I’m stopping by to let you know that your coffee table was Amber’s favorite from our last party! Woo Hoo! We will be featuring it at our party tonight at 7 pm. I hope to see you there! Happy Monday! Lou Lou Girls
This is so cool. Love it.
Wow Amy, you seriously rocked this! I love everything about it! You have skills girl, and I have been so happy with the Ryobi tools, the make life sooo good when building! Hugs!
Thanks Mindi, I totally agree with you on Ryobi. I’ve had some of mine for 10 years and they’re still going strong…but thank goodness for the new batteries. BTW are you going to SNAP?
Am I understanding right? Is this thing on wheels? I think it just became the most amazing DIY coffee table ever! It looks so professional… like I could run out and buy this right now. I absolutely love the clean lines and all the storage.
Thanks Betsy. Yep it’s on wheels, to make it easy to move around while cleaning and such. The wheels are totally optional though.
I love this project. I think I may try this in the spring.
What are the dimensions of the table?
It is 44 1/2″ long, 28″ wide and 17″ tall
This is AWESOME! Absolutely love how you put this together! Thanks for linking up to our Creative Spark party! Come back and party with us this week, too 😉
Thanks Emily!
Amy, i LOVE the creativity and functionality of the crate coffee table!! Thanks so much for linking up last week at Creativity Unleashed. You were my choice for rockstar of the week. That means you are in the top five , competing to be the MegaRockstar! Voting opened last night and I’m pulling for you!! http://www.oneprojectcloser.com/creativity-unleashed-link-party/
This is incredible! Love it. Functional and pretty!
Amy my wife found your table on pintrest. And she just had to have it. I am currently making the table out of upcycled pallets. Your planes are extremely easy to follow. So far the whole this has cost me $30 for plywood and various hardware I didn’t already have. Once it is complete I’ll repost with a link to pictures of it.
Awesome, can’t wait to see it.
Amy,
You cut list is incorrect. You call for cutting the Face Frame H and V at 1 1/12 inches. They are supposed to be 2 inches. This is evident because the center drawer guide you call for a 2 inch cut but if I cut the vertical face frames at 1 1/2 like you call for then the center drawer guide hangs out past the face frame. Unfortunately, I didn’t notice any of these issues until I was cutting the drawer guide. So needless to say I have a table with 1 1/2 face frames that obviously look disproportionate to the 2 inch crates. So I had to dismantle the crate and rip the fronts down to 1 1/2 to make them look like they belong. Also, the molding that you call for is 2 1/2 inches, however that will also need to be smaller so the base don’t overtake the look of the table. Additionally, you call for 1 1/4 screws but the pop out the other side if you cut the face frames to 1 1 /2 inches like you call for. Also, the side accent that you suggest cutting 9 3/4 is incorrect. It should be 10 3/4. The table is beautiful and you did a great job, but unfortunately the info that you are putting out there is incorrect and there is no way that you made those cuts that you suggested and ended up with that table. Wood is not cheap. you even stated in a post on March 5th that the face frames were 1 1/2 inches. INCORRECT……
Hi Dan,
I apologize for the frustration. Thank you for bringing the mistakes to my attention, I’ve corrected them on the cut list.
1. You are correct the face frame V should be 2″ wide, however face frame H is 1 1/2″ wide.
2. I used 2 1/2″ molding, you can use whatever you think looks best.
3. I never had any 1 1/4″ screws pop out, you may need to check the setting on your pocket hole jig. (On the bottom support 2×4’s I mentioned to make the pocket holes for 3/4″ material.)
4. The 4th piece of side accent should be 10 1/4″, as shown on the sketch…again my mistake.
Can you tell me where the crates are from?
The crates are from Home Depot http://www.homedepot.com/p/Houseworks-Crates-and-Pallet-18-in-x-12-5-in-x-9-5-in-Large-Wood-Crate-94565/203153338
Can someone email me the supply list and directions for this?
I’m in love of this. I love seeing ladies that are great with tools. I’m rubbish myself. This is so very lovely, and I’ll be featuring it on an upcoming blog about crates. Keep up the good work.
xoxo,
Sarah @ Backwoods Babies
Thank you Sarah
This looks great! Did you use Pine as the type of wood? What kind of stain did you use for the top, and what color of white did you use to paint the sides?
Thanks Josh. Yes most of the wood is pine except for those poplar trim pieces and the plywood. The top is 2 coats of Varathane/Rustoleum Carrington. The white is Behr Ultra Pure While latex paint.
Hi I was wondering what color the stain is? I love how there is a reddish tint for this stain versus the “dark walnut” stains that are very pretty and deep, but don’t have red. Thanks!
Hi Robin,
The stain is Rustoleum/Varathane Carrington, it’s a really pretty color. http://www.homedepot.com/p/Varathane-1-qt-3X-Carrington-Premium-Wood-Stain-2-Pack-271146/203957124
Did you strip each board when making this? You tell us to buy a 1×4 but you want the width to be 1 1/2 inches? Every single board we bought you have a different width needed on your cut list but it is not mentioned anywhere about stripping the boards to make them skinnier. My husband is very frustrated because he cut all the boards to your specifications and they do not fit with the exact crates you said to buy. There is no way that table was made from this cut list and measurements and we spent $170 to build it! So frustrated right now. Please explain.
Yes I ripped the 1×4’s and 1×3’s to the correct width as needed. I am so sorry I didn’t make that note, I thought it was implied, but have added the note (not that it helps you now).
Where are the crates having issues fitting in the table, mine have plenty of room???
I think its mostly because we didnt see that the boards needed to be cut width wise and that added a lot of inches to the entire thing so each crate was about 2 inches too big. Thanks for adding it. My husband just decided to make up his own table… and buy new boards so hopefully it works!
Thank you so much for sharing this awesome project! My husband and I are in desperate need of storage (new baby) and a new table. I think we are going to attempt this! I also really love the fabric you used on the stools where did you purchase that at?
I picked it up at Joann’s in the outdoor fabric section.
This is a wonderful project! Great Job. Do you have the blueprints or instructions on how to build the crate stools? Thank you.
Yes sorry, I didn’t realize that I missed adding that. They are at the bottom of the post now. I bought the crates and the stool top cut dimensions are up with the rest of the cut list.
Hi, you didn’t say how long to wait between conditioning and painting ect..
Usually you condition the wood before staining. Check your can, but mine usually says to wait 15 min and stain before 2 hours.
I love the design of this table! I would love to make it so that you can pull the crates out as drawers instead of them coming out all the way. I don’t know how you would do that, but I think it would be cool. I don’t know how to do any of this DIY stuff but I really want to after seeing all of the cool pins on Pinterest!
I love this table! I have never built anything before but I am going to try this out. What size clamp did you use for this project?
Thank you!
36″ clamp. Have fun building!
This is amazing! I love the little stools around the table. I love being able to have the whole family in one room, even if we are doing different things! Being able to have the little ones at the table and some of us on the couch, it would be awesome. Thanks for sharing, definitely getting on this. 😀
How do the stools with the padding fit in the holes? Looking at the stools while they are in the table they don’t appear to have the tops.
Sorry the picture is probably deceiving, the stools with the padding are separate and don’t go in the table. I just put them off to the side when not needed.