• Home
  • Project Gallery
  • About me
    • Disclosure
    • Disclaimer
  • Blog

Her Tool Belt

DIY furniture plans, crafts, and home improvement tutorials to empower you!

  • Free Woodworking Plans
    • Bathroom Furniture
    • Bedroom Furniture
    • Entry
    • Family Room Furniture
    • Garage
    • Kitchen furniture
    • Laundry Room
    • Mudroom Furniture
    • Organization
    • Outdoor Furniture
  • Home Decor
    • Upcycle
  • Crafts
    • Holiday
  • Home Improvement
    • Cleaning
    • Fix IT
    • Paint
    • Tile
  • Tool Reviews
  • Tool Time Videos

Build an Easy 2×4 Double X Bench

April 29, 2017 by Amy 19 Comments

Last summer I built a double X bench out of 2×4’s and 2×3’s, I love it and it fits perfectly on my front porch.  When drawing up the plans for that bench I was trying to keep with the look of an inspiration piece and some of the build was unnecessarily tricky without an extra pair of hands.  Also if your 2×4’s have a little twist in them, there was no way to correct that and you could end up with a rocking bench.  Here is round 2 of the Double X Bench made from 2×4’s and 2×3’s, it’s easier to assemble and doesn’t require a pocket hole jig.

If you went to SNAP 2017 this is the Let’s Get Building class project that was sponsored by Ryobi Nation.

I'm making this cute bench for my porch! Build an easy double X bench from 2x4's and 2x3's with free plans.

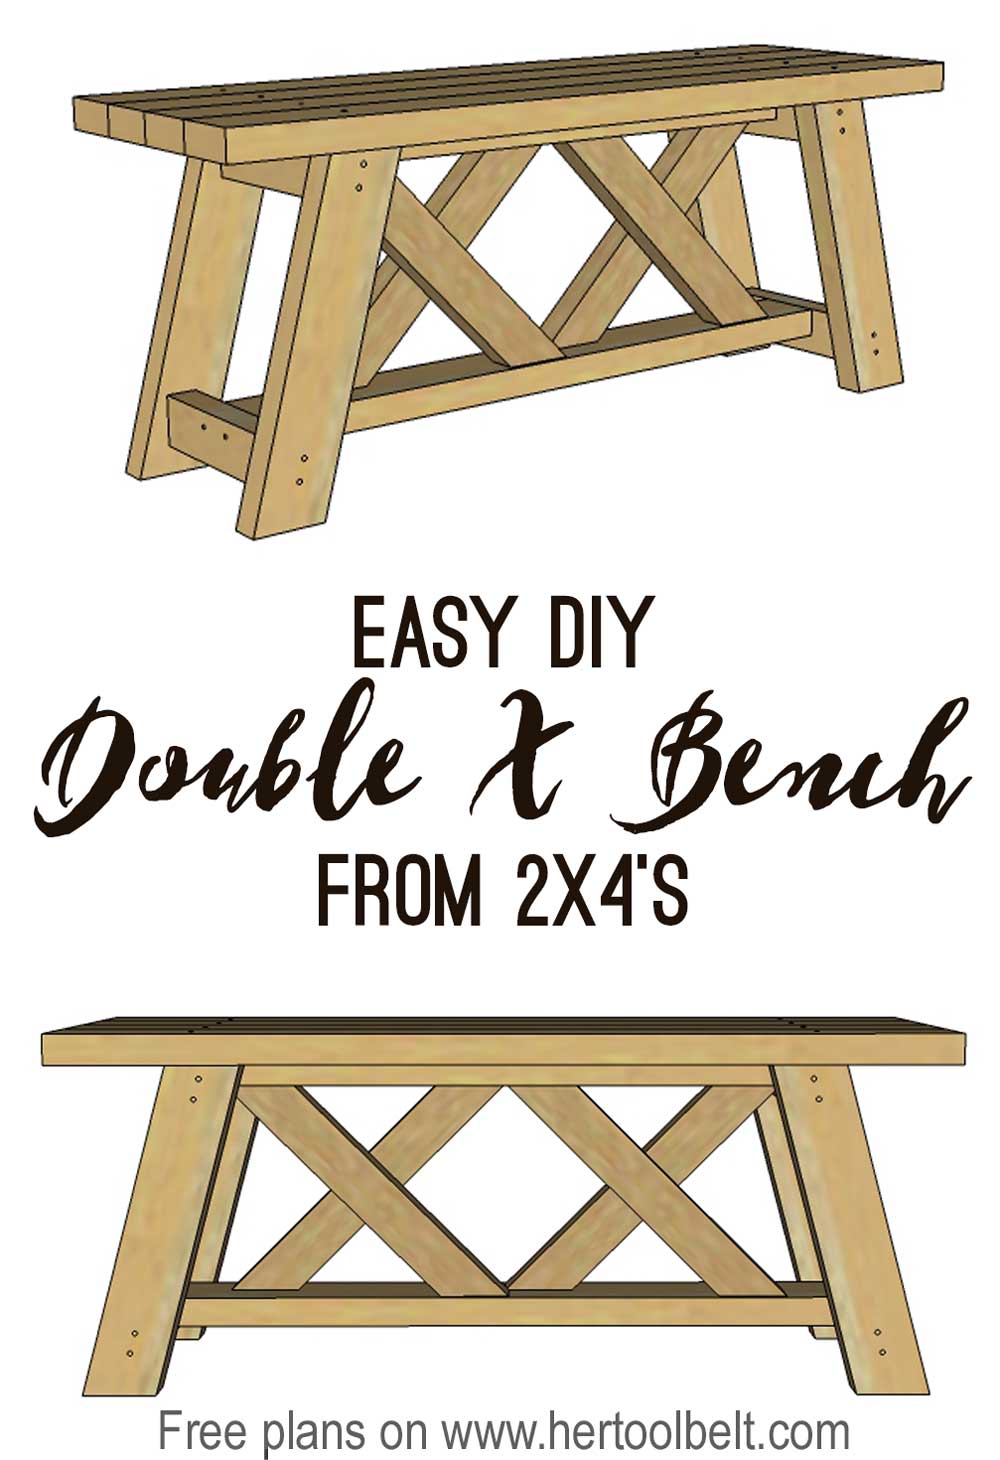
How to Build an Easy Double X Bench from 2×4’s

This post contains some affiliate links for your convenience. Click here to read my full disclosure policy.

I'm making this cute bench for my porch! Build an easy double X bench from 2x4's and 2x3's with free plans.

 Materials

  • 4 – 2″ x 4″ x 8′ boards (douglas fir or whitewood)
  • 2 – 2″ x 3″ x 8′ boards (you only need 9″ of one board, cut down 2×4 scrap if you can)
  • 32 – 3″ wood screws (I prefer self tapping/drilling screws)
  • wood glue
  • sandpaper
  • 2″ brad nails (18 ga)
  • stain or paint as desired

Tools Used

  • Miter Saw
  • Drill
  • Airstrike Brad Nailer
  • Tape Measure
  • Countersink Bit
  • Sander
  • Bar Clamp

Cut List

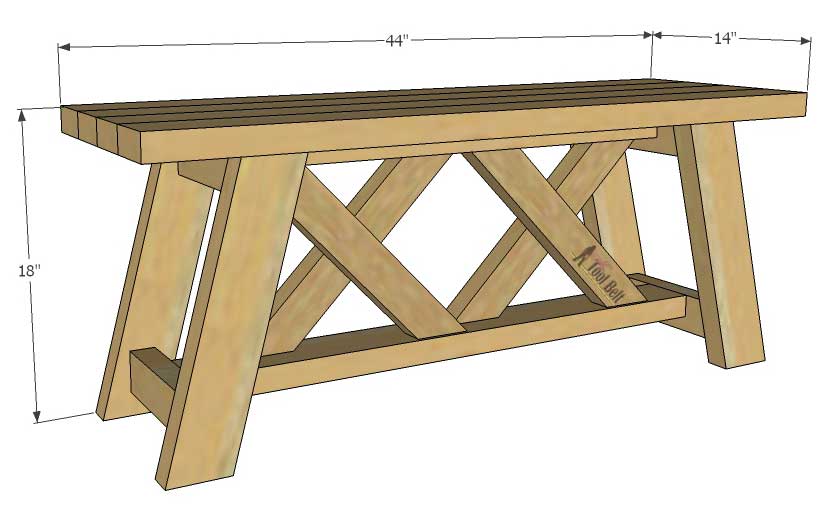
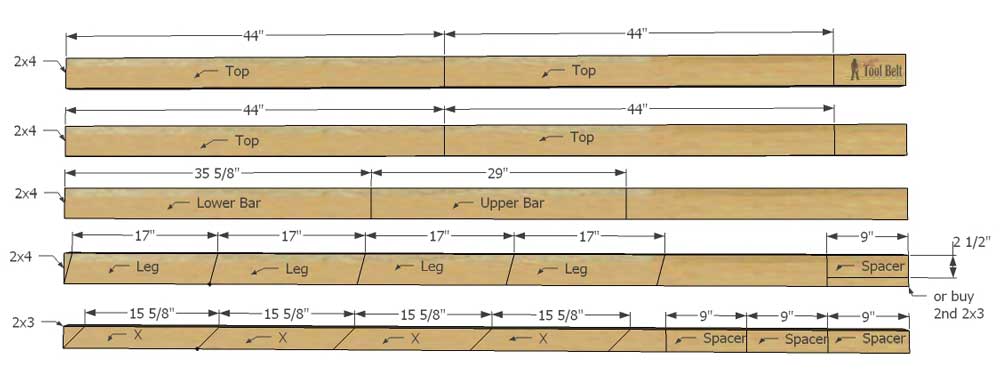
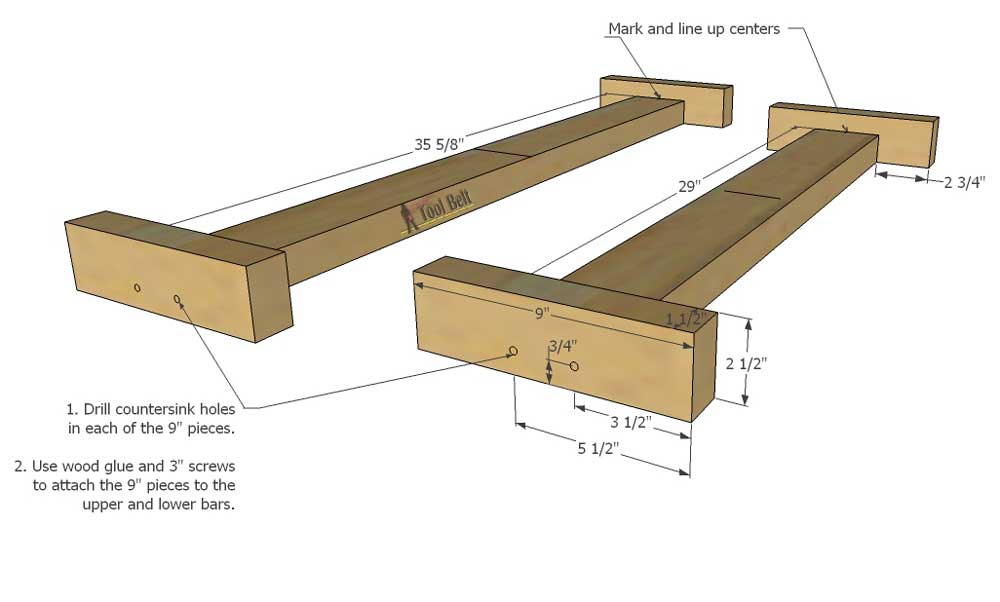
  • 4 – 1 1/2″ x 3 1/2″ x 44″ (Top)
  • 1 – 1 1/2″ x 3 1/2″ x 35 5/8″ (Lower Bar)
  • 1 – 1 1/2″ x 3 1/2″ x 29″ (Upper Bar)
  • 4 – 1 1/2″ x 3 1/2″ x 17″ with 15 deg miters on each end (Leg)
  • 4 – 1 1/2″ x 2 1/2″ x 15 5/8″ with 45 deg miters on each end (X)
  • 4 – 1 1/2″ x 2 1/2″ x 9″ (Spacer)

Cut Diagram

I'm making this cute bench for my porch! Build an easy double X bench from 2x4's and 2x3's with free plans.

Step 1

Make all of the board cuts from the cut list. I like to sand all of my boards now before assembly.

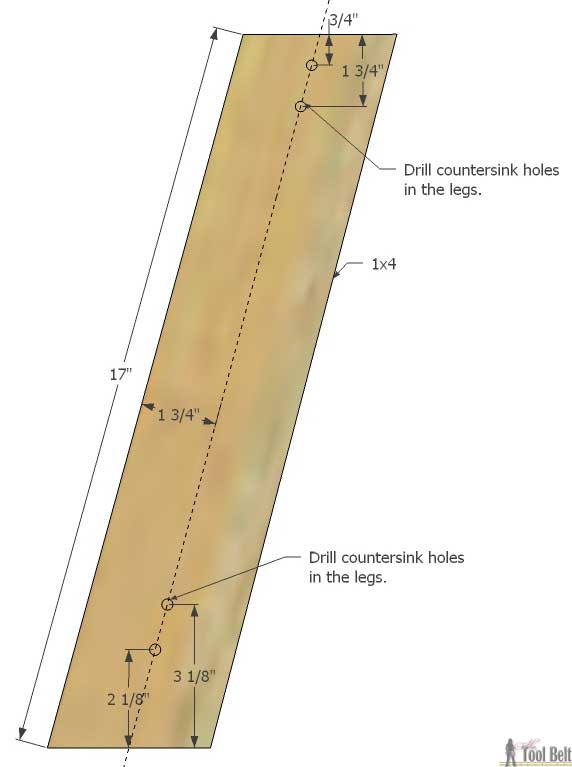
To make assembly easier, measure and mark locations for countersink holes. A countersink hole will allow the screw head to be flush with the wood surface.

Leg countersink holes

Measure and mark the following locations and drill countersink holes, only drill the countersink deep enough to take the screw head.  2 legs will be as shown and 2 legs will be mirrored.

I'm making this cute bench for my porch! Build an easy double X bench from 2x4's and 2x3's with free plans.

Spacer countersink holes

On each spacer mark 3 1/2″ and 5 1/2″ from an end and 3/4″ from the bottom. Drill 2 countersink holes in spacer.

Mark the center of each spacer (opposite side from the countersink holes) and mark the center of the upper and lower bar ends. Place a spacer on each end of the bars and line up the center marks.  Use wood glue and 3″ wood screws to attach the spacers to each bar end.

I'm making this cute bench for my porch! Build an easy double X bench from 2x4's and 2x3's with free plans.

Step 2

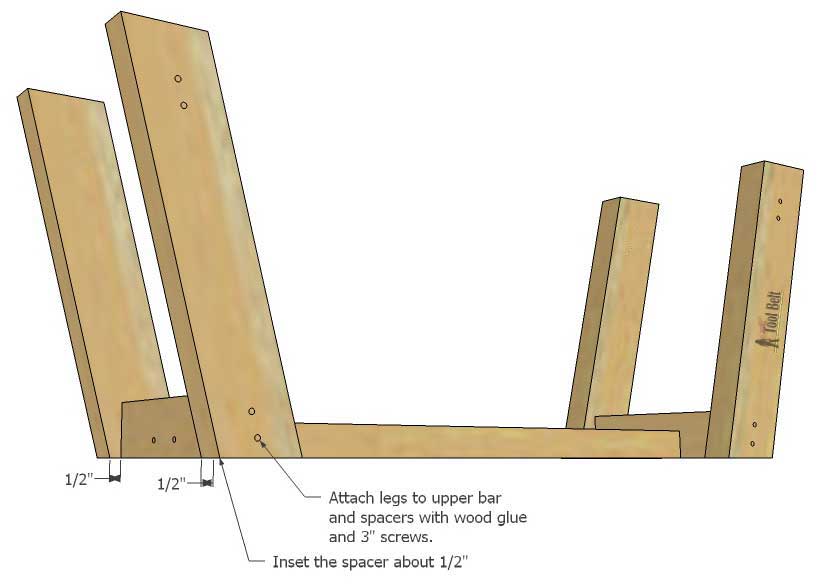
Place the upper bar (the short one) on a flat surface, add wood glue on each spacer end. Place a leg on each side of a 9″ spacer and offset the leg 1/2″ as shown. Use a bar clamp to hold the legs in place and secure the legs to the spacer with 3″ wood screws. Repeat for other leg set.

***Tip for eliminating a rocking bench***

Screw 3 of the legs into place.  Flip the bench over and place on a flat surface. Put the 4th leg in place so there is no rocking, hold with the clamp and secure with 3″ screws.

I'm making this cute bench for my porch! Build an easy double X bench from 2x4's and 2x3's with free plans.

Step 3

Mark the center of the upper bar. Add wood glue to the ends of the X pieces. Put an X piece on each end of the upper bar and inset 1/4″ from each side, tack the end of the X pieces with 2″ brad nails.  Place the other 2 X pieces on the center-line of the upper bar and inset 1/4″, tack the ends with 2″ brad nails.

I'm making this cute bench for my porch! Build an easy double X bench from 2x4's and 2x3's with free plans.

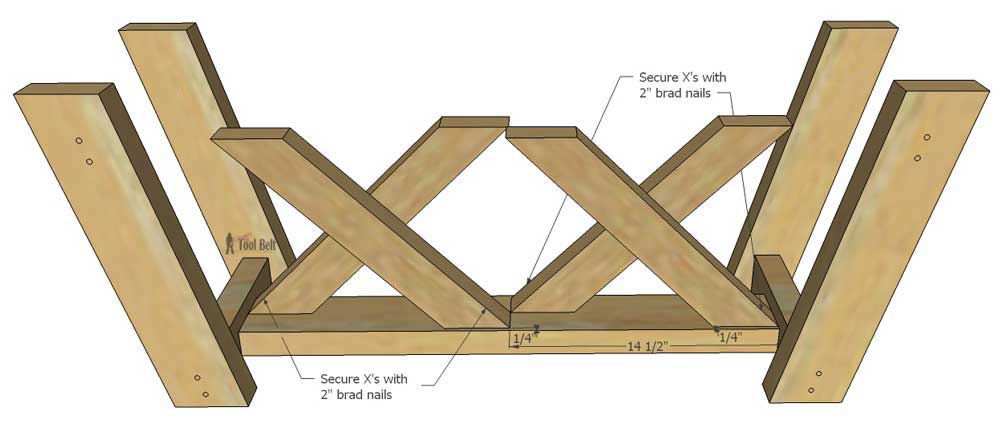
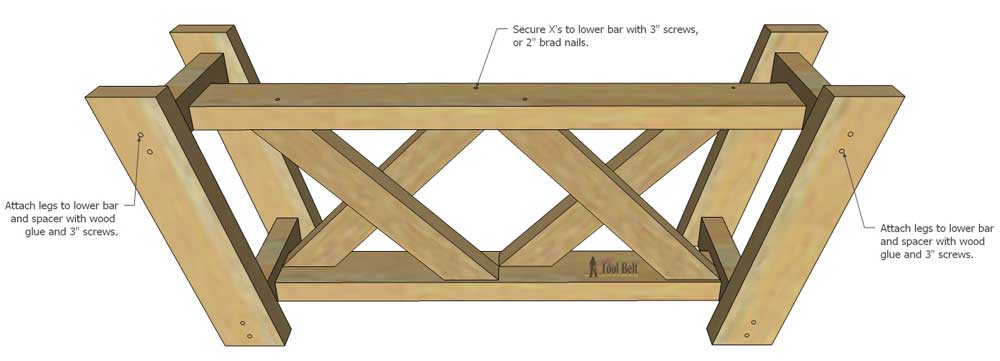
Put the lower bar evenly on the X pieces and between the legs. Center the lower bar and use the clamp to hold in place.  Attach the legs to the lower bar spacers with 3″ wood screws.  Secure the X pieces through the lower bar with 2″ brad nails or screws.
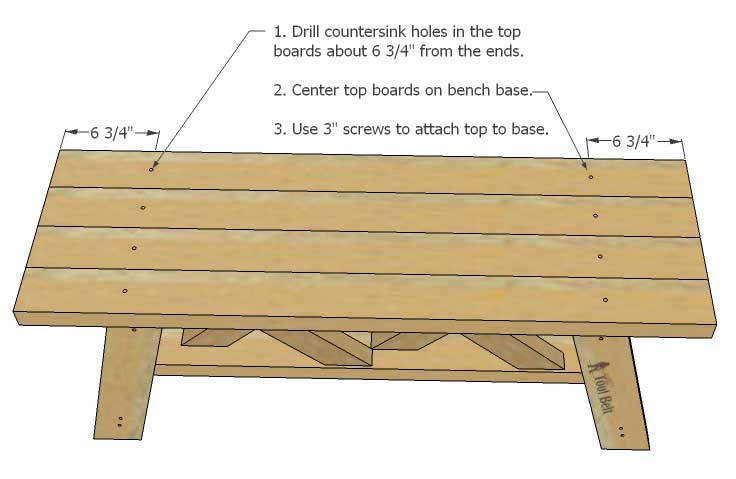
I'm making this cute bench for my porch! Build an easy double X bench from 2x4's and 2x3's with free plans.

Step 4

Measure and mark 6 3/4″ from each end of the top boards and the center (1 3/4″).  Drill countersink holes in each top board.  Center the boards on the bench base and use 3″ wood screws to attach the top boards to the base.

I'm making this cute bench for my porch! Build an easy double X bench from 2x4's and 2x3's with free plans.

Step 5

Sand the bench with 80 grit and finish with 120 grit sanding in the direction of the grain. Stain or paint the bench as desired.  Add a top coat for additional outdoor protection.

Click Link to Print Free Plans

Easy 2×4 Double X Bench Plans

Related

Filed Under: Free Woodworking Plans, Outdoor Furniture, Projects Tagged With: bench, outdoor seating

Attention: Any do-it-yourself project involves risk of some sort. Your tools, materials, and skills will vary, as will the conditions at your work site. Hertoolbelt LLC will not assume any responsibility or liability for damages or losses sustained or incurred in the course of your project or in the use of the item you create. Always follow the manufacturer's operating instructions in the use of tools, check and follow your local building codes, and observe all commonly accepted safety precautions.

Comments

  1. Wendi@H2OBungalow says

    May 2, 2017 at 12:44 pm

    Amy, I LOVE this bench! It would look awesome with a picnic table. Pinning for future inspiration 🙂

    Reply
    • Amy says

      May 3, 2017 at 8:43 am

      Thanks Wendi

      Reply
  2. Margo says

    July 17, 2017 at 10:55 am

    Do you know what the total cost of lumber is?

    Reply
    • Amy says

      July 17, 2017 at 11:05 am

      At my Home Depot the lumber costs about $17.50, but wood prices vary around the nation. $3.16/2×4 and $2.28/2×3

      Reply
  3. Rita says

    February 6, 2018 at 8:45 am

    lOVE THIS! Thanks for the plans.

    Reply
  4. Yaressi Vasquez says

    March 6, 2018 at 1:40 pm

    Hello! Love you bench. How would we go about cutting up for a 3 foot bench (36 inches)?

    Reply
    • Yaressi Vasquez says

      March 8, 2018 at 1:00 pm

      *your

      Reply
  5. paula says

    April 22, 2018 at 4:03 pm

    I LOVE this little bench. I made two all by myself.

    Reply
  6. Susan says

    July 7, 2018 at 2:51 pm

    I absolutely LOVE this bench! I was wondering how difficult it would be to add 1 more X to create a longer bench? Have you ever created one like this? Thanks for your expert direction.

    Reply
    • Amy says

      July 11, 2018 at 7:08 pm

      Hi Susan,
      I’ve seen a few people make the bench longer and add an extra X, it looks cute.

      Reply
  7. Todd Wallace says

    November 23, 2018 at 5:43 am

    I’ve made 2 of these easy to build benches thanks to your instructions. I have been asked to make a 6’ table to replicate this design. I’m excited to try this and will let you know how it turns out!! Thanks again!

    Reply
    • Amy says

      November 29, 2018 at 9:15 am

      Awesome, I bet it’ll turn out great!

      Reply
  8. Kevin says

    February 19, 2019 at 11:19 am

    Quick question. Should I use pressure treated wood instead or is the stain/paint good enough for weathering protection?

    Reply
    • Amy says

      February 19, 2019 at 11:46 am

      Mine has been on the porch (mostly protected from rain and snow) for a few years and been fine with paint. If you’re going to have it out in the rain and snow, you may want to use pressure treated.

      Reply
  9. Omqofut says

    March 2, 2019 at 9:13 pm

    Are the “X’s” attached in the middle (of each “x”)… or just at the ends?

    Reply
    • Amy says

      March 4, 2019 at 1:18 pm

      Just at the ends, although you can do the middle if you want.

      Reply
  10. Dustin says

    June 10, 2020 at 8:01 am

    Are the 2″ brads a requirement or suggestion? I only have a 1 1/4″ brad nail gun. Can I use that or smaller screws?

    Reply
    • Amy says

      June 10, 2020 at 8:20 pm

      You can use 1 1/4″ brads if you nail in the thinner part of the mitered end.

      Reply
  11. Tamara Smith-Bomia says

    December 21, 2020 at 5:17 am

    I would really like to know how you clamped the legs to drill the screws in. It would be great if you would show that process.

    Reply

Leave a Reply Cancel reply

Your email address will not be published. Required fields are marked *

This site uses Akismet to reduce spam. Learn how your comment data is processed.

Search Her Tool Belt

Follow Me!

  • Bloglovin
  • Email
  • Facebook
  • Instagram
  • Pinterest
  • RSS
  • Twitter
  • YouTube

Top Posts & Pages

Left Offset Bathroom Vanity

Check out more projects

Copyright

Thank you for wanting to share my work! No need for my permission to pin my work or to feature 1 or 2 pictures with full watermarks intact that link back to the original project. Please do NOT copy tutorials.

Disclosure & Privacy Policy

Disclaimer

Copyright © 2025 · Magazine Pro Theme on Genesis Framework · WordPress · Log in

This website uses cookies to improve your experience. We'll assume you're ok with this, but you can opt-out if you wish.Accept Read More
Privacy & Cookies Policy

Privacy Overview

This website uses cookies to improve your experience while you navigate through the website. Out of these, the cookies that are categorized as necessary are stored on your browser as they are essential for the working of basic functionalities of the website. We also use third-party cookies that help us analyze and understand how you use this website. These cookies will be stored in your browser only with your consent. You also have the option to opt-out of these cookies. But opting out of some of these cookies may affect your browsing experience.
Necessary
Always Enabled
Necessary cookies are absolutely essential for the website to function properly. This category only includes cookies that ensures basic functionalities and security features of the website. These cookies do not store any personal information.
Non-necessary
Any cookies that may not be particularly necessary for the website to function and is used specifically to collect user personal data via analytics, ads, other embedded contents are termed as non-necessary cookies. It is mandatory to procure user consent prior to running these cookies on your website.
SAVE & ACCEPT