I few years ago I made a build plan for Remodelaholic for a super adorable House Frame Bed. The build plan was inspired by this darling room shared by an Australian magazine, Home Life. Over the years a few requests have been made for a full size mattress version. Here it is –>
How to Build a House Frame Bed – Full Size
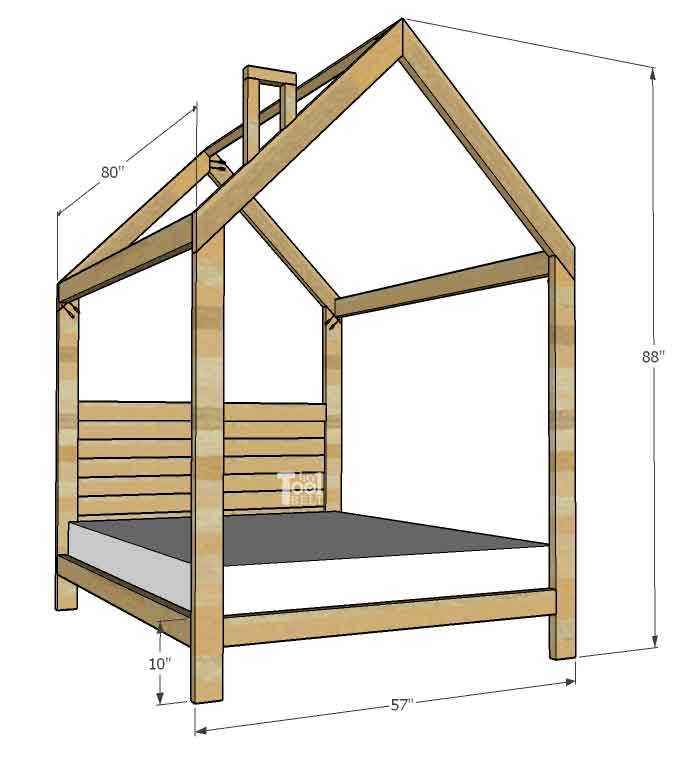
This bed is designed to fit a full mattress 53″ x 75″, with or without a box spring. Here are the overall dimensions of the bed.
Materials Needed
- 5 – 2″ x 4″ x 104 5/8″ boards (actual 1 1/2″ x 3 1/2″)
- 4 – 2″ x 4″ x 8′ boards (actual 1 1/2″ x 3 1/2″)
- 3 – 2″ x 2″ x 8′ boards (actual 1 1/2″ x 1 1/2″)
- No Box Spring option add:
- 10 – 1″ x 4″ x 8′ boards (actual 3/4″ x 3 1/2″)
- 1 1/2″ screws
- Headboard option add:
- 1 – 2″ x 4″ x 8′ boards (actual 1 1/2″ x 3 1/2″)
- 7 – 1″ x 4″ x 8′ boards (actual 3/4″ x 3 1/2″)
- 1 1/2″ pocket hole screws (self tapping)
- 2 1/2″ pocket screws (self tapping)
- 2″ brad nails
- wood glue
- wood filler – optional
- sand paper
- Paint and primer or wood stain
Tool Needed:
- Kreg Jig pocket hole jig
- Miter Saw (power or hand)
- Drill
- Sander – optional
- Tape Measure
- Brad Nailer (for the chimney, but screws and a drill can be substituted)
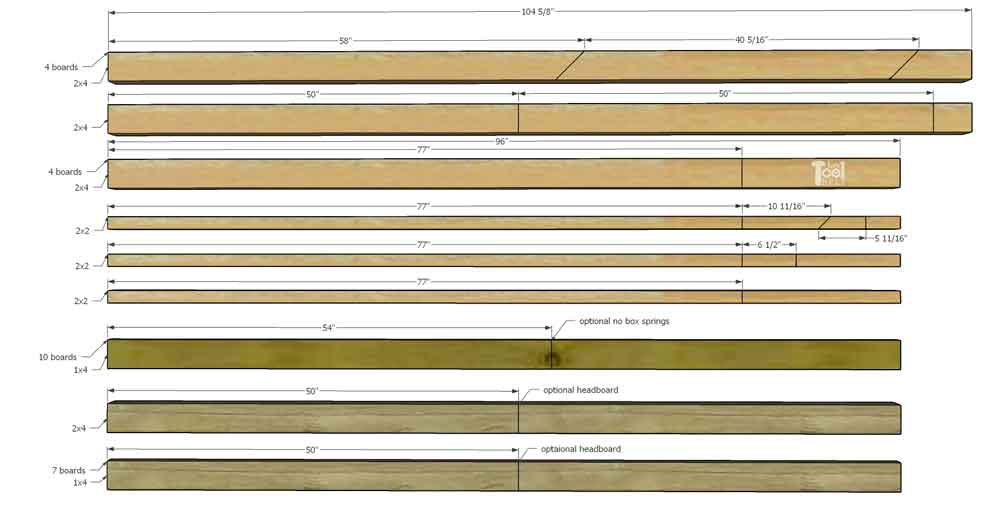
Cut List
| Quantity | Board Type | Length |
| 4 | 2×4 | 58″ with a 45 deg angle on one end |
| 4 | 2×4 | 40 5/16″ with 45 deg angles on both ends |
| 2 | 2×4 | 50″ |
| 4 | 2×4 | 77″ |
| 3 | 2×2 | 77″ |
| 1 | 2×2 | 10 11/16″ with a 45 deg angle on one end |
| 1 | 2×2 | 5 11/16″ with a 45 deg angle on one end |
| 1 | 2×2 | 6 1/2″ |
| 10 | 1×4 | 54″ *no box spring option |
| 1 | 2×4 | 50″ *Headboard option |
| 7 | 1×4 | 50″ *Headboard option |
Cut diagram
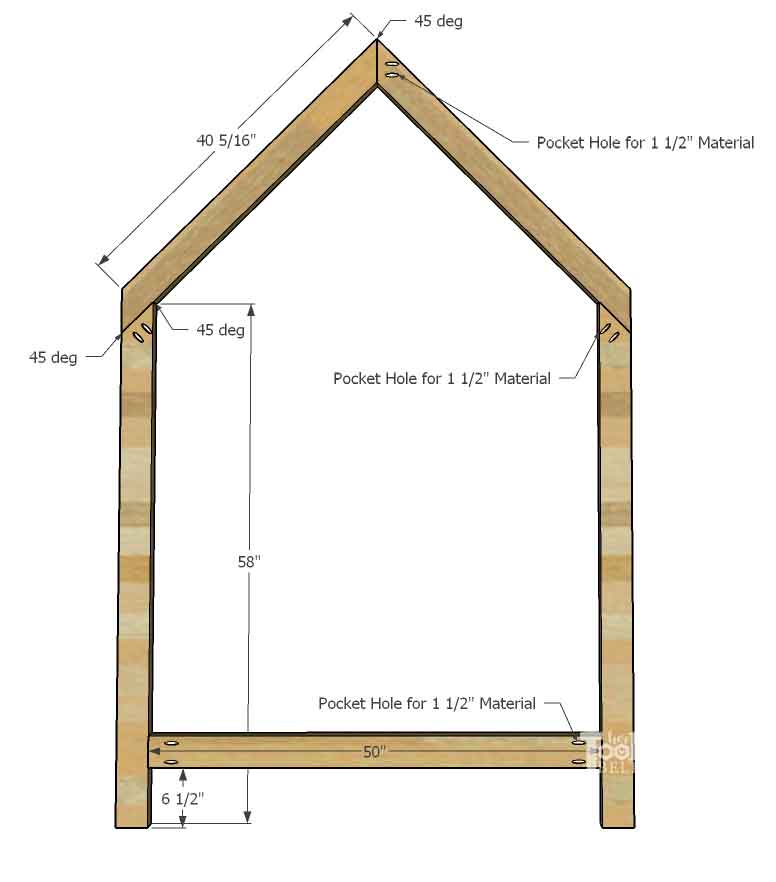
Assemble the House Shapes
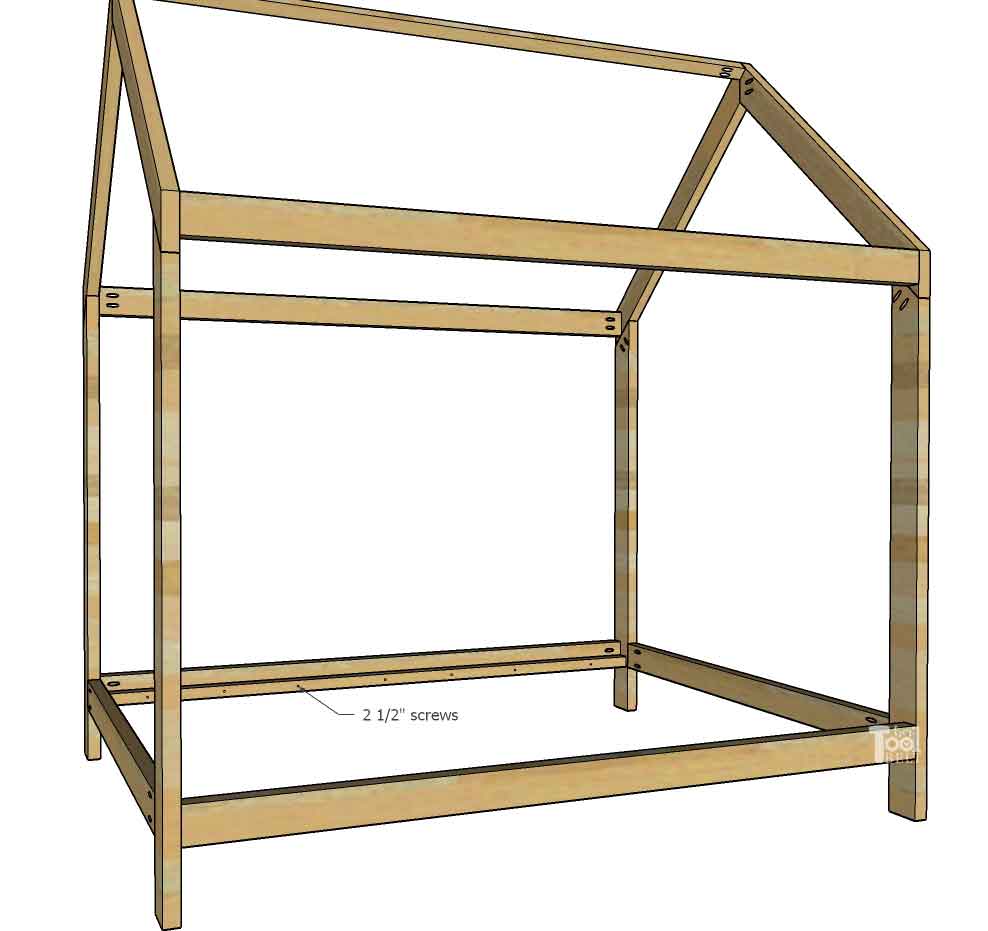
Cut the boards according to the cut list and cut diagram. First we will assemble the front and back house shapes. On the vertical boards, measure and mark 6 1/2″ from the bottom. To join the boards, we will use pocket holes set for 1 1/2″ material. Apply wood glue to the joints and secure with 2 1/2″ pocket screws as indicated.
Add the House Rails
Drill pocket holes in each end of the 5 – 77″ boards. The 2 lower 77″ boards are mounted 6 1/2″ up from the bottom. Secure with 2 1/2″ pocket screws as indicated.
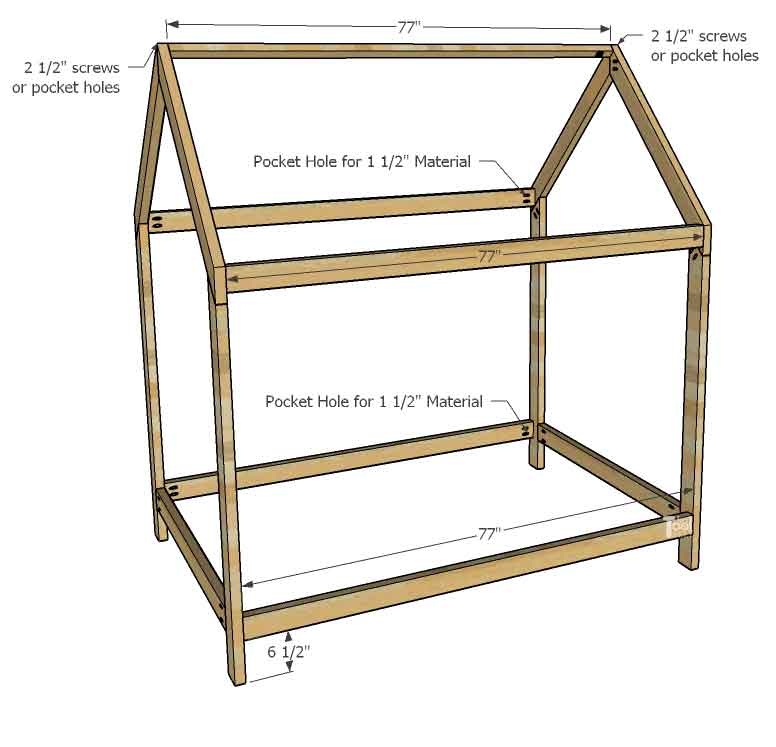
Drill pilot holes in the 2 – 77″ 2×2 boards in about 7 places, spaced along the length of the board. Attach the 77″ 2×2’s flush with the bottom of the 77″ 2×4’s. Secure with 2 1/2″ screws. The box spring will sit on this ledge. For added support, use the extra pieces of the 2×2’s and install them on the inside of the front and back 50″ boards.
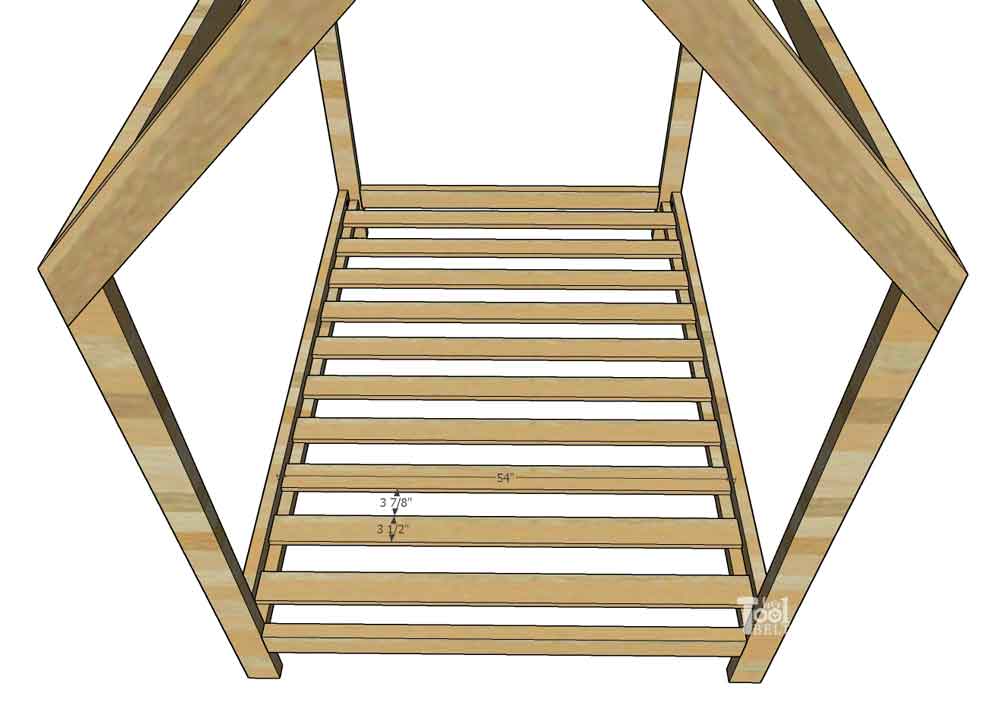
For the *No box spring option:
Cut 10 1″ x 4″ x 54″ boards for bed slats, you may have to trim the length a little to fit. Drill 2 pilot holes in each end of the bed slats. Space the bed slats approximately every 3 7/8″, starting with a space at the top and bottom. Secure the bed slats on the 2″ x 2″ supports with 1 1/2″ screws.
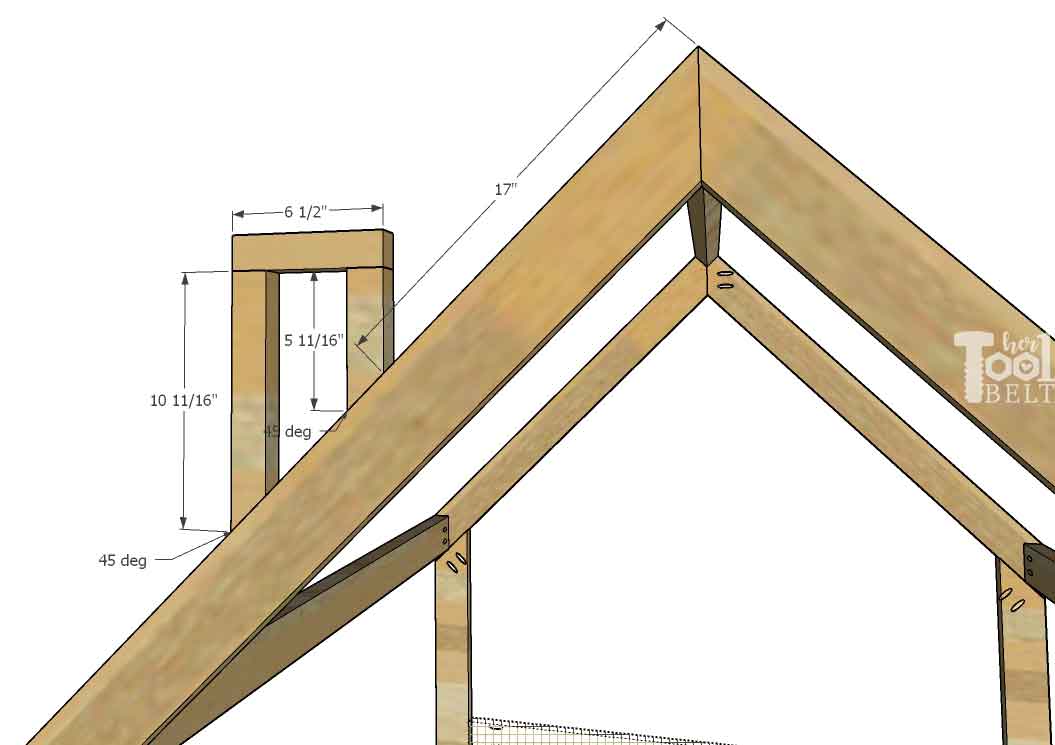
Put on the Chimney
Assemble the chimney pieces. Use 2 1/2″ screws and screw from the top down into the vertical pieces. Use brad nails and wood glue, and attach the chimney to the front roof about 17″ down from the peak. (Or whatever looks good to you.)
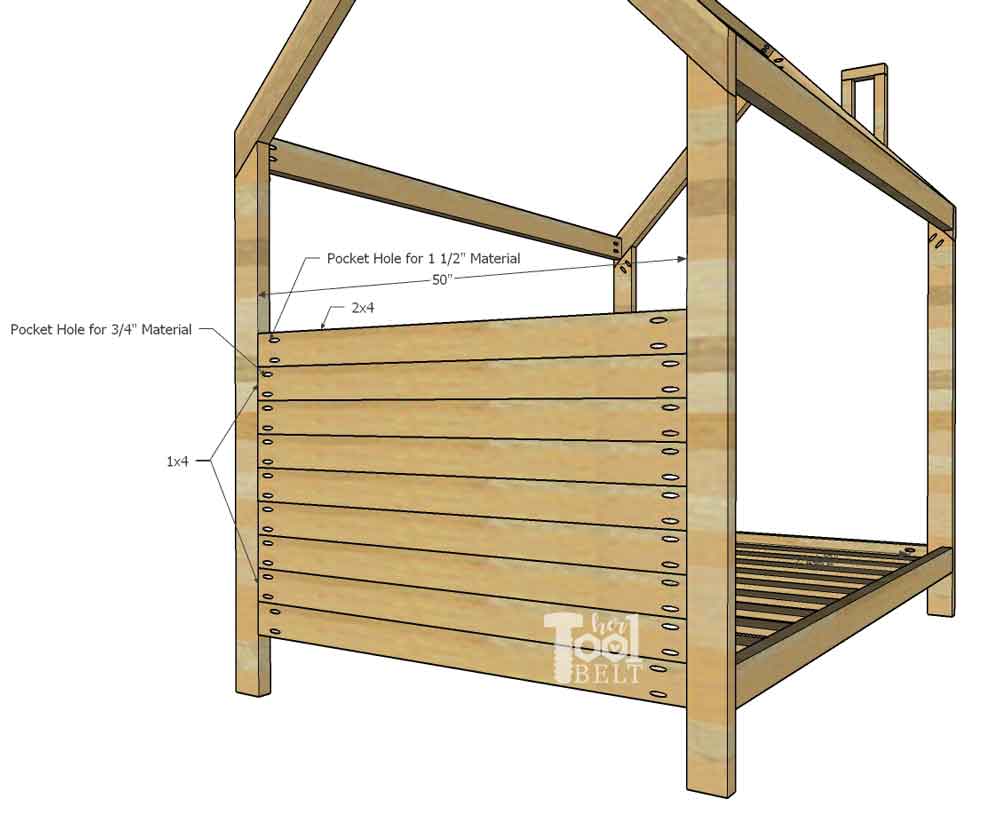
House Frame Bed – Headboard Option
If you’d like to add a headboard to the House Frame, here’s an option for you. It may be easiest to do this while you’re assembling the house shape.
Cut 7 pieces of 1×4 that are 50″ long (trim to fit) and drill pocket holes for 3/4″ material in both ends. Cut 1 piece of 2×4 that is 50″ long (trim to fit) and drill pocket holes for 1 1/2″ material in both ends.
Attach the 1×4’s starting above the 2×4 lower rail, using wood glue and 1 1/2″ pocket hole screws. Finish the headboard with the 2×4 and attach it with 2 1/2″ pocket hole screws.
Step 4
Remove any excess glue, apply wood filler to nail holes, cracks and blemishes and allow to dry. Sand the wood filler and house frame bed until smooth, finishing with 120-150 grit sand paper. Stain or paint and prime as you like.
I need a set of plans for the single bed not the full if you could send that it would be great thank you
I don’t have printable plans for the twin house bed, but you might be able to print them from remodelaholics website. https://www.remodelaholic.com/house-frame-twin-bed-building-plan/
Hey, thanks for the plans.
What type of lumber do you recommend?
Regards
Adam
If I’m staining the wood I usually like to get the douglas fir over whitewood. I think douglas fir stains nicer.
Thank you. Great post
How would I adjust the cuts to make it flat on the floor?
Hi Brittney,
To make the bed flat on the floor, cut the 4 legs to 51 1/2″ with a 45 deg angle on one end (instead of 58″ with a 45 deg angle on one end as stated in the cut list.)
HTH and good luck!
This is a beautiful bed and I love the detailed instructions, thank you so much for this!!
Seriously considering making this for my 1 year old over the weekend….Wondering the approximate cost to build this one if you don’t mind sharing??
I made this bed and it really looks good. I would like to ask if the top of the bed is supposed to sway some at the top?
How long would I need to cut the wood if I wanted it y’all enough for a trundle underneath?
Thanks.
Ashley
Just finished building this! Thank you so much for the plans! Also very proud that I was able to build mostly by myself. I’m fairly new to building and the plans made it easy! Thank you again!
Hello,
Could this be made to sit flush with the floor by simply cutting off the 10 inches for the feet? Kind regards, Meg
Hi Meg,
You can either mount the bed rails (the horizontal parts) at the bottom of the legs. Or simply cut off the bottom 10″ like you mentioned.
Thank you so much for these plans. My son and I used them to build this for my granddaughter’s 4th birthday which is coming up. Your plans were great and everything went together well. I love how you have the options for no box spring or no headboard.
Julie, that’s so cool! Would you mind sharing what wood you used and the approximate cost?
Thanks!