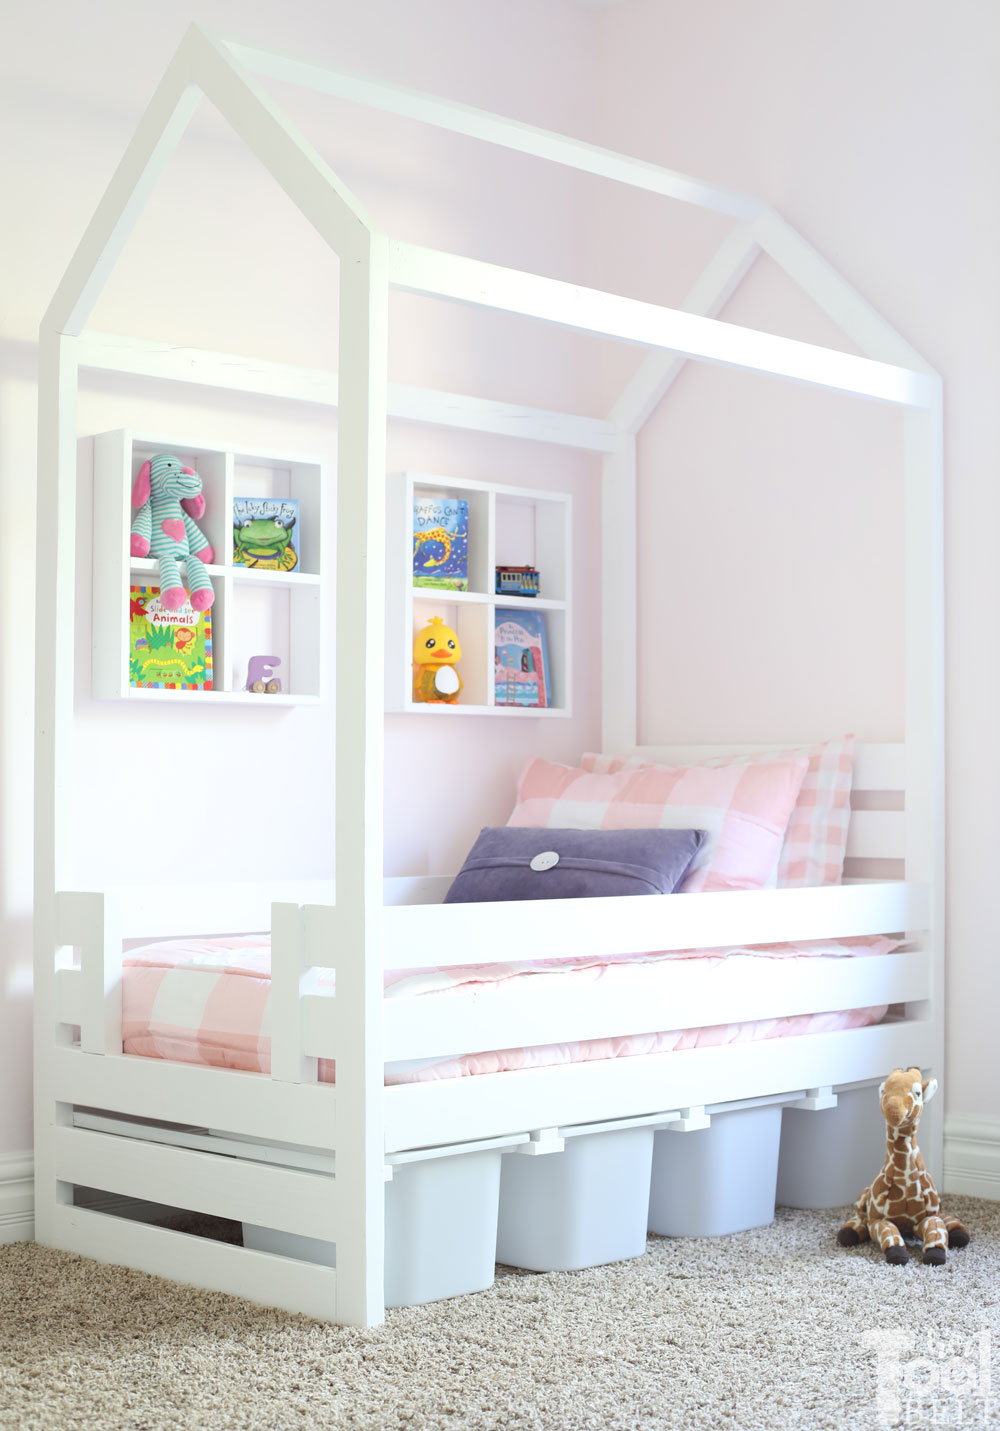
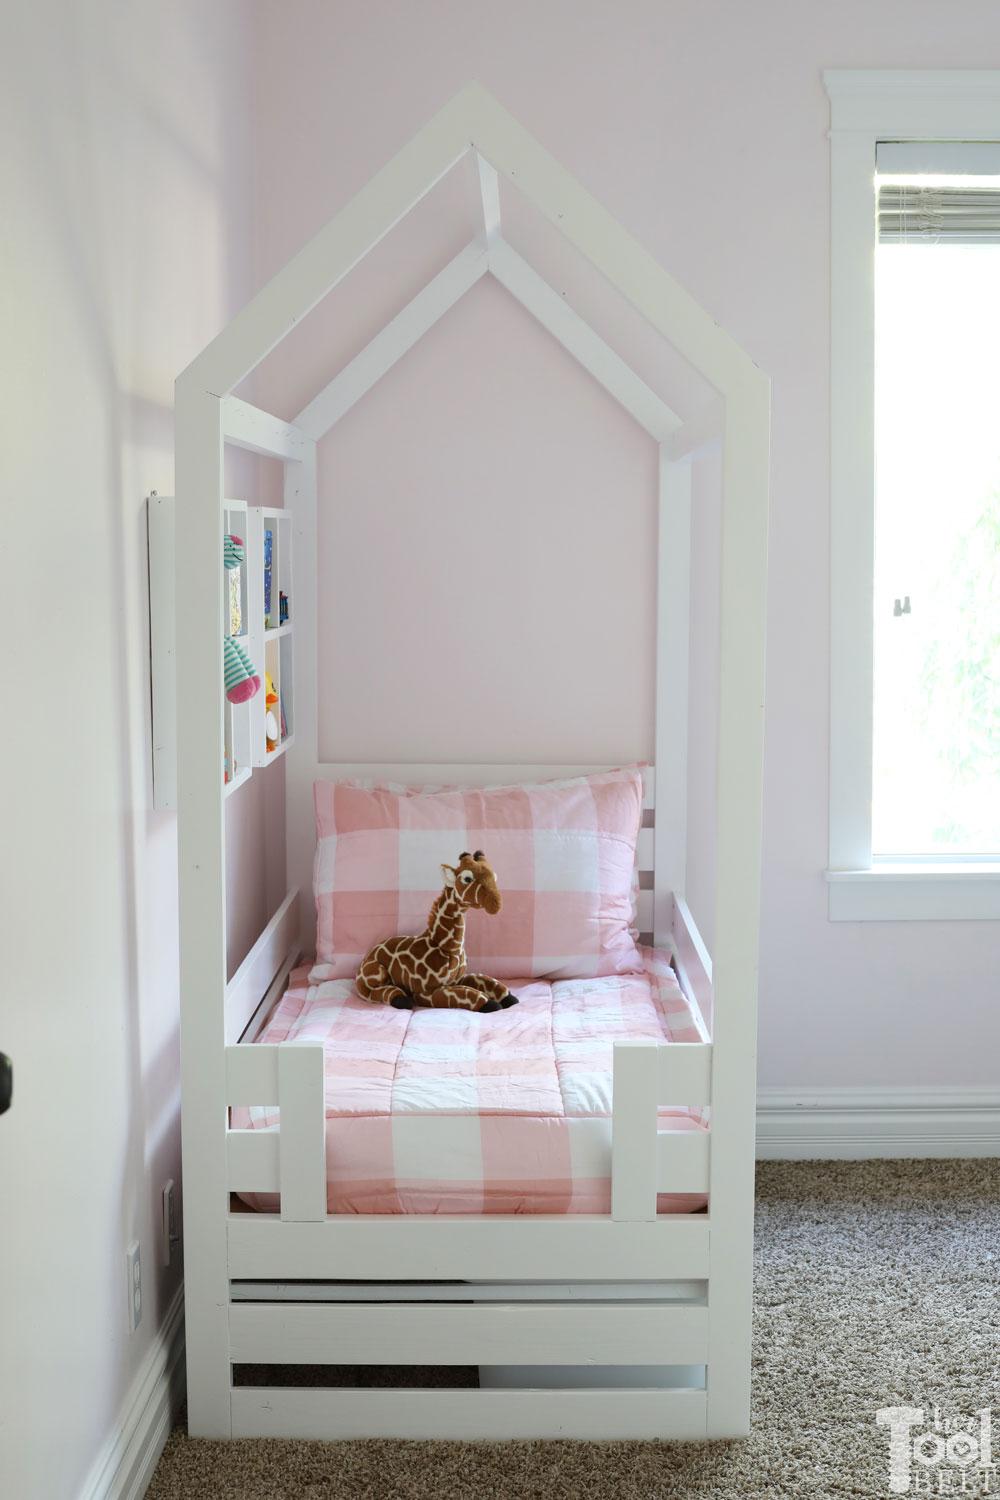
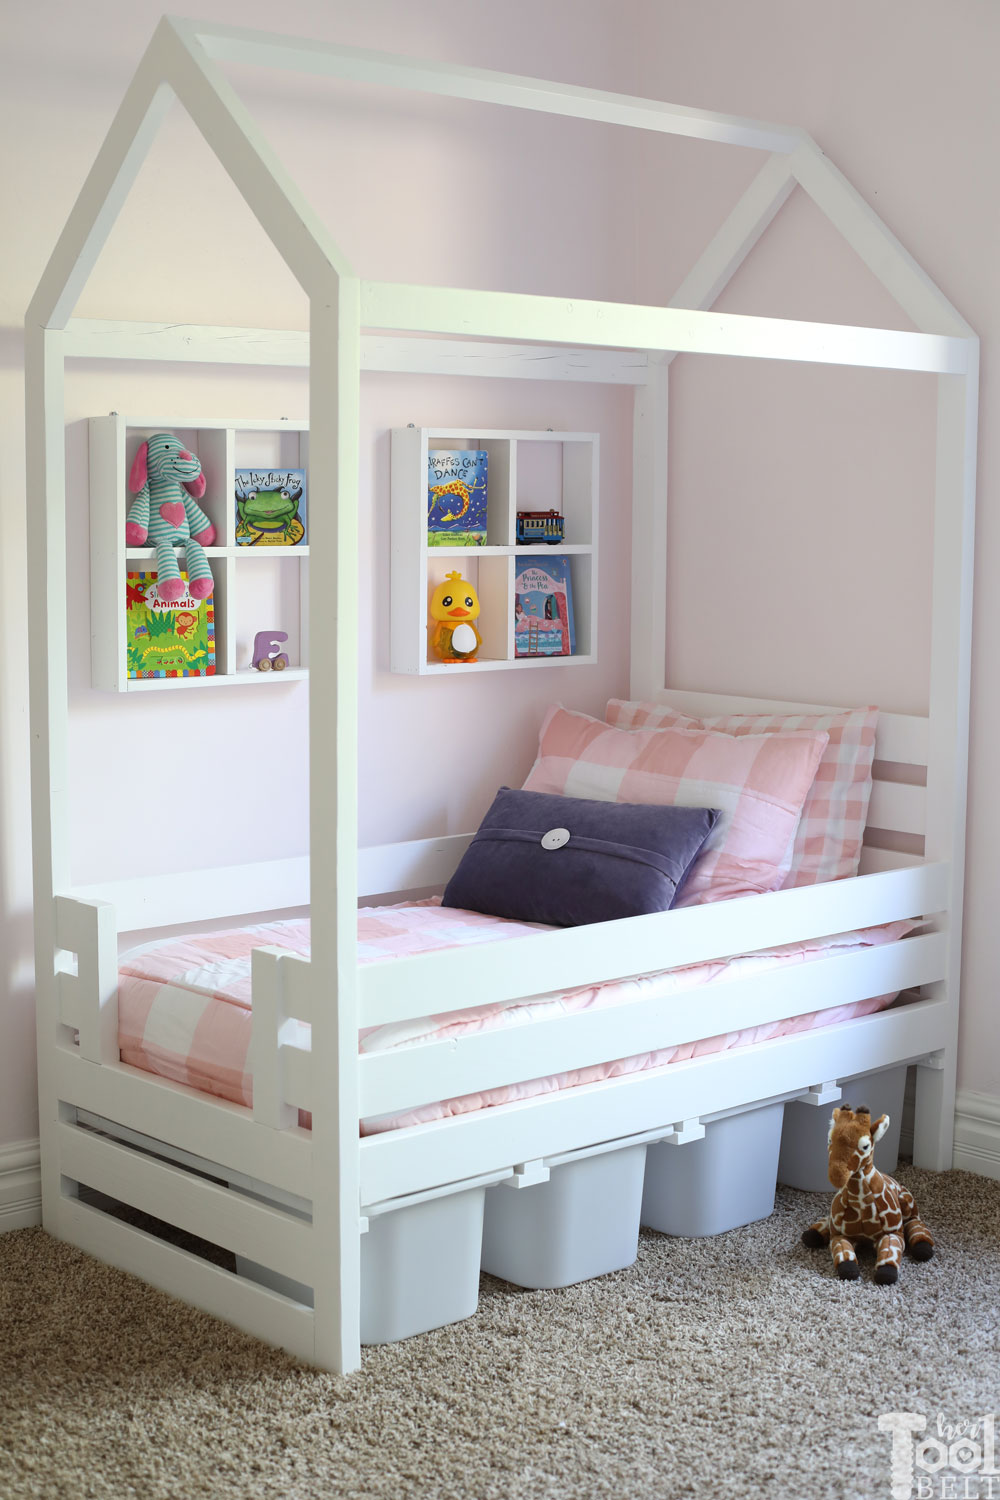
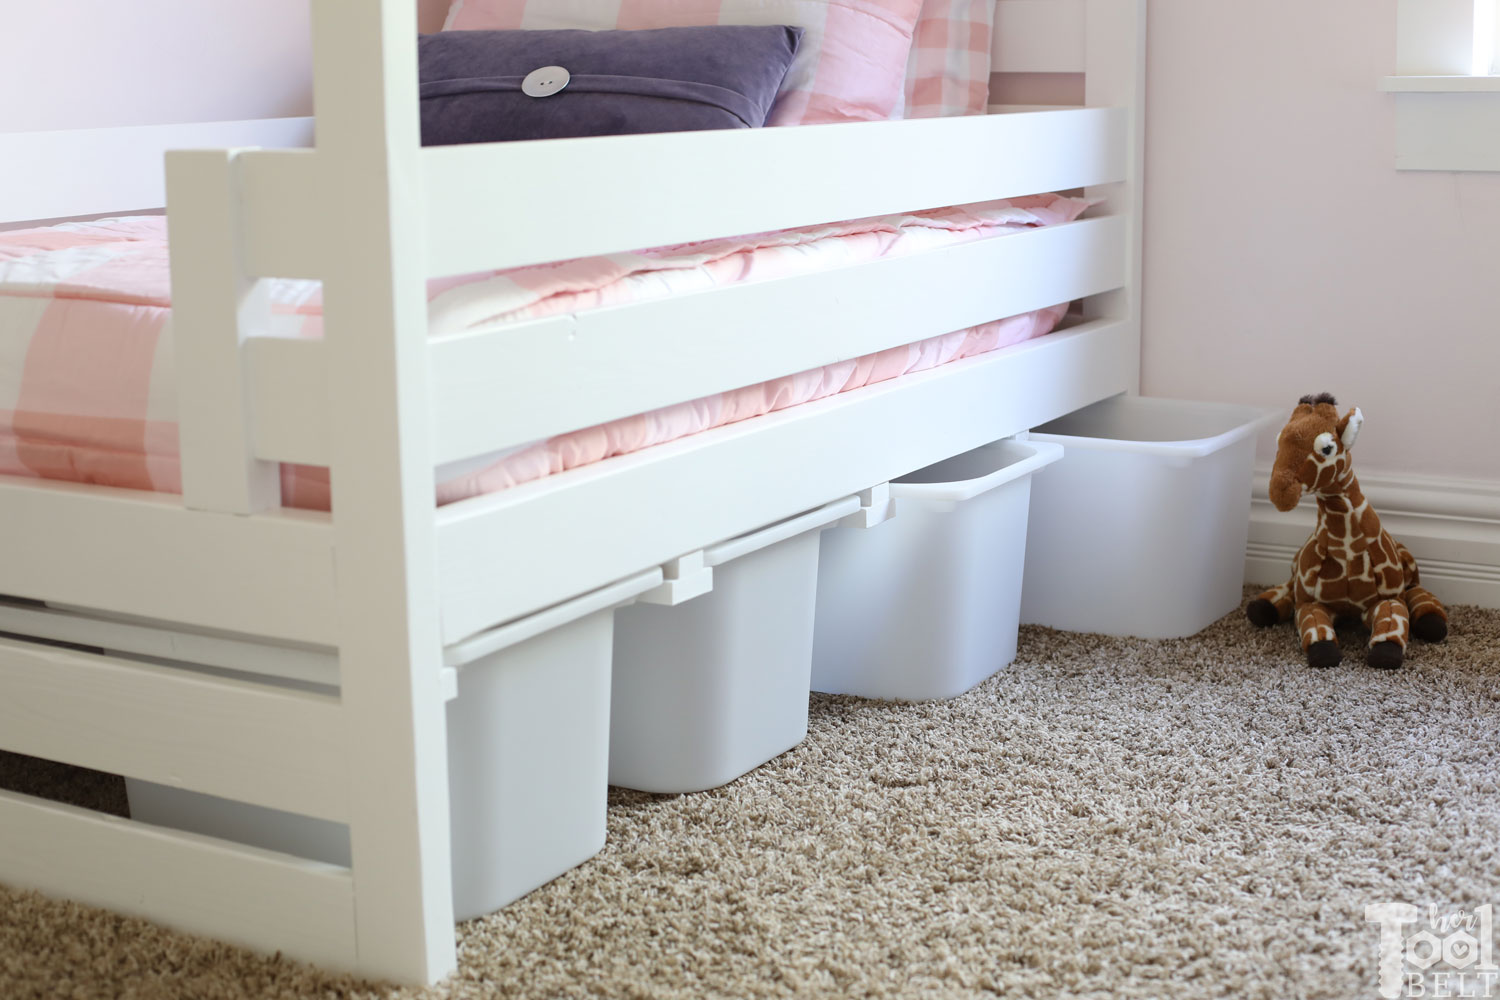
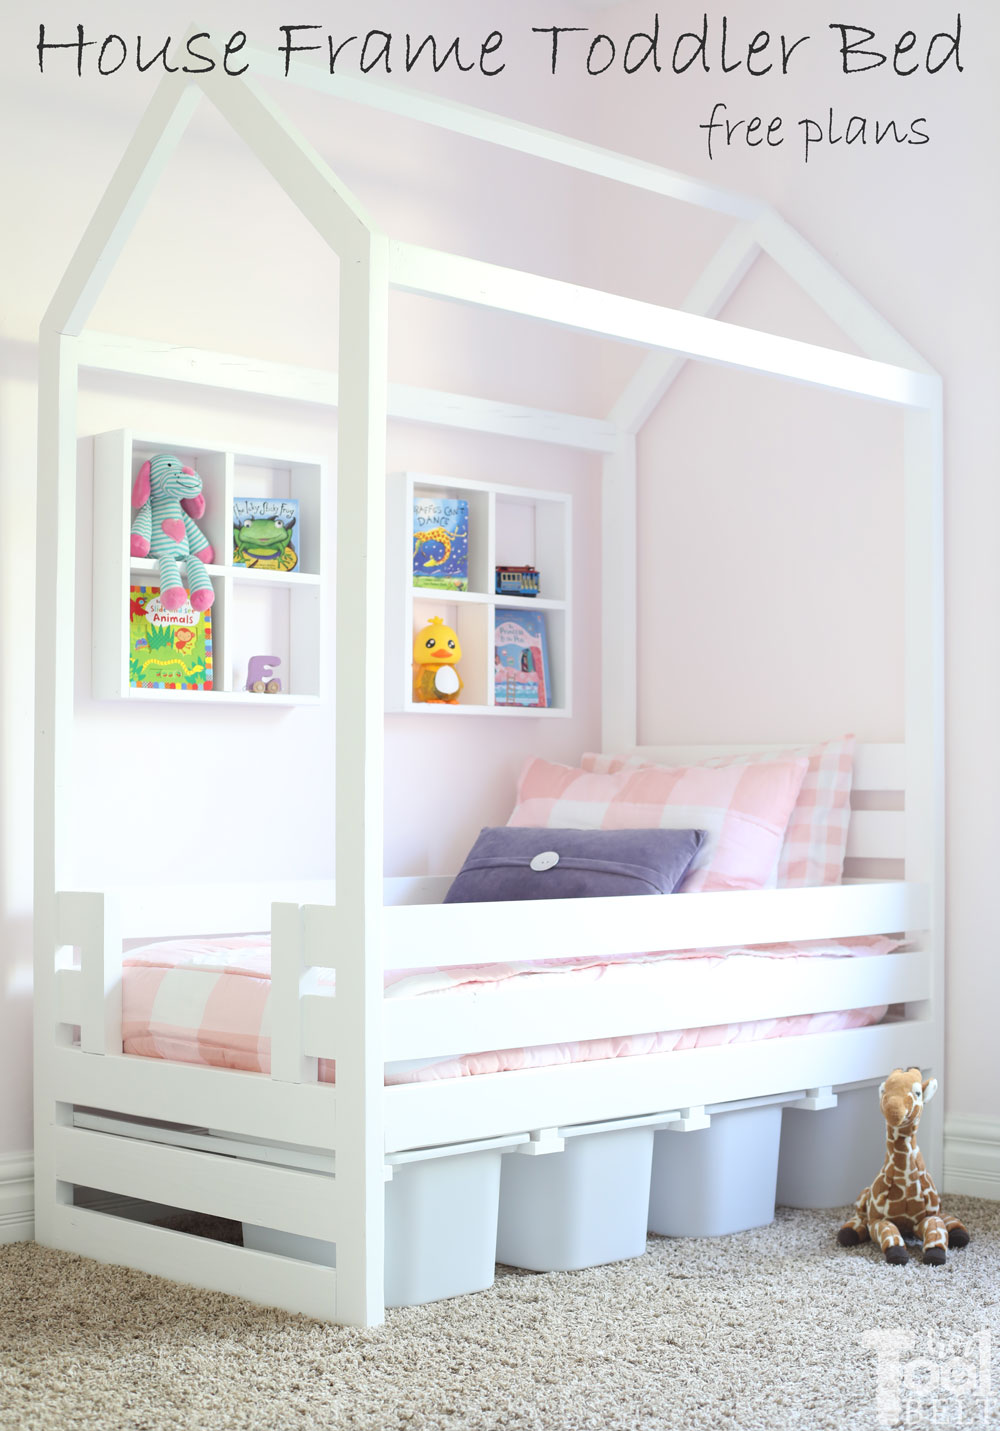
My toddler is in need of a bed upgrade! I liked the little house frame doll beds in the playhouse so much, I thought it would make a darling toddler bed. This house frame toddler bed uses a crib mattress (approx 28″ x 52″), making it a perfect way to transition from a crib. My daughter is a mega roller, so full side rails are a must. On the foot board of the bed, I added slats at the bottom to act as a little ladder. She is now sharing a room with her older sister, so storage space is a hot commodity. I made this toddler bed multipurpose by adding optional Ikea bin slides, or you could use crates or baskets under the bed. So far she is thrilled with her new bed and here’s to many good night sleeps!!! Fingers Crossed
 I’m participating in a fun Multipurpose Furniture Challenge, check out the other projects too:
Multipurpose Project Challenge
- Katie @Addicted2DIY – DIY Trophy Shelf and Hat Rack
- Sarah @The Created Home – Dog Murphy Bed
- Anika @Anikas DIY Life – DIY End Table Charging Station
- Sarah @Ugly Duckling House – DIY Bathroom Deodorizer
This post contains some affiliate links for your convenience. Click here to read my full disclosure policy.
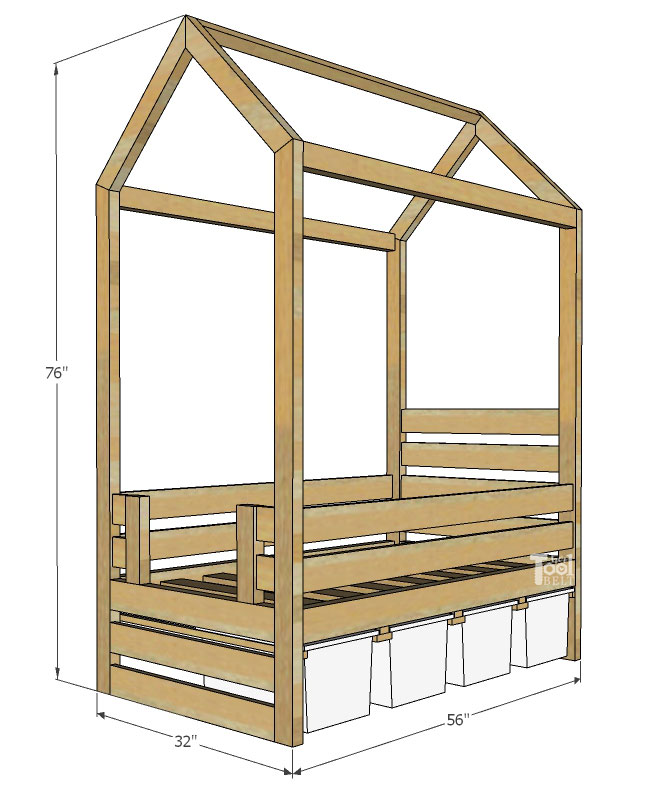
How to Build a House Frame Toddler Bed with Storage
Materials
- 2 – 2×4 x 8′ boards (actual dimensions 1 1/2″ x 3 1/2″)
- 6 – 2×3 x 8′ boards (actual dimensions 1 1/2″ x 2 1/2″)
- 1 – 2×2 x 8′ boards (actual dimensions 1 1/2″ x 1 1/2″)
- 8 – 1×4 x 8′ boards (actual dimensions 3/4″ x 3 1/2″)
- 1 – 1×3 x 8′ boards (actual dimensions 3/4″ x 2 1/2″) (for storage option)
- 3 – 1×2 x 8′ boards (actual dimensions 3/4″ x 1 1/2″) (1 of these is for the storage option)
- Approximate cost of lumber for this project is ~$42
- wood glue
- sandpaper
- 1 1/4″ pocket hole screws
- 2 1/2″ pocket hole screws
- 4 – IKEA Trofast Bins – optional storage
- spackle or wood putty (optional to fill pocket holes)
- Paint Primer and Paint (Behr Ultra Pure White)
Tools Used
- DeWalt Miter saw
- DeWalt Sander
- Milwaukee Drill
- Milwaukee Tape Measure
- Kreg pocket hole jig
- HomeRight Paint Sprayer
- Clamps
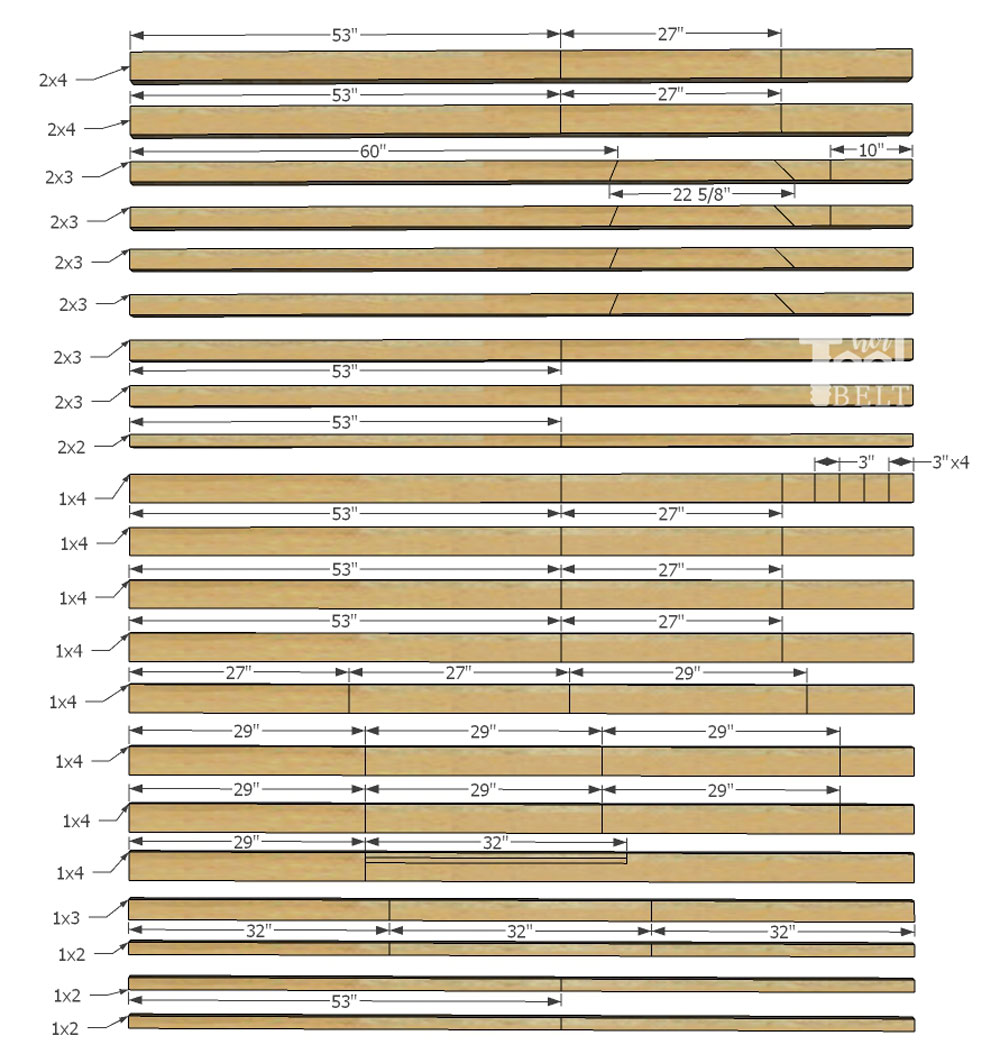
Cut List
- 2 – 1 1/2″ x 3 1/2″ x 53″ (2×4) bed rails long
- 2 – 1 1/2″ x 3 1/2″ x 27″ (2×4) bed rails short
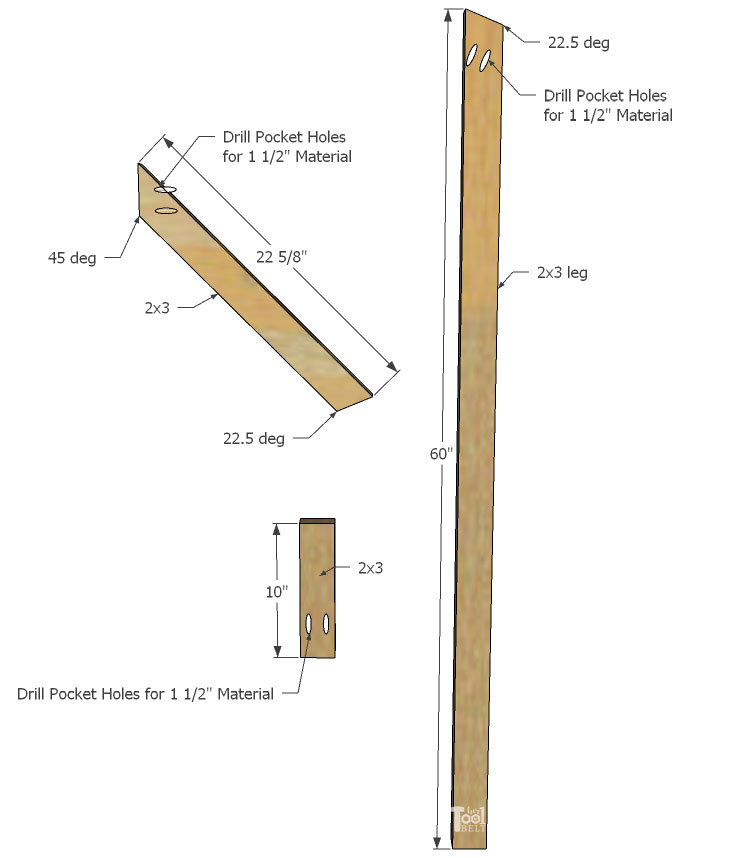
- 4 – 1 1/2″ x 2 1/2″ x 60″ with a 22 1/2 deg miter on one end (2×3) legs
- 4 – 1 1/2″ x 2 1/2″ x 22 5/8″ with a 22 1/2 deg miter on one end and a 45 deg miter on another (2×3) roof (see diagram for direction)
- 2 – 1 1/2″ x 2 1/2″ x 10″ (2×3) doorway
- 2 – 1 1/2″ x 2 1/2″ x 53″ (2×3) roof line
- 1 – 1 1/2″ x 1 1/2″ x 53″ (2×2) roof peak
- 4 – 3/4″ x 3 1/2″ x 53″ (1×4) rail slats long
- 6 – 3/4″ x 3 1/2″ x 27″ (1×4) rail slats short
- 4 – 3/4″ x 3 1/2″ x 3″ (1×4) rail slats door
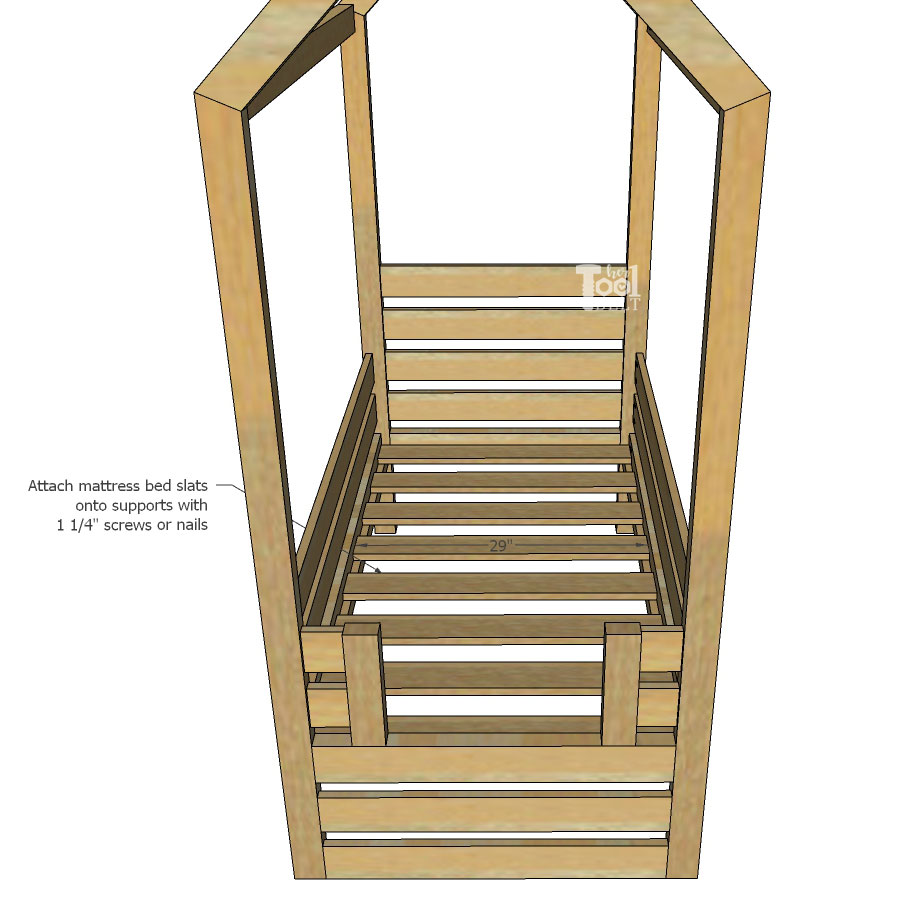
- 8 – 3/4″ x 3 1/2″ x 29″ (1×4) mattress slats
- 2 – 3/4″ x 1 1/2″ x 53″ (1×2) mattress support
- These are for the optional storage
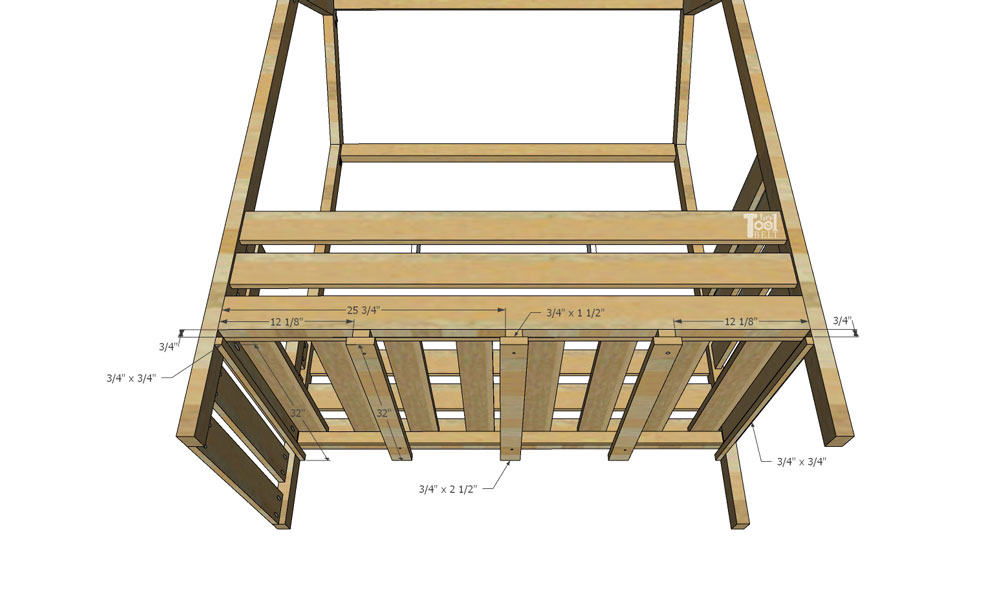
- 2 – 3/4″ x 3/4″ x 32″ (1×4) bin ends (or you can buy square dowels 3/4″ x 3/4″)
- 3 – 3/4″ x 2 1/2″ x 32″ (1×3) bin supports
- 3 – 3/4″ x 1 1/2″ x 32″ (1×2) support spacer
Cut Diagram
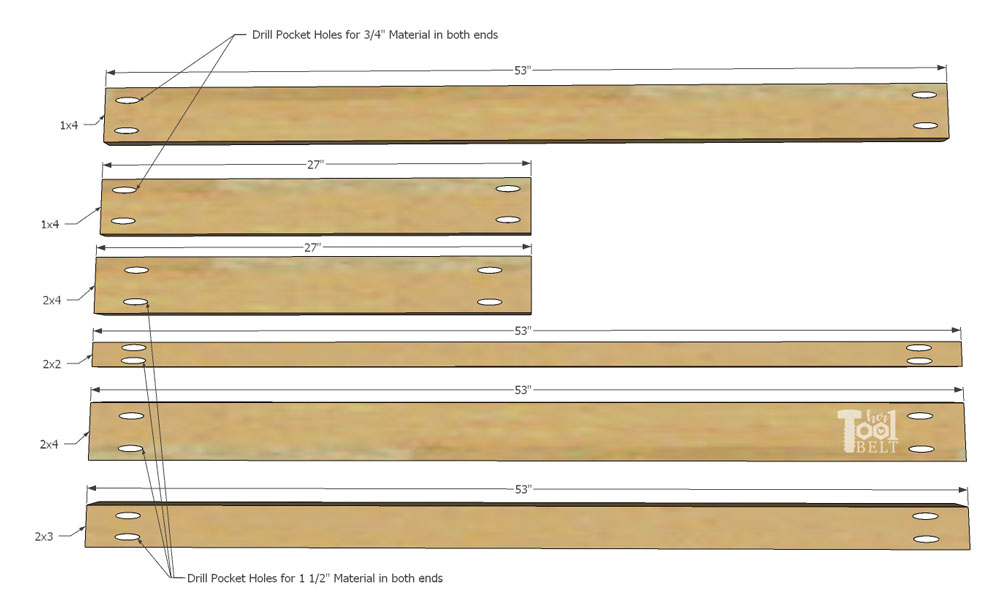
Step 1 – Drill Pocket Holes
To connect this bed together I used pocket hole joinery.
Drill pocket holes for 3/4″ material in both ends of the:
- 4 – 3/4″ x 3 1/2″ x 53″ (1×4) rail slats long
- 6 – 3/4″ x 3 1/2″ x 27″ (1×4) rail slats short
- 4 – 3/4″ x 3 1/2″ x 3″ (1×4) rail slats door
Drill pocket holes for 1 1/2″ material in both ends of the:
- 2 – 1 1/2″ x 3 1/2″ x 53″ (2×4) bed rails long
- 2 – 1 1/2″ x 3 1/2″ x 27″ (2×4) bed rails short
- 2 – 1 1/2″ x 2 1/2″ x 53″ (2×3) roof line
- 1 – 1 1/2″ x 1 1/2″ x 53″ (2×2) roof peak
Also drill pocket holes for 1 1/2″ material in:
- one end of the 2 – 1 1/2″ x 2 1/2″ x 10″ (2×3) doorway pieces
- in the end with the 22 1/2 deg miter of the 4 – 1 1/2″ x 2 1/2″ x 60″ (2×3) legs (Note: to make sure pocket holes don’t show in the front, make sure the pocket holes on 2 of the legs mirror the other 2 legs, see diagram of the leg angles in steps 2 and 3.)
- in the end with the 45 deg miter of only 2 – 1 1/2″ x 2 1/2″ x 22 5/8″ (2×3) roof pieces
I sanded each of the boards at this point.
Step 2 – House Frame Headboard Assembly
(The pocket holes will face the backside of the headboard)
On 2 of the legs, measure and mark 10″, 15″, 20″, 25″ and 30″ these will be the slat locations. Also on the 15″-30″ mark 3/8″ inset.
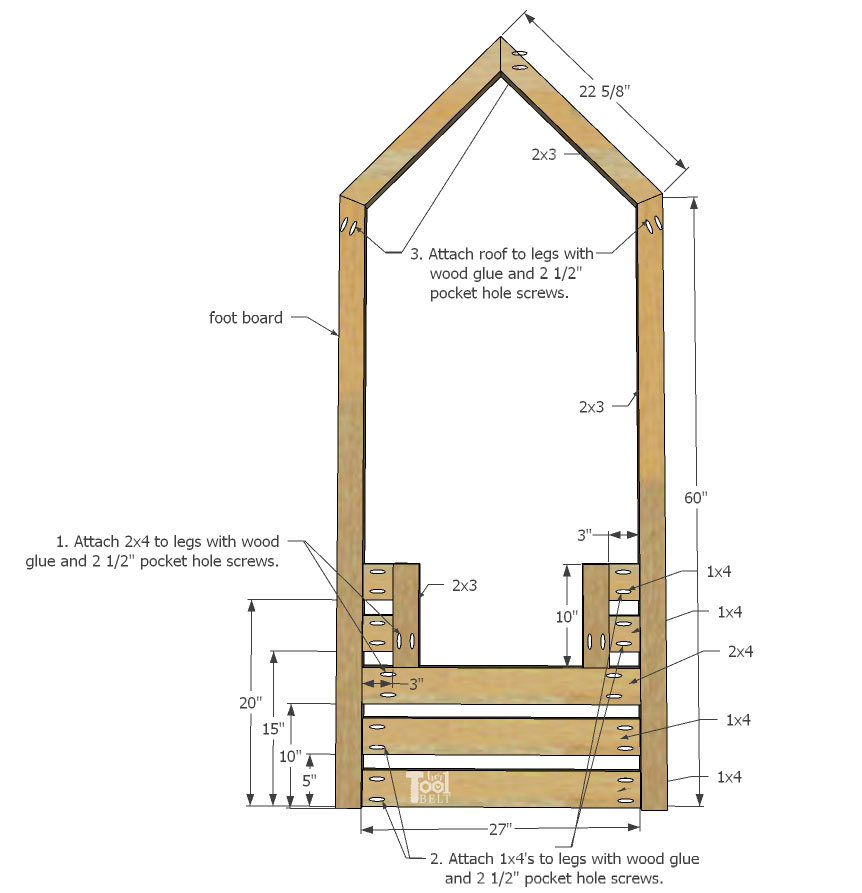
- Attach a 27″ (2×4) to a leg at the 10″ mark with wood glue and 2 1/2″ pocket hole screws. Make sure the top of the leg angles are as shown below.
- Attach 4 – 27″ (1×4) pieces to a leg with wood glue and 1 1/4″ pocket hole screws, at marks 15″ – 30″ and inset 3/8″ from the face of the leg.
Repeat 1-2 to attach the other leg. - Next attach the 22 5/8″ (2×3) roof boards to the tops of the legs with wood glue and 2 1/2″ pocket hole screws. The 45 deg cuts go in the top peak of the roof.

Step 3 – House Frame Foot Board Assembly
On 2 of the legs, measure and mark 5″, 10″, 15″ and 20″ these will be the slat locations. Also on the 15″-20″ mark 3/8″ inset.
- Attach a 27″ (2×4) to a leg at the 10″ mark with wood glue and 2 1/2″ pocket hole screws, make sure the top of the leg angles are as shown below. On the 2×4, mark over 3″ and attach 10″ (2×3) with wood glue and 2 1/2″ pocket hole screws.
- Attach 2 – 27″ (1×4) pieces to a leg with wood glue and 1 1/4″ pocket hole screws, one flush with the leg bottom and the other 5″ up. I put these slats flush with the front leg face or they could be inset 3/8″. Then attach 3″ (1×4) pieces at 15″ and 20″, insetting 3/8″ from the face of the leg, with wood glue and 1 1/4″ pocket hole screws.
Repeat 1-2 to attach the other leg. - Next attach the 22 5/8″ (2×3) roof boards to the tops of the legs with wood glue and 2 1/2″ pocket hole screws. The 45 deg cuts go in the top peak of the roof.
Step 4 – House Frame Toddler Bed Assembly
All my pocket holes are facing the direction of the wall the bed will be against. Also I didn’t glue any of these next joints because I have to disassemble the bed to get it into the bedroom, even though the diagram says too ;-).
On each leg, measure and mark 10″, 15″ and 20″ for the slats. Also on the 15″-20″ mark 3/8″ inset from the outside corner of the legs.
- Attach a 53″ (2×4) to each leg at the 10″ mark with 2 1/2″ pocket hole screws.
- Then attach 4 – 53″ (1×4) pieces to the legs with 1 1/4″ pocket hole screws, at marks 15″ and 20″ and inset 3/8″ from the leg corners.
- Next attach the 53″ (2×3) roof line boards to the tops of the legs with 2 1/2″ pocket hole screws.
- Following the peak of the roof, attach the 53″ (2×2) at the top peak with 2 1/2″ pocket hole screws.
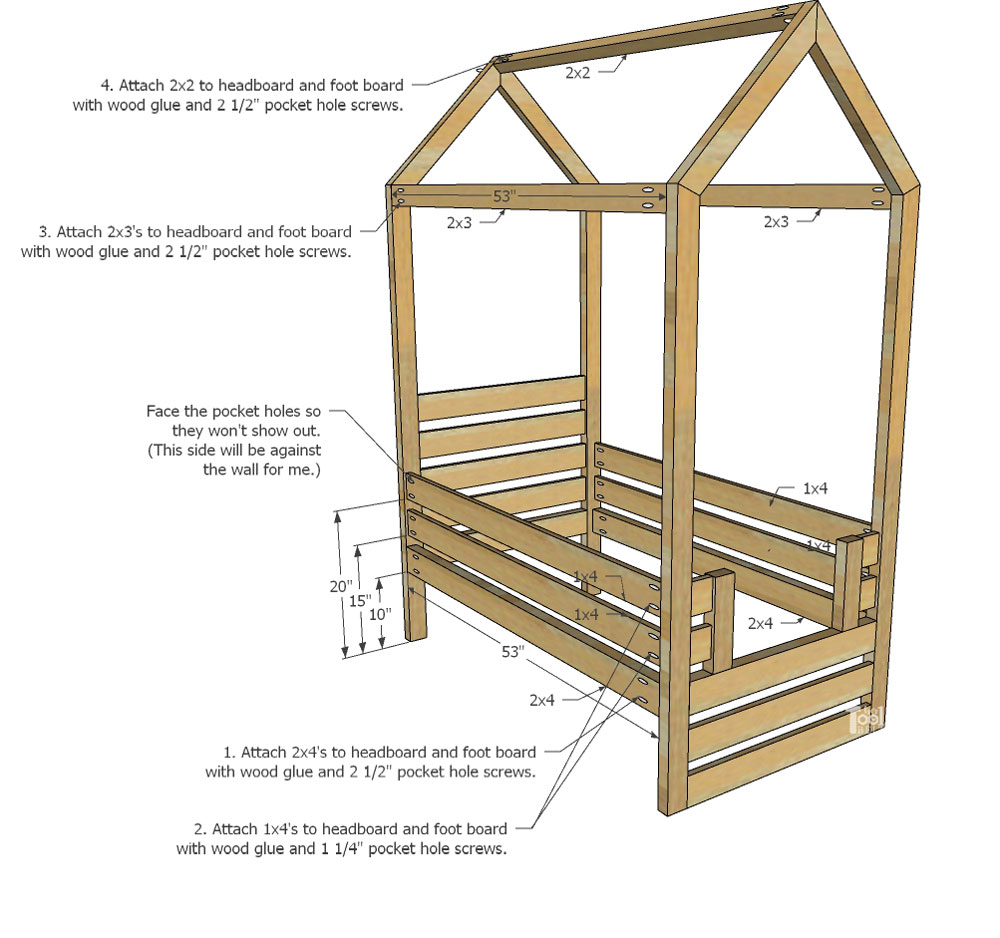
Secure a 53″ (1×2) mattress support to both 53″ (2×4) with 1 1/4″ screws, make the bottoms flush.
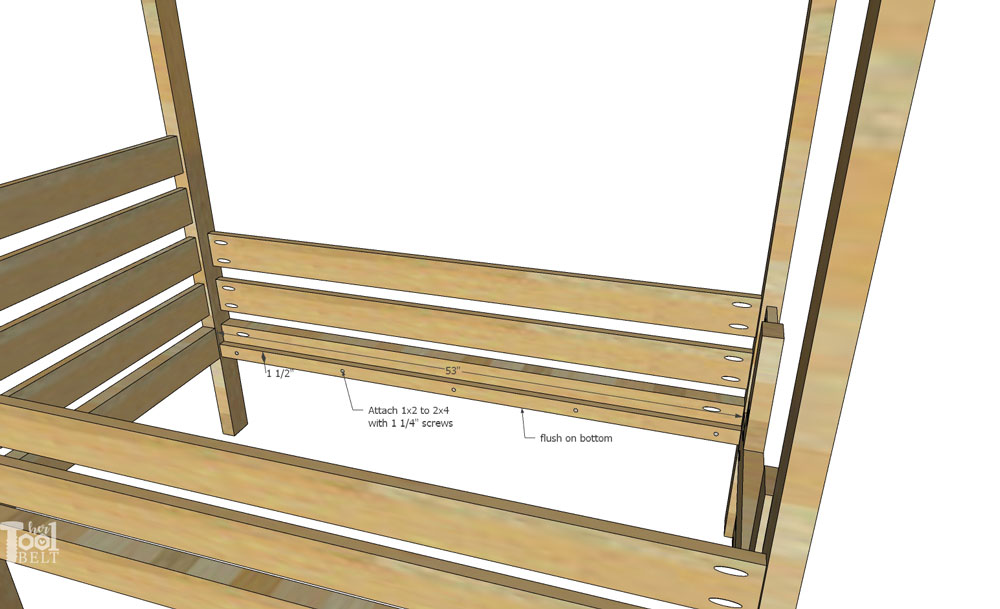
Add 8 or more 29″ (1×4) mattress slats spaced evenly on the mattress supports. Secure the mattress slats with 1 1/4″ screws or brad nails. I had some scrap pieces of 3/4″ plywood, so instead of slats I used plywood to support the mattress.
Step 5 – Optional Under Bed Storage
Under the 53″ (2×4) boards, mark over 12 1/8″, 25 3/4″ and also 12 1/8″ from the other end. Secure a 32″ (1×2) at each mark with 1 1/4″ screws. Then center a 32″ (1×3) on each (1×2) and secure with 2 1/2″ screws. On the ends mark down 3/4″ and secure the 3/4″ x 3/4″ x 32″ pieces with 1 1/4″ screws, you may need to pre-drill holes in the 3/4″ x 3/4″ pieces so they don’t split.
Step 6 – Finish
To finish the house frame toddler bed, fill any pocket holes with spackle or wood filler/putty that you don’t want seen and let dry. Sand the wood smooth. Since I was painting the bed, I stopped at 120 grit sandpaper. If staining, you may want to sand up to 220 grit. I first primed the wood with paint primer and let that dry. Then lightly I sanded the primer smooth. Finally I applied 2 coats of Behr ultra pure white in satin and let that dry.
We are so excited for the new bed, Yay!
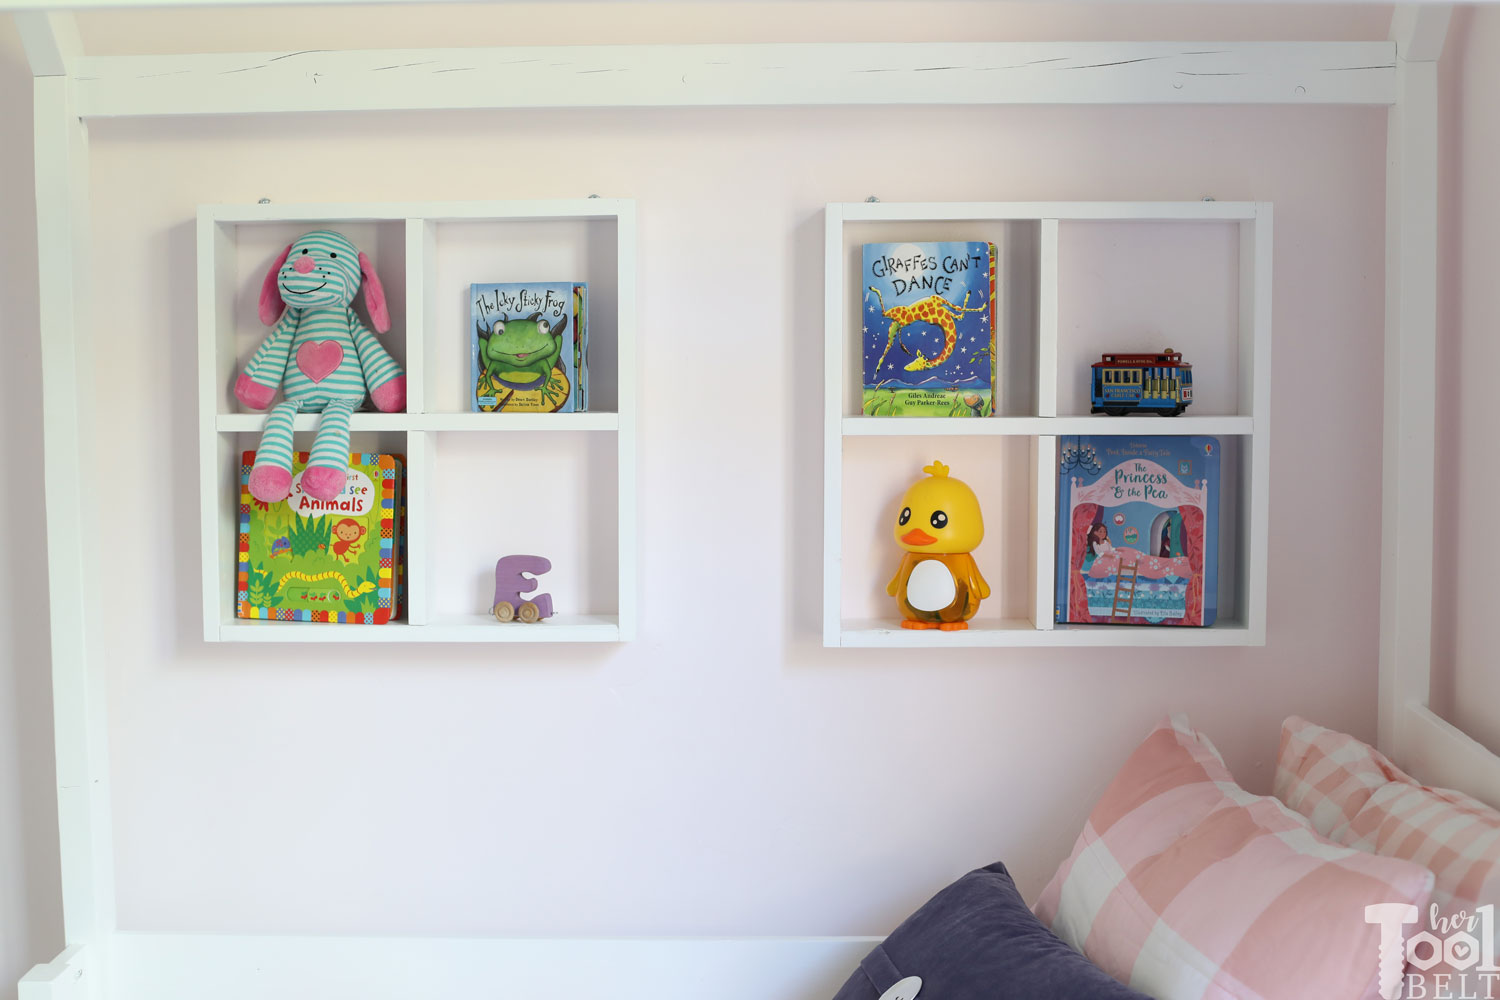
I made these little ‘window’ shadow box shelves to hold her nightly story books and a few knickknacks.
 I’m excited for the easy under the bed storage. Really, I like to put storage under beds to hopefully deter from unwanted ‘junk’ under the beds.

We filled these Ikea bins with her clothes and I was surprised at the amount of stuff they hold!
The cute bedding is from Beddy’s, this is the toddler Mini Pink Sugar set. I plan on making bunkbeds for the toddler and her older sister when she outgrows this bed and I’ve been eyeing these Beddy’s zip up bedding for that project. However I don’t want to buy two sets and find out we don’t like them. So I bought a toddler set (with 25% off using CLASSYCLUTTER25) as a trial since toddler size is half as much as a twin. Hopefully we will love them and they’ll be the answer for the bunk bed project!

Breath-taking one!! Keep up the Good work
This is really great idea and beautiful. Can this plan modified to full bed?
Thank you in advance?
I have a slightly different house bed in full size here https://www.hertoolbelt.com/house-frame-bed-full-size/
WOWWWWWWWWW!!! Amazing. So impressed.
Any chance for a twin size plan????
There is a twin version over on Remodelaholic https://www.remodelaholic.com/house-frame-twin-bed-building-plan/
HTH!
I just finished this last night and everyone loves it! I’ve had people on social media cheering me on! this was my first project of this scale and your plans were easy to follow and the only thing I had to return the store for after my initial trip were the 1 1/4in regular screws. Thanks so much for sharing your awesome plans!
That’s awesome! Glad it worked out.
Am I understanding correctly that once this is fully assembled and finished/painted it’s never meant to be disassembled? And that you essentially have to do the final sanding and painting in the room it’ll be in? Just trying to think through all the logistics!
Thanks!
Hi Rachel,
I assembled the Headboard, footboard then painted everything outside. Then I brought it into the room to assemble the bedrails, and all of the horizontal rails to the Head and Foot Boards. Finally I added the little wood pieces that the storage bins slide on. My daughter has grown out of hers, so I passed it to my niece, took it out of the room the same way.
Thanks,
Amy