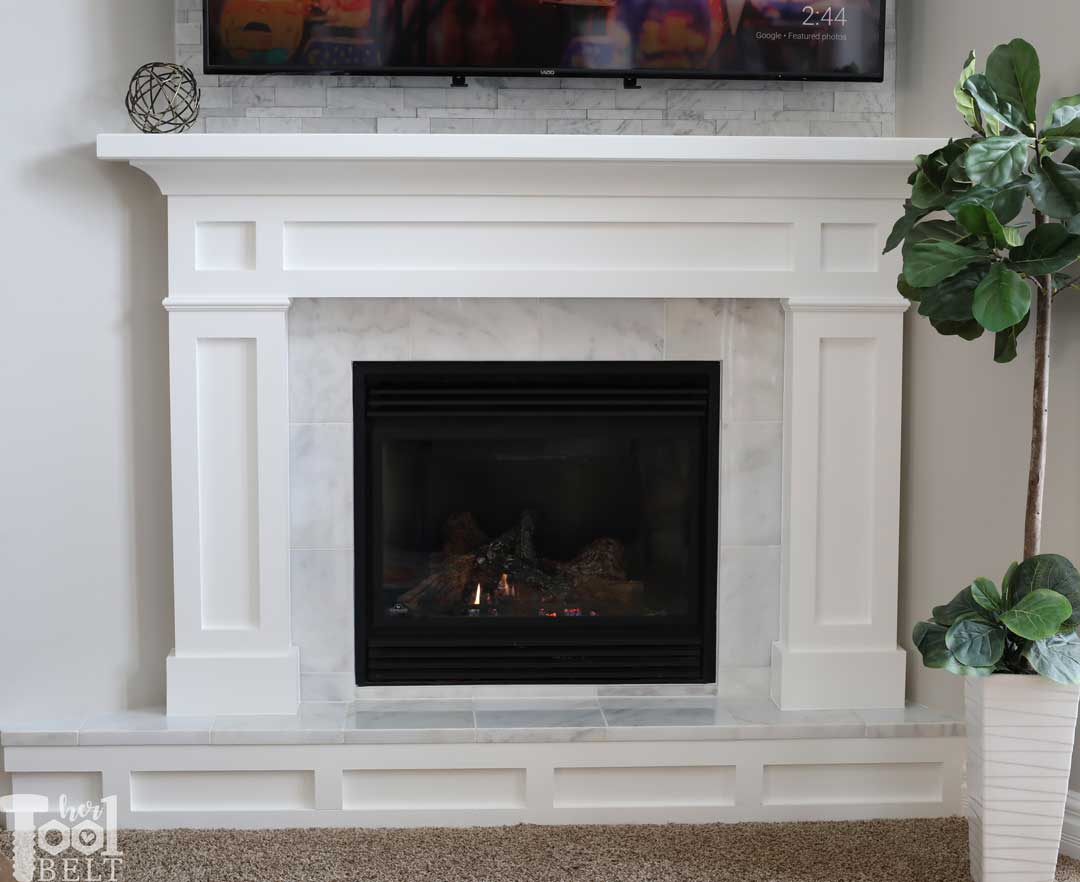
I have never been impressed with my builders grade mantel, it feels a little lack luster to me. Then last Christmas, I pulled off a command strip that I left on too long and it took mantel paint off with it. That was it! I set a goal that I would upgrade my blah fireplace before the next holiday season. Besides updating the mantel, I really want to hang my TV above the fireplace to keep it out of the reach of little hands and free up some much needed space in my small living room. The style I’m going for is modern farmhouse, a corner fireplace modern farmhouse mantel! I debated between white and dark wood fireplace, and ultimately I went with white.
Please Subscribe
Mantel Before
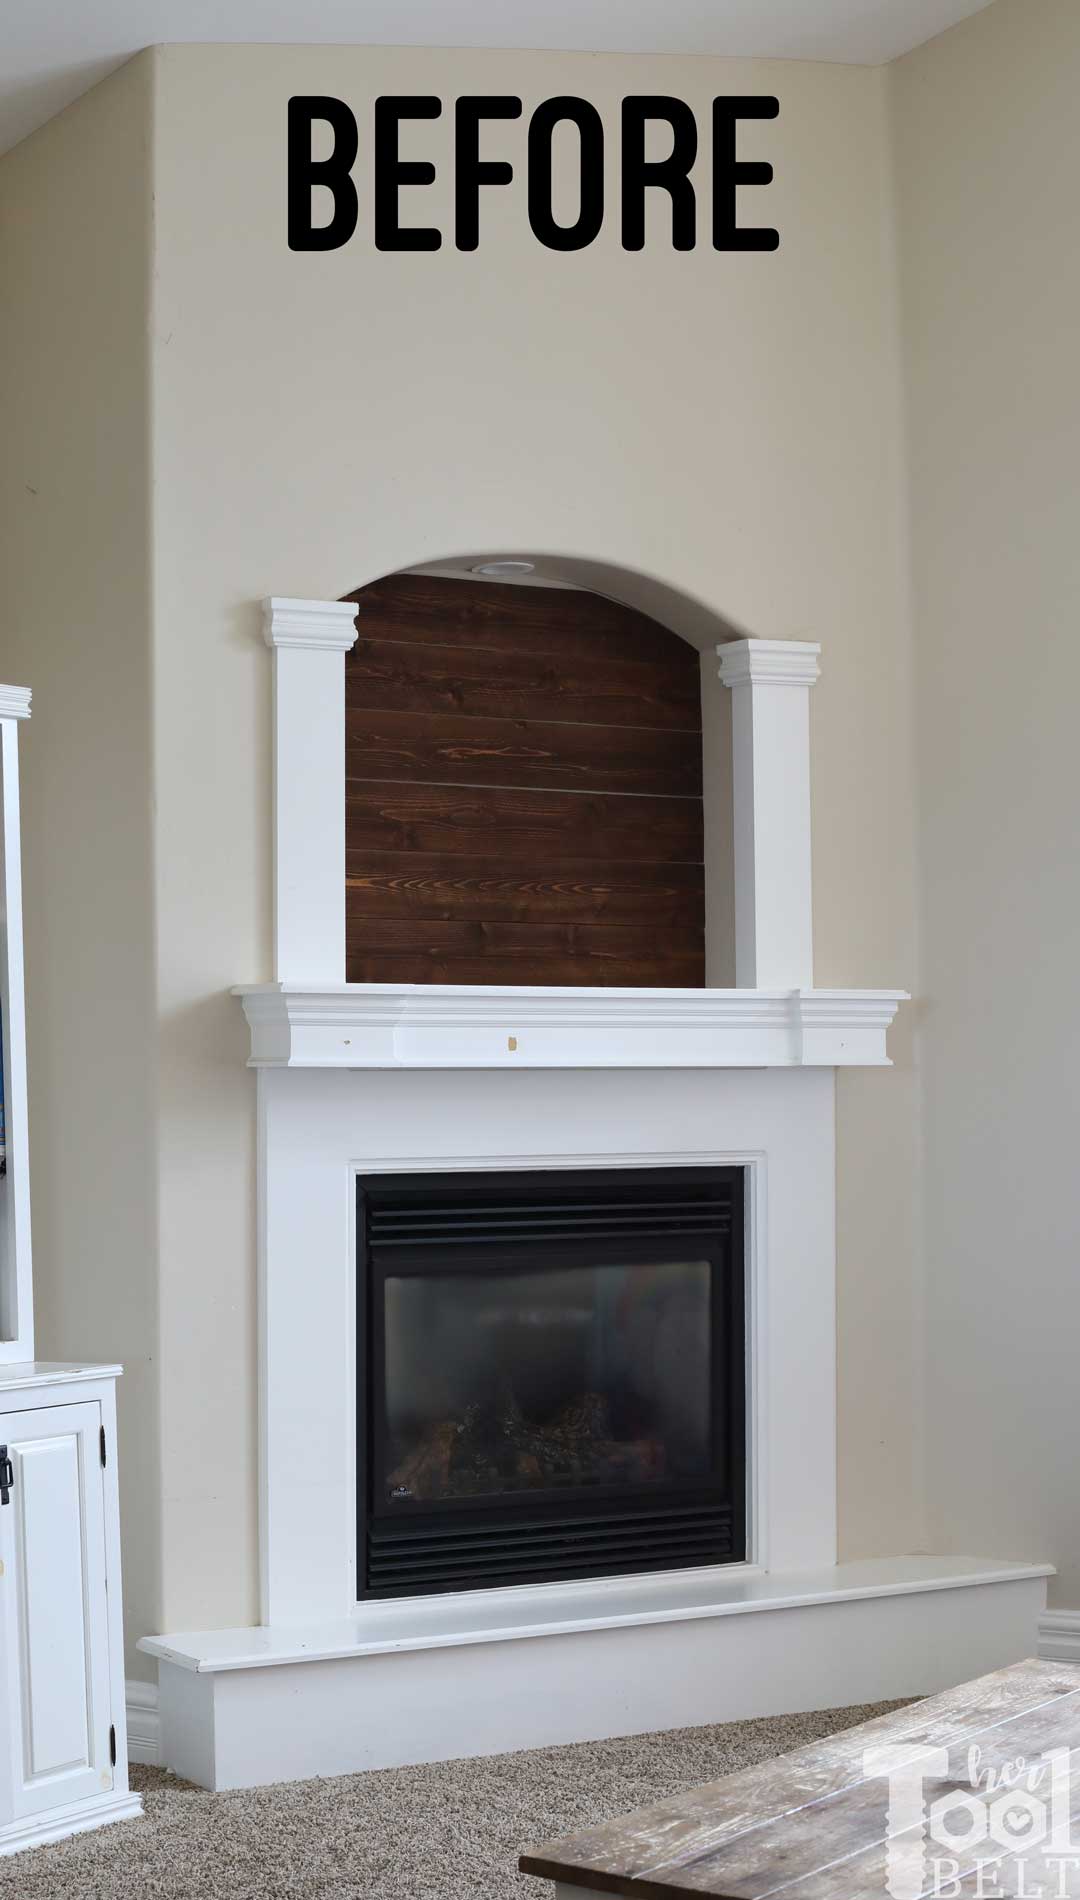 The mantel wall is on a corner angle, then has a jut back to the main wall. Originally I assumed that the wall was at a 45 deg angle, however I was very wrong, ha 🙂 It is something around 35.8 deg. Well isn’t that convenient. 😉 I used that 18″ jut back to the wall, and added a built in media cabinet.
The purpose of the cabinet is two fold:
- Create a balanced look from the front.
- Create a storage area for all of the electronics and media stuff.
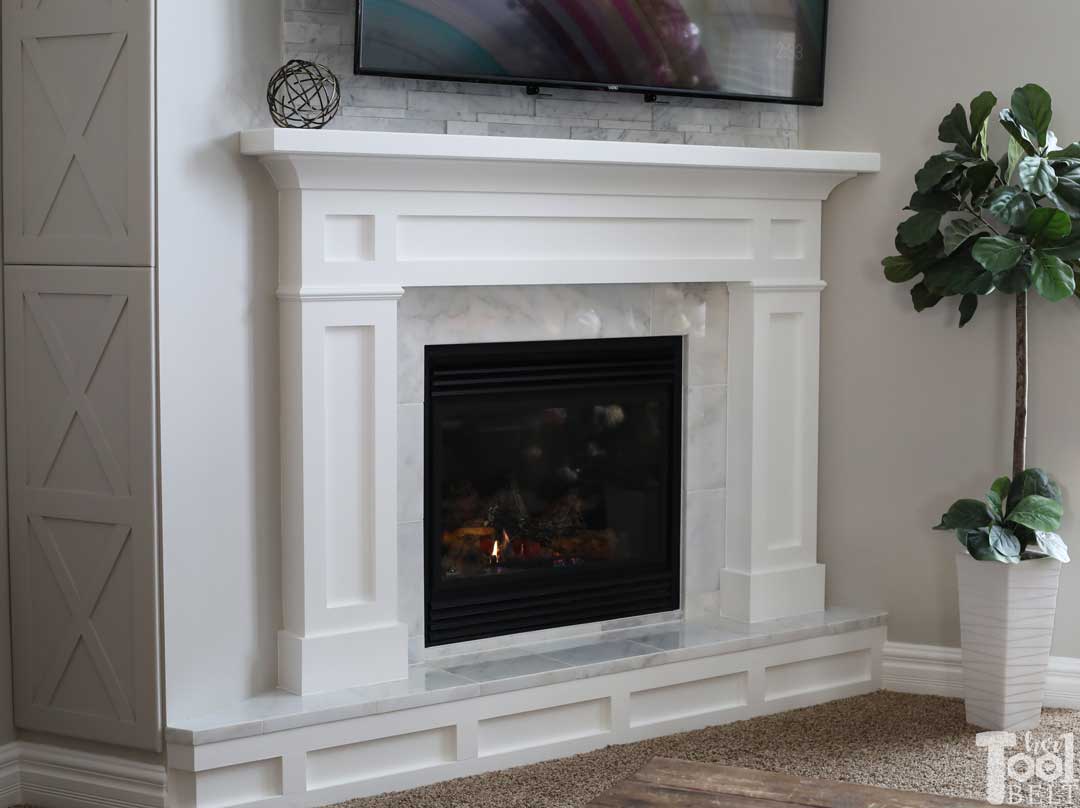
Modern Farmhouse Mantel After
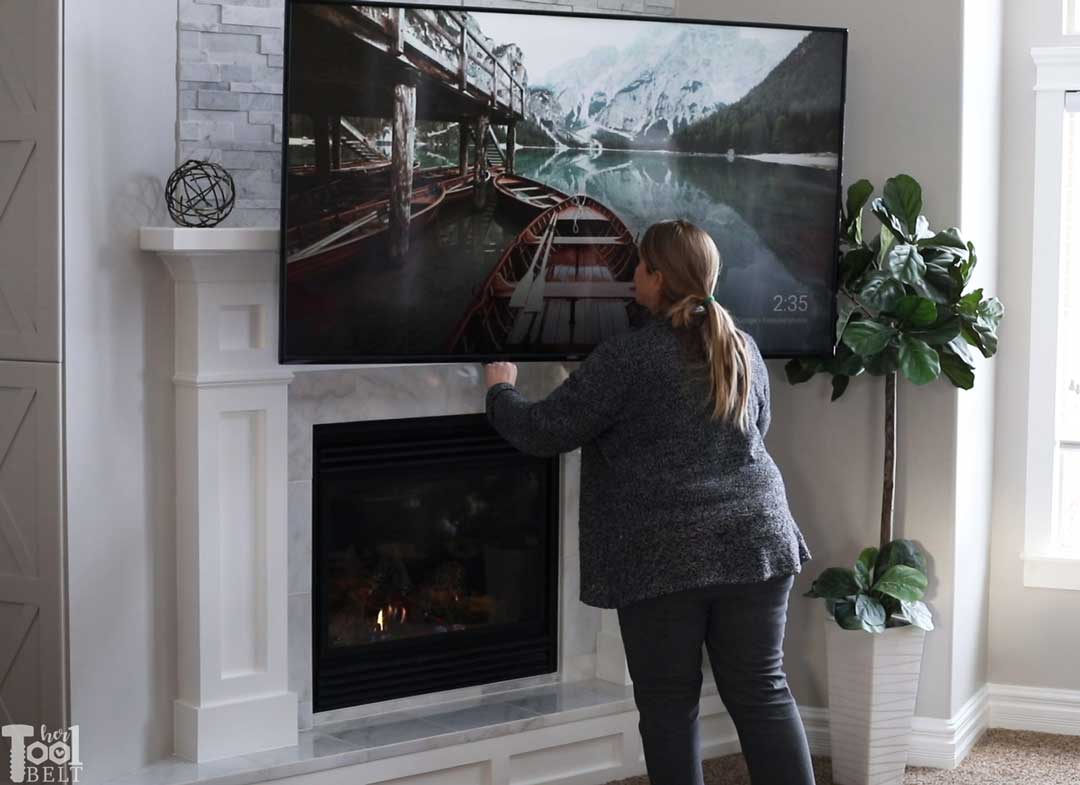
My husband was concerned with the viewing height of the TV above the fireplace. I found a cool TV mount that easily drops down to bring the TV to a comfortable viewing height. You can find it on Amazon here. The size linked fits my 70″ TV, but they have different sizes depending on the TV weight.
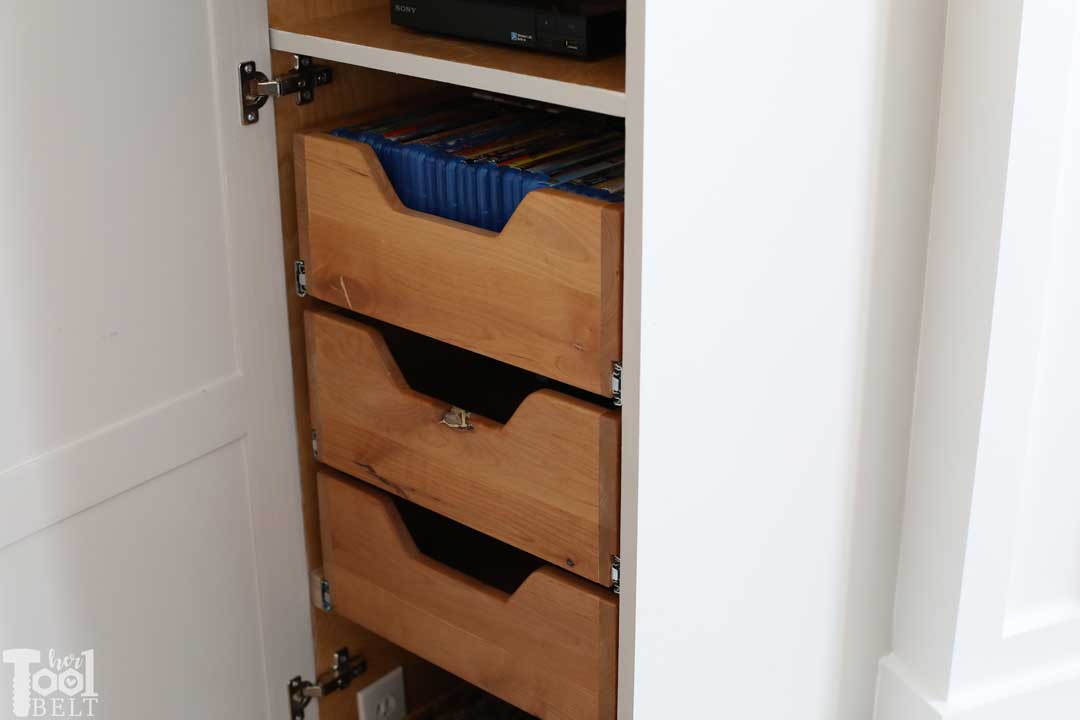
I’m especially loving the new media cabinet on the left of the fireplace that holds all of the electronics, cords, XBOX and DVDs.
Note Before Beginning –
If you’re going to tackle this project, you’ll first want to check out the requirements for your fireplace set up, check your user manual or google your fireplace make and model. Generally you’ll want to keep combustible materials at least 6″ away from the fireplace. There may also be a minimum distance away from fireplace and Mantel Height vs Mantel Depth clearance as well.
In my user manual for a Napoleon fireplace, there is a linear scale for mantel height vs depth. Starting at 2″ from the fireplace, the material can’t stick out to more that 2″, 4″ from the fireplace, the material can’t stick out more than 4″, 6″ for 6″, etc.
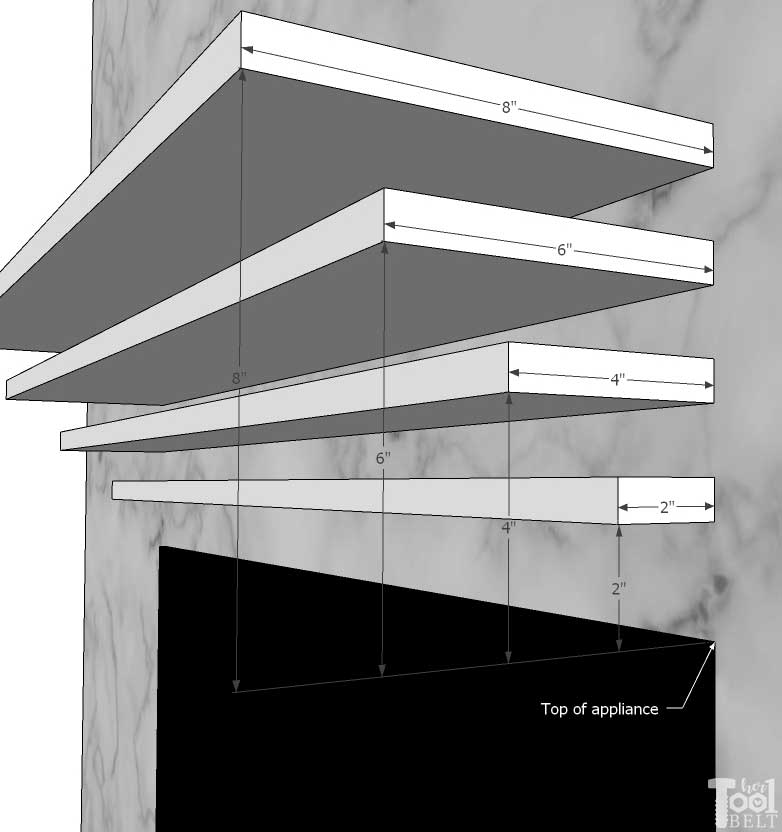
So in my case, measuring from the tile surface, the mantel legs and face stick out 4 1/4″ and they are at least 6″ from the fireplace. If you need more clearance than I have, adjust the frame size to fit your need, then follow the same process in building up the MDF pieces and adjusting to the size of your frame. It really is a simple process to build this fireplace mantel.
This post contains some affiliate links for your convenience. Click here to read my full disclosure policy.
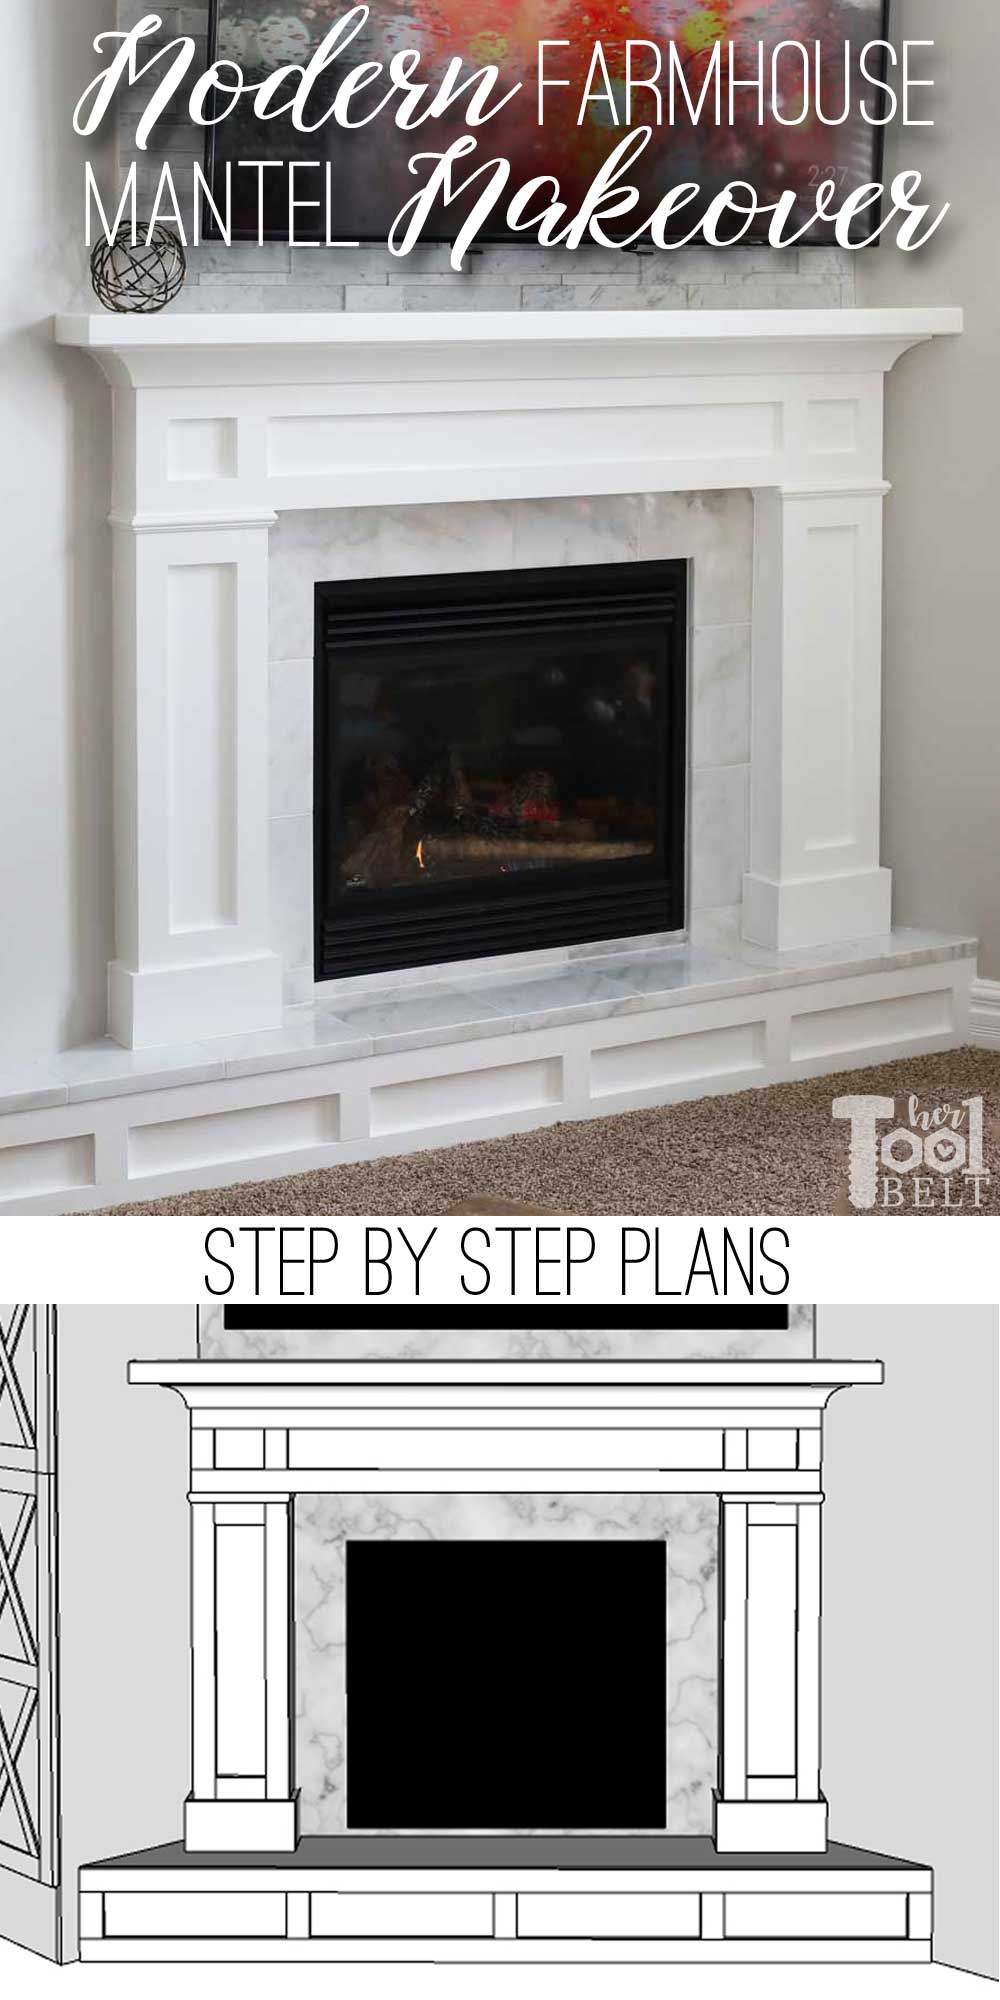
How to Build a Modern Farmhouse Mantel
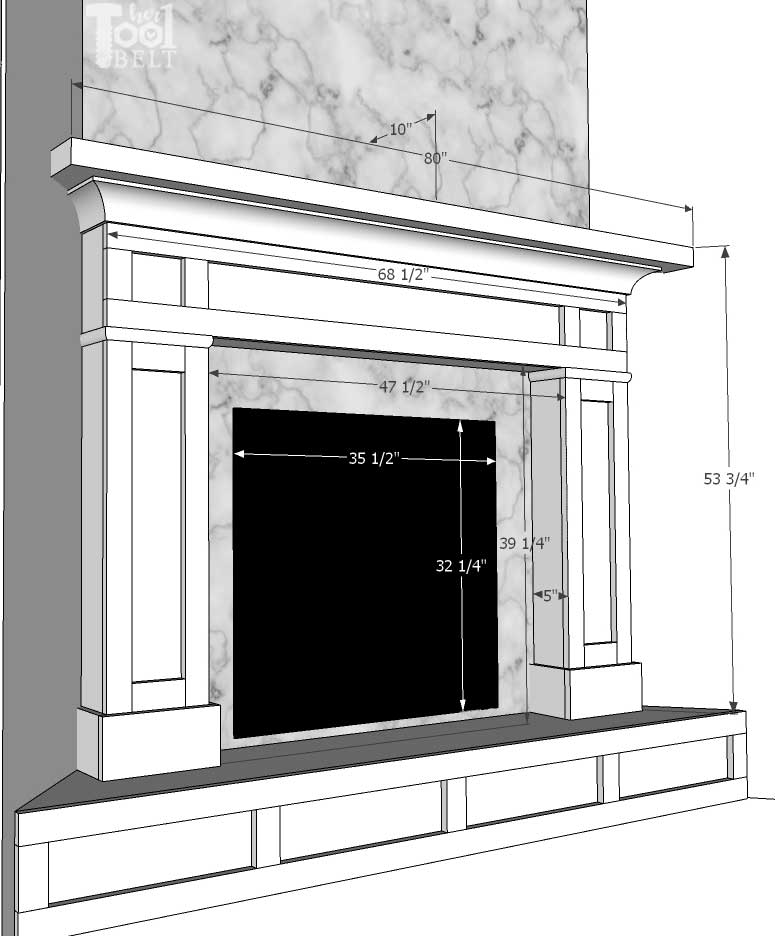
Overall dimensions of the new mantel.
Materials
Mantel
- 2 – 4’x8′ sheets of 3/4″ MDF
- 2 – 2″x4″ x 8′ boards
- 2 – 2″x4″ x 104 5/8″ boards
- 8′ – CM794.25 3/4″ x 4 1/4″ R&G MDF CRN crown molding (Wheelwright Lumber)
- 8′ – 1/4″ x 1 3/16″ #183 panel molding (Wheelwright Lumber)
- 3″ construction screws
- 2 1/2″ pocket hole screws
- 2″ finish nails (brad nails could be used)
- spackle
- caulk
- paint primer
- white paint
- sandpaper
Tools Used
- Ridgid Finish Nailer
- DeWalt Miter Saw
- Ridgid NXT Shop Vacuum
- Dewalt Circular Saw
- with Kreg Rip cut
- level
- Measuring tape
- Putty knife
- Caulk gun
- Pocket hole jig optional
- Drill
- Stud Finder
- 3/8″ drill bit
 |
 |
 |
 |
 |
 |
 |
 |
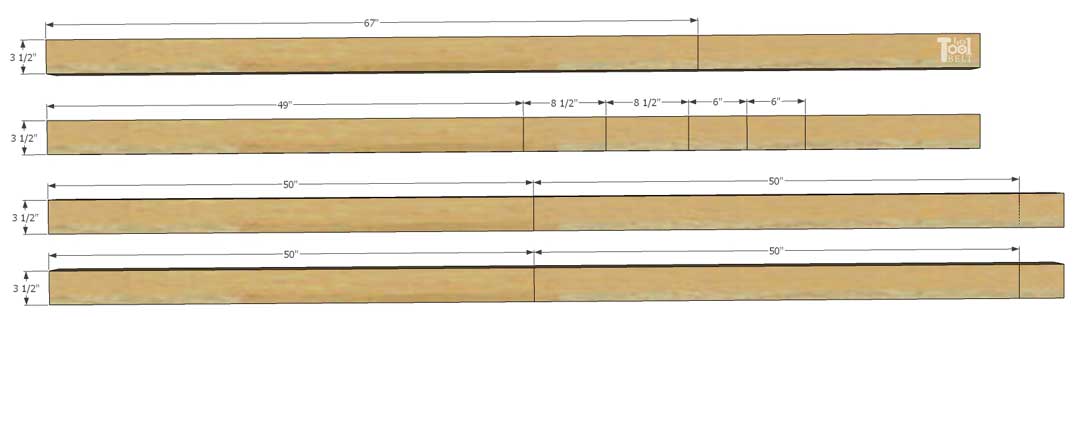
Cut List
2×4
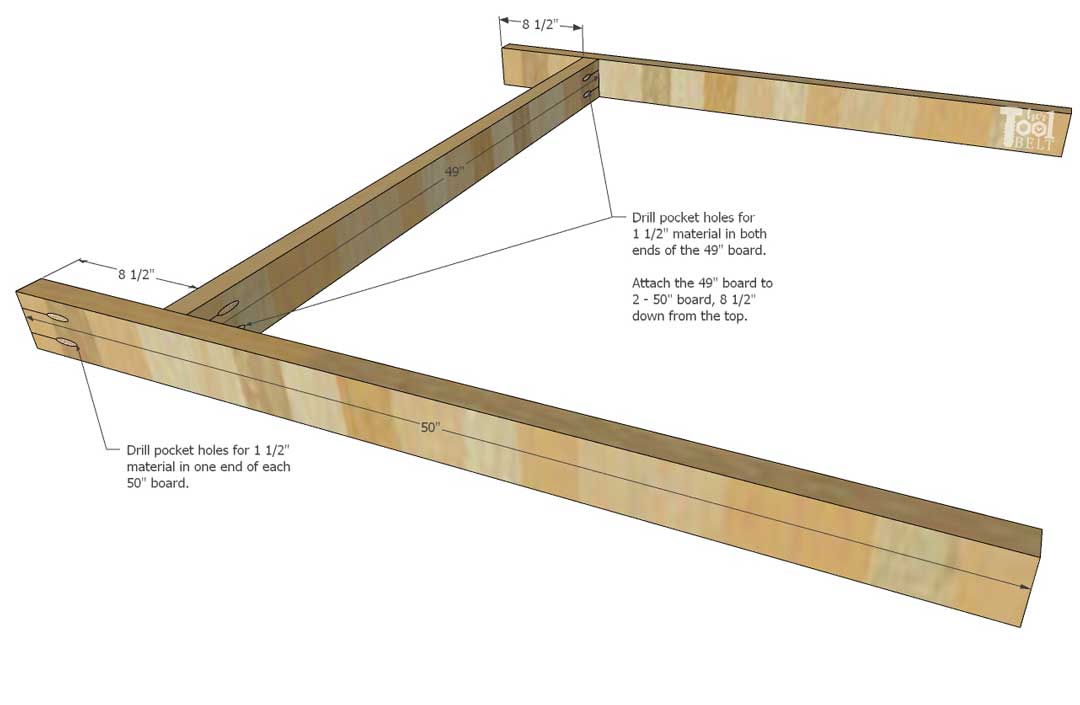
- 4 – 1 1/2″ x 3 1/2″ x 50″ – frame legs
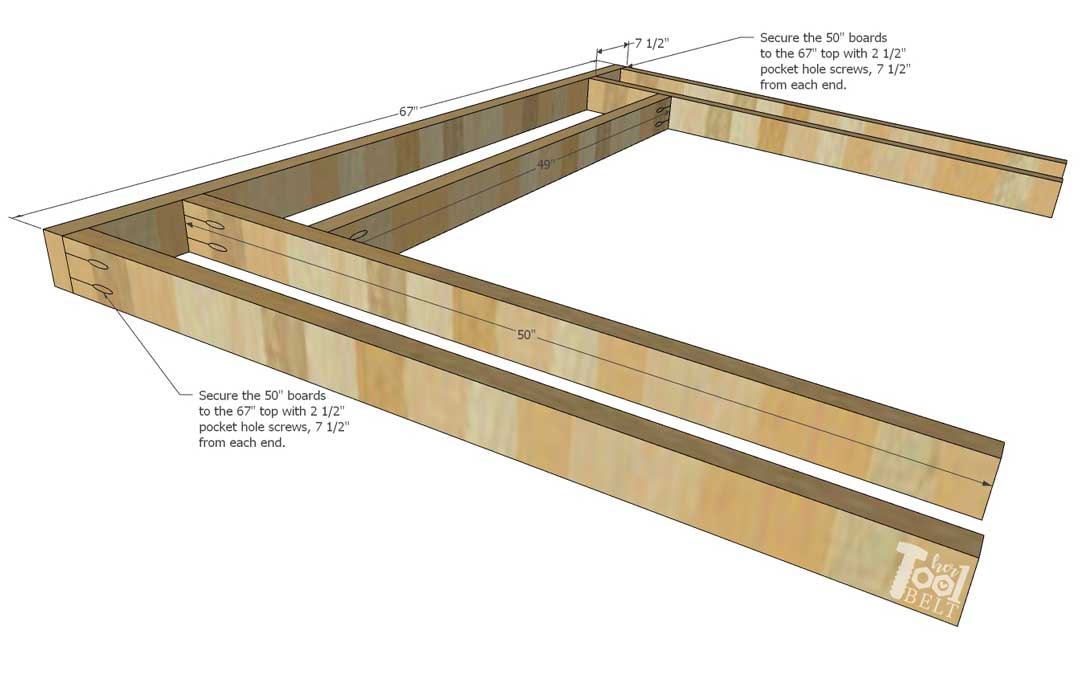
- 1 – 1 1/2″ x 3 1/2″ x 67″ – frame top
- 1 – 1 1/2″ x 3 1/2″ x 49″ – frame middle
- 2 – 1 1/2″ x 3 1/2″ x 6″ – frame lower support
- 2 – 1 1/2″ x 3 1/2″ x 8 1/2″ – frame support
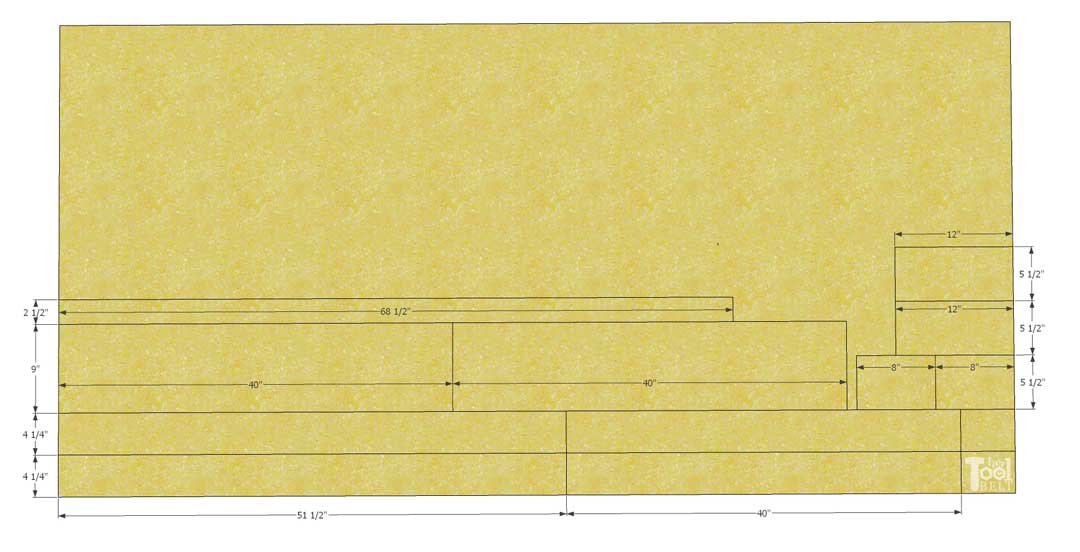
MDF
- 3 – 3/4″ x 10″ x 80″ – top
- 1 – 3/4″ x 11 1/2″ x 67″
- 1 – 3/4″ x 5 1/4″ x 68 1/2″
- 1 – 3/4″ x 4 1/4″ x 47 1/2″
- 4 – 3/4″ x 2 1/2″ x 39 1/4″
- 4 – 3/4″ x 2 1/2″ x 4 1/2″
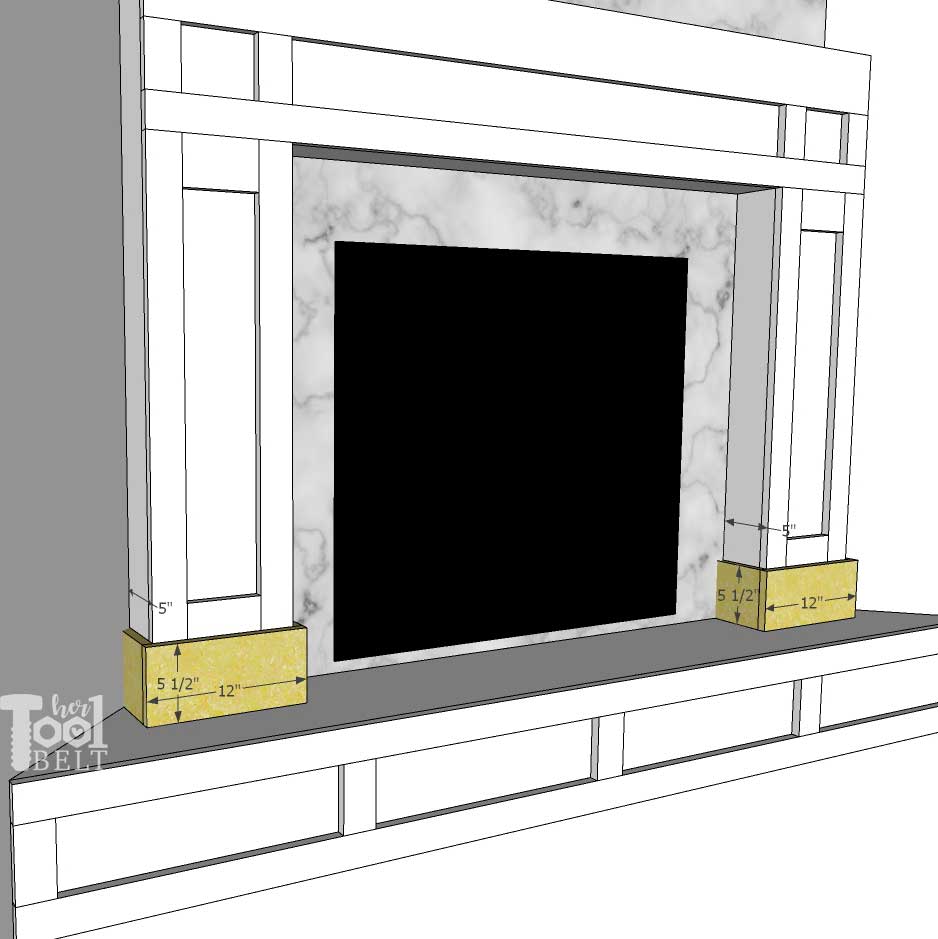
- 4 – 3/4″ x 5″ x 5 1/2″
- 2 – 3/4″ x 3 1/2″ x 5 1/2″
- 1 – 3/4″ x 2 1/2″ x 68 1/2″
- 2 – 3/4″ x 9″ x 40″
- 2 – 3/4″ x 4 1/4″ x 51 1/2″
- 2 – 3/4″ x 4 1/4″ x 40″
- 2 – 3/4″ x 5 1/2″ x 8″
- 2 – 3/4″ x 5 1/2″ x 12″
Frame Cut Diagram
MDF Cut Diagrams

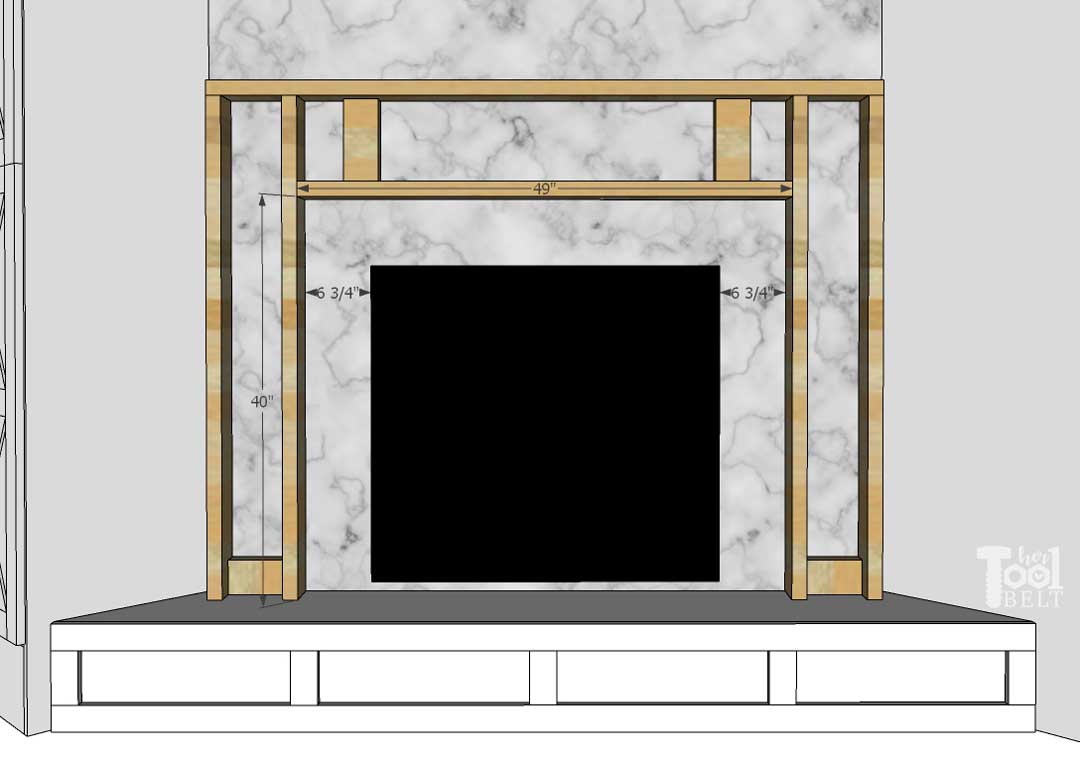
Step 1 – Assemble Mantel Frame
Cut the 2×4’s according to the cut list.
Drill pocket holes for 1 1/2″ material in one end of each of the 50″ boards, and both ends of the 49″ board. (Note: pocket holes are not required, the boards can be attached with 3″ screws thru the 50″ boards.)
Mark down 8 1/2″ from the top of the 50″ boards. Attach the 49″ board to the 50″ boards with 2 1/2″ pocket hole screws, at the 8 1/2″ marks.
On the 67″ top board, mark 7 1/2″ over from each end. Secure the 50″ boards to the 67″ top board with 2 1/2″ pocket hole screws 7 1/2″ from each end.
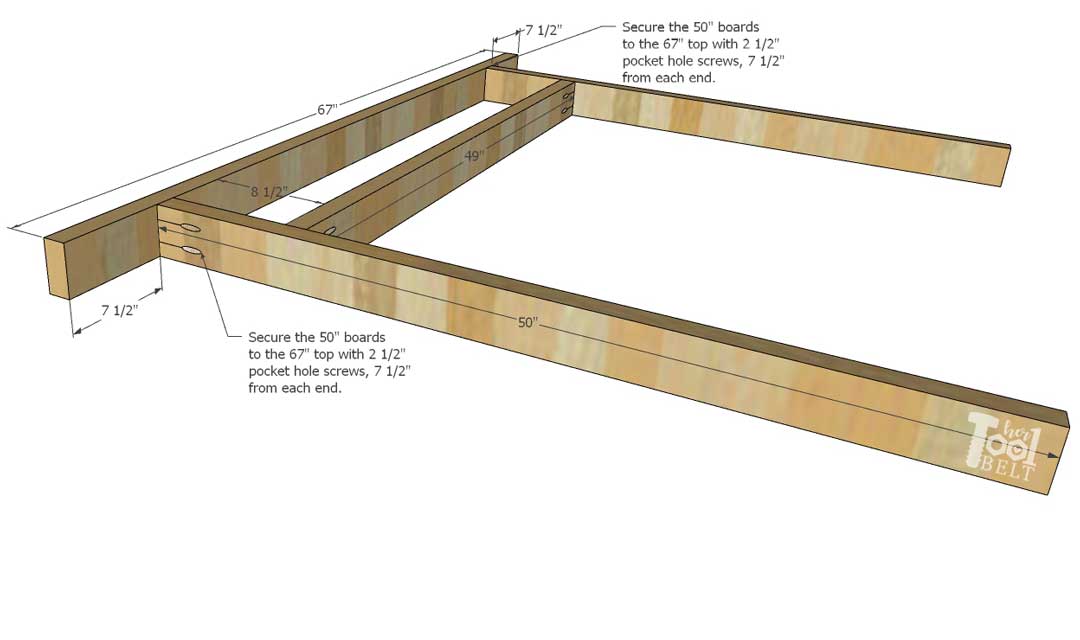
Attach 2 more 50″ boards flush with the ends of the 67″ top board with 2 1/2″ pocket hole screws.
The 6″ and 8 1/2″ support pieces are used to secure the frame to the wall. Place these support blocks in locations that will correspond with 2×4’s in your wall around the fireplace. Secure the support blocks flush with the back of the frame with 2 1/2″ or 3″ screws.
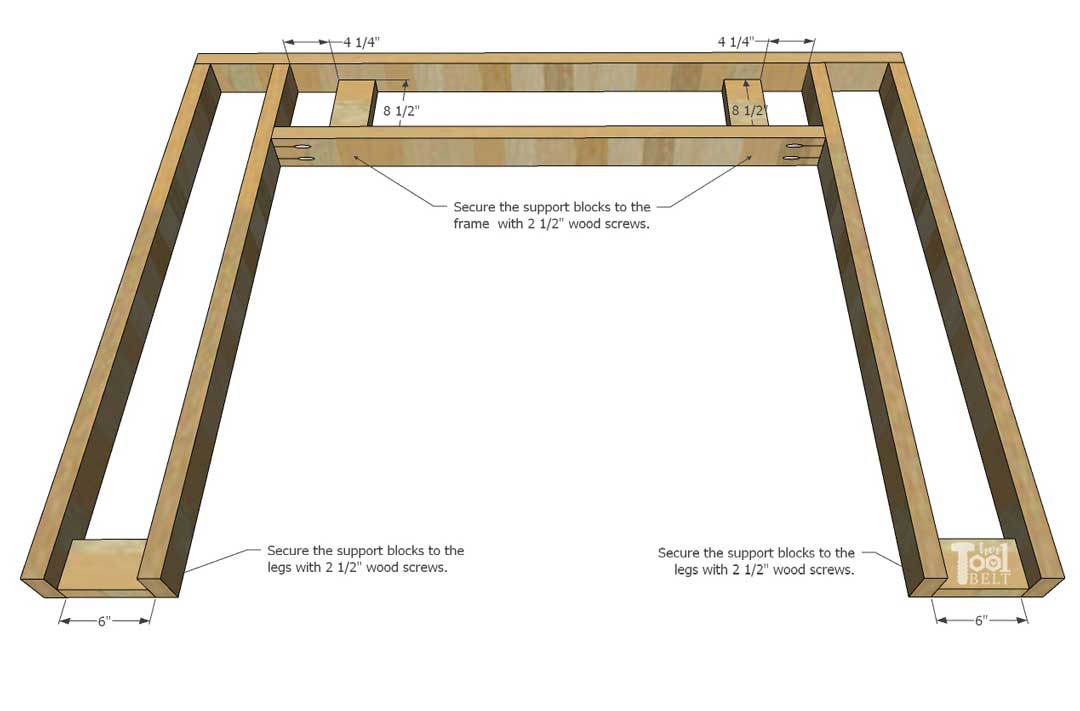
Locate the studs in the wall surrounding the fireplace. Center the frame over your fireplace. Use 3″ wood screws (or longer) to secure the frame to the wall thru the 6″ and 8 1/2″ support blocks into studs in the wall.
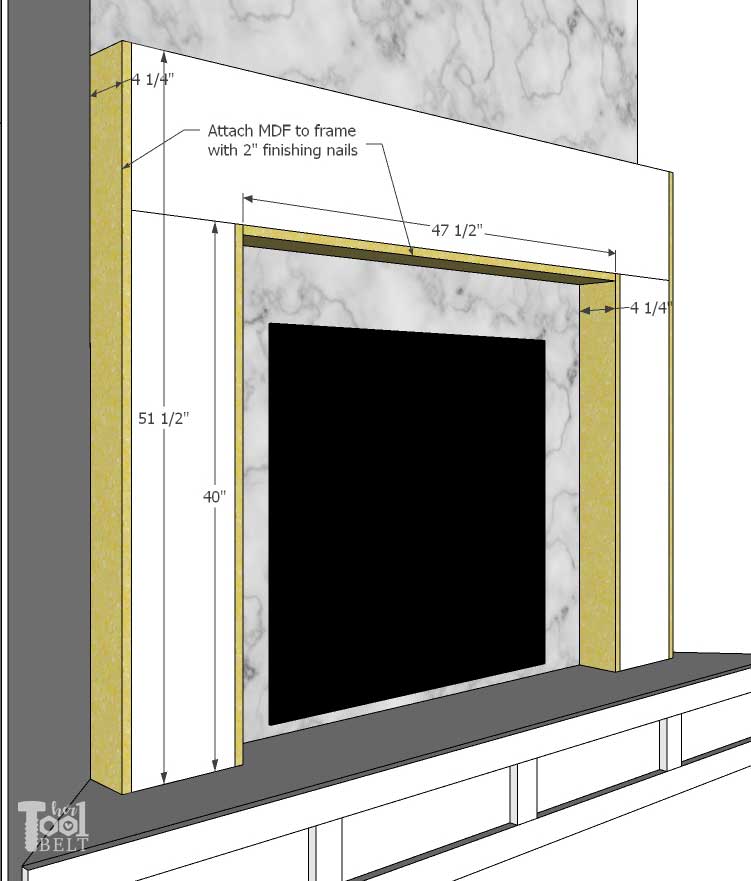
Step 2 – Build Up Modern Farmhouse Mantel
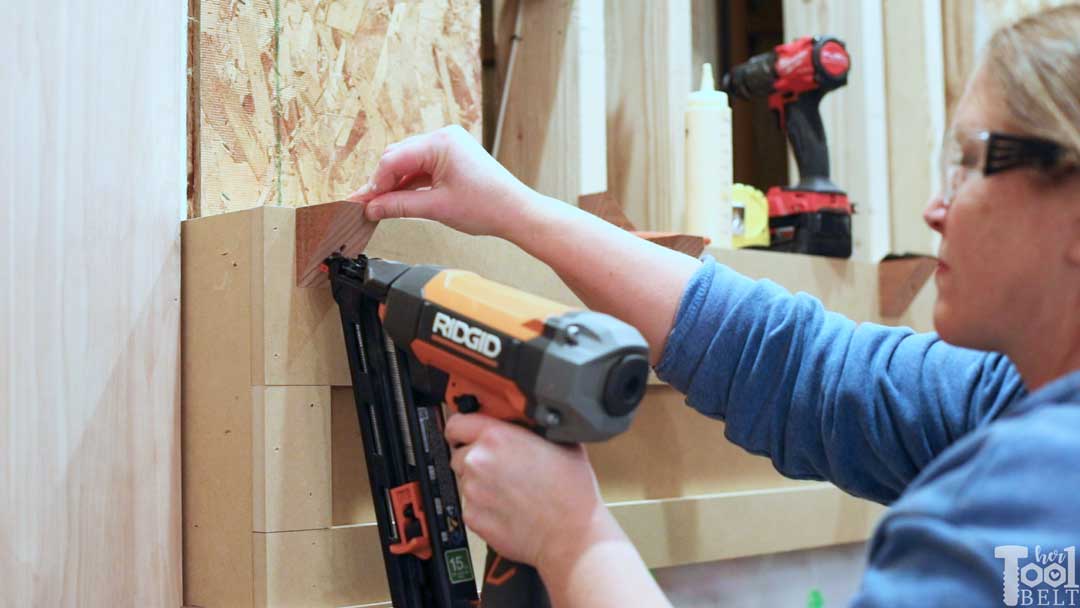
The first step is to cover the face of the frame with MDF. If you adjusted the frame size, cut the MDF to fit the face of the frame. Use a finishing or brad nailer and secure the MDF to the 2×4 frame with 2″ minimum length nails.
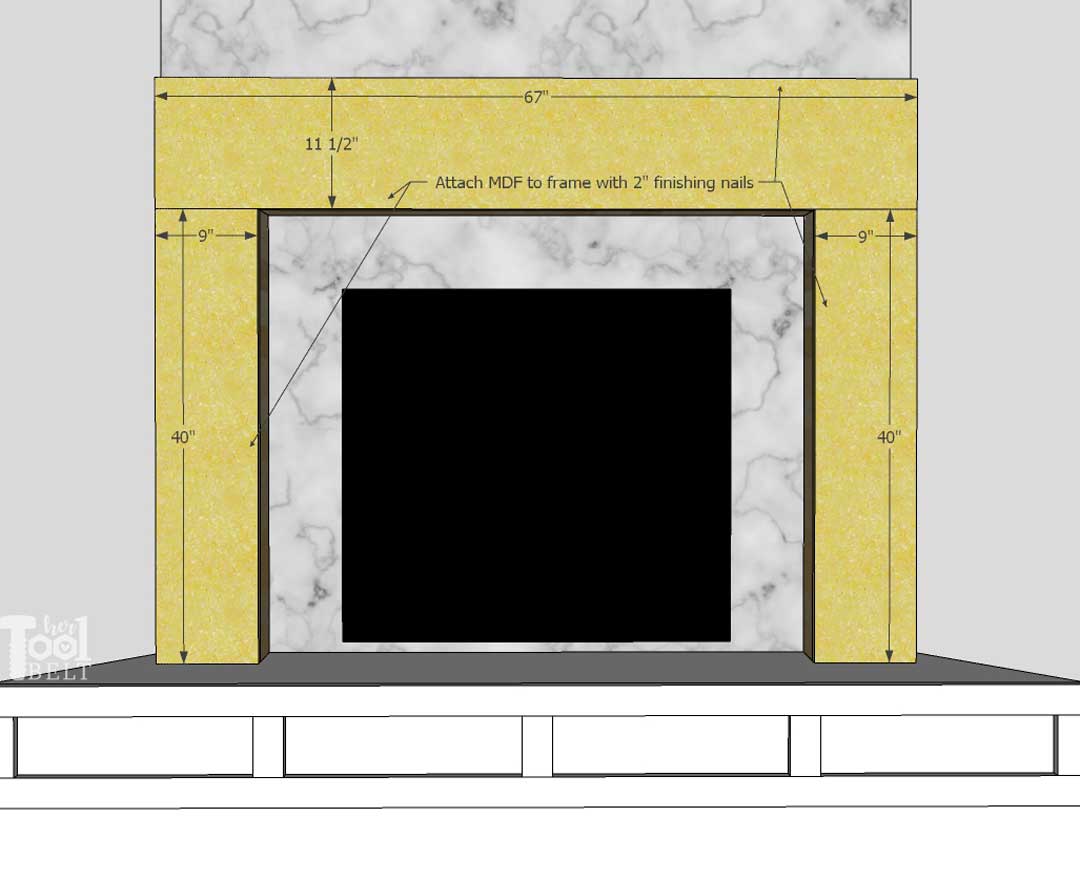
Measure the wall to face of the MDF, and cut side pieces to fit all around the mantle. Secure the size MDF pieces to the frame with 2″ finishing or brad nails.
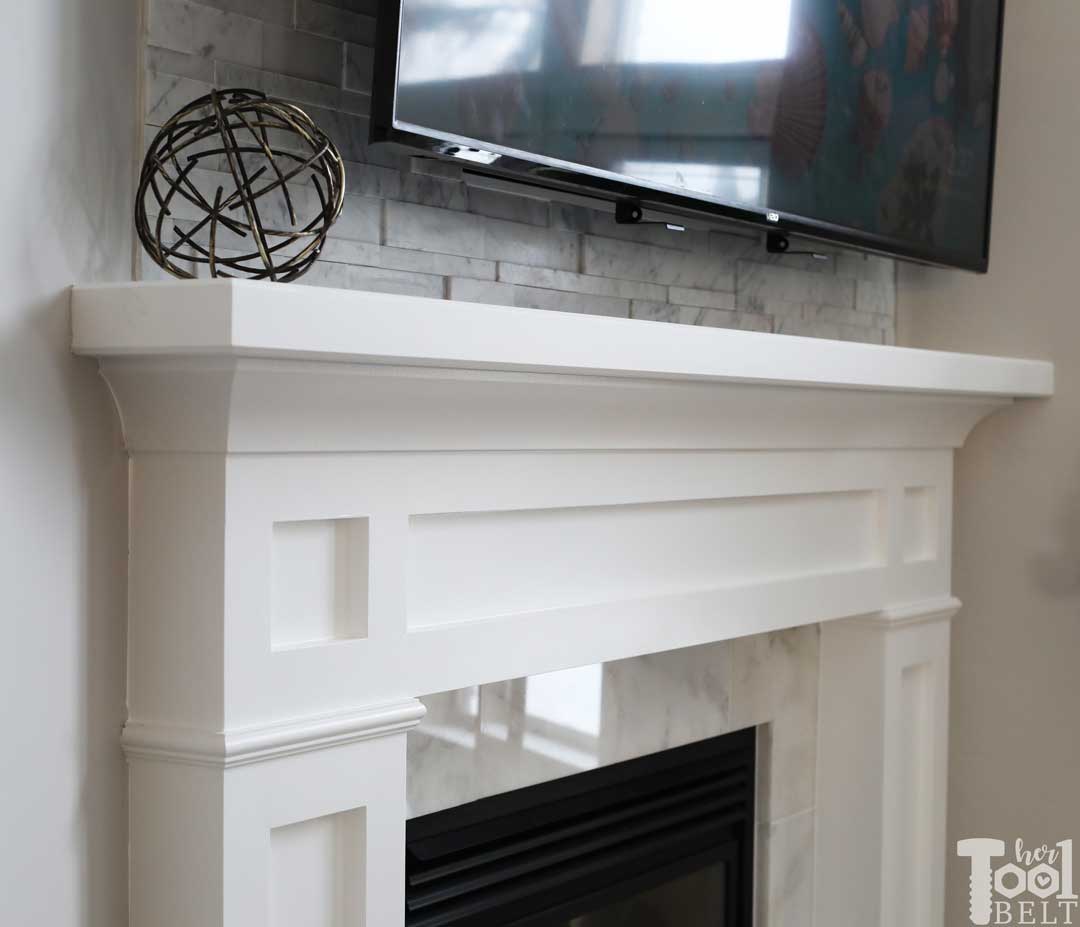
Modern Farmhouse Mantel Details
The top 5 1/4″ x 68 1/2″ piece is based on the crown molding I chose to go under the Mantel Top. The crown molding is just under 3″ tall, leaving about 2 1/2″ showing of the 5 1/4″ piece. You can adjust the width of the 5 1/4″ piece according to the crown molding you choose to use. Adjust the length of the 4 1/2″ vertical pieces as needed.
Attach all of the MDF details with 2″ finishing or brad nails. Take care to line up the edge pieces with the mantel sides, then cut the middle pieces to fit.
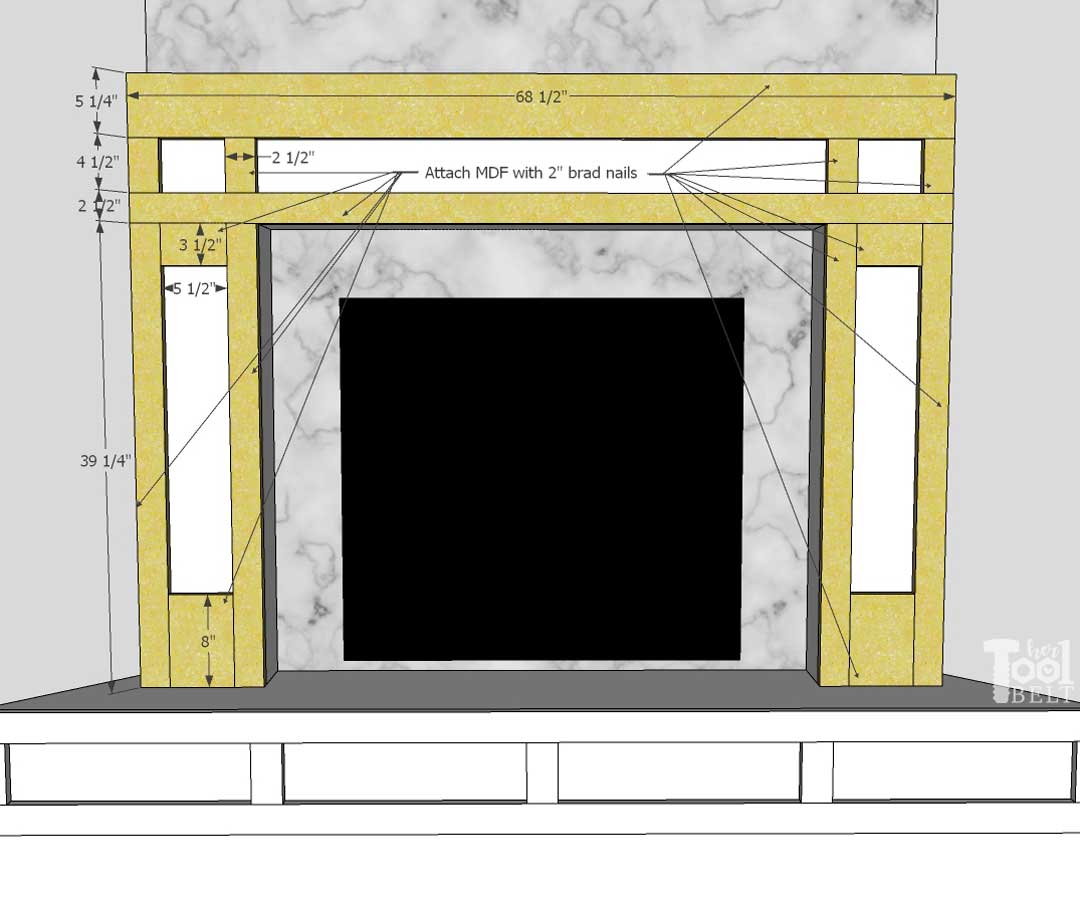
Wrap the base of the mantel legs with 5 1/2″ pieces, secure with 2″ finishing or brad nails.
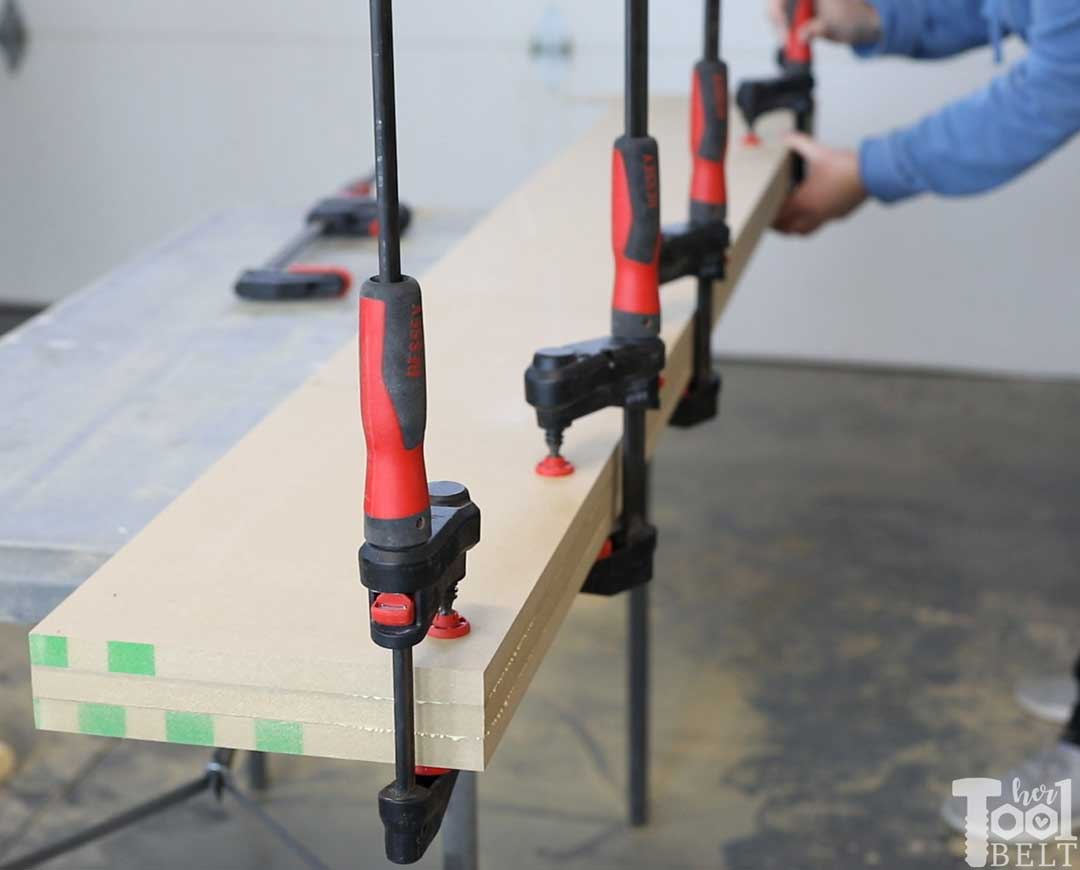
I wanted the Mantel Top to look chunky like the rest of the mantel. I laminated (glued) together the 3 – 10″ x 80″ MDF pieces together in a triple stack and let that dry for a day.
Then I sanded the front and side edges smooth. I routed a small chamfer on the edges for detail. Then I cut the angles to fit in the corner, making sure to keep the center of the top, lined up with the center of the mantel frame. Once the mantel top fit perfectly in my odd corner, then I drilled a few 3/8″ holes about 1″ down and 1 1/2″ from the back of the top, to secure the top to the 2×4 frame.
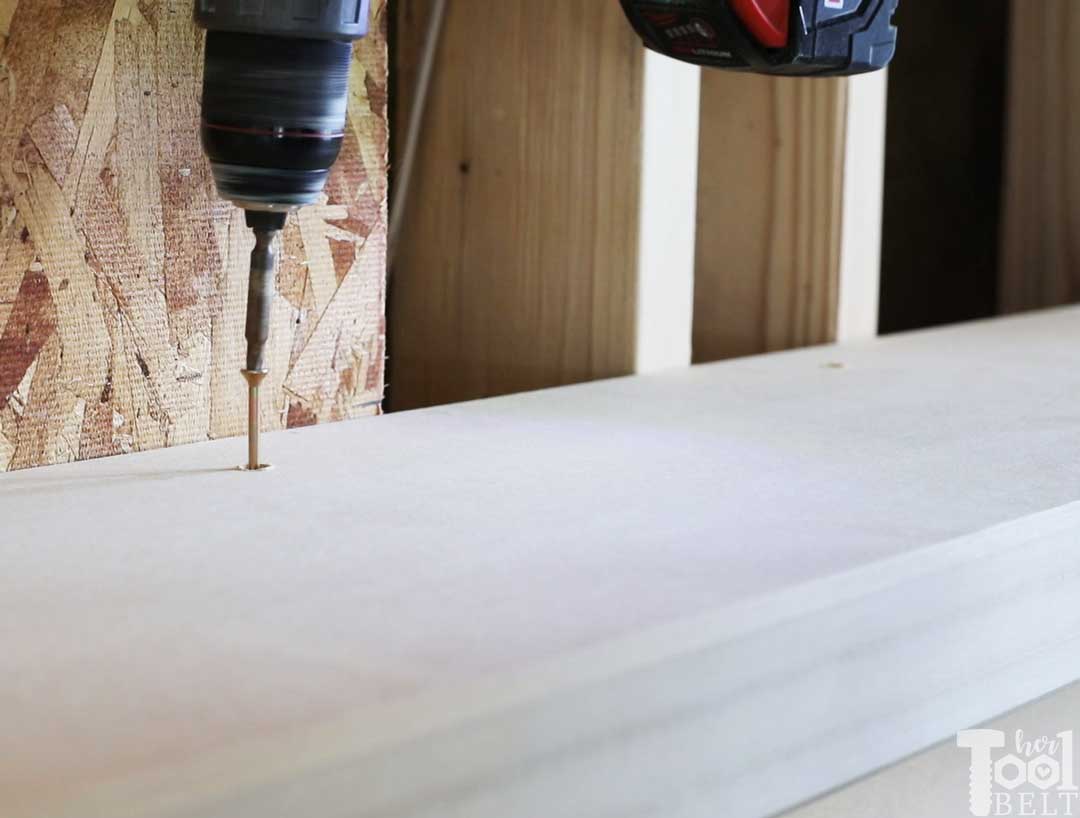
I secured the mantel top to the frame with 3″ wood screws. Then I filled the holes with spackle or putty.
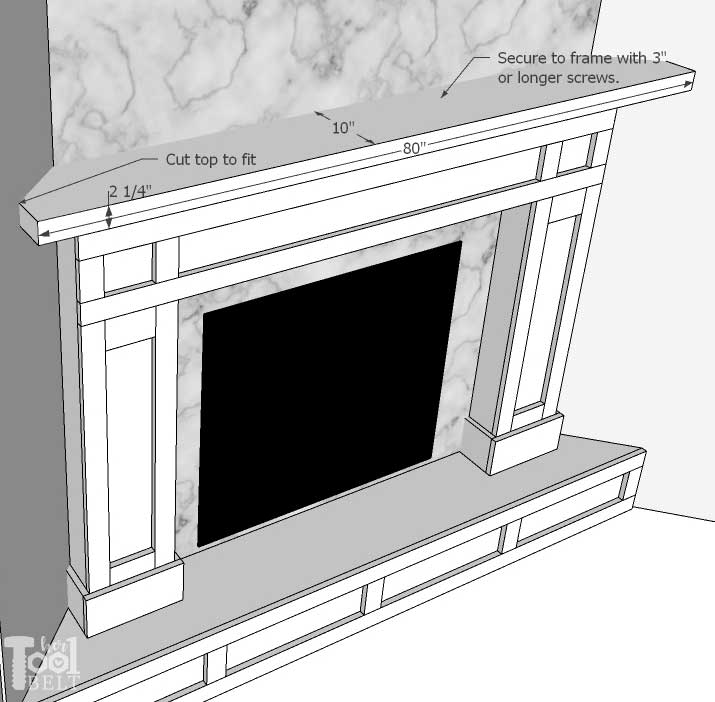
I trimmed the top of the legs with 1/4″ x 1 3/16″ #183 panel molding, cutting to fit and securing with 2″ finishing nails. Then I trimmed under the top of the mantel with CM794.25 3/4″ x 4 1/4″ R&G MDF CRN crown molding, cutting to fit and securing with 2″ finishing nails.
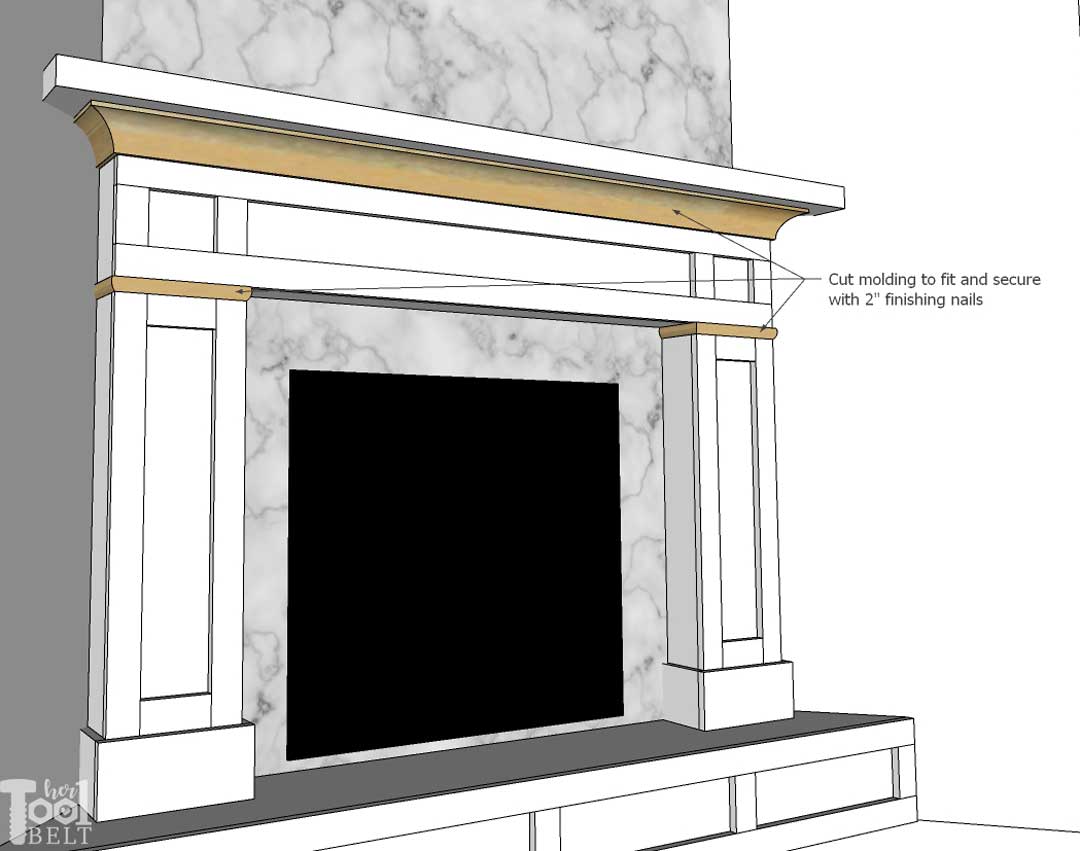
To help secure the crown molding, I cut little triangle support blocks out of scrap 2×4 and secured them to the mantel, the attached to crown to the mantel. (The triangle blocks were kind of a pain to attach to the mantel, I’m not sure they were worth the effort???)
Step 3 Finish
MDF can look amazing once painted, and it’s all about the prep before painting!!! The MDF cut edges need a little extra attention to look good. I like to sand all of the edges smooth with the adjacent side pieces, then apply a thin layer of spackle. Once the spackle is dry, sand them smooth. Also fill the nail holes with spackle, removing any raised MDF from the nail. If any nails are above the surface, use a nail setter punch and hammer to tap the head below the MDF surface. Then use caulk to fill in any cracks and gaps around the edges of the mantel, between the mantel and wall, and also around all of the MDF and molding trim pieces.
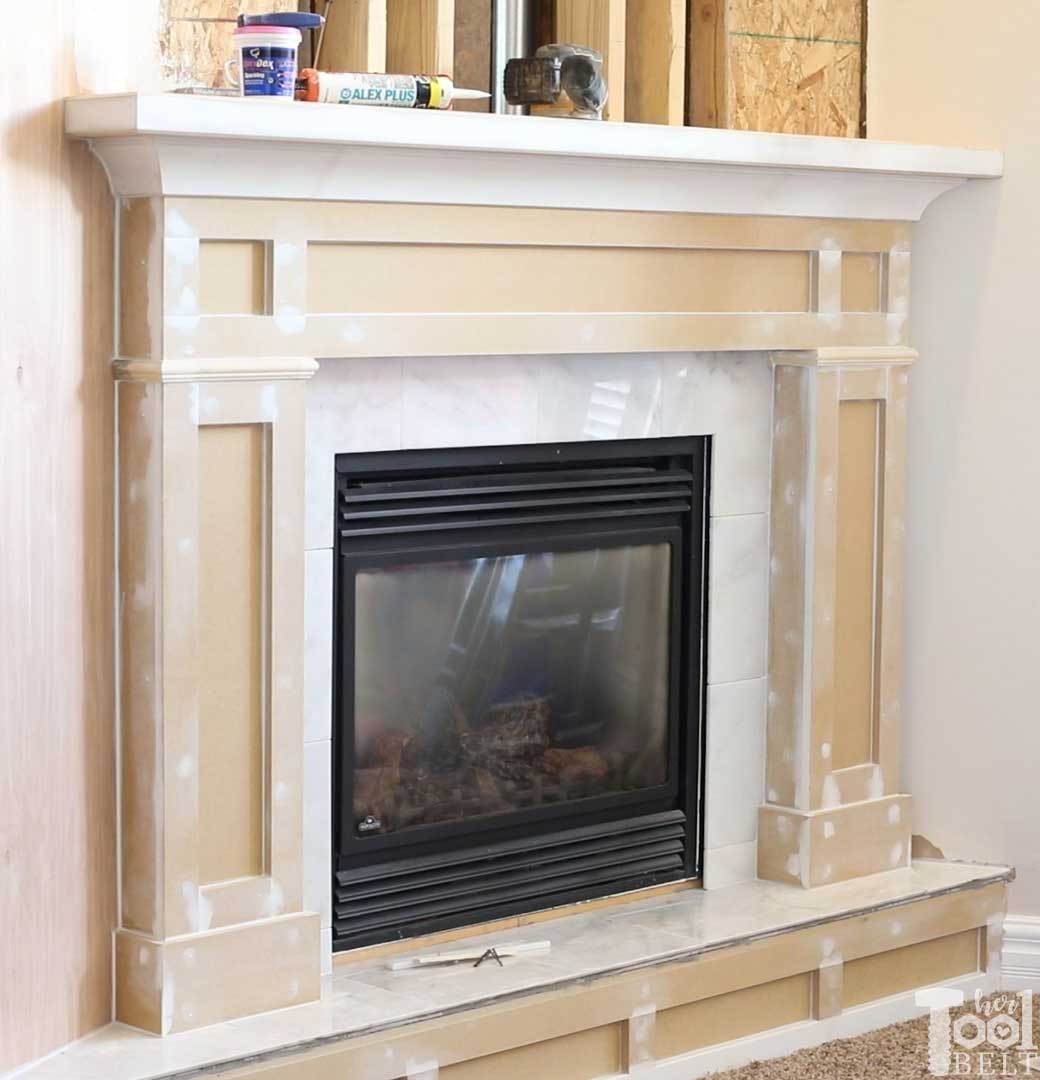
I primed the modern farmhouse mantel with primer and let the first coat dry. Once the primer is dry, make sure to use a sanding sponge or sand paper to sand all of the cut edges of the MDF smooth. Priming will often raise the raw fibers of the MDF, sanding these smooth after priming will make all of the difference in the world on the finished product! Then I applied a second coat of primer, followed by 2 coats of Behr Cabinet and Trim white paint. Sanding between coats as needed.
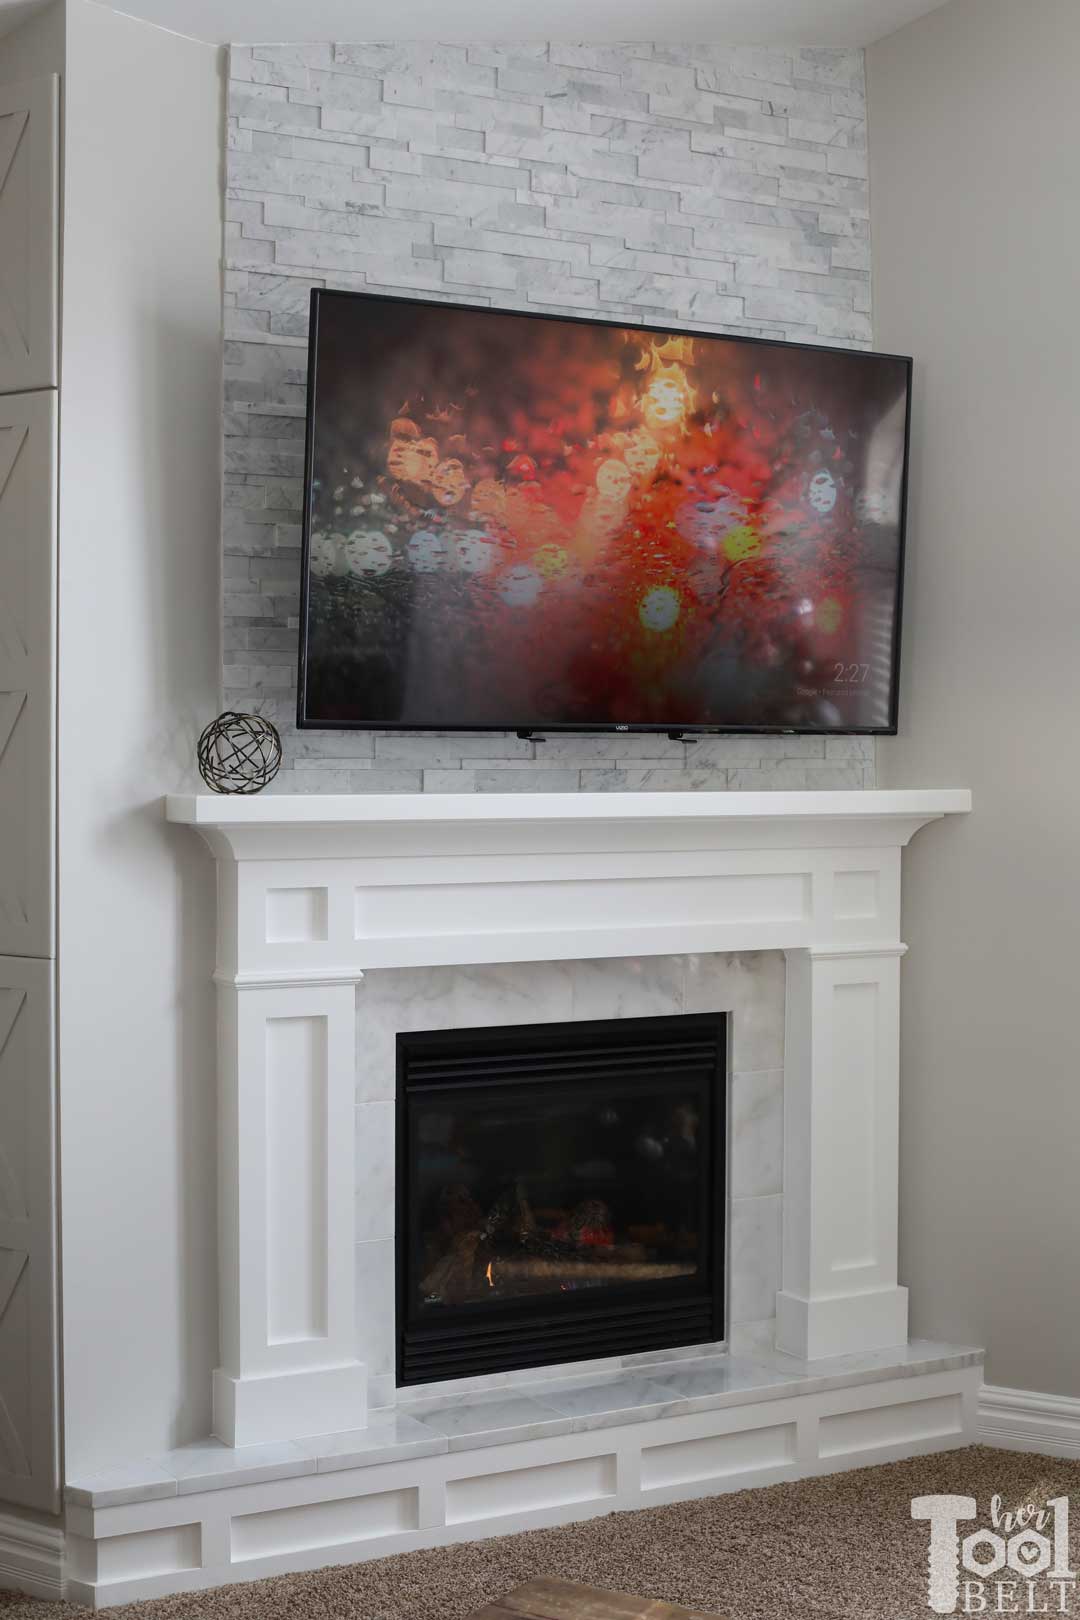
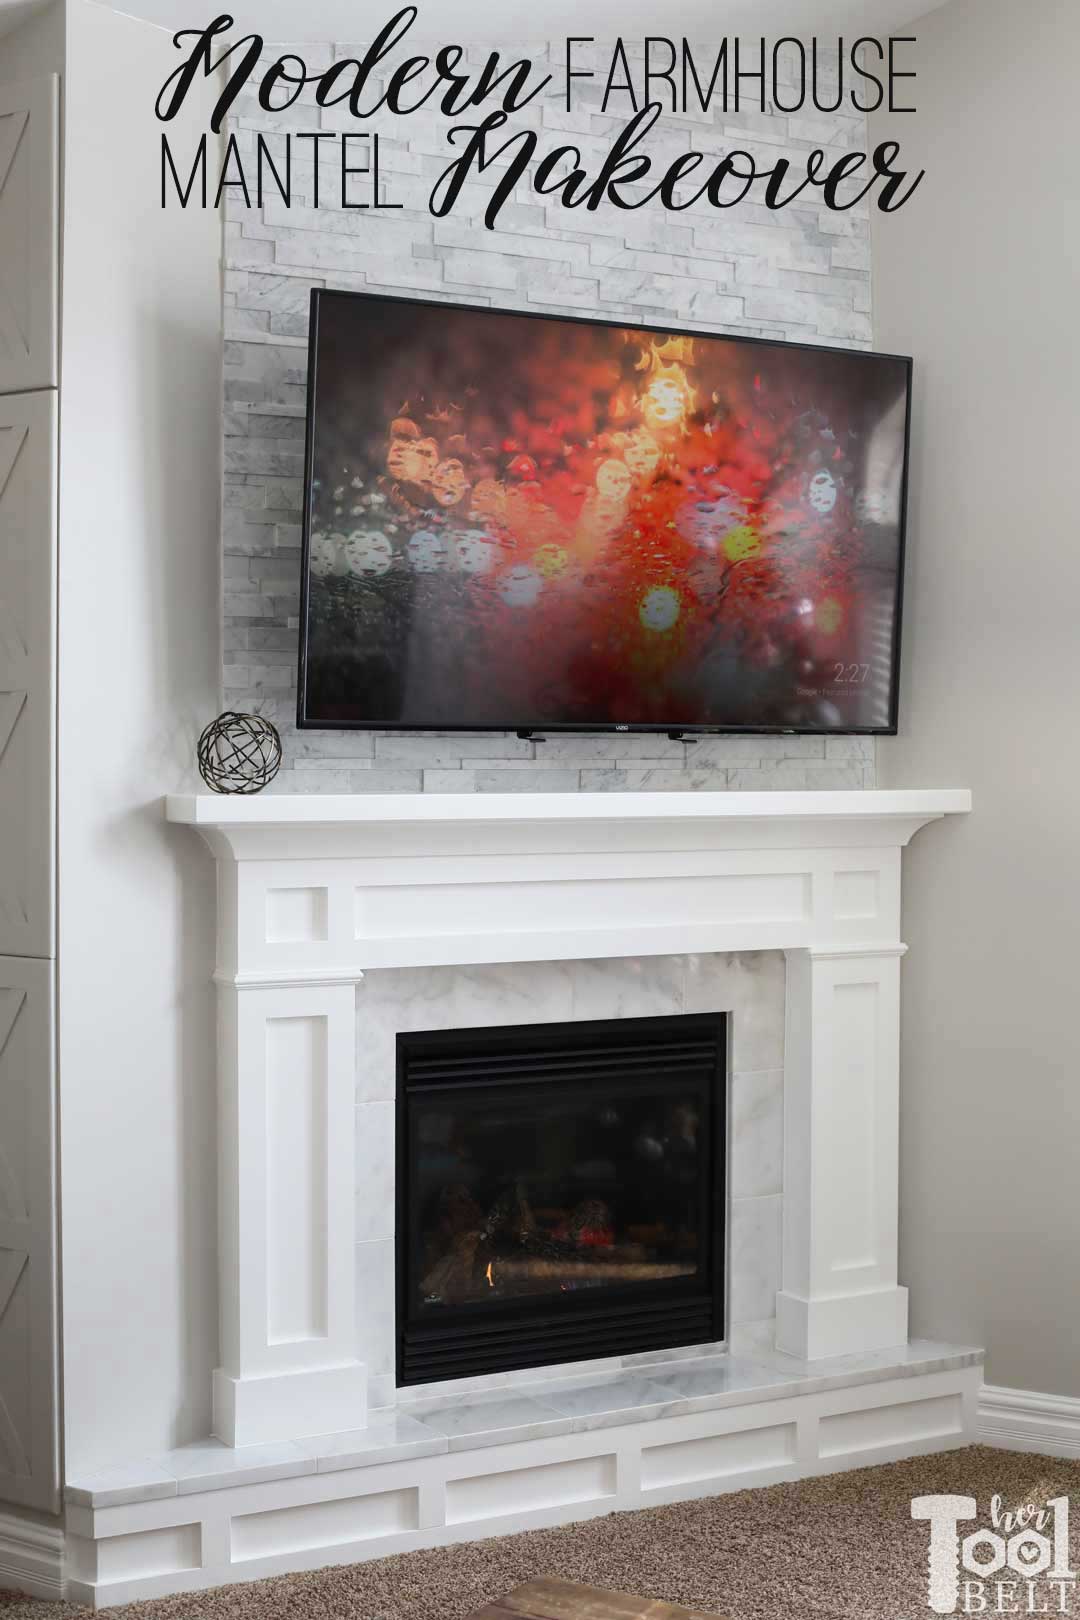
I’m super happy with the results. I love having the TV up and out of the way, and the white mantel turned out beautiful.
Download the plans for the Modern Farmhouse Mantel –>Here<–
Thanks for pinning!

Modern Farmhouse Mantel in a room corner.
Leave a Reply