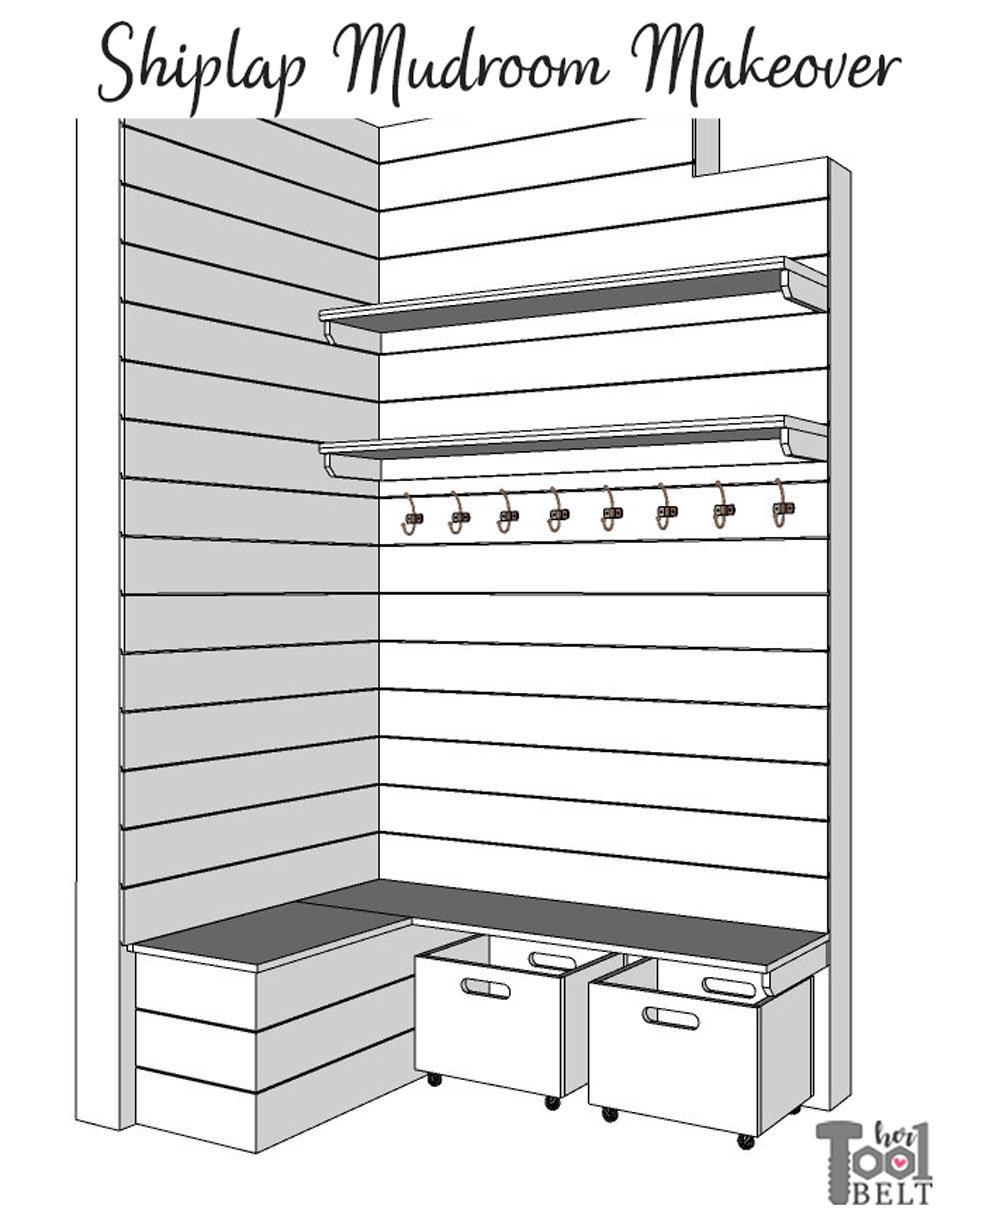
This post is a reader request for a shiplap mudroom that will better utilize the small space. The reader Marla wanted an ‘L’ bench with pull out shoe crates (from Jaime Costiglio) and a hinging bench top (for winter boots, etc).
This post contains some affiliate links for your convenience. Click here to read my full disclosure policy.
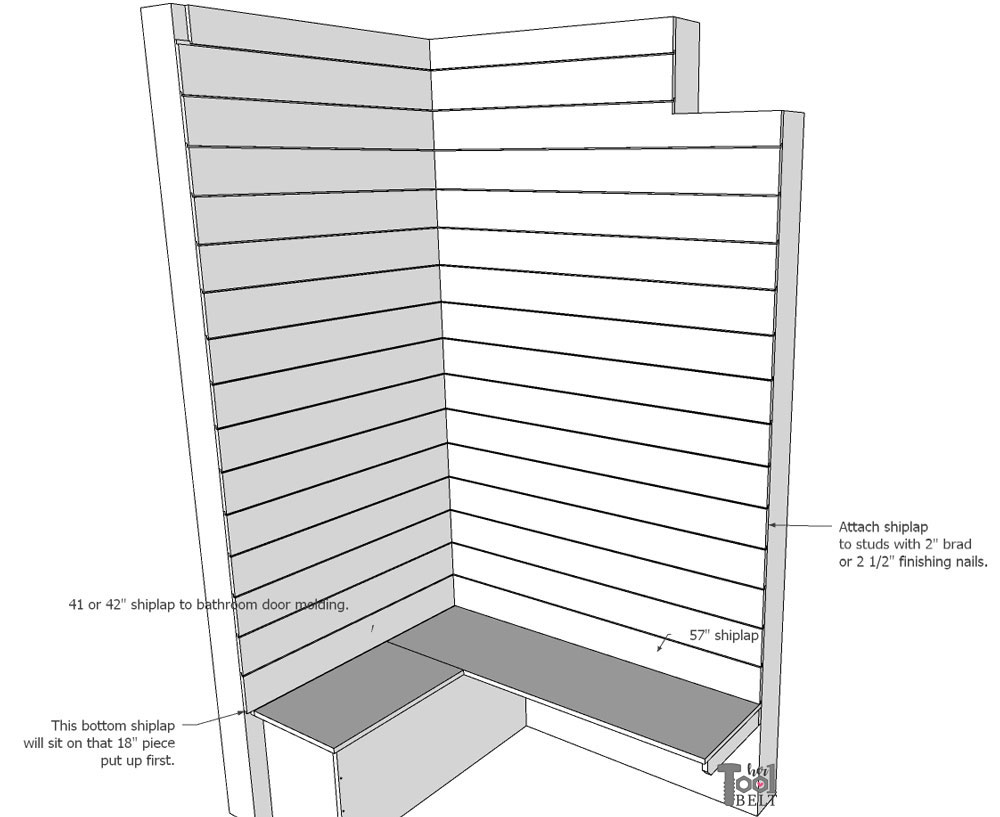
This mudroom has a back wall that is 57″ long and a side wall that is 41″ long, the ceiling is 107 1/2″ high with a duct in the corner.
I know that no one will have the same dimensions as Marla, but I’m sharing this tutorial for inspiration.
Materials for the Shiplap Mudroom (links of material below)
- 1 sheet (4’x8′) of 3/4″ MDF or plywood
- 9 – 12′ MDF shiplap
- 5 – 8′ MDF shiplap
- 3 – 3/4″ x 2 1/2″ MDF molding (4 if a 2nd shelf is wanted)
- 1 – 3/4″ x 11 1/4″ shelf board (2 if a 2nd shelf is wanted)
- 2 1/2″ finishing nails (or you can use 2″ brad nails)
- 1 1/4″ brad or finishing nails
- sandpaper
- Spackle
- Paint and Primer
- caulk
- 2 euro hinges for the cubby bench top or 2 – utility hinges
- 1 1/2″ or longer screws
- 8 small casters or the shoe crates
- 8 or so coat hooks
- Approximate cost of wood and hinges is about $175 (doesn’t include coat hooks and casters)
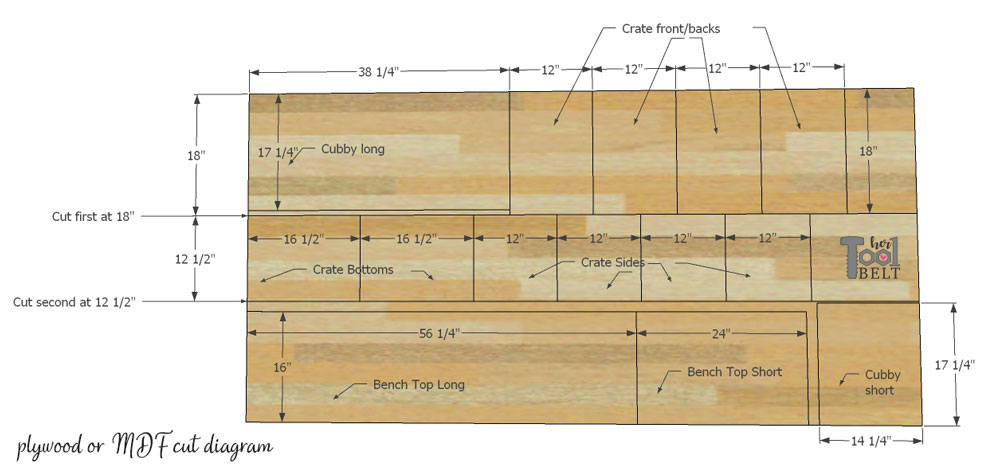
Cut List and Diagram for the 3/4″ MDF or plywood sheet
First make a cut 18″ x 96″, then make a cut at 12 1/2″ x 96″
- 1 – 3/4″ x 17 1/4″ x 38 1/4″ – cubby long side
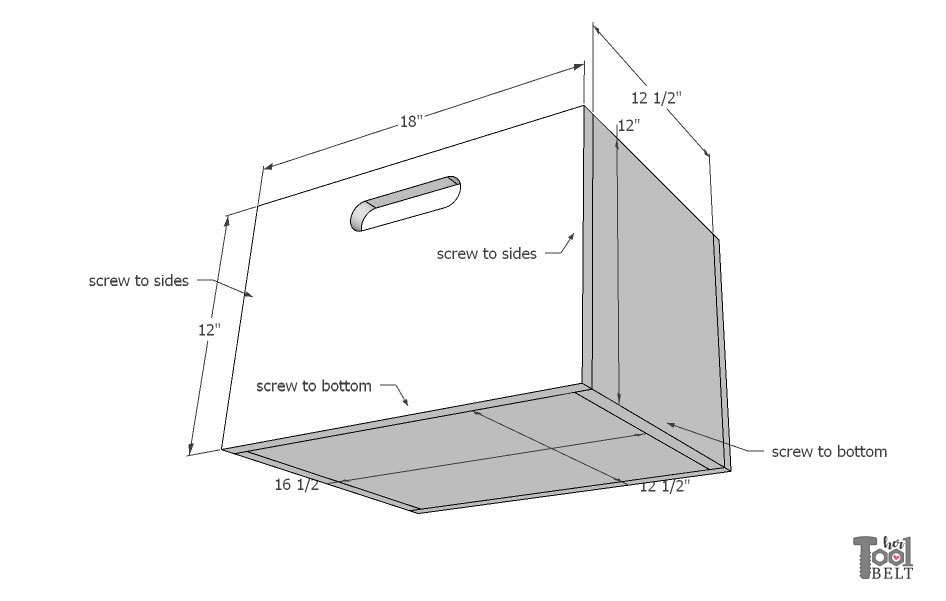
- 4 – 3/4″ x 18″ x 12″ – shoe crate front and back pieces
- 2 – 3/4″ x 12 1/2″ x 16 1/2″ – shoe crate bottoms
- 4 – 3/4″ x 12 1/2″ x 12″ – shoe crate sides
- 1 – 3/4″ x 16″ x 56 1/4″ – bench top long
- 1 – 3/4″ x 16″ x 24″ – bench top short
- 1 – 3/4″ x 17 1/4″ x 14 1/4″ – cubby short side
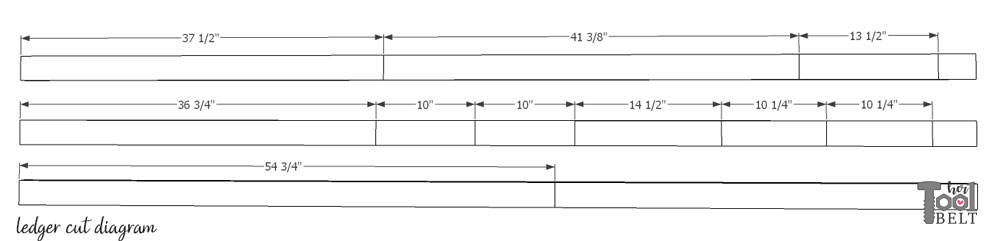
Cut List and Diagram for the Bench/Shelf Ledger (cleat)
- 1 – 11/16″ x 2 1/2″ x 37 1/2″
- 1 – 11/16″ x 2 1/2″ x 41 3/8″
- 1 – 11/16″ x 2 1/2″ x 13 1/2″
- 1 – 11/16″ x 2 1/2″ x 36 3/4″
- 2 – 11/16″ x 2 1/2″ x 10″
- 1 – 11/16″ x 2 1/2″ x 14 1/2″
- 2 – 11/16″ x 2 1/2″ x 10 1/4″ (4 if you want 2 shelves)
- 1 – 11/16″ x 2 1/2″ x 54 3/4″ (2 if you want 2 shelves)
- from scrap 1 – 11/16″ x 3/4″ x 2 1/2″ for a filler piece
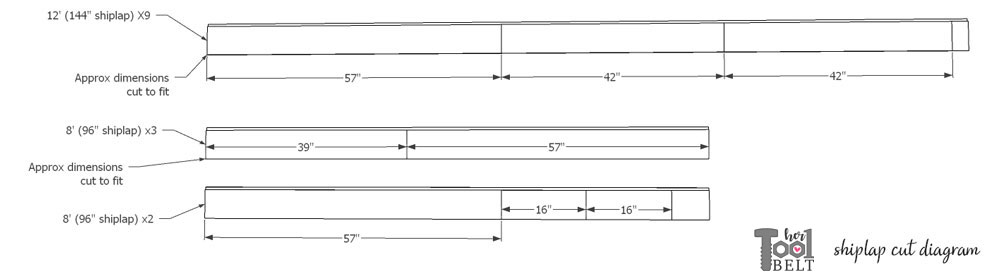
Cut List and Diagram for the Shiplap
This is just a guide for shiplap cuts to be efficient, shiplap should be cut to fit.
- From the 12′ (144″) shiplap
- 9 – 57″ long
- 18 – 42″ long (trim to fit)
- From the 8′ (96″) shiplap
- 3 – 39″ long (45 deg cut later)
- 5 – 57″ long
- 3 – about 16″ long (45 deg cut later)
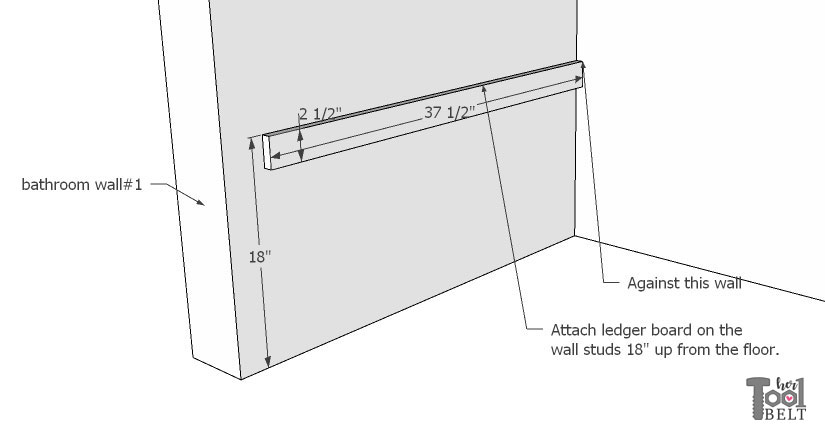
Step 1 – Attach Ledger (cleat)
This step is necessary for the hinging bench top and since she wants shiplap on the side wall.
Attach a 2 1/2″ x 37 1/2″ ledger on the side wall studs with 2 1/2″ finishing nails (or screws would be fine here). Make the top of the ledger 18″ up from the floor.
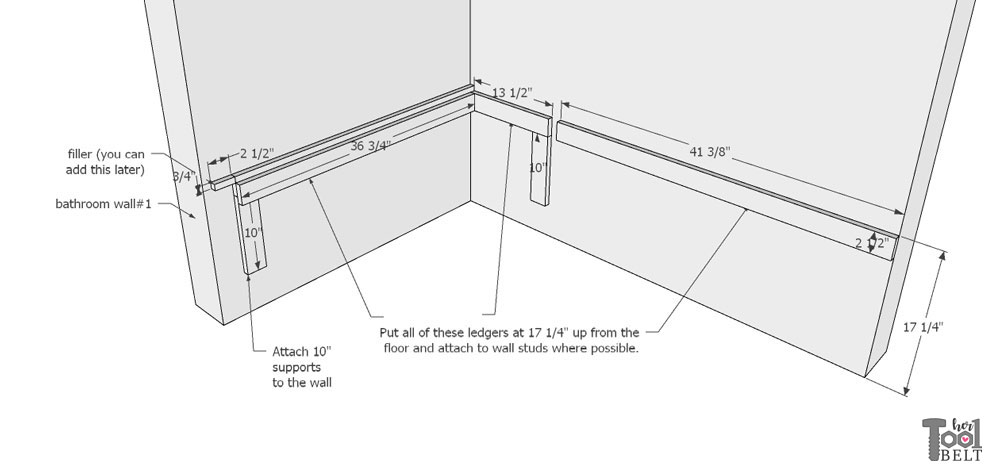
Next attach the other ledger pieces 17 1/4″ up from the floor, securing to the wall studs on the back wall, or to the first ledger on the side wall. Place the boards as shown below.
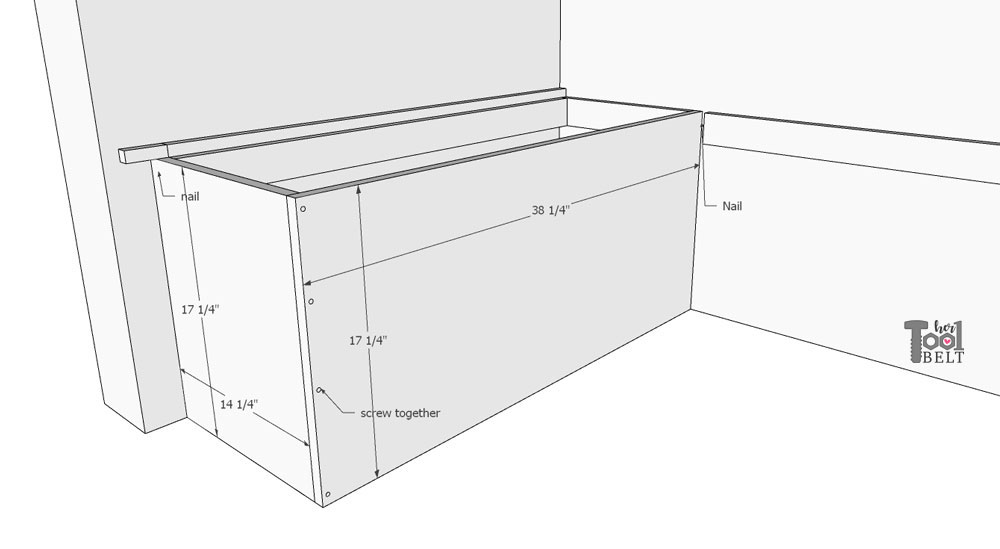
Step 2 – Build Bench
Screw together the short cubby (17 1/4″ x 14 1/4″) to the long cubby (17 1/4″ x 38 1/4″) board with 1 1/2″ or longer screws. It may be helpful to drill countersink holes in the long cubby board first.
Attach the cubby boards to the ledgers on the wall with finishing nails.
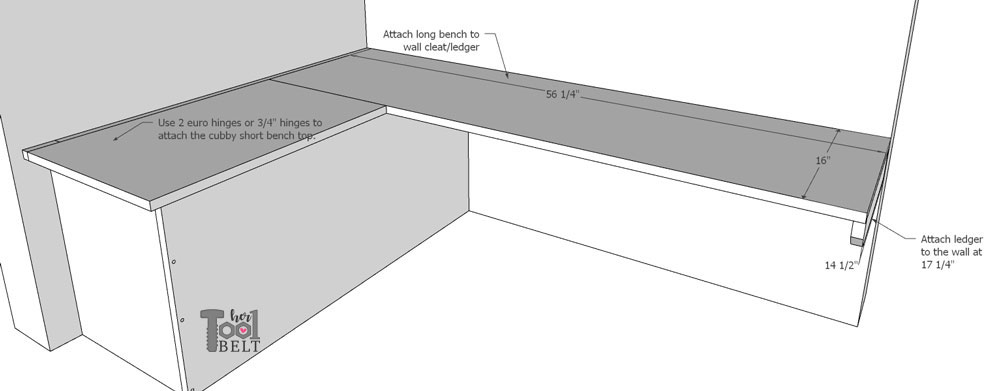
For the bench ledger on the left side, I cut a little 45 deg miter cut on the bottom for style. Attach the ledger to the left wall 17 1/4″ up from the floor. Place the long bench board along the back wall, trim to fit, then secure to the ledgers with finishing nails.
Attach the short bench top to the ledgers with the 2 hinges.
Step 3 – Shiplap
Cut all of the shiplap to fit. The back wall of shiplap will sit on the back bench. The side shiplap will sit on that first ledger put up at 18″ high. Secure the shiplap to the wall with 2 1/2″ finishing nails (or 2″ brad nails). I usually nail the shiplap in the ‘tongue’ at each stud and a couple places on the face (since those holes will have to be filled later.)
Attach shiplap to the cubby box. Cut the shiplap to fit. On the corner of the cubby, cut the shiplap at a 45 deg to meet together. The top pieces of shiplap may need to be trimmed to fit under the bench top. Secure the shiplap to the cubby box with 1 1/4″ nails (brad or finishing).
Step 4 – Shelves
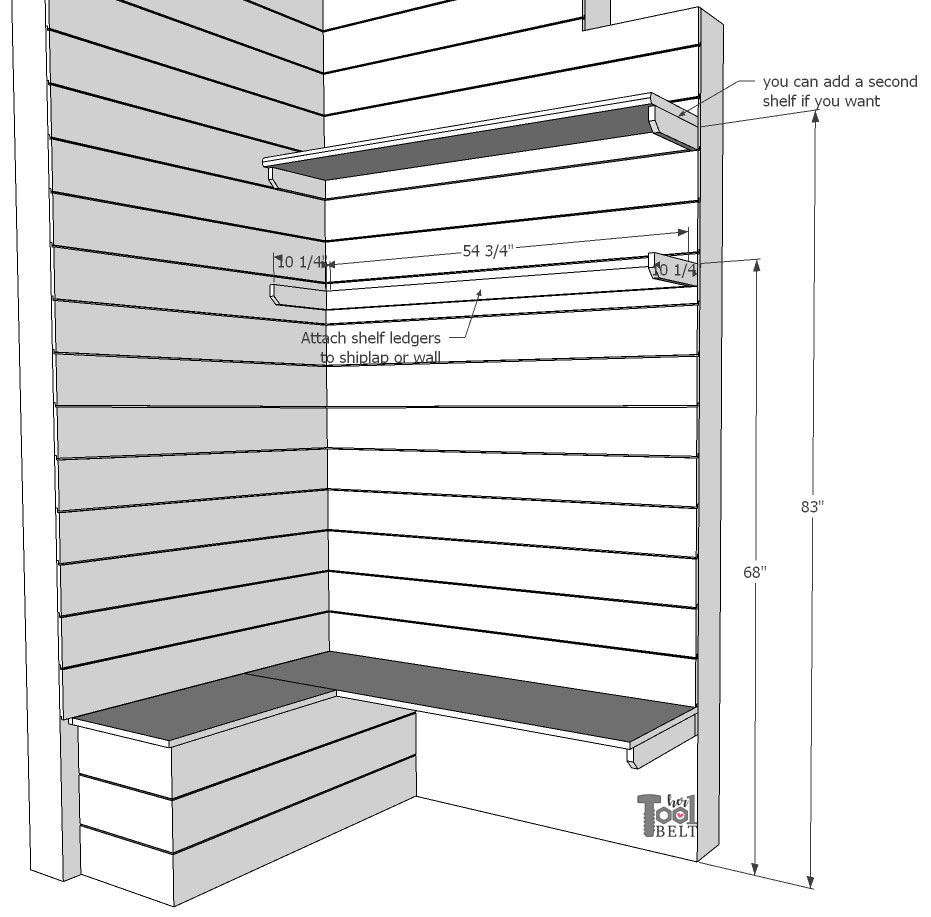
On the 10 1/4″ shelf ledgers, I made a little 45 deg miter cut for style.
Attach the 10 1/4″ side shelf ledgers at 68″ up from the floor. Secure the ledgers with 2 1/2″ finish nails. (Another shelf could go around 83″ if desired.) Secure a 54 3/4″ shelf back ledger (trim to fit) with 2 1/2″ finish nails.
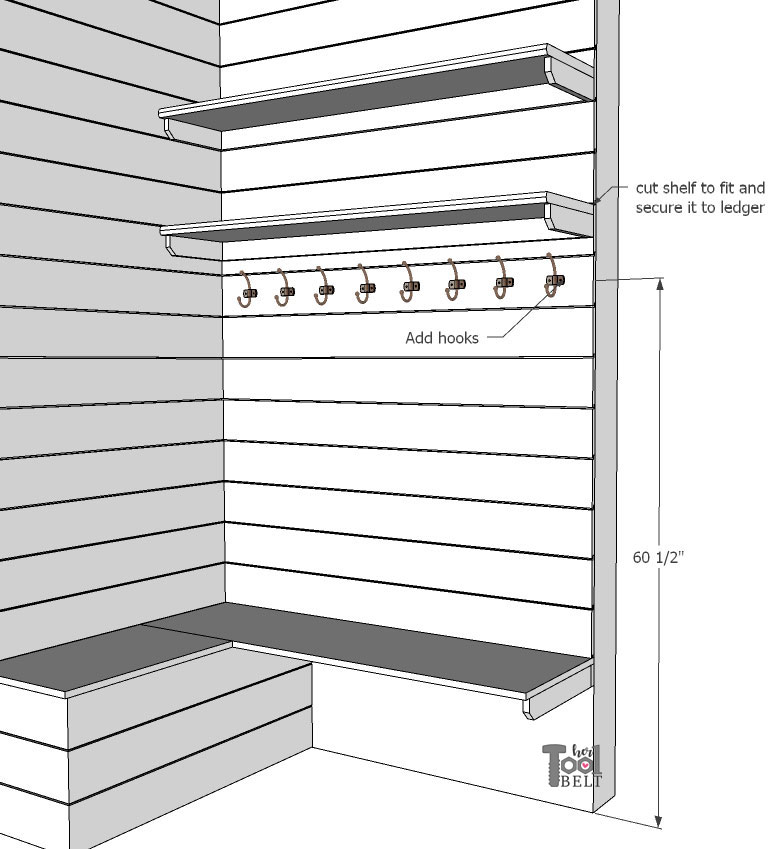
Cut the shelf boards to fit. Attach the shelf board to ledgers with 2 1/2″ finish nails.
Add coat hooks at around 60″ high.
Follow Jaime’s tutorial to make the shoe crates, but with the modified dimensions below.
Step 5 – Finish and Paint
Sand down any bumps in the MDF that the nails made. Then fill all the nail holes with spackle, once the spackle is dry, sand it smooth. Caulk around any gaps or cracks in the bench, shelf, or shiplap. MDF soaks up paint, so I make sure to apply 2 good coats of primer before painting. Let the primer dry and sand smooth if any fibers are sticking up. Then apply a couple coats of paint.
Leave a Reply