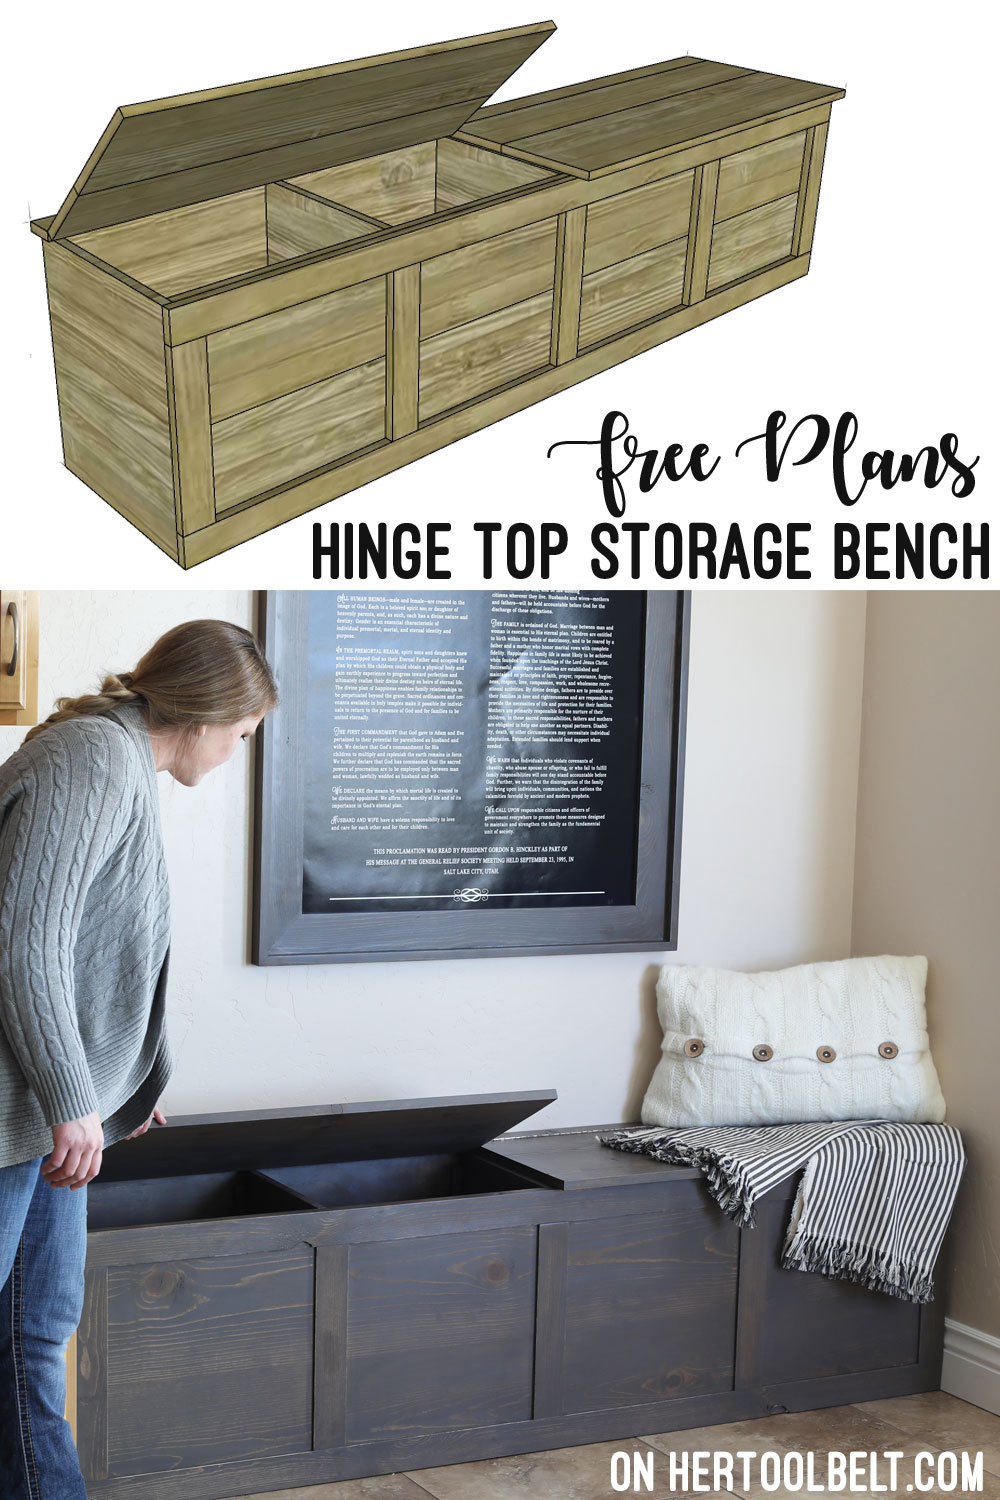
My sister has a very open concept rambler house without a mudroom space (it’s the only thing she doesn’t like about her house). She hates clutter, and with 4 kids in school ranging from high school to elementary school she was in desperate need of a way to organize all those backpacks. There is one wall at the end of the kitchen cabinets that she had a decorative cabinet on and the kids put their backpacks in there for 9 years. But she got a new kitchen table that was bigger, leaving the space way too tight for that old cabinet. She started brainstorming 2×4 bench ideas that she could put 4 baskets under for the kids to store their backpacks. After lots of searching she had a hard time finding baskets that would fit overflowing high school backpacks.
I suggested that we make a bench with a hinging top and compartments for each backpack. It worked out perfectly for the space and all are happy, organized and clutter free!
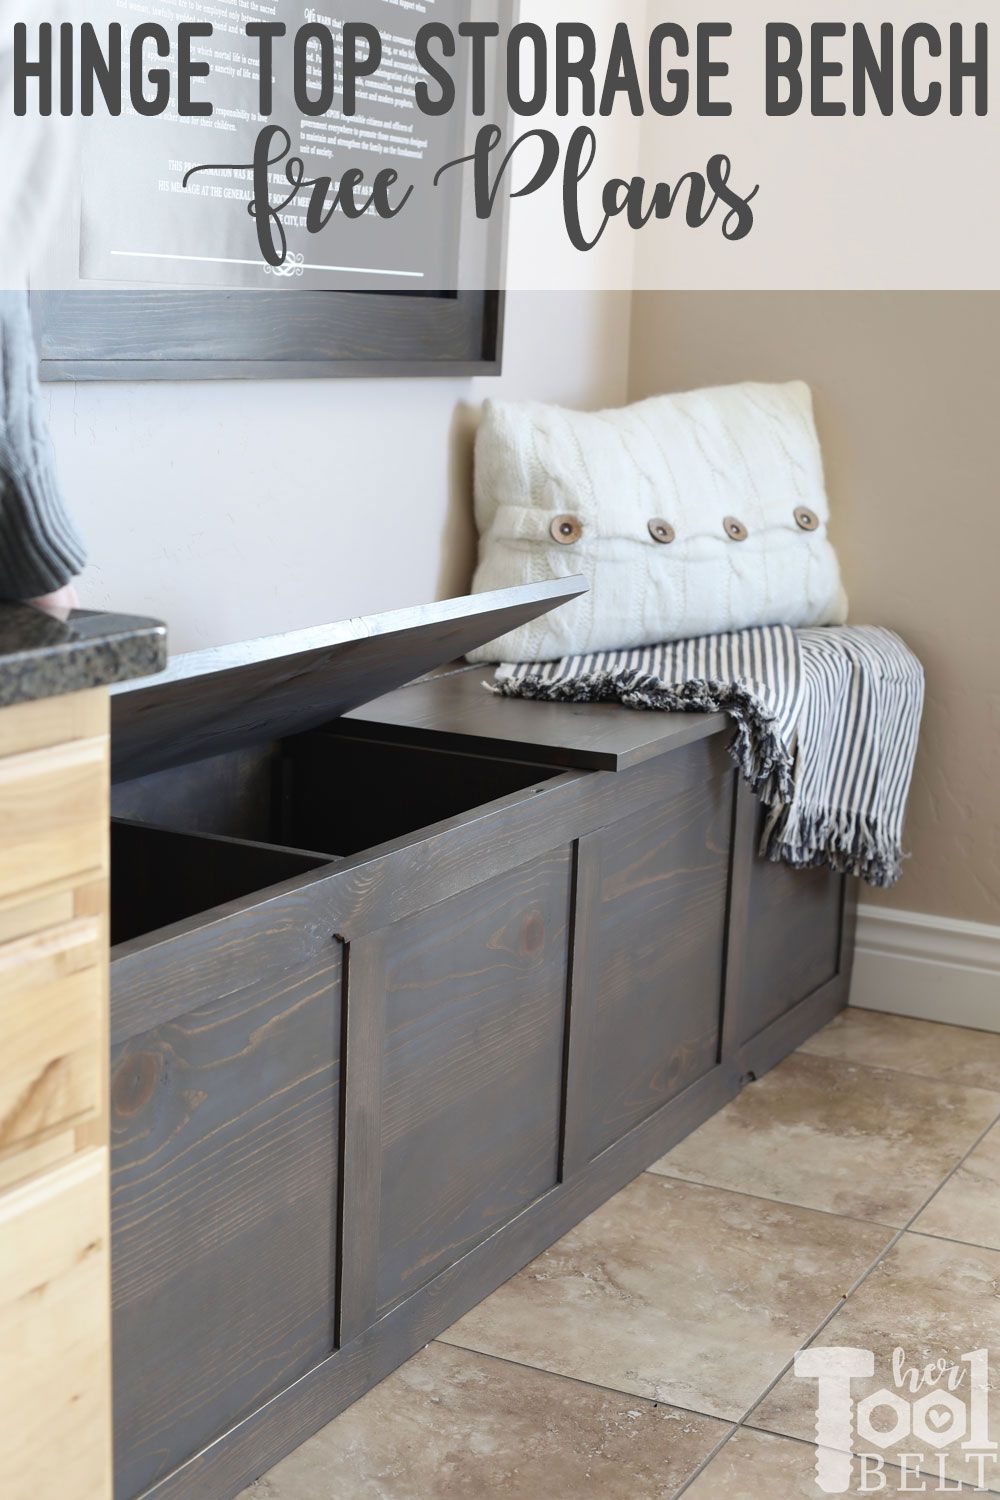
How to build a Backpack Storage Bench with a Hinge Top
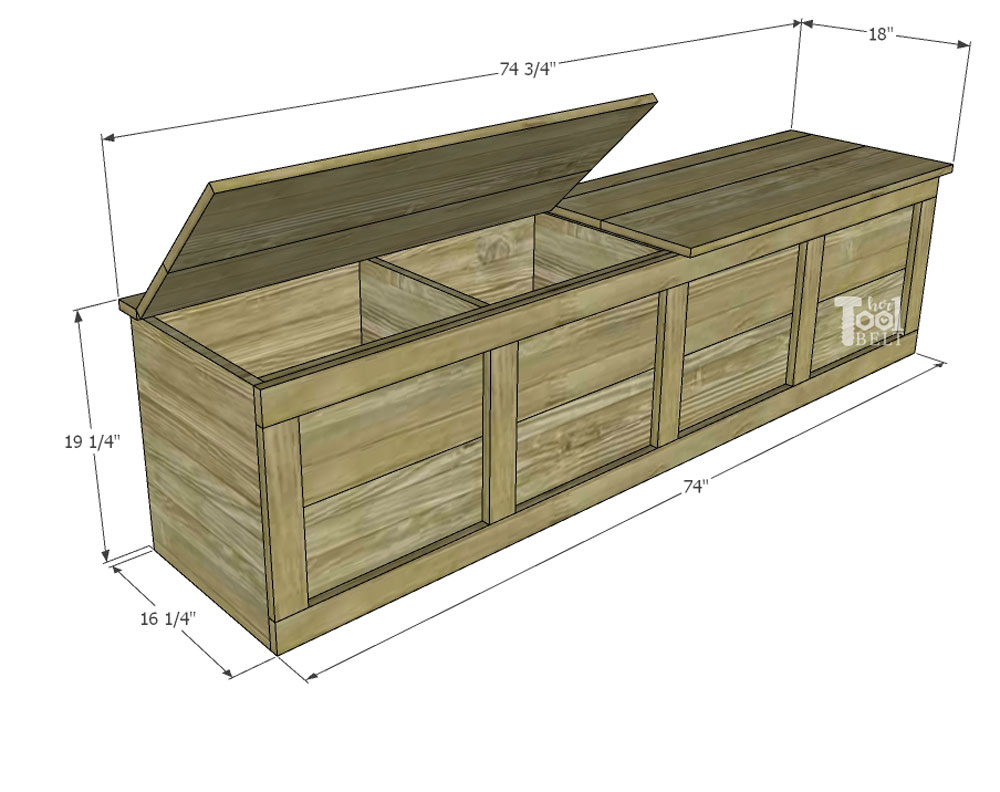
***Dimensions can be easily modified to fit your space.
This post contains some affiliate links for your convenience. Click here to read my full disclosure policy.
Materials
 |
 |
 |
 |
 |
 |
 |
 |
Tools Used
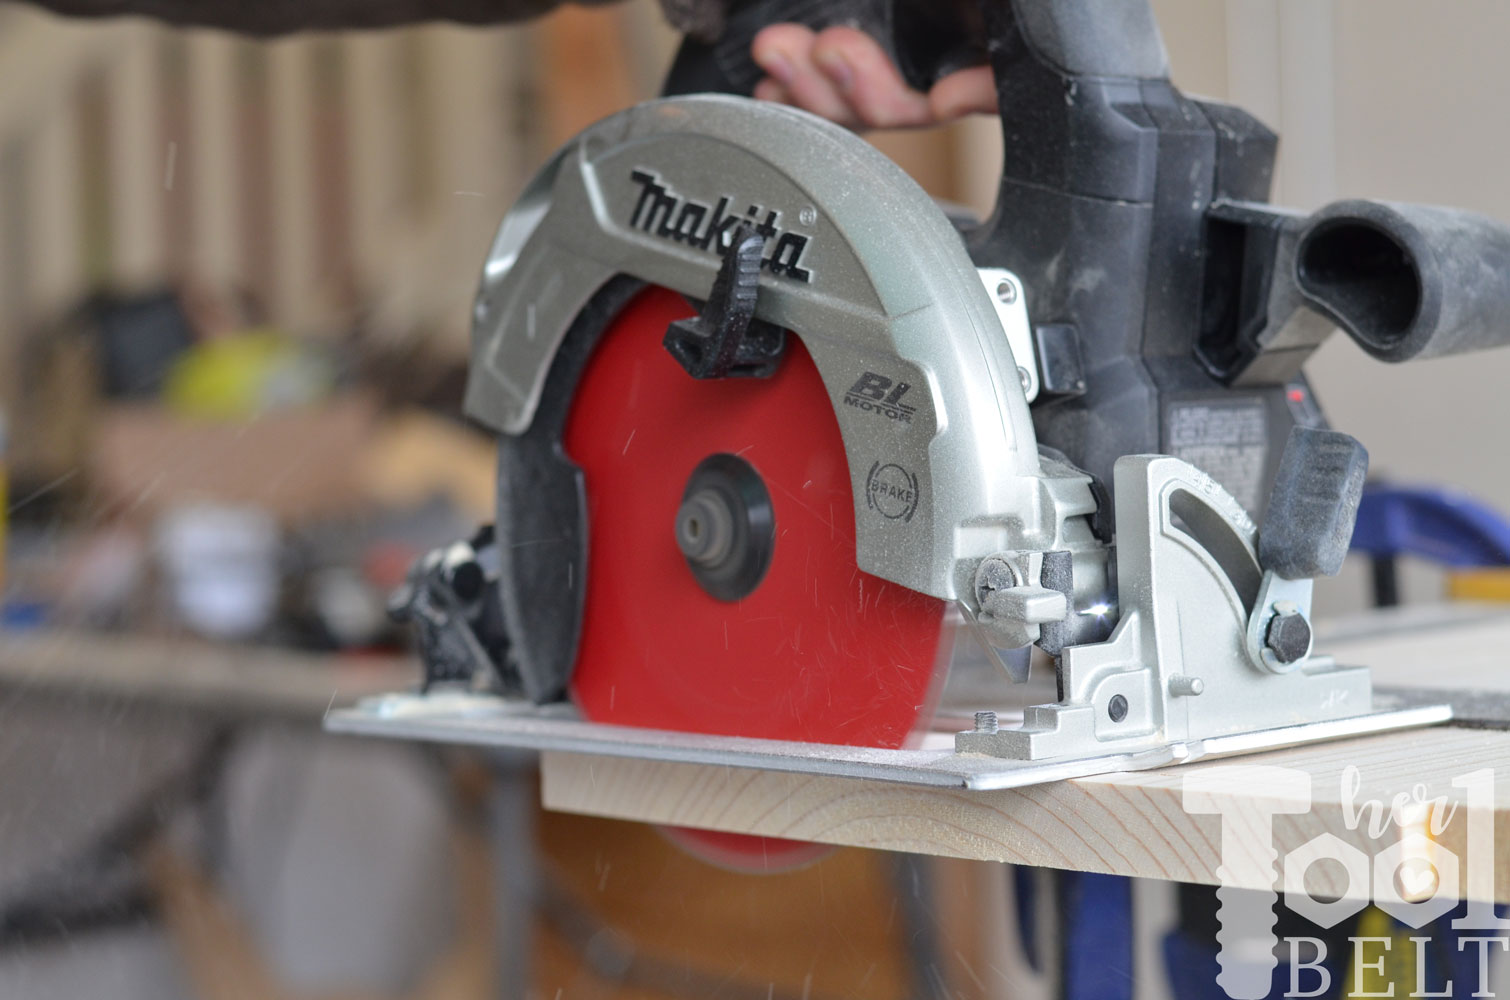
- Makita subcompact circular saw with Diablo blade
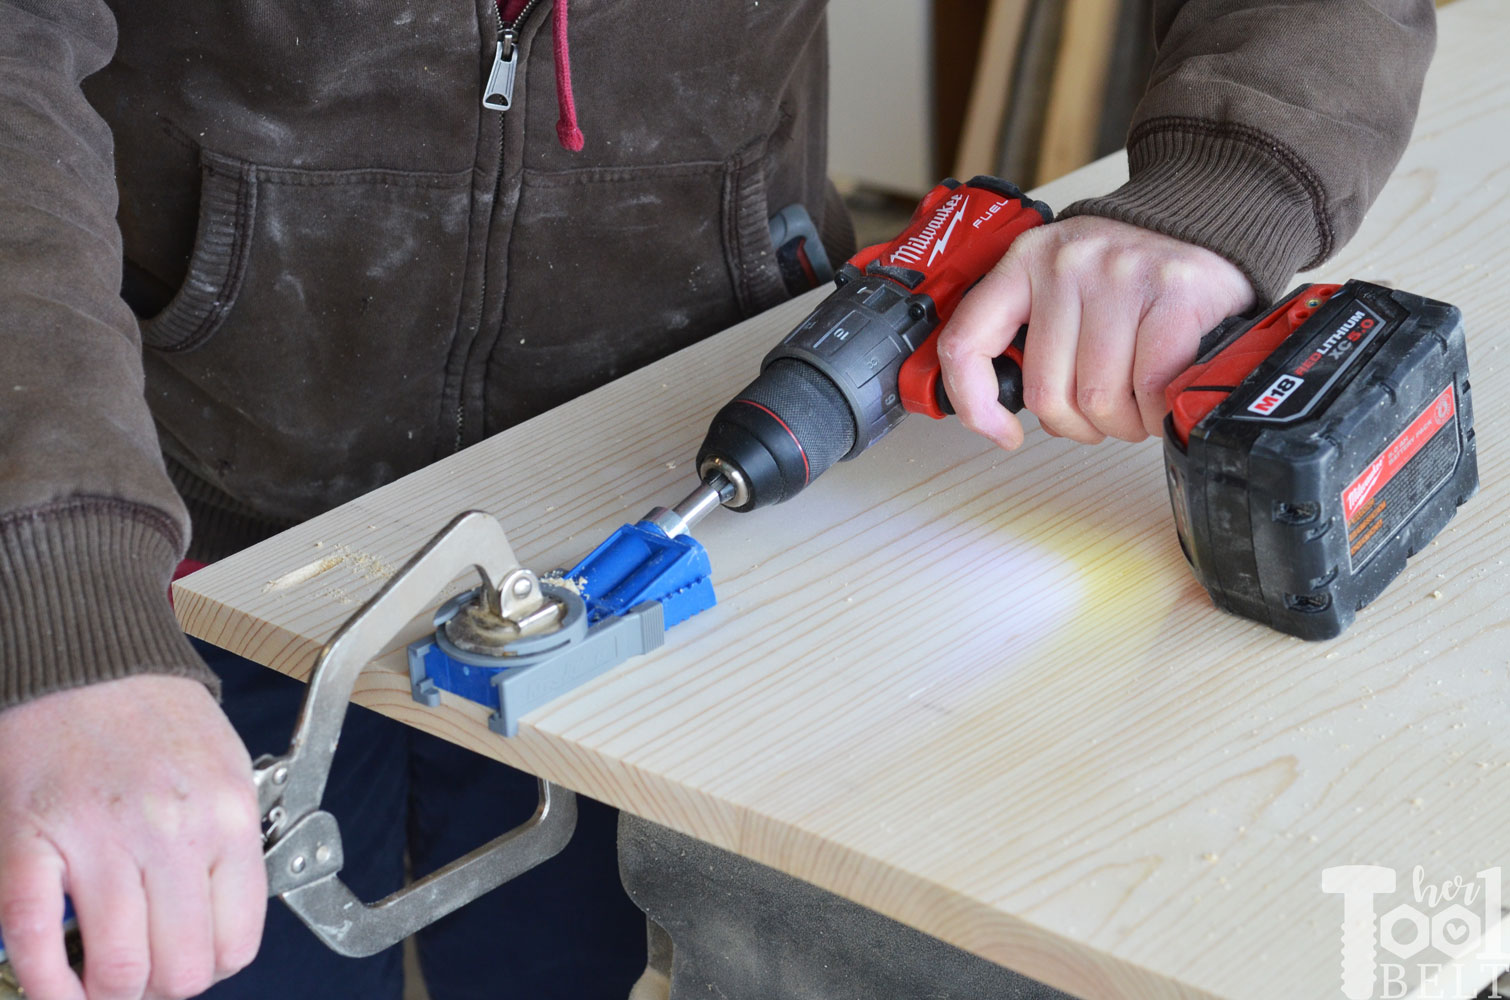
- Milwaukee Drill/Impact
- Kreg Pocket hole jig
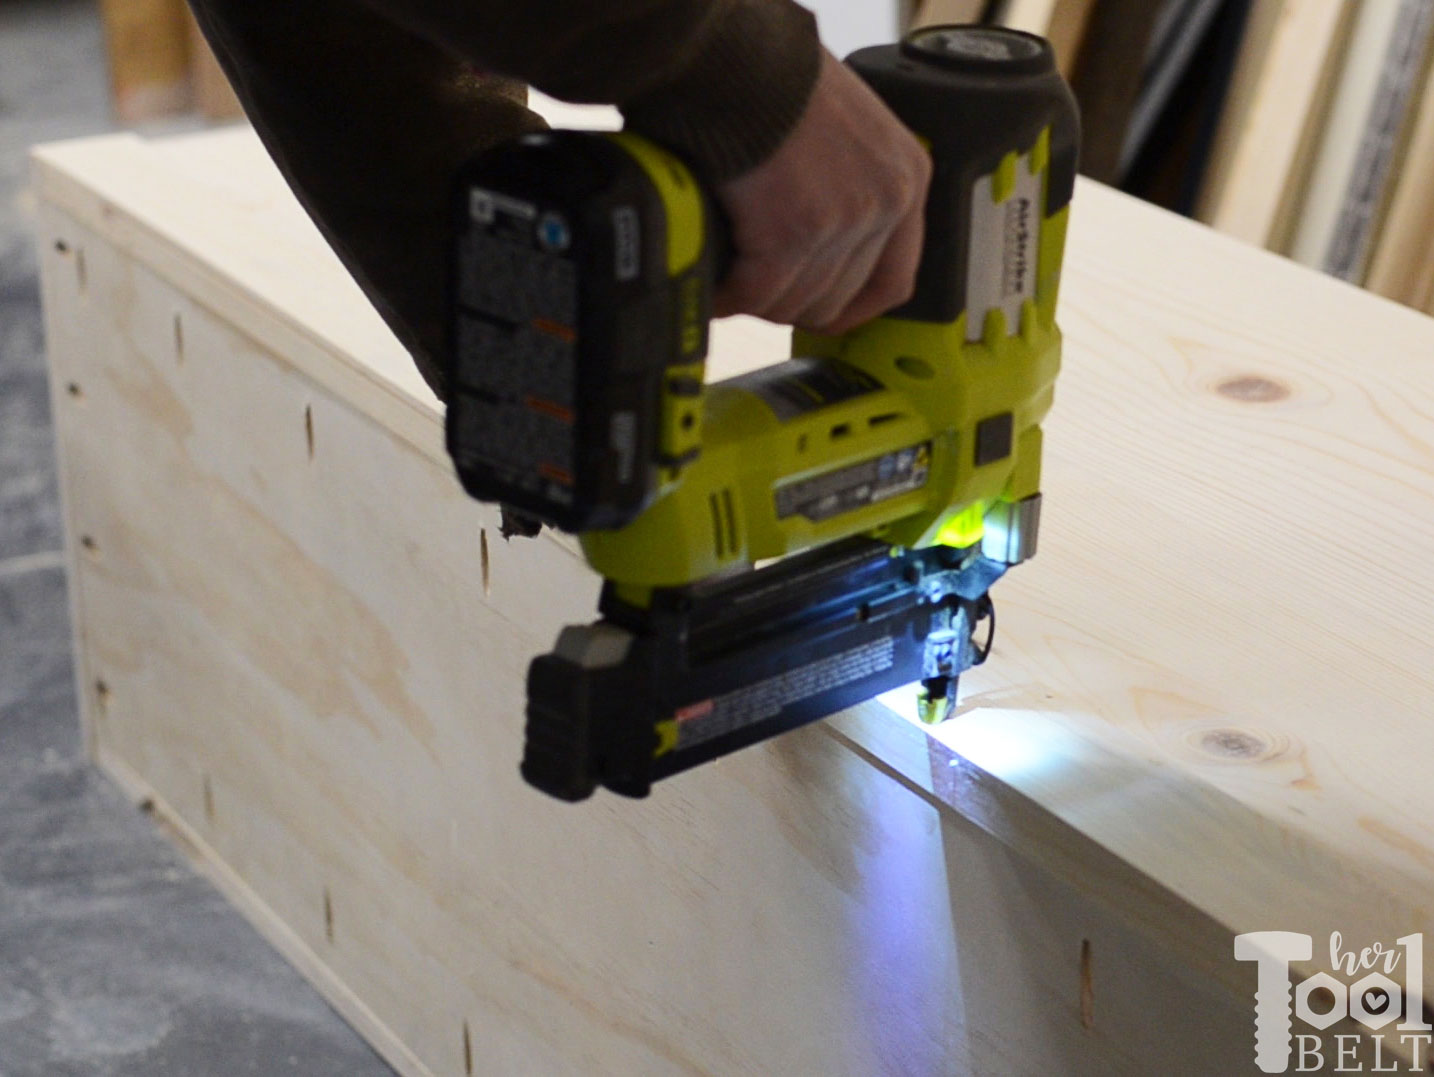
- Ryobi Brad Nailer
- Dremel screwdriver
- DeWALT Sander
- Tape Measure
- tin snips – optional
 |
 |
 |
 |
 |
 |
 |
 |
Cut List
- 1 – 3/4″ x 18 1/2″ x 72 1/2″ (plywood) – back
- 1 – 3/4″ x 14″ x 72 1/2″ (plywood) – bottom
- 3 – 3/4″ x 14″ x 17 3/4″ (plywood) – dividers (for 4 compartments)
- 2 – 3/4″ x 15 1/2″ x 18 1/2″ (plywood) – sides
- 2 – 3/4″ x 9 1/4″ x 72 1/2″ (1×10) – front boards
- 1 – 3/4″ x 2 1/2″ x 74 3/4″ (1×10) – top hinge support
- 1 – 3/4″ x 6 1/4″ x 74 3/4″ (1×10) – top
- 1 – 3/4″ x 9 1/4″ x 74 3/4″ (1×10) – top
- 2 – 3/4″ x 2 1/2″ x 74″ (1×3) – front trim
- 5 – 3/4″ x 2 1/2″ x 13 1/2″ (1×3 and 1×10) – front trim
- I needed to save space so my trim boards were re-sawed down to 1/4″ thick instead of 3/4″.
Cut Diagram
Plywood

Boards

Step 1 – Cut Boards
Cut up the plywood and boards according to the cut list. I used the Makita subcompact circular saw, and a straight edge to cut the plywood and boards. I’ve been using this saw for 6 months or so and absolutely love it. I used to avoid circular saws like the plague until I got this one! I’ve paired it with a 6 1/2″ Diablo 60T blade and it’s a great combo for fine finish.
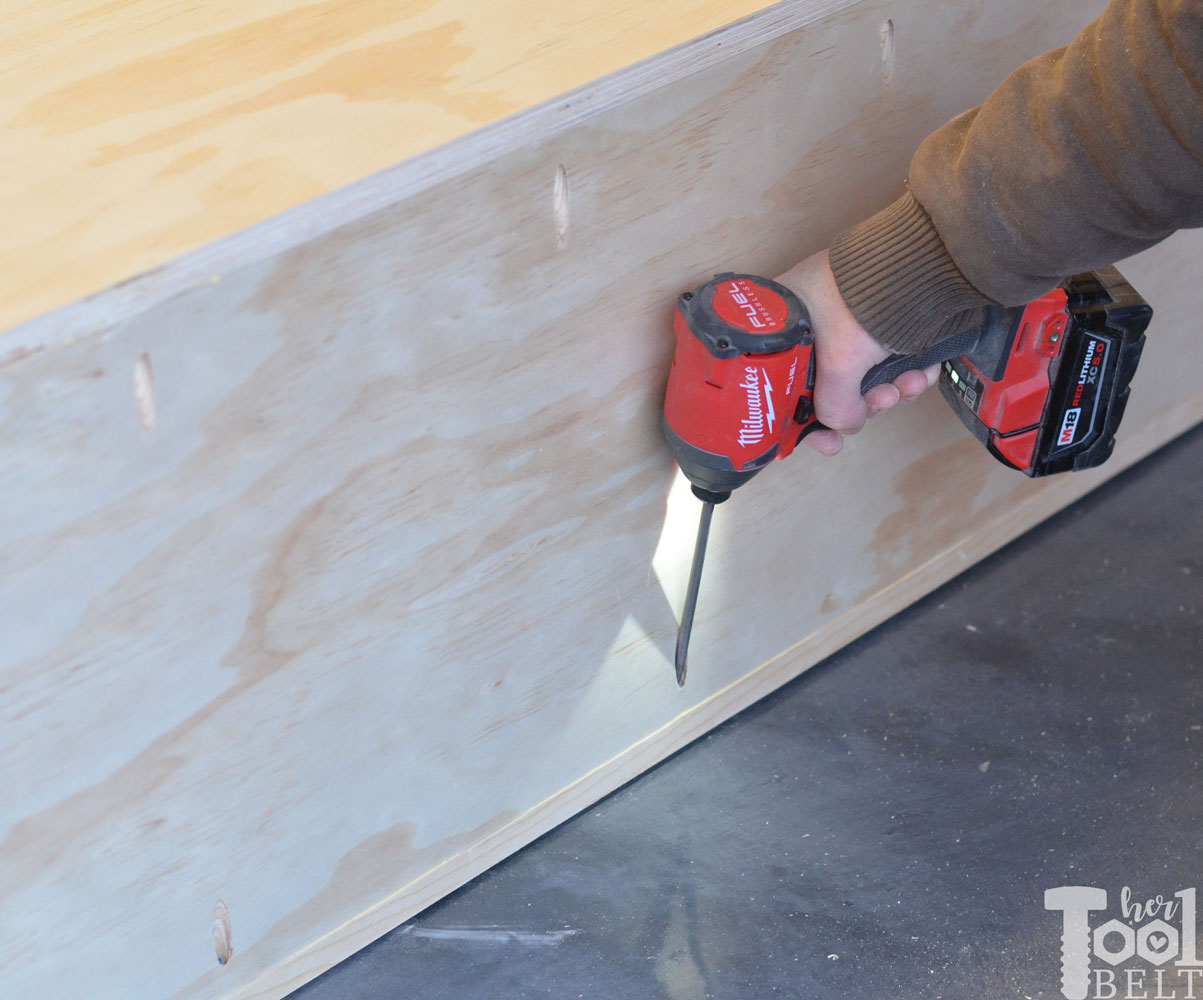
Step 2 – Drill Pocket Holes
I used pocket holes to do all the joinery for this bench. There are many different ways to join the wood, but the pocket holes worked good. I used the R3 jig and the Milwaukee drill.
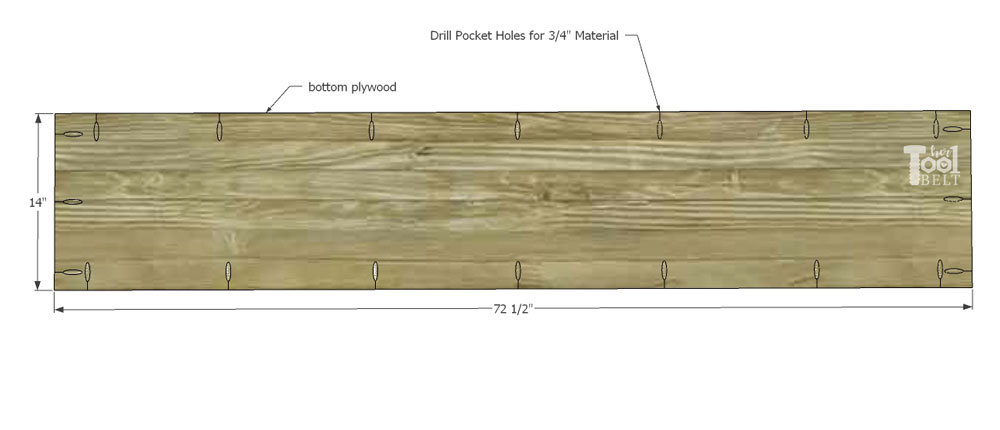
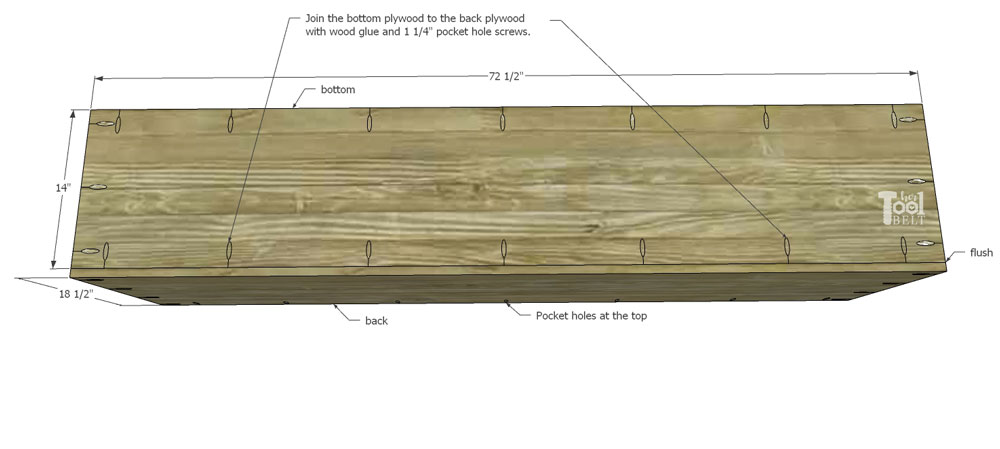
Bottom plywood
Drill pocket holes for 3/4″ material all around the perimeter of the bottom plywood piece (14″ x 72 1/2″).
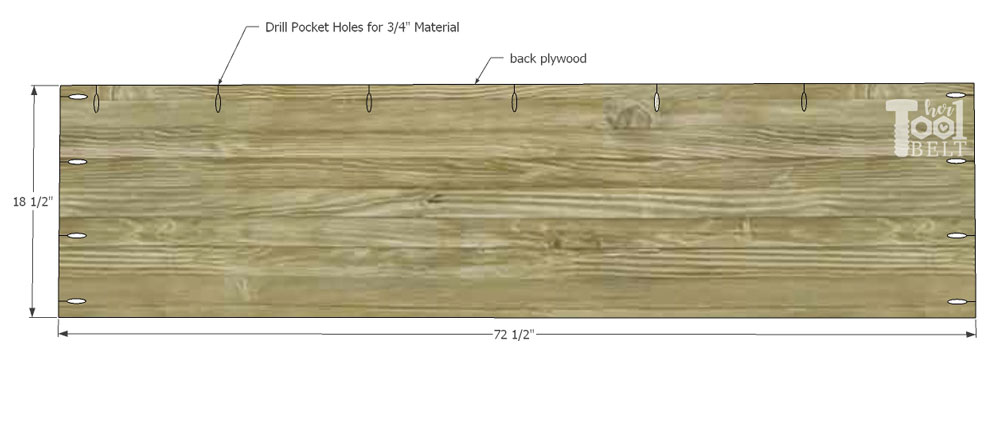
Back Plywood
Drill pocket holes for 3/4″ material in the ends and top edge of the back plywood piece (18 1/2″x 72 1/2″).
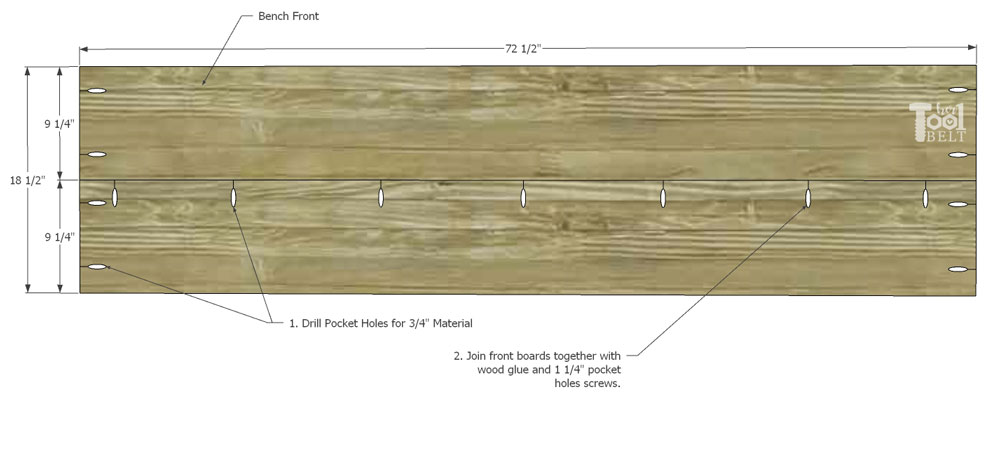
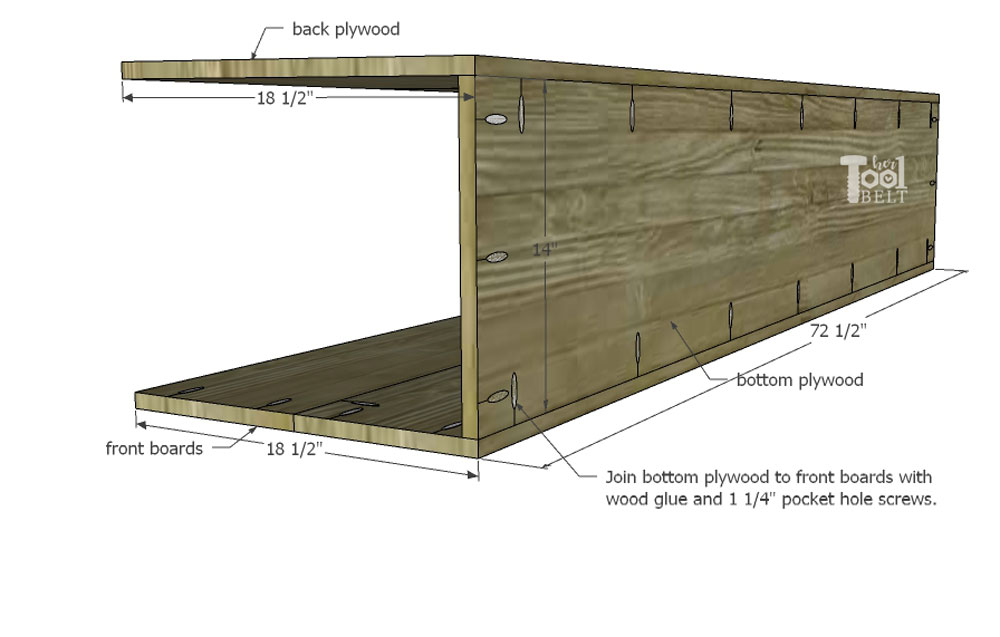
Front Boards
Drill pocket holes for 3/4″ material in the ends of the front boards (9 1/4″ x 72 1/2″) and in the top edge of one of the front boards. Join the front boards together using wood glue and 1 1/4″ pocket hole screws, as shown below.
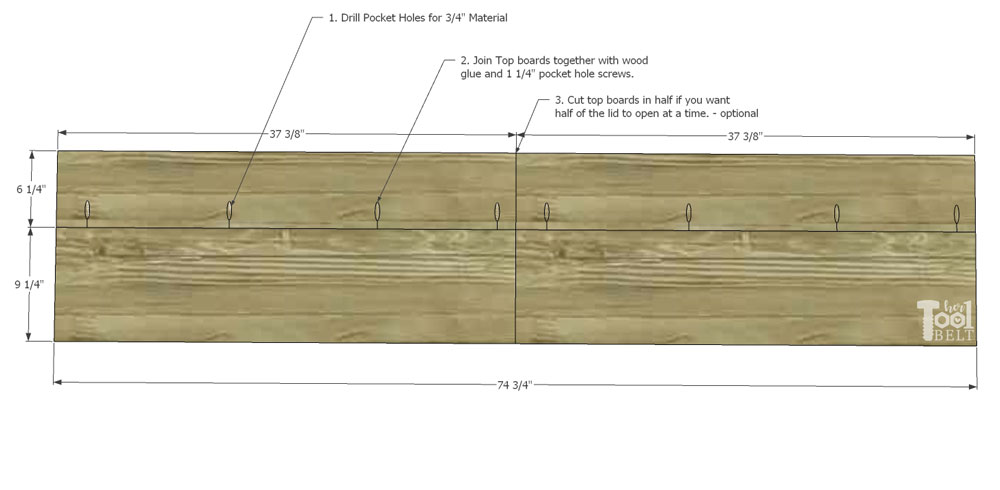
Top Boards
- Drill pocket holes for 3/4″ material in the bottom side of the 6 1/4″ x 74 3/4″ top board.
- Join the top boards together using wood glue and 1 1/4″ pocket hole screws, as shown below.
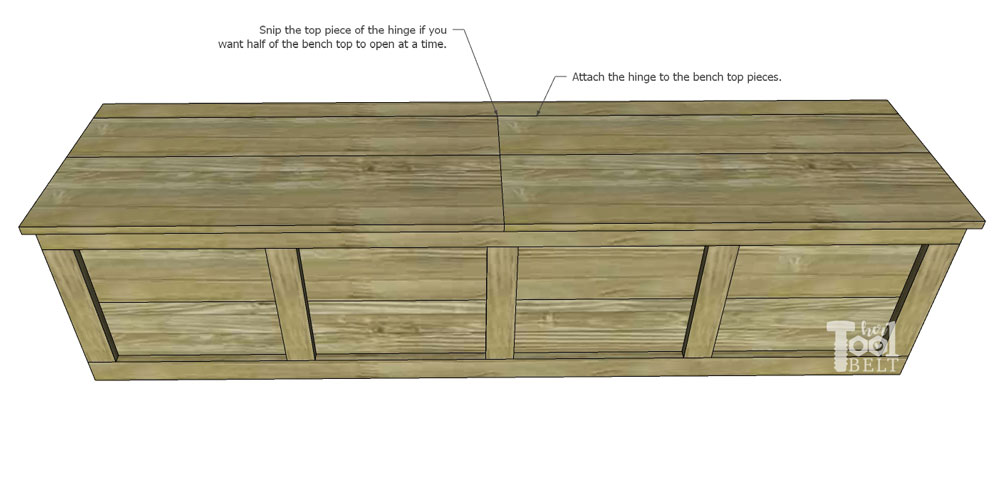
- Cut the top boards in half (37 3/8″) if you want half the lid to open at a time. Of if you want 1/4th of the lid to open at a time, you can cut it in fourths (18 11/16″).
Step 3 – Bench Assembly
Time for assembly, I like to use the impact driver for driving the pocket hole screws. Then the drill bit can stay in the drill!
Place the back plywood on a flat surface, put the pocket holes faced down. Use wood glue and 1 1/4″ pocket hole screws to attach the bottom plywood piece to the back plywood.
Place the top boards on a flat surface with the pocket holes facing the inside of the bench. Attach the bottom plywood to the front boards with wood glue and 1 1/4″ pocket hole screws.
Note – you may want to use some 14″ scrap wood as supports for the back of the plywood as you’re attach the bottom to the front.
Attach the bench side plywood pieces to the front, back and bottom pieces. Some plywood isn’t actually 3/4″ thick, so you may need to slightly trim the side pieces to fit flush. Use wood glue and 1 1/4″ pocket hole screws to attach the sides to the bench.
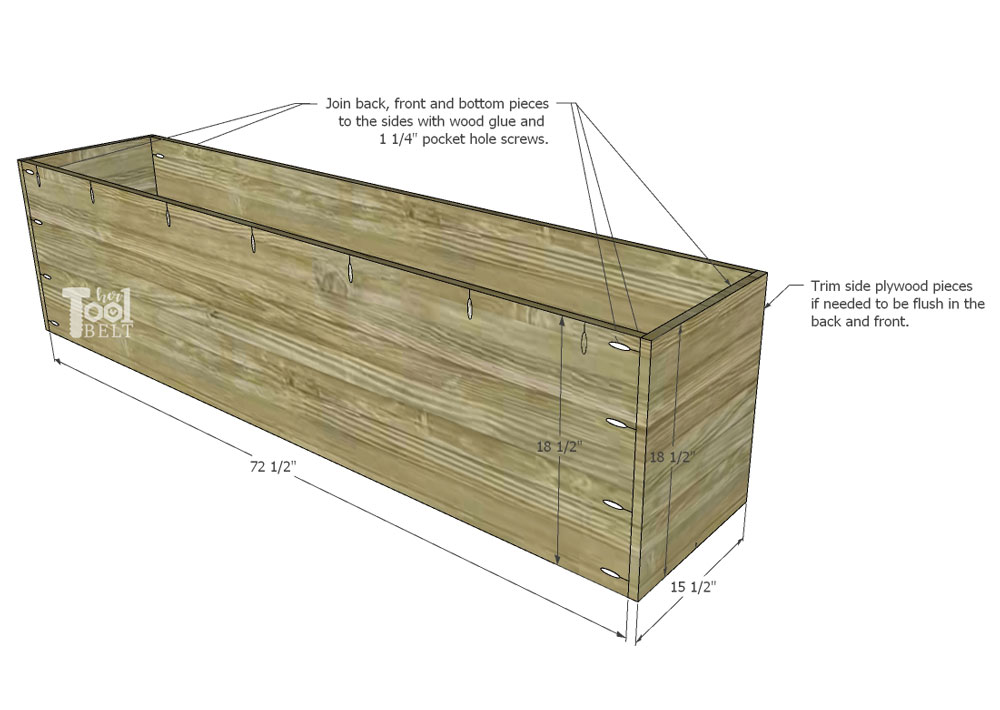
Mark the locations for the compartment dividers. From the inside side edge the dividers go 17 5/8″, 35 7/8″, and 54 1/8″. Drill pocket holes for 3/4″ material in the sides of the dividers. Use wood glue and 1 1/4″ pocket hole screws to attach the dividers to the front and back.
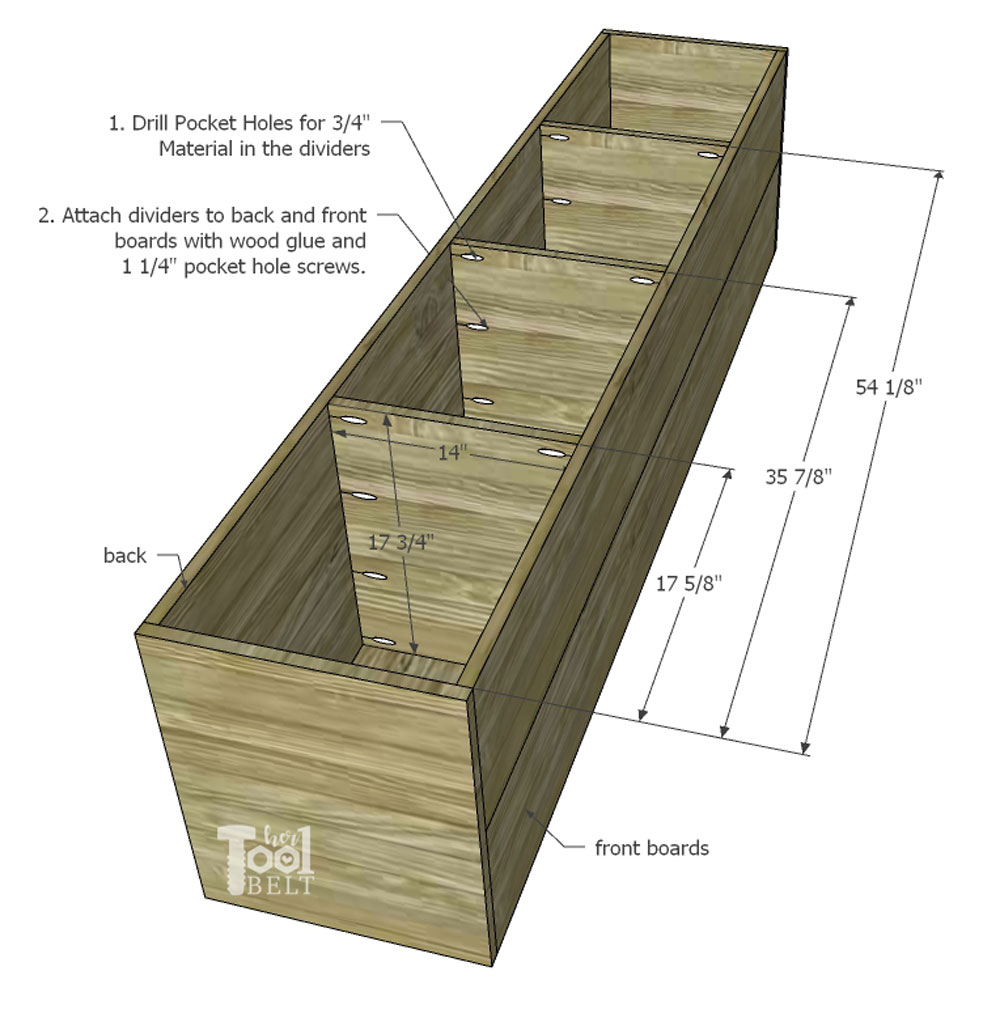
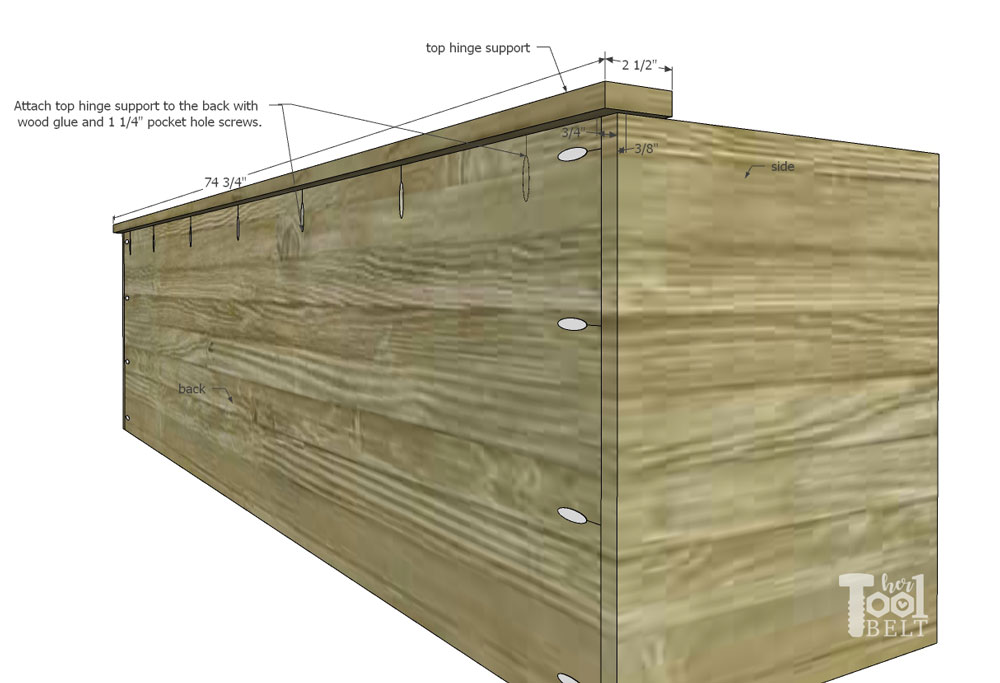
The top hinge support board (2 1/2″ x 74 3/4″) is offset back 3/4″ so that if your wall has baseboards, the top will fit flush to the wall – this is optional.
Center the top hinge support board on the bench (about 3/8″ overhang on the sides). Use wood glue and 1 1/4″ pocket hole screws to secure the top hinge support to the back plywood.
Step 4 – Add Trim and Hinge
Use wood glue and a 1 1/4″ brad nails to attach the trim pieces to the front of the bench.
The width of 1×3’s can vary, so you may want to put the top and bottom long trim pieces on the bench, flush with the top and bottom respectively. Then measure the length of the vertical trim pieces and attach to the bench.
The verticals should go approximately:
- Flush with the sides
- 17 7/8″ in from both sides
- Front center or about 35 3/4″ as shown below.
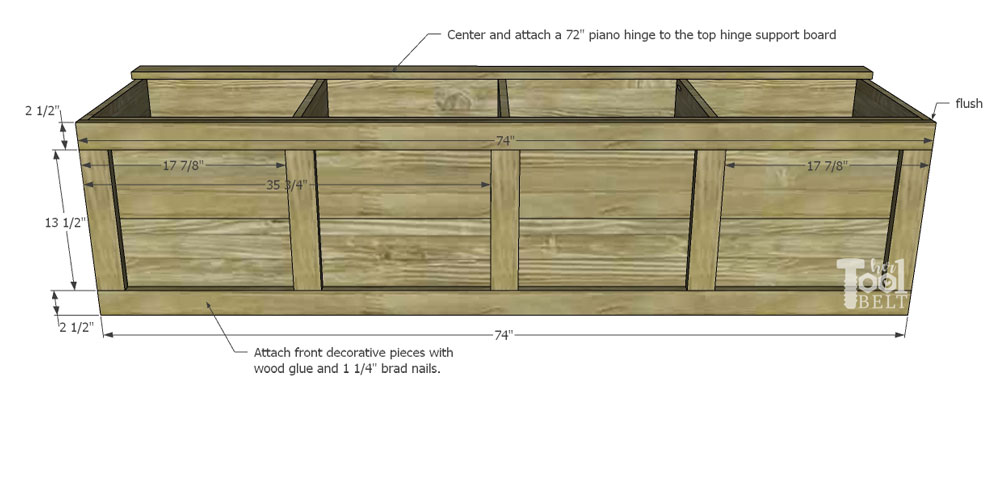
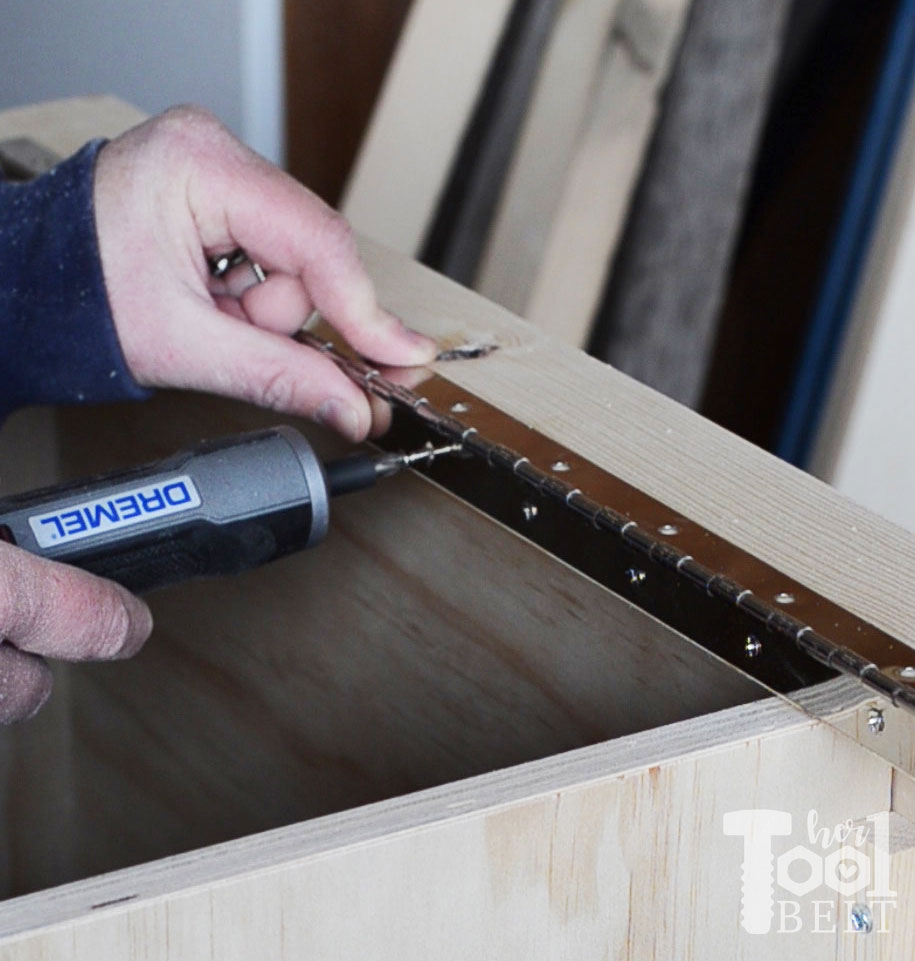
Next I attached the piano hinge to the top hinge support board, with the hinging part sticking just above the top surface of the board. The hinge should come with screws. This Dremel screwdriver really came in handy with installing all those screws. It only turns when there is pressure applies to the tip, it was great!
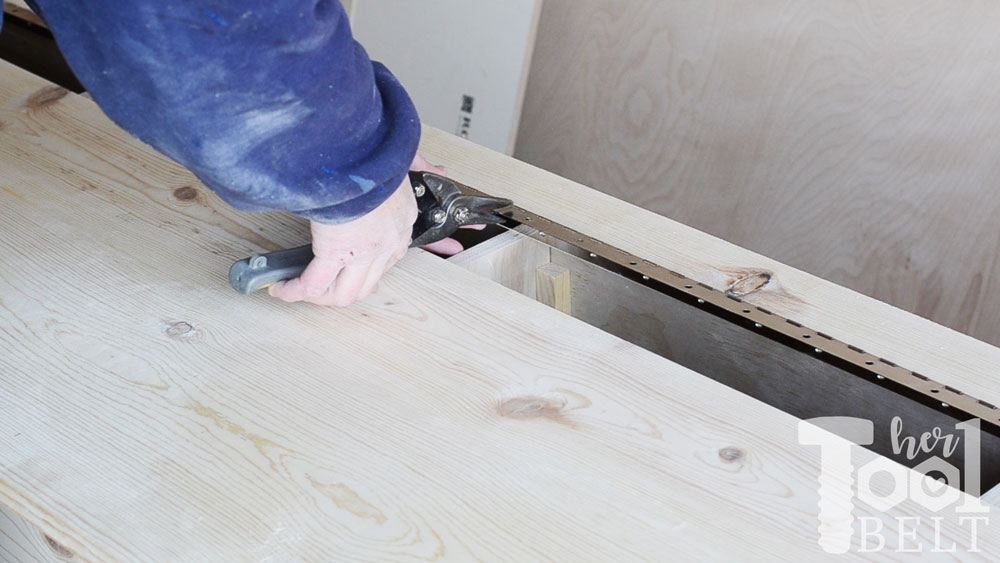
If you want to have the lid open in multiple sections, cut the hinge piece that will attach to the top boards.
Attach the loose flap of the hinge to the bench top boards.
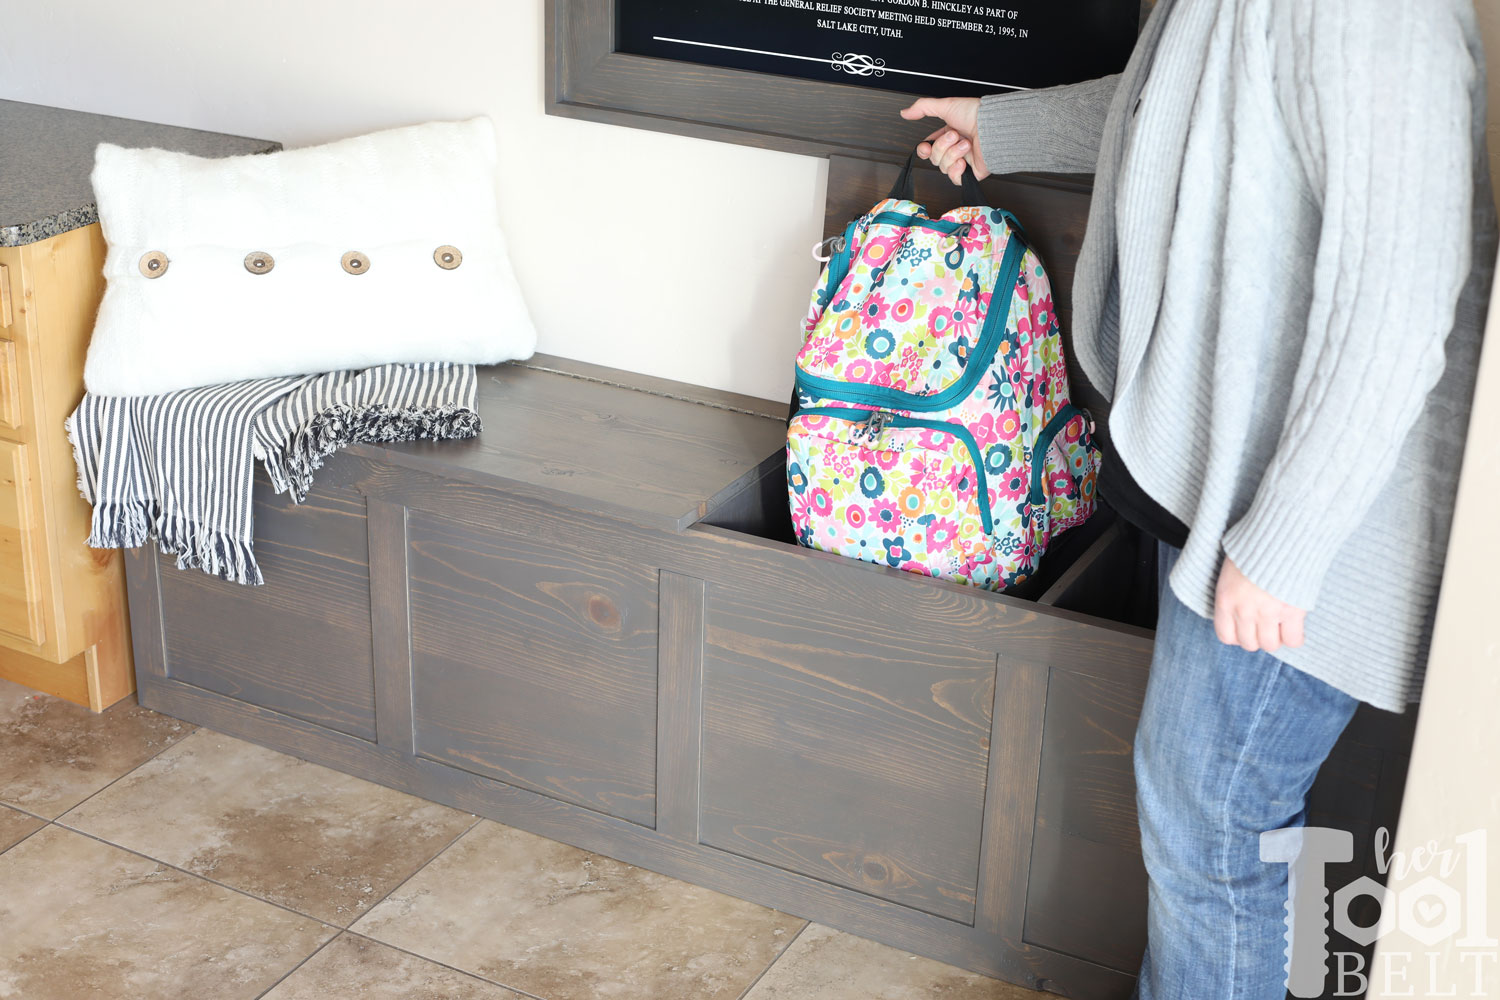
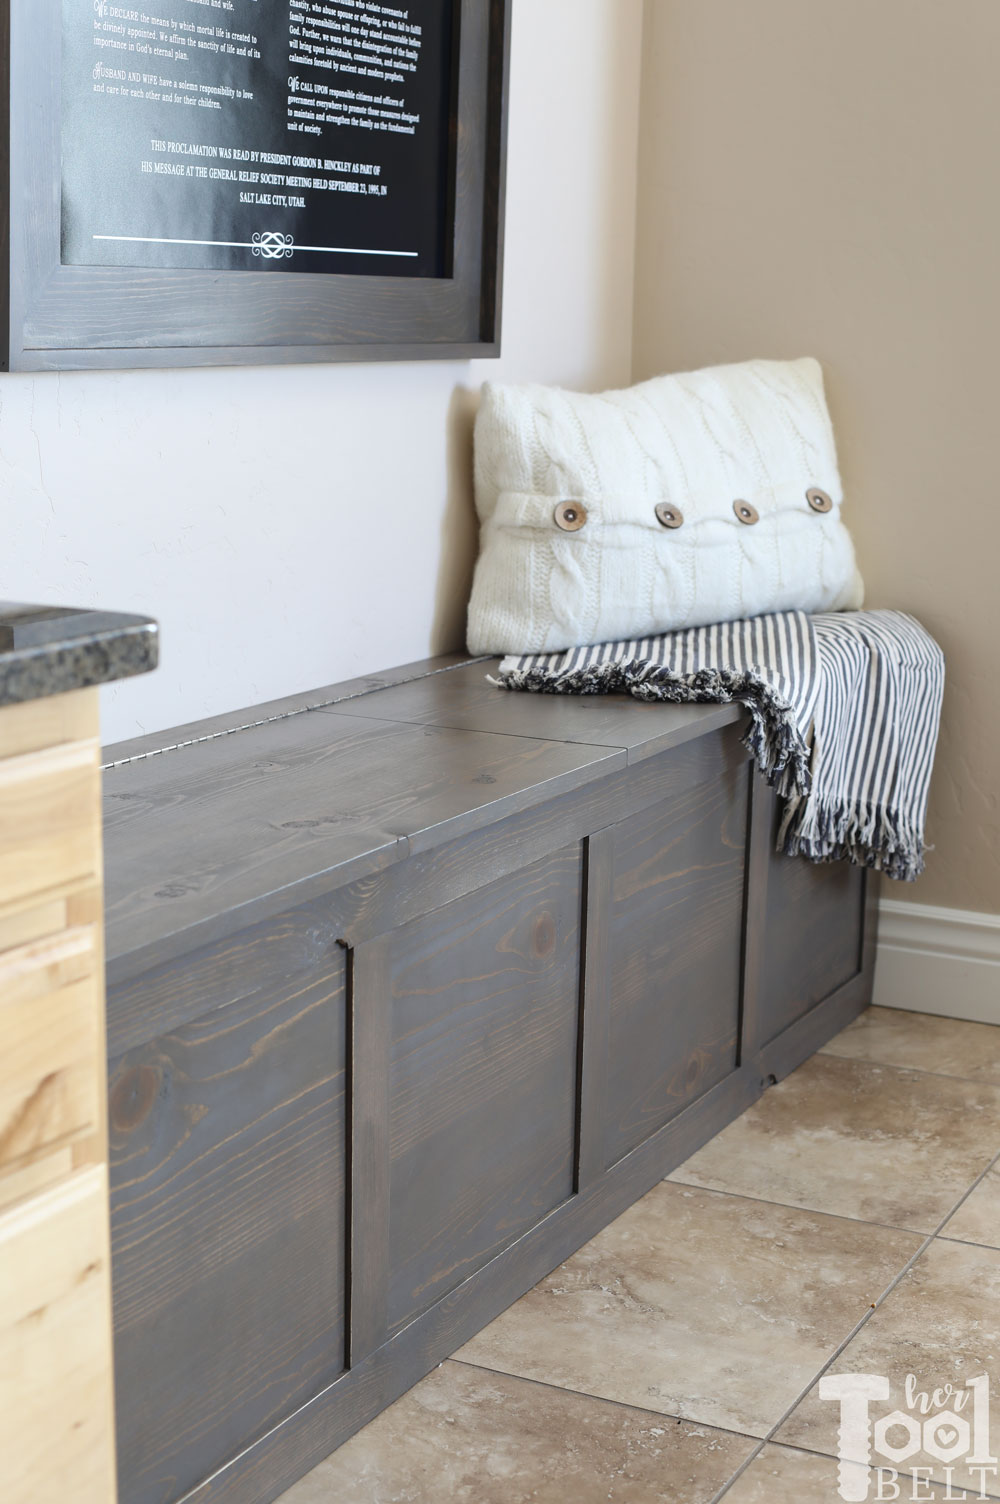
Yay for a hinging top.
Plenty of room in the compartments for very full backpacks, even the kind with two large main pockets.
Step 5 – Finish
To finish the bench, remove any excess glue and sand the wood smooth. I usually start with 80 grit, 120 and move up to 180 grit. The backpack storage bench was stained with Varathane Briarsmoke. After the stain dried, a coat of two of Satin polyurethane.
Now my sister has a great space to organize the backpacks and gear…and they can walk around the table!!!

You could add feet if you’d like too.

Check out all of the Spring Organization Challenge Ideas:
| Blog | Project |
|---|---|
| Her Tool Belt | Storage Bench – Here |
| The House of Wood | Shoe Organizer |
| House Becoming Home | Closet Organization |
| Anika’s DIY Life | Corner Vegtable Storage |
| 100 Things 2 Do.ca | Small Parts Bins |
| Addicted 2 DIY | French Cleat Wall Organizer |
| Remodela Casa | Organization |
| Jaime Costiglio | Easy Closet Shelves |
| The Created Home | Shoe Storage Cabinet with Trays |
| Woodshop Diaries | Closet Cabinets |
| The Inspired Workshop | Ziploc Bag Organizer |
| Reality Daydream | Cleaning Closet Organization |
| My Love 2 Create | Between Studs Workshop Organization |
| My Repurposed Life | Between Studs Broom Closet |
| Ugly Duckling House | Jewelry Organizer |
| Hazel and Gold Designs | Bathroom Drawer Organizer |
| Place of My Taste | Wine Rack |
| Joyful Derivatives | Spice Rack |
Thanks for pinning
what a good sister you are! This is such a great project to tidy up an everyday problem of backpacks.
pinning!
It looks perfect, Amy! Nicely done.
Such a great idea Amy! I have never liked the idea of displaying my kids back packs, maybe just because they only look good the day before school starts! Lol! This is a great alternative that looks beautiful!
Beautiful build, Amy! Love how functional and pretty it is! Thanks for joining in on the fun!
Awesome project Amy! Wish I had a space for something like this. Nice work!
Amy that is the most beautiful backpack storage and so smart. I definitely need one, my kids leave their backpacks all over the kitchen floor.
This is such a great idea! I need one yesterday. The backpacks are all over the entryway bench and no place to sit.
This is awesome! A beautiful way to hide backpacks, plus it adds seating too! I bet your sister is feeling really blessed. 🙂
Hi there! Love this bench. Question: can it support people sitting on it? I want to attempt to make one about 56” wide with a depth of 24.5” and same height as yours.
Yep it’s great to sit on too.
Thank you! I appreciate your inspiration!