
If you've been wanting to add storage to your laundry room, these laundry room cabinet plans are for very budget friendly cabinets. The tall cabinet is great for storing and organizing cleaning supplies and a vacuum. The small folding table gives space to fold laundry and fits 2 standard laundry baskets in the shelves. The 2 upper cabinets fit wonderfully above the washer and … [Read more...]
Custom Drill Storage and Charge Station – Easy
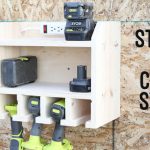
The custom drill storage and charge station and tool review is sponsored by The Home Depot. I have been compensated for my time and provided with product (tools). All ideas and opinions are my own. This post contains some affiliate links for your convenience. Click here to read my full disclosure policy. Over 5 years ago, I made some plans for my friend to build a cordless … [Read more...]
Husky Mobile Office and Tool Organizer Tote Review
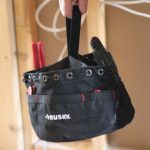
This Husky Tool Organizer Tote review post is sponsored by The Home Depot. I have been compensated for my time and provided with the saw. All ideas and opinions are my own. This post contains some affiliate links for your convenience. Click here to read my full disclosure policy. This spring I have been tackling my Entryway (check it out here). The list of To-Do's on that … [Read more...]
Backpack Storage Bench Plans
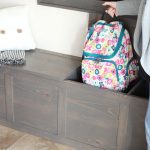
My sister has a very open concept rambler house without a mudroom space (it's the only thing she doesn't like about her house). She hates clutter, and with 4 kids in school ranging from high school to elementary school she was in desperate need of a way to organize all those backpacks. There is one wall at the end of the kitchen cabinets that she had a decorative cabinet on and … [Read more...]
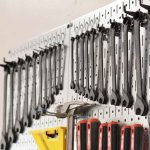
Garage Hand Tool Storage Cabinet Plans
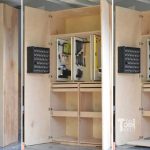
Hand Tool Storage Cabinet and Tool Review is sponsored by The Home Depot. I have been compensated for my time and provided with product. All ideas and opinions are my own. This post contains some affiliate links for your convenience. Click here to read my full disclosure policy. During this build, I'll be reviewing the Ridgid Drill/Impact combo, Bosch multipurpose drill bits … [Read more...]
Weather Guard Saddle Truck Box – Tool Review

Truck Box Tool Review is sponsored by The Home Depot. I have been compensated for my time and provided with product. All ideas and opinions are my own. This post contains some affiliate links for your convenience. Click here to read my full disclosure policy. Growing up on a farm we were always fixing or maintaining something. We worked in the fields and there were a number … [Read more...]
Garage Tool Organization Ideas
Garage tool organization ideas is sponsored by The Home Depot. I have been compensated for my time and provided with product. All ideas and opinions are my own. This post contains some affiliate links for your convenience. Click here to read my full disclosure policy. Last year I cleaned out most of the garage, painted the walls and coated the garage floor with Rocksolid … [Read more...]
Rolling Gift Wrap Organizer
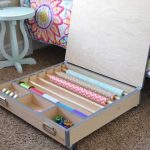
Closet space is very limited at my house. We only have one small closet besides the bedroom closets. The last thing I want is for it to be stuffed with wrapping paper supplies (as it is now). However under the bed is free! It's ok to put things under the bed if it's organized and useful, right??? When deciding on the features for this gift wrap organizer, I wanted it to: … [Read more...]
Easy Crate Leaning Shelf and Storage

My older kids are back to school and that means more and more stuff! Where does it all come from? :-) I need a simple solution to help organize toys and books. The leaning shelves are a fun and simple idea, but I like the added bin that Land of Nod uses in theirs. Perfect place for toys, accessories, blankets, etc. Add a few crates to some cheap 1x3's and you have a super easy … [Read more...]
Mobile Miter Saw Station and Storage
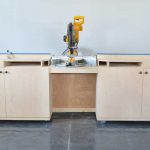
I have been slowly trying to get my garage/workshop organized and easy to work in as a shared space. Two major things that I have issues with are storage and work space. I use this old table as an assembly table/ miter saw stand. I am tired of pulling the heavy miter saw on and off the table and want a permanent spot for it. But since it's my garage, it really does need to be … [Read more...]