• Home
  • Project Gallery
  • About me
    • Disclosure
    • Disclaimer
  • Blog

Her Tool Belt

DIY furniture plans, crafts, and home improvement tutorials to empower you!

  • Free Woodworking Plans
    • Bathroom Furniture
    • Bedroom Furniture
    • Entry
    • Family Room Furniture
    • Garage
    • Kitchen furniture
    • Laundry Room
    • Mudroom Furniture
    • Organization
    • Outdoor Furniture
  • Home Decor
    • Upcycle
  • Crafts
    • Holiday
  • Home Improvement
    • Cleaning
    • Fix IT
    • Paint
    • Tile
  • Tool Reviews
  • Tool Time Videos

Grand Island Console Table

February 2, 2016 by Amy 18 Comments

Hi!  I’d love for you to follow me on Pinterest Her Tool Belt  and if you love instagram, you can keep up with me there too!

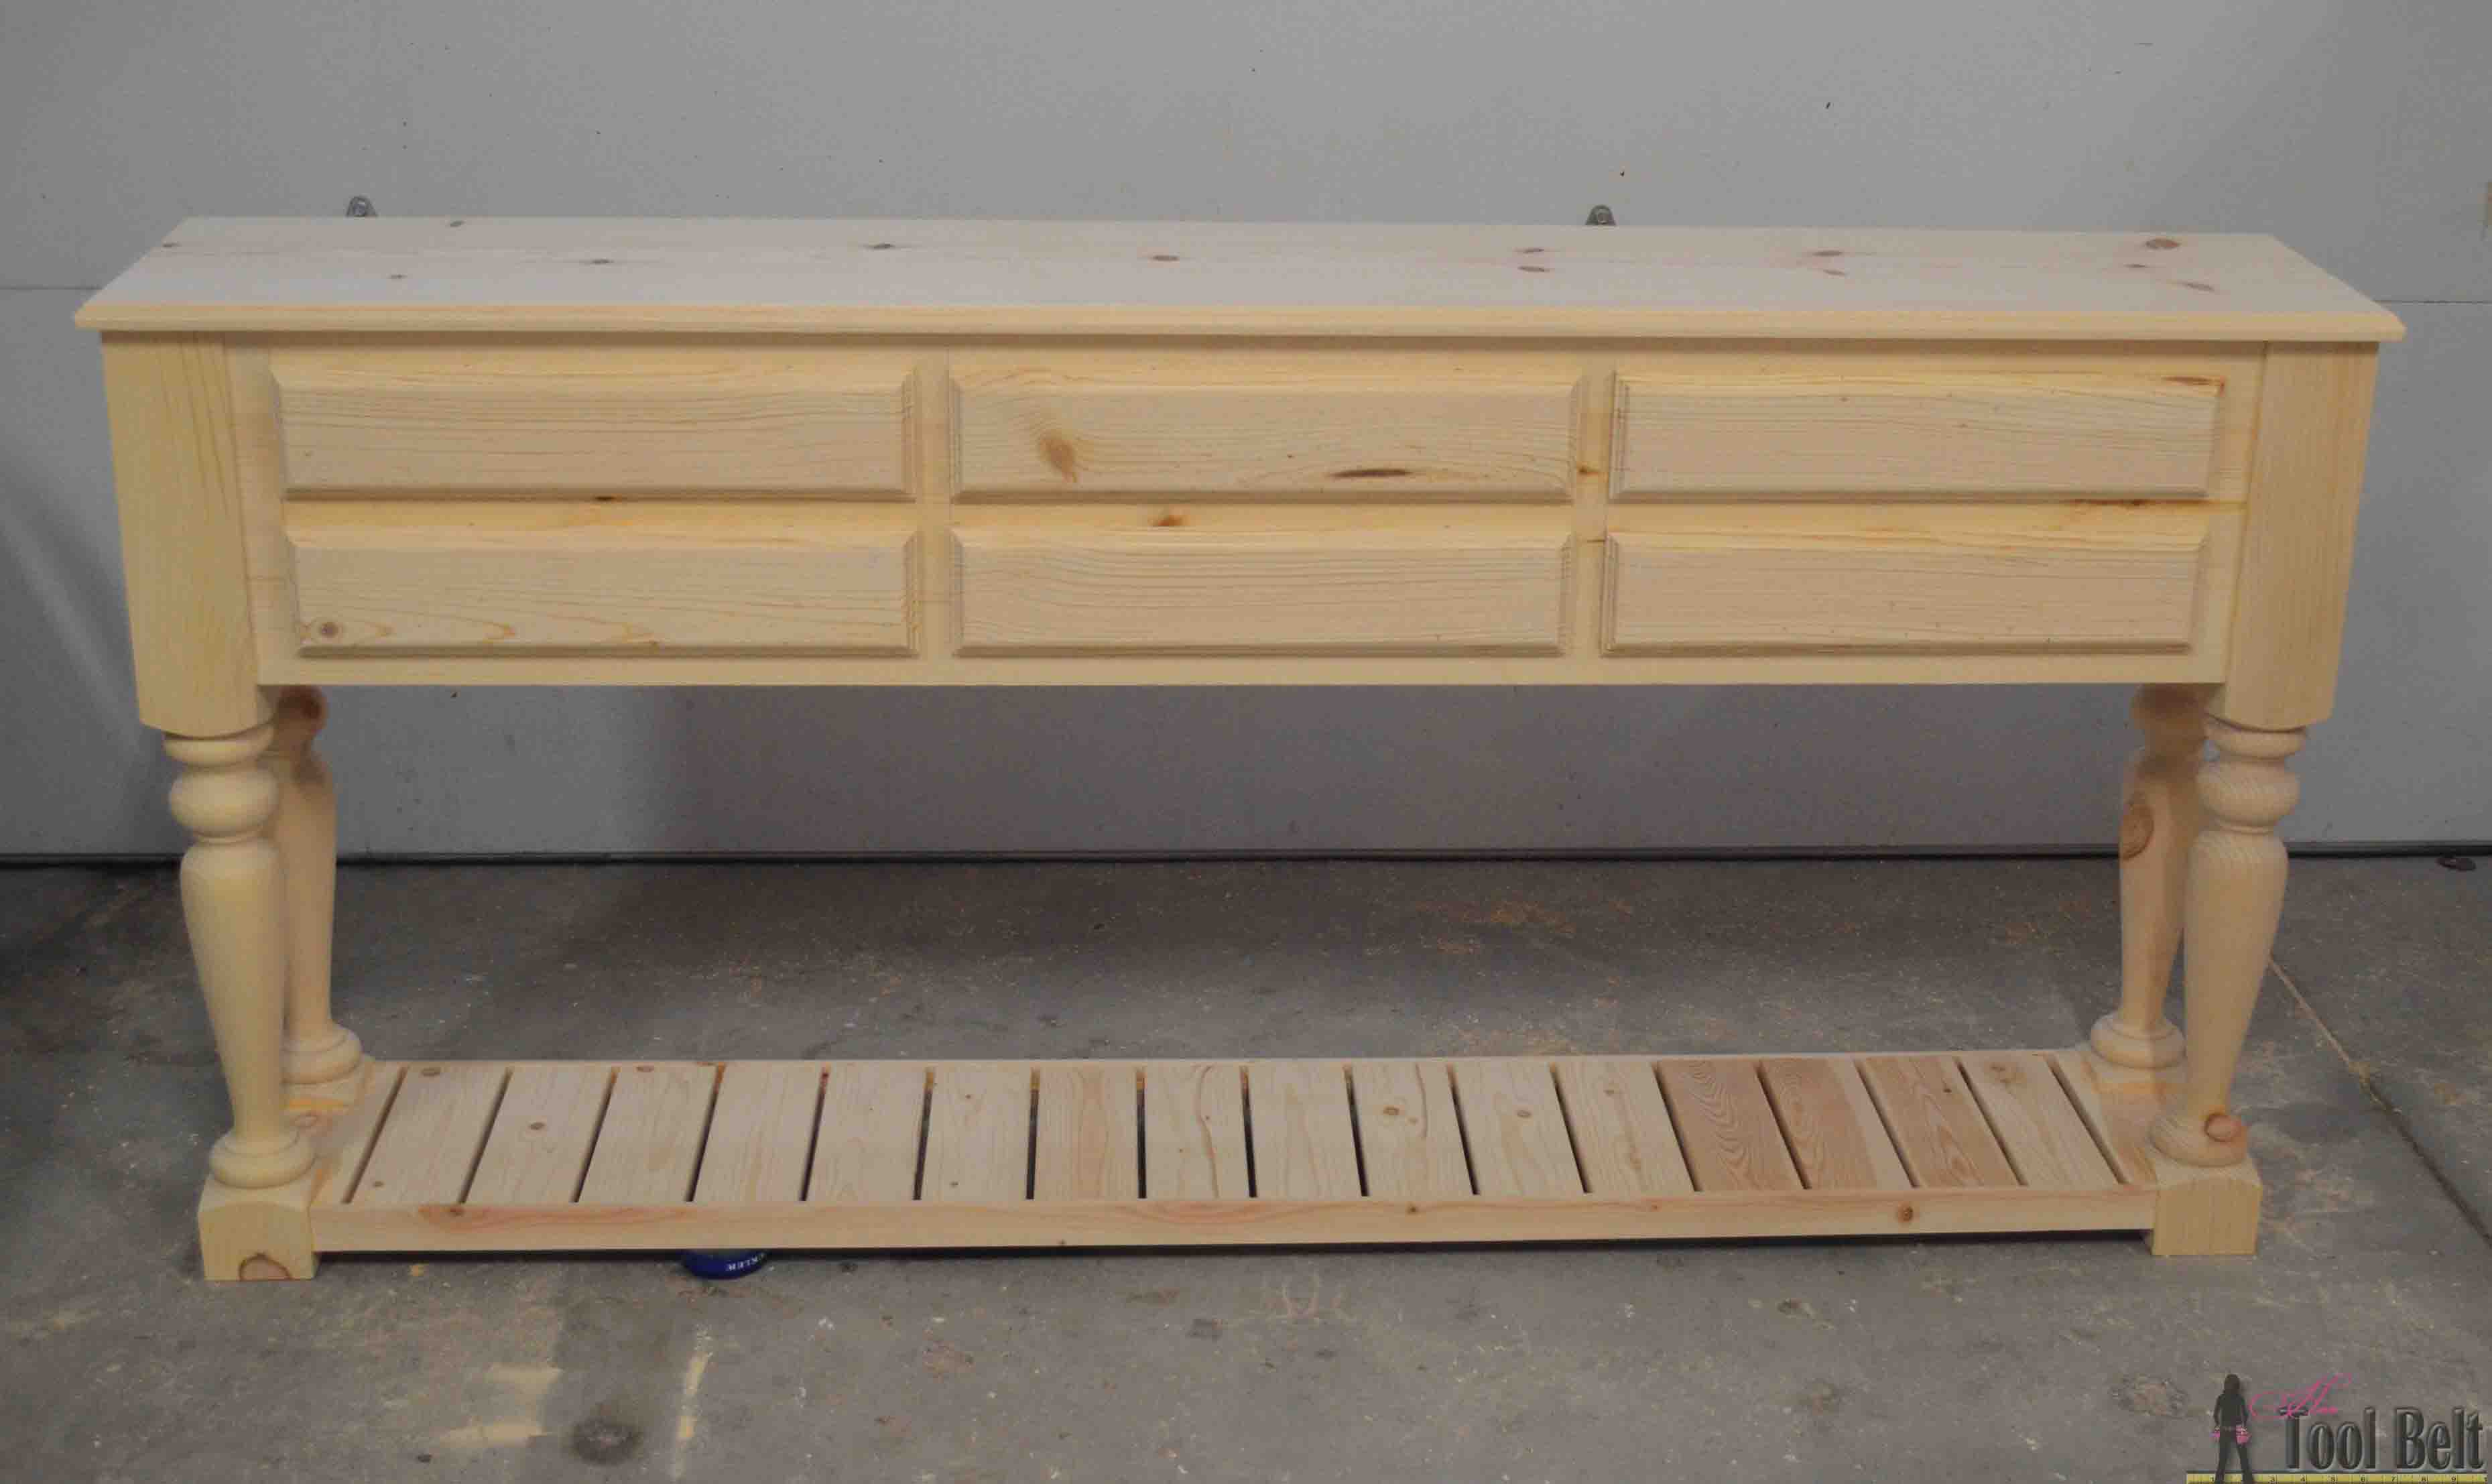
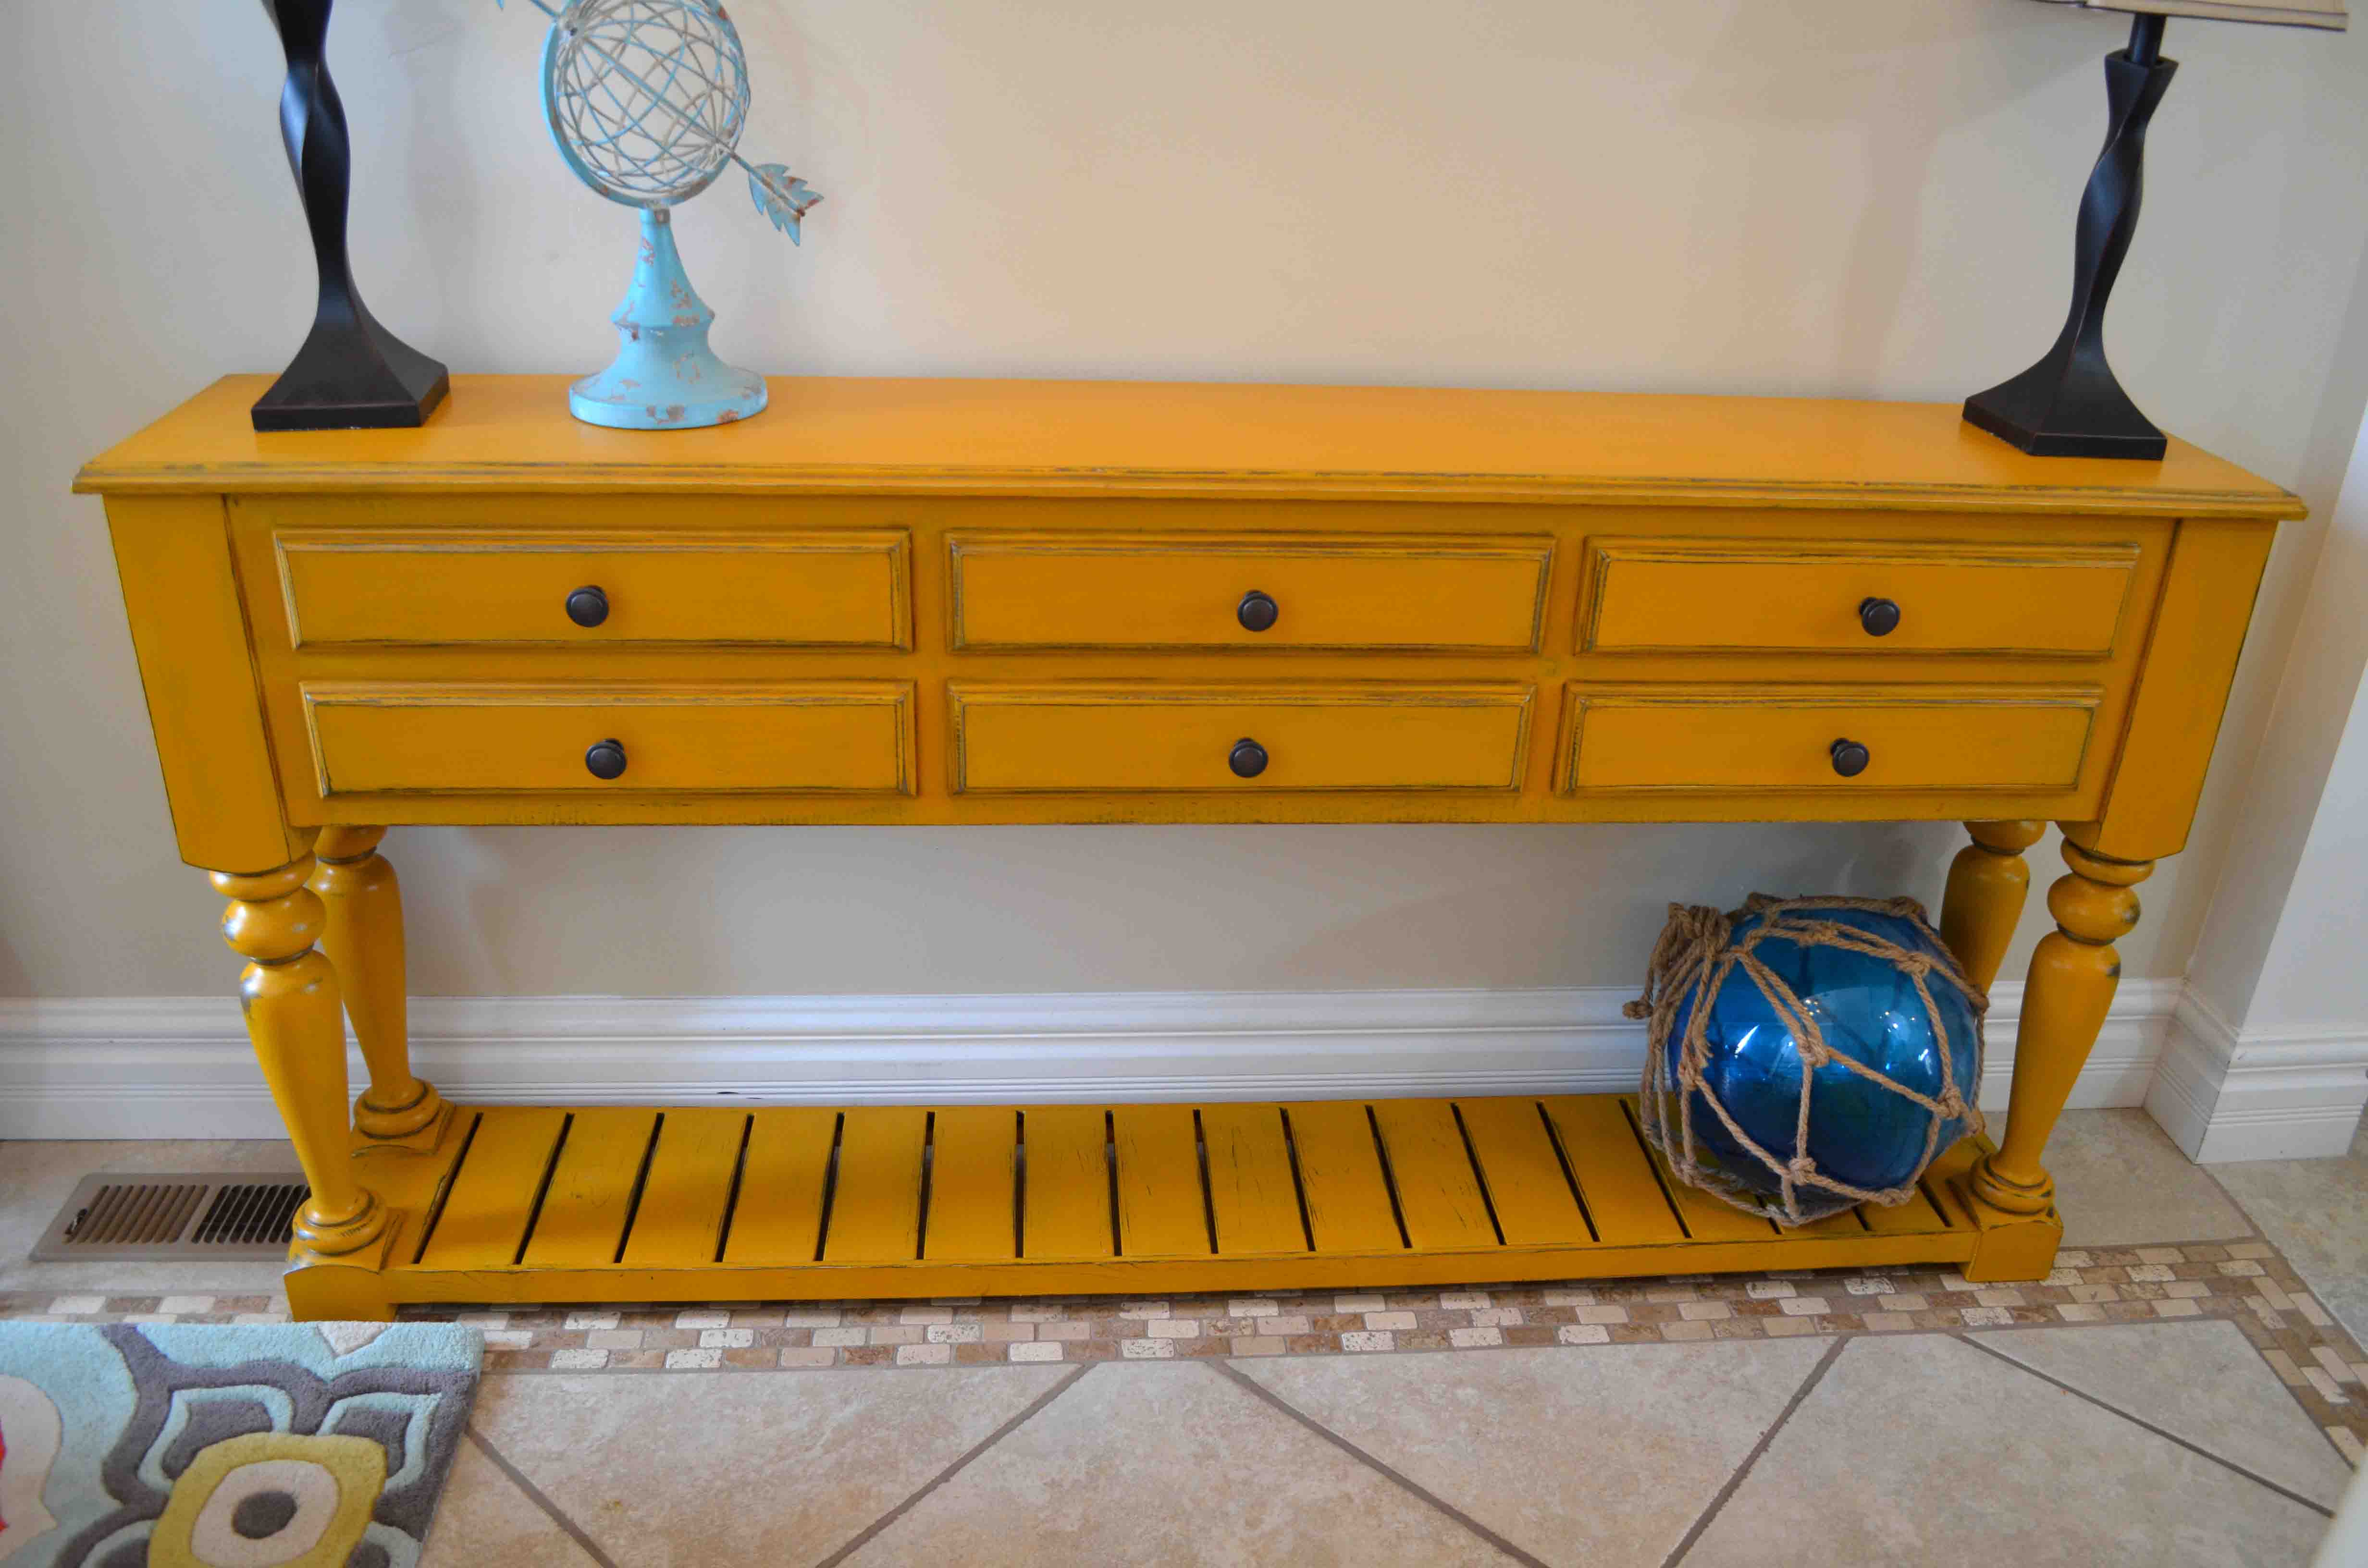
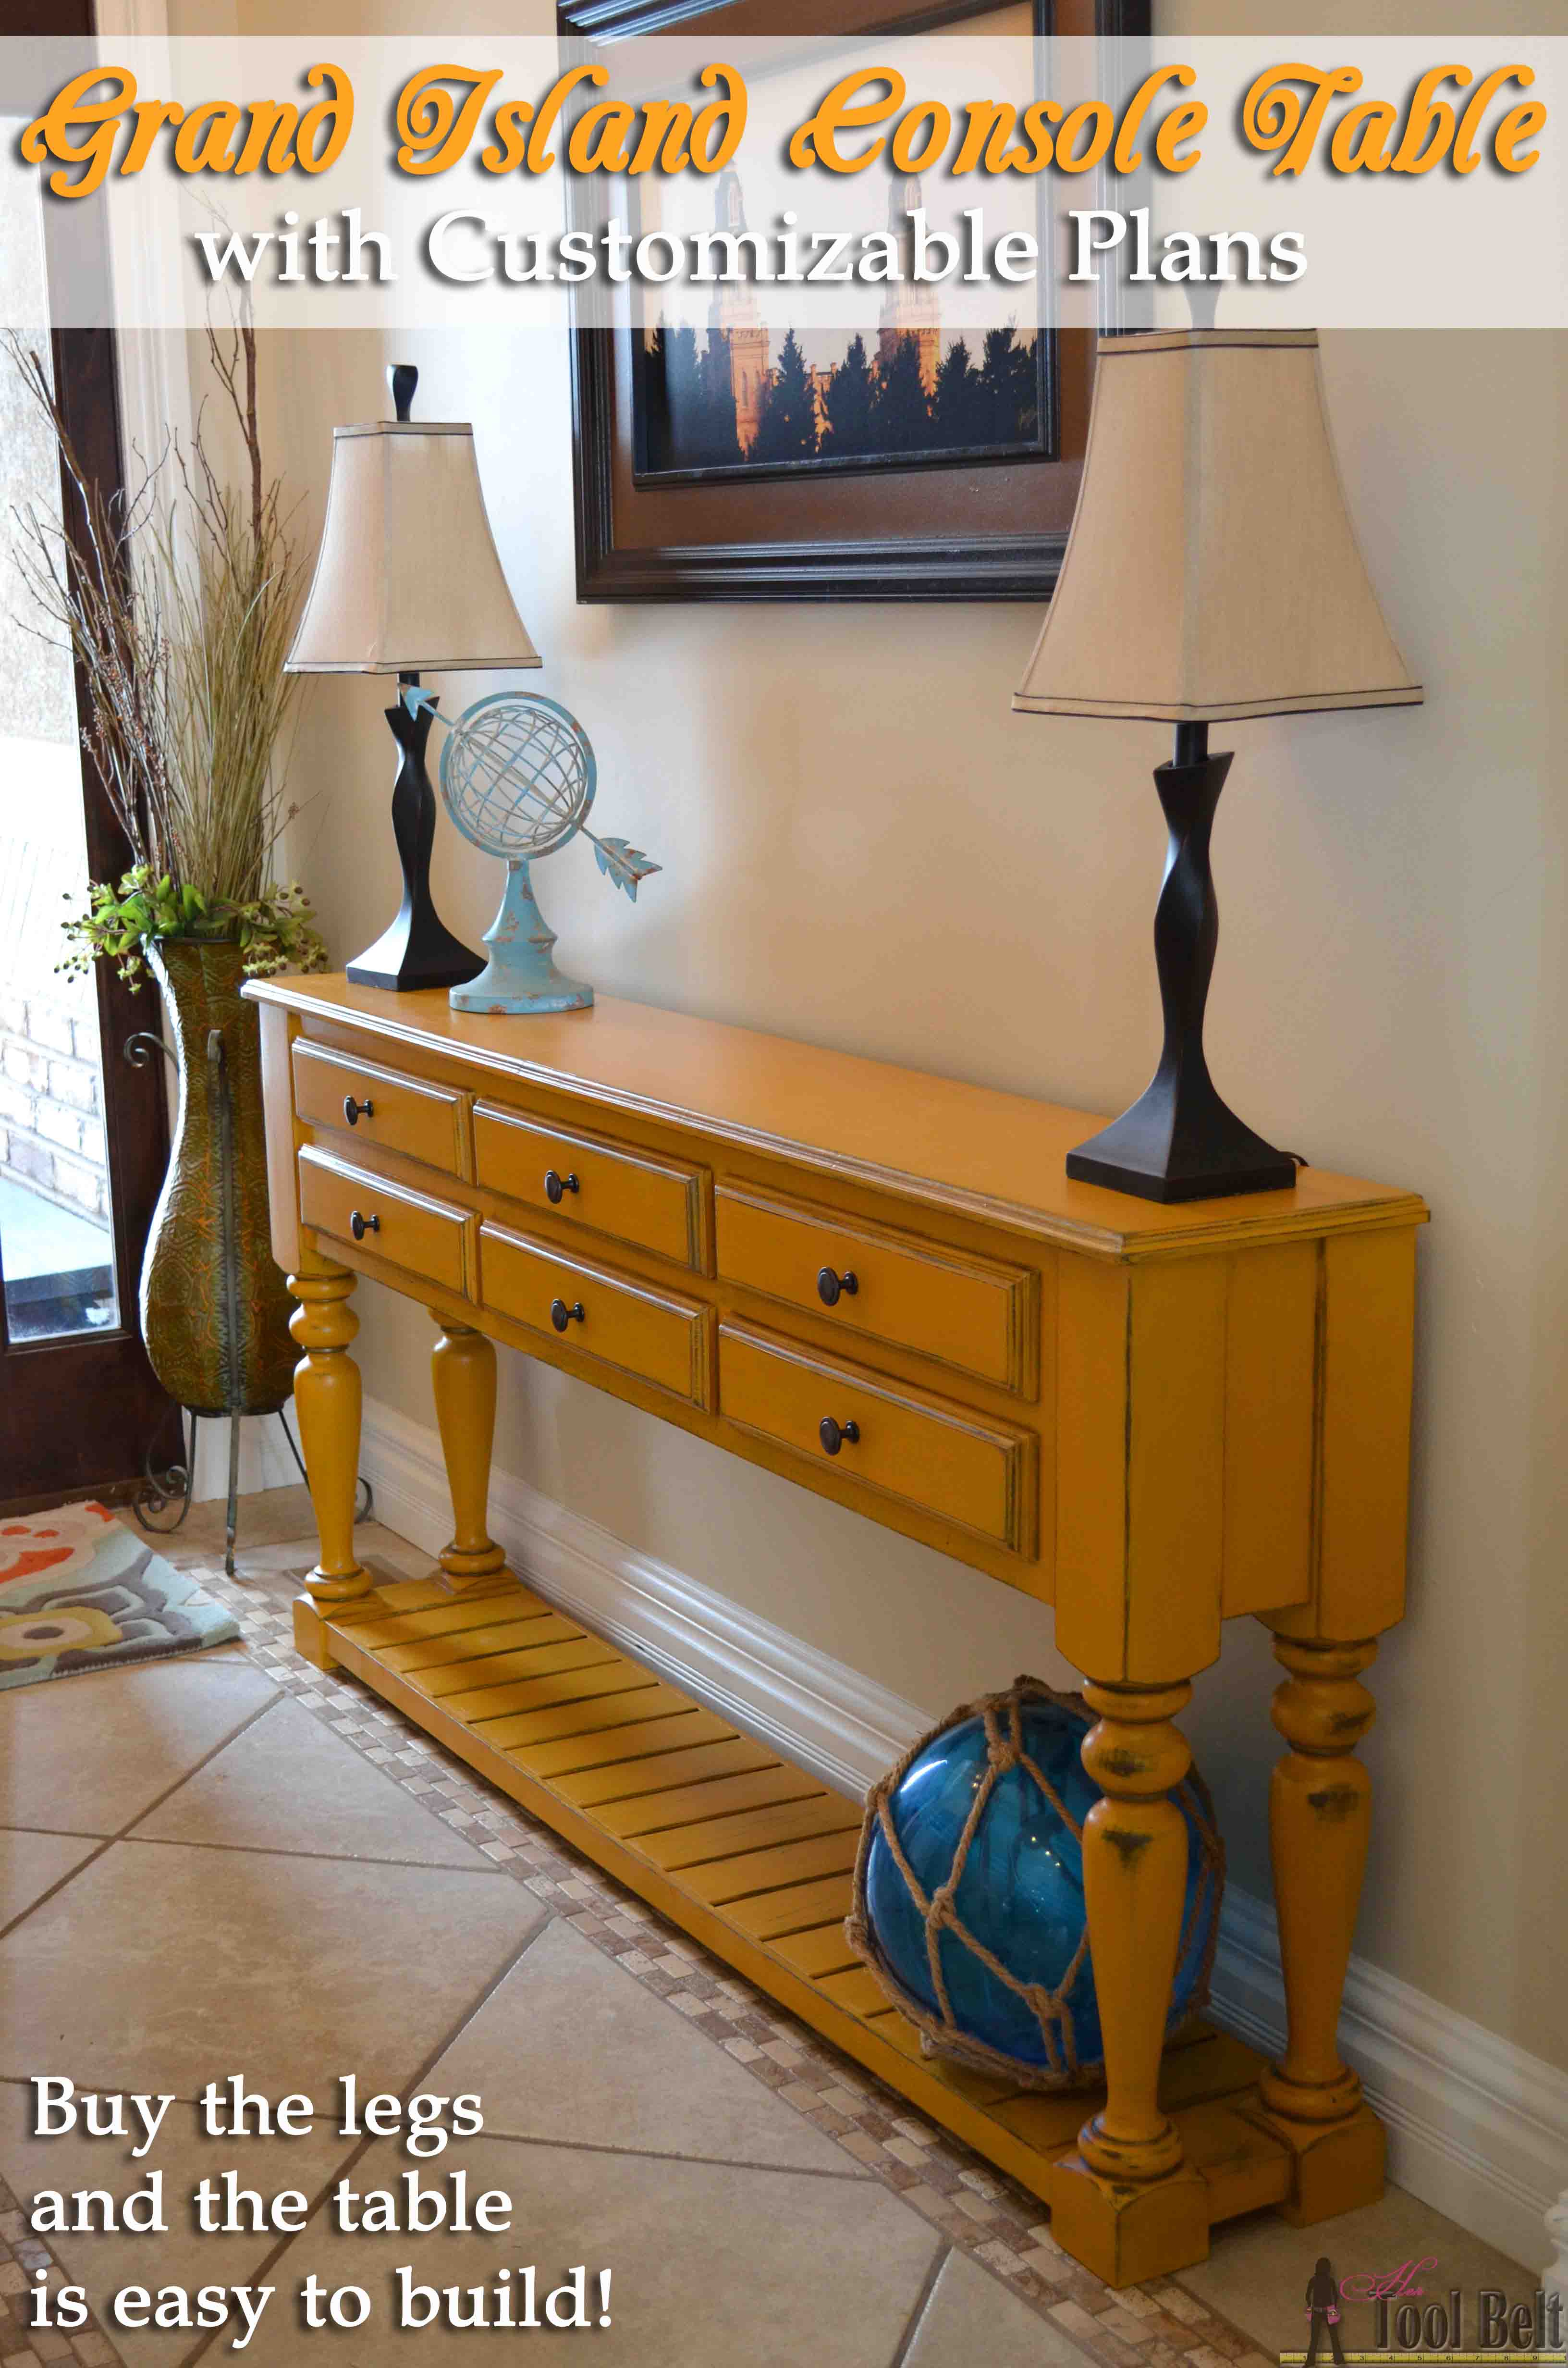
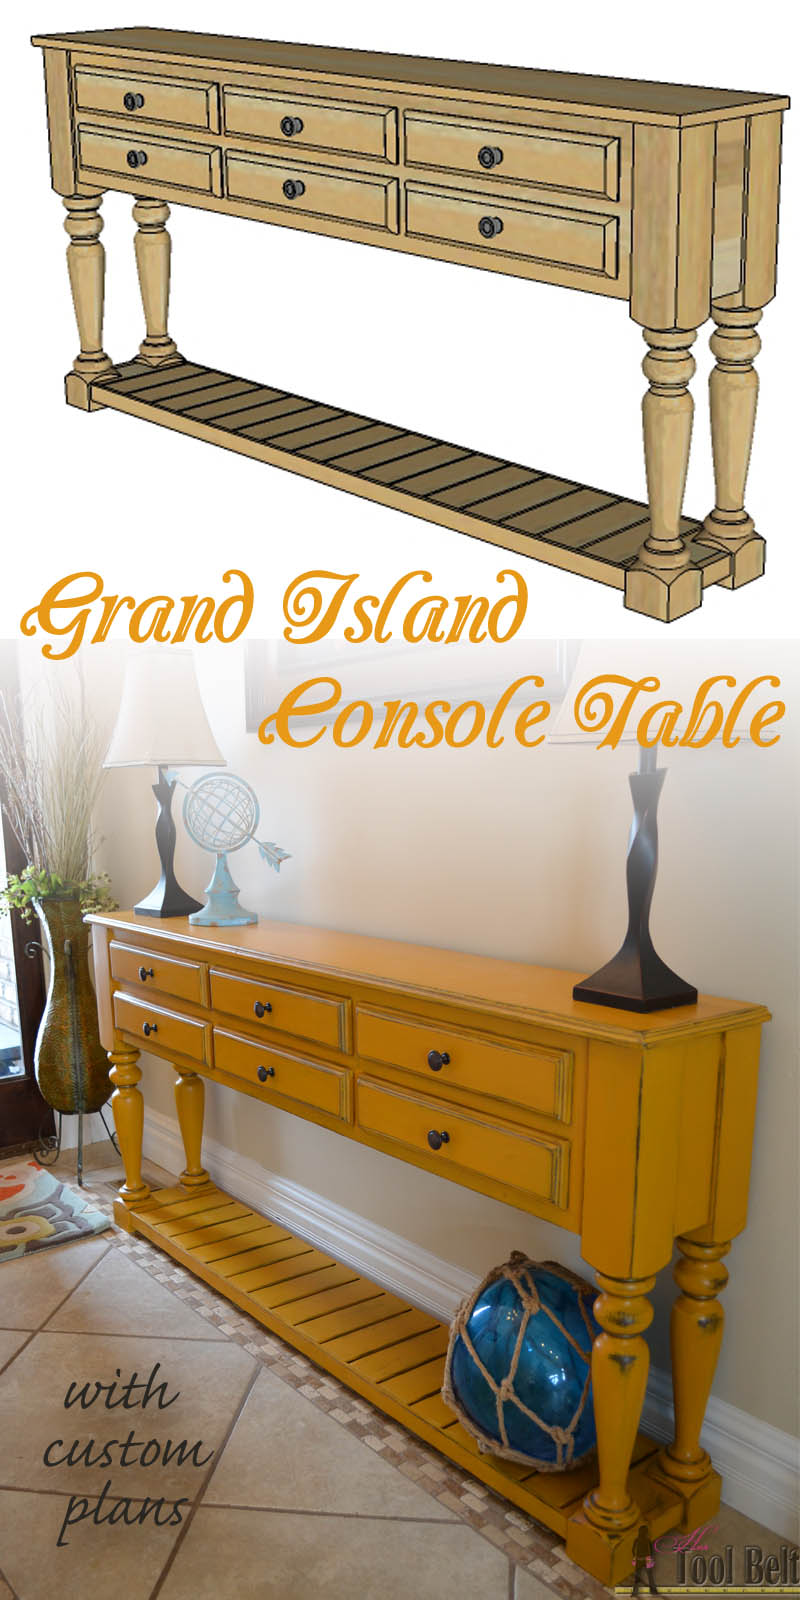
I have been wanting to build a fun and fancy console table, but it had to be a fairly narrow design.  Then I found the perfect turned legs and it may have been destiny!  The drawers are faux because the depth is narrow, so they wouldn’t hold much anyway.  One of the greatest parts of DIY’ing is that you can totally customize your furniture for the space.  I made customizing this table really easy.  The cut list is a spreadsheet, download it and put in your desired dimensions and it will automatically update for you!

Need a stylish console table, perfect for your space? Free plans that you can easily customize the dimensions and build what you want. Buy the legs and DIY'ing is a breeze.

A quick video of the console table build:

How to Build a Custom Grand Island Console Table

This post contains affiliate links noted by *.

Need a stylish console table, perfect for your space? Free plans that you can easily customize the dimensions and build what you want. Buy the legs and DIY'ing is a breeze.

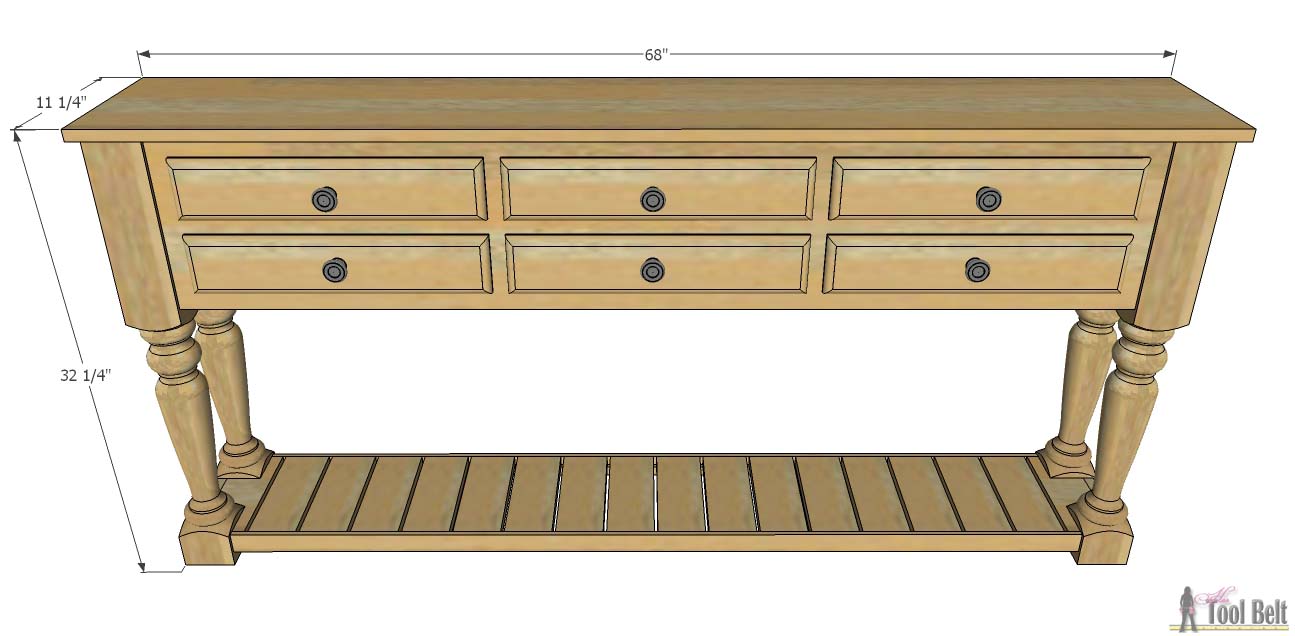
This plan is customizable, so the materials list will change according to the desired dimension of your console table.  This example material list is what I used for the console table being 68″ long and 11 1/4″ deep.

Material

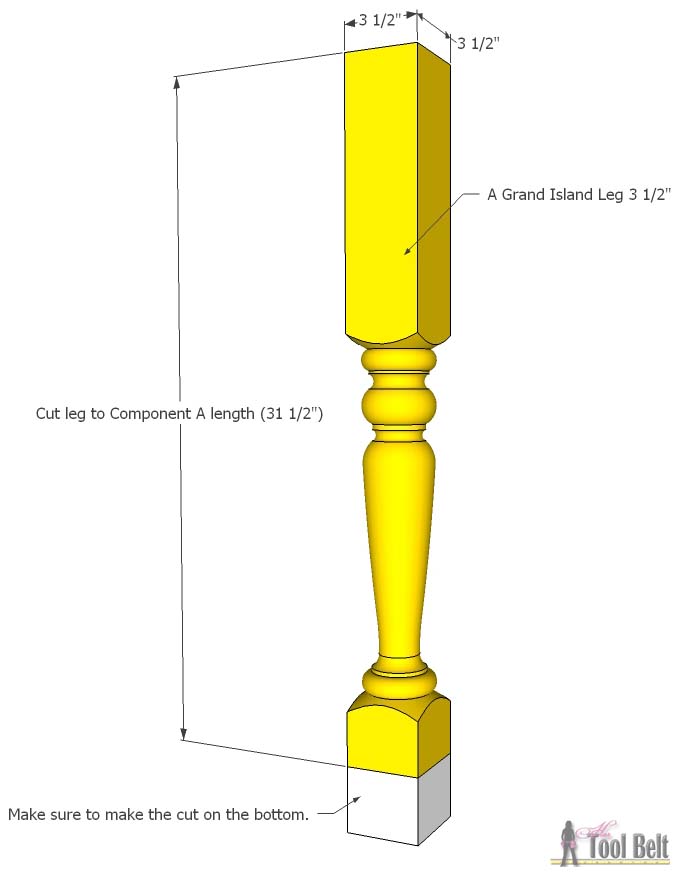
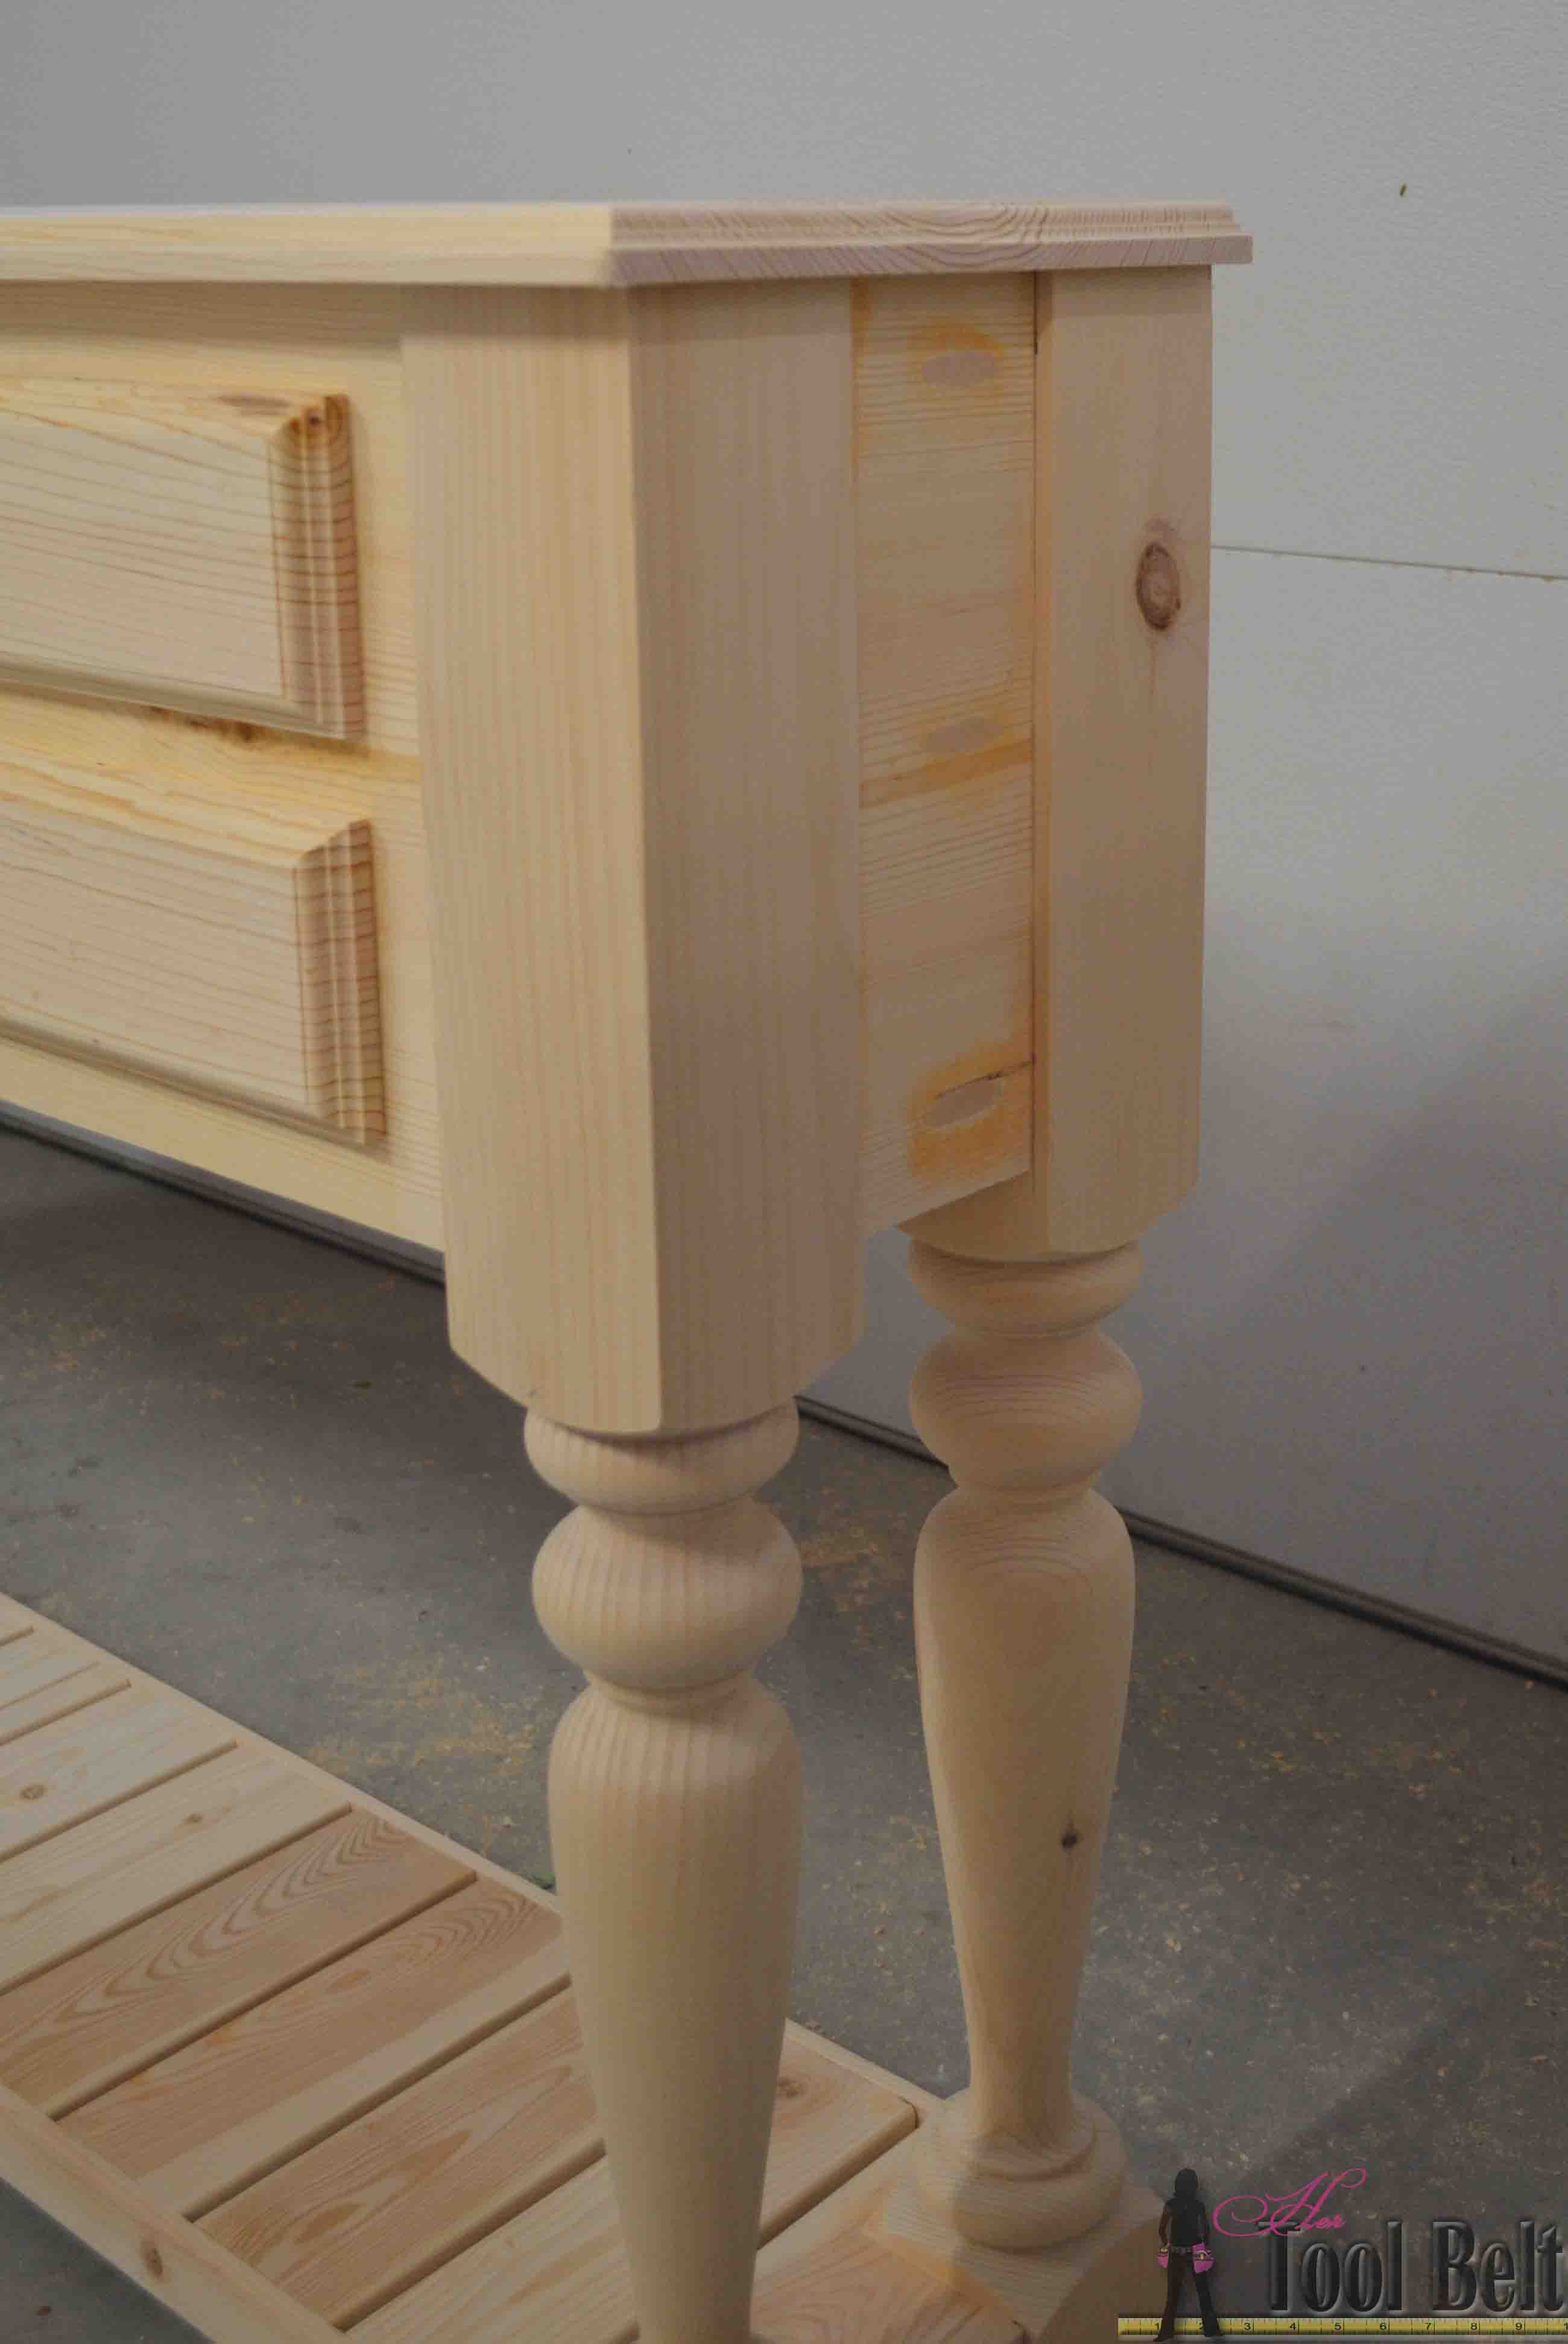
  • 4 – 3 1/2″ Grand Island Legs from Osborne Wood Products in Knotty Pine
  • 2 – 1″ x 12″ x 6′ boards (actual 3/4″ x 11 1/4″)
  • 1 – 1″ x 10″ x 6′ board (actual 3/4″ x 9 1/4″)
  • 2 – 1″ x 4″ x 8′ boards (actual 3/4″ x 3 1/2-3 1/4″) I usually buy extra 1×4’s to rip into 2 and make 1×2’s.  The selection of 1×2’s at my store is usually poor, plus is saves money.
  • 5 – 1″ x 2″ x 8′ boards (actual 3/4″ x 1 1/2″) (see note above)
  • 1 sheet 5 mm (about 1/4″) underlayment plywood
  • 1 1/4″ pocket hole screws
  • 1 1/4″ brad nails
  • 3/4″ brad nails
  • wood glue
  • sandpaper
  • wood filler
  • paint
    • for this project I used Country Chic Paint:  Chocolate Tart, Fresh Mustard and Belt Buckle metallic cream
  • top coat (optional)
  • 6 – drawer knobs*
    • Approximate cost of building materials is $210.
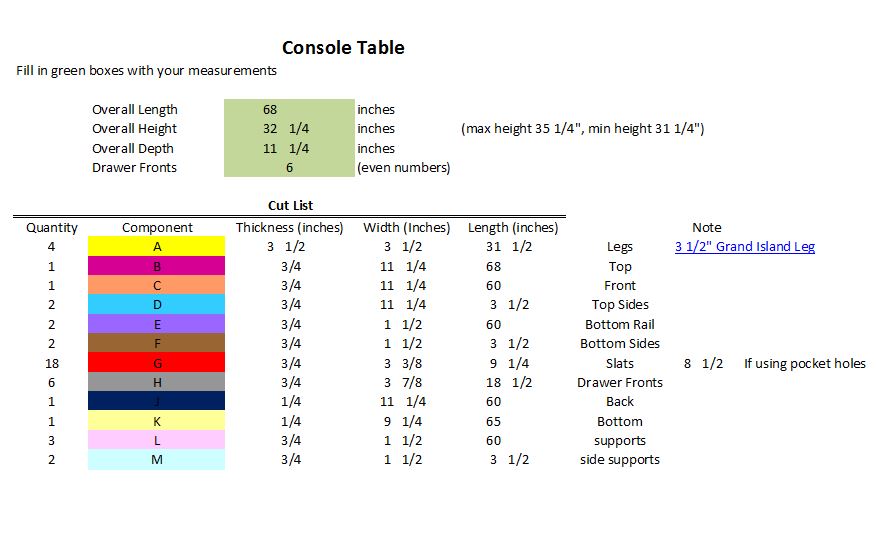
Cut List

To customize the dimensions of the console table, download the spreadsheet and change the green fields (overall length, height depth and number of drawer fronts).  The spreadsheet will automatically change the cut list numbers accordingly.  Cut list speadsheet: Grand Island Leg custom Console Table  See step 3 for rail and slat options.

Example grand island console table cut list

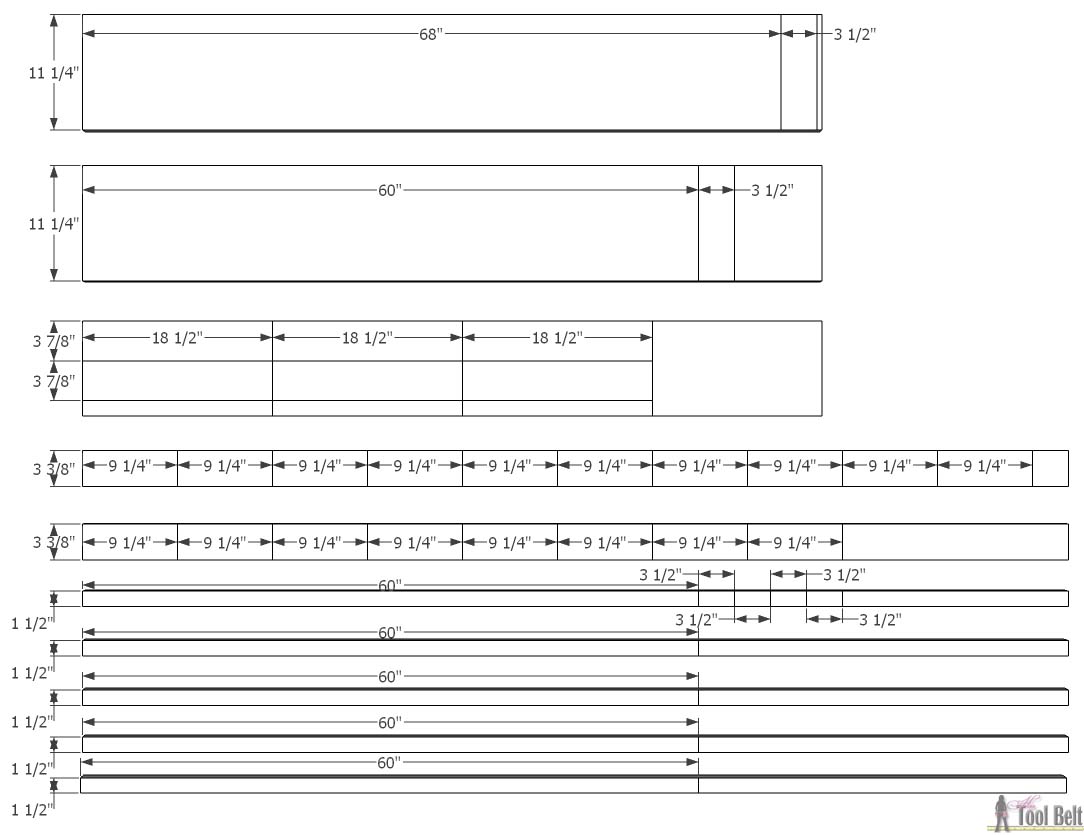
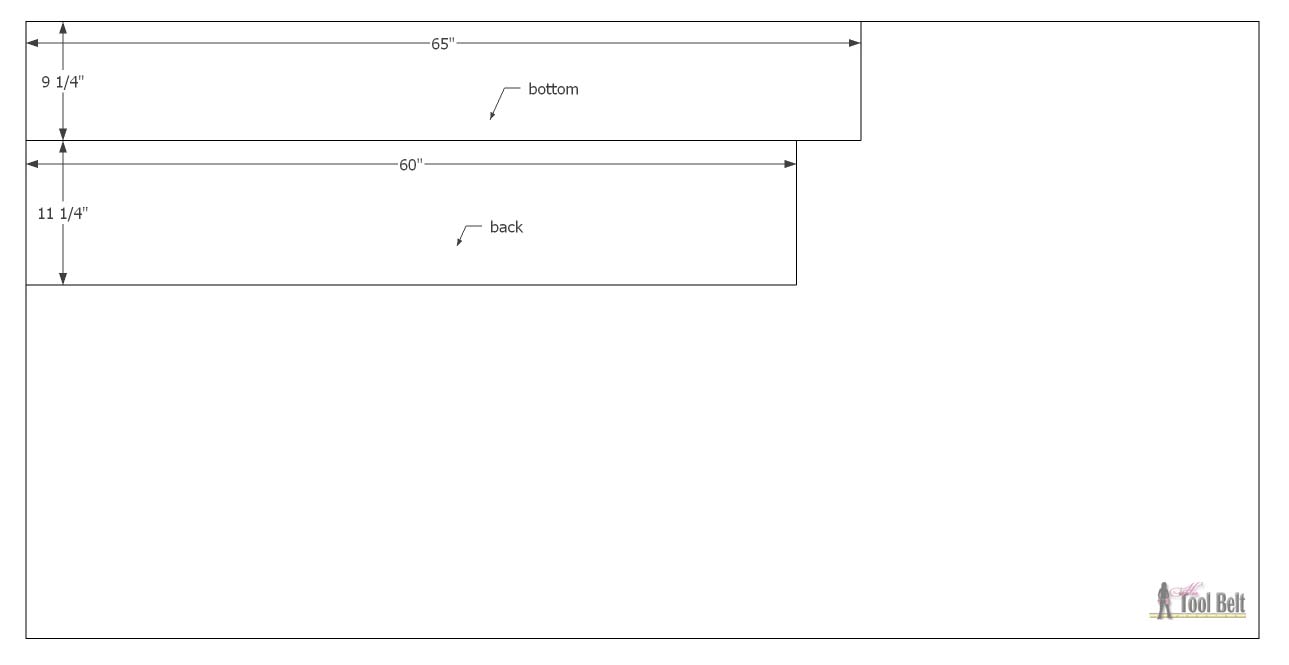
Example cut diagram (for 68″ table).

Need a stylish console table, perfect for your space? Free plans that you can easily customize the dimensions and build what you want. Buy the legs and DIY'ing is a breeze.

Need a stylish console table, perfect for your space? Free plans that you can easily customize the dimensions and build what you want. Buy the legs and DIY'ing is a breeze.

Step 1

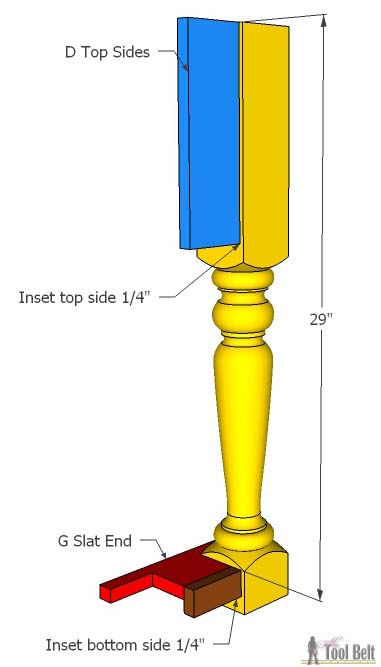
Cut the legs to length.  Measure from the top of the legs down, mark and cut the leg to component A length.

Need a stylish console table, perfect for your space? Free plans that you can easily customize the dimensions and build what you want. Buy the legs and DIY'ing is a breeze.

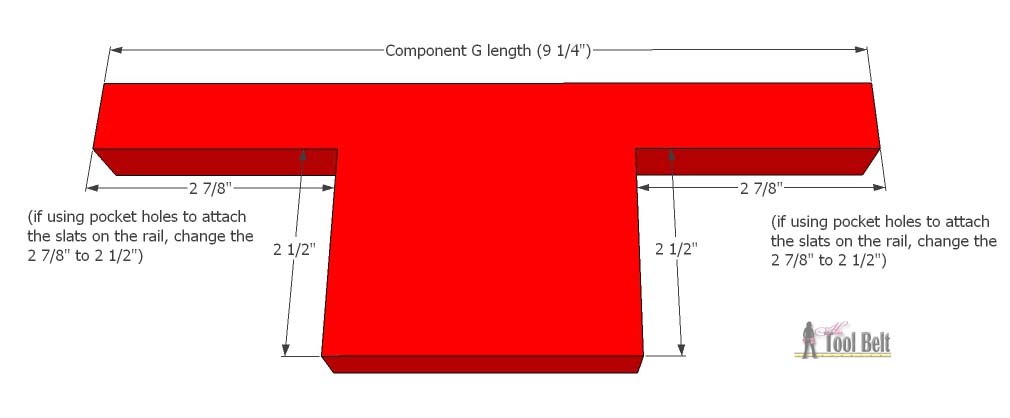
Take 2 of the component G slats and mark the following measurements, then cut out (jig saw) to notch for the legs.

Need a stylish console table, perfect for your space? Free plans that you can easily customize the dimensions and build what you want. Buy the legs and DIY'ing is a breeze.

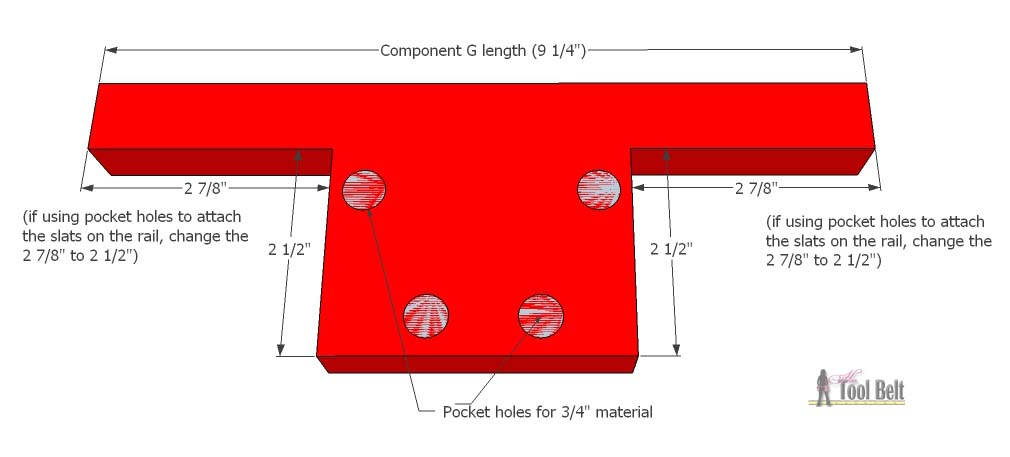
Drill pocket holes for 3/4″ material, 2 that will attach to the bottom sides and one near each corner.  Note: put it near the corner to make it easier to secure the screw when the legs are in place.

Need a stylish console table, perfect for your space? Free plans that you can easily customize the dimensions and build what you want. Buy the legs and DIY'ing is a breeze.

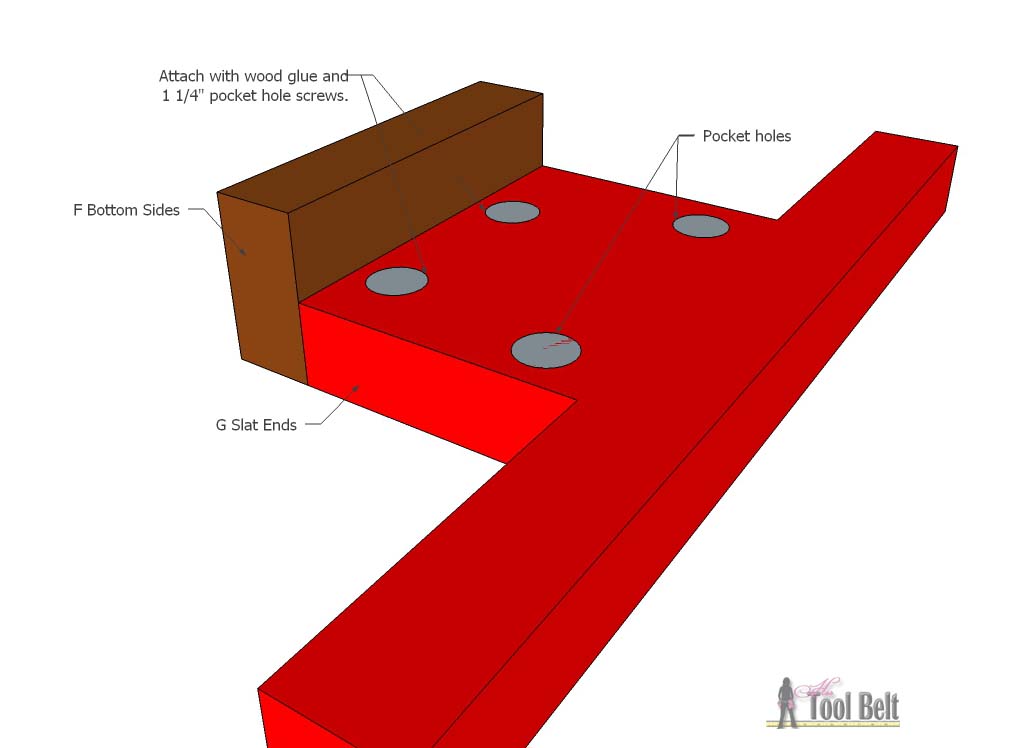
Use wood glue and 1 1/4″ pocket hole screws to attach a bottom side to and end slat.

Need a stylish console table, perfect for your space? Free plans that you can easily customize the dimensions and build what you want. Buy the legs and DIY'ing is a breeze.

Drill pocket holes in the top side pieces.  Drill a couple in the top to secure the top later.  Drill about 4 down one side, and on the opposite side drill another 3-4 (this will be on the side that shows).  When the sides are being installed between the legs, there won’t be enough room to put your drill.  I filled the outside pocket holes with filler and they don’t show.

Need a stylish console table, perfect for your space? Free plans that you can easily customize the dimensions and build what you want. Buy the legs and DIY'ing is a breeze.

On the legs mark in 1/4″ from one side (top and bottom blocks).  Mark 29″ from the leg top for the bottom side piece to attach.

Need a stylish console table, perfect for your space? Free plans that you can easily customize the dimensions and build what you want. Buy the legs and DIY'ing is a breeze.

Use wood glue and 1 1/4″ pocket hole screws to attach the top side and bottom side to a leg.

Need a stylish console table, perfect for your space? Free plans that you can easily customize the dimensions and build what you want. Buy the legs and DIY'ing is a breeze.

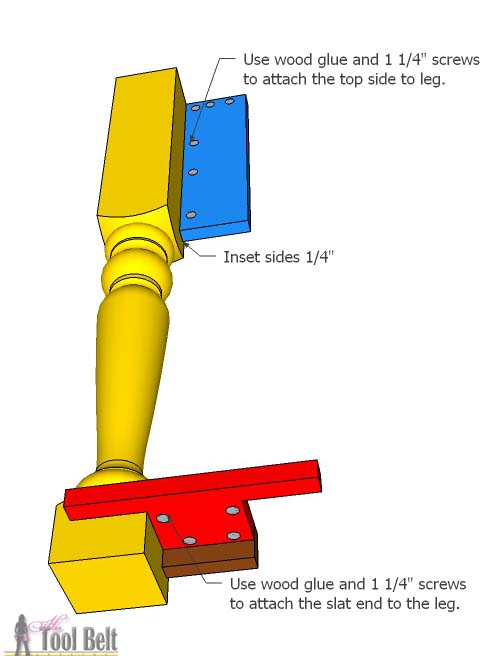
Use wood glue and 1 1/4″ screws to attach the sides to the other leg.

Need a stylish console table, perfect for your space? Free plans that you can easily customize the dimensions and build what you want. Buy the legs and DIY'ing is a breeze.

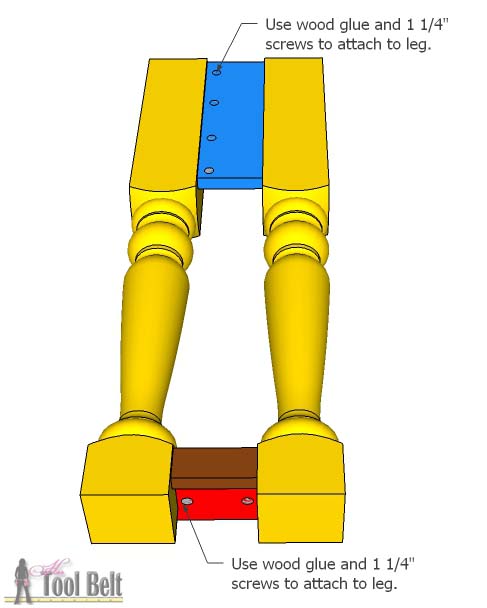
Repeat for other leg set.

Step 2

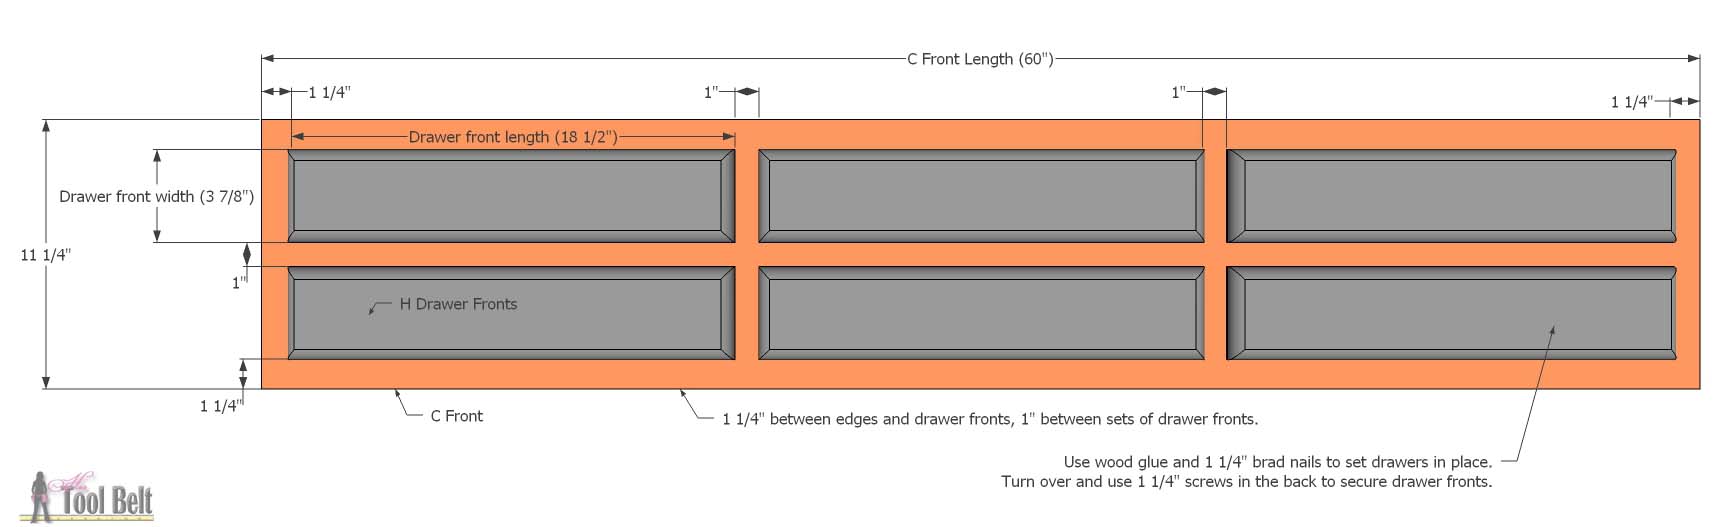
Cut the top, front and drawer front pieces.  If you want a routed edge on these pieces, now is a good time to route them.

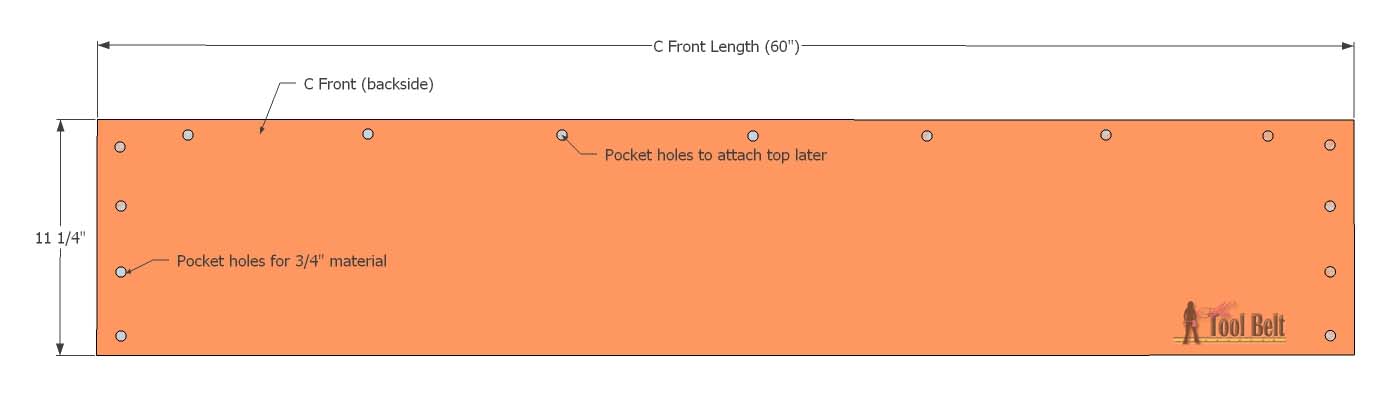
Drill pocket holes for 3/4″ material on the back of the front piece, about 4 holes on each end to attach the legs and some up top.

Need a stylish console table, perfect for your space? Free plans that you can easily customize the dimensions and build what you want. Buy the legs and DIY'ing is a breeze.Space out the drawer fronts onto the front piece.  The drawer fronts will be 1 1/4″ from each side of the front piece and 1″ gap between each drawer front.  Use wood glue and 1 1/4″ brad nails to secure the drawer fronts in place.  Then I flipped the front over and added 1 1/4″ screws from the back for a little extra security.  If you know what knobs/pulls you plan on using, you can drill the holes for them now, or wait until later.

Need a stylish console table, perfect for your space? Free plans that you can easily customize the dimensions and build what you want. Buy the legs and DIY'ing is a breeze.

Step 3

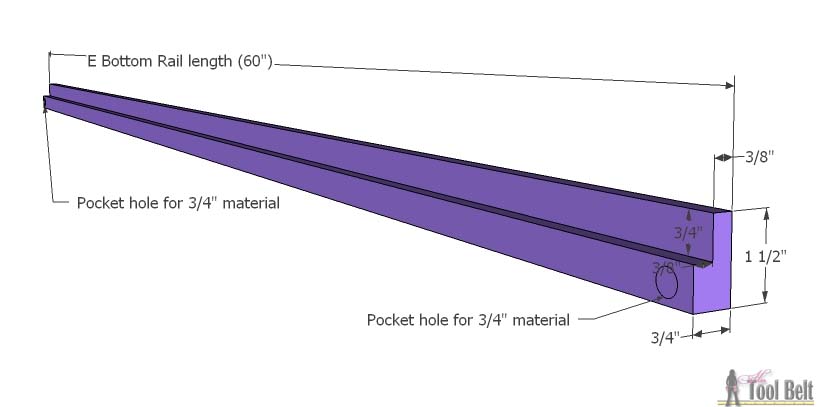
To attach the slats on the bottom, I decided to cut a rabbet (groove) in the rail for the slats to sit on, then nail them in place.  If you’d rather not cut a rabbet, leave the rails whole and you can attach the slats with pocket holes/screws (see note on cut list for this option).

I cut the rabbet joint as shown on the table saw making 2 passes.  Drill a pocket hole for 3/4″ material in each end of the rails.

Need a stylish console table, perfect for your space? Free plans that you can easily customize the dimensions and build what you want. Buy the legs and DIY'ing is a breeze.

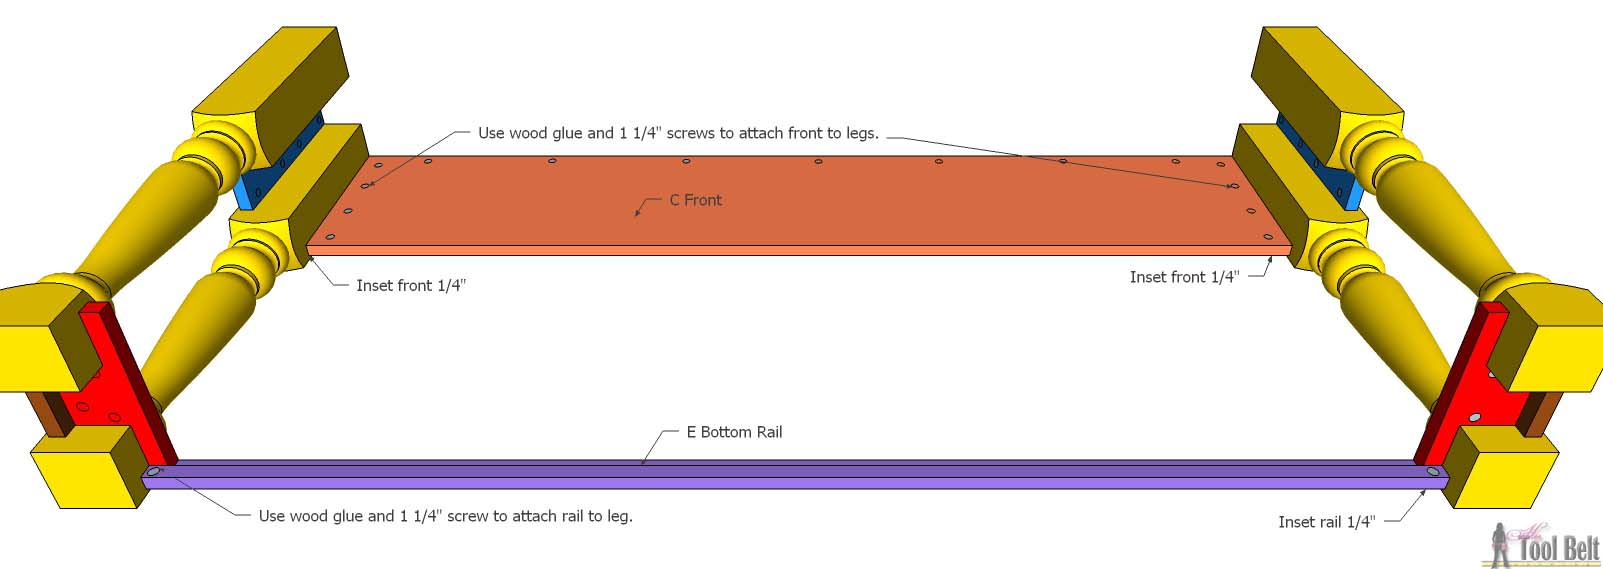
On the legs mark in 1/4″ from one side (top and bottom blocks).  Mark 29″ from the leg top for the rail pieces to attach.  Use wood glue and 1 1/4″ screws to attach the front and front rail onto the front legs.

Need a stylish console table, perfect for your space? Free plans that you can easily customize the dimensions and build what you want. Buy the legs and DIY'ing is a breeze.

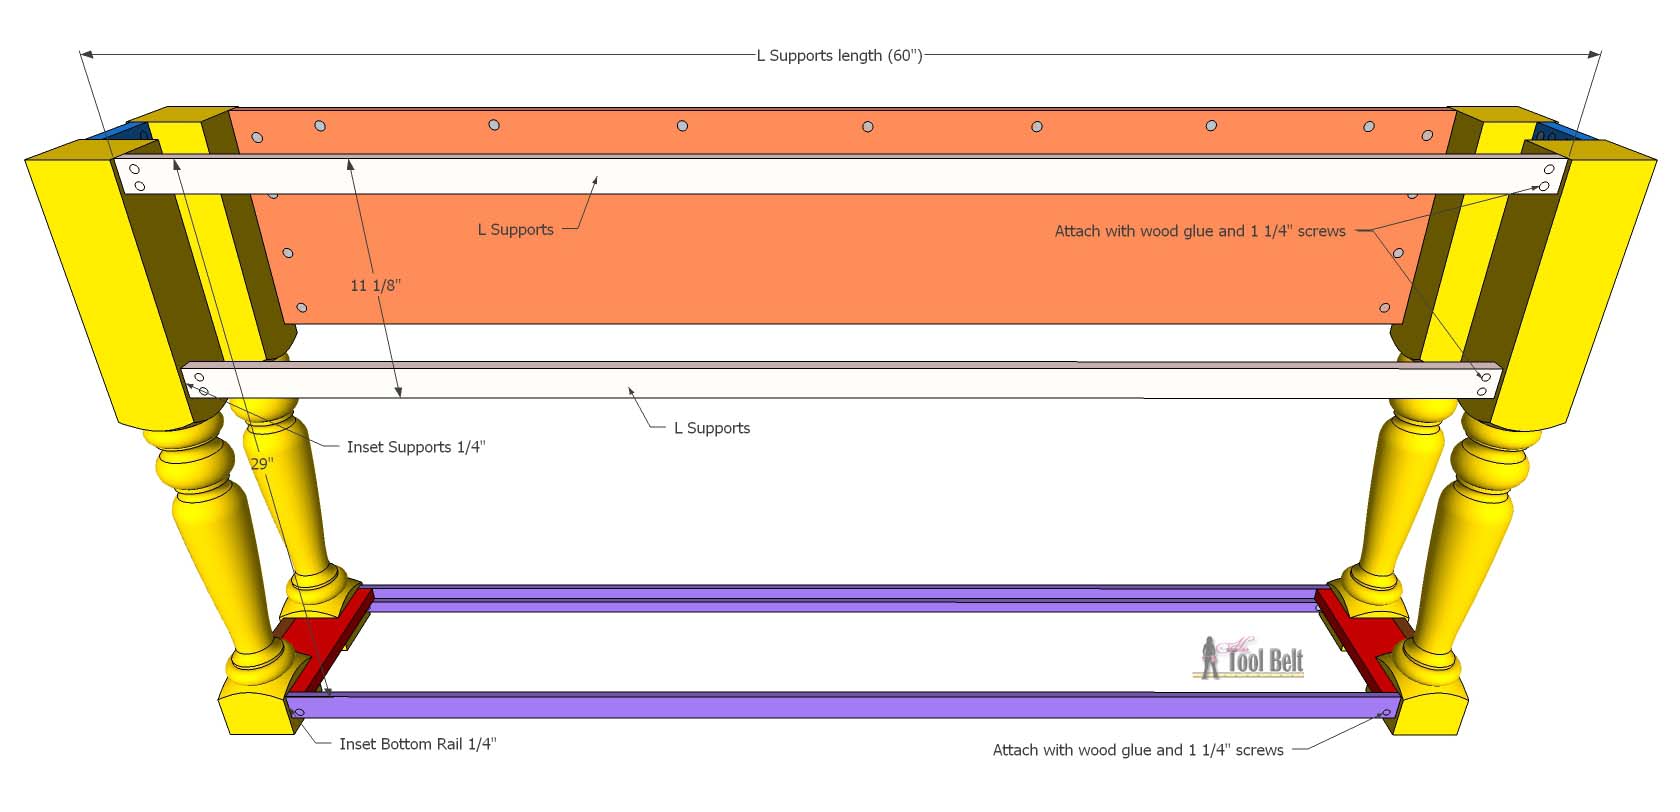
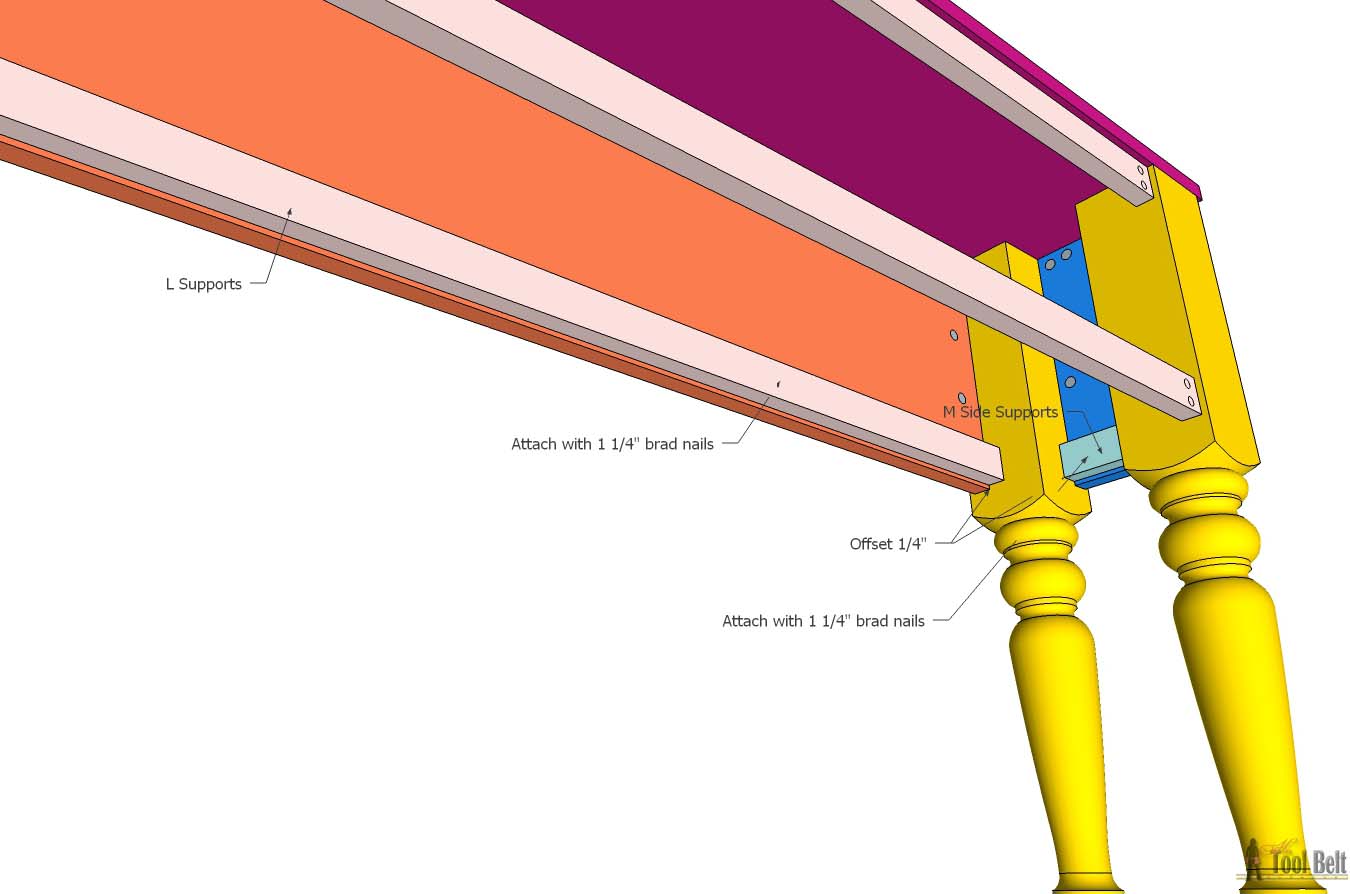
Drill pocket holes for 3/4″ material on the ends of the component L supports.  Mark 11 1/8″ from the leg top.  Use wood glue and 1 1/4″ screws to attach the L supports and back rail onto the legs.

Need a stylish console table, perfect for your space? Free plans that you can easily customize the dimensions and build what you want. Buy the legs and DIY'ing is a breeze.

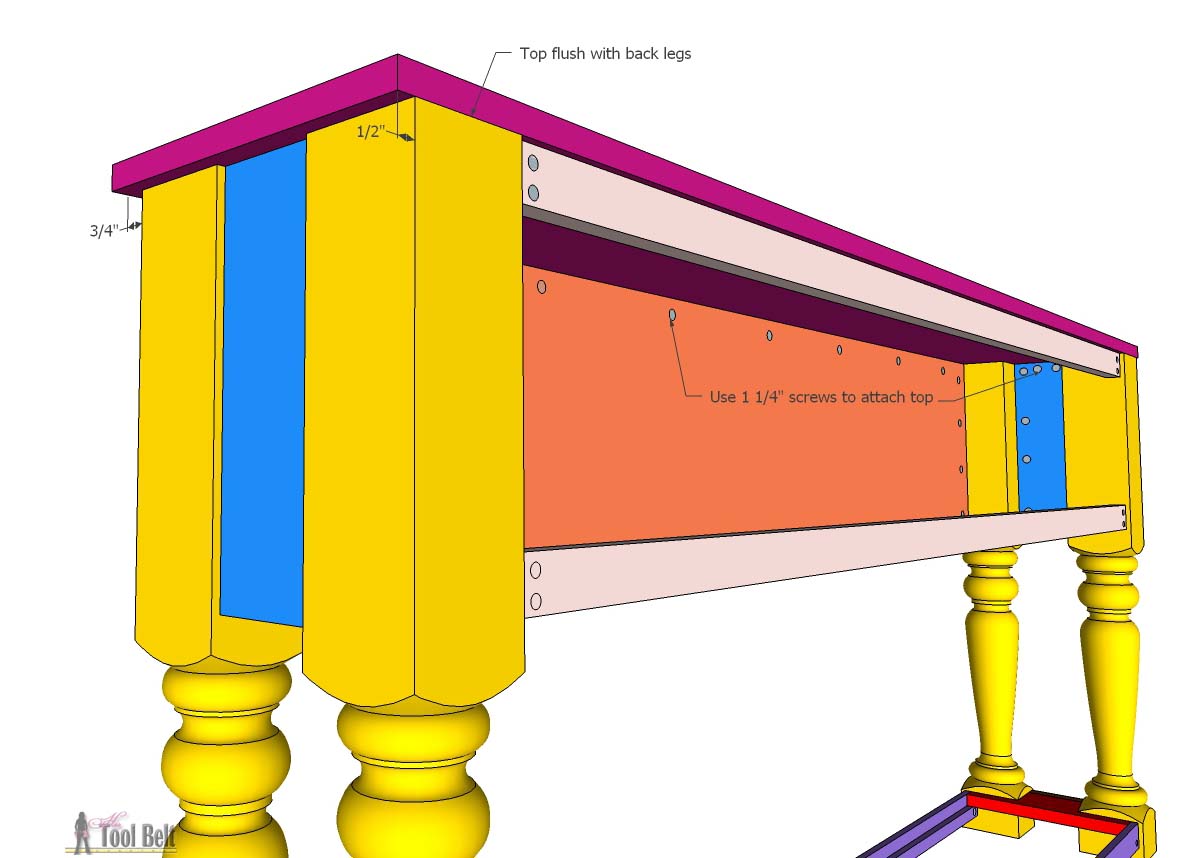
Place the top onto the table.  The back of the top piece will be flush with the back of the legs and the sides will overhang about 1/2″.  Use 1 1/4″ pocket hole screws to attach the top onto the table.

Need a stylish console table, perfect for your space? Free plans that you can easily customize the dimensions and build what you want. Buy the legs and DIY'ing is a breeze.

On the back of the front piece and top sides, mark 1/4″ from the bottom.  Use 1 1/4″ brad nails to attach the L support and M side supports in place.

Need a stylish console table, perfect for your space? Free plans that you can easily customize the dimensions and build what you want. Buy the legs and DIY'ing is a breeze.

Step 4

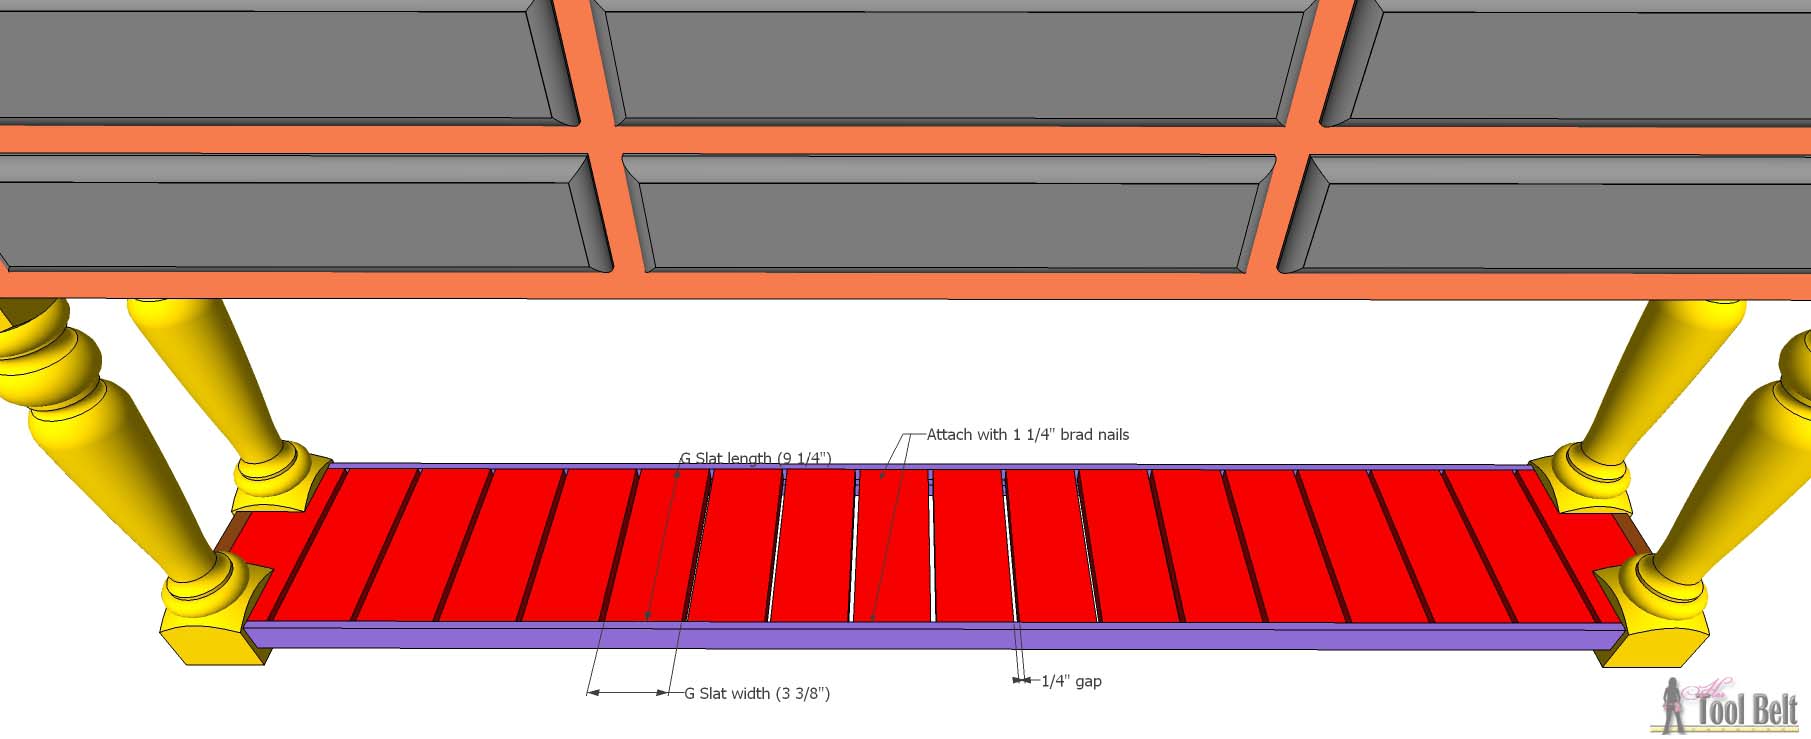
On the slats, I routed a very small round over on the edges.  You can easily do this with a sander.  Apply wood glue to the rabbet and place the slats along the rail, spacing every 1/4″.  I cut a scrap piece of wood 1/4″ wide and used it as my spacer.  Use 1 1/4″ brad nails to secure the slats.

Need a stylish console table, perfect for your space? Free plans that you can easily customize the dimensions and build what you want. Buy the legs and DIY'ing is a breeze.

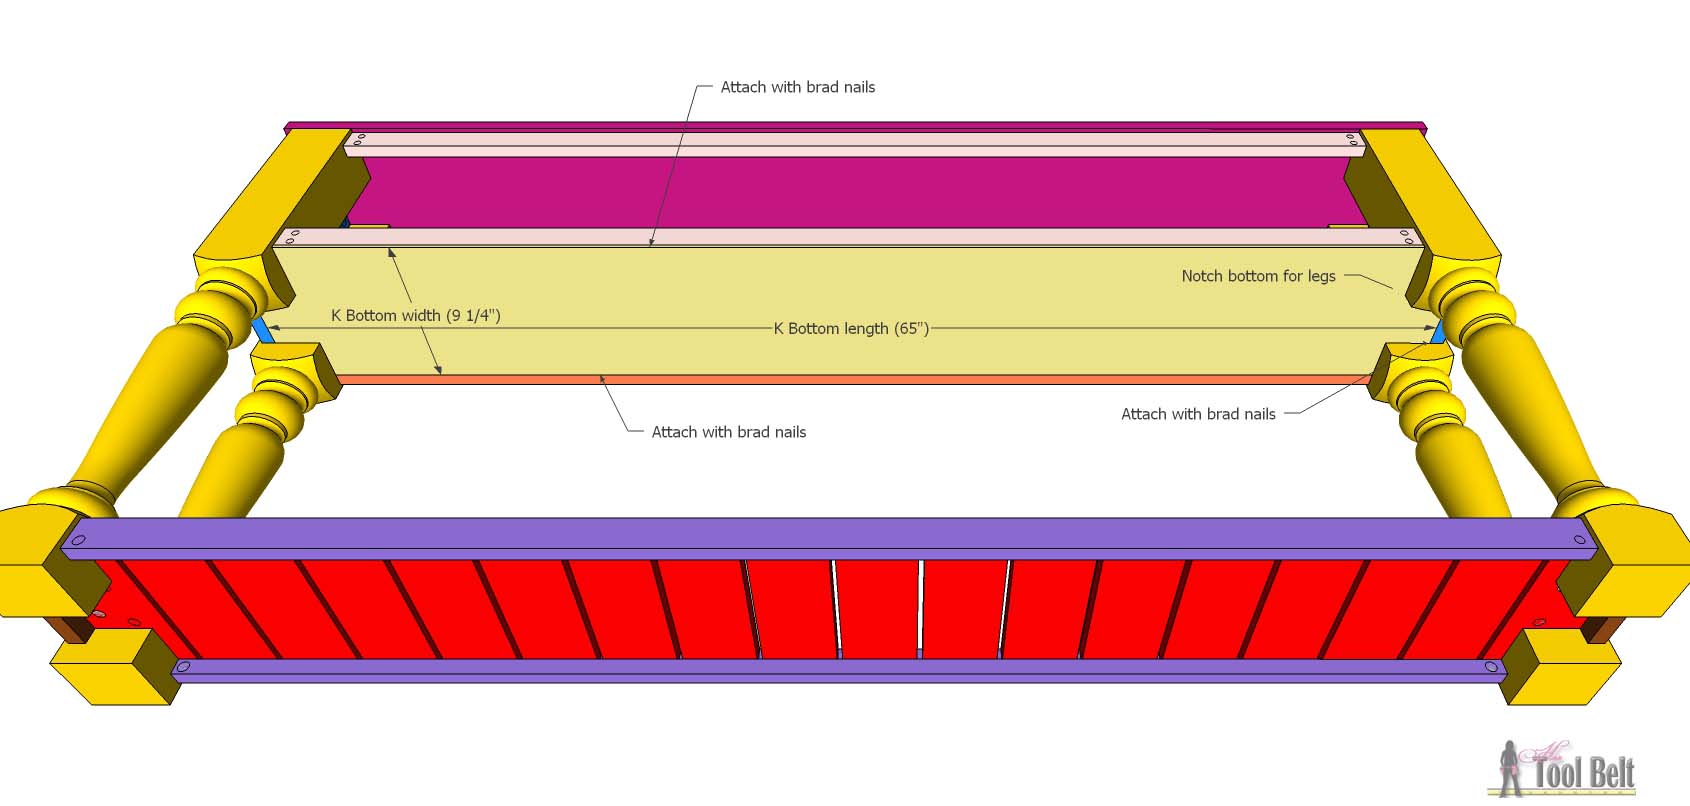
Mark the bottom piece to notch for the legs.  A jig saw is an easy way to make the notches.  Secure the bottom piece with 3/4″-1 1/4″ brad nails.

Need a stylish console table, perfect for your space? Free plans that you can easily customize the dimensions and build what you want. Buy the legs and DIY'ing is a breeze.

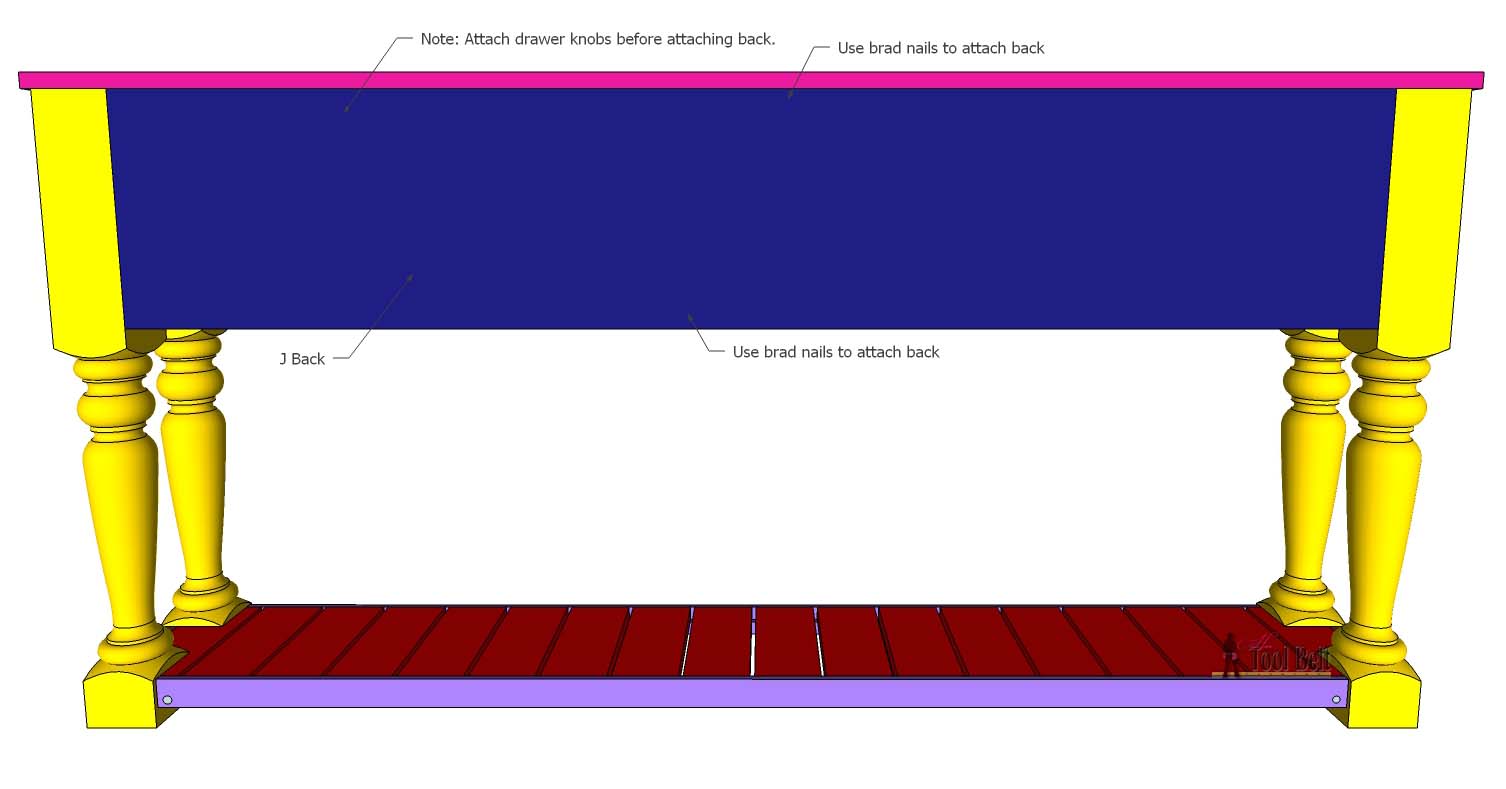
Before attaching the back, you’ll want to install the knobs/pulls (this may be after painting/finish).  Attach the back with 3/4″-1 1/4″ brad nails.

Need a stylish console table, perfect for your space? Free plans that you can easily customize the dimensions and build what you want. Buy the legs and DIY'ing is a breeze.

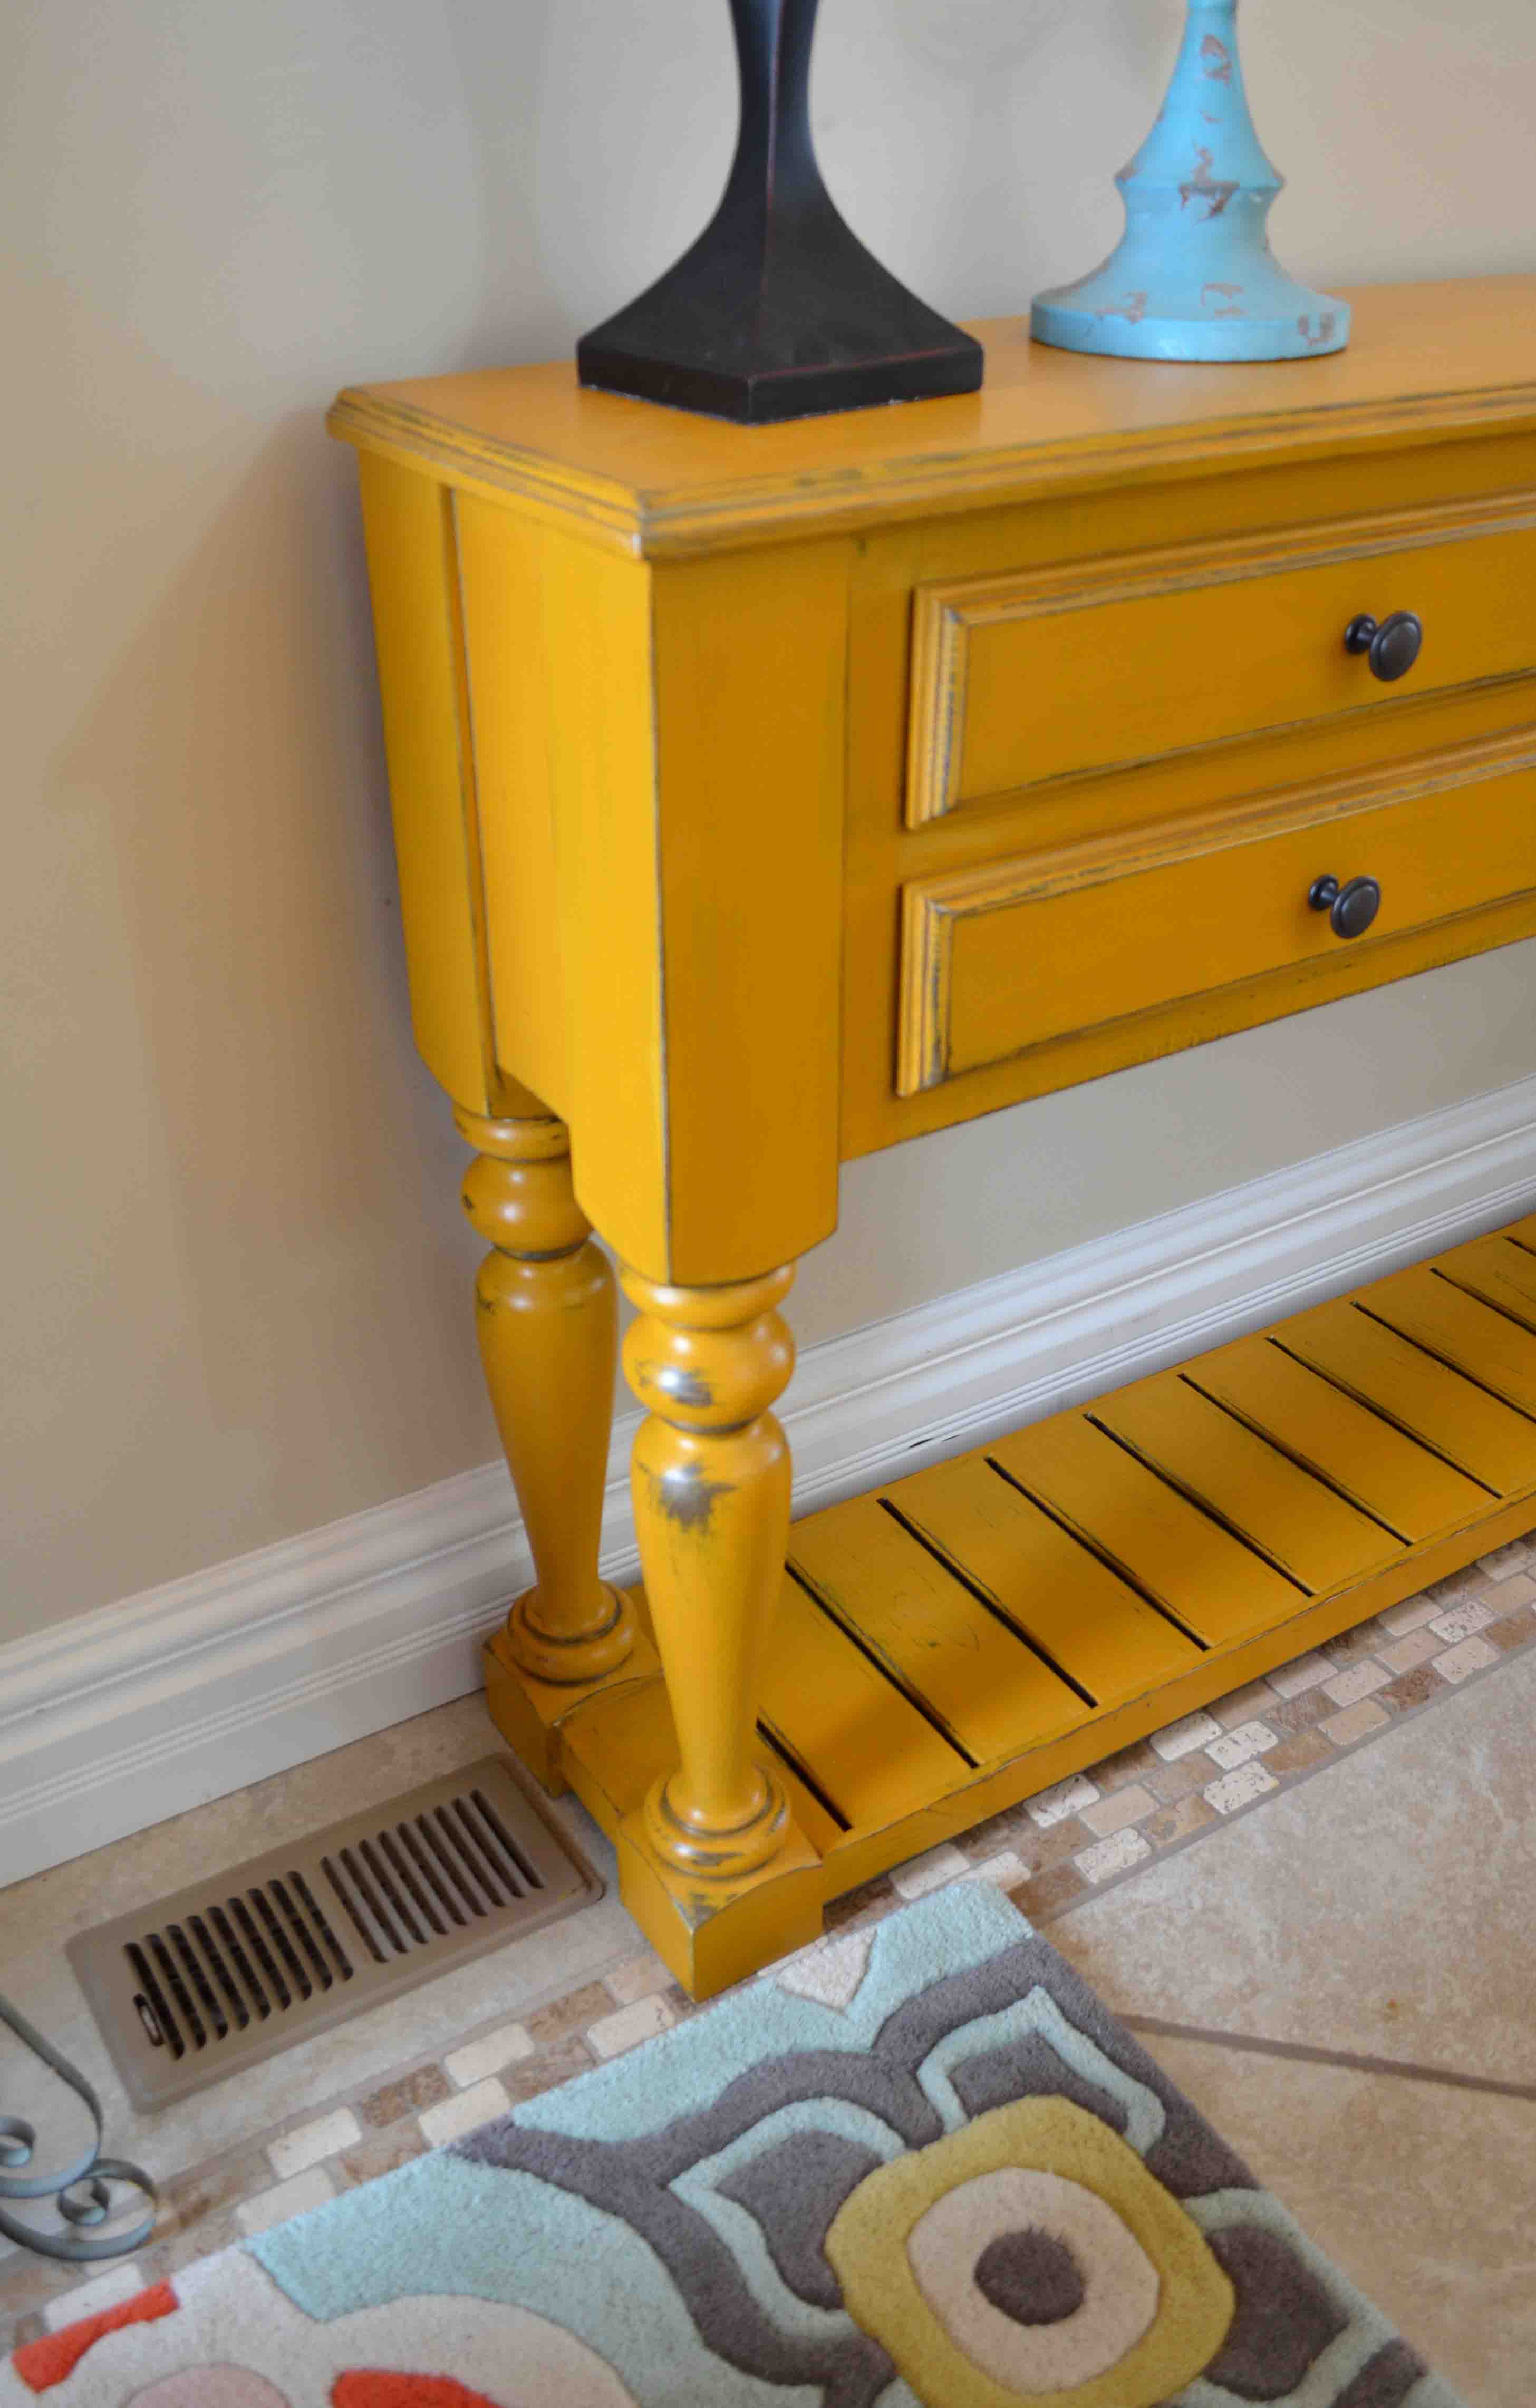
I love the shape of the console legs, those grand island legs are perfect.

Need a stylish console table, perfect for your space? Free plans that you can easily customize the dimensions and build what you want. Buy the legs and DIY'ing is a breeze.

Step 5

Fill any holes, cracks or blemishes with wood filler and let dry.

Need a stylish console table, perfect for your space? Free plans that you can easily customize the dimensions and build what you want. Buy the legs and DIY'ing is a breeze.

Sand the table and wood filler smooth.  I usually finish with 120 grit sandpaper.  For this table I was able to try out Country Chic paint.  I wanted to do a bright cheery color, so I choose yellow with a little brown peaking through after distressing.   The first coat of paint is chocolate tart, it went onto the raw wood really well.  I let the brown dry for a day.Need a stylish console table, perfect for your space? Free plans that you can easily customize the dimensions and build what you want. Buy the legs and DIY'ing is a breeze.

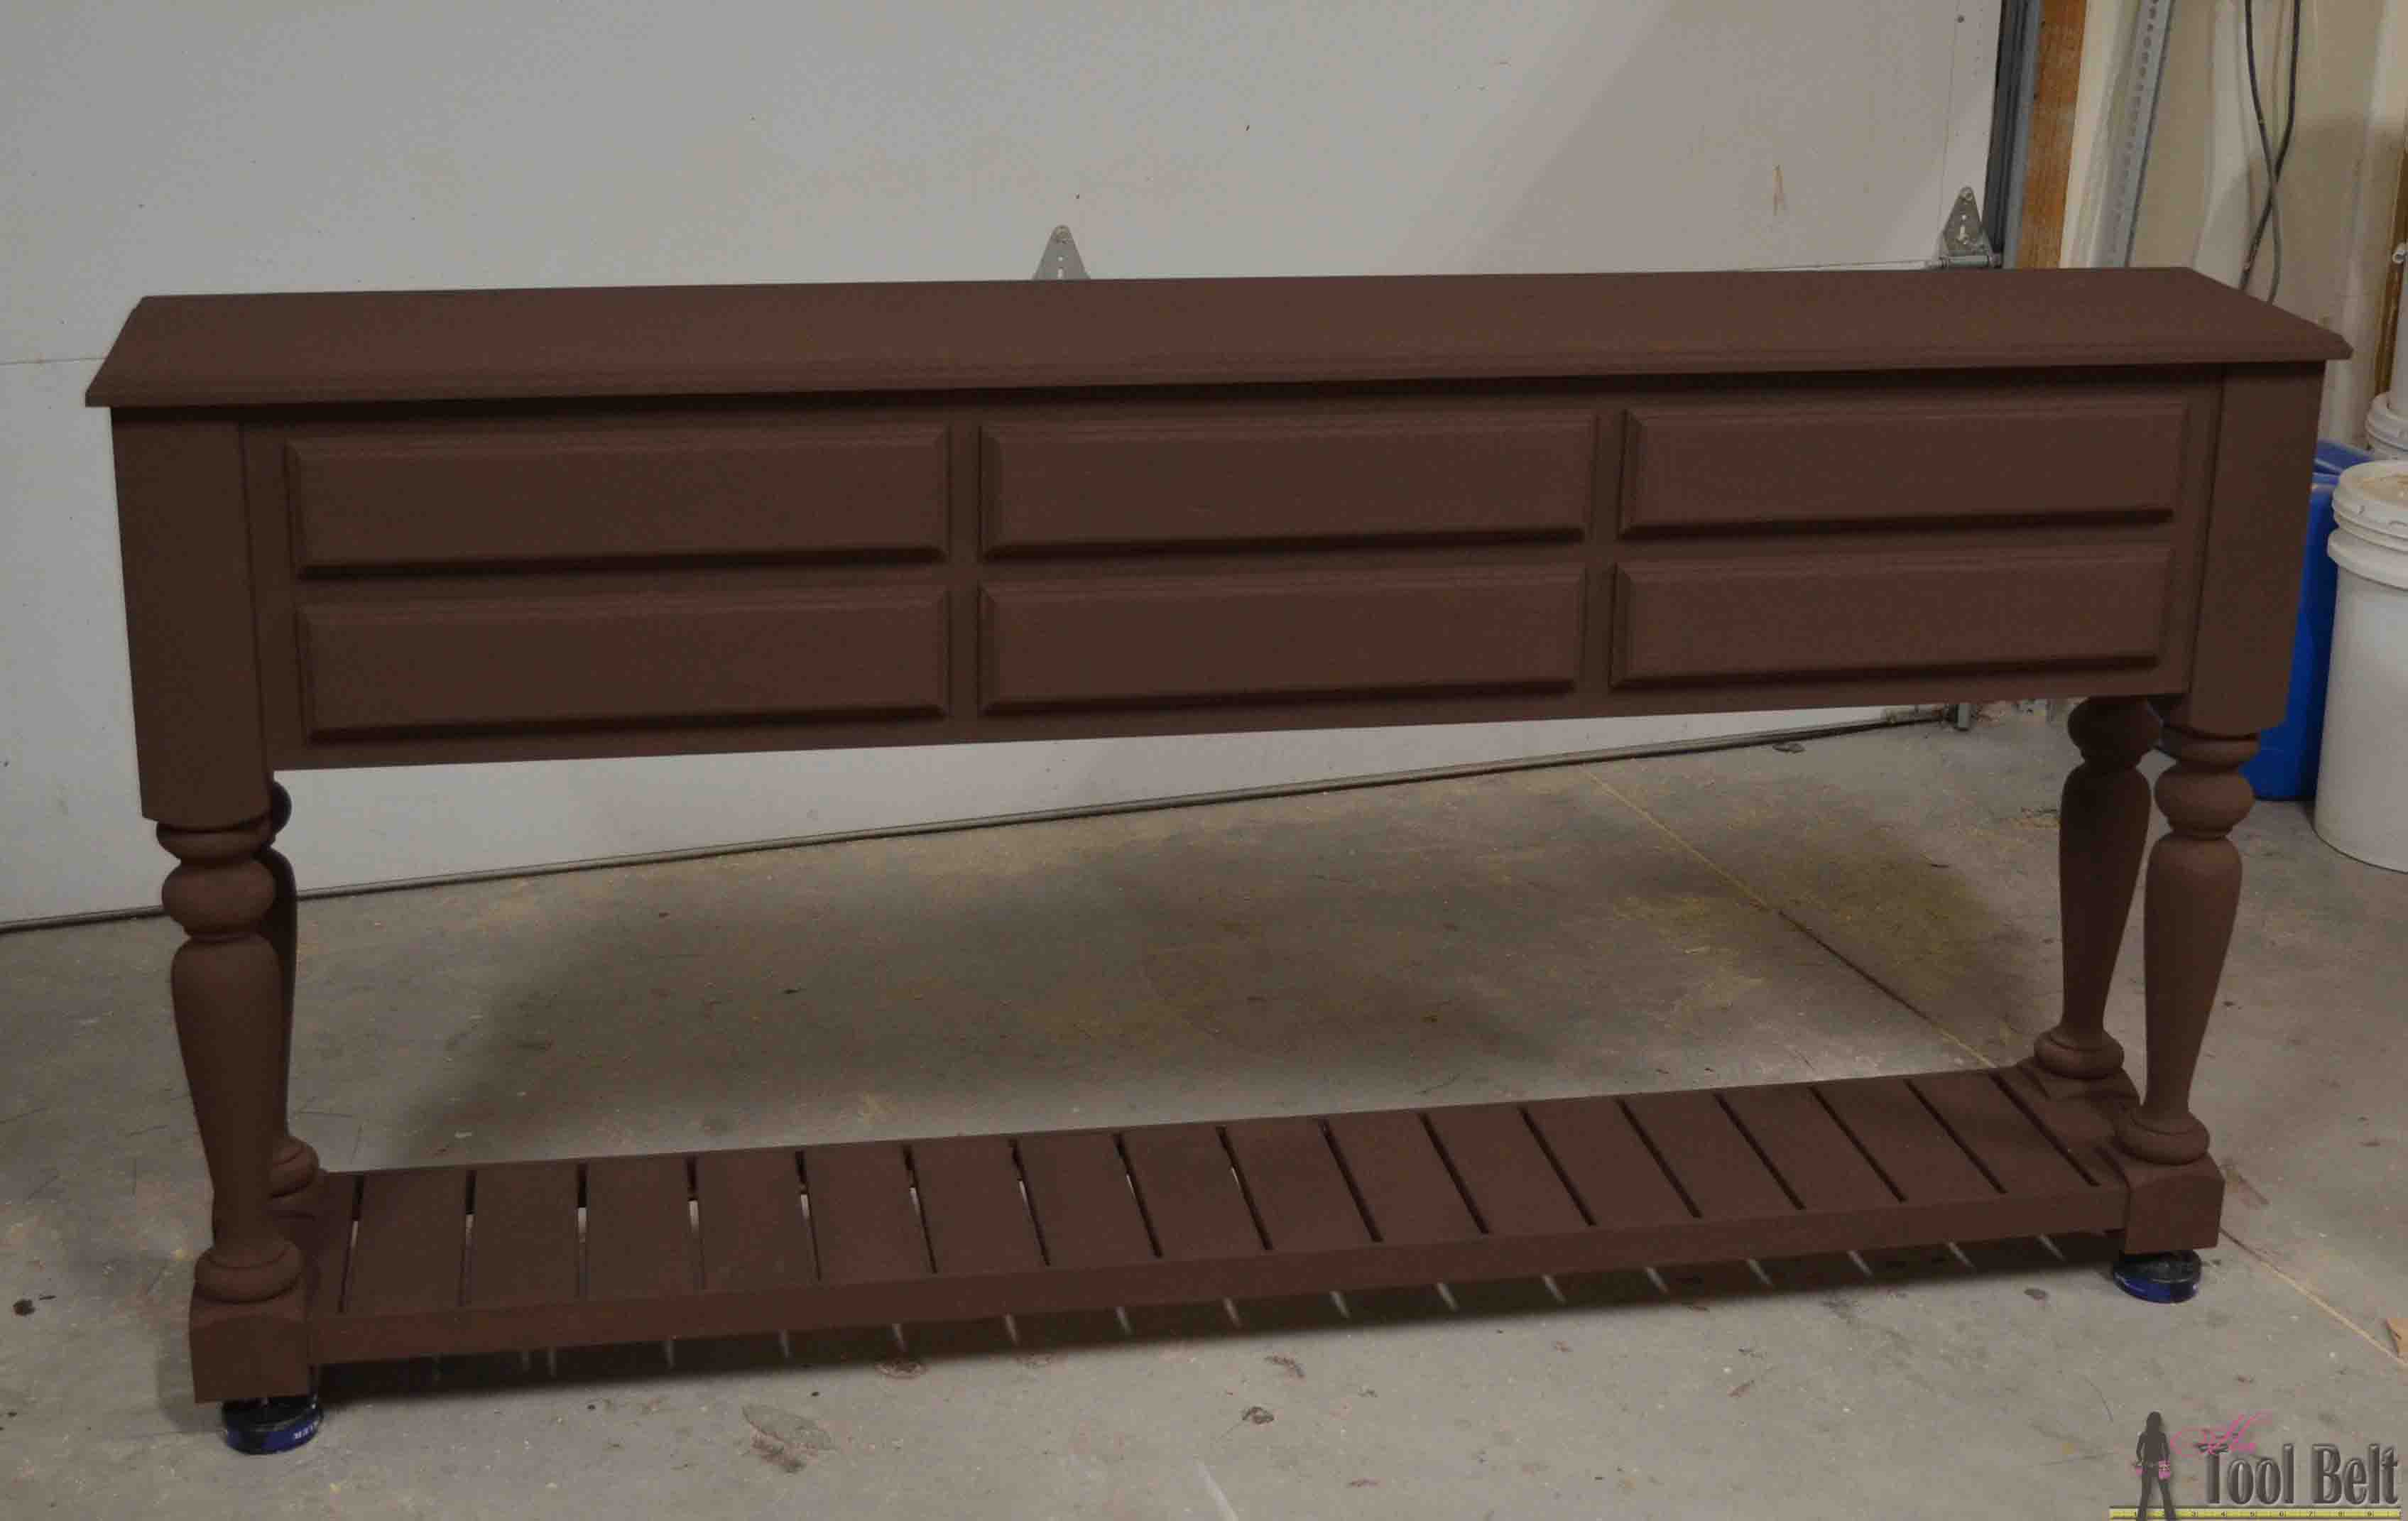
The next layer is fresh mustard and it is true to it’s name.  The paint brushed on very smoothly, and didn’t leave brush strokes.  I definitely needed 2 coats to adequately cover the brown.  After the yellow was dry, I distressed the paint and where I wanted additional brown (like in the corners) I used the belt buckle metallic cream.  To protect the table from little kid finger prints 🙂 I applied a layer of water based polyurethane.

I was a little skeptical about the knobs on Amazon*, because they were pretty cheap as far as knobs go, but they are great.

Need a stylish console table, perfect for your space? Free plans that you can easily customize the dimensions and build what you want. Buy the legs and DIY'ing is a breeze.

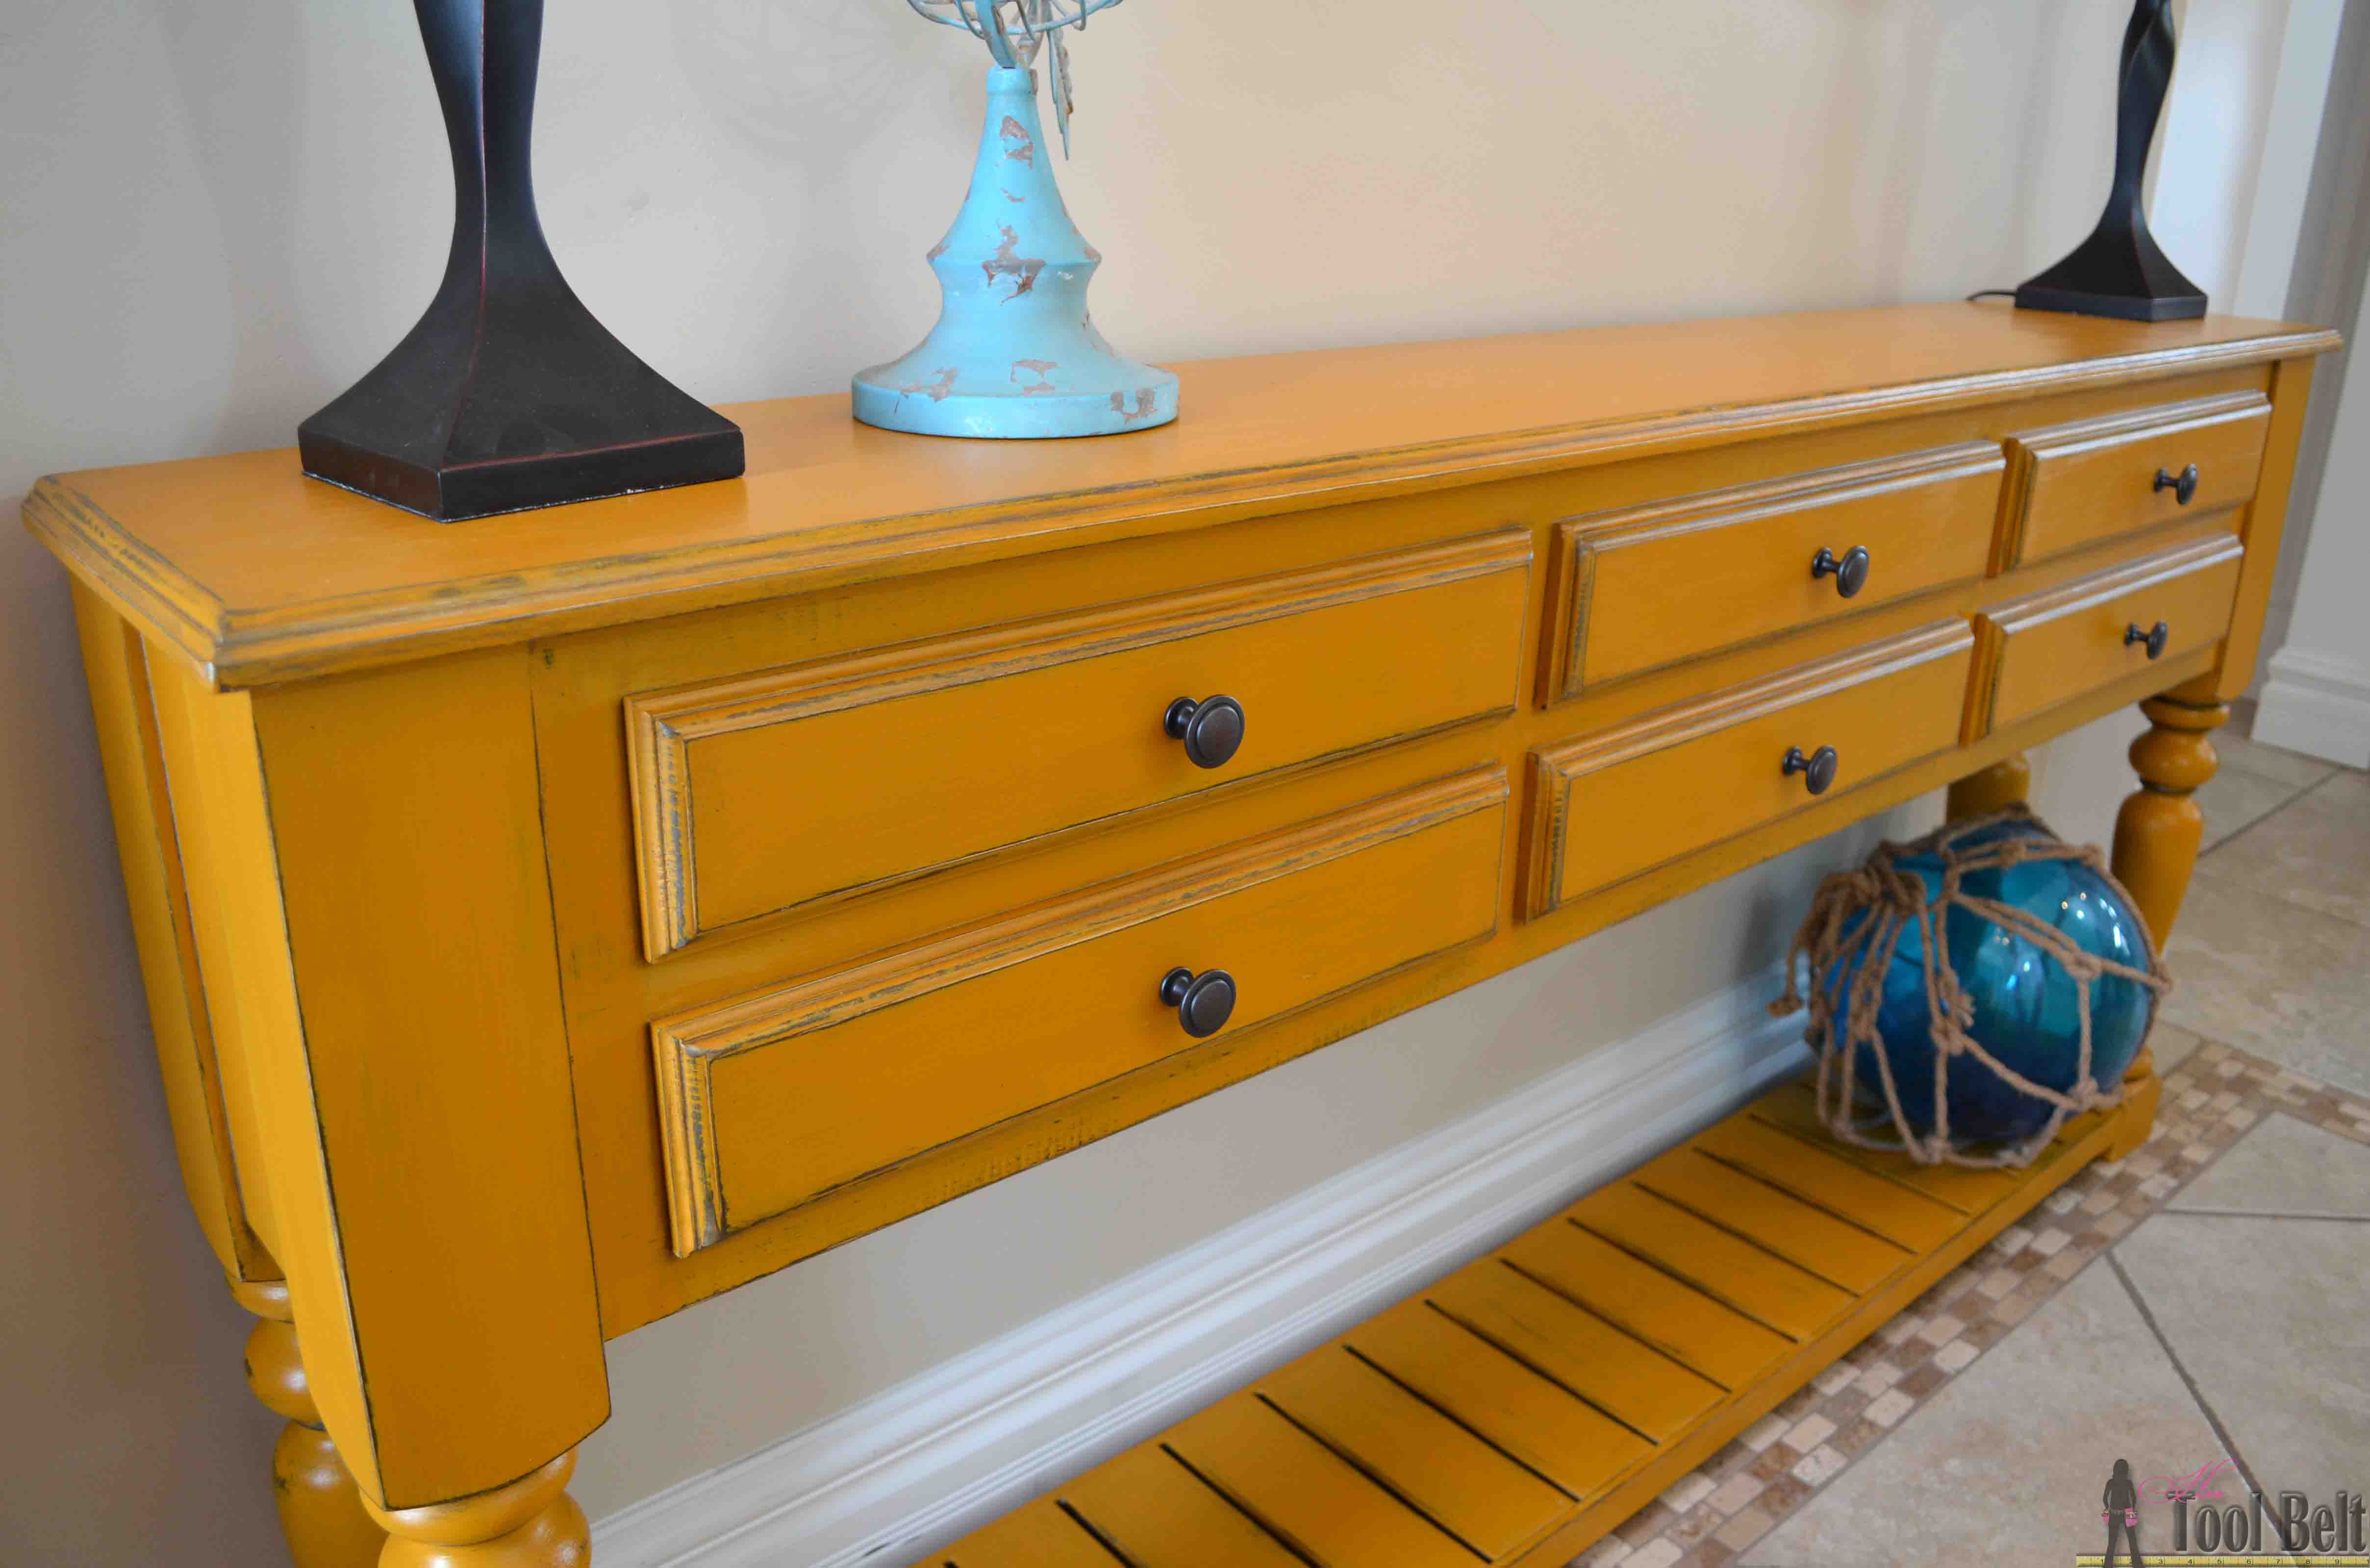
You can see where I put the metallic cream in the crevasses, it gives a nice shimmer.

Need a stylish console table, perfect for your space? Free plans that you can easily customize the dimensions and build what you want. Buy the legs and DIY'ing is a breeze.

Download free plans

Grand Island Console Table plans-hertoolbelt

Need a stylish console table, perfect for your space? Free plans that you can easily customize the dimensions and build what you want. Buy the legs and DIY'ing is a breeze.


Need a stylish console table, perfect for your space? Free plans that you can easily customize the dimensions and build what you want. Buy the legs and DIY'ing is a breeze.

Need a stylish console table, perfect for your space? Free plans that you can easily customize the dimensions and build what you want. Buy the legs and DIY'ing is a breeze.

The turned legs were provided by Osborne Wood Products for this console table plan, I definitely recommend their products.  The paint was provided by Country Chic Paint and I would definitely use it again.

Linked to Link Parties, Remodelaholic, savvy southern style, homestoriesatoz

Related

Filed Under: Built From Scratch, Entry, Free Woodworking Plans Tagged With: console table, free plans, osborne, table, turned legs

Attention: Any do-it-yourself project involves risk of some sort. Your tools, materials, and skills will vary, as will the conditions at your work site. Hertoolbelt LLC will not assume any responsibility or liability for damages or losses sustained or incurred in the course of your project or in the use of the item you create. Always follow the manufacturer's operating instructions in the use of tools, check and follow your local building codes, and observe all commonly accepted safety precautions.

Comments

  1. Jaime Costiglio says

    February 2, 2016 at 11:48 am

    Amy beautiful piece as always but that paint color is just perfection! Nice work my friend.

    Reply
    • Amy says

      February 2, 2016 at 12:59 pm

      Thanks so much Jaime! I was a little worried about the color, but it turned out really fun.

      Reply
  2. Timisha says

    February 2, 2016 at 6:34 pm

    This has to be one of my favorite builds of yours. The color is the best!

    Reply
    • Amy says

      February 3, 2016 at 8:24 am

      Thanks Timisha!!!

      Reply
  3. Mindi says

    February 2, 2016 at 9:19 pm

    Amy it is seriously beautiful!! I love the finish, so pretty! I was so happy to see those were faux drawers…makes me want to build it, just cause I wouldn’t have to build drawers! Ha ha! I loved the video too, nicely done!

    Reply
    • Amy says

      February 3, 2016 at 8:26 am

      Thanks Mindi! Ya the faux drawers made life really easy.

      Reply
  4. Ashley says

    February 2, 2016 at 9:32 pm

    Beautiful new build! I love the colors and the faux doors. And nice video too.

    Reply
    • Amy says

      February 3, 2016 at 8:23 am

      Thank you Ashley!

      Reply
  5. Leanne from Diva of DIY says

    February 3, 2016 at 7:54 am

    Amy I absolutely love the mustard color with the metallic! Bravo to you for going for it!

    Reply
    • Amy says

      February 3, 2016 at 8:23 am

      Thanks Leanne!

      Reply
  6. Vineta @ The Handyman's Daughter says

    February 8, 2016 at 11:40 am

    Beautiful! I’ve always admired your work, and this is one of my favorites!

    Reply
  7. DazzleWhileFrazzled says

    February 8, 2016 at 9:46 pm

    Thhtat’s an awesome piece, esp. the color! I don’t trust my husband’s building skills to make us one however! 🙂

    Reply
  8. Beth @ Reality Daydream says

    February 17, 2016 at 7:55 am

    This is GORGEOUS! I feel like everybody has the perfect spot in their home for something like this. So pretty!

    Reply
    • Amy says

      February 17, 2016 at 11:17 am

      Thanks Beth!

      Reply
  9. Marie, The Interior Frugalista says

    February 25, 2016 at 1:19 pm

    Amy the rich mustard color of your console table caught my eye at the DIY Like a Boss party. Visiting here to see that you actually made the table – impressed the hell out of me! The design plans you provide are so professional too and seem fairly easy to follow, with the right tools. Pinning to share your gorgeous console table. Arms up in the air for you over here!!!

    Reply
    • Amy says

      March 4, 2016 at 8:54 pm

      Thanks so much Marie!

      Reply
  10. Lynn says

    July 11, 2016 at 3:51 pm

    Love as always.. This is a great piece & the color is just beautiful.

    Reply
    • Amy says

      July 12, 2016 at 7:30 pm

      Thanks Lynn!

      Reply

Leave a Reply Cancel reply

Your email address will not be published. Required fields are marked *

This site uses Akismet to reduce spam. Learn how your comment data is processed.

Search Her Tool Belt

Follow Me!

  • Bloglovin
  • Email
  • Facebook
  • Instagram
  • Pinterest
  • RSS
  • Twitter
  • YouTube

Top Posts & Pages

Left Offset Bathroom Vanity

Check out more projects

Copyright

Thank you for wanting to share my work! No need for my permission to pin my work or to feature 1 or 2 pictures with full watermarks intact that link back to the original project. Please do NOT copy tutorials.

Disclosure & Privacy Policy

Disclaimer

Copyright © 2025 · Magazine Pro Theme on Genesis Framework · WordPress · Log in

This website uses cookies to improve your experience. We'll assume you're ok with this, but you can opt-out if you wish.Accept Read More
Privacy & Cookies Policy

Privacy Overview

This website uses cookies to improve your experience while you navigate through the website. Out of these, the cookies that are categorized as necessary are stored on your browser as they are essential for the working of basic functionalities of the website. We also use third-party cookies that help us analyze and understand how you use this website. These cookies will be stored in your browser only with your consent. You also have the option to opt-out of these cookies. But opting out of some of these cookies may affect your browsing experience.
Necessary
Always Enabled
Necessary cookies are absolutely essential for the website to function properly. This category only includes cookies that ensures basic functionalities and security features of the website. These cookies do not store any personal information.
Non-necessary
Any cookies that may not be particularly necessary for the website to function and is used specifically to collect user personal data via analytics, ads, other embedded contents are termed as non-necessary cookies. It is mandatory to procure user consent prior to running these cookies on your website.
SAVE & ACCEPT