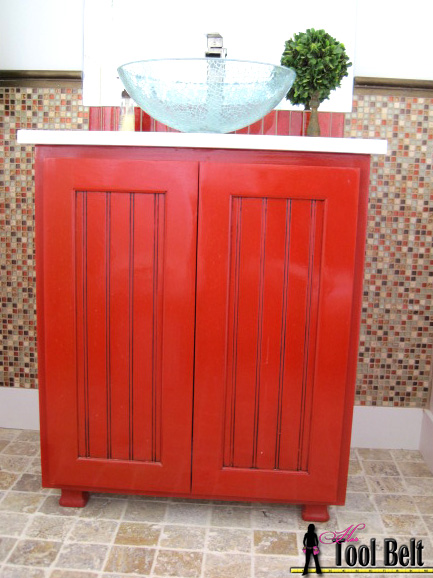
 Are you in need of a fun simple cabinet for your half bath? Well then, here are the plans for you. This fun paprika vanity sink cabinet is simple to build and will add that punch of color that you’ve been wanting!
Now if you are thinking, ‘I don’t have a router to make the doors.’ Then you are in luck, since the door panels are bead board, you can actually make these doors with your table saw. (However I did use my router 😉
Since I knew that I was painting this vanity sink cabinet, I didn’t worry about using fine wood. The solid pieces of wood are made from poplar (available pre-planed to 3/4″ at Home Depot and Lowes) and the plywood is the cheaper sanded plywood. If you don’t want to use poplar, you can substitute for pine, however I have found that overtime the extra sap around knots in pine can discolor your paint. Just something to think about. The doors for this cabinet are sized for 1/2″ overlay hinges. The cabinet is sized for exposed cabinet feet. If you don’t want to purchase feet, cut blocks of wood to make the cabinet a comfortable height for your needs.
Cut List:
Cabinet
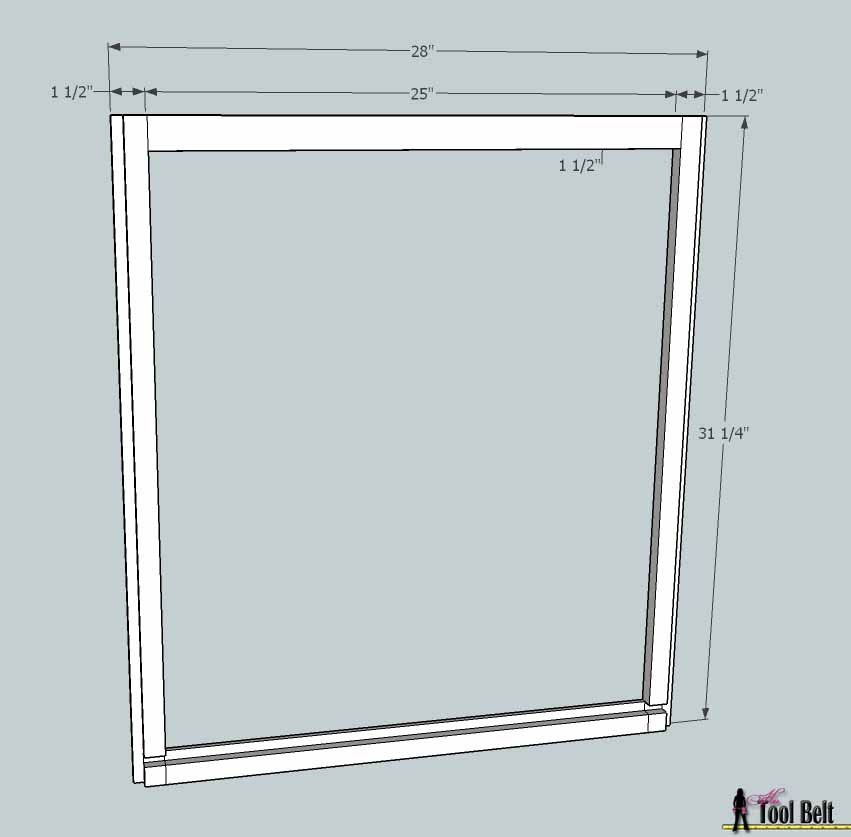
- 2 – 1 1/2″ x 31 1/4″ x 3/4″ poplar (face frame)
- 2 – 1 1/2″ x 25″ x 3/4″ poplar (face frame)
- 2 – 19 1/2″ x 31 1/4″ x 1/2″ plywood (cabinet sides)
- 1 – 19 1/2″ x 27 1/2″ x 1/2″ plywood (cabinet bottom)
- 1 – 30″ x 27 1/2″ x 5/16″ plywood (cabinet back)
- 1 – 2″ x 27″ x 3/4″ poplar (this is a hidden support, can be made from anything)
Doors
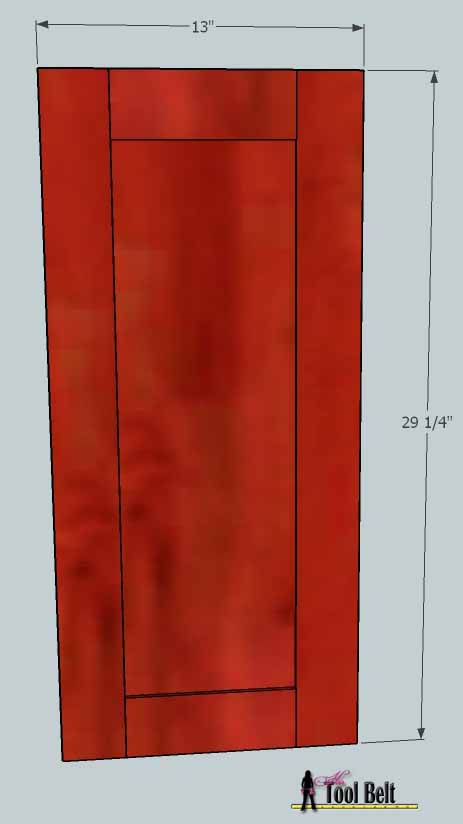
- 4 – 2 3/4″ x 8 1/4″ x 3/4″ poplar (door rail – horizontal part of door)
- 4 – 2 3/4″ x 29 1/4″ x 3/4″ poplar (door stile – vertical part of door)
- 2 – 24 1/2″ x 8 1/4″ x 1/4″ bead board
Let’s get building
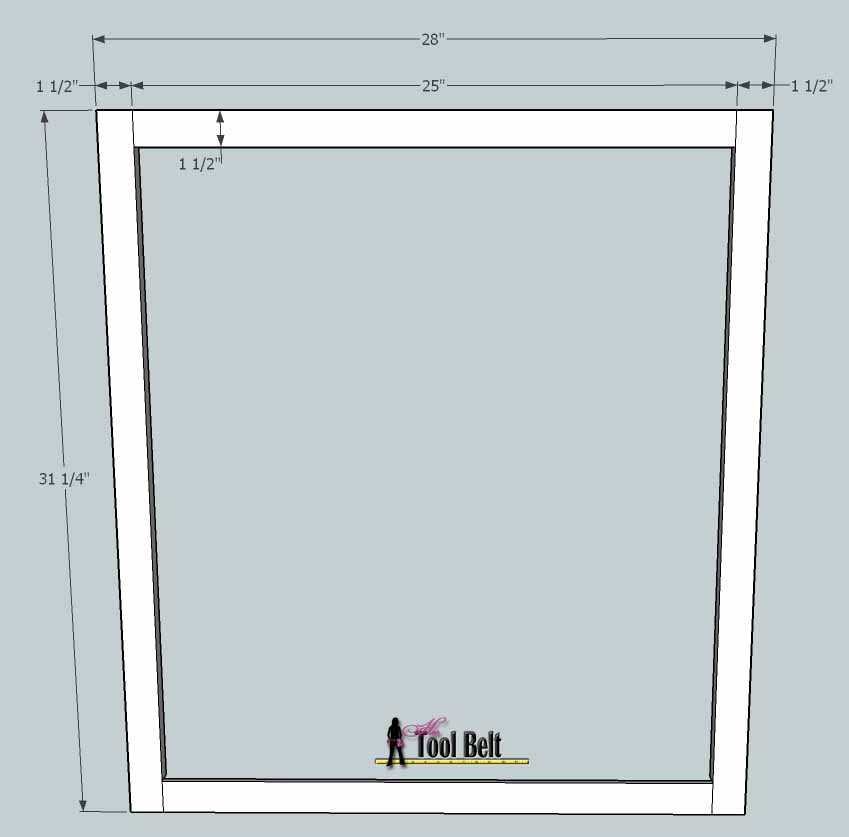 Cut the 4 pieces for the face frame. To assemble, I use a biscuit joiner to make my joints. Another preferred option is two dowels at each joint. (You may also use a pocket hole joiner, however we are cutting dado’s in the face frame, so make the dado cuts before you screw it together. You don’t want to hit a screw with your table saw, that would be very bad.) Apply glue in your joints and clamp together your face frame. Make sure it is square by measuring diagonally corner to corner, each diagonal should be the same, adjust as necessary.
Cut the sides, bottom, back and support for the cabinet. If you have a dado blade set for your table saw, set it up for 1/2″ thickness cuts. If you don’t have a dado blade set, you can accomplish the same thing my running multiple passes.
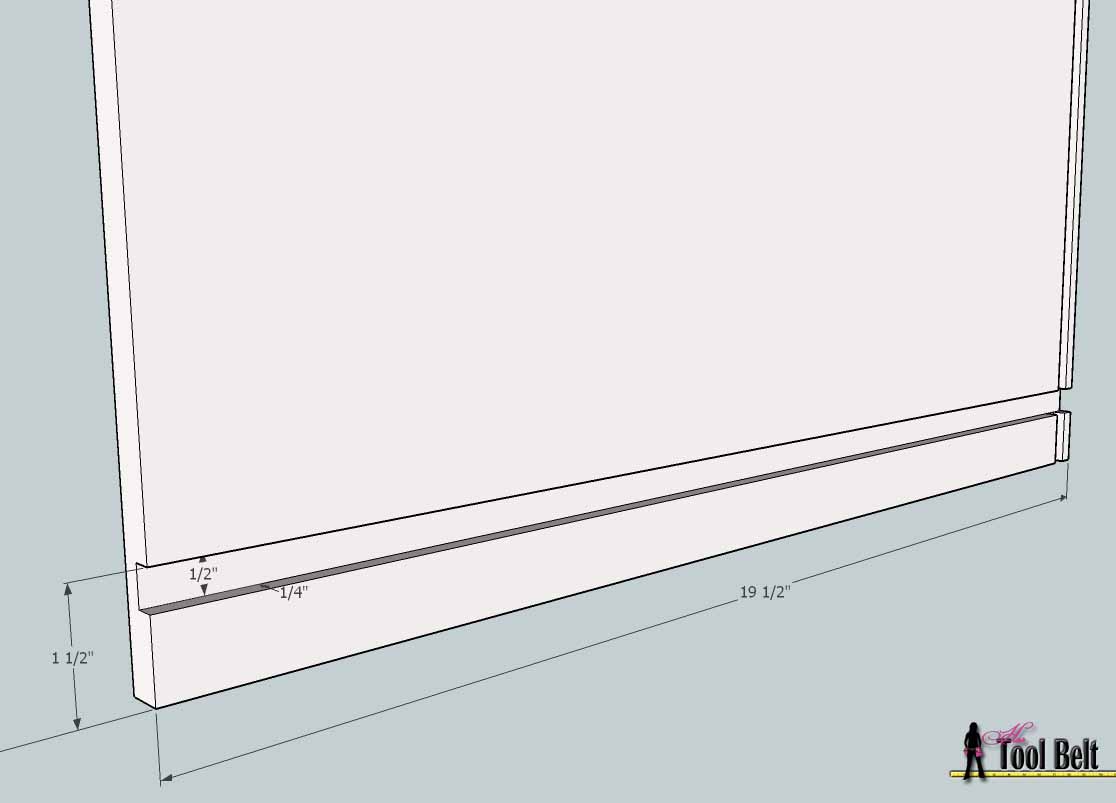 In both of the side pieces cut a dado 1 1/2″ up from the bottom that is 1/2″ wide and 1/4″ deep.
 Once the face frame is completely dry. Cut a dado 1 1/2″ up from the bottom that is 1/2″ wide and 1/2″ deep.
 Cut dados along both vertical edges that are 1/2″ wide and 1/2″ deep. (If you are using pocket holes for face frame assembly, apply glue and screw together now.)
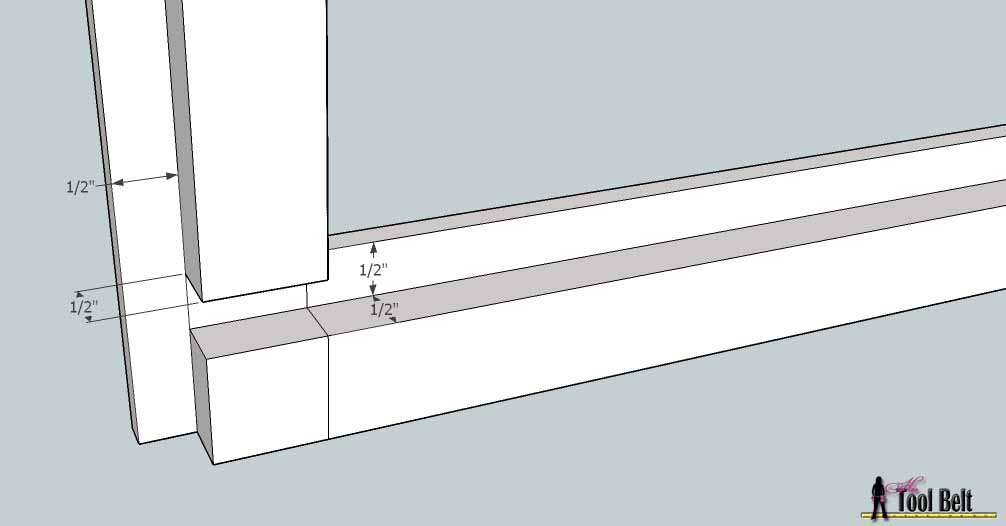
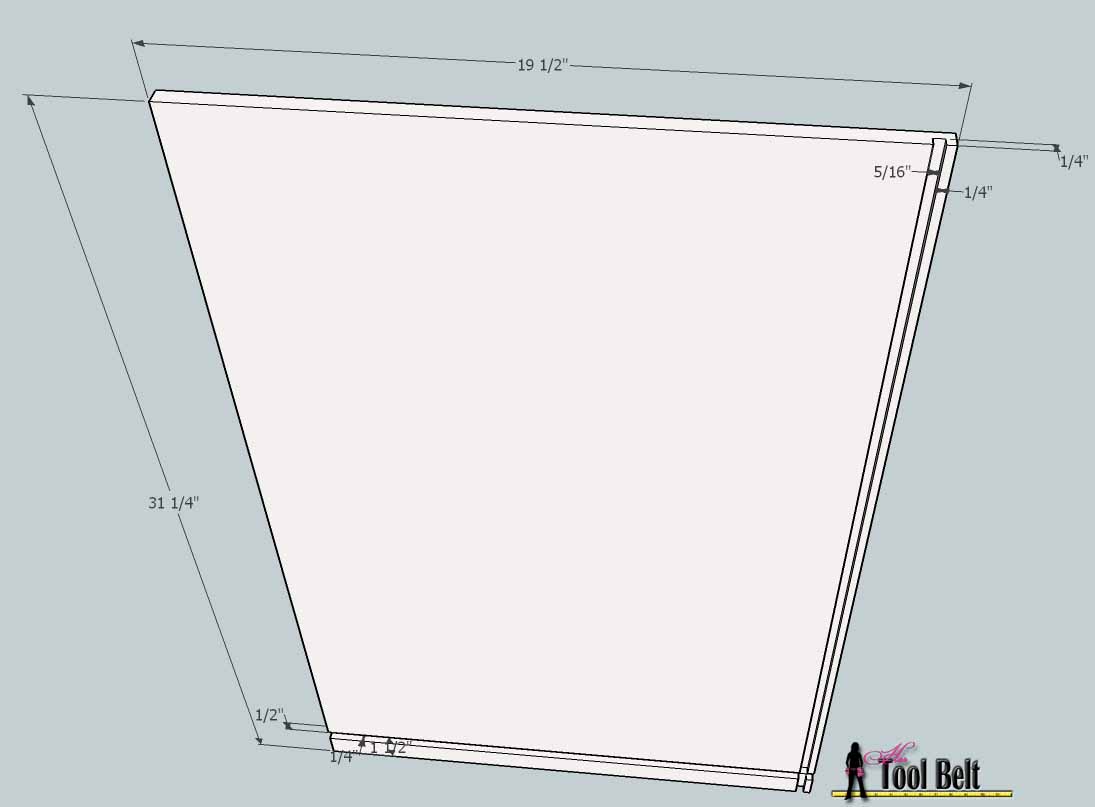 Change the dado to 5/16″ wide. Cut a dado that is 5/16″ wide and 1/4″ deep, leaving 1/4″ of material from the edge. Make this cut on both sides, but make sure that you do a mirror copy.
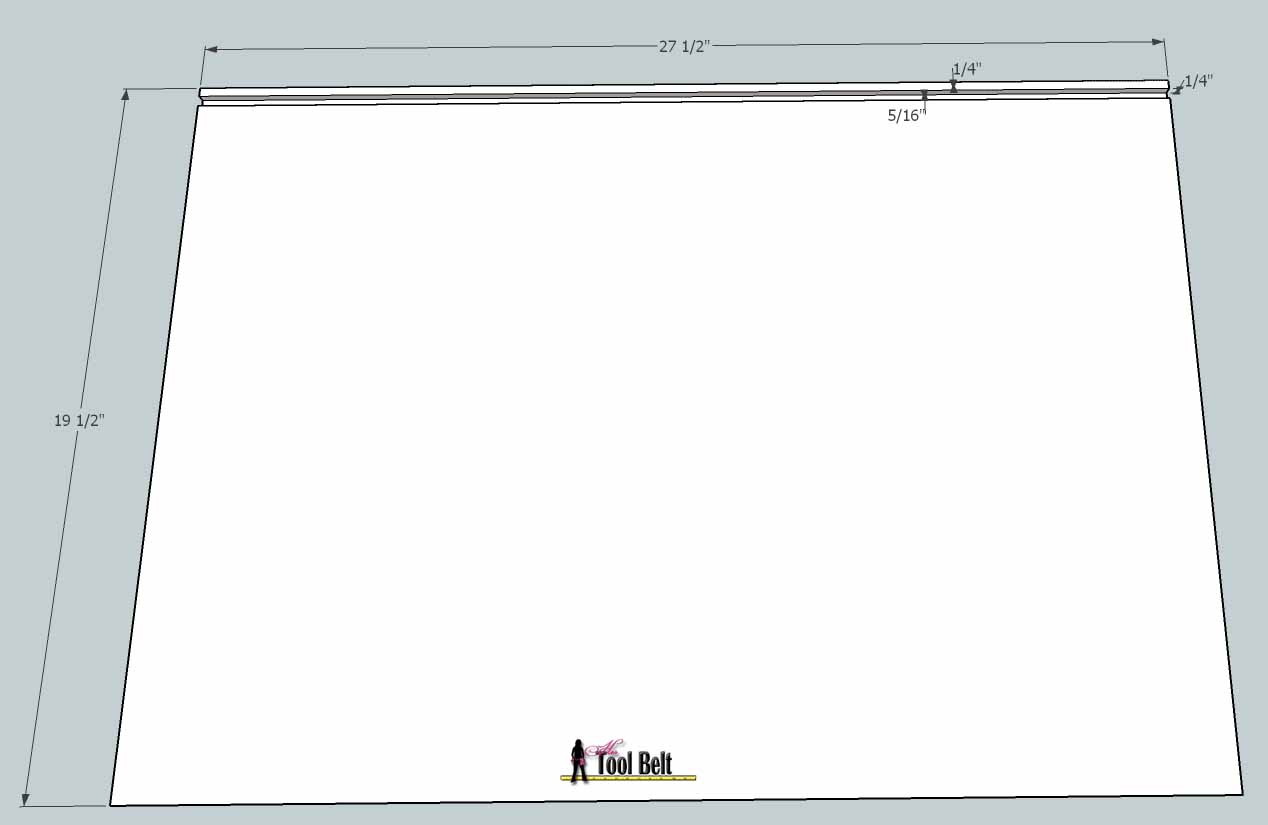 Make a dado cut on the bottom piece that is 5/16″ wide, 1/4″ deep and leaving 1/4″ a material from the edge. Yay we are done with our dado cutting!
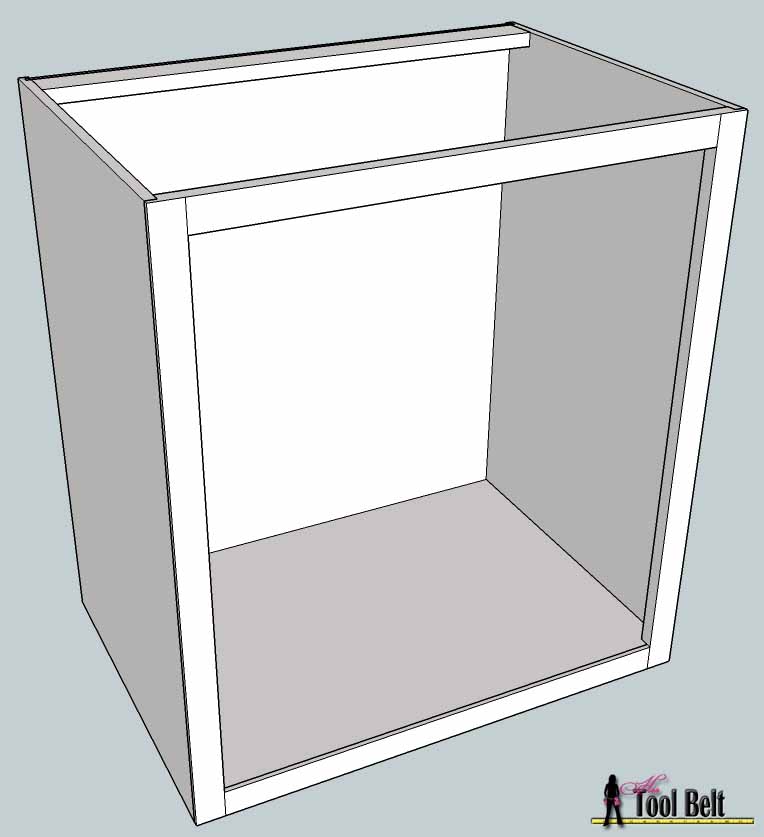 Now it’s time for cabinet assembly. Do a dry fit of the cabinet assembly to make sure everything fits before you apply glue. Make adjustments as necessary. When assembling my cabinets I’ll use some brad nails from the outside plywood into the face frame or other components if I’m painting the project. If you’re staining the project, skip the brad nails. Apply glue in all of the joints and assemble the cabinet together. Use the hidden support at the top of the back of the cabinet to keep the spacing correct. Nail/glue into place if you’d like. Use clamps to keep everything in place until it dries. Remove any excess glue.
While that’s drying, let’s get the doors done.
Cut the pieces for the doors. If you have a router and bits for making door joints, use it, or you can use your table saw for a similar look.
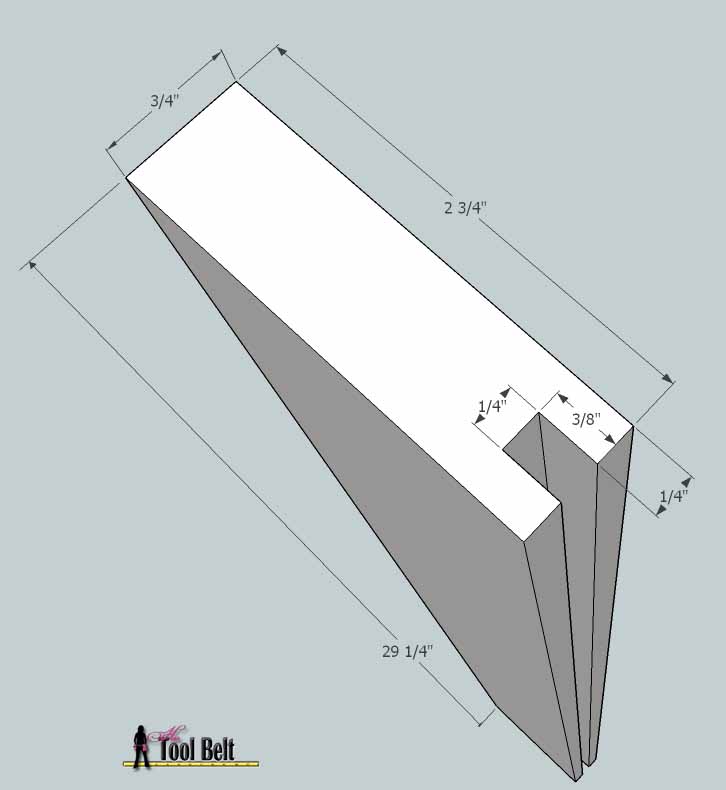 Cut the groove in the vertical stiles. Starting 1/4″ from an edge cut a groove that is 3/8″ deep and 1/4″ wide. Repeat for each stile.
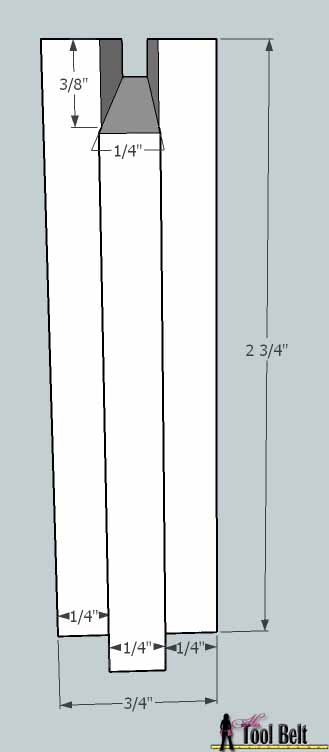 The rail pieces are a little more involved, but totally doable. The rail has the same groove as the stile. Starting 1/4″ from an edge cut a groove that is 3/8″ deep and 1/4″ wide. Repeat for each rail.
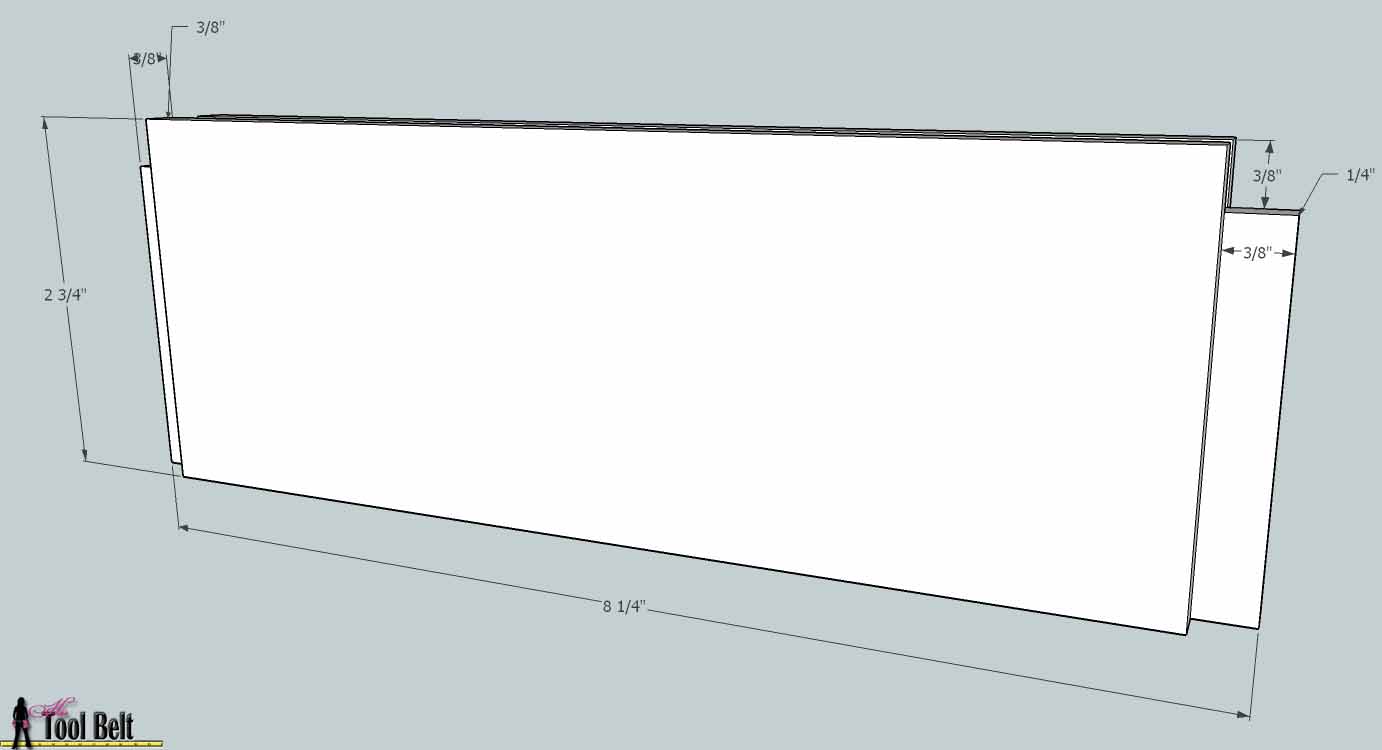 On each end of the rail pieces we are going to leave a tongue to fit into the stile groove. So cut 1/4″ wide x 3/8″ deep on both sides of the tongue. You may have to make one of the sides a hair larger, so the tongue will be just under 1/4″ and smoothly slide into the rail groove. Repeat for other end of rail and each rail piece.
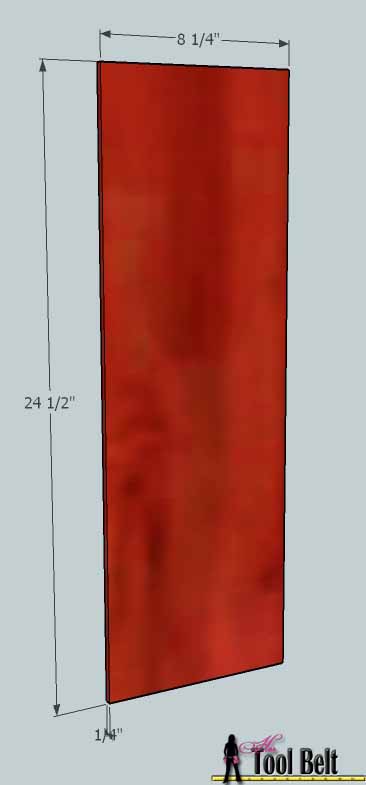 Cut the panel pieces from bead board.
 Dry fit the door pieces together. If necessary, make any adjustments so all the pieces will snuggly, and smoothly fit together.
When gluing a cabinet door, generally you only apply glue to the tongue and groove parts, not along the panel groove. This allows for expansion and contraction.
Glue the cabinet doors and clamp together until dry. Check to make sure the doors are square by measuring the corners on the diagonal to make sure they are the same. Adjust as necessary. Remove any excess glue.
When the cabinet and doors are dry, use spackle or putty for any gaps or blemishes that you want filled. Sand the cabinet and doors until all joints are smooth and flush. Finish sanding with 120-150 grit paper to prepare for paint or stain.
Prime and paint your cabinet, doors and feet. For this cabinet, I used Rustoleum Paprika. It’s a fun redish-orange color. I applied a coat of semi-gloss polyurethane. It turned out very shiny.
To mount the cabinet doors you’ll need 4 – 1/2″ overlay hinges. I used the liberty 1/2″ overlay concealed hinges available at Home Depot. But there are lots of varieties to choose from. If you use concealed hinges you’ll need a little jig to install them. The drill bit and jig are only about $12.
If you bought feet for this cabinet, then they probably had a small stud on them. I bought T-nuts at Fastenal for very cheap. Depending on the height of the cabinet you want, you can install the T-nuts into underside of your cabinet or on pieces of scrap wood. I mounted mine on scrap wood pieces that were approx. 2″x2″x3/4″ each. Mount each T-nut into a piece of scrap wood. Screw each piece of scrap wood into a corner of the underside of the cabinet. Thread the feet into the T-nuts.
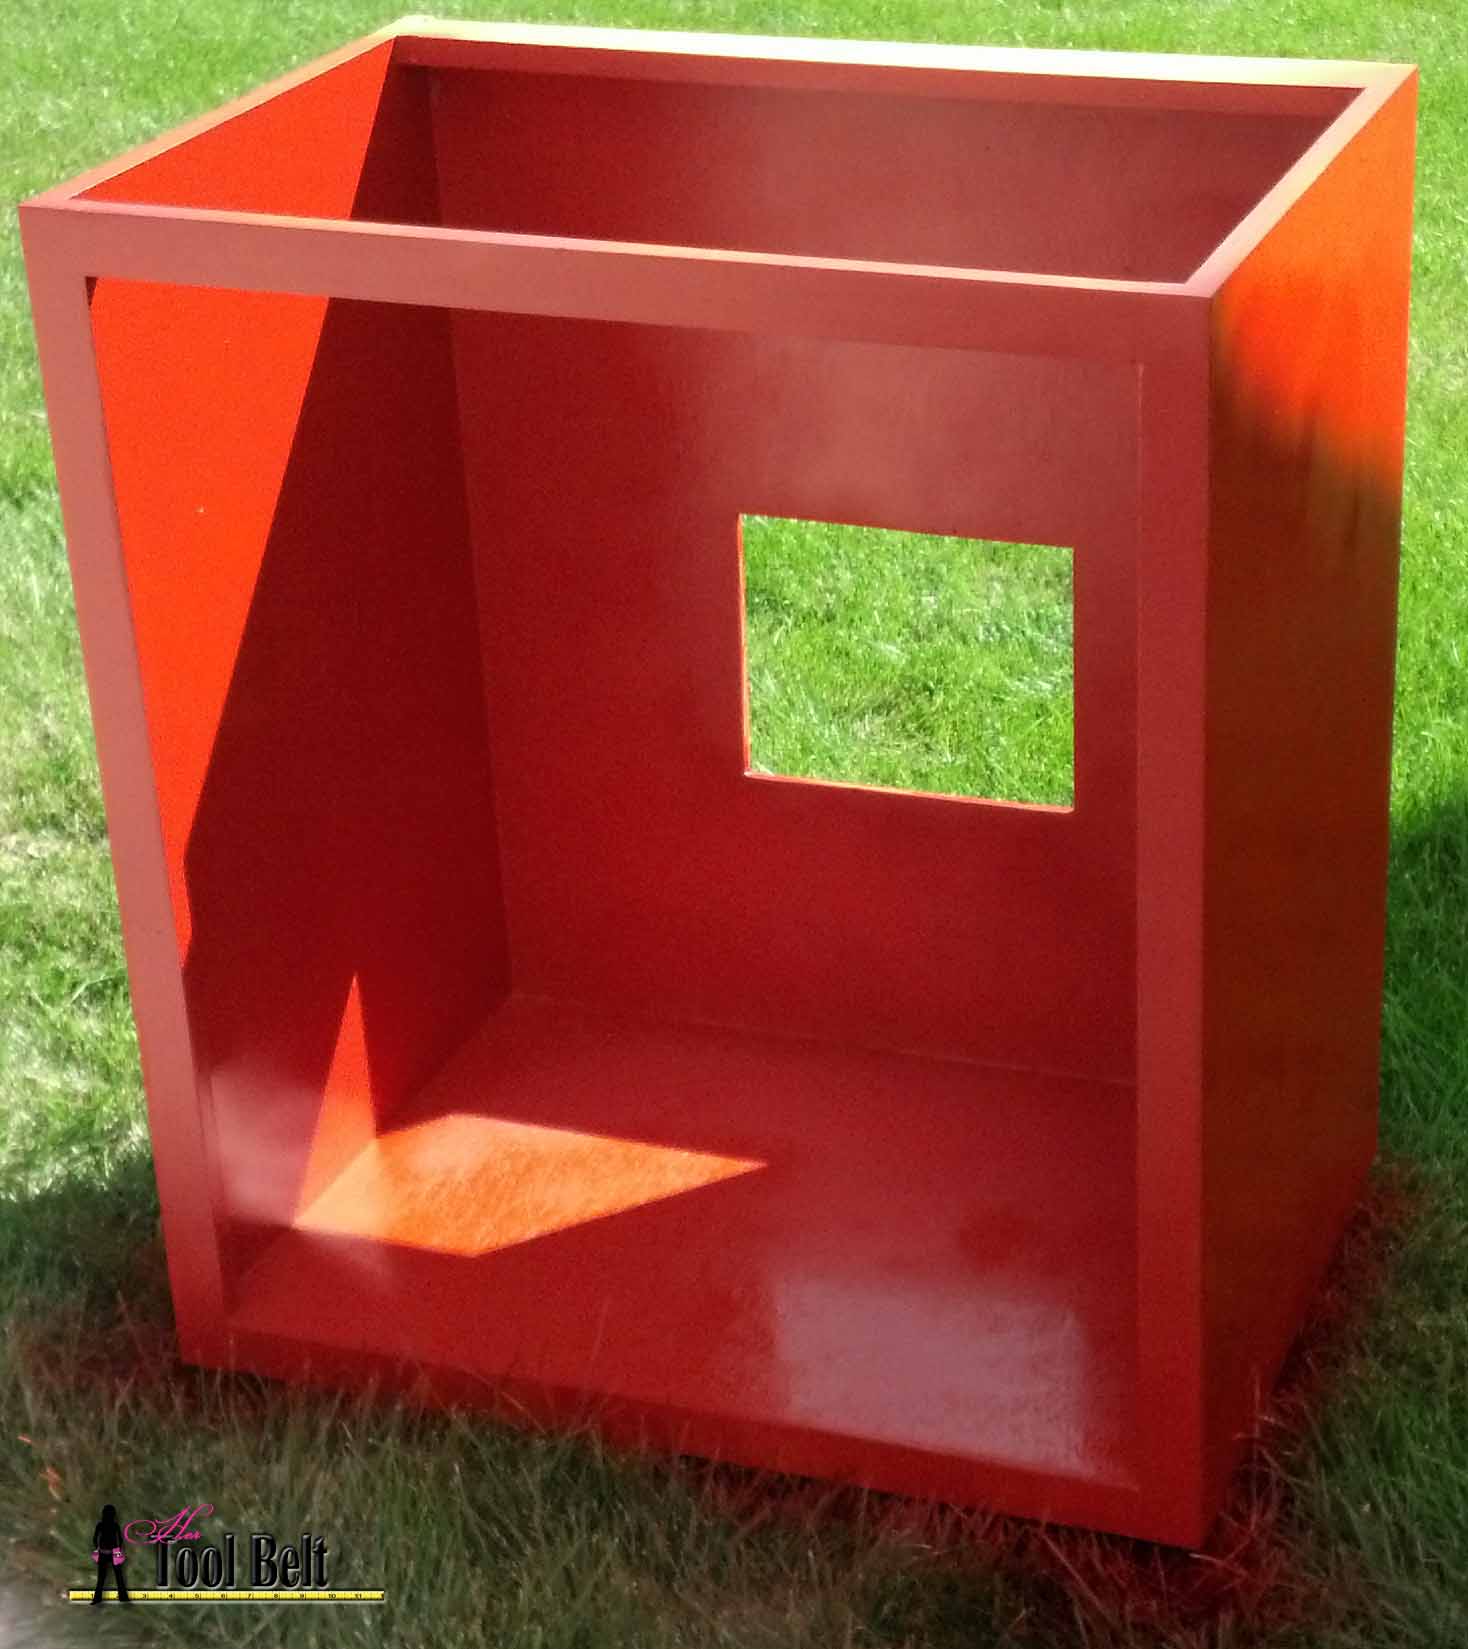 You’ll need to cut a hole in the back of your cabinet for the plumbing. Measure where your cabinet will go and cut the hole(s) accordingly.
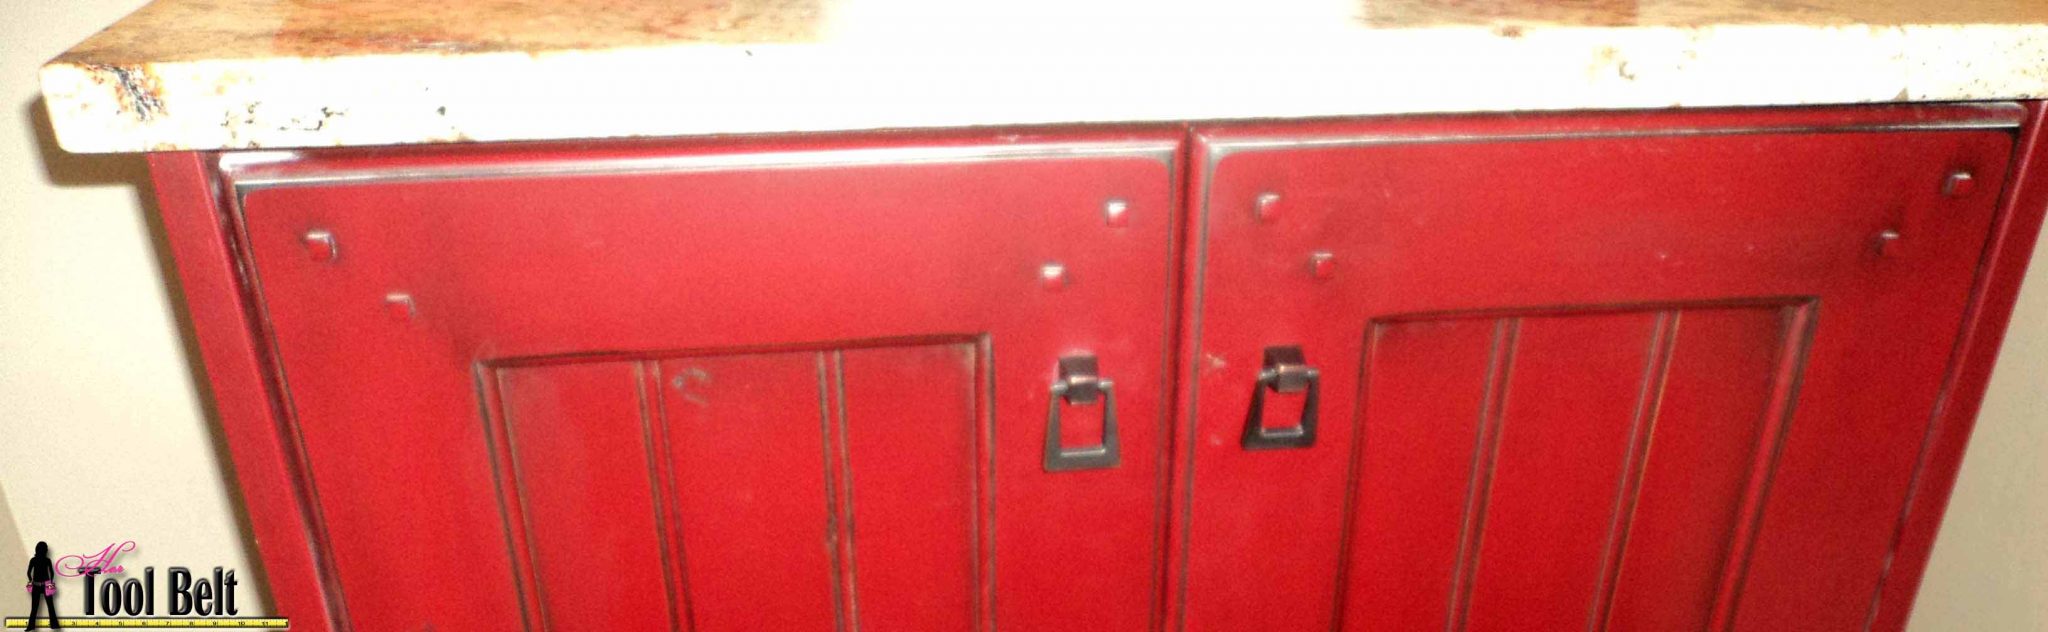 Add fun details to your cabinet. These cabinet doors have fun square clavos’ (decorative nails) in the corners. Distress and antique your cabinet to your taste, and enjoy!
(This picture came from a cabinet in a Utah home show)
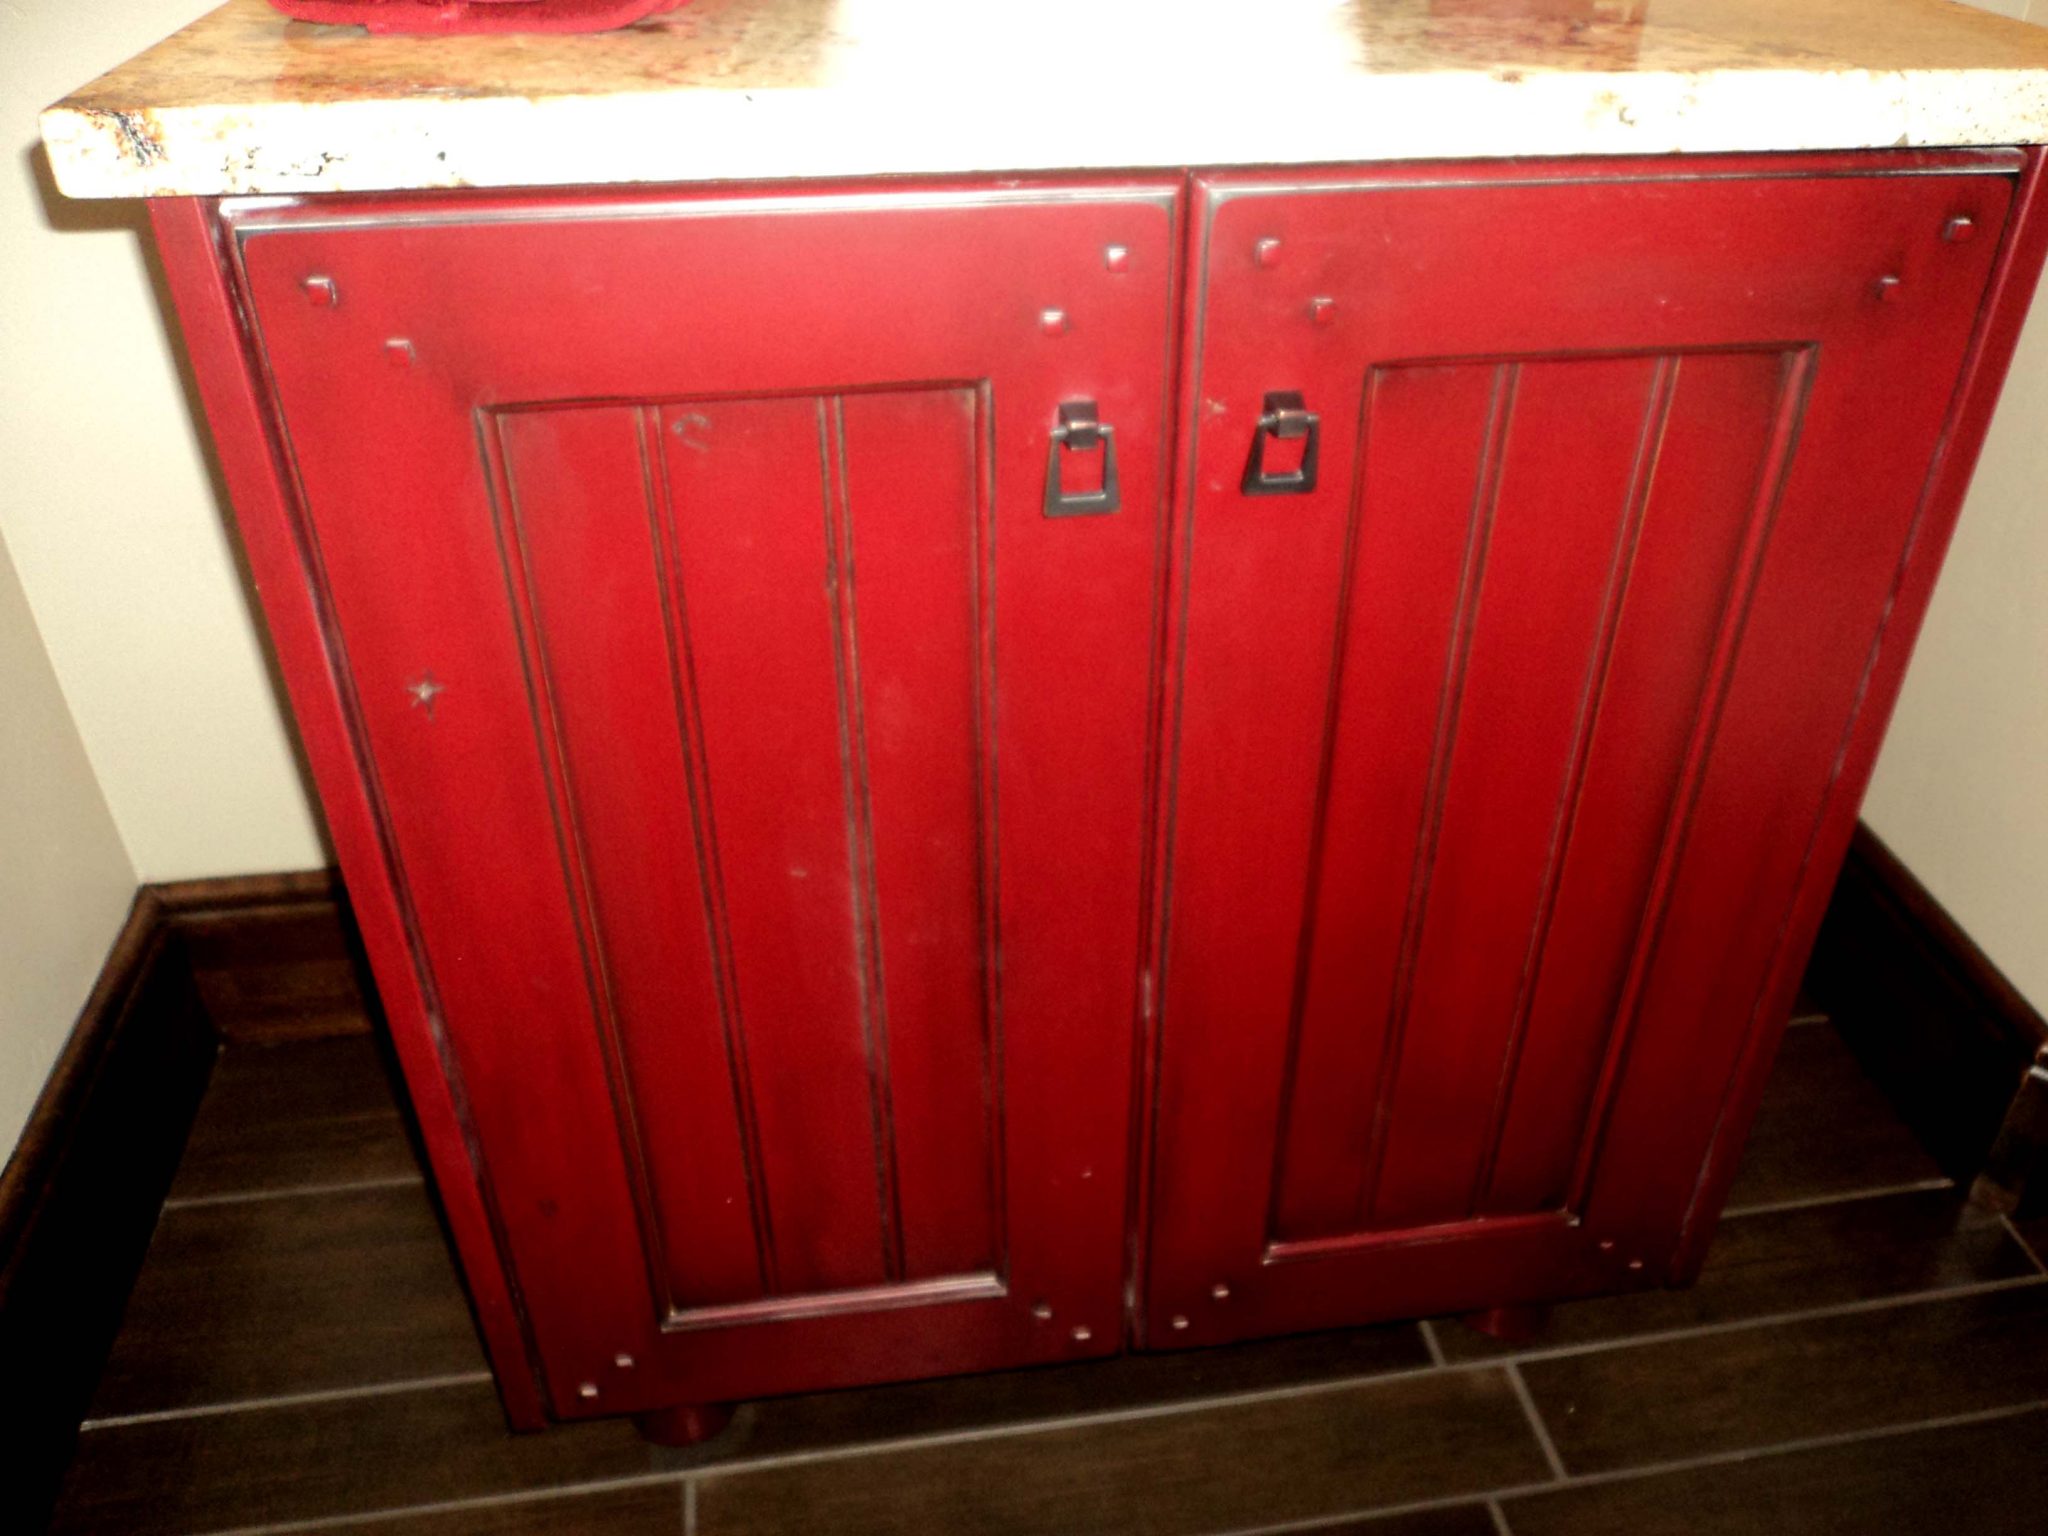 This is the cabinet inspiration. Not the best pic, but you get the idea.
Amazing Amy!! You are so talented 🙂 I think I am going to have to lean on your expertise sometimes!
You are so talented! I love how you included the plans so anyone could make this! I can’t wait to see what is next!
LOVE THIS!