Late last summer my Dad called me up and told me that they are leveling Remo’s barn. (Each section of the family farm is named after whomever they acquired it from over the years, Lee Halls, Ray’s, Henry’s, Neeley’s, Remo’s, etc that’s how we roll 🙂 ) Remo’s was a sizable area with a little farm yard on it. He had built a big hay barn back in his day, but over the years it had deteriorated and became a hazard structurally. So I talked my Dad into waiting until I could salvage as much wood as possible. Luckily he was good with that. I’m such a sucker for wood, and good barn wood is a limited commodity.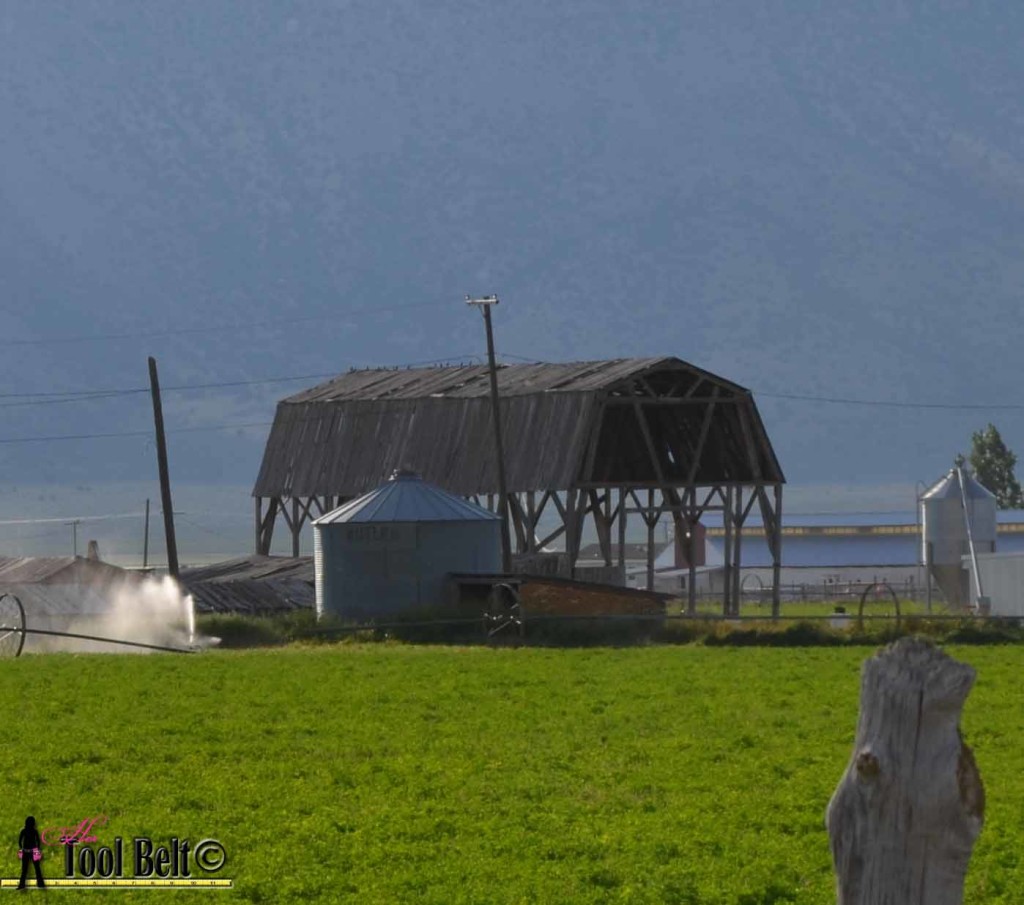
My first project with this reclaimed lumber is this beautiful rustic chevron bed for my son. I love to build with reclaimed lumber/barn wood. For me, it has unmatched character and it’s free, which is the best part! To find free/cheap wood, sometimes on craigslist or local classifieds ads people will give you the wood if you take the building down for them. Or drive around and see if there are old barns in disarray, ask the owner if they are looking to get rid of it. It usually can’t hurt to ask 🙂 Remo’s barn was a beast to bring down nicely, but we got ‘er done. I’ll post the video soon.
Quite often old barns were built using rough cut lumber. So a 2″ x 4″ rough cut lumber board actually is 2″ x 4″. A 2″ x 4″ board that you buy at the lumber yard is 1 1/2″ x 3 1/2″, but we still call it a 2 x 4. So this bed plan is designed using the rough cut lumber dimensions. Adjust the dimensions to your lumber size as needed. To build this bed with standard lumber sizes go here.
![]()
Once you gather your reclaimed lumber, wash it off with warm water, dish soap, and a bristle brush. It has probably gathered a lot of dirt and grime over the years. Let the wood dry completely before cutting it.
A few things to consider when using barn wood:
- Does it have a strong smell? If so don’t use it in your house. The barn wood may have soaked up manure or other things, that may never air out. Use pieces of wood that were higher up in the barn.
- Does it have bugs? If it does google how to get rid of them for your case. You don’t want to infest your house, yuck!
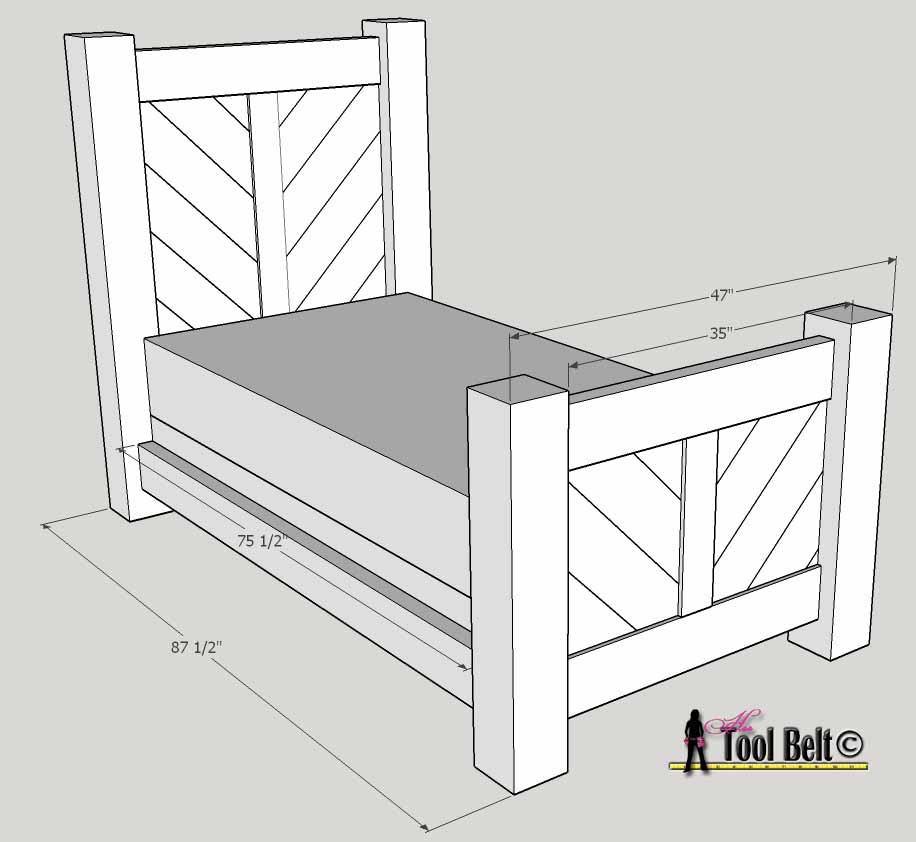
Alrighty let’s get building. Twin bed cutlist:
| Quantity | Length | Width | Thickness | Material | Description |
|---|---|---|---|---|---|
| 2 | 60" | 6" | 6" | barnwood | tall post |
| 2 | 36" | 6" | 6" | barnwood | short post |
| 1 | 44" | 4" | 2" | barnwood | tall divider |
| 1 | 20" | 4" | 2" | barnwood | short divider |
| 4 | 37" | 6" | 2" | barnwood | rails |
| 2 | 77 1/2" | 6" | 2" | barnwood | bed rails |
| 2 | 75 1/2" | 1 1/2" | 1 1/2" | pine/barnwood | bed rail support |
| as needed | cut to fit | 6" | 1" | barnwood | diagonal |
To make my lumber manageable I used a chain saw to roughly cut the boards to size. (Leave a little extra in case your saw doesn’t cut straight.) 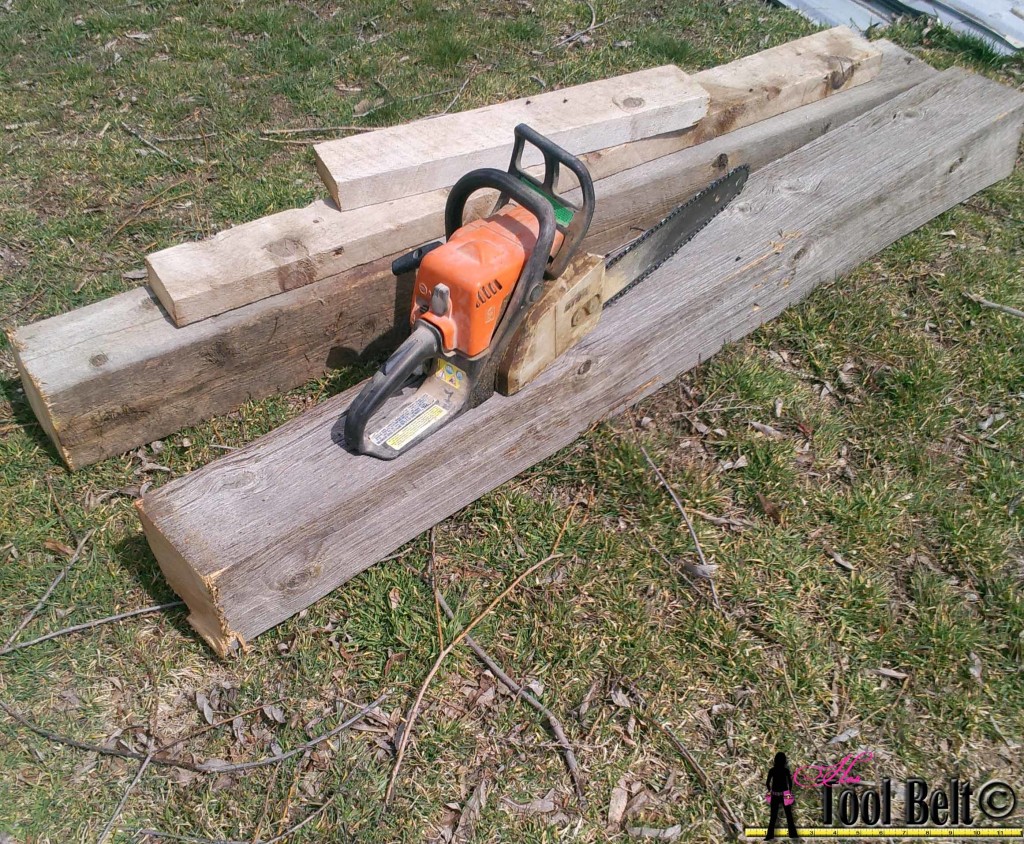 When making the final cuts use a compound miter saw or table saw to get more precise cuts. I used a band saw to do the final cuts on the 6″ x 6″ beams.
The design of the head board and foot board use dado slots for the diagonal boards to slide into. I did this because I thought it would make a cleaner look and be forgiving on the diagonal cuts.
I used my table saw to cut the long dado’s and a router cut out the slots for the rails.
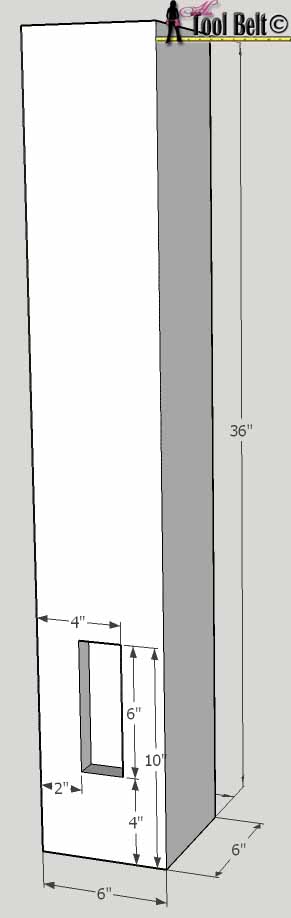
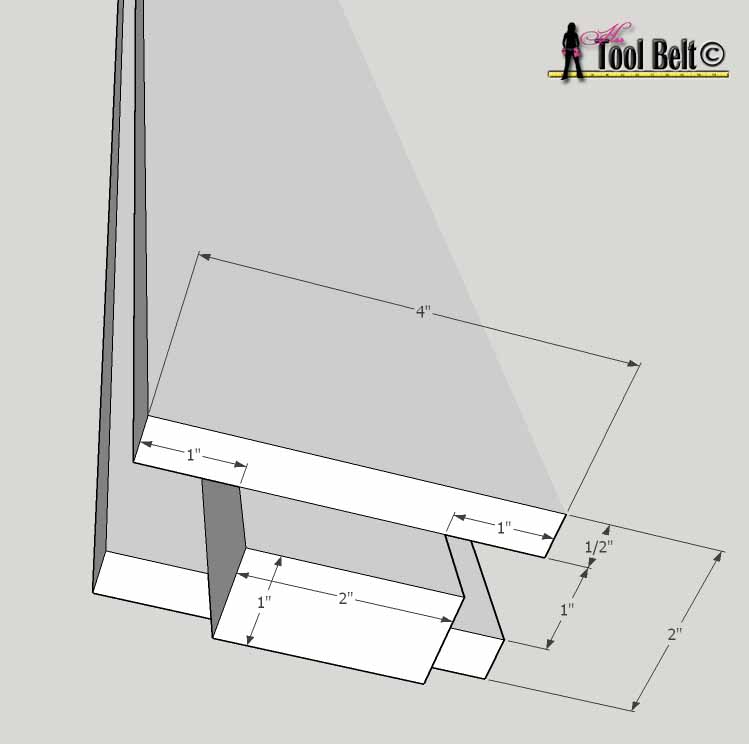
Cut 2 posts that are 6″ x 6″ x 60″. Pick the best side that you’d like showing in the front. On the front side route out a pocket for the bed rail 1″ deep, 3″ wide and 6″ tall according to the diagram.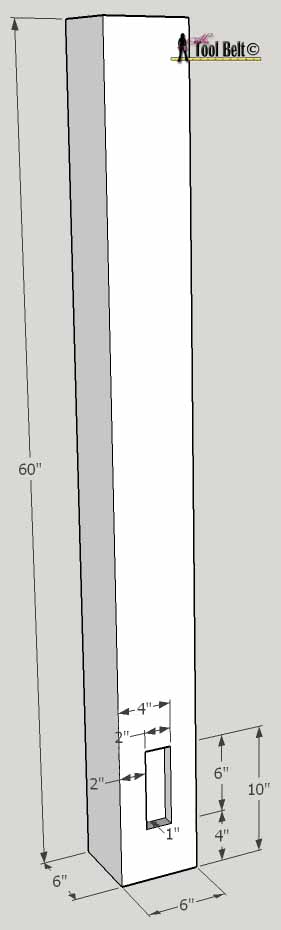
Next route out similar pockets on one side for the head board rails to fit into the post according to the diagram. I don’t think the pockets are 100% necessary if it will be too difficult to accomplish. Kreg jig pocket holes/screws could probably hold the rails in place. If you do the no pocket route, adjust your rails accordingly. But I suggest doing the long dado down the side for the diagonal panel boards to fit in.
Using a table saw and dado blade, or router make a dado groove down the side of the post as shown in the diagram. Repeat for the other tall post, but remember to do the mirror image of the first post.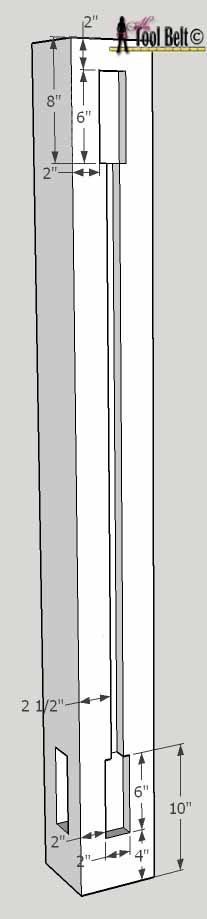
Cut 2 posts that are 6″ x 6″ x 36″. Pick the best side that you’d like showing in the front. On the back side route out a pocket for the bed rail 1″ deep, 2″ wide and 6″ tall according to the diagram.
Next route out similar pockets on one side for the foot board rails to fit into the post according to the diagram.
Using a table saw and dado blade, or router make a dado groove down the side of the post as shown in the diagram. Repeat for the
other tall post, but remember to do the mirror image of the first post.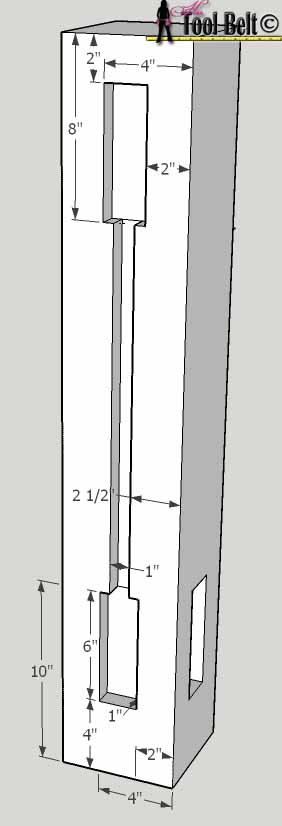
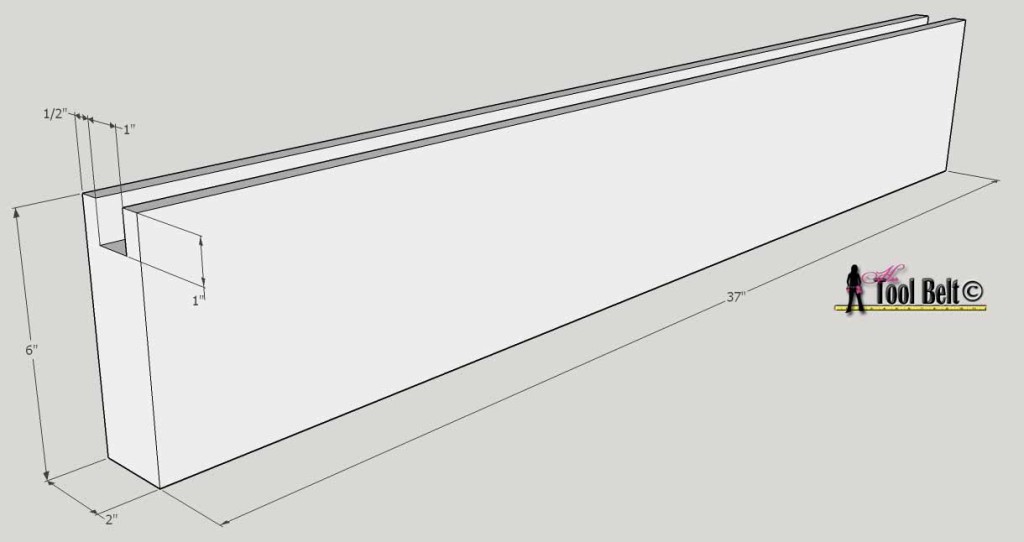
Cut 4 boards that are 2″ x 6″ x 37″. Cut a 1″ x 1″ dado along the center of one long end of each board. These are the head/foot board rails.
Cut a 2″ x 4″ x 20″ and a 2″ x 4″ x 44″ board. Cut a 1″ x 1″ dado along both long ends. Now we need to cut tongues that will fit into the rail dado’s that we just cut.
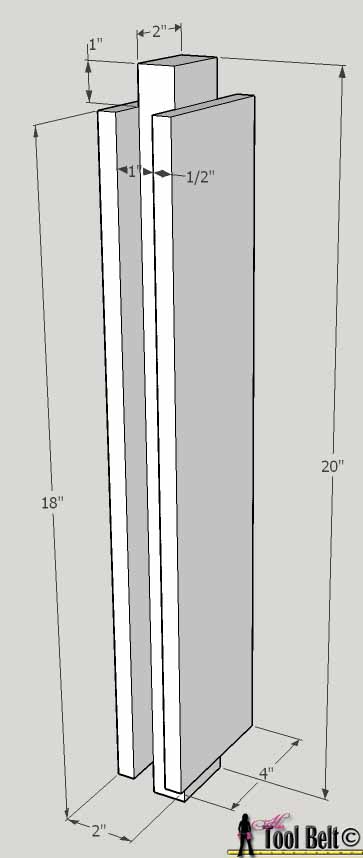
On each end make cuts to match the diagram. The tongue should fit snuggly into the rail groove, trim as necessary. These are the head/foot board center dividers.
Cut 2 bed rails that are 2″ x 6″ x 77 1/2″. Cut 2 bed rail supports that are 1 1/2″ x 1 1/2″ x 75 1/2″.

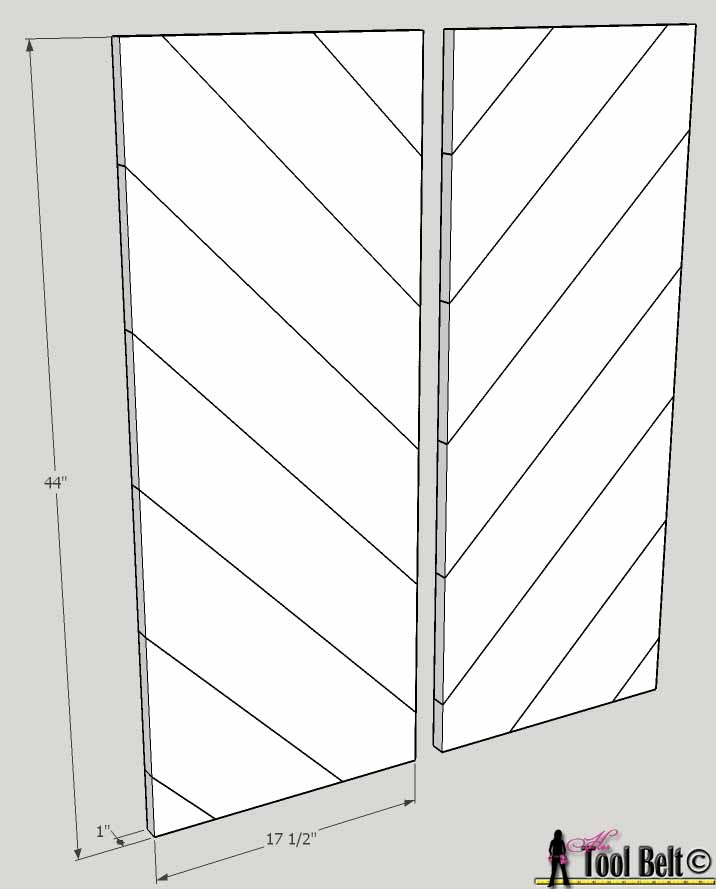
I didn’t give any dimensions for the diagonal panels, because I think it’s best to cut those to fit. The plan suggests using 1″ x 6″ wide boards, but you can use whatever width and varying widths will be cool too. Partially assemble the head and foot boards by putting the bottom rails in the corresponding post holes. Place the corresponding divider in the center. Start the diagonal panels with a 45 deg triangle on each lower outside corner. Then measure the length of the diagonal side of the triangle and that is the length of the shorter side of your next diagonal piece. Continue to cut the ends at 45 deg. Once the boards get past the inside corners, the boards will repeat the same length with 45 deg ends, until you reach the top. When doing the top boards, I left them a little long to dry fit, then took a straight edge and marked where they needed to be cut at the top. Trim pieces as necessary to fit together. Disassemble all of the pieces.
Now we’ll add some Kreg Jig® R3* pocket holes to hold the bed together. Add at least 2 pocket holes to the bottom of each headboard/footboard rails. Add 3 pocket holes to the inside face of the bed rail ends, and 2 to each bed rail bottom.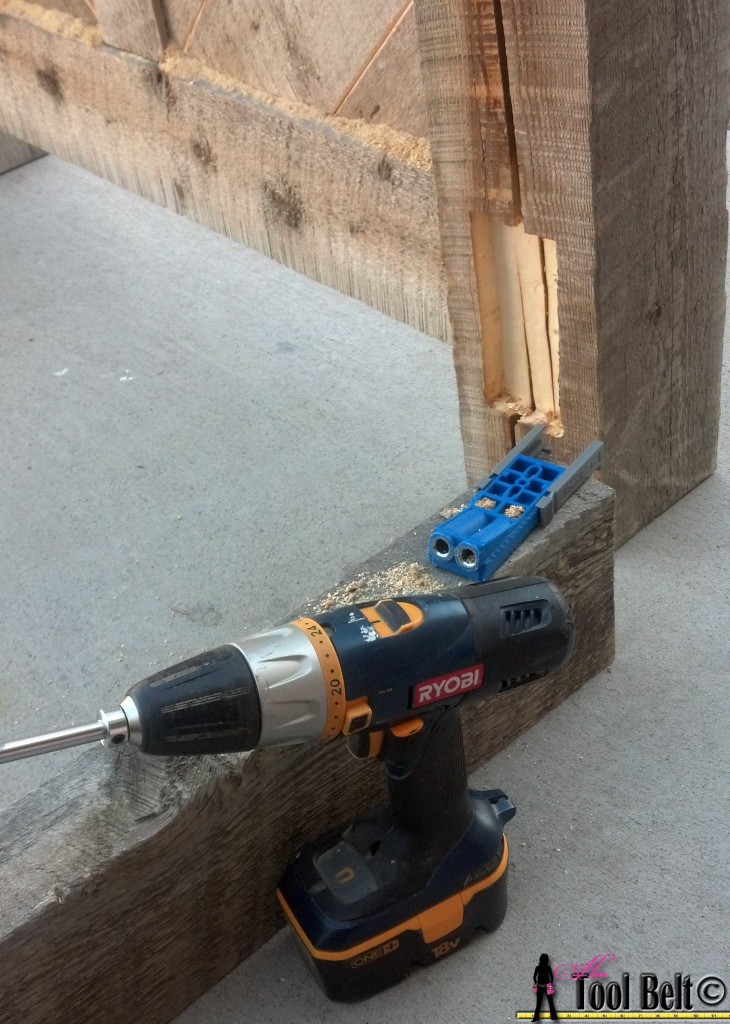
To assemble the headboard and foot board, I found it easiest to lay one post on it’s side. Put in the top and bottom rail, screw into place. Stack the diagonal panels in order starting on one side, install center divider, stack other side diagonal panels, then the other post. Screw the rails into the post. Repeat for the other head/foot board. Tip the head/foot boards over.
Install the bed rails into the post holes and screw into place. Screw the rail supports to the inside face of the bed rails near the bottom. This is for the box spring to sit on.
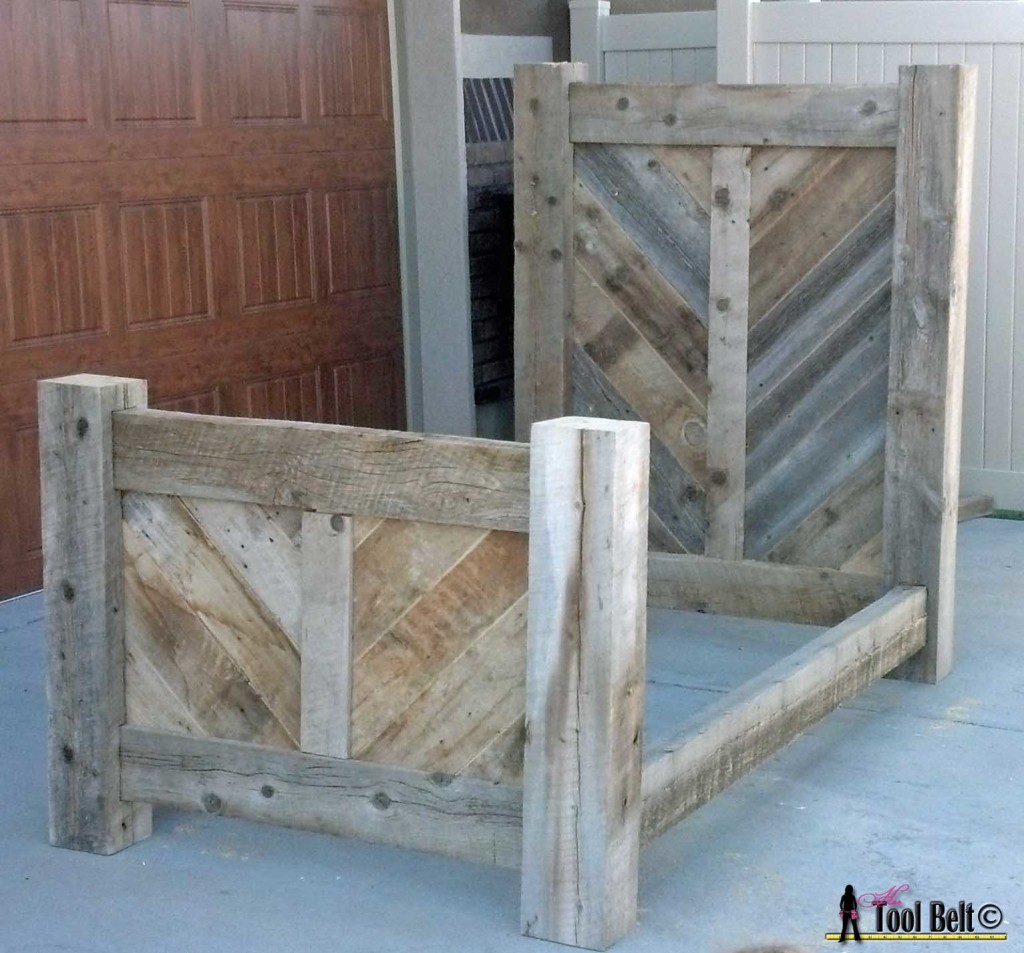
Alright your bed is ready to go!
![]()
Pin me for later
![]()
Check out these free DIY plans:
linked up to: Remodelaholic DIYShowoff Hit me with your best shot, Savvy Southern Style, Get your DIY on , BestofDIY Party
Wow Amy, You are Amazing!!! Beautiful Job 🙂
This is AMAZING!!!
Thanks Kristyn! And a huge thanks for pinning!!!
Beautiful bed design! I didn’t realize how much character barn wood has; although I am not sure I could ever get some on O’ahu. Looking forward to seeing more of your work! 🙂
Love how this turned out! There is nothing like reclaimed wood! This is one of my “knockouts” from last week’s Hit Me With Your Best Shot! Thanks SO much for linking up!
Thanks Shelly!
Beautiful! Love that you reclaimed the barn wood.
Thank you! And thanks for visiting.
This turned out so good! Thanks for sharing at The Makers!
This looks amazing! Thanks for sharing with us!
You are being featured today at Your Designs This Time!
Emily & Erin @ Elizabeth Joan Designs
I saw this featured on Ana White! Yay for you! Its fabulous and I’m super impressed by your Sketch-up skills!
Thanks Elisha! I wasn’t actually featured on Ana White, anyone can submit a plan on her site once you make an account.
This bed is really cool. I would like to give my boys who share a room matching beds but everything I find is kind of girlie. This would be perfect. Featuring you this week on the Be. YOU. tiful link party. Thanks for linking up!
Thank you!
I love people like you who are so brave to use power tools and do all of that math to figure out what cuts to make! Thank you so much for linking up to the Be.You.Tiful Link Party. I look forward to seeing more of your links each week!
I totally l.o.v.e. this bed! I am thinking about coming over and stealing it from you! Do you think it will fit in my car? No seriously, I really like it and am super impressed! You really outdid yourself…. 🙂
hugs x, Crystelle
Crystelle Boutique
I’m pretty sure you’ll need a truck & some extra muscles!!!
Amy, your work is just flat incredible- all the measuring and washing and cutting and even gathering- and, wow, you break it all down so it’s possible for anyone! What an awesome bed this is, and just an awesome personality you have! 🙂
Thanks Sky, it was great meeting you at Snap.
I love it and will be featuring it at Wow this week!
Awesome, thank you!
Beautiful! Thanks for sharing!
WOW! This bed is amazing! Do you ever think about how this bed might be passed down now since it’s something you built? You created a beautiful family heirloom! 🙂
Thank you, I haven’t thought that far down the road…but hopefully it gets passed down!
In my search for a headboard, I came across your bed on Remodelaholic, and think it’s great! Even more great is that green leaf pillow! I’ve scoured the internet to find it, with no success. Can you help me identify it? I’d very much appreciate it!
I bought it from Costco a couple of years ago, sorry I must have removed the tag.
Oh I found the name of it on Amazon. Brentwood Starburt Petals 16-Inch Pillow
My teen son is wanting a bigger bed. I wonder how difficult it would be to make this a Full size instead if a Twin. I love it! Great work!!
You can definitely make a full size. You need to add 15″ to the head and foot board rails, so instead of 37″ they’d be 52″. Happy Building!
LOVE this bed! Do you have dimensions for a queen size?