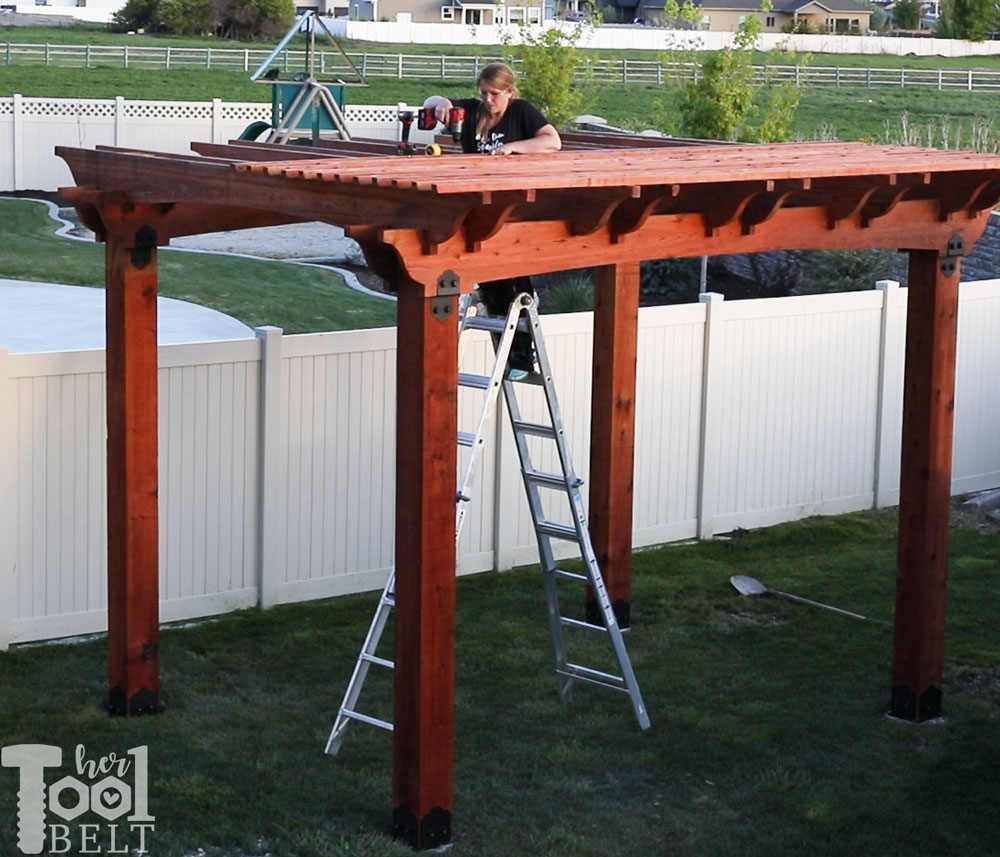
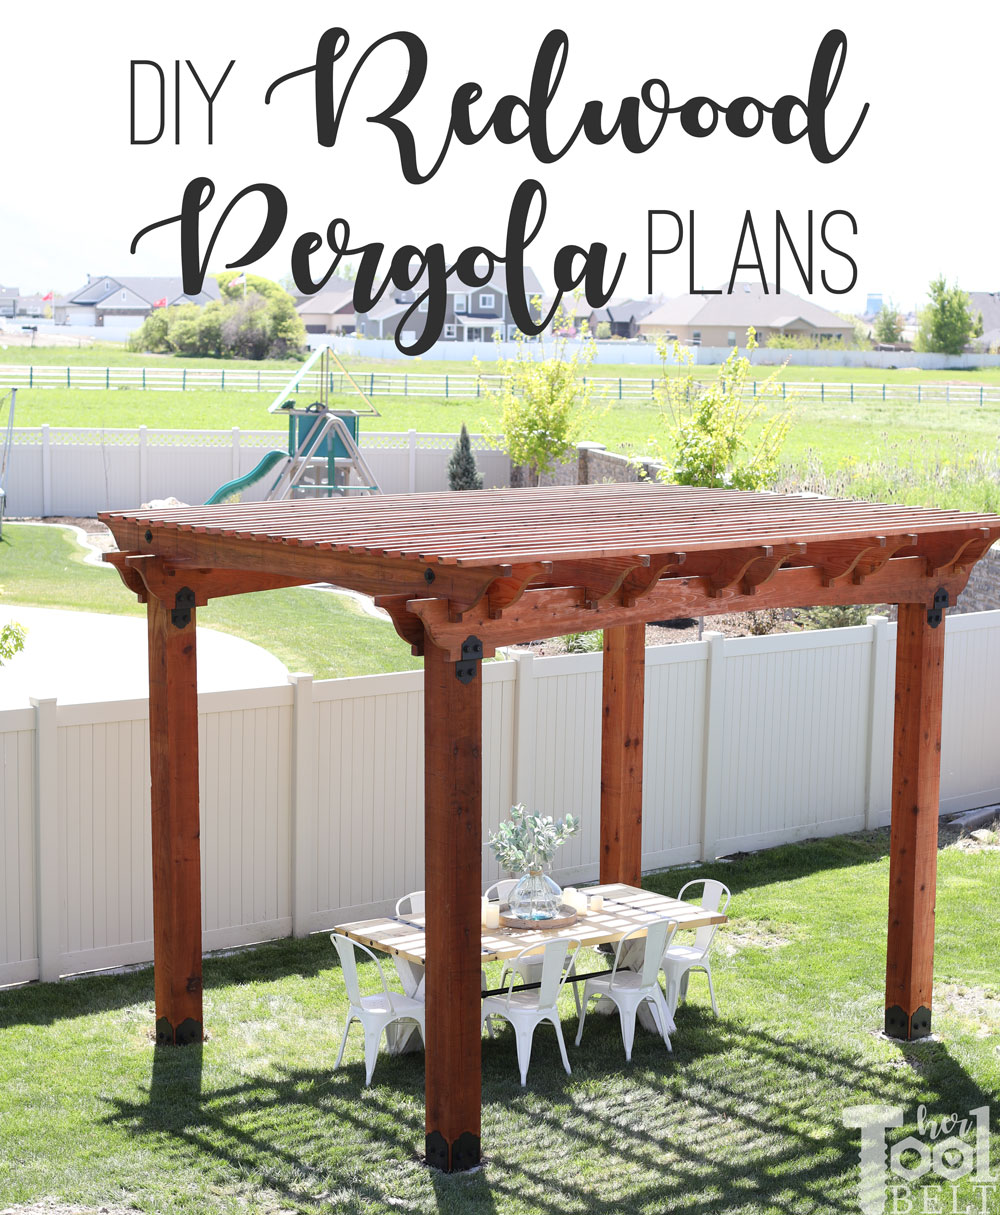
I am super excited to share with you my latest project. I have started working on creating an outdoor entertaining space and the first item crossed off the list is a redwood pergola! As a wood lover, I was truly in awe working with redwood. While cutting and sanding, the redwood looked like any other lumber. At some point the boards actually looked like douglas fir. When I applied natural stain to the wood, it magically turned it into this deep and rich red/brown color. Now I’m planning how I can use it again, maybe an arbor???
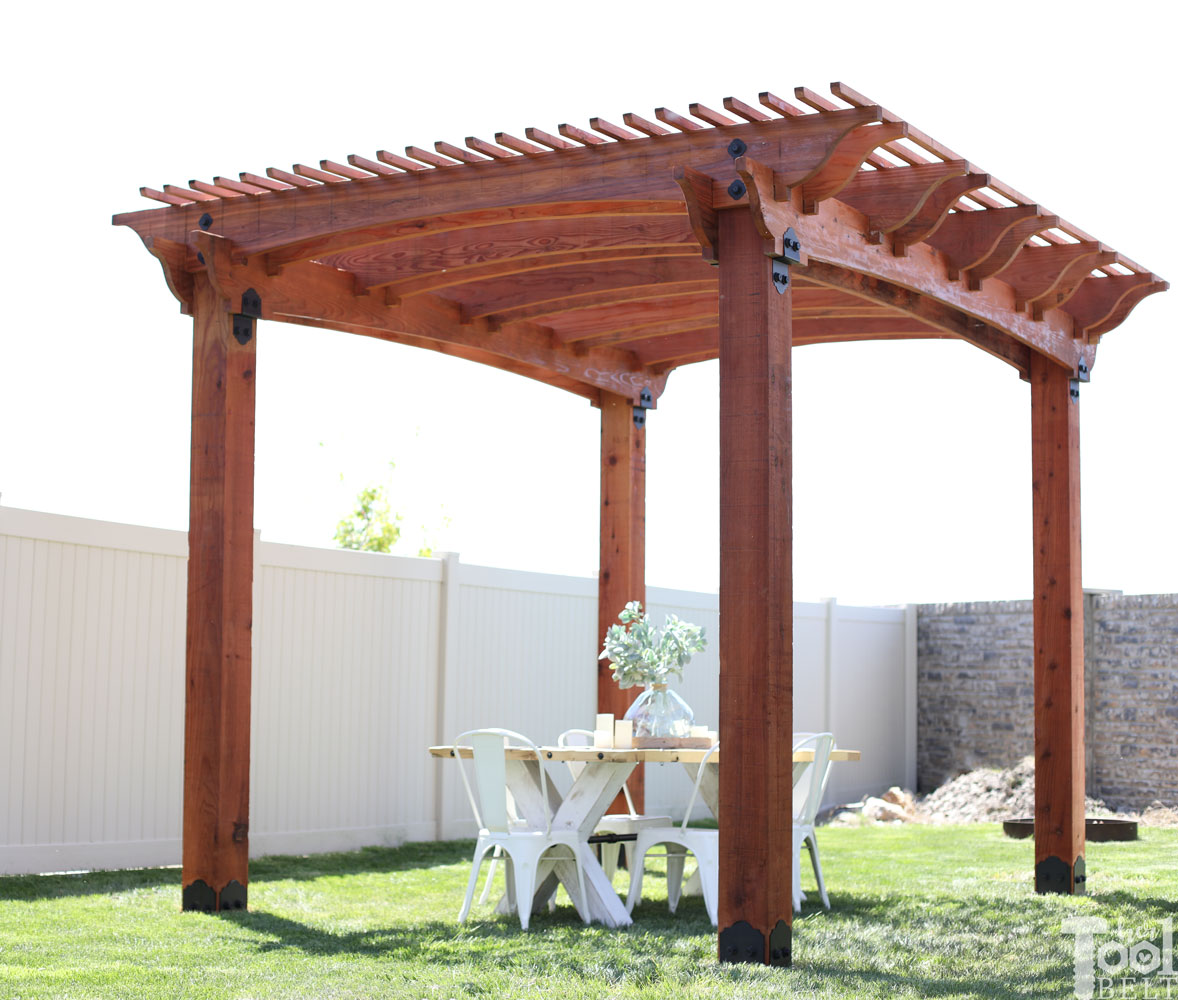
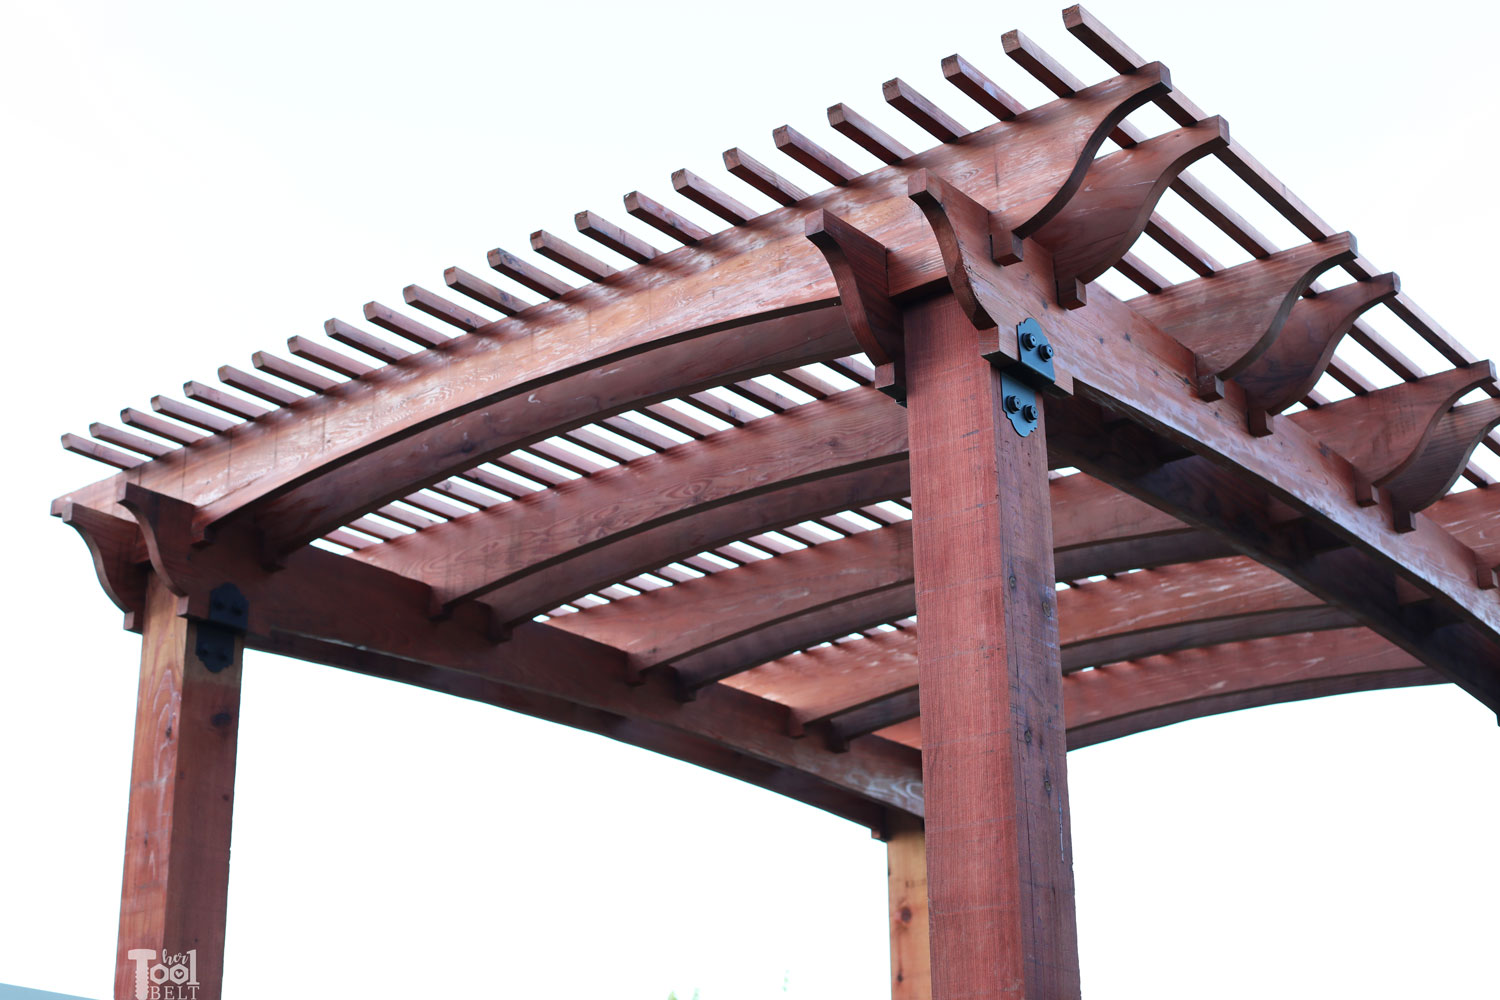
I’m loving all of the details!
This post contains some affiliate links for your convenience. Click here to read my full disclosure policy.
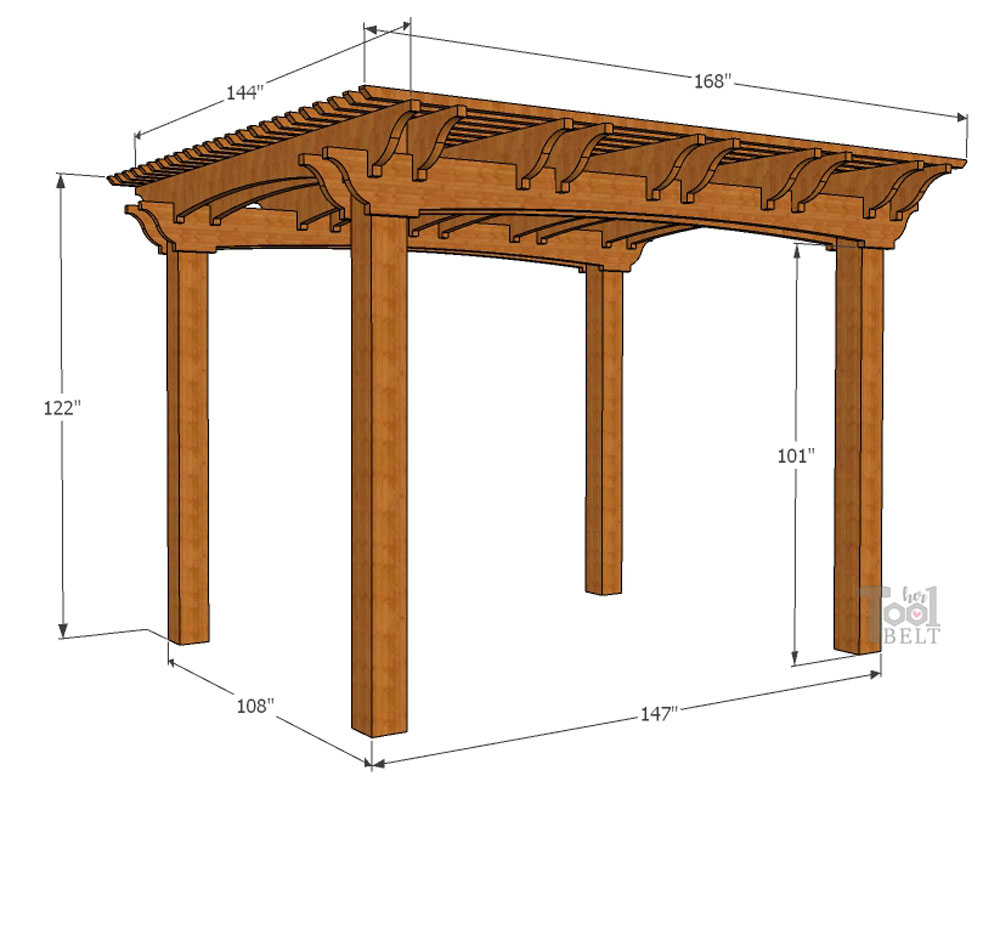
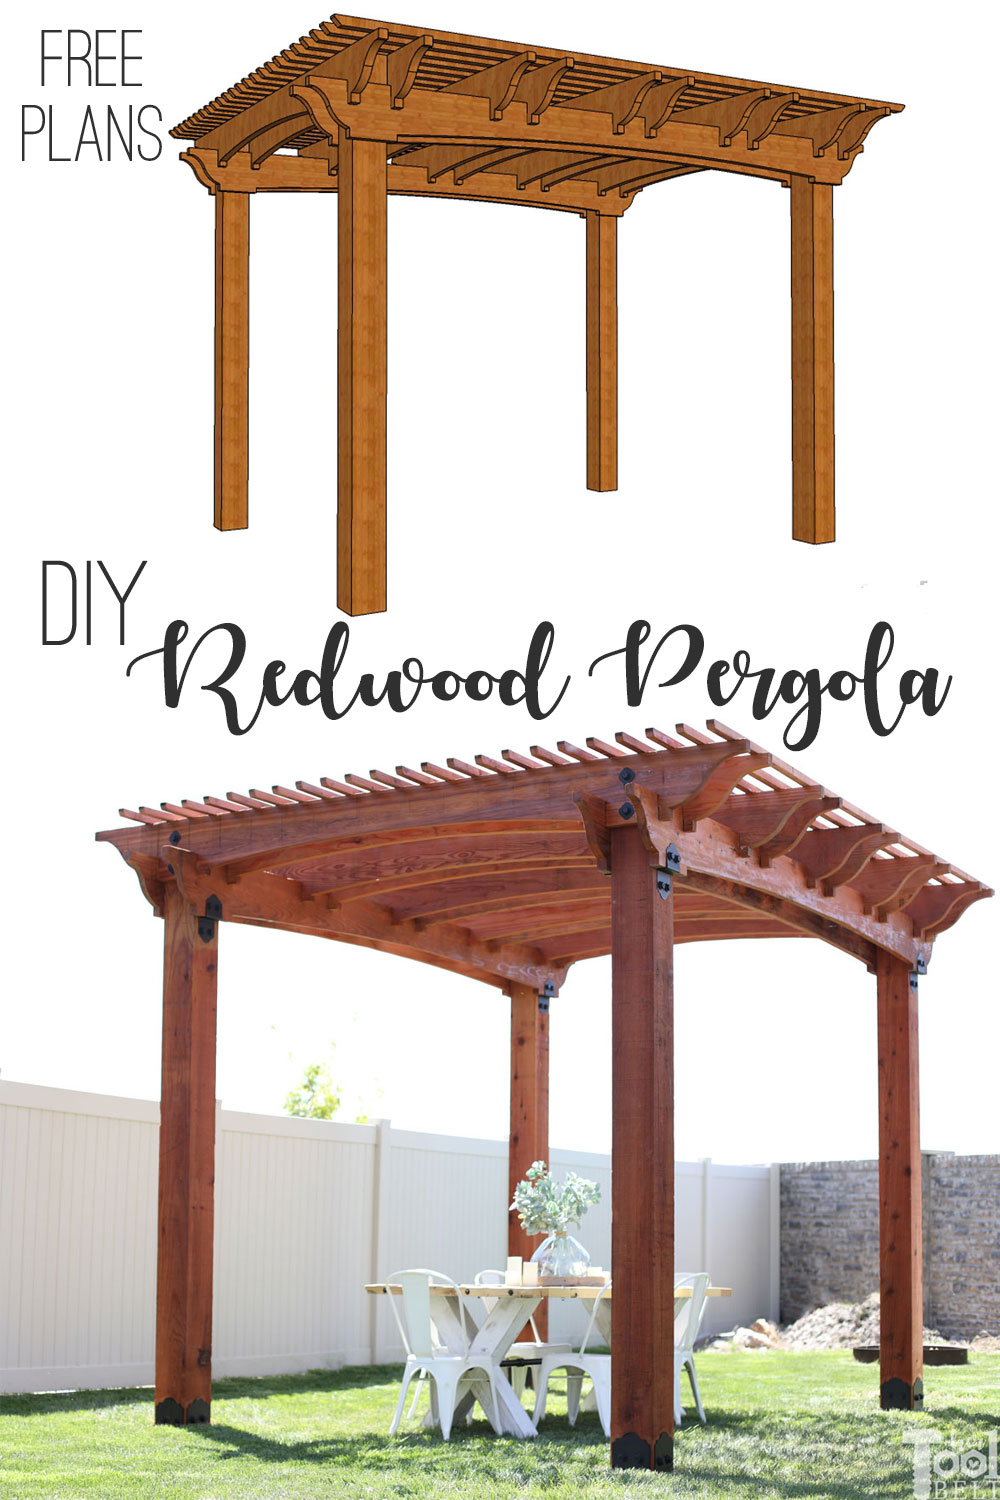
How to Build a Redwood Pergola with Arch Detail
Please Subscribe
Materials
Redwood
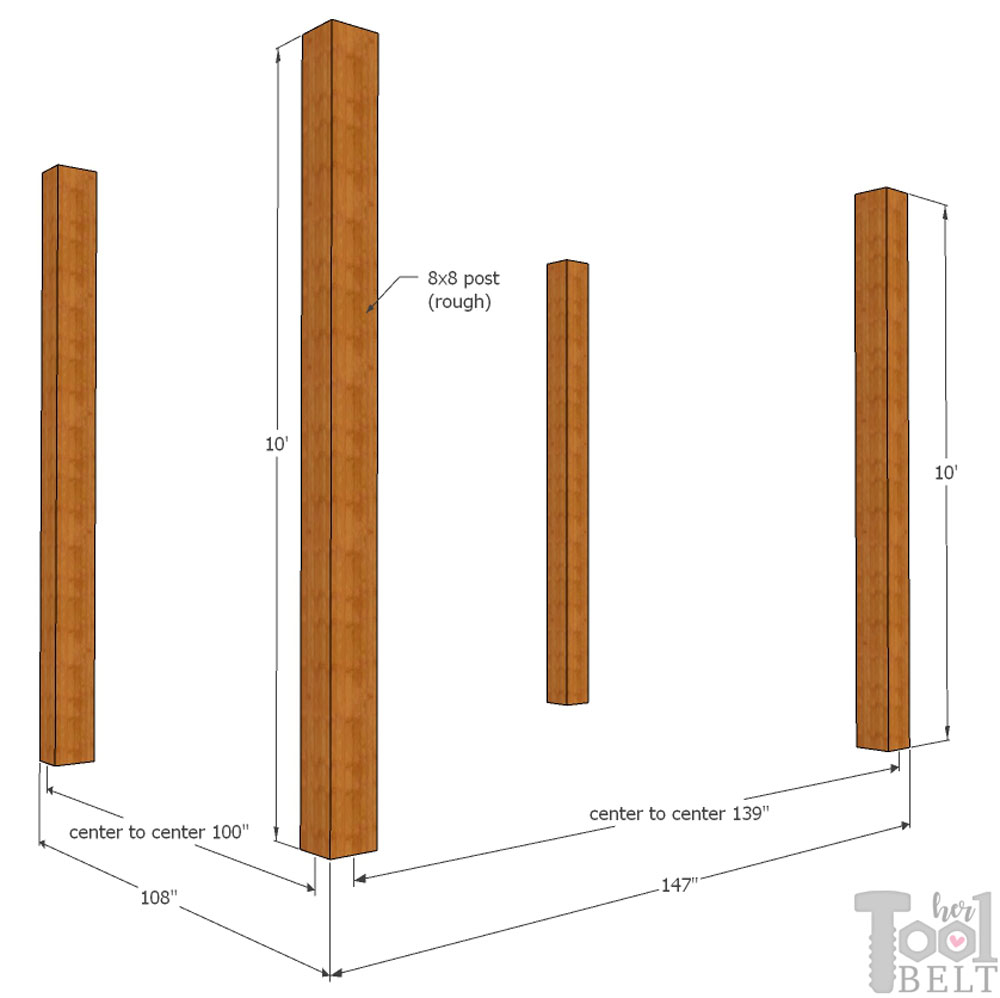
- 4 – 8″ x 8″ x 10′ rough cut redwood timbers (posts)
- 4 – 2″ x 12″ x 14′ rough cut redwood lumber boards
- 10 – 2″ x 12″ x 12′ rough cut redwood lumber boards
- 24 – 2″ x 2″ x 14′ rough cut redwood lumber boards (If these are not rough cut and the measure 1 1/2″ x 1 1/2″, then you’ll need 26.)
- 2 – 1″ x 12″ x 8′ rough cut redwood lumber boards – optional (for post sleeves to cover hardware)
Finish
Ornamental Hardware – Optional
- 4 – Post Bases for 8×8 posts
- 4 – 5/8″ x 7″ Concrete Anchors (or whatever you need to attach to concrete, wood, etc)
- 8 – Deck Joist Ties for Rough Cut Lumber (if you’re not using rough cut lumber, they do have strap for 1 1/2″ thick lumber)
- 16 – Ornamental Washers
- 48 – Decorative Nuts
- 16 – 3 1/2″ Ornamental screws
- 32 – 5 1/2″ Ornamental screws
- 3″ exterior screws
Standard Hardware – (if not using Ornamental Hardware list)
- 16 – 1/2″-13 x 12 1/2″ bolts (minimum length)
- 32 – 1/2″ flat washer
- 16 – 1/2″ nut
- 4 – 8 x 8 post base and hardware associated with the type you choose
- 3″ exterior screws
Concrete Footings
(This list depends on your frost line. For my area, I poured 12″ diameter x 36″-40″ deep footings)
- 4 – 12″ diameter concrete form tube
- 15 – 80 lb Concrete Mix
- I added some rebar for good measure 🙂
Choosing Redwood
There are a variety of materials to choose from when building a pergola. The #1 reason I’m choosing Humboldt redwood is because it is GORGEOUS! I love the deep red-brown color. I stained the redwood board with natural stain and wow, the redwood color is so beautiful and vibrant! But it does have other compelling characteristics that put it on the top of the materials list for me.
- Redwood’s rich, warm color and wood grain creates a wow factor that compliments any backyard and landscaping.
- Redwood is naturally resistant to insects and decay, and resists warping and splitting!
- It is much lighter in weight than plastic composite, redwood can be easily cut, sawed, and drilled with regular woodworking tools, making it perfect for the DIY-er.
- It’s strength to weight ratio and straight grain makes it one of nature’s strongest building materials.
- It’s all about #RedwoodDIY! It can be used in so many home DIY projects (building a deck, arbor, furniture, pergola or even accenting the interior of a home). If using it as decking material it stays comfortable for bare feet even on the hottest, sunniest days. Tell that to dark composite plastics. 🙂
- And most important is sustainability. Humboldt Redwood products are grown and harvested in a responsible, ethical manner with an eye for long-term sustainability; environmental stewardship is the cornerstone of their culture. They make sure to harvest well below the growth rate of the forest and plant new trees every year. Redwood is an environmentally sustainable choice!
That beautiful redwood really dresses up this sad corner of my yard. It will take it from a place I avoid to a beautiful hang out in the evenings!!!
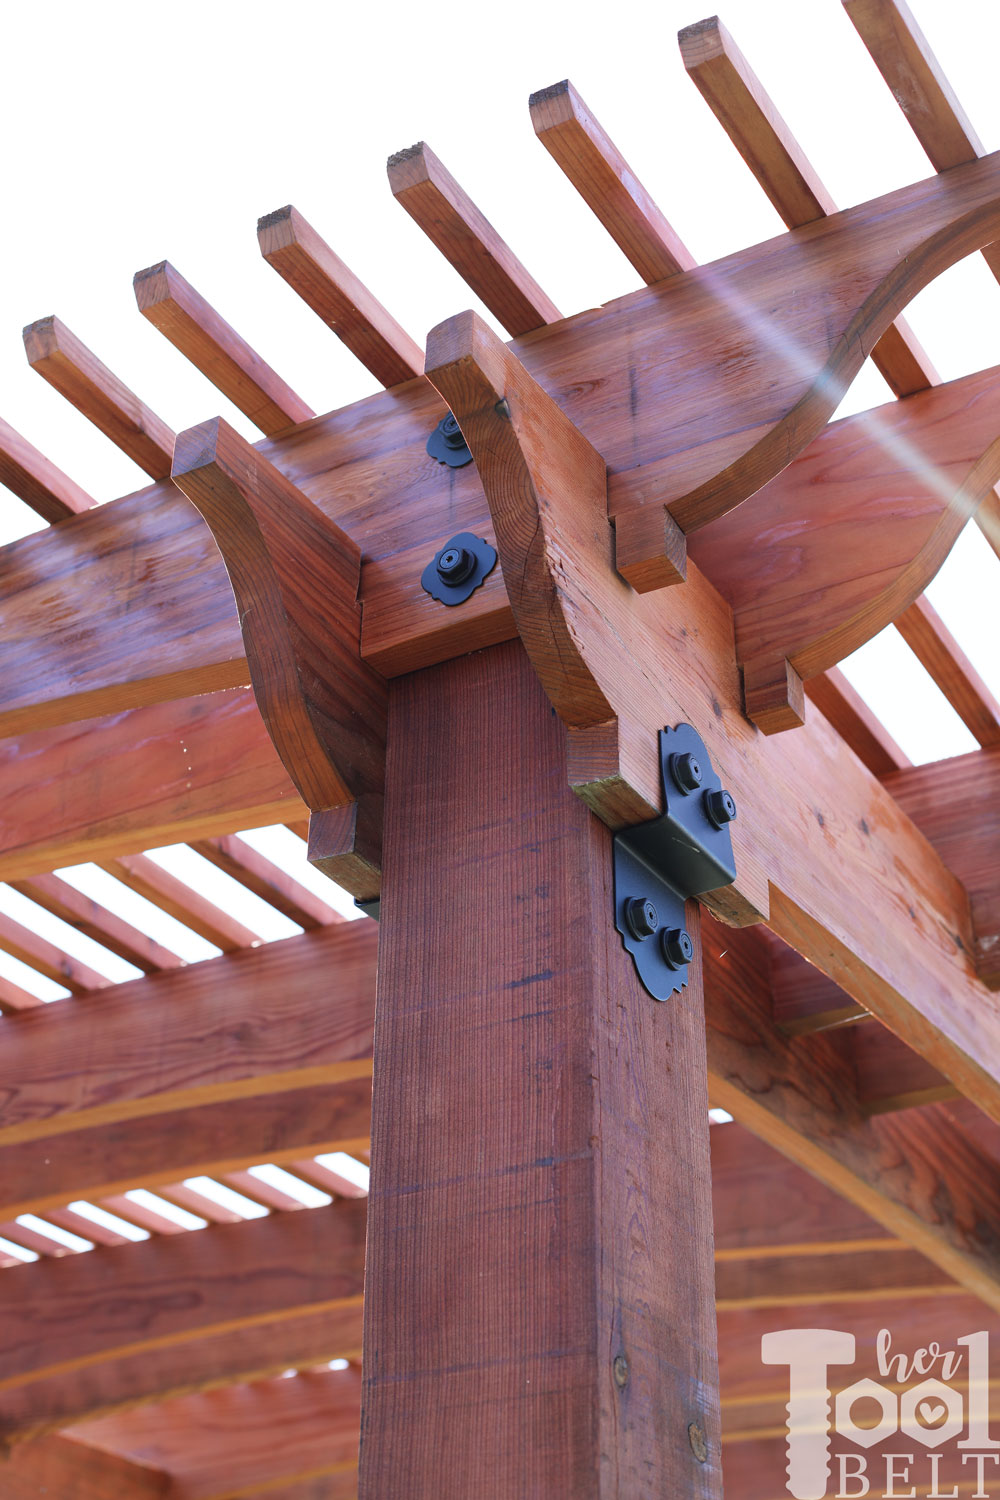
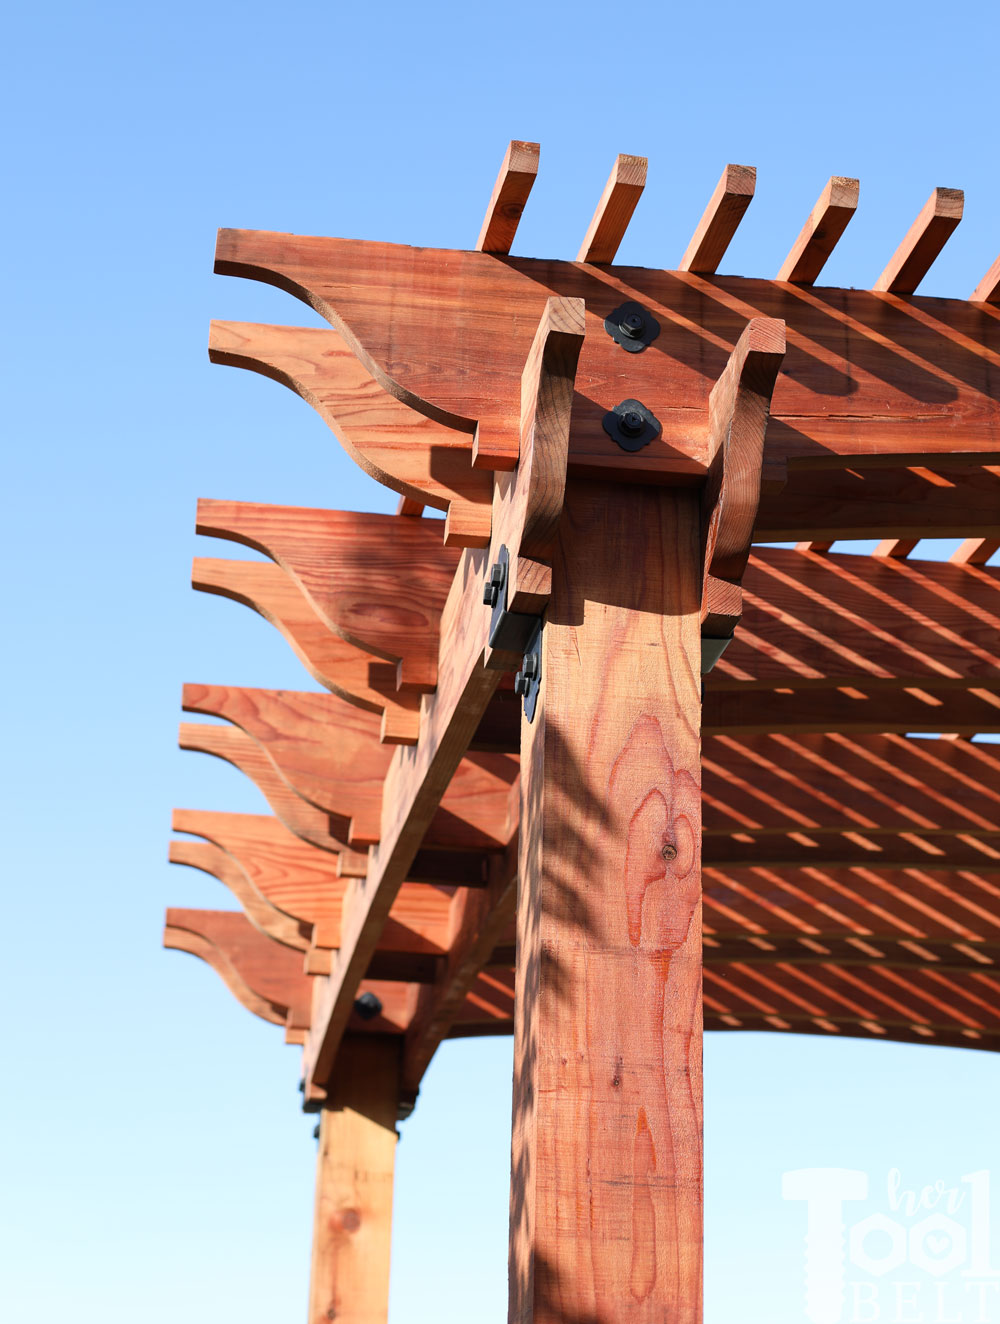
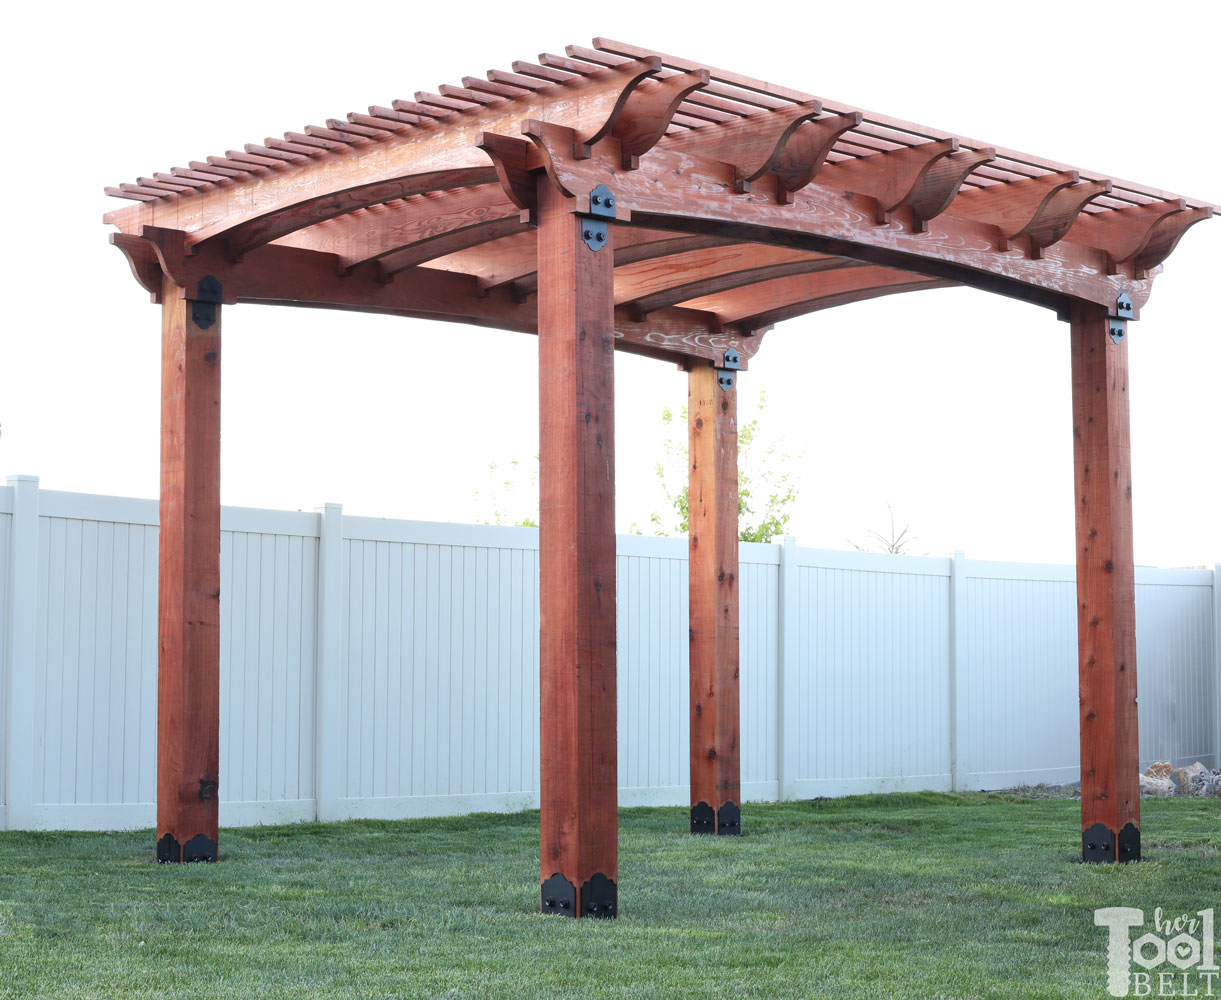
To compliment the beautiful redwood, I did splurge a bit and bought the Ornamental Hardware. I think the black hardware with that deep red-brown color really pops!
Tools Used
- Jigsaw (I wish I would have upgraded my jig saw, I got quite a bit of blade flaring that I had to sand down.)
- Belt Sander
- Orbital Sander
- Drill and Impact Driver
- Drill bits
- Circular Saw
- Oscillating Tool
- Rotary Hammer for cement anchors
- Shovel
- Cement Mixer – optional
- Post Hole digger
- Tape Measure
- Level
- Laser Level – optional
- Speed Square
- hammer
Step 1 – Preparing and Pouring the Footings
This part of the redwood pergola build made me the most nervous. I didn’t want to mess up the placement of the large 8×8 posts. Instead of setting the post base in the concrete or using a J bolt, I opted for using 5/8″ concrete anchors and OWT 8×8 post bases.
I started off by laying out where the footers needed to be placed. The 8×8 pergola posts are 139″ center to center, in the front and back. They are 100″ center to center, on the sides.
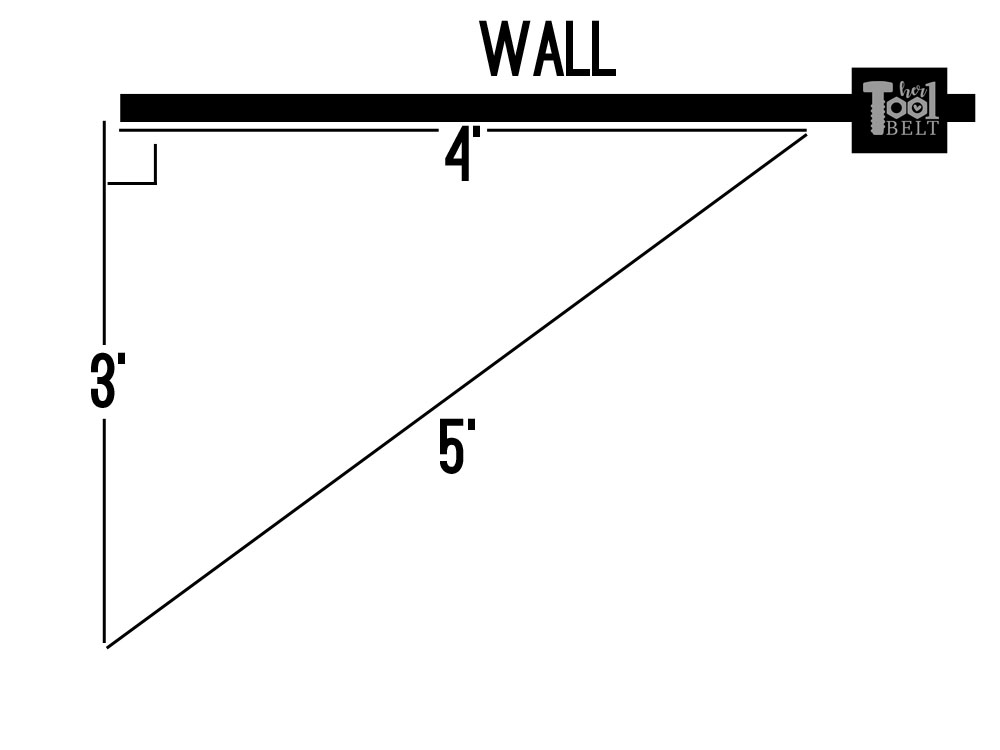
 I used some wood stakes and string to create a straight back line. Then used Pythagoreans theory to find the 90 deg angle for the sides. Along the straight line string, measure/mark 4′ and 8′. Then measure mark 3′ and 6′ along what will be the side. From the 4′ mark, measure to the 3′ mark and where the tape reads 5′, that is where you should place your 3′ side mark. Repeat for the 6′, 8′ and 10′ measurements. Take a string from the starting corner and line up along the 3′ and 6′ marks. This should make your side line pretty close to 90 degrees from the back line. (ignore ‘wall’, this graphic is from a different project)
 Now that you have straight lines and a 90 degree side line, mark the centers for the post 139″ front/back and 100″ sides. Measure diagonally hole to hole to make sure your holes are parallel.
I dug holes just larger than the 12″ concrete form and about 36-40″ deep. That was fun :-). Then I placed the form into the hole and tried to level the forms between all of the holes. (I used a laser level for this part. I added some rebar in the hole, then started mixing concrete then pouring in the holes.
Step 2 – Setting the Posts
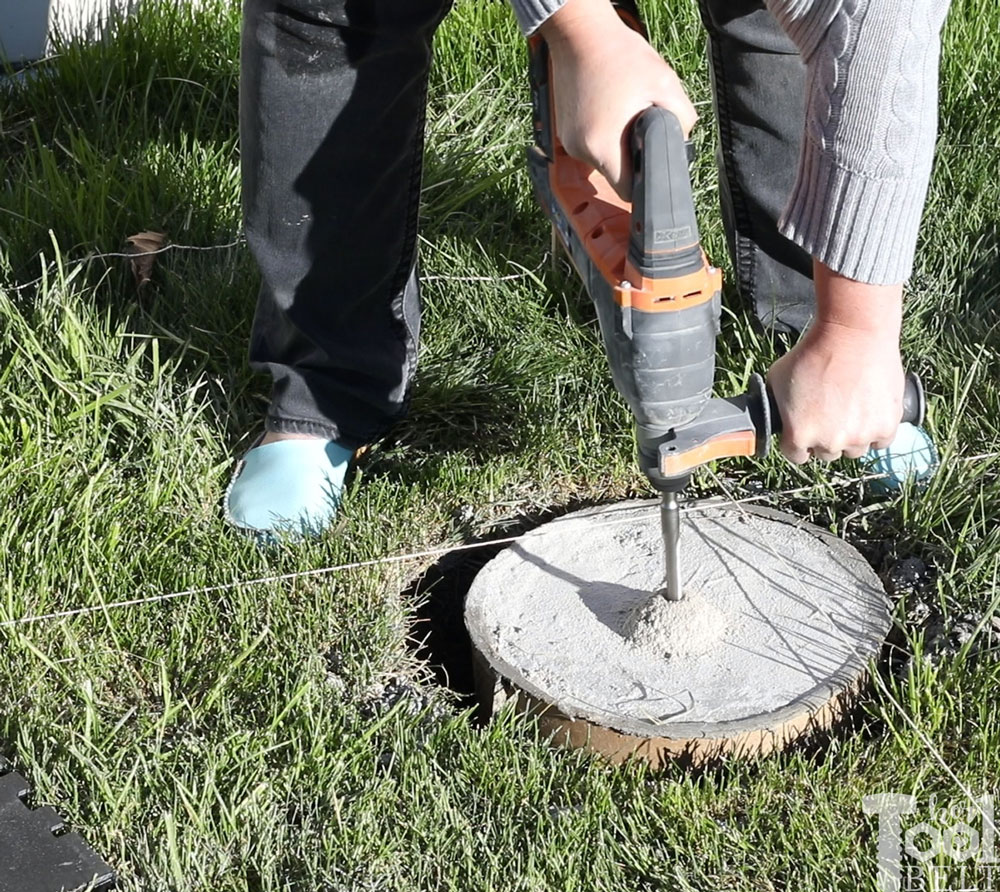
After a few days when the concrete was set, I drilled 5/8″ holes with the rotary hammer and 5/8″ masonry bit.
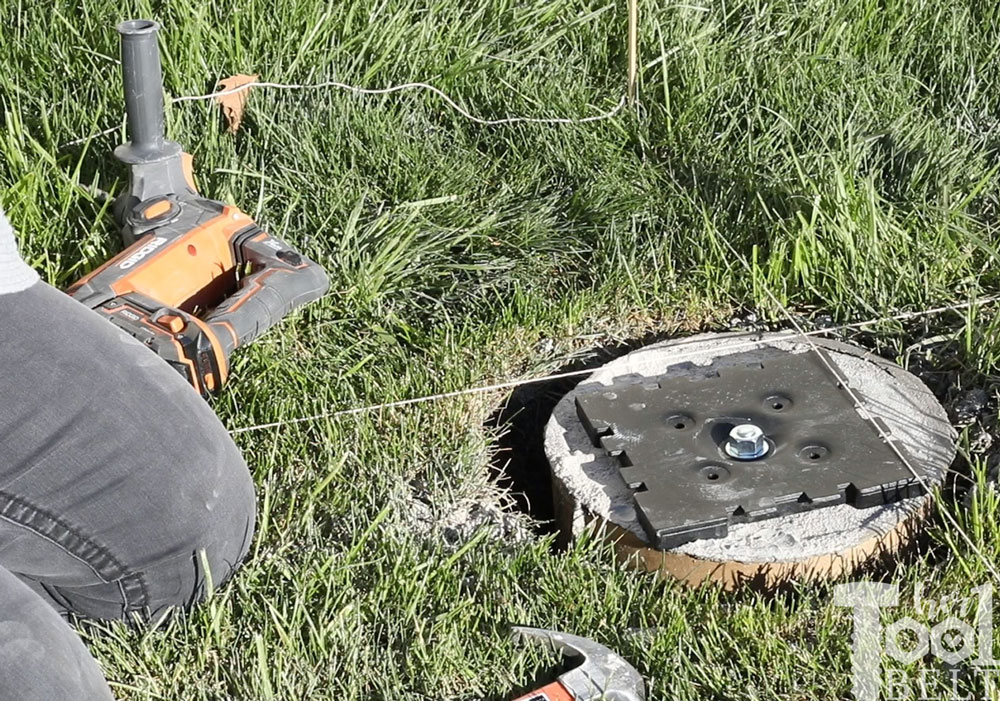
Then placed the 5/8″ x 7″ anchor in the hole, tapped down with a hammer, added the post base, washer and nut. Then used a wrench to tighten down the nut, which in turn expands the anchor in place.
The OWT post base made it easy to set the posts on the bases. However the nut from the concrete anchor stuck up a bit. In the bottom center of each redwood post I drilled a 1 1/2″ diameter hole about 1 1/2″ deep. I put 2-3 of the OWT plates on the sides of the post base, placed the 8×8 post in the center and secured the 4 plates on the posts with the included structural screws.
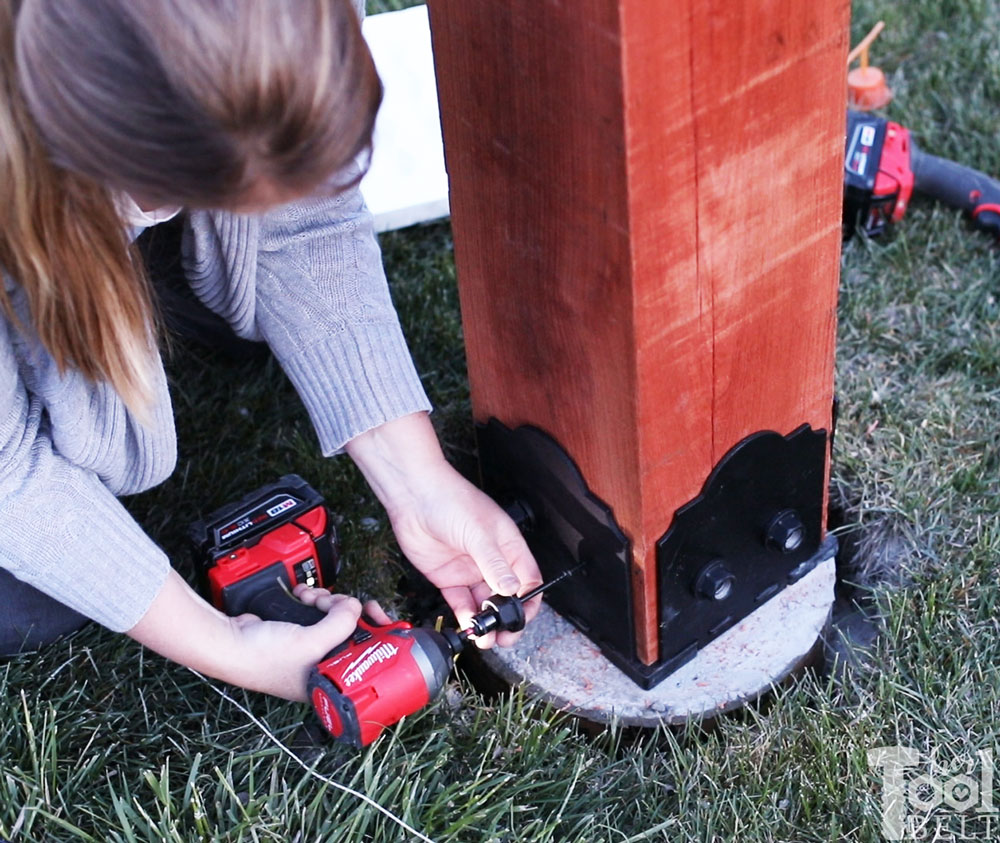 The OWT’s have little caps that hide the screw inside the nut.
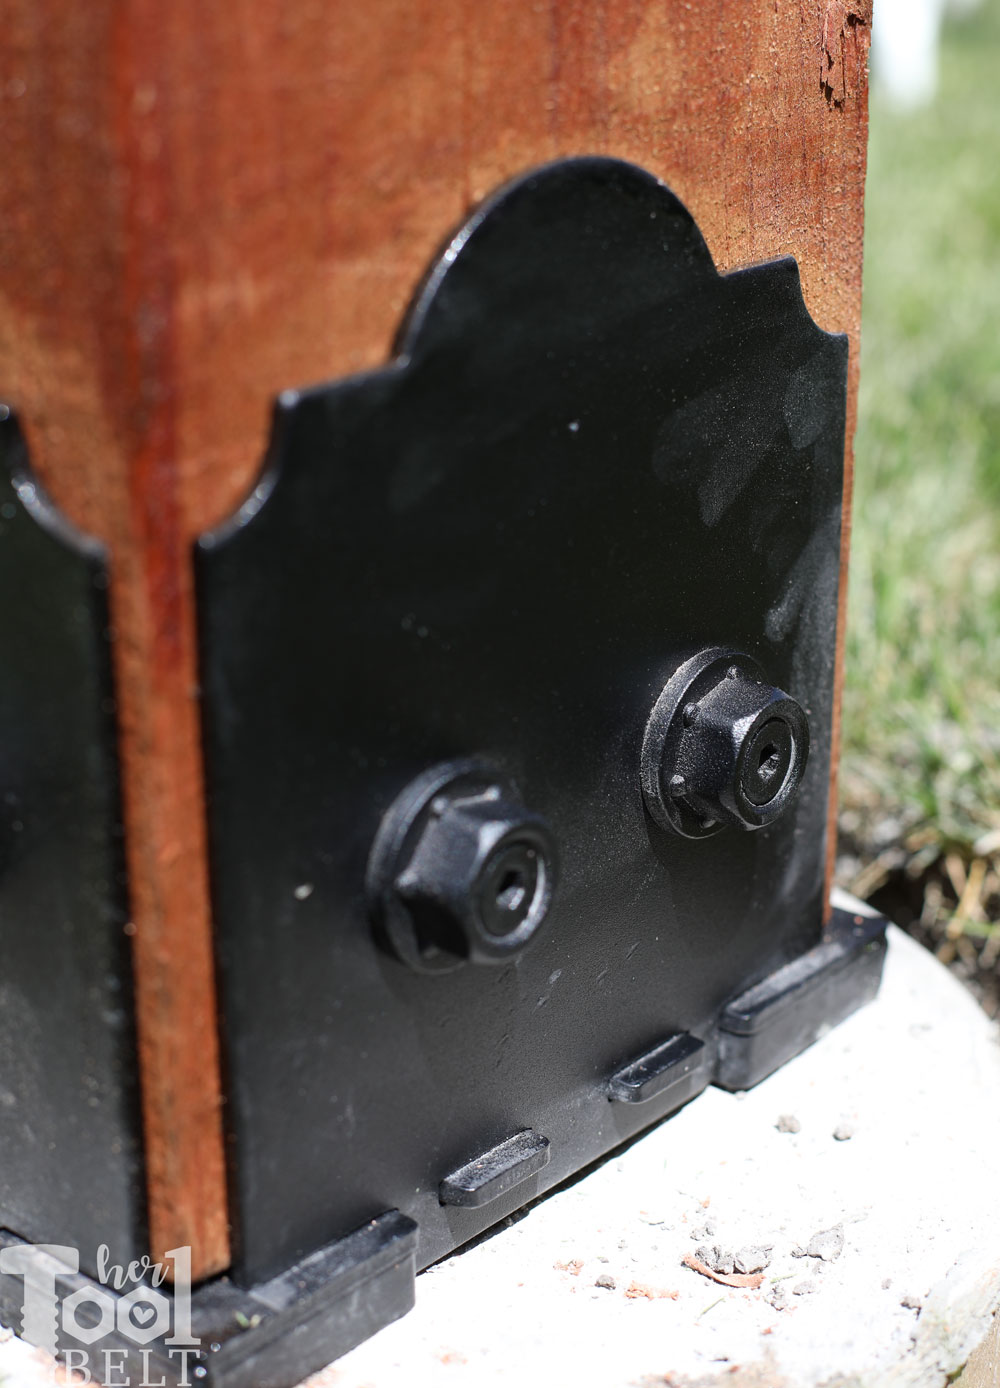
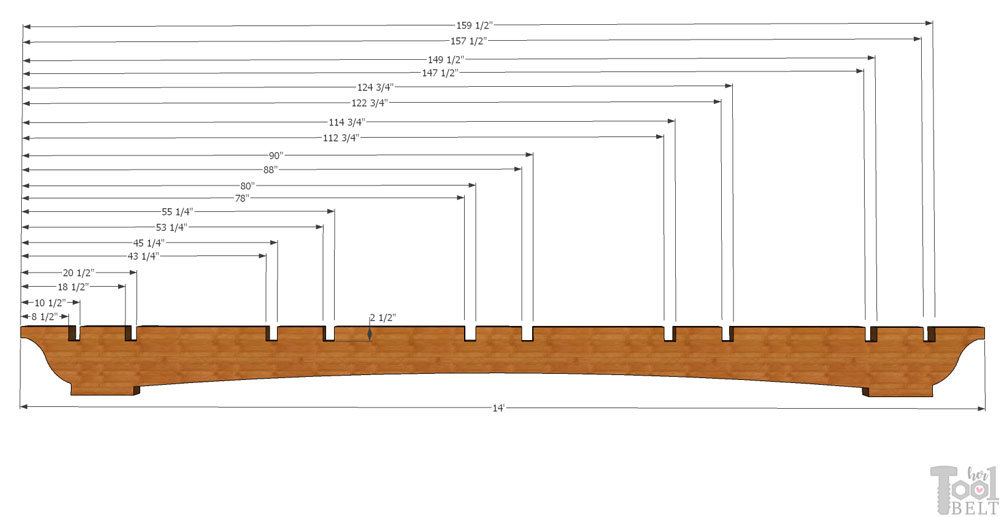
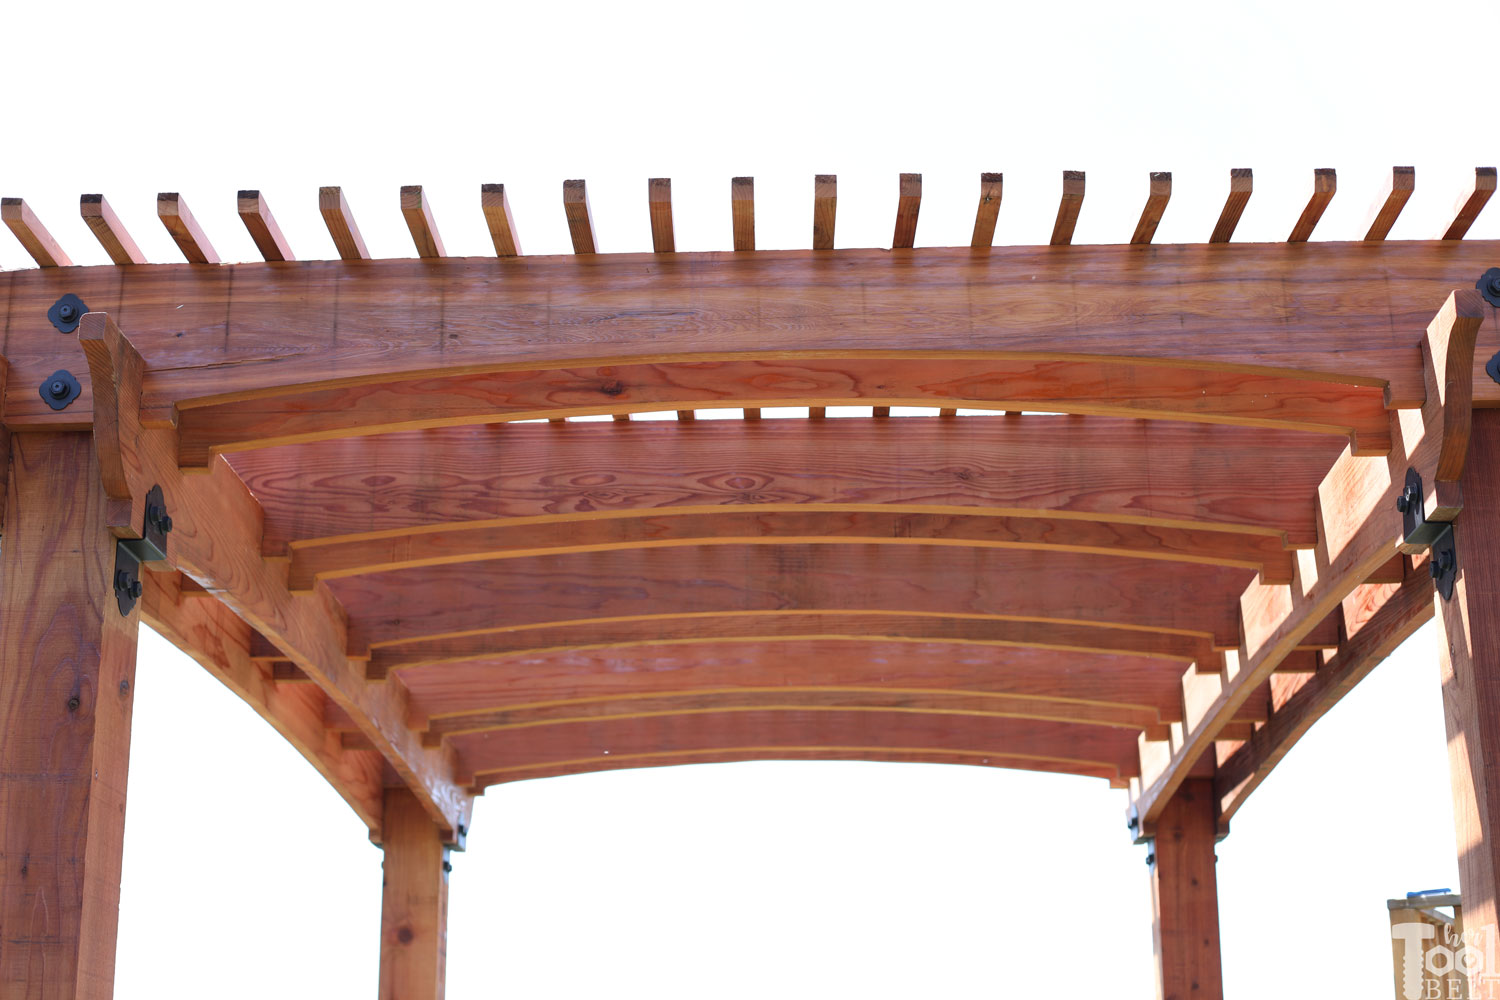
Step 3 – Cutting the Beam Details
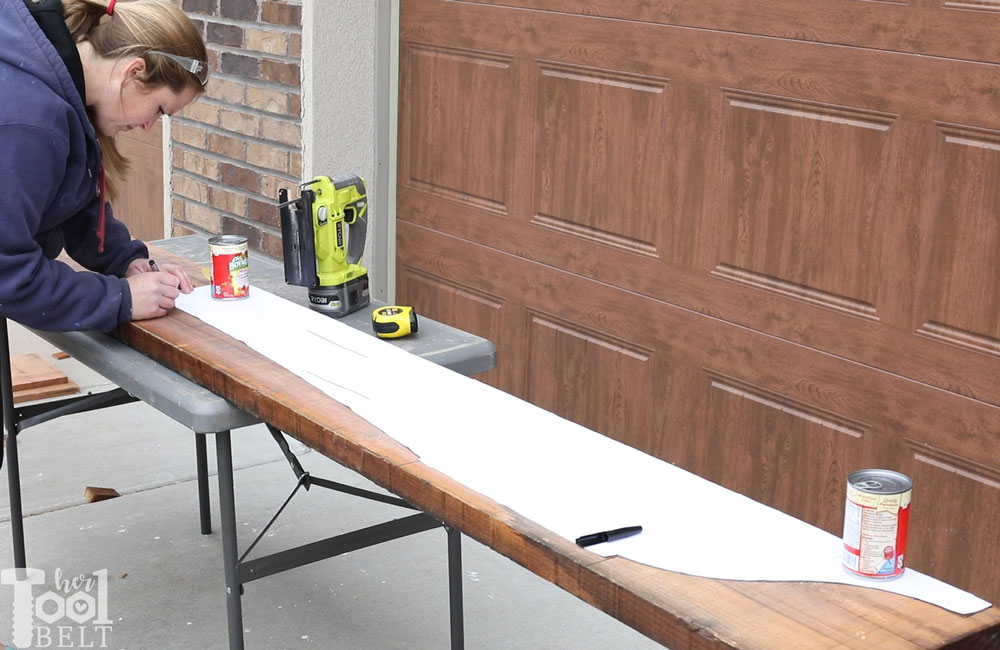
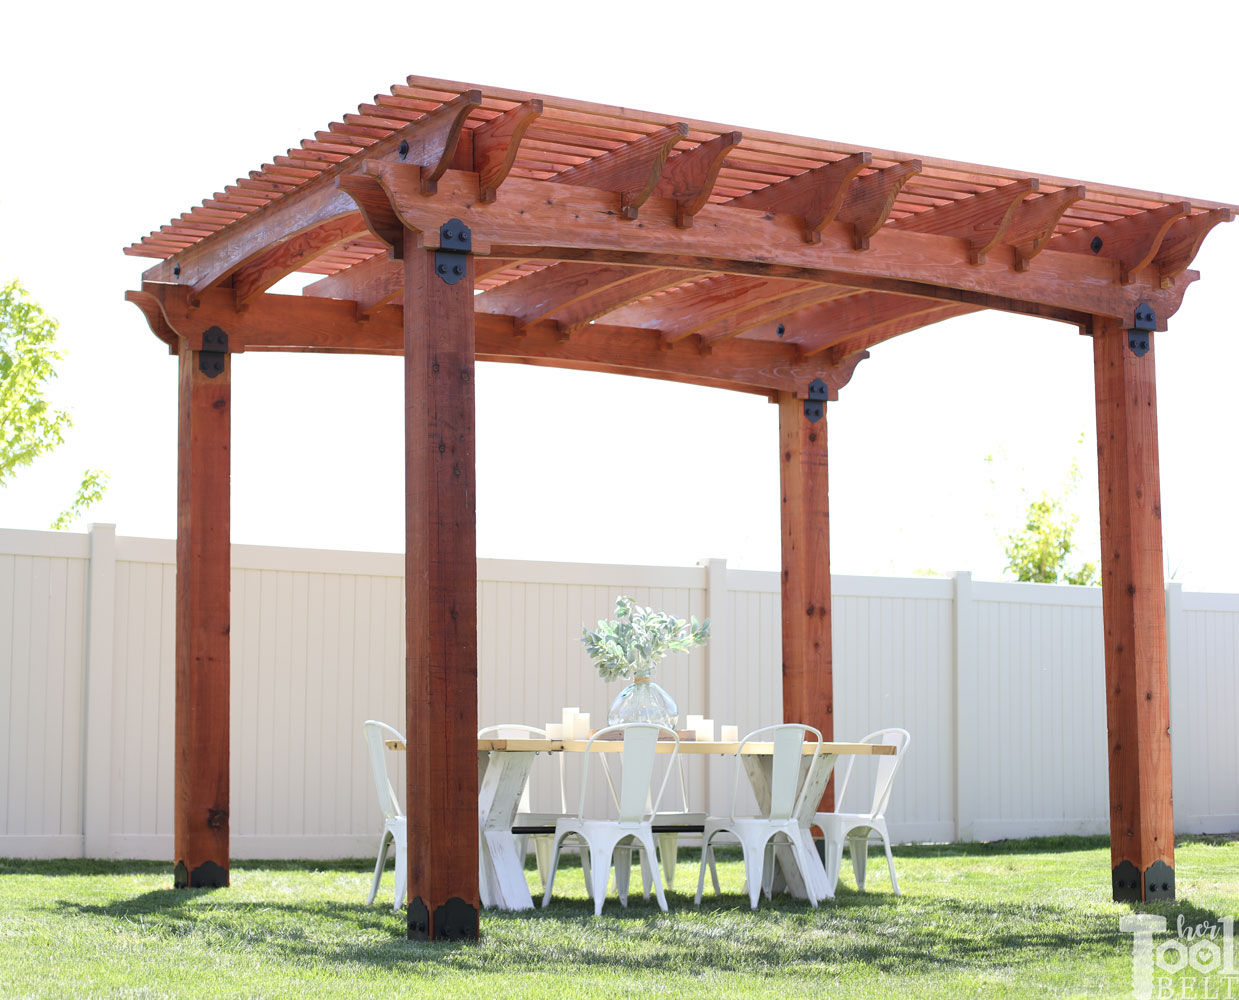
Besides the redwood, I think the real wow factor of this pergola is the arch details in the 2×12 beams! But I can’t do anything without a pattern. The pattern can be printed on 8 1/2″ x 11″ paper, but will have to be taped together. There are little gray alignment lines to help.
Download 14′ beam pattern
Download 12′ beam pattern
Once taped together, cut out the pattern. The patterns are also for 1/2 of the beam, so trace on the left side of the beam, flip the pattern over and trace on the right side.
Cut 4 – 14′ beams
Cut 10 – 12′ beams
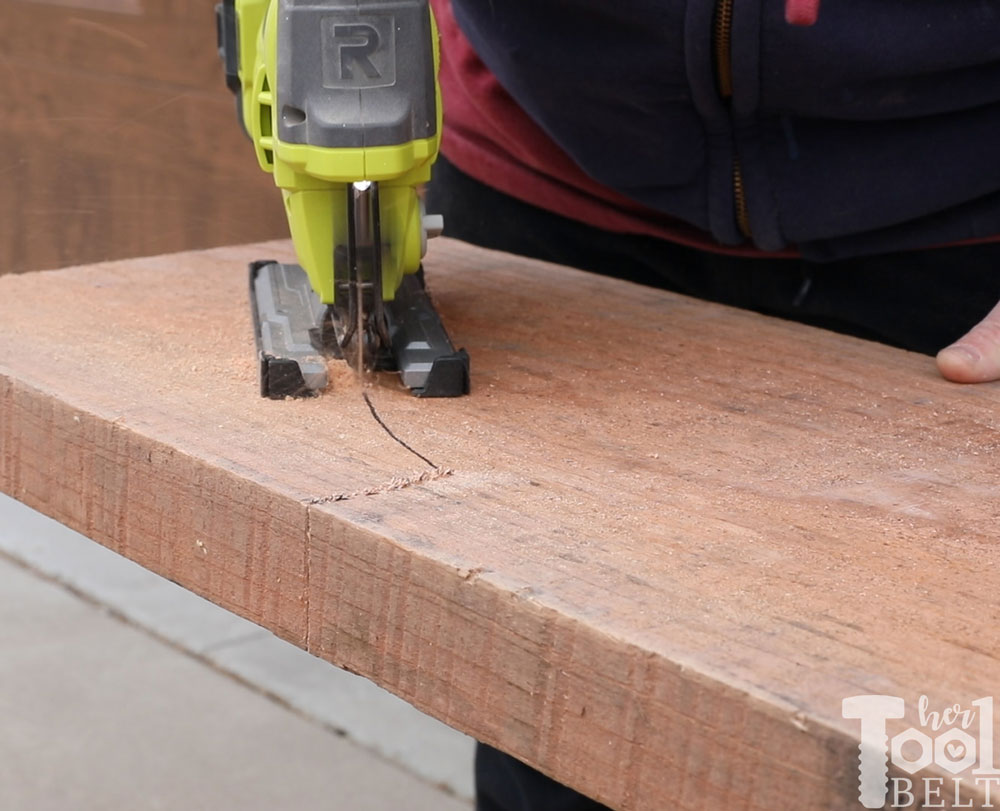
Once I traced the pattern onto the beams, I used a jigsaw to cut it out. The jigsaw I used worked well cutting, but the blade flared out creating an angled cut which was not ideal. I believe there are more robust jigsaws that will cut straight down and have reduced flare (see barrel grip jigsaws).
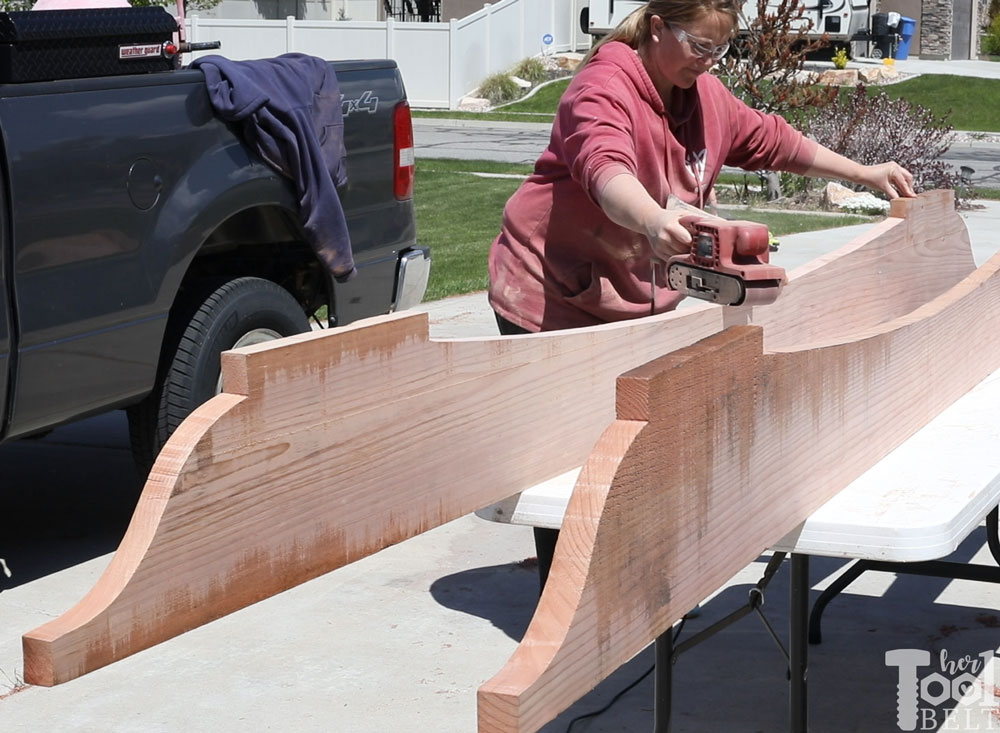
I sanded the curves smooth with a belt sander and a random orbital sander. Once I got a smooth curve for each beam size, I used that for my pattern for the rest of the beams.
14′ Beam Notches
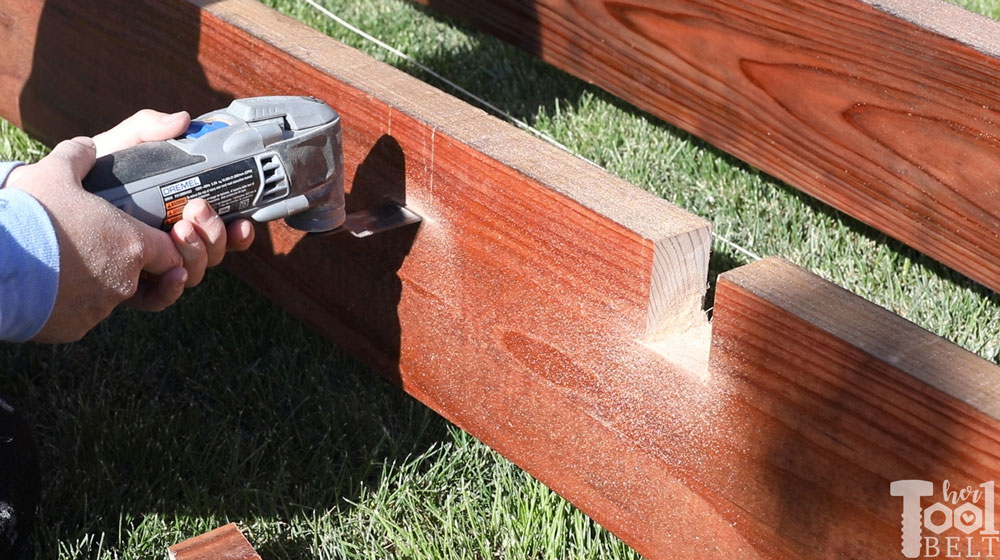
On each of the 14′ beams I measured and marked the locations for each notch. The notches should be about 2″ wide and 2 1/2″ deep. I used the circular saw and square to make the vertical cuts and the Oscillating tool to make the horizontal cuts.
 12′ Beam Notches
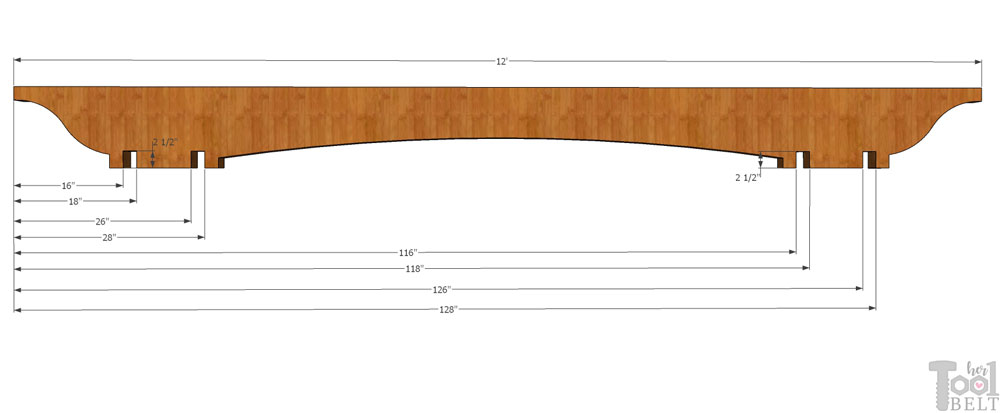
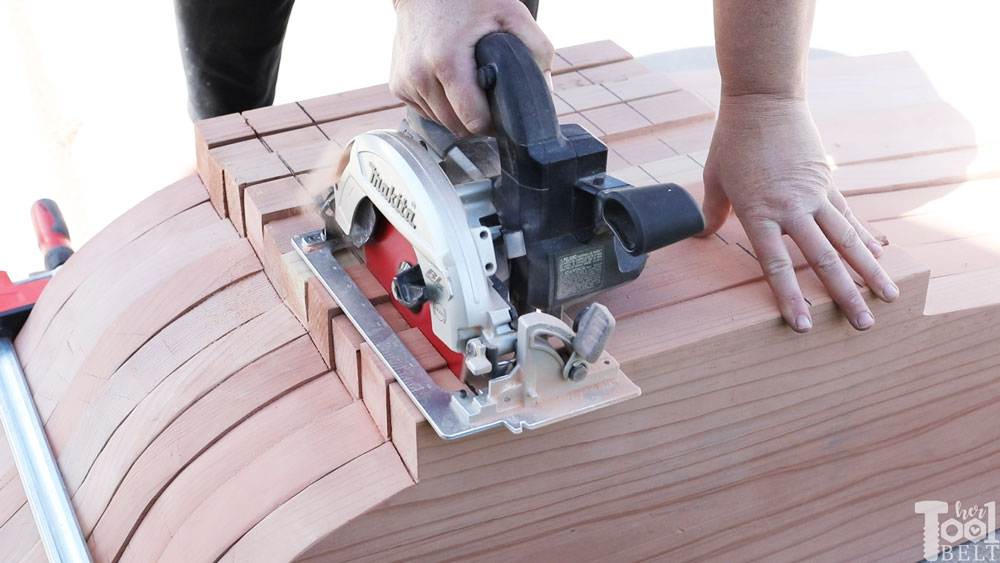
My 12′ boards varied a little bit in board widths, but I wanted to make sure the tops were level once assembled. I lined all of the 12′ beams together setting the beams on the flat top and lining up one end flush with each other. Then I clamped all of the boards together. Some of the beams stood higher than others. I measured/marked the location of the notches and used the circular saw to ‘gang’ cut all of the beam notches at once.
Then I used the oscillating tool to make the horizontal cuts.
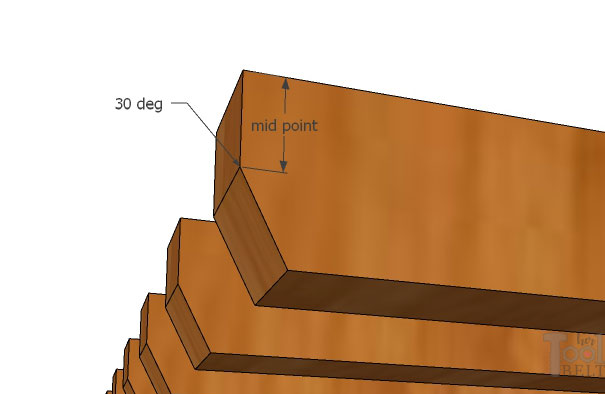
Step 4 – Prepare 2×2 Rafters/stain
On each end of the 2×2 rafter boards, I cut a 30 deg miter starting at the midpoint.
Stain
At this point you may want to apply stain and sealer to all of the boards and posts. However if you prefer, you can apply it after the pergola is assembled.
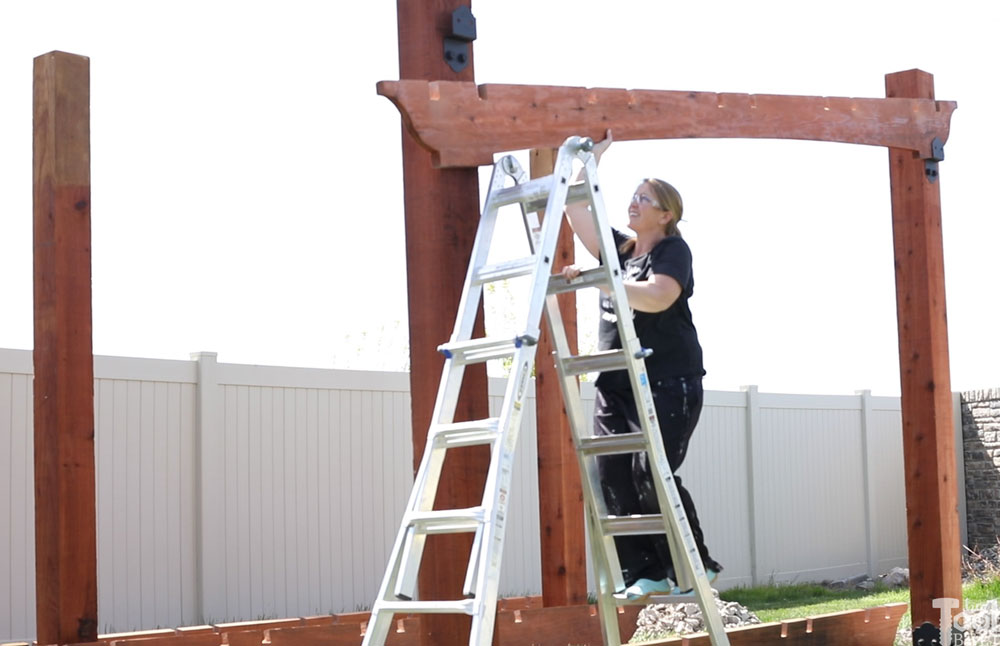
Step 5 – Redwood Pergola Assembly
14′ Beams
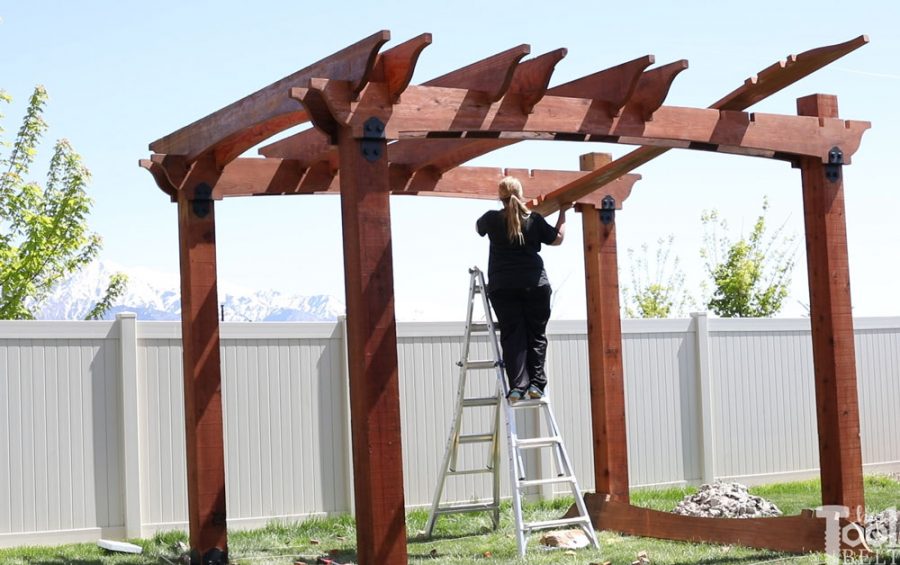
Now starts the real fun, assembly! I marked up on the posts 113″ from the ground (and used a laser level to make sure it was level across all of the posts.
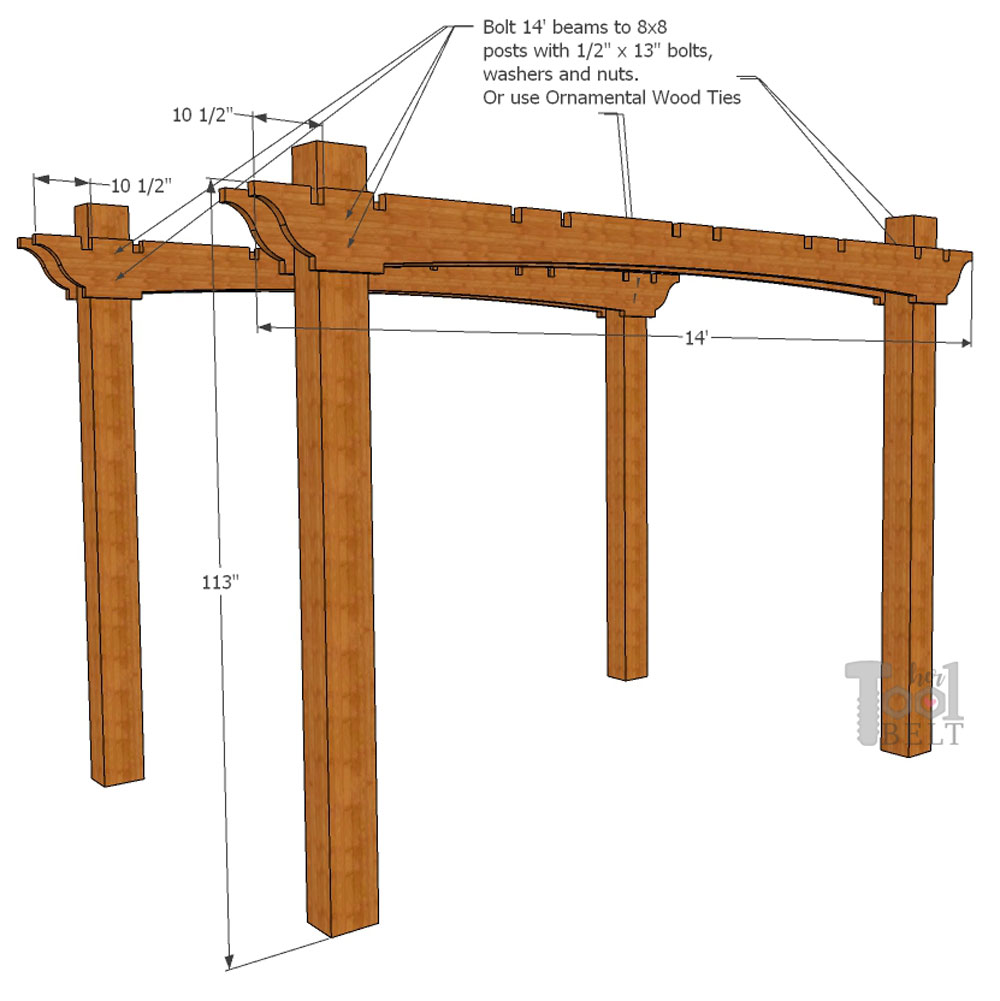
Then I mounted the deck joist ties with 3 1/2″ structural screws about 12″ down from my level line (or the width of my beam, the exact width may vary). You want the top of the 14′ beam to line up with the level mark. Mounting the brackets first made it easy for me to lift the beams in place. I placed one end of the beam in a bracket and lifted the other end into the other bracket.
Once the beams were setting on the brackets, I lined up the notches with the posts and secured the 14′ beams to the brackets and beam with 5 1/2″ structural screws.
12′ Beams
Slide the 12′ beams into place.
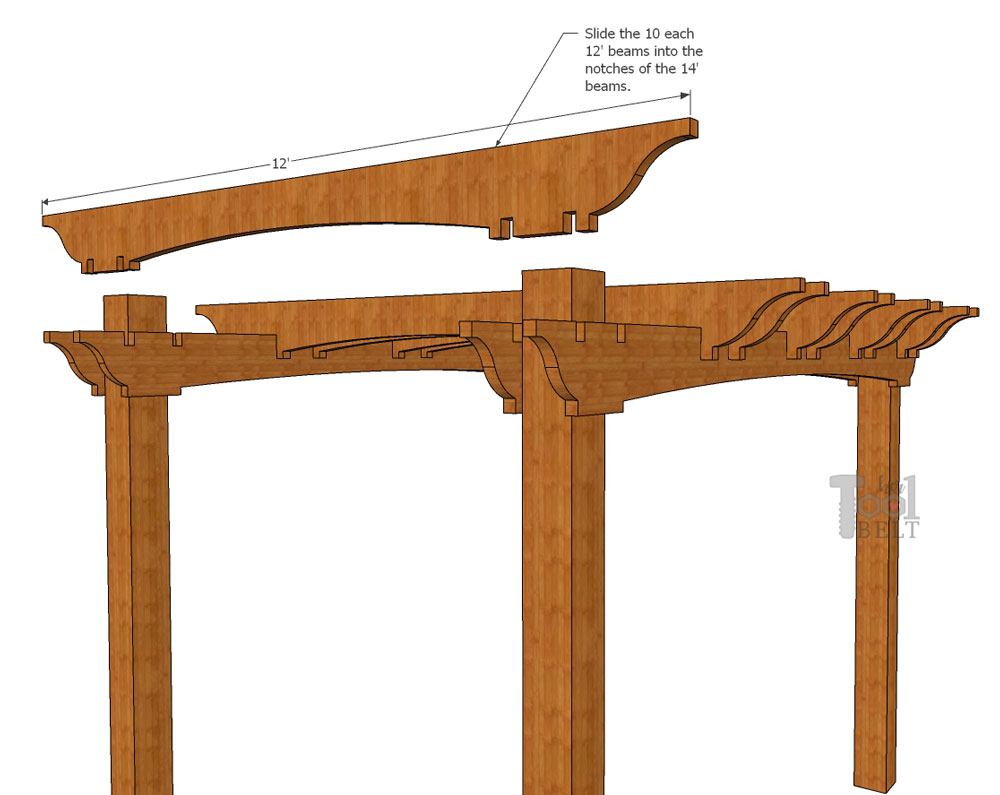
Again, if I placed one end of the beam up on the 14′ beam, then I could lift the other end up on top. Then I would line up the notches and drop into place.
Not all wood is perfectly straight, some persuasion or notch trimming may be necessary. 🙂
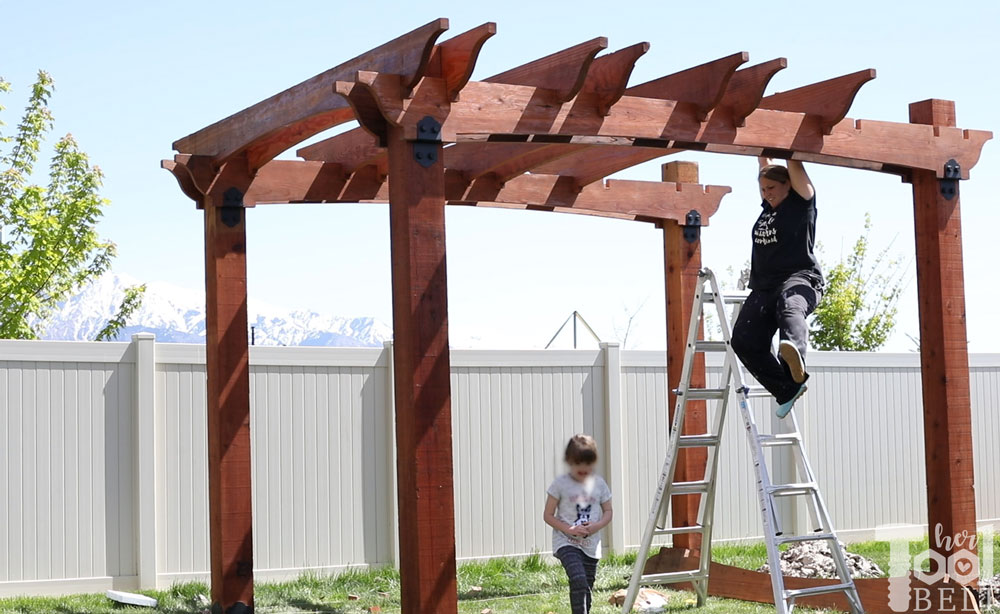
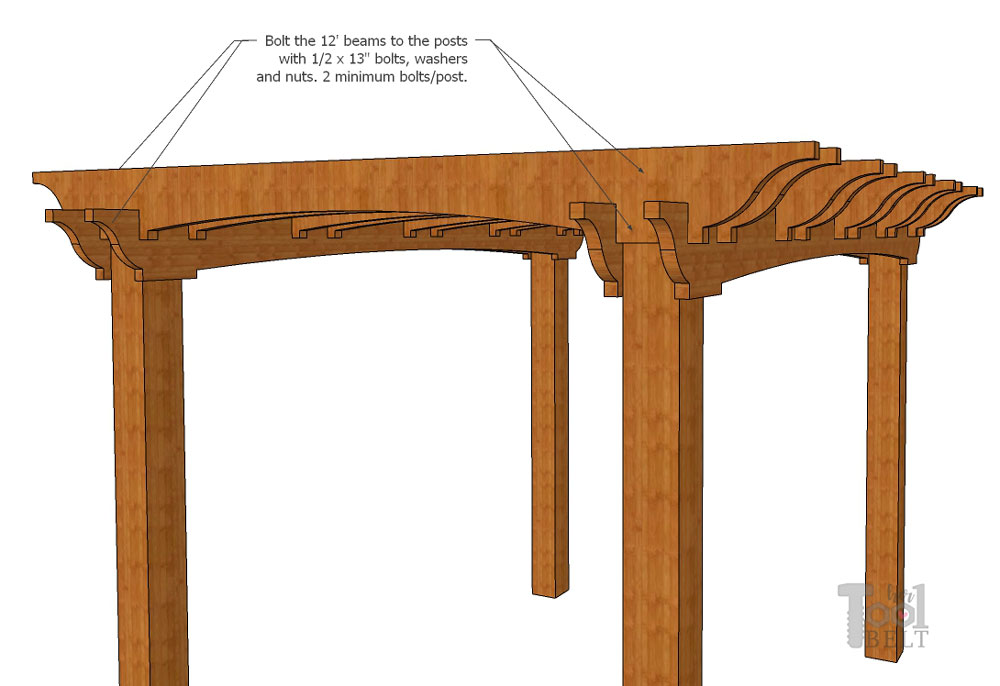
I used 5 1/2″ structural screws with the ornate washers to secure the 12′ beams to the posts. Use 2 screws on each side. If needed, toenail any of the 12′ beams to the 14′ beams with a 3″ exterior screw.
2×2 Rafters
Finally time to add the rafters. Start the first rafter 2″ from the ends of the 12′ beams and 8 1/2″ from the side of the beam. Secure the rafters to the 12′ beams with 3″ exterior screws. Spacing the rest of the rafters 4″ from each other. I drilled pilot holes in the 2×2 rafters before screwing them to the beams to reduce wood cracking.

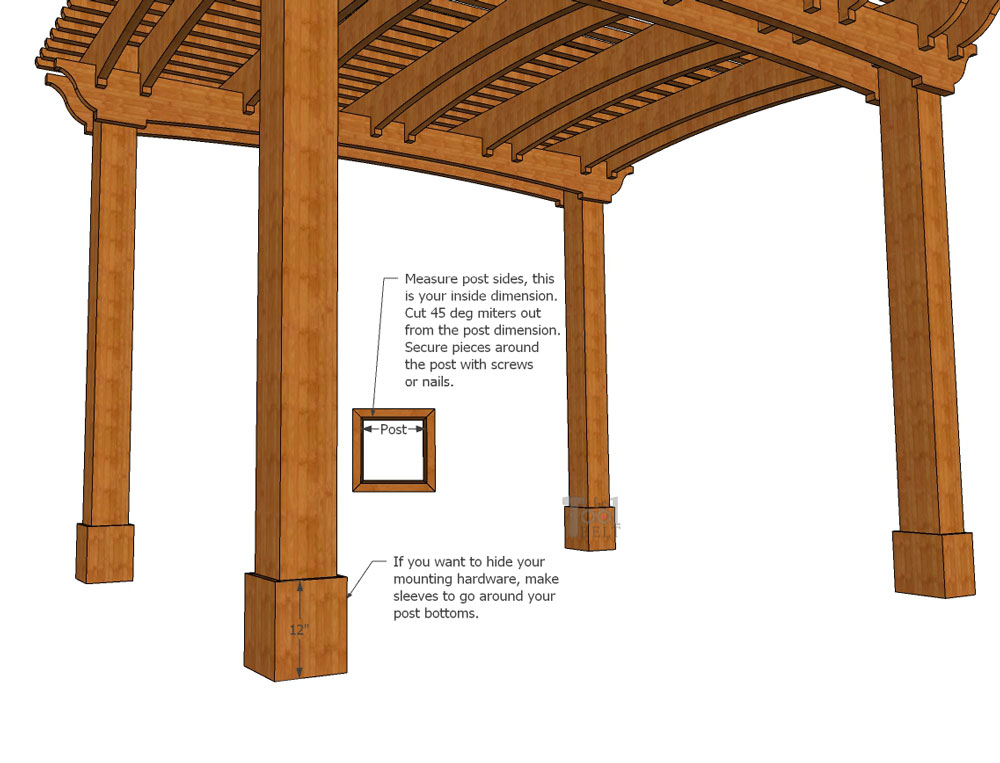
If you use standard hardware, you may want to create a sleeve around the bottom of the posts to cover up the hardware. Measure the width of each post and this will be the inside dimension of your cut. Cut 45 deg miter cuts out from the post dimension (about 8″). Cut 4 of these for each post. Secure to the bottom of the post with exterior screws or nails.
 Although the notches were a bit of work up front, it made assembly go very quickly.
Now it’s time to relax and enjoy this awesome redwood pergola!!!
What would you put under your redwood pergola?
I’m excited to have this area as a outdoor dining space. I need to work on some hardscaping and a fire pit next!!!
Thanks for pinning!
This post is brought to you by Humboldt Redwood and The Motherhood. All opinions are my own.
Beautiful build from some really helpful plans. If you’re still thinking about other arbor-y uses for the same elements as you noted, maybe a covered swing?
I saw the pergola that inspired this on your other link. I love that you notched the beams, it looks 200% better than the original inspiration! Well done!
Thank you!
Hello
Your Pergola is amazing. We are planning something very similar. Could you tell me? Are your 2×12 boards actually 2 inches thick? I know that finished lumber is actually 1 1/2 inch thick. Were just decanting between 2 inch thick and 2 1/2 ice thick
Hi,
My boards were rough cut lumber, so close-ish to 2″ thick. I had some surface defects, and ran them through the planer, bringing them down closer to 1 1/2″ thick. I would’ve left them 2″ otherwise.
I couldn’t find the printable cut sheet for the arches on the 14 and the 12
Do you have a rough estimate of how many hours this project took you?
I’m not sure exactly, probably around 40 hours.
Can you tell me where you purchased the decorative hardware?
It’s available at Home Depot.