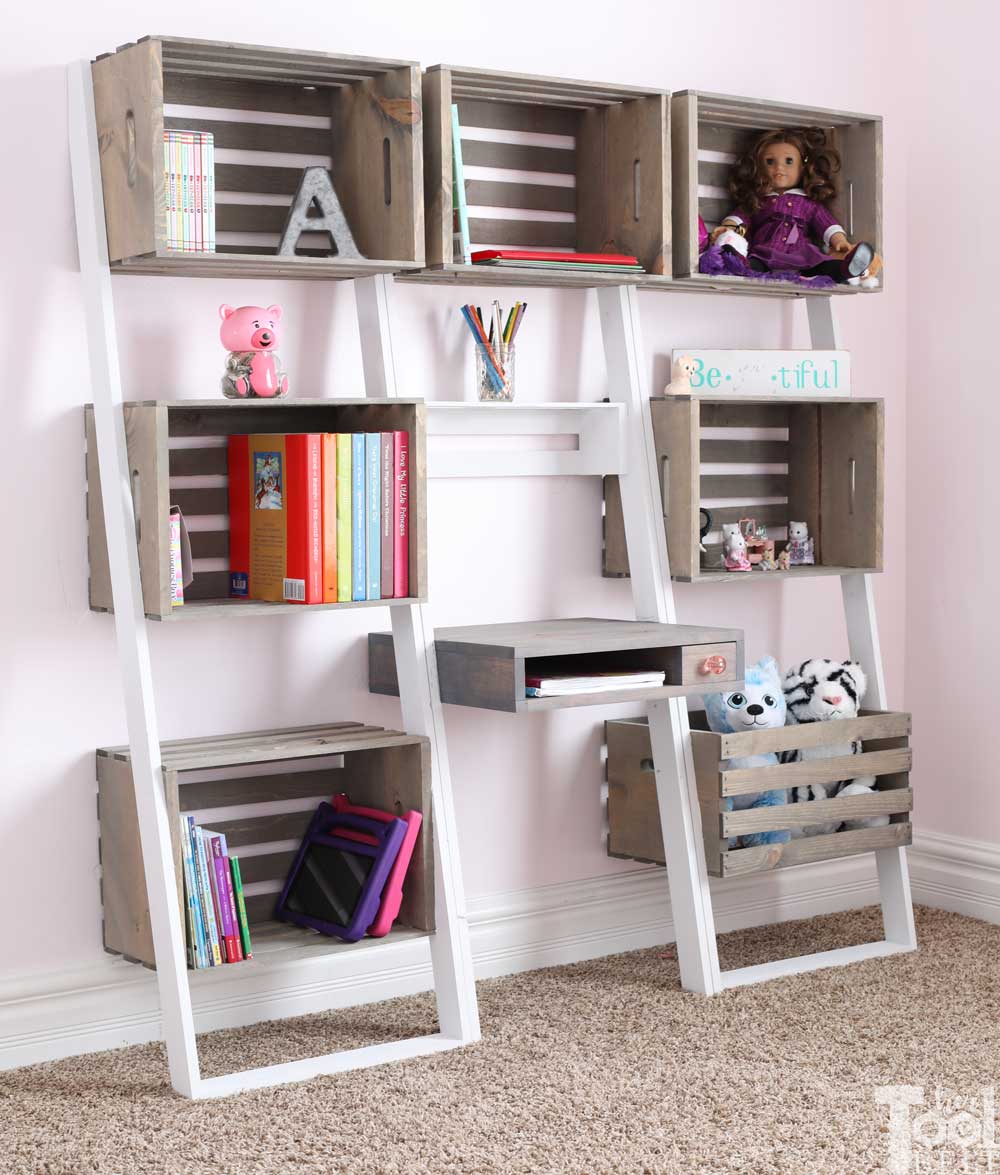
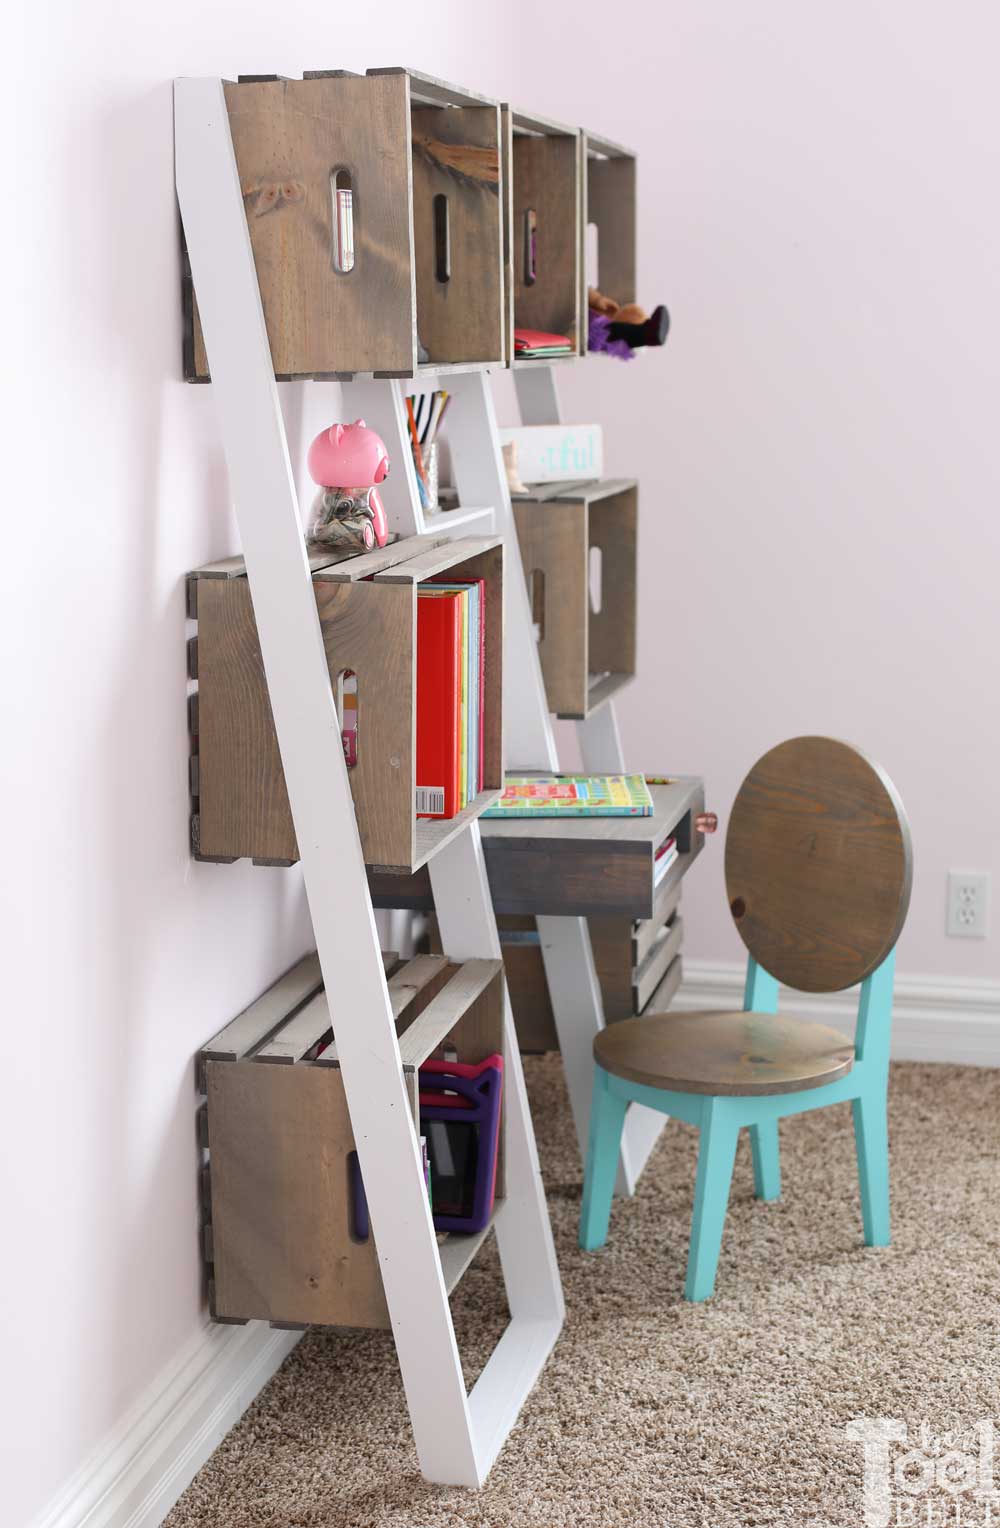
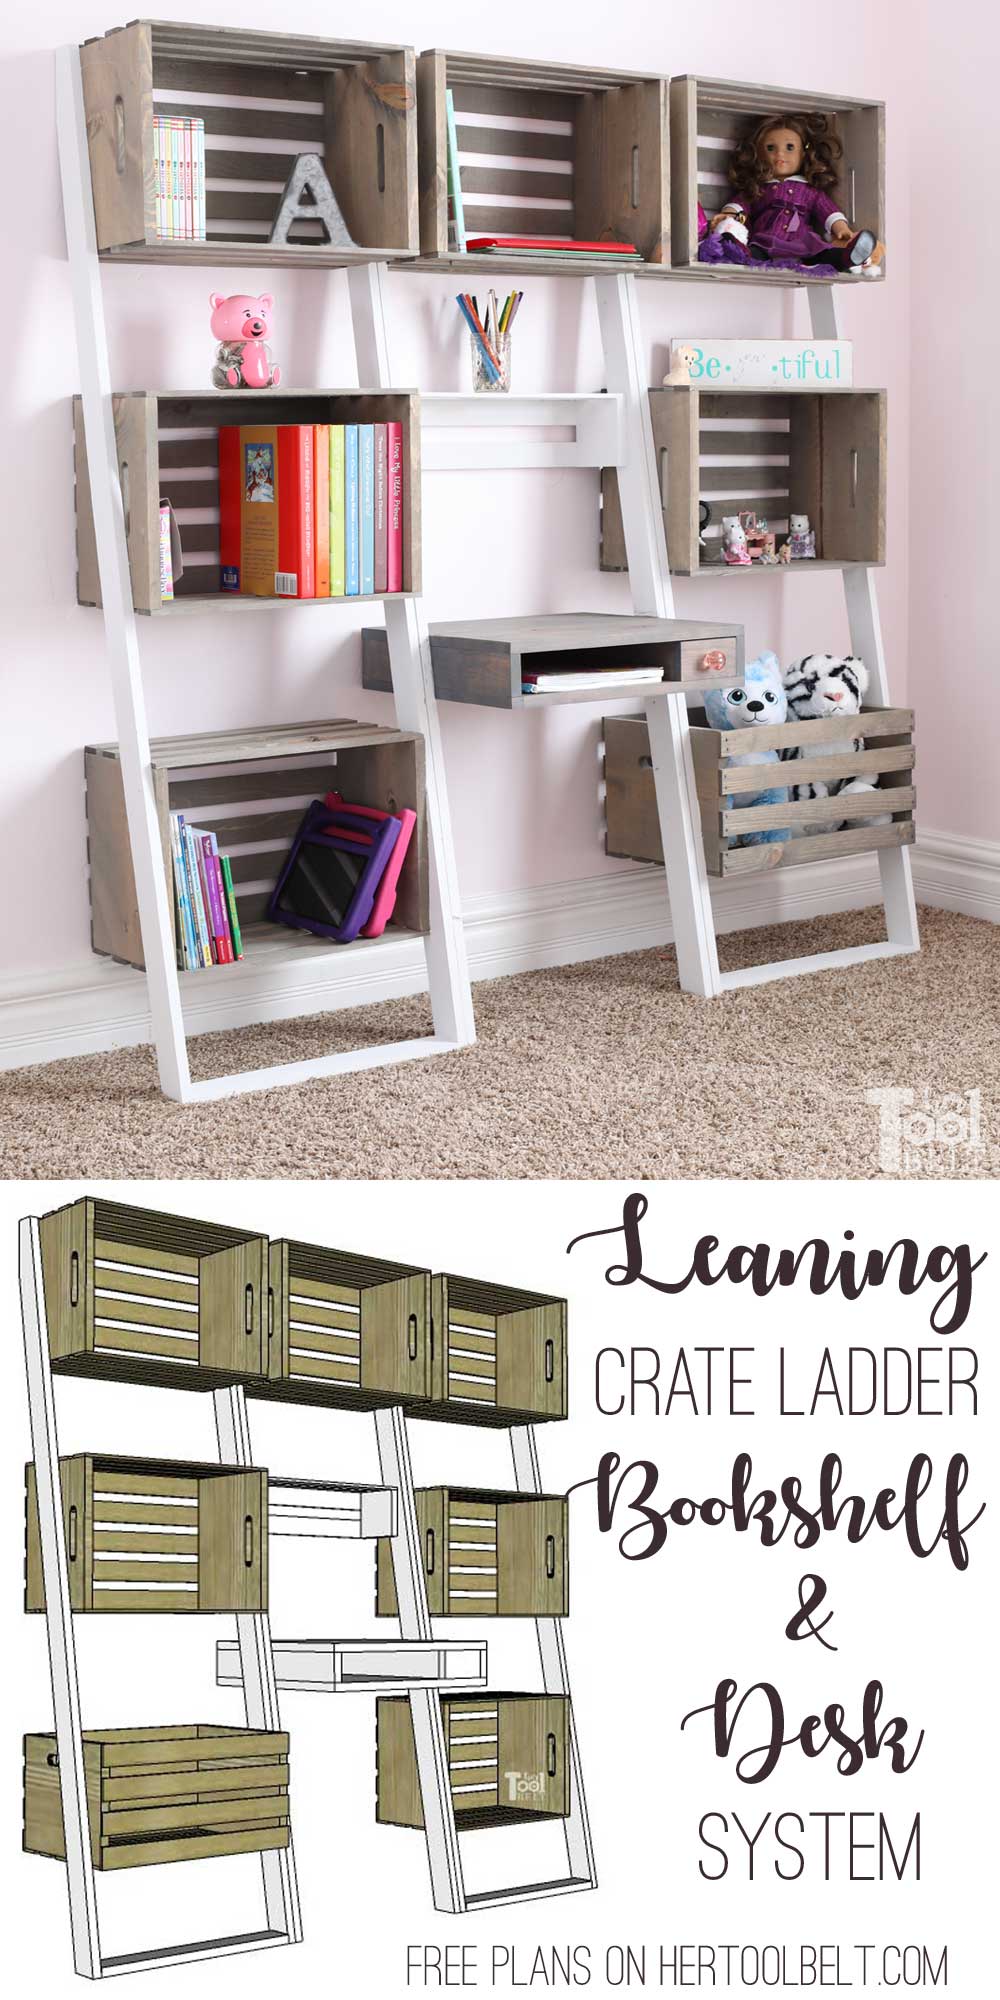
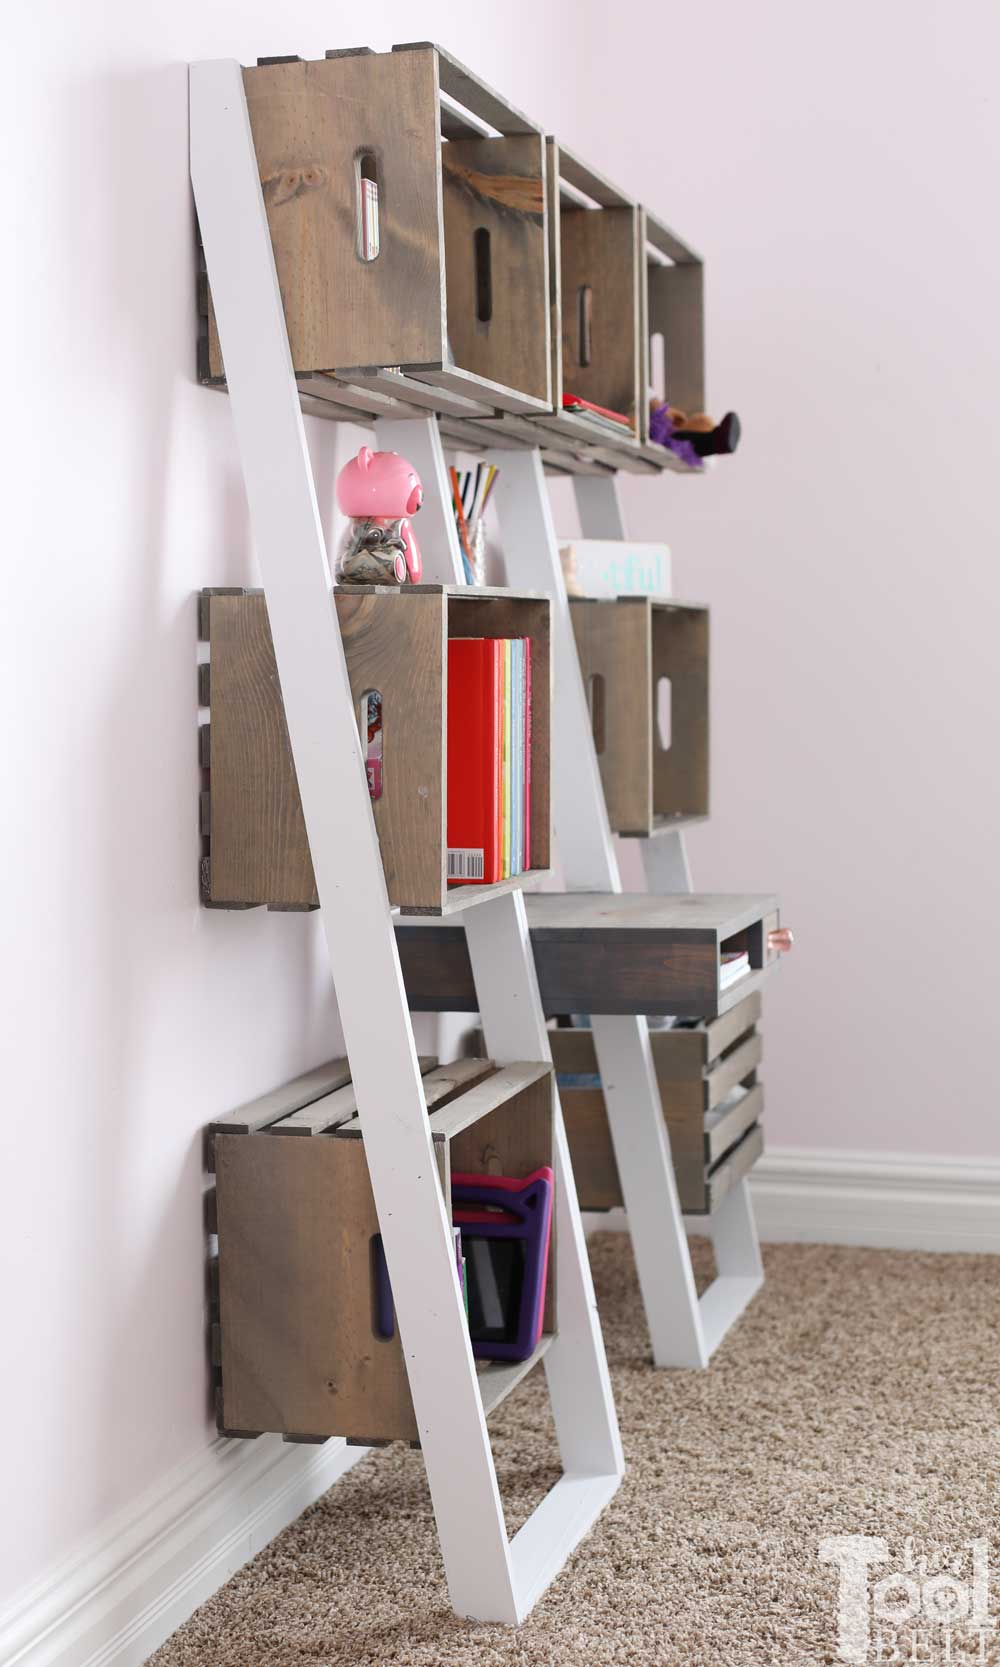
A few years ago I used some crates to make a leaning ladder shelf for my daughters room. As she got older, I noticed that she started using the middle crate (shelf) as a desk to color and do homework. I realized that I could rework the leaning shelf a little to make a proper desk. To add more storage options to her room, I made 3 leaning shelves, a desk, bookshelf and bookshelf with a storage bin. These leaning ladder shelves are made with large crates, they are easy to make and modular.
 Here is the updated leaning crate ladder bookshelf and desk system.
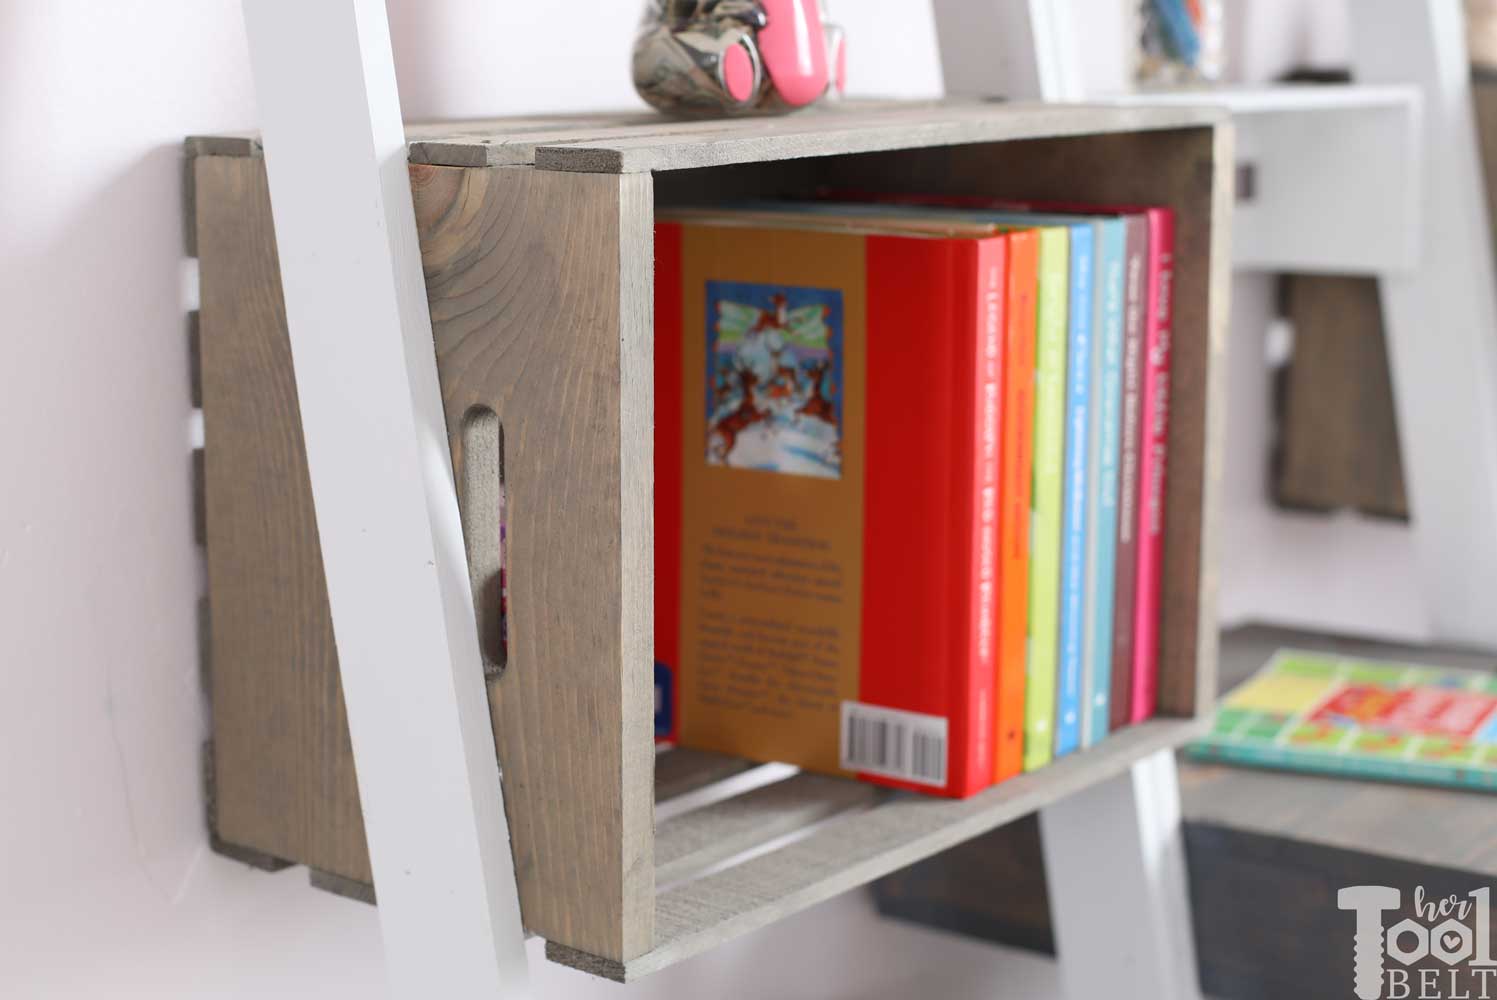
For this project I used these fun weathered gray crates. I love that they are already stained and ready to use!
The crates used in the project were graciously provided by Crates & Pallet. This post contains some affiliate links for your convenience. Click here to read my full disclosure policy.
How to Make a Leaning Crate Ladder Bookshelf and Desk System
Materials
- 7 Large Weathered Crates
- 1 Half Wall Crate (for desk option)
- 6 – 1×3 boards
- 1 – 1×6 x 10′ board (for desk option)
- knob
- 1 1/4″ brad nails or screws
- wood glue
- paint or stain
Tools Used
- Miter Saw
- Jig Saw (optional)
- Brad Nailer
- Sander (optional)
- Tape Measure
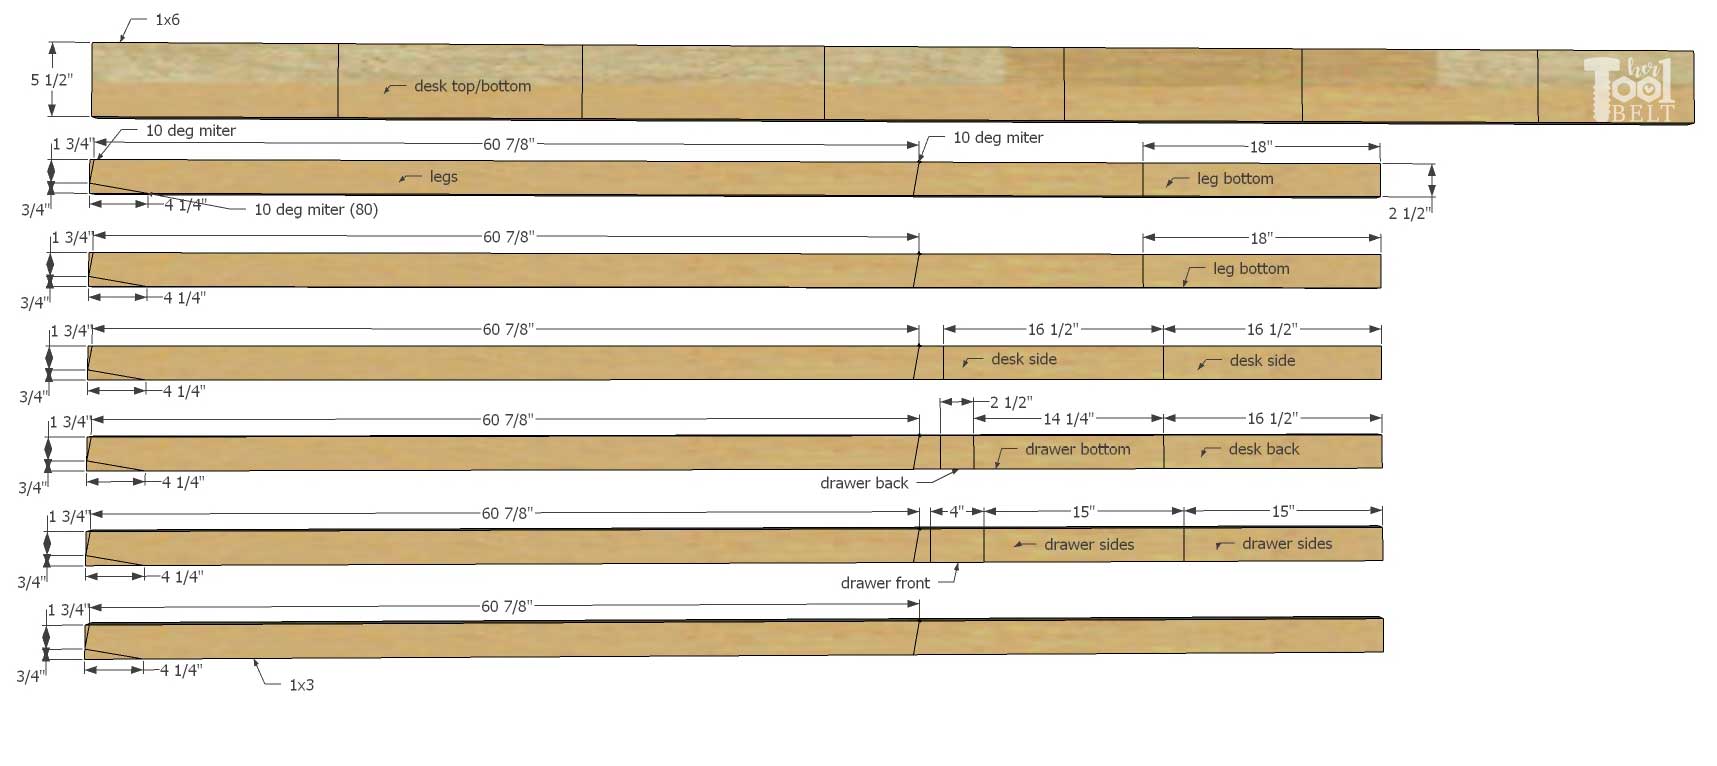
Cut List and Diagram
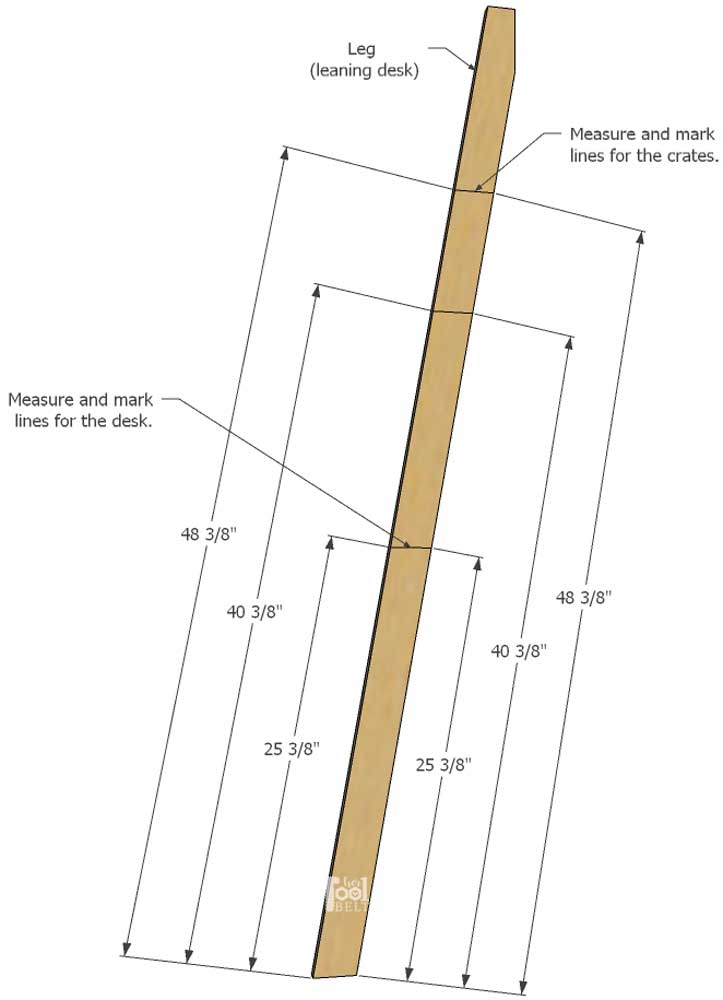
Legs – for each leaning shelf (I cut 6 legs and 2 – 18″ leg bottoms)
- 1 – 3/4″ x 2 1/2″ x 18″ (leg bottom)
- 2 – 3/4″ x 2 1/2″ x 60 7/8″ both ends cut at a 10 deg miter (leg)
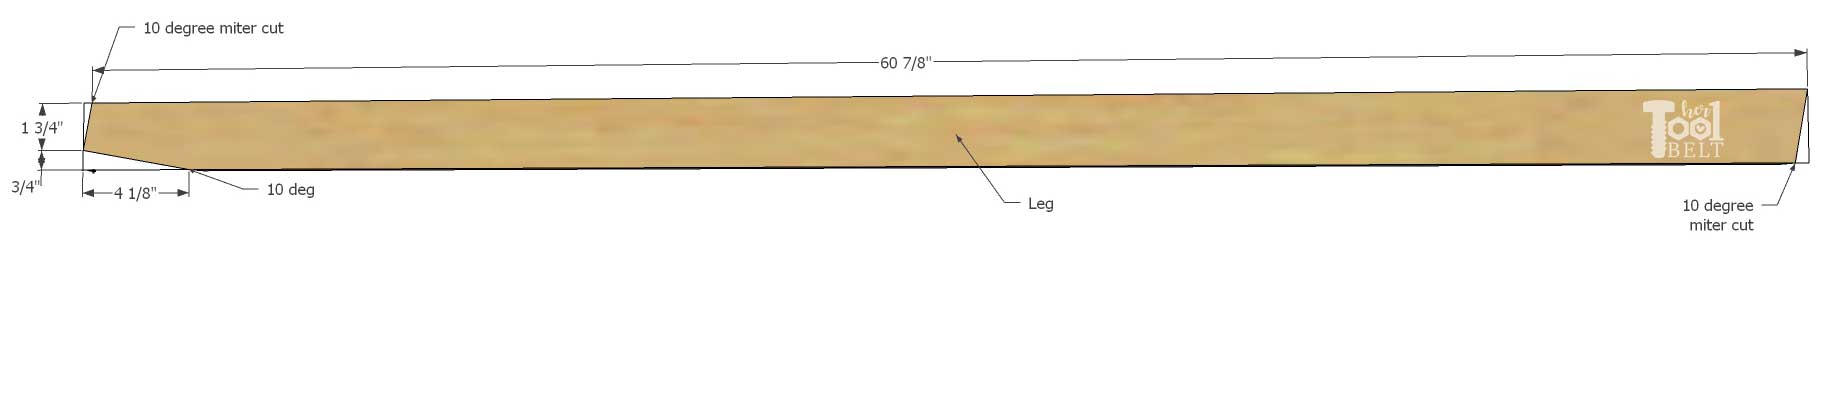
- Alternate leg – if you can’t cut that back 10 degree miter (3/4″ x 4 1/8″)

Desk
- 6 – 3/4″ x 5 1/2″ x 18″ (desk top/bottom) (this can be substituted with 2 – 16 1/2″ x 18″ pieces of plywood)
- 3 – 3/4″ x 2 1/2″ x 16 1/2″ (desk sides and back)
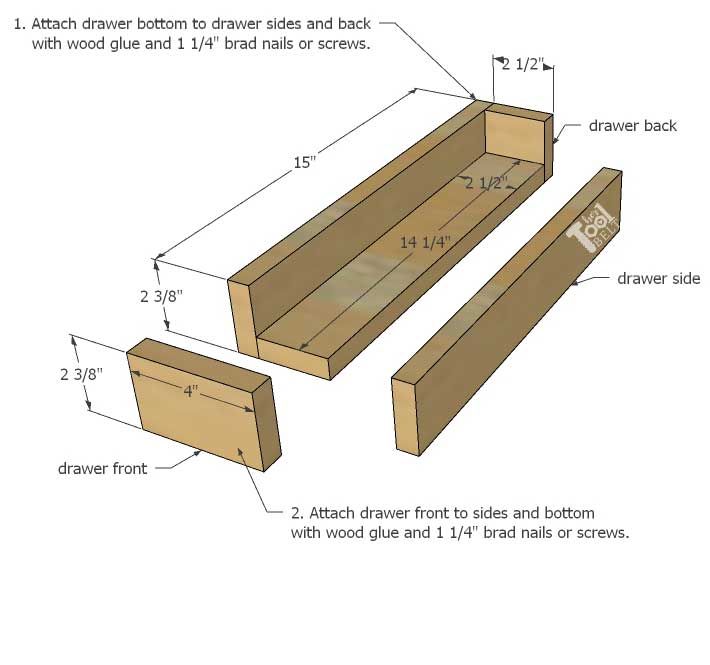
Drawer
- 2 – 3/4″ x 2 3/8″ x 15″ (drawer sides)*
- 1 – 3/4″ x 2 1/2″ x 14 1/4″ (drawer bottom)
- 1 – 3/4″ x 2 3/8″ x 2 1/2″ (drawer back)*
- 1 – 3/4″ x 2 3/8″ x 4″ (drawer front)*
- (*Note the width of the drawer sides, back and front pieces needs to be trimmed down or sanded down so it will slide into the desk opening.)
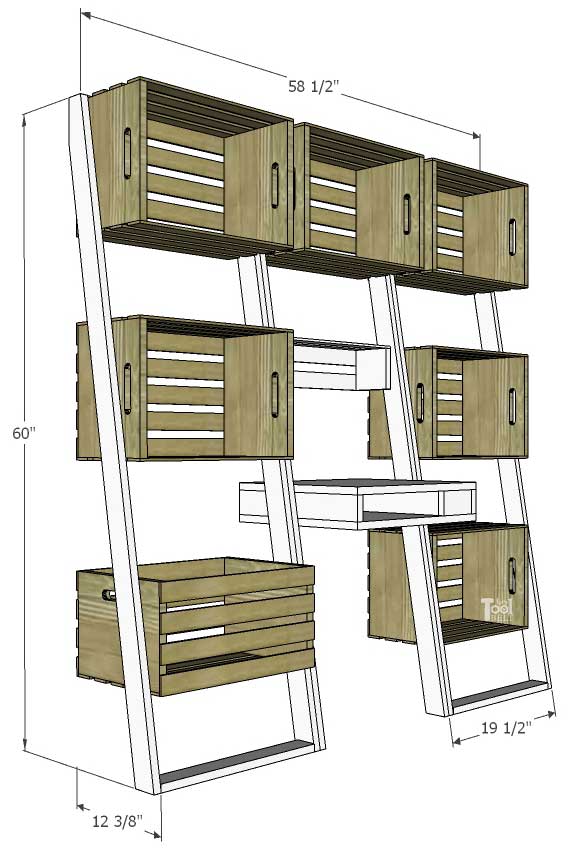
Cut Diagram for 2 leaning bookshelves and 1 leaning desk.
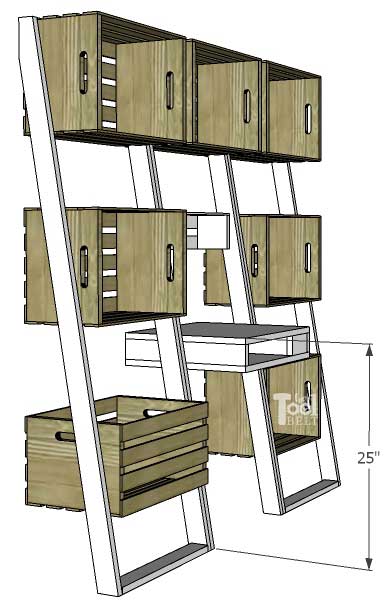
Leaning Crate Ladder Desk
The height of the desk is 25″ (for a child). Adult desk height is about 30″.
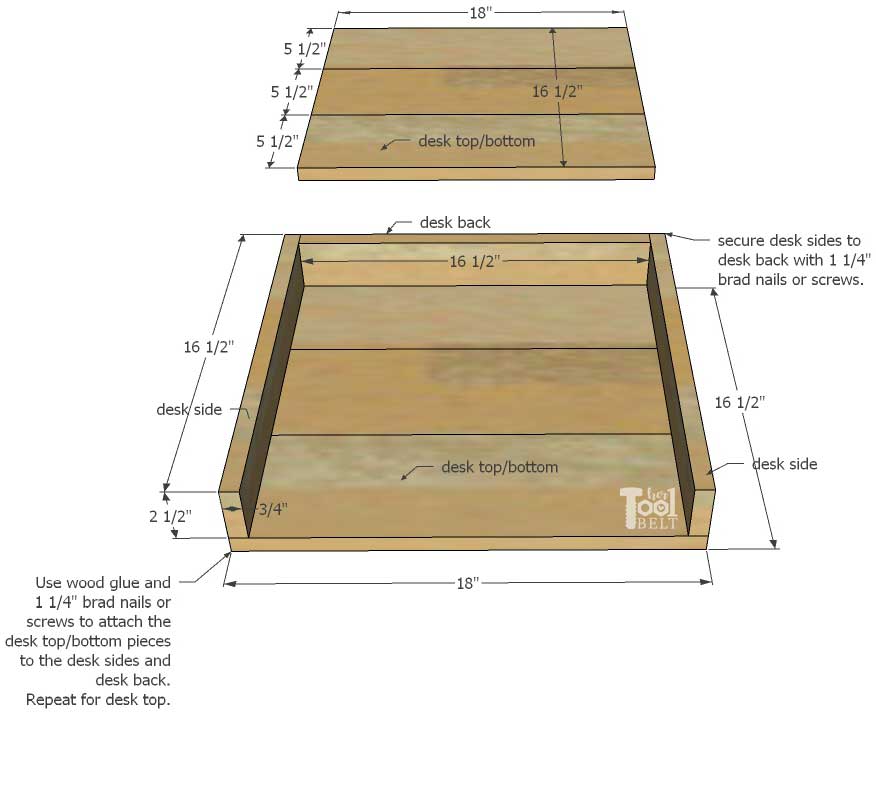
Assemble the desk portion
- Glue 3 – desk top/bottom pieces together.
- Use wood glue and 1 1/4″ brad nails or screws to attach the desk sides and back (16 1/2″) to the desk bottom.
- Secure the desk sides to back with 1 1/4″ brad nails or screws.
- Use wood glue and 1 1/4″ brad nails or screws to attach the desk top to the sides and back.
Assemble the drawer – optional
- The drawer sides, back and front pieces need to be trimmed down to 2 3/8″.
- Attach drawer bottom to drawer sides and back pieces with wood glue and 1 1/4″ brad nails or screws.
- Attach drawer front to sides and bottom with wood glue and 1 1/4″ brad nails or screws.
Mark the legs and crates for assembly
Starting from the bottom of the legs, mark the inside of 2 legs with the following dimensions: 25 3/8″, 40 3/8″ and 48 3/8″. Measure and mark from each side of the leg bottom, then connect the marks to make a 10 deg line.
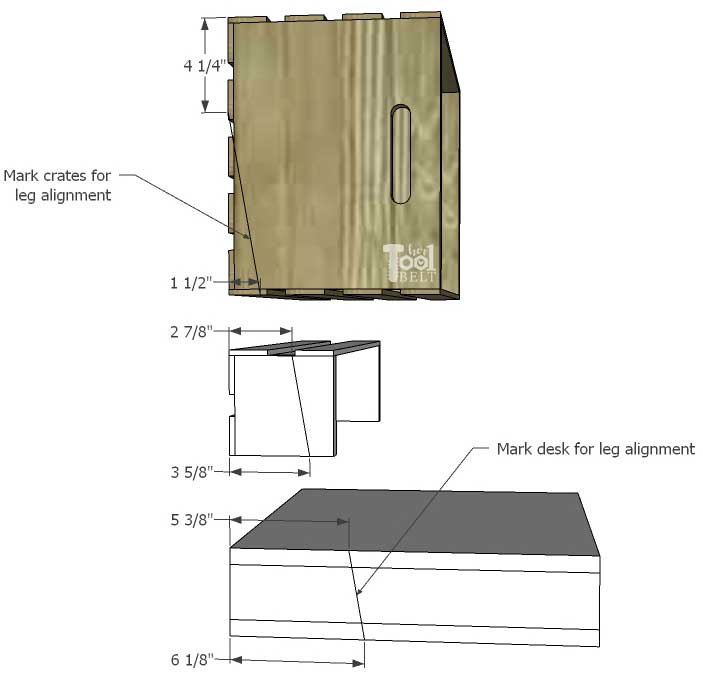
- Large crate – On the sides, mark down from the top back corner 4 1/4″ and mark over 1 1/2″ from the lower back corner. Connect the marks and repeat for other side.
- Half wall crate – On the sides, mark over from the top back corner 2 7/8″ and mark over 3 5/8″ from the lower back corner. Connect the marks and repeat for other side.
- Desk – On the sides, mark over from the top back corner 5 3/8″ and mark over 6 1/8″ from the lower back corner. Connect the marks and repeat for other side.
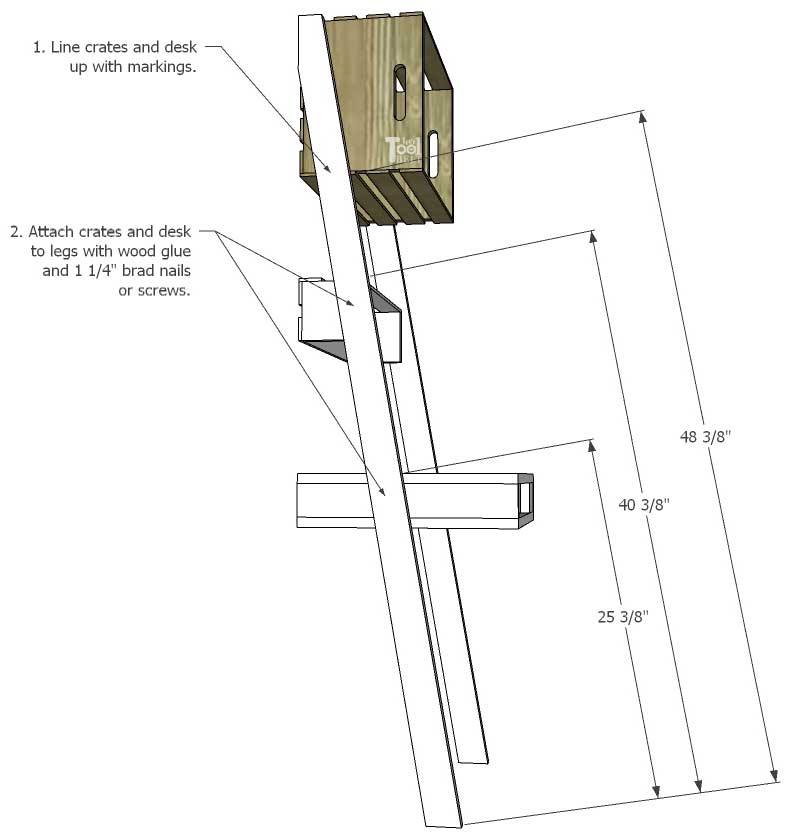
Assemble the leaning desk
Line up the crates and desk with the markings. The bottom of the top crate will line up with the top line, the half wall crate and desk top’s will line up the the other two lines.
Attach the crates and desk to the legs with wood glue and 1 1/4″ brad nails or screws. The backs of the crates and desk should lay flat(ish).
Leaning Crate Ladder Bookshelf with Bin
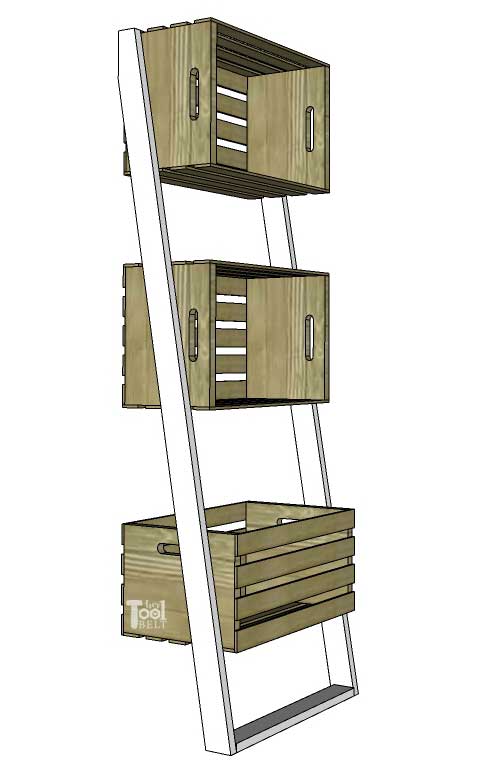
Mark the legs and crates for assembly
Starting from the bottom of the legs, mark the inside of 2 legs with the following dimensions: 17 3/4″, 40 1/2″ and 48 3/8″ (if using alternate leg style). Measure and mark from each side of the leg bottom, then connect the marks to make a 10 deg line.
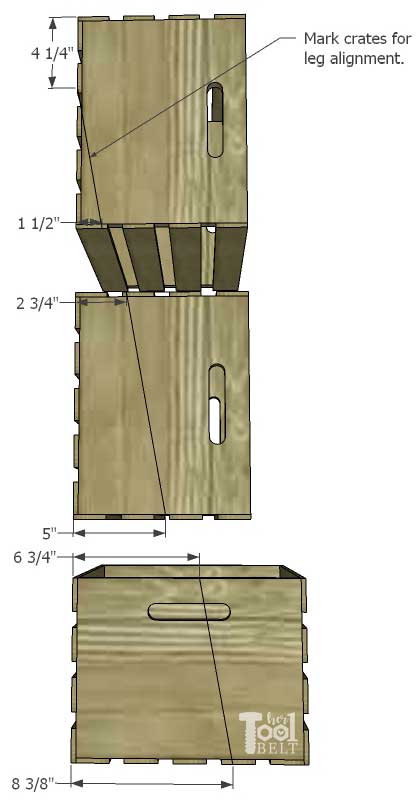
- Top Crate – On the sides, mark down from the top back corner 4 1/4″ and mark over 1 1/2″ from the lower back corner. Connect the marks and repeat for other side.
- Middle Crate – On the sides, mark over from the top back corner 2 3/4″ and mark over 5″ from the lower back corner. Connect the marks and repeat for other side.
- Bin Crate – On the sides, mark over from the top back corner 6 3/4″ and mark over 8 3/8″ from the lower back corner. Connect the marks and repeat for other side.
Assemble the leaning bookshelf with bin
Line up the crates with the markings. The top crate upper corner will line up the the top corner of the legs (or the bottom of the top crate will line up with 48 3/8″ line), the middle and bin crate top’s will line up the the other two lines.
Attach the crates to the legs with wood glue and 1 1/4″ brad nails or screws. The backs of the crates should lay flat(ish).

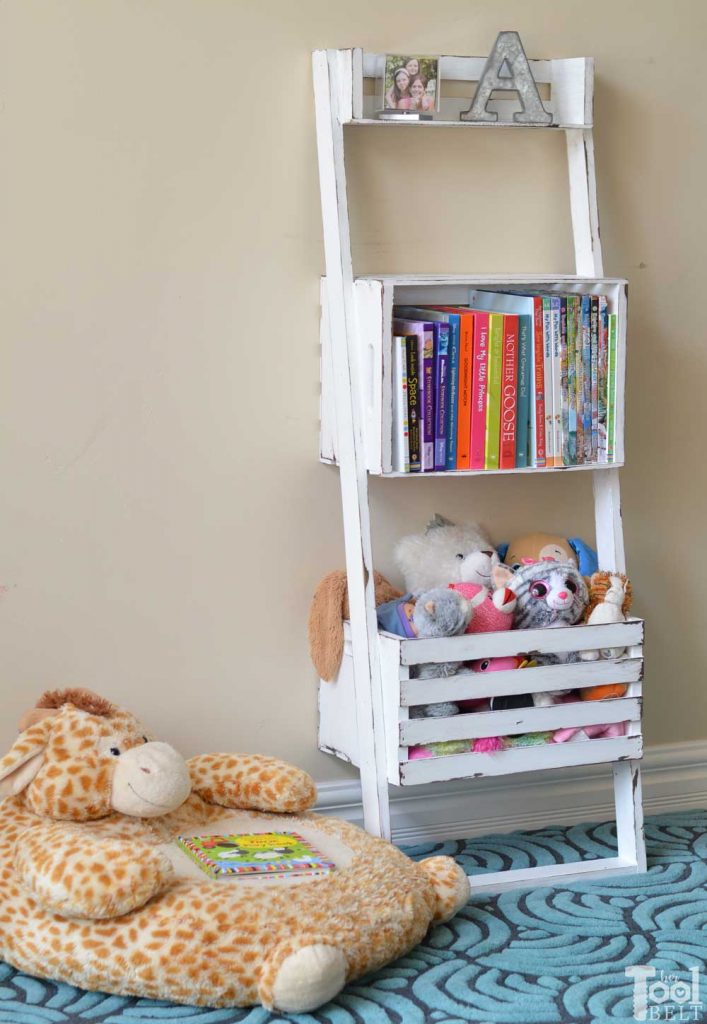
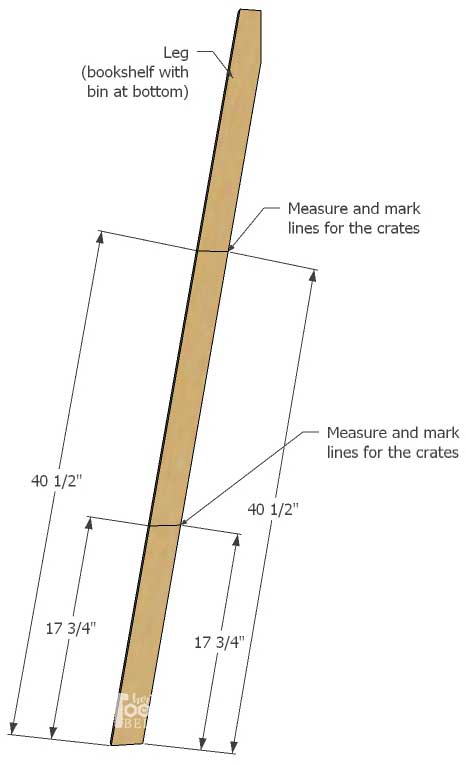
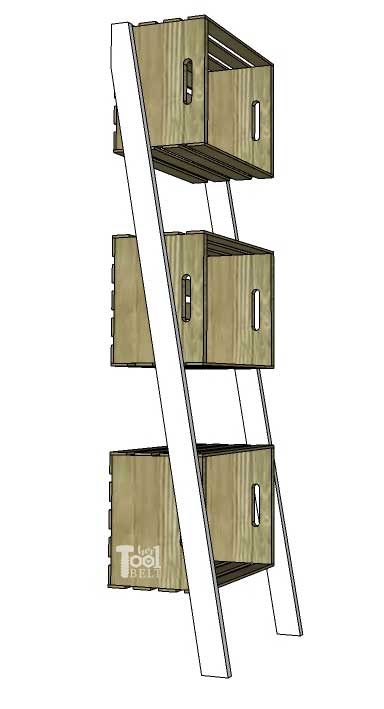
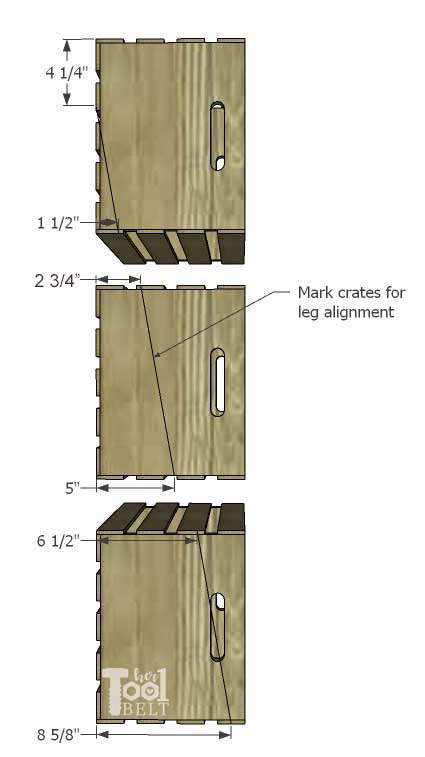
Leaning Crate Ladder Bookshelf
Mark the legs and crates for assembly
Starting from the bottom of the legs, mark the inside of 2 legs with the following dimensions: 19 1/2″, 40 1/2″ and 48 3/8″ (if using alternate leg style). Measure and mark from each side of the leg bottom, then connect the marks to make a 10 deg line.
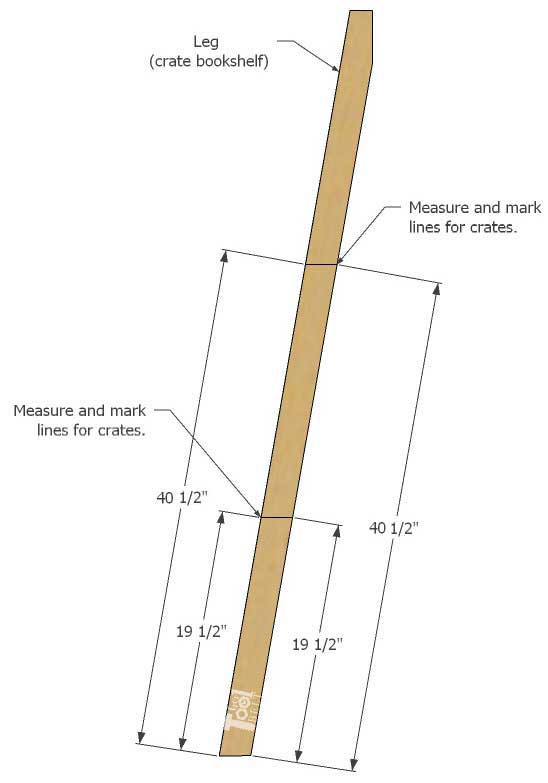
- Top Crate – On the sides, mark down from the top back corner 4 1/4″ and mark over 1 1/2″ from the lower back corner. Connect the marks and repeat for other side.
- Middle Crate – On the sides, mark over from the top back corner 2 3/4″ and mark over 5″ from the lower back corner. Connect the marks and repeat for other side.
- Lower Crate – On the sides, mark over from the top back corner 6 1/2″ and mark over 8 5/8″ from the lower back corner. Connect the marks and repeat for other side.
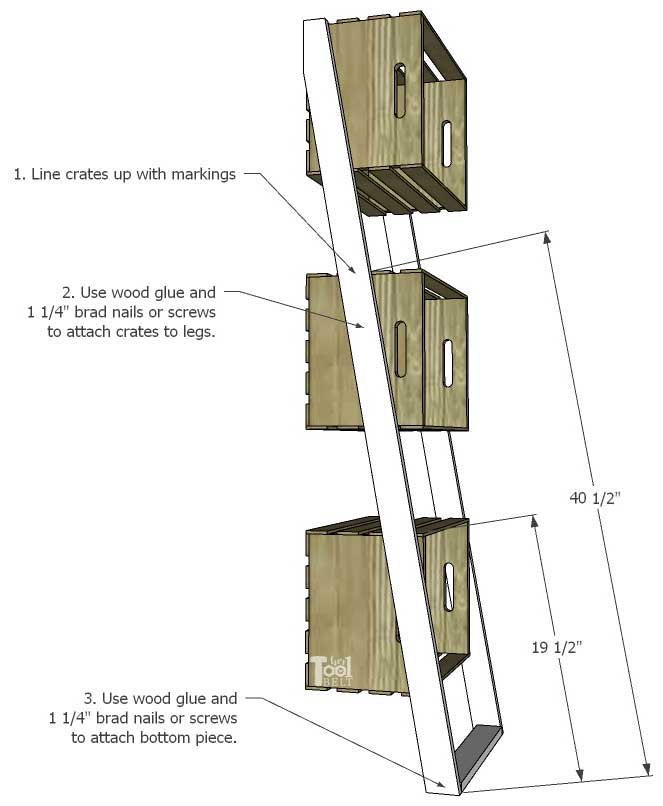
Assemble the leaning bookshelf
Line up the crates with the markings. The top crate upper corner will line up the the top corner of the legs (or the bottom of the top crate will line up with 48 3/8″ line), the middle and lower crate top’s will line up the the other two lines.
Attach the crates to the legs with wood glue and 1 1/4″ brad nails or screws. The backs of the crates should lay flat(ish).
Finish
Sand the legs, desk and drawer smooth. Paint or stain the legs, crates, desk and drawer as desired. I left the weathered gray crates as they came. The legs and half crate shelf were painted with Rustoleum Linen White chalky paint. I stained the desk and drawer with weathered gray. Apply a polyurethane top coat as desired.
Then I added a pink glass knob on the drawer.
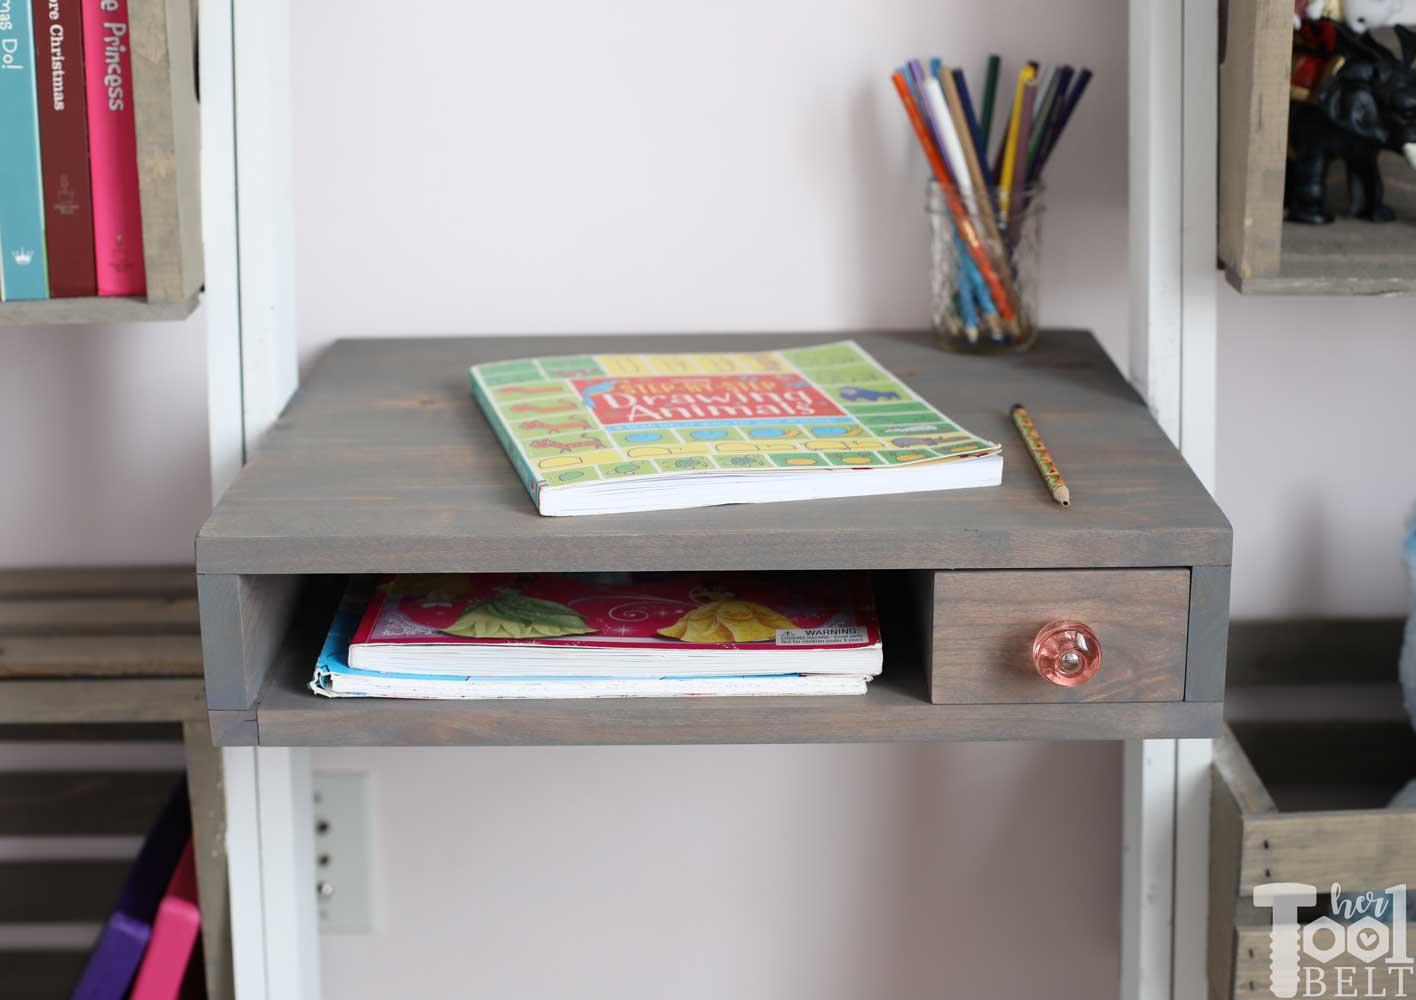
I love how the crate bookshelf and desk turned out. My daughter now has an official place to do her homework and drawings.
Download the Printable Plans –>Here<–
Thanks for pinning.
Breath-taking one!! Keep up the Good work
Hi! Great job! I was wondering what the finished dimensions are? It may have said in the article but I didn’t see it. Thanks!
Hi Erin,
It’s 60″ tall, 58 1/2″ long, the legs stick out from the 12 3/8″ from the wall and the desk sticks out 16 1/2″ from the wall.
HTH