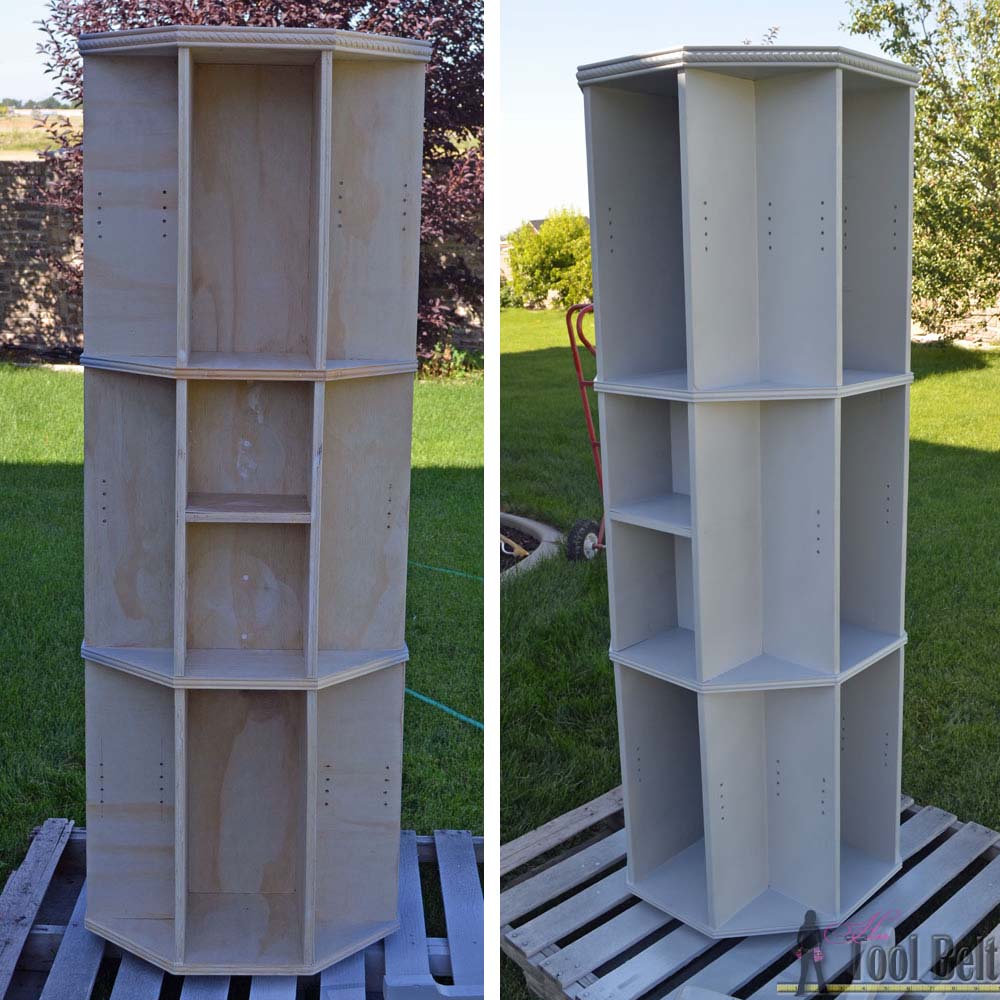
My kids love books, especially a good nighttime story or two. We have been collecting books over the years and really need a functional and stylish place to store them. They have overtaken my media center! I’ve had my eye on the PBteen Revolving Bookcase for some time and decided that is the answer to my storage problem. I planned to construct the bookshelf out of 3/4″ plywood. While planning out the design, I decided to forgo on the circles and switch to octagons because you can get a little more shelf for the same amount of wood. Not to mention, it’s a little easier to build 🙂
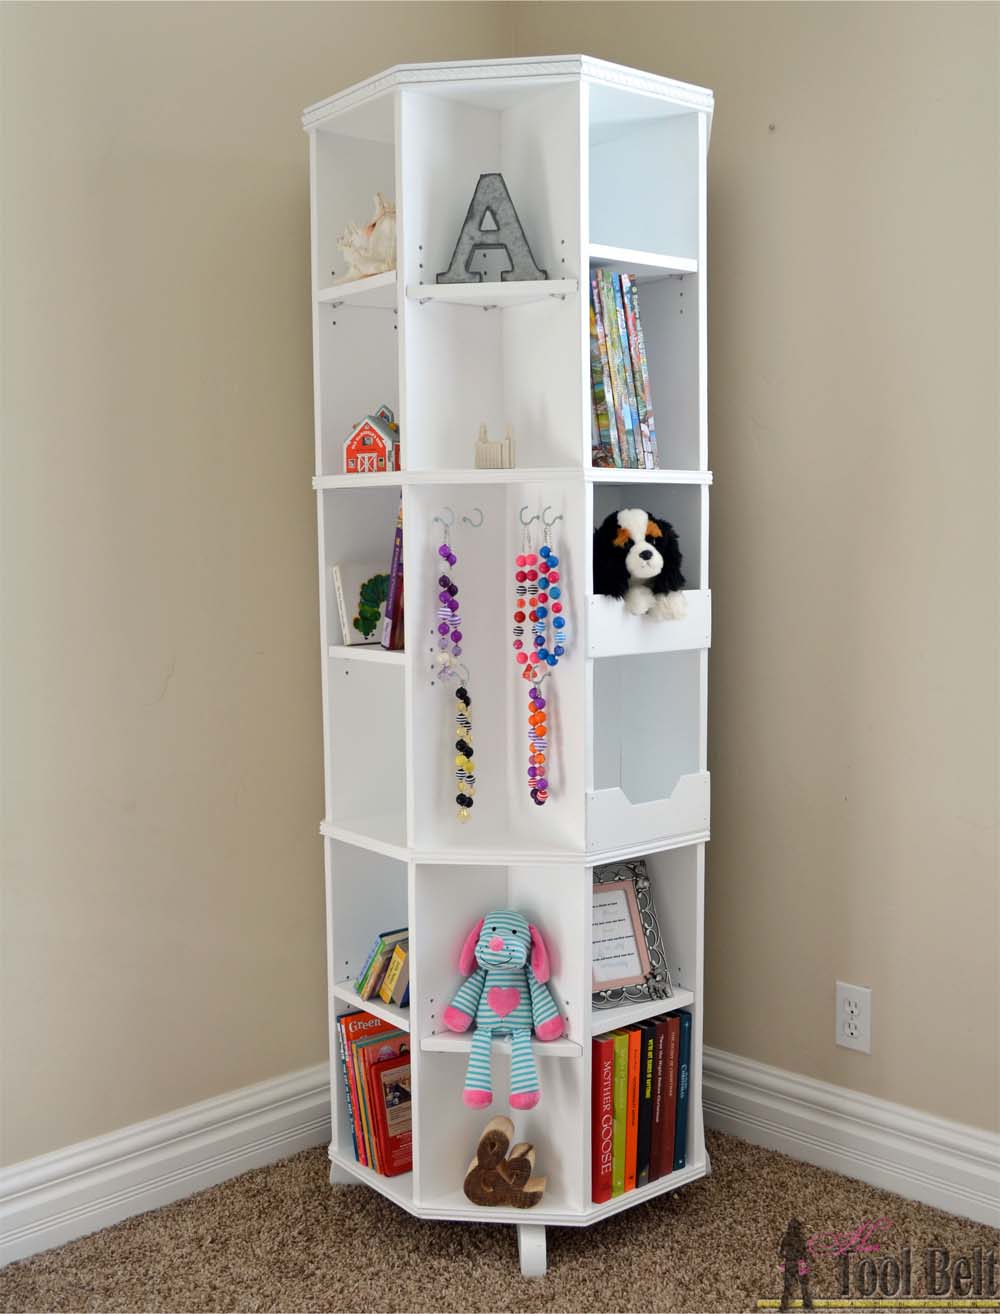
I wanted to add plenty of space to display knick-knacks and store items that are important to my 2 year old, so I added hooks and ‘bin’ fronts to a few places. The bins are a perfect place for her to store her favorite stuffed friends. The whole octagon bookshelf spins really easy on a 12″ lazy susan bearing.
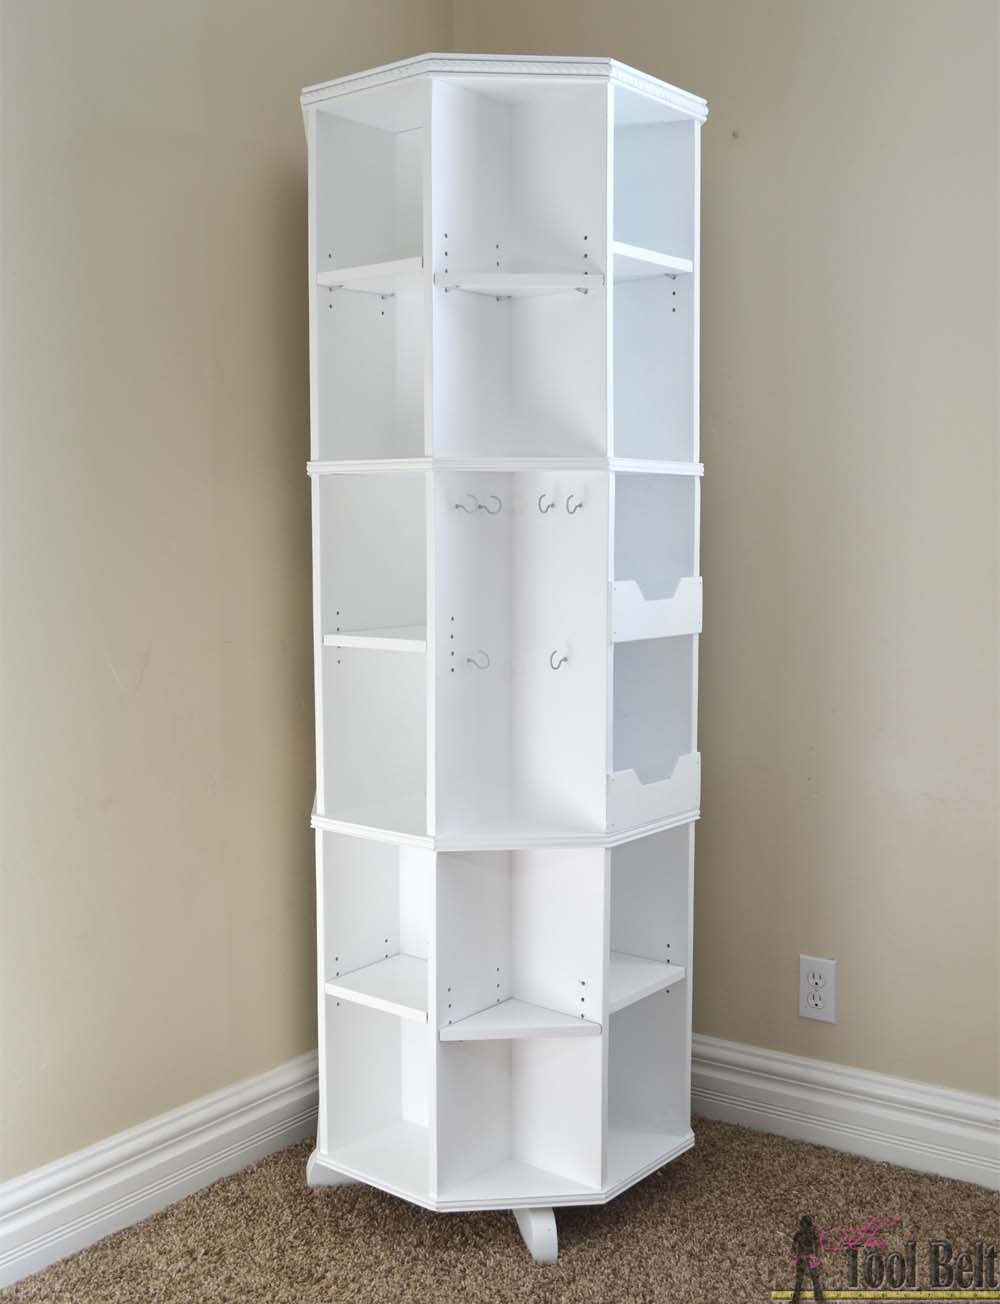
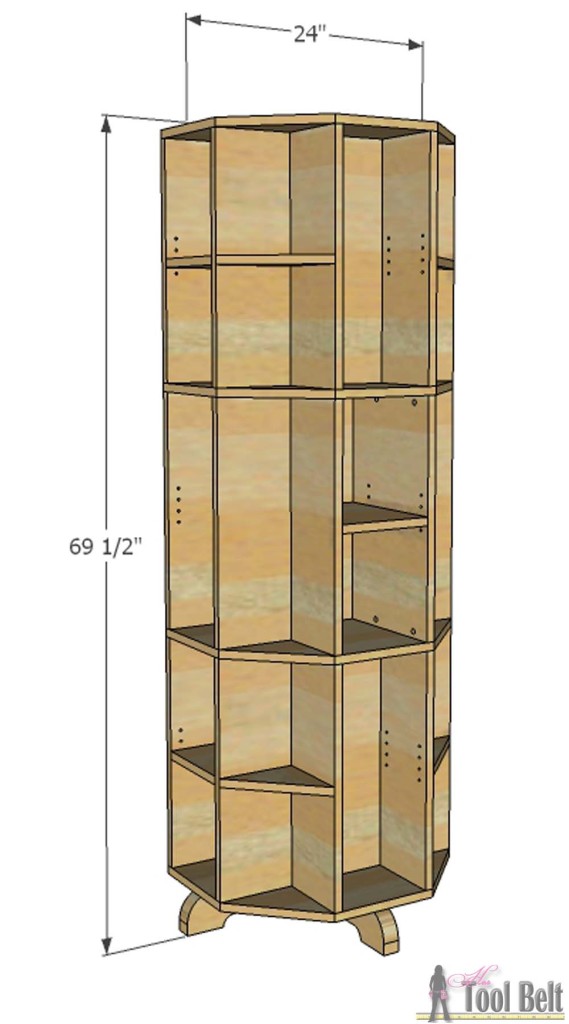
The octagon rotating bookshelf is constructed from 2 sheets of plywood, some molding and a 2 x 4 for the feet.
This post contains some affiliate links for your convenience. Click here to read my full disclosure policy.
How to Build a Octagon Rotating Bookshelf
Materials
- 2 sheets of ¾” plywood
- 1 – 2″ x 4″ x 8′ stud
- 30’ molding
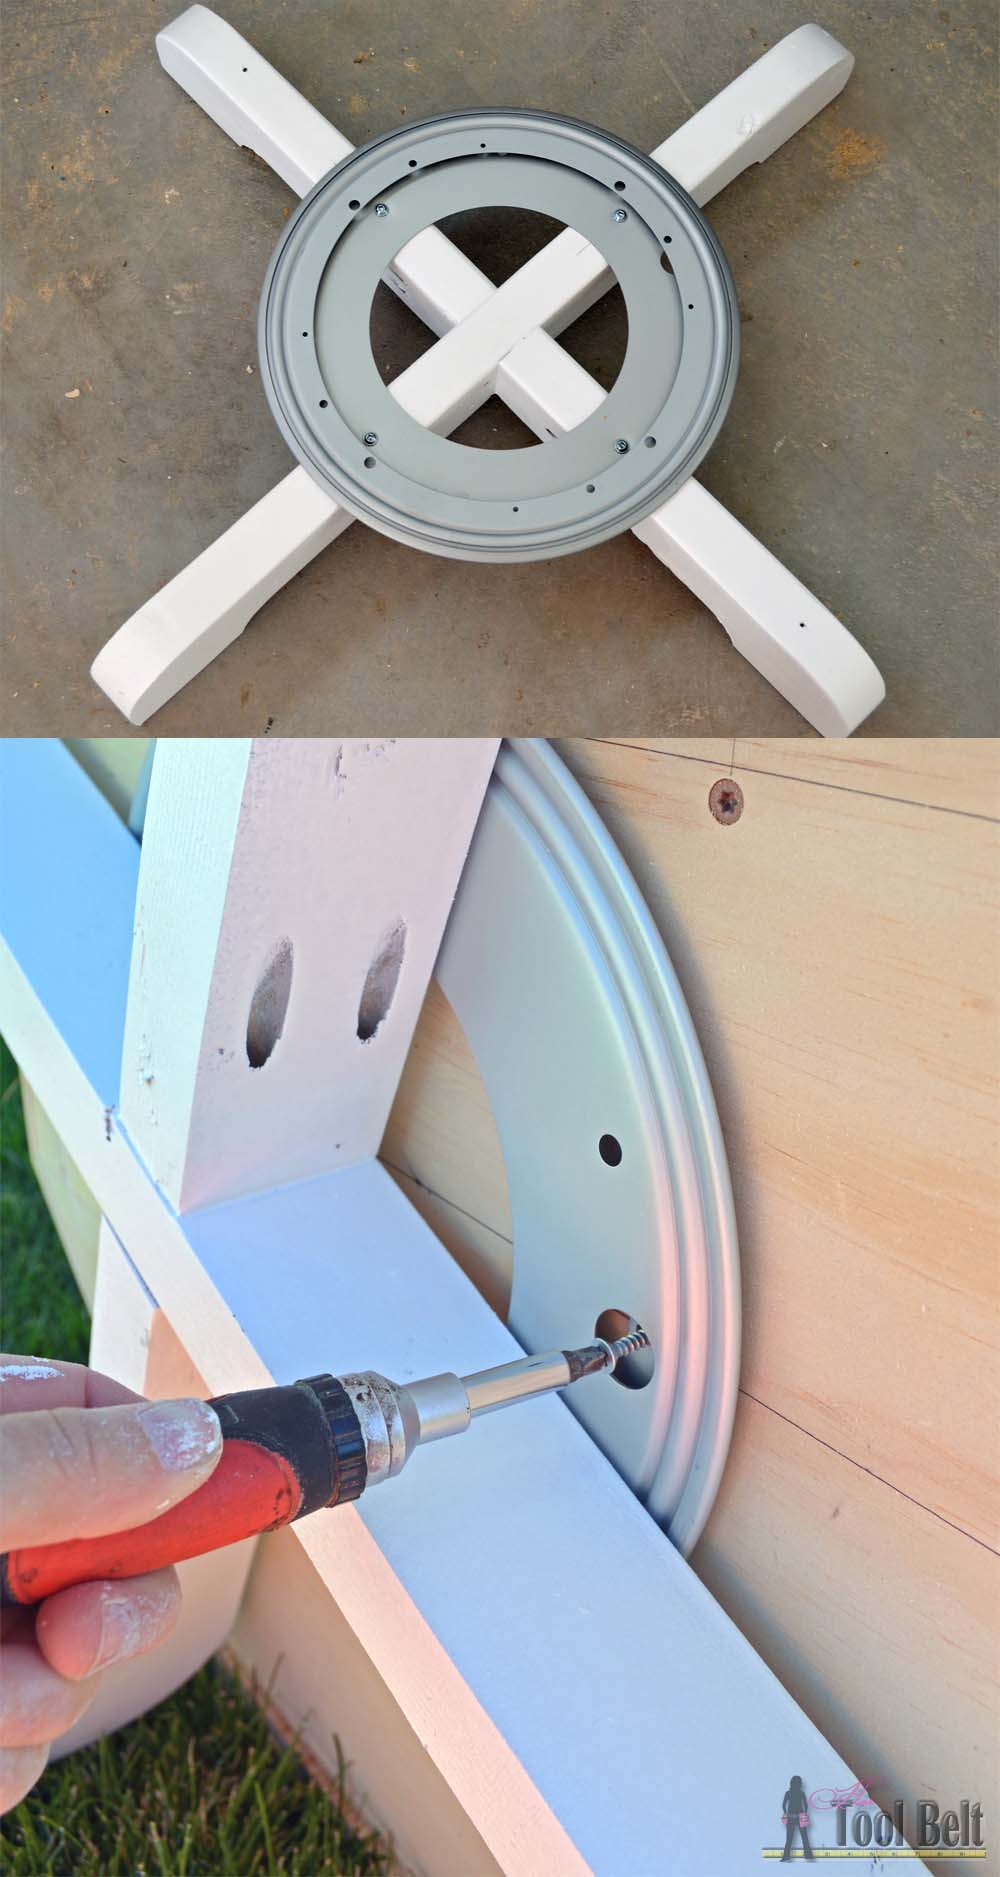
- 12” lazy susan bearing
- 1 1/4″ pocket hole screws
- 1 1/2″ screws or 1 5/8″ deck screws
- brad nails
- sandpaper
- wood filler
- primer/paint
The plywood is 48” wide, so when you cut it in half it will just be shy of 24” which is fine. The measurements assume the plywood is ¾” thick, if your plywood is thinner than ¾” you may have to adjust the measurements slightly.
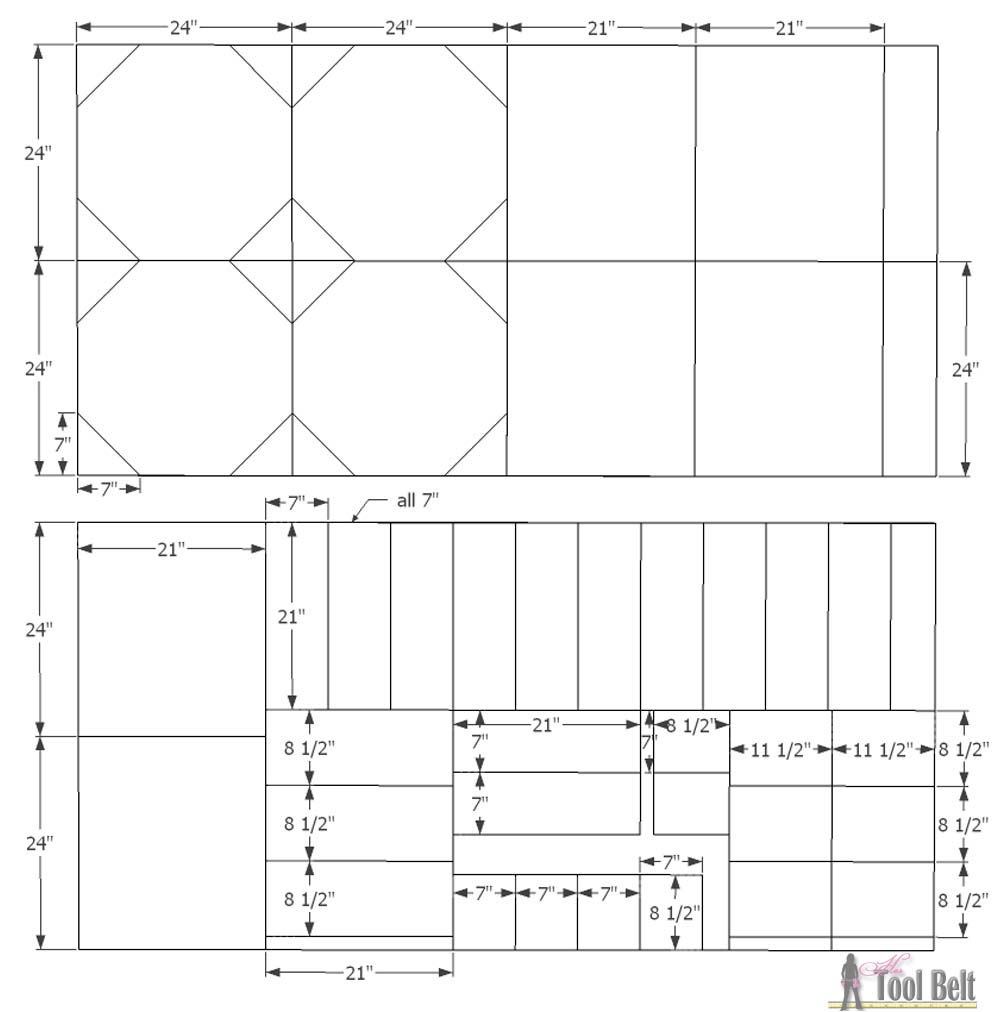
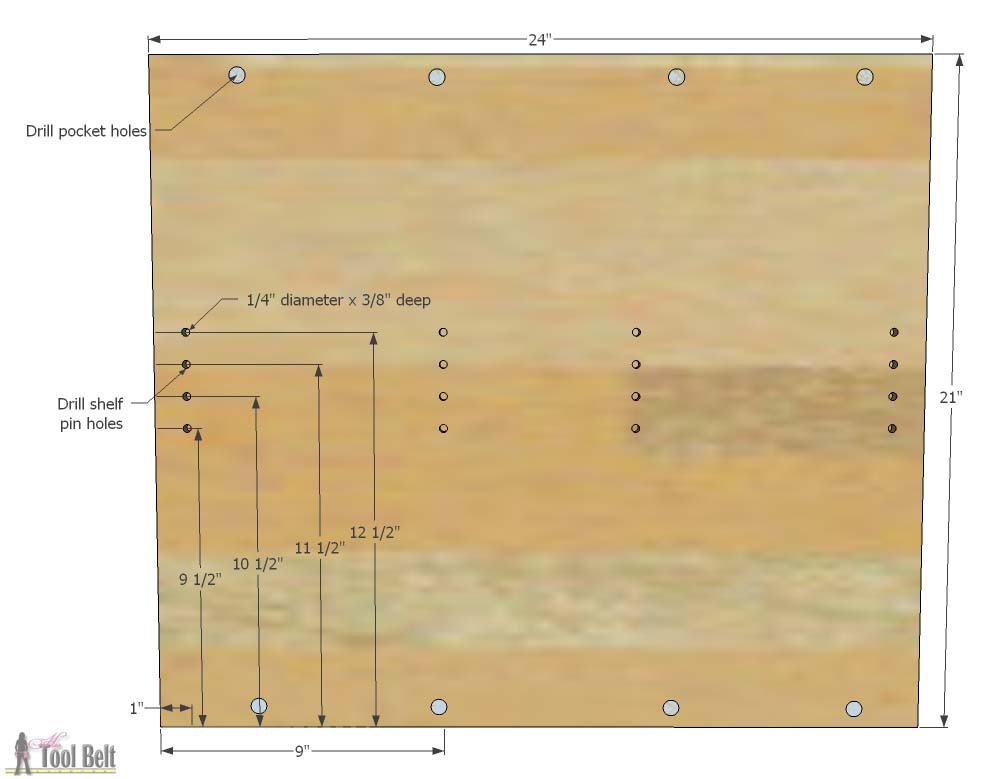
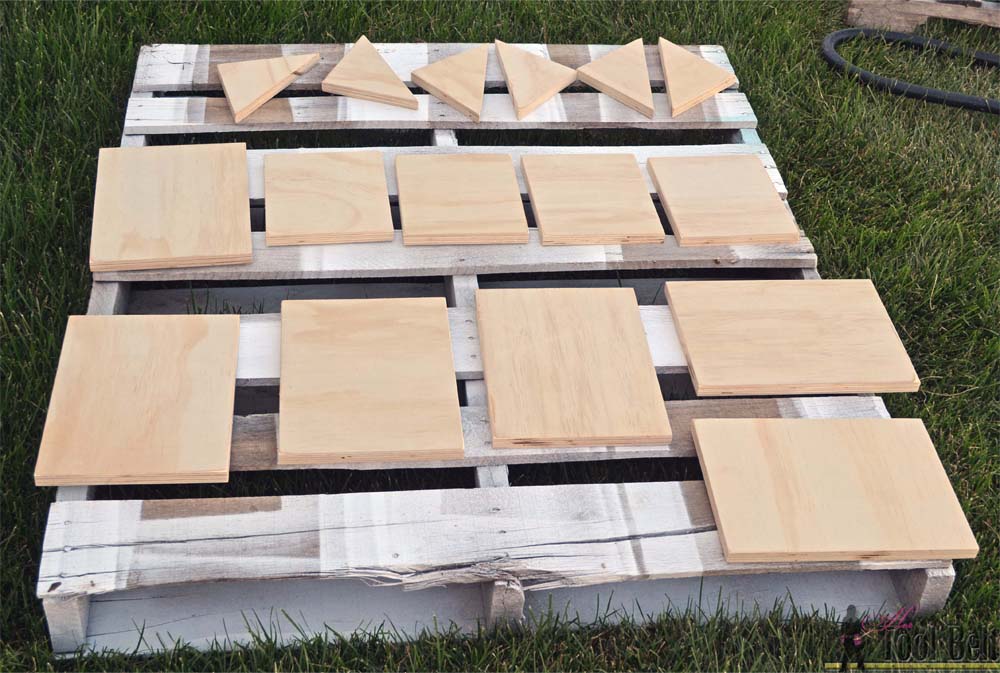
Cut the 4 – 24” x 24” squares into octagons. Mark 7” from each corner and draw a connecting line. Cut along the line, and save the triangles for shelves later.

I want shelves that can adjust for different book sizes, so I drilled shelf pin holes at 9 ½”, 10 ½”, 11 ½” and 12 ½” from the bottom. You can change these dimensions depending on your need. In the 24” x 21” boards, drill shelf pin holes ¼” diameter and 3/8” deep, but if the same hole locations can be used on the other side of the board then drill all of the way through.
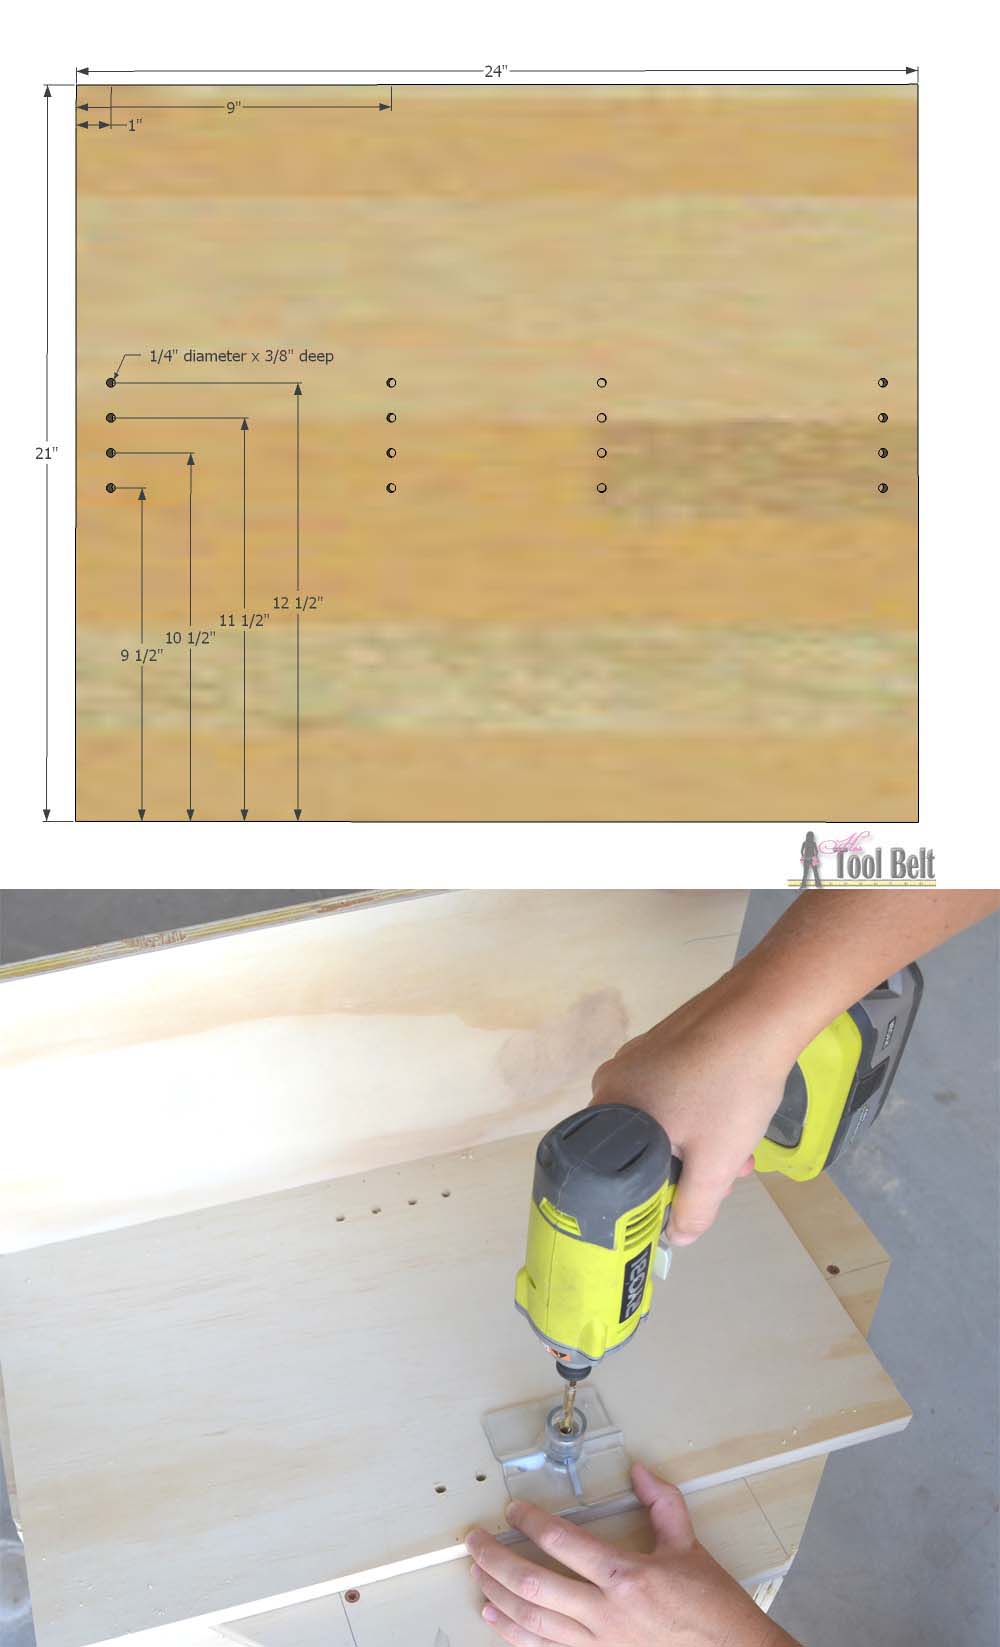
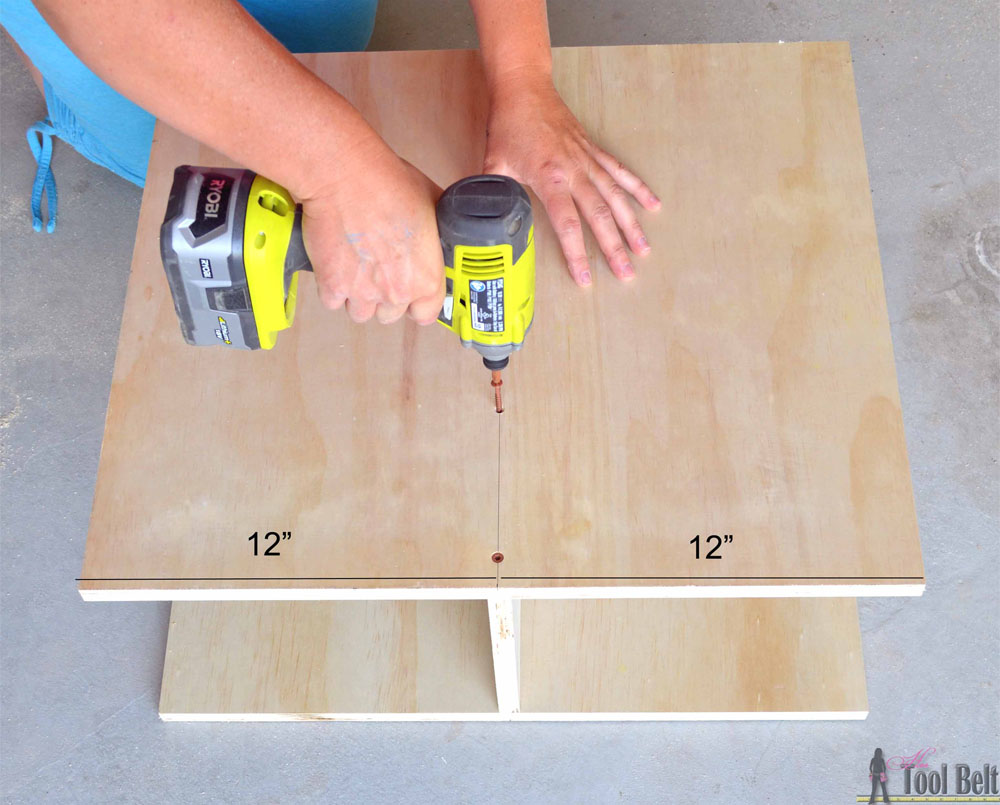
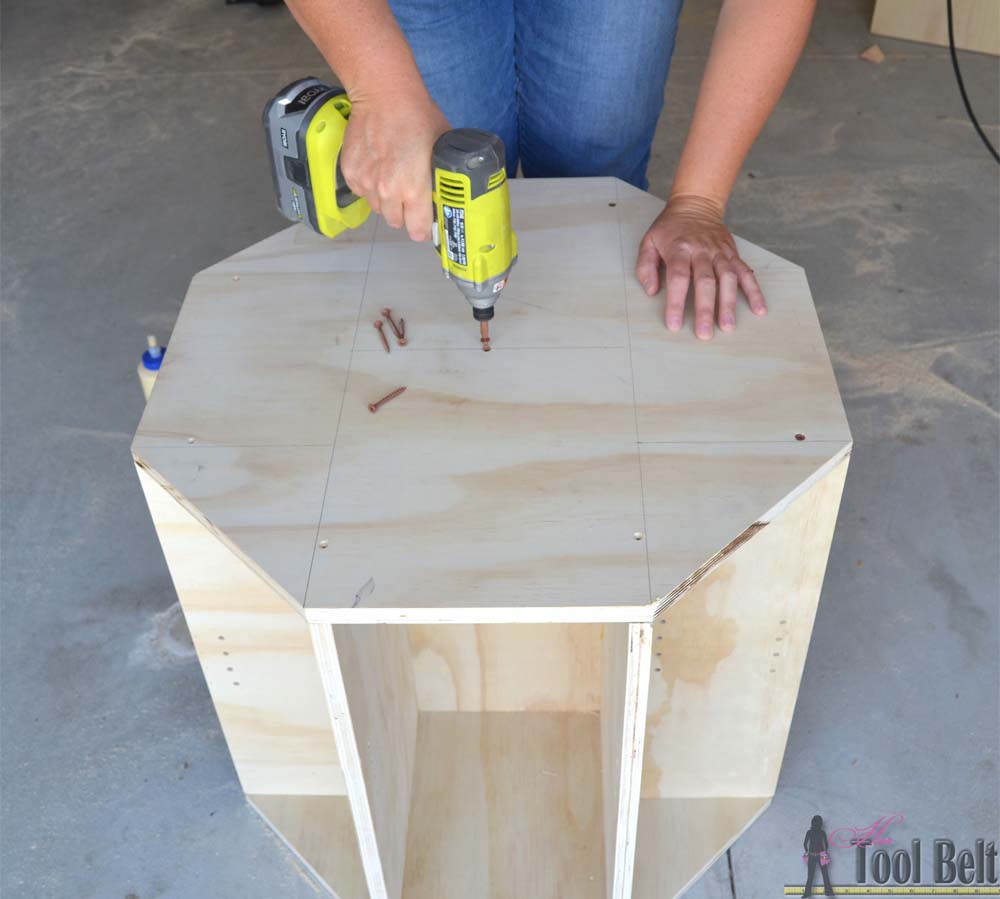
Join 2 of the 24” x 21” with a 8 ½” x 21” boards (the shelf pin holes go on the inside). Predrill countersink holes down the center of the 24” x 21”. Use wood glue and 1 ½” screws to join the boards together.
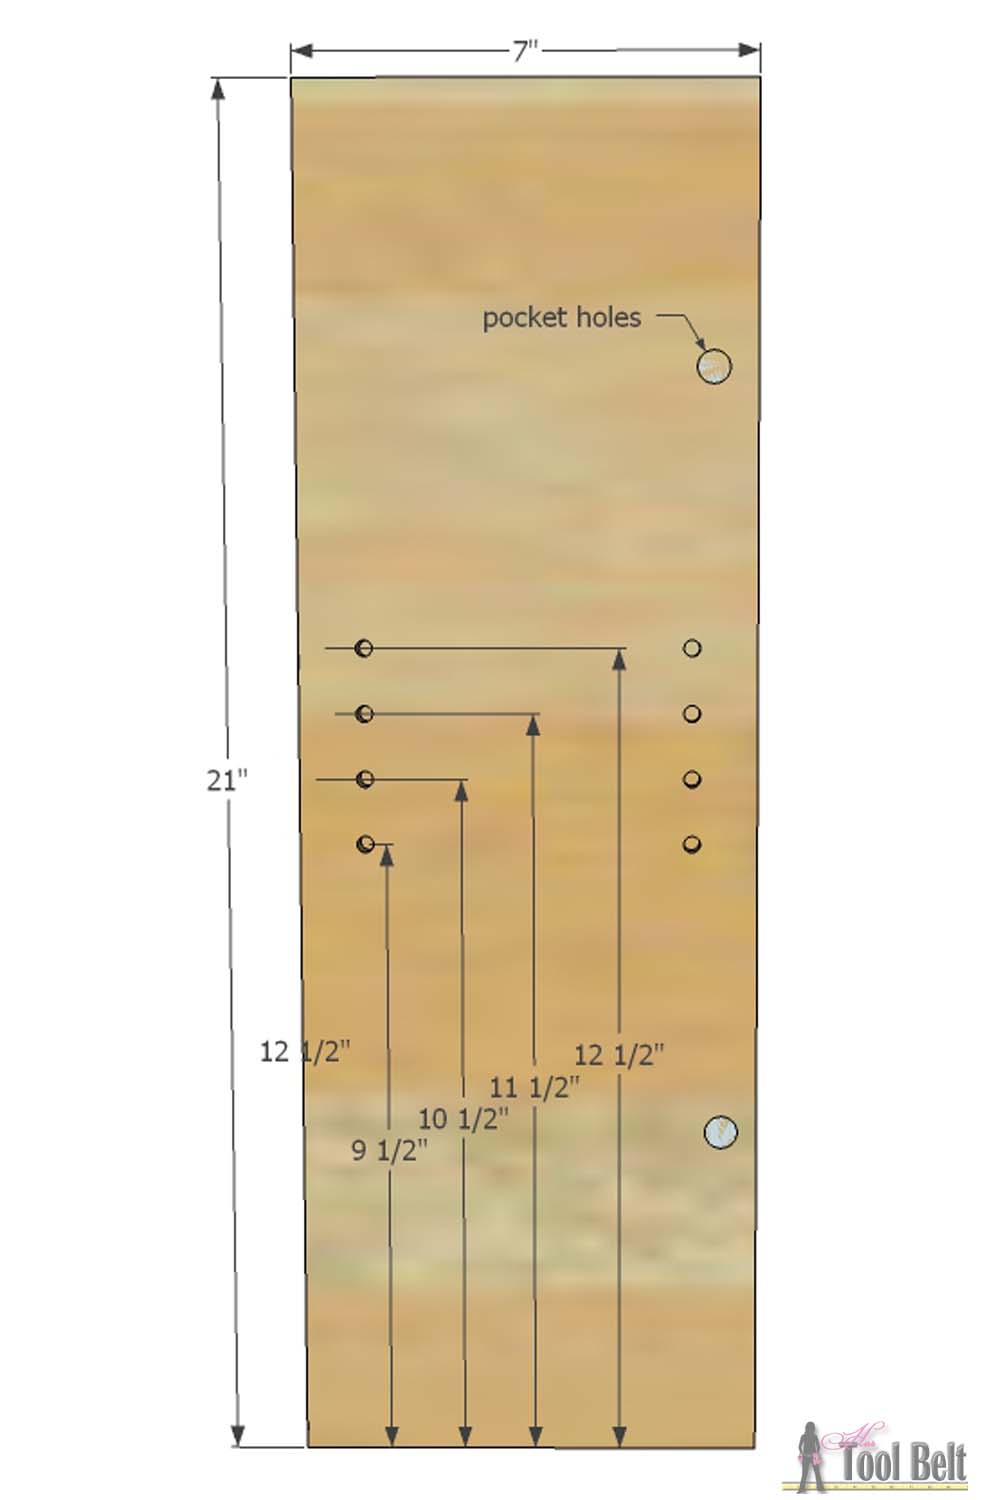
On 4 of the 7” x 21” boards drill shelf pin holes and drill pocket holes.
Place the H piece made in step 4 on an octagon piece and the 7” x 21” pieces, predrill countersink holes where the boards will be mounted. Use wood glue and 1 ½” screws to attach the boards to the octagon. Also secure the 7” pieces to the H piece with 1 ¼” pocket hole screws.
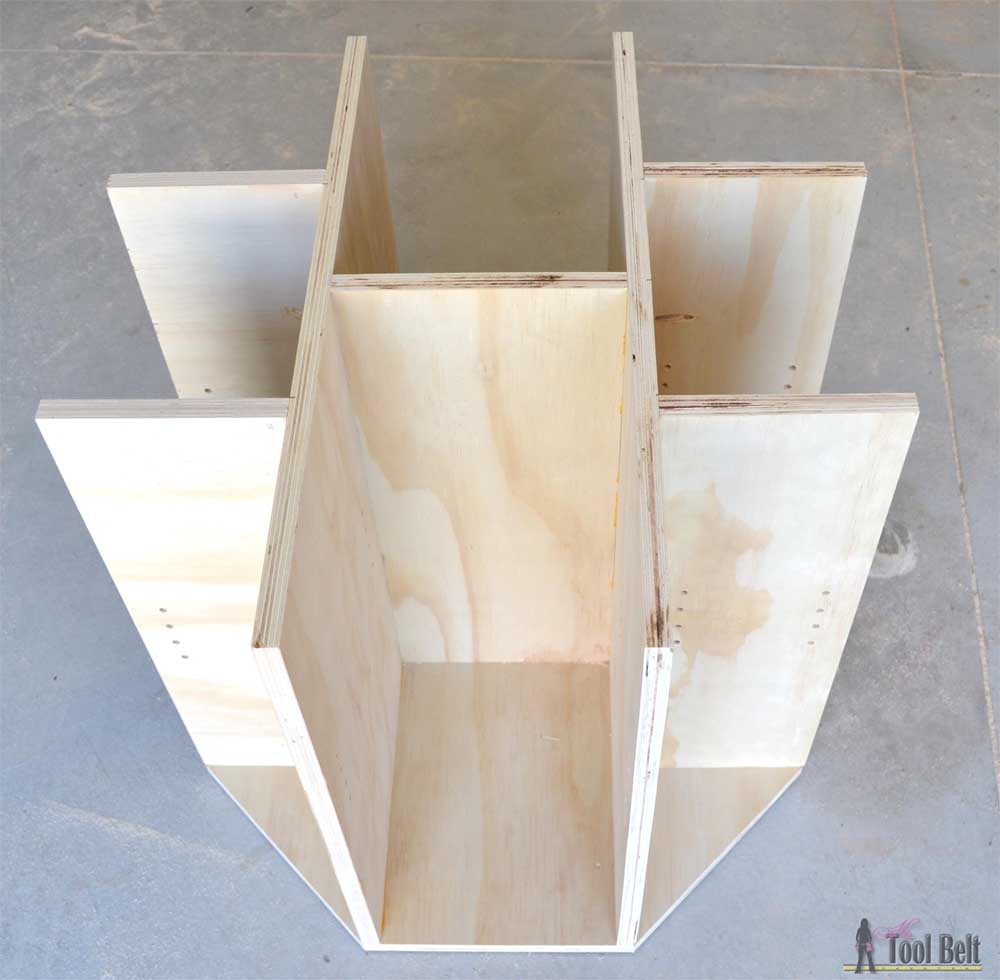
Attach an octagon piece to the top with wood glue and 1 ½” screws, countersink the screws. Repeat steps 3 thru 7.
In the 2 remaining 24” x 21” boards, drill shelf pin holes ¼” diameter and 3/8” deep, but if the same hole locations can be used on the other side of the board then drill all of the way through. Drill pocket holes along the bottom and top edges.
Join the 24” x 21” boards with a 8 ½” x 21” board (the shelf pin holes go on the inside). Predrill countersink holes down the center of the 24” x 21”. Use wood glue and 1 ½” screws to join the boards together. Use wood glue and 1 ¼” pocket hole screws to attach it to the top of one of the octagon pieces. I rotated it 90 degrees to how the other H piece attaches on the octagon (for aesthetics only).
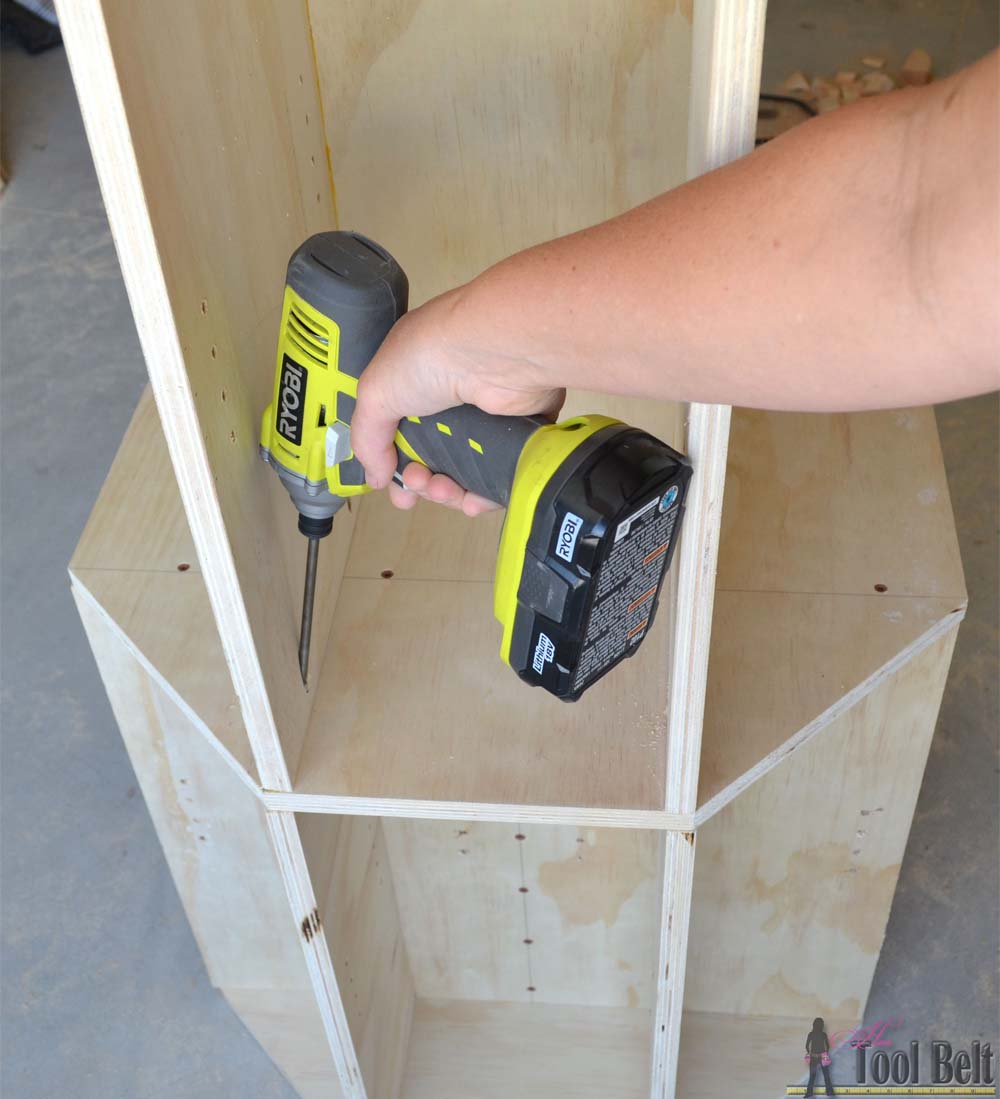
On 4 of the 7” x 21” boards drill shelf pin holes and drill pocket holes to attach to the top, bottom and H piece. Use wood glue and 1 ¼” pocket hole screws to attach the boards to the octagon.
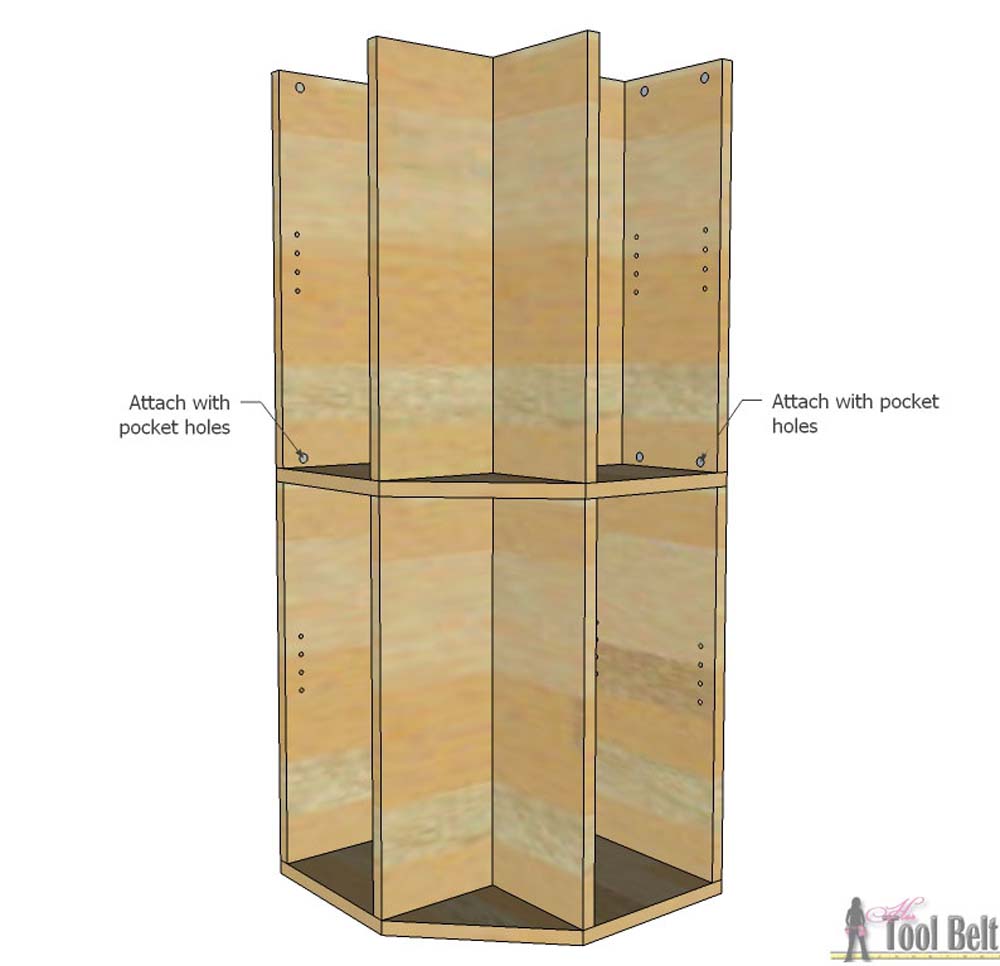
Place the other octagon unit on top and attach with wood glue and 1 ¼” pocket hole screws. Drill additional shelf pin holes as desired.

Cut out shelves for the bookshelf. Dryfit the shelves with the shelf pins, and trim as needed.
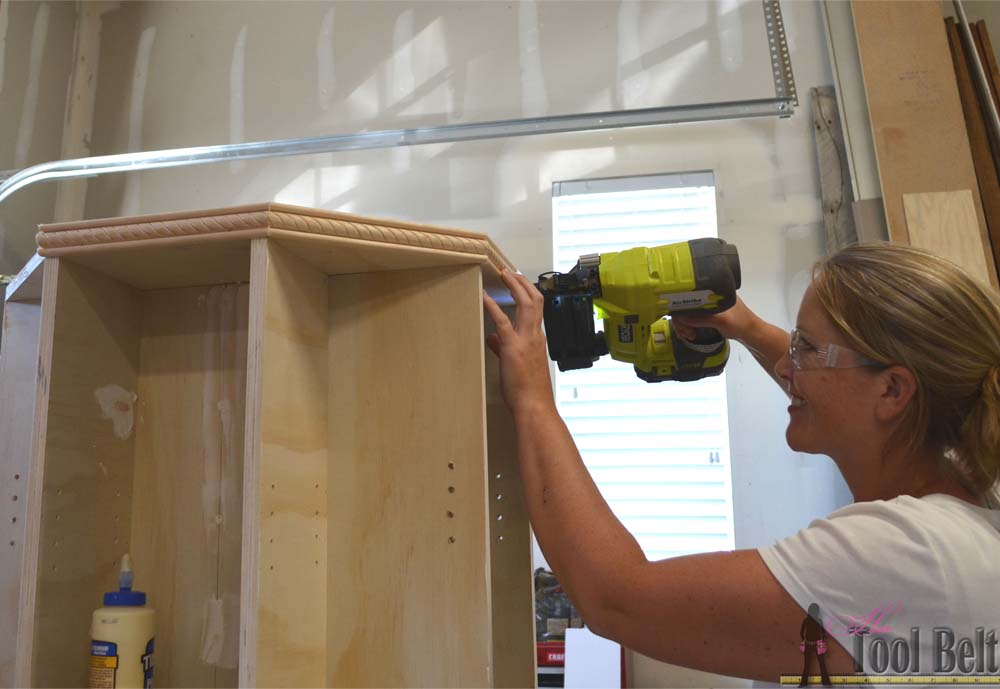
If you want to dress up the bookshelf a little, add molding around the edge of the octagon. The cut angle is 22 ½” degrees, cut to fit. Use wood glue and 1” brad nails to secure in place.
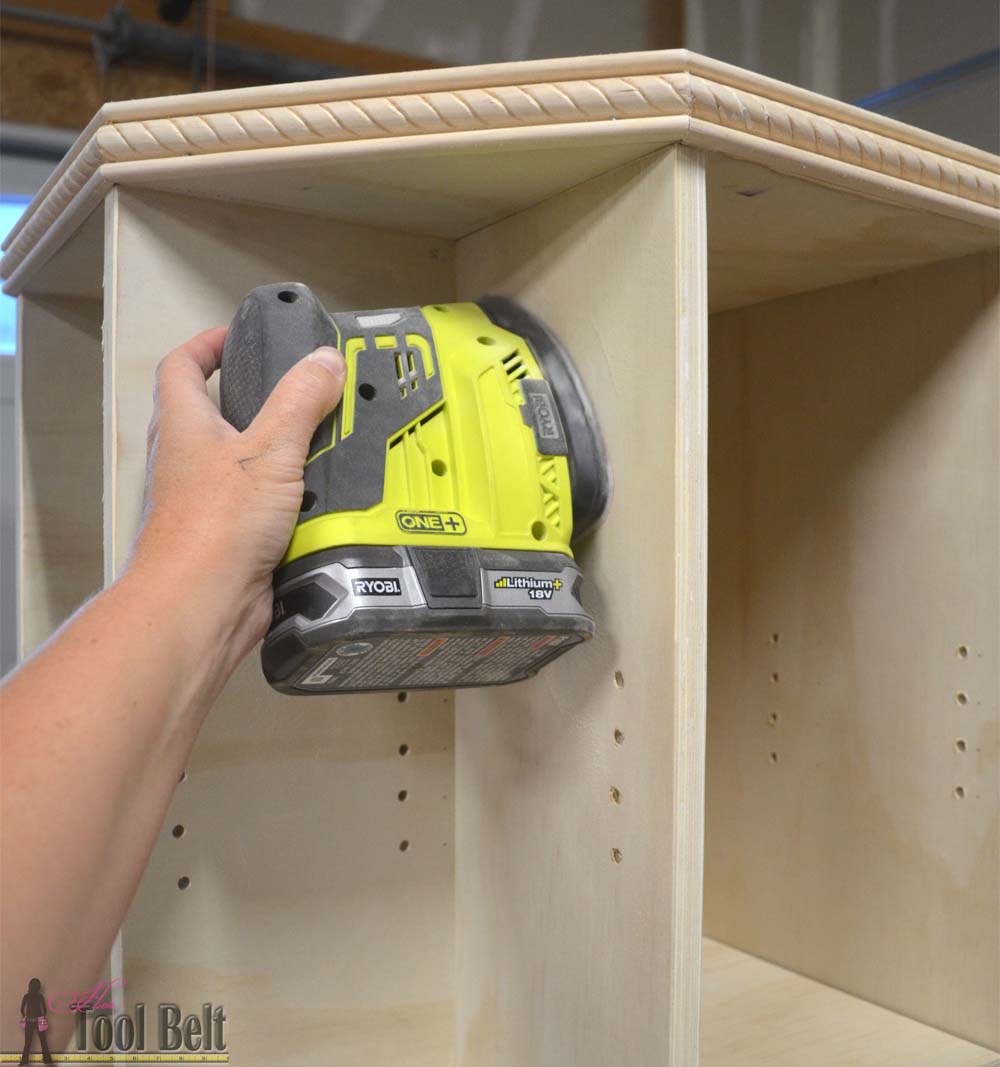
Fill any blemishes with filler or putty and allow to dry. Sand, sand and sand!
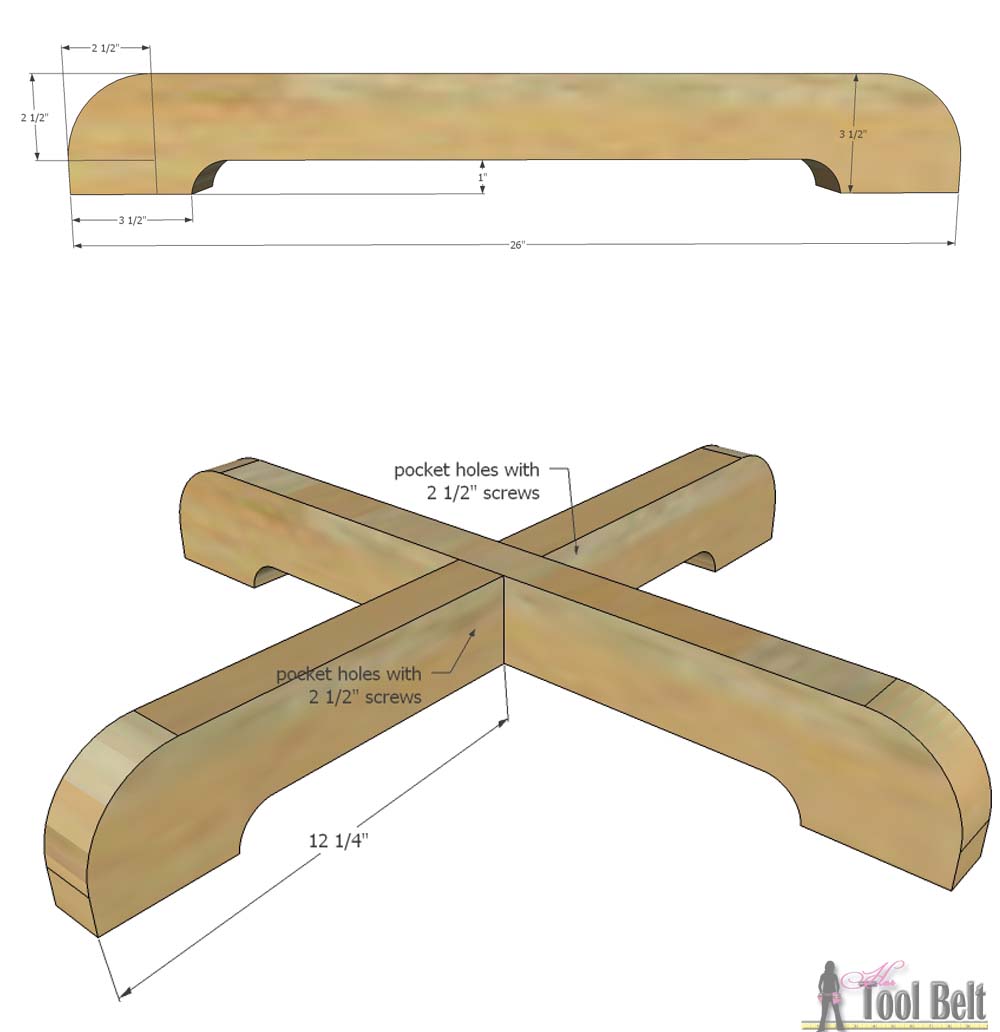
For the base you can go simple with another octagon of ¾” plywood or you can add feet.
To make my feet, cut a 2×4 into 1 – 26” long and 2 – 12 ¼” long pieces. Draw a pattern onto the ends of the 2×4 pieces and cut out. Drill pocket holes in the mating ends of the 12 ¼” pieces and attach to the center of the 26”, making sure all of the feet sit level.
Note: After the bookshelf was finished, I realized you can’t see the bottom cut out. Save yourself a couple cuts and leave the bottom flat.
Finish the bookshelf however you desire. I primed the bookshelf and painted it white. Allow the finish to dry.
Attach the lazy susan bearing to the feet, making sure it is centered. Attach the lazy susan bearing to the bottom of the bookshelf according to the manufacturers directions.
Awesome bookshelf Amy, I like the octagon better than the circle! 🙂
COOL!!!
I visited you on Facebook but more importantly I am heading to Lowe’s for materials to construct the octagon storage unit. Thank you for your ingenuity!
You are awesome and I have a girl crush on your skills! Get it girl!
Thanks, you’re nice 😉
This is absolutely fantastic! But how can you secure it to keep it from being tipped over?
I don’t know. I haven’t had any issues with it being tippy. You could make the ‘feet’ extend beyond the base to make it less likely to tip over.
This is amazing! How long did it take you to make it?
I don’t remember exactly, but a few days.
Shut the front door, this is AWESOME!! I’ve been looking for a way to make something exactly like this.. well pretty darn close and, tah dah, here you are with all the details!!
Thank you! Love how it turned out!
Love the book Octagon Rotating Bookshelf shelf. I am going to make one for granddaughter for Christmas. Where did you get the Lazy Susan?
I’m sure she’ll love it! I got it on Amazon —> 12″ bearing
Thank You. One more question. How far in are the shelf pin holes?
You can do whatever works for you, but I did 4 sets of holes 1″ apart and that has worked well for us.
What width molding should I be looking for.
I used 3/4″ molding to cover up the edges of the plywood. Around the top I used some molding that was around 1 1/4″-1 1/2″.
that is nice ..I just wish i could work with tools