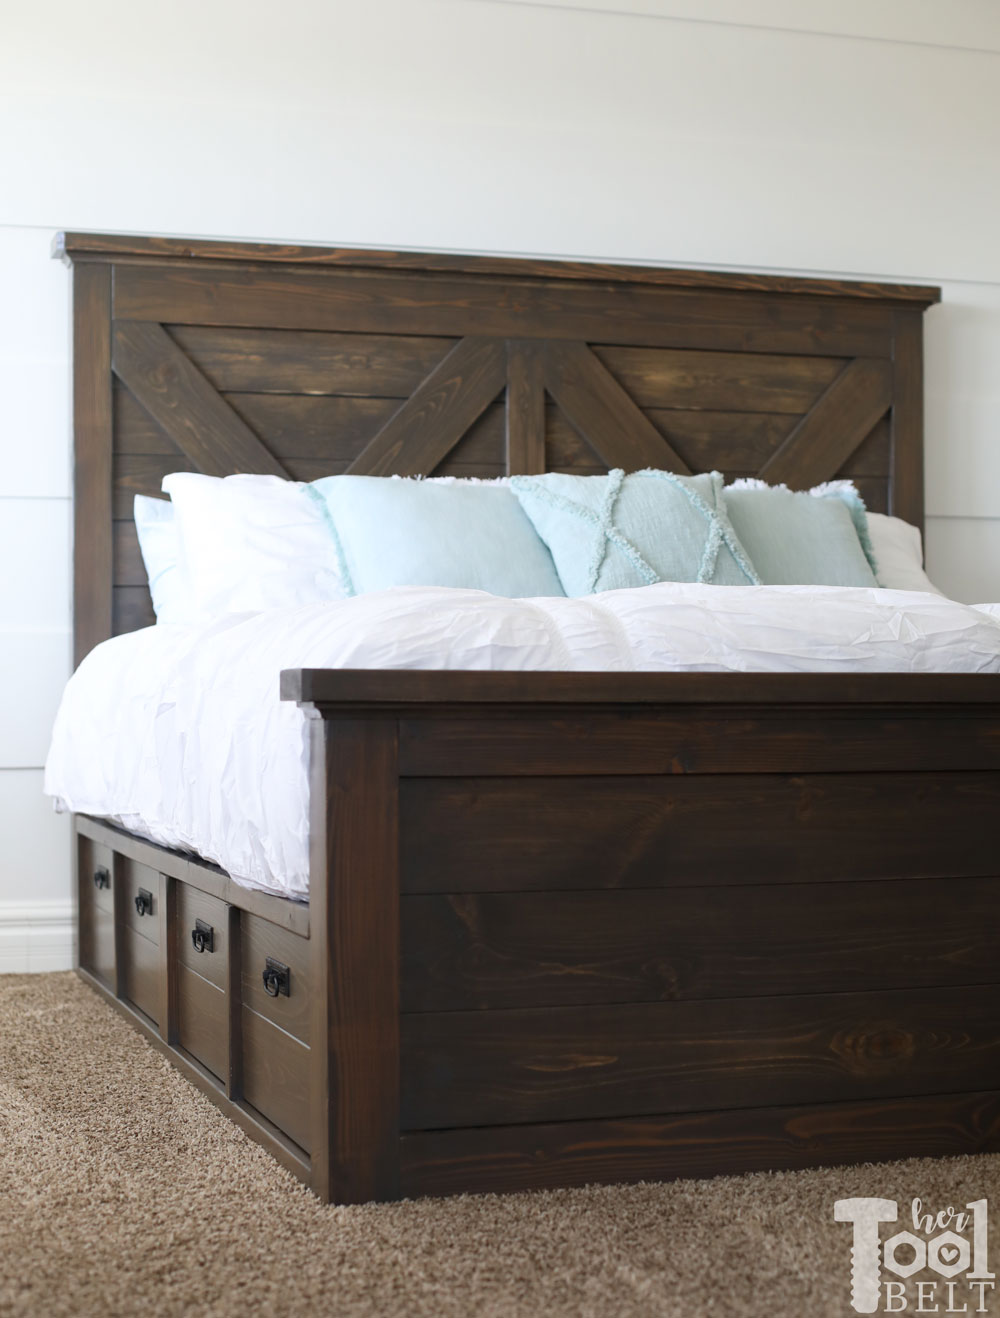
A little while ago, I built myself a X Barn door farmhouse bed – king size, which we love. The version of the king bed I made has storage underneath the bed. I received a few requests to make plans for Queen size bed without the under bed storage. If interested, here are plans for a matching nightstand – Farmhouse X Nightstand
Picture of the Kingsize version:
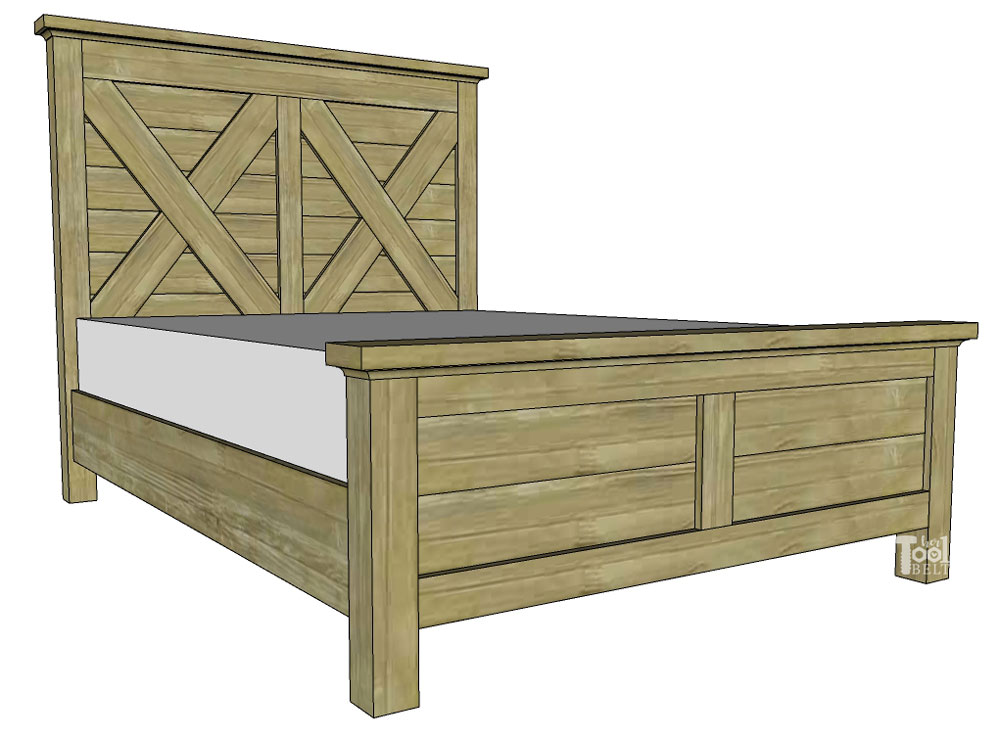
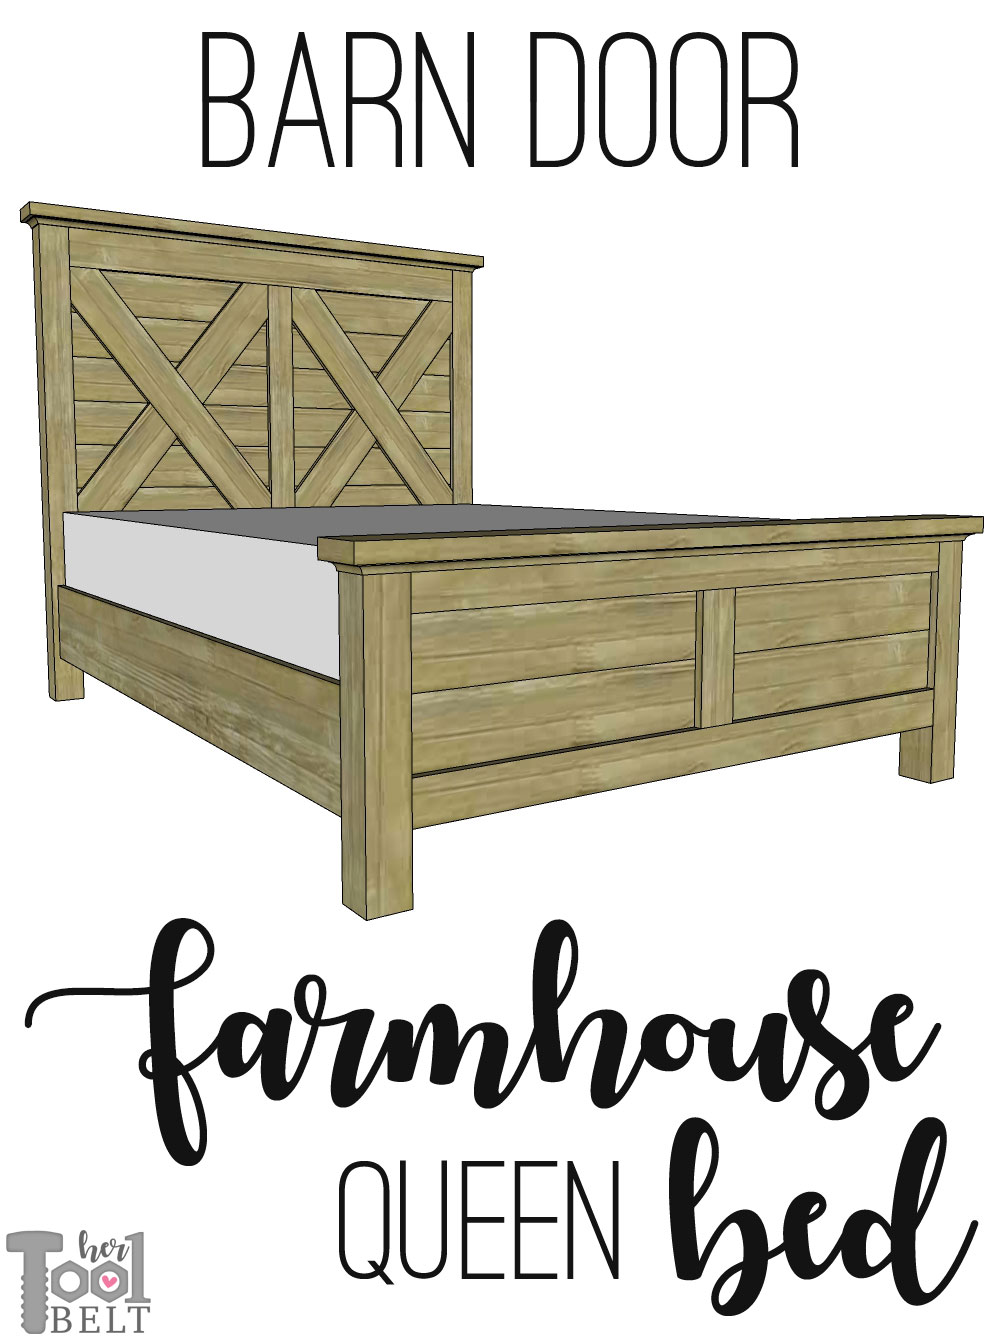
This is what the queen bed will look like:
This post contains some affiliate links for your convenience. Click here to read my full disclosure policy.
How to Build a Queen X Barn Door Farmhouse Bed

Materials
- 2 – 4 x 4 x 8′ post (actual 3 1/2″ x 3 1/2″)
- 1 – 2 x 6 x 10′ boards (actual 1 1/2″ x 5 1/2″)
- 1 – 2 x 6 x 12′ boards (actual 1 1/2″ x 5 1/2″)
- 2 – 2 x 4 x 10′ boards (actual 1 1/2″ x 3 1/2″)
- 3 – 2 x 4 x 8′ boards (actual 1 1/2″ x 3 1/2″)
- 4 – 1 x 6 x 10′ boards (actual 3/4″ x 5 1/2″)
- 2 – 1 x 6 x 8′ boards (actual 3/4″ x 5 1/2″)
- 12 – 1 x 4 x 8′ boards (actual 3/4″ x 3 1/2″)
- 2 – 1 x 10 x 8′ boards (actual 3/4″ x 9 1/4″)
- 2 – 8′ pieces of cove molding
- 2 1/2″ pocket hole screws
- 1 1/4″ pocket hole screws
- 1 1/4″ brad nails or pin nails
- 4 bed rail brackets (if you don’t want to pocket hole the bed rails on)
- sandpaper
- wood glue
- wood putty
- stain – (Varathane Briarsmoke)
- top coat – (Varathane polyurethane)
-
Approximate cost of lumber: $170
-
Tools Used
- DeWALT Atomic Drill/Driver kit
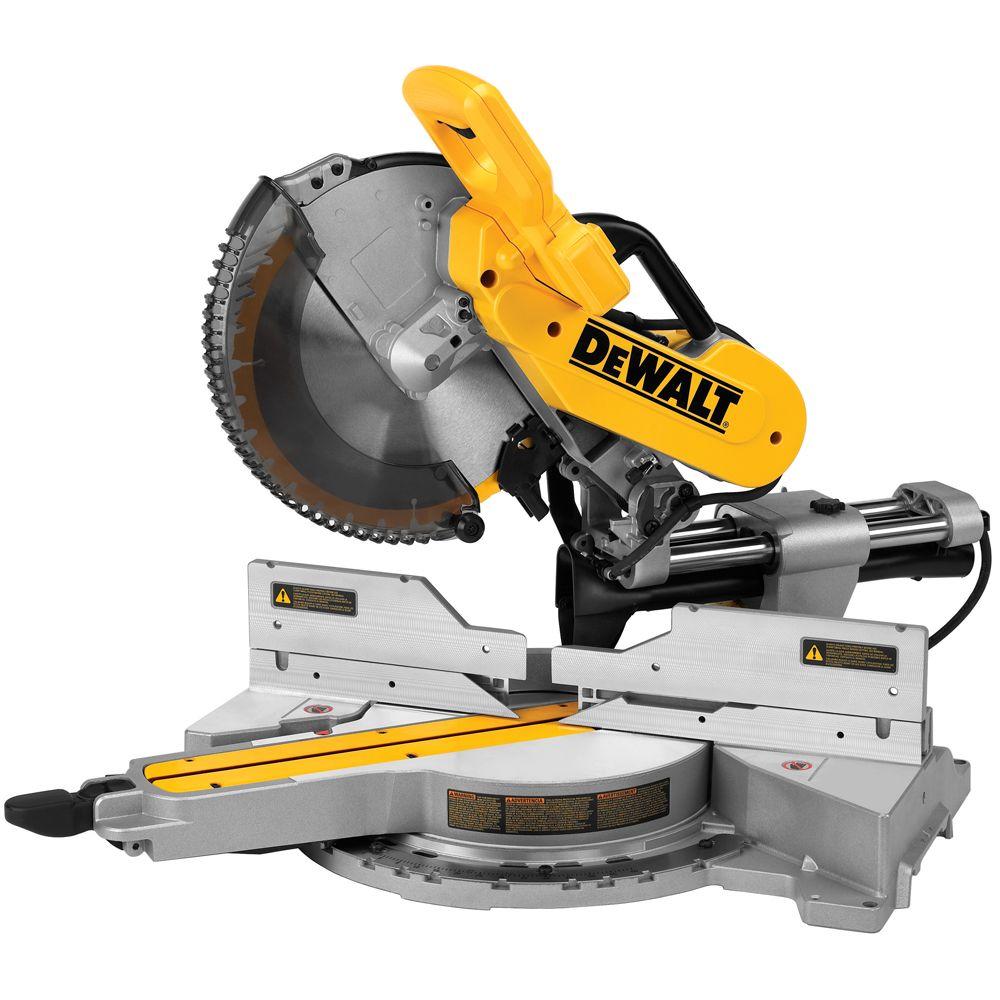
- DeWALT Miter Saw
- Kreg Pocket hole jig
- DeWALT Portable Workbench
- DeWALT Sander
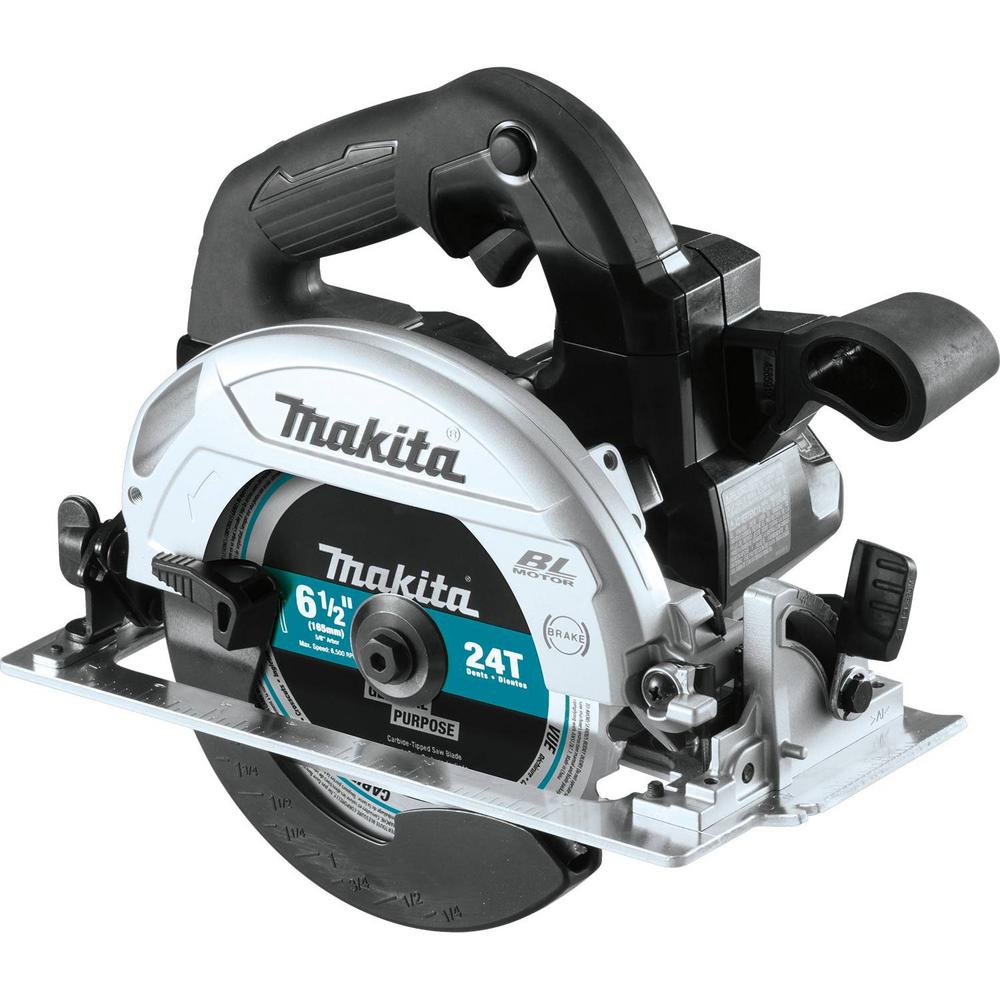
- Circular Saw or Table Saw
- Tape Measure
- Brad or Pin Nailer
 |
 |
 |
 |
 |
 |
 |
 |
Cut List
- 2 – 3 1/2″ x 3 1/2″ x 60″ (4×4) – headboard legs
- 2 – 3 1/2″ x 3 1/2″ x 23 1/2″ (4×4) – foot board legs
- 2 – 1 1/2″ x 5 1/2″ x 65 1/2″ (2×6) – headboard or foot board top (I trimmed mine down to 5″ wide, not required just personal preference)
- 2 – 1 1/2″ x 5 1/2″ x 56″ (2×6) – headboard frame
- 4 – 1 1/2″ x 3 1/2″ x 56″ (2×4) – foot board frame/support
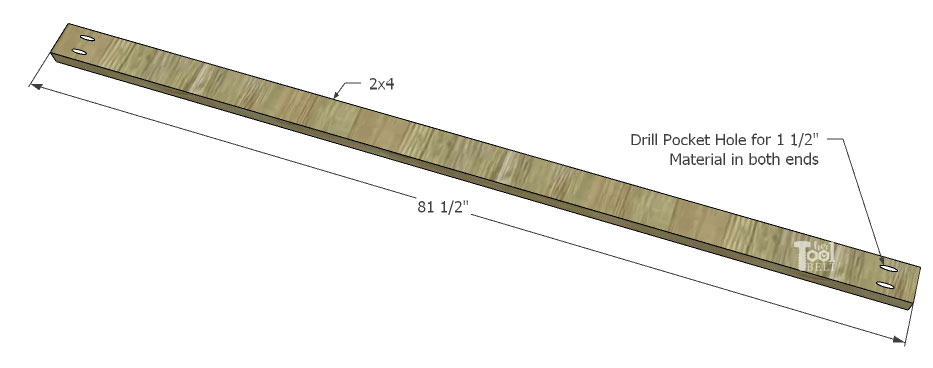
- 3 – 1 1/2″ x 3 1/2″ x 81 1/2″ (2×4) – mattress support
- 2 – 1 1/2″ x 3 1/2″ x 11 1/4″ (2×4) – center supports
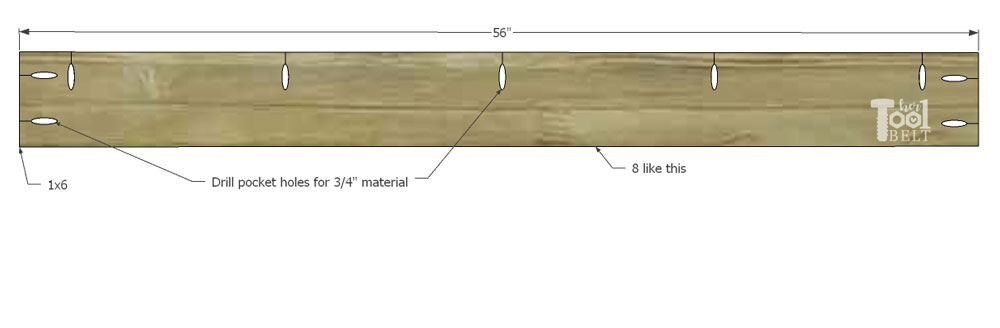
- 8 – 3/4″ x 5 1/2″ x 56″ (1×6) – head and foot board planks
- 4 – 3/4″ x 5 1/2″ x ~44″ (1×6) – X (cut to fit)
- 12 – 3/4″ x 3 1/2″ x 60″ (1×4) – bed slats
- 1 – 3/4″ x 3 1/2″ x 33″ (1×4) – headboard center
- 1 – 3/4″ x 3 1/2″ x 11″ (1×4) – foot board center
- 2 – 3/4″ x 9 1/4″ x 81 1/2″ (1×10) – bed rails (these don’t need to be this wide, they could be 7 1/4″ (1×8))
Cut Diagram
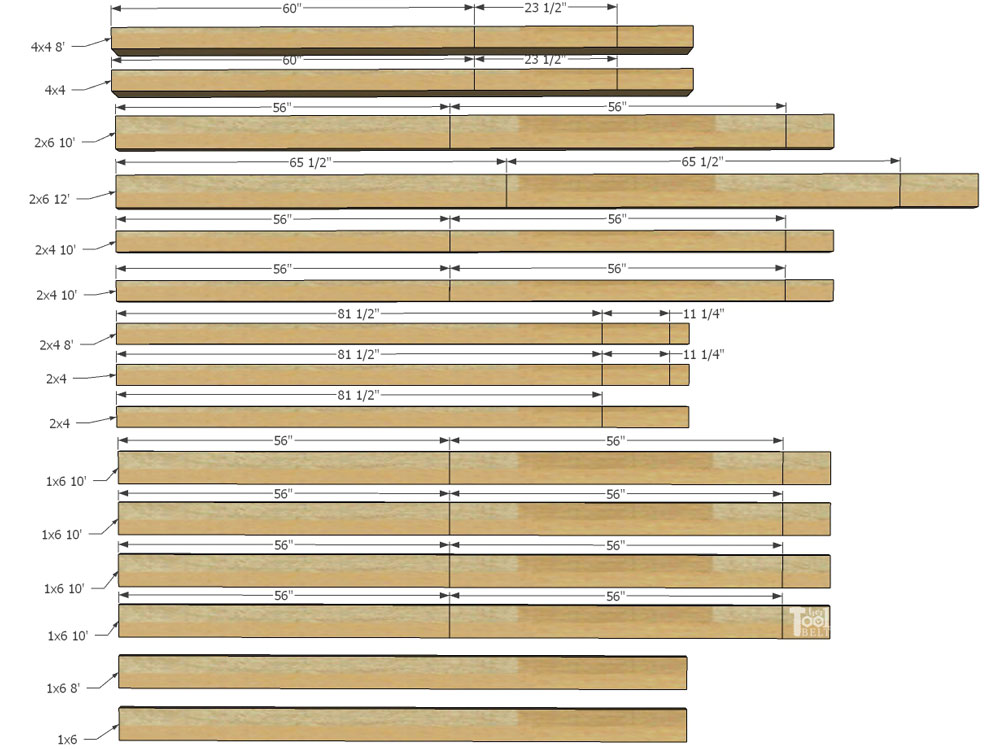
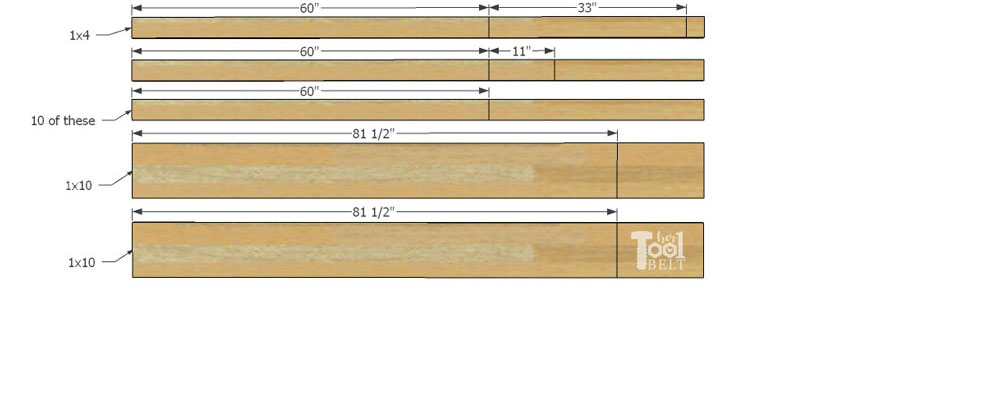
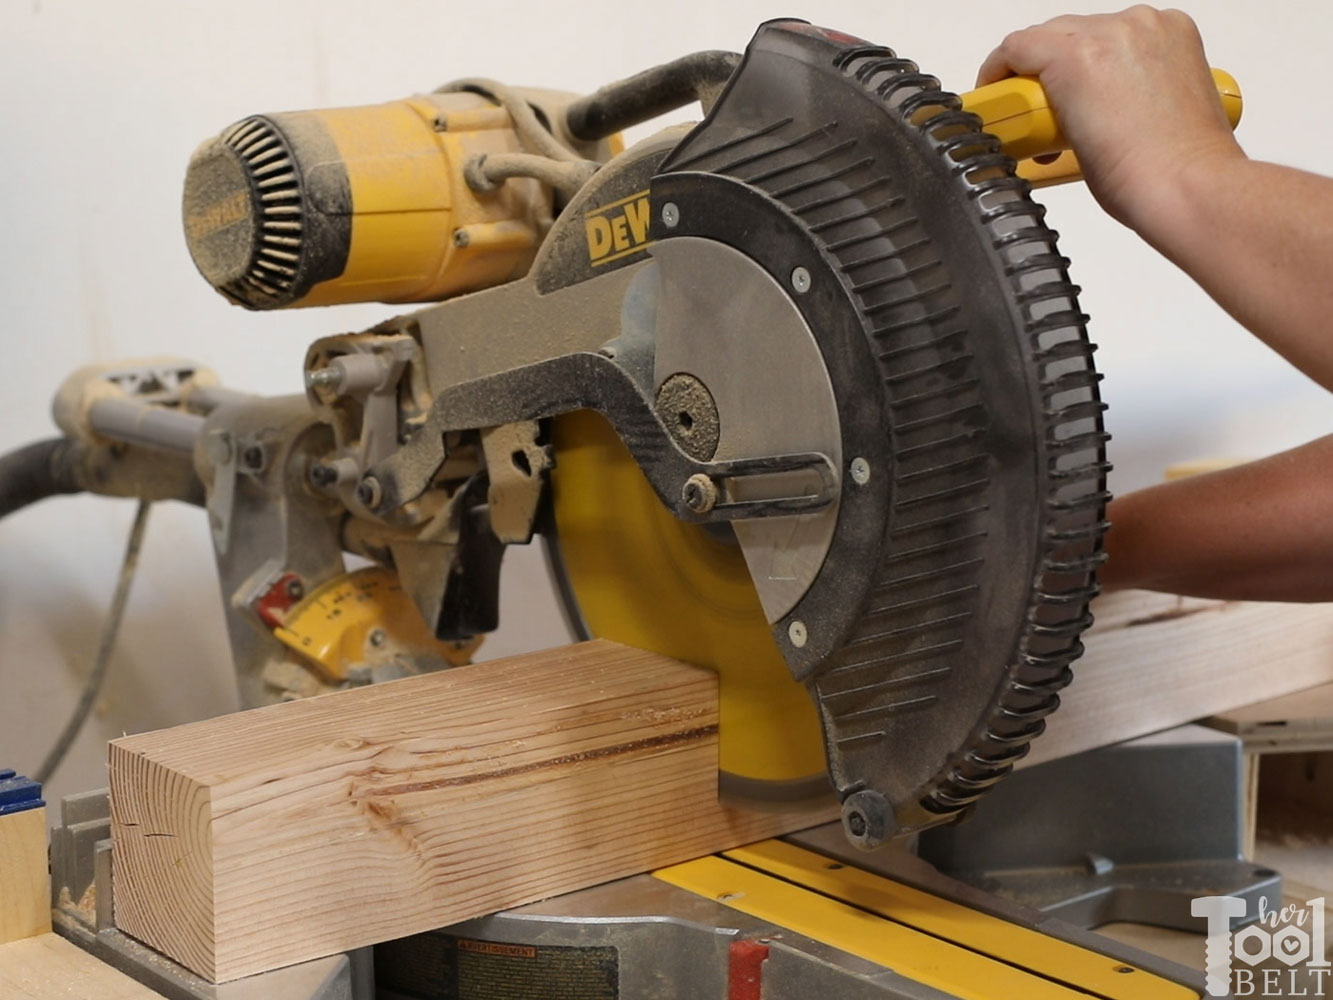
Step 1 – Cut boards
Cut the boards according to the cut list and cut diagram. (The 1×6’s for the X pieces will be cut later.)
Step 2 – Drill pocket holes
This barn door farmhouse bed uses pocket holes to join the wood together. I use the K5, but any of the pocket hole jigs should work.

In the (2×6) x 56″ headboard frame boards, drill pocket holes for 1 1/2″ material in both ends. In one of the boards, drill pocket holes along the top side.

On the 4 (2×4) x 56″ foot board frame/base attach boards, drill pocket holes for 1 1/2″ material in both ends. In one of the boards, drill pocket holes along the top side.

Then in the 3 (2×4) x 81 1/2″ mattress support, drill pocket holes for 1 1/2″ material in both ends.
In the (1×6) x 56″ headboard/foot board frame boards, drill pocket holes for 3/4″ material in both ends. Also drill pocket holes for 3/4″ material along the top.
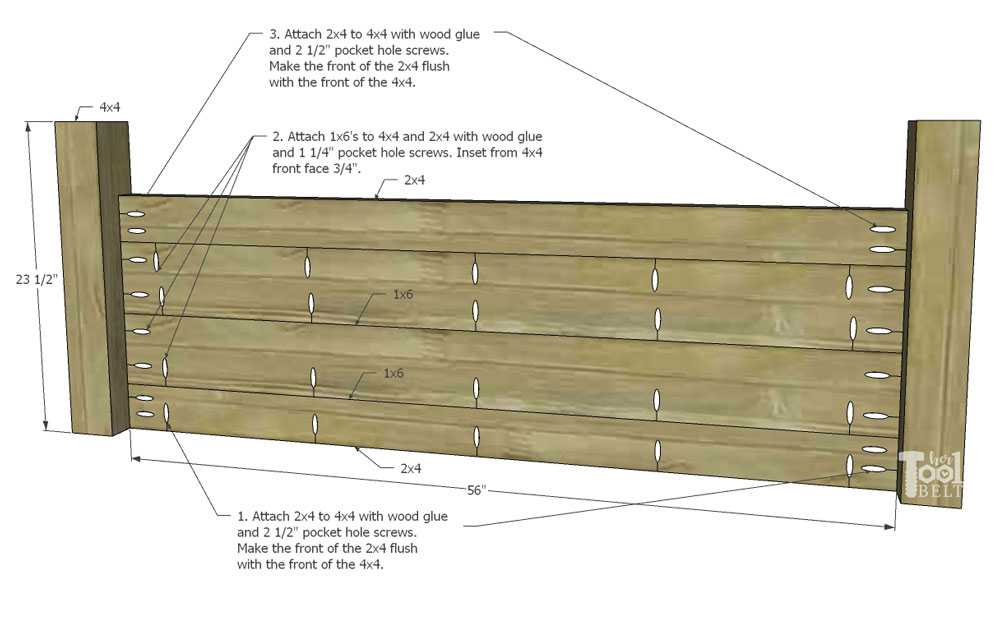
Step 3 – Assemble Foot Board
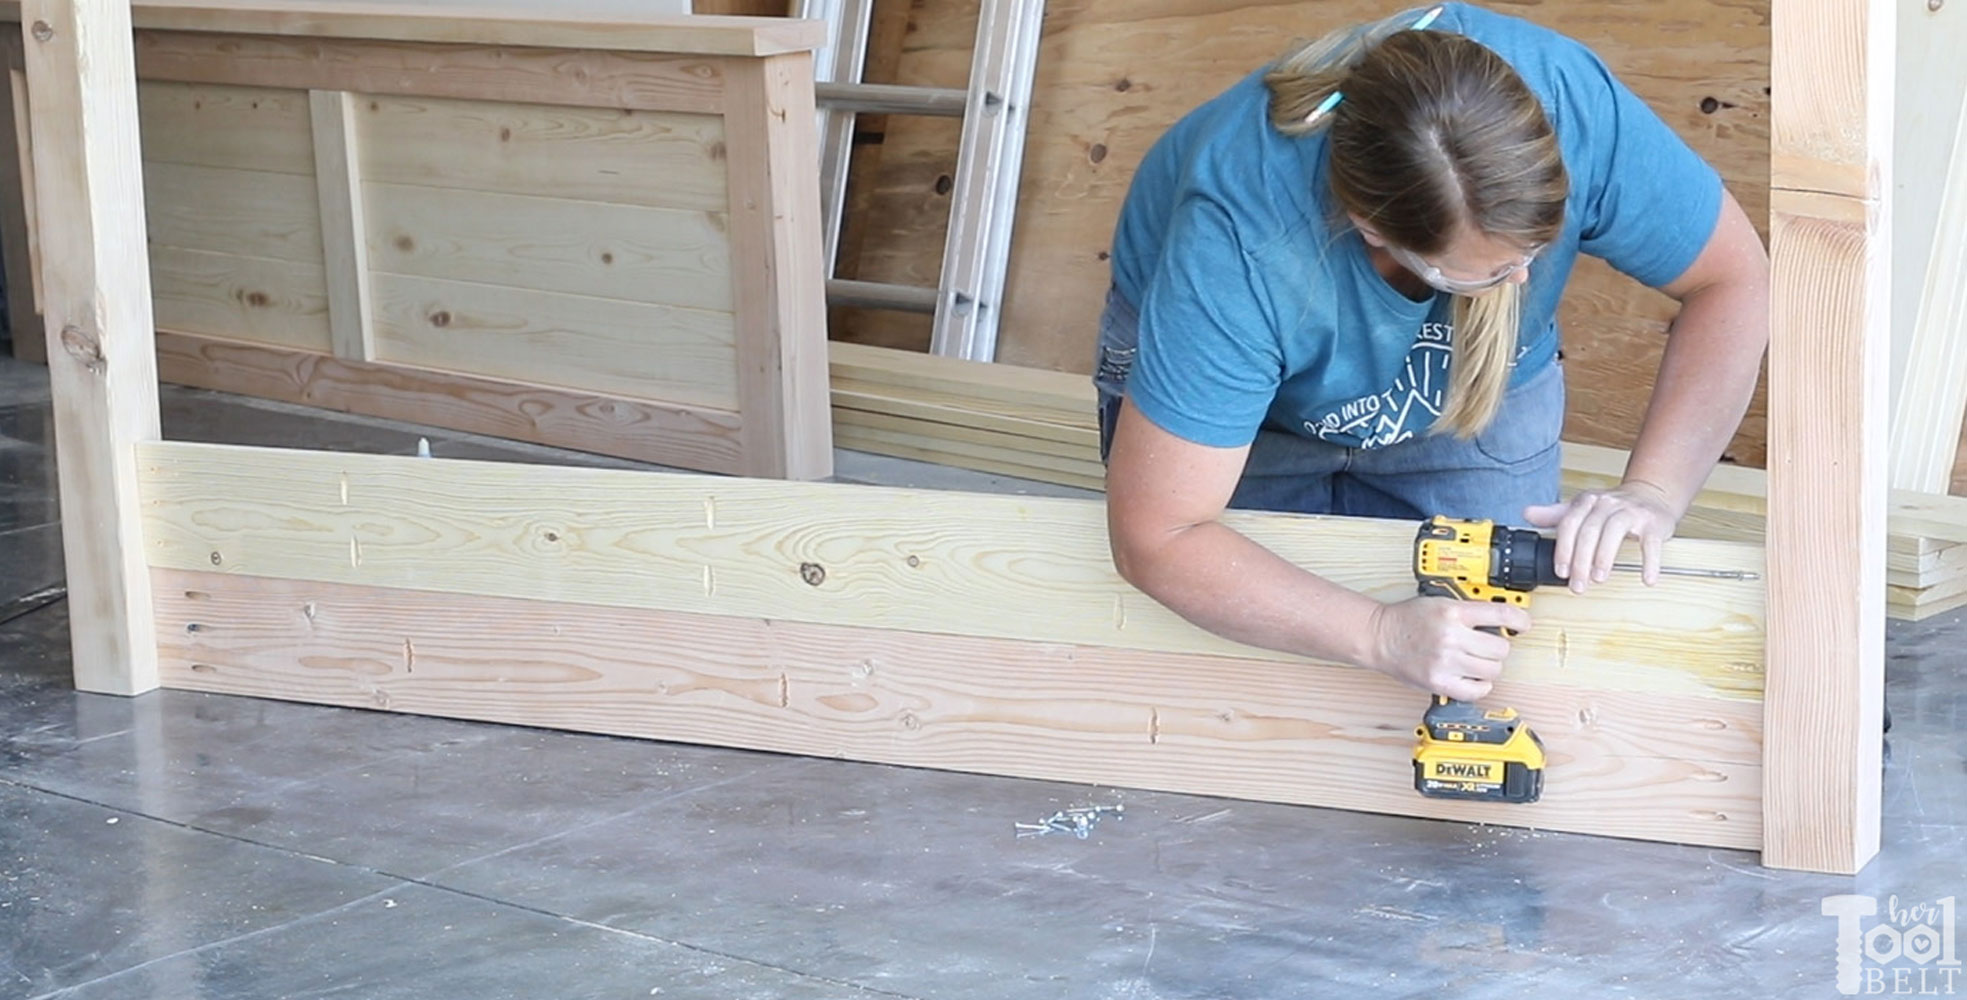
I found it easiest to assemble the foot board upside down.
- Attach the foot board frame board (2×4) x 56″ that has the pocket holes drilled along the top side to the 2 (4×4) x 23 1/2″ posts with wood glue and 2 1/2″ pocket hole screws. Make the front of the 2×4 flush with the 4×4 front face, also make the tops of the boards flush.
- Attach a (1×6) x 56″ with pocket holes to the posts and 2×4 with wood glue and 1 1/4″ pocket hole screws. Then attach a (1×6) to the posts and 1×6 with wood glue and 1 1/4″ pocket hole screws. All of the 1×6 boards will be inset 3/4″ from the front face of the 4×4/2×4’s.
- Then attach the bottom (2×4) x 56″ board to the (1×6) with wood glue and 1 1/4″ pocket hole screws and to the (4×4) post with 2 1/2″ pocket hole screws.
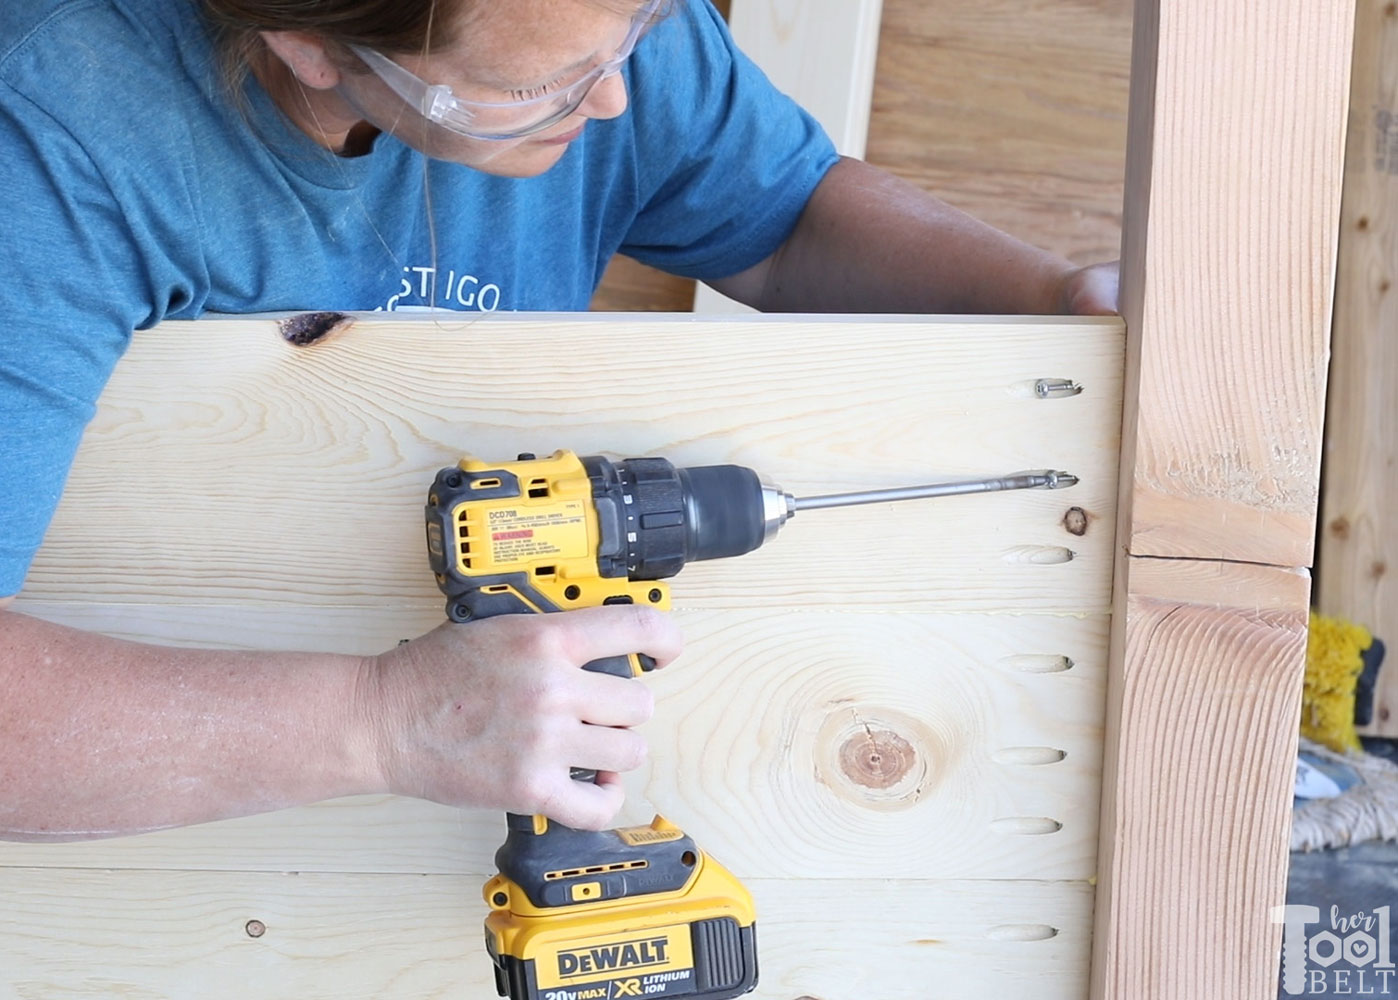
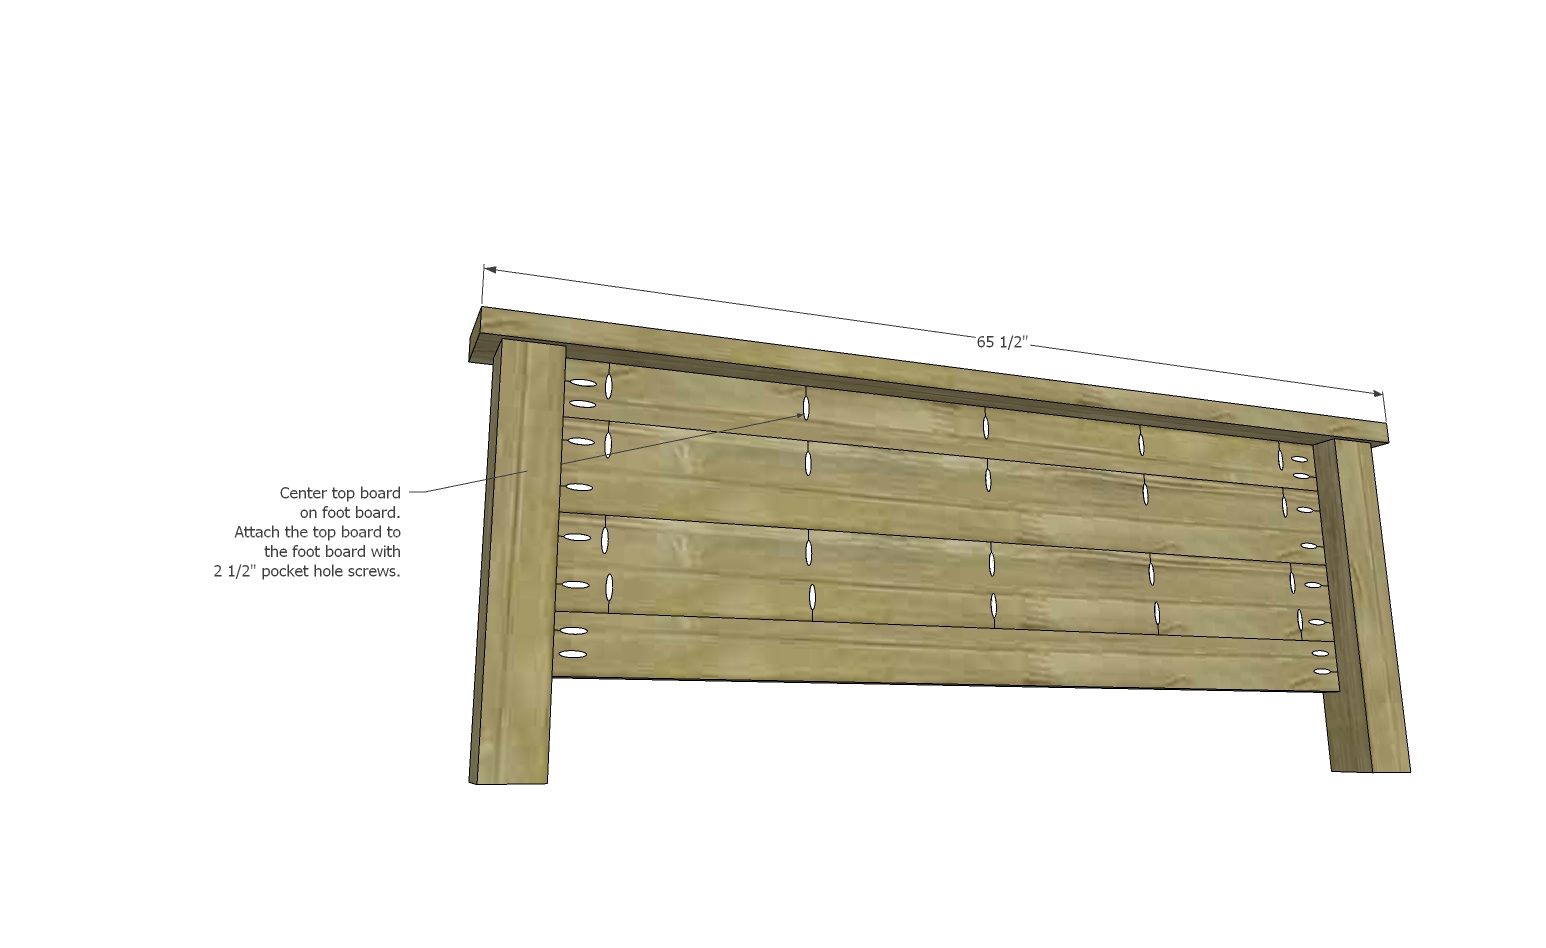
Center the foot board top (2×6) x 65 1/2″ on top of the foot board, then use the holes in the top 2×4 board, and attach it with wood glue and 2 1/2″ pocket hole screws.
Note: I didn’t want my top board sticking out quite so much, so I trimmed the width down to 5″, and also cut small 45 deg on the outside corners.
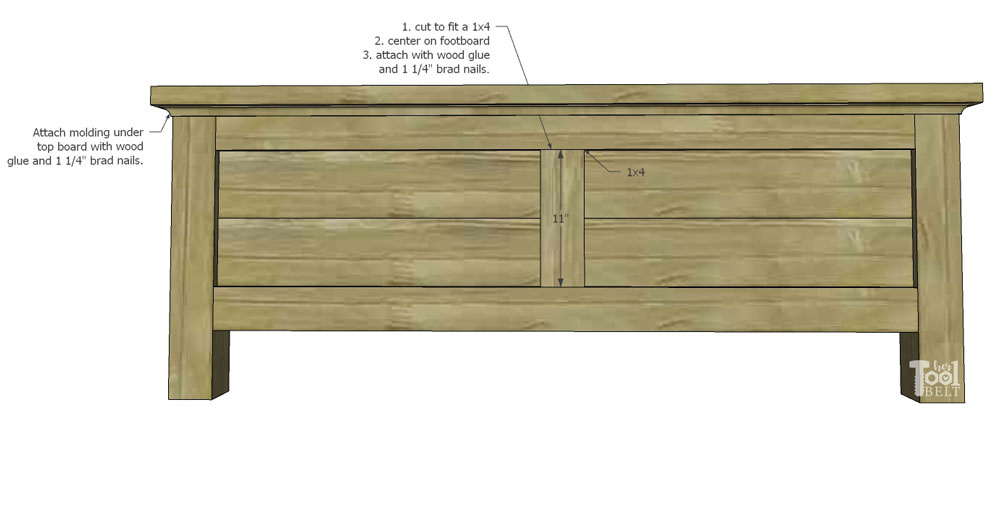
Cut to fit a piece of 1×4 (about 11″ long) for the center of the foot board front. Mark the center of the foot board and center of the 1×4, attach the 1×4 to the foot board with wood glue and 1 1/4″ brad or pin nails.
If desired, cut cove molding to fit under the top board. Attach the cove molding with wood glue and 1 1/4″ brad or pin nails.
Step 4 – Assemble the Headboard
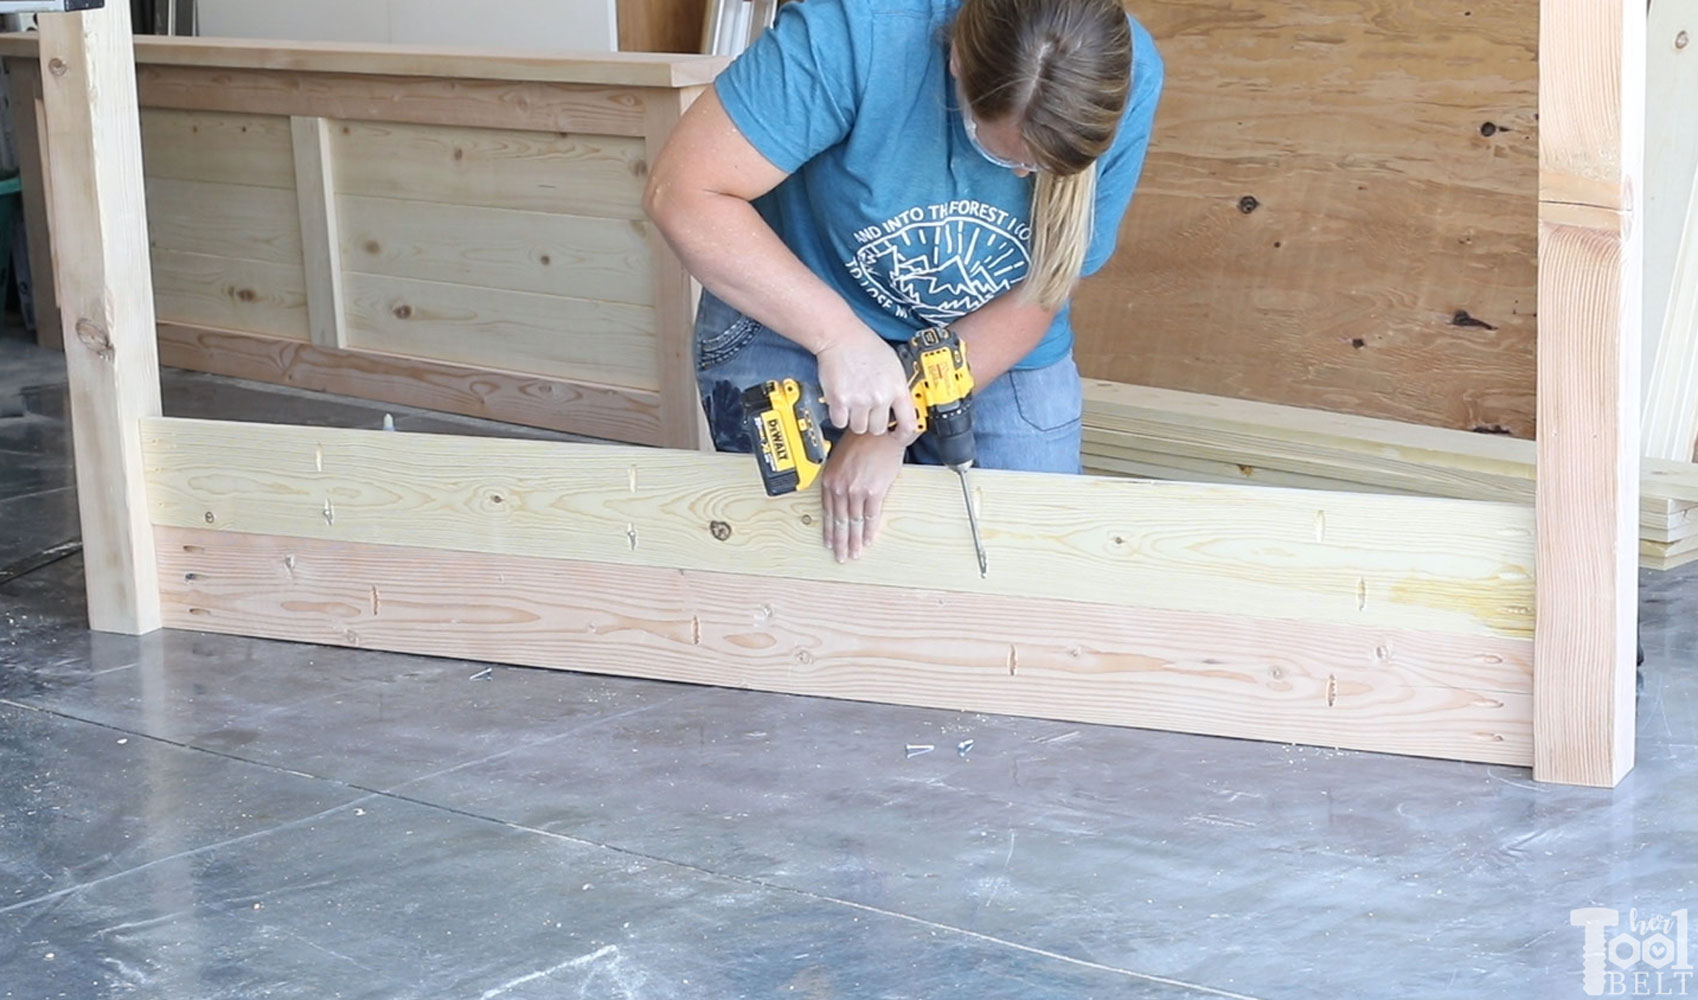
When assembling the headboard, I found it easiest to build it upside down, because I wanted to make sure the top of the headboard is flush.
- Attach the headboard frame board (2×6) x 56″ that has the pocket holes drilled along the top side to the 2 (4×4) x 60″ posts with wood glue and 2 1/2″ pocket hole screws. Make the front of the 2×6 flush with the 4×4 front face, also make the tops of the boards flush.
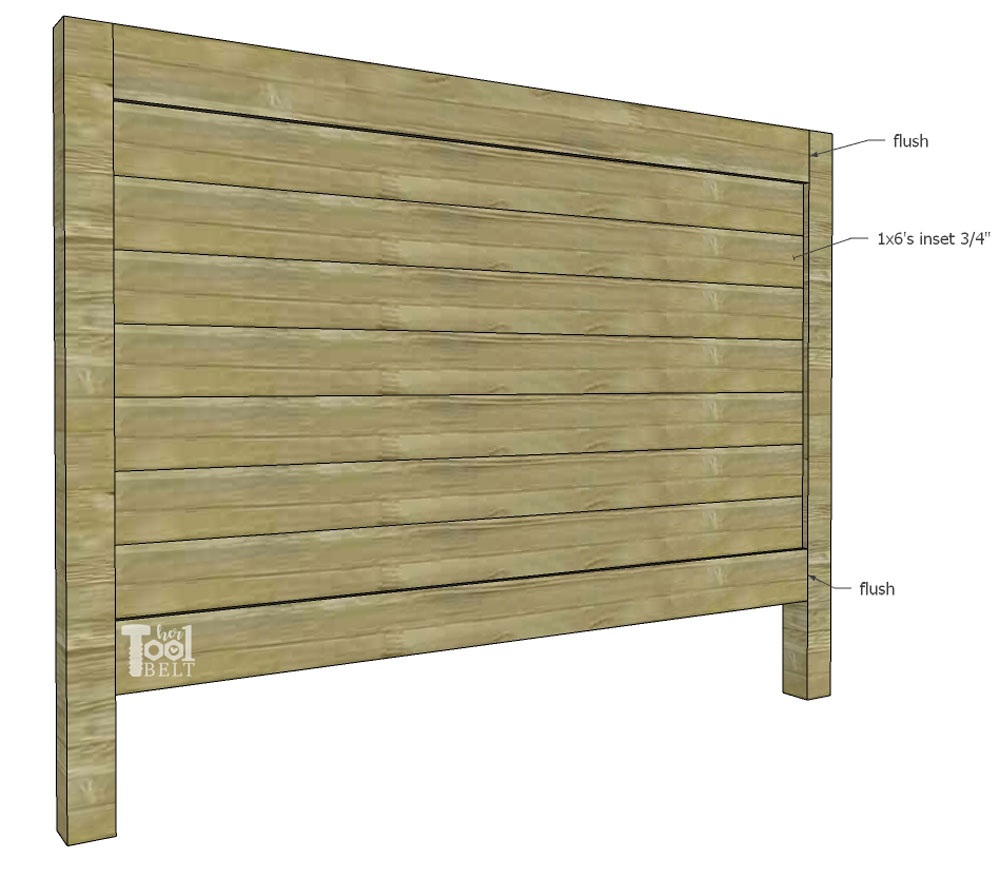
- Attach a (1×6) x 56″ to the posts and 2×4 with wood glue and 1 1/4″ pocket hole screws. Then attach 5 more (1x6s) to the posts and previous 1×6’s with wood glue and 1 1/4″ pocket hole screws. All of the 1×6 boards will be inset 3/4″ from the front face of the 4×4/2×6’s.
- Then attach the bottom (2×6) x 56″ board to the (1×6) with wood glue and 1 1/4″ pocket hole screws and to the (4×4) post with 2 1/2″ pocket hole screws.
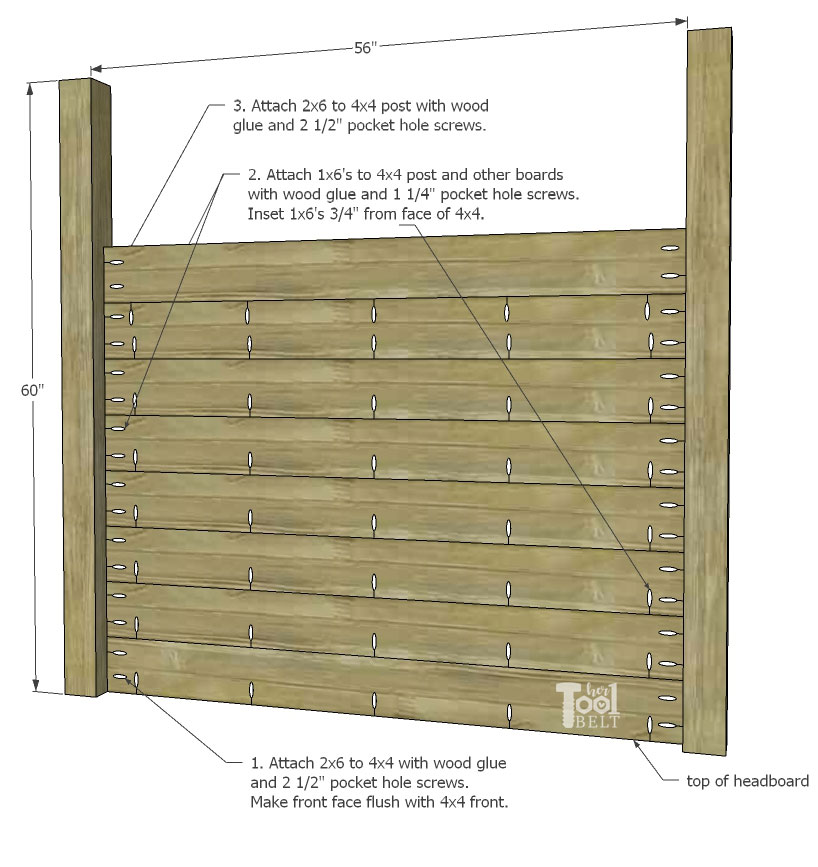
(The 2×6’s are flush with the 4×4’s, the 1×6’s are inset 3/4″)
Center the headboard top (2×6) x 65 1/2″ on top of the headboard, then use the holes in the headboard frame 2×6 board, and attach it with wood glue and 2 1/2″ pocket hole screws.
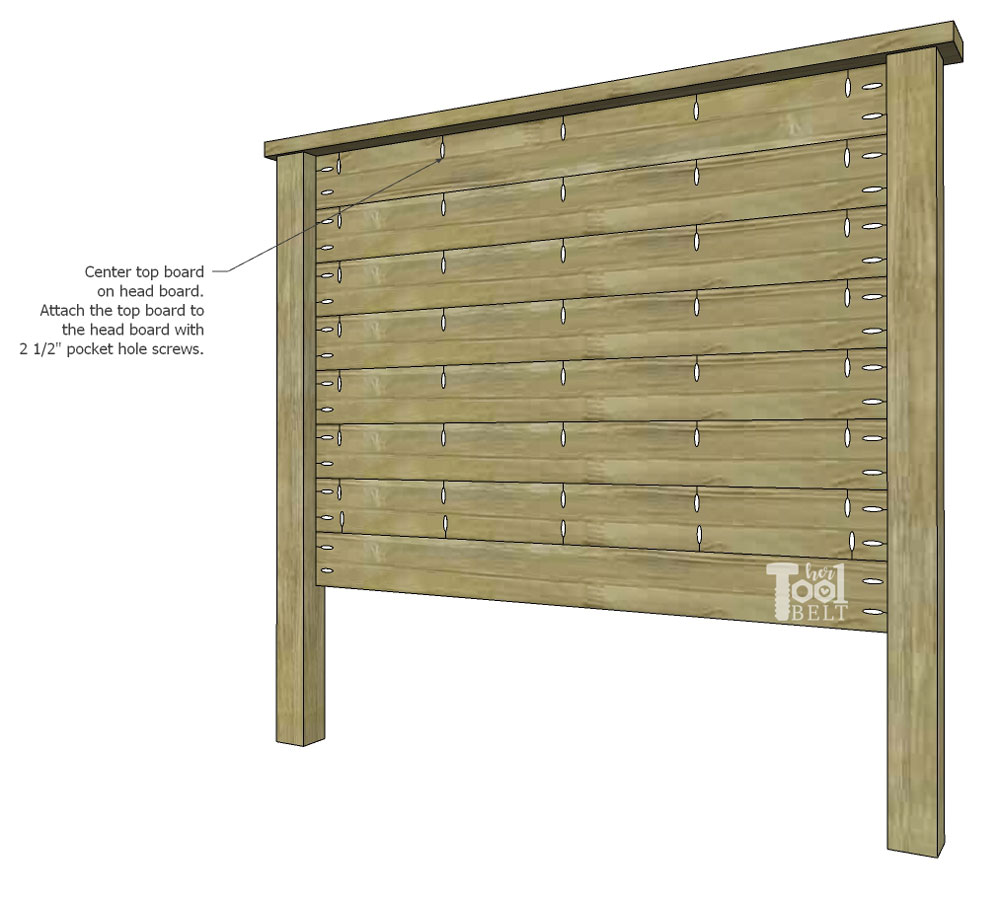
If desired, cut cove molding to fit under the top board. Attach the cove molding with wood glue and 1 1/4″ brad or pin nails.
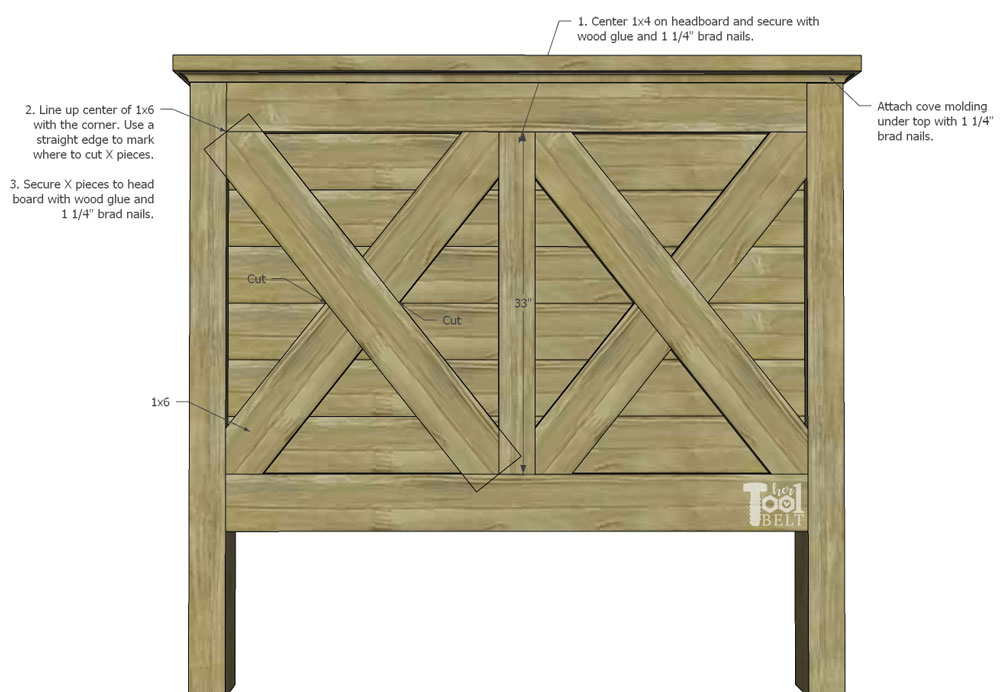
Cut to fit a piece of 1×4 (about 33″ long) for the center of the headboard front. Mark the center of the headboard and center of the 1×4, attach the 1×4 to the headboard with wood glue and 1 1/4″ brad or pin nails.
It is probably easiest to cut the X pieces to fit. Find the centerline of each 1×6 X piece. Line up the board centerlines with the headboard corners. Use a straight edge or square to mark where to cut. Cut the X pieces to fit. Use wood glue and 1 1/4″ brad or pin nails to attach the X pieces to the headboard.
Step 5 – Sand and Finish
Fill any holes, cracks or unwanted blemishes with wood putty/filler and allow to dry. Sand the barn door farmhouse bed and bed rails until it is smooth, finishing with 180-220 grit sandpaper. (I stained the bed with Rustoleum Briarsmoke. After the stain dried, I applied polyurethane and let it dry fully.
Assembly time!
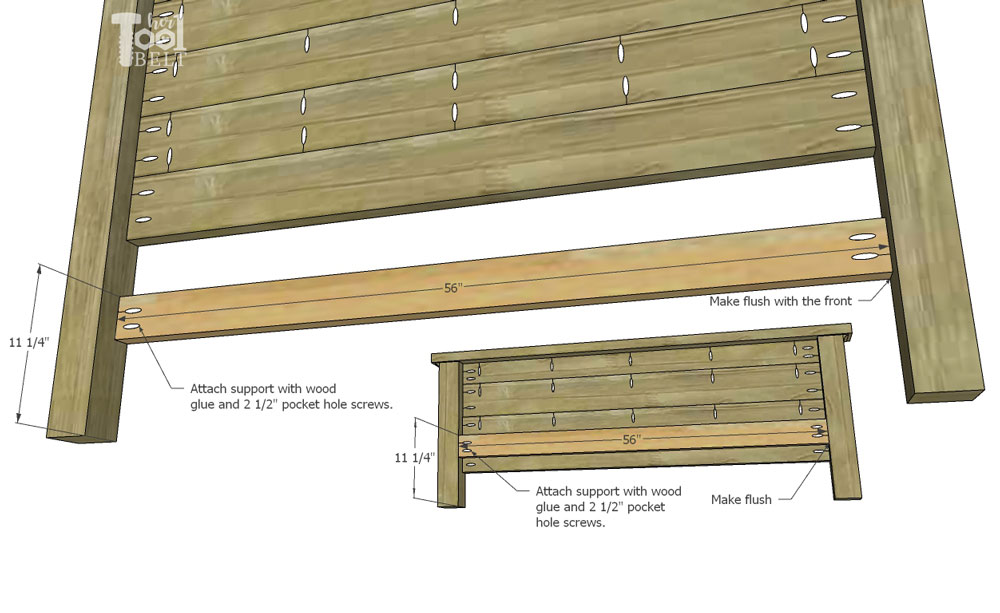
Mark 11 1/4″ up from the ground on both head/foot board. Attach a (2×4) 56″ mattress support to the head board and foot board with 2 1/2″ pocket hole screws. The headboard support should be flush with the front side of the head board. The foot board support should be flush with the backside of the foot board.
Measure and mark 5 1/2″ up from each 4×4 leg, and 3/4″ in from each leg outside. Attach the bed rails to the legs with 1 1/4″ pocket hole screws, or mount the bed rails with bed rail brackets.
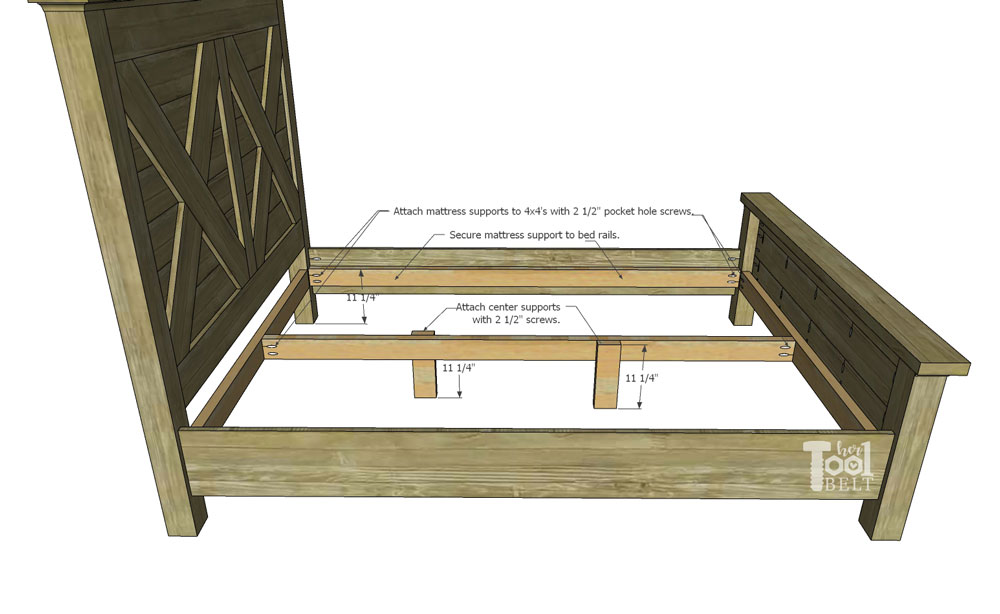
 Mark 11 1/4″ up on the legs. Attach (2×4) 81 1/2″ mattress support to legs with 2 1/2″ pocket hole screws. On the mattress supports, drill some pilot holes about 1/2″ deep, then secure the 2×4 mattress support to the bed rail with 1 1/4″ screws. Attach another mattress support in the center of the 56″ support with 2 1/2″ pocket hole screws. Attach a couple 11 1/4″ (2×4) pieces to the center mattress support with 2 1/2″ screws.
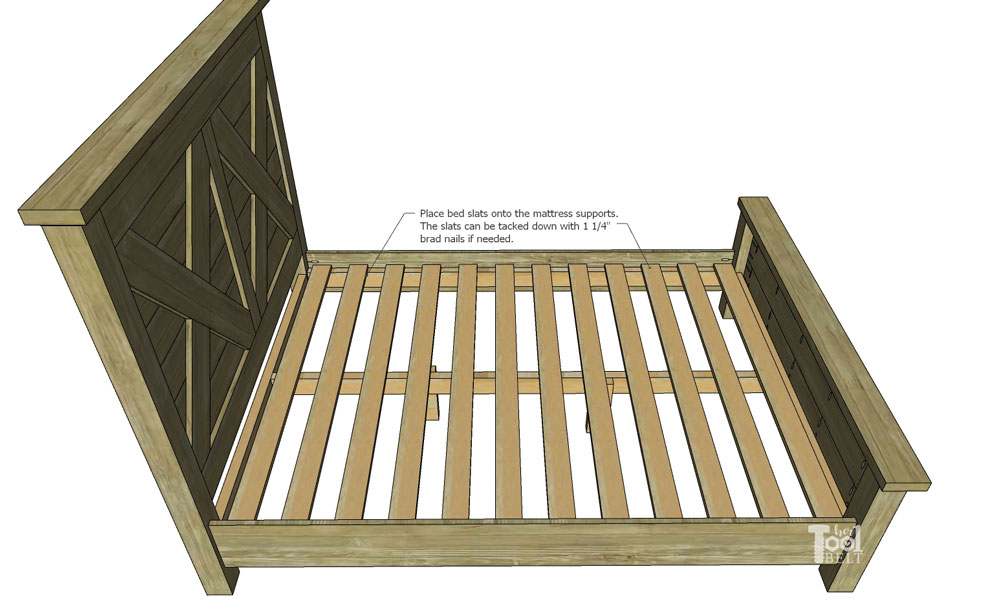
Cut 12 – 1×4’s to fit a crossed the bed and rest on the mattress supports. The slats can be secured to the mattress supports with 1 1/4″ brad nails or screws. Then add the mattress and you’re ready to go.
Thanks for pinning!
Do you have measurements for a full size bed like the design of the queen bed?
Not yet, but soon.
Ok thanks. I am looking to make a bed for my daughter to get her in a “big girl” bed before our 2nd child arrives.
If you put box springs on will the plans need to be adjusted for the extra height or is that built into the plans?
Do you happen to have the queen plans with the storage underneath? I’ve been comparing your King and Queen plans, and it seems OK to adjust the two, but I would hate to miss a measurement and have to redo.
Hi Robin,
You shouldn’t have any problems making the Queen head and foot boards. Then building the king storage. The lengths of the king and queen are the same.
Hi Her Tool Belt,
Can u take the farmhouse queen bed and make it like the king with storage but queen sized. Would it be easy to just follow the king plans but make the bed the width of the queen size bed with out storage. Also, do you happen to have plans for the queen farmhouse bed with storage. This is the exact style we have been looking to build! I have been wanting a driftwood grey bed that’s farmhouse style with storage but we need it in a queen!! Thanks so much!!
Hi Kate,
Yes you can build the head board and foot board according to the queen plans. Then build the storage portion of the king plans. The lengths of the beds are the same.
My daughter and I made this bed frame and though we’re not skilled carpenters by any stretch, we were able knock it out in a weeend. Some helpful hints for other newbs like us:
– Examine all your lumber before drilling the pocket holes. Drill the holes on the least desirable side.
– Sand exposed pieces before assembling.
– Make sure you recess the 56″ wide planks deep enough so the 1×6 ‘X’s lay flush with the Top & Bottom boards of the head & footboard. If you don’t, the Xs will sit proud and you’ll have to do some pretty agressive sanding to make them look better..
– Don’t cut the 1x4x33 & 11 (head/footboard center vertical piece) until you have the head & footboard completely assembled. I goofed by cutting them both in the beginning with the rest of the lumber, then realized they weren’t the proper length.
– Space the pocket holes out
– Measure twice. Cut once.
– Measure twice. Cut once. lol
– If using a cordless drill, have two batteries or have a corded drill as a backup while the charging a dead battery.
– If your power miter saw doesn’t have slide capability, it won’t be able to make the full ‘X’ miter cuts. You’ll have to eyeball it while “free handing”
– Use a Wood Conditioner prior to staining.
Thank you for sharing your tips!
This is gonna be my first bed to make! I love it and all the inspiration you give me! Thank you ❤️
Do you have plans for this bed but in King Size. I saw the one with storage, but am interested in this style but in king.
Hi Ryan,
Build the King head board and foot board from the King with storage, but use the queen bed rails and middle supports. Regular King and queen mattresses are the same length.
HTH,
Amy
Do you have plans for this bed in full size?
Hi Amy
I noticed in the plans that some of the 1x6s have pocket holes on top and bottom. Is that correct?
What type of wood do you recommend for this? We are planning on staining it a lighter color so that the grain really shows through. We were thinking about Pine or Cedar, but would like your recommendation!
Thank you for your thoughts!
I used pine because it was cheapest at the time, so that’ll work great if you choose that route. Cedar will be beautiful too, and it stains nicely.