• Home
  • Project Gallery
  • About me
    • Disclosure
    • Disclaimer
  • Blog

Her Tool Belt

DIY furniture plans, crafts, and home improvement tutorials to empower you!

  • Free Woodworking Plans
    • Bathroom Furniture
    • Bedroom Furniture
    • Entry
    • Family Room Furniture
    • Garage
    • Kitchen furniture
    • Laundry Room
    • Mudroom Furniture
    • Organization
    • Outdoor Furniture
  • Home Decor
    • Upcycle
  • Crafts
    • Holiday
  • Home Improvement
    • Cleaning
    • Fix IT
    • Paint
    • Tile
  • Tool Reviews
  • Tool Time Videos

Rolling Island + Counter Table

October 27, 2014 by Amy 17 Comments

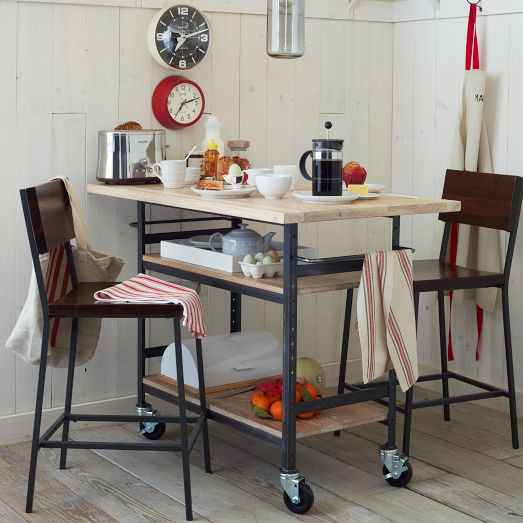
My good friend, Jenny just moved into a compact apartment.  She needed to get a table, but it sure would be nice if that table could double as more counter space and add much needed storage.  The table also needed to be small, easy to move and of course stylish!  Quite the list to ask of a table 🙂  Then she saw the West Elm ‘Design Workshop Wood Top Bar + Counter’ (now sold out), it fit all of the requirements, except for the hefty price tag of $2,399.  I assured her that we can DIY it for a small fraction of that price.

Build a stylish DIY multi-functional table. Free plans for a rolling industrial counter table, rolling island with lots of open storage. West Elm Knockoff

 How to Build a Rolling Table

Materials

  • 2 – 2″ x 8″ x 96″ wood
  • 2 – 2″ x 10″ x 96″ wood
  • 2 – 1 1/4″ x 1/8″ x 72″ plain steel angle
  • 6 – 1″ x 1/8″ x 36″ plain steel angle
  • 2 – 1″ x 1/8″ x 36″ steel flat bar
  • 20 – bolts and nuts (I used 1/4″ – 20 x 1/2″ round head machine screws and nut)
  • Primer
  • Spray Paint
  • 4 – 3″ locking swivel casters
  • 2 1/2″ pocket screws*
  • 1 1/4″ pocket screws*
  • Polyurethane top coat*
  • sand paper
  • wood glue
  • wood filler

I bought everything I needed to build this table from Home Depot, although I think you may be able to find the metal cheaper at a metal store.

Step 1

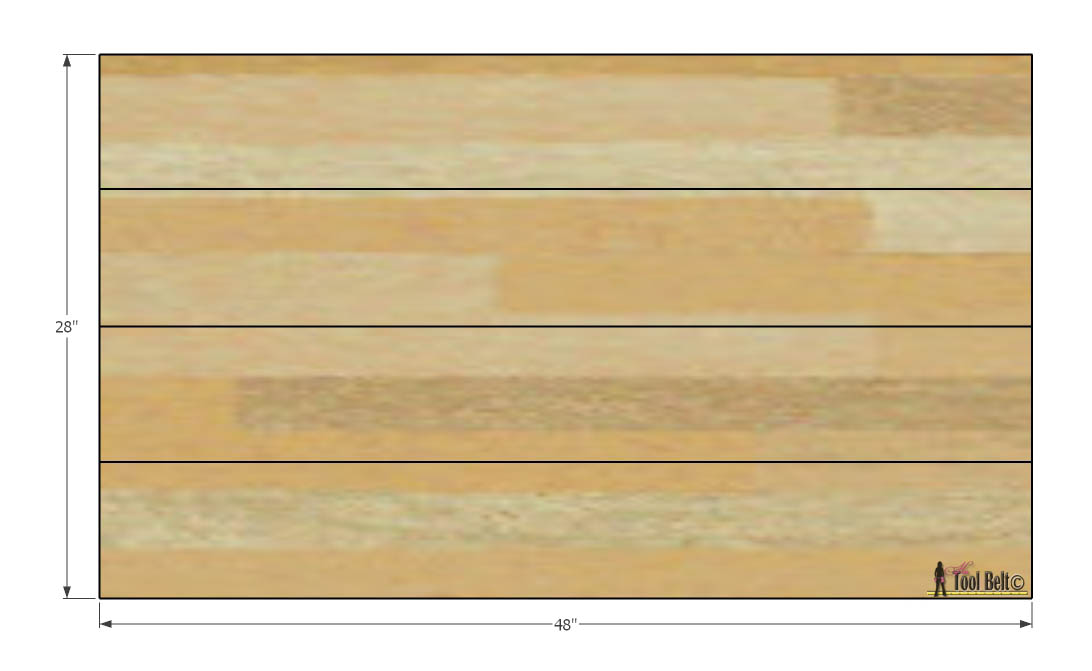
Cut 4 pieces of 2″ x 8″ boards to about 48″.   When I join 2 x boards, I like to trim the long sides to get a straight edge and to remove the rounded edge.  Trim the 2″ x 8″ boards to 7″ wide.

Build a stylish DIY multi-functional table. Free plans for a rolling industrial counter table, rolling island with lots of open storage.

* denotes affiliate link

Set your Kreg Jig* for 1 1/2″ material.  Drill pocket holes to join the boards together, about 5 holes per board.  Glue and secure the boards together with 2 1/2″ screws.

Build a stylish DIY multi-functional table. Free plans for a rolling industrial counter table, rolling island with lots of open storage.

Cut 4 pieces of 2″ x 10″ boards to 36″ long. Trim the 2″ x 10″ boards to just under 9″ wide.  Set your Kreg Jig* for 1 1/2″ material.  Drill pocket holes to join the boards together, about 5 holes per board.  Glue and secure the boards together with 2 1/2″ screws.

Build a stylish DIY multi-functional table. Free plans for a rolling industrial counter table, rolling island with lots of open storage.

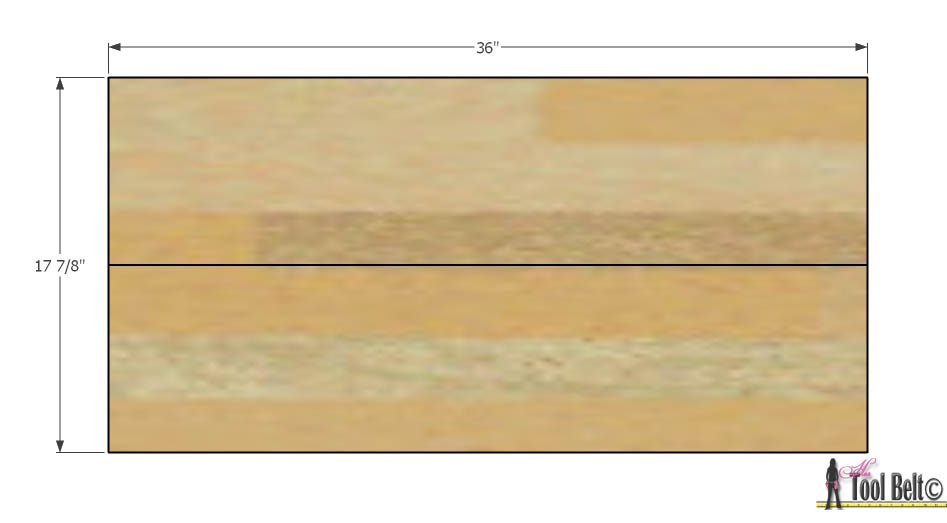
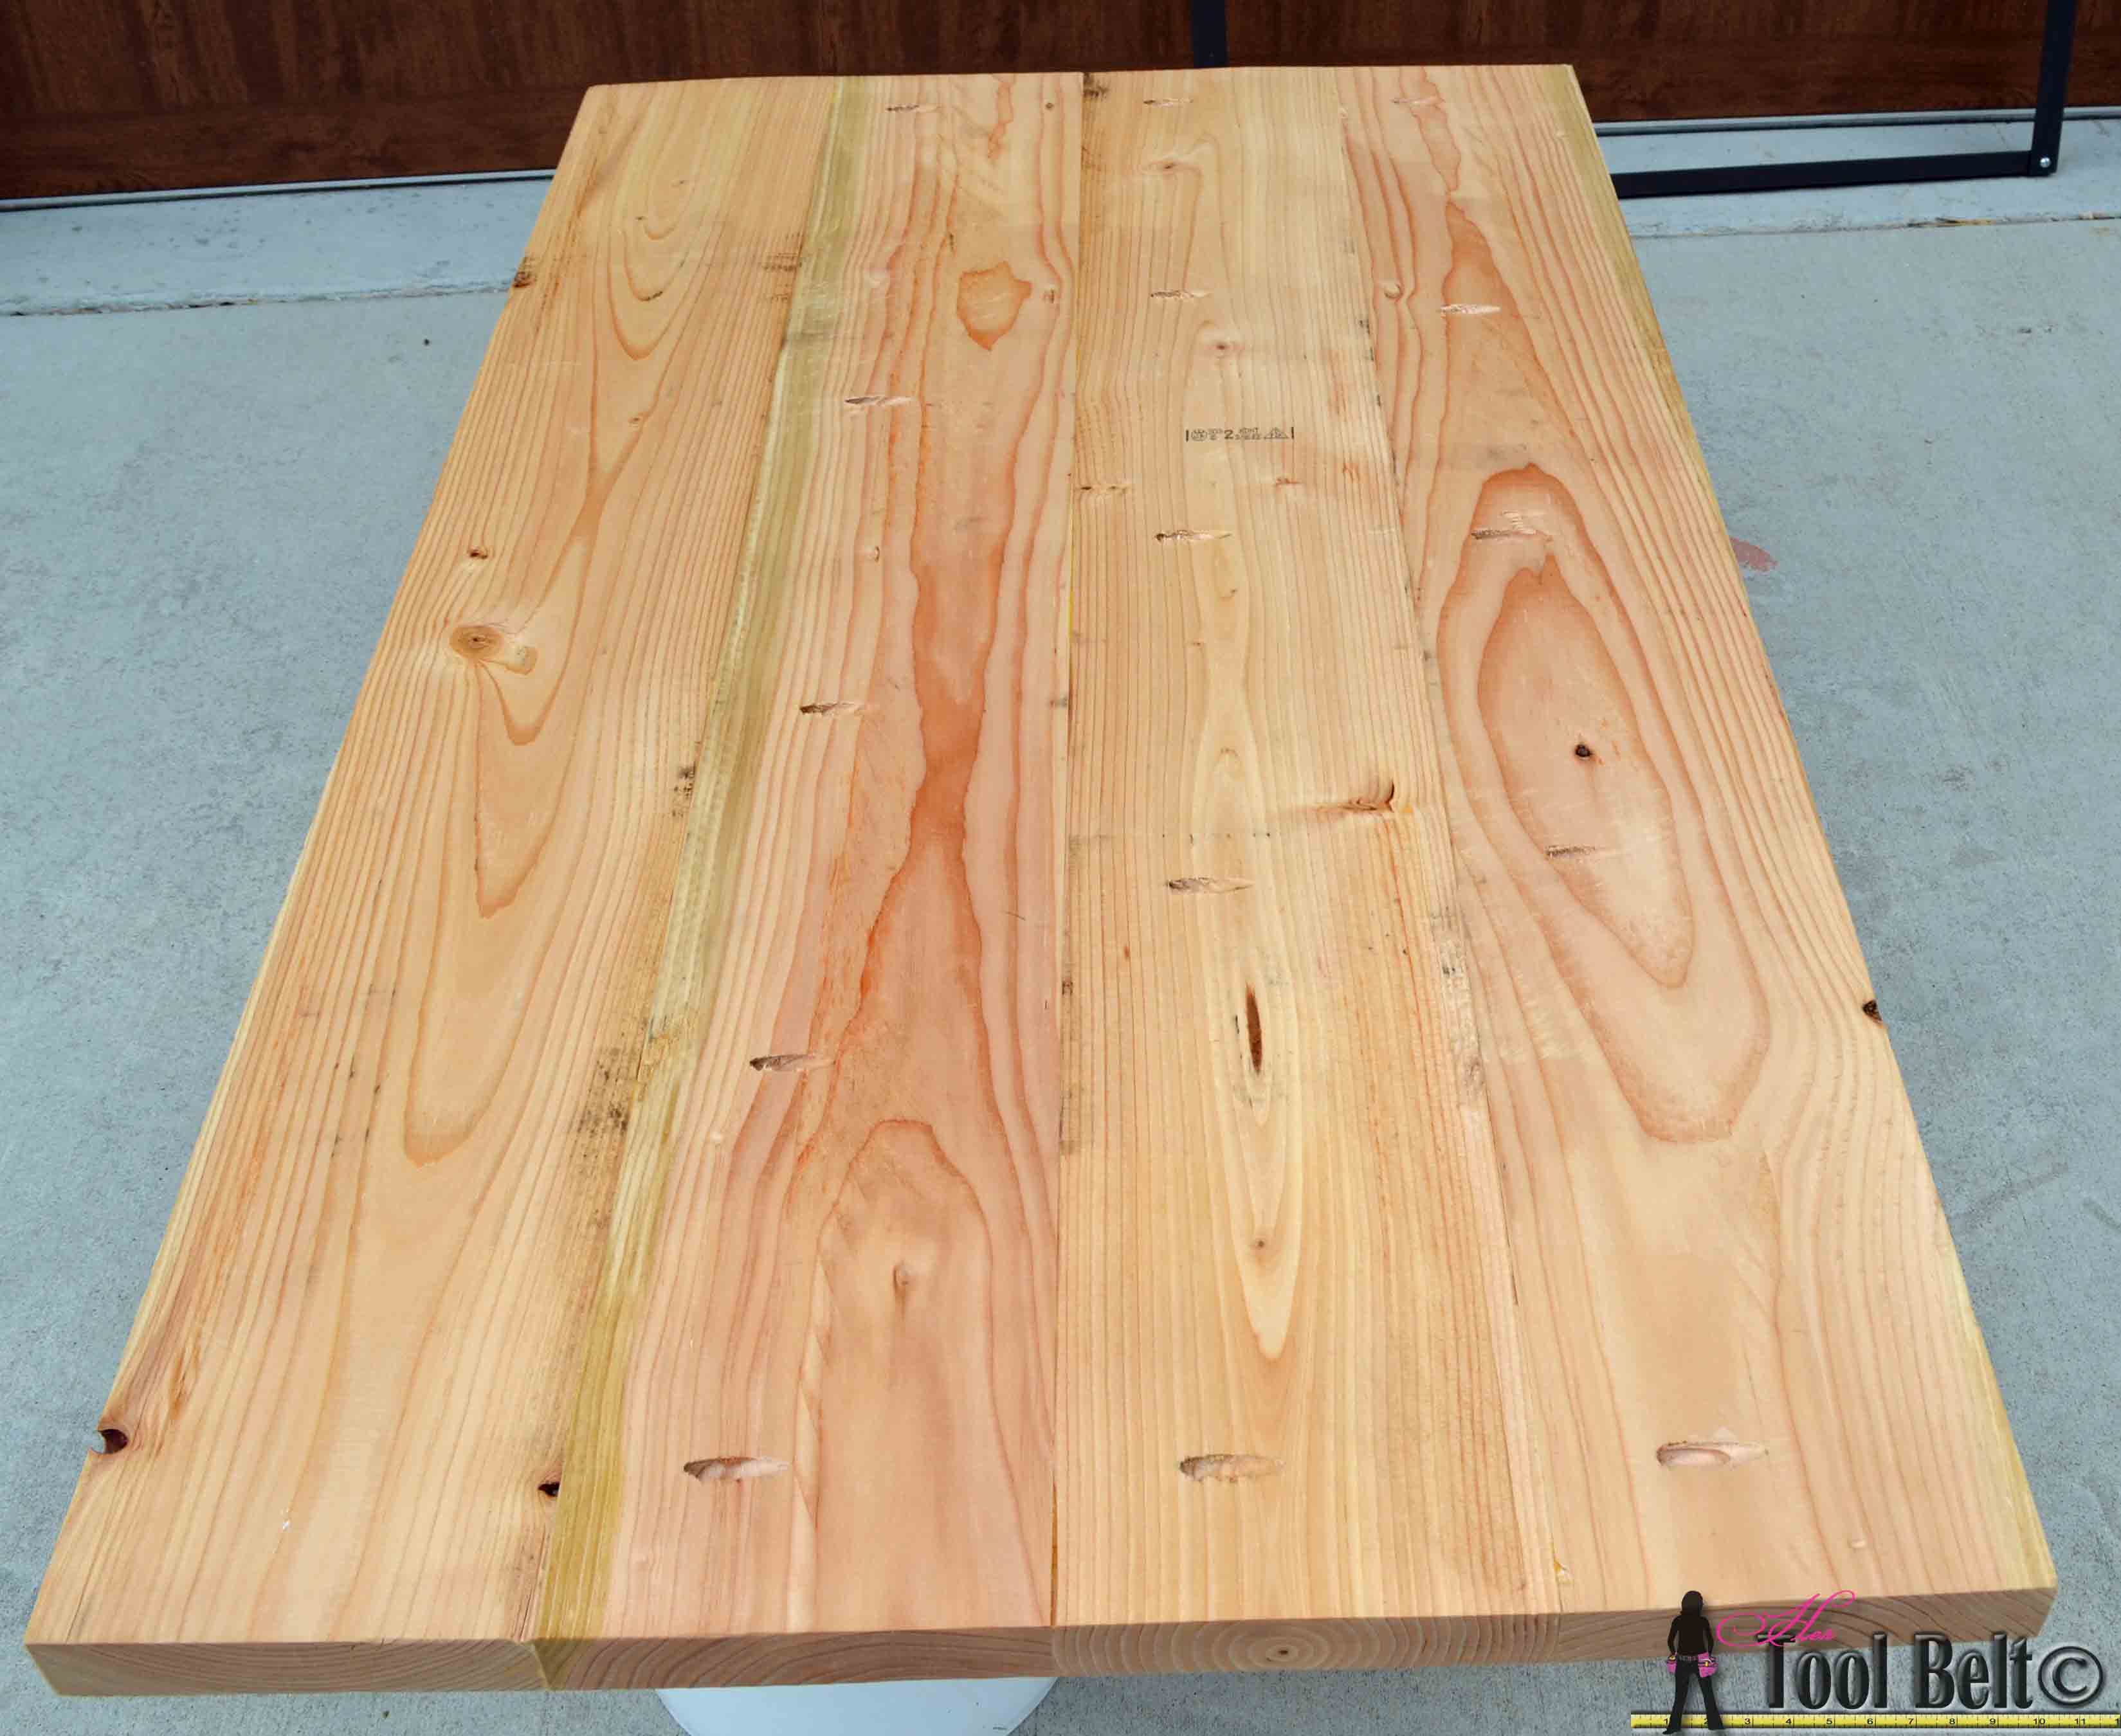
Once the glue has dried, trim the ends of the boards to be flush.

Step 2

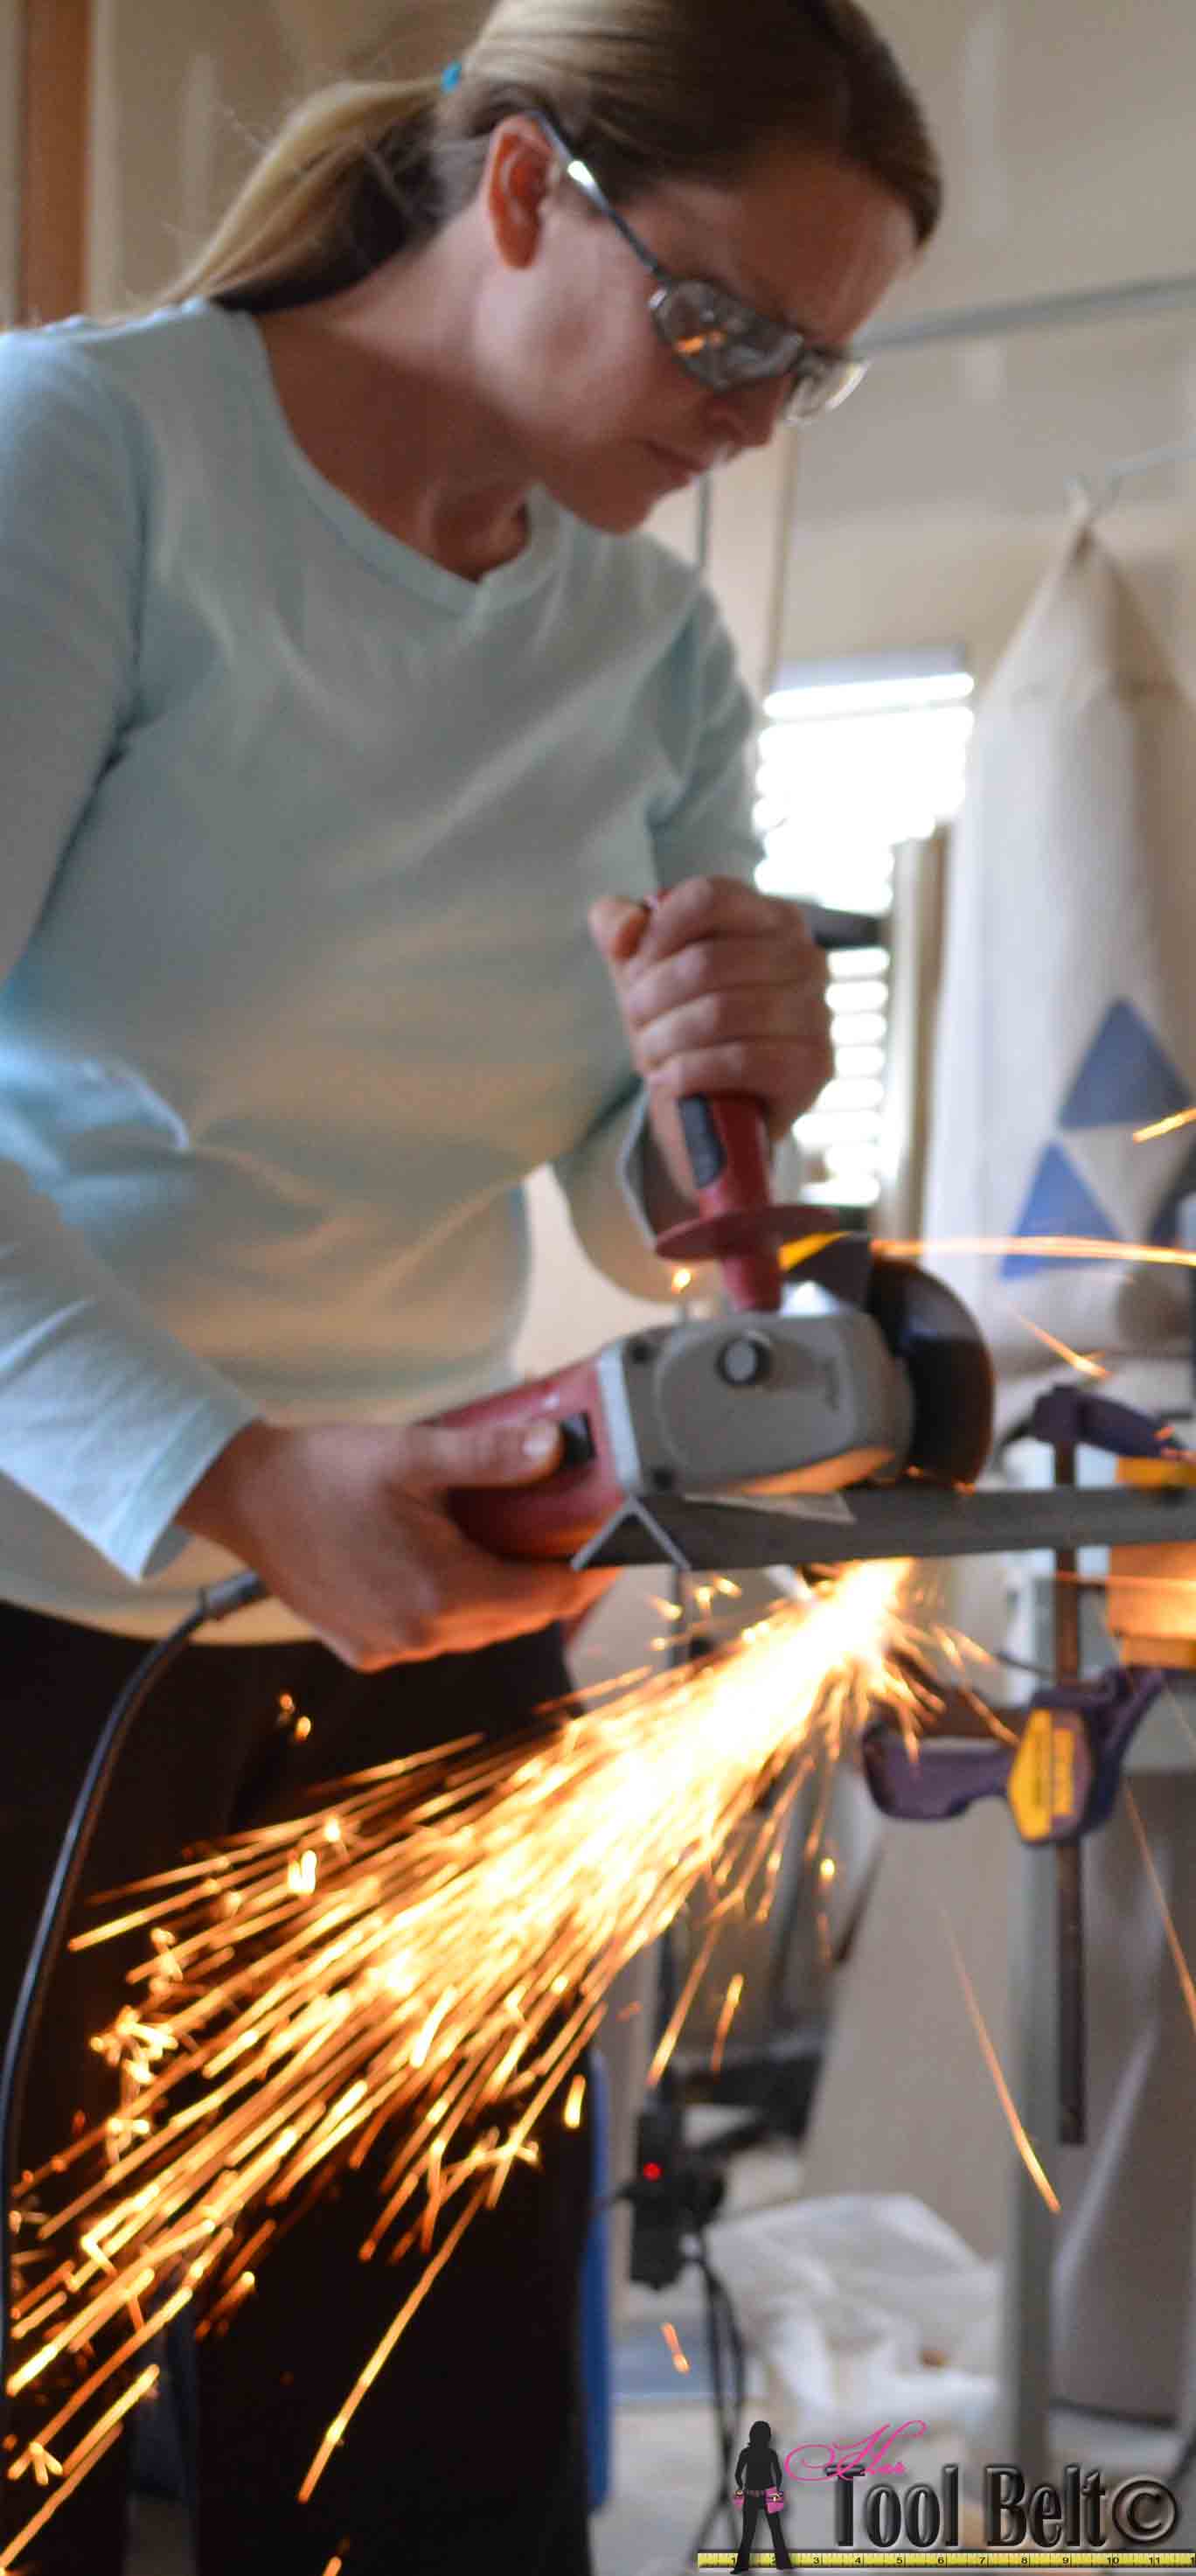
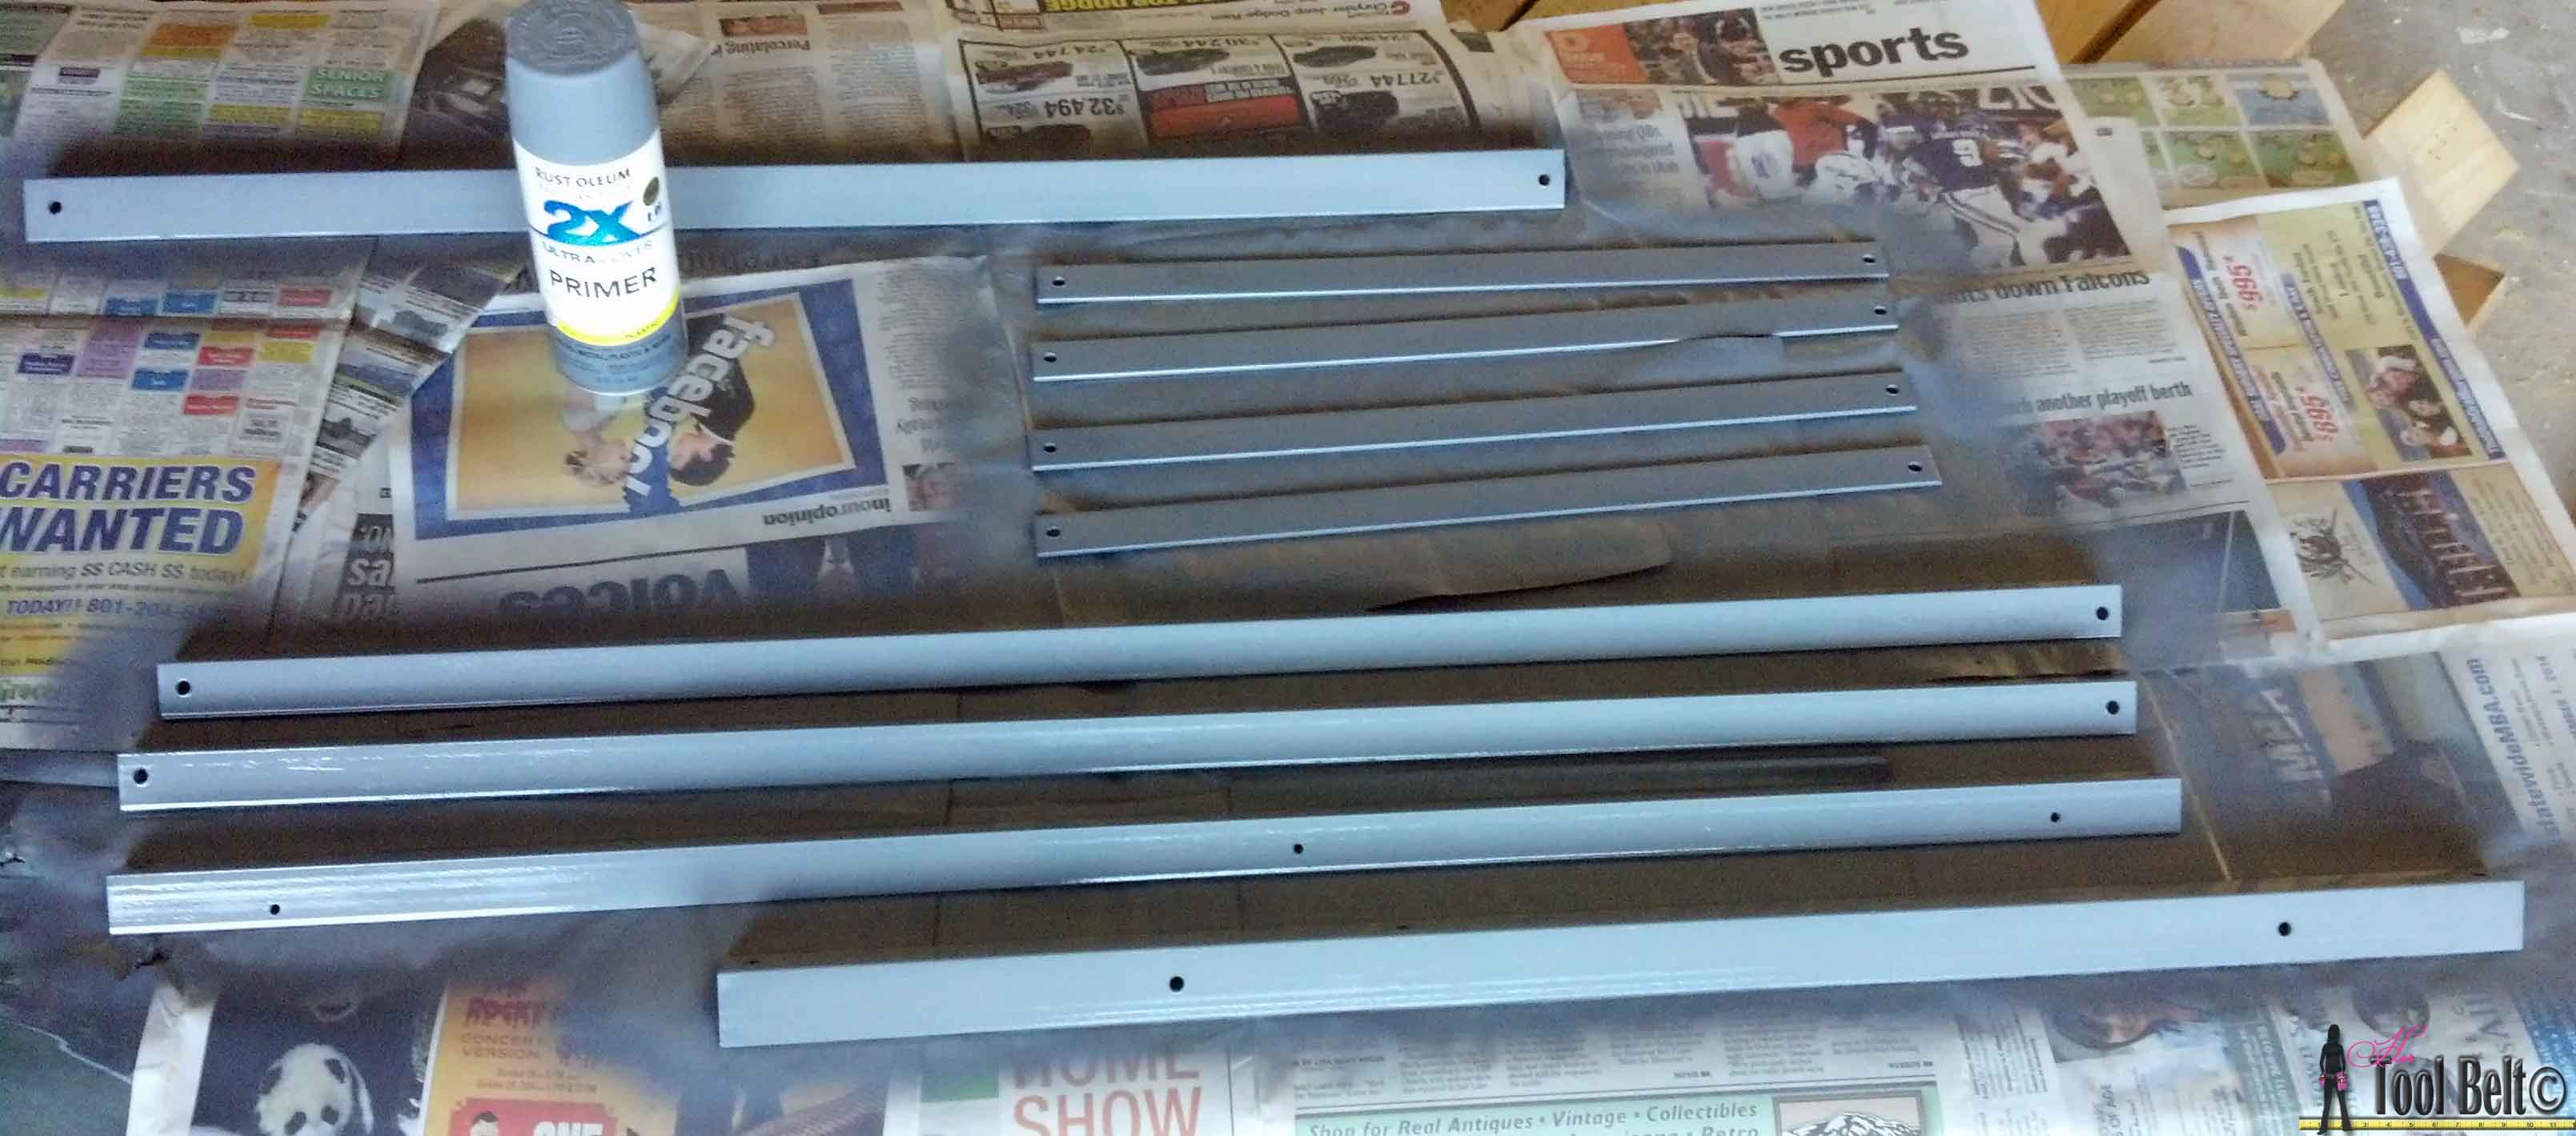
Now it’s time to cut some metal!  There are a variety of ways to cut the steel. I used a grinder with a cut off wheel, it is an easy way to cut the metal.  Cut the 1 1/4″ x 1/8″ x 72″ steel angle into 4 pieces 31 1/2″ long.  Cut the 1″ x 1/8″ x 36″ flat bar into approximately 18″ long pieces.  Make sure to wear your safety equipment, especially glasses.

Build a stylish DIY multi-functional table. Free plans for a rolling industrial counter table, rolling island with lots of open storage. #hertoolbelt

Step 3

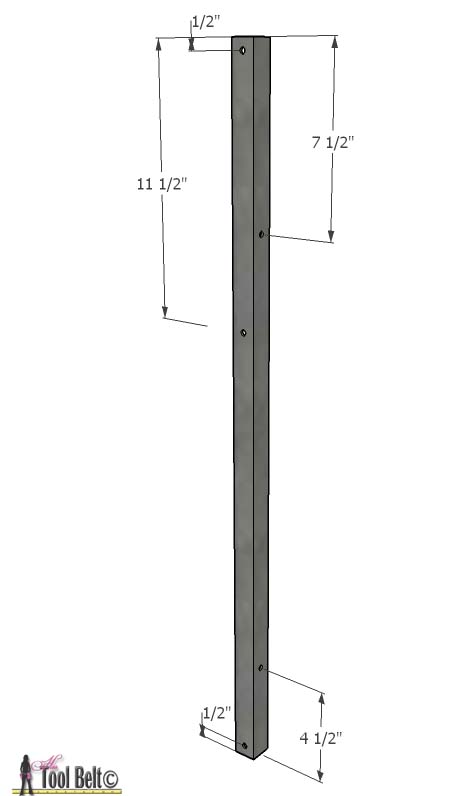
First we need to drill holes in the 4 – 31 1/2″ legs.  The hole size will depend on your bolt, mine was a 1/4″ hole.  Make sure when drilling the holes, you pair up the legs and do the mirror image on 2 of the legs.  Drill holes according to the following dimensions.

Build a stylish DIY multi-functional table. Free plans for a rolling industrial counter table, rolling island with lots of open storage.


Next, we need to drill holes in the ends of the 1″ x 1/8″ x 36″ metal shelf supports.  I found it best to place the metal shelf supports where they should go (see dimensions below), and mark the matching hole, then drill.

Build a stylish DIY multi-functional table. Free plans for a rolling industrial counter table, rolling island with lots of open storage.


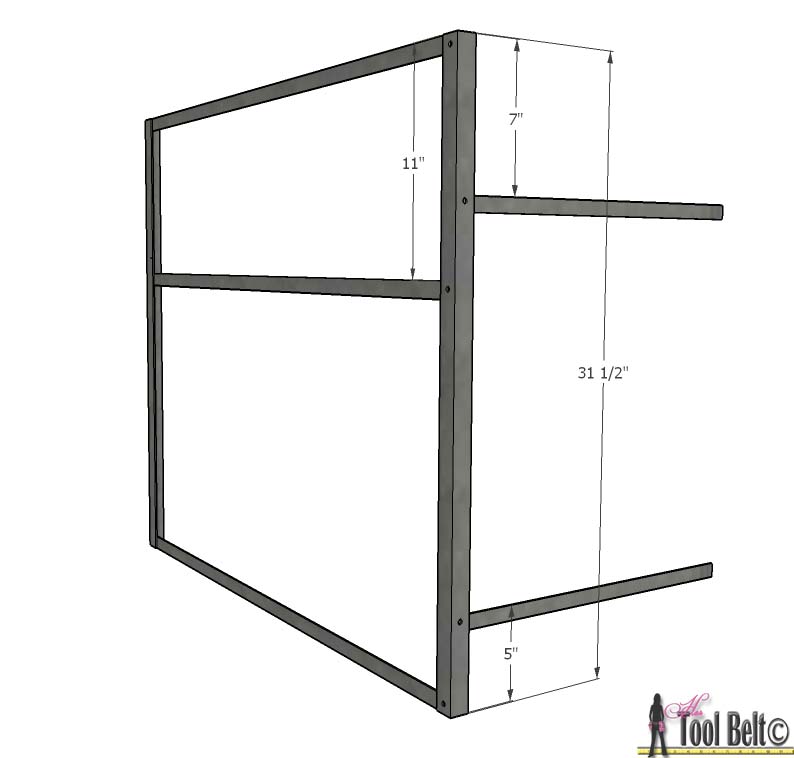
Here’s the orientation of the shelf supports.

Build a stylish DIY multi-functional table. Free plans for a rolling industrial counter table, rolling island with lots of open storage.


Step 4

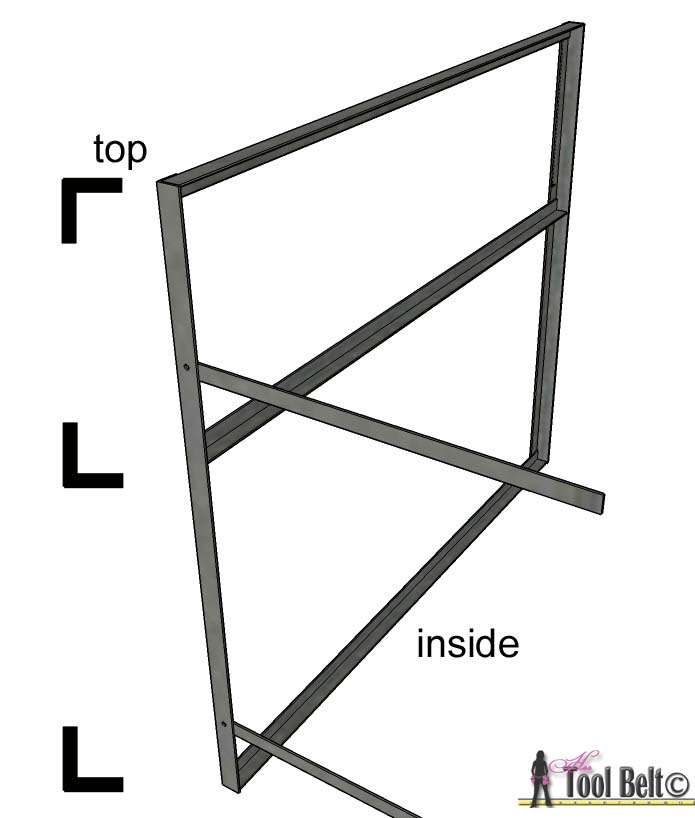
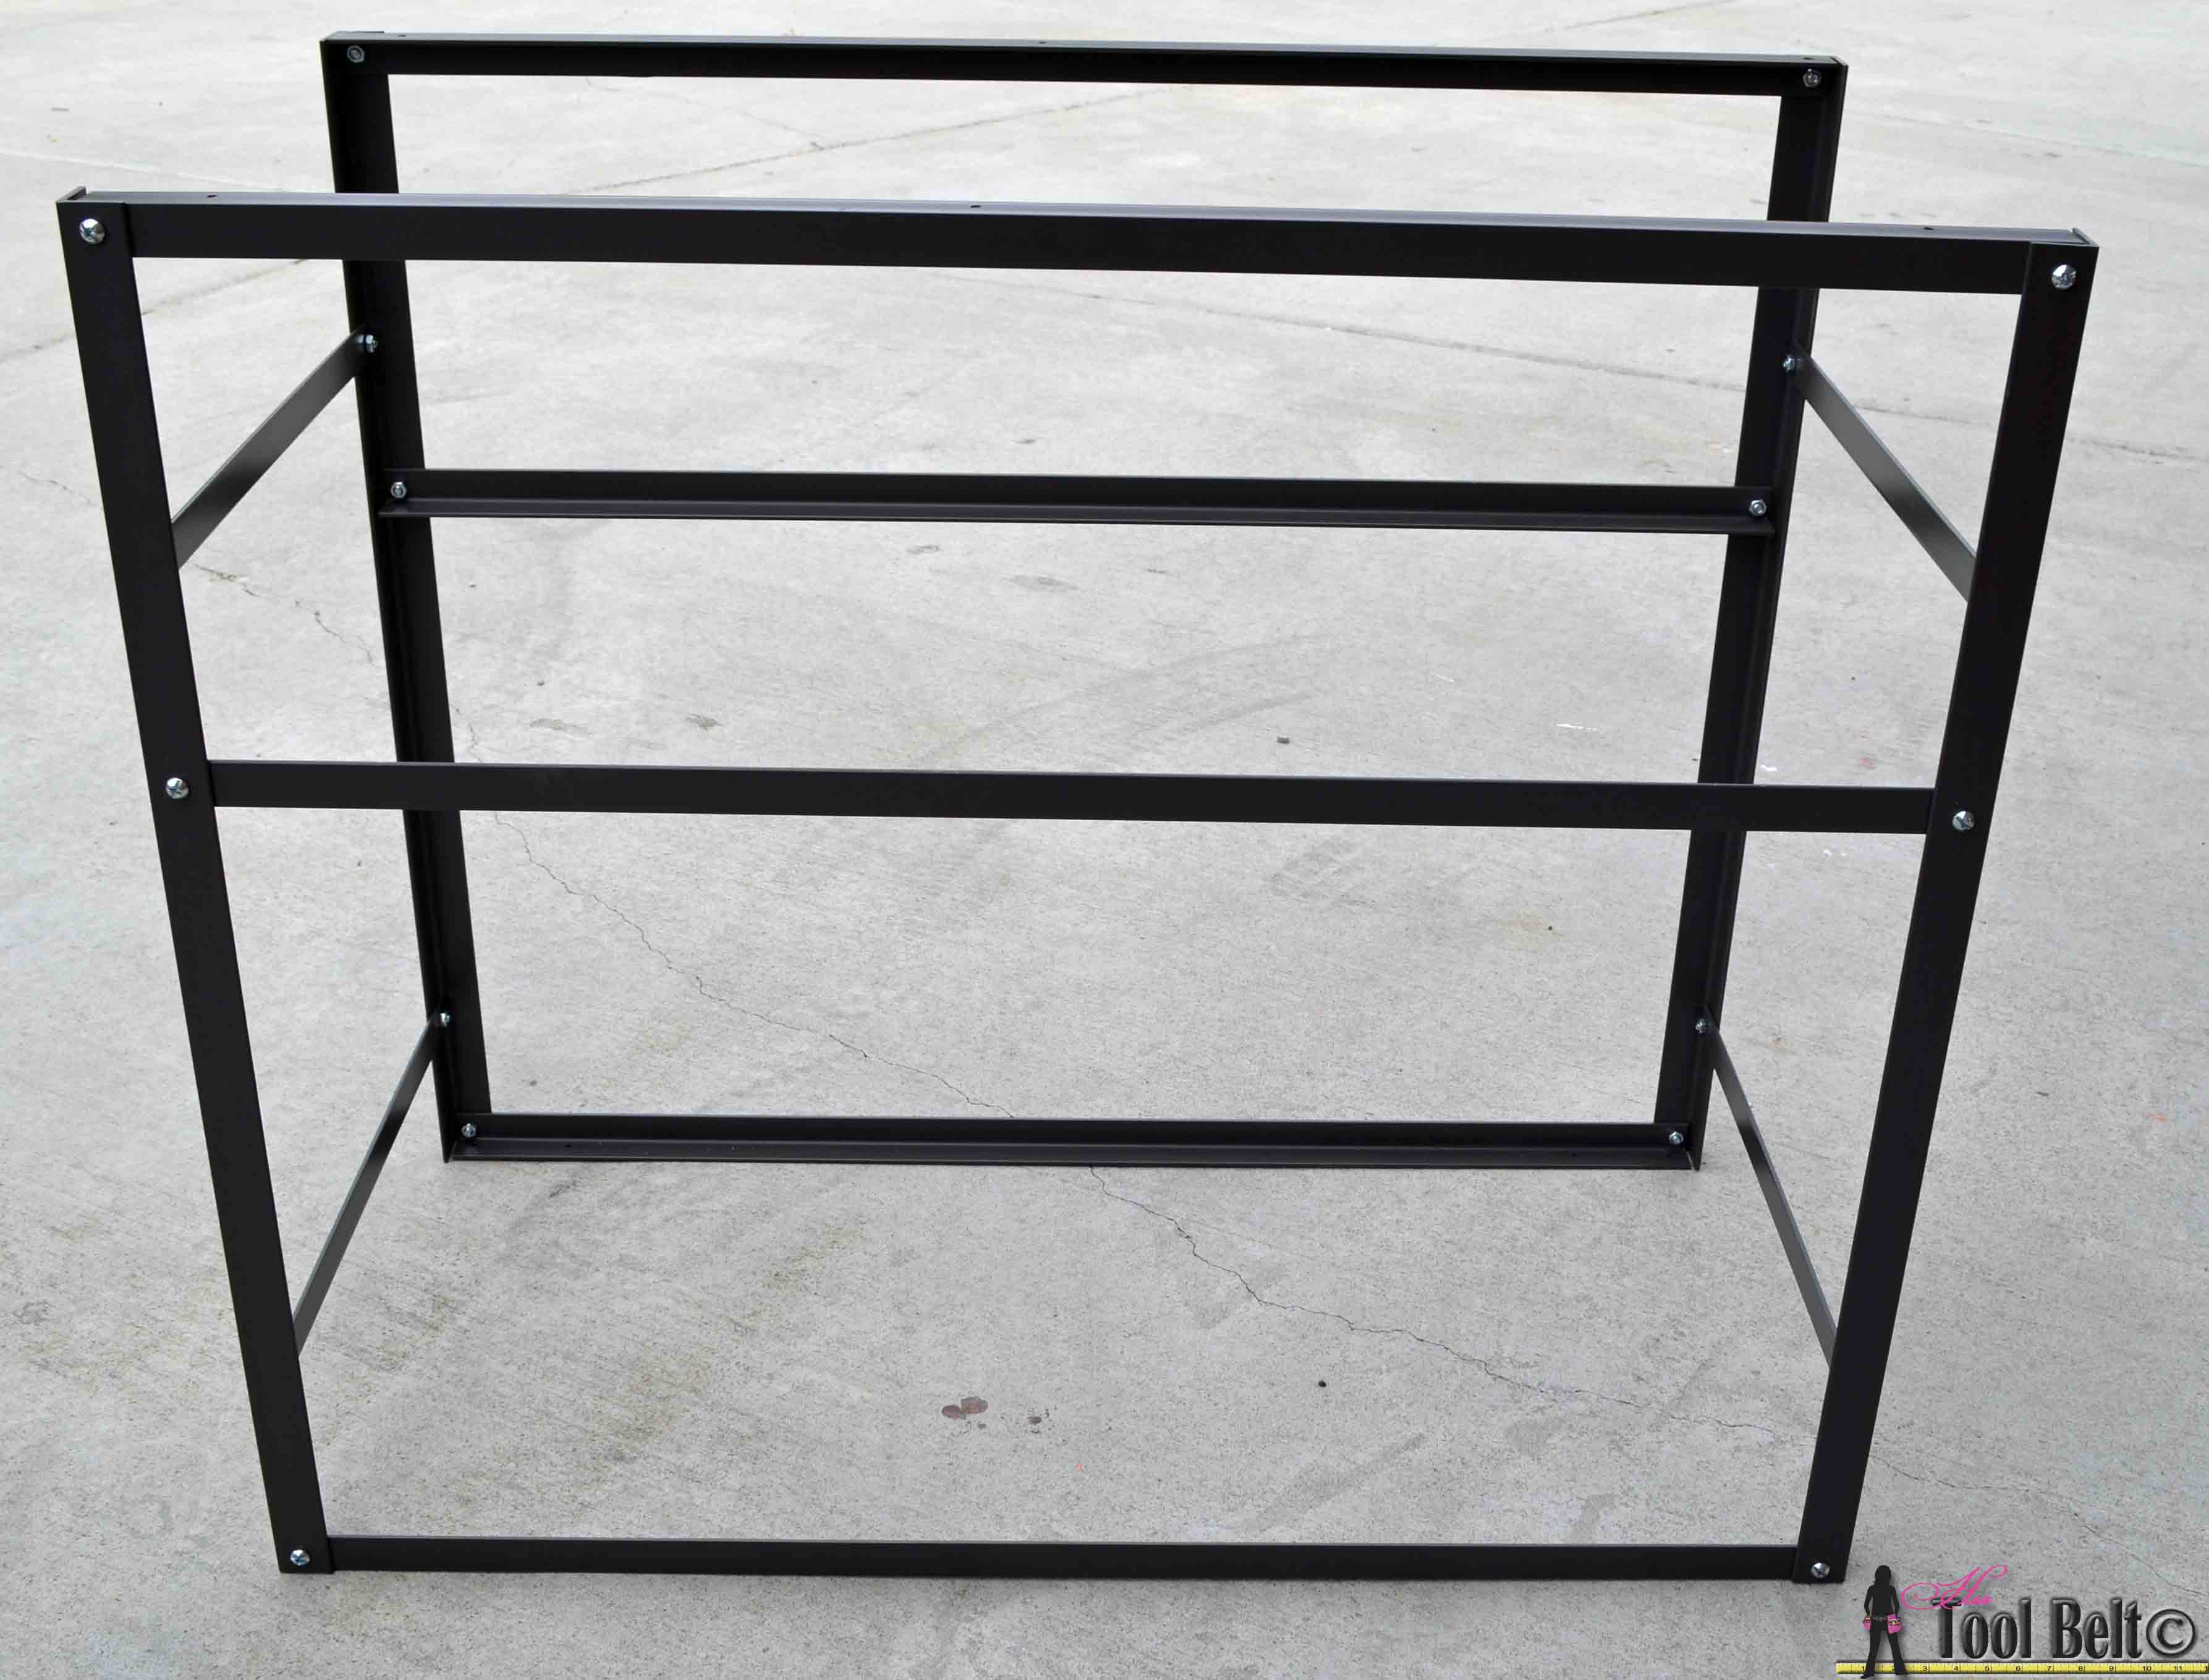
Once all of the holes are drilled, put the frame together with bolts, make any adjustments as necessary.  Take the metal frame apart.  Remove any rust with a wire brush or steel wool.  Wipe all of the metal clean.  Prime all of the steel parts.  Once the primer is dry, I painted the metal with Rustoleum Anodized Bronze and let it dry.

Build a stylish DIY multi-functional table. Free plans for a rolling industrial counter table, rolling island with lots of open storage.

Put the frame back together with bolts and nuts.  Place the frame on a level surface and make sure each section is square, then tighten the bolts and nuts with a wrench.  An easy way to tell if something is square is measure corner to corner, and the opposite corner to corner.  Make adjustments until both measurements are the same.

rolling table measure to make square

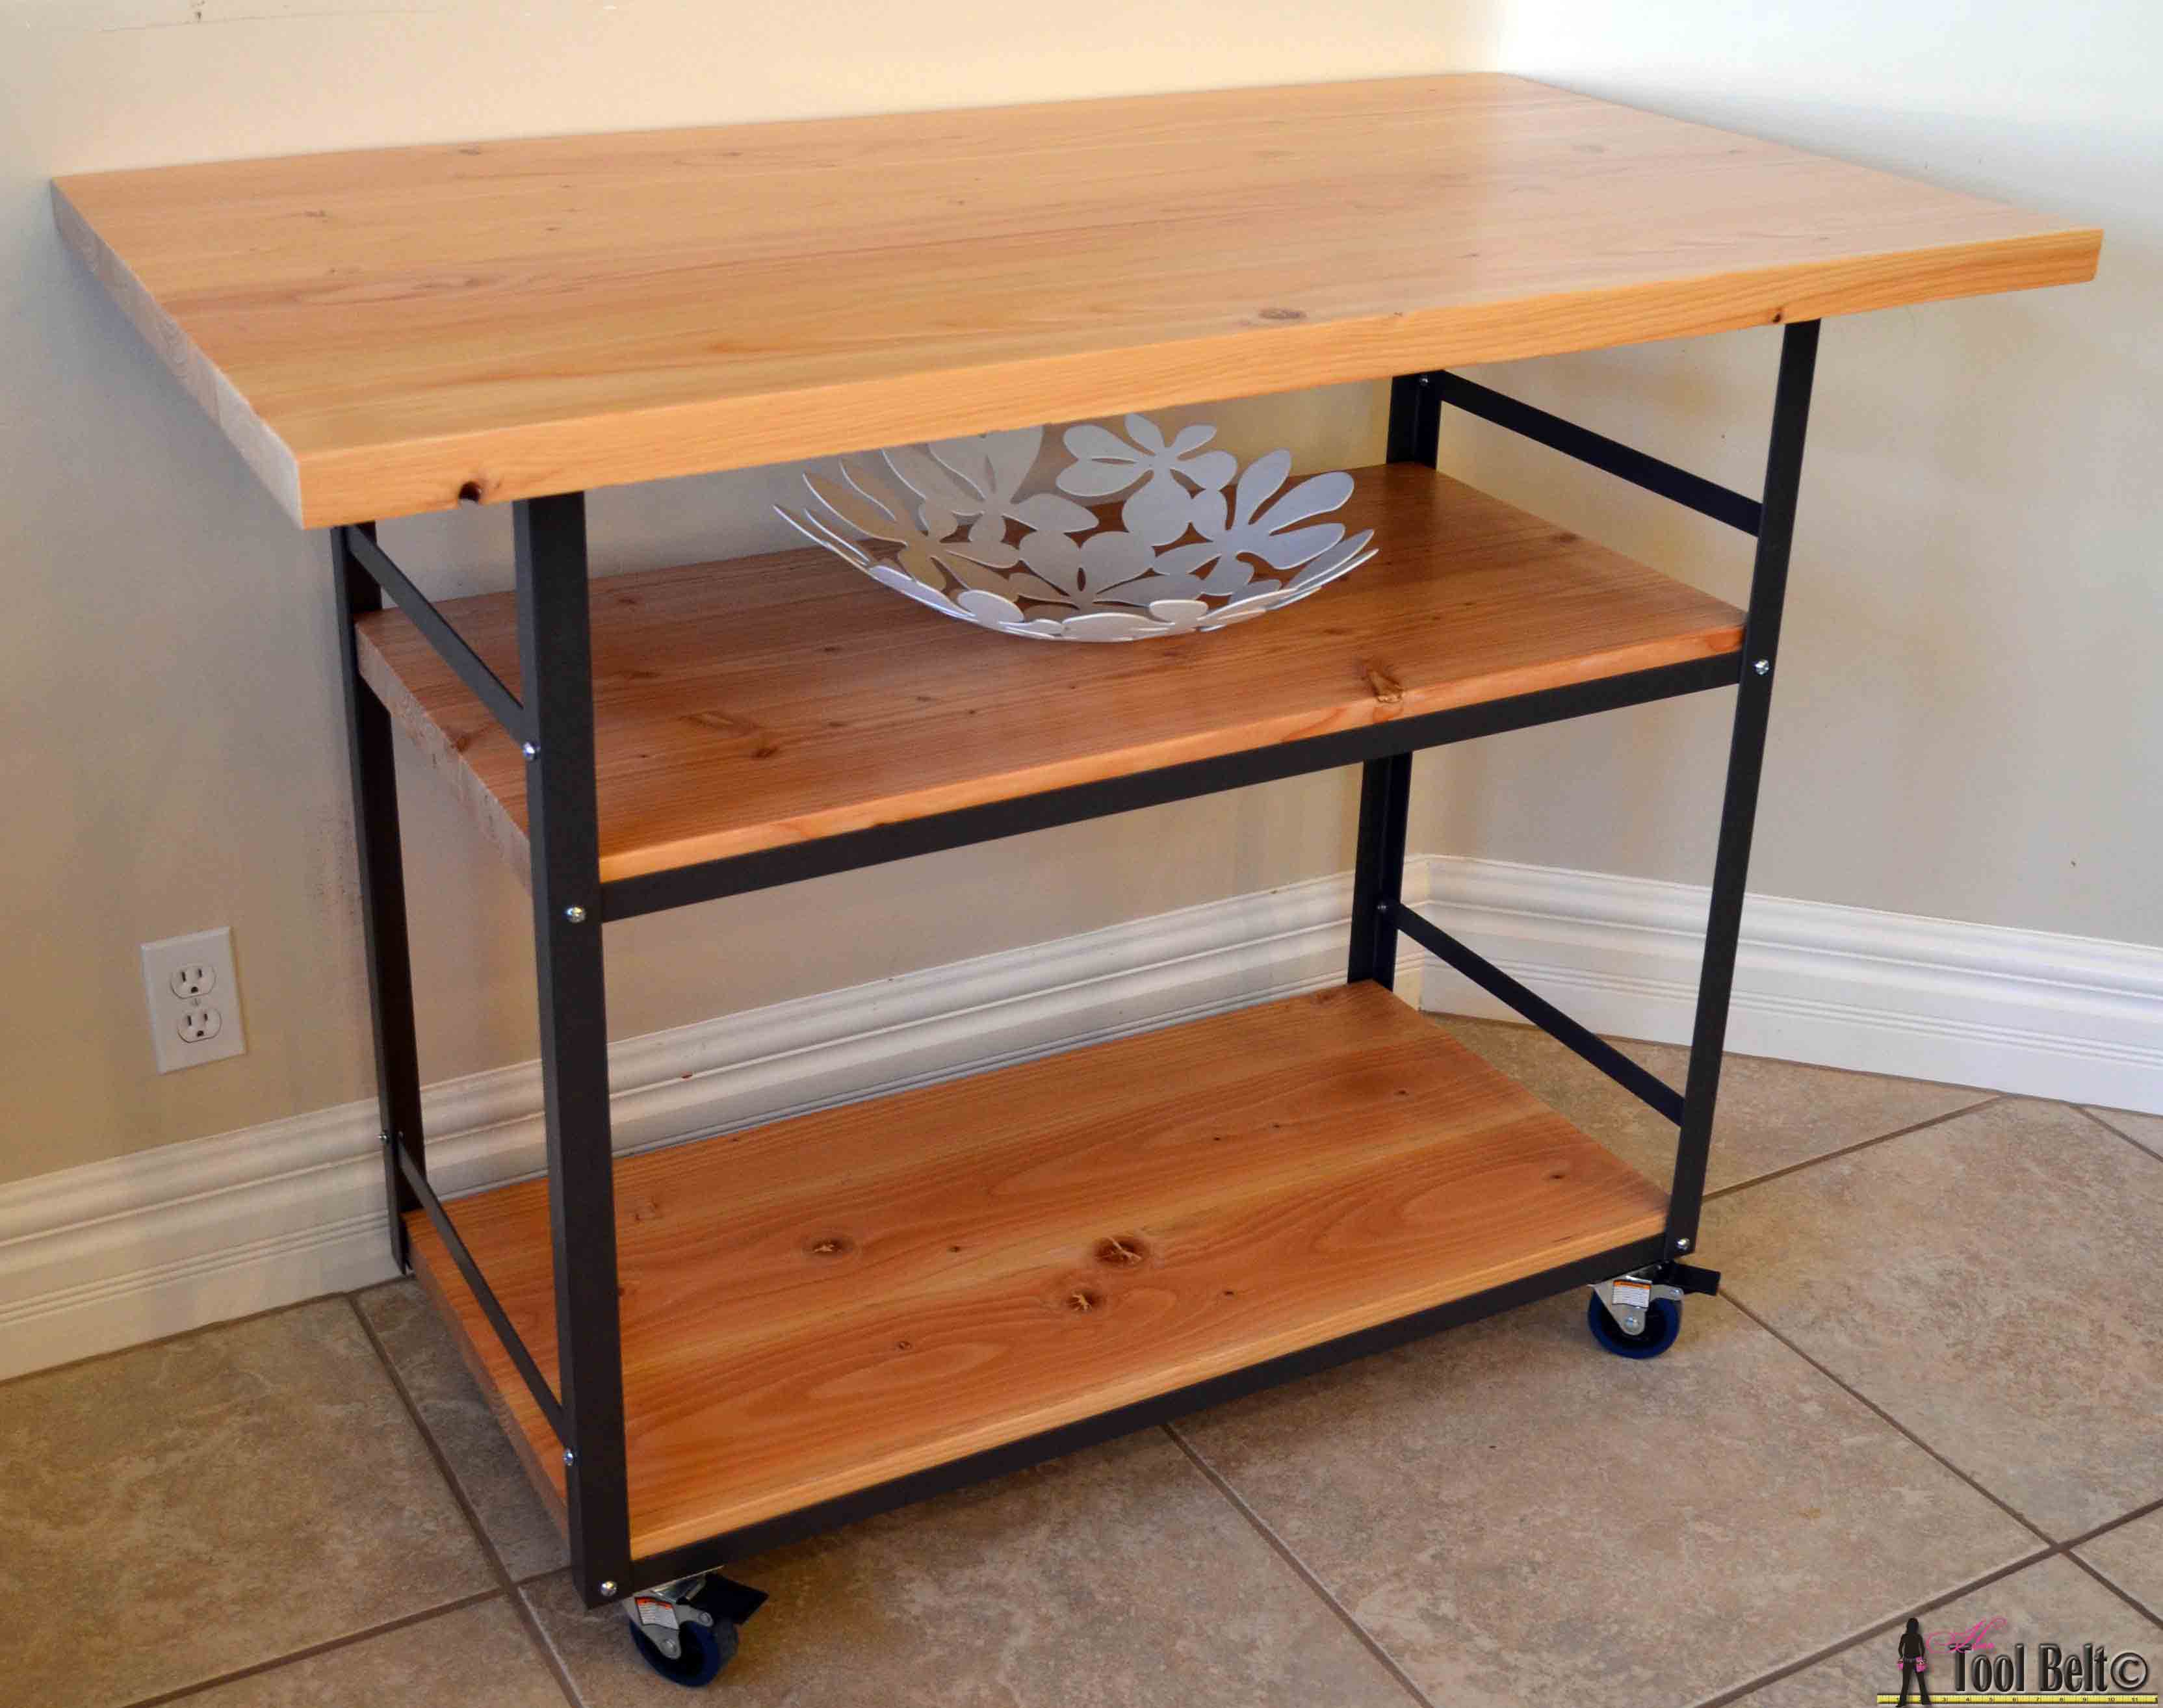
Assembled table frame.  Drill a few holes on the top support to attach the wood top.  On the bottom, drill holes to attach the casters.

Build a stylish DIY multi-functional table. Free plans for a rolling industrial counter table, rolling island with lots of open storage.

 Step 5

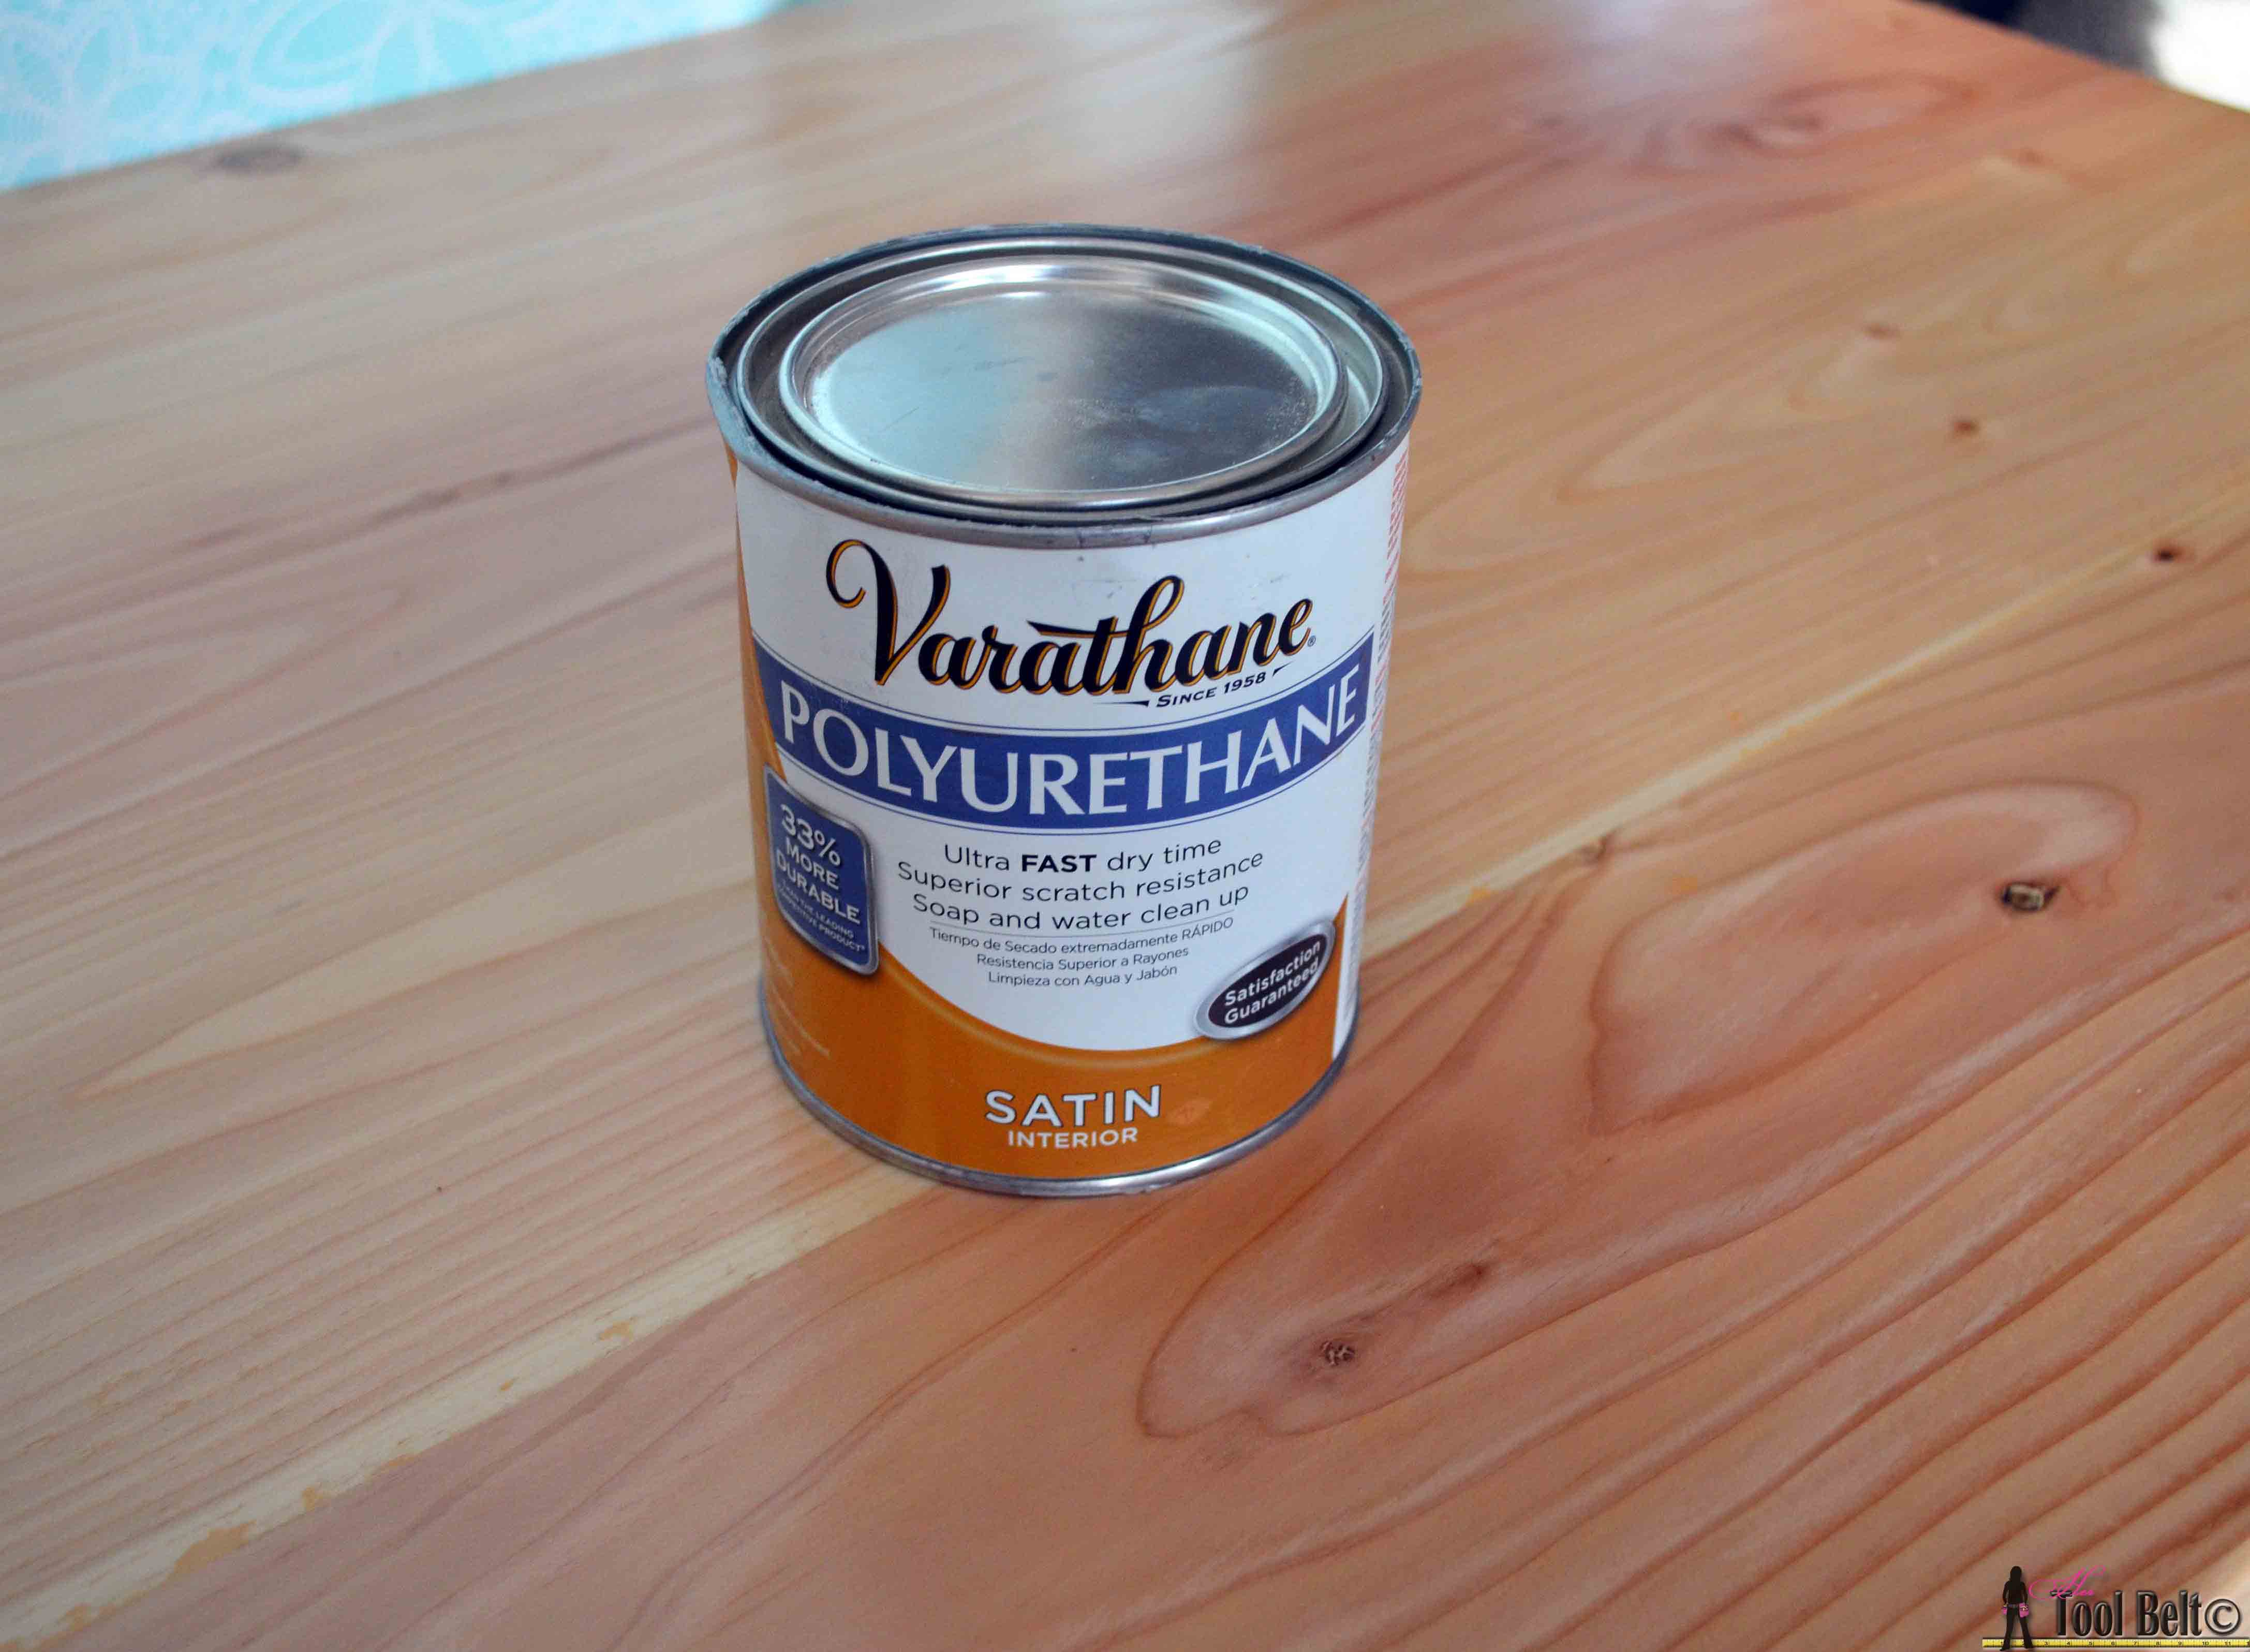
Dry fit the 2 wood shelves to make sure they fit in the metal shelf supports.  Trim the wood as necessary.  I notched out slots in the corners of the wood shelves to fit over the nuts.  Remove any excess glue on the top and shelves, apply wood filler to any cracks, holes or blemishes and allow to dry.  Sand the tops and shelves until smooth, finishing with 120-150 grit paper.  Remove any dust.  My friend wanted the wood to be a natural color, so I applied a few coats of Varathane Polyurethane Satin.  It is a water based polyurethane.  I haven’t used the water based polyurethane before, it went on really well and dried quickly, with minimal smell.  I loved it.

Build a stylish DIY multi-functional table. Free plans for a rolling industrial counter table, rolling island with lots of open storage.

Step 6

Center the metal frame on the table top.  Attach the top with 1 1/4″ pocket screws.

Build a stylish DIY multi-functional table. Free plans for a rolling industrial counter table, rolling island with lots of open storage.

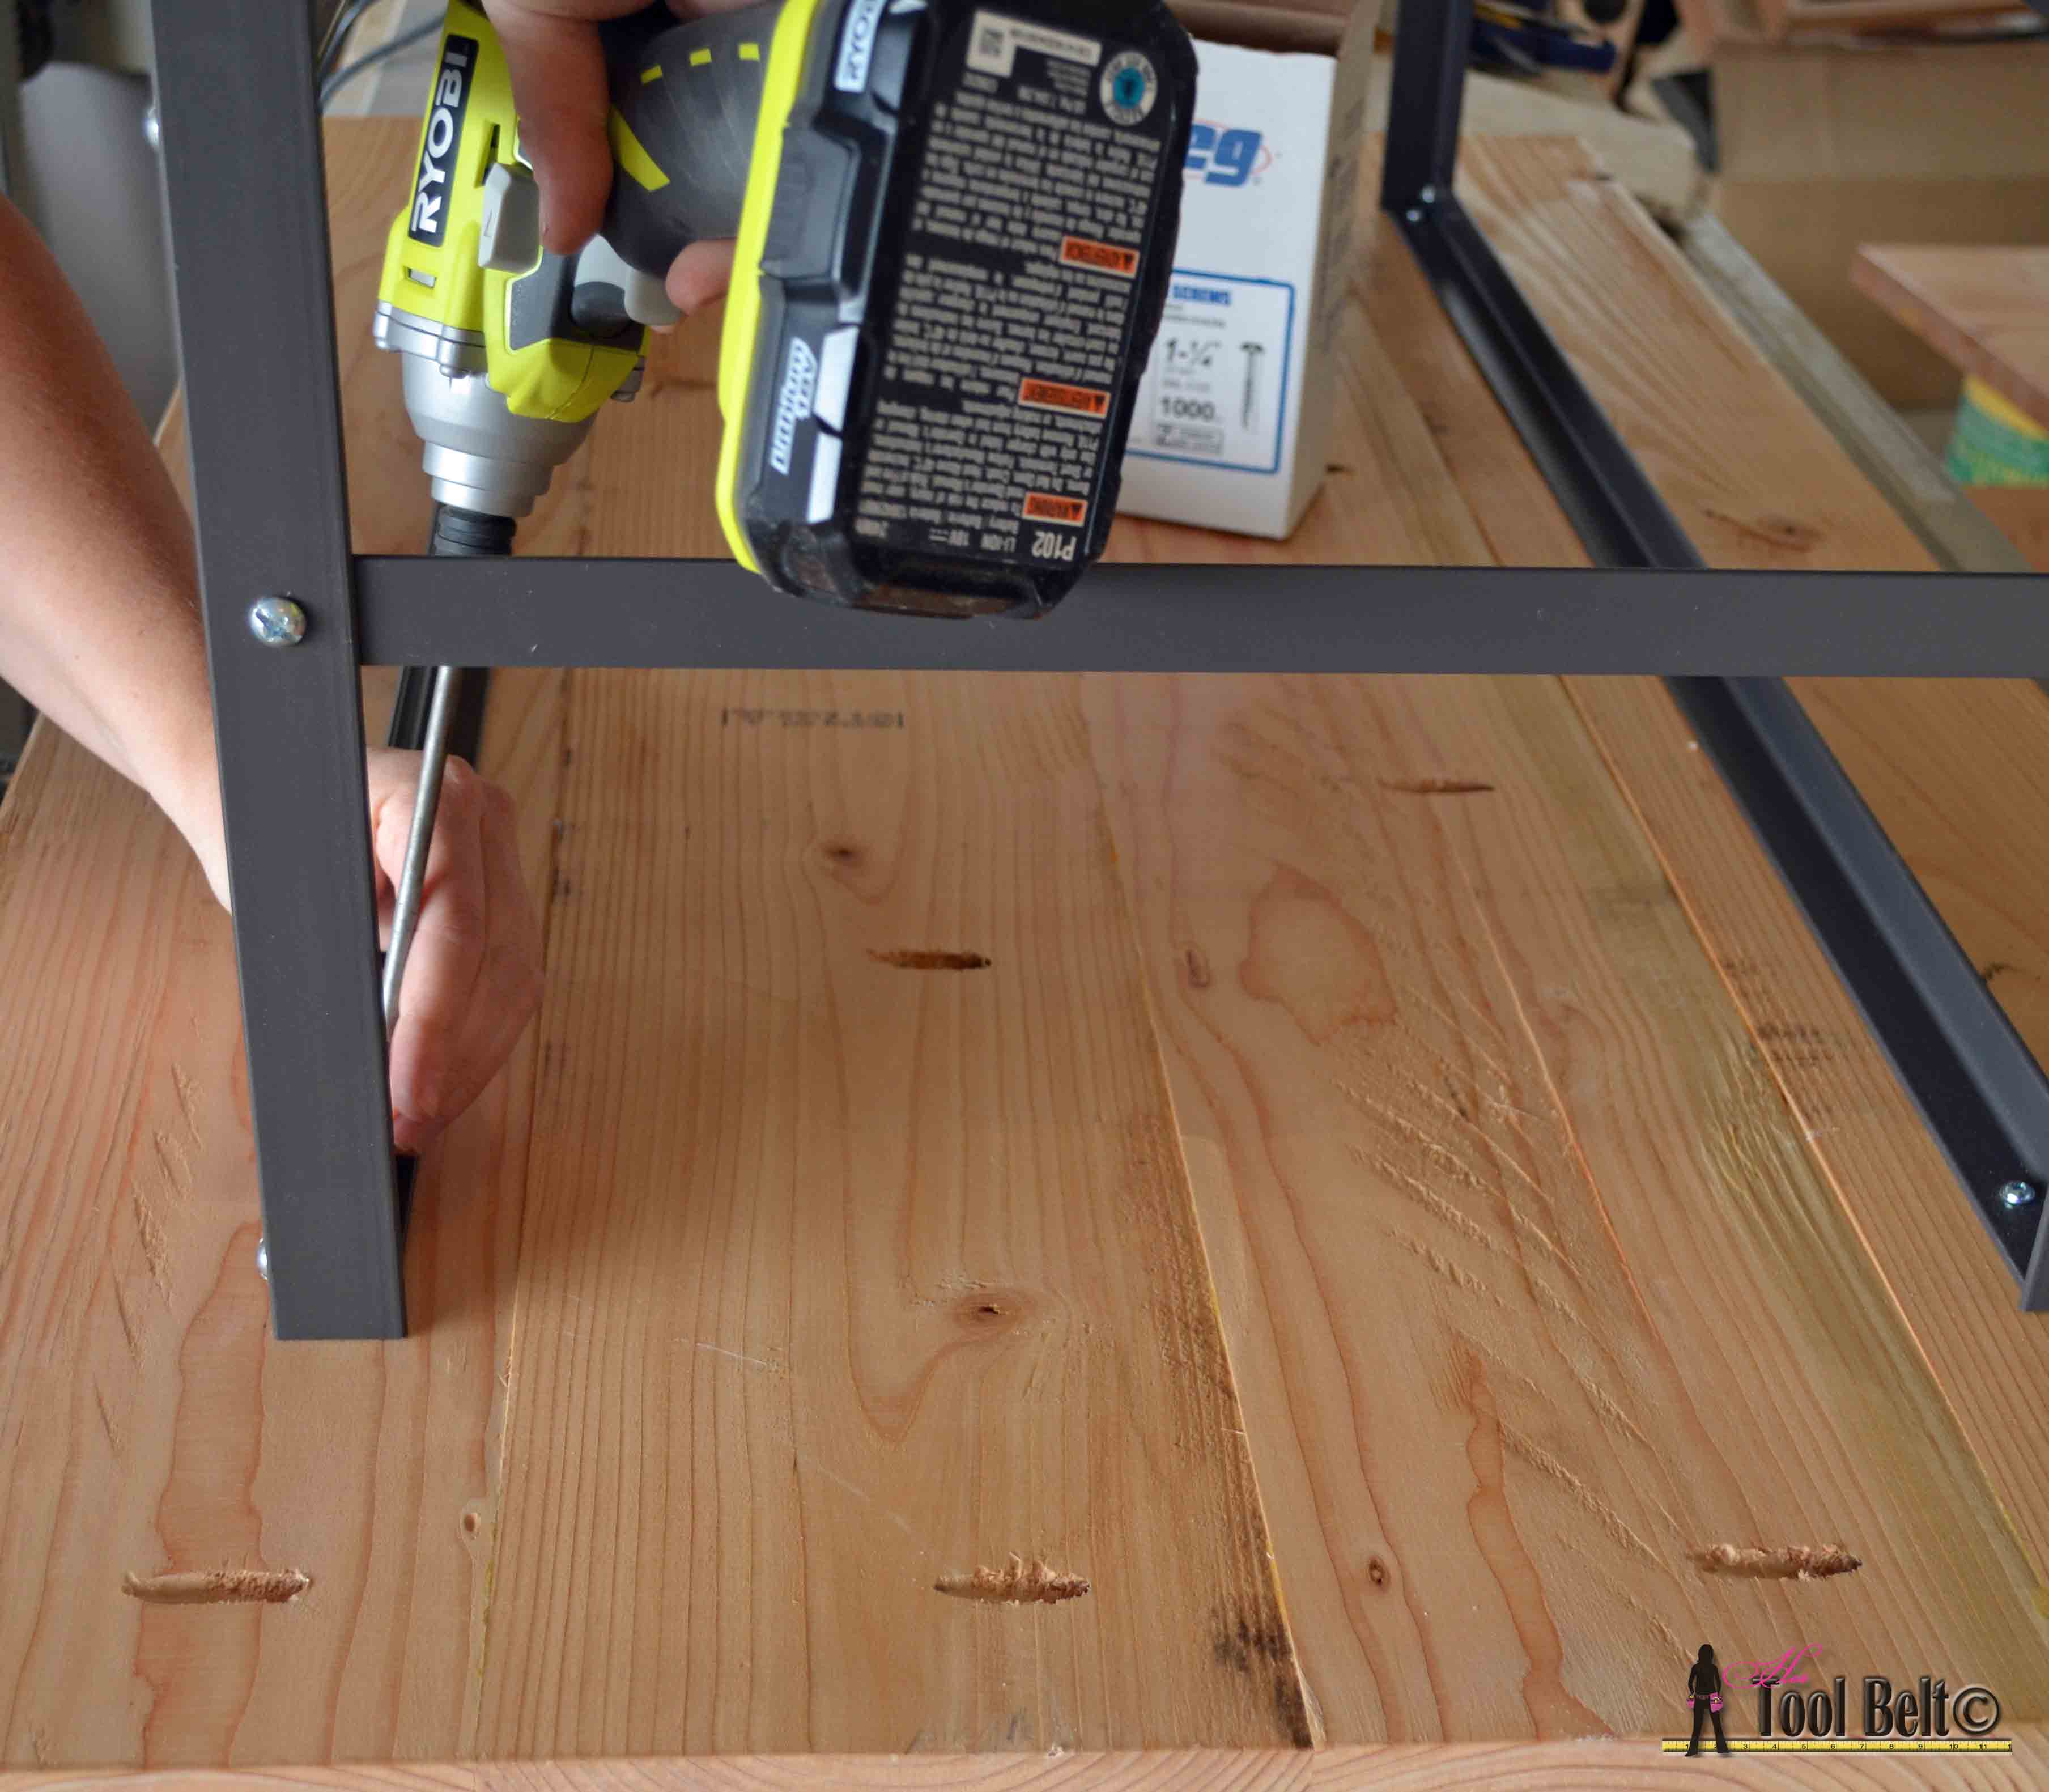
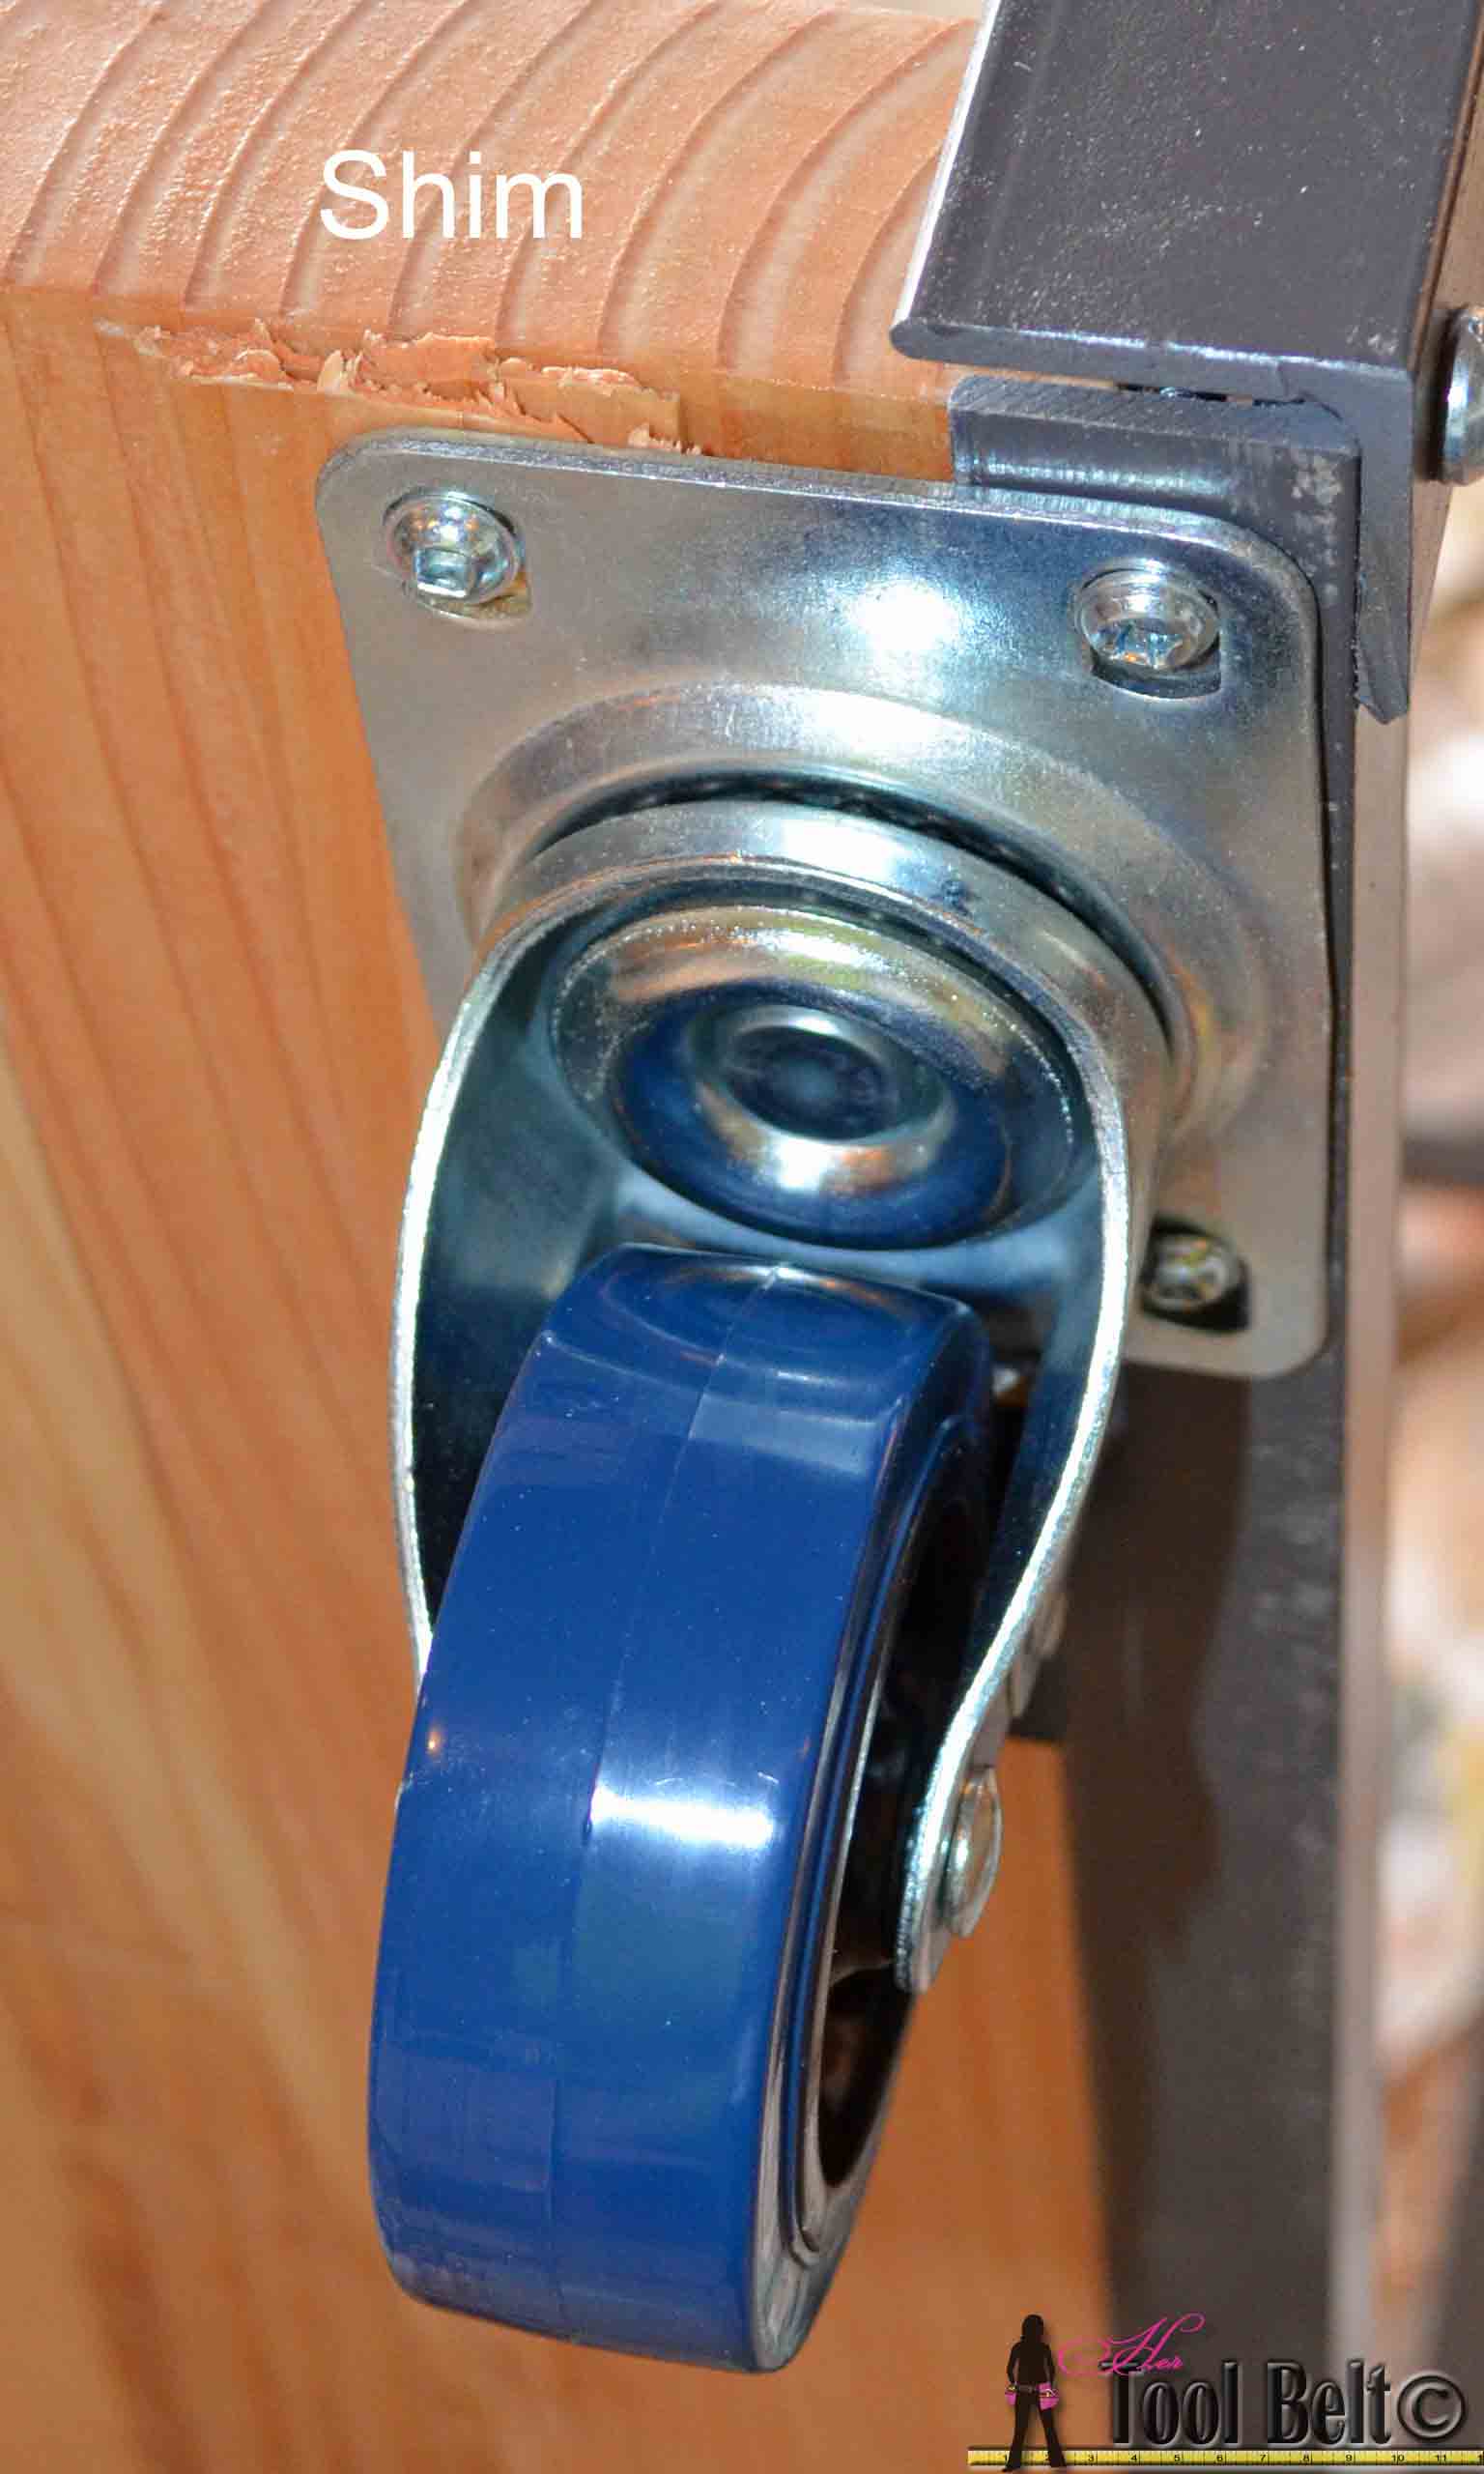
Attach the casters to the bottom of the frame and bottom shelf with 1 1/4″ pocket screws.  You may need to shim the side without the metal.  Also if your wood doesn’t sit completely flat you may have to shim a caster or two, so they table will be level.

Build a stylish DIY multi-functional table. Free plans for a rolling industrial counter table, rolling island with lots of open storage.

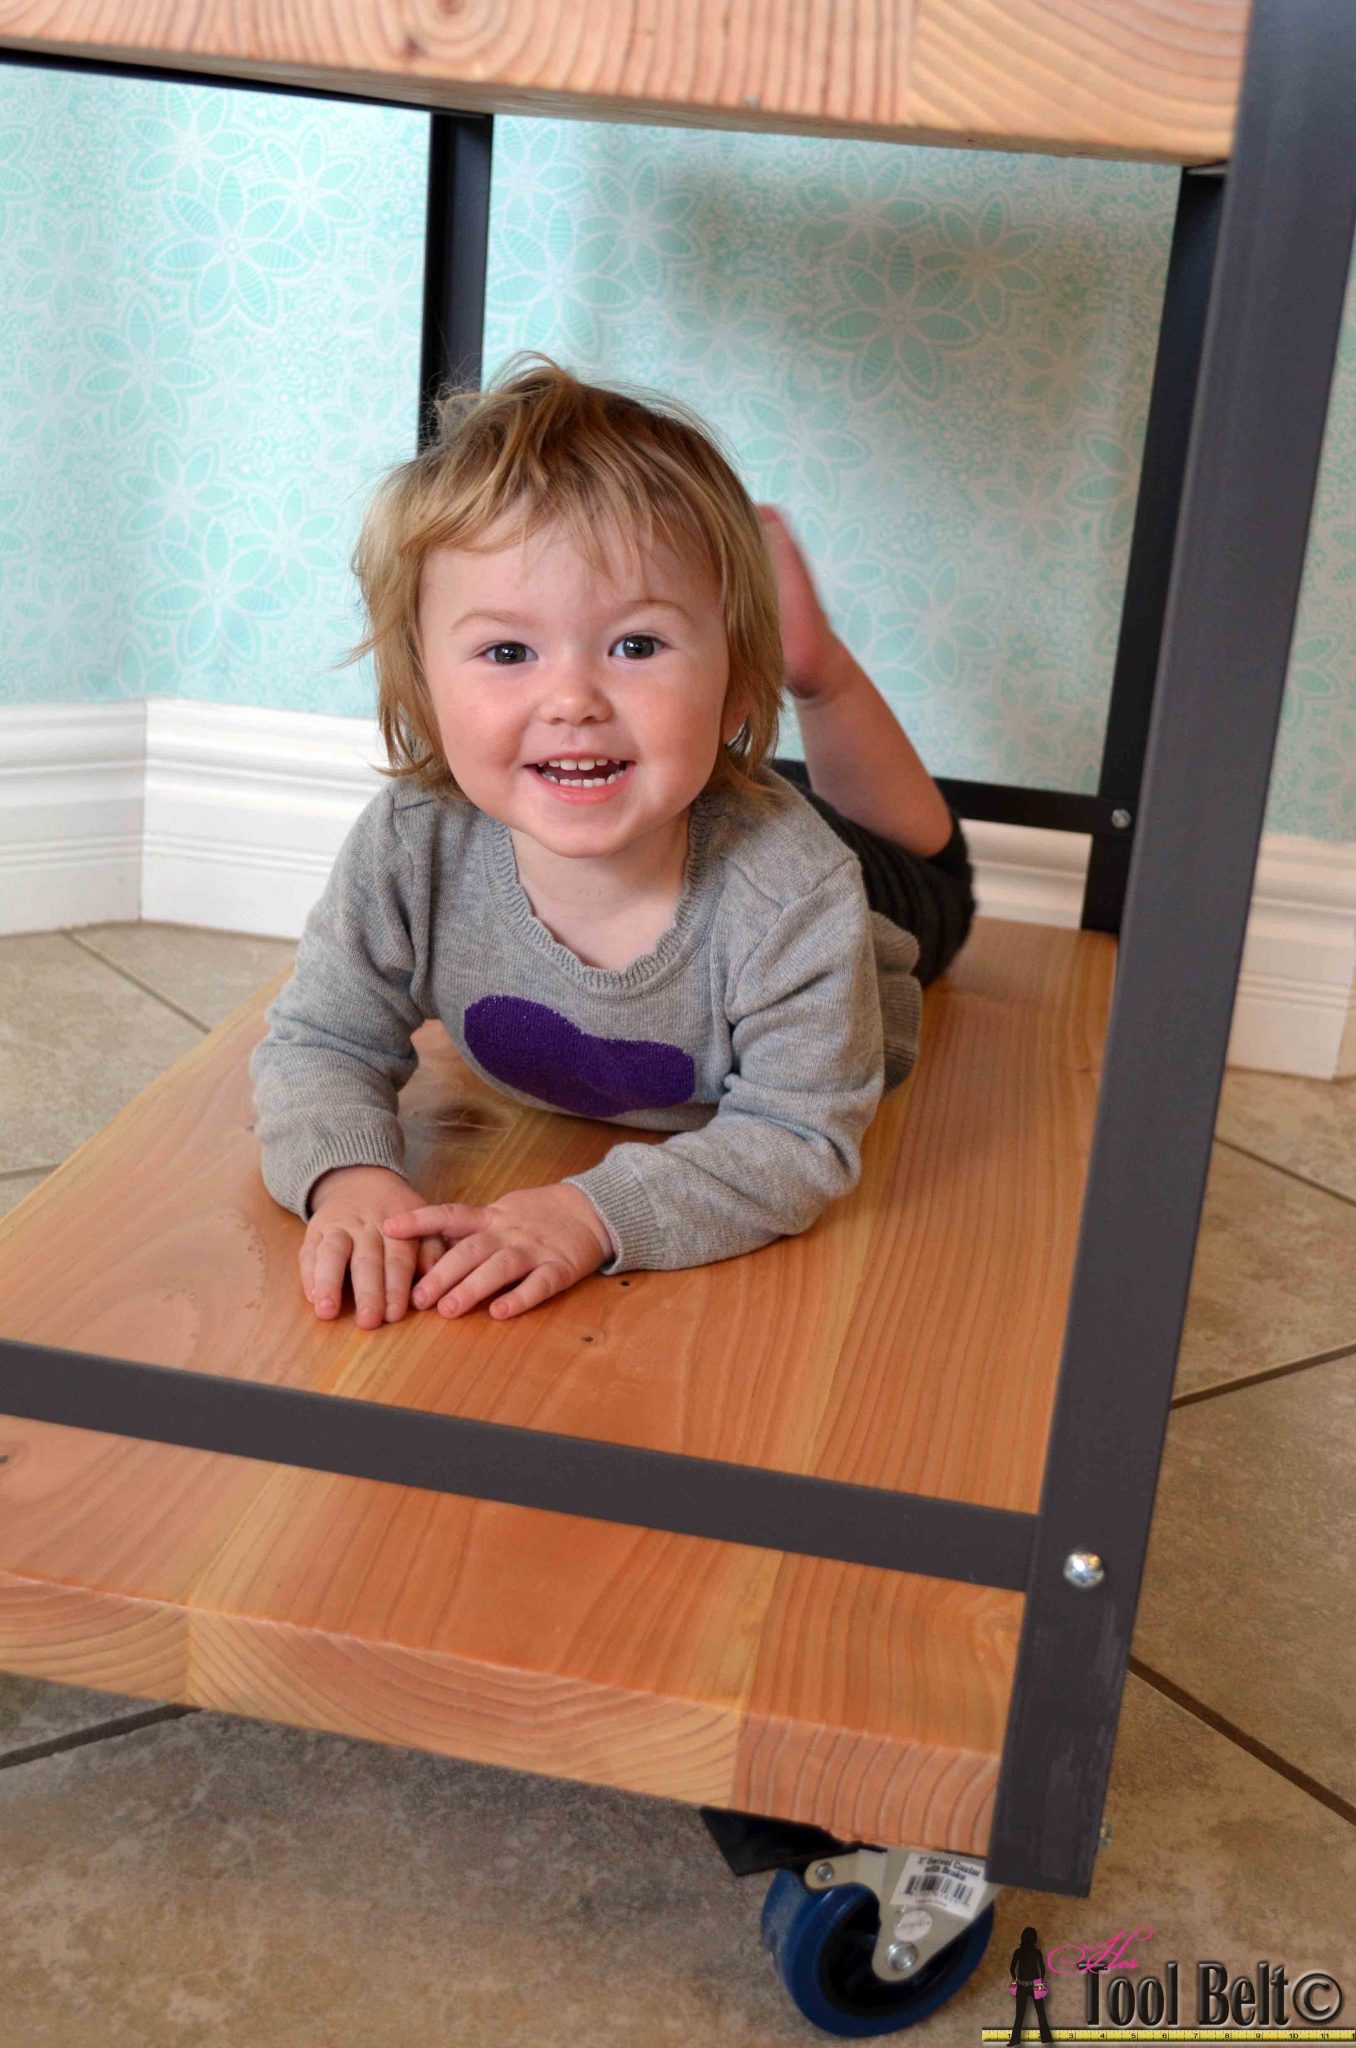
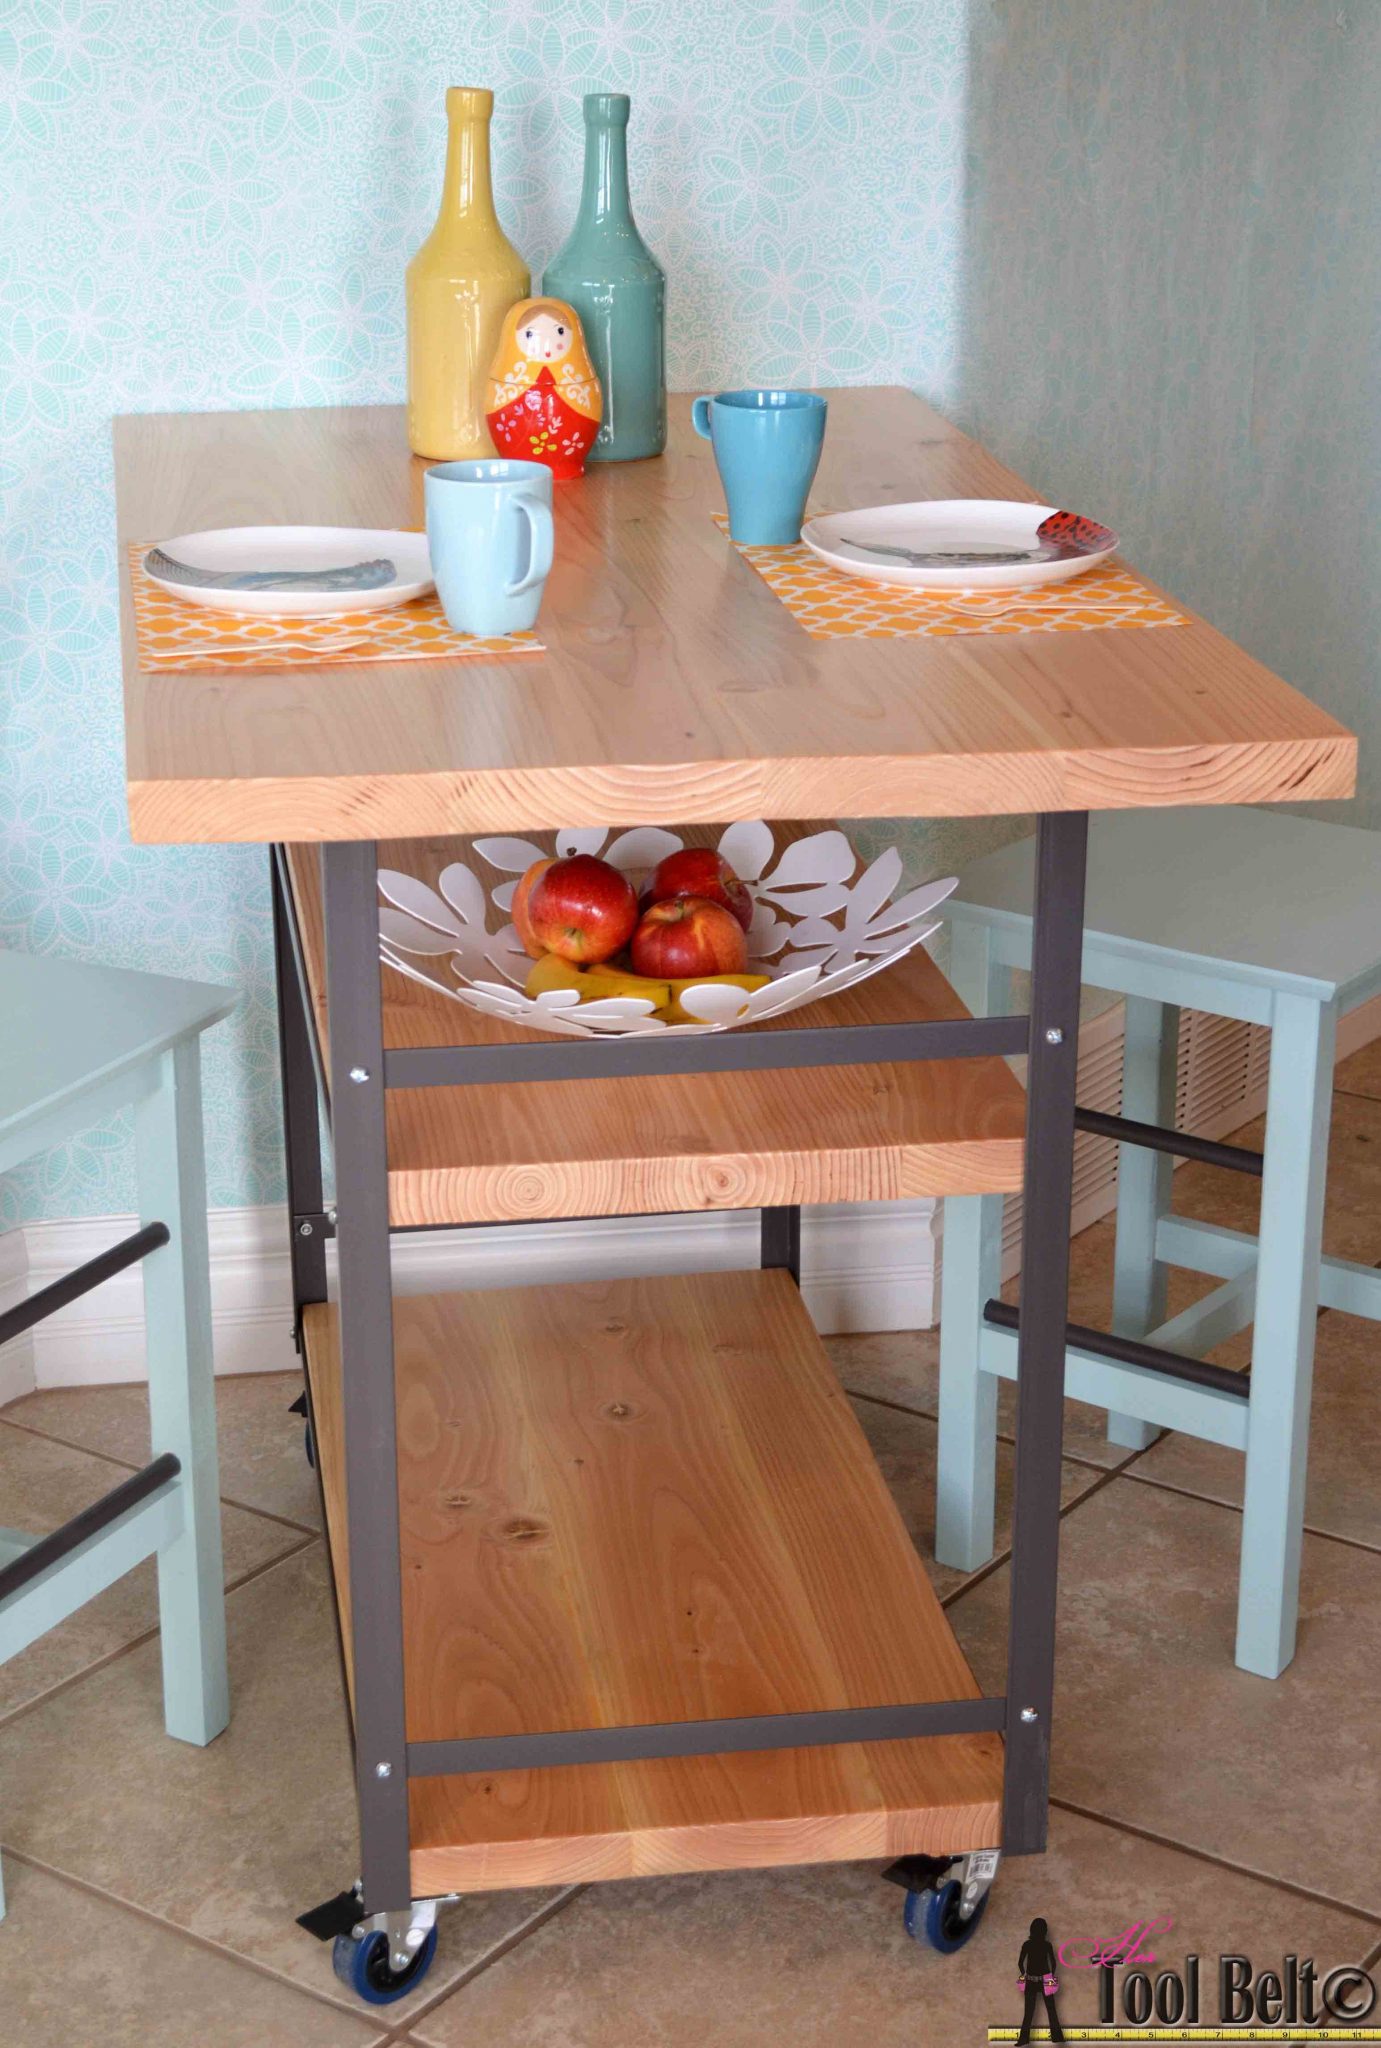
Now your table is done, yay!  My little helper loves playing on the bottom shelf of the table.

Build a stylish DIY multi-functional table. Free plans for a rolling industrial counter table, rolling island with lots of open storage.

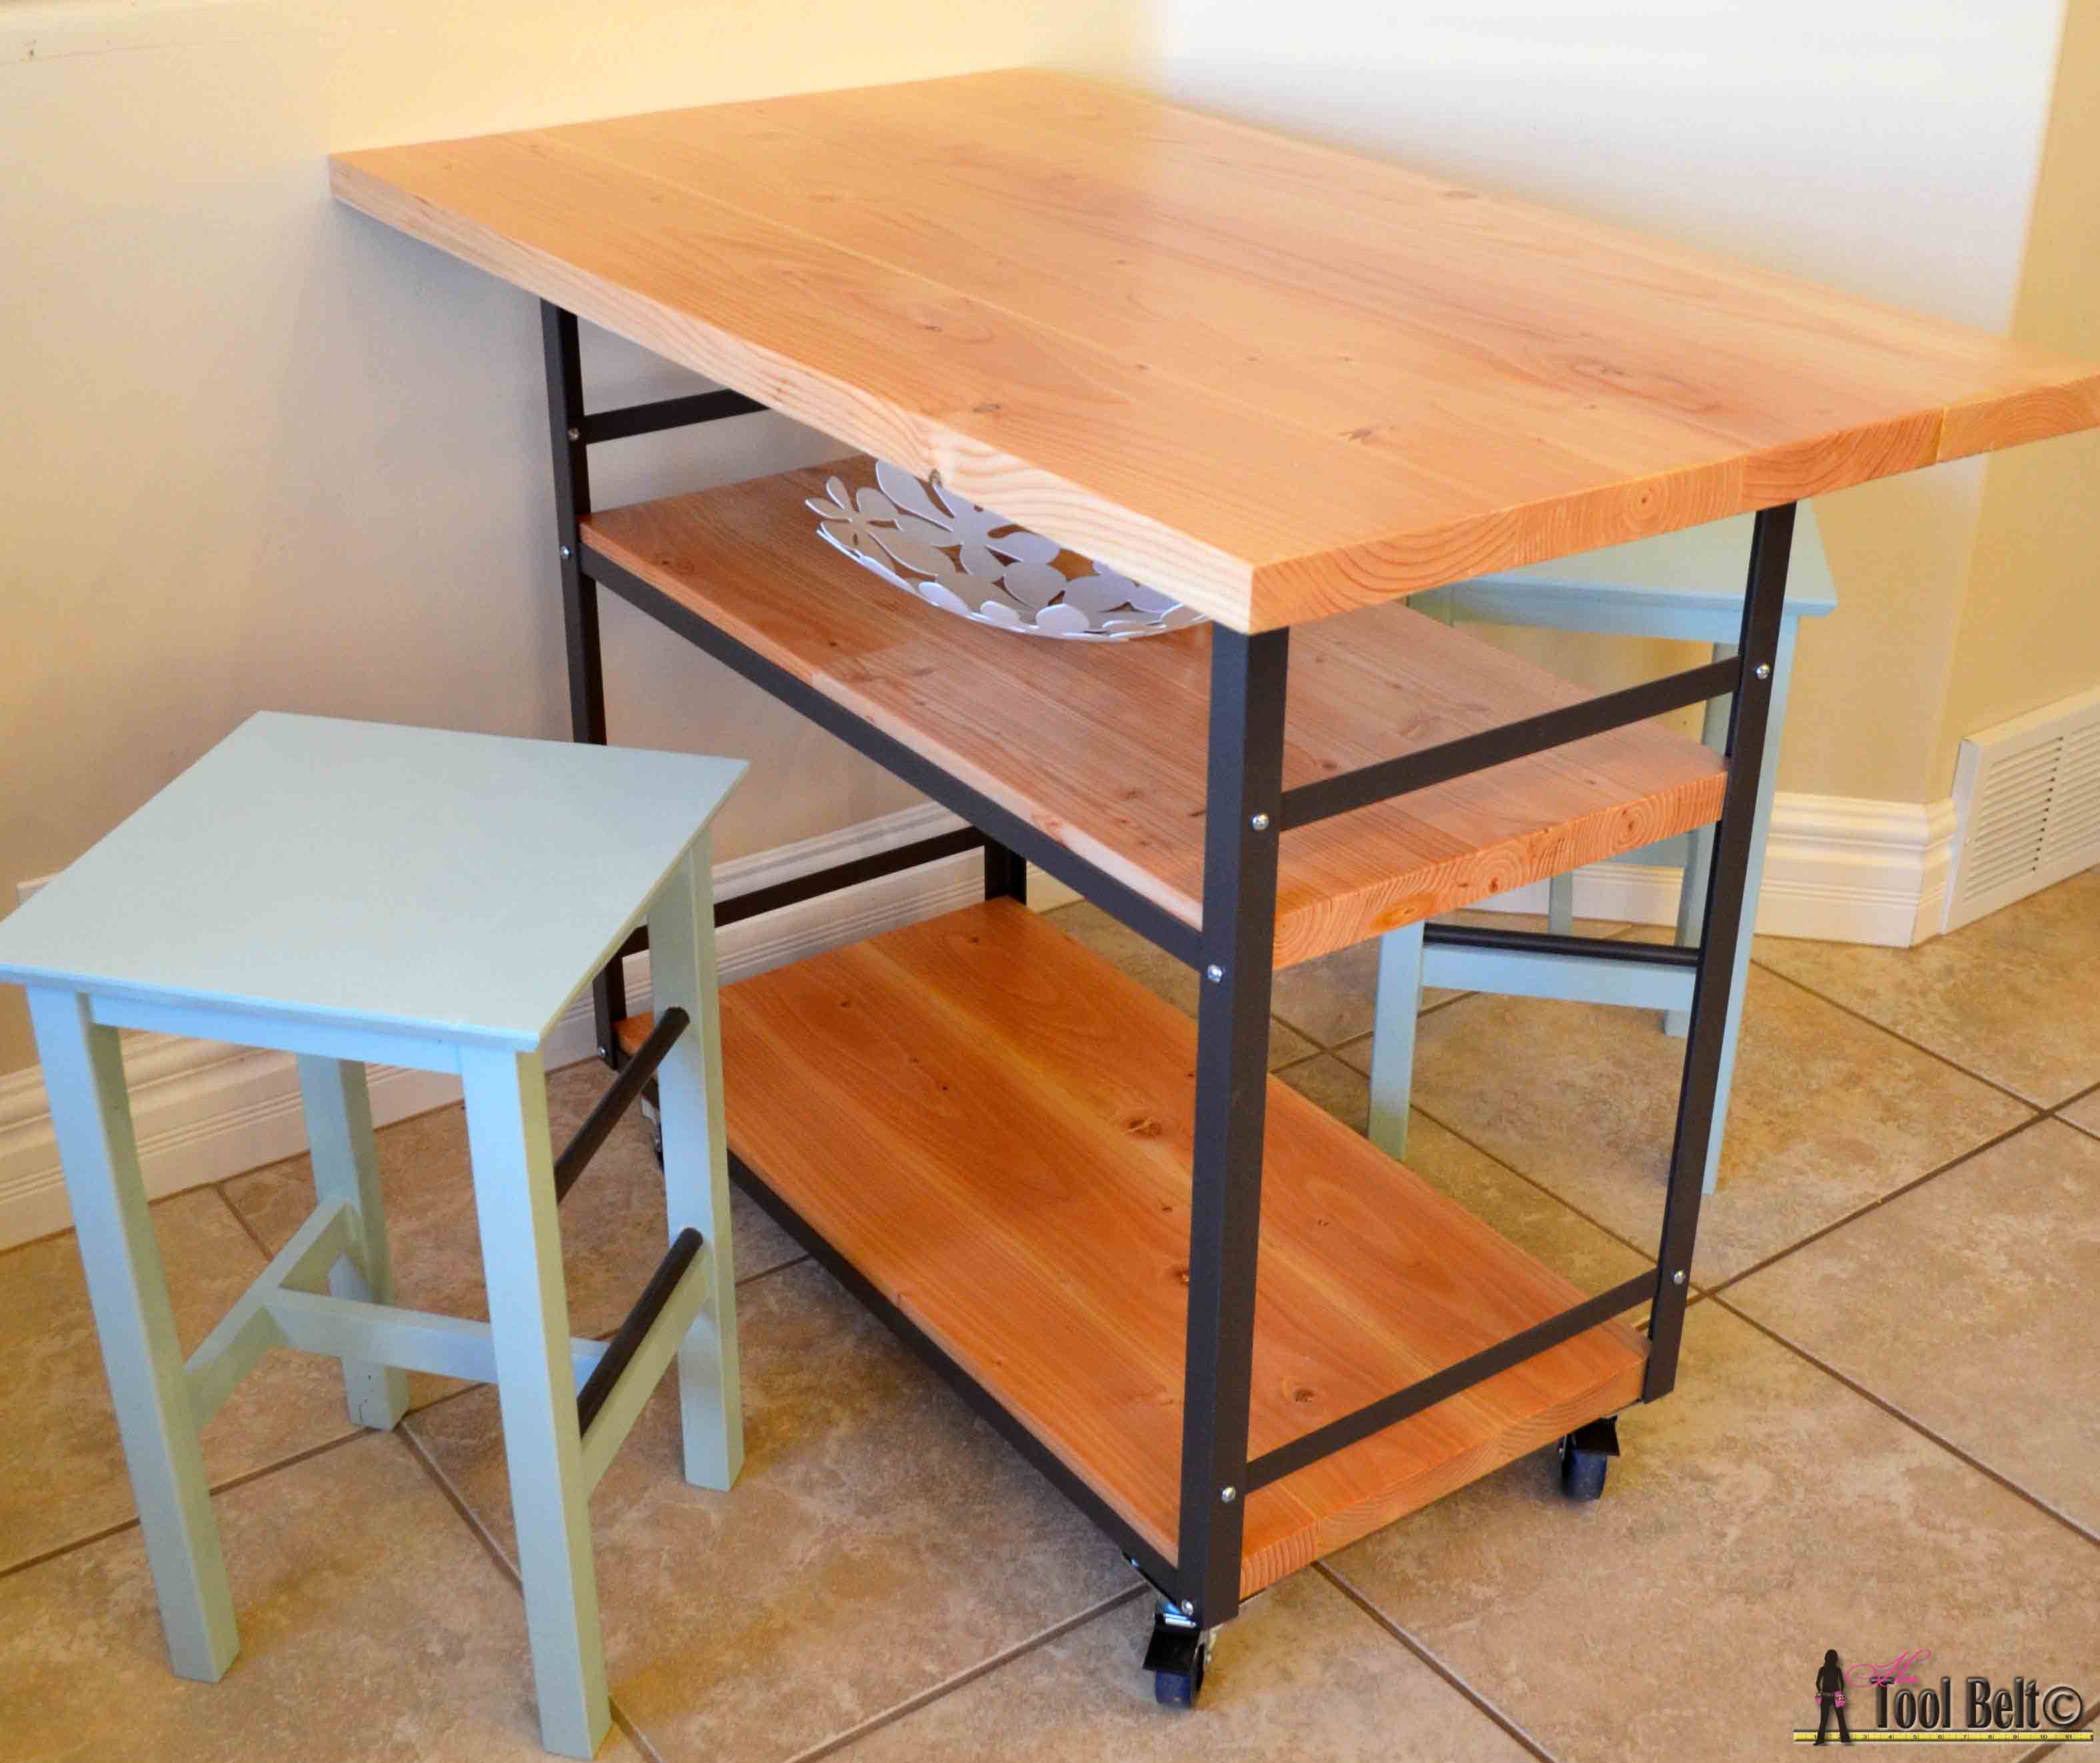
My friend is thrilled with her new industrial style table (rolling island, extra counter, and extra storage).  Plus the cost ($135) was a fraction of the retail ($2,399).

Build a stylish DIY multi-functional table. Free plans for a rolling industrial counter table, rolling island with lots of open storage.

I built a couple of super easy and CHEAP stools from plans that I did for Remodelaholic, and she is all set.

Build a stylish DIY multi-functional table. Free plans for a rolling industrial counter table, rolling island with lots of open storage.


Build a stylish DIY multi-functional table. Free plans for a rolling industrial counter table, rolling island with lots of open storage.


Linked to: Favorite Parties, HomestoriesAtoZ, Remodelaholic, Savvysouthernstyle,

Related

Filed Under: Built From Scratch, Free Woodworking Plans, Kitchen furniture Tagged With: industrial, kitchen, kreg, table

Attention: Any do-it-yourself project involves risk of some sort. Your tools, materials, and skills will vary, as will the conditions at your work site. Hertoolbelt LLC will not assume any responsibility or liability for damages or losses sustained or incurred in the course of your project or in the use of the item you create. Always follow the manufacturer's operating instructions in the use of tools, check and follow your local building codes, and observe all commonly accepted safety precautions.

Comments

  1. Pauline says

    October 27, 2014 at 4:47 pm

    Amy,

    I love this! I’m a sucker for things on wheels, and I love the function that’s wrapped up in all the beauty here.

    Awesome.

    Reply
    • Amy says

      October 27, 2014 at 5:36 pm

      Thanks Pauline!

      Reply
  2. angie says

    October 27, 2014 at 8:35 pm

    the many uses I can find for this and it looks so super attractive
    come see us

    Reply
  3. Kyla @ HouseOfHipsters says

    October 27, 2014 at 8:55 pm

    Holy wow! This is awesome!

    Reply
    • Amy says

      October 27, 2014 at 9:04 pm

      Thanks!

      Reply
  4. Leslie @ House on the Way says

    October 28, 2014 at 9:13 am

    What an awesome job! Love it! I’m pinning and sharing. Have a great day!

    Reply
    • Amy says

      October 28, 2014 at 10:38 am

      Thanks!!!

      Reply
  5. ana@carpe_diem says

    October 28, 2014 at 9:14 am

    Ooooh,wonderful!!!!

    Reply
  6. Amanda @ Dwelling in Happiness says

    October 30, 2014 at 11:19 am

    This is beautiful!! I love the metal + wood look. So functional, too!! Great job, I’m sure your friend is so thrilled! 🙂

    Reply
  7. Jenny says

    October 31, 2014 at 8:21 pm

    This turned out beautiful. Thanks for sharing!

    Reply
  8. Virginia Fynes says

    November 1, 2014 at 7:23 am

    Totally awesome!! You have such inspiring projects!

    Reply
  9. Lou Lou Girls says

    November 2, 2014 at 1:45 pm

    Hello sweet lady! This looks incredible. Pinned. We appreciate you taking the time to party with us. We hope to see you on Monday at 7 pm. We love partying with you! http://loulougirls.blogspot.com/
    Happy Sunday! Lou Lou Girls

    Reply
  10. Leigh Anne says

    November 3, 2014 at 6:30 am

    This is fantastic, great job! And aren’t you a handy friend to have around 😉 Thanks for sharing at Think & Make Thursday!!!

    Reply
  11. Katie @ Made to be a Momma says

    November 3, 2014 at 10:56 am

    This is amazing!! Your projects are always so much fun!

    Reply
  12. Carrie @ Kenarry: Ideas for the Home says

    November 4, 2014 at 1:08 pm

    Wow, Amy! This turned out so cool! I can see why your friend is thrilled with her new table. Thank you so much for sharing at Think and Make Thursday!

    Reply
  13. Mindi says

    November 13, 2014 at 3:12 pm

    This is amazing Amy, I love it! Pinned!

    Reply
  14. Chris says

    February 13, 2018 at 7:22 pm

    Hello,

    this is a beautiful table. Do you know how much this cost to build?

    Thanks!

    Reply

Leave a Reply Cancel reply

Your email address will not be published. Required fields are marked *

This site uses Akismet to reduce spam. Learn how your comment data is processed.

Search Her Tool Belt

Follow Me!

  • Bloglovin
  • Email
  • Facebook
  • Google+
  • Instagram
  • Pinterest
  • RSS
  • Twitter
  • YouTube

Top Posts & Pages

Custom Drill Storage and Charge Station - Easy
Wood Bunny Easter Basket
Project Gallery
Cordless Drill Storage - Charging Station
Pallet Planter Box For Cascading Flowers
2x4 Console Table
$5 Blanket Ladder
Wood DIY LOVE Marquee Letters

Check out more projects

Copyright

Thank you for wanting to share my work! No need for my permission to pin my work or to feature 1 or 2 pictures with full watermarks intact that link back to the original project. Please do NOT copy tutorials.

Disclosure & Privacy Policy

Disclaimer

Copyright © 2023 · Magazine Pro Theme on Genesis Framework · WordPress · Log in

This website uses cookies to improve your experience. We'll assume you're ok with this, but you can opt-out if you wish.Accept Read More
Privacy & Cookies Policy

Privacy Overview

This website uses cookies to improve your experience while you navigate through the website. Out of these, the cookies that are categorized as necessary are stored on your browser as they are essential for the working of basic functionalities of the website. We also use third-party cookies that help us analyze and understand how you use this website. These cookies will be stored in your browser only with your consent. You also have the option to opt-out of these cookies. But opting out of some of these cookies may affect your browsing experience.
Necessary
Always Enabled
Necessary cookies are absolutely essential for the website to function properly. This category only includes cookies that ensures basic functionalities and security features of the website. These cookies do not store any personal information.
Non-necessary
Any cookies that may not be particularly necessary for the website to function and is used specifically to collect user personal data via analytics, ads, other embedded contents are termed as non-necessary cookies. It is mandatory to procure user consent prior to running these cookies on your website.
SAVE & ACCEPT