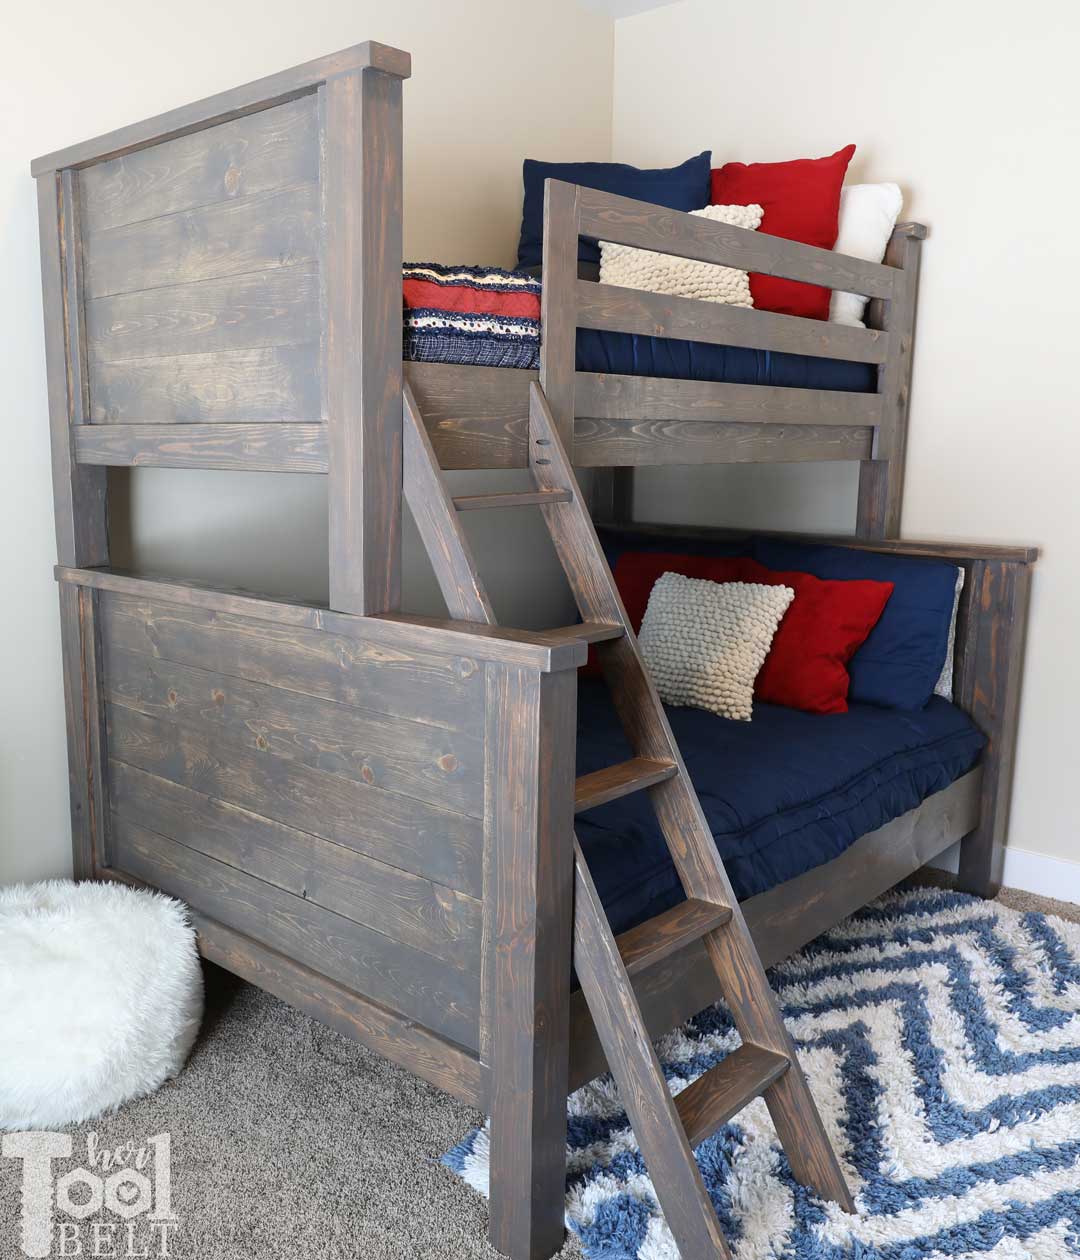
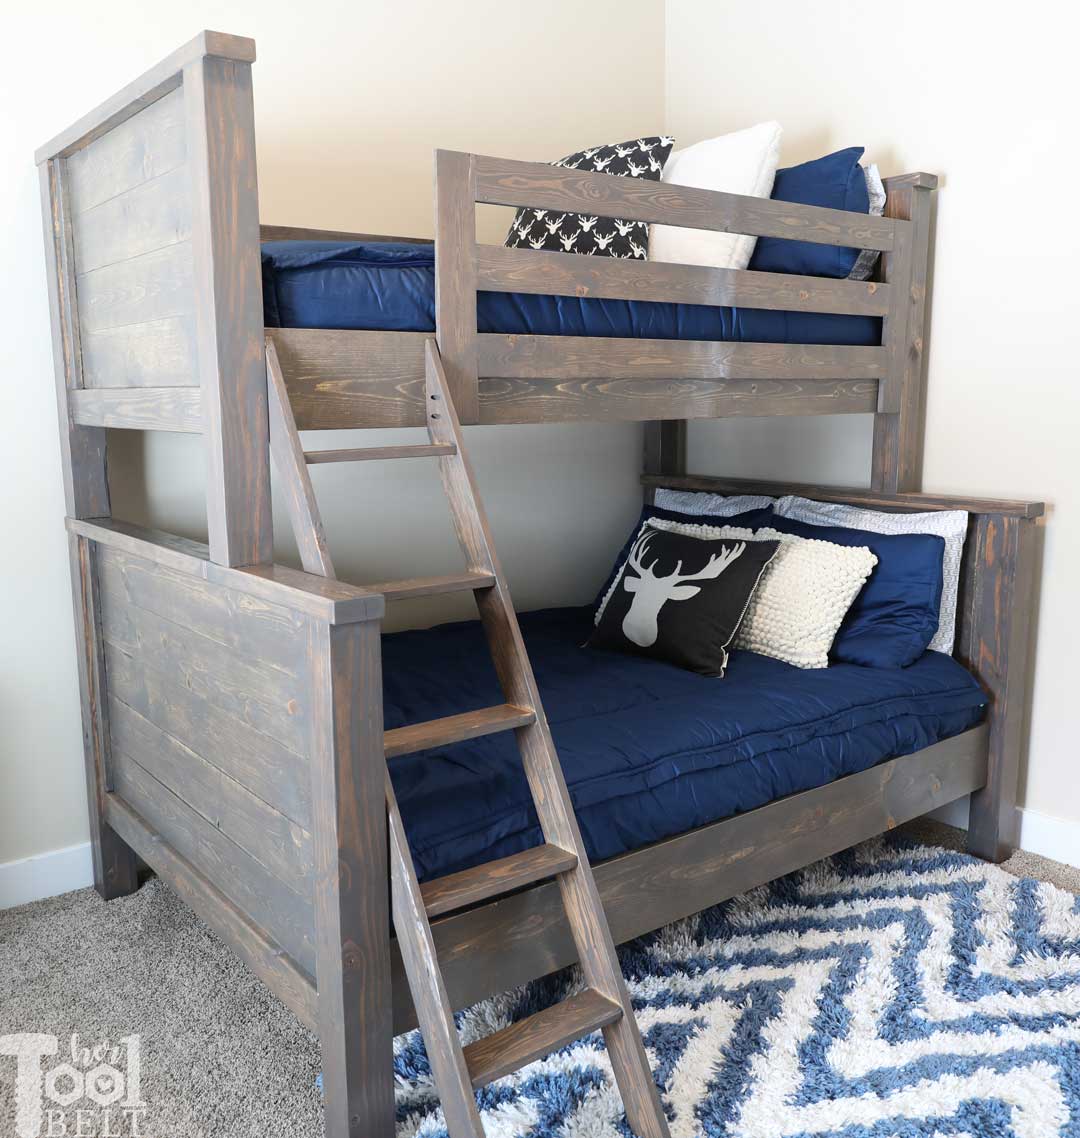
My Brother and Sister-in-Law needed a bunk bed for their little boys. They already have a twin and full mattress, I made plans for a farmhouse style twin over full bunk bed. This bunk bed style works really well in their room and doesn’t cramp the space like separate twin and full beds would have done. Thanks to my Bro and SIL for testing out these bunk bed plans. The boys are in love with their new beds!
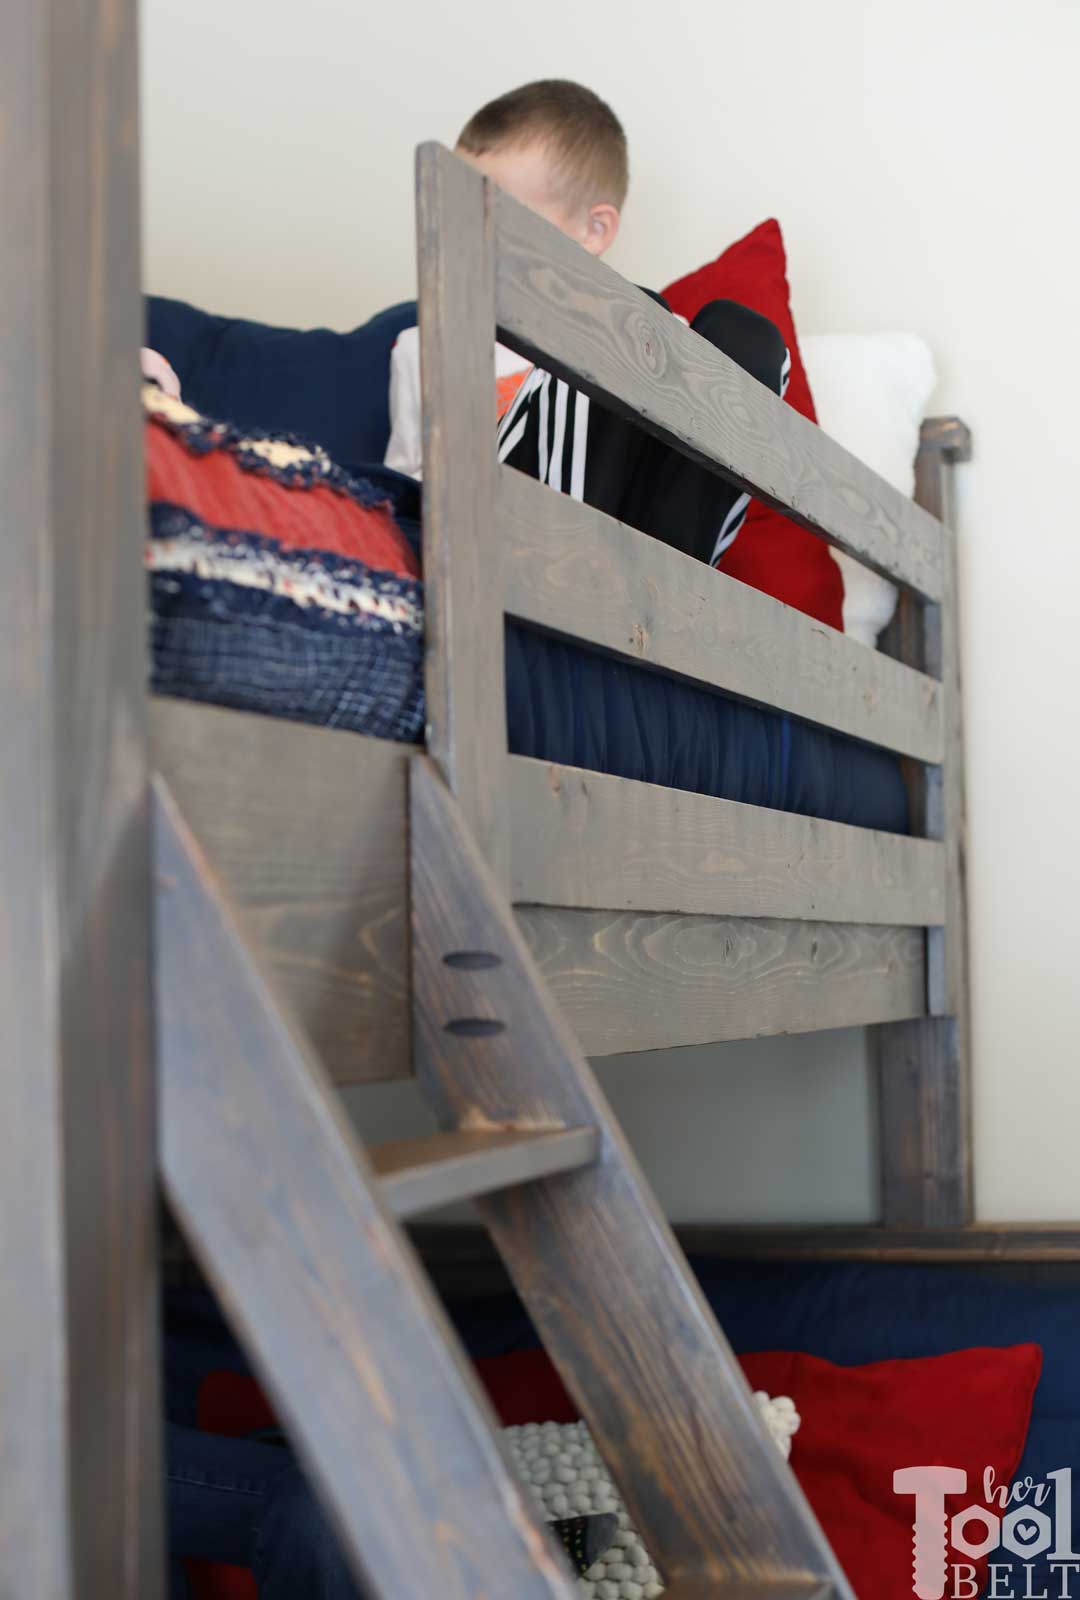
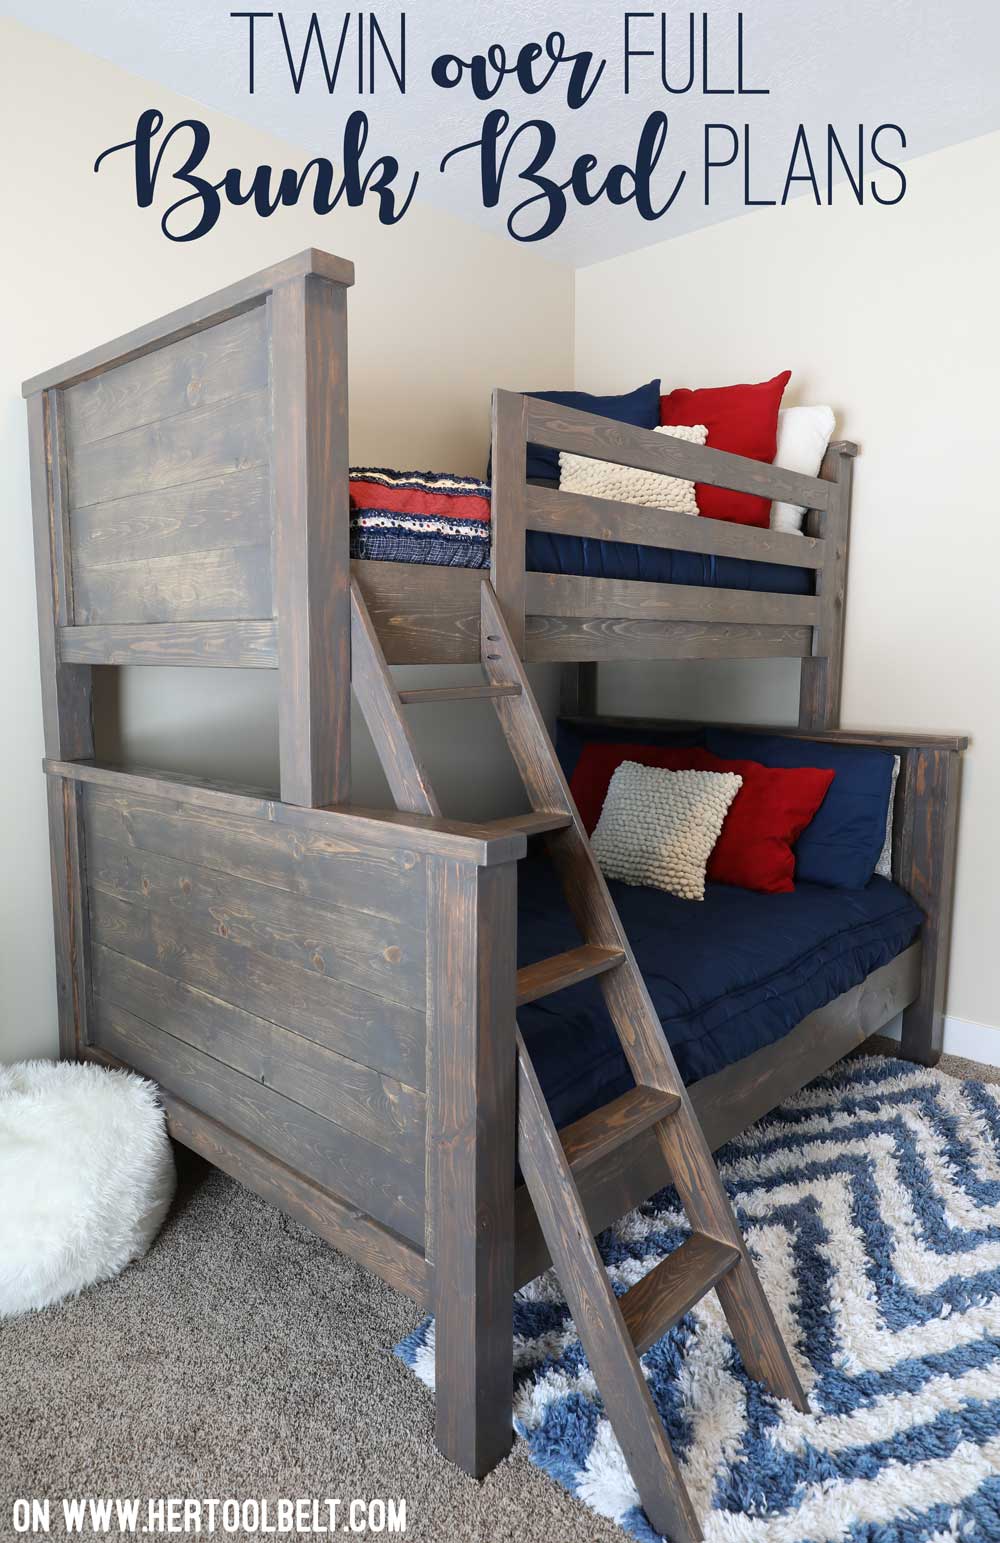 One happy boy!

This post contains some affiliate links for your convenience. Click here to read my full disclosure policy.
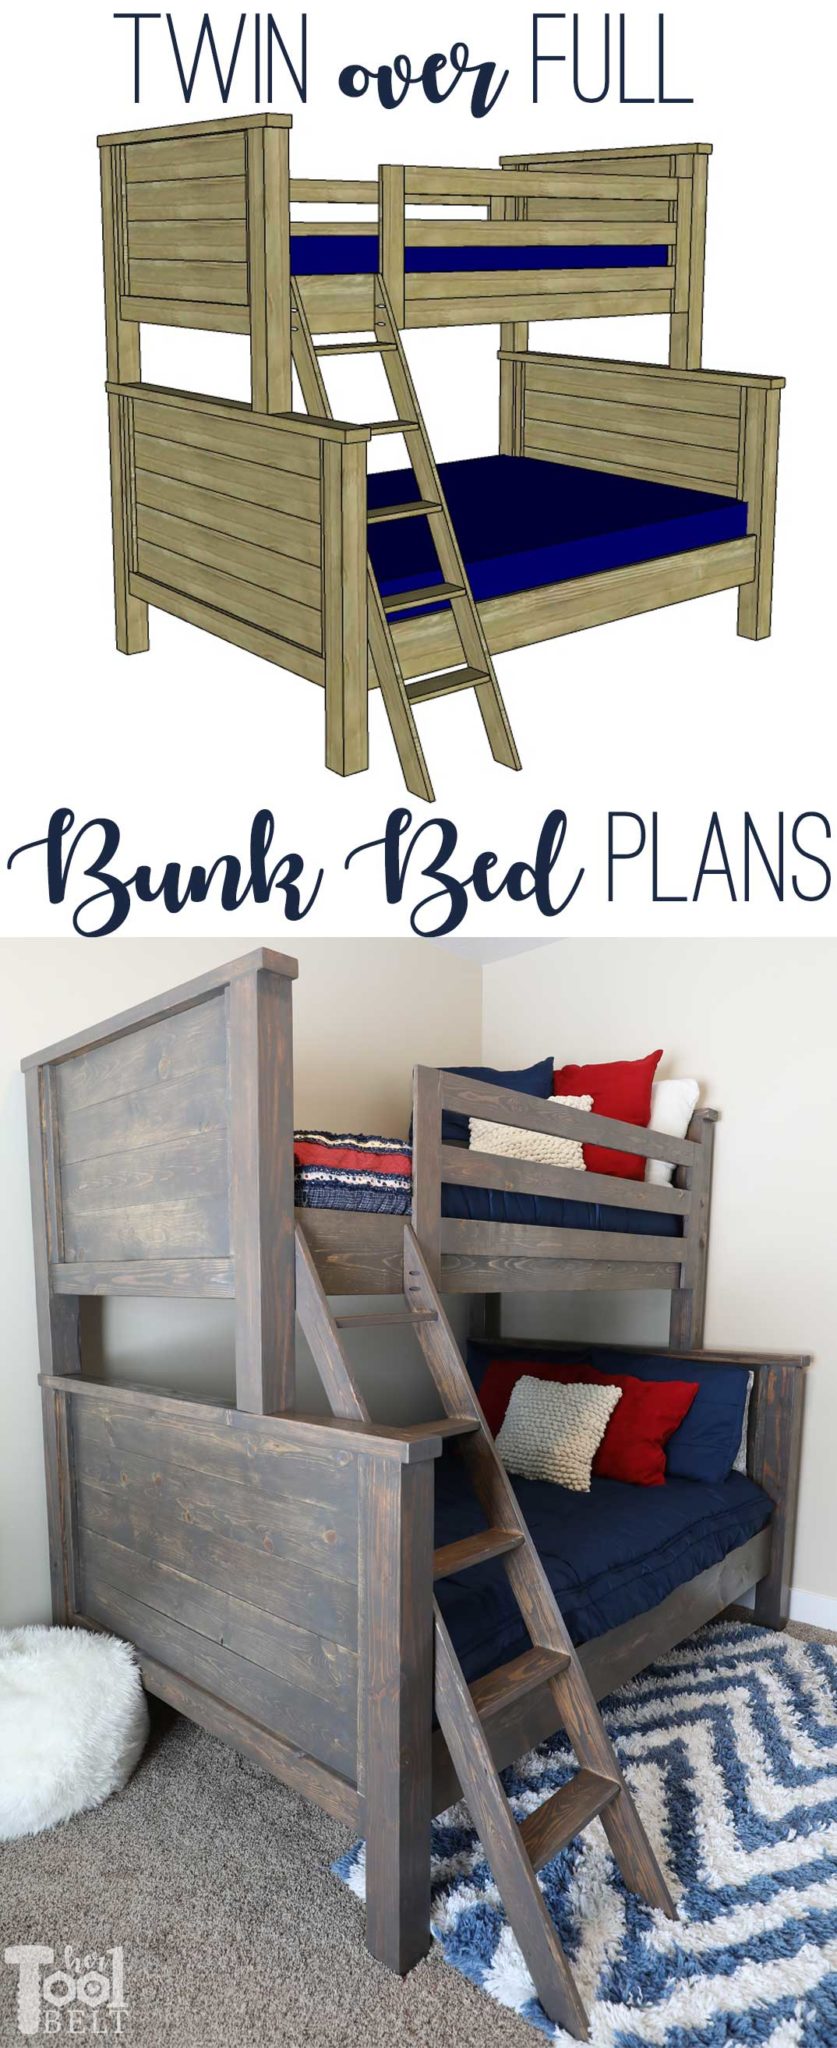
How to Build a Farmhouse Style Twin over Full Bunk Bed
 Materials
- 2 – 4×4 x 10’ post
- 1 – 4×4 x 8’ post
- 4 – 2×4 x 8’ board
- 4 – 2×2 x 8’ board
- 4 – 1×8 x 8’ board
- 8 – 1×6 x 8’ board
- 1 – 1×6 x 10’ board
- 19 – 1×4 x 8’ board or furring strip
- 4 – 1×2 x 8’ board or furring strip
- Wood is approx. $220
- 1 ¼” pocket hole screws
- 2 ½” pocket hole screws
- 3” wood screws
- 2” brad nails
- 1 ¼” brad nails
- wood glue
- stain (they used Varathane Briar Smoke)
- top coat (they used Varathane satin polyurethane)
- sandpaper
- wood filler
Tools Used
- Miter Saw
- Drill
- Drill bits
- Kreg Pocket hole jig
- Brad Nailer
- Sander
- Measuring Tape
- Table saw – optional
Cut List
- 11 – ¾” x 3 ½” x 55” – full mattress slat
- 11 – ¾” x 3 ½” x 40” – twin mattress slat
- 3 – ¾” x 3 ½” x 68” – long bed guard rail
- 4 – ¾” x 3 ½” x 20 ¾” – guard stile
- 3 – ¾” x 3 ½” x 54” – short bed guard rail
- 2 – ¾” x 3 ½” x 63” – ladder leg
- 5 – ¾” x 3 ½” x 12 ½” – step
- 3 – ¾” x 1 ½” x 13 ½” – guard supports
- 4 – 3 ½” x 3 ½” x 39” – leg full bed
- 4 – 3 ½” x 3 ½” x 33 ¾” – leg twin bed
- 2 – 1 ½” x 3 ½” x 59 ½” – top full bed
- 2 – 1 ½” x 3 ½” x 36” – lower rail twin bed
- 2 – 1 ½” x 3 ½” x 51” – lower bed full bed
- 2 – 1 ½” x 3 ½” x 44 ½” – top twin bed
- 4 – ¾” x 7 ¼” x 75” – bed rail
- 10 – ¾” x 5 ½” x 51” – full slat
- 8 – ¾” x 5 ½” x 36” – twin slat
- 4 – 1 ½” x 1 ½” x 73” – bed rail support
- 8 – ¾” x 1 ½” x 26 ¼” – full trim (cut to fit)
- 8 – ¾” x 1 ½” x 21” – twin trim (cut to fit)
Cut Diagrams
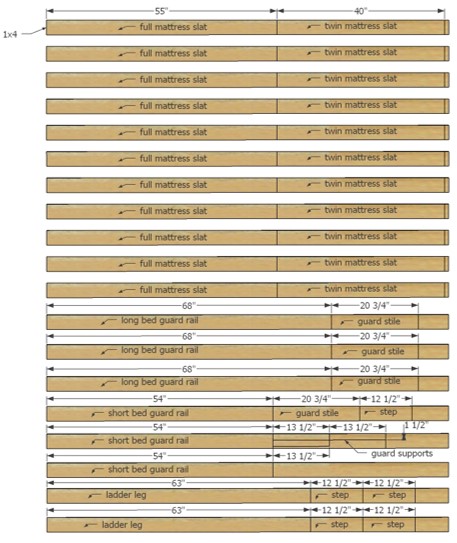

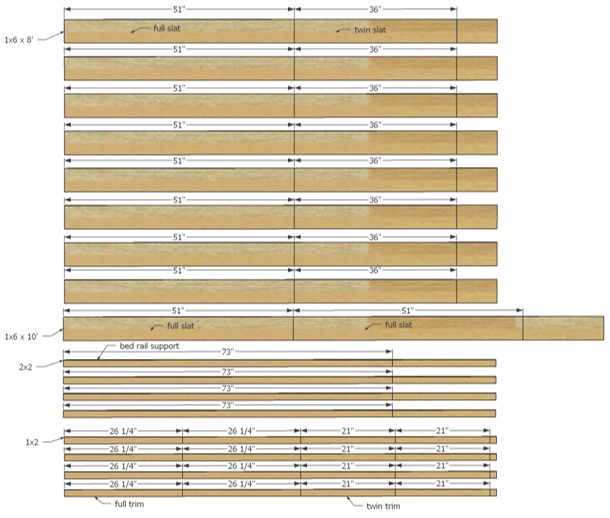
*Note: wait to cut the 1×2 full and twin trim pieces until later.
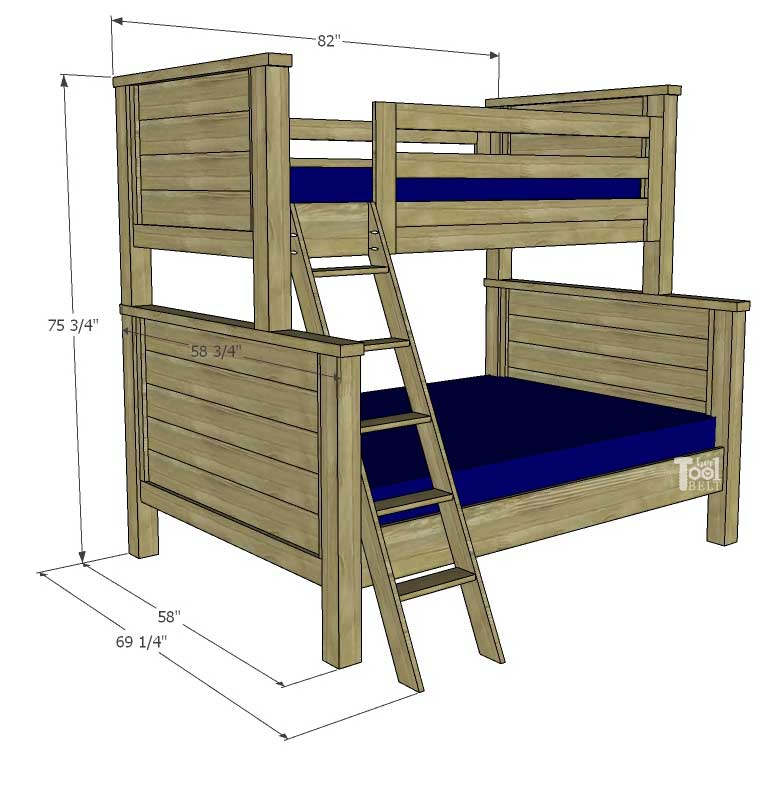
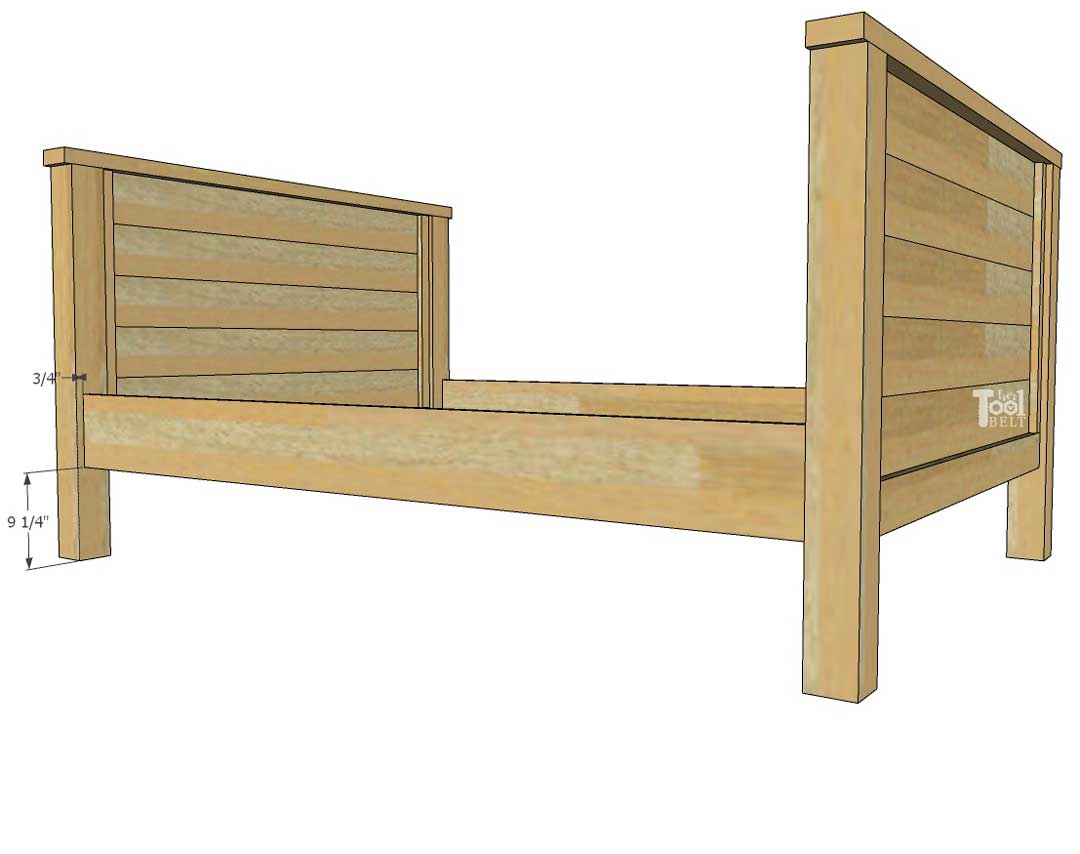
Step 1 – Build 4 Head/Foot Boards (2 full, 2 twin)
The following instructions are generic for each head/foot board size use full pieces for full, twin for twin.
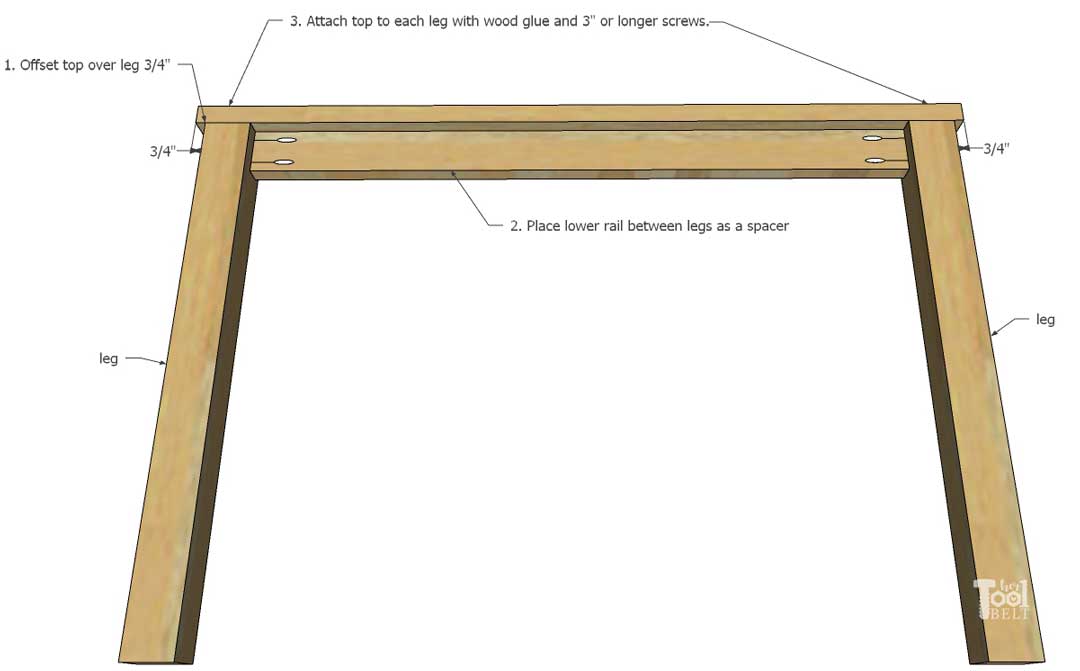
1. Mark over ¾” from one end of a top board (2×4).
2. Place a lower rail between the legs as a spacer (don’t attach).
3. Place a leg at the ¾” mark. Use 3” or longer screws and wood glue and attach the top to 2 legs. (A couple screws in each leg.)
The width of 1×6’s can vary between 5 1/4″ and 5 1/2″.
Table saw – option
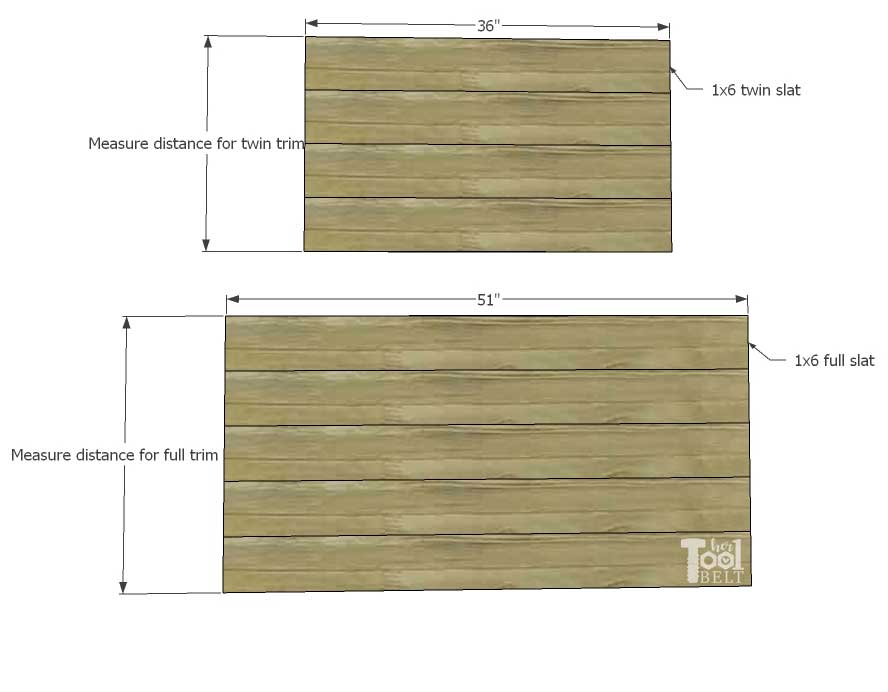
If you have access to a table saw, you may want to trim the 1×6 head/foot board slats down to 5 1/4″. It’s best to cut a little off of both sides, so you end up with two straight sides and 5 1/4″ wide slats. Line up the head/foot board 1×6’s and measure the total height. Cut the 1×2 trim pieces to that lengths (height). (see sketch below in no table saw option)
No Table saw – option
Line up the head/foot board 1×6’s and measure the total height. Cut the 1×2 trim pieces to that lengths (height).
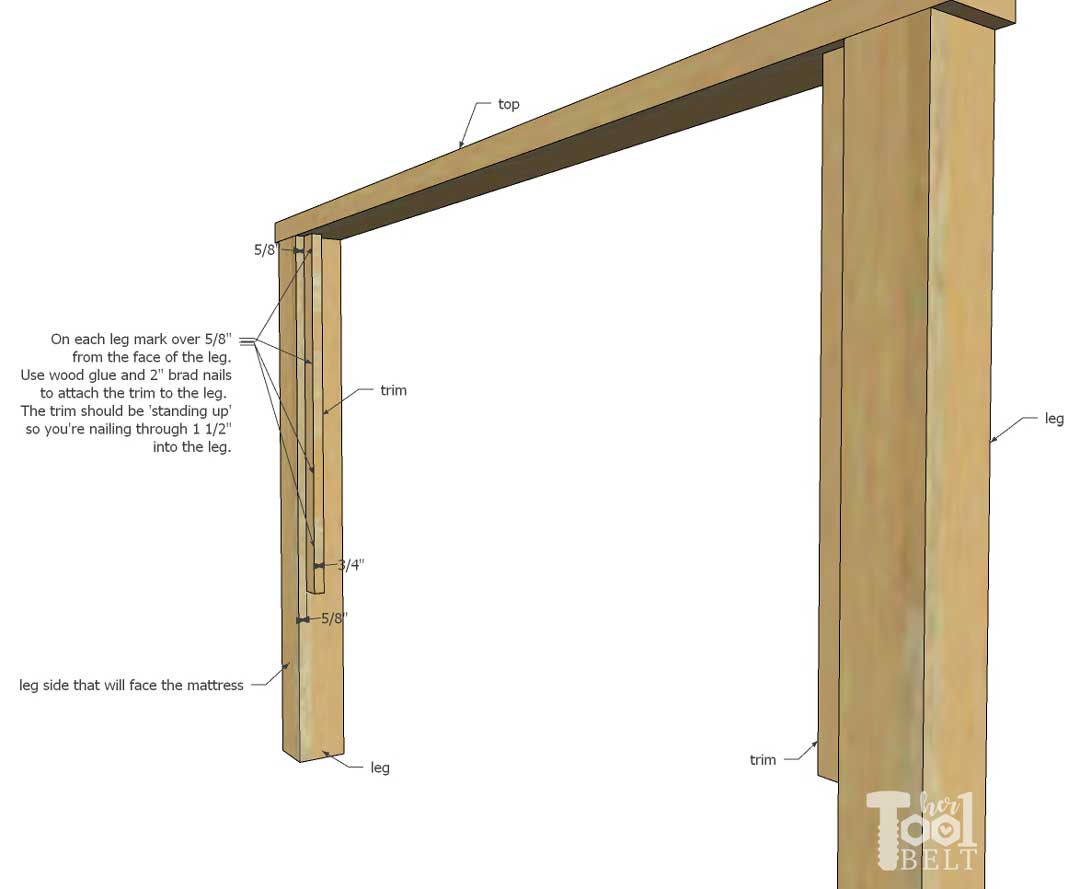
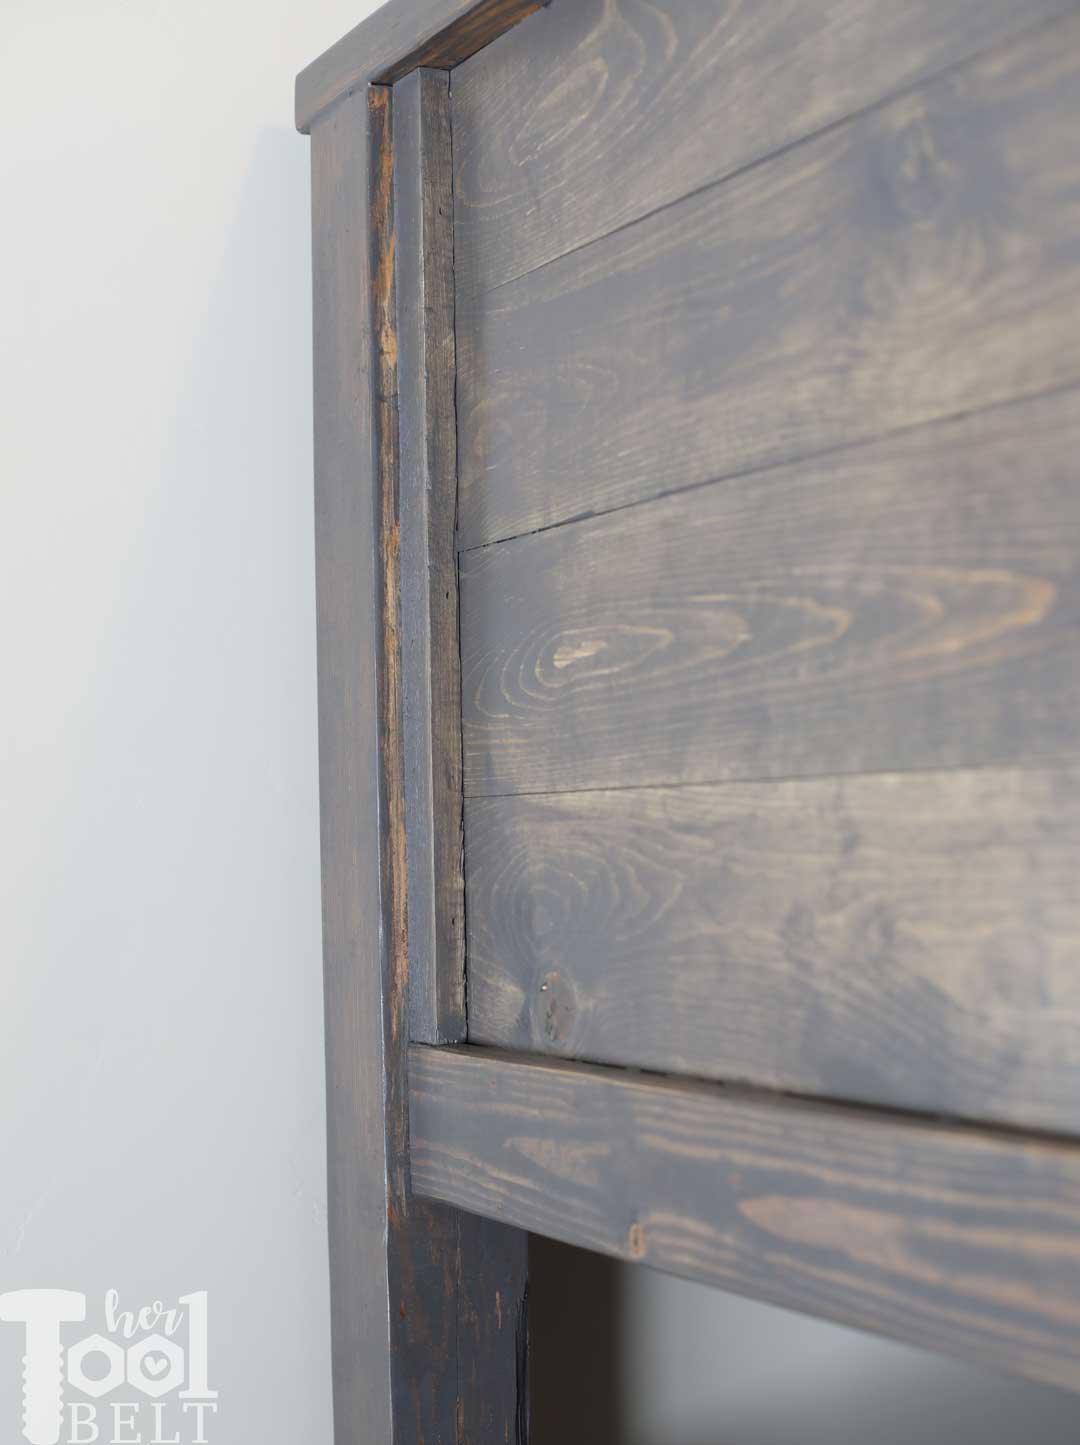
On each leg mark over 5/8” from the face of the leg. Use wood glue and 2” brad nails to attach the trim to the leg. The trim should be ‘standing up’ so you’re nailing through 1 ½” into the leg.
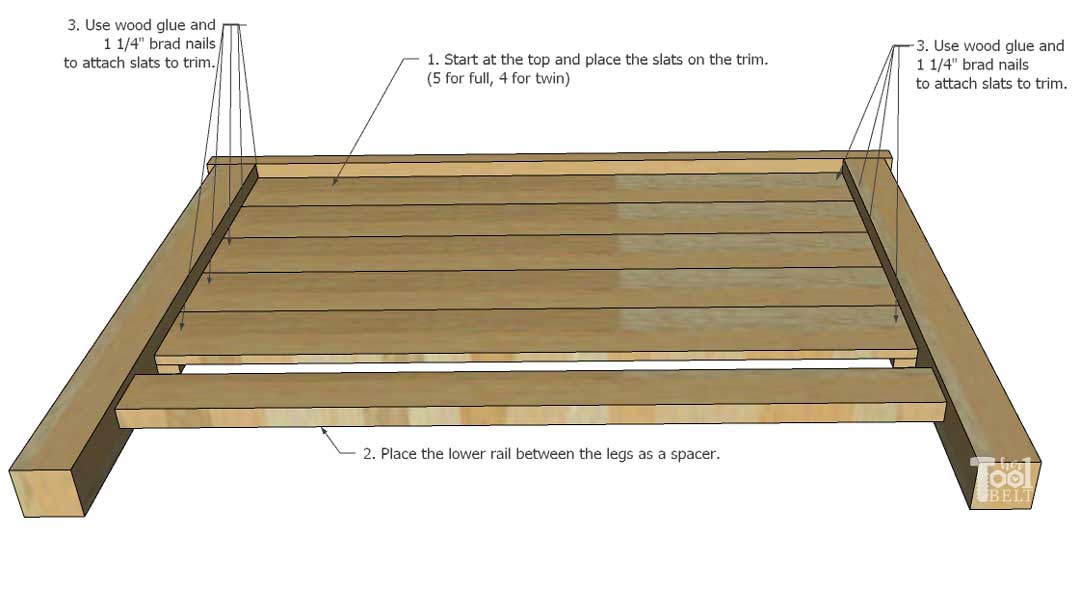
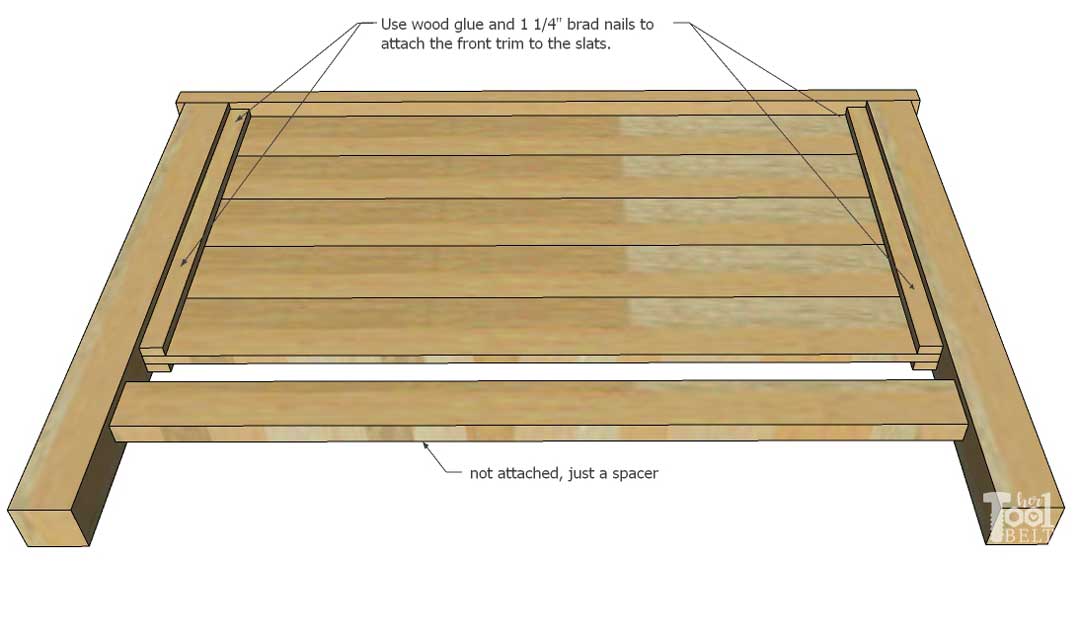
1. Put wood glue on the trim and start at the top and place (5 ¼”) slats on the trim. 5 slats if making a full, 4 if making a twin.
2. Place the lower rail between the legs as a spacer. Cut any slats as necessary to fit.
3. Nail the slats to the trim with 1 ¼” brad nails.
Use wood glue and 1 ¼” brad nails to attach the front trim to the slats. Also use a few 2” brad nails to attach the front trim to the leg.
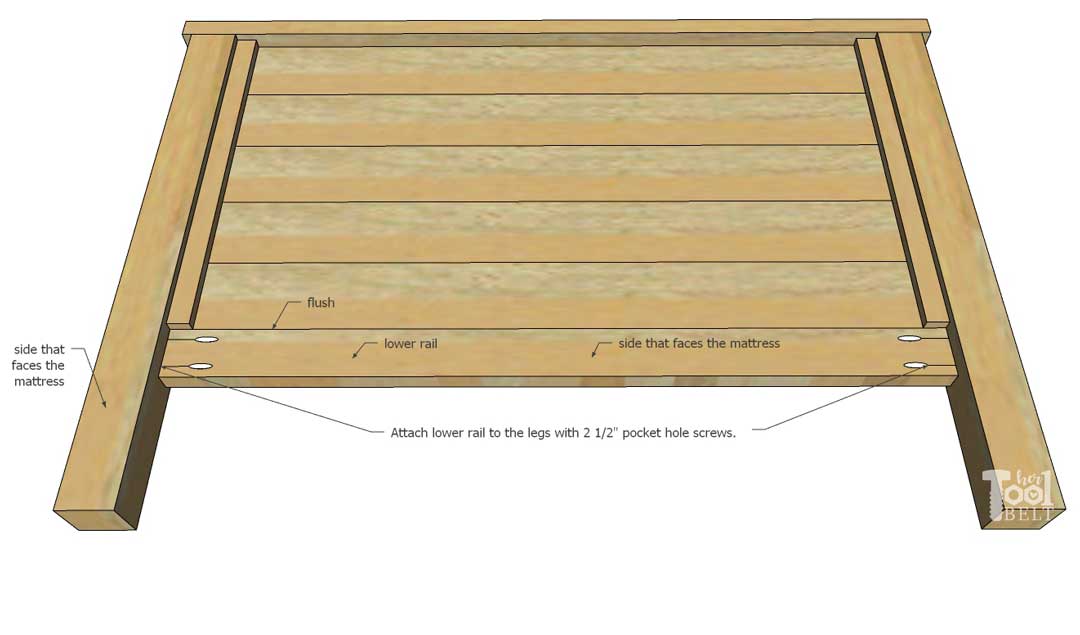
Drill pocket holes for 1 ½” material in each end of the lower rail (2×4). The pocket holes will face inside (the side that will have the mattress.) Place the lower rail at the bottom of the slats and front trim (the 2×4 face should be flush with the front trim, and the backside will be flush with the slats.)
Picture showing backside (mattress side).
Secure lower rail to the legs with 2 ½” pocket hole screws.
Repeat for each head/foot board.
Sand and stain or paint the head/foot boards.
Step 2 – Bed Rails
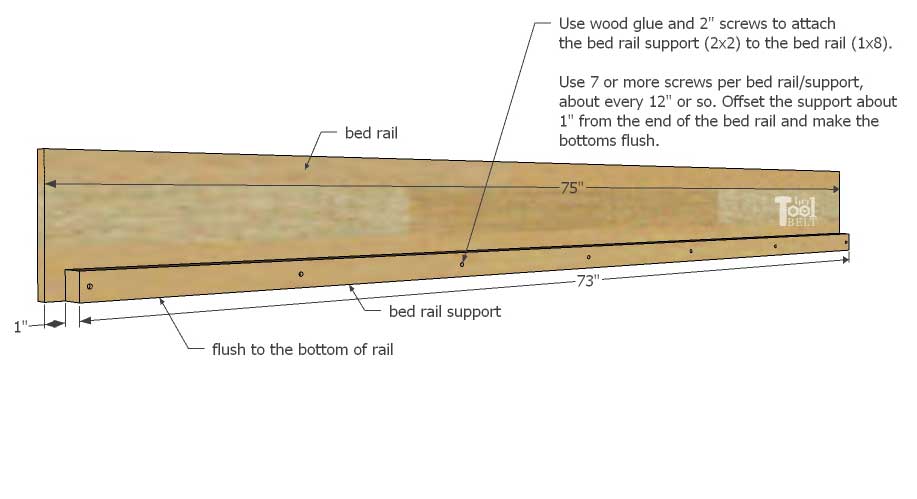
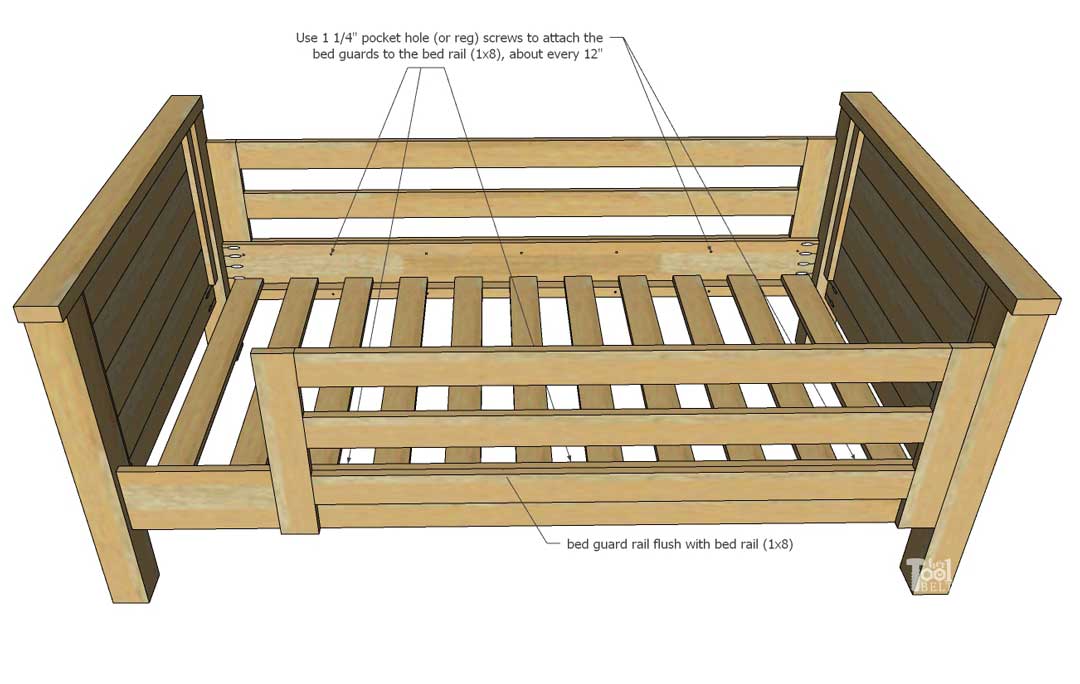
Drill 7 or 8 pilot holes, about ever 12” or less, in the 2×2 bed rail supports. Inset the end of the 2×2 about 1″ from the 1×8 end. Use wood glue and 2” screws to firmly attach the bed rail support to the bed rail. The bottom of the 2×2 and 1×8 should be flush.
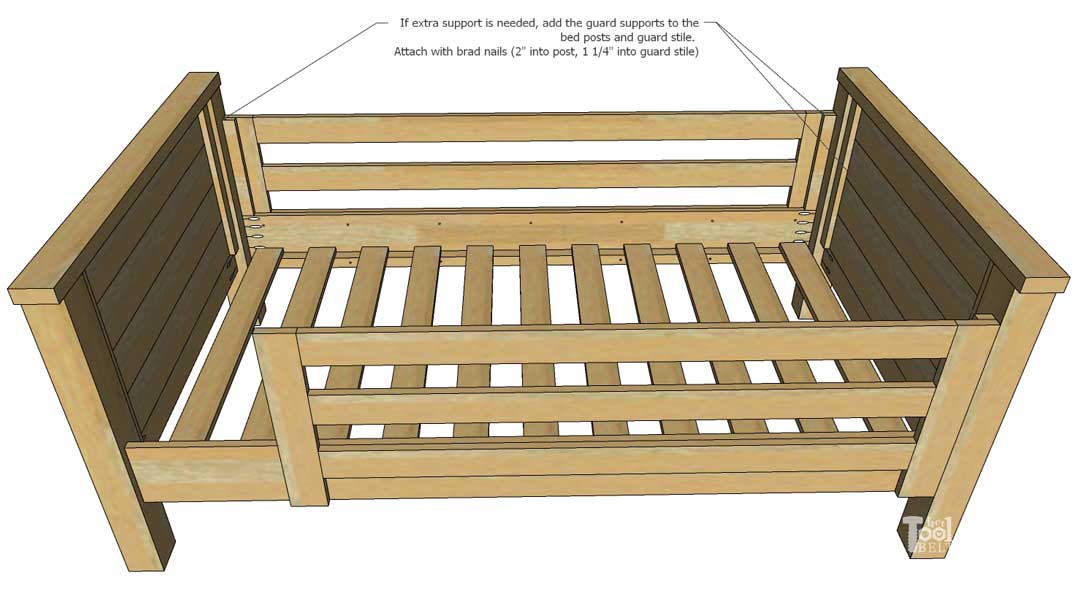
Step 3 – Guards
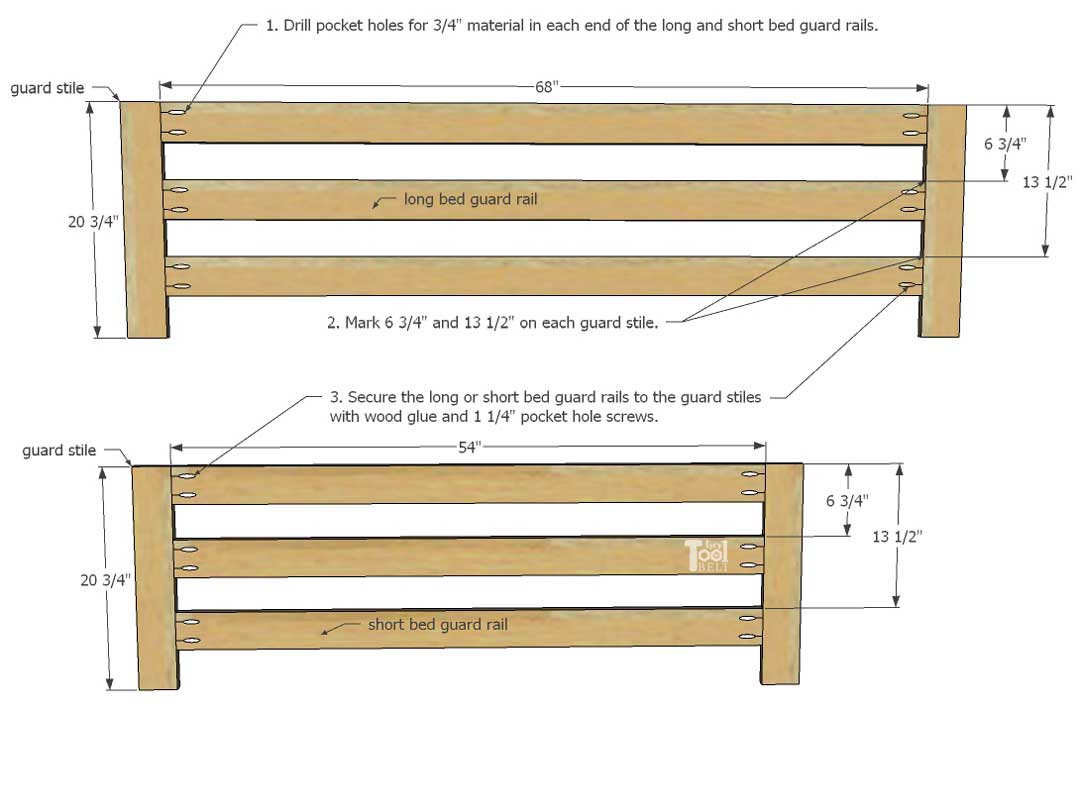
Drill pocket holes for ¾” material in each end of the long/short bed guard rail boards (68 and 54). Measure and mark 6 ¾” and 13 ½” on each guard stile. Secure the bed guard rail boards to the guard stiles with wood glue and 1 ¼” pocket hole screws, one at the top, 6 ¾” and 13 ½” for both long and short bed guards.
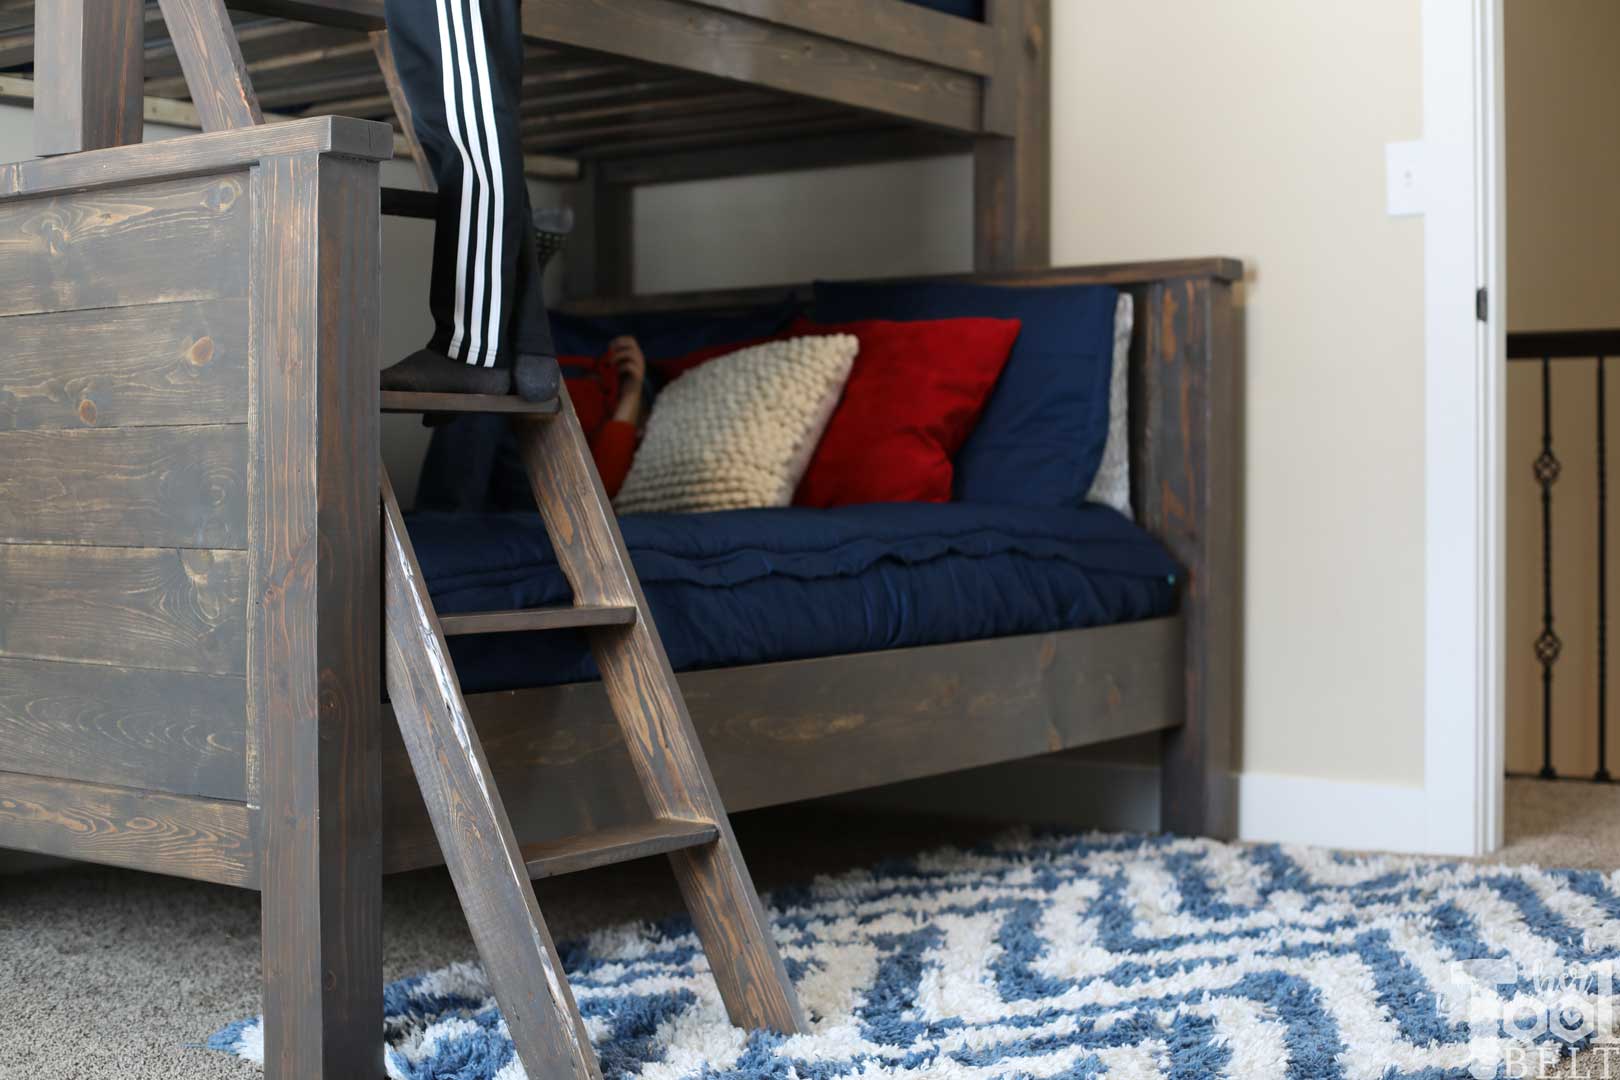
Step 4 – Ladder
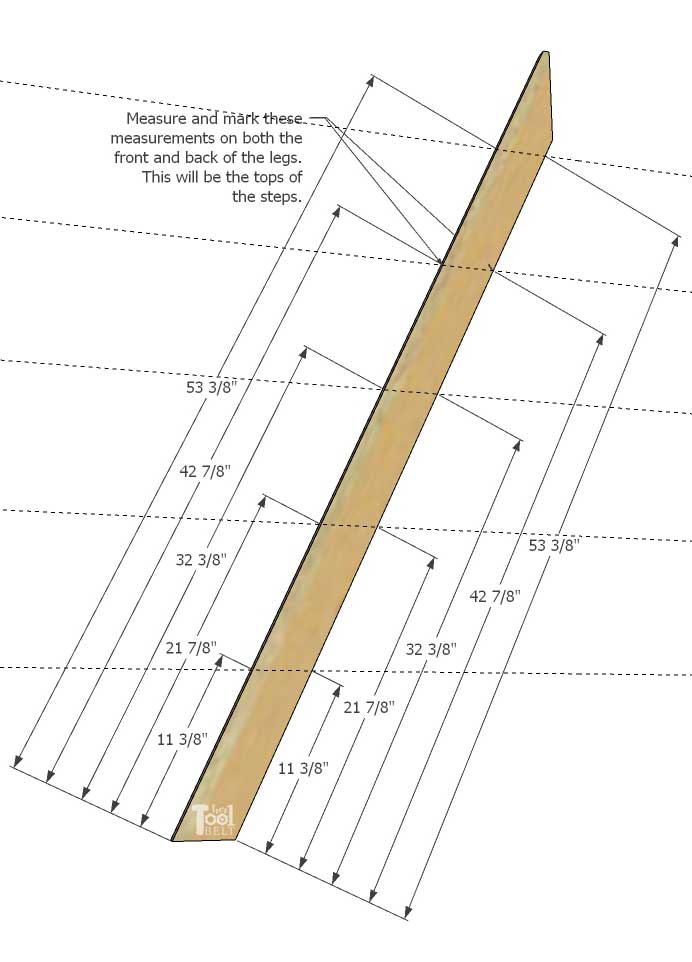
Cut a 25 deg miter cut at the bottom of the ladder leg board. Measure up 62 7/8” then make another 25 deg miter cut. Measure over from ½” on the top of the ladder leg. Measure up 54 7/8” from the backside of the ladder leg and draw a line between the 54 7/8” mark and the ½” mark. Make a cut along this line. Repeat for other leg.

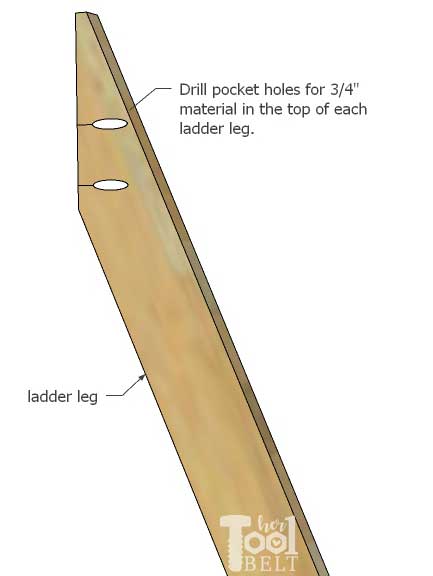
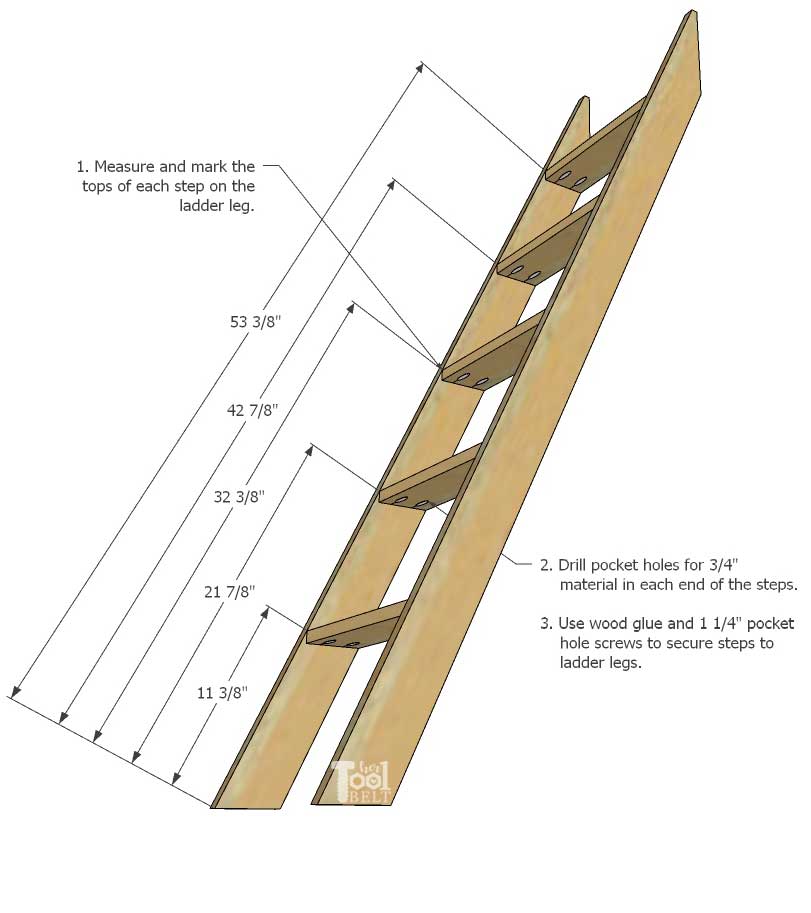
Drill pocket holes for ¾” material in each end of the step boards (12 ½”). Drill pocket holes for ¾” material in the top of the ladder legs as shown.
On the ladder legs, measure and mark from the front and back of the ladder bottom (11 3/8”, 21 7/8”, 32 3/8”, 42 7/8”, 53 3/8”). Draw a line between the marks.
Use wood glue and 1 ¼” pocket hole screws to attach the ladder steps to the ladder legs.
Step 5 – Finish
Fill any nail holes, screw holes, blemishes, etc with wood filler and allow to dry. Sand all of the pieces to the bunk bed. My Sister-in-Law used Varathane Briar Smoke to stain the bunk bed. After the stain dried, she applied a coat of Varathane polyurethane in satin to protect the wood. Let the stain and/or top coat fully dry.
Step 6 – Bed Assembly (Assemble in the bedroom)
This plan assumes a twin bed is 39″ wide and a full bed is 54″ wide. I added 1″ on the bed width to allow for bedding. Mattress widths can vary. You can inset the bed rails more than 3/4″, and trim the mattress slats, if you want a tighter fit to the mattress. (Example, their full mattress was 52″, so we inset the bed rails 1 3/4″ from each side and cut the mattress slats to 53″.)
Use 1 ¼” and/or 2 ½” pocket hole screws to attach the bed rails to the 4×4 head/foot board posts. The bottom of the bed rail should be up 9 ¼” on the 4×4 and inset ¾”.
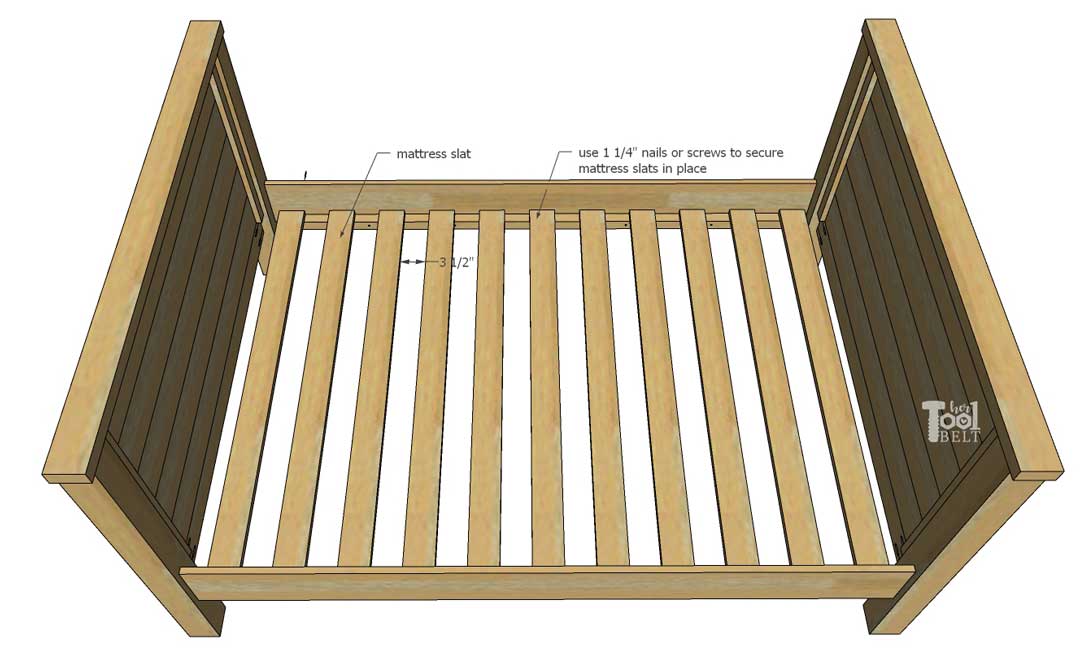
Attach mattress slats onto the 2×2 rail support. Space the mattress slats about ever 3 ½”. Slats can be secured with brad nails or 1 ¼” screws.
Step 6 – Guard Rails on the Twin Bed
Place the long guard rail in the back of the bed (if desired), put the lower guard rail flush with the bed rail board. Secure the bed guard with 1 ¼” screws spaced about every 12” through the bed rail into the guard rail/stile. Repeat for short bed guard in the front.
If extra support is needed on the upper portion of the bed guard, then secure guard supports in the 3 corners with 2” brad nails into the post and 1 ¼” brad nails into the guard stile.
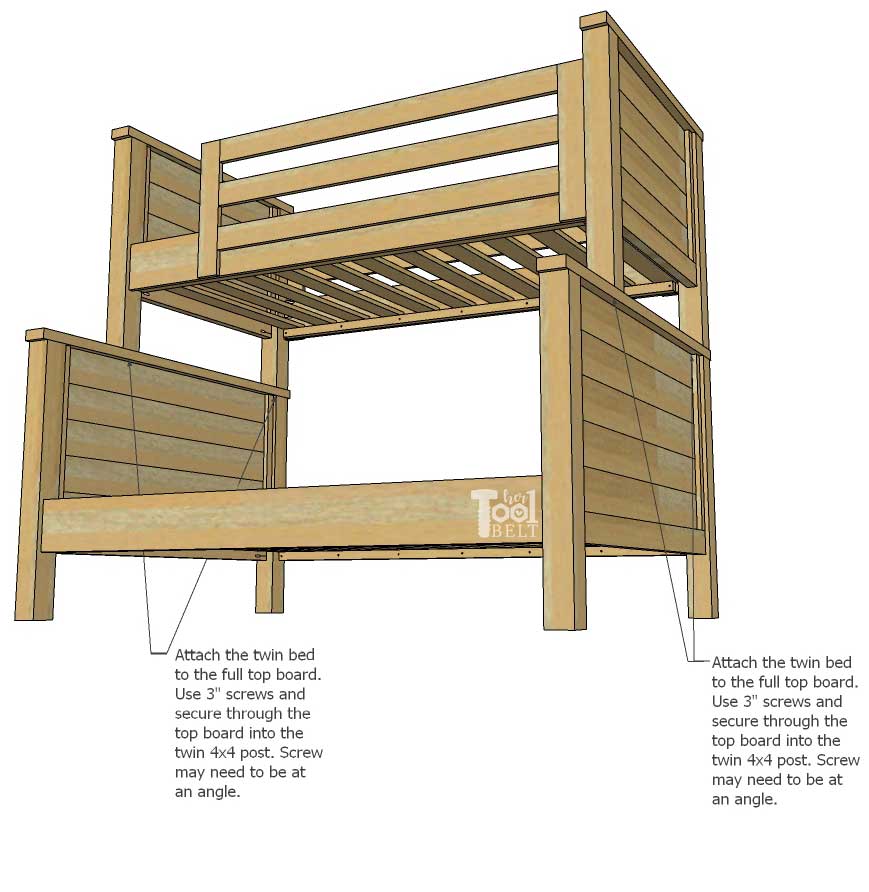
Place the Twin Bed on top of the Full Bed and line up the back 4×4 posts.
Attach the twin bed to the full top board. Use 3” screws and secure through the underside of the top board into the twin 4×4 post.
The screws may need to be at an angle.
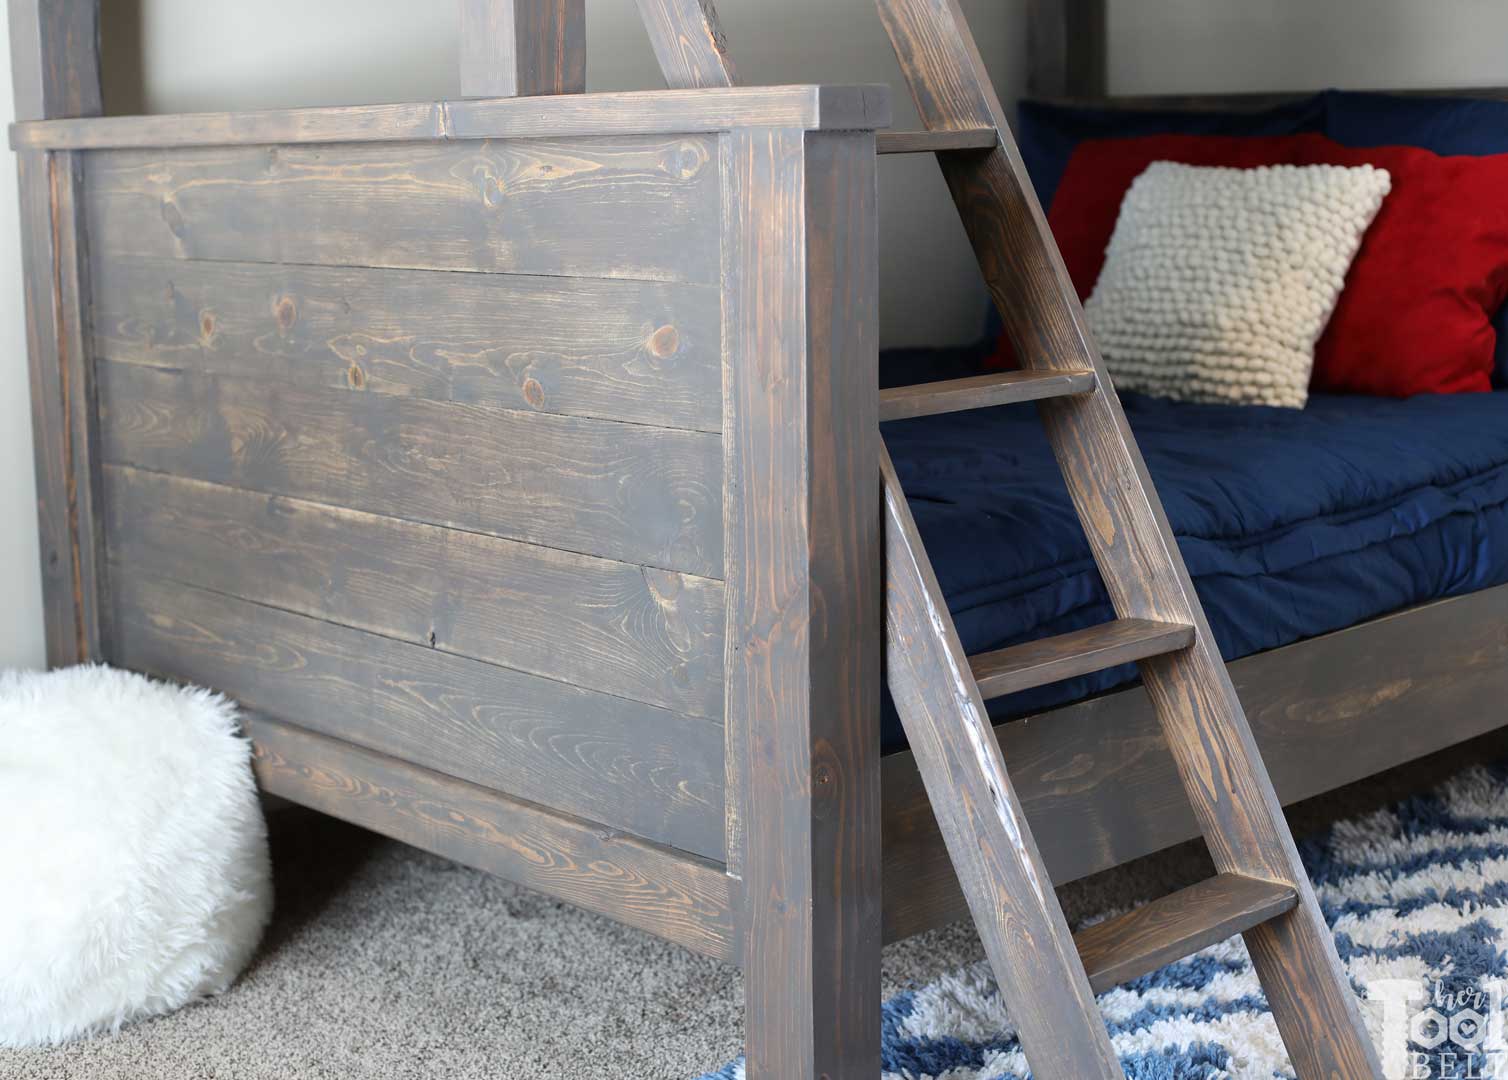
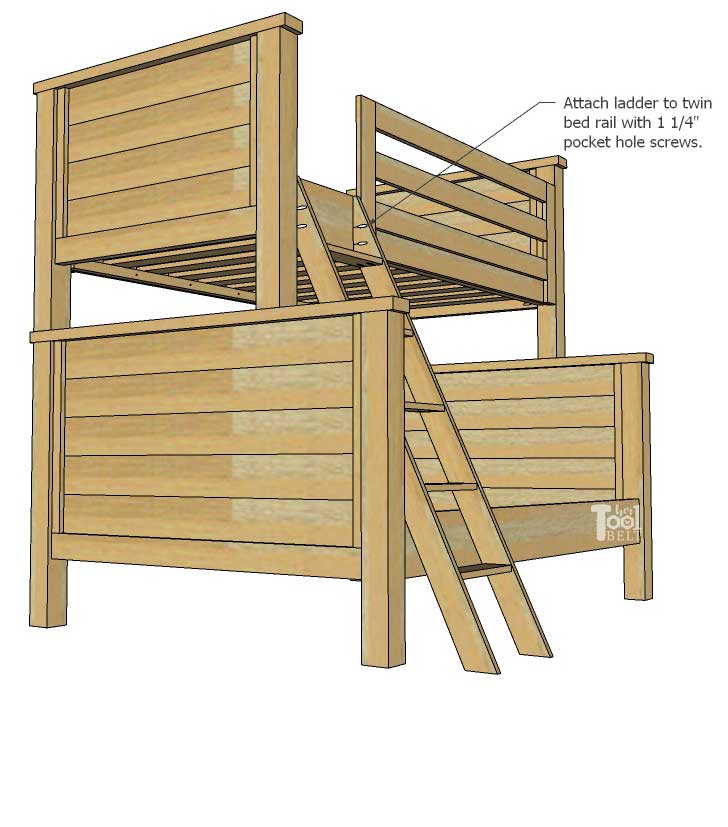
Place the ladder to the open spot on the front bed rail. Use 1 ¼” pocket hole screws to attach the ladder top to the bed rail.
This bed is solid!
To make life with bunk beds a little easier, my SIL got these Beddy’s in nautical Navy blue. I’ve noticed that Classy Clutter has an on going 25% off discount that you can find here.
Even my little 3 year old nephew can easily ‘zip’ his bed now!

Here’s to many good nights sleep.
Download the PDF Twin over Full Bunk Bed Plans –> Here <–
Thanks for Pinning.
Great work !! Thank a lot Buddy!!
This is awesome. Like the rustic look they have. Your nephews must be impressed!
What kind of wood did you use to build the bunks?Would love to build these for my boys.
It was built from pine or white wood (common boards).
Thank you, can’t wait to build this for my boys
What color stain was used on this bed…I LOVE the color!
It’s my favorite too. It is Varathane/Rustoleum Briar Smoke. Usually available at Home Depot, or homedepot.com.
Hey, I was wondering if you had an estimate for the total cost of this project? This is something we definetly want to do in our girls bedroom.
I think with the wood, stain, screws etc it was about $250.