• Home
  • Project Gallery
  • About me
    • Disclosure
    • Disclaimer
  • Blog

Her Tool Belt

DIY furniture plans, crafts, and home improvement tutorials to empower you!

  • Free Woodworking Plans
    • Bathroom Furniture
    • Bedroom Furniture
    • Entry
    • Family Room Furniture
    • Garage
    • Kitchen furniture
    • Laundry Room
    • Mudroom Furniture
    • Organization
    • Outdoor Furniture
  • Home Decor
    • Upcycle
  • Crafts
    • Holiday
  • Home Improvement
    • Cleaning
    • Fix IT
    • Paint
    • Tile
  • Tool Reviews
  • Tool Time Videos

Window Shadow Box Shelf Plan

September 19, 2019 by Amy 1 Comment

The Window Shadow Box Shelf and Diablo saw blade Tool Review is sponsored by The Home Depot. I have been compensated for my time and provided with product (tools). All ideas and opinions are my own. This post contains some affiliate links for your convenience. Click here to read my full disclosure policy. 

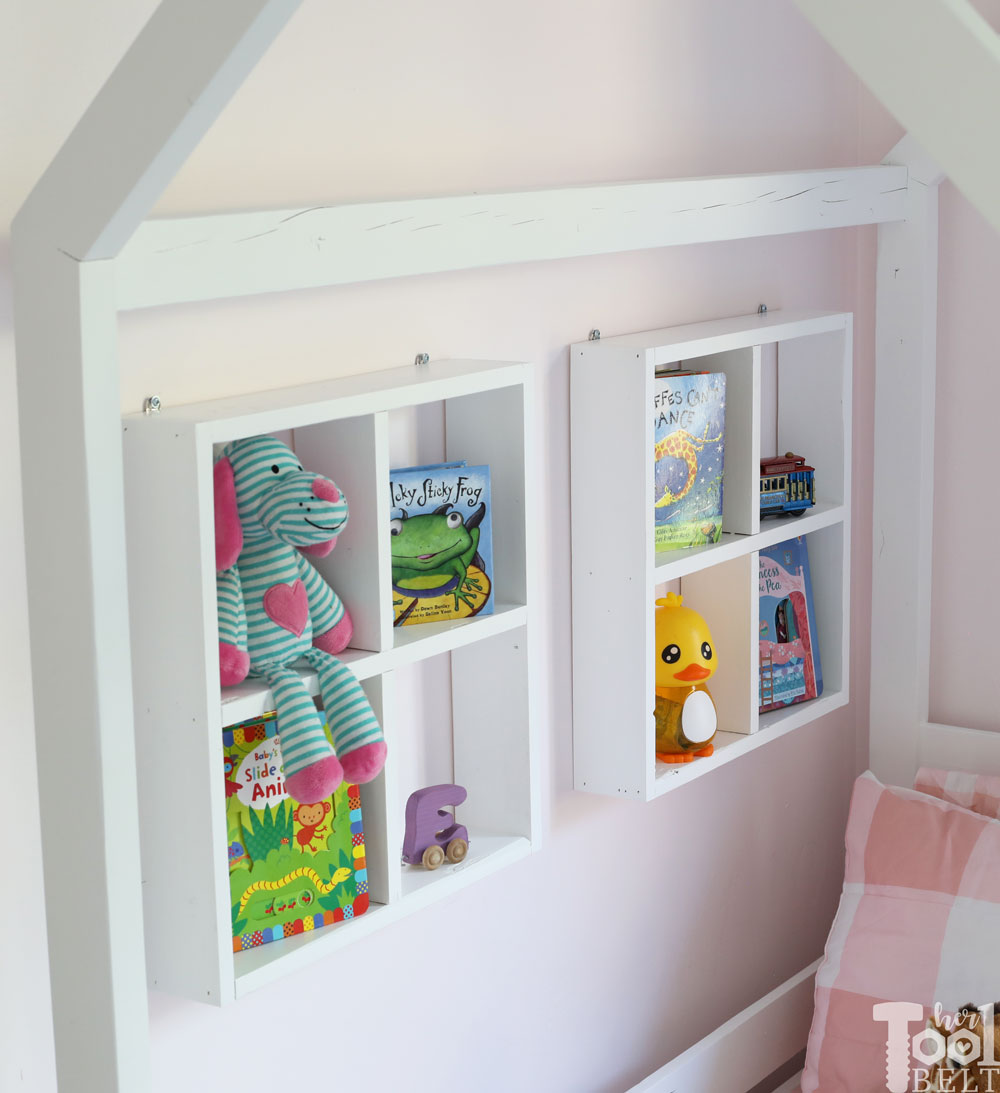
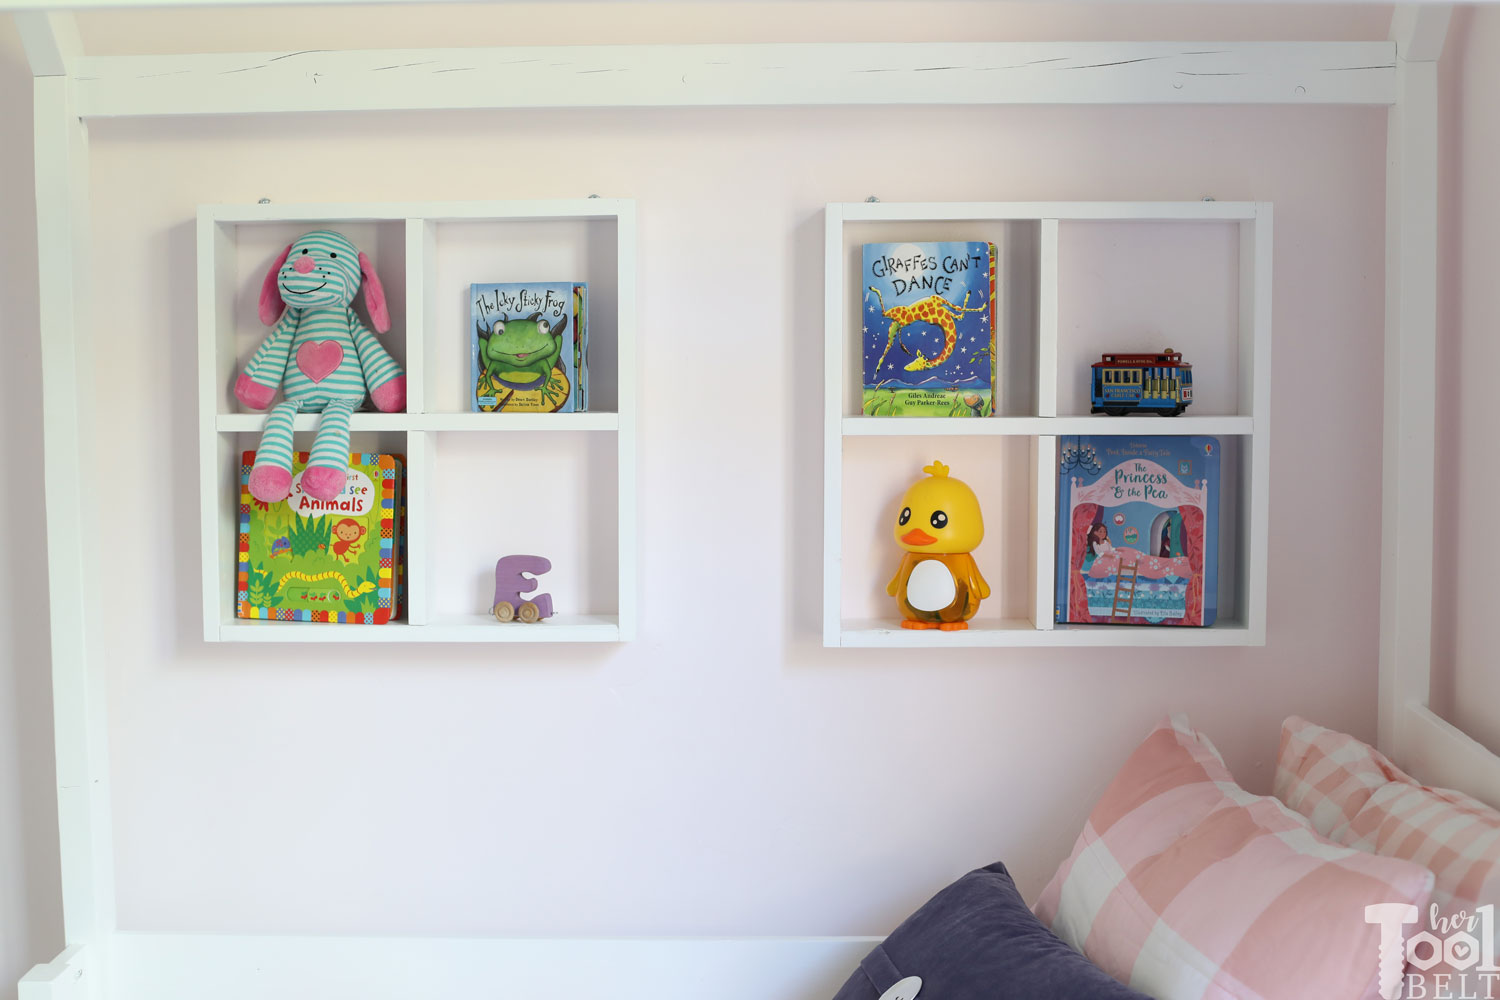
A few weeks ago I made my toddler a ‘big girl’ bed…but not too big! Her bed is a cute little house frame toddler bed that uses her crib mattress. It turned out super cute.

The perfect accessory for a 'house frame' bed, is accompanying window shadow box shelves. Build for as little as $2 each in lumber.

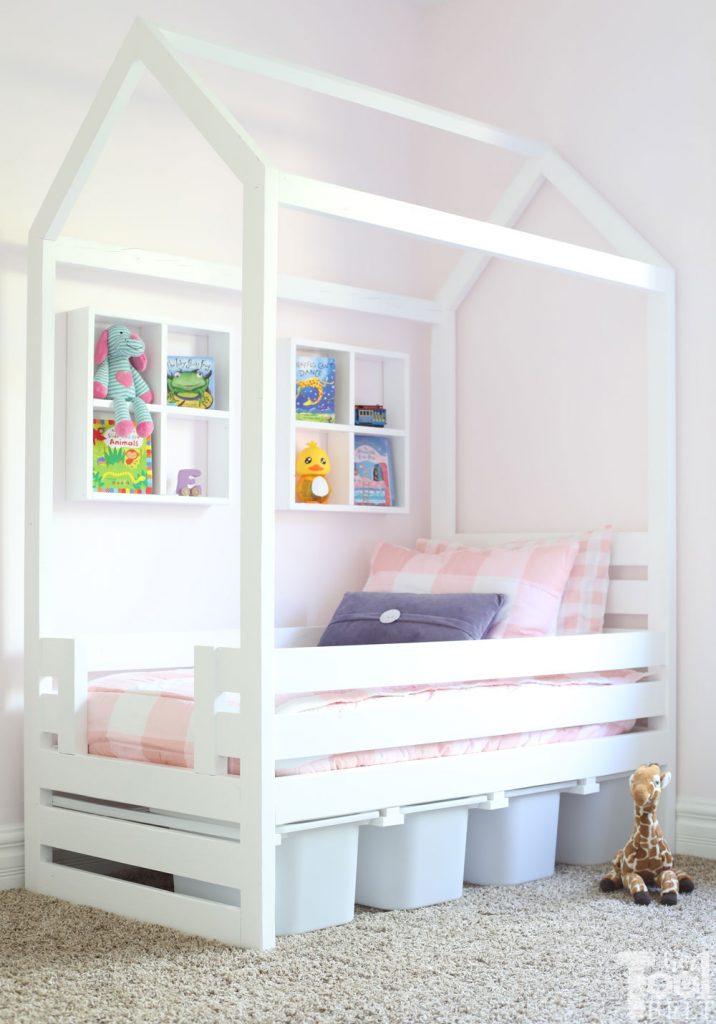
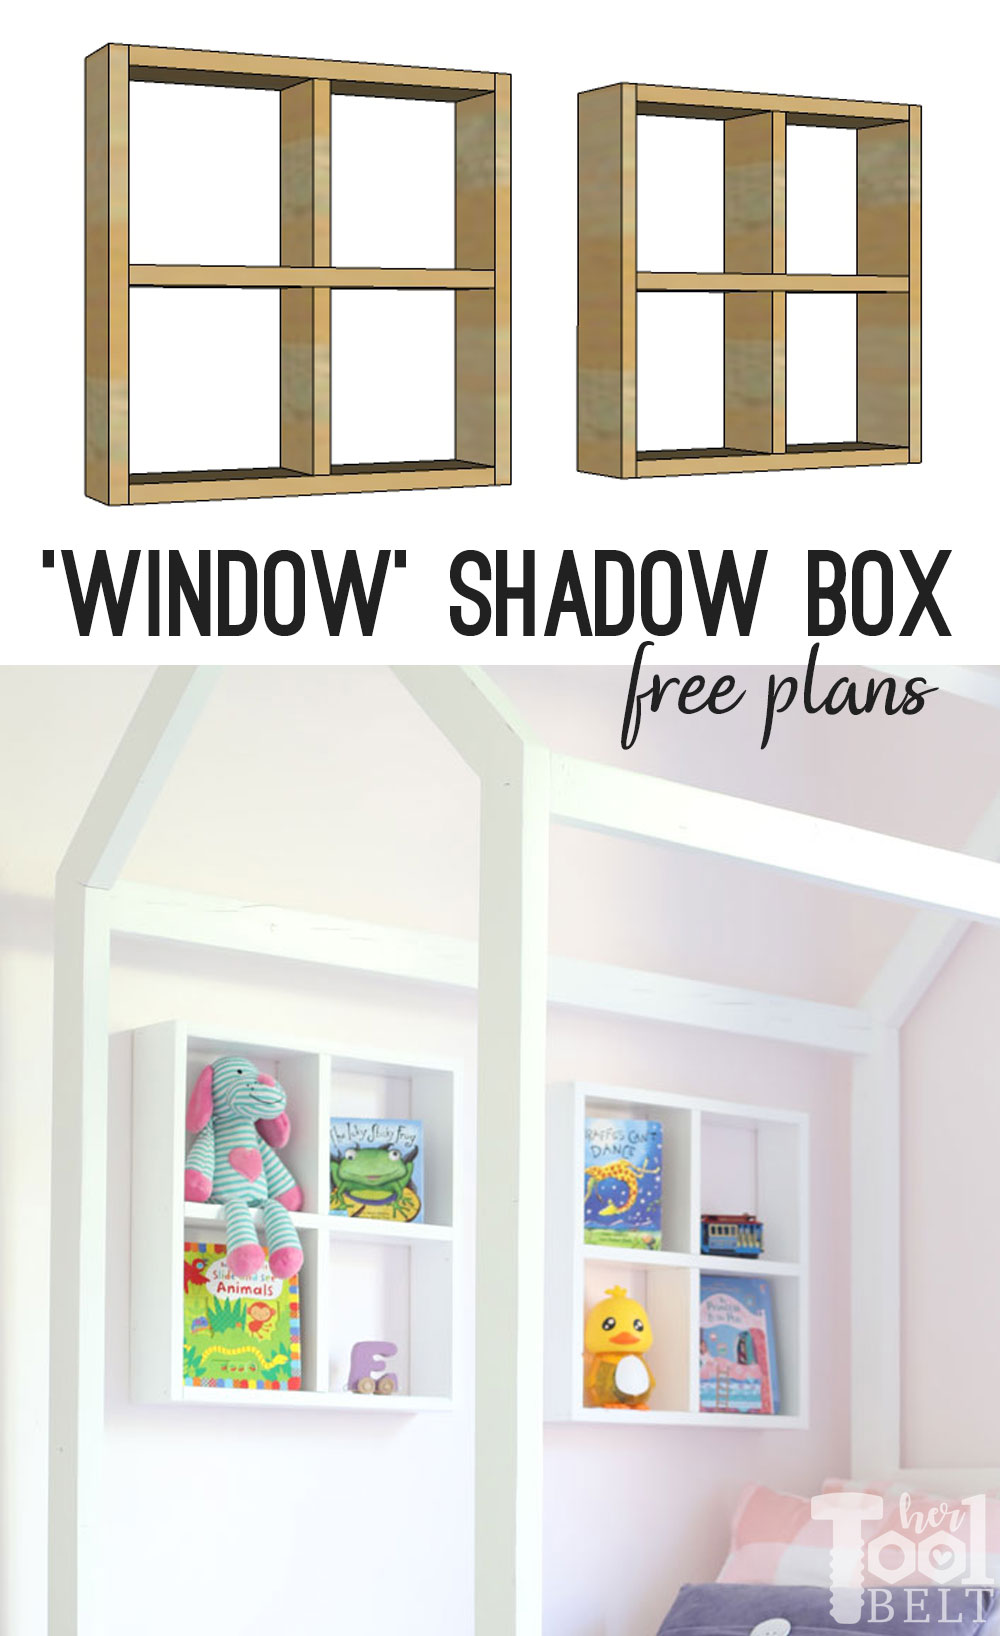
While brainstorming ideas for wall decor, I thought, of course a house needs windows. These window shadow box shelves add the look of windows, but double as a place to put her little books and knick-knacks.

The ‘window’ shadow box shelves can be made for as little as $2 each in lumber, depending on the size of ‘window’ you need. Even better, they are a great way to use up scrap 1×4 pieces!

How to Build a Window Shadow Box Shelf

The perfect accessory for a 'house frame' bed, is accompanying window shadow box shelves. Build for as little as $2 each in lumber.

Materials (links to products used)

  • 1 – 1×4 x 8′ board (this is the common name, actual size is 3/4″ x 3 1/2″) – 1 board = 1 window shelf
  • 1 1/4″ brad nails
  • sandpaper
  • wood glue
  • 2 – sawtooth picture hangers – I ran out of these and substituted 2 soda can tabs instead 🙂
  • paint or stain
  • top coat
    • The lumber cost for a 17″ x 17″ window shelf is $2!

Tools Used

  • DeWALT Miter Saw
  • Diablo 12″ Saw Blade
  • DeWALT Sander
  • Ryobi Brad Nailer
  • Measuring Tape
  • Screw Driver

Cut List

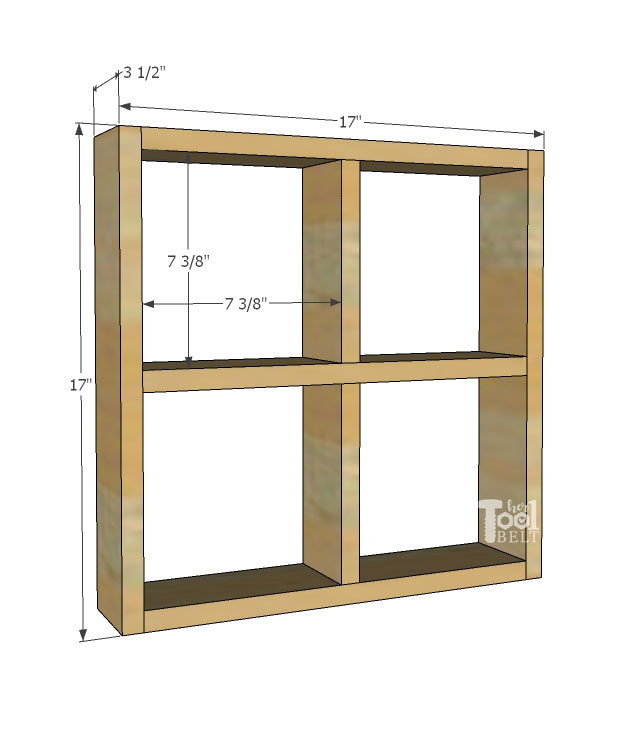
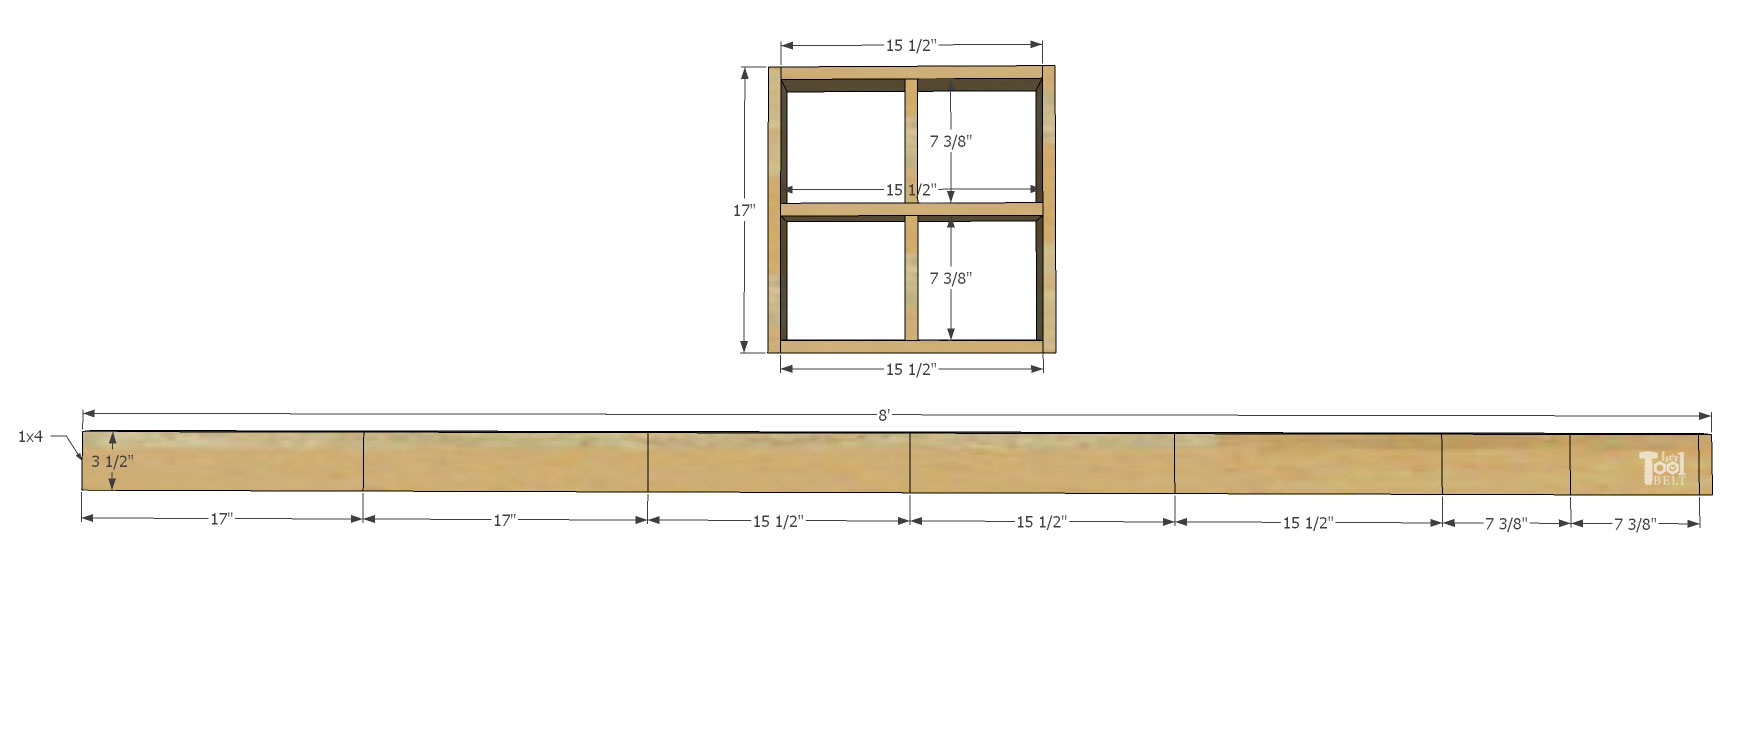
  • 2 – 3/4″ x 3 1/2″ x 17″ (1×4)
  • 3 – 3/4″ x 3 1/2″ x 15 1/2″ (1×4)
  • 2 – 3/4″ x 3 1/2″ x 7 3/8″ (1×4)

Note: You can make this shelf whatever size you need:

  • 2 pieces at shelf height”
  • 3 pieces at shelf height” – 1 1/2″
  • 2 pieces at (shelf height” – 2 1/4″)/2

Cut Diagram

window shadow box shelf cut diagram

Step 1 – Make the cuts

Measure and cut the 1×4 into the sizes listed in the cut list. I used a miter saw to make the cuts.

Using miter saw to cut window shadow box shelf boards.

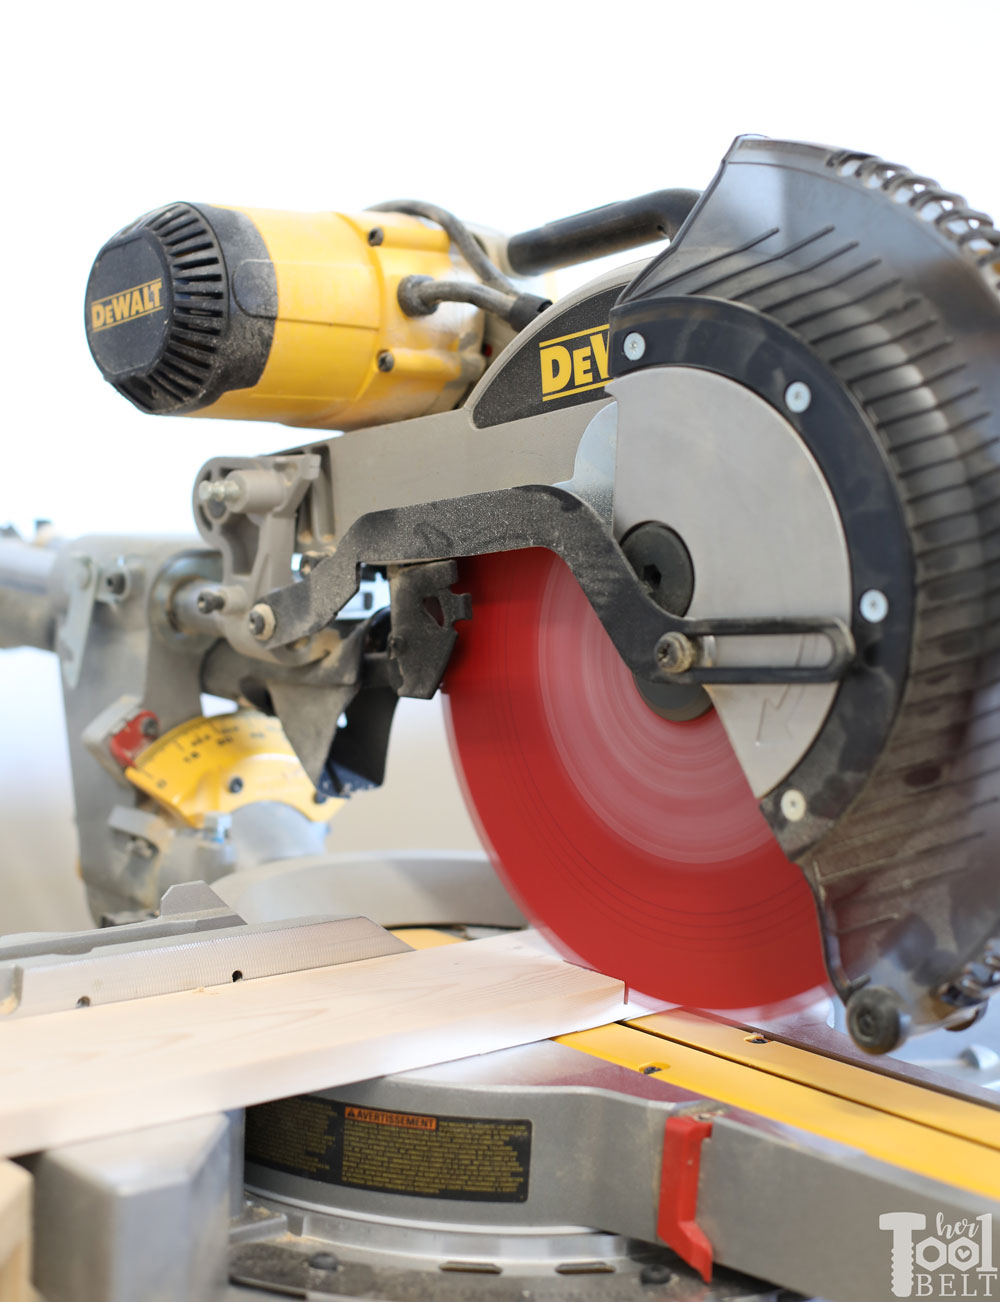
Let’s chat about blades for a minute.

Fresh Diablo saw blade for clean cuts. Using DeWalt miter saw and Diablo blade to cut window shadow box shelf boards.

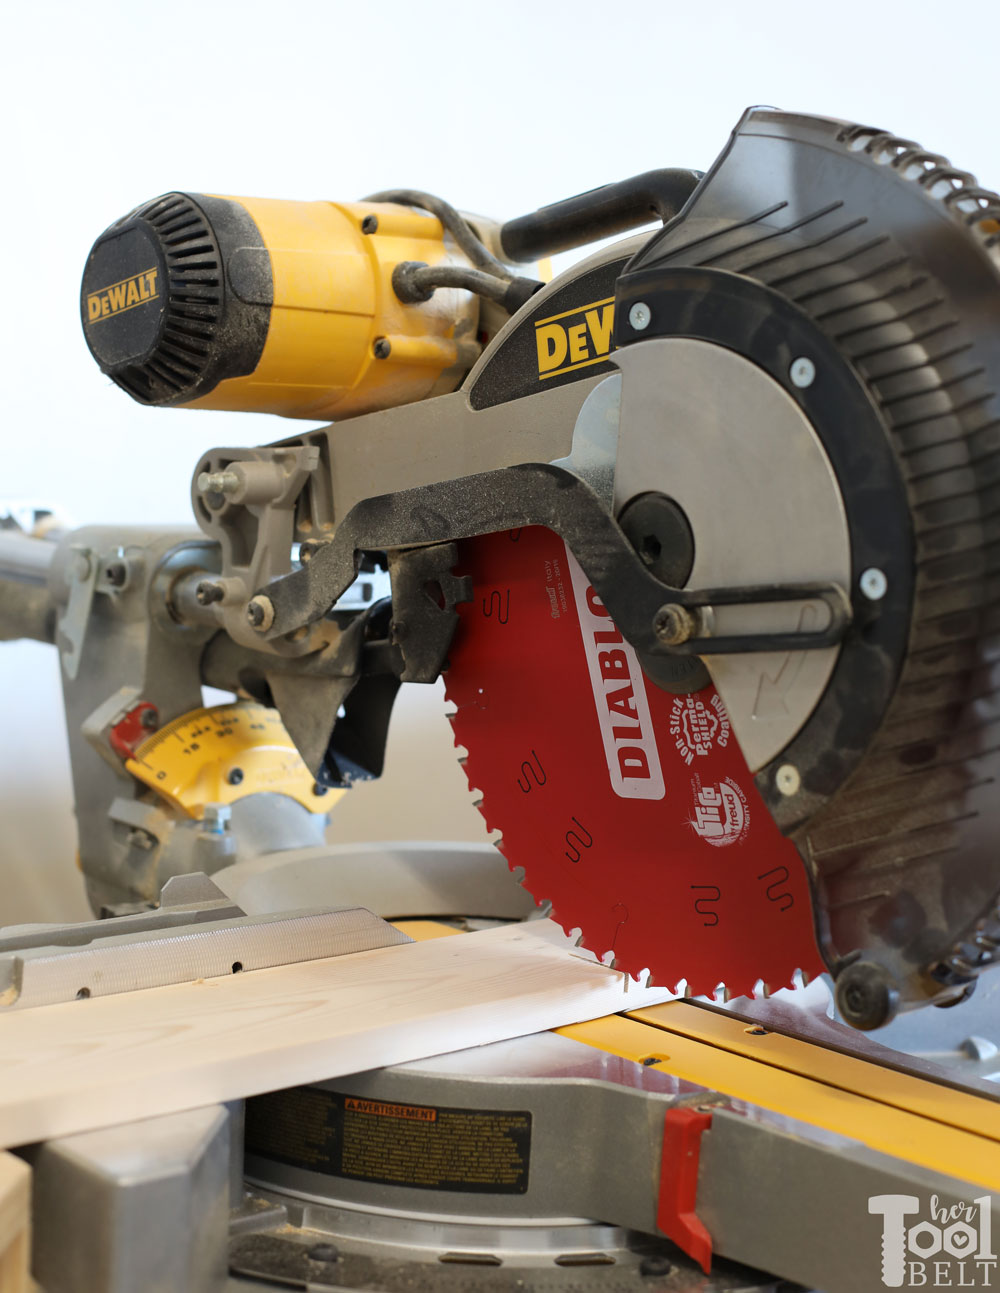
I’m sporting a new Diablo 12″ 44T general purpose saw blade. Nothing perks up your saw like a new blade and Diablo is my go to!

  • Those squiggly lines in the blade body are laser-cut stabilizer vents that absorb noise and vibration, and prevent sideways movement for precise, clean cuts.
  • The blade has a super-thin kerf (cut width) design for fast and effortless cuts, and saves material when you’re trying to get as much out of board as possible. 🙂
  • This blade comes in a 2-blade value pack…my favorite. 
  • The 44 tooth blade is a general purpose for hardwoods, softwoods, decking and pressure treated lumber. If you want a little finer cut they have a 60T option. If you do a lot of fine finish work, like trim work, you’d want to consider upping the teeth count to a 80T.
  • I especially like how long the blades stay sharp and give me crisp cuts.
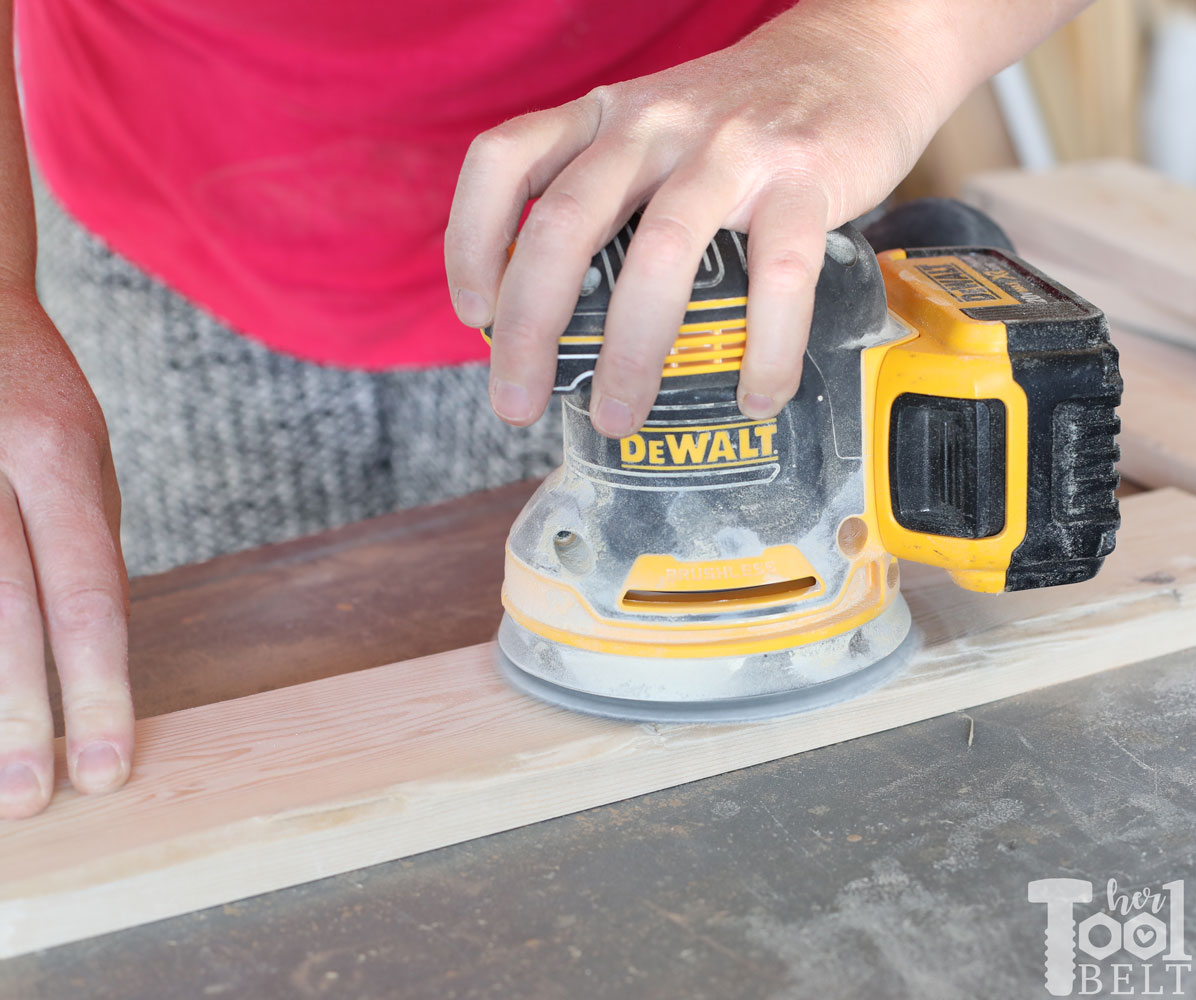
Step 2 – Sanding

While I have all of the boards separate, I like to sand them smooth. It’s easier now then trying to sand assembled. If I’m going to paint the boards, I’ll usually only sand to 120 grit. However if I’m staining, I’ll usually go up to 220 grit sandpaper.

Sanding boards for window shadow box shelf

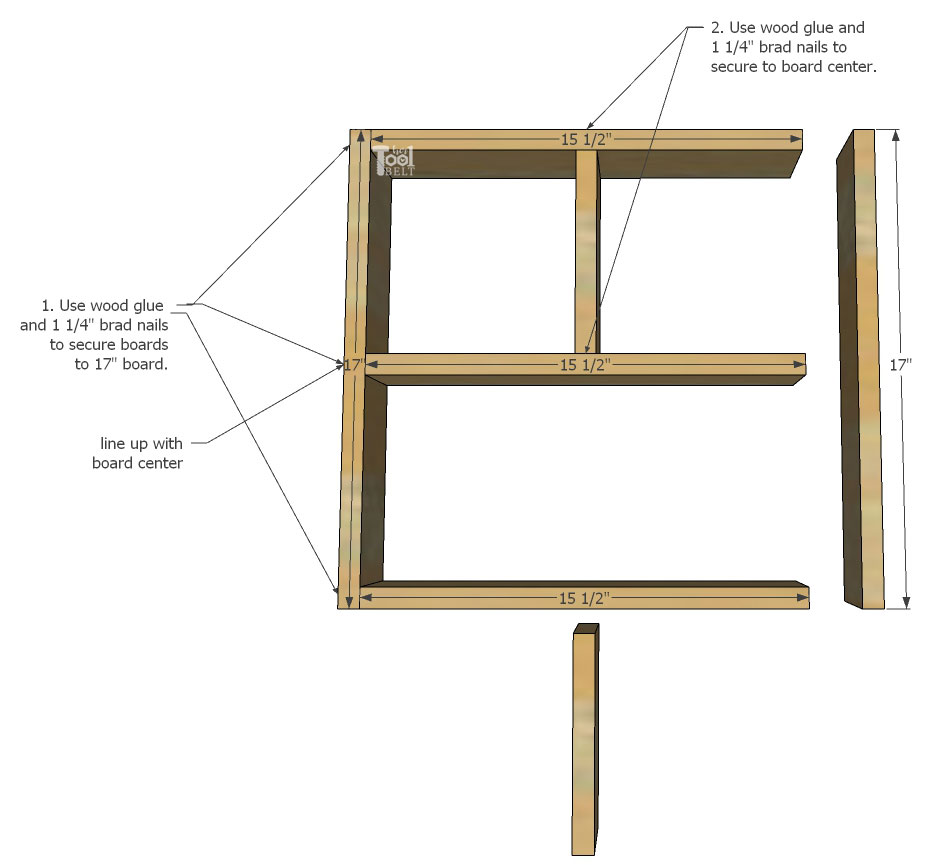
Step 3 – Window Shadow Box Shelf Assembly

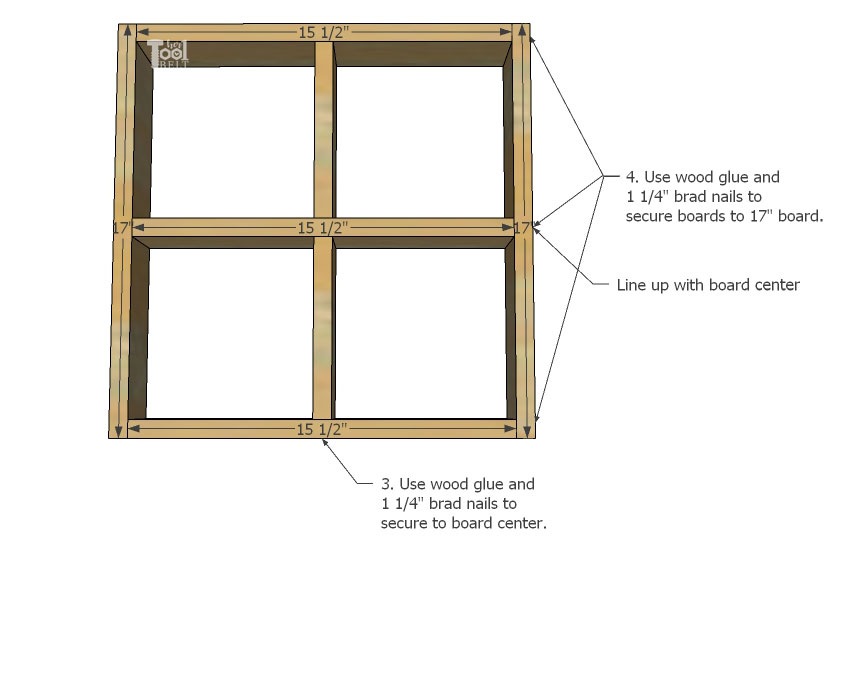
In preparation to assemble the shelf, mark the centers of all the 17″ and 15 1/2″ boards.

  1. Use wood glue and 1 1/4″ brad nails to attach 3 – 15 1/2″ boards to a 17″ board, one flush with each end, and one lined up with board center.
  2. Then use wood glue and 1 1/4″ brad nails to attach a 7 3/8″ board to the center of two 15 1/2″ boards.                                                                                                                                                    The perfect accessory for a 'house frame' bed, is accompanying window shadow box shelves. Build for as little as $2 each in lumber.
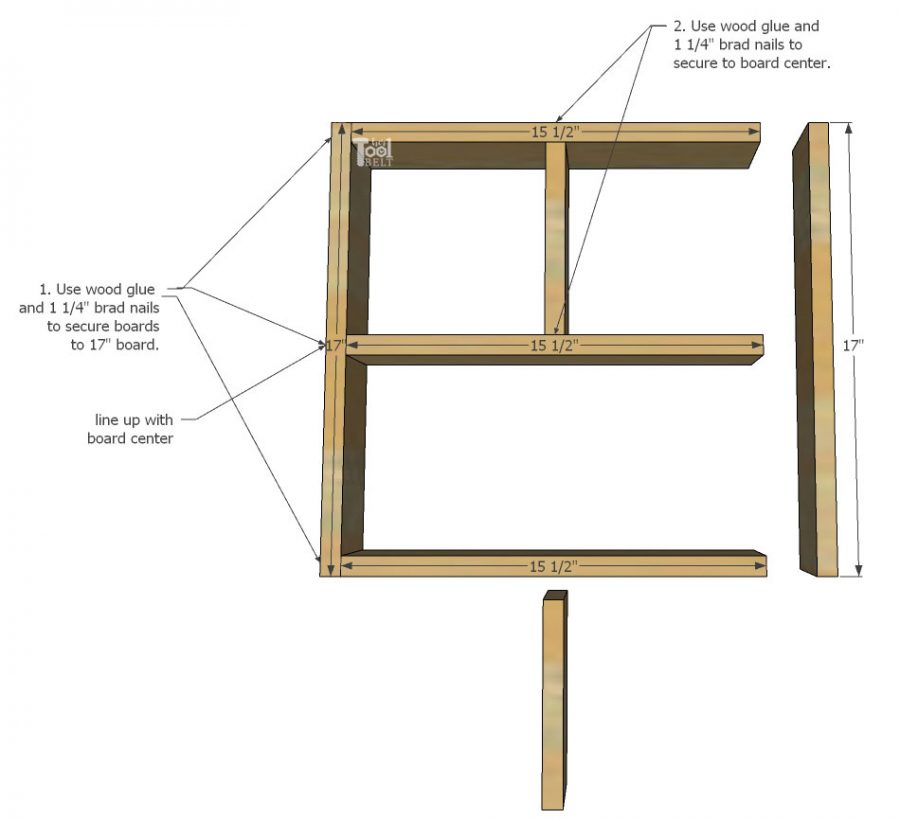
  3. Use wood glue to attach the other 7 3/8″ board to the center of the 15 1/2″ boards, and use brad nails to secure the outside end.
  4. Finally use wood glue and 1 1/4″ brad nails to attach the 17″ board to the 15 1/2″ boards, one flush with each end, and one lined up with board center.


The perfect accessory for a 'house frame' bed, is accompanying window shadow box shelves. Build for as little as $2 each in lumber.

I’m using my good trusty Ryobi airstrike brad nailer to secure the boards together.  Note: it may be helpful to use clamps to hold the shelf together during assembly.
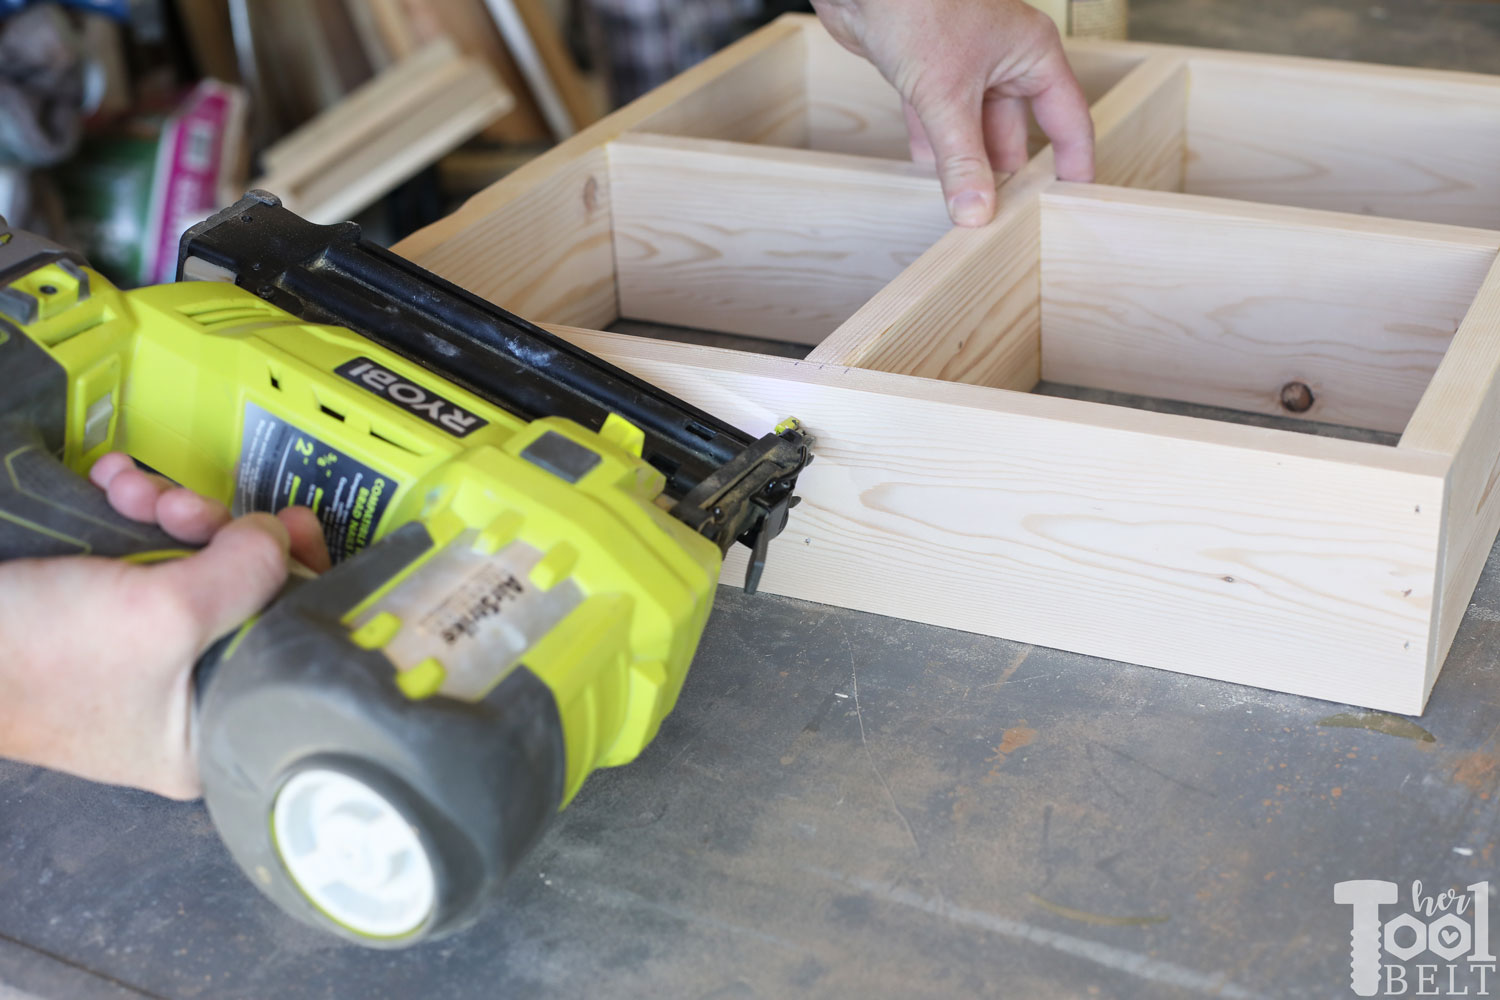
 Using Ryobi airstrike to assembly window shadow box shelves.

Step 4 – Finish

Once the glue has dried, remove any excess glue and sand the shelf smooth. Use paint or stain to finish the shelf. I primed the shelves, then applied Behr Ultra Pure White in satin.

Add picture hangers to the back. I ran out of saw-tooth hangers and didn’t want to run to the store. So I grabbed a couple soda/pop can tabs and secured them to the back with small screws. Worked great, although I should probably paint them white!

The perfect accessory for a 'house frame' bed, is accompanying window shadow box shelves. Build for as little as $2 each in lumber.

The perfect accessory for a 'house frame' bed, is accompanying window shadow box shelves. Build for as little as $2 each in lumber.

Thanks for pinning!

The perfect accessory for a 'house frame' bed, is accompanying window shadow box shelves. Build for as little as $2 each in lumber.

“I acknowledge that The Home Depot is partnering with me to participate in the Tool Review Program. As a part of the Program, I am receiving compensation in the form of products and services, for the purpose of promoting The Home Depot. All expressed opinions and experiences are my own words. My post complies with the Word Of Mouth Marketing Association (WOMMA) Ethics Code and applicable Federal Trade Commission guidelines.”

Related

Filed Under: Free Woodworking Plans, Kid's Furniture Tagged With: kids bedroom, shelves, THDprospective, tool review

Attention: Any do-it-yourself project involves risk of some sort. Your tools, materials, and skills will vary, as will the conditions at your work site. Hertoolbelt LLC will not assume any responsibility or liability for damages or losses sustained or incurred in the course of your project or in the use of the item you create. Always follow the manufacturer's operating instructions in the use of tools, check and follow your local building codes, and observe all commonly accepted safety precautions.

Comments

  1. Floranet says

    January 14, 2020 at 4:56 am

    Creative Writing!! Continue your great work.

    Reply

Leave a Reply Cancel reply

Your email address will not be published. Required fields are marked *

This site uses Akismet to reduce spam. Learn how your comment data is processed.

Search Her Tool Belt

Follow Me!

  • Bloglovin
  • Email
  • Facebook
  • Instagram
  • Pinterest
  • RSS
  • Twitter
  • YouTube

Top Posts & Pages

Left Offset Bathroom Vanity

Check out more projects

Copyright

Thank you for wanting to share my work! No need for my permission to pin my work or to feature 1 or 2 pictures with full watermarks intact that link back to the original project. Please do NOT copy tutorials.

Disclosure & Privacy Policy

Disclaimer

Copyright © 2025 · Magazine Pro Theme on Genesis Framework · WordPress · Log in

This website uses cookies to improve your experience. We'll assume you're ok with this, but you can opt-out if you wish.Accept Read More
Privacy & Cookies Policy

Privacy Overview

This website uses cookies to improve your experience while you navigate through the website. Out of these, the cookies that are categorized as necessary are stored on your browser as they are essential for the working of basic functionalities of the website. We also use third-party cookies that help us analyze and understand how you use this website. These cookies will be stored in your browser only with your consent. You also have the option to opt-out of these cookies. But opting out of some of these cookies may affect your browsing experience.
Necessary
Always Enabled
Necessary cookies are absolutely essential for the website to function properly. This category only includes cookies that ensures basic functionalities and security features of the website. These cookies do not store any personal information.
Non-necessary
Any cookies that may not be particularly necessary for the website to function and is used specifically to collect user personal data via analytics, ads, other embedded contents are termed as non-necessary cookies. It is mandatory to procure user consent prior to running these cookies on your website.
SAVE & ACCEPT