• Home
  • Project Gallery
  • About me
    • Disclosure
    • Disclaimer
  • Blog

Her Tool Belt

DIY furniture plans, crafts, and home improvement tutorials to empower you!

  • Free Woodworking Plans
    • Bathroom Furniture
    • Bedroom Furniture
    • Entry
    • Family Room Furniture
    • Garage
    • Kitchen furniture
    • Laundry Room
    • Mudroom Furniture
    • Organization
    • Outdoor Furniture
  • Home Decor
    • Upcycle
  • Crafts
    • Holiday
  • Home Improvement
    • Cleaning
    • Fix IT
    • Paint
    • Tile
  • Tool Reviews
  • Tool Time Videos

Wood DIY LOVE Marquee Letters

May 26, 2016 by Amy 38 Comments

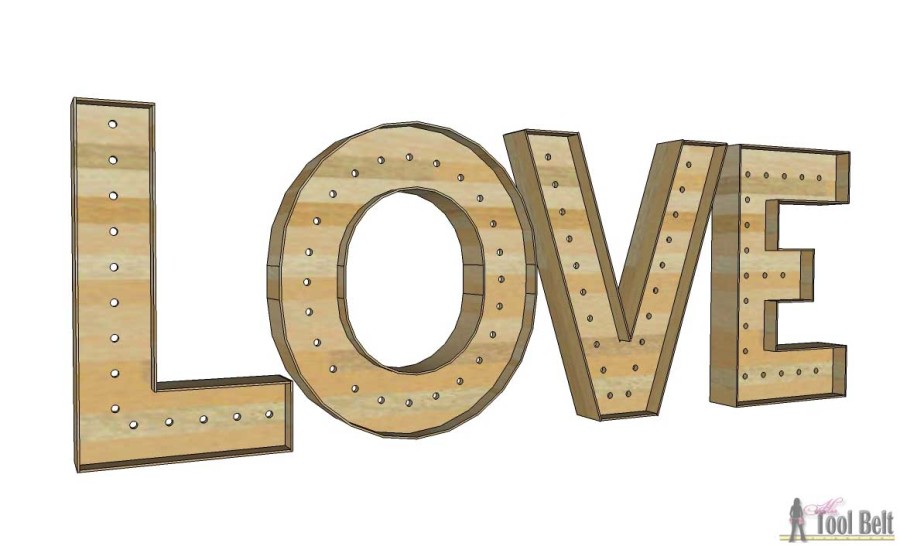
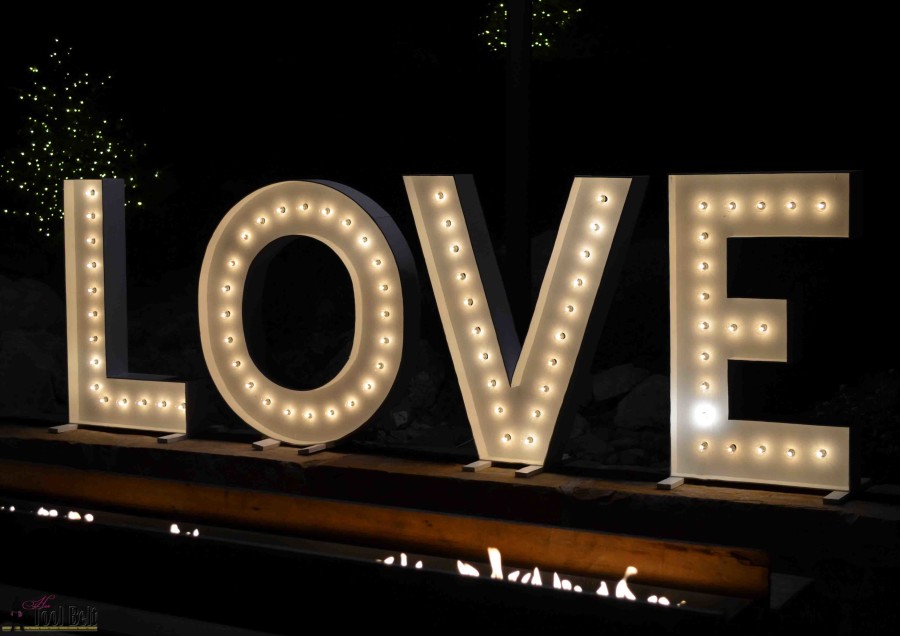
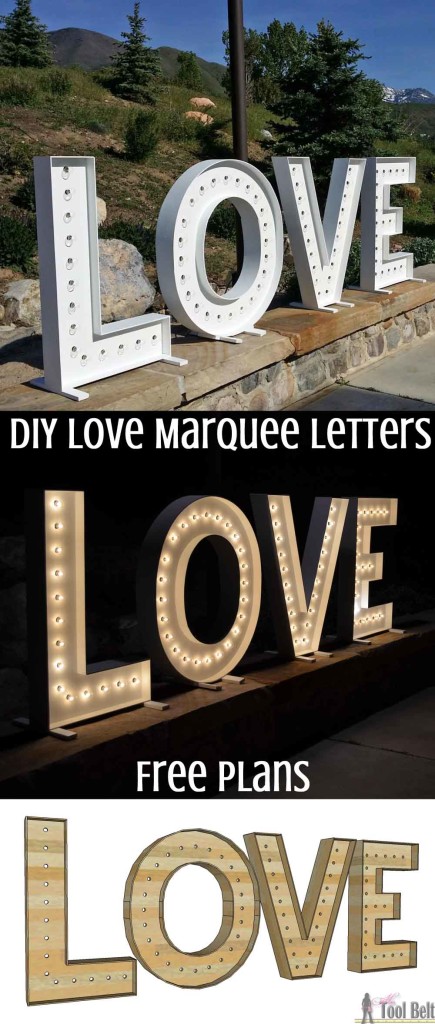
My Aunt Becky is a wedding planner extraordinaire, or should be!  She has helped with mine, my sister’s and cousin’s weddings, so to say I owe her a big favor would be an understatement.  When my cousin, her youngest daughter, got married earlier in May; I was asked to make some huge LOVE marquee letters like seen in this cool LOVE picture via Rebecca Douglas – isn’t that stunning!  From the dark picture, I can’t tell if the letters are flat or are trimmed out like typical marquee letters.

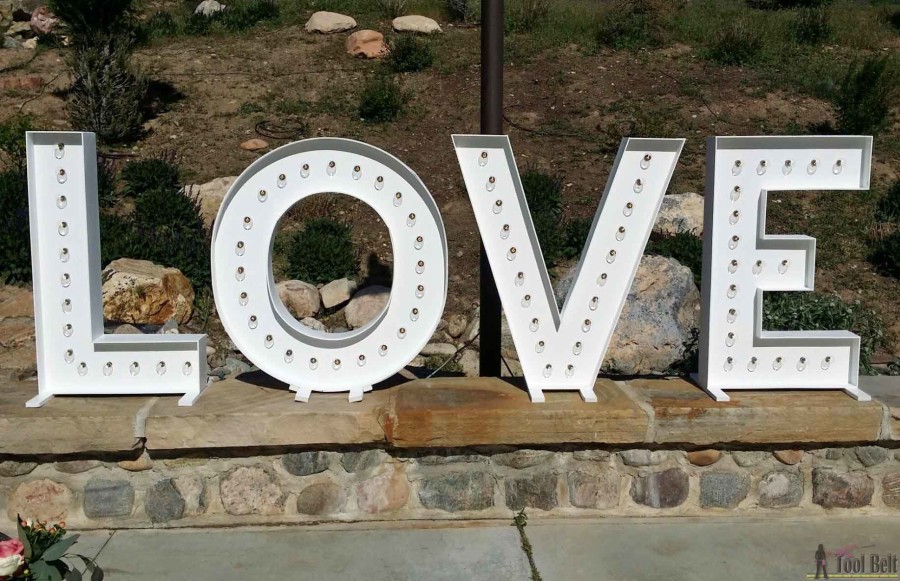
My Aunt needed the letters freestanding, so I opted to trim the letters.  Either way the letters look really cool and are pretty easy to make, just take a little bit of time.  They are really big, 40″ tall, and definitely make a statement.

These are so cute for a wedding and make big statement! DIY LOVE marquee letters that are 40" tall and made from wood. Free plans + building tutorial.

This post contains some affiliate links noted by *.

How to Make DIY Love Marquee Letters from Wood

These are so cute for a wedding and make big statement! DIY LOVE marquee letters that are 40" tall and made from wood. Free plans + building tutorial.

Materials

  • 1 – 3/4″ plywood sheet (4’x8′)
  • 1 – 5mm (~1/4″) underlayment plywood sheet
  • 1 – 2.7mm (~1/8″) utility panel sheet
  • 1″ brad nails or staples
  • wood glue
  • sandpaper
  • spackle* or wood filler
  • paint/primer
  • scrap wood
  • 4 strands of string lights
  • 1-1 1/4″ screw

Tools

  • Jigsaw
  • Drill
  • Brad nailer or stapler
  • 7/8″ spade bit* or whatever size fits your lights
  • Table saw or circular saw (for optional trimming)
  • HomeRight* paint sprayer
    • These are the tools that I used, use whatever works best for you.

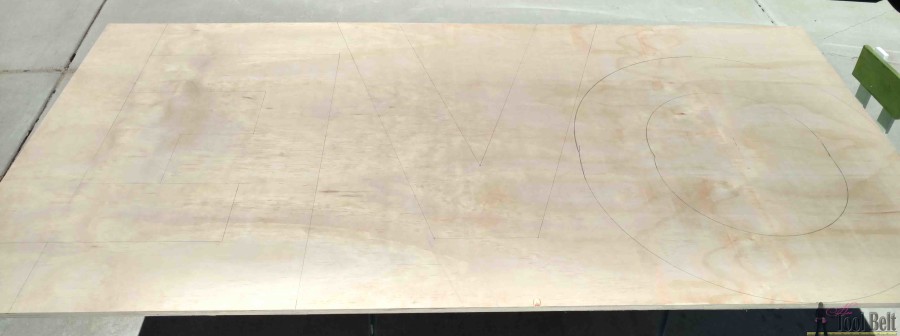
On the sheet of 3/4″ plywood, measure and mark the location of the LOVE letters.

These are so cute for a wedding and make big statement! DIY LOVE marquee letters that are 40" tall and made from wood. Free plans + building tutorial.

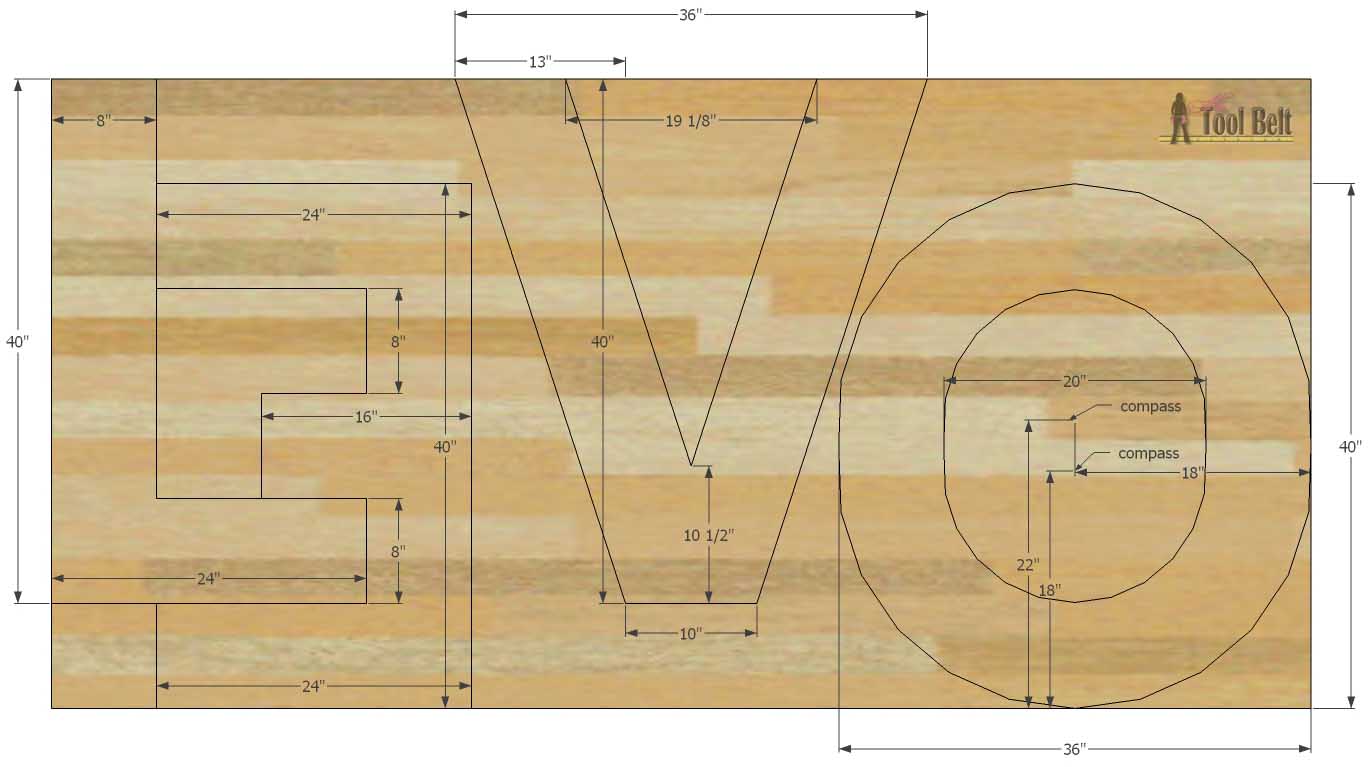
To mark out the O, I used a piece of scrap wood to make a compass of sorts.  Drill a hole the size of a pencil near one end, a hole 10″ from the first hole and 18″ from the first hole.

These are so cute for a wedding and make big statement! DIY LOVE marquee letters that are 40" tall and made from wood. Free plans + building tutorial.

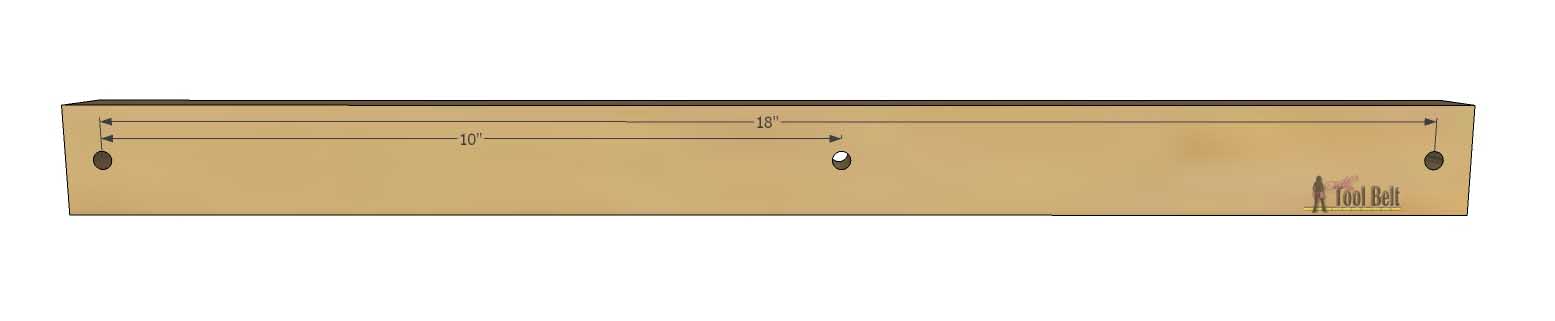
Use a screw and place the end of the ‘compass’ in one of the two marks on the plywood.  Place a pencil in either the 10″ or 18″ hole and mark a half circle, change to the other hole and mark another half circle.  Change the screw to the other compass location and repeat.  Use a ruler and mark straight lines on the edge of the half circles.

These are so cute for a wedding and make big statement! DIY LOVE marquee letters that are 40" tall and made from wood. Free plans + building tutorial.

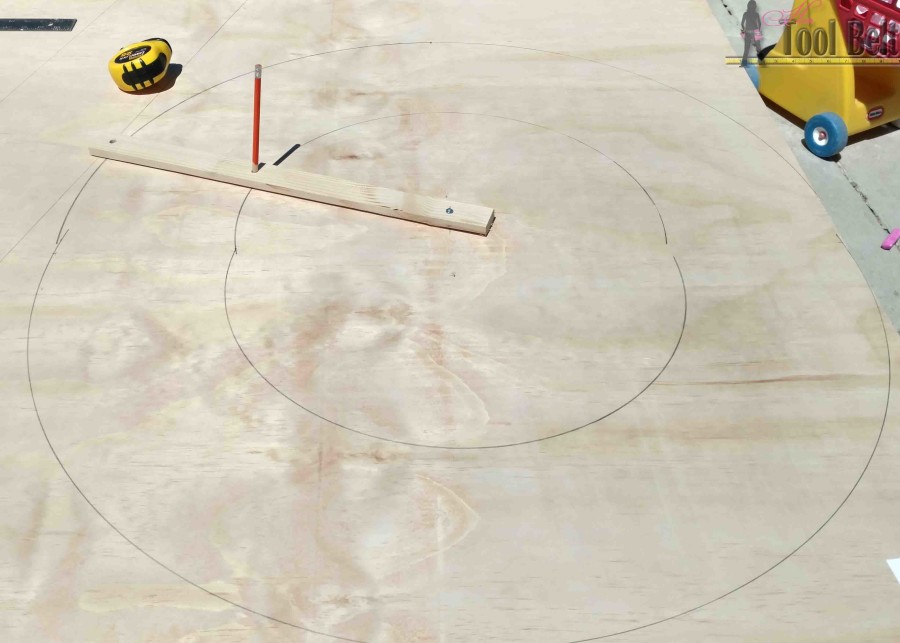
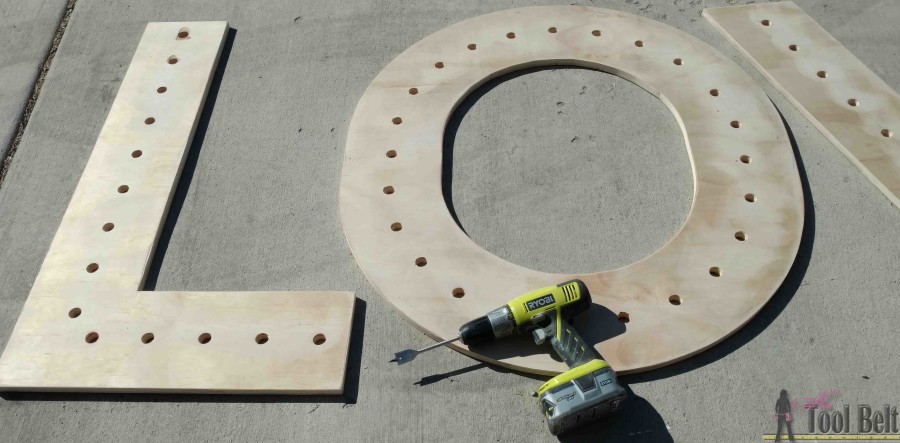
Letters marked out on the plywood.

These are so cute for a wedding and make big statement! DIY LOVE marquee letters that are 40" tall and made from wood. Free plans + building tutorial.

Use a jigsaw to cut out the letters.  To cut out the center of the O, drill a hole in the O center large enough that the jigsaw blade will fit, and cut out the donut hole.

These are so cute for a wedding and make big statement! DIY LOVE marquee letters that are 40" tall and made from wood. Free plans + building tutorial.

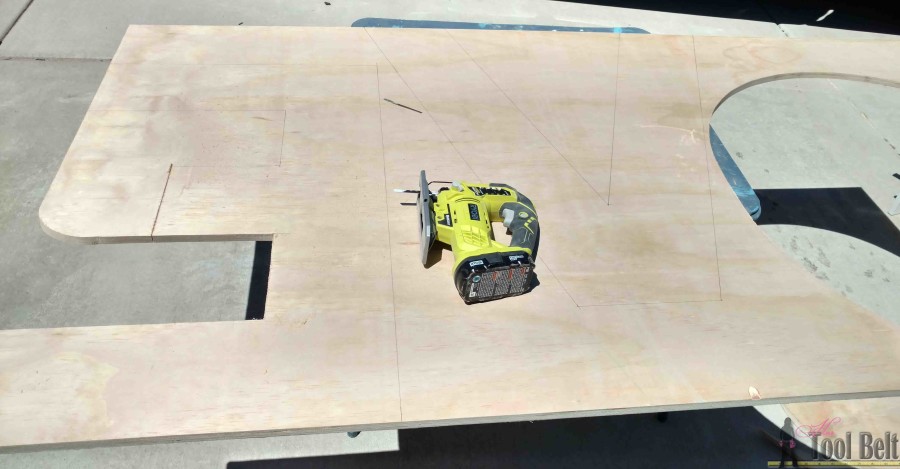
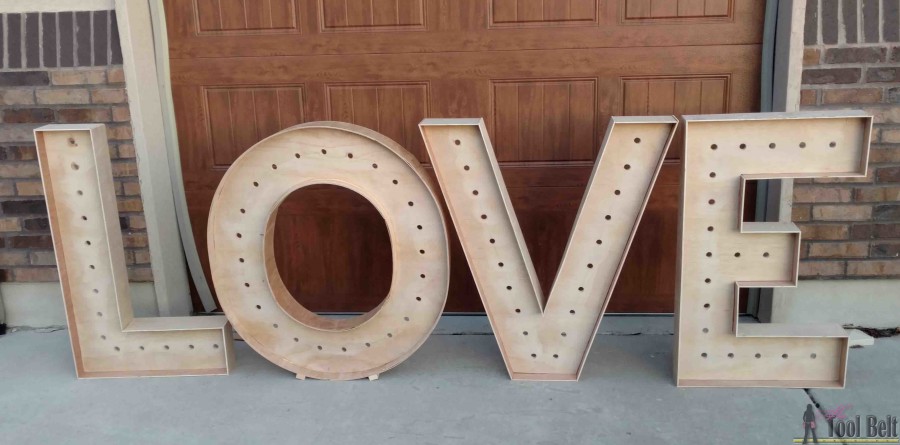
Letters cut from the plywood, they are starting to look cool.

These are so cute for a wedding and make big statement! DIY LOVE marquee letters that are 40" tall and made from wood. Free plans + building tutorial.

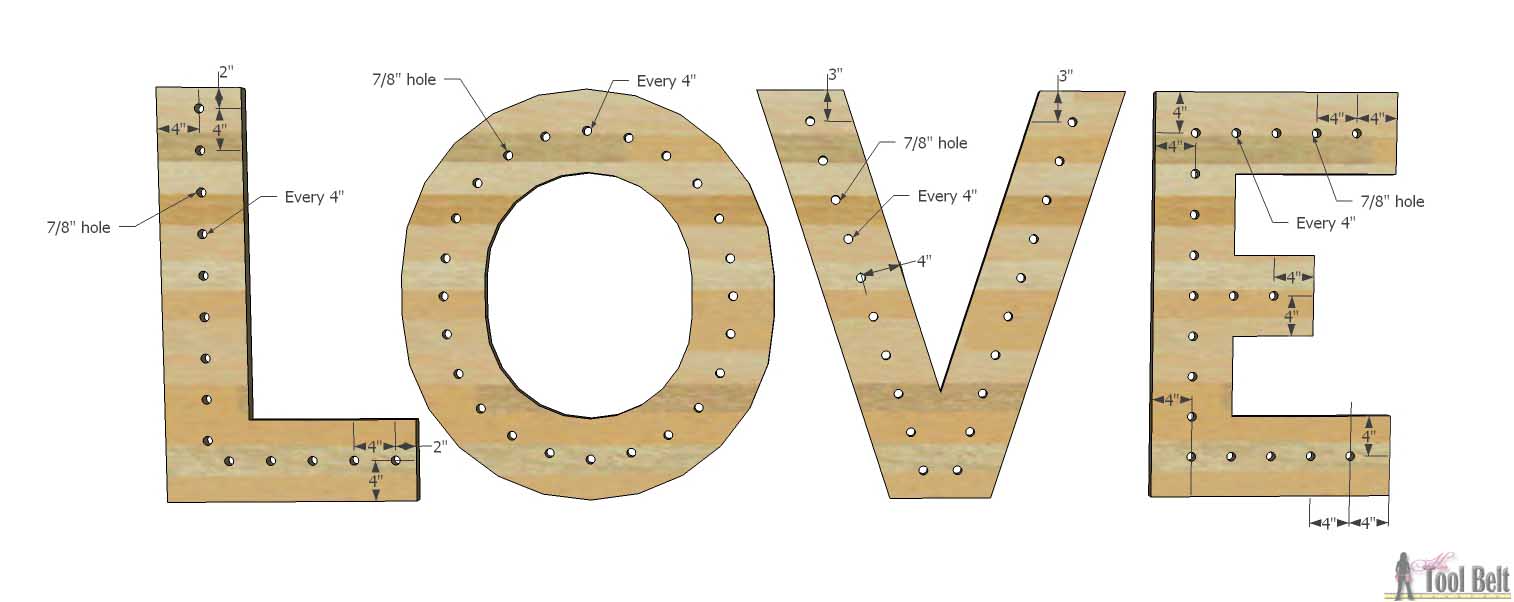
Next is to drill holes in the letters for the lights.  You can space the lights however you want, but this is how I placed mine.  The lights are all 4″ apart. Measure the diameter of the light sockets, mine with the clip needed a 7/8″ diameter hole.  Drill holes for the lights.

These are so cute for a wedding and make big statement! DIY LOVE marquee letters that are 40" tall and made from wood. Free plans + building tutorial.

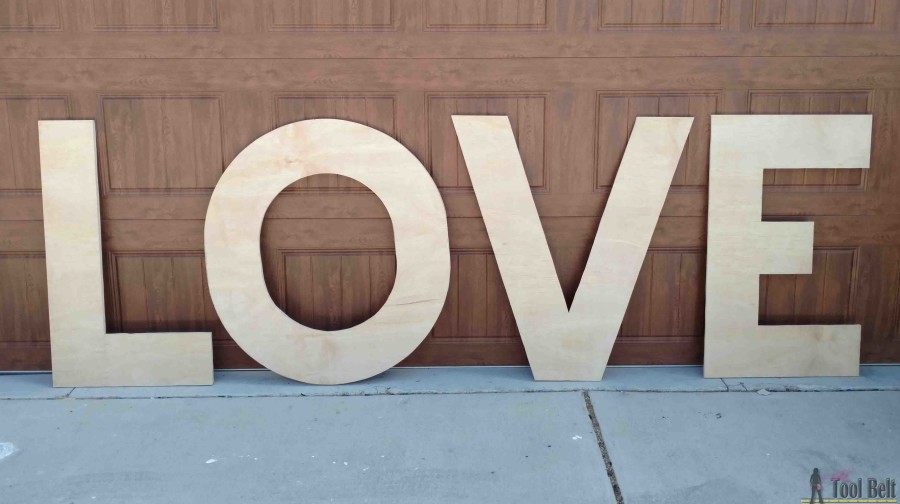
I used a drill and 7/8″ spade bit to drill the holes.  The letters can be used like this, if you don’t want to add the trim around the edges.
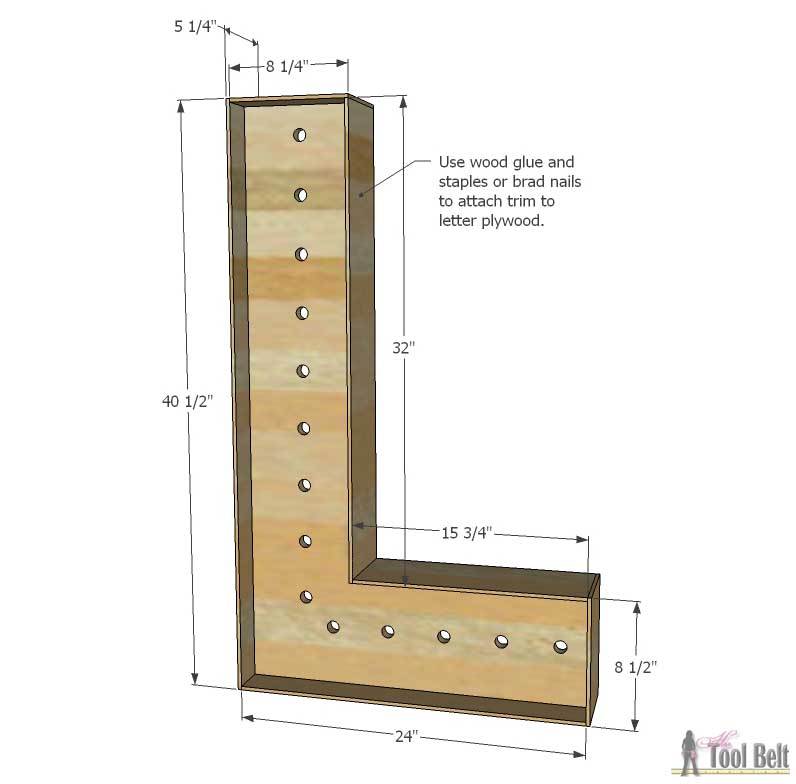
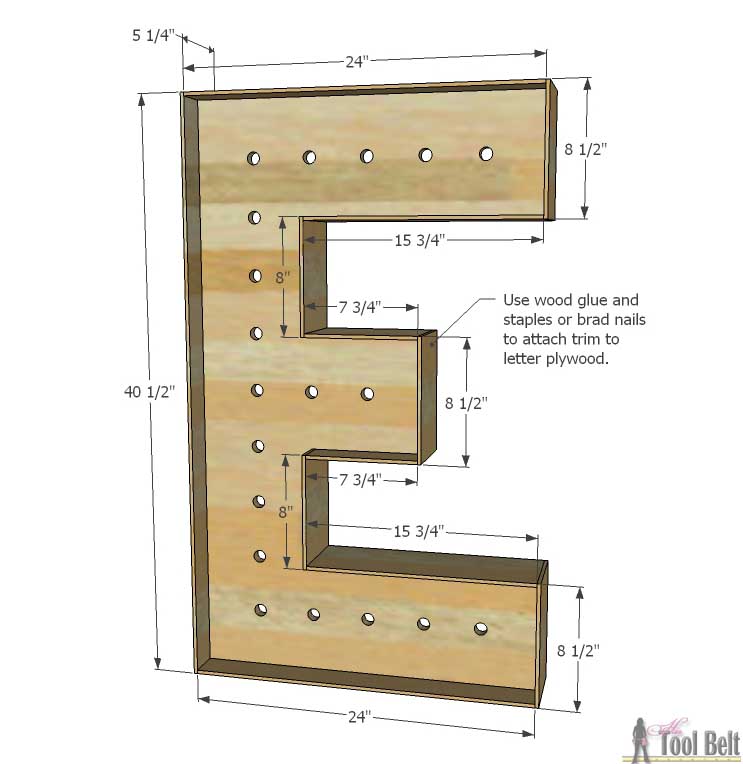
These are so cute for a wedding and make big statement! DIY LOVE marquee letters that are 40" tall and made from wood. Free plans + building tutorial.

Adding Trim

I added trim around the plywood letters to give them a marquee look.  I cut the 5mm (~1/4) underlayment sheet in strips that are 5 1/4″ wide.  If you cut it the short way (48″) you’ll need about 11 strips.  Cut the strips to fit your letters, but the following diagrams will give you a guide.  After I cut each piece, I marked the center, applied wood glue and used a brad nailer to attach the strip to the plywood letter edge.  (I think a stapler may work better, because sometimes the small brad nail head would go through the plywood.  However most of the time the brad nails worked fine.)

These are so cute for a wedding and make big statement! DIY LOVE marquee letters that are 40" tall and made from wood. Free plans + building tutorial.


These are so cute for a wedding and make big statement! DIY LOVE marquee letters that are 40" tall and made from wood. Free plans + building tutorial.


These are so cute for a wedding and make big statement! DIY LOVE marquee letters that are 40" tall and made from wood. Free plans + building tutorial.

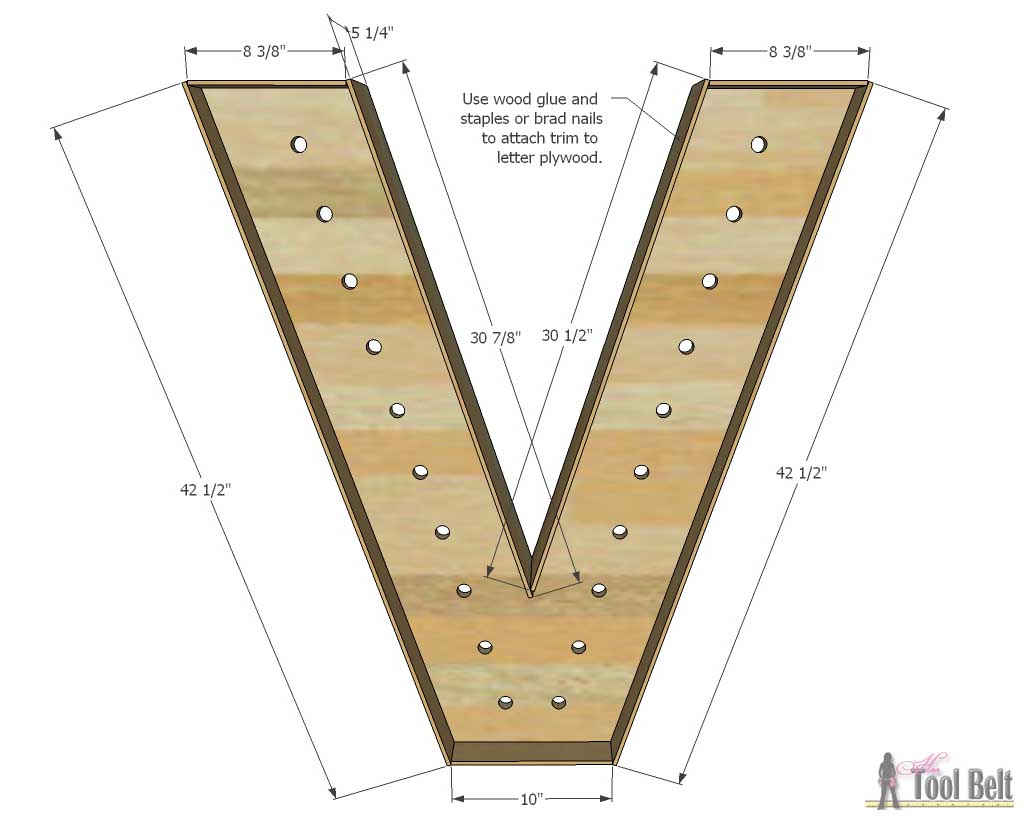
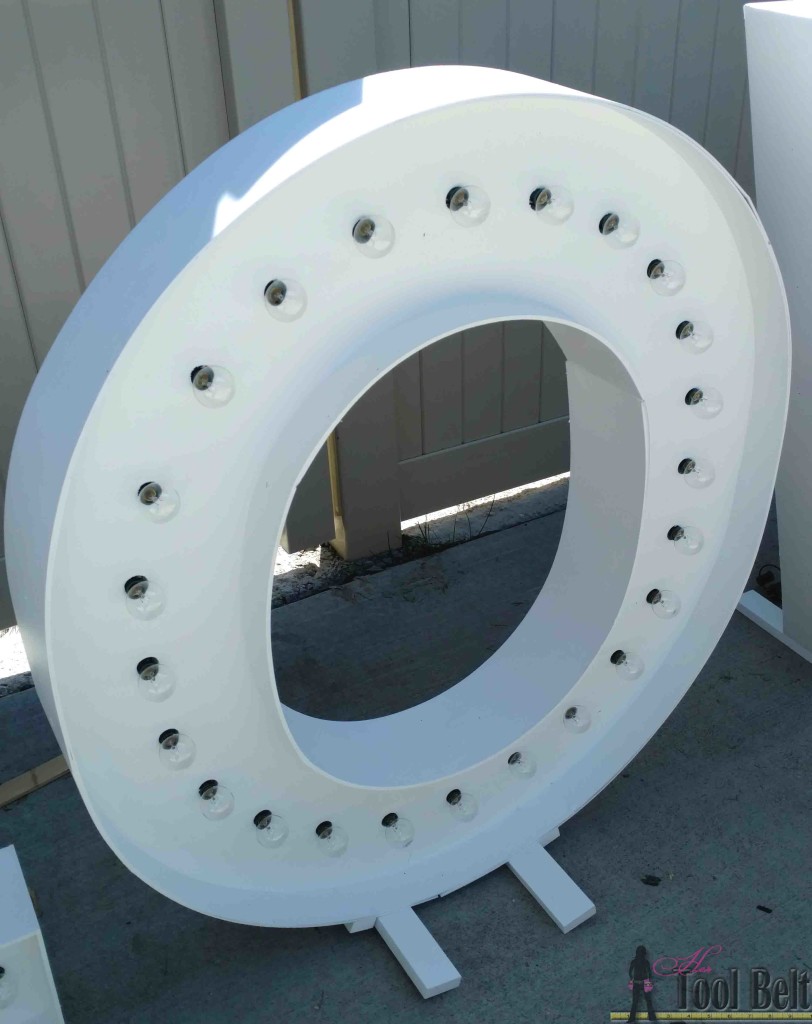
The LVE were easy to put the trim around.  When I got the the O, I realized the 5mm plywood wouldn’t bend as much as I hoped.  I found a sheet of 2.7mm utility plywood that bends fairly easily.  I cut the 2.7mm sheet into strips 5 1/4″ wide (6-7 strips).

These are so cute for a wedding and make big statement! DIY LOVE marquee letters that are 40" tall and made from wood. Free plans + building tutorial.

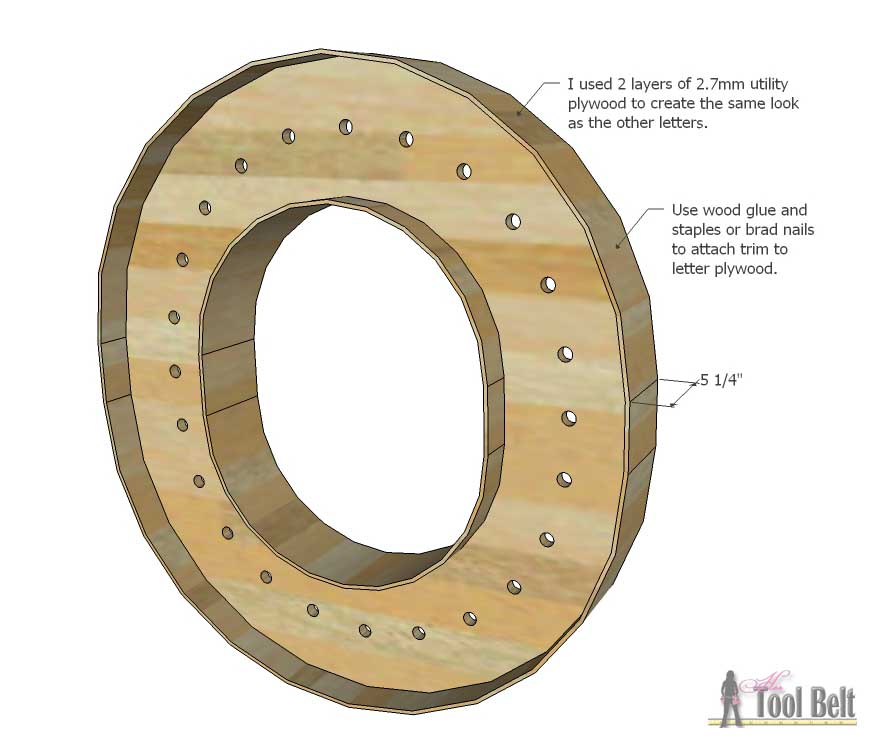
I applied 2 layers of the 2.7mm strips to make the O look the same as the other letters.

These are so cute for a wedding and make big statement! DIY LOVE marquee letters that are 40" tall and made from wood. Free plans + building tutorial.

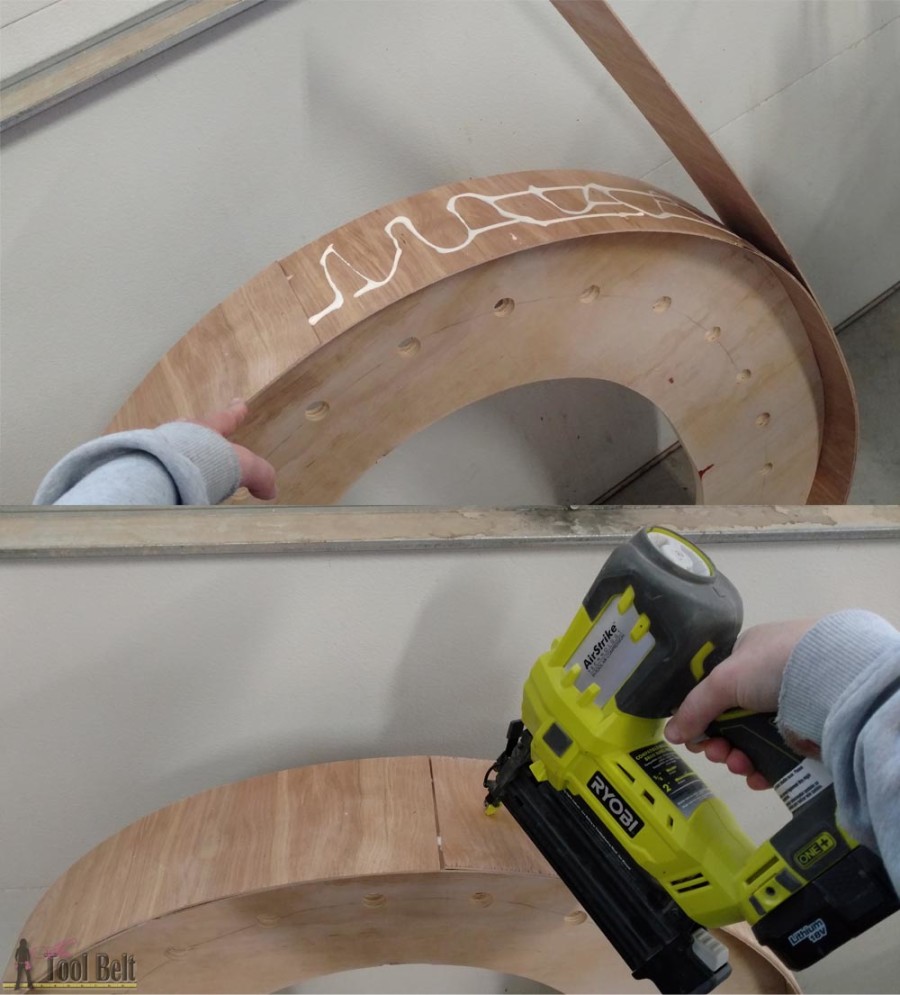
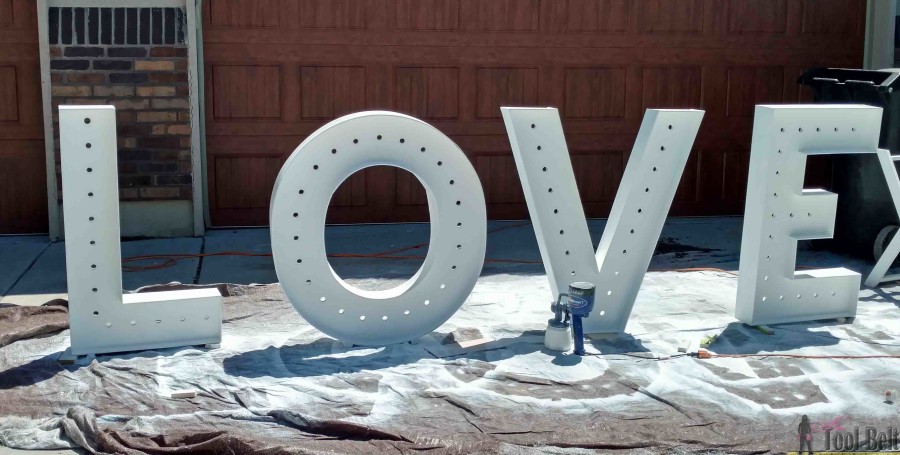
To keep the O from rolling away, I nailed a couple of pieces of 5 1/4″ scrap wood to the bottom. I ‘love’ how the turned out :-), they really are fun.  Next I filled any gaps with spackle, let that dry and sanded it smooth.

These are so cute for a wedding and make big statement! DIY LOVE marquee letters that are 40" tall and made from wood. Free plans + building tutorial.

I primed the letters with Zinsser primer, then painted them with Behr Ultra Pure White paint.  The paint sprayer made painting so easy with all of those corners.

These are so cute for a wedding and make big statement! DIY LOVE marquee letters that are 40" tall and made from wood. Free plans + building tutorial.

Once the paint dried, I removed the bulbs from the string light sockets and placed them in the holes.

These are so cute for a wedding and make big statement! DIY LOVE marquee letters that are 40" tall and made from wood. Free plans + building tutorial.

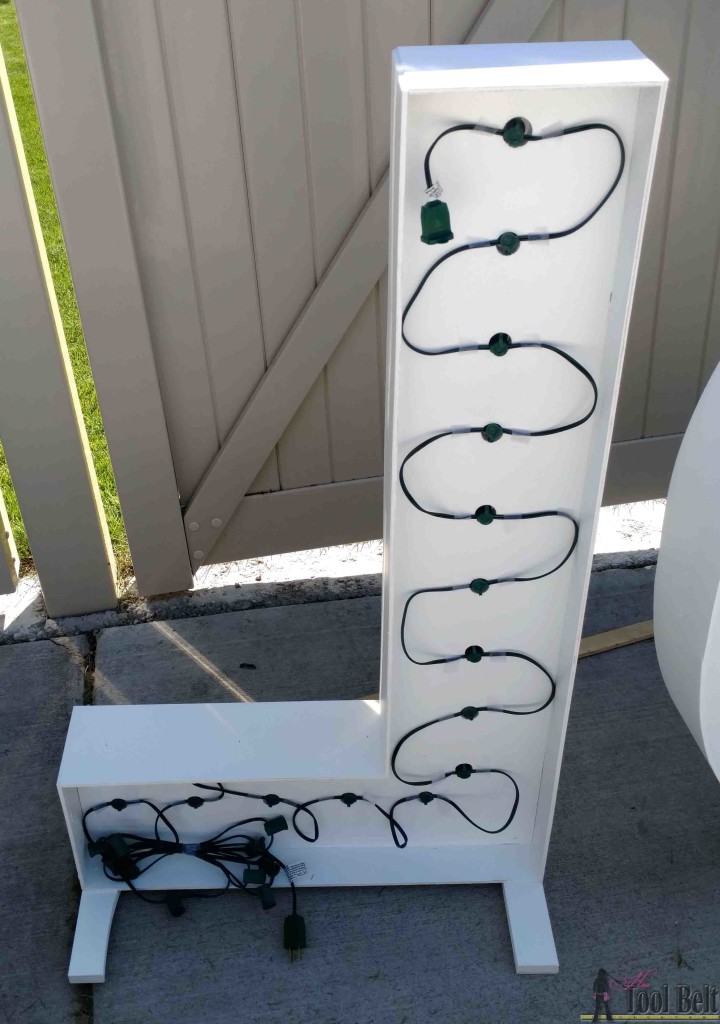
The string light wiring is in parallel, they will work without all of the light bulbs in the sockets.  I used the excess string light wire as an extension cord to the power strip/surge protector.  I replaced the bulbs into the socket and the letters are ready to go!

These are so cute for a wedding and make big statement! DIY LOVE marquee letters that are 40" tall and made from wood. Free plans + building tutorial.

I did add ‘feet’ to the letters because the wedding was near a canyon and I was a little concerned about wind.

These are so cute for a wedding and make big statement! DIY LOVE marquee letters that are 40" tall and made from wood. Free plans + building tutorial.

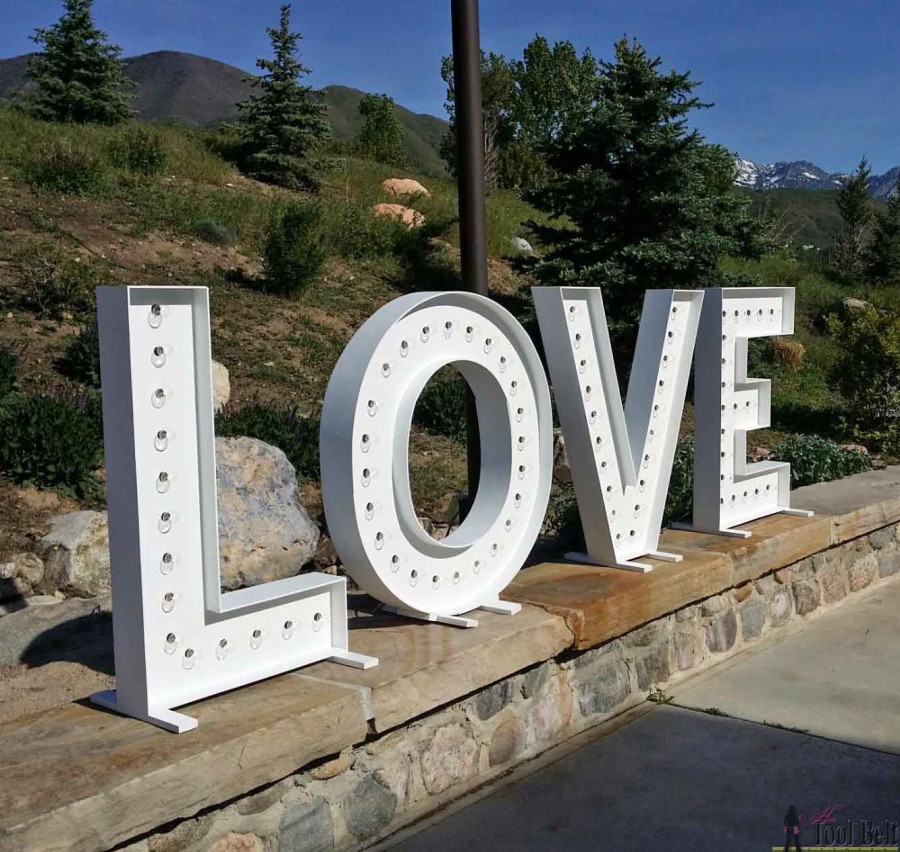
A look down the aisle.

These are so cute for a wedding and make big statement! DIY LOVE marquee letters that are 40" tall and made from wood. Free plans + building tutorial.

Gorgeous mountain backdrop.

These are so cute for a wedding and make big statement! DIY LOVE marquee letters that are 40" tall and made from wood. Free plans + building tutorial.

After the ceremony the party moved inside for dinner.  Later in the evening, the ceremony space became the dance floor and the letters really began to shine.

These are so cute for a wedding and make big statement! DIY LOVE marquee letters that are 40" tall and made from wood. Free plans + building tutorial.

The flames near the bottom are a s’more bar for those taking a break from dancing.

These are so cute for a wedding and make big statement! DIY LOVE marquee letters that are 40" tall and made from wood. Free plans + building tutorial.

Thanks for pinning!

These are so cute for a wedding and make big statement! DIY LOVE marquee letters that are 40" tall and made from wood. Free plans + building tutorial.

Linked to Link Parties, Savvy Southern Style, HomestoriesAtoZ, Remodelaholic

Related

Filed Under: Built From Scratch, Crafts, Home Decor Tagged With: DIY Wedding, wedding, wedding decor

Attention: Any do-it-yourself project involves risk of some sort. Your tools, materials, and skills will vary, as will the conditions at your work site. Hertoolbelt LLC will not assume any responsibility or liability for damages or losses sustained or incurred in the course of your project or in the use of the item you create. Always follow the manufacturer's operating instructions in the use of tools, check and follow your local building codes, and observe all commonly accepted safety precautions.

Comments

  1. Jaime Costiglio says

    May 26, 2016 at 6:58 am

    Beautiful! Funny we both were working on marquee signs simultanously but I love yours more 😉 Great solution for the O – I was wondering how you bent the plywood, thanks for sharing your secret.

    Reply
    • Amy says

      May 27, 2016 at 11:04 am

      I know it is funny, and Jen did some for a wedding a couple months ago too. It’s fun how they are all different!

      Reply
  2. Malissa - Southern Sawdust says

    May 26, 2016 at 7:27 am

    Beautiful! I’ve had marquee letters on my to-do list for some time now but I can’t decide on what word I want to use. These look fabulous and what a statement piece for the wedding!

    Reply
  3. Wendi@H2OBungalow says

    May 26, 2016 at 7:38 pm

    These are awesome! You are so talented! I was wondering how you made the “O” too! Love it, pinning & sharing!

    Reply
    • Amy says

      May 27, 2016 at 11:04 am

      Thanks!

      Reply
  4. Mindi says

    May 28, 2016 at 8:39 am

    Amy these look stunning!! I “Love” them! 🙂 Amazing job, and very cleaver!!

    Reply
  5. jessica says

    June 7, 2016 at 9:48 pm

    this is beautiful

    Reply
    • Amy says

      June 12, 2016 at 10:09 pm

      Thank you

      Reply
  6. Jamie says

    October 14, 2016 at 2:45 pm

    I have been searching for a tutorial for these! Thank you!!! We have a company in town that is renting theirs for $500, any idea how much this cost you?

    Reply
    • Amy says

      October 20, 2016 at 5:05 pm

      They cost about $100 to make including the 4 strands of lights. (I had left over paint that I used)

      Reply
  7. Angie ~ ambient wares says

    January 14, 2017 at 10:25 am

    These are mind blowing-ly beautiful! Pinned 🙂

    Reply
  8. Edilberto Rojas says

    April 3, 2017 at 9:26 am

    I want to thank you for this amazing project and for sharing the plans with us. I just finish yesterday and everything came of just as expected. Everybody love this letters. I can’t with until the end of this month to display them on our wedding.

    Here are my letters: http://imgur.com/a/YBSJ0

    Thanks you again.

    Reply
    • Amy says

      April 3, 2017 at 2:19 pm

      Wow! Those look so good. Congrats and best of luck on your wedding.

      Reply
      • Edilberto Rojas says

        April 3, 2017 at 3:50 pm

        Thanks Amy!

        Reply
        • Melissa says

          April 1, 2019 at 8:45 am

          Your letters came out so beautifully! I am thinking of making these with my fiance for our wedding as well! I noticed you didn’t add feet, and we wanted to do the same. Did yours stand up on their own alright without the feet?
          Thanks so much!
          Cheers

          Reply
  9. Chelsey says

    May 10, 2018 at 2:55 pm

    Do you remember where you got the string lights?

    Reply
    • Amy says

      May 10, 2018 at 3:29 pm

      Yes they are from Target.

      Reply
  10. Steffi says

    June 4, 2018 at 10:20 am

    Many many thanks for this fantastic Tutorial.
    Lovely greetings from Germany

    Reply
  11. Carrie Swenson says

    July 2, 2018 at 10:08 am

    Amy,
    I can always count on you to have a tutorial for everything I need. I am making large marquee letters for my 20 year class reunion. I have looked everywhere for an easy to follow tutorial and couldn’t find one until your popped up in Pinterest. Now I can’t wait to get started on my letters. Thank you so much!

    -Carrie

    Reply
    • Amy says

      July 11, 2018 at 7:09 pm

      Can’t wait to see what you whip up!!!

      Reply
      • Jason says

        September 1, 2020 at 8:05 am

        Great Job! Making one for on top of vintage mobile photo booth canned ham trailer!!!

        Reply
  12. Paige says

    January 5, 2019 at 4:38 pm

    Thank you so so much for posting this! My (now) husband and I went full DIY and made these letters for our wedding. We had limits on space so made them 3/4 the size and they turned out amazing! They were such a statement and everyone took so many photos with it. They were FLOORED to hear we made them ourselves, The Love sign lit up the outdoor garden area during the reception and it added such a fun ambiance!

    Thank you!

    Reply
  13. Marlee says

    February 28, 2019 at 1:04 am

    I know this is an older post, but did you just glue the feet on the bottom of the letters? Or did you hammer them into the letters to make them stand?

    Reply
    • Amy says

      March 1, 2019 at 8:00 pm

      I just attached the feet with screws, that way if they were being transported laying flat I could rotate the feet out of the way.

      Reply
  14. Max says

    May 3, 2019 at 8:10 am

    Great job looks fabulous
    Which program did you use to design?

    Reply
    • Amy says

      May 5, 2019 at 2:43 pm

      It’s called Sketchup, it’s a fantastic free tool.

      Reply
  15. Shawna says

    June 5, 2019 at 6:41 pm

    Thank you so much for this fabulous tutorial! I’m in the beginning stages of making these for my wedding. can I ask what type of white paint you used glossy, flat, or eggshell?

    Thanks again!

    Reply
    • Amy says

      June 6, 2019 at 7:58 am

      I used satin, but I think any sheen would be fine.

      Reply
  16. Francis says

    September 15, 2019 at 4:40 am

    Hi I’m looking at making these as they look amazing ,

    Where can I get the lights from as I’m really struggling to find them.

    Reply
    • Amy says

      September 18, 2019 at 6:05 pm

      I guess the ones I used aren’t in stock anymore.
      These look very similar https://www.target.com/p/clear-globe-string-lights-black-room-essentials-153/-/A-53197429?ref=tgt_adv_XS000000&AFID=google_pla_df&fndsrc=tgtao&CPNG=PLA_Lighting%2BShopping_Brand&adgroup=SC_Lighting&LID=700000001170770pgs&network=g&device=c&location=9052686&gclid=CjwKCAjwq4fsBRBnEiwANTahcIsjHdne_XD2tNRsoWJL-Us_tRY9TRoQBnnkxpnGirmeKf0t8i104RoCkN0QAvD_BwE&gclsrc=aw.ds

      Reply
  17. Francis says

    October 18, 2019 at 3:09 am

    Did you use a new pack of lights for each letter or did you join them up?

    Reply
  18. Kim says

    July 14, 2020 at 12:28 am

    by any chance do you make these to sell?

    Reply
    • Amy says

      July 18, 2020 at 3:56 pm

      No, sorry I don’t.

      Reply
  19. Hannah says

    September 2, 2020 at 9:13 pm

    Do you plug each letter in individually? Or did you add a “electric box” or “switch” the the back of the letter so you don’t have to run an extension cord?

    Curious to know how you did the electrical side of things! Thank you!!

    Reply
    • Amy says

      September 19, 2020 at 4:57 pm

      Hi Hannah,
      I plugged each letter light strand into a power strip connected to an extension cord.

      Reply
  20. Treand Laura says

    January 10, 2021 at 7:03 am

    WoW, thank you for taking the time to do such a detailed tutorial AND sharing it with us!!
    THIS IS PERFECT!!! I will start this project asap!

    Cheers!

    Reply
  21. Carol Toone says

    January 23, 2021 at 4:51 pm

    How much were the materials about?
    To rent letters it is $250. Too much.

    Reply
    • Amy says

      February 1, 2021 at 7:30 pm

      The wood and the lights came up to about $120.

      Reply

Leave a Reply Cancel reply

Your email address will not be published. Required fields are marked *

This site uses Akismet to reduce spam. Learn how your comment data is processed.

Search Her Tool Belt

Follow Me!

  • Bloglovin
  • Email
  • Facebook
  • Google+
  • Instagram
  • Pinterest
  • RSS
  • Twitter
  • YouTube

Top Posts & Pages

Custom Drill Storage and Charge Station - Easy
Wood Bunny Easter Basket
Cordless Drill Storage - Charging Station
$5 Blanket Ladder
Pallet Planter Box For Cascading Flowers
2x4 Console Table
King X Barn Door Farmhouse Bed Plans
Project Gallery

Check out more projects

Copyright

Thank you for wanting to share my work! No need for my permission to pin my work or to feature 1 or 2 pictures with full watermarks intact that link back to the original project. Please do NOT copy tutorials.

Disclosure & Privacy Policy

Disclaimer

Copyright © 2023 · Magazine Pro Theme on Genesis Framework · WordPress · Log in

This website uses cookies to improve your experience. We'll assume you're ok with this, but you can opt-out if you wish.Accept Read More
Privacy & Cookies Policy

Privacy Overview

This website uses cookies to improve your experience while you navigate through the website. Out of these, the cookies that are categorized as necessary are stored on your browser as they are essential for the working of basic functionalities of the website. We also use third-party cookies that help us analyze and understand how you use this website. These cookies will be stored in your browser only with your consent. You also have the option to opt-out of these cookies. But opting out of some of these cookies may affect your browsing experience.
Necessary
Always Enabled
Necessary cookies are absolutely essential for the website to function properly. This category only includes cookies that ensures basic functionalities and security features of the website. These cookies do not store any personal information.
Non-necessary
Any cookies that may not be particularly necessary for the website to function and is used specifically to collect user personal data via analytics, ads, other embedded contents are termed as non-necessary cookies. It is mandatory to procure user consent prior to running these cookies on your website.
SAVE & ACCEPT