This Farmhouse Side Table post is sponsored by The Home Depot. I have been compensated for my time and provided with product. All ideas and opinions are my own. This post contains some affiliate links for your convenience. Click here to read my full disclosure policy.
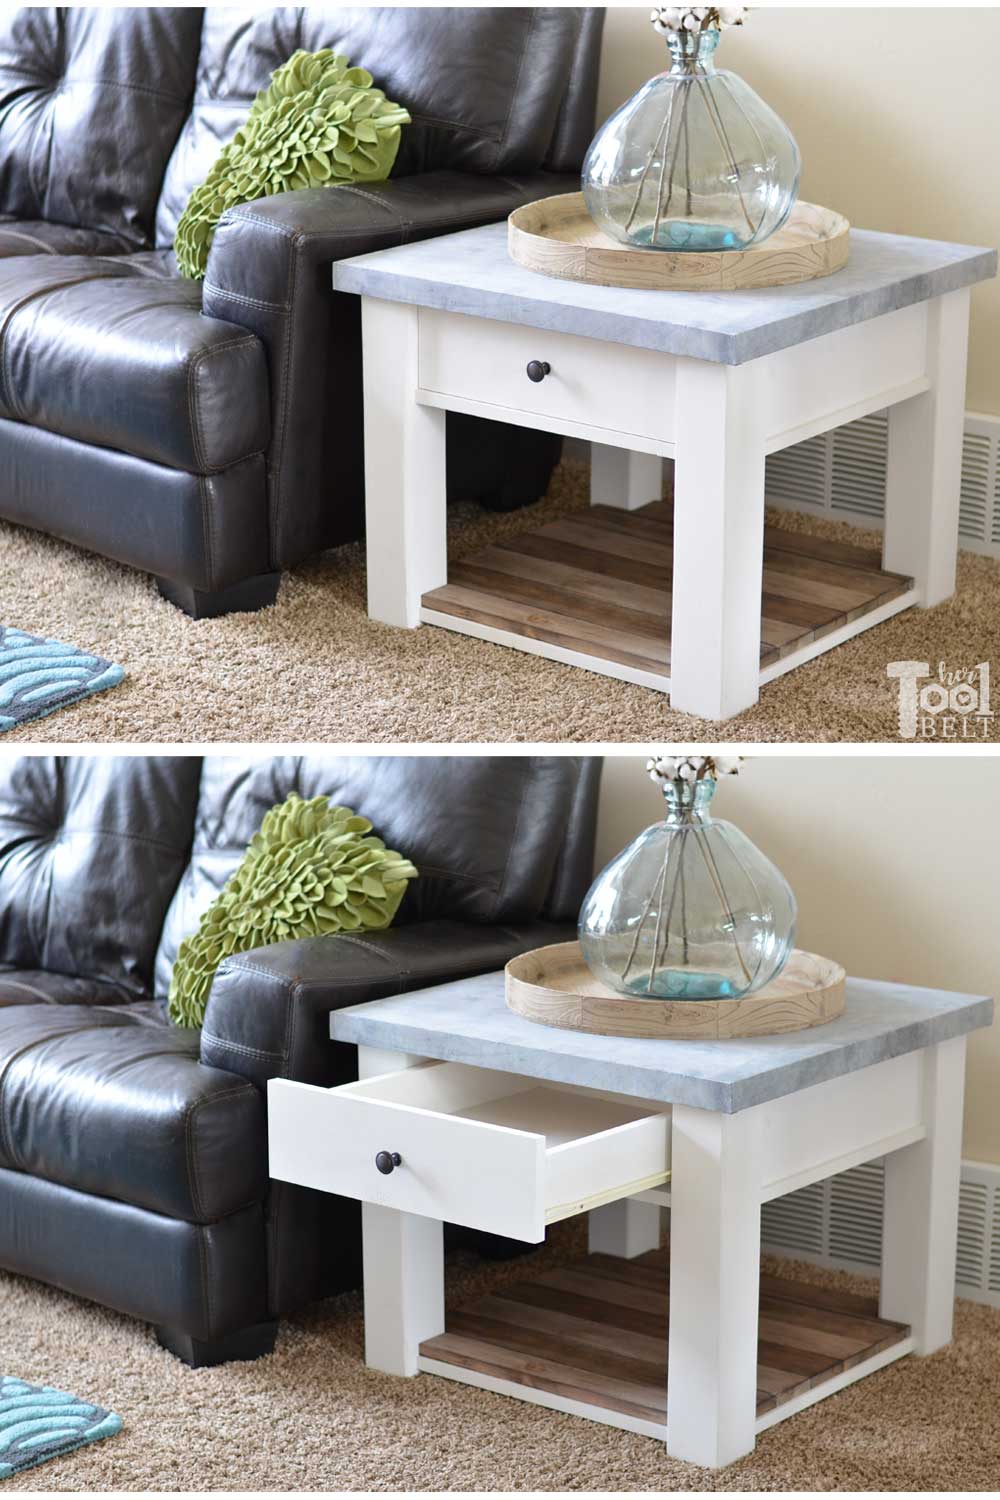
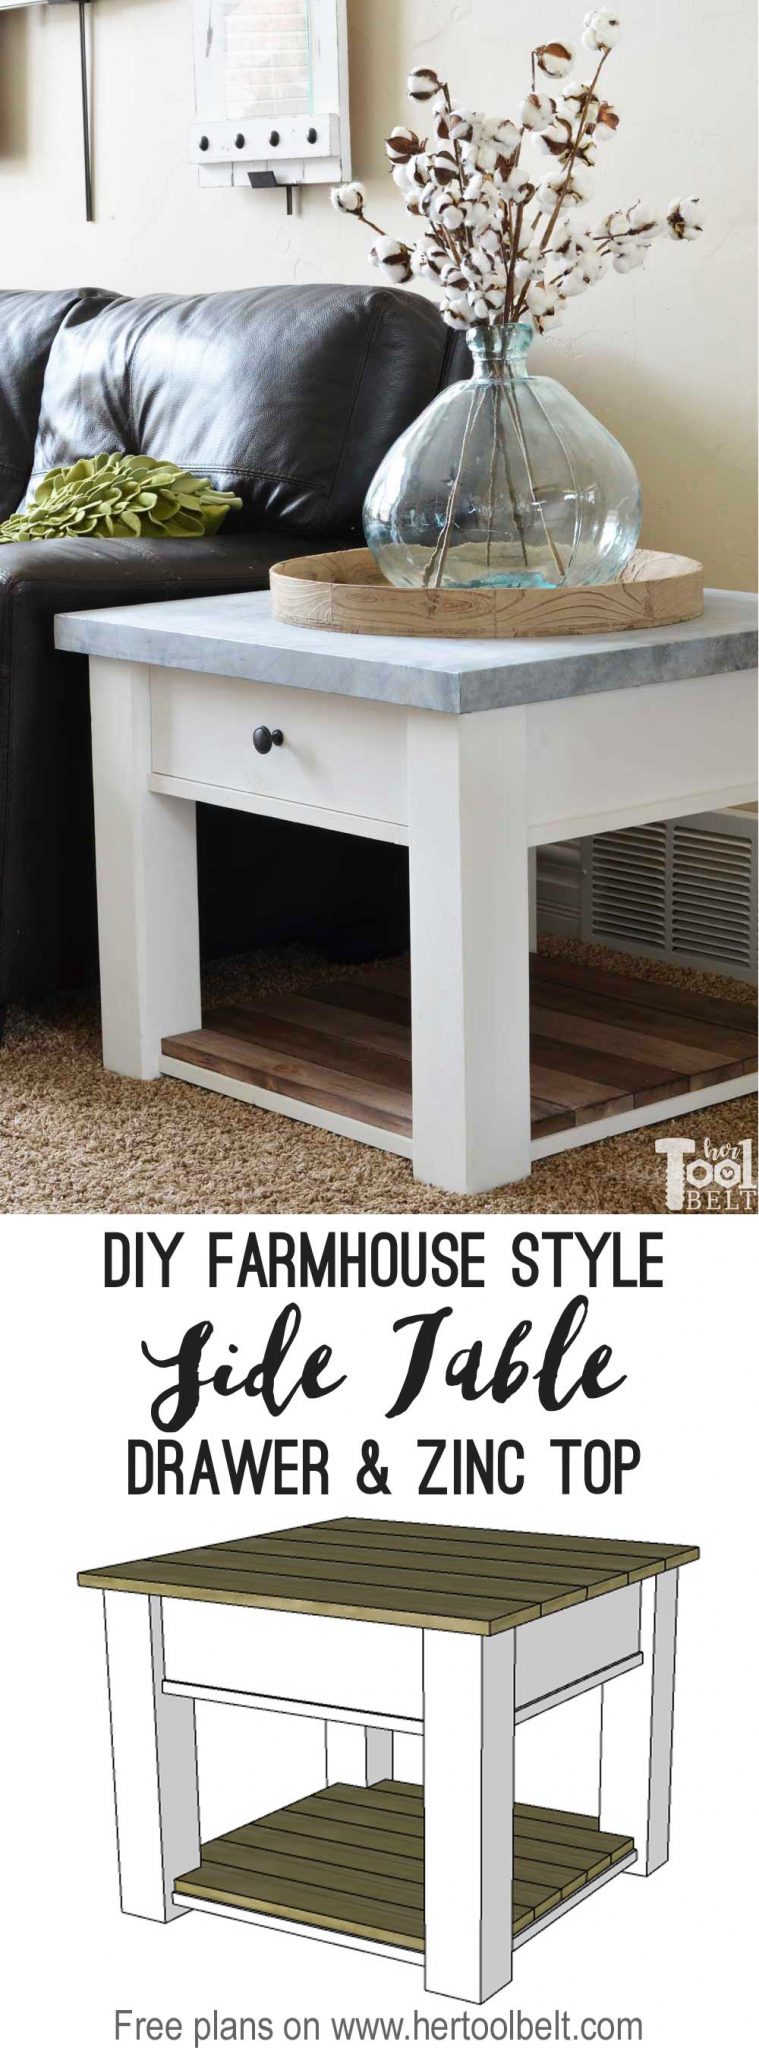
Building a new farmhouse side table to go along with my farmhouse coffee table has been on my list for a while. It is nice to finally check it off my list. I tried something new for me and did a DIY Zinc treatment on the top. What do you think? Are you a fan of Zinc table tops? I thought it would look good with the farmhouse style and it really wasn’t that hard to do.
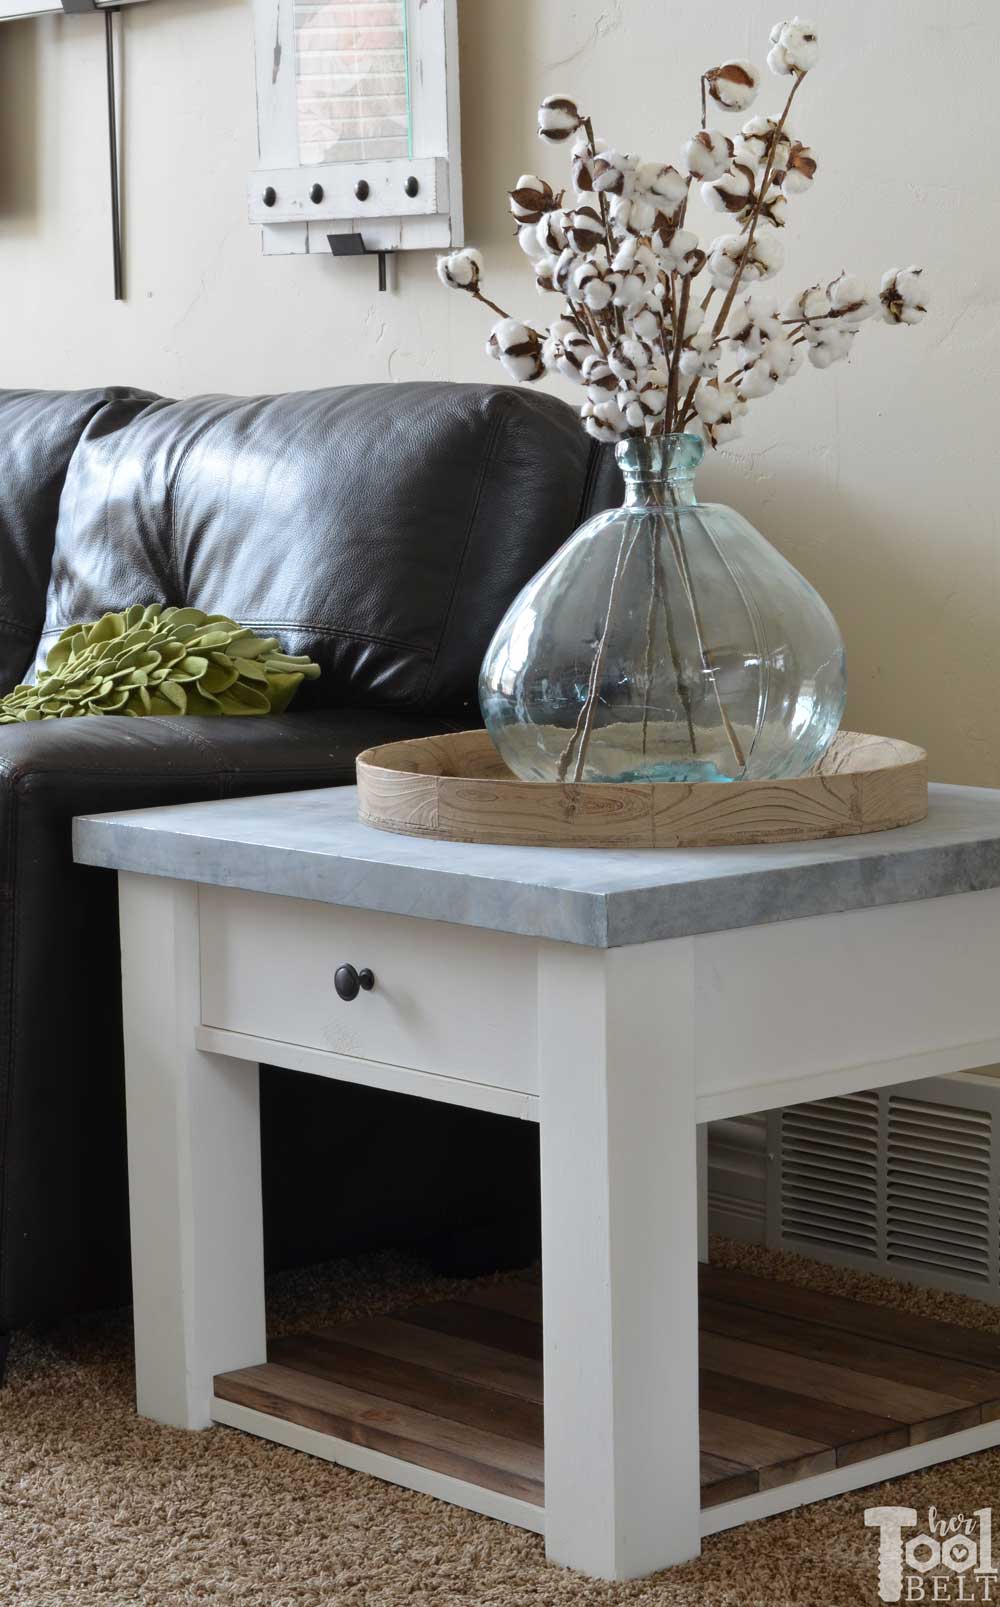
I also added a drawer to have a place for remotes, books, magazines, etc.
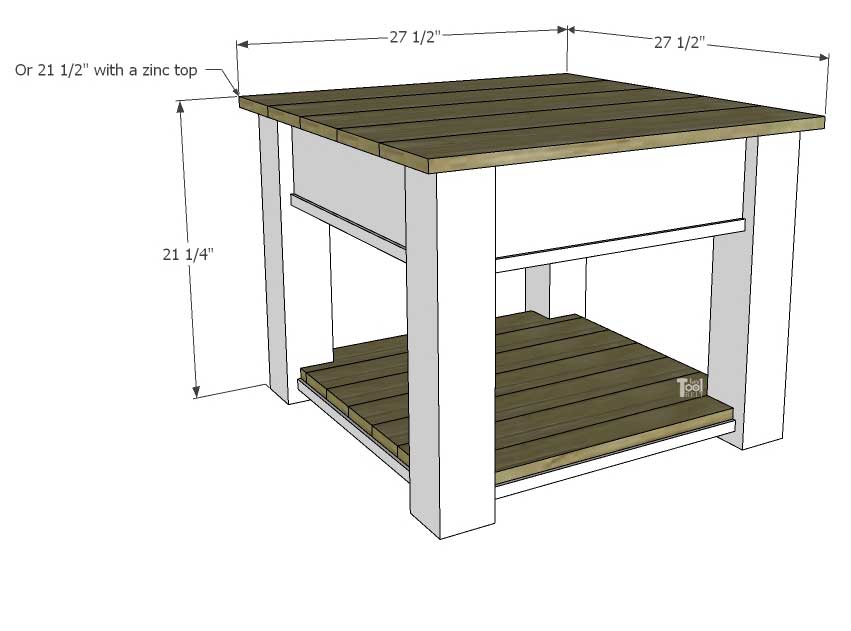
How to Build a Farmhouse Side Table with optional Zinc Top
Materials
- 1 – 4″ x 4″ x 8′ post
- 3 – 1″ x 6″ x 8′ board (If you want to do a zinc top, then you’ll only need 1 – 1″ x 6″ x 8′ boards)
- 2 – 1″ x 2″ x 8′ board
- 3 – 1″ x 4″ x 8′ board (if you don’t want to make a drawer, you’ll only need 2)
- 1 1/4″ pocket hole screws
- 1 1/4″ brad nails
- wood glue
- sandpaper
- paint/stain – Paint I used Linen White Paint, Stain I used Varathane Weathered Wood Accelerator, Kona and Pre-stain Conditioner to blend the Kona
- Drawer Option
- 1 – 1/4″ or 5mm x 16 3/4″ x 21″ (dado’d in drawer) or 17 1/2″ x 21 3/4″ (bottom mount)
- 1 – 22″ drawer slide
- knob
- Zinc Top Option
- 1 – 36″ x 48″ 30 gauge galvanized steel sheet metal
- construction adhesive
- support material 1 1/2″ x 27 1/2″ x 27 1/2″ (This can be anything, plywood, particle board, MDF, 2×6’s)
Tools Used
- Miter Saw
- Impact Driver
- Pocket hole jig
- Drill
- Jig saw
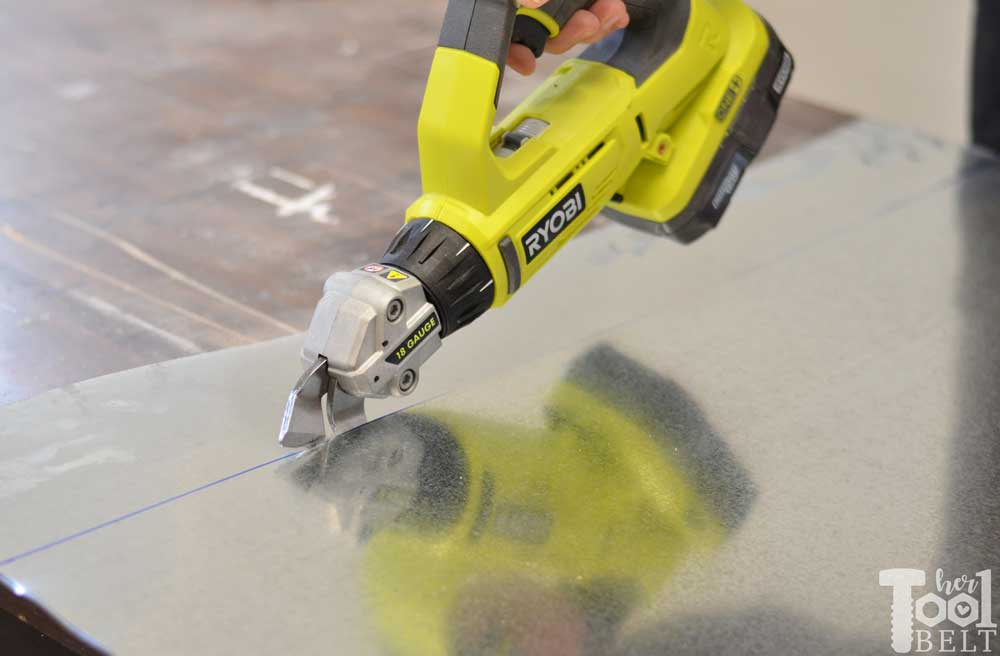
- Offset Shears – optional for zinc top
- Screwdriver – optional for drawer
- Brad Nailer
- Sander
- Tape Measure
- Table Saw or circular saw – optional for drawer dado
In this post I will be reviewing the Milwaukee 18v Brushless Impact Driver and Ryobi 18v Offset Shears as part of the Home Depot prospective program.
Cut List
- 4 – 3 1/2″ x 3 1/2″ x 20 1/2″ – legs (4×4)
- 4 – 3/4″ x 5 1/2″ x 18 1/2″ – sides (1×6)
- 5 – 3/4″ x 5 1/2″ x 27 1/2″ – optional wood top (1×6)
- 8 – 3/4″ x 1 1/2″ x 18 1/2″ – side and bottom trim (1×2)
- 6 – 3/4″ x 3 1/2″ x 23 1/2″ – bottom (1×4)
- 1 – 3/4″ x 2 1/2″ x 18 1/2″ – bottom (1×4)
- 2 – 3/4″ x 3 1/2″ x 21 3/4″ – optional drawer sides (1×4)
- 2 – 3/4″ x 3 1/2″ x 16″ – optional drawer front/back (1×4)
- 1 – 5mm x 16 3/4″ x 21″ – optional drawer bottom
- 1 – 1 1/2″ x 27 1/2″ x 27 1/2″ – optional zinc top support material
Cut Diagram
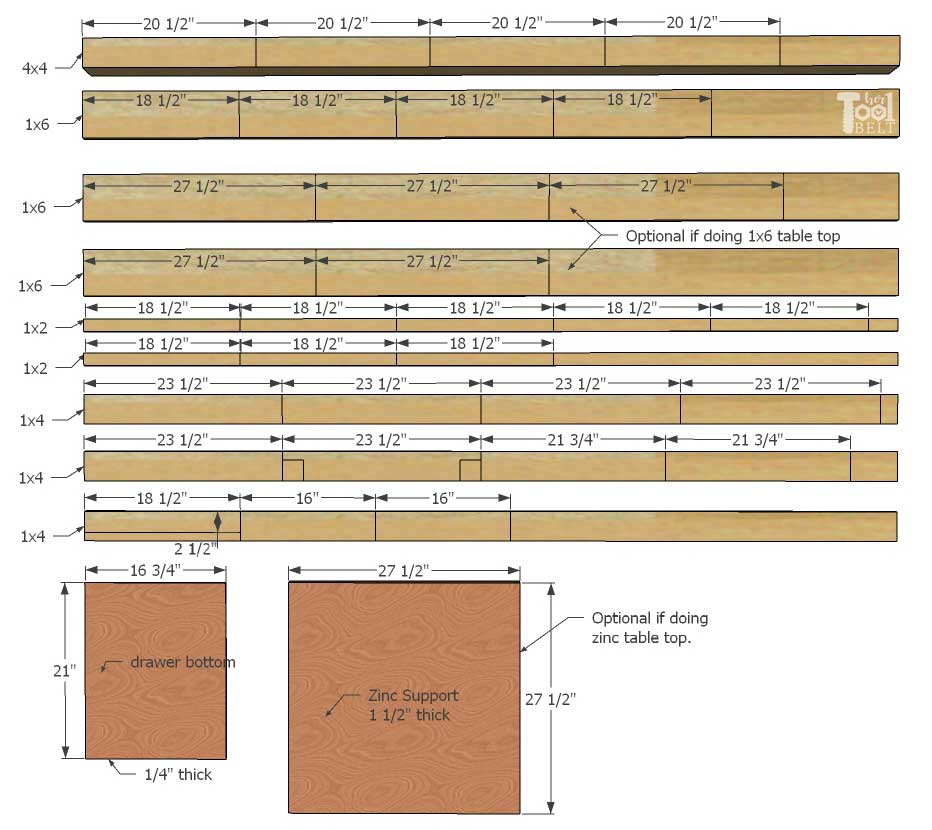
Step 1 – Cut boards and drill pocket holes
Cut the boards according to the cut list and diagram.
- Drill pocket holes for 3/4″ material in both ends of the 4 – 1 x 6 x 18 1/2″ side boards (if doing a drawer only drill pocket holes in 3 side boards).
- If doing zinc top, also drill pocket holes along one side to attach the top later.
- Drill pocket holes for 3/4″ material in both ends of the 4 – 1 x 2 x 18 1/2″ trim boards (if doing a drawer drill pocket holes in 5 of the trim pieces).
- If doing a drawer, drill pocket holes for 3/4″ material in both ends of the 2 – 1 x 4 x 16″ boards.
Step 2 – Assemble legs and sides
- Find the center of the side boards and the trim pieces (without pocket holes). Use wood glue and 1 1/4″ brad nails to attach the trim on the side boards as shown below.
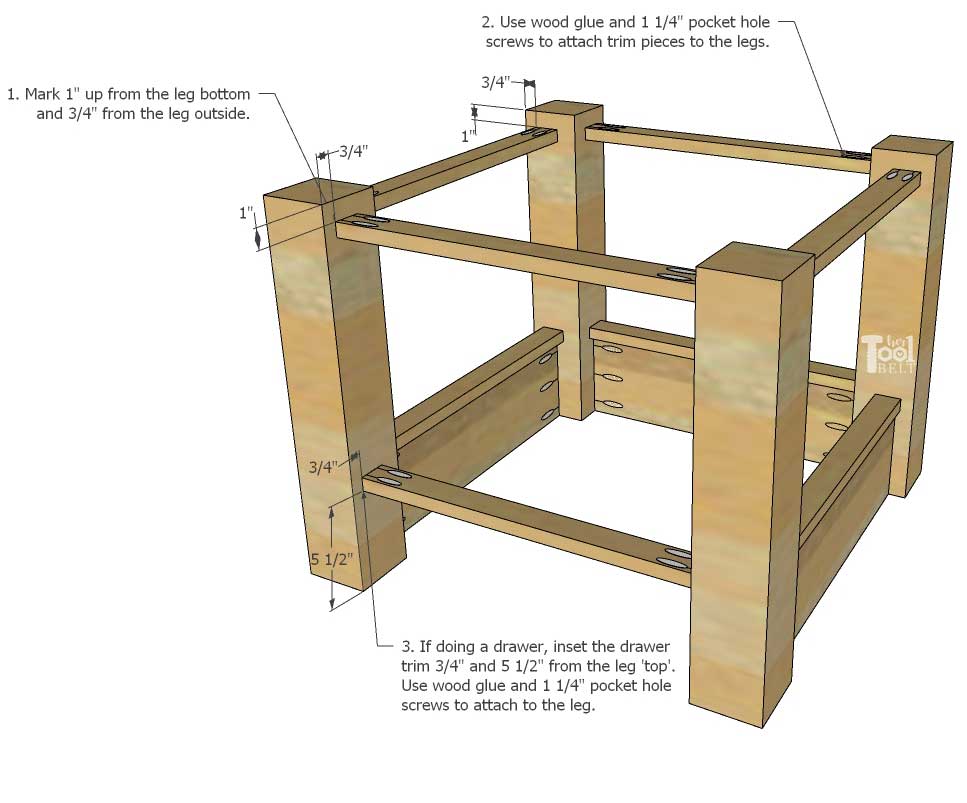
- On each 4×4 leg mark 1″ in from the outside, and 3/4″ where the trim goes.
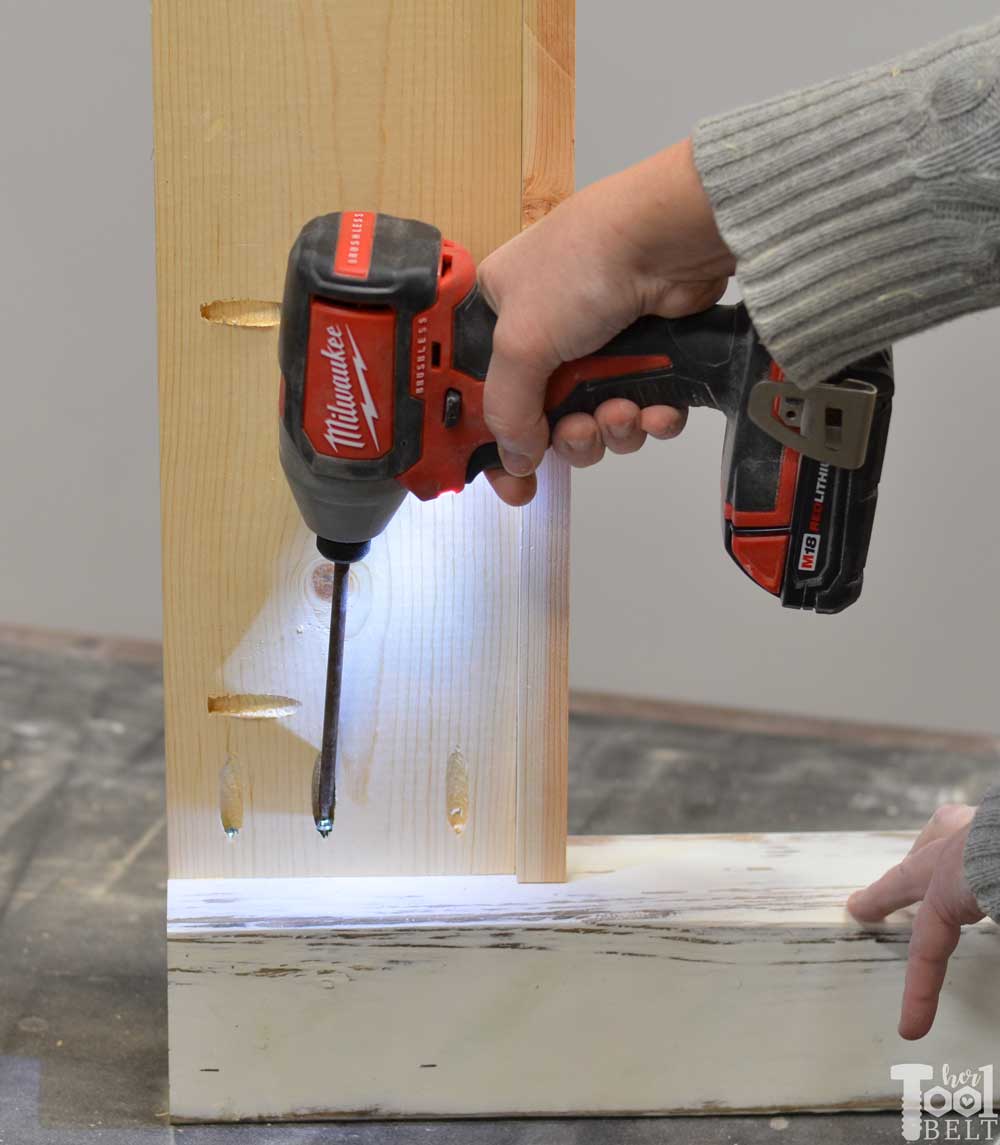
- Use wood glue and 1 1/4″ pocket holes to attach the sides to the legs. The sides should be inset 1″ and flush with the leg ‘top’ (I’m showing it upside down to make sure the sides are flush with the leg tops.)
- If you are doing a drawer, leave the 4th side off.

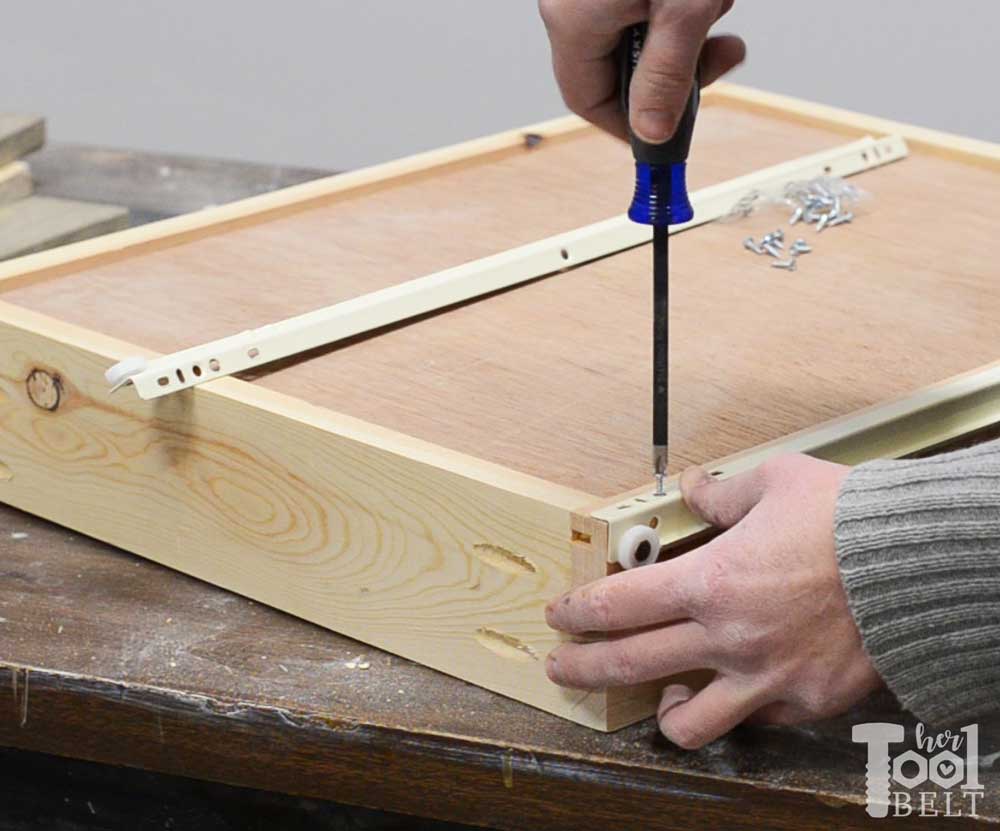
Attaching the side to the leg with 1 1/4″ pocket hole screws. The impact driver is one of my favorite tools, especially from driving pocket hole screws. It takes a lot of the ‘work’ out of drilling. The Milwaukee brushless impact driver worked awesome. It is really light weight compared to some of my other impact drivers, only 3.1 lbs with the battery. It provides plenty of torque, up to 1,500 in-lbs and seems to run forever on the M18 battery. So far I am a big fan.
- Measure and mark 1″ from each leg bottom and 3/4″ in from the leg outside.
- Use wood glue and 1 1/4″ pocket hole screws to attach the 1×2 bottom trim pieces to the legs.
- If you are doing a drawer, mark 5 1/2″ from the leg top and 3/4″ from the leg outside. Secure the drawer trim with wood glue and 1 1/4″ pocket hole screws.
Step 3 – Optional Drawer Assembly
Skip this step if you are not making the drawer.
Drawer assembly – dado method
There are a few ways to make drawers. I usually use the dado method.
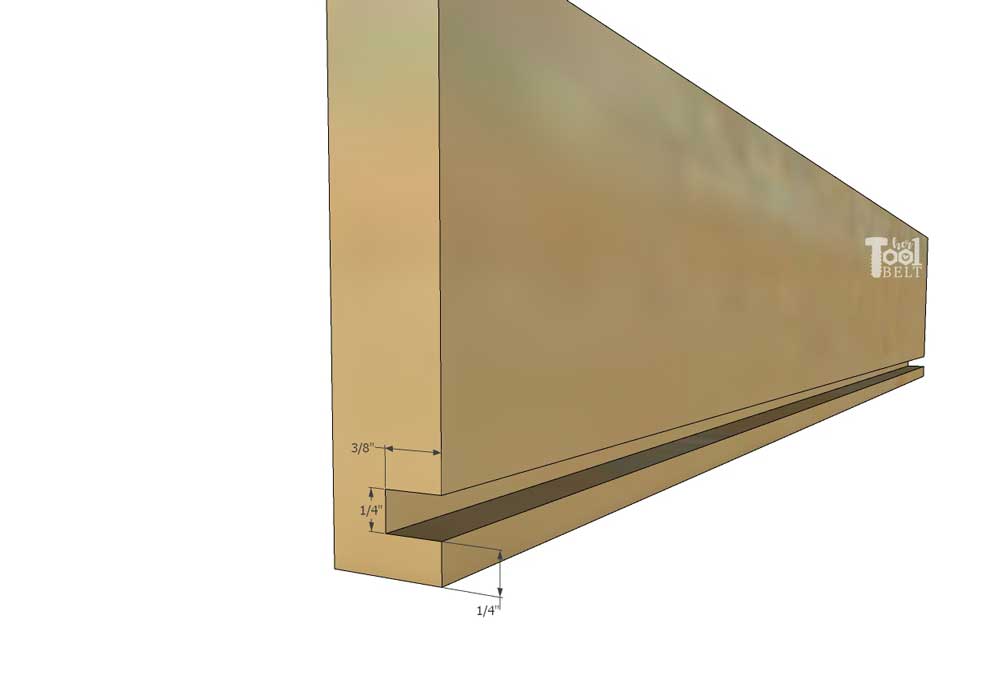
In each of the drawer pieces 16″ and 21 3/4″ 1×4’s cut a dado with a table saw, router or multiple passes with the circular saw. Set the blade height at 3/8″ and set the fence 1/4″ from the bottom. Make multiple passes adjusting the fence as necessary until you have a dado 1/4″ wide x 3/8″ deep and 1/4″ from the bottom. Put the dado on the opposite side of the pocket holes in the 16″ pieces.
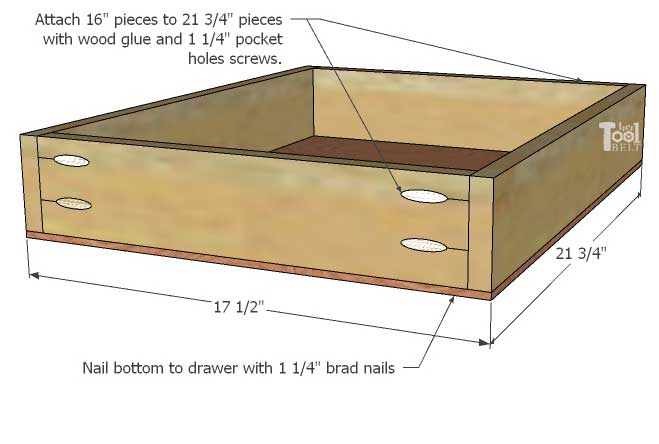
Cut the drawer bottom to 16 3/4″ and 21″ (or a hair smaller). Slide the drawer bottom into the dados. Assemble the drawer with wood glue and 1 1/4″ pocket holes.
Drawer Assembly – Alternate method nail bottom to drawer.
If you don’t want to cut dados, the drawer is small and will probably be fine attaching the drawer bottom to the bottom of the drawer sides/front/back.
Assemble the drawer front/back to the sides with wood glue and 1 1/4″ pocket hole screws. Use 1 1/4″ brad nails to nail the 17 1/2″ x 21 3/4″ drawer bottom to the sides/front back.
Attach Drawer Slides
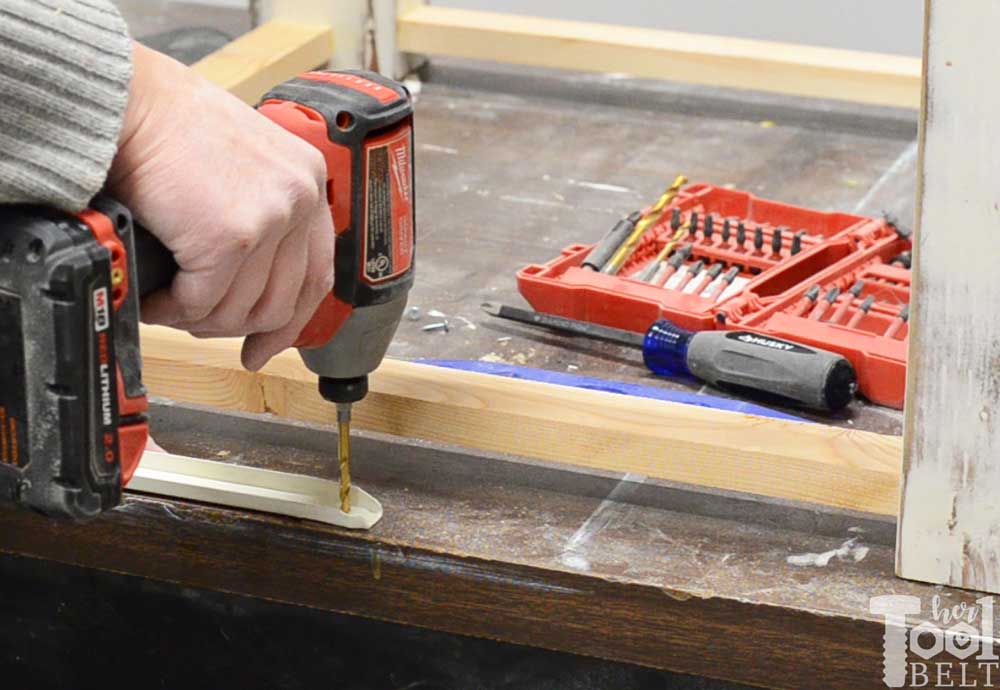
I used 22″ bottom mount drawer slides to mount this drawer. Attach the bottom mount pieces to the drawer with provided screws. Place the end without a wheel flush with the front of the drawer box.
You’ll need an additional hole in the back end of the drawer slide that mounts to the table. Drill a hole about the same size as the other holes in the slide 3/4″ from the end.
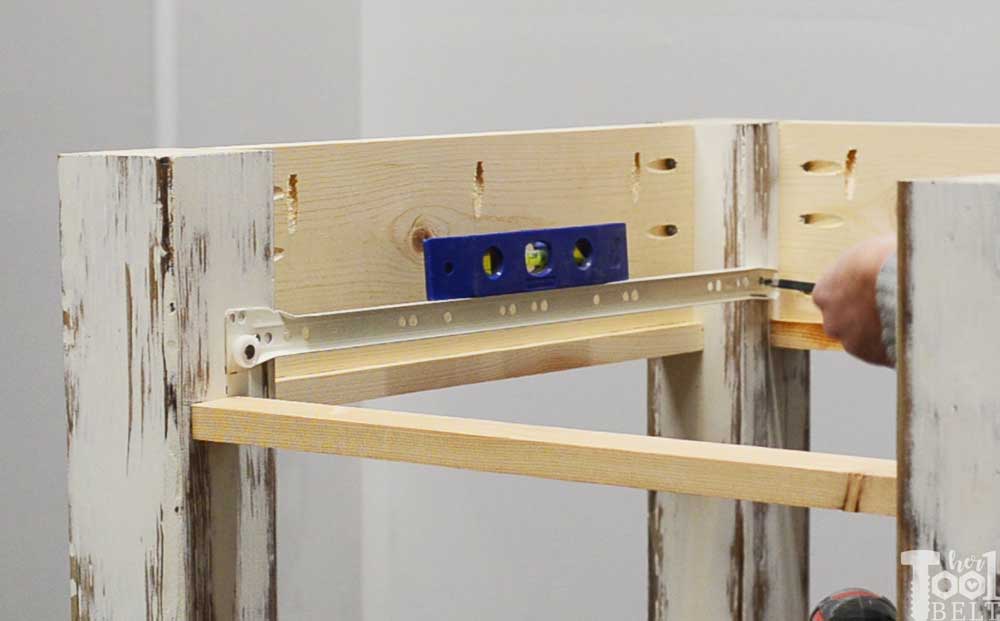
On the front legs, mark down 5″ and in 1 3/4″ from the leg front. This will be the drawer slide front bottom corner. Use one screw to secure the front of the drawer runner to the front of the leg. Place a level on the drawer slide, level the slide and secure the back of the slide with a screw in the hole just drilled. Add additional screws as necessary to secure drawer slide. Repeat for other side of drawer slide.
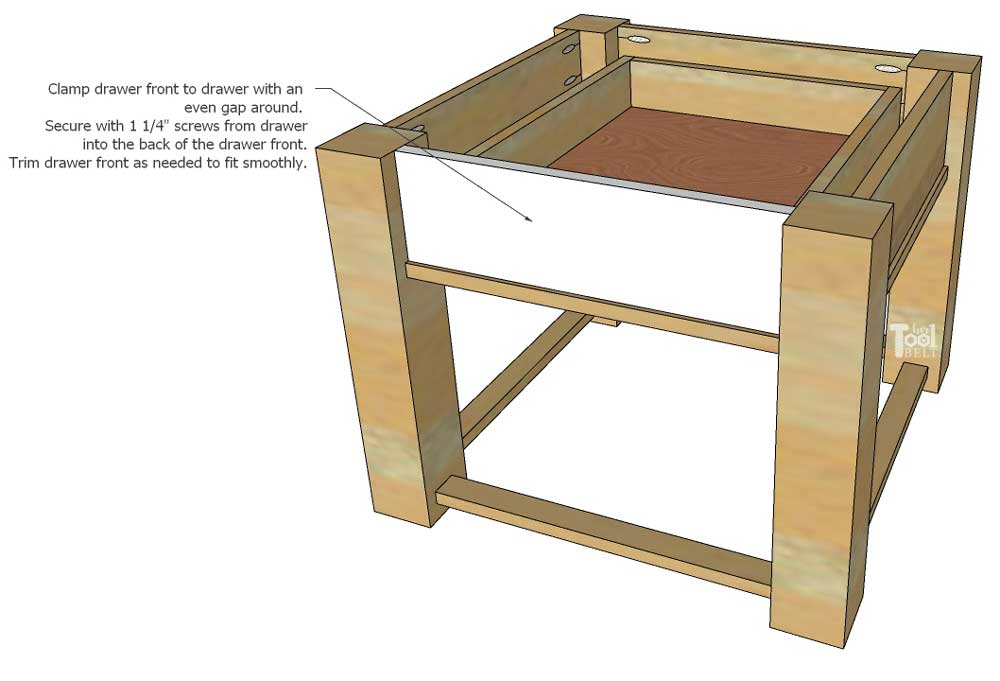
With the drawer installed, now we’ll attach the drawer front. Trim the drawer front as necessary to easily fit between the legs. you’ll want at least 1/16″ all around. Clamp the drawer front to the drawer and use 1 1/4″ screws to attach the drawer front. Screw from the inside of the drawer into the back of the drawer front. Add a knob in the center of the drawer front as desired.
Step 4 – Attach Bottom
On one of the bottom pieces, it will need to be notched to fit between the legs. Using a jig saw or similar notch out a 2 1/2″ x 2 1/2″ section from both ends. Test fit the piece and trim more as needed.
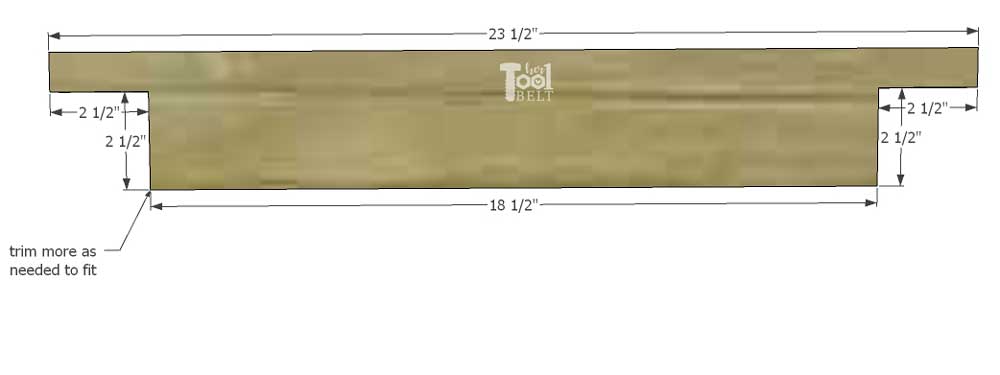
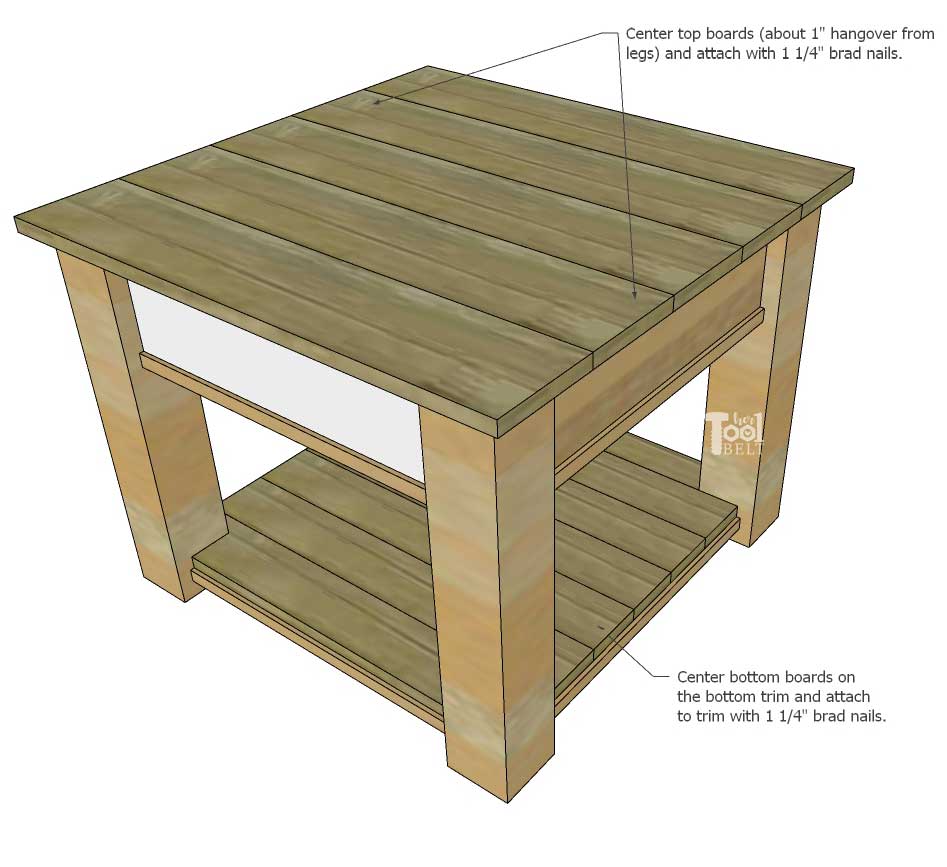
Center all of the bottom pieces along the bottom trim. There should be about 1/4″ of the bottom trim showing under the bottom pieces. Use 1 1/4″ brad nails to secure each of the bottom pieces in place.
If doing the wood 1×6 top, center all of the 1×6 top pieces on the sides and legs. There should be about 1″ overhang from the legs. Use 1 1/4″ brad nails to secure the 1×6 top boards in place.
Step 5 – Optional Zinc Top
For the zinc top, I bought a piece of 36″ x 48″ 30 gauge galvanized sheet metal and applies the same treatment I did on my son’s magnet board.
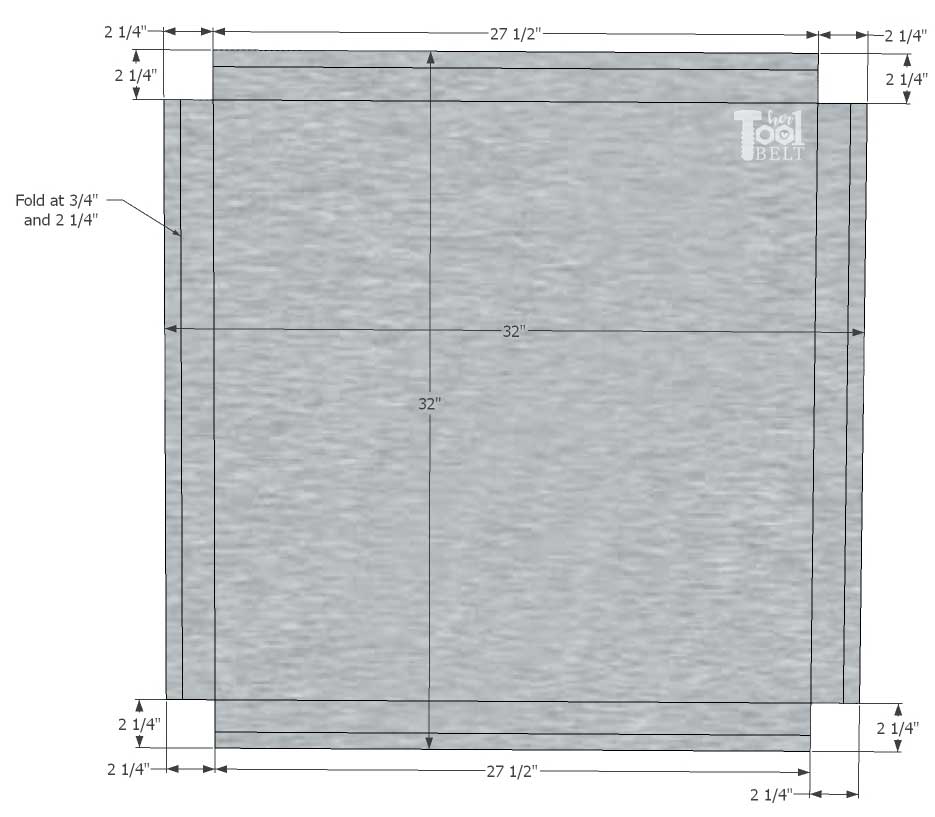
You’ll also need 1 1/2″ x 27 1/2″ x 27 1/2″ support material. I had some pieces of particle board shelving material that I glued and nailed together to create the right size.
Cut the sheet metal to 32″ x 32″. Place the support material in the center of the sheet metal and trace around it. Notch 2 1/4″ x 2 1/4″ from each corner. The notches should line up with the lines you traced around the support material.
This was my first time using the 18v offset shears, I usually use tin snips. The Ryobi offset shears were awesome compared to using hand held tools. It was easier to cut a straight line and the edge came out nice and smooth. I found that the faster I cut the cleaner the cut. The trigger is variable speed and you can rotate the head as needed.
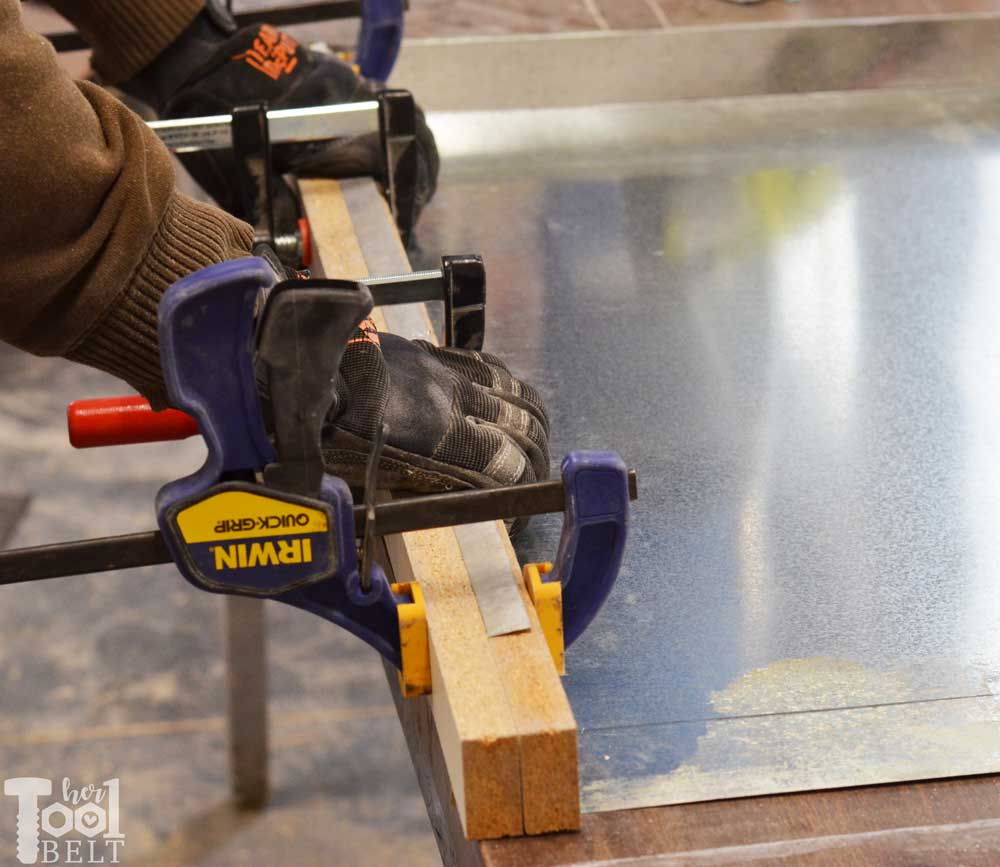
I don’t have a fancy metal bending machine and didn’t want to take it to a fabrication shop. I wanted to make sure my edges were nice and crisp and this DIY method worked really well. Cut 2 straight boards to 27 1/2″ and the width should be the same as the support material thickness (1 1/2″). Sandwich the boards around the sheet metal, lining up the board edges with the inside corner of the notch (where the fold needs to happen. Clamp the two boards tightly together and fold the board in, creating a perfect fold. Use your gloved hands and fold over the top 3/4″ extra metal. Remove the boards and clamps and repeat for each side.
Next add construction glue to the inside of the sheet metal. I just picked one of the construction glues that said it worked with metal and wood.
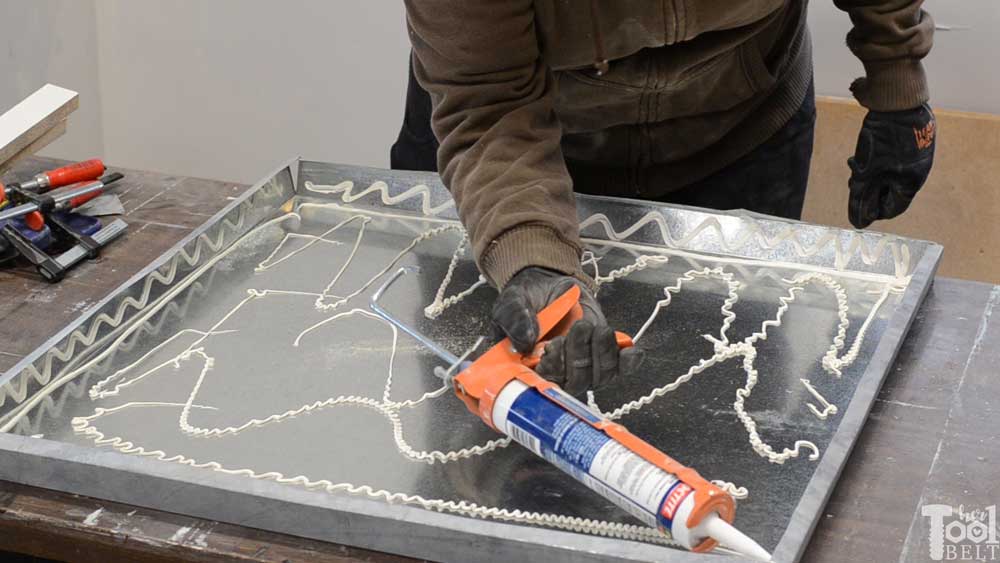
Place the support material inside the sheet metal. Use the 27 1/2″ straight boards and some clamps to tighten the sheet metal around the support material. Secure the sheet metal lip in place with screws. Then you can switch the boards and clamps to the other side and add screws until the glue dries.
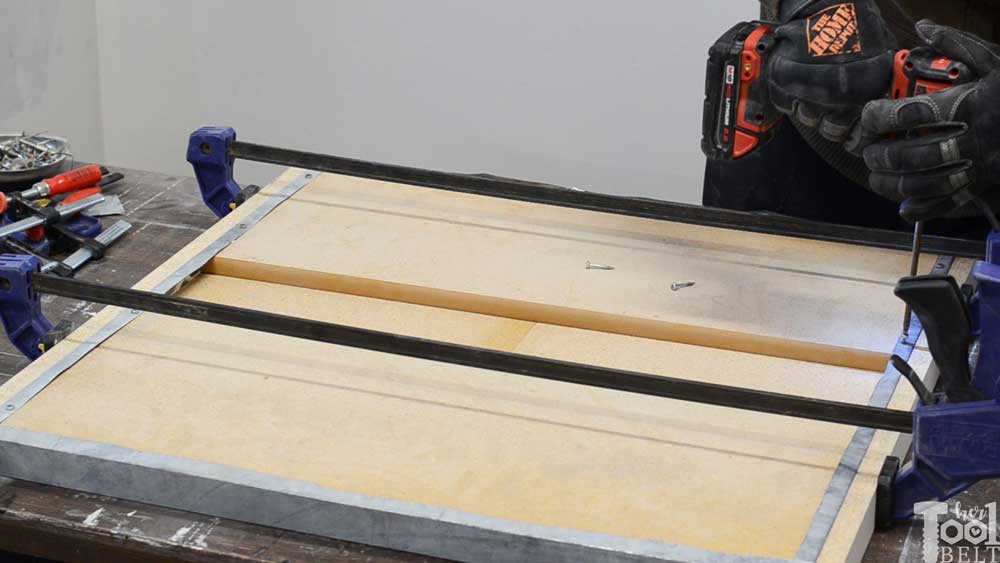
Center the top onto the table legs and use the pocket holes drilled in the side pieces to attach the top with 1 1/4″ pocket hole screws.
Step 6 – Finish
Sand the table until smooth. I painted the side table base white with Rustoleum Linen White chalky paint. I stained the bottom boards with my favorite weathered wood process. See video.
For a grayish brown weathered wood / reclaimed wood look:
- I first applied a coat of Varathane Weathered Accelerator and let that fully dry.
- I applied a small amount of Kona to a bristle brush, dabbing off the extra and dry brushed it onto the frame lightly.
- The last step is to take a paper towel or rag and rub on some Minwax pre-stain conditioner and let it dry completely.
- Consider putting a clear coat finish (polyurethane) on to protect the wood.
Thanks for pinning!
“I acknowledge that The Home Depot is partnering with me to participate in the Tool Review Program. As a part of the Program, I am receiving compensation in the form of products and services, for the purpose of promoting The Home Depot. All expressed opinions and experiences are my own words. My post complies with the Word Of Mouth Marketing Association (WOMMA) Ethics Code and applicable Federal Trade Commission guidelines.”
Leave a Reply