Hi! I’d love for you to follow me on Pinterest Her Tool Belt and if you love instagram, you can keep up with me there too!
Today I’m participating in a challenge hosted by the amazing Sandra at Sawdust Girl.
Create something with only scrap wood!
- Free wood, branches, pallets, reclaimed lumber is all good.
- Also feel free to use new fasteners (nails, screws etc.) and finishing products.
She put out a challenge to build a project using your sCrap pile, which was perfect because I have a large sCrap pile! I’m a bit of a collector and saver, because I might need that piece…sometime for something. 🙂
About 1 1/2 years ago my Dad had a big building project on his farm. There were a bunch of these shipping pallets/sheet supports left and some other pieces of less than stellar wood.
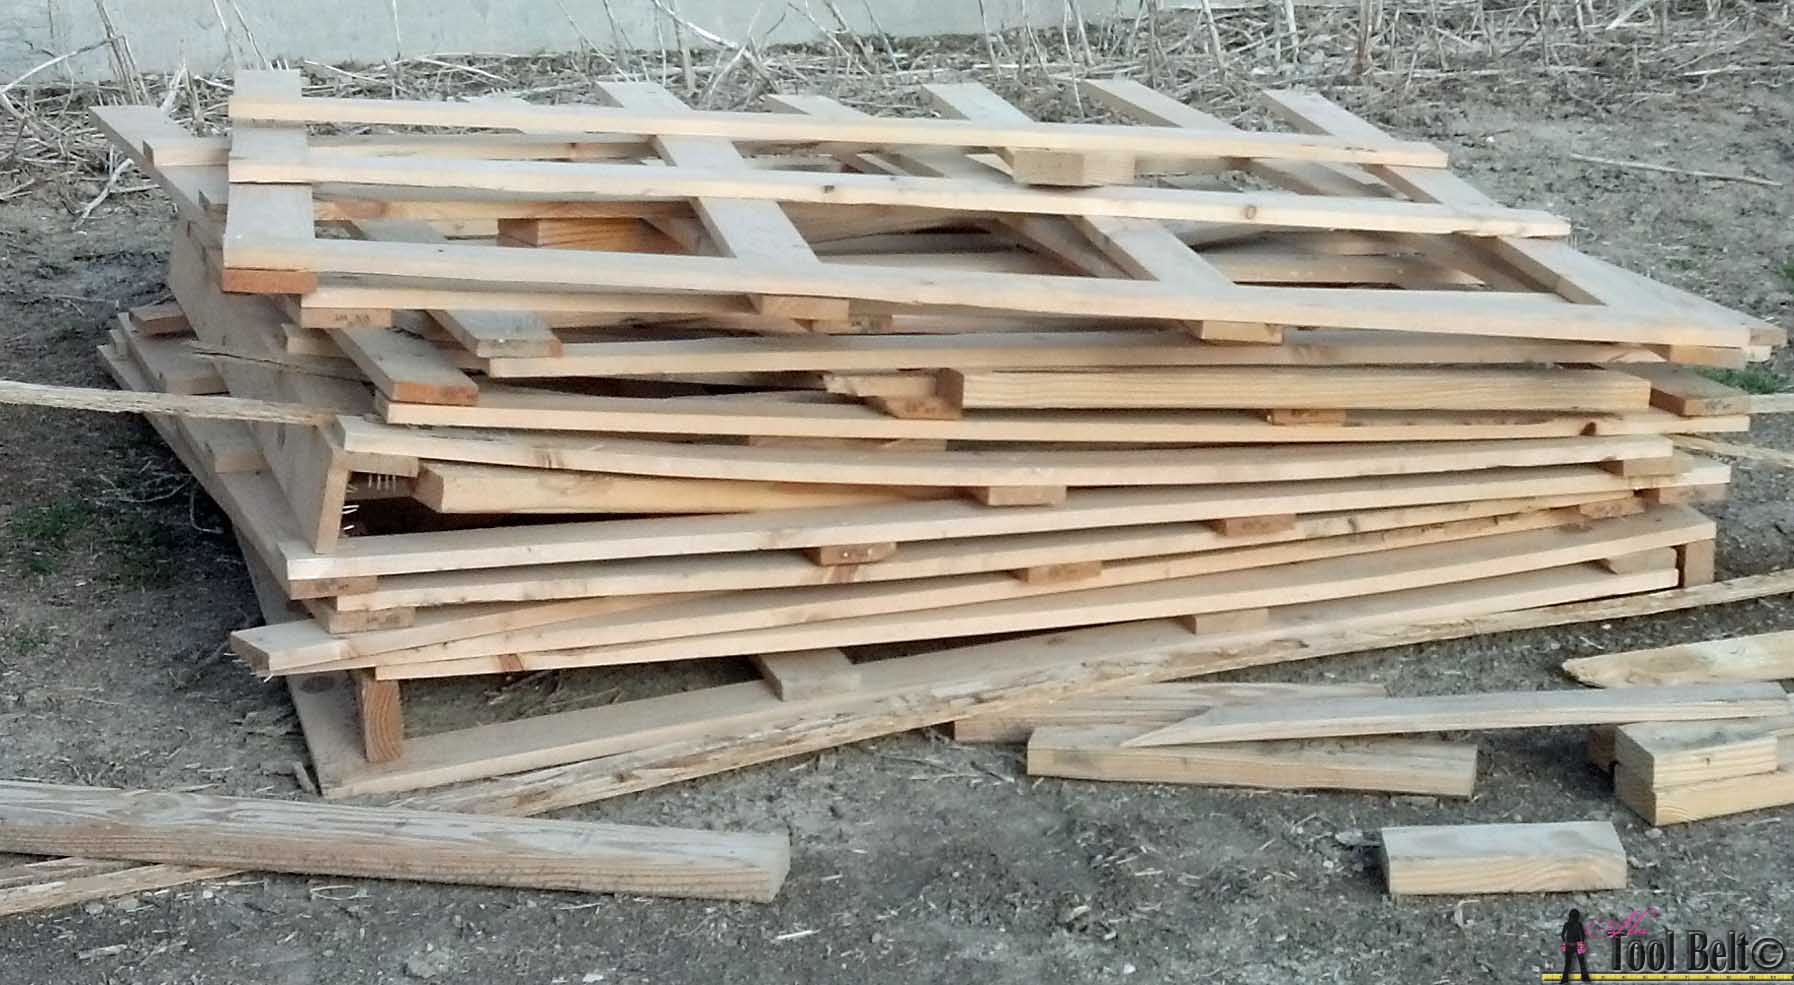
Even though there probably wasn’t a straight board in the piles, I saved the wood…because it was free. I’ve used the best of that wood (even made a dresser) over the last 1 1/2 years and I finally went through my remaining wood and sorted it, determined to clear out my sCrap pile. Here is what I started with for this project.

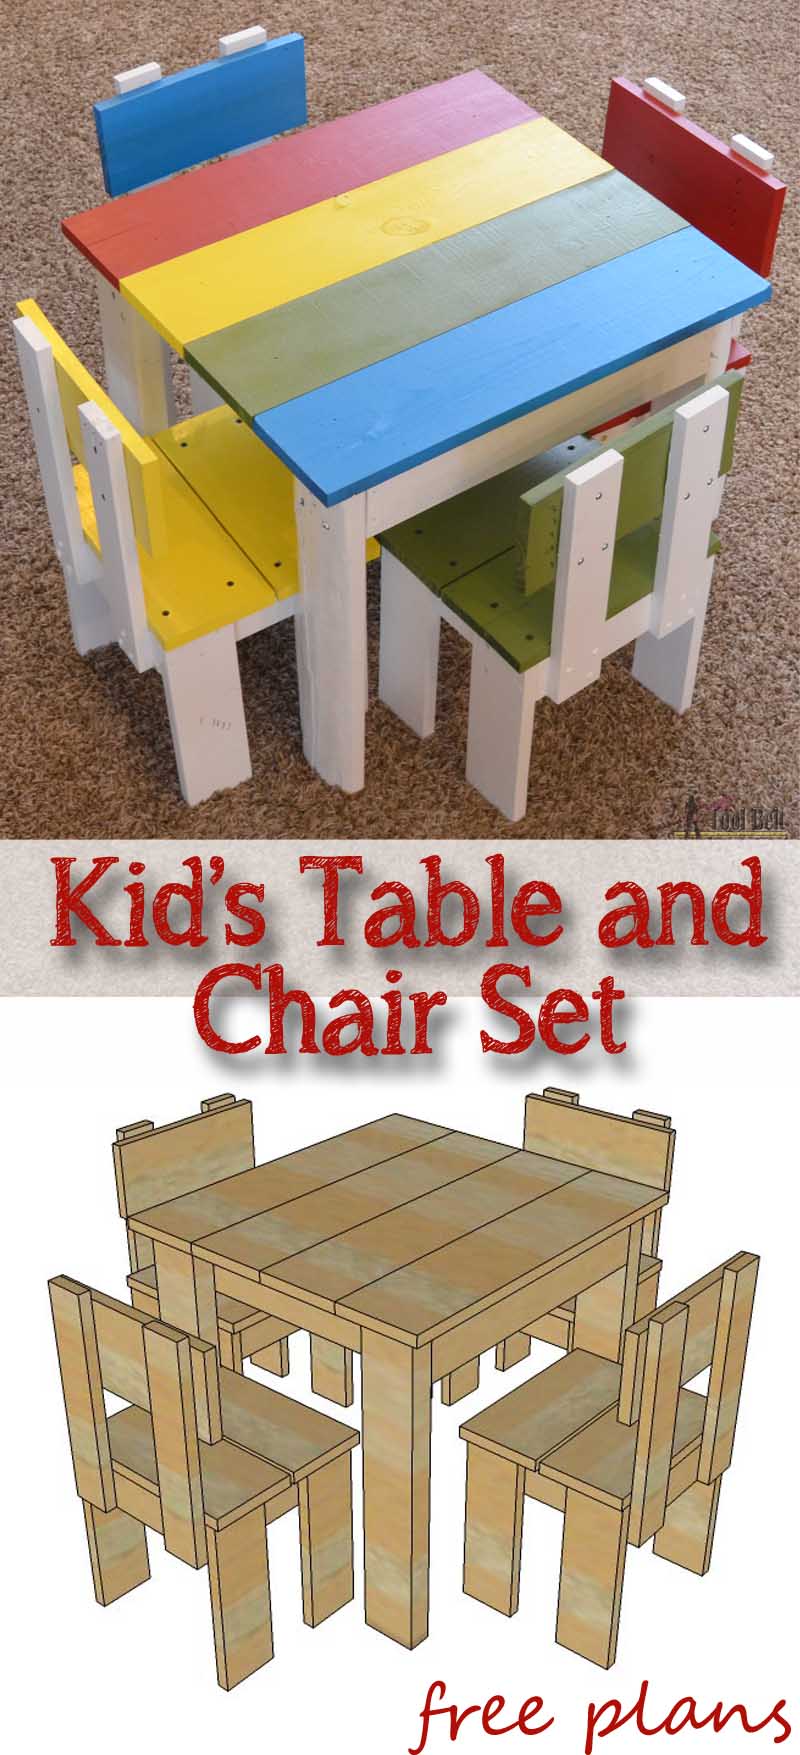
The wood was very crooked and in bad shape, but since most of the cuts are short it didn’t matter too much. I saw this idea for a table set at a craft show this summer and decided that it would be perfect for my pile.
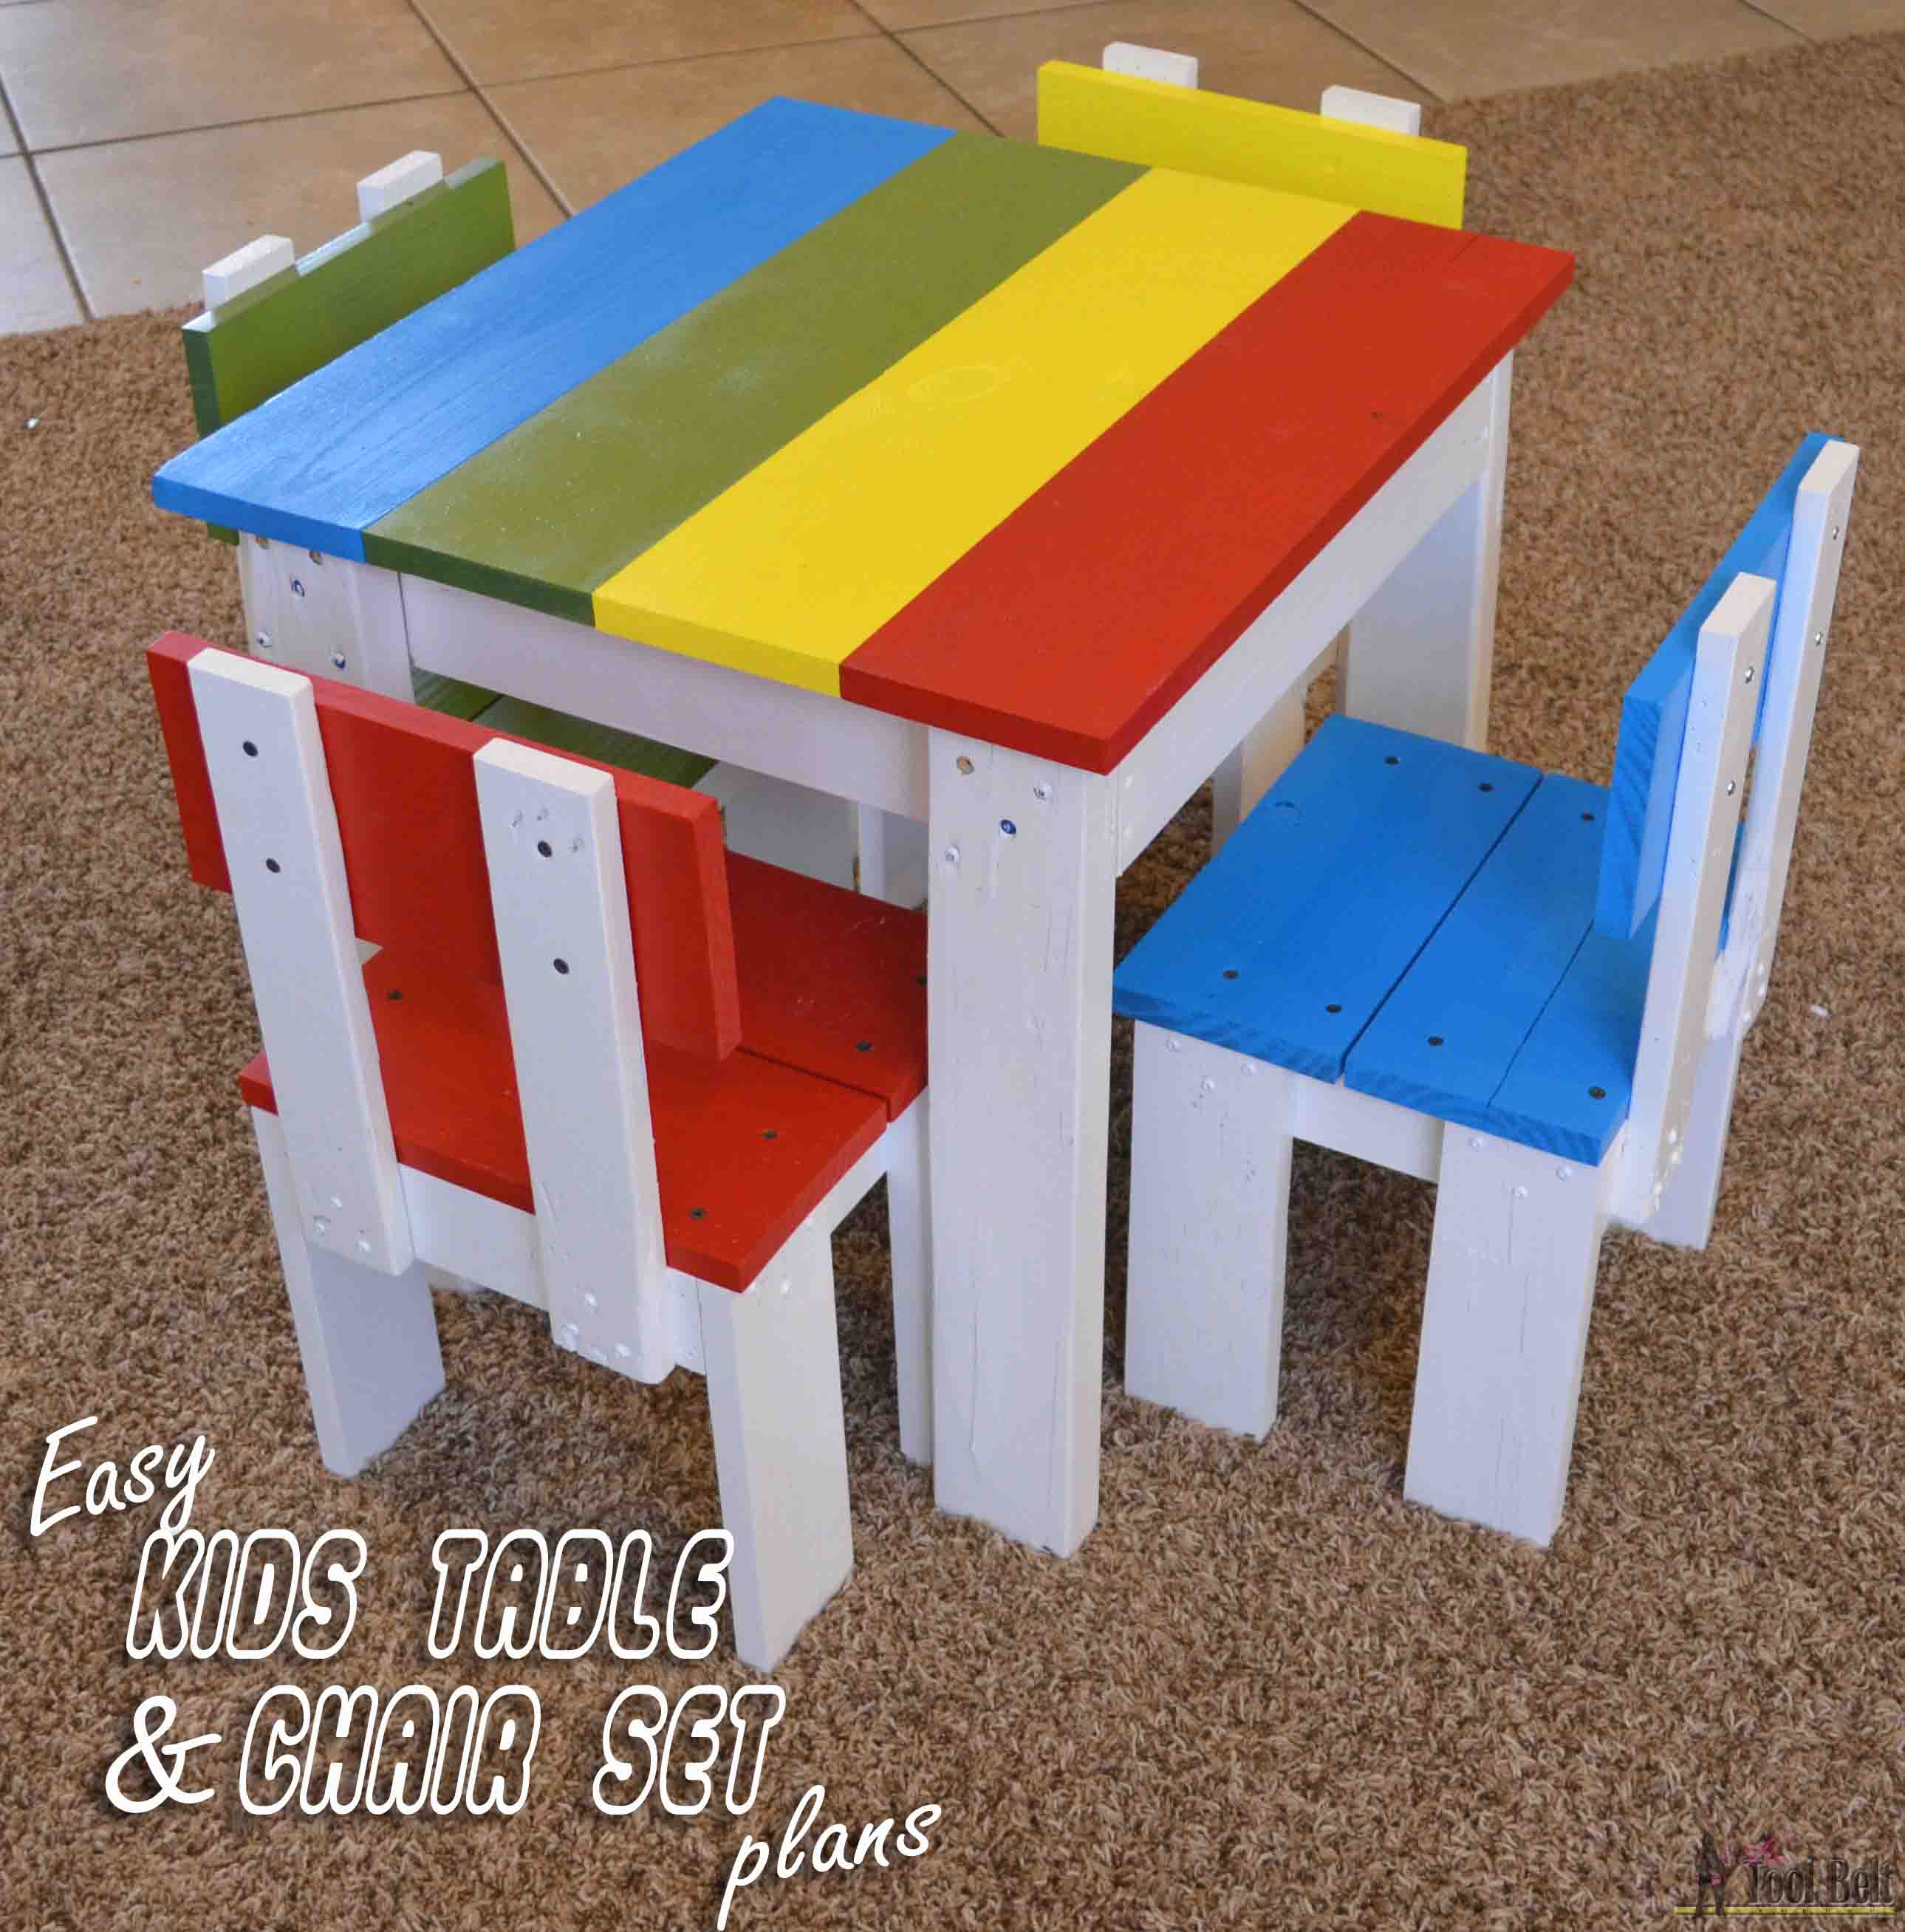
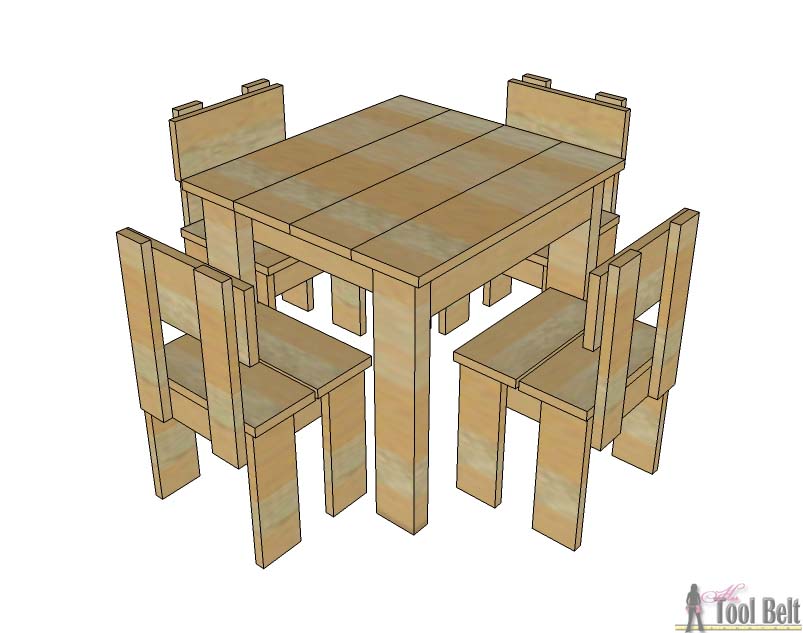
How to Build a Kid’s Table and Chair Set
This post contains some affiliate links for your convenience. Click here to read my full disclosure policy.
This is an easy project for any skill level. You’ll need a miter saw, drill and sander.
Materials
- 1 – 2″ x 4″ x 8′ stud
- 1 – 1″ x 6″ x 8′ board
- 2 – 1″ x 6″ x 6′ boards
- 3 – 1″ x 4″ x 8′ boards
- 3 – 1″ x 3″ x 8′ boards
- 1 1/4″ screws (about 1 lb of grabber screws)
- 2″ screws (if needed)
- wood glue
- paint/stain
- optional – 1/2″ plywood
- optional – 1″ pocket hole screws
- optional – 14″ full extension ball bearing slides
- Approximate project cost $35 to buy the wood and screws.
Chairs x4
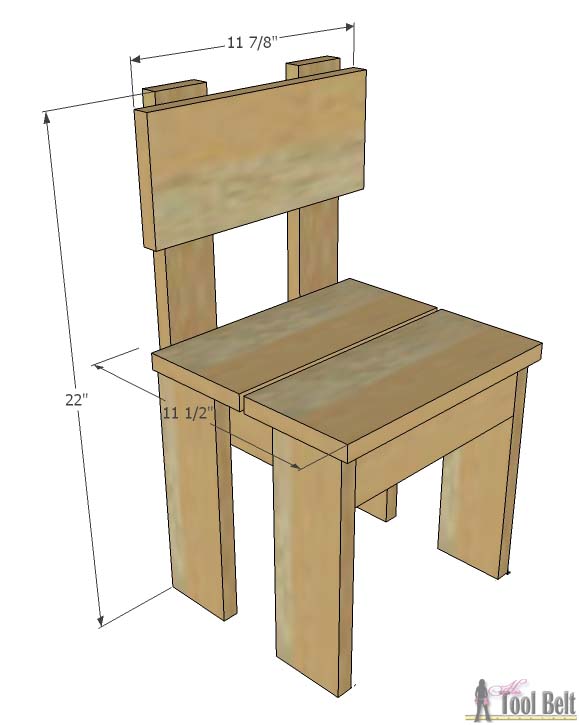
Cut List
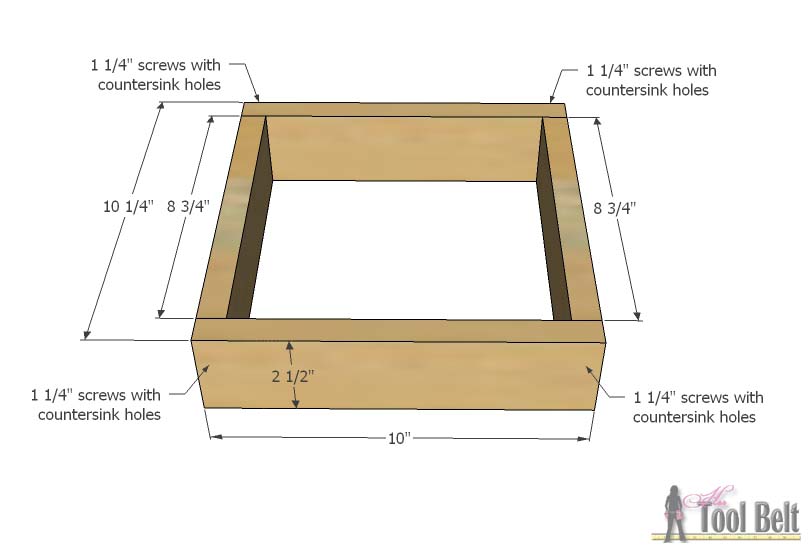
- 8 – 3/4″ x 2 1/2″ x 10″ skirt (1×3)
- 8 – 3/4″ x 2 1/2″ x 8 3/4″ skirt (1×3)
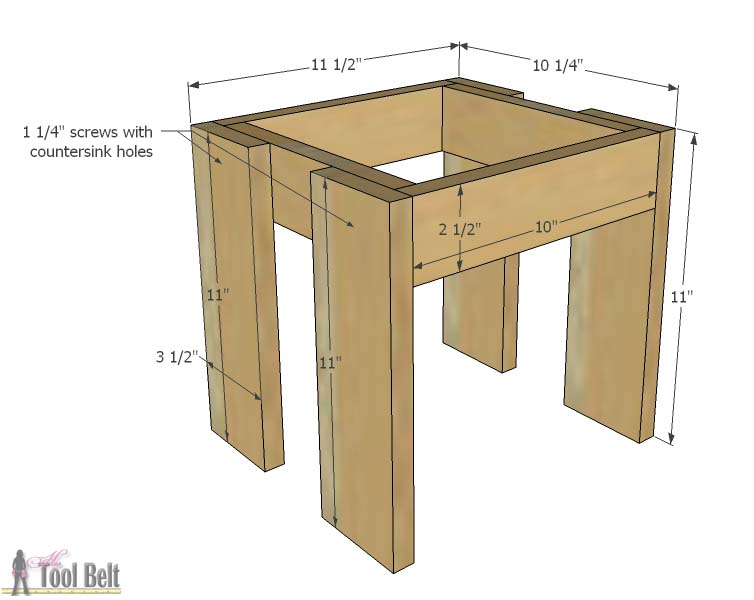
- 16 – 3/4″ x 3 1/2″ x 11″ legs (1×4)
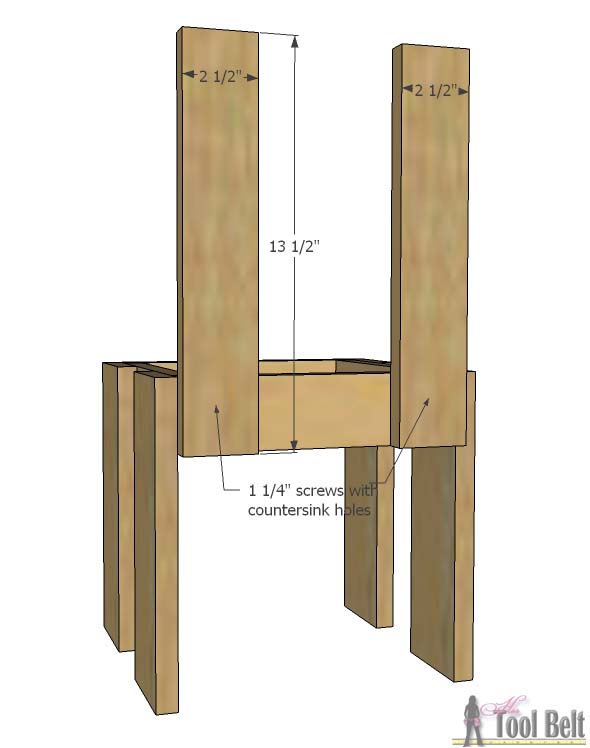
- 8 – 3/4″ x 2 1/2″ x 13 1/2″ back support (1×3)
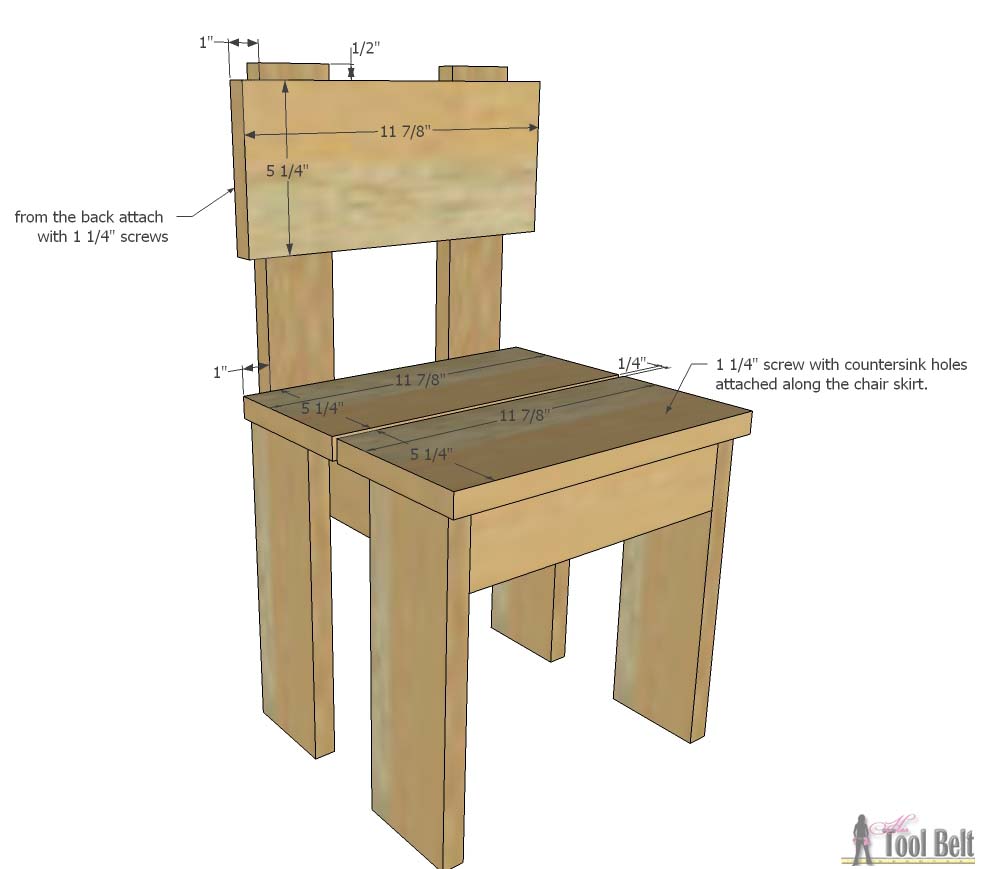
- 12 – 3/4″ x 5 1/4″ x 11 7/8″ seats/back (5 1/2″ width ok) (1×6)
Cut all of the pieces according to the cut list. Wherever you are placing a screw, use a countersink bit* to pre-drill the holes so the screw head will sit flush.
About 3/8″ in from each end of the 10″ pieces, drill 2 pilot holes to attach the 10″ pieces to the 8 3/4″ pieces. Use wood glue and 1 1/4″ screws to assemble the chair skirts.
Pre-drill 3 holes in the top 2 1/2″ of the chair legs. Use wood glue and 1 1/4″ screws to attach the legs to the chair skirt as shown.
Tip for getting the chair to not rock. Attach 3 legs to the skirt. Place the chair on a flat surface, legs down, hold the 4th leg onto the skirt so there is no rocking between the legs and screw into place.
Pre-drill 2-3 holes in the bottom and 2 holes in the top 5″ of the 13 1/2″ back support pieces. Attach the back supports to the chair skirt with wood glue and 1 1/4″ screws.
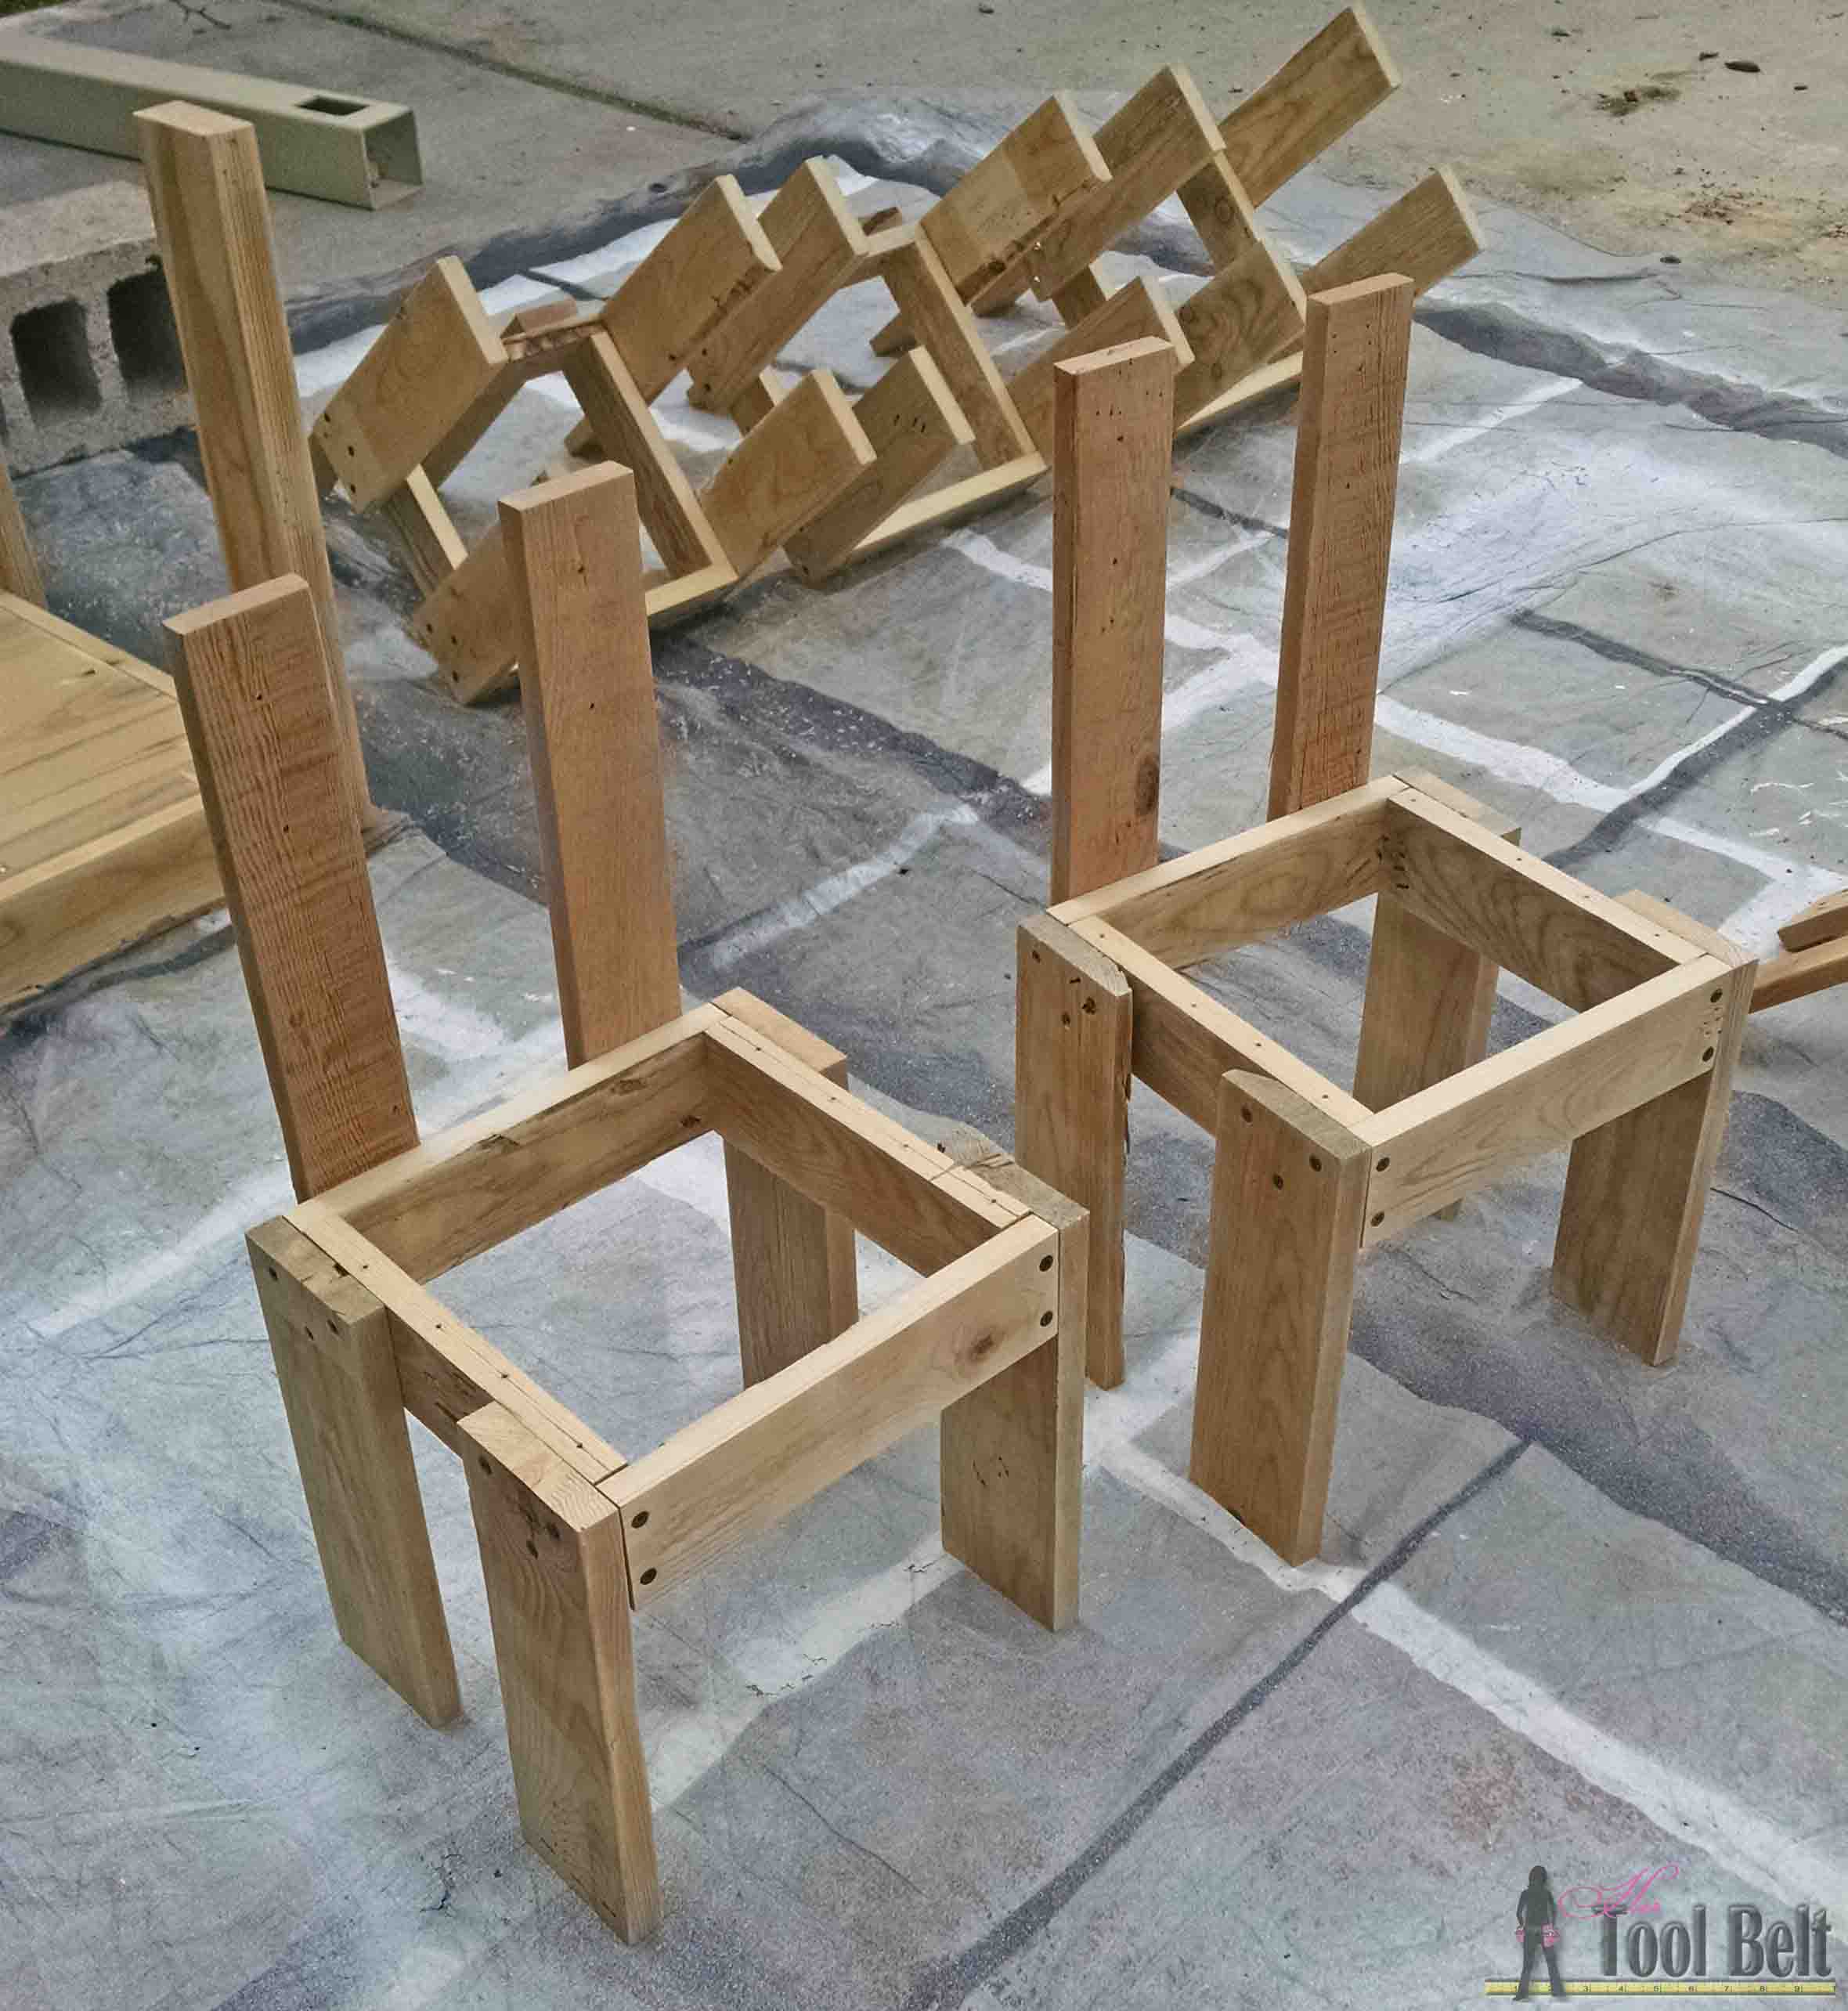
At this point I primed/painted the chairs and table frames white.
Once the paint dried, I attached the seats and backs (which I painted before installation).
Pre-drill holes in the seats to attach to the chair skirt. Center the seats on the chair frame and secure the seats with 1 1/4″ screws. Offset the back from the top of the back support about 1/2″ and secure with 1 1/4″ screws.
 The chairs turned out really cute.
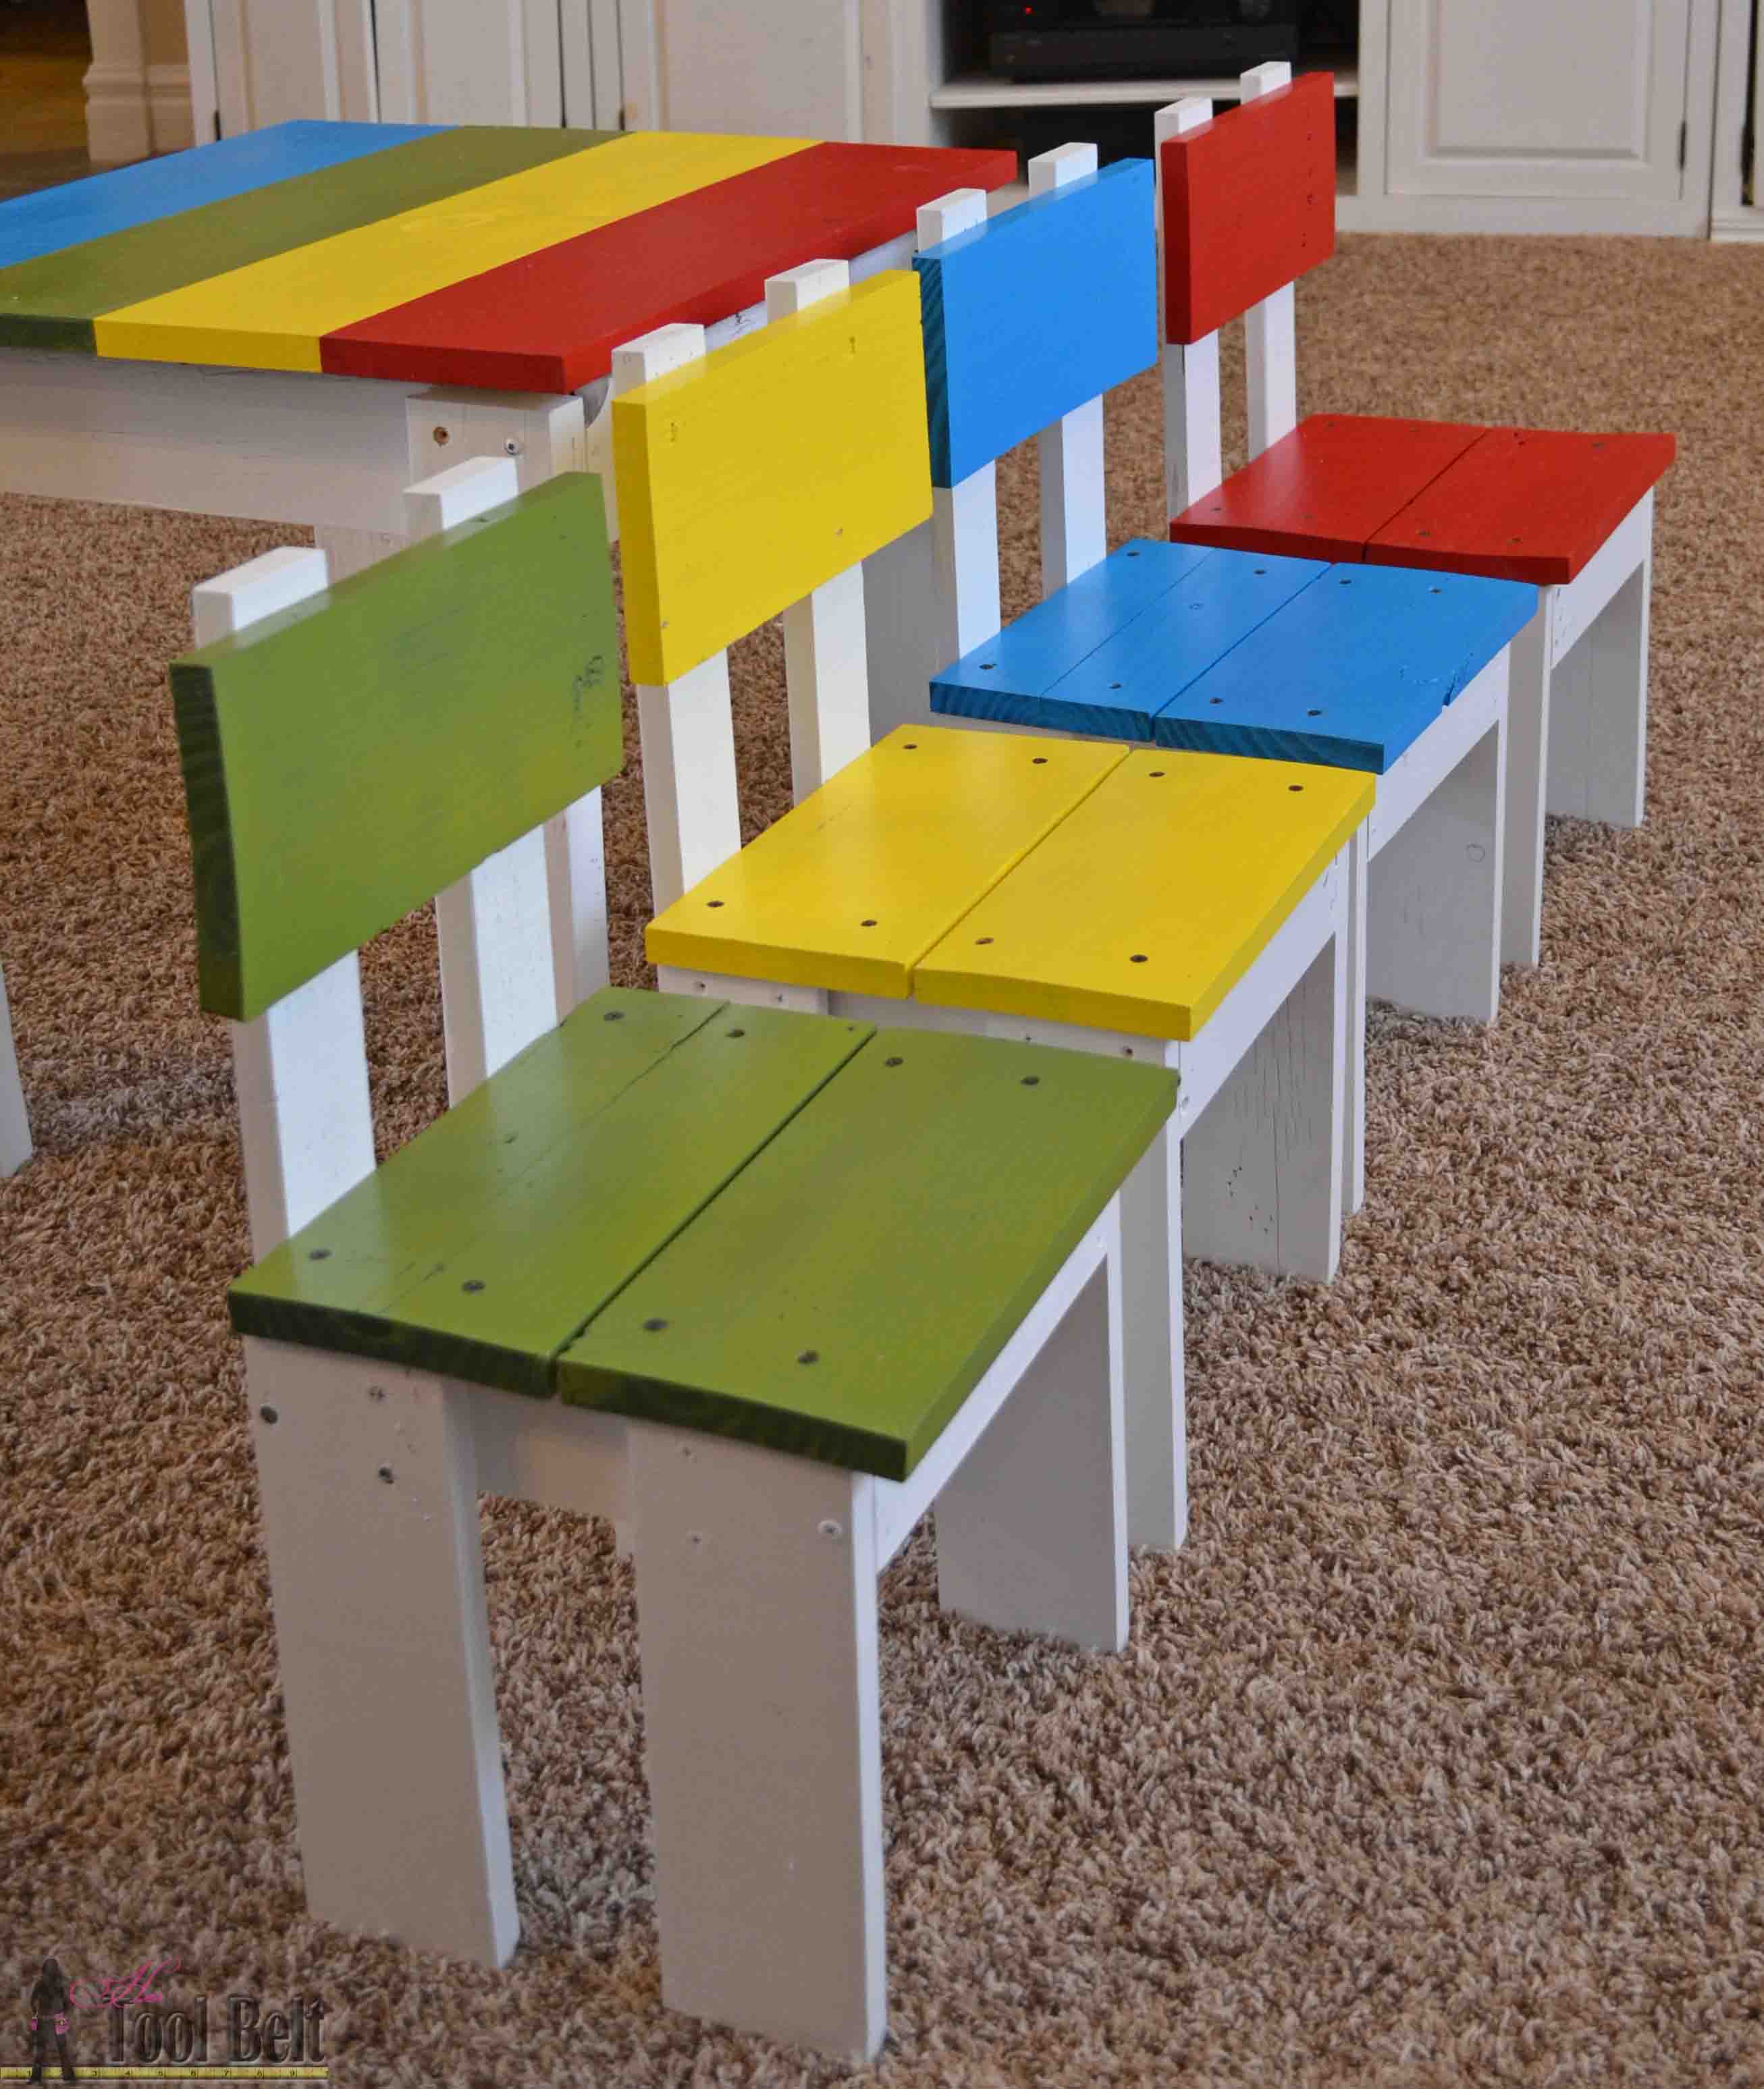
Table – regular
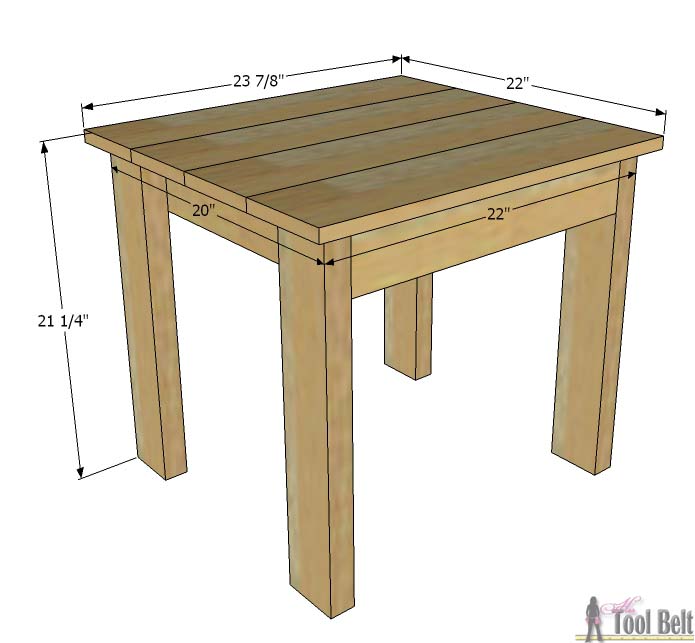
Cut List
- 2 – 3/4″ x 3 1/2″ x 19″ skirt (1×4)
- 2 – 3/4″ x 3 1/2″ x 18 1/2″ skirt (1×4)
- 4 – 1 1/2″ x 3 1/2″ x 20 1/2″ legs (2×4)
- 4 – 3/4″ x 5 1/2″ x 23 7/8″ top (1×6)
Cut all of the pieces according to the cut list. Wherever you are placing a screw, use a countersink bit to pre-drill the holes so the screw head will sit flush.
About 3/8″ in from each end of the 19″ pieces, drill 2 pilot holes to attach the 19″ pieces to the 18 1/2″ pieces. Use wood glue and 1 1/4″ screws to assemble the table skirt.
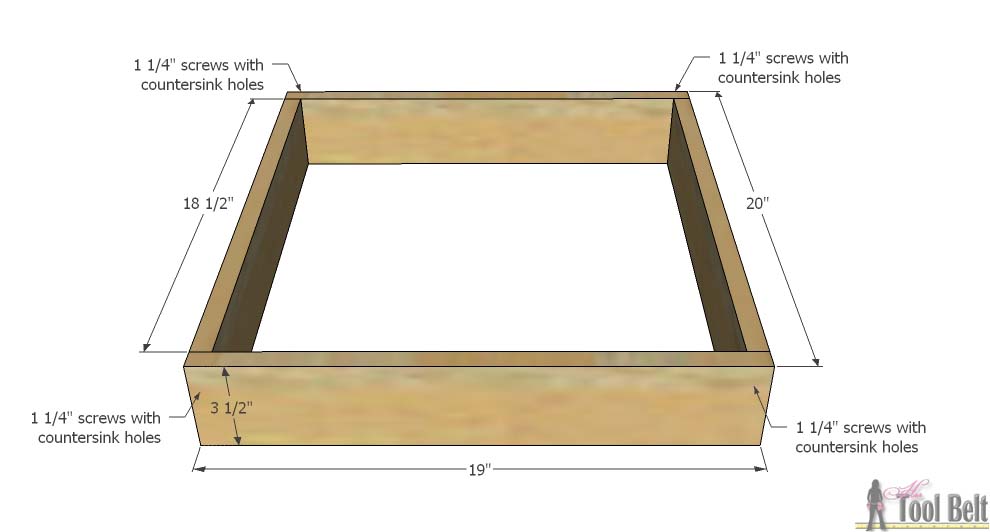
It is best to attach the legs to the skirt from the inside of the skirt. Use wood glue and 1 1/4″ screws to attach the legs to the skirt as shown.
Tip for getting the table to not rock. Attach 3 legs to the skirt. Place the table on a flat surface, legs down, hold the 4th leg onto the skirt so there is no rocking between the legs and screw into place.
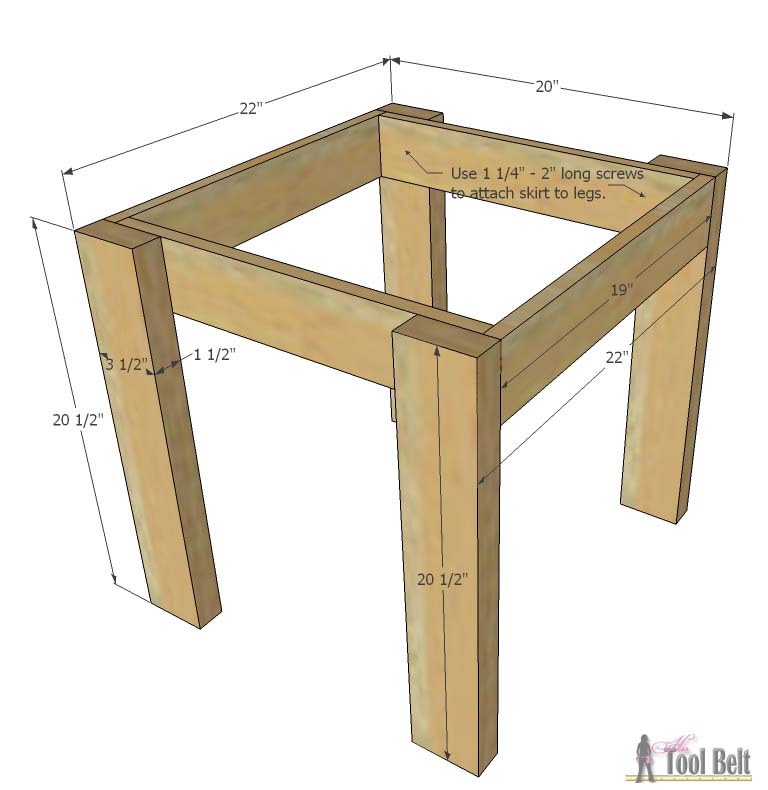
Center the table top on the table skirt. Use brad nails or 1 1/4″ screws to attach the table top to the skirt.
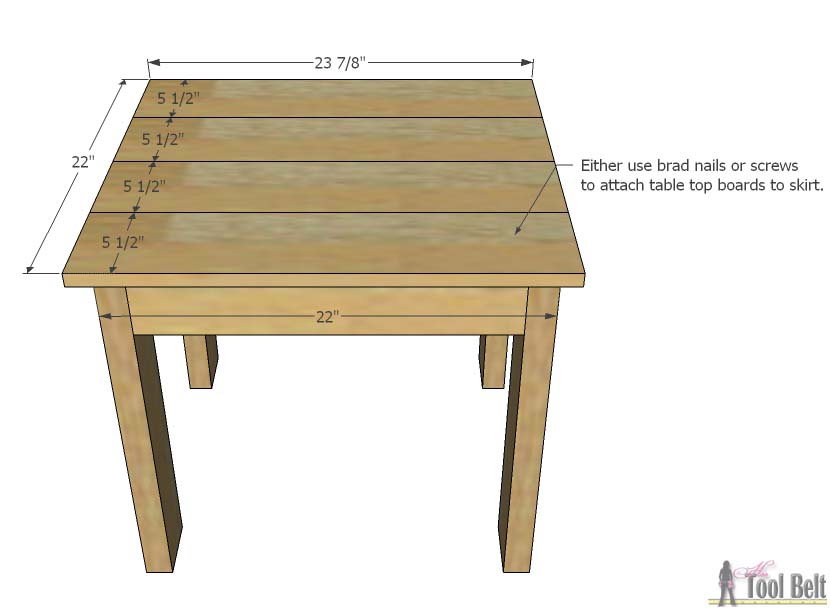
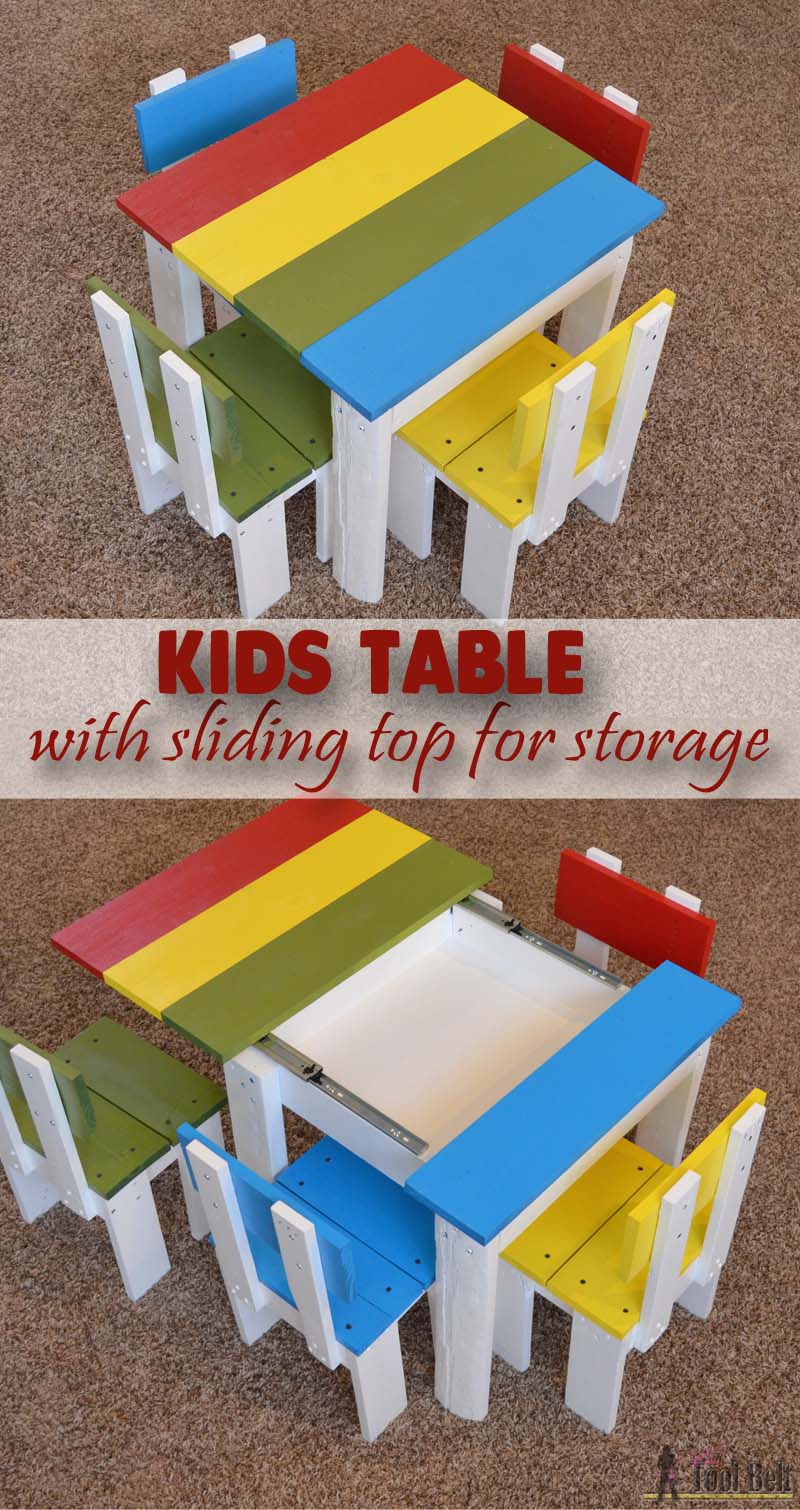
Table – Storage Option
My son is really into Legos right now. We’ve been using the Lego tray which has been good, but I wanted something a little more contained (hopefully). So I added a little storage to this table and a sliding top. Now he can put his Legos in the table and slide the top open to work on them and still have a build surface, when done just slide it shut…so far so good.

Just a note, I’m not using the ball bearing slides as intended. They work great unless the table is fully open and someone pushes hard on the table top end, it may come off. Just slide it back on and it’ll be fine.
Cut List
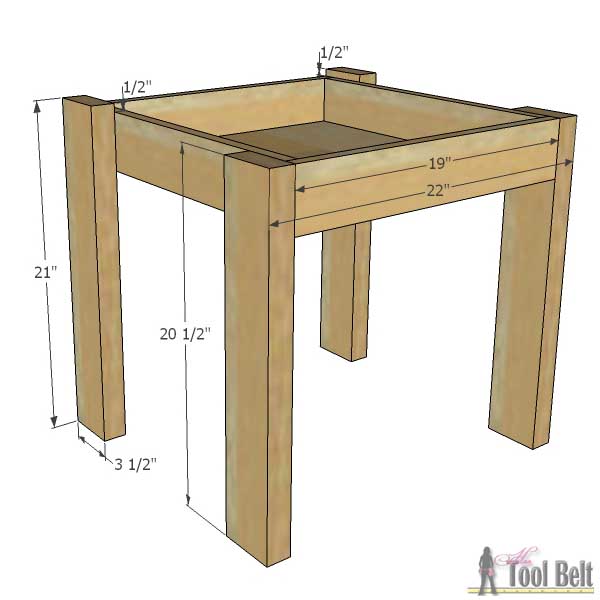
- 2 – 3/4″ x 3 1/2″ x 19″ skirt (1×4)
- 2 – 3/4″ x 3 1/2″ x 18 1/2″ skirt (1×4)
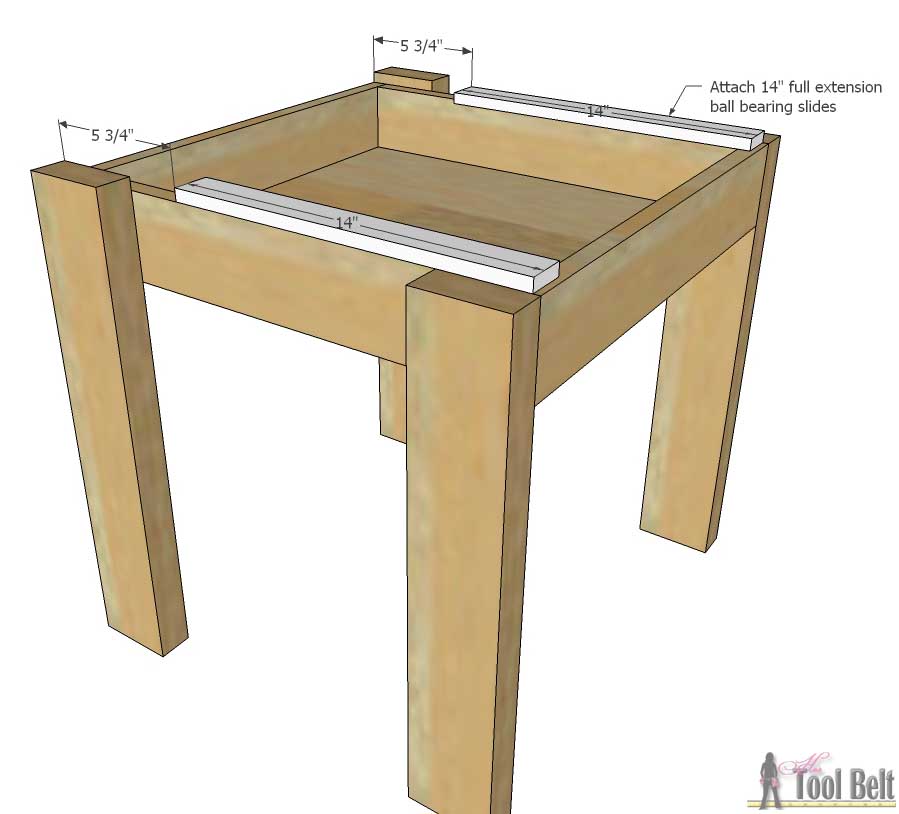
- 2 – 1 1/2″ x 3 1/2″ x 20 1/2″ legs (2×4)
- 2 – 1 1/2″ x 3 1/2″ x 21″ legs (2×4)
- 4 – 3/4″ x 5 1/2″ x 23 7/8″ top (1×6)
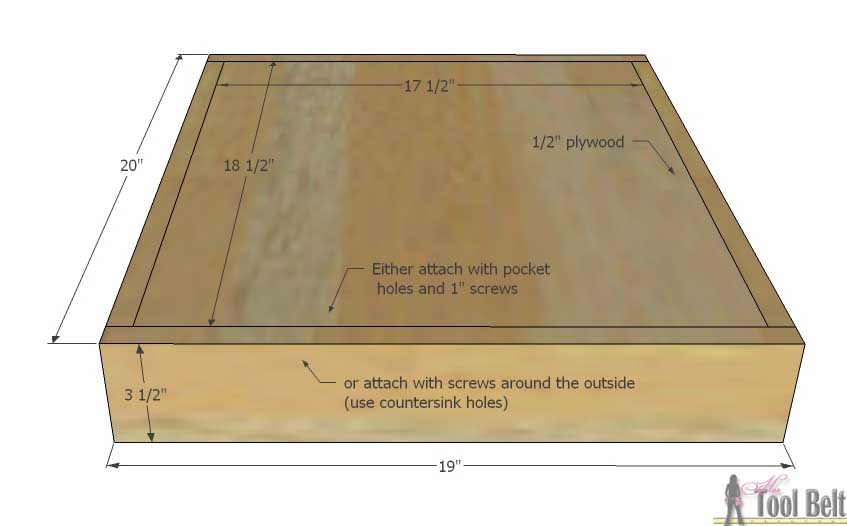
- 1 – 1/2″ x 18 1/2″ x 17 1/2″ bottom (1/2″ plywood)
Cut all of the pieces according to the cut list. Wherever you are placing a screw, use a countersink bit to pre-drill the holes so the screw head will sit flush.
About 3/8″ in from each end of the 19″ pieces, drill 2 pilot holes to attach the 19″ pieces to the 18 1/2″ pieces. Use wood glue and 1 1/4″ screws to assemble the table skirt.
Drill pocket holes for 1/2″ material around the edge of the plywood. Use wood glue and 1″ pocket hole screws to secure the table bottom into the skirt.
It is best to attach the legs to the skirt from the inside of the skirt. Use wood glue and 1 1/4″ screws to attach the legs to the skirt as shown. The 21″ legs will stick up 1/2″ (this makes up for the drawer slides).
Tip for getting the table to not rock. Attach 3 legs to the skirt. Place the table on a flat surface, legs down, hold the 4th leg onto the skirt so there is no rocking between the legs and screw into place.
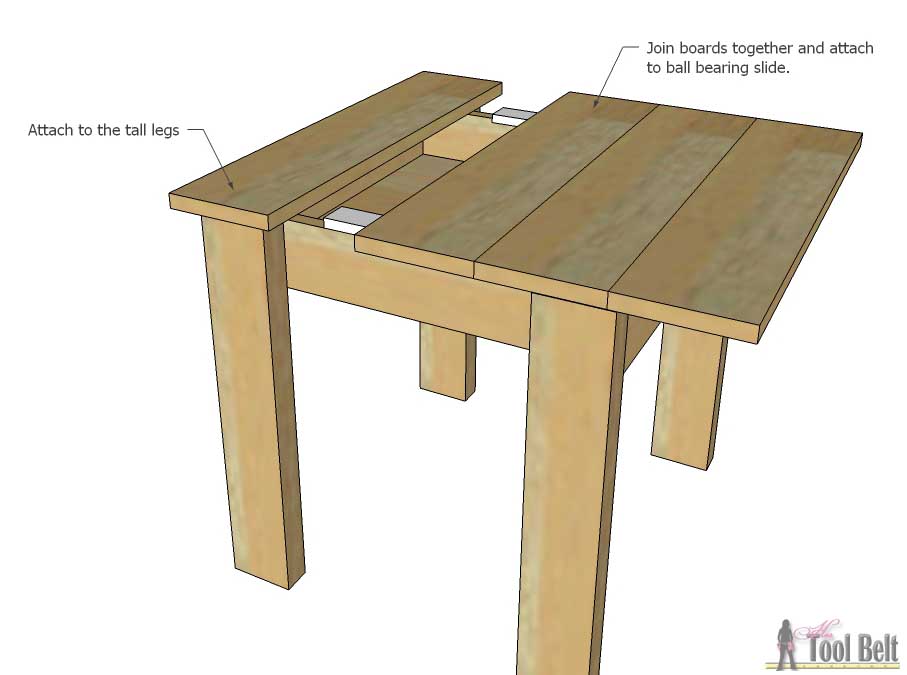
I joined 3 of the top pieces together with pocket holes, then attach the drawer slides to the top.
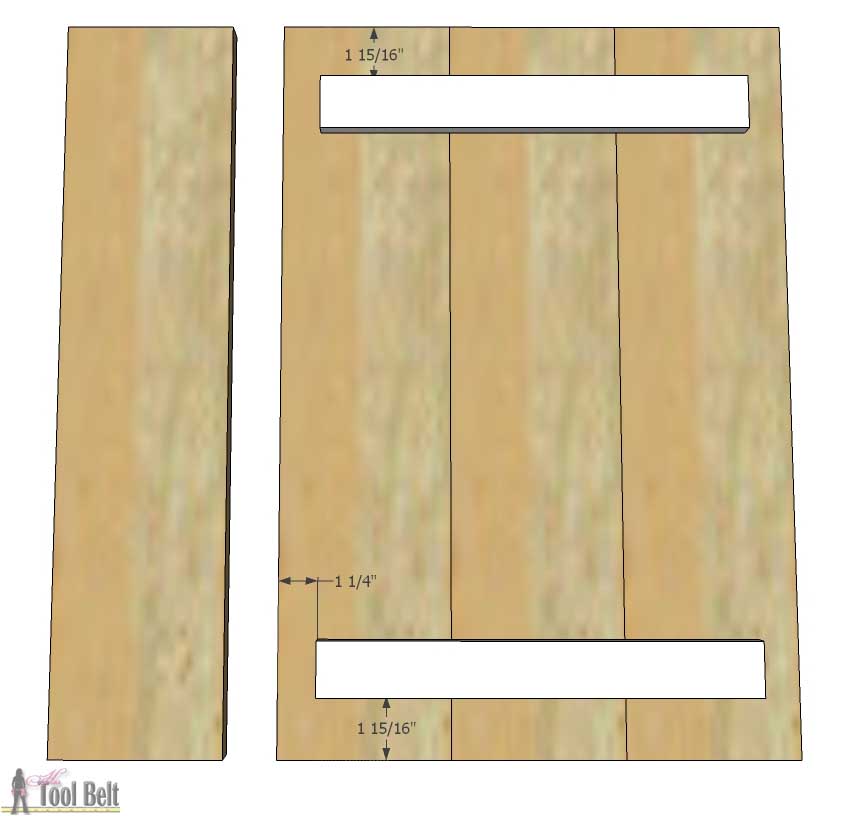
Place the drawer slides onto the skirt and mark the locations for holes. Install the drawer slides with top onto the skirt.
Line up the 4th top piece and secure it into place with wood glue and brad nails or screws.
Give everything a good sanding and paint or stain. I think eventually I’ll distress mine, I know my kids will help with that!
Download free plans
Kids Table and Chair Set Plans- Hertoolbelt
Thanks for pinning!
If you have a project made from your scrap pile, feel free to link it up. The link up will be open for a week.
 Loading InLinkz ...
This table and chairs set is absolutely precious! And I love that it has an option for storage in the middle! What kids area couldn’t use more storage?! #loulougirls — Amy @ http://thegiftedgabber.com
Love those bright colors! I can totally see my kids sitting there with their sketch pads and markers. Great job!
I love this kids table and chairs set!! It is super cute, and I love how you painted them! My favorite part is the secret storage table, you never cease to amaze me Amy!!
This is pretty brilliant!
Amy
I love your kids table and chairs. 🙂 The colors and the style are so perfect and the hidden storage? genius!
gail
thanks so much I needed something easy that I can do pretty quick ..
love this so much I have a family childcare and this is perfect… thanks again
What a darling table & chairs! Your instructions & illustrations are EXCELLENT. The only suggestion I’d make is to cut the chairs’ rear legs on a slight angle (at both ends) to prevent the chair from easily tipping backwards when your child sits in it.
NICE job!
Thanks Mimi, great idea!
Those chairs and table turned out so fun!!! Love the legos inside too!
I’m new to DIY and I’m interested in making this table. Question.. I see the list of materials and several different sized boards. Then I see a cut lust for chairs….. Which size boards do I do which cuts on??
Sorry that’s a bit confusing. On the Materials section I list the boards by what they are called at the store, however boards don’t actually measure according to their store measurement names. They are called by the rough cut dimensions, but then are planed down to size.
So
2×4 is 1 1/2″ x 3 1/2″
1×6 is 3/4″ x 5 1/2″
1×4 is 3/4″ x 3 1/2″
1×3 is 3/4″ x 2 1/2″
In the cut list I call out what the final measurement should be.
I really do love this table and chair set!! My grandchildren will enjoy it!
You must have purchased very little wood, because I just priced out the cheap stuff ( which is pretty much scrap anyway…hahahahaha!!) at a big box store and it’s gonna run me around $60.00. Pallet wood isn’t that easy to come by where I am at.
Wow that’s crazy how much wood prices differ. For my local Home Depot the wood and screws are $33.93, that doesn’t include the optional storage.
1 – 2×4 $2.81
1 – 1x6x8′ $5.53
2 – 1x6x6′ $3.97
3 – 1x4x8′ $1.98
3 – 1x3x8′ $1.58
1 lb 1 1/4″ grabber screws $6.97
If you add in the plywood and drawer slides option it does bring the total up to $60, both those items are pricey. I was lucky having all of this ‘junk’ wood, the only thing I had to buy was the drawer slides. My kids sure love it though.
Amy, I made this table the first time, stained it a dark brown and it’s on my front porch. I made a second one that I donated to a friend to finish so she could sell it at a craft booth. I’m making it a third time, this one with the storage option, but I have a question about attaching the bottom to the skirt with pocket holes/screws: I can imaging putting the whole thing (skirt and bottom) on a bench and pocketing through the “top” of the bottom and then finishing with with the dowels and sanding. Is this the “right” way or is there another approach?
I’m new at this. I don’t what piece of lumber to cut per cut list. The cut list for the chairs doesn’t say which piece of lumber to cut as all the other cut list don’t have.
Thank You
It’s making sense now. Thank you for your help
How much would you sell these for? I had a person already wanting to buy and I haven’t even finished the chairs.
🙂 That’s a good problem to have. I think I’ve seen them for around $100…maybe more.