Hi! I’d love to for you to follow me on Pinterest Her Tool Belt and if you love instagram, you can keep up with me there too!
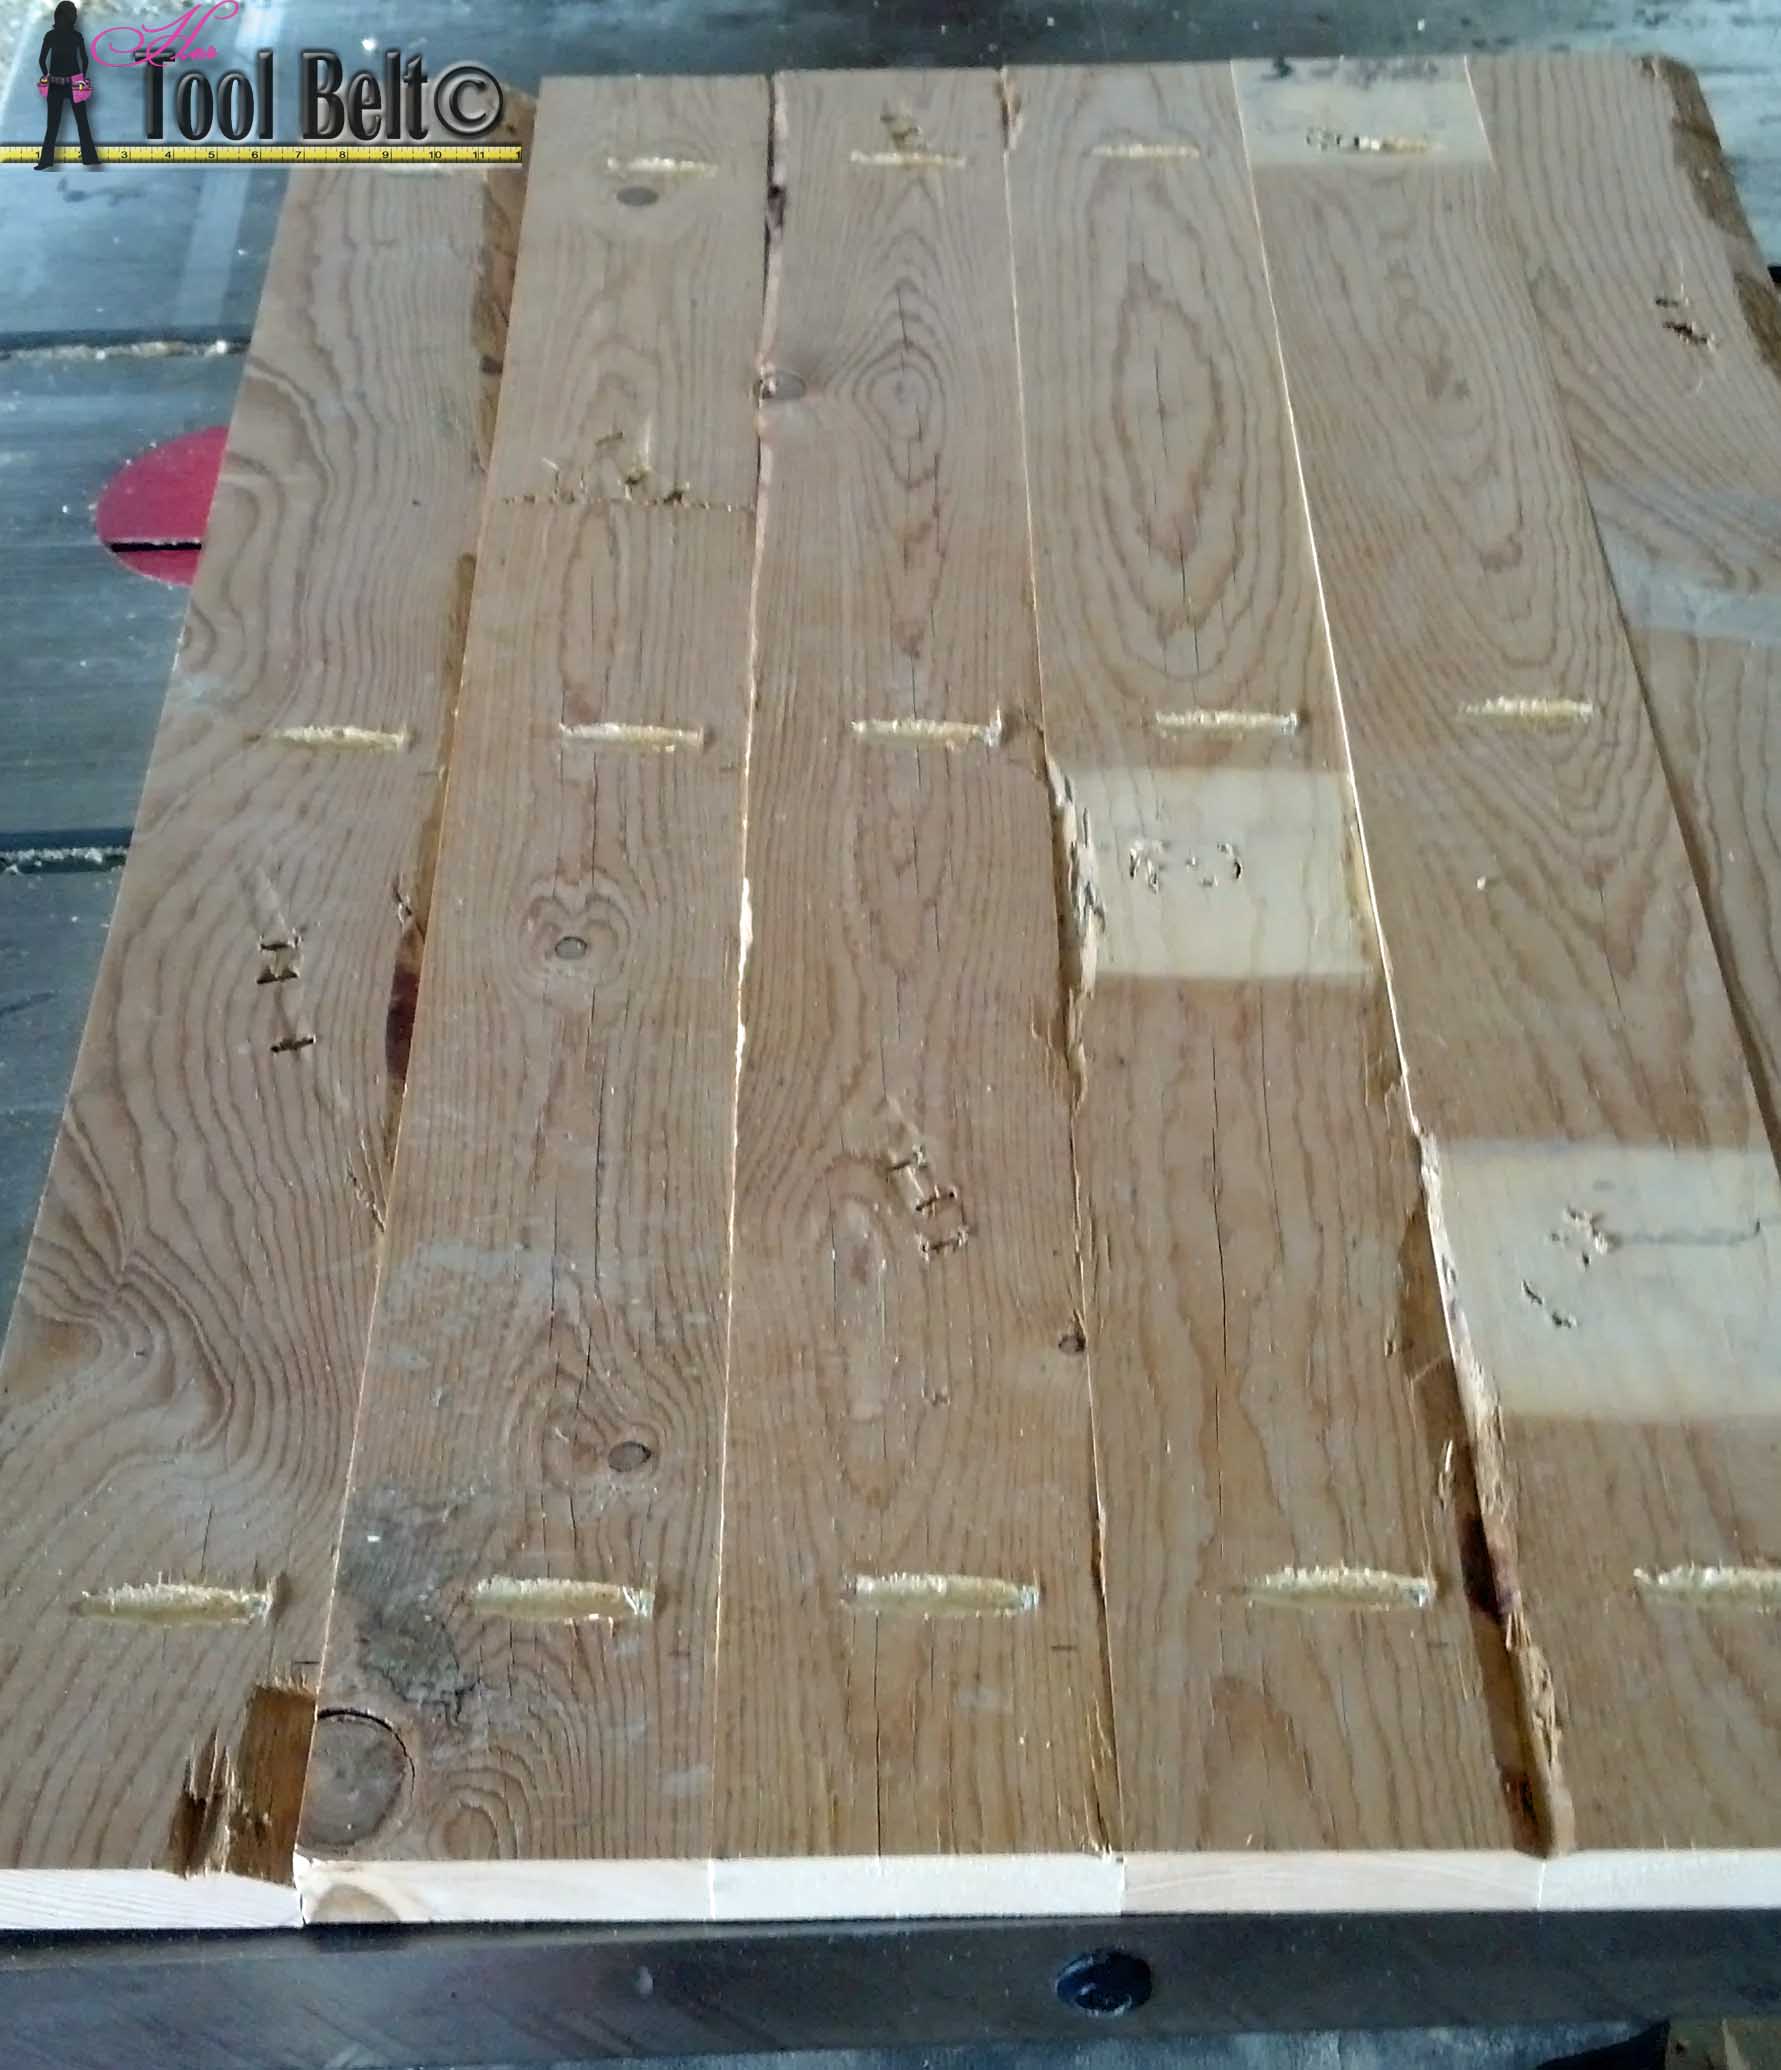
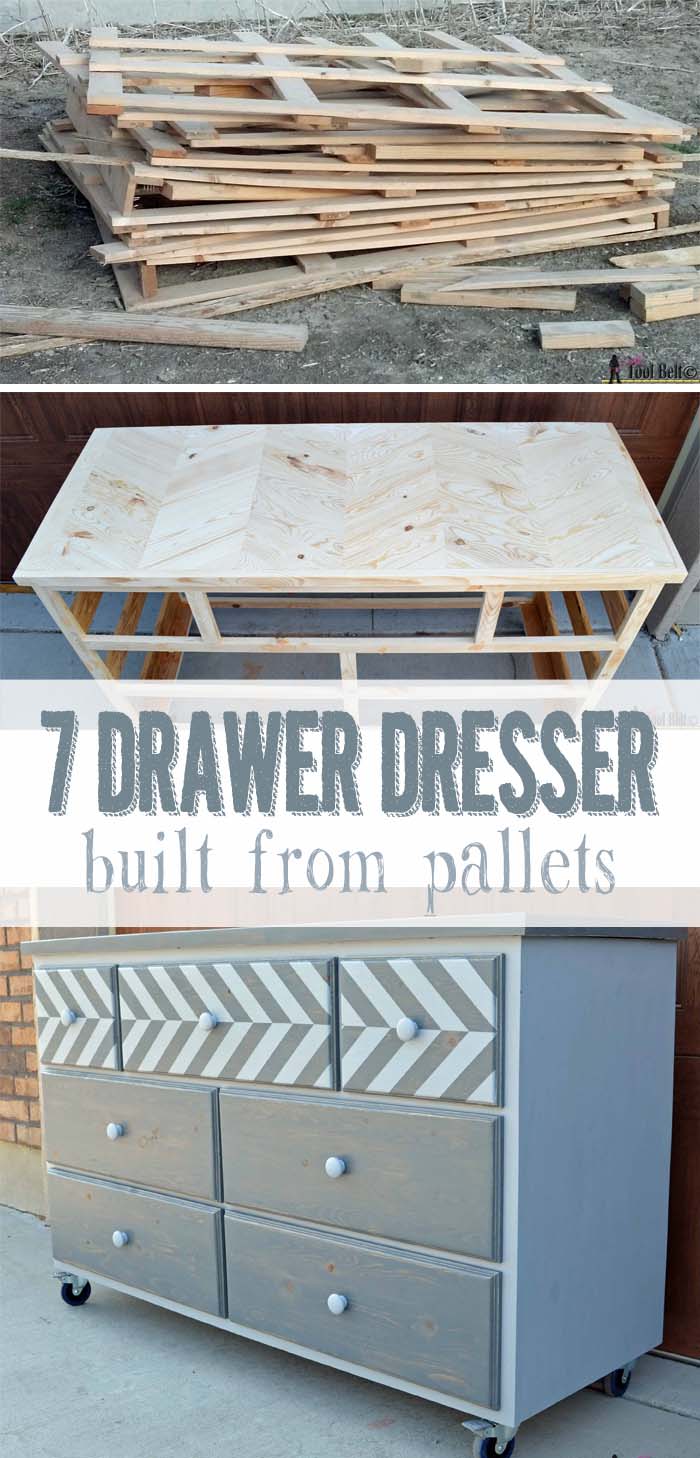
My Brother and Sister-in-law are having their first baby! My Sister-in-law asked me if I could build a dresser/changing table for the new little guy, reluctantly I said yes. Her colors for the nursery are gray, navy, and orange. So my game plan was a 7 drawer dresser, chevron top, gray stain and wheels. This past winter, the family farm built 2 new turkey sheds and had a number of left over pallets. The pallet wood is in fairly good condition and is similar to 1×4 pine furring strips.
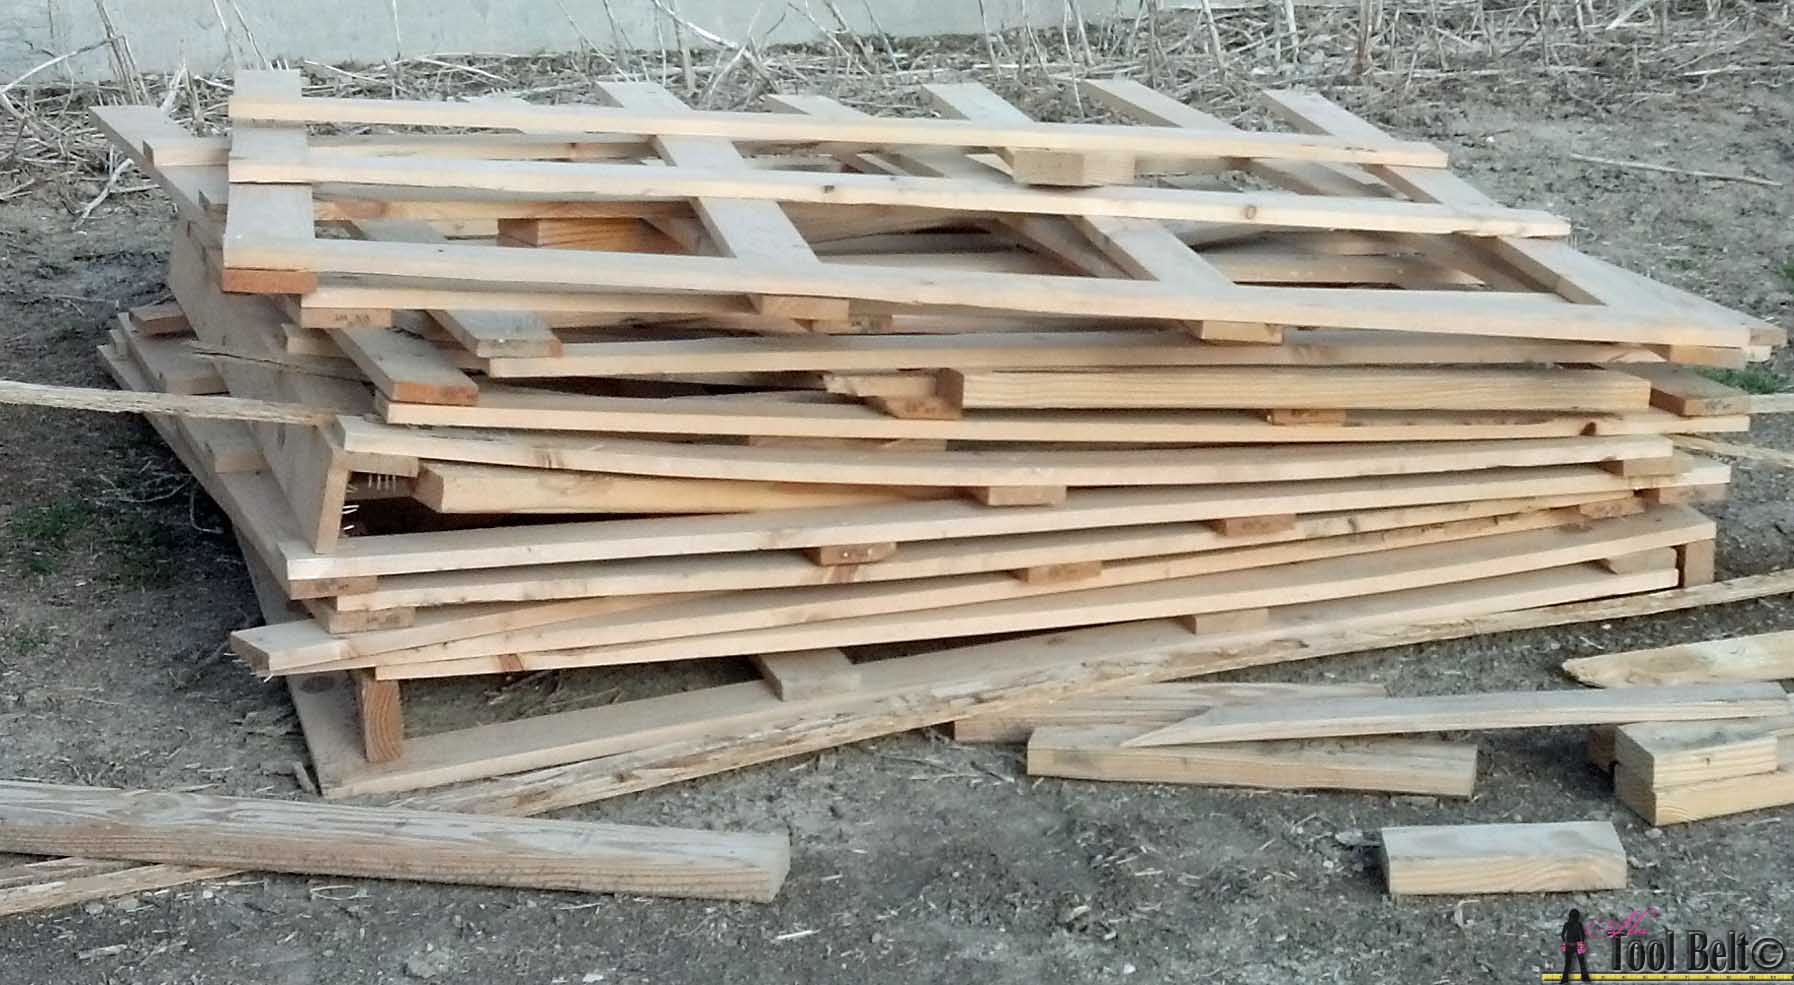 I decided to build as much of the dresser from these pallets, to reduce cost. I knew it would mean a little more work, but I thought I’d give it a try. I also wanted to try and make ALL of my joints with my R3 Kreg pocket hole jig*. I have never done that before, usually I’ll use biscuit and dado joint assisted by my R3 Kreg Jig.
I disassembled the pallets and removed all of the staples. Then I trimmed the edges with the table saw, to have straight edges to work from.
(Note: I used this scrap wood to build the dresser, but you can use plywood to make the building process easier.)
7 drawer dresser cut list:
| Quantity | Thickness | Width | Length | Material | Description |
|---|---|---|---|---|---|
| 4 | 3/4" | 1 1/2" | 51" | Pine | Face Frame |
| 2 | 3/4" | 1 1/2" | 30" | Pine | Face Frame |
| 4 | 3/4" | 1 1/2" | 8" | Pine | Face Frame |
| 2 | 3/4" | 1 1/2" | 30" | Pine | Back Frame |
| 1 | 3/4" | 1 1/2" | 49 1/2" | Pine | Back Frame |
| 3 | 3/4" | 3 1/2" | 49 1/2" | Pine | Back Frame |
| 2 | 3/4" | 1 1/2" | 17 3/4" | Pine | Side Support |
| 8 | 3/4" | 3 1/2" | 17 3/4" | Pine | Side Support |
| 4 | 1 1/2" | 3 1/2" | 17 3/4" | 2x4 | Rail Support |
| 2 | 3/4" | 18 3/4" | 30" | Pine or Plywood | Sides |
| 1 | 1/4" | 52 1/2" | 30" | Plywood (optional) | Back |
| 14 | 1/2" | 6 1/2" | 17 3/4" | Plywood | Drawer Sides |
| 4 | 1/2" | 6 1/2" | 10" | Plywood | Drawer Ends |
| 2 | 1/2" | 6 1/2" | 22" | Plywood | Drawer Ends |
| 8 | 1/2" | 6 1/2" | 22 3/4" | Plywood | Drawer Ends |
| 2 | 5 mm (3/16") | 10 1/2" | 17 1/4" | 5 mm Sheathing | Drawer Bottom |
| 1 | 5 mm (3/16") | 22 1/2" | 17 1/4" | 5 mm Sheathing | Drawer Bottom |
| 4 | 5 mm (3/16") | 23 1/4" | 17 1/4" | 5 mm Sheathing | Drawer Bottom |
| 2 | 3/4" | 9" | 13" | Pine | Drawer Front |
| 1 | 3/4" | 9" | 25" | Pine | Drawer Front |
| 4 | 3/4" | 9" | 25 3/4" | Pine | Drawer Front |
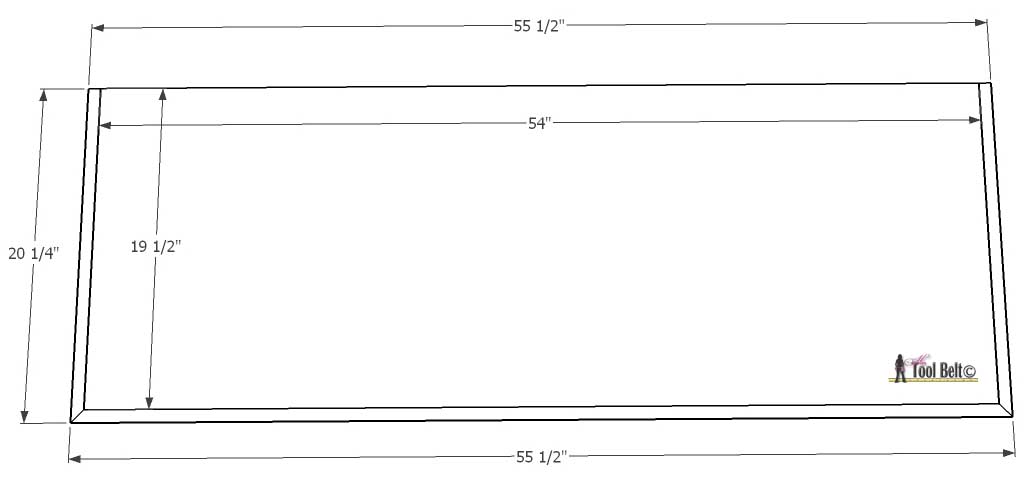
| 1 | 3/4" | 19 1/2" | 54" | Plywood | Plain top (option) |
| 2 | 3/4" | 3/4" | 20 1/4" | Pine | Plain top sides (option) |
| 1 | 3/4" | 3/4" | 55 1/2" | Pine | Plain top Front (option) |
| 1 | 1/2" | 19 1/2" | 54" | Plywood | Chevron top (option) |
| 2 | 3/4" | 1 1/4" | 20 1/4" | Pine | Chevron top sides (option) |
| 1 | 3/4" | 1 1/4" | 55 1/2" | Pine | Chevron top front (option) |
| See Below | 3/4" | 3 1/4" | see below | Pine | Chevron top (option) |
This dresser plan uses 7 pairs of 18″ full extension drawer slides. I found an online store that sells them for 1/2 the price of the big home improvement stores, Woodworker’s Hardware, the price is for a pair. I bought enough for upcoming projects to get the better pricing. Previously I bought slides at Home Depot and they seemed to be the exact same product.
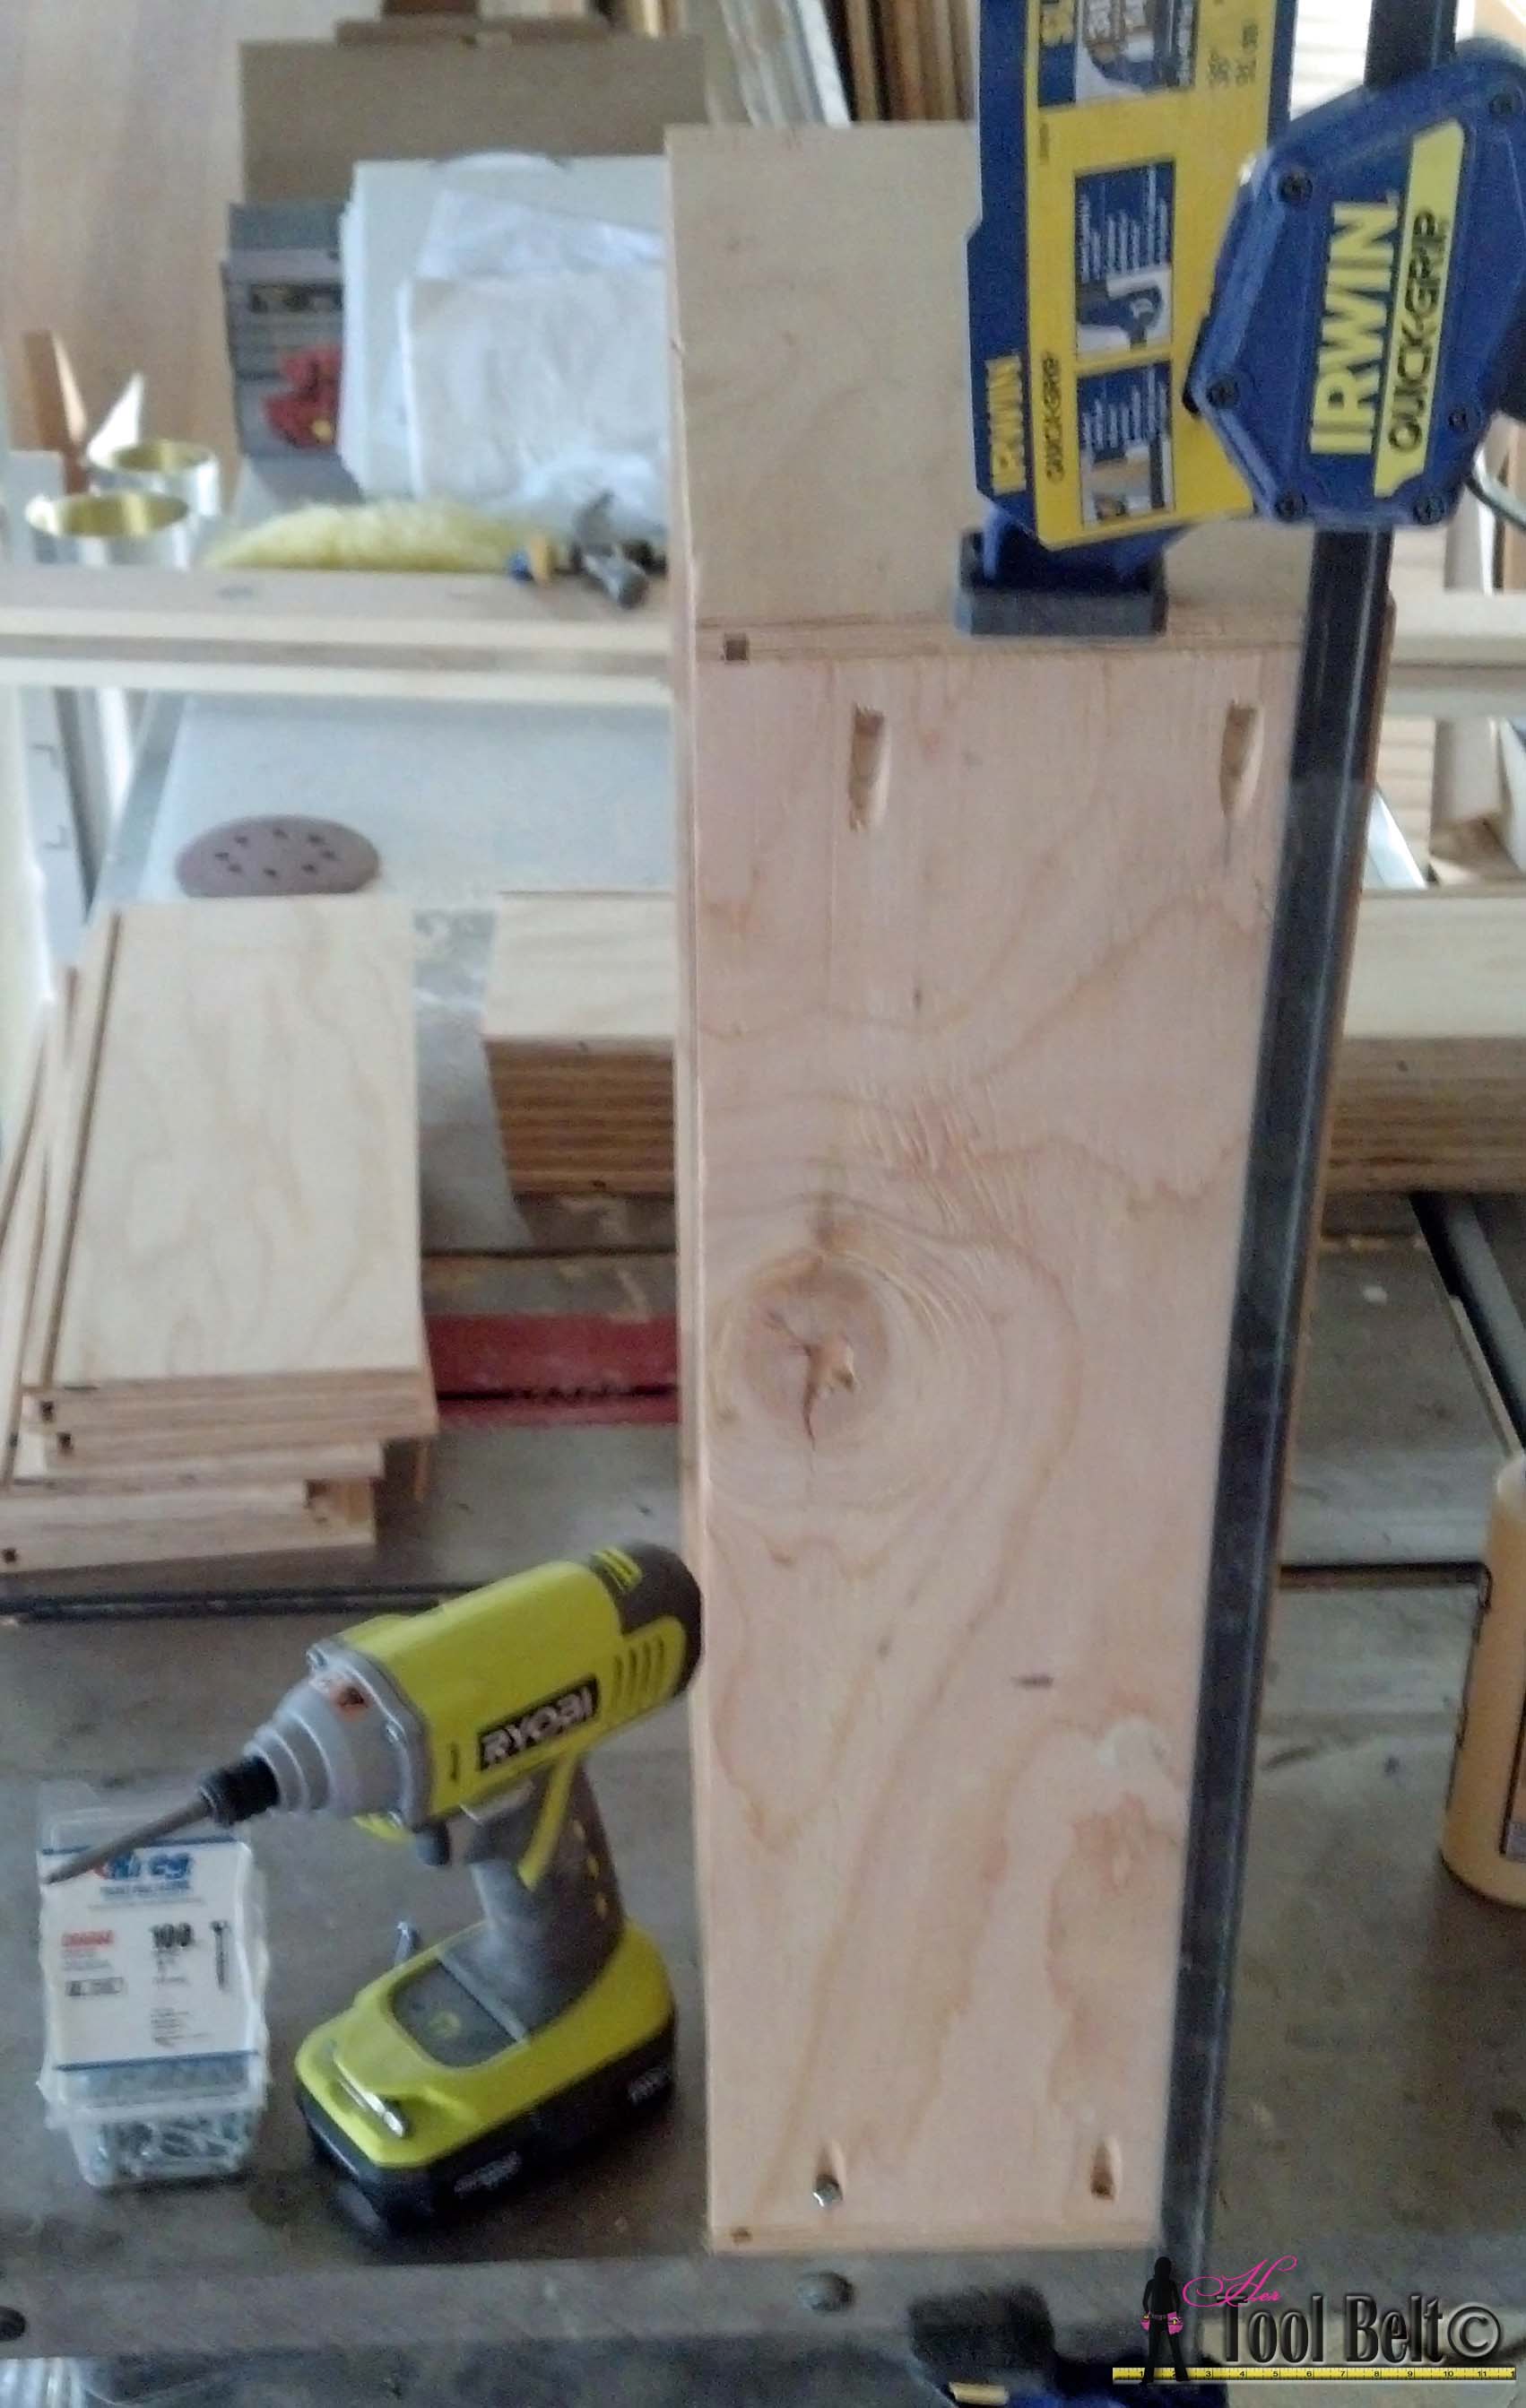
Build the Face Frame
Cut the pieces for the face frame. View of the backside of the face frame.
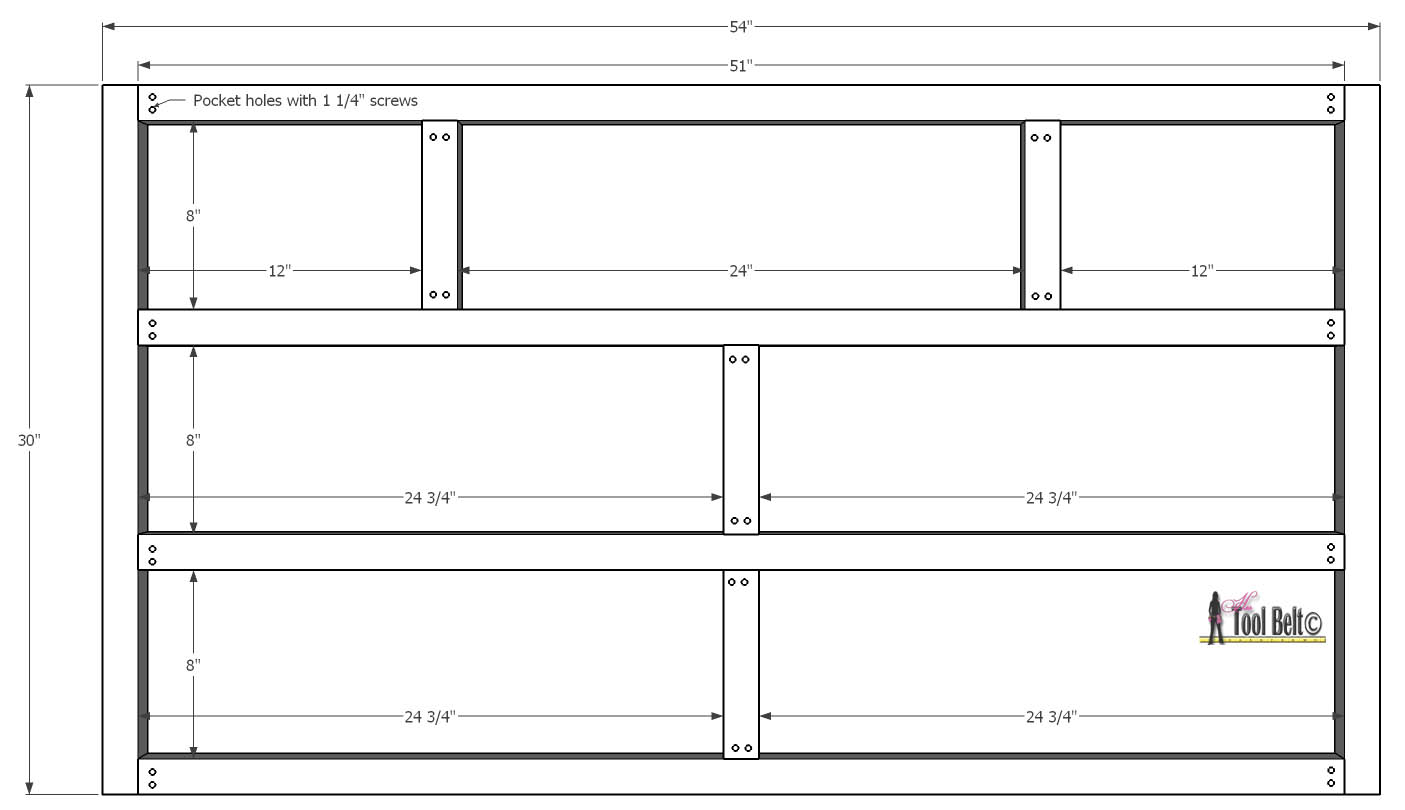
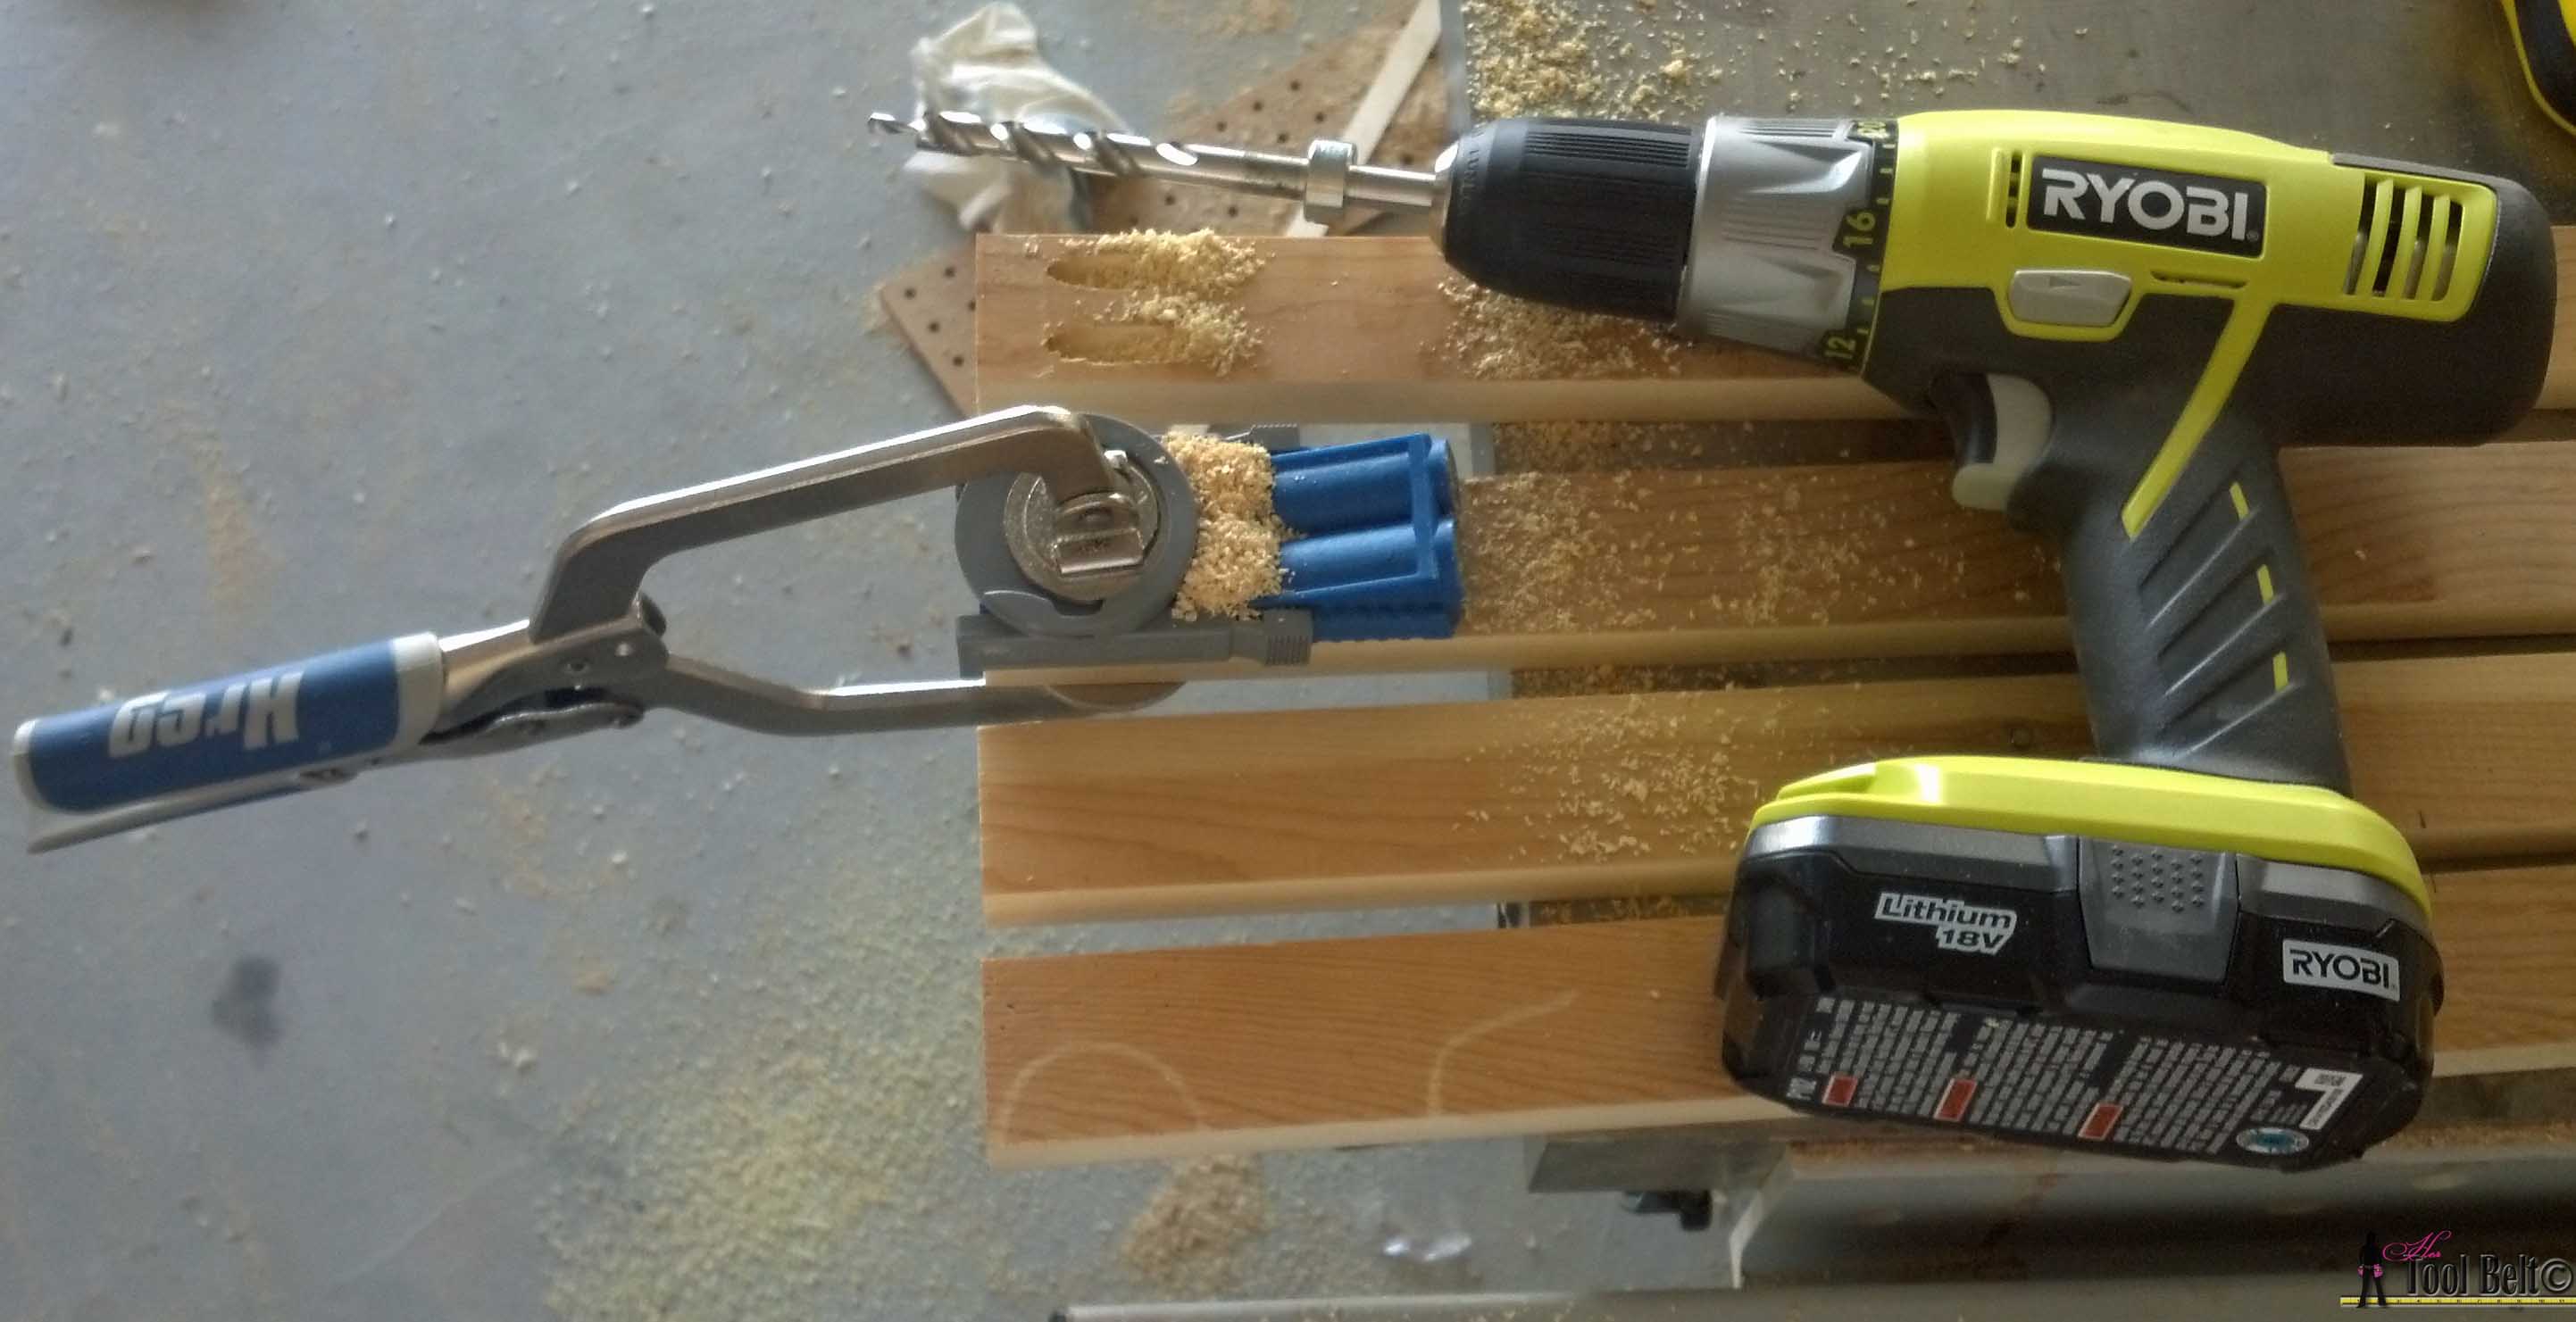
Drill pocket holes as indicated, set for 3/4″ wood. I have used a little R3 Kreg Jig for a lot of years, but during this project I was wishing that I had one of those new Foreman Pocket-Hole Machine!*
(Note: if you are using a K4 or K5, you may want to drill pocket holes in the top piece now to attach the top later.)
Once all of the pocket holes are drilled, mark the placement of each piece according to the diagram. Glue, clamp and screw each joint together with 1 1/4″ screws.
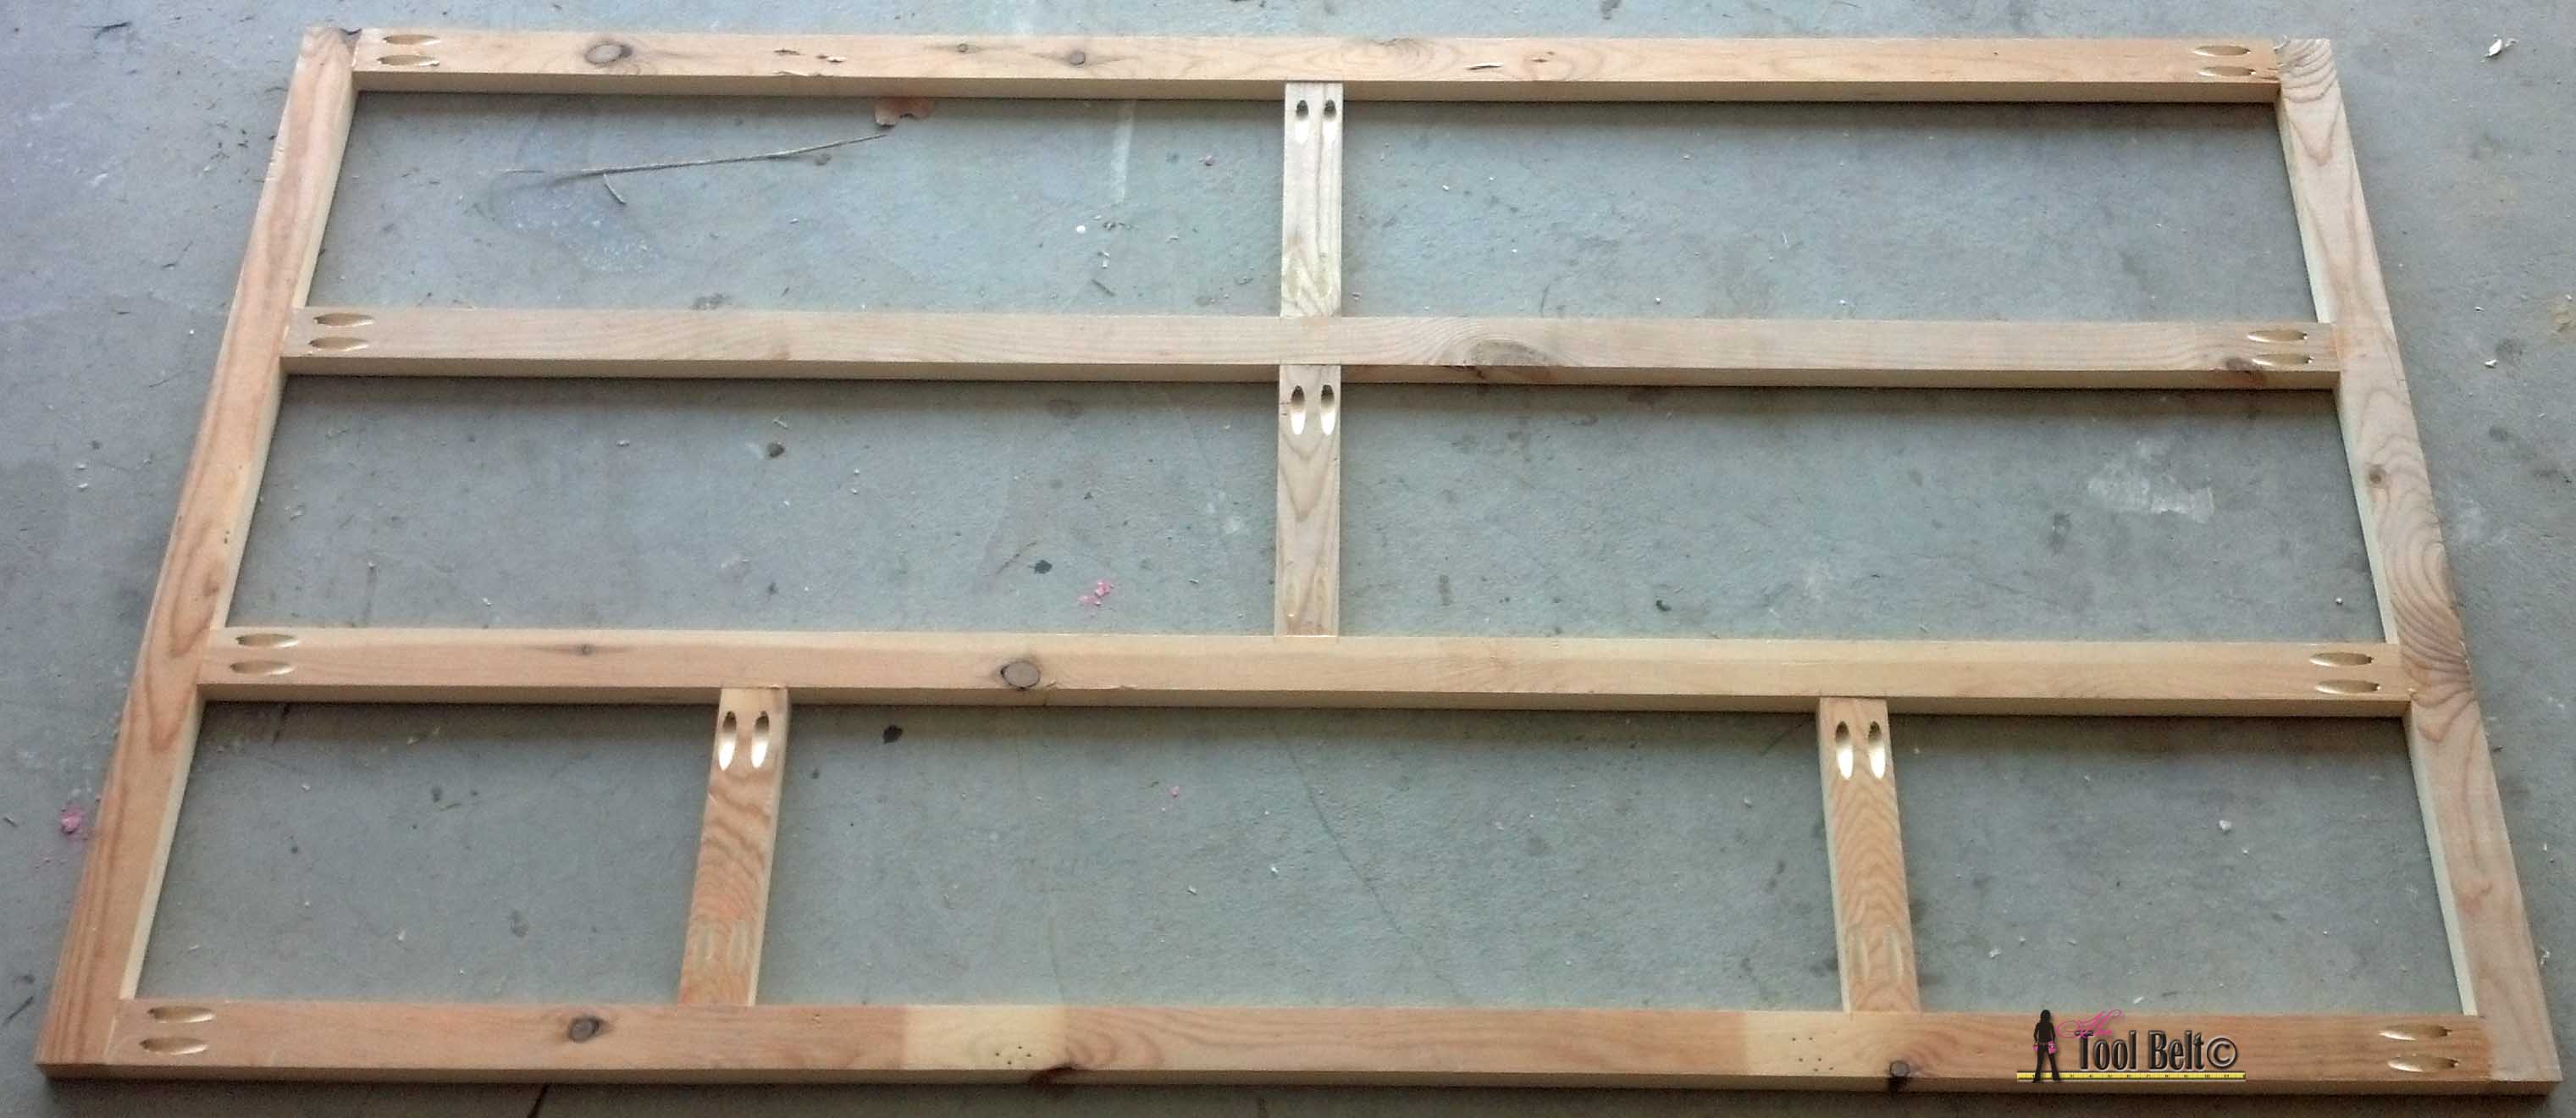
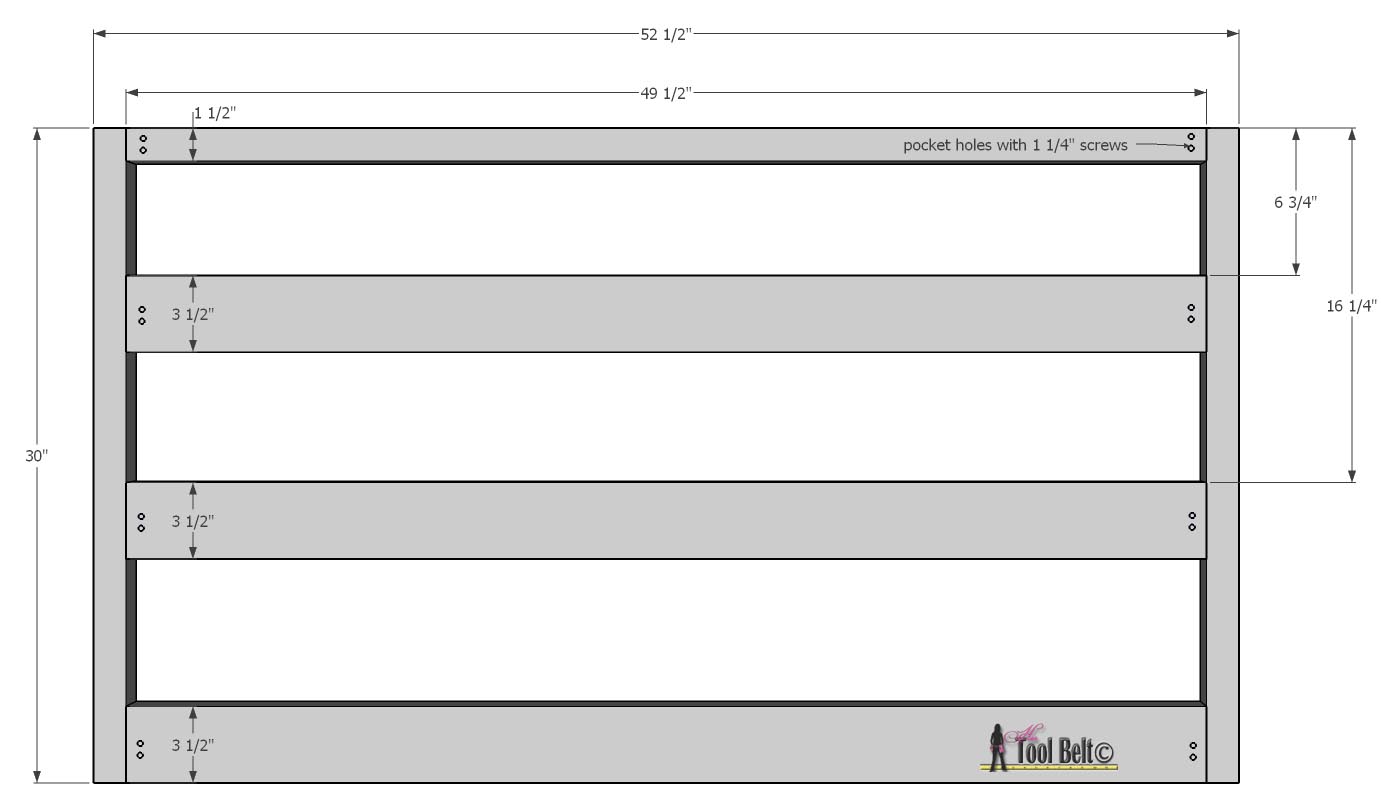
Build the Back Frame
Cut the pieces for the back frame. Drill pocket holes in the places indicated. (Note: if you are using a K4 or K5, you may want to drill pocket holes in the top piece now to attach the top later.)
Once all of the pocket holes are drilled, mark the placement of each piece according to the diagram. Glue, clamp and screw each joint together with 1 1/4″ screws.
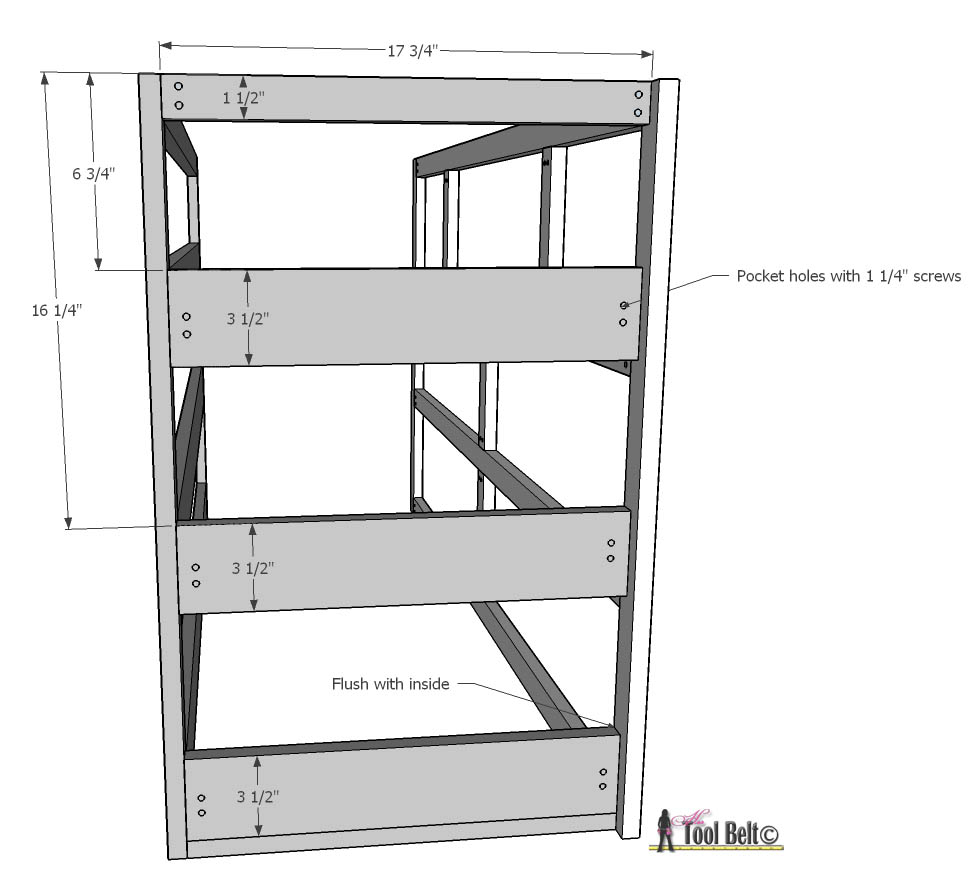
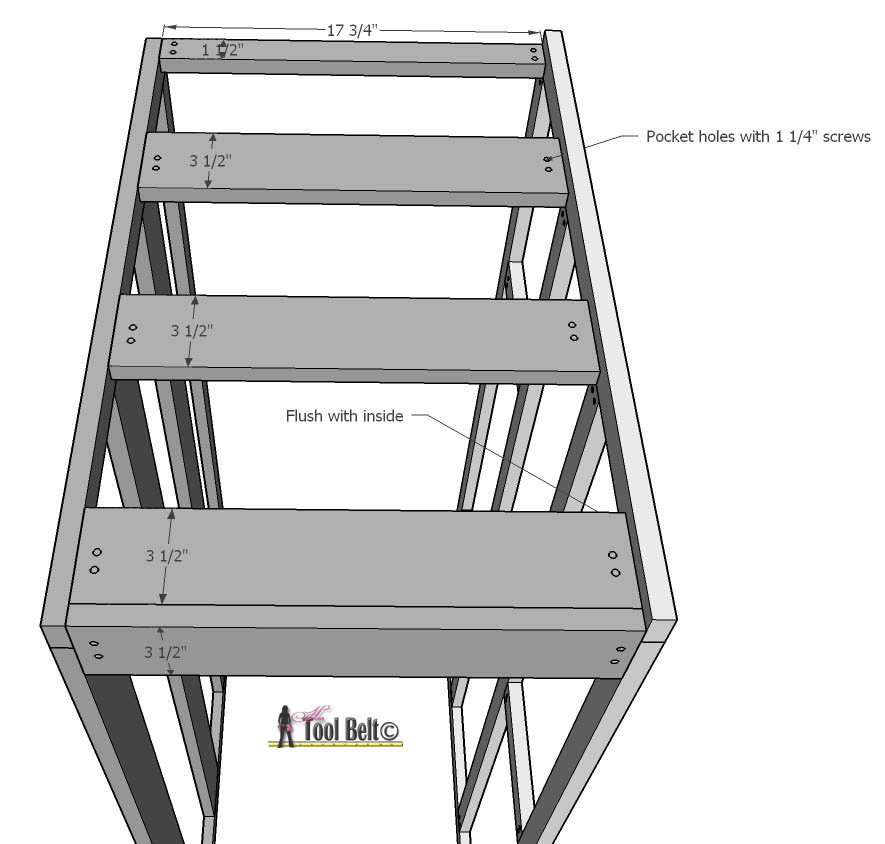
Assemble with Side Supports
Cut the pieces for the side supports. Drill pocket holes on each end of the support boards. Once all of the pocket holes are drilled, mark the placement of each piece according to the diagram. Glue, clamp and screw each joint together with 1 1/4″ screws. The side supports are flush with the outside edge of the back frame and the inside edge of the face frame. Repeat for the other side.
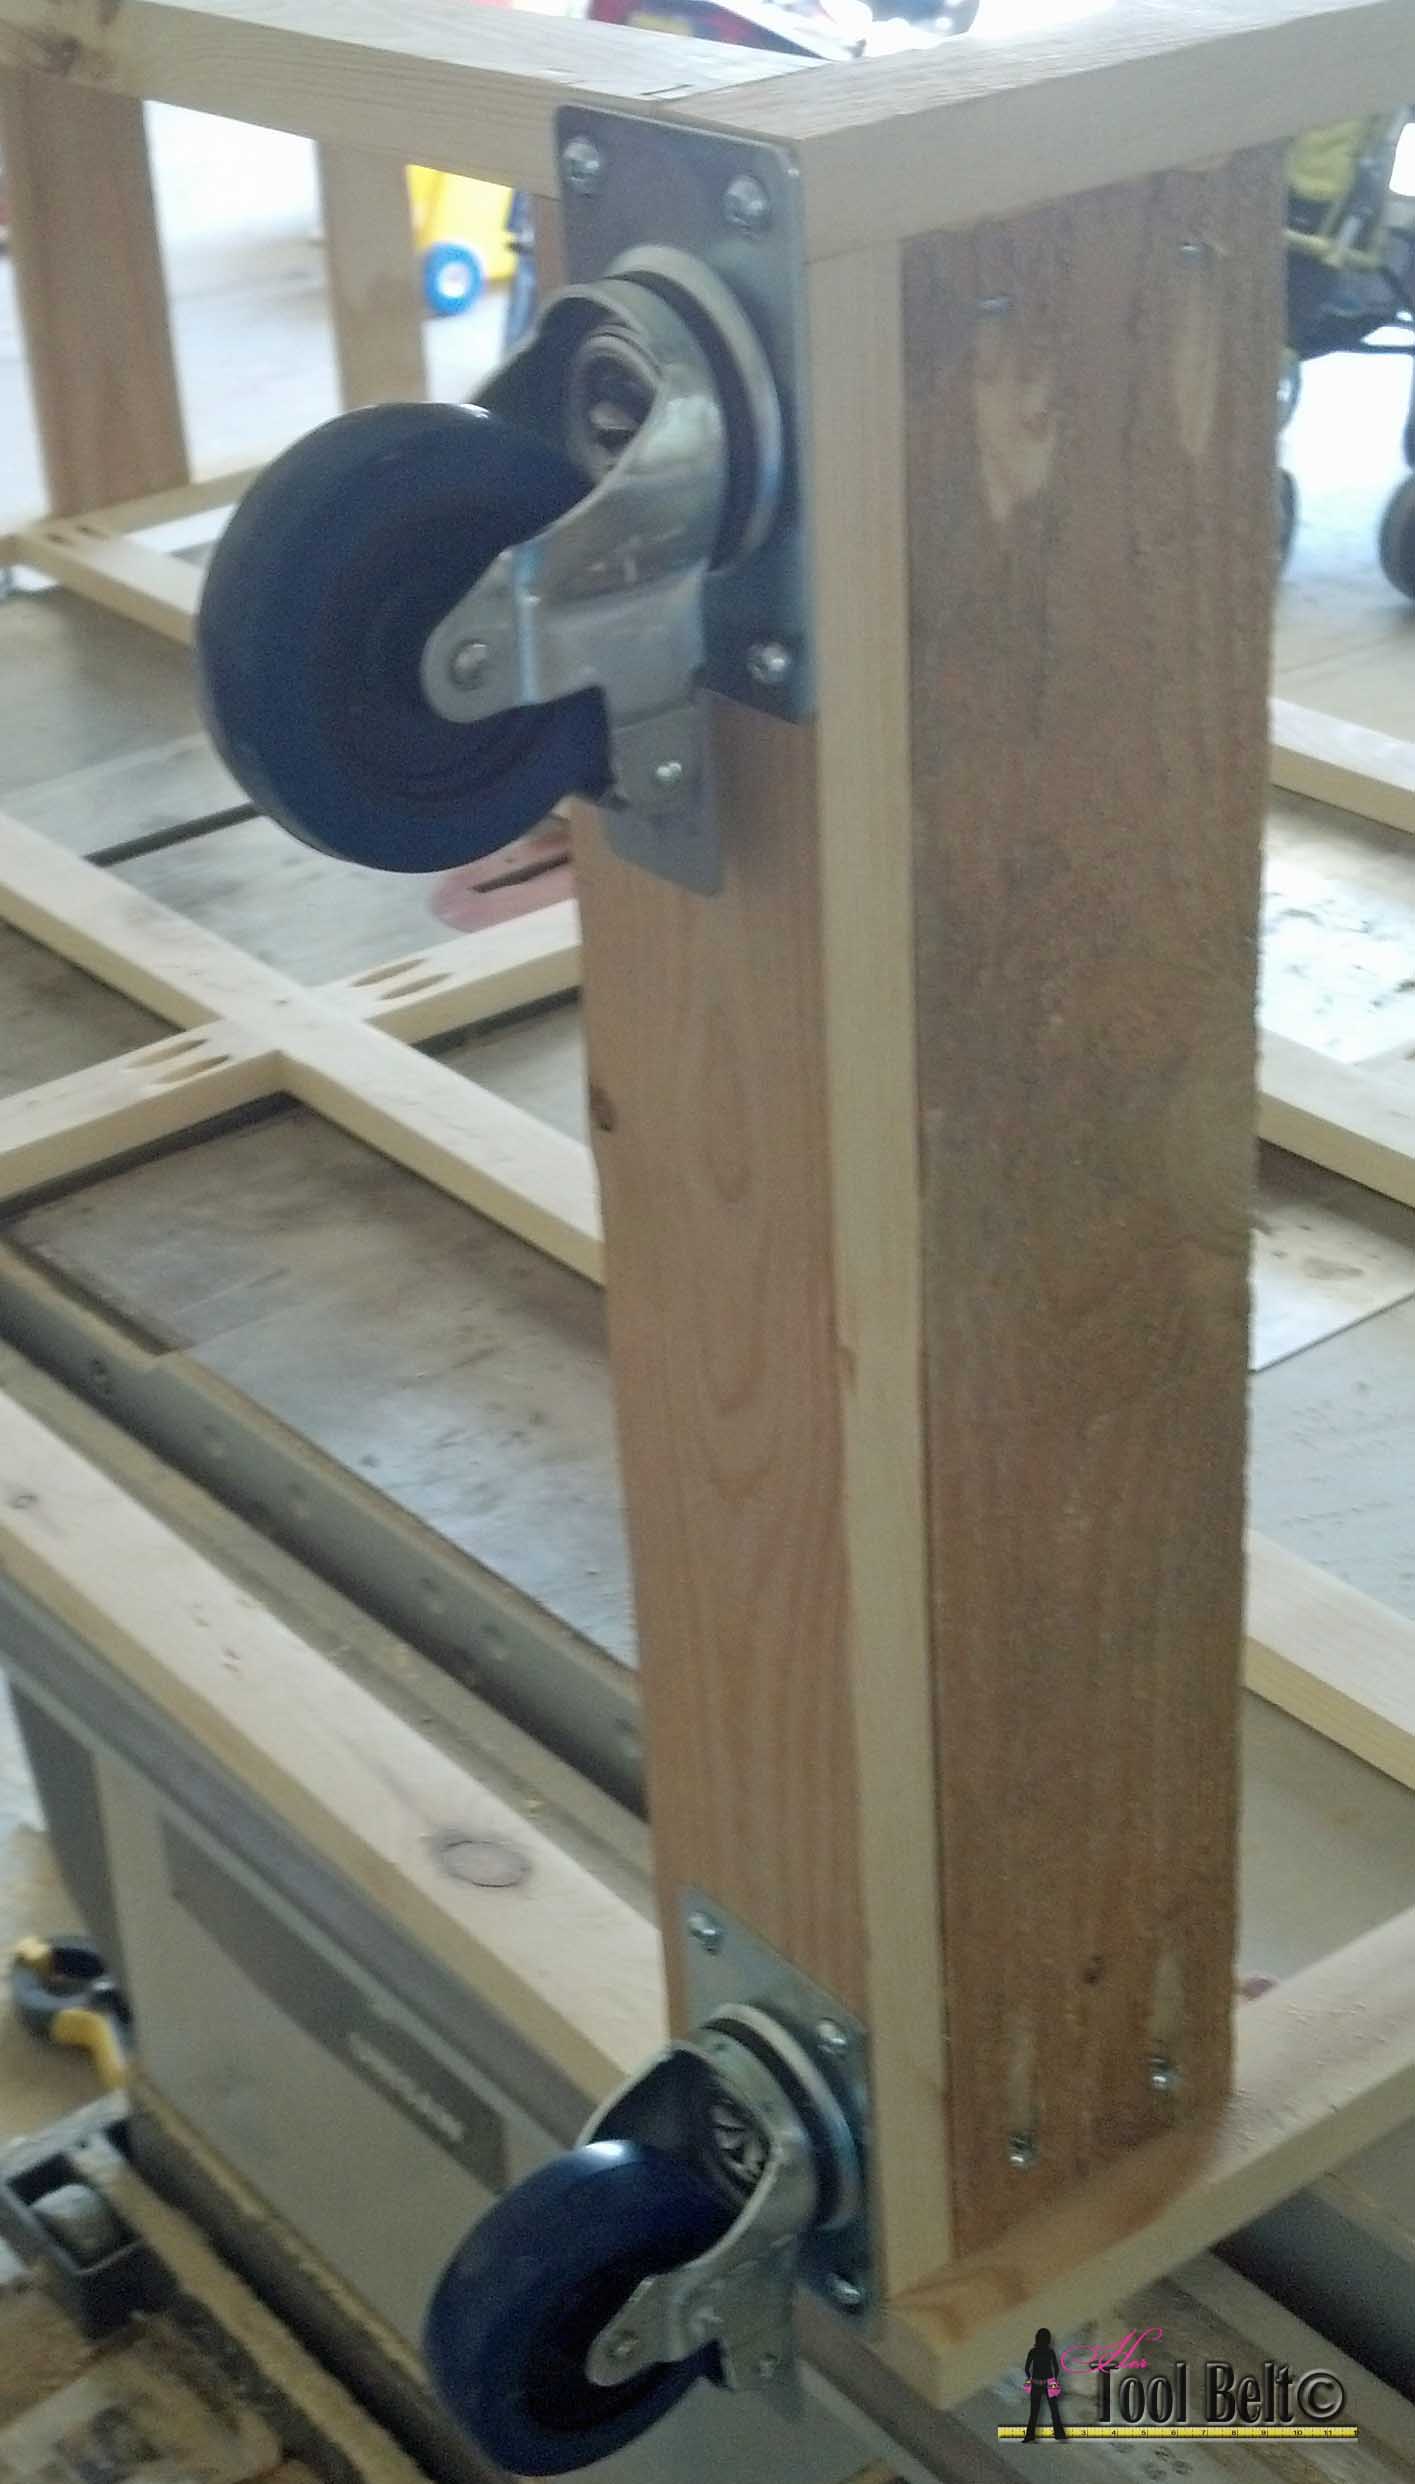
If you’re using castors, I used 3″ castors from Harbor Freight, I got the locking castors. Install them in the four corners of the bottom of the dressers. It was so nice to have wheels on my project, I think I might put everything on wheels!!! If you don’t want wheels, you can install decorative feet or cut 3″-4″ blocks for the feet.
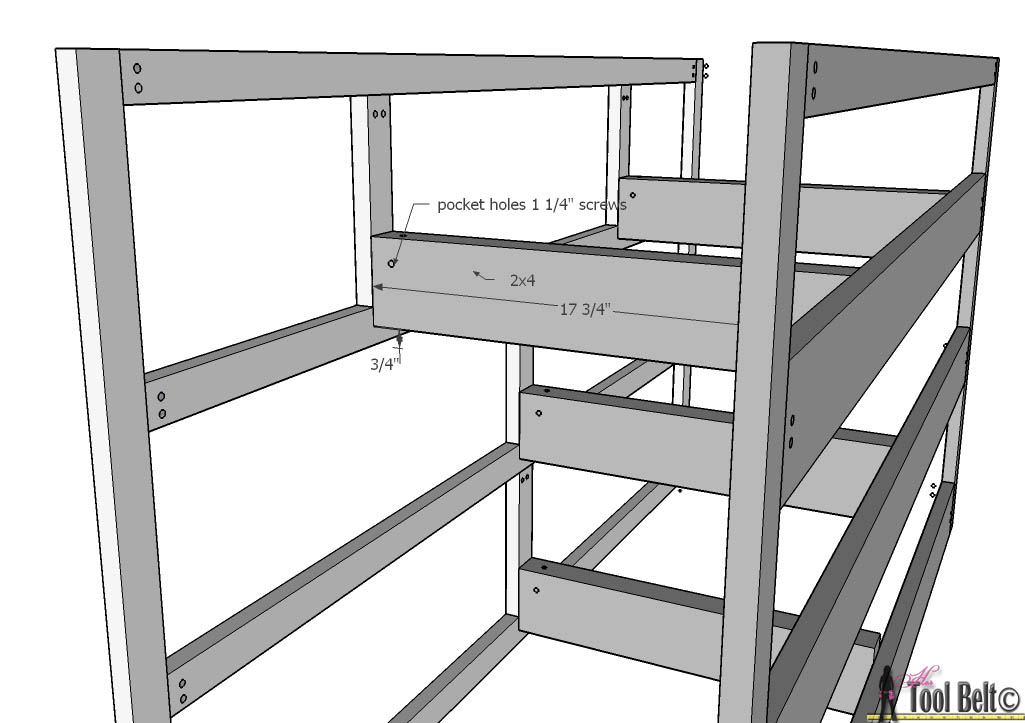
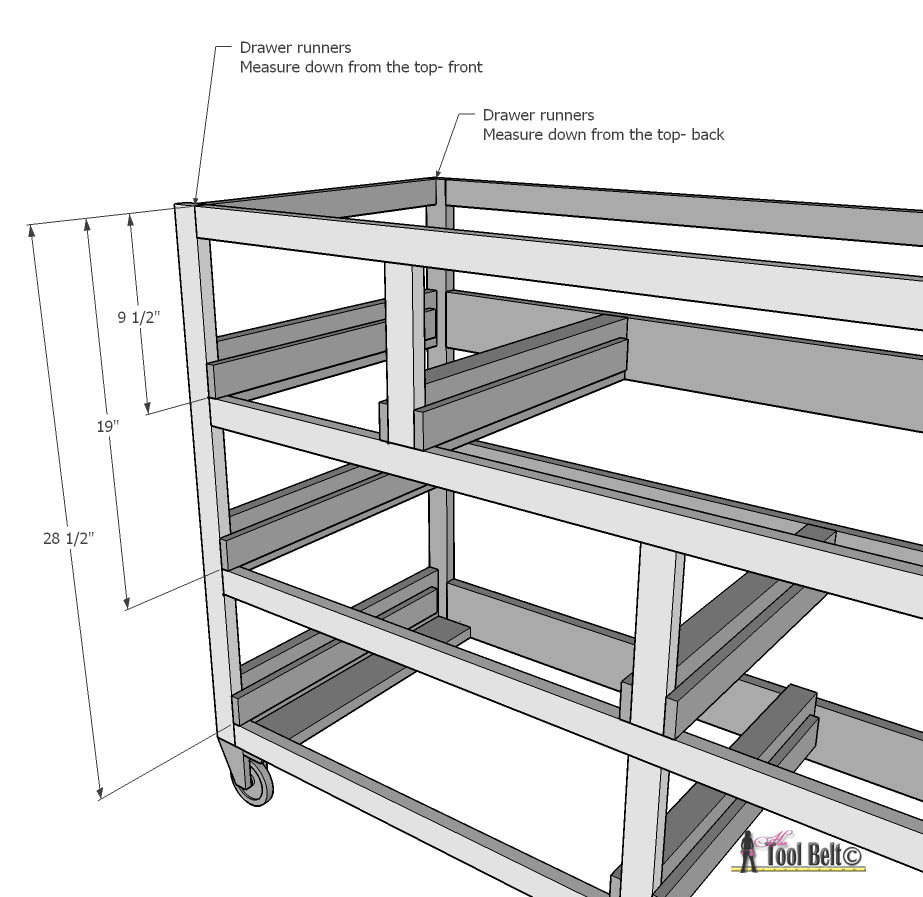
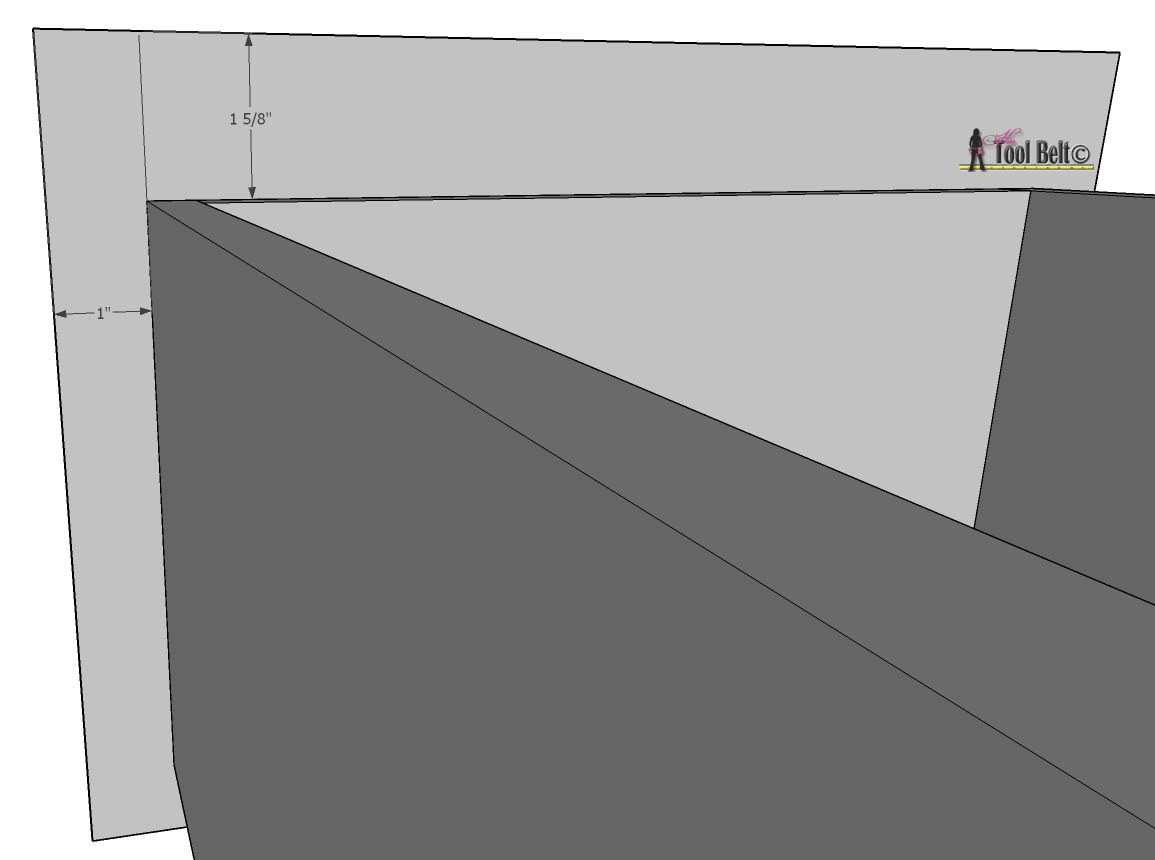
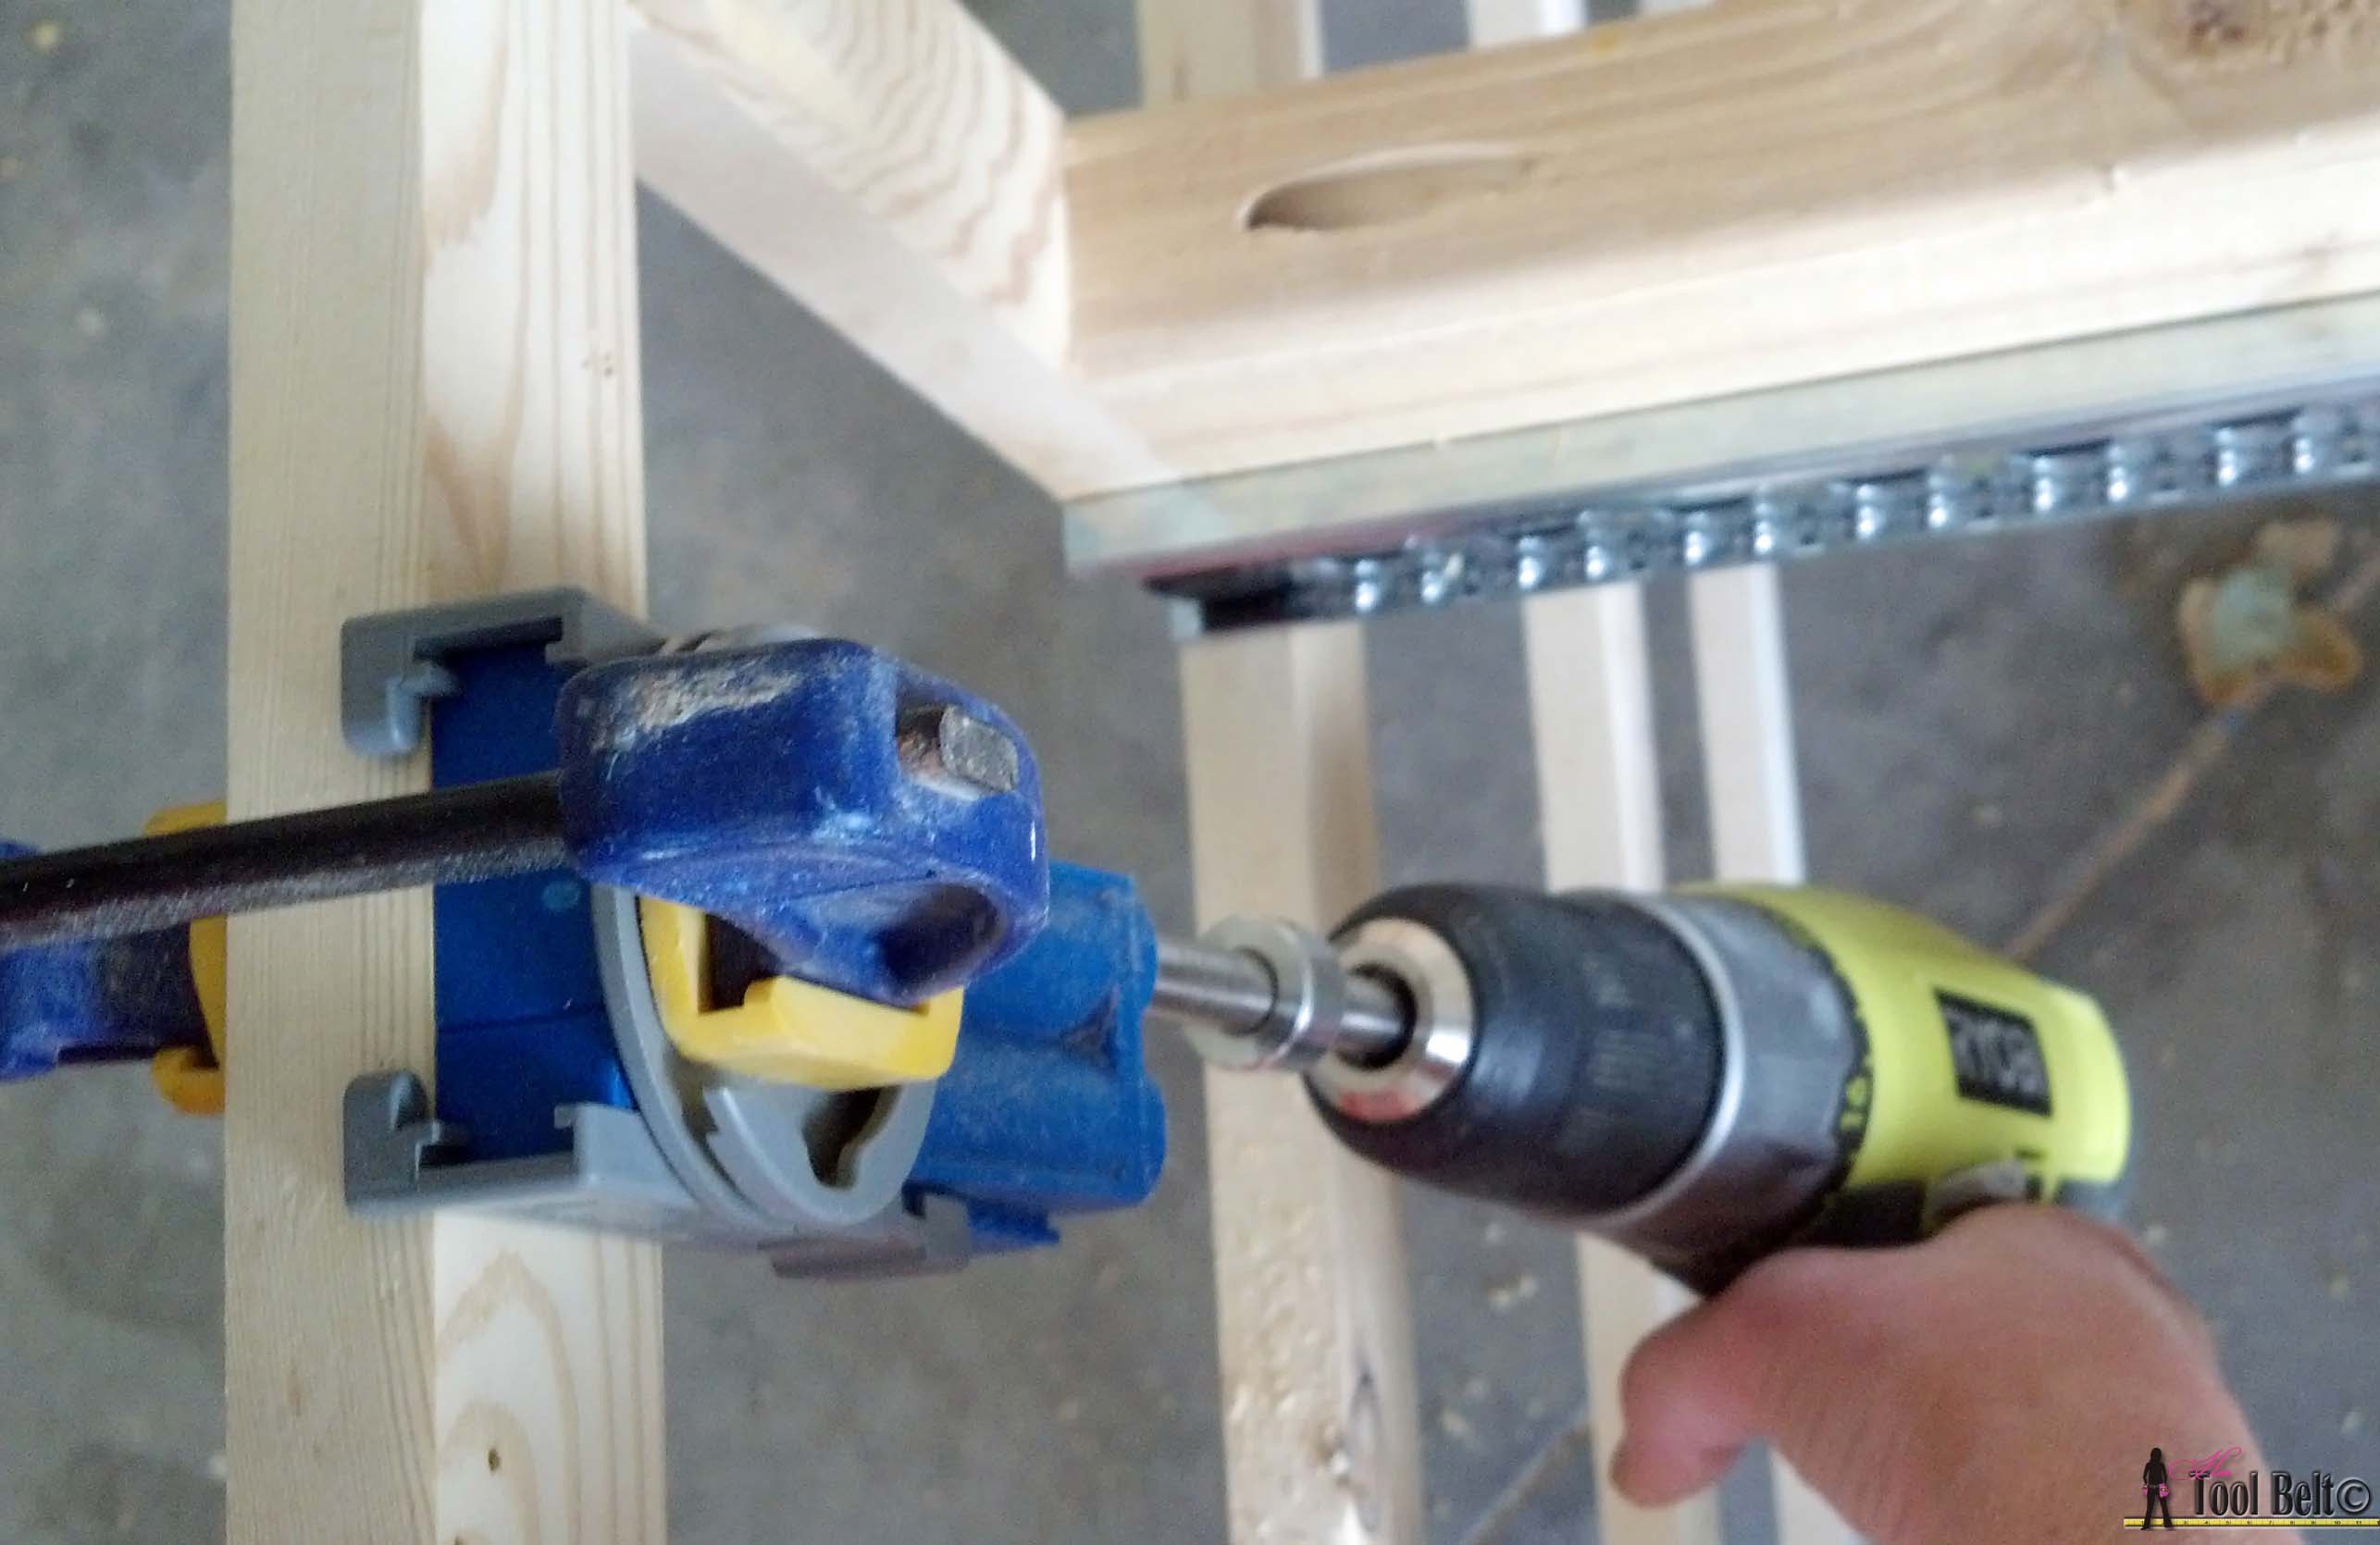
Install Rail Supports
Cut the 4 rail support 2×4’s (actual 1 1/2″ x 3 1/2″). Drill pocket holes on the rail supports. For the face frame side, I drilled 1 in the top and 1 on each side of the upper top portion of the board to avoid other screws in the face frame. The rail supports need to be installed straight back so the drawer slides will work correctly. Measure the distance on the front from the side support to where the rail support is to be installed, then measure and mark the same distance on the back frame, repeat for each rail support.
Glue, clamp and screw each joint together with 1 1/4″ screws.
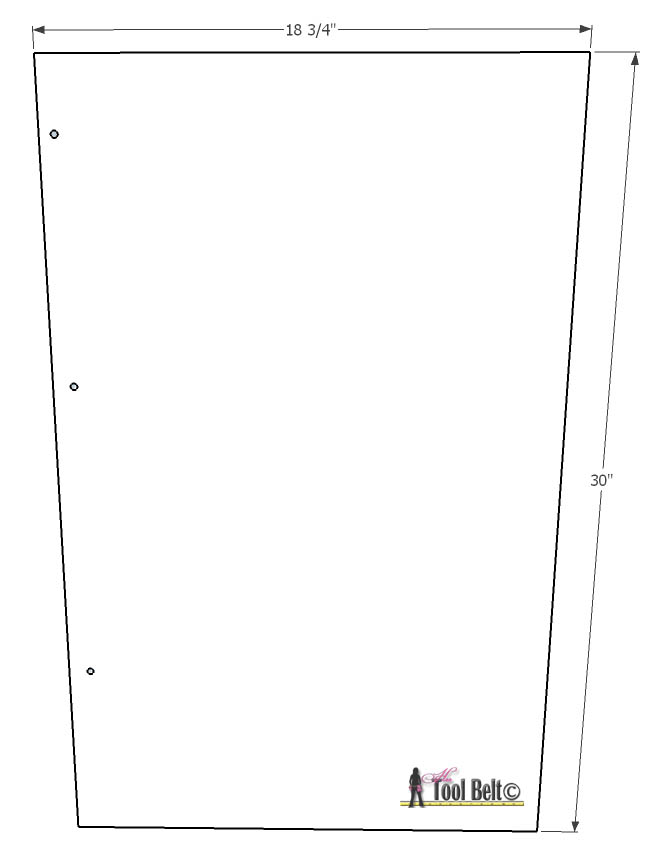
Side Panels
Either cut 2- 3/4″ pieces of plywood that are 18 3/4″ x 30″ or glue up boards to make the sides. I used the pallet boards, so I drilled pocket holes and glued the panels together.
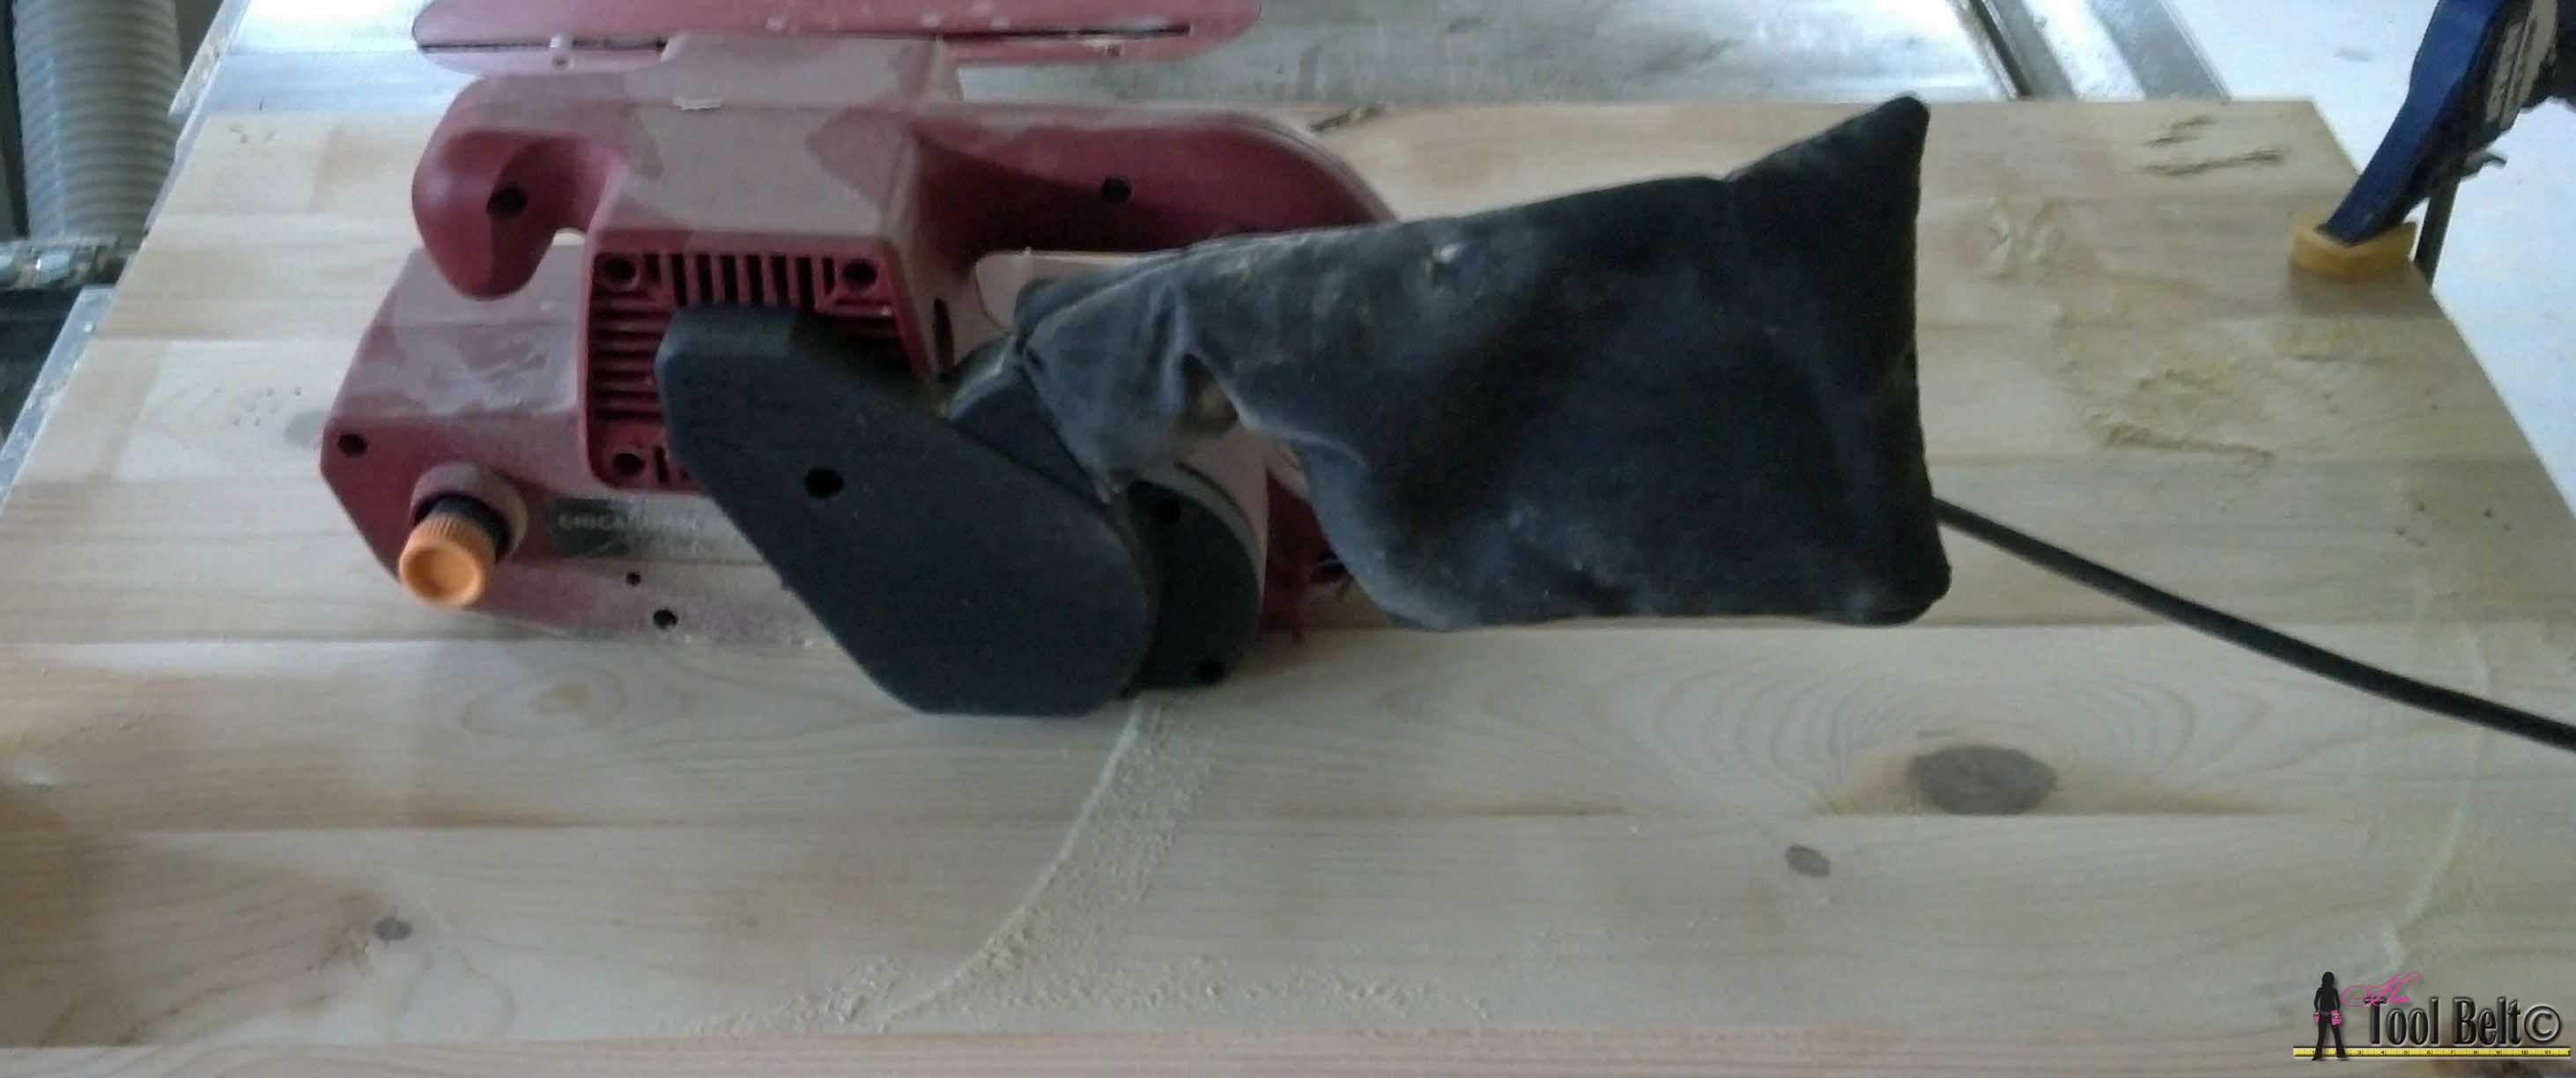
I let the side panel glue dry. Since the boards are pretty rough, I started sanding them with a belt sander. Once the boards were even, I sanded them with an random orbit sander.
If you want, add pocket holes to the backside to attach to the face frame. Glue and nail (1 1/4″ minimum length) the side panels to the dresser.
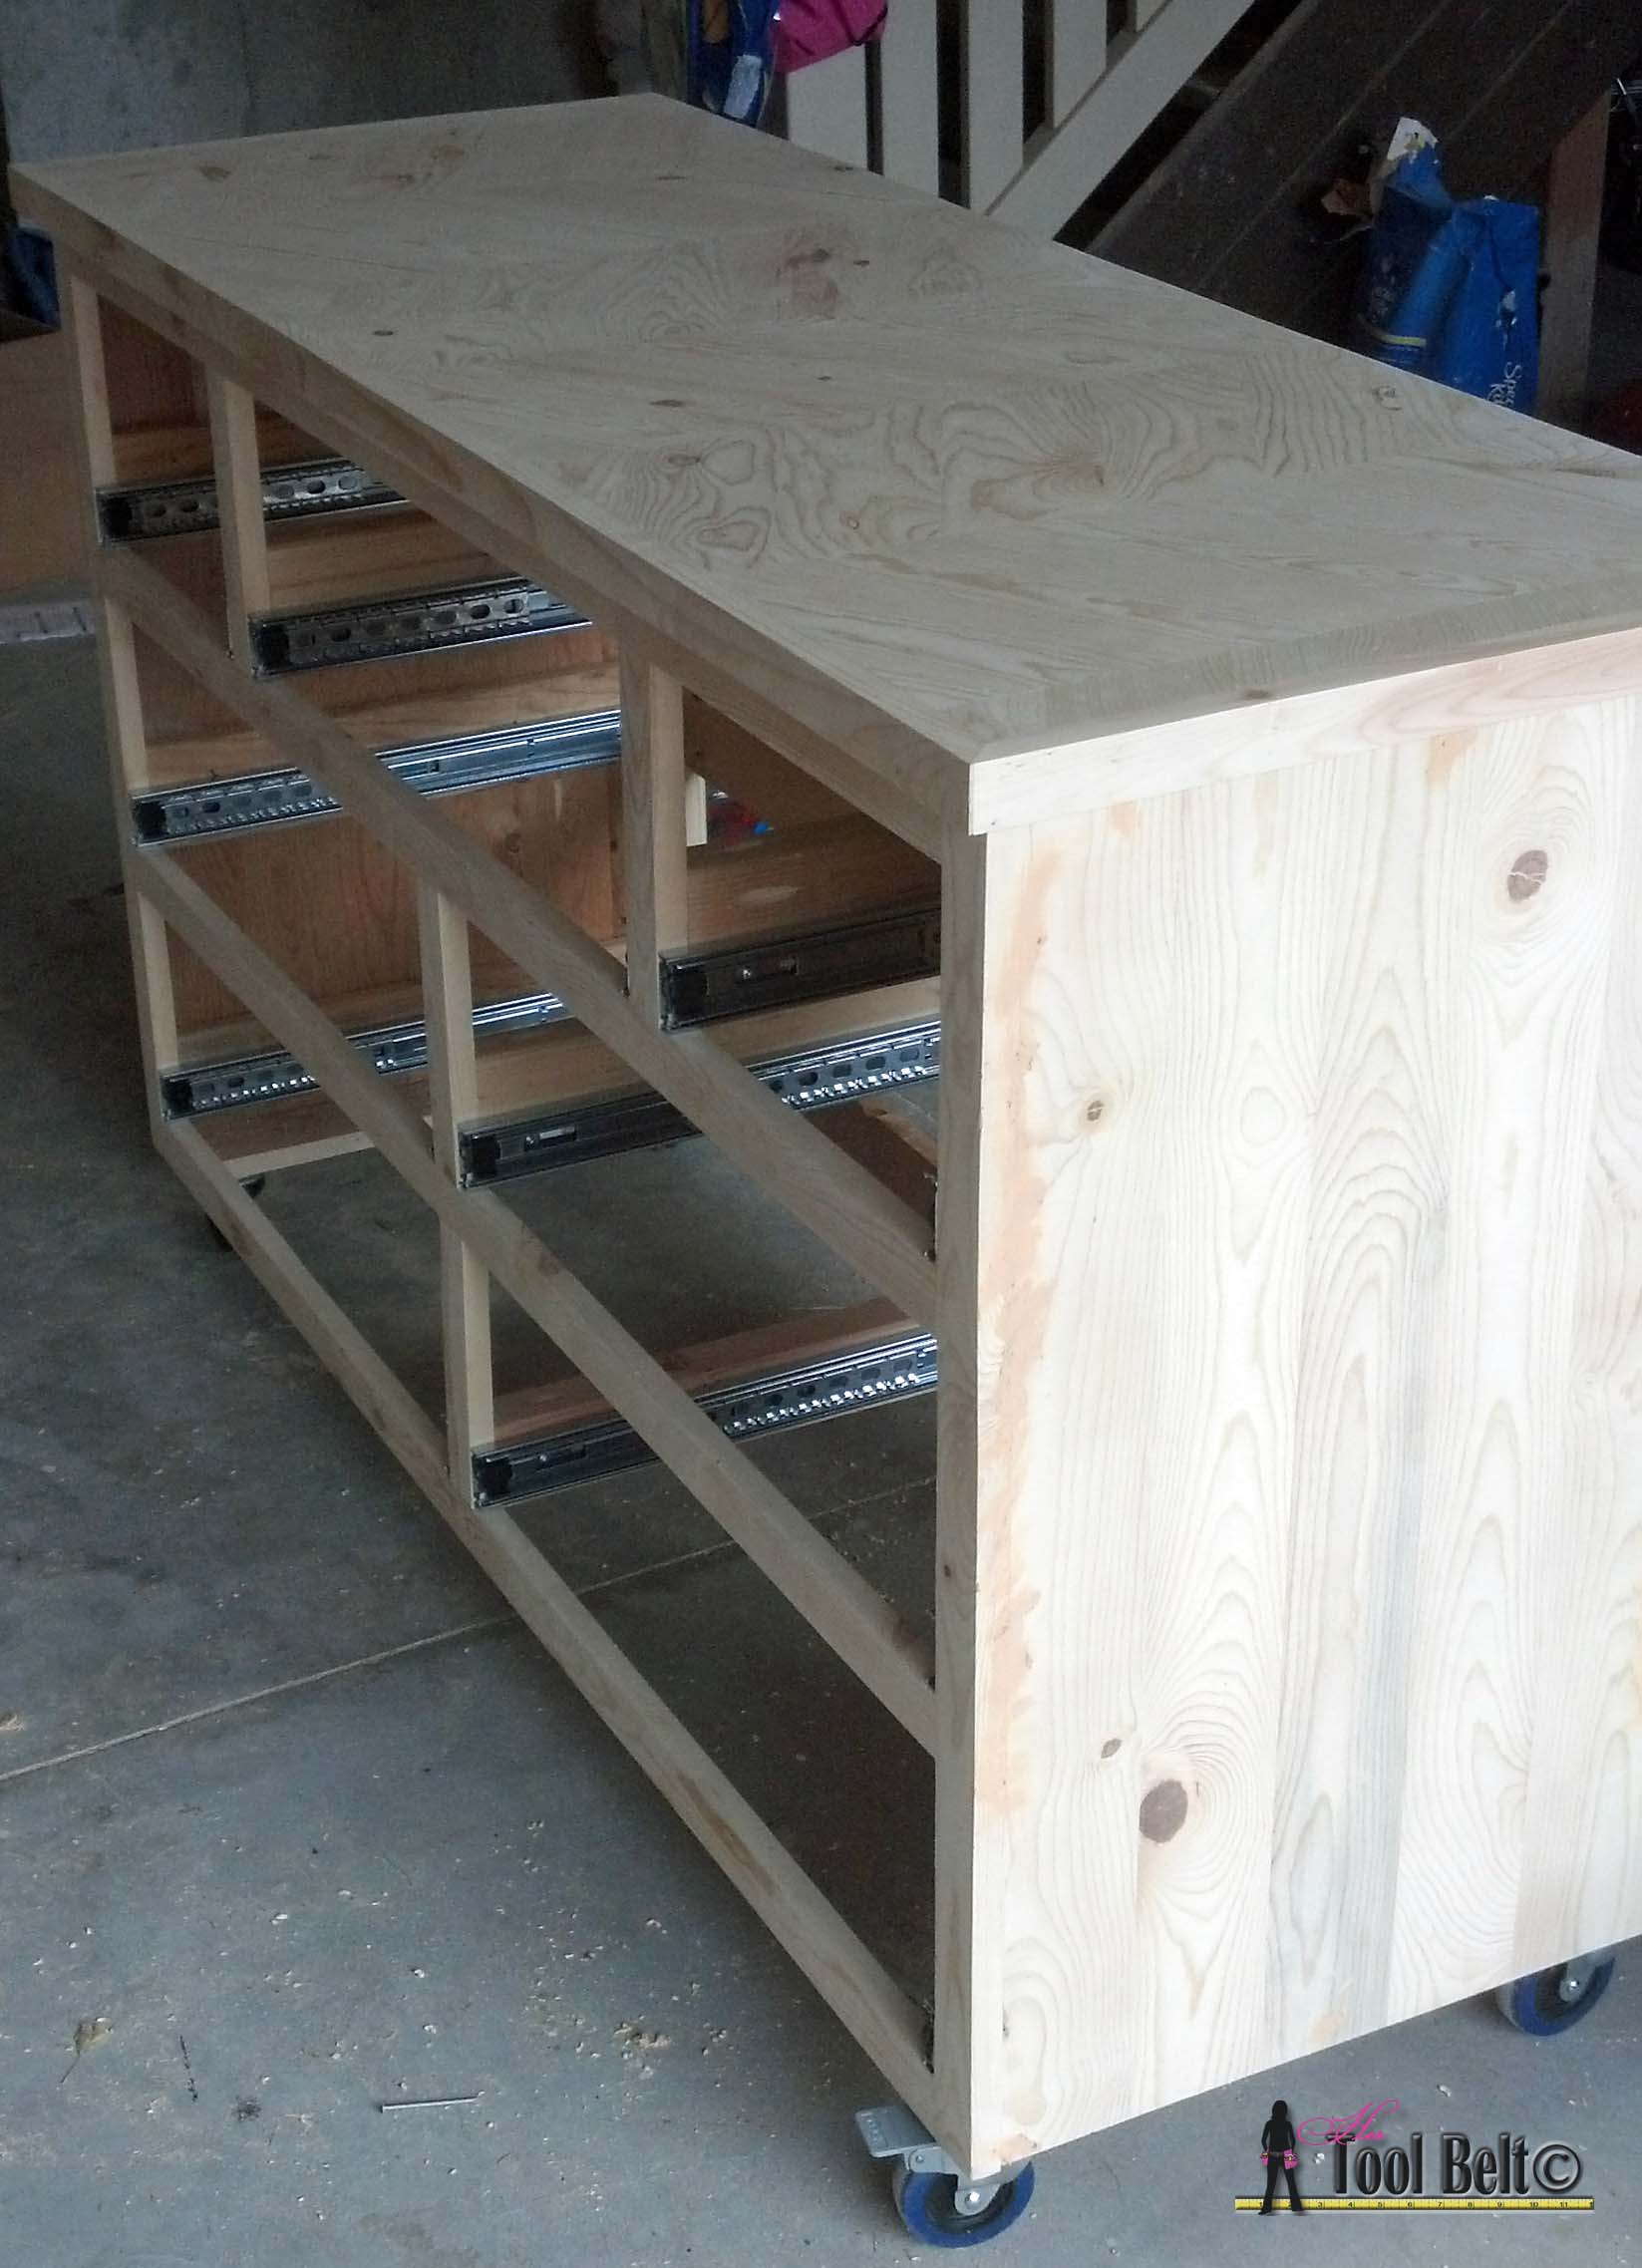
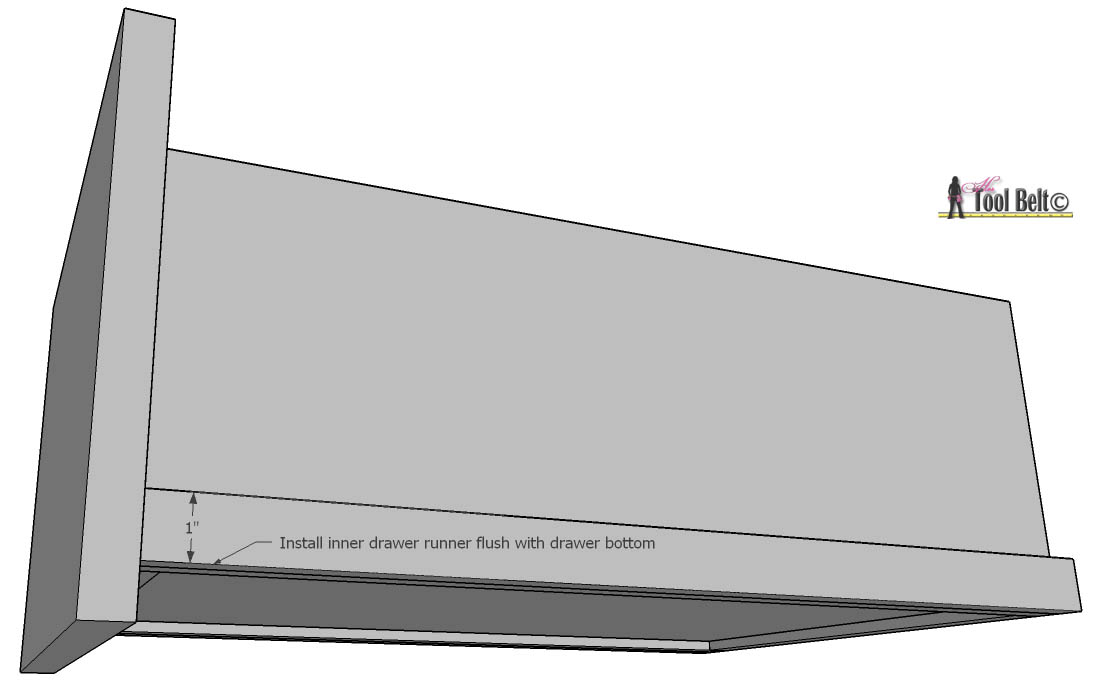
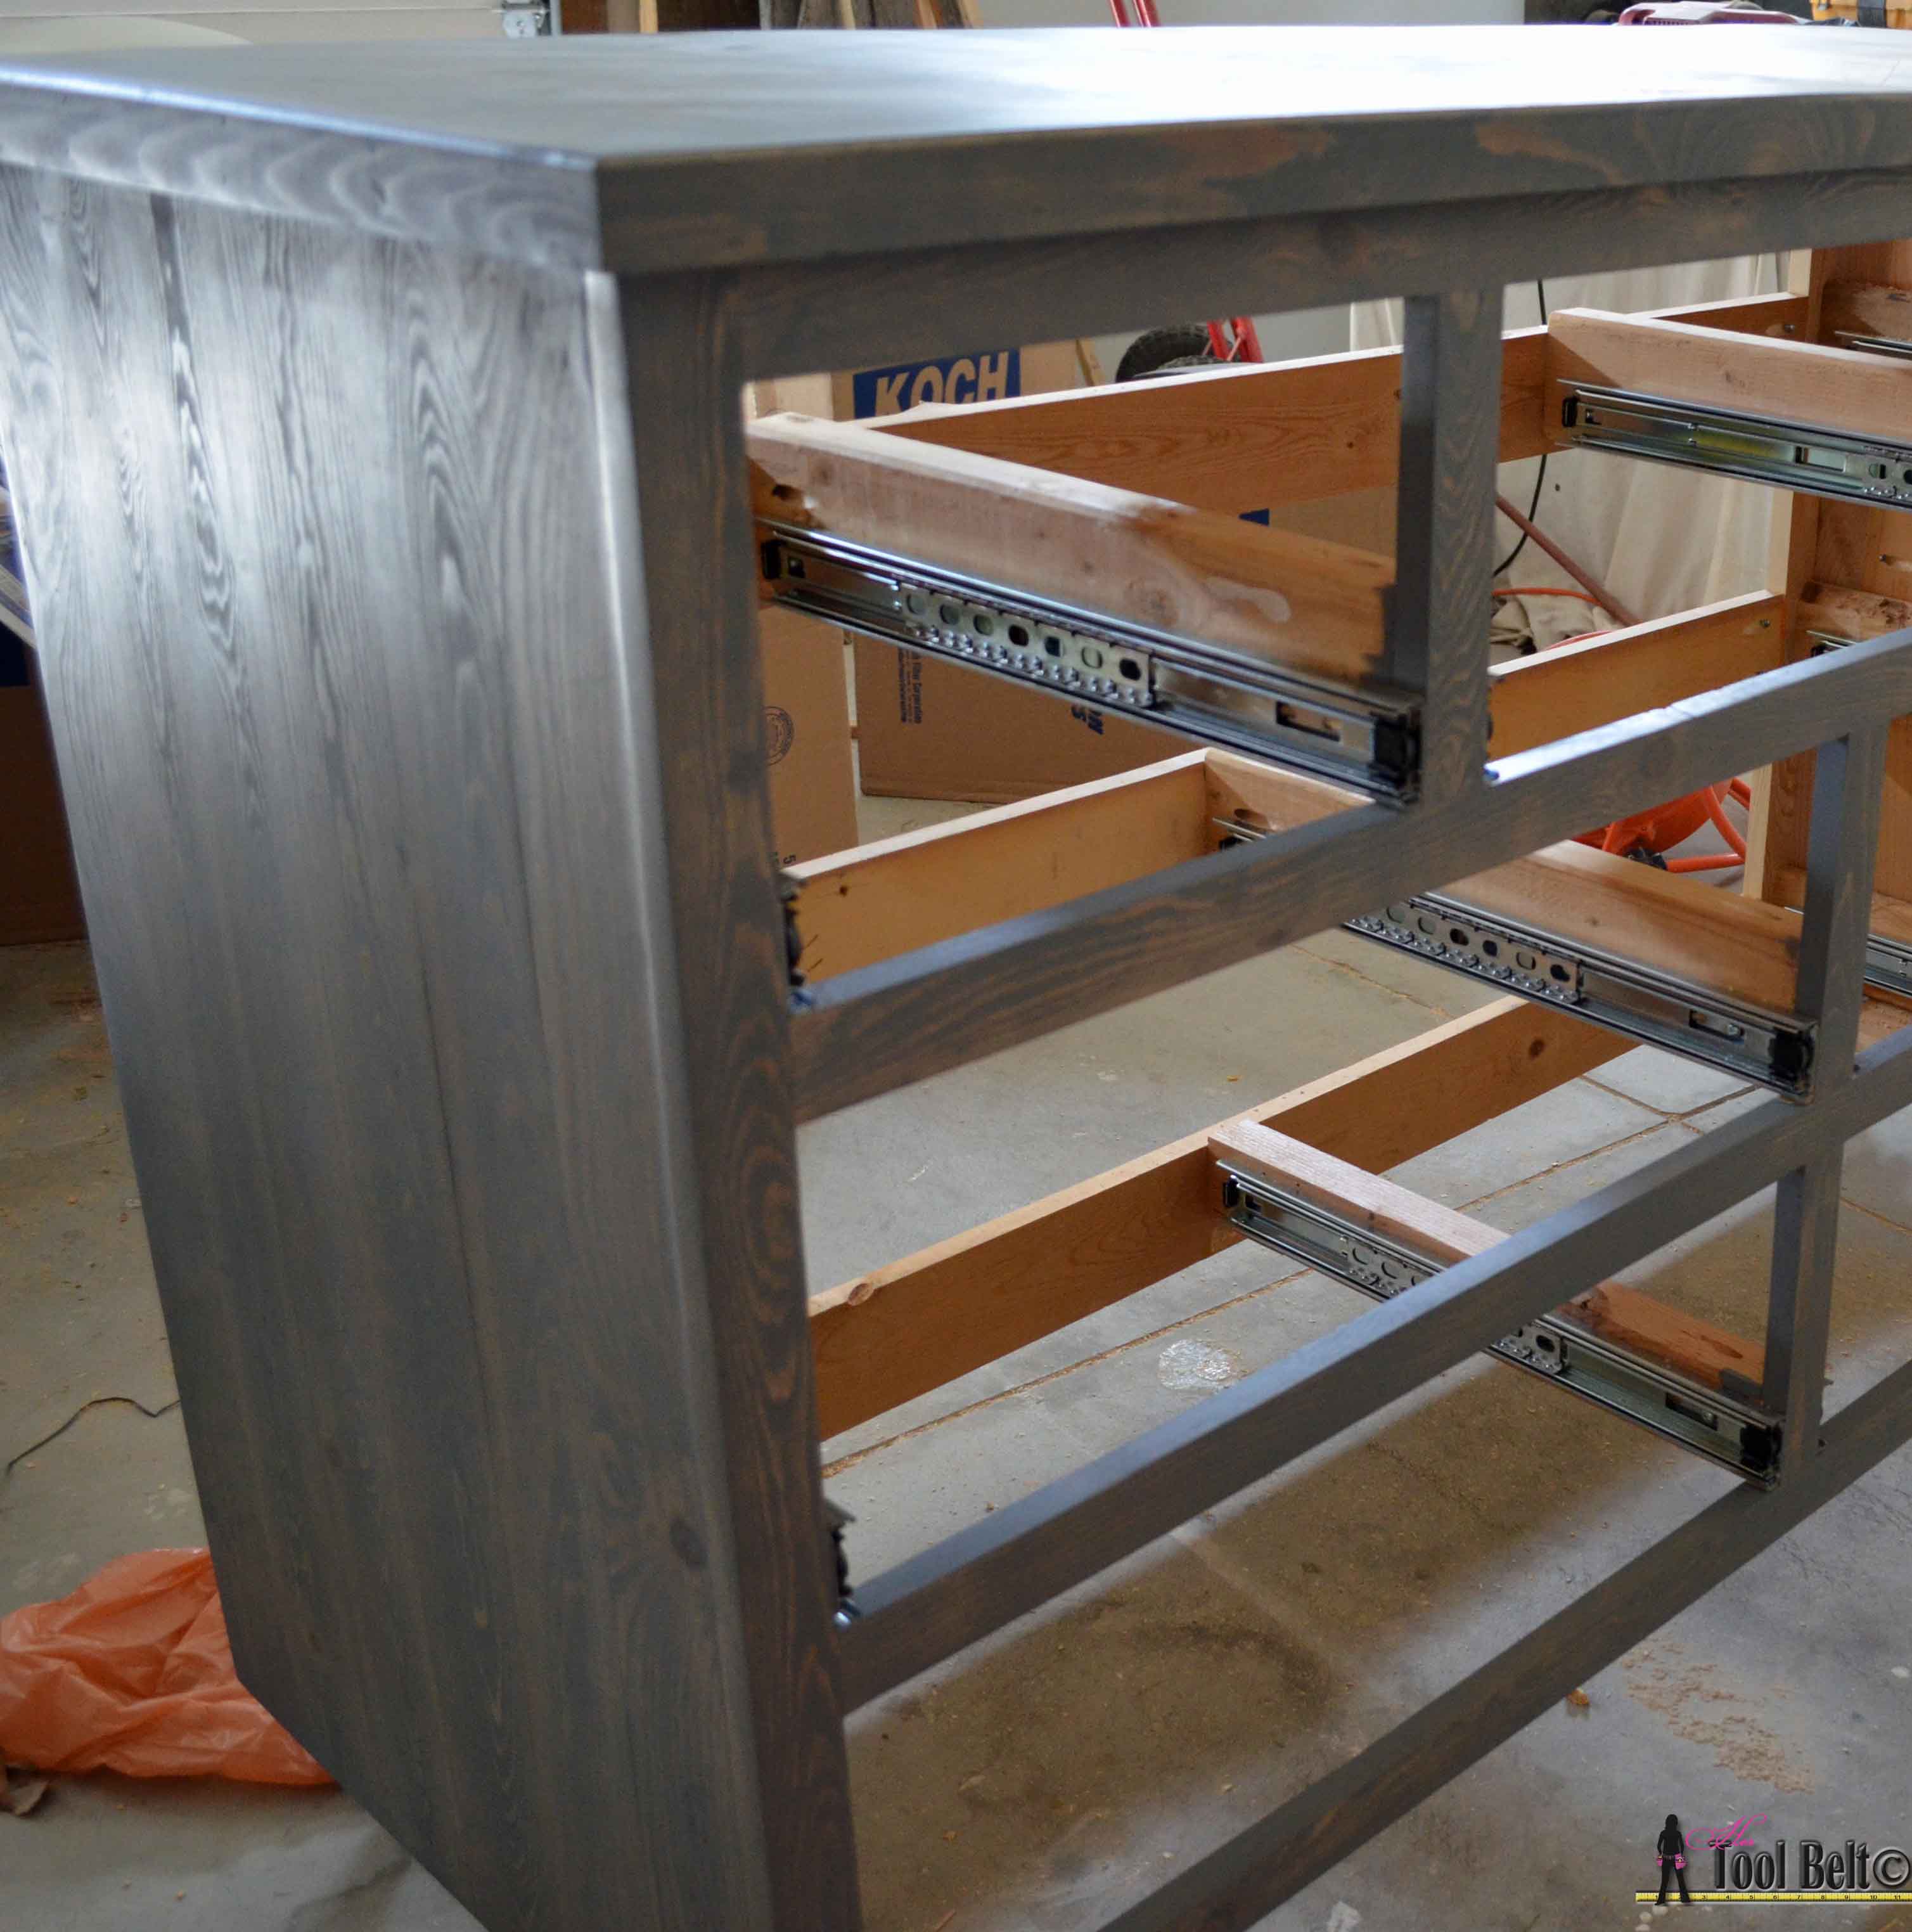
Install Drawer Slides
If using the full extension drawer slides, take them apart. We are installing the outer/larger piece on the side and rail supports. The drawer slides have to parallel for them to function properly. The drawer slide will rest on the face frame opening for the drawer, measure that distance from the top, then measure and mark the distance from the top in the back. Repeat for each slide. Screw into place with 2 screws each, one of the front, one in the back.
Build the Drawers
Cut all of the pieces for the drawers from the cut list. We need to cut a dado for the drawer bottom. The dado is about 2 passes on the table saw.
For each of the drawer sides, cut a dado 1/4″ from the bottom and 1/4″ deep that is the same width as the 5 mm sheathing plywood.
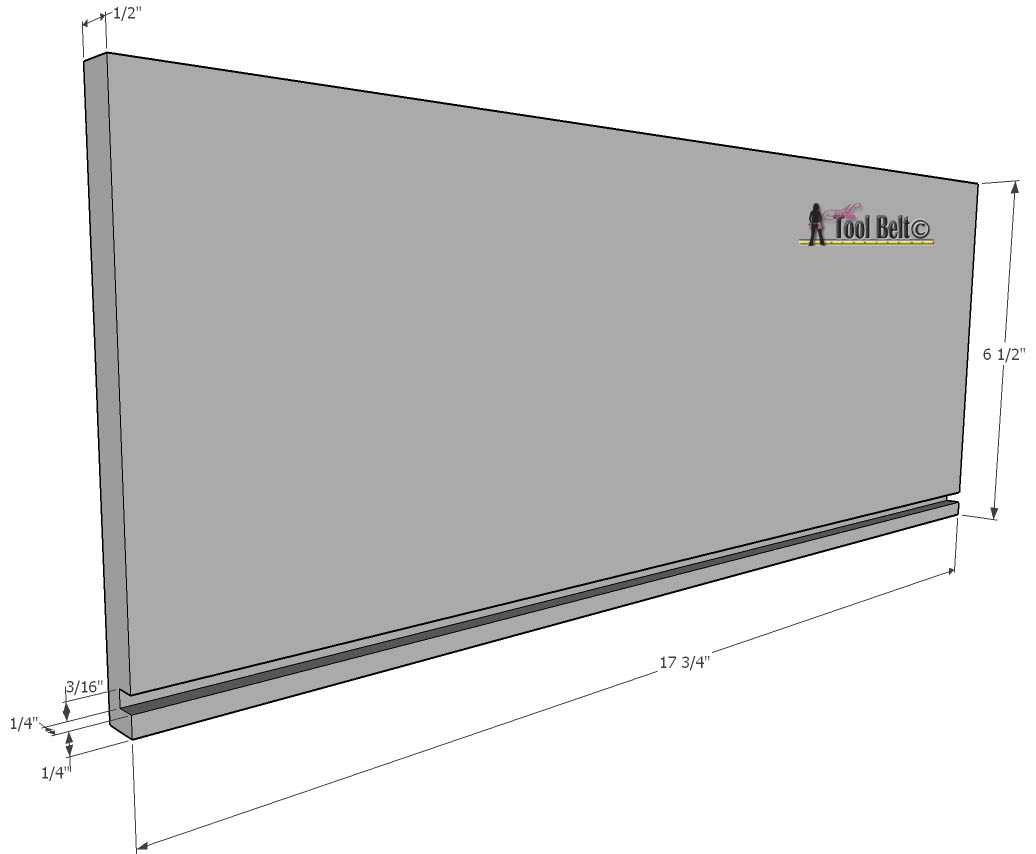
For each of the drawer ends, cut a dado 1/4″ from the bottom and 1/4″ deep that is the same width as the 5 mm sheathing plywood.

On the drawer ends, on the opposite side of the dado, drill pocket holes for 1/2″ material. Assemble the drawers by placing the sheathing in the dado, glue and clamp the drawer ends to the drawer sides. Screw the drawers together with 1″ screws. Update: Per Kreg you should actually use 3/4″ screws to join 1/2″ to 1/2″, but the shortest I had on hand was 1″.
Repeat for each drawer.
Cut the 7 drawer fronts. If you want, route a shape around the outside of the drawer front, or round over the corners with a sander. I mounted my drawer fronts with a 1″ screw through the drawer into the drawer front. Mark each drawer front according to the diagram and install the fronts onto the drawers.
Install the inner part of the drawer slides onto the drawers. Set the drawer flat on a surface and place the side piece flat next to the drawer. Screw the drawer slide onto the side of the drawer. Repeat for each slide.
Check and make sure each drawer slides nicely in the dresser. Make adjustments as necessary.
Attach the back plywood onto the back of the dresser with a few brad nails.
Dresser Top
Plain Option
Cut a piece of 3/4″ plywood that is 19 1/2″ x 54″. Cut a 3/4″ x 3/4″ x 55 1/2″ piece of solid wood and cut 45 deg angles on both ends. Cut 2 – 3/4″ x 3/4″ x 20 1/4″ pieces of solid wood and cut a 45 deg angle on one end. Glue the solid wood on the front and sides of the plywood. Use brad nails as necessary. Allow the glue to dry.
Chevron Option
Instead of joining each chevron piece together, I opted for gluing and mounting the pieces onto a piece of 1/2″ plywood. This is how the chevron pieces will be laid out.
![]()
Cut a piece of 1/2″ plywood 19 1/2″ x 54″. I put a temporary straight board on one side of the plywood, to keep things straight.
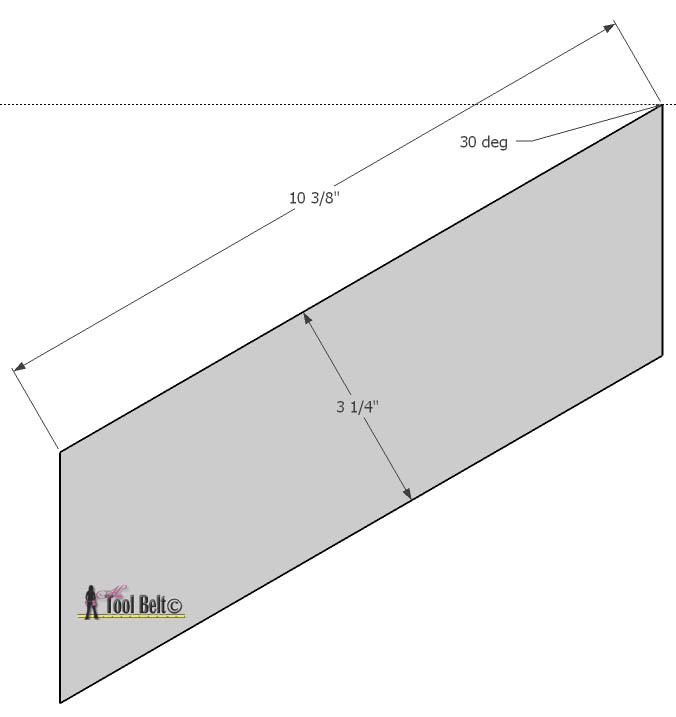
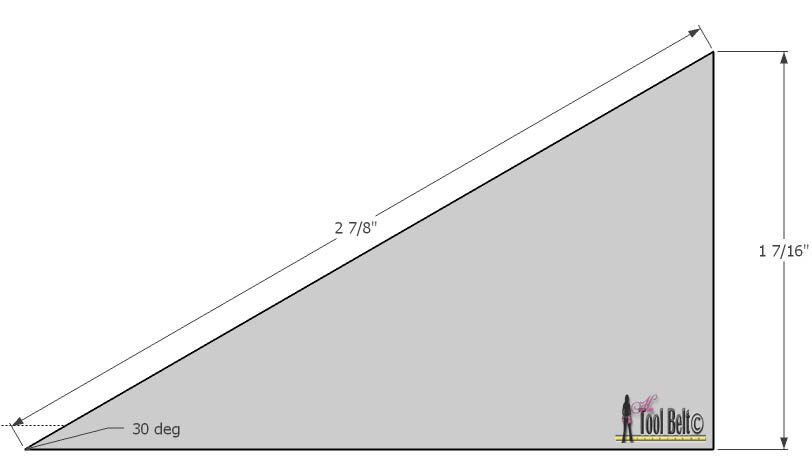
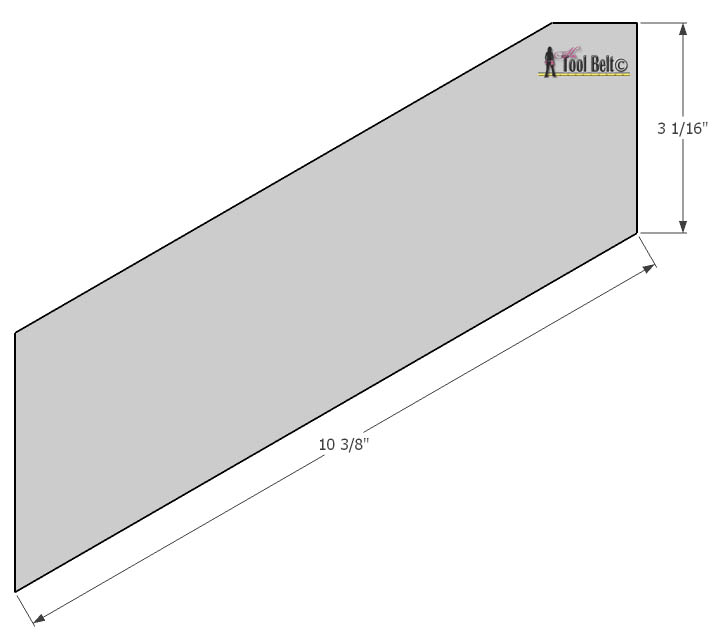
Cut 18 – 3/4″ x 3 1/4″ x 10 3/8″ pieces that are cut at a 30 deg angle, these are labeled as 1.
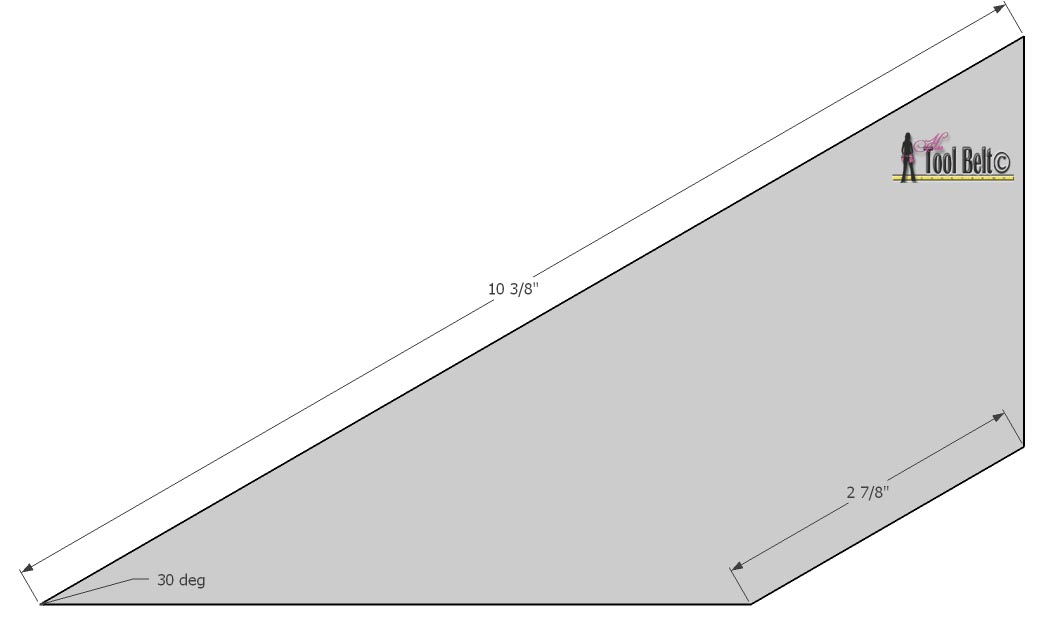
Cut 6 – 3/4″ x 3 1/4″ x 10 3/8″ pieces that are cut at a 30 deg angle. Measure down 2 7/8″, trim the board to make a 90 with the right side. These are labeled as 2.
 Cut 6 – 3/4″ x see below, these are labeled as 3.
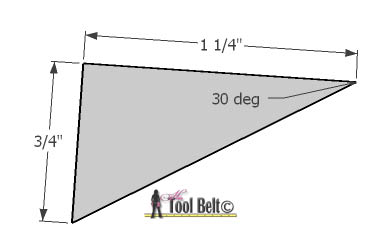
Cut 6 – 3/4″ x 3 1/4″ x 10 3/8″ pieces that are cut at a 30 deg angle, trim the top corner off at a 90 deg angle at 3 1/16″, these are labeled as 4.
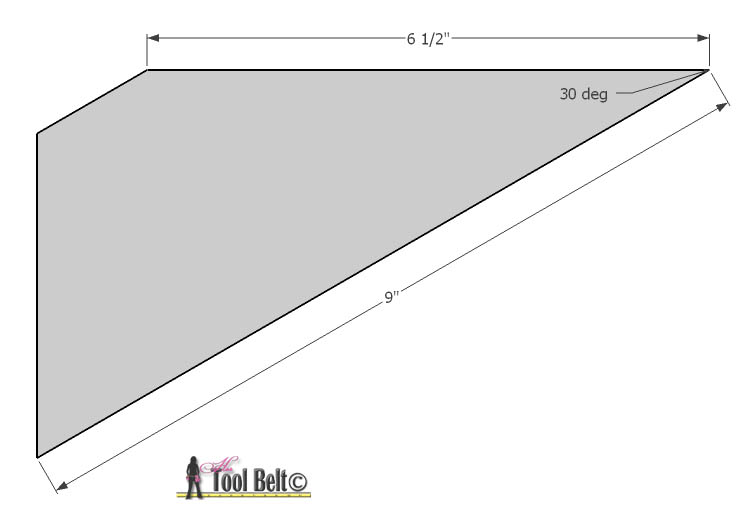
Cut 6 – 3/4″ x 3 1/4″ x 10 3/8″ pieces that are cut at a 30 deg angle, Trim the top off at 9″ at a 90 deg angle to the left side, these are labeled as 5.
Cut 6 – 3/4″ x see below, these are labeled as 6.
Dry fit everything together, make adjustments as necessary. Apply plenty of glue to the plywood and to the ends of the chevron pieces. Put together chevron top. If needed, nail the chevron pieces to the plywood with 1″ brad nails.
![]()
![]()
(note: mine lines up a little differently, because I didn’t figure it before I did it, I just winged it.)
Once the glue is dry, trim the edges if necessary. Cut a 3/4″ x 1 1/4″ x 55 1/2″ piece of solid wood and cut 45 deg angles on both ends. Cut 2 – 3/4″ x 1 1/4″ x 20 1/4″ pieces of solid wood and cut a 45 deg angle on one end. Glue the solid wood on the front and sides of the plywood. Use brad nails as necessary. Allow the glue to dry.

If you haven’t, drill pocket holes in the inside of the sides, back and front to attach the top to the dresser.
Place the top onto the dresser, make sure the back is flush and the overhang is even on the sides. Attach the top to the dresser by applying a bead of glue around the top of the dresser and use 1 1/4″ screws.
![]()
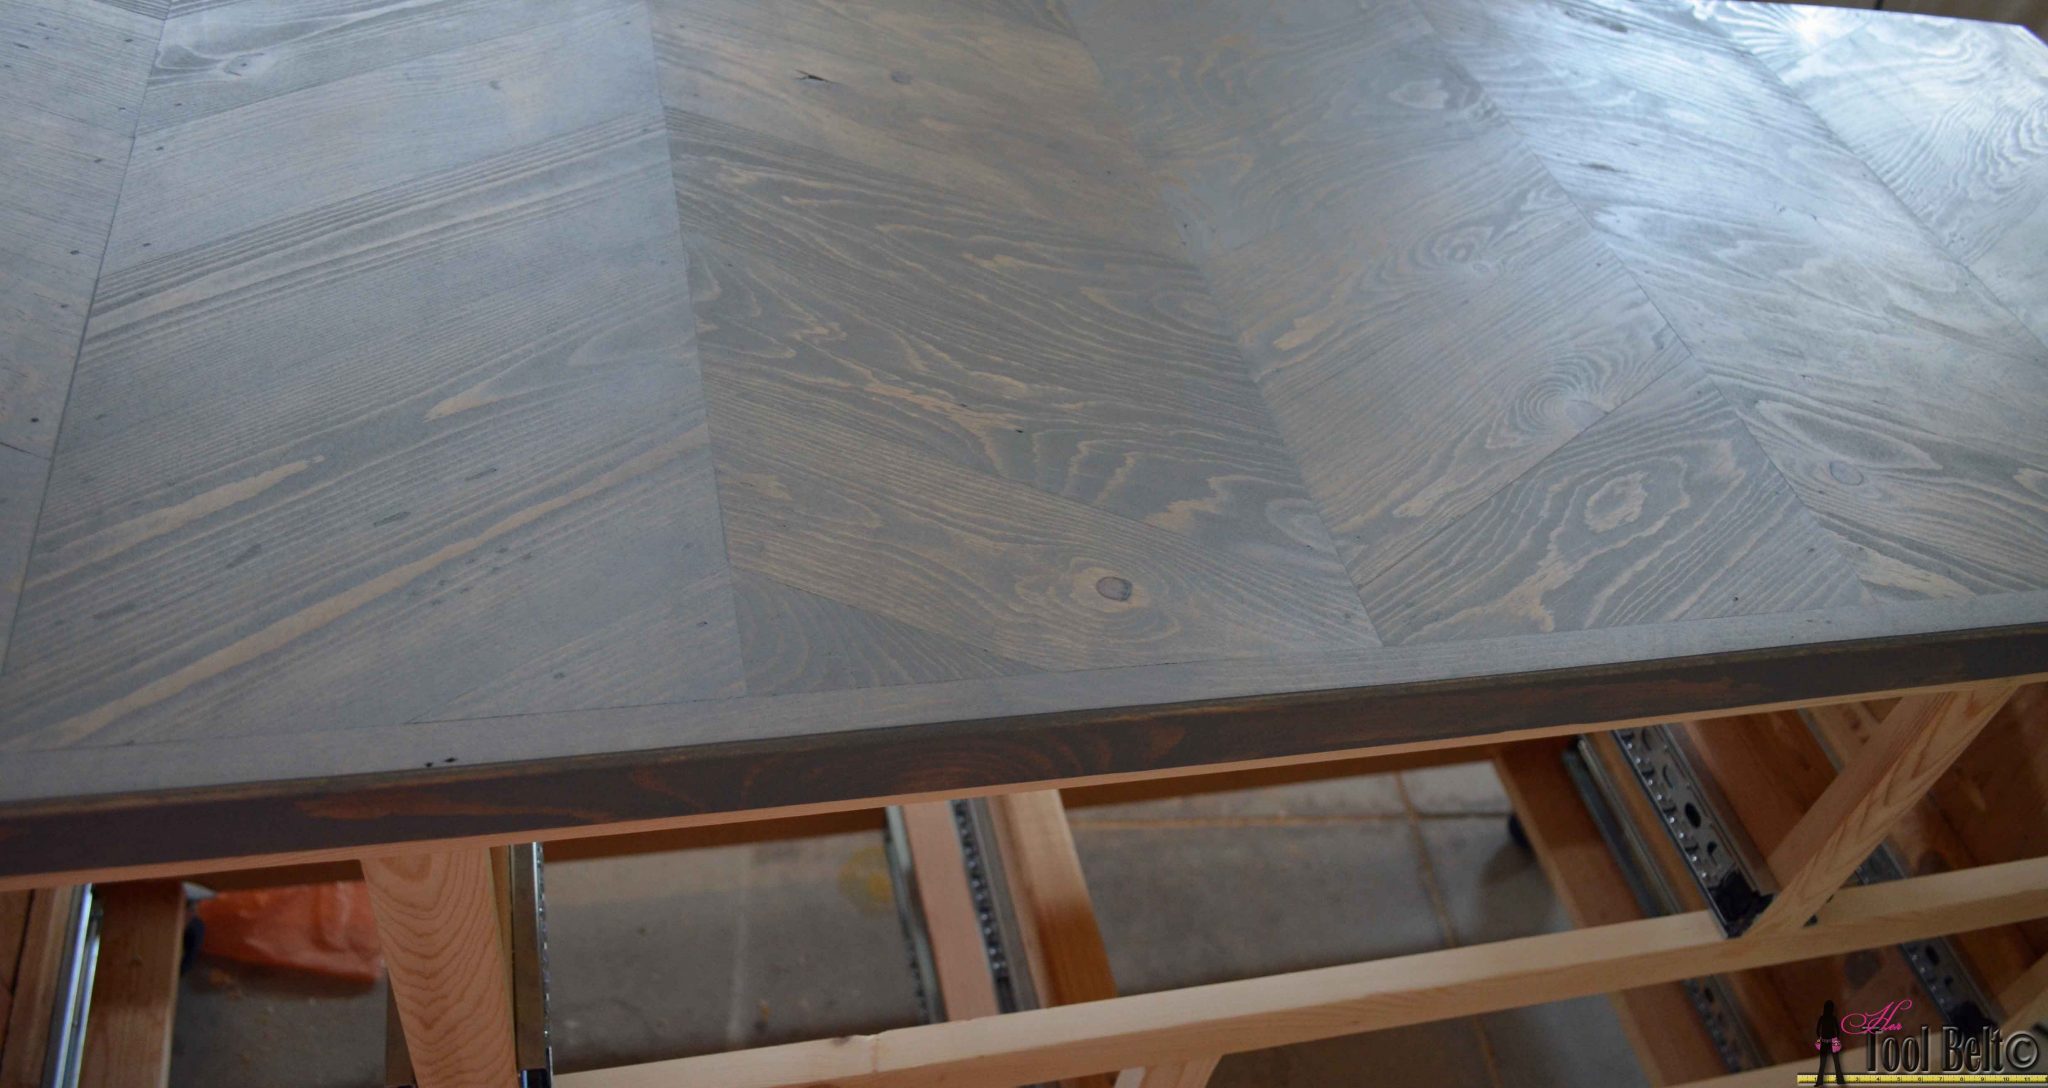
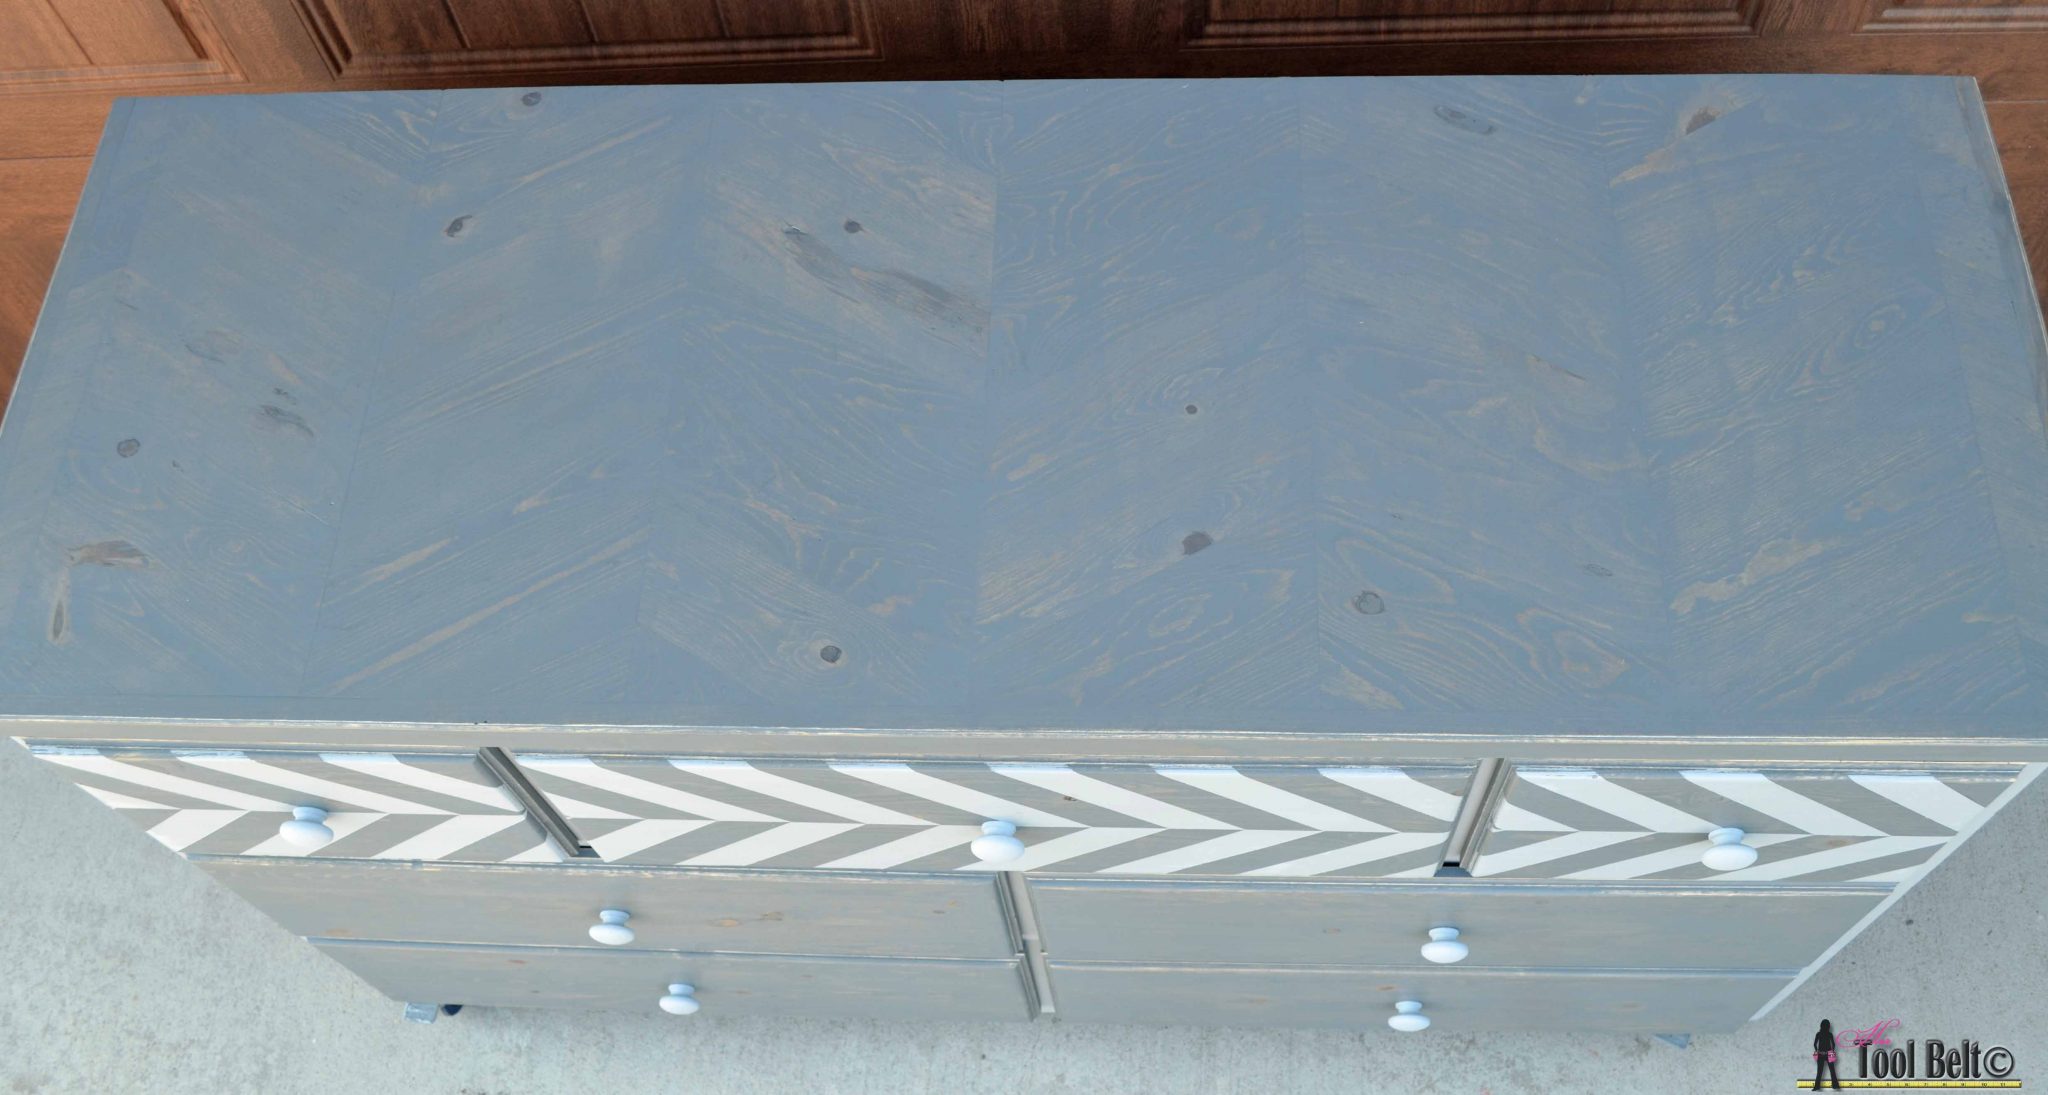
The chevron top turned out kind of fun.
Finish Prep
Apply wood filler to the nail holes and any gaps. Allow the filler to dry. Sand, sand, sand! Before this project, I never needed a belt sander, I picked one up a Harbor Freight for cheap. It was an arm savor with this pallet wood. End the sanding with 120-150 grit paper.
Finish Work
I had never used the gray stain before, but was excited to try. I always get a little anxiety finishing a project, it either makes it or breaks it…and after all of that work you hope it looks awesome. I decided to use Rust-oleum weathered gray. I practiced on a couple of test pieces. Usually I use pre-stain conditioner, but I didn’t love the pieces that I used it with.
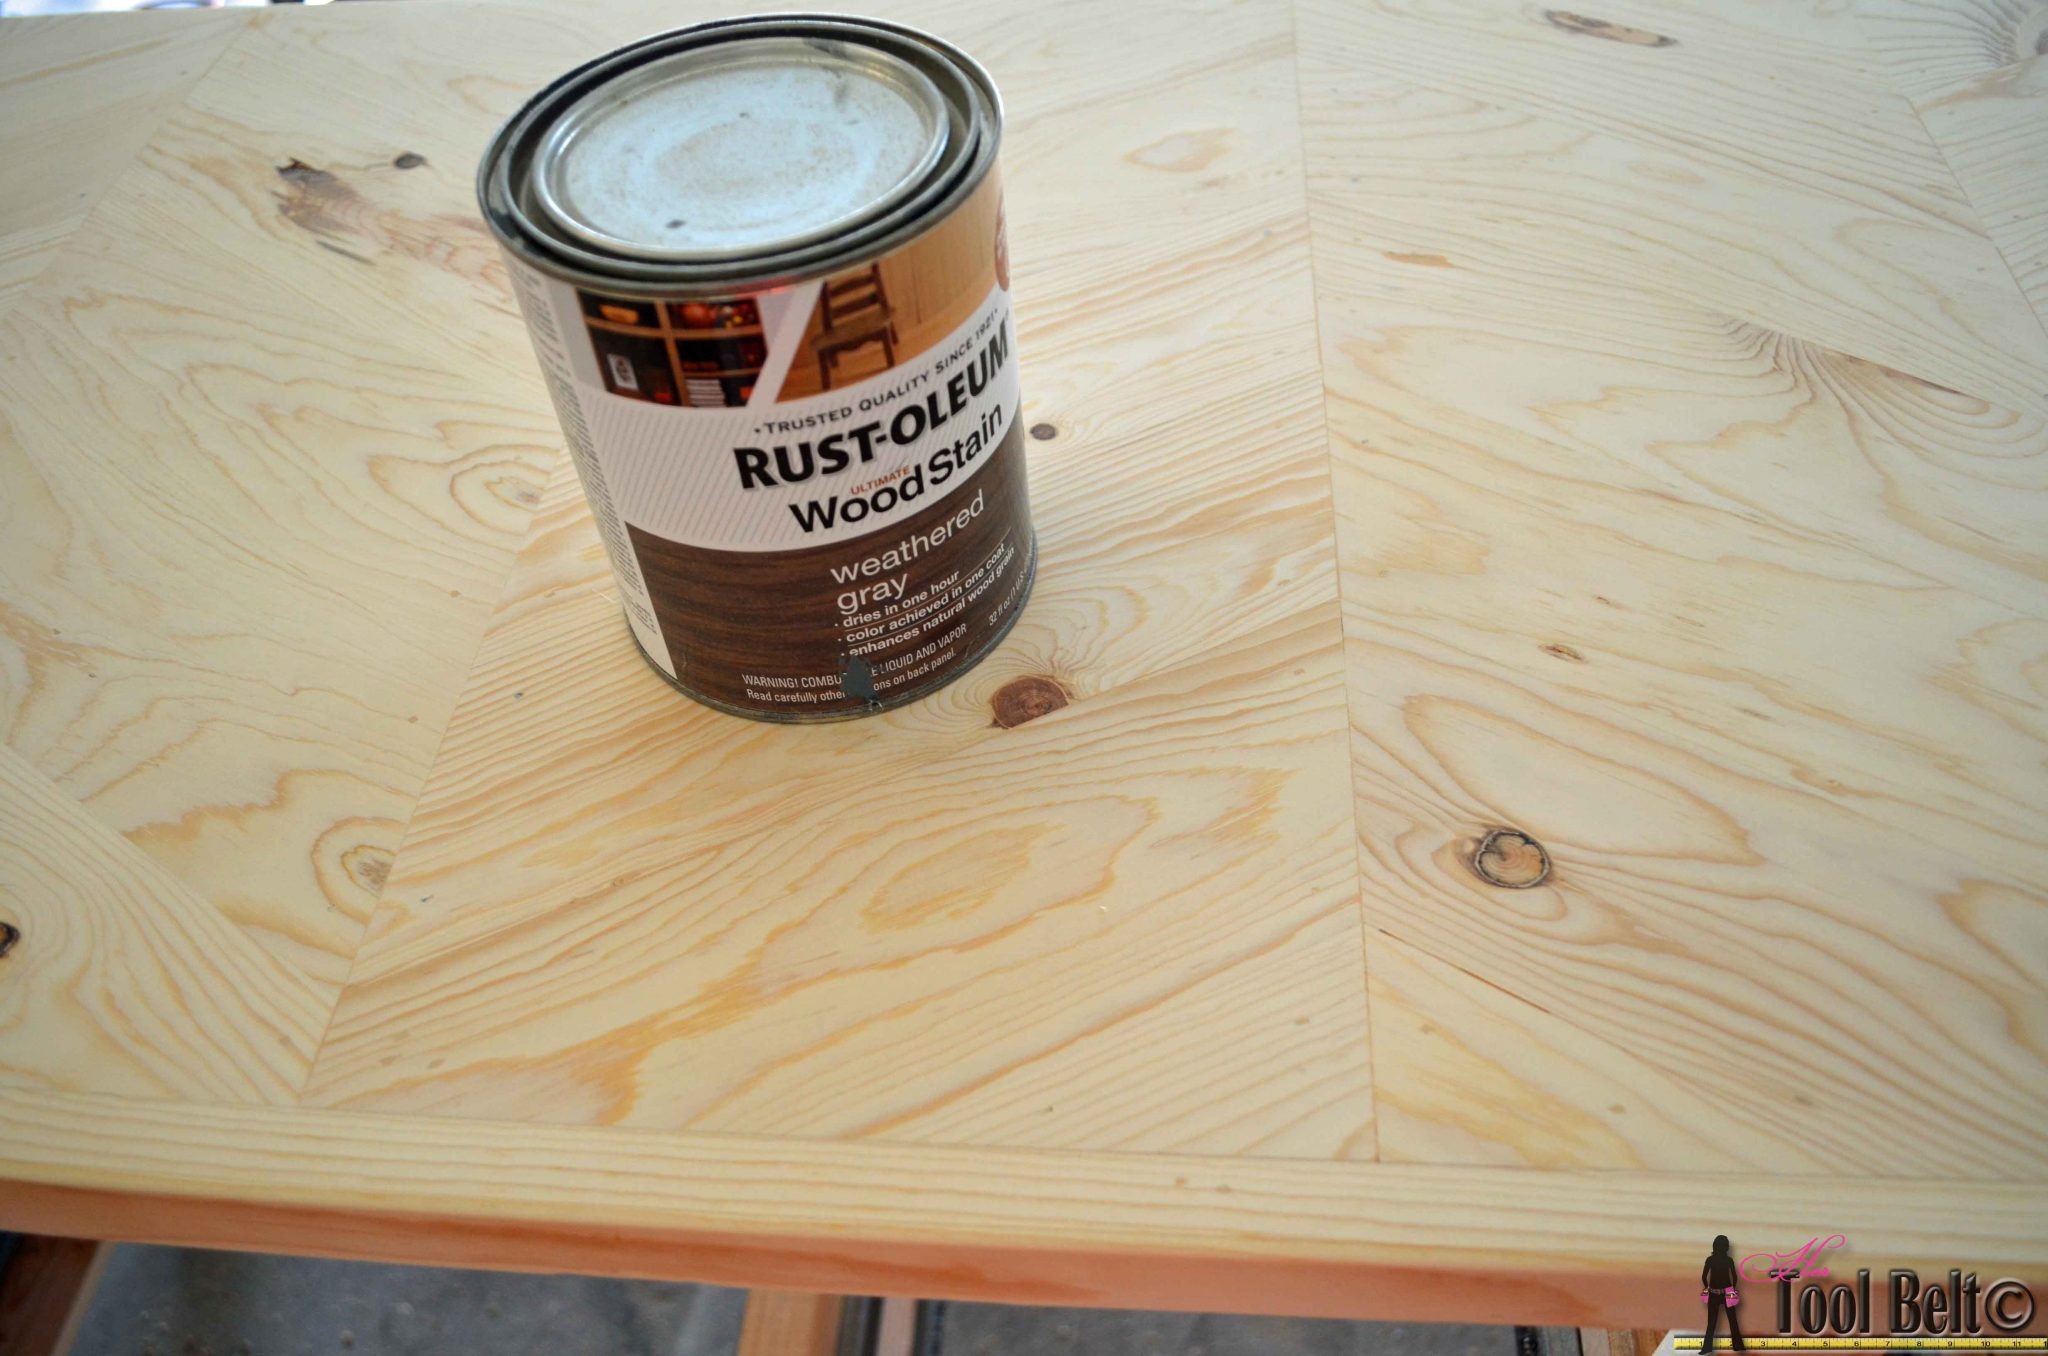
I applied a thin coat of the stain, it looks like gray paint going on.
I let the stain soak in for a few minutes, then used a cloth to remove the excess. This was after 1 coat, I wanted a little more coverage, so I applied another coat.
I stained the rest of the dresser.
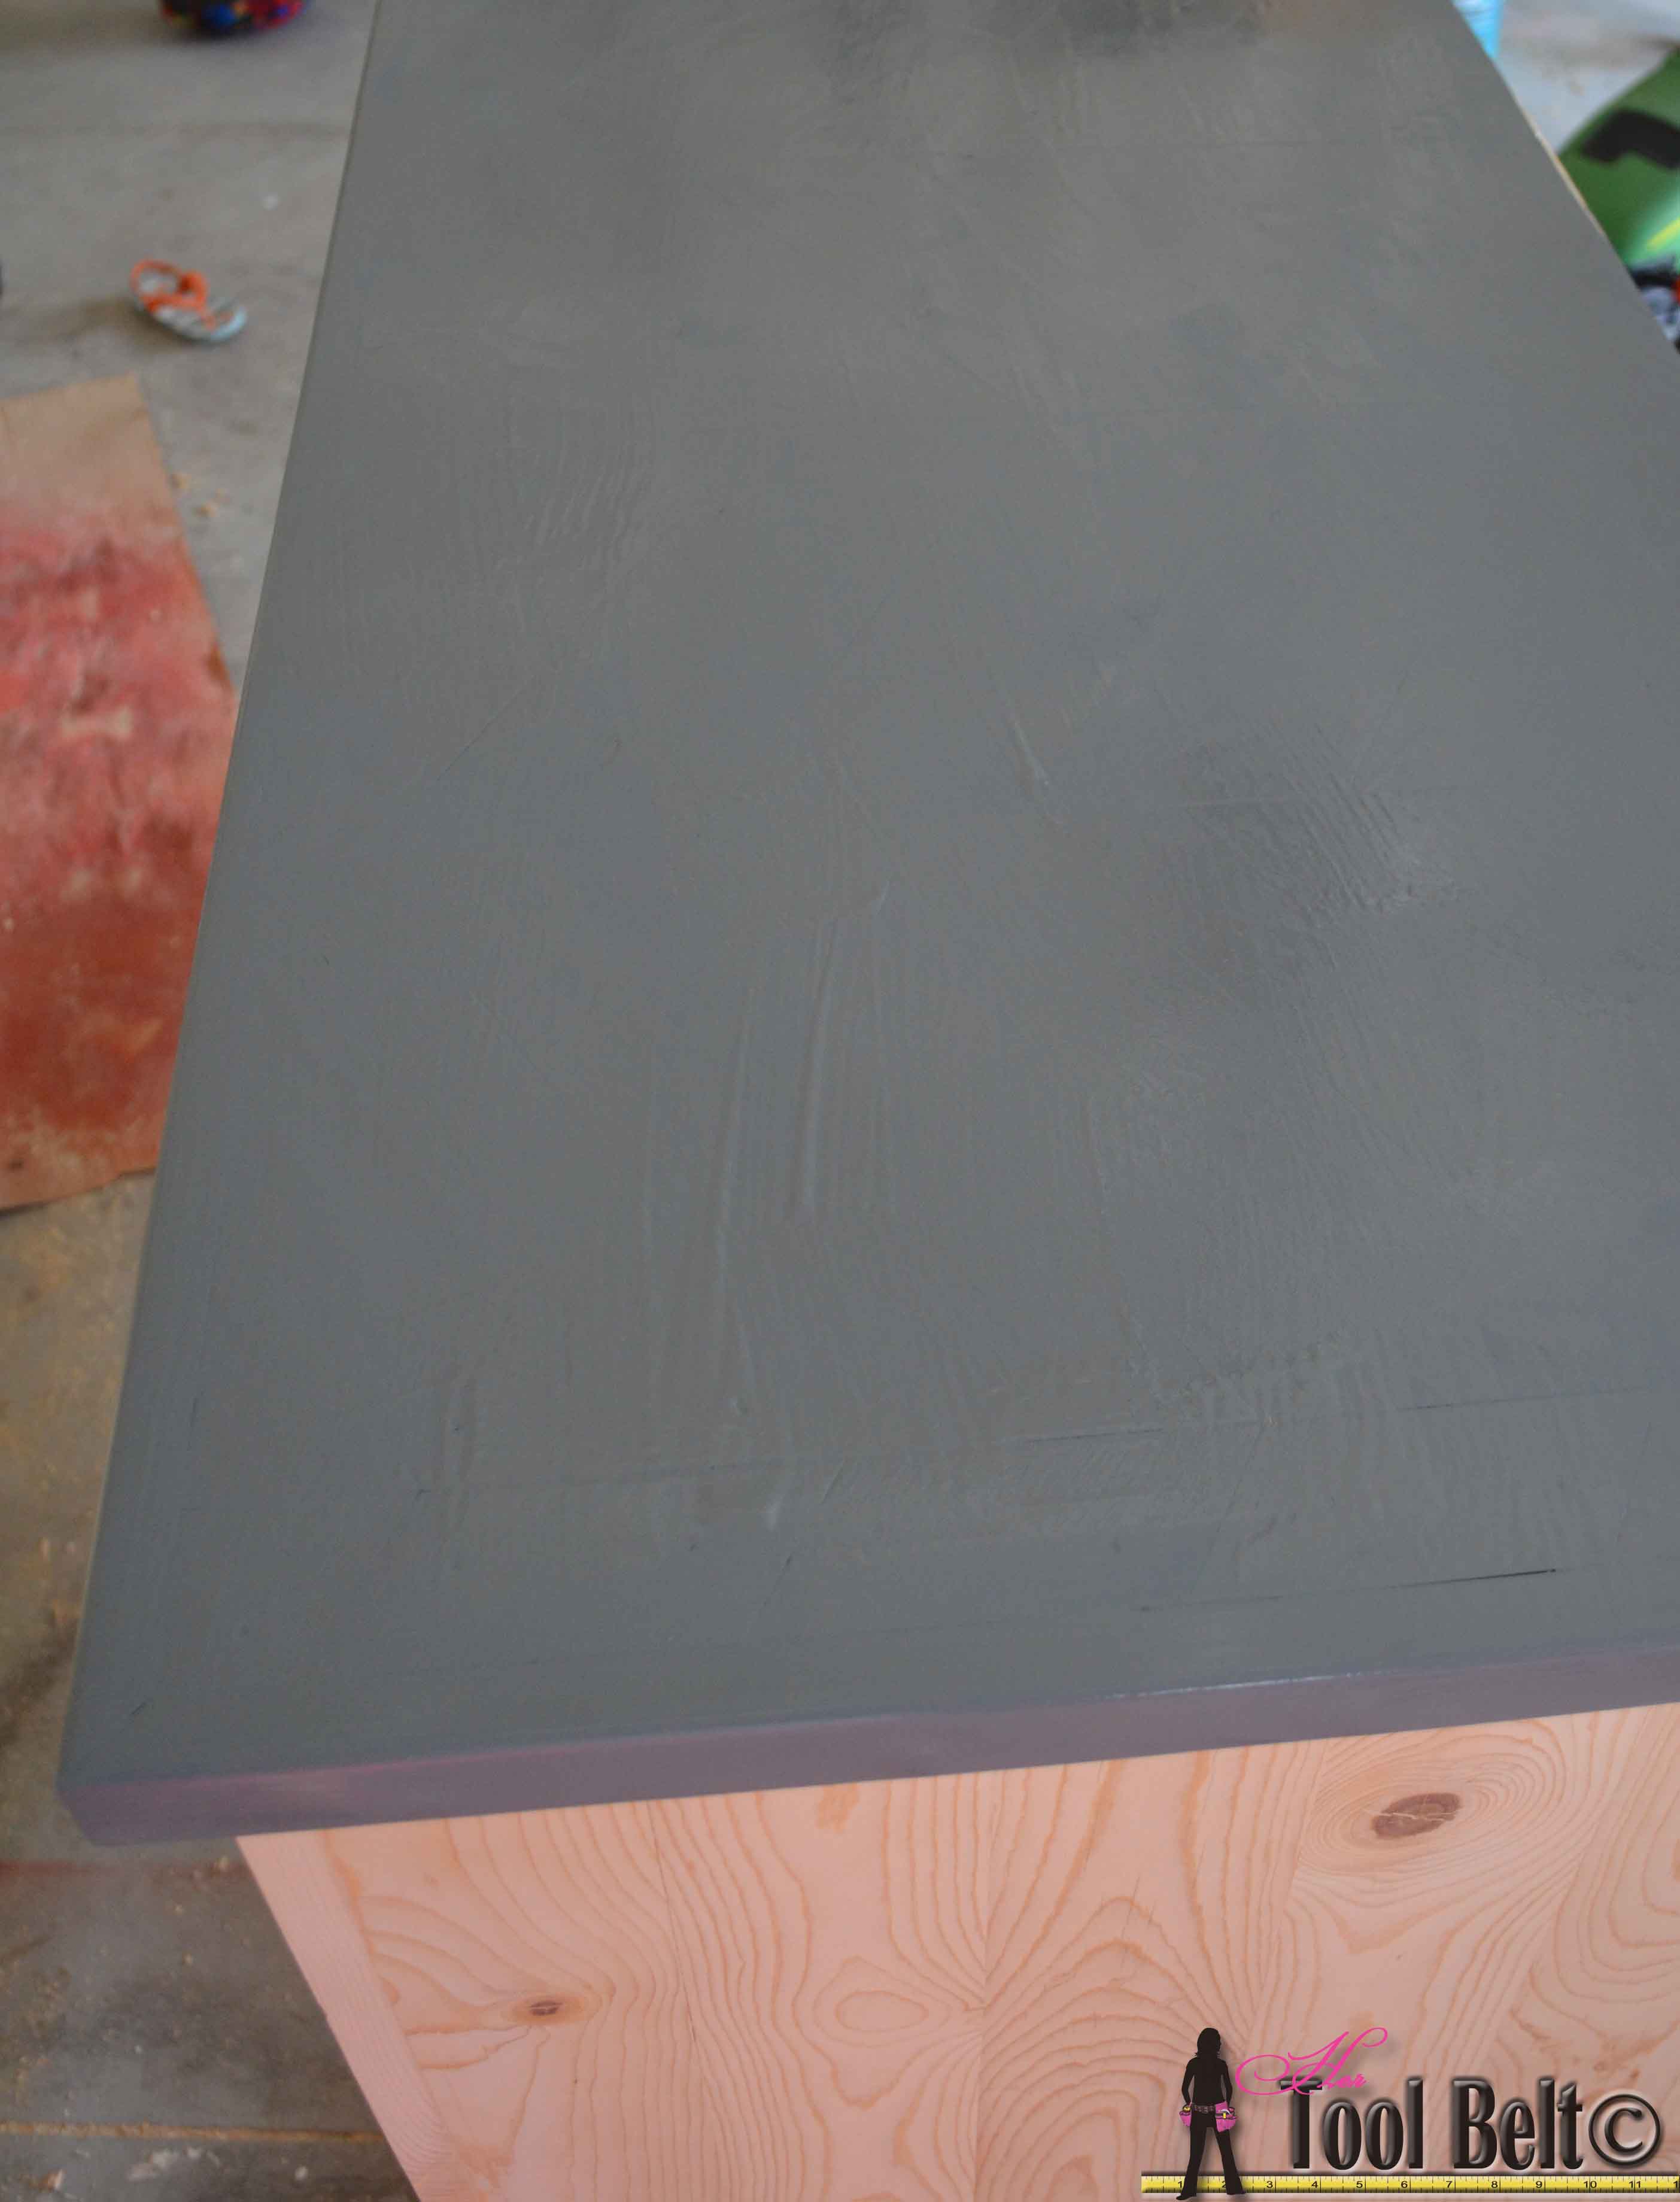
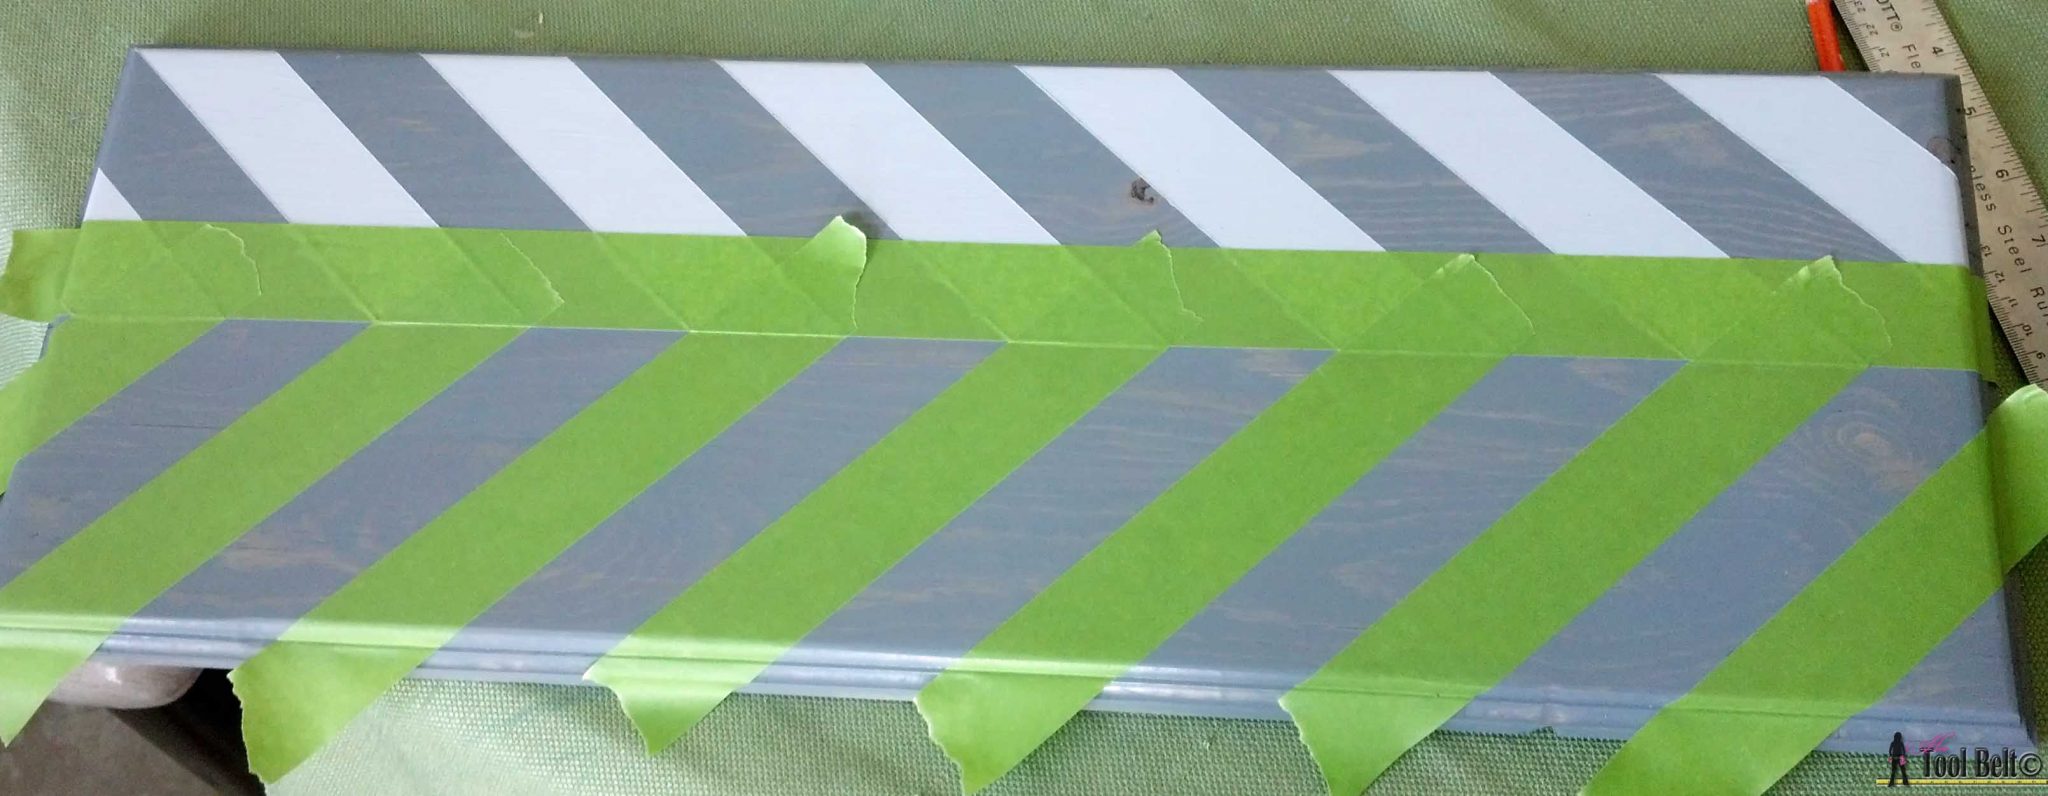
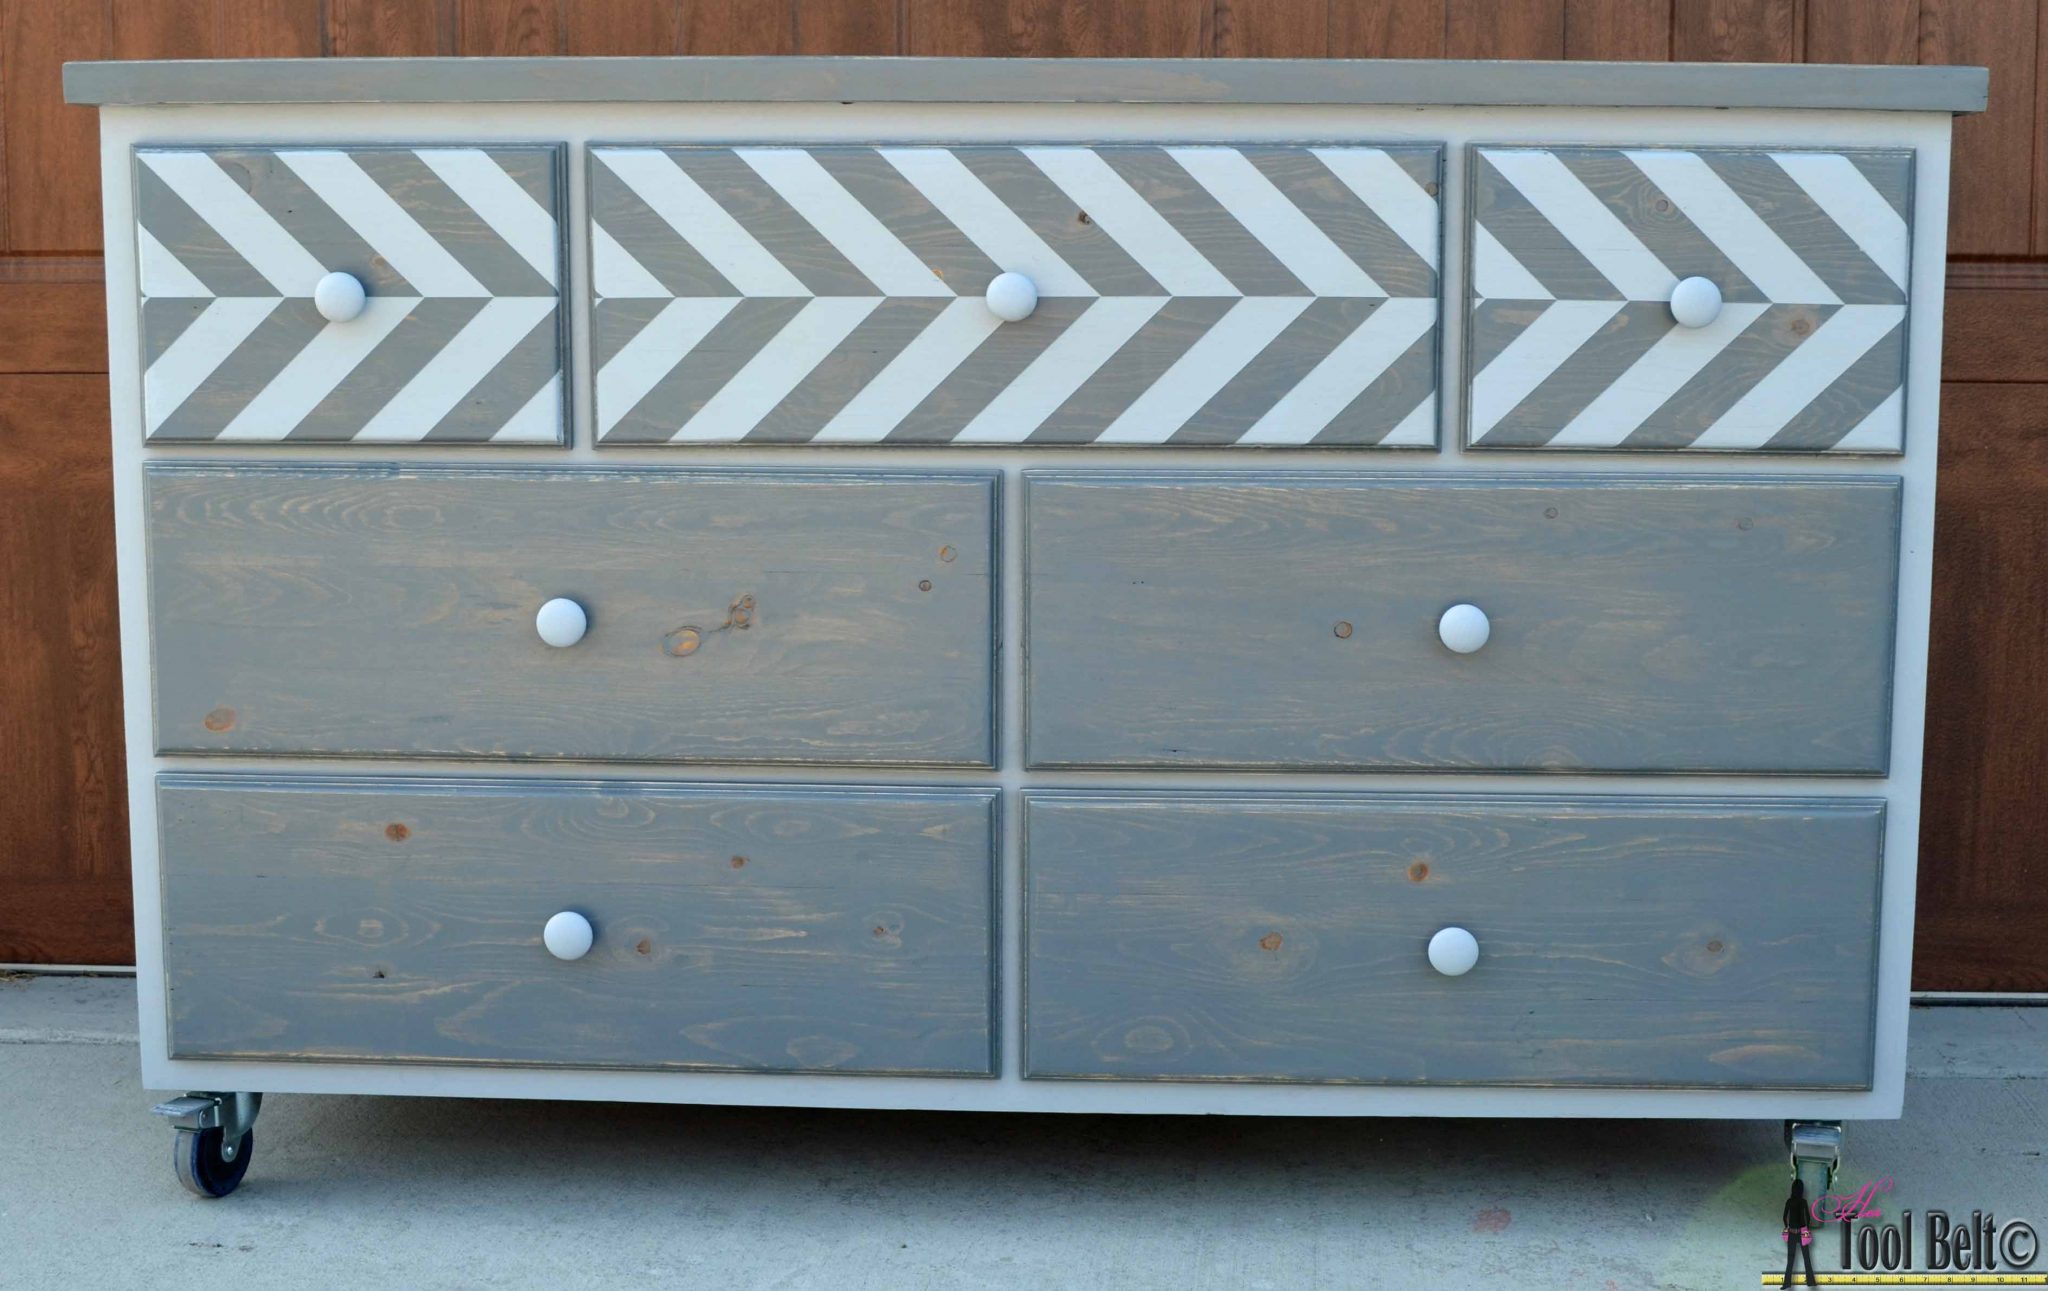
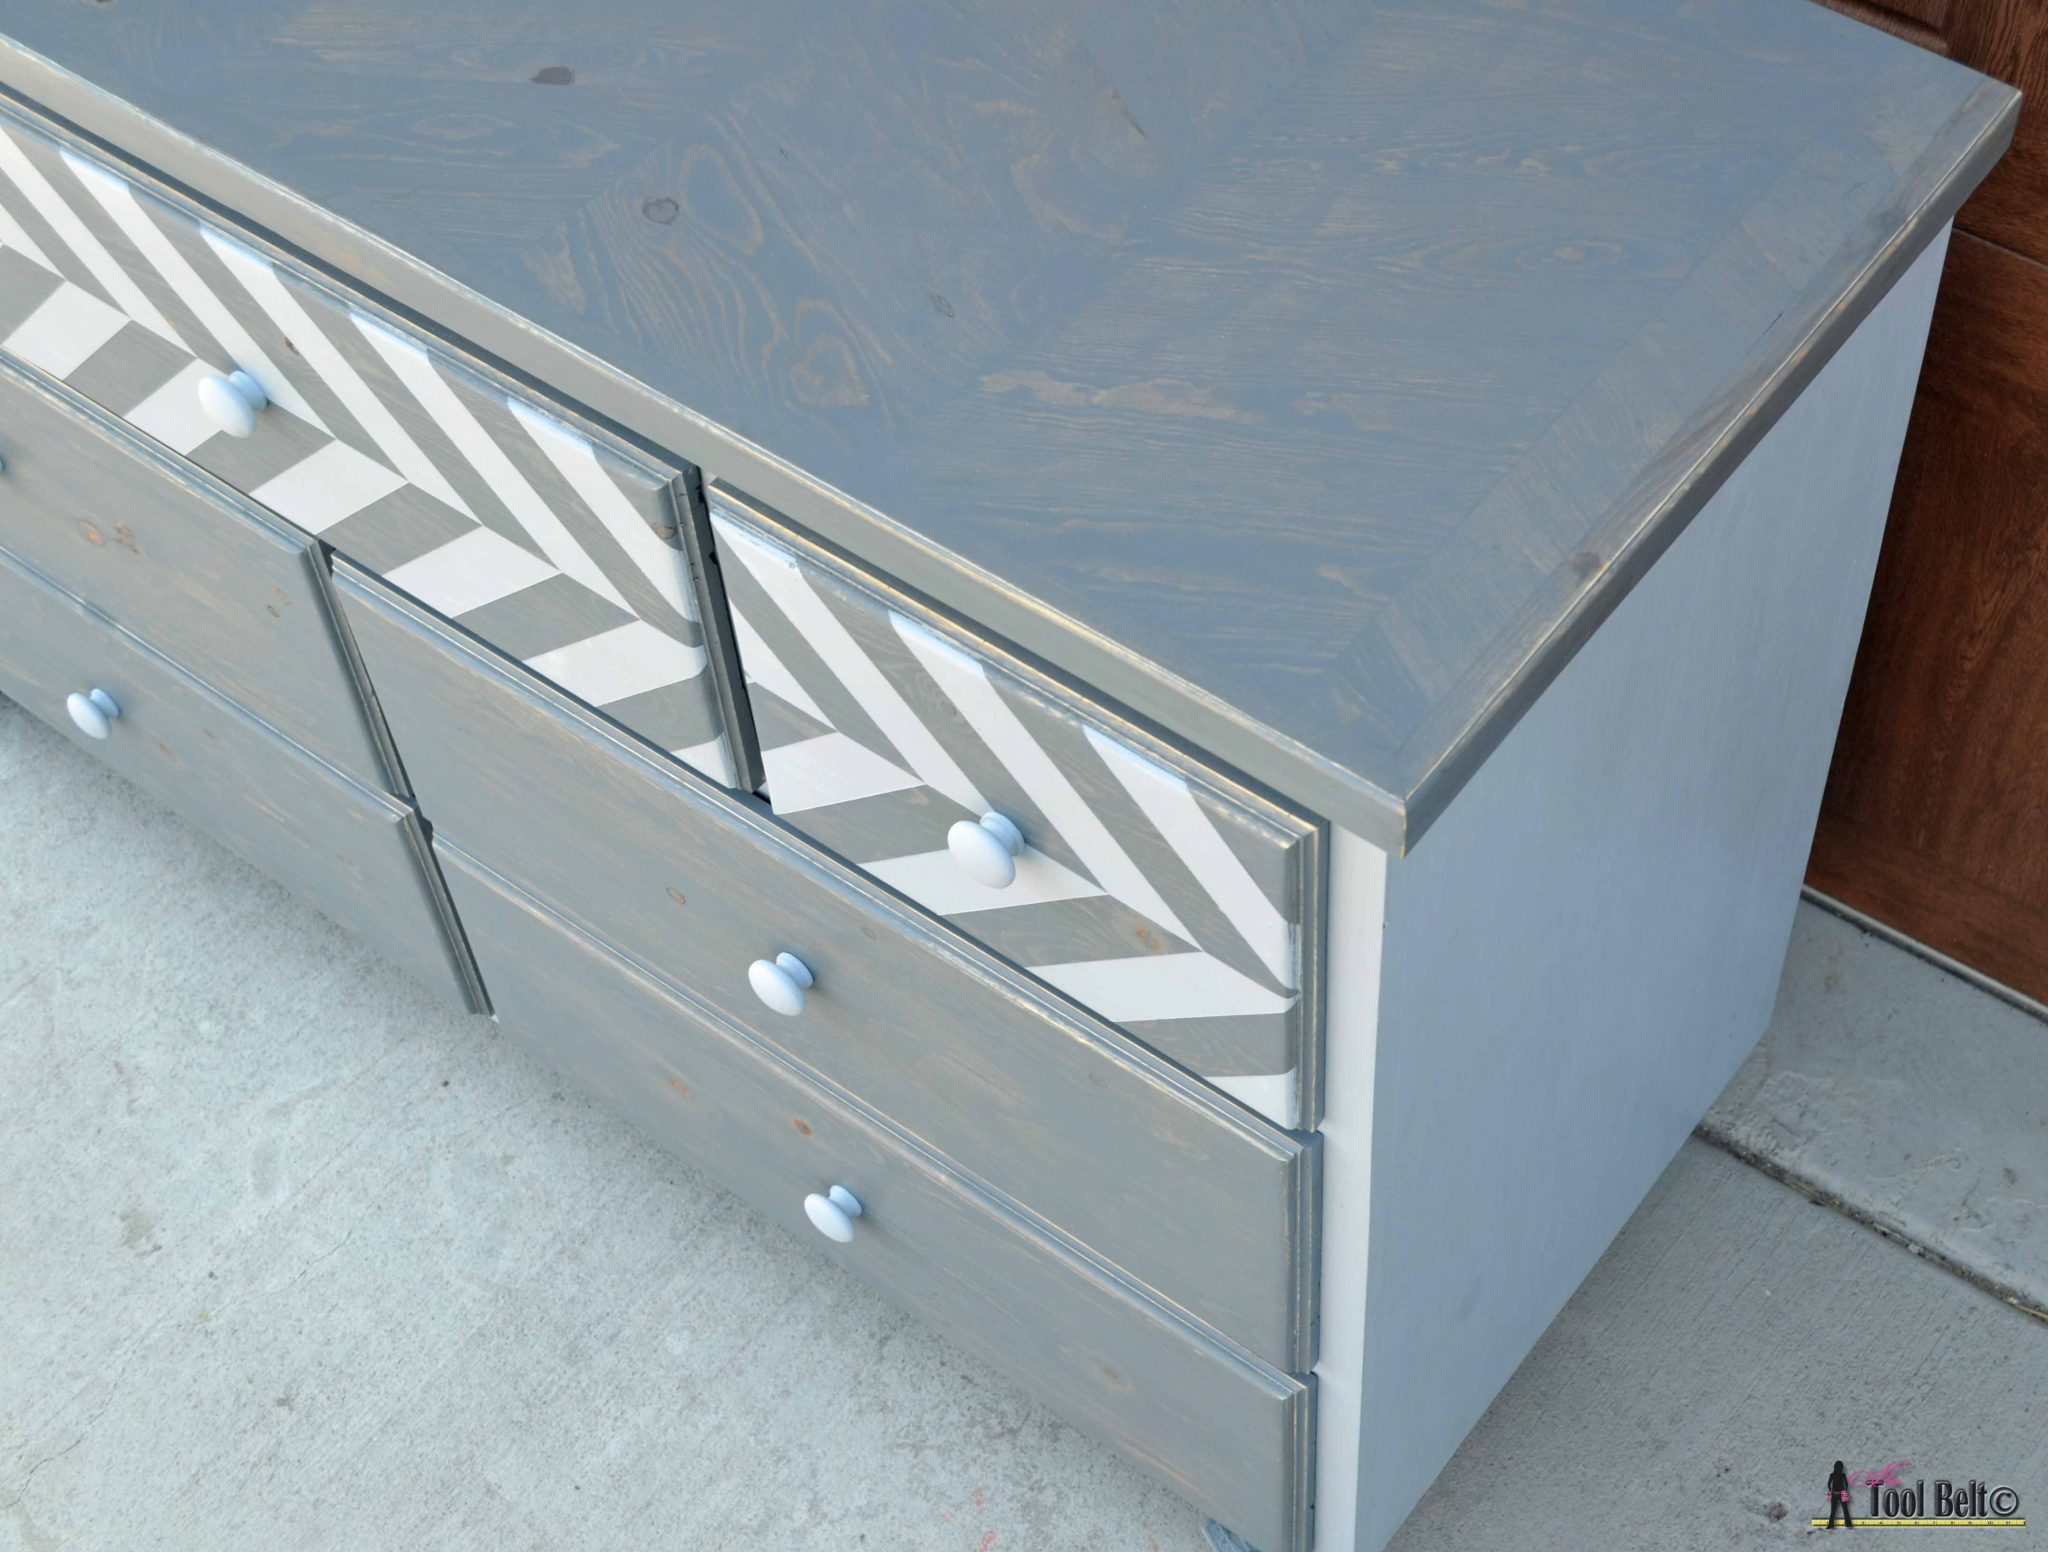
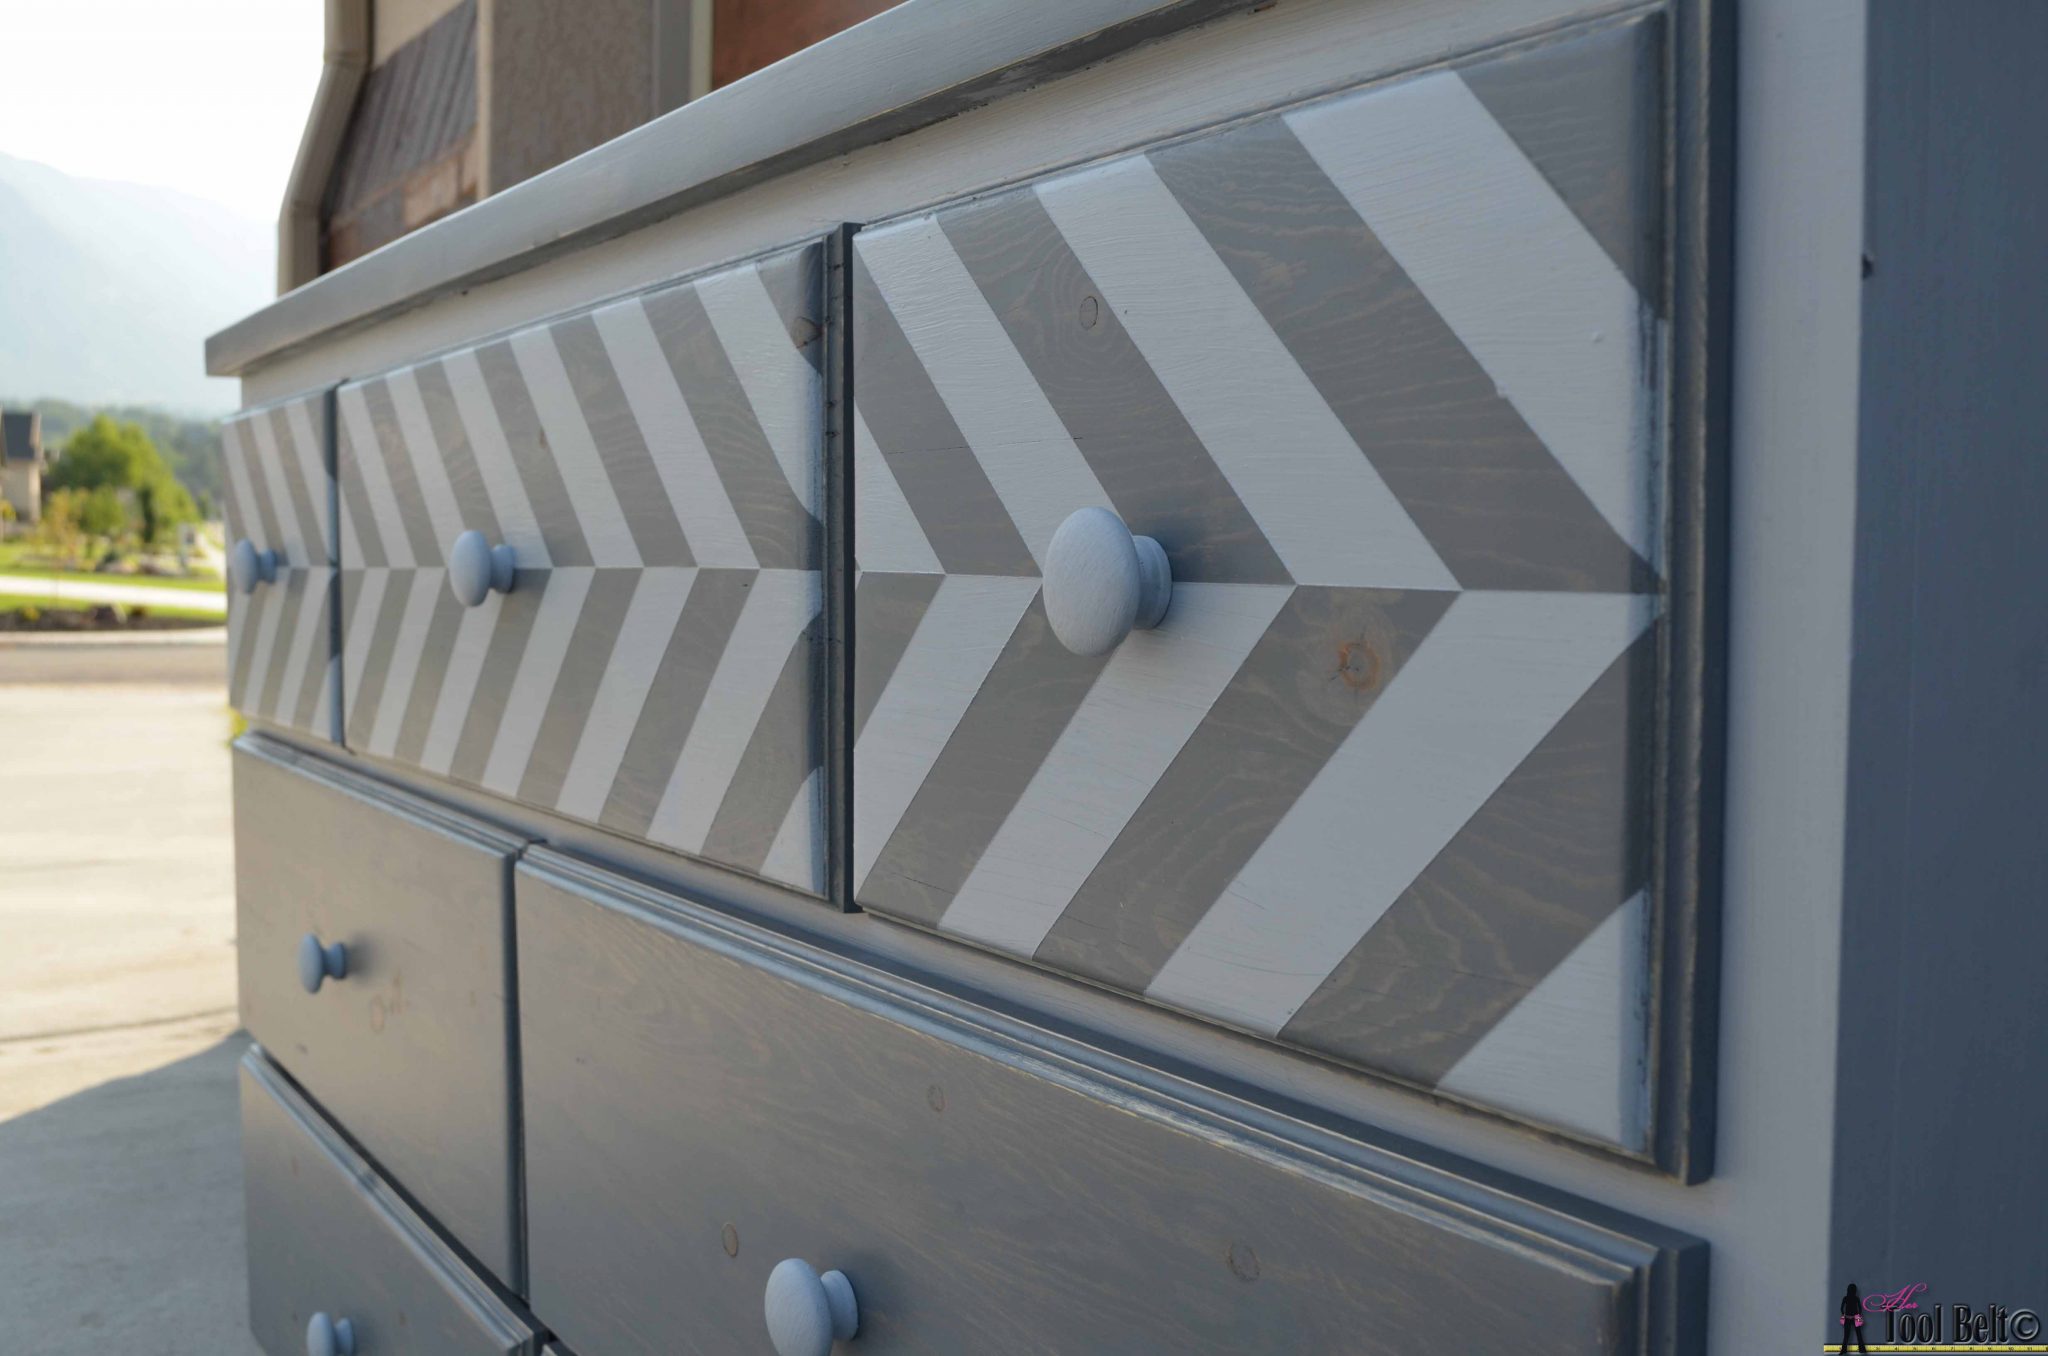
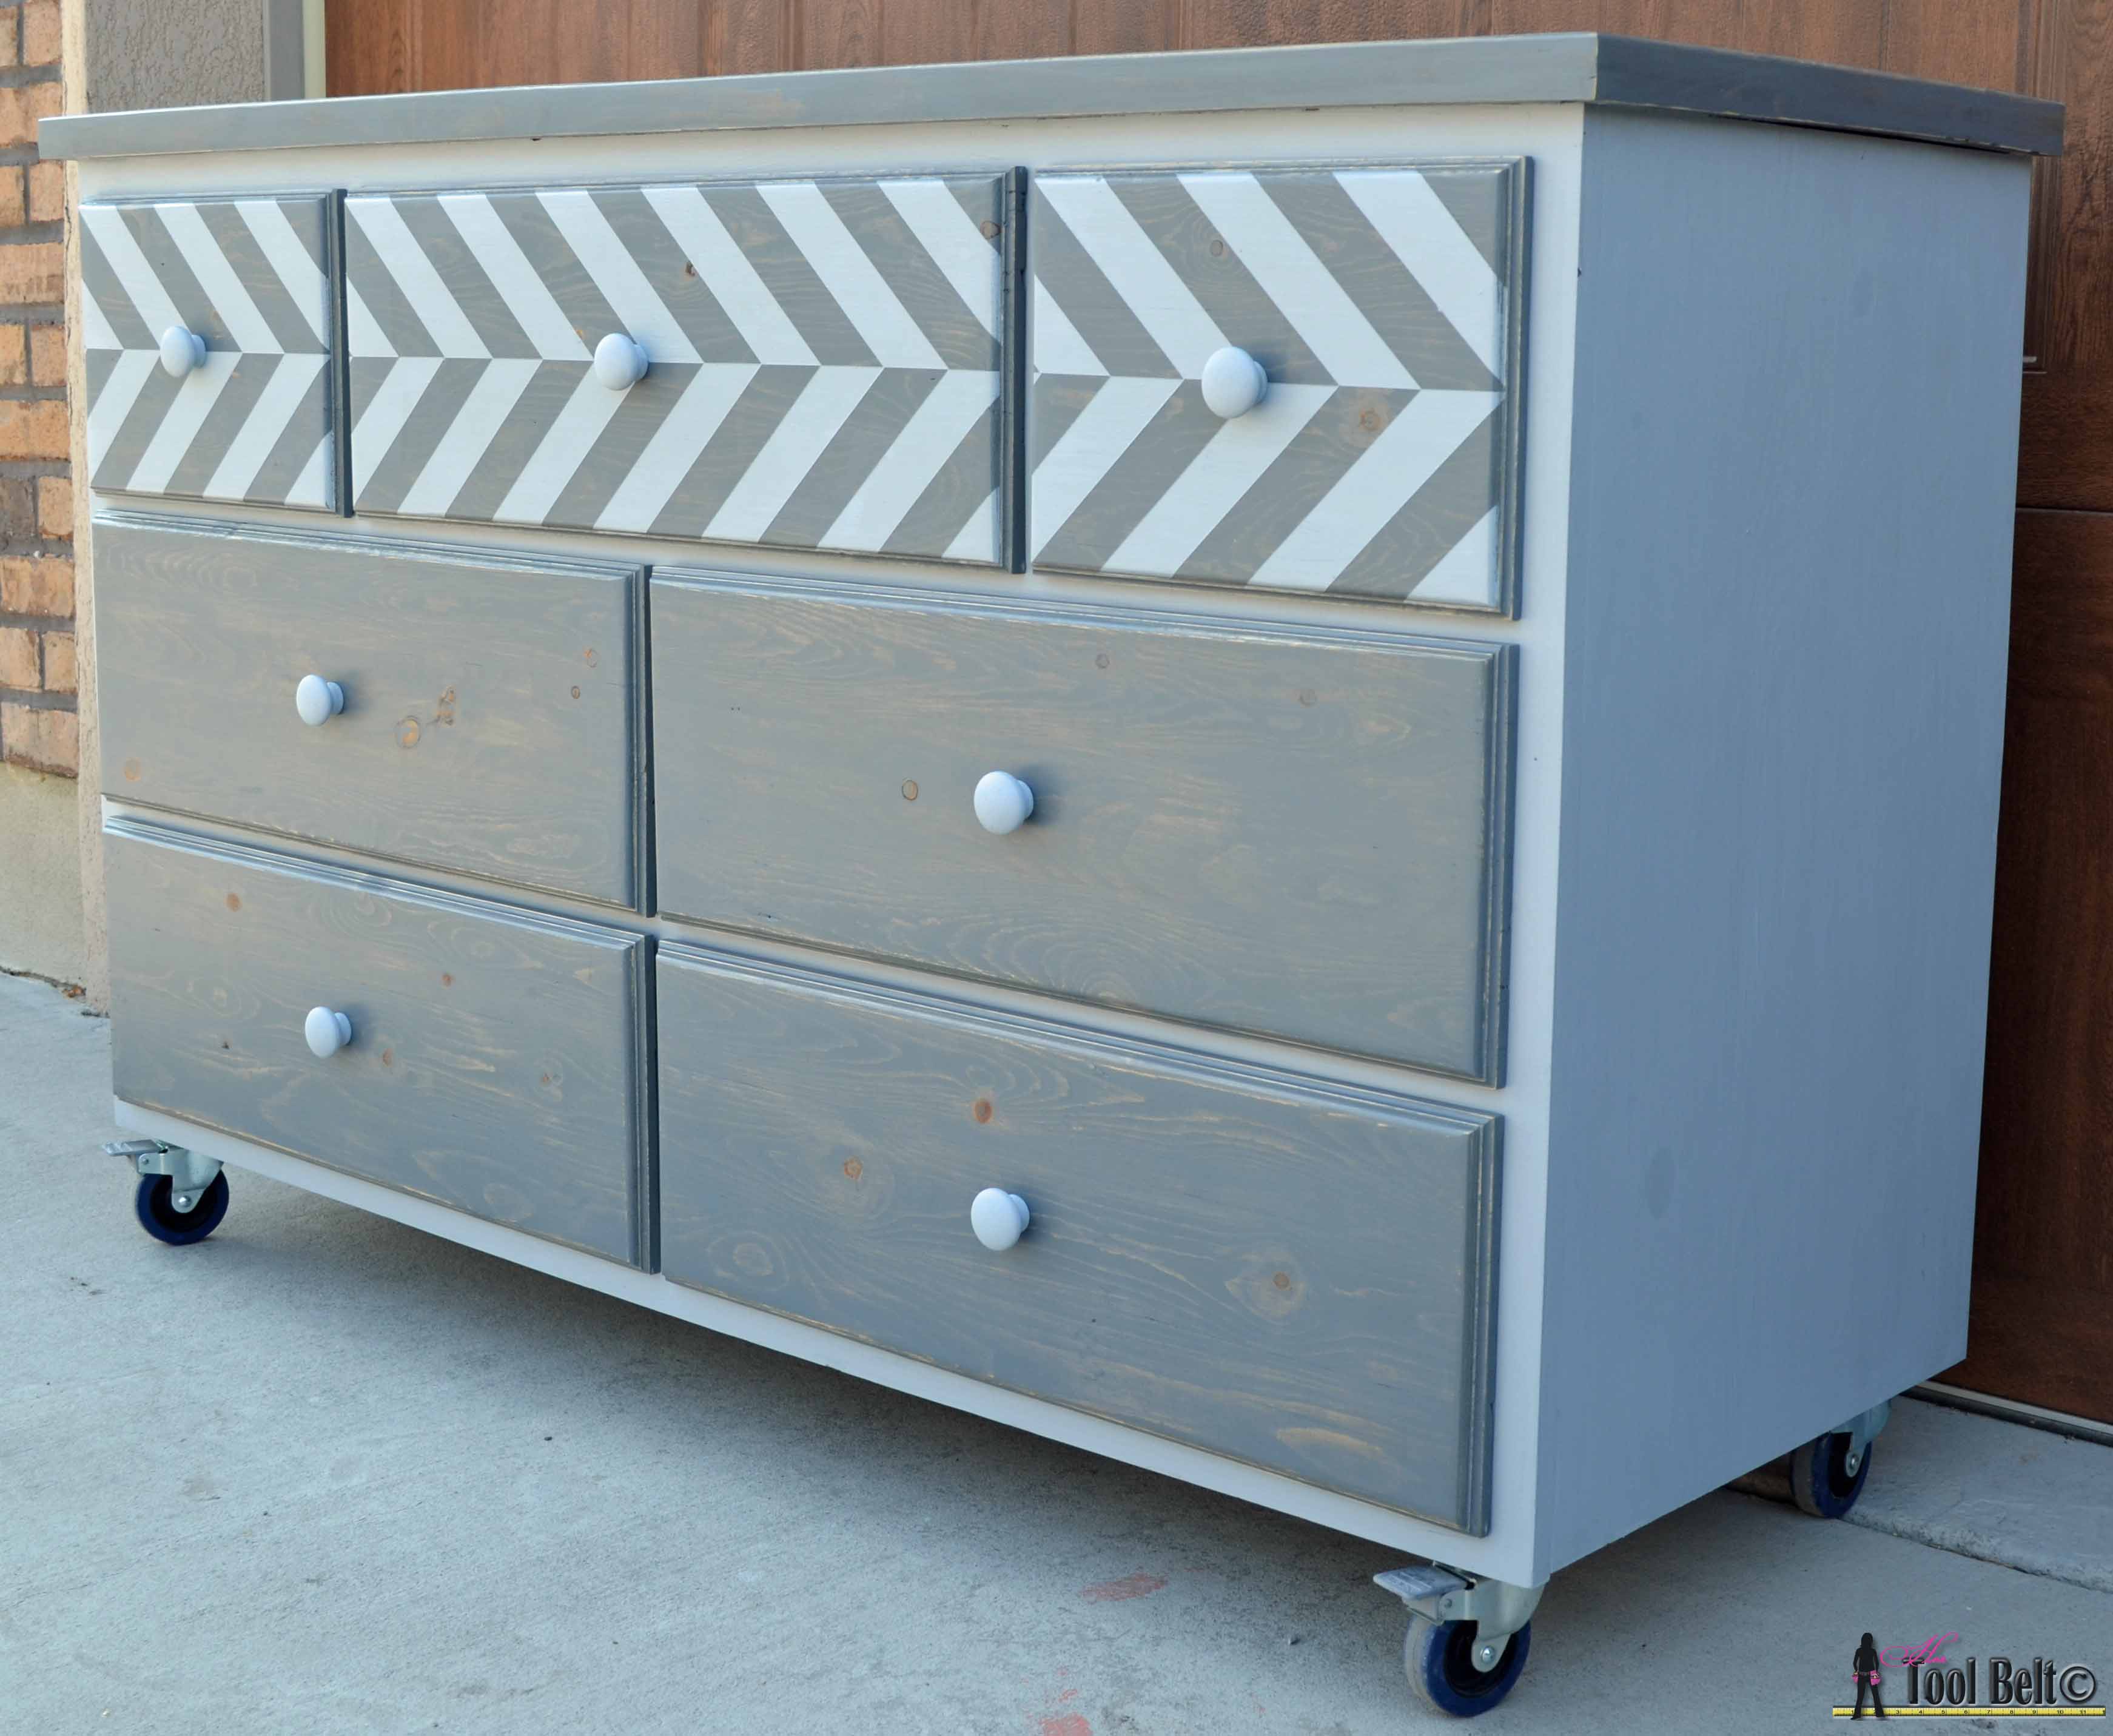
After I finished staining, and it had dried for a while. I was nervous that the dresser looked like a big gray blob. I stewed about it for a while, and I wasn’t sure my sister-in-law would like the look, even though it was gray. I decided to go gray two-toned to break up the blob. I used Yesteryear Americana Decor Chalky paint. I painted the cabinet body the very light gray Yesteryear color. Then I added chevron stripes to the top drawer fronts.
Measure the half point of the drawer fronts, apply a piece of painters tape with the top edge on the halfway line. Apply diagonal stripes in tape at whatever increment that you want.

Paint the taped side of the drawer front. Pull the tape off of the drawer front and allow the paint to fully dry.
Apply tape on the same half way mark, but put the tape on the other side of the line this time. Apply tape diagonally, lining up with the previous diagonal marks. Paint the taped side of the drawer front. Pull the tape off carefully and allow the paint to fully dry.
For the knobs, I bought cheap wooden knobs at Home Depot and painted them with the same Oyster Chalky paint. I installed the knobs in the center of each drawer.
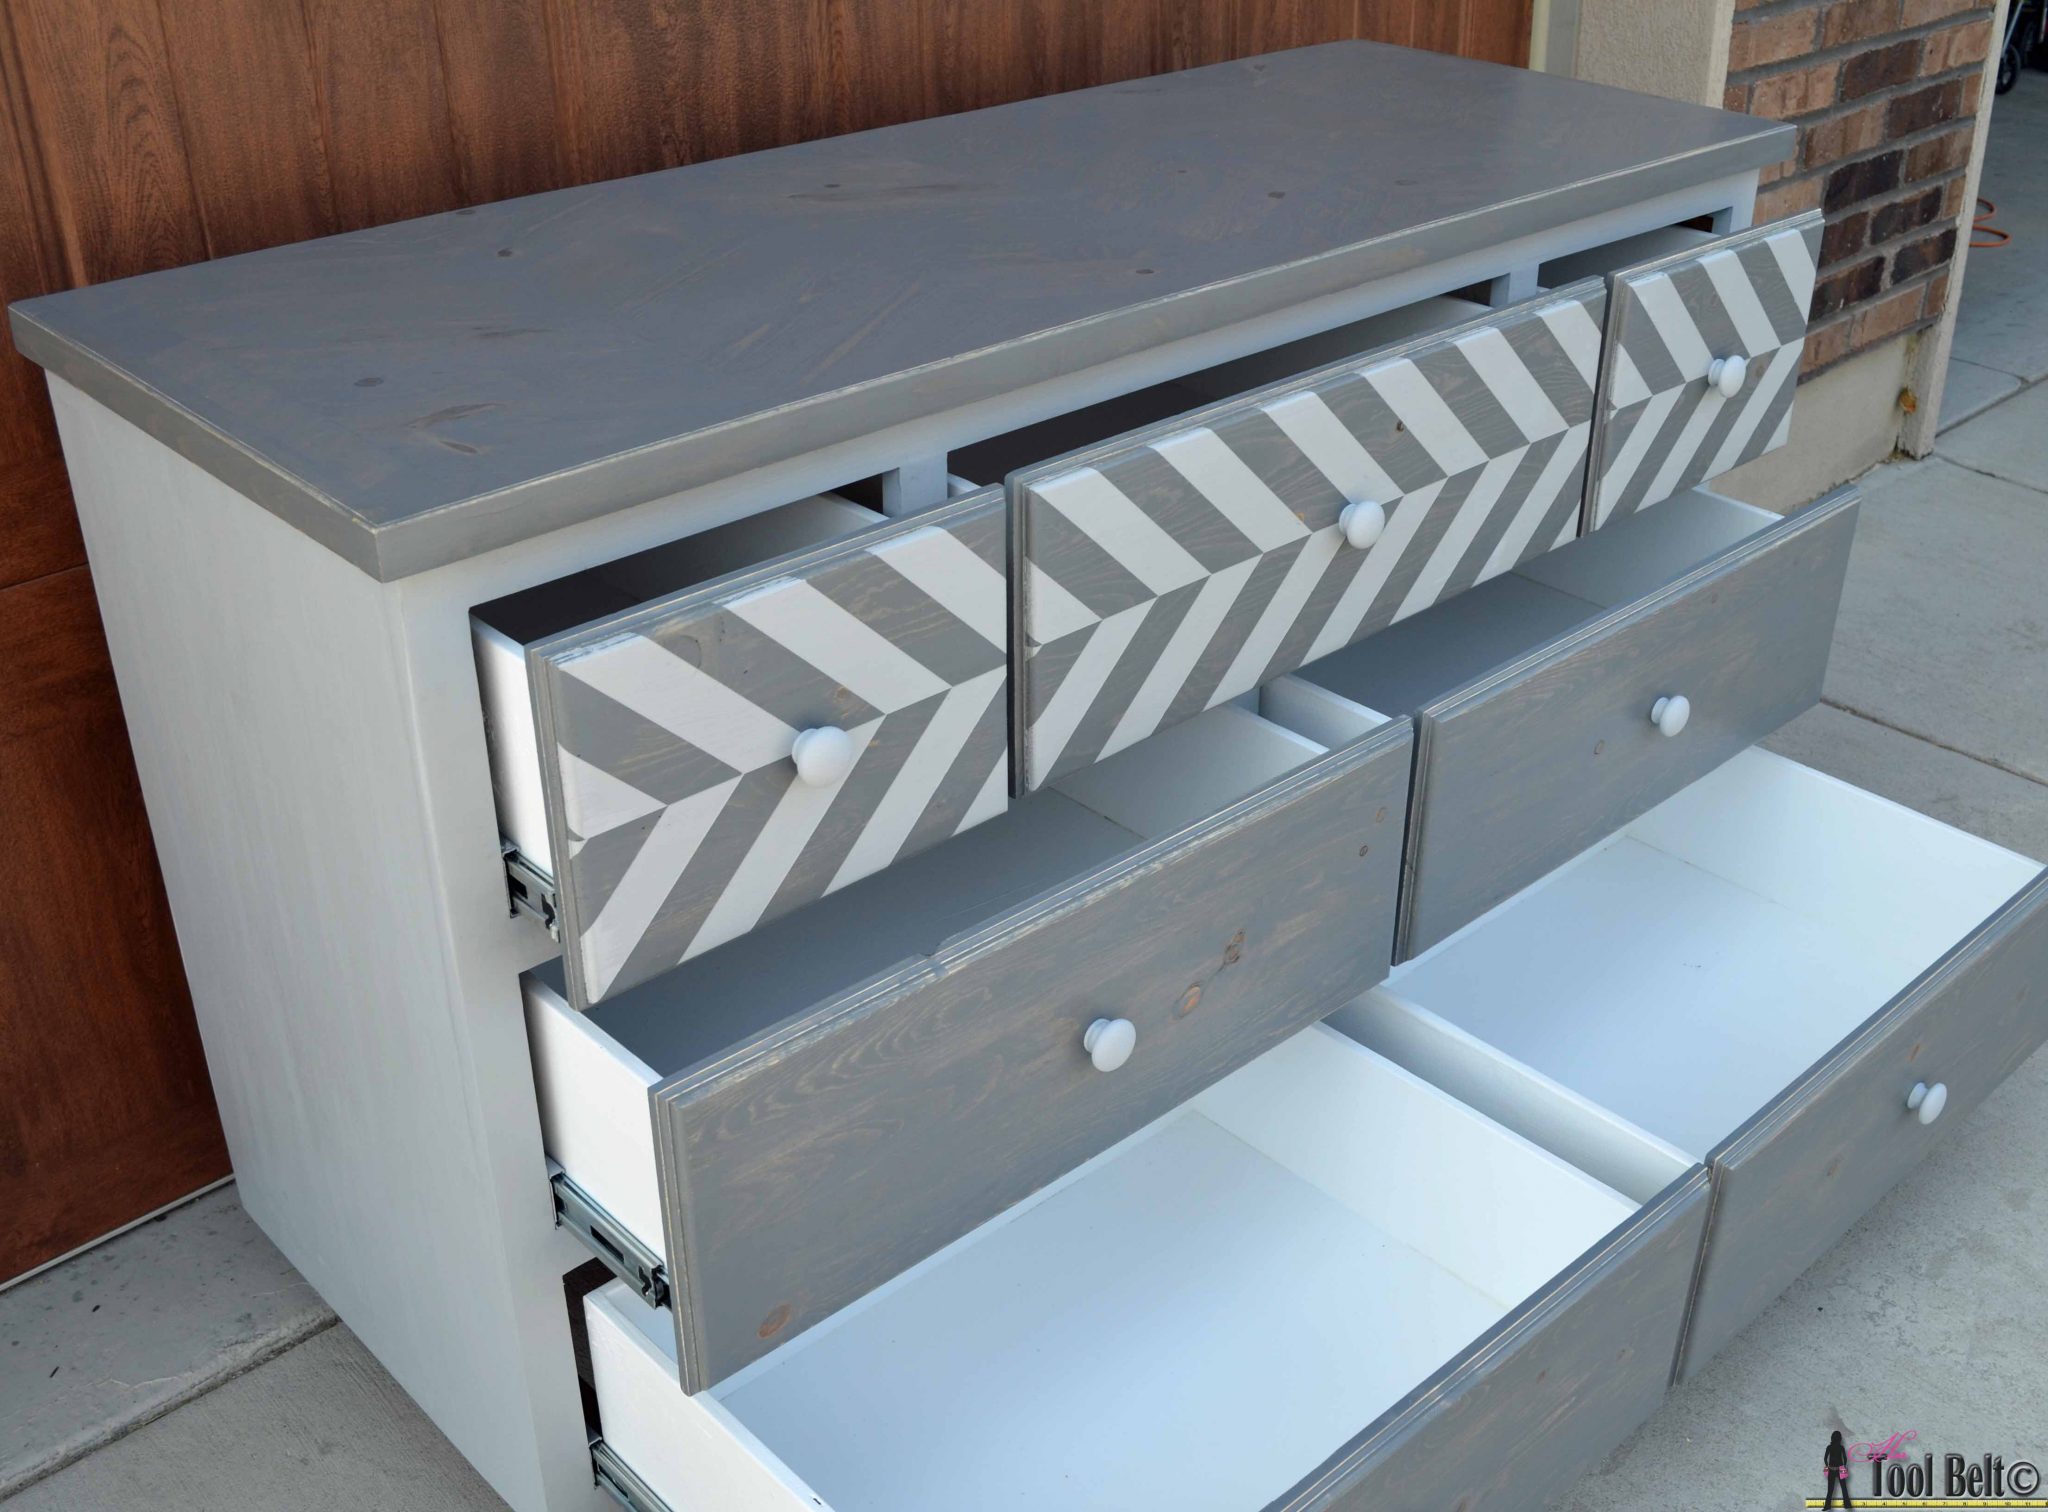
I primed and painted all of the drawer boxes white.
Once all of the paint and stain is completely dry, apply a protective top coat. I used polycrylic, because it dries clear. I let the top coat dry completely.
What do you thing, are you a fan?
I was a little disappointed that the gray stain muted the chevron design on the top.
I love the full extension drawers, and I’m jealous. I better start making one for my daughter’s room.
The chevron paint on the front was a good addition for a little boy.
 Pin for later
Linked to: Favorite Link Parties, Remodelaholic, Savvy Southern Style, Home Stories A to Z, DIY’ers, Best of DIY
You are very talented. Gorgeous work. I love that it is on casters too!
Thanks Kelley, I love the castors too!
wow this is fantastic lucky nephew xx
Thanks!
You rocked it!!!!! Pinned
What an amazing dresser, I just love the chevron top! Thanks so much for linking up to Your Designs This Time. I”m pinning your beautiful build to our favorites and features board. Thanks so much for sharing!
Thank you!
Amy, you have some mad skills! I absolutely love it! Amazing job…as always!
Leslie
Thanks Leslie
Stop by tonight and see it featured at the Twirl & Take a Bow Party! Love it!
this is amazing and love the pattern.
thanks
This is INCREDIBLE! I am completely in love with it. I so wish I had tools to make this (and time!!). The colors are gorgeous, and I looooooove the herringbone design with the wood and the paint. Ah I can’t stop staring at it! Pinned! Visiting from The Makers 🙂
Thanks Amanda
Unbelievable! I can’t believe you built this, it’s so stunning!! Please come share at our link party going on now! http://www.delineateyourdwelling.com/2014/08/link-it-or-lump-it-party-51.html
holy cannoli! That’s gorgeous and the BEST tutorial ever. Thanks so much for all the beautiful pics and for linking up to Twirl and Take a Bow!
Thanks Robin!
Wow! This is the best pallet project I’ve ever seen!
You did amazing!
This is ridiculously impressive! I wish I had your skill! LOVE the stain.
Amy,
I swear I commented on your post but I am glad I am back and made sure too this time. Amy you are talented and know how to use it. Awesome!
Have a creative day,
Karen Marie
Dragonfly & Lily Pads
Hi Karen, thanks for coming back!!! That’s always a good thing & thanks for your nice words.
This is pure AMAZINGNESS! Thanks for linking it up at Monday Funday! Sharing on FB!
Thank you
wow totally amazing. awesome dresser and awesome step by step tute. I would love this dresser so if he doesn’t like it I will come pick it up! 🙂 Thanks for sharing with us at Snickerdoodle Sunday!
This is truly impressive…from the building to the paint job…first rate all the way! Great job! Thanks for sharing at my Creative Ways Link Party!
Blessings,
Nici
That turned out so awesome! I’m not usually a chevron fan, but I really like how you alternated the chevrons to make it a little different on the drawer fronts. Great dresser.
Wow! This looks amazing! Thank you bunches for linking up and partying with us this week! Pinning this!
I love how this turned out and am so glad you shared at our link party. I featured YOU this morning, be sure to stop by and grab a feature button!
http://www.delineateyourdwelling.com/2014/08/link-it-or-lump-it-party-52-features.html
This is seriously amazing! The top of the dresser alone is to die for! Thanks for linking this up to The Creative Collection Link Party!
Thanks
This is gorgeous! I LOVE the chevron design on the top drawers and using two different shades of gray. I would never have guessed you made this from pallet wood. Thanks for sharing with Creative Spark Link Party. Hope you join us again tomorrow.
Glenna @ My Paper Craze
Amy!! It turned out so beautiful!! Wow. I don’t have words… you are my hero!!
Thanks Mindi
I just chopped up 6 pallets last night! I’m a little less ambitious I am making pallet signs though. Since I love pallets and chevron so much I had to feature you this week on the Creative Spark Link Party. Stop by and check out your feature and link up again! http://bit.ly/1pGnzMf
Thank you
You are very talented, you know your way with tools
Amy, this is gorgeous! You are so, so talented! I’m featuring you this week for the Thursday S.T.Y.L.E. Link Party. Thanks for linking up with us!
Thanks Katie!!!
Thanks of relining up to the Be. YOU. Tiful Link Party. Featuring you this week as my fav pick:)
*linking
Thank you Adrienne!
This is gorgeous! I cannot believe you made it, I love so much about this. I am featuring it at Friday Favorites, head on over at 5pm and grab a button!
Love this!!
Thanks Trish
Thank you for the plans ,nice project..
This is amazing, how long did it take?
Thanks, it took around 25-30 hours off and on. The extra sanding time really adds up when using reclaimed lumber 🙂
Love this! Great Idea for the top!
Love DIY projects and this one even takes recycling to the next level. Great post.
Thanks Ally
Amazing what can be made with pallets! Your dresser came out great! Or should I say your nephew’s dresser?!?! 🙂
Thanks, good luck on yours!
I love this dresser! Trying to convince my husband to make it for me! How many pallets did this take to make?
So excited to do this! I just found this website for the first time and what’s even better is I work at a Home Depot so I can watch for awesome deals on tools. Especially when I work in the hardware department ?. I’m so excited! How long did it take you and roughly how much did you spend?
Where can I get 17 3/4 inch side mount drawer slides CHEAP !!!
Someone please email me with your ideas …. other than this dilemma I haves loved building this dresser
Do you have a cut list for this still? The cut list is no longer visible in the tutorial.