• Home
  • Project Gallery
  • About me
    • Disclosure
    • Disclaimer
  • Blog

Her Tool Belt

DIY furniture plans, crafts, and home improvement tutorials to empower you!

  • Free Woodworking Plans
    • Bathroom Furniture
    • Bedroom Furniture
    • Entry
    • Family Room Furniture
    • Garage
    • Kitchen furniture
    • Laundry Room
    • Mudroom Furniture
    • Organization
    • Outdoor Furniture
  • Home Decor
    • Upcycle
  • Crafts
    • Holiday
  • Home Improvement
    • Cleaning
    • Fix IT
    • Paint
    • Tile
  • Tool Reviews
  • Tool Time Videos

DIY Bike and Scooter Rack

January 14, 2016 by Amy 31 Comments

Hi!  I’d love for you to follow me on Pinterest Her Tool Belt  and if you love instagram, you can keep up with me there too!

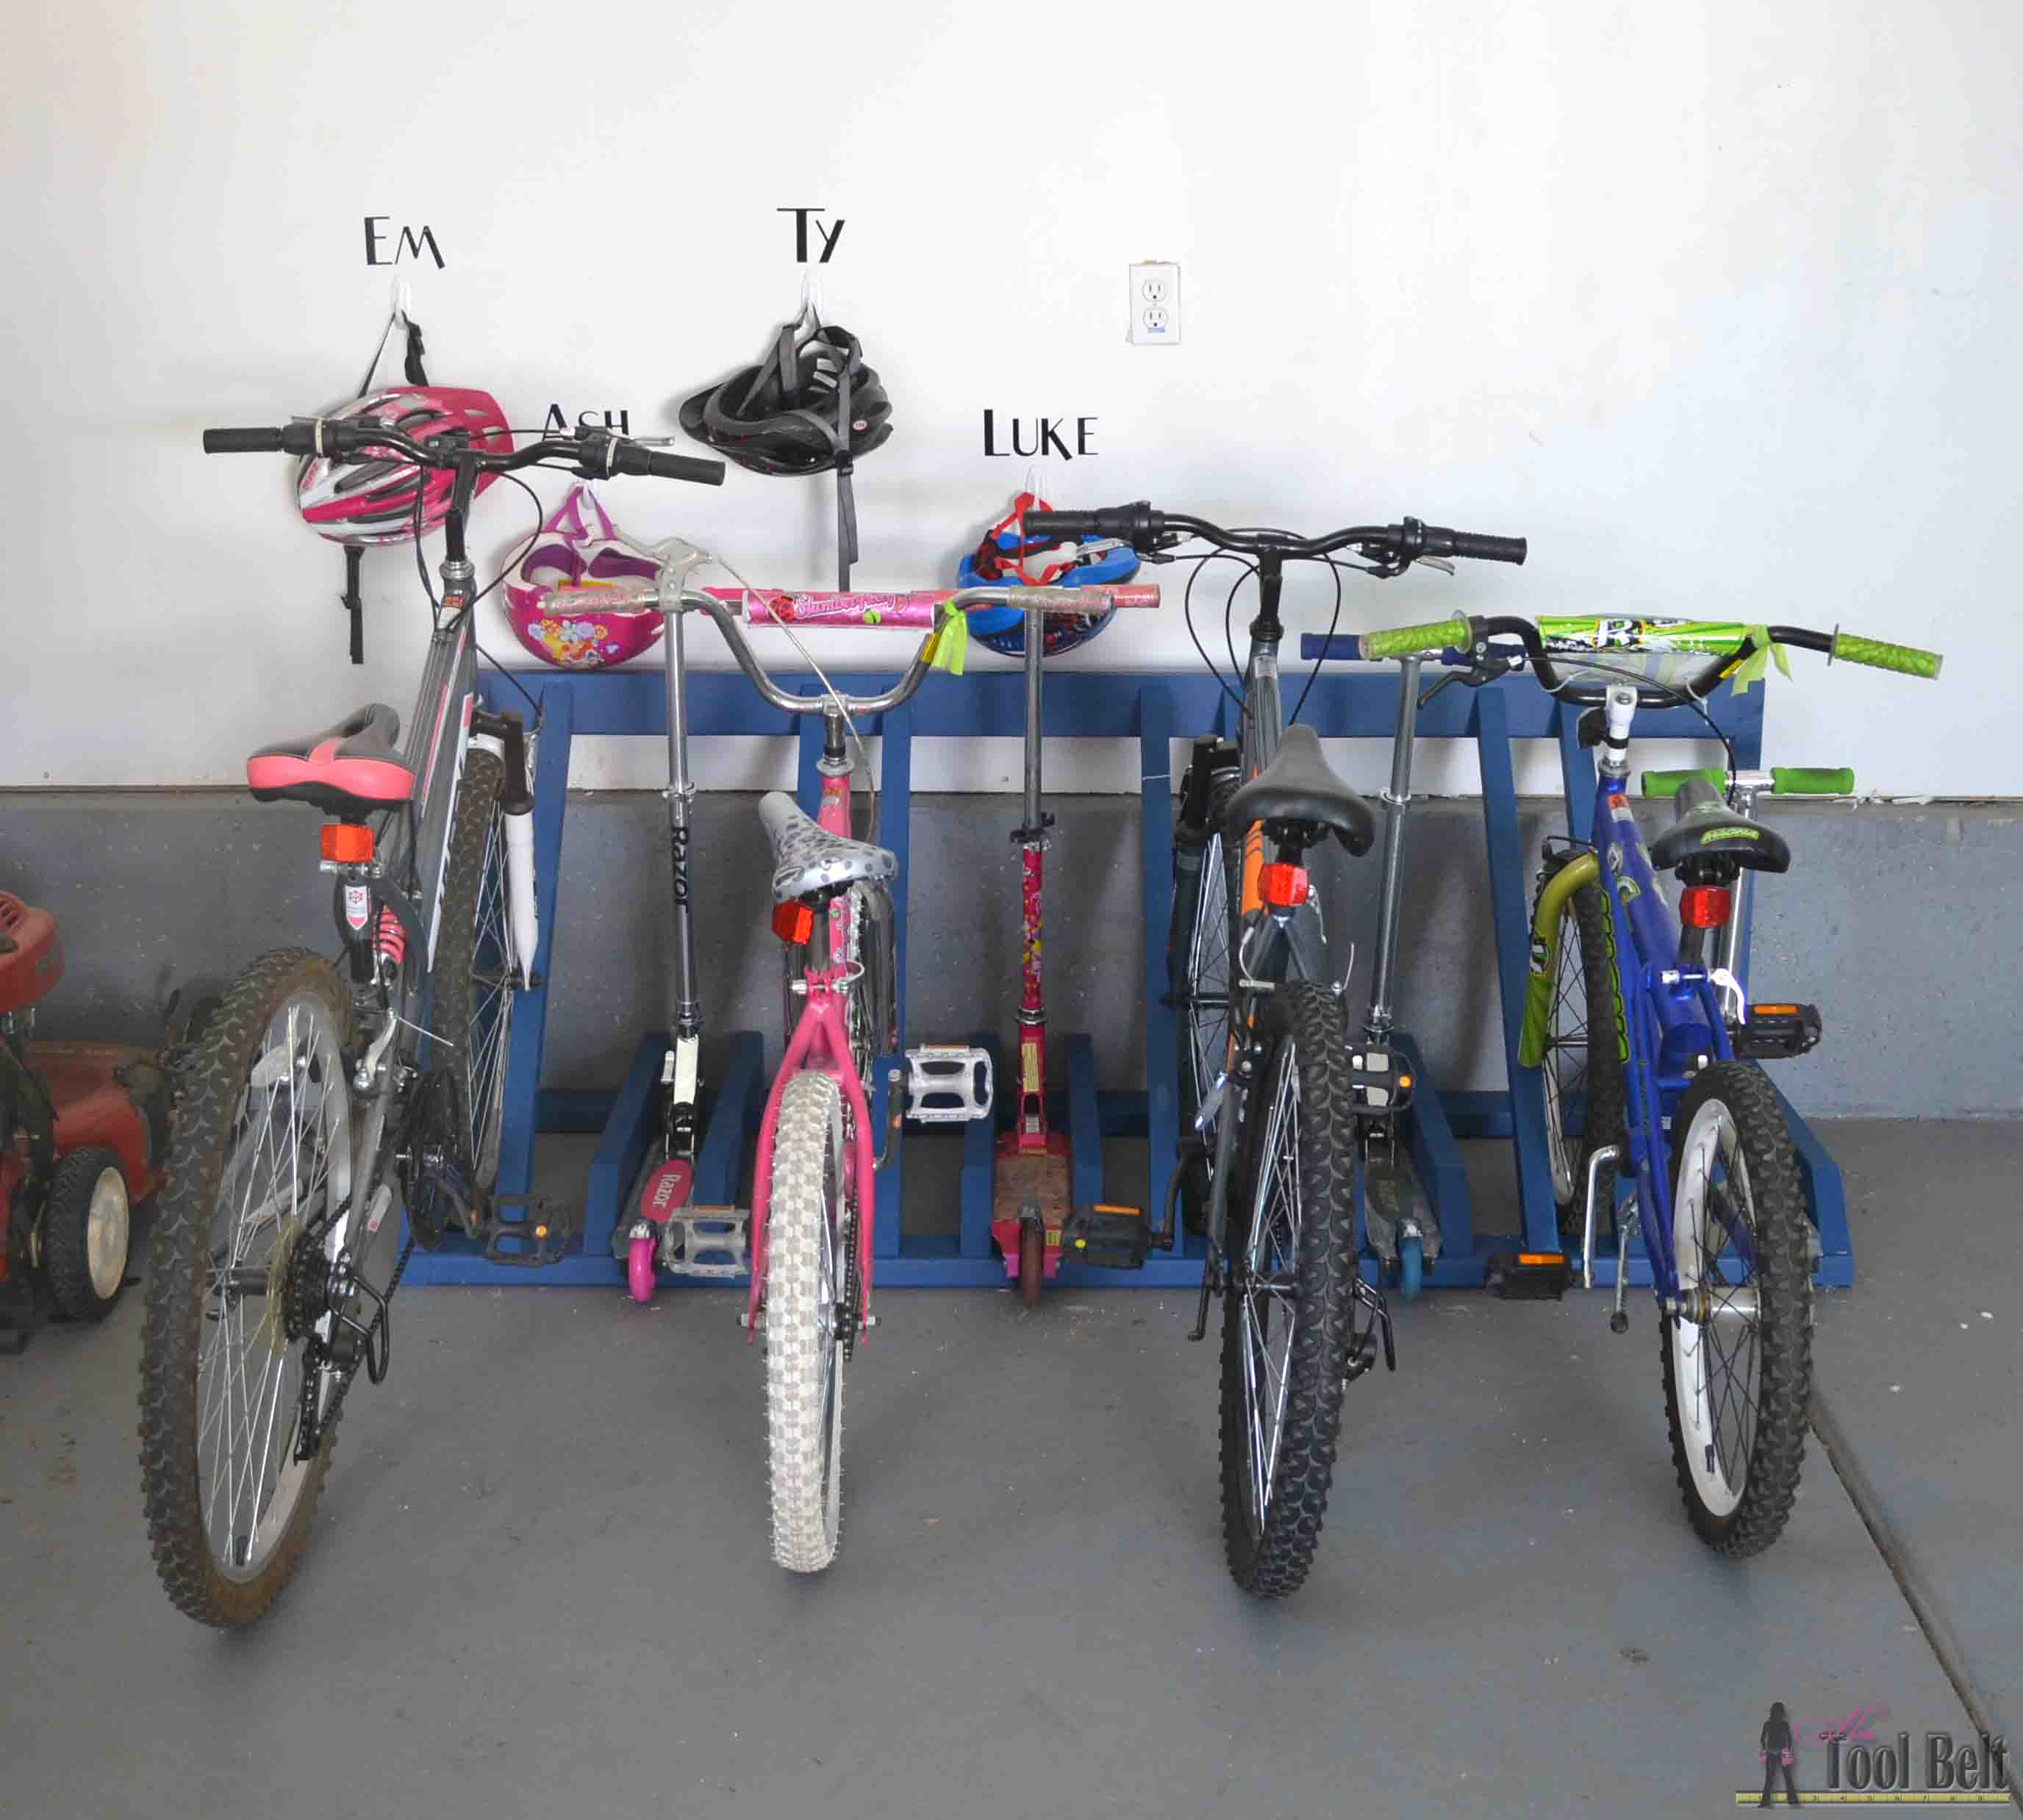
My sister is very organized and loves things neat and tidy.  With four kids, having a bike and scooter each, it is sometimes hard for their stuff to be ‘put away’.  To help organize the helmets, she put command hooks and vinyl names on the wall.  I thought that was a great idea.  The scooters are difficult, because they aren’t self standing.  If you have kids, I’m sure you understand the problem!

The perfect way to organize those bikes and scooters all over the garage. Free and easy plans to build a bike and scooter rack for only about $30.

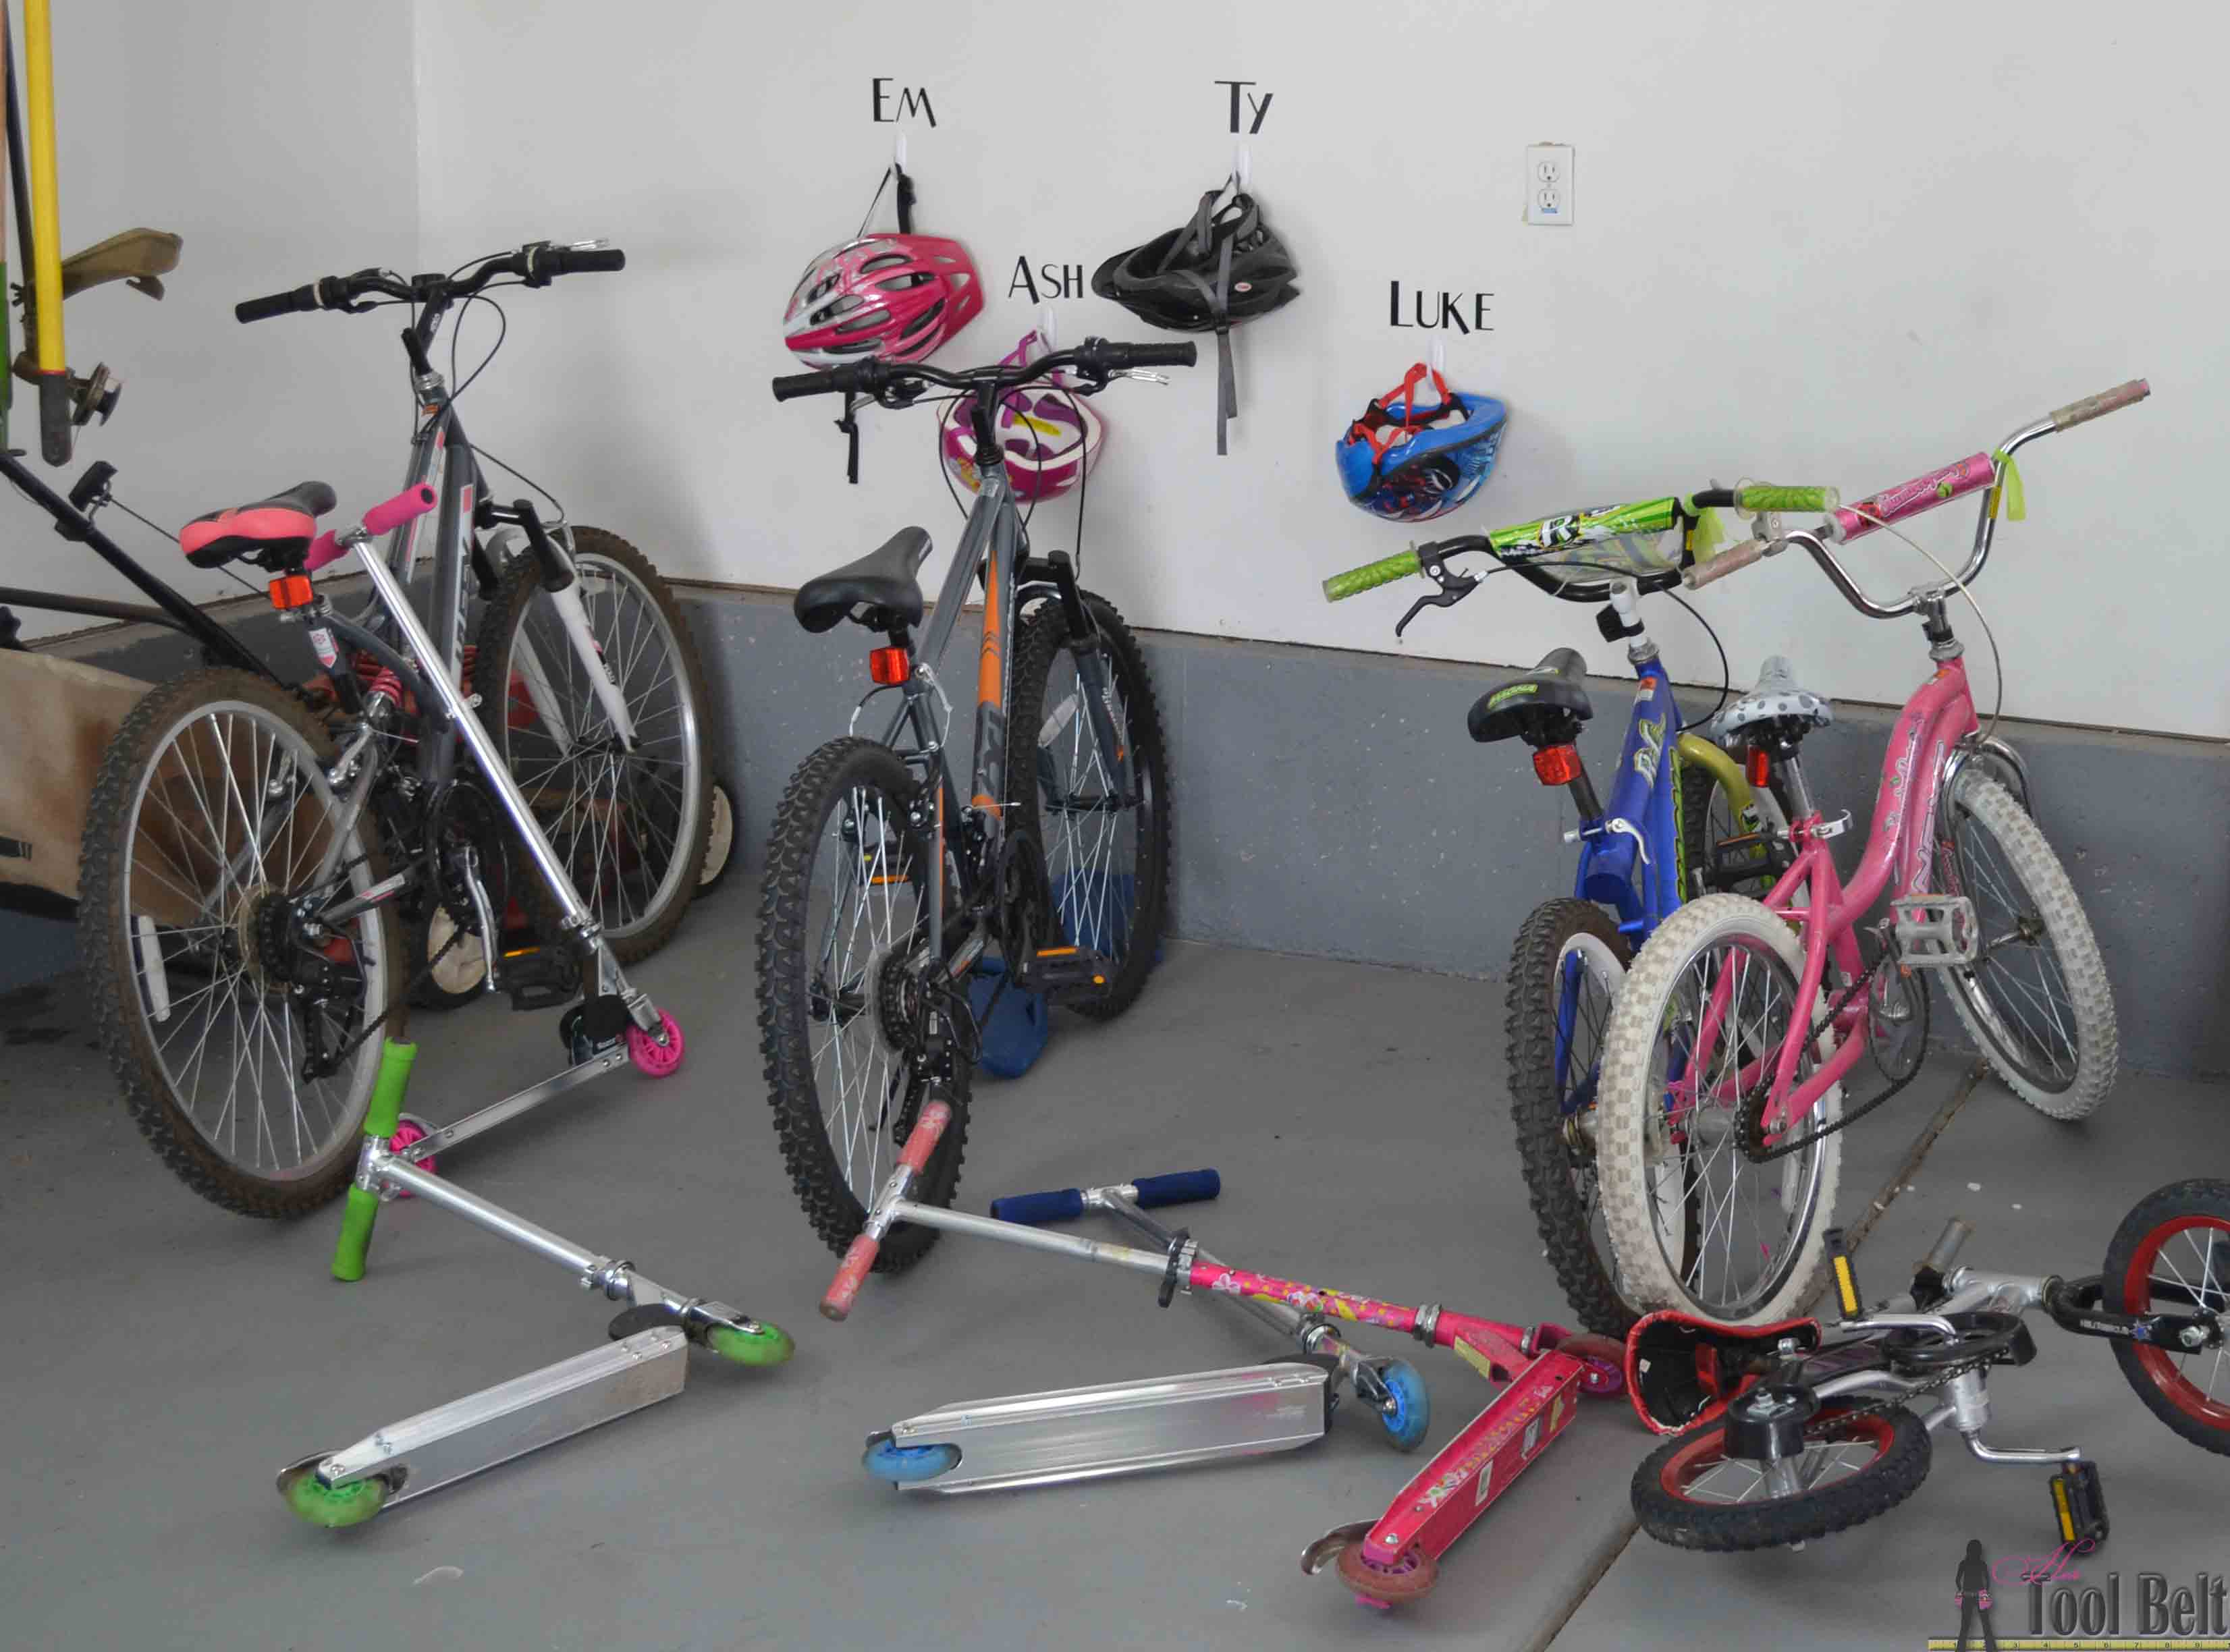
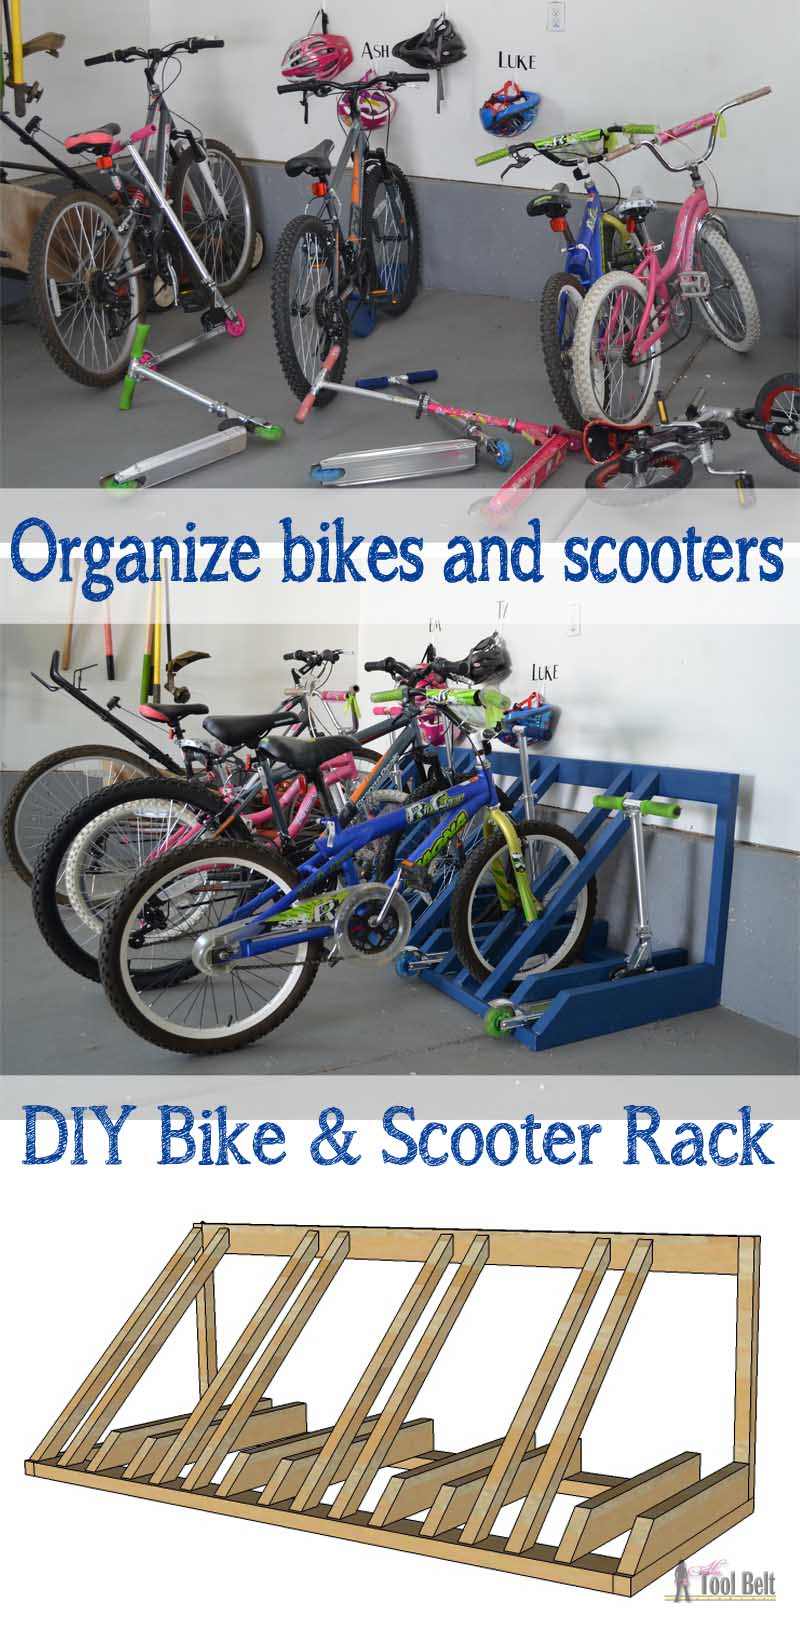
For Christmas this year, I made her a bike and scooter rack out of wood, so the kids would have somewhere to put their bikes and scooters.  This bike rack works great for big bikes and little bikes and razor scooters.

If you need a kids bike rack with integrated helmet storage, you should check out this great one by Addicted 2 DIY.

How to Build a DIY Wood Bike and Scooter Rack

The perfect way to organize those bikes and scooters all over the garage. Free and easy plans to build a bike and scooter rack for only about $30.

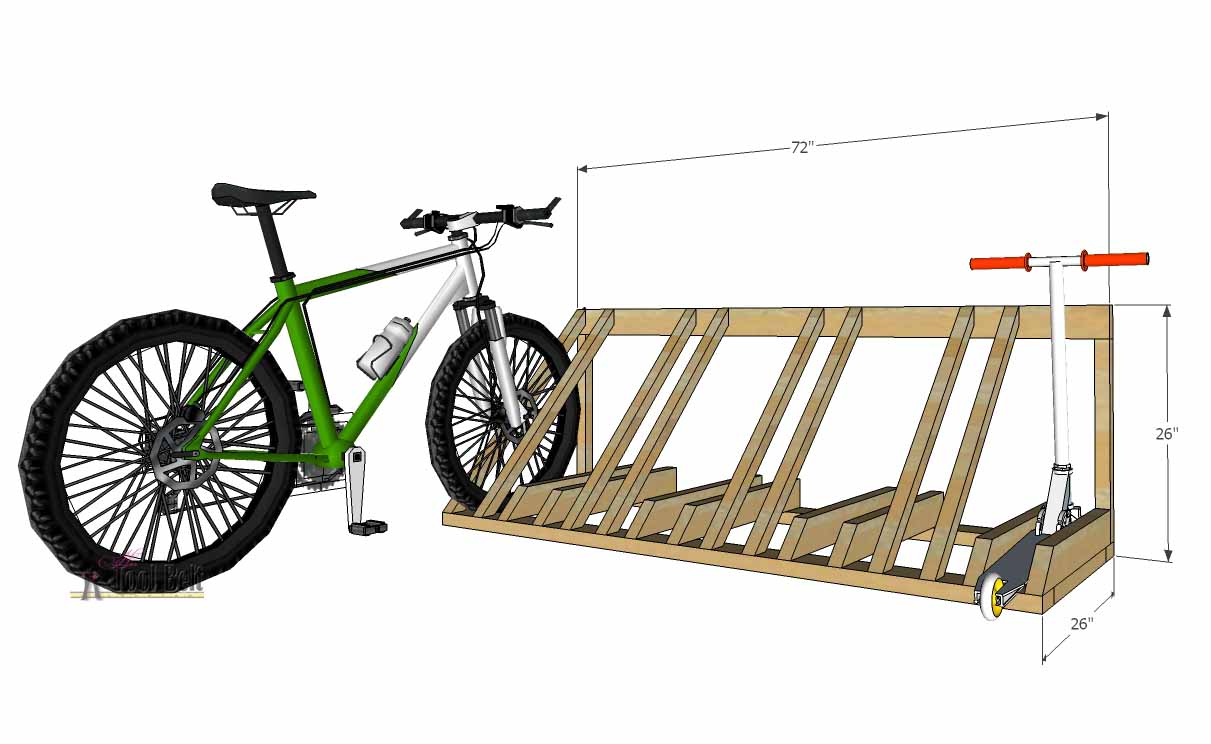
This bike rack is really easy to make, you just need a miter saw and drill.

The perfect way to organize those bikes and scooters all over the garage. Free and easy plans to build a bike and scooter rack for only about $30.

Materials

  • 5 – 2″ x 4″ x 96″ studs (actual 1 1/2″ x 3 1/2″)
  • 4 – 2″ x 2″ x 96″ boards (actual 1 1/2″ x 1 1/2″)
  • 2 1/2″ screws – I used deck screws
  • wood glue
  • sandpaper
  • paint
    • Approximate lumber cost – $21
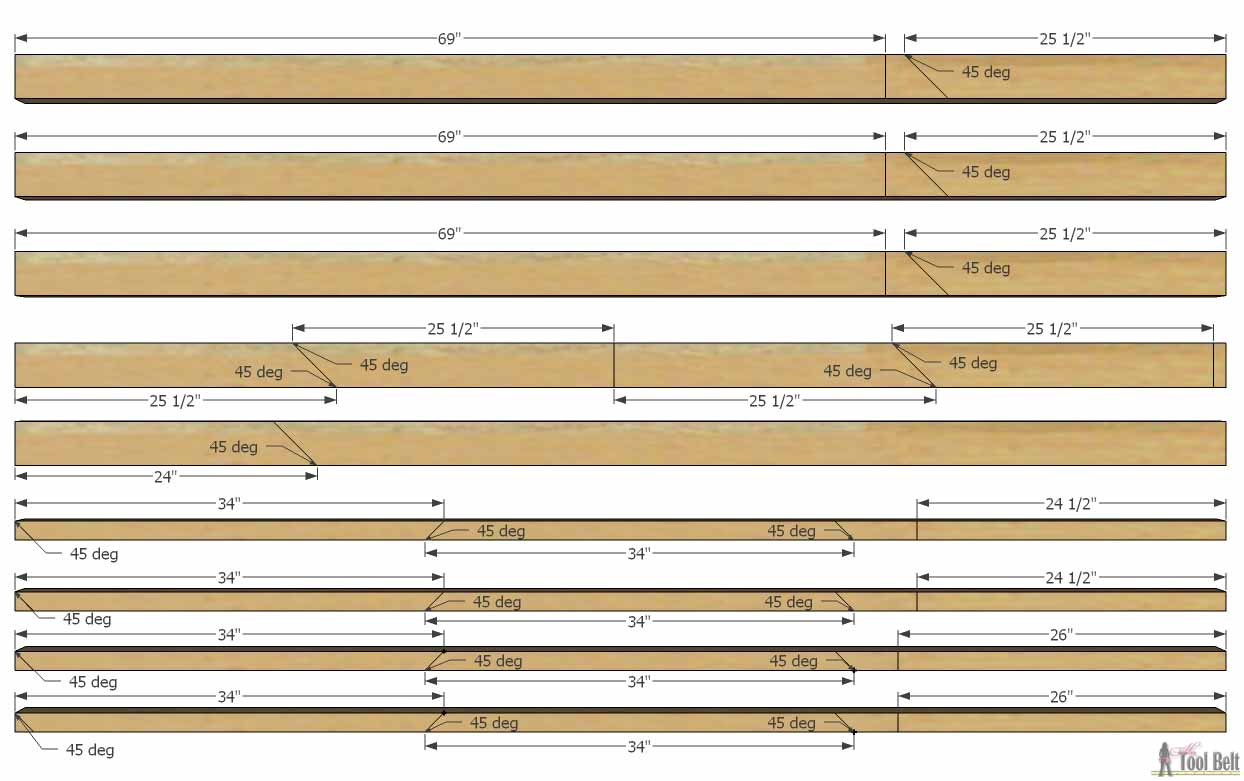
Cut List

  • 3 – 1 1/2″ x 3 1/2″ x 69″
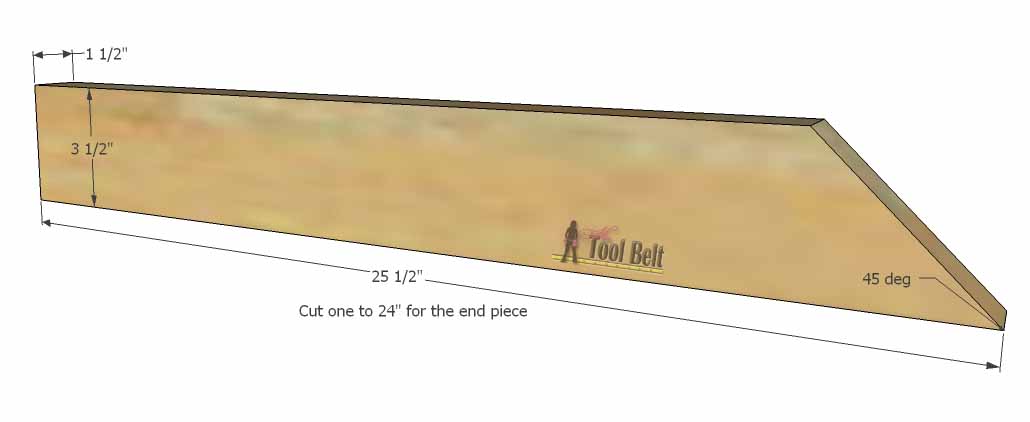
  • 7 – 1 1/2″ x 3 1/2″ x 25 1/2″ with 45 deg on one side
  • 1  – 1 1/2″ x 3 1/2″ x 24″ with 45 deg cut on one side
  • 2 – 1 1/2″ x 1 1/2″ x 26″
  • 2 – 1 1/2″ x 1 1/2″ x 24 1/2″
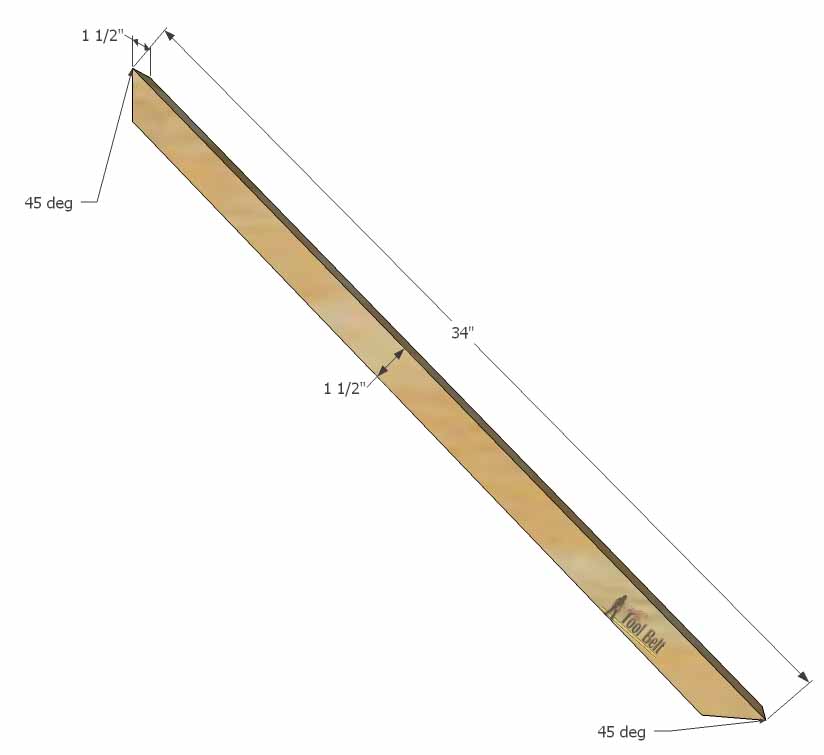
  • 8 – 1 1/2″ x 1 1/2″ x 34″ with 45 deg cut on both ends facing each other.
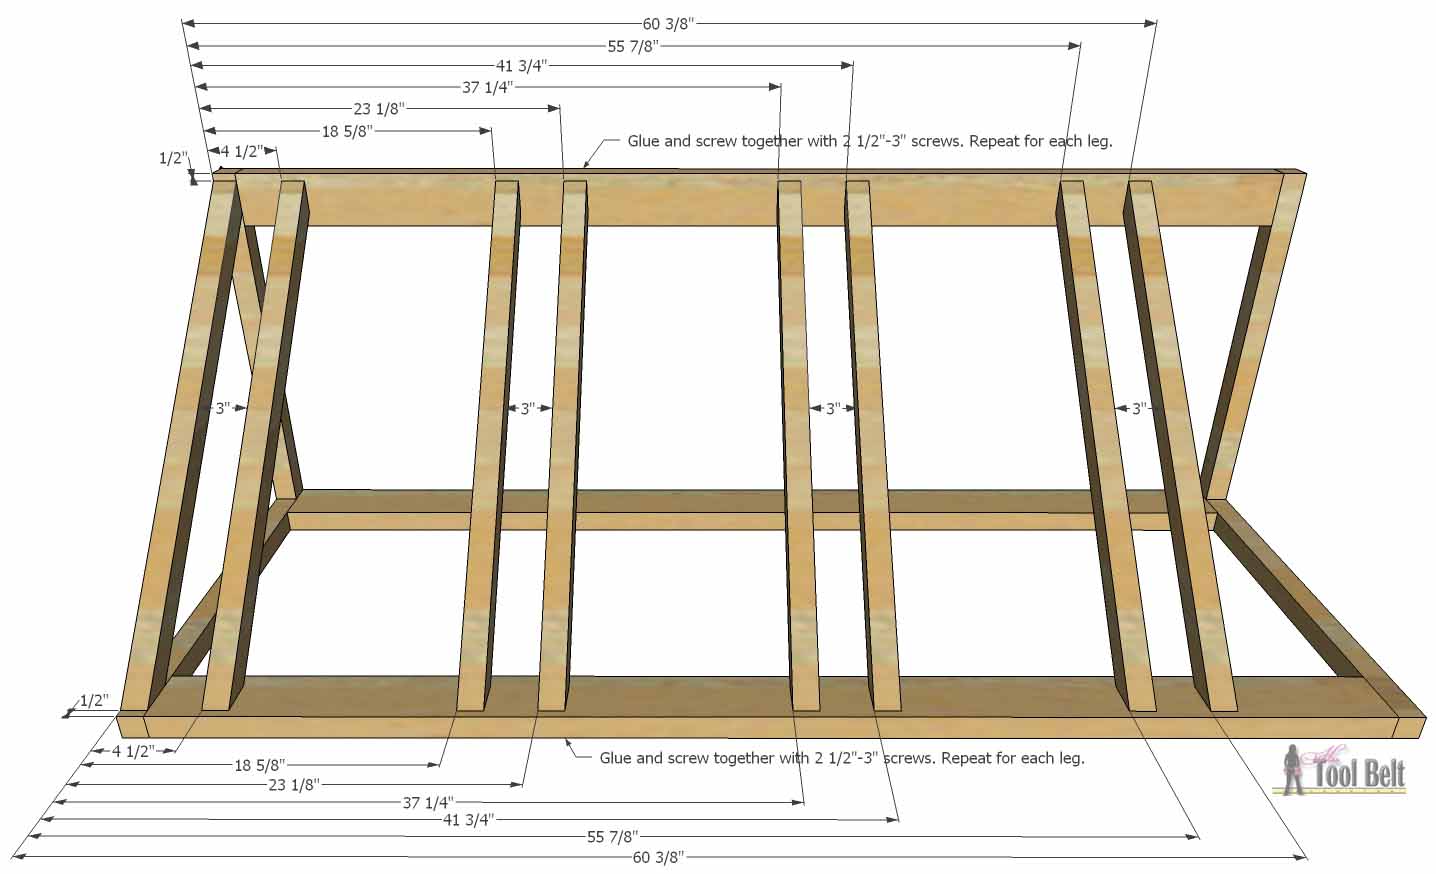
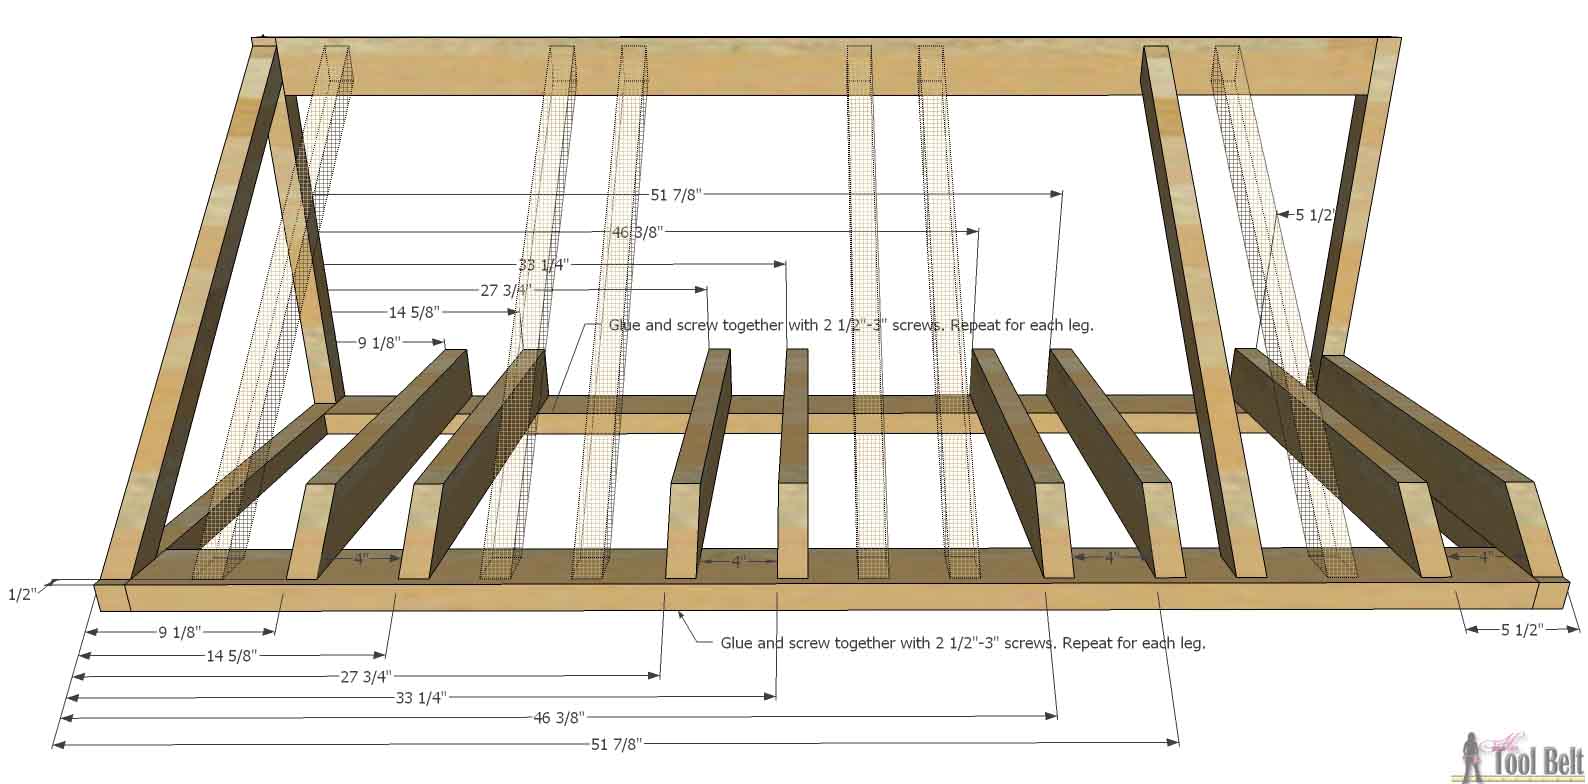
Cut Diagram

The perfect way to organize those bikes and scooters all over the garage. Free and easy plans to build a bike and scooter rack for only about $30.

The perfect way to organize those bikes and scooters all over the garage. Free and easy plans to build a bike and scooter rack for only about $30.

The perfect way to organize those bikes and scooters all over the garage. Free and easy plans to build a bike and scooter rack for only about $30.

Step 1

Pre-drill all of the holes before putting the screw in to prevent the wood splitting.

Cut all of the boards according to the cut list and diagram.

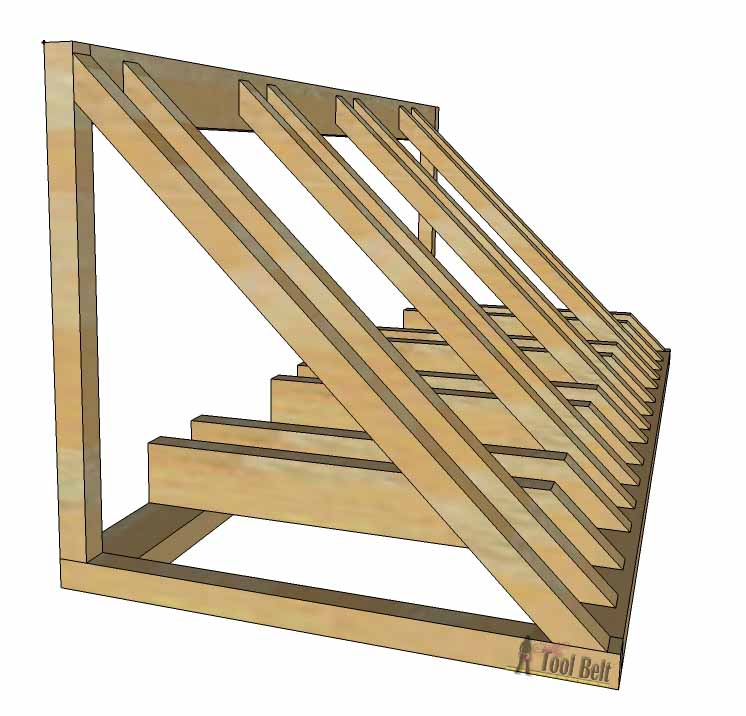
Attach a 26″ board to each end of two 69″ boards as shown, secure with wood glue and 2 1/2″ screws to create the base.  The perfect way to organize those bikes and scooters all over the garage. Free and easy plans to build a bike and scooter rack for only about $30.

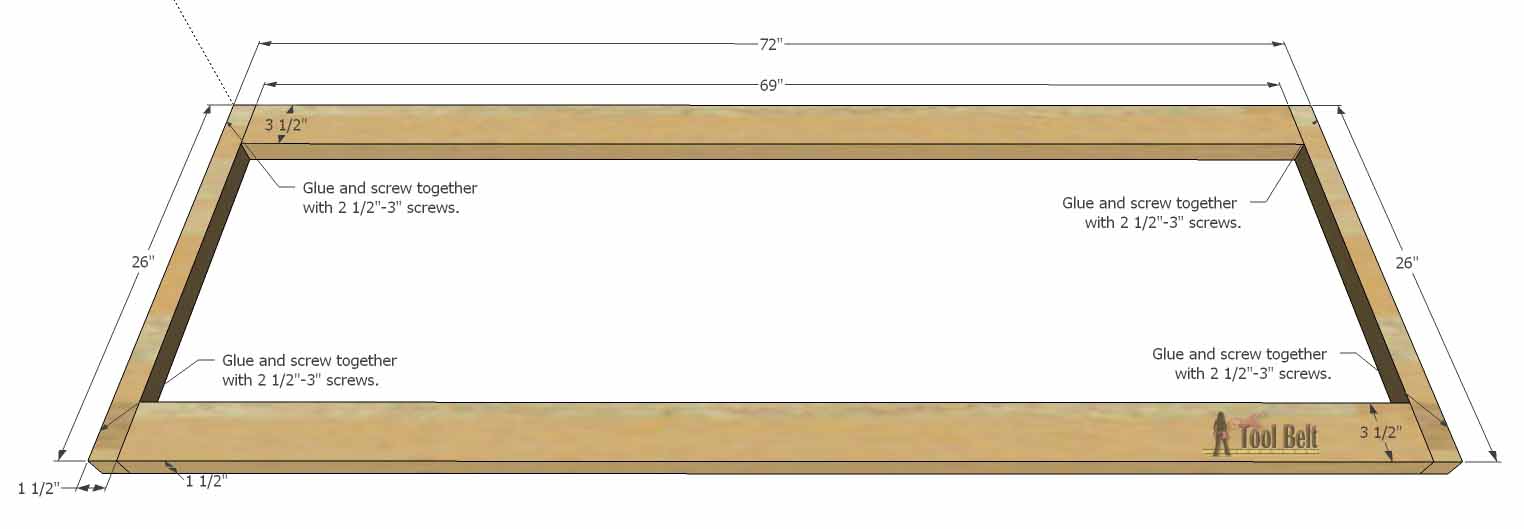
Attach a 24 1/2″ board to each end of the remaining 69″ board, secure with wood glue and 2 1/2″ screws to create the back.   The perfect way to organize those bikes and scooters all over the garage. Free and easy plans to build a bike and scooter rack for only about $30.

Attach the back to the base, secure with wood glue and 2 1/2″ screws.  Keep the back flush with the back of the base.
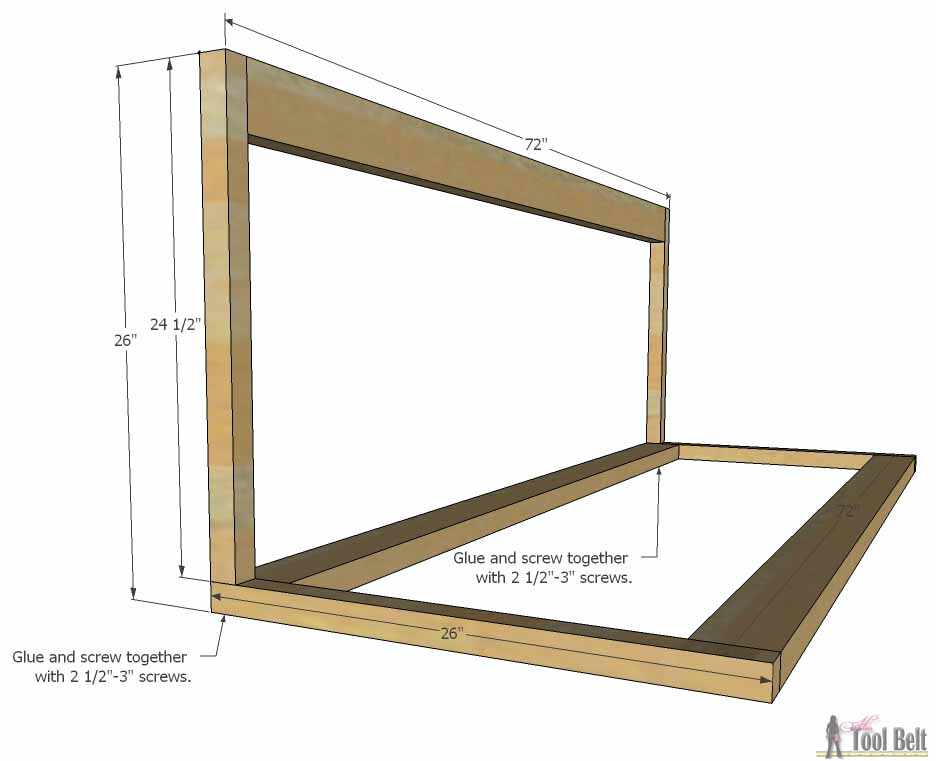
    The perfect way to organize those bikes and scooters all over the garage. Free and easy plans to build a bike and scooter rack for only about $30.

Step 2

Determine the spacing you need for your bikes and/or scooters.  3″ seemed to work great for all of my Sister’s bikes (adult to child) and 4″ for the Razor scooters.  You can adjust the following measurements accordingly.

Measure and mark the location of the bike supports on the base and back.  Pre-drill holes for the bike supports and secure with wood glue and 2 1/2″ screws.

The perfect way to organize those bikes and scooters all over the garage. Free and easy plans to build a bike and scooter rack for only about $30.

Measure and mark the location of the scooter supports on the base.  Pre-drill holes for the scooter supports and secure with wood glue and 2 1/2″ screws.
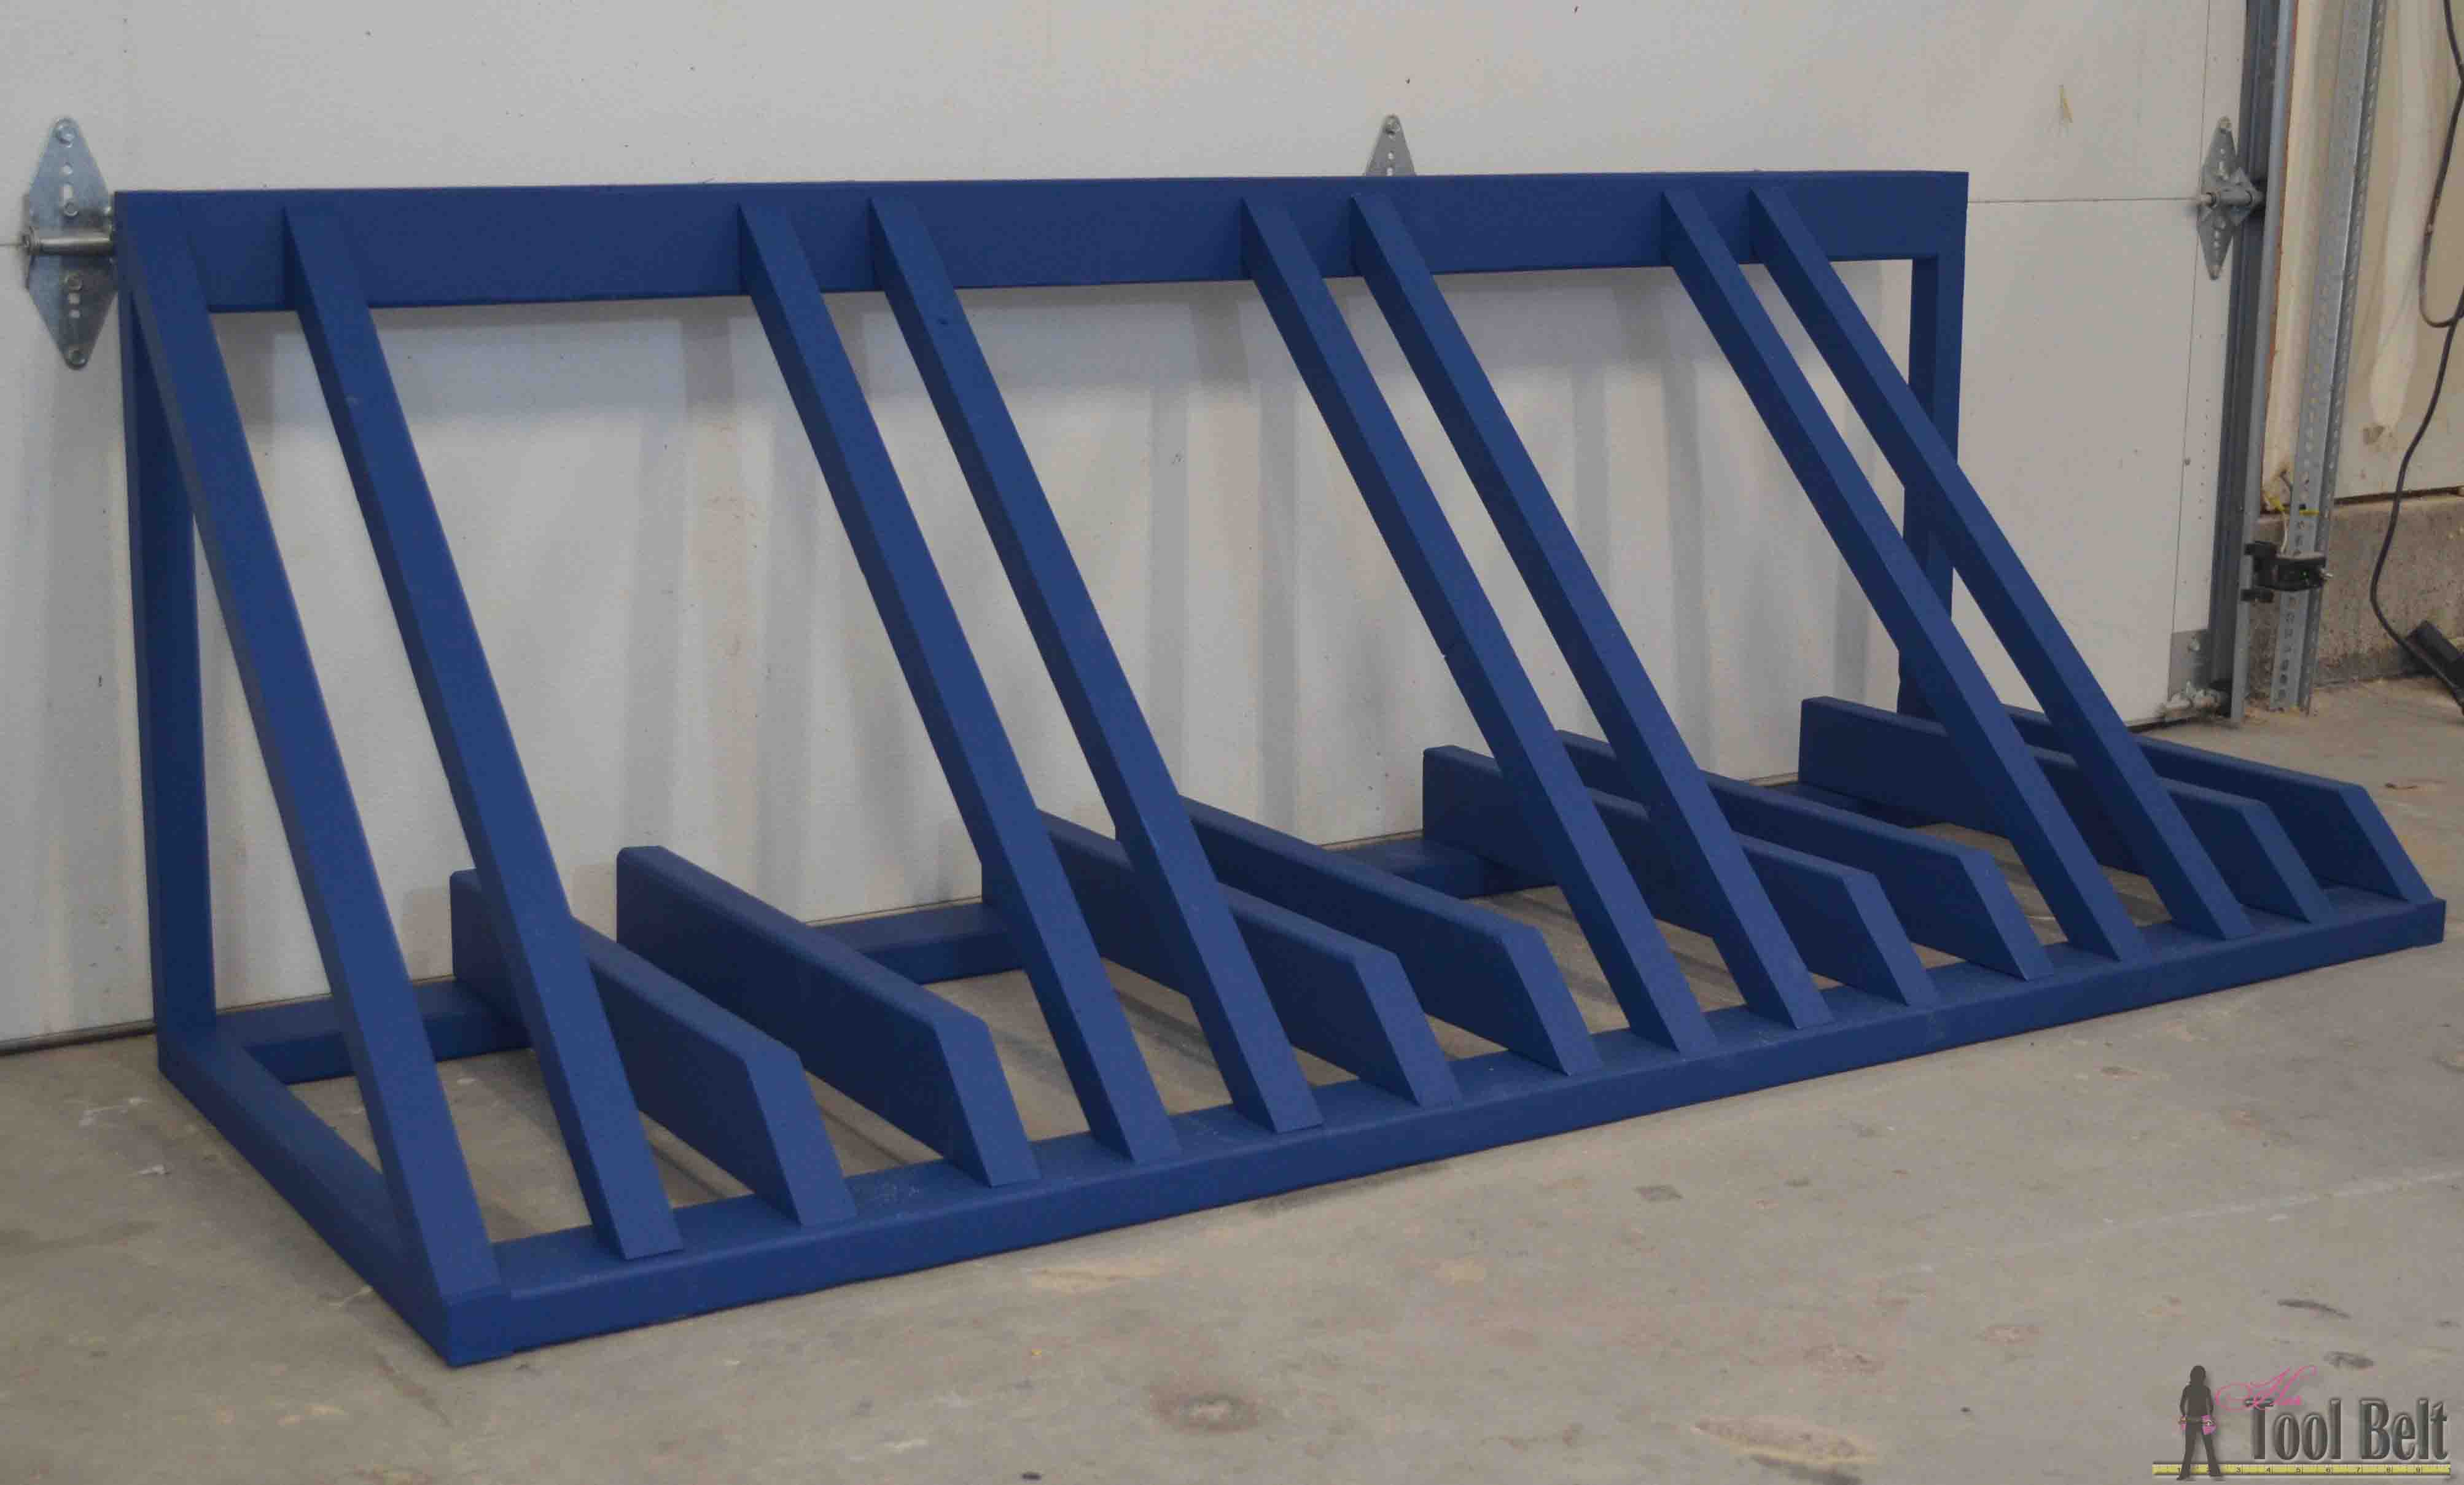
The perfect way to organize those bikes and scooters all over the garage. Free and easy plans to build a bike and scooter rack for only about $30.

Step 3

Let the glue dry, then sand the bike rack until smooth.  Paint or stain the bike rack as desired.  For my sister’s bike rack, I painted it in their favorite team’s color – Cougar Blue.  I was going to paint ‘Cougar only parking’, but ran out of time.  Isn’t that always the case. 🙂

The perfect way to organize those bikes and scooters all over the garage. Free and easy plans to build a bike and scooter rack for only about $30.

All of the bikes and scooters fit great!

The perfect way to organize those bikes and scooters all over the garage. Free and easy plans to build a bike and scooter rack for only about $30.

The perfect way to organize those bikes and scooters all over the garage. Free and easy plans to build a bike and scooter rack for only about $30.

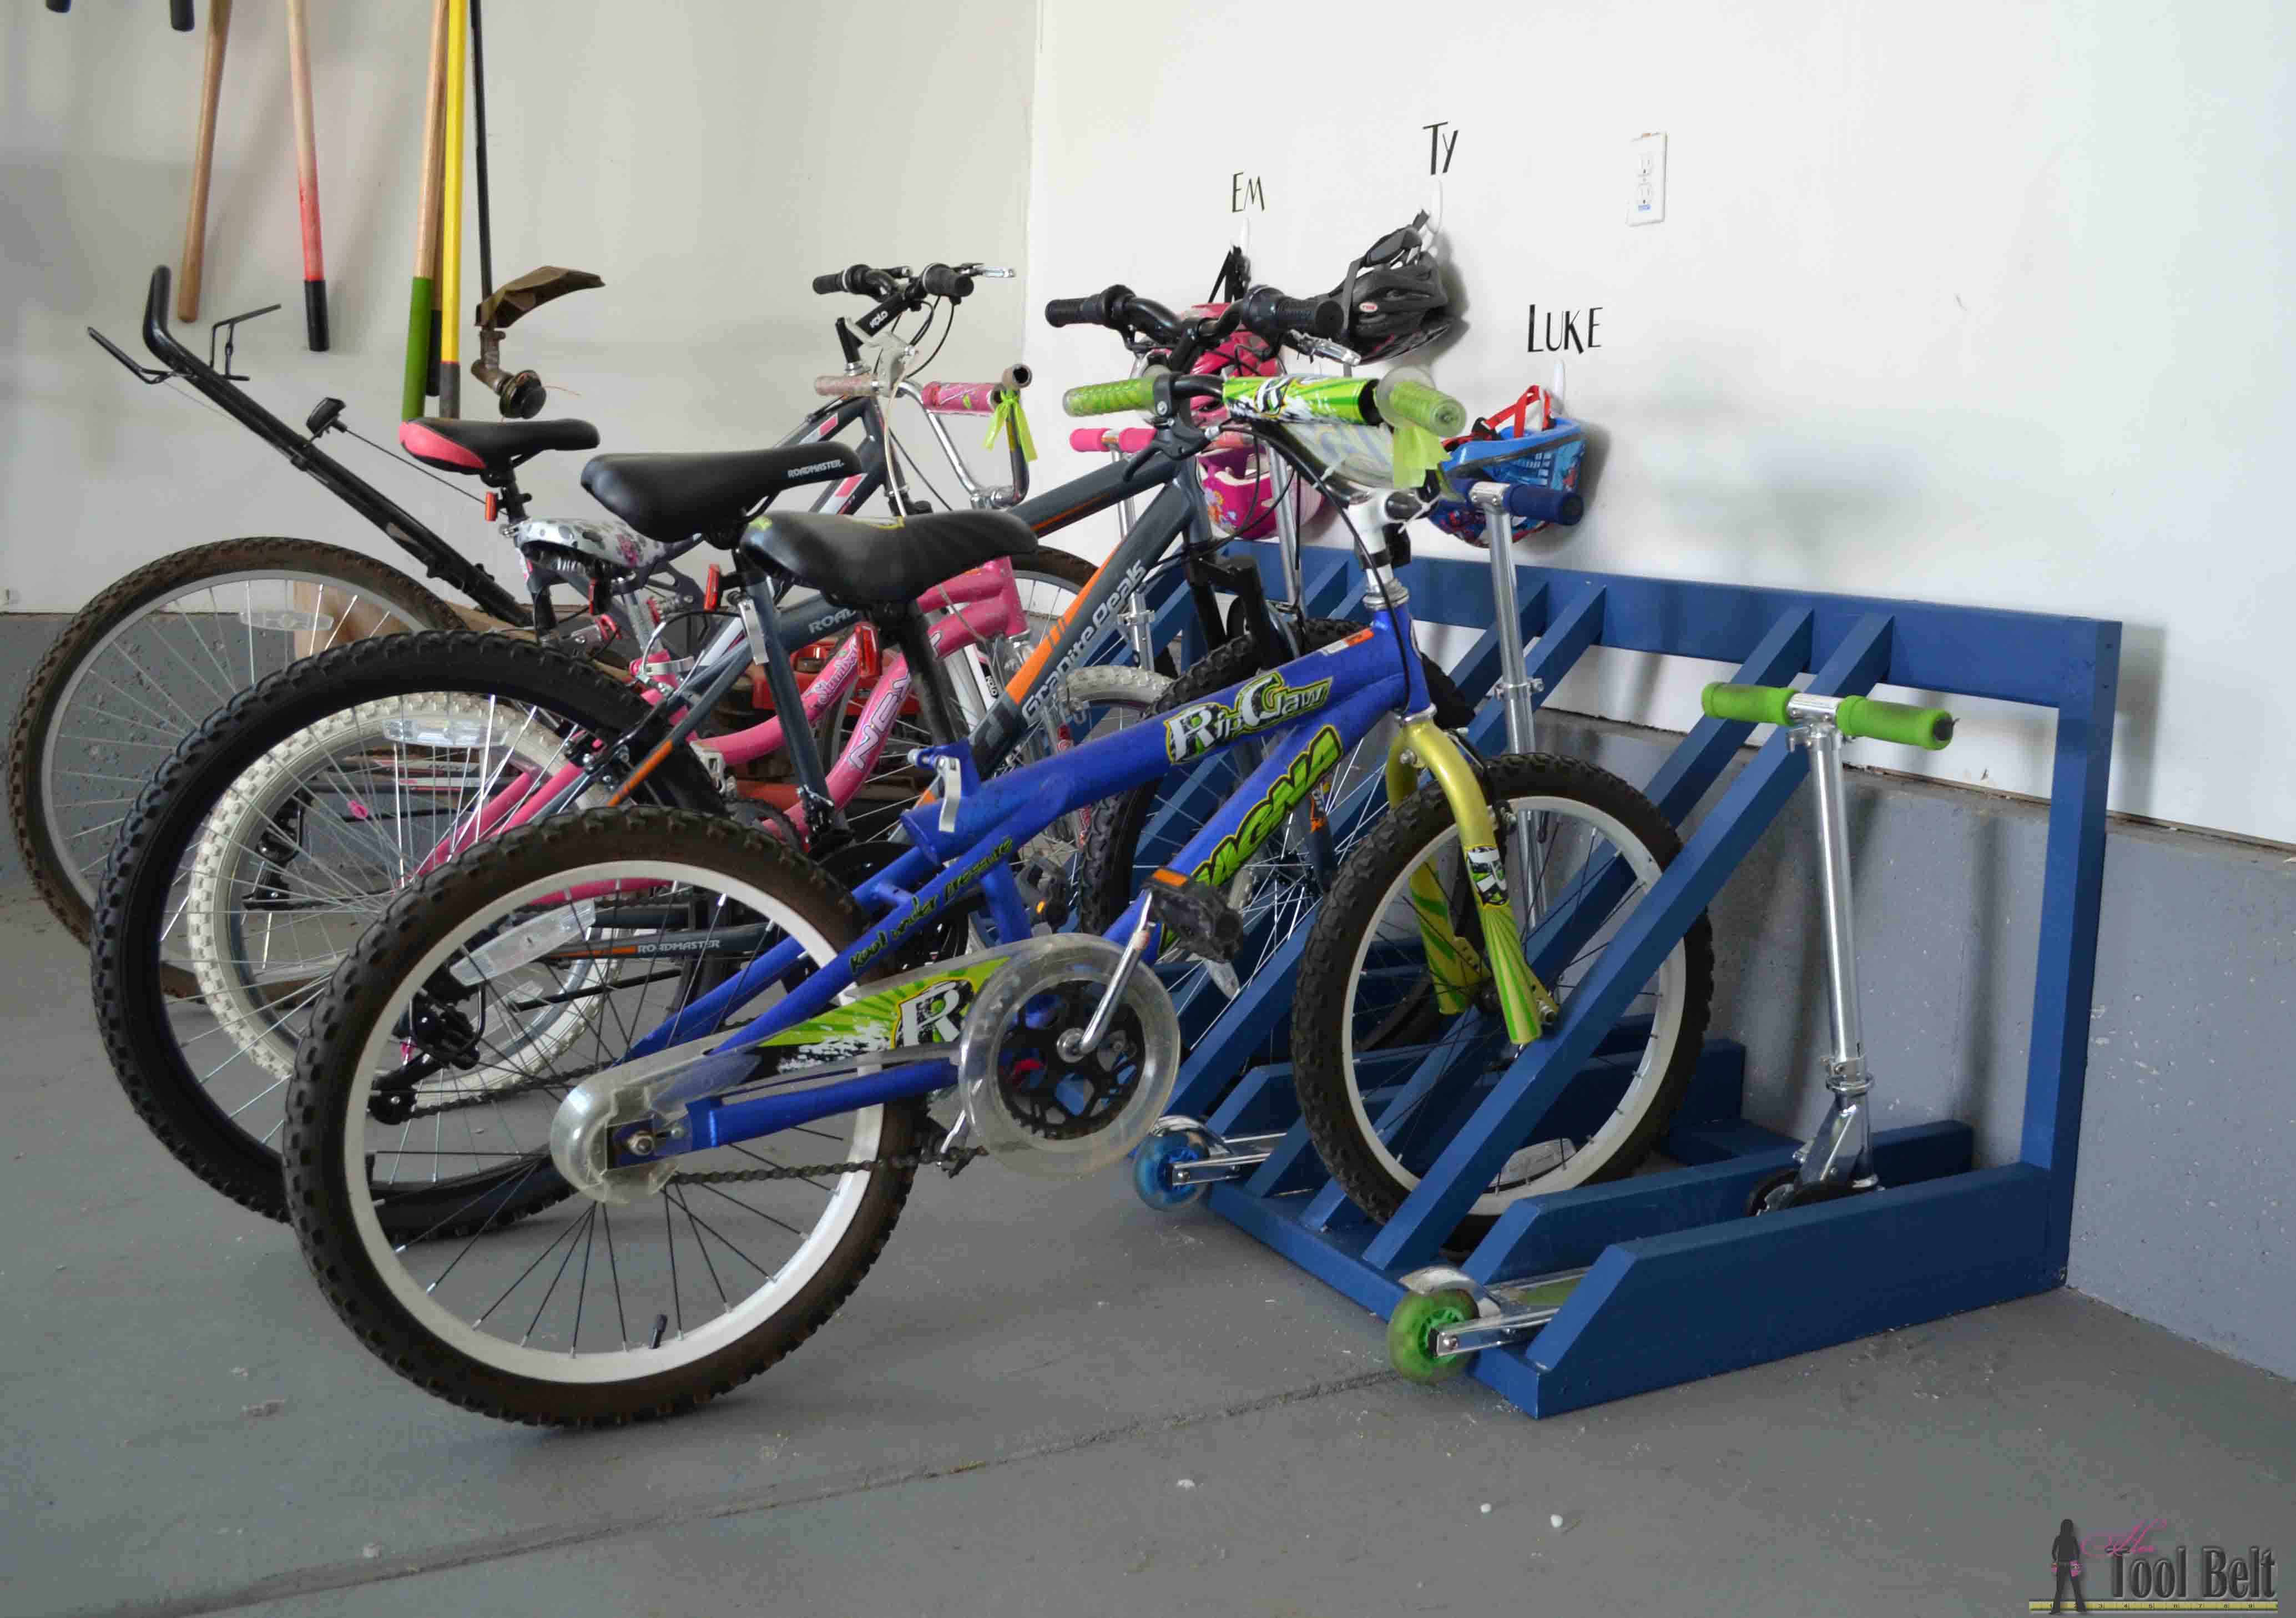
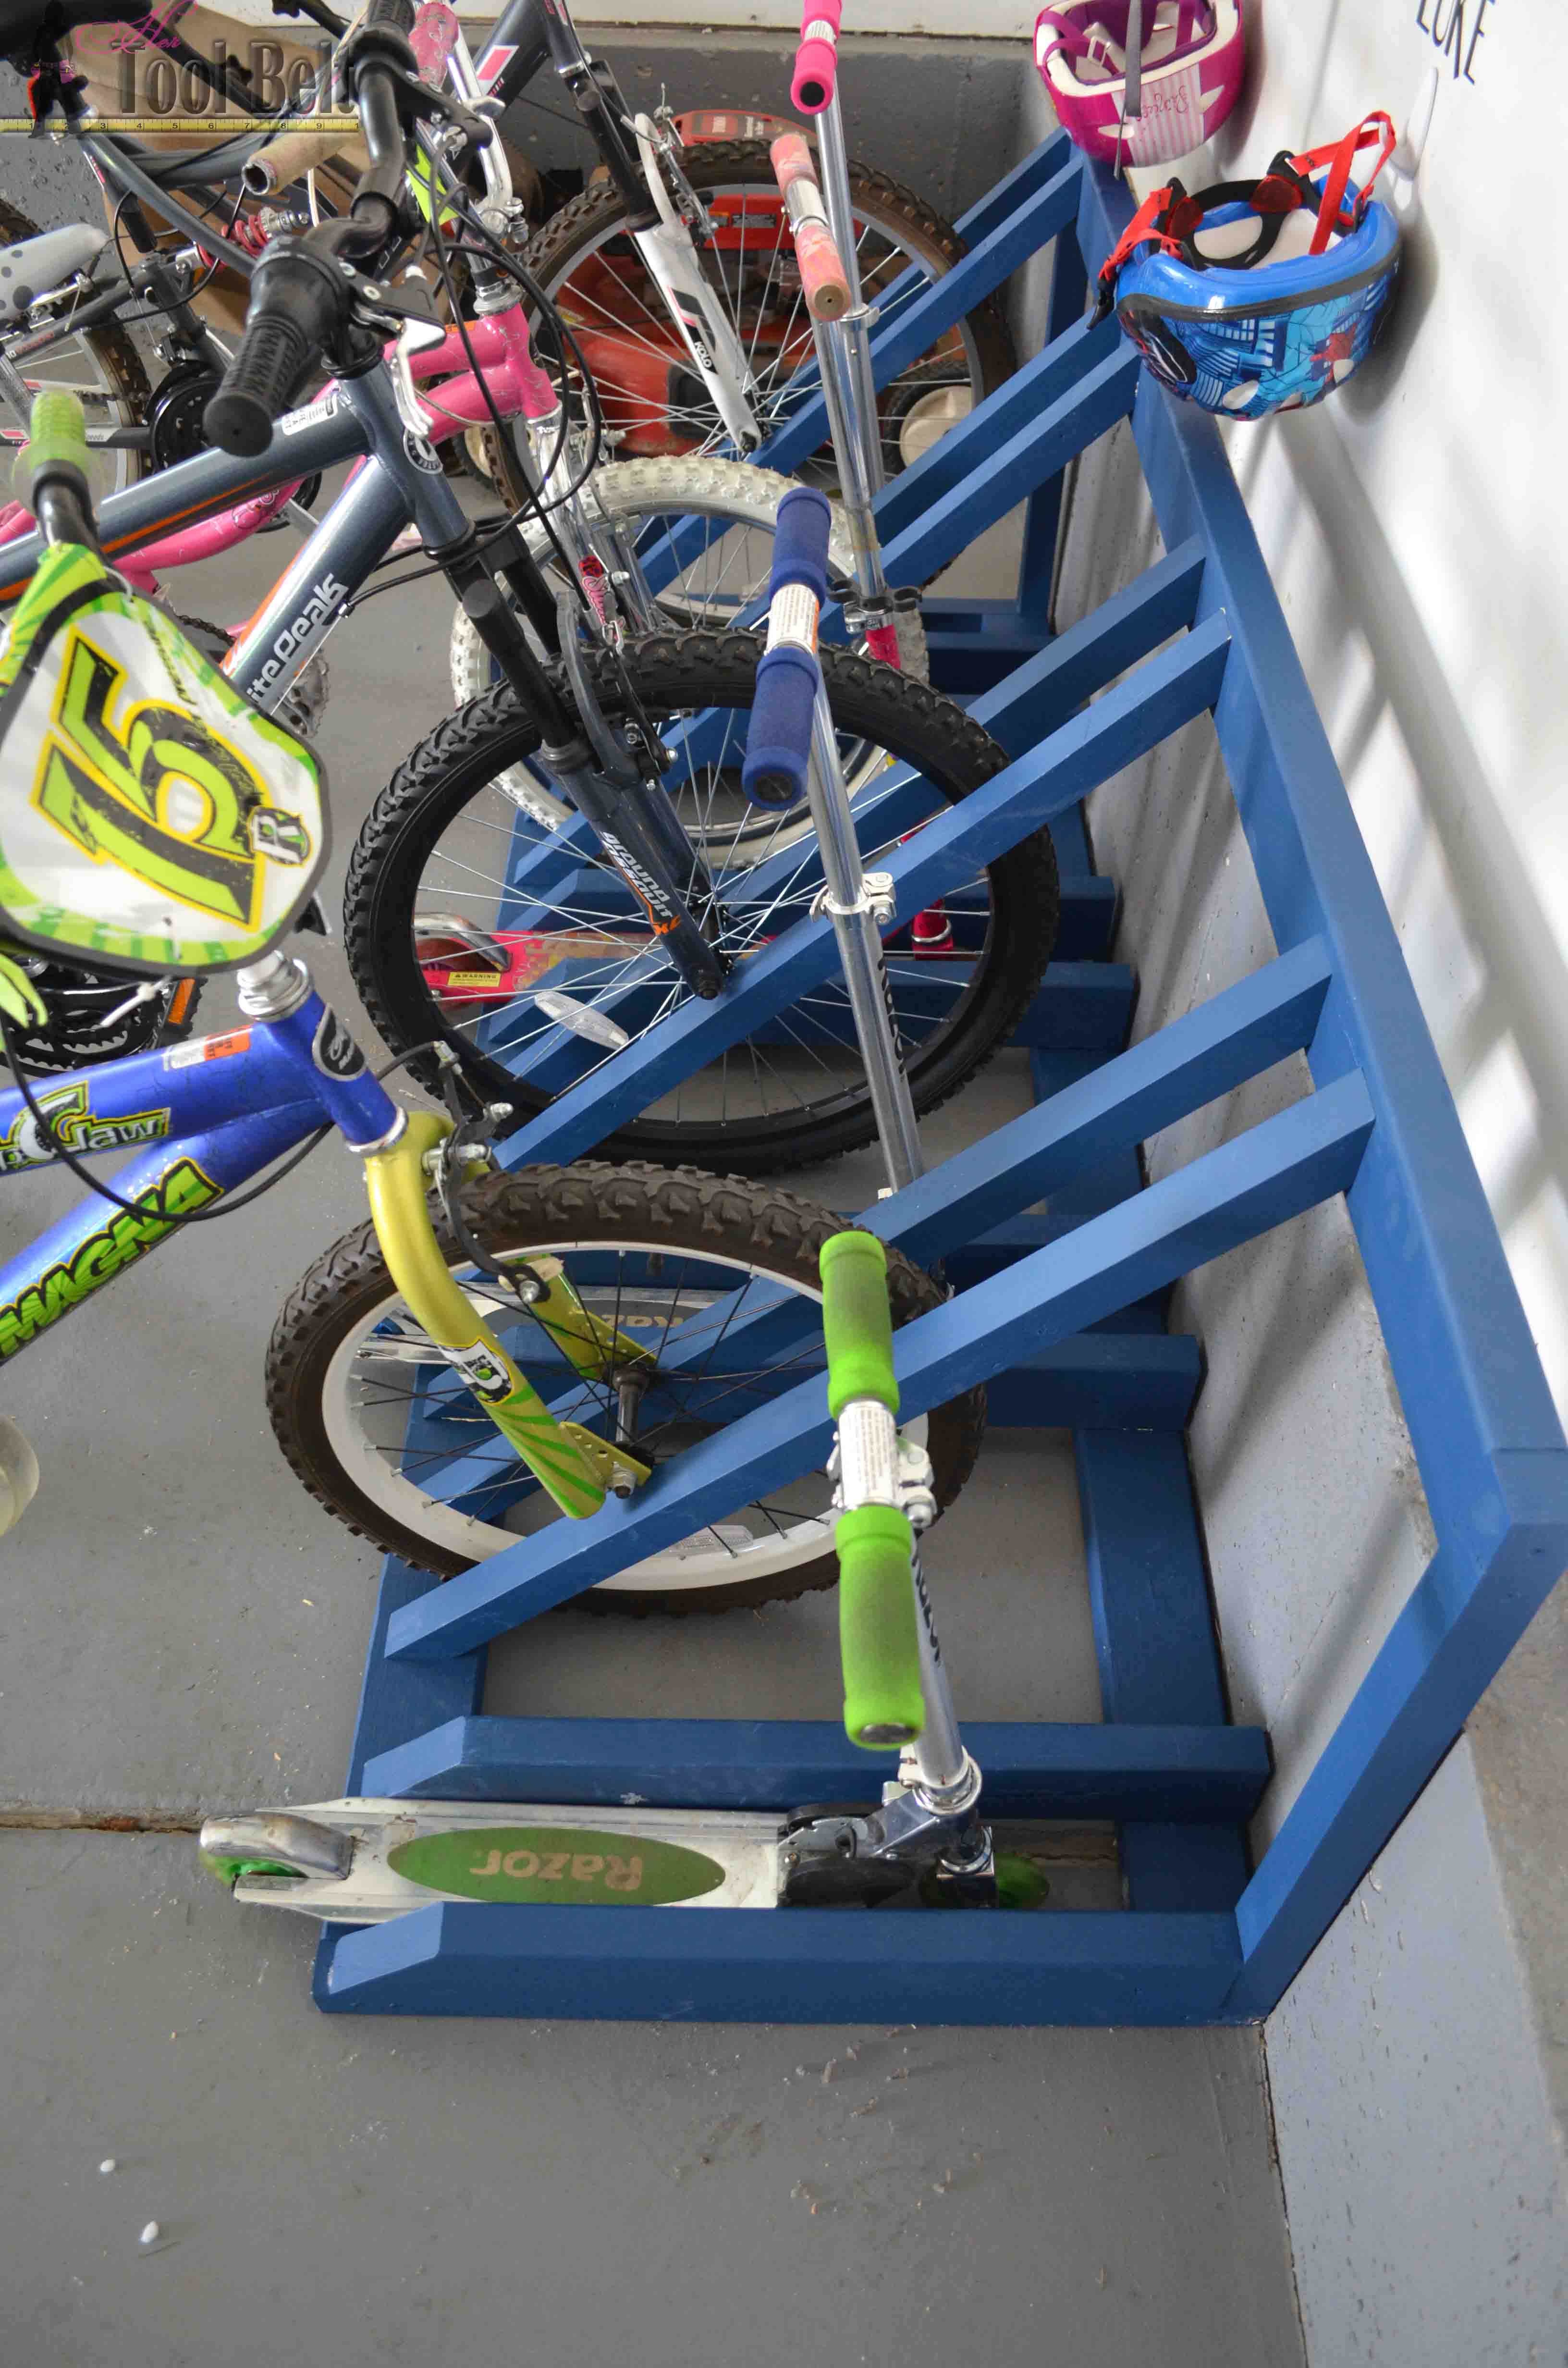
I think the best thing will be that the scooters will now stay in place, and there is room to get bikes/scooters out without tipping others over.

The perfect way to organize those bikes and scooters all over the garage. Free and easy plans to build a bike and scooter rack for only about $30.

Thanks for pinning!

The perfect way to organize those bikes and scooters all over the garage. Free and easy plans to build a bike and scooter rack for only about $30.

Download and print the free plans

DIY Scooter and Bike Rack Plans-Hertoolbelt

This bike rack is part of the organization power tool challenge.  January Power Tool Challenge

Check out some of the other clever organization projects.

An InLinkz Link-up

Related

Filed Under: Built From Scratch, Organization, Outdoor Furniture Tagged With: bike, bike rack, garage, organization

Attention: Any do-it-yourself project involves risk of some sort. Your tools, materials, and skills will vary, as will the conditions at your work site. Hertoolbelt LLC will not assume any responsibility or liability for damages or losses sustained or incurred in the course of your project or in the use of the item you create. Always follow the manufacturer's operating instructions in the use of tools, check and follow your local building codes, and observe all commonly accepted safety precautions.

Comments

  1. Cher @ Designs by Studio C says

    January 14, 2016 at 5:12 am

    Super-awesome idea! That is the perfect way to corral the bikes and especially the scooters… Love the color!

    Reply
  2. Jaime Costiglio says

    January 14, 2016 at 5:48 am

    Great build Amy! (I just need a garage first ;)) But I love how easy it is for the kids to roll in and not have to fumble with the kick stands. And very pretty paint color too!

    Reply
  3. Paula@SweetPea says

    January 14, 2016 at 5:53 am

    What a great idea! Bikes and scooters take up so much room and your rack keeps them perfectly contained.

    Reply
  4. Wendi @ H2OBungalow says

    January 14, 2016 at 6:38 am

    Arrrrg! Why didn’t I know you and have DIY skills when my kids were little! Seeing this picture brought back so many memories of tripping over bikes and those Razor scooters too! This is brilliant and a good way to teach the kids to put things back in place too. Smart project!

    Reply
  5. gail says

    January 14, 2016 at 7:00 am

    Awesome tute Amy! Busy families definitely need a way to keep all those “wheels” organized!

    I love the cougar blue color.

    gail

    Reply
    • Amy says

      January 15, 2016 at 4:18 pm

      Thanks Gail!

      Reply
  6. Marie, The Interior Frugalista says

    January 14, 2016 at 7:26 am

    Oh my gosh could we have used one of these in our shed when my kids were little! Your sister and her kids, must’ve been tickled pink when they saw their Christmas gift.

    Reply
  7. Jeanie @ create&babble says

    January 14, 2016 at 2:16 pm

    Nice project Amy! My husband and I own several bikes and bike trailers. This sure would come in handy at our house! Pinned!

    Reply
  8. Christy@Confessions of a Serial Do-it-Yourselfer says

    January 14, 2016 at 3:45 pm

    You are so clever…I bet your sister loved this storage solution!! XO

    Reply
    • Amy says

      January 15, 2016 at 4:18 pm

      Thanks, she sure is!

      Reply
  9. ananda says

    January 14, 2016 at 5:11 pm

    Amy what a difference this makes! love the clarity of your plan too! =)

    Reply
    • Amy says

      January 15, 2016 at 4:17 pm

      Thanks Ananda

      Reply
  10. Maryann @ Domestically Speaking says

    January 15, 2016 at 12:14 am

    This is seriously on my build list for 2016 – our garage NEEDS it!

    Reply
  11. Judy Montague says

    January 15, 2016 at 3:02 am

    Geez, I too wish I had this plan when my kids were growing up! With 7-yes SEVEN, you can just imagine the “parking” issues! I did, however, have a solution to leaving their bikes out on the front lawn that worked wonderfully. I would wait until the “offender” was well snuggled and asleep in their warm bed for at least an hour then rouse them up, pulling their feet to the floor, urgently telling them, “you have to go get your bike ( or scooter), its going to be stolen! I will go with you but I can’t ride it to put it away, hurry! Before someone takes it! I never raised my voice but very supportively and sympathically pushed, pulled, led them outside in the cool/cold night in only their jammies -no time for a coat or to get dressed-???????????to bring in their bike, very sympathetic and lovingly urgent all the way. It usually only took one time to get woken in the middle of the night and thereafter all I had to say was,”.are your bikes put away?” Some of the youngers even learned from the olders experience!

    Reply
    • Amy says

      January 15, 2016 at 4:17 pm

      That’s awesome, great lesson!!!

      Reply
  12. Larissa ~ Prodigal Phanks for sharing the DIY,Jaieces says

    January 18, 2016 at 5:03 am

    tsk. With 6 kids you know I could use this! Thanks, Amy!

    Reply
    • Amy says

      January 18, 2016 at 9:02 am

      I bet you can! 🙂

      Reply
  13. Sarah @ Pebbles and Peonies says

    January 25, 2016 at 8:30 pm

    This is awesome! Thanks for sharing the plans!

    Reply
  14. Brenda Young says

    January 26, 2016 at 6:24 am

    Awesome tutorial and a wonderful solution for getting the garage organized! Pinning this one!

    Reply
  15. Rebecca says

    January 26, 2016 at 8:27 pm

    Great tutorial and plan. I am always tripping over scooters, so this would be wonderful. Pinning so I can make it.

    Reply
  16. betsy says

    June 16, 2016 at 9:33 am

    This is the best plan I’ve seen so far as far as ease of build AND functionality- and I’ve been looking for about 3 years for a DIY bike and scooter rack that I can make AND will look good! 🙂 I AM SO GRATEFUL! Wish me luck…

    Reply
  17. bob says

    August 8, 2017 at 9:49 am

    had to change dimensions and design to prevent scooters and smaller bikes from falling over.

    Reply
  18. Scott K. says

    June 30, 2018 at 9:42 am

    Thank you for this. Just made one and can’t tell you how easy and happy I am with the outcome. The wife and kids are super happy. Would love to post a pic of it to show others.

    Reply
    • Amy says

      July 11, 2018 at 7:10 pm

      Awesome! If you have instagram or facebook you can tag me in your picture @hertoolbelt

      Reply
  19. Ryan M. says

    October 30, 2018 at 12:59 pm

    Amy, great plans. Just wanted to let you know of a correction in your Material List. I think you meant 2×2’s instead of 2x4s for the angled boards that hold the bike wheels.

    5 – 2″ x 4″ x 96″ boards (actual 1 1/2″ x 1 1/2″) should be
    5 – 2″ x 2″ x 96″ boards (actual 1 1/2″ x 1 1/2″)

    Reply
    • Amy says

      November 5, 2018 at 2:11 pm

      Thanks so much for catching that.

      Reply
  20. Michael D says

    December 22, 2019 at 9:06 am

    Thank you!

    Just to ensure, from the picutres it seems, that you are not fully utilizing height and depth (for the bicycle) and that the actual size might be smaller?

    Reply
  21. Grampa Bill says

    May 3, 2020 at 9:08 pm

    Loved your detailed plan. Built it fairly quickly but the full sized bikes would tip over if you touched them. I just added two 2×2’s at the bottom of each 45 degree stand. The bottom 2×2’s are fastened flush at the front (where bike rolls in) and placed on top of 2×4 in the back. I spaced them the the width of the tire so now the tire is snug at bottom and spokes are snug in the 3″ spacing on 45 degree 2×2’s. The bikes are more stable now.

    Reply
    • Amy says

      May 6, 2020 at 9:21 am

      Thanks for the improvement ideas!

      Reply
  22. jamie says

    August 6, 2020 at 10:25 am

    horrible plans , numbers are incorrect and in the end wouldnt even work for a bike with disc brakes

    Reply
    • Amy says

      September 19, 2020 at 5:19 pm

      Hi Jamie,
      Which numbers are incorrect?

      Reply

Leave a Reply Cancel reply

Your email address will not be published. Required fields are marked *

This site uses Akismet to reduce spam. Learn how your comment data is processed.

Search Her Tool Belt

Follow Me!

  • Bloglovin
  • Email
  • Facebook
  • Google+
  • Instagram
  • Pinterest
  • RSS
  • Twitter
  • YouTube

Top Posts & Pages

Custom Drill Storage and Charge Station - Easy
Pallet Planter Box For Cascading Flowers
Cordless Drill Storage - Charging Station
Wood Bunny Easter Basket
$5 Blanket Ladder
Wood DIY LOVE Marquee Letters
How to Build a Redwood Pergola with Arch Detail
King X Barn Door Farmhouse Bed Plans

Check out more projects

Copyright

Thank you for wanting to share my work! No need for my permission to pin my work or to feature 1 or 2 pictures with full watermarks intact that link back to the original project. Please do NOT copy tutorials.

Disclosure & Privacy Policy

Disclaimer

Copyright © 2023 · Magazine Pro Theme on Genesis Framework · WordPress · Log in

This website uses cookies to improve your experience. We'll assume you're ok with this, but you can opt-out if you wish.Accept Read More
Privacy & Cookies Policy

Privacy Overview

This website uses cookies to improve your experience while you navigate through the website. Out of these, the cookies that are categorized as necessary are stored on your browser as they are essential for the working of basic functionalities of the website. We also use third-party cookies that help us analyze and understand how you use this website. These cookies will be stored in your browser only with your consent. You also have the option to opt-out of these cookies. But opting out of some of these cookies may affect your browsing experience.
Necessary
Always Enabled
Necessary cookies are absolutely essential for the website to function properly. This category only includes cookies that ensures basic functionalities and security features of the website. These cookies do not store any personal information.
Non-necessary
Any cookies that may not be particularly necessary for the website to function and is used specifically to collect user personal data via analytics, ads, other embedded contents are termed as non-necessary cookies. It is mandatory to procure user consent prior to running these cookies on your website.
SAVE & ACCEPT