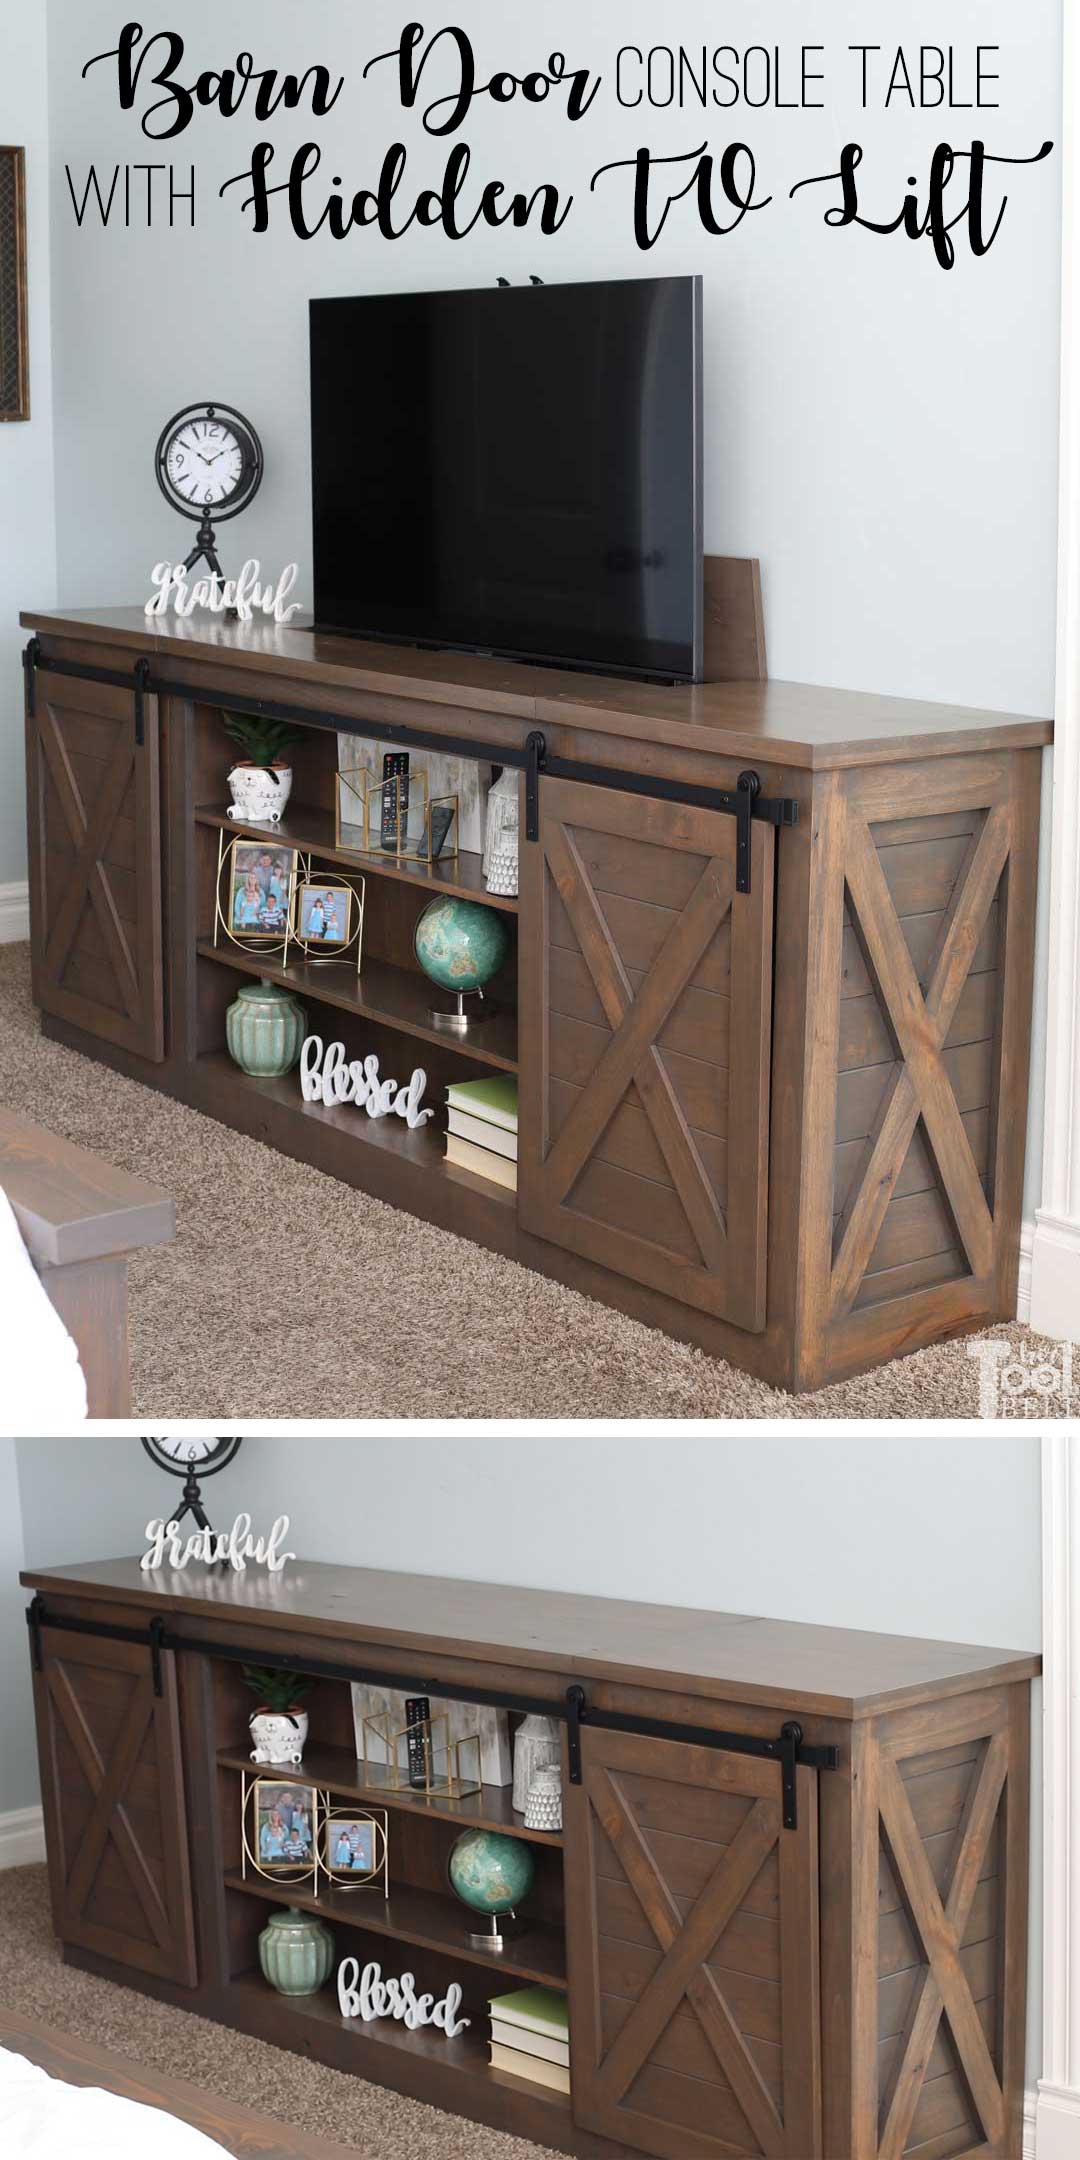
Confession time: Sometimes I like to watch movies while lounging in bed, or folding laundry at the foot of my bed. 🙂 However the best wall in my bedroom for a TV to be mounted, is visible from the entry way and family room area. I don’t love having the ugly side view of the TV mount showing. I have a clever solution, a barn door console table with a hidden TV lift!
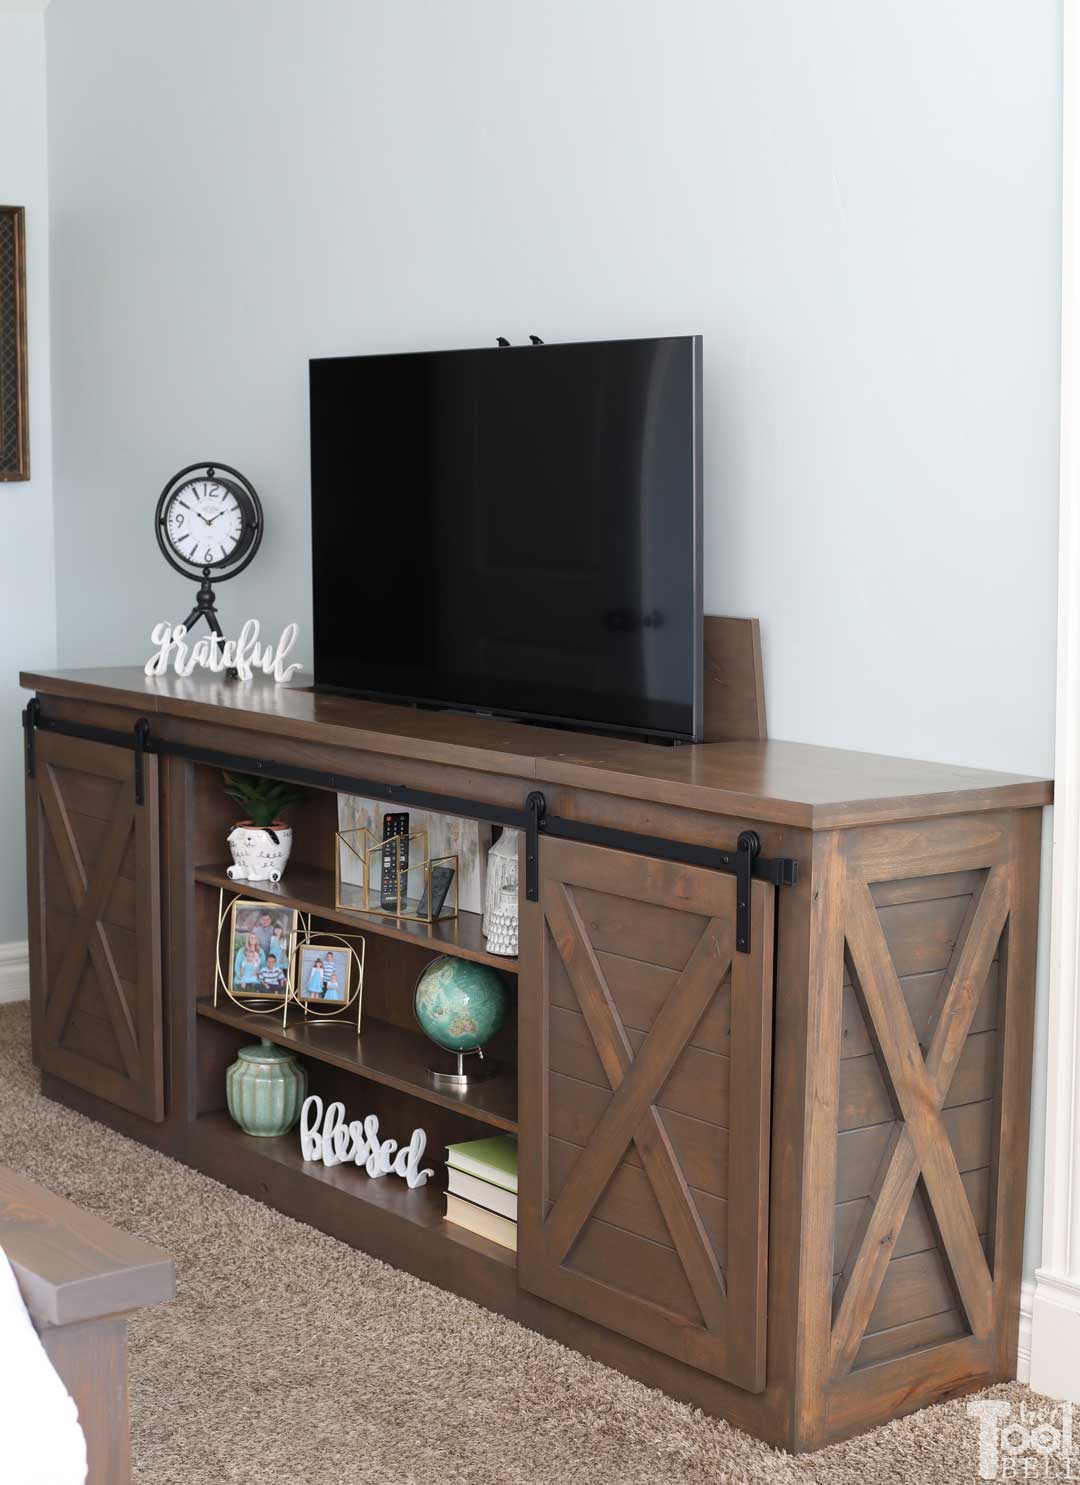
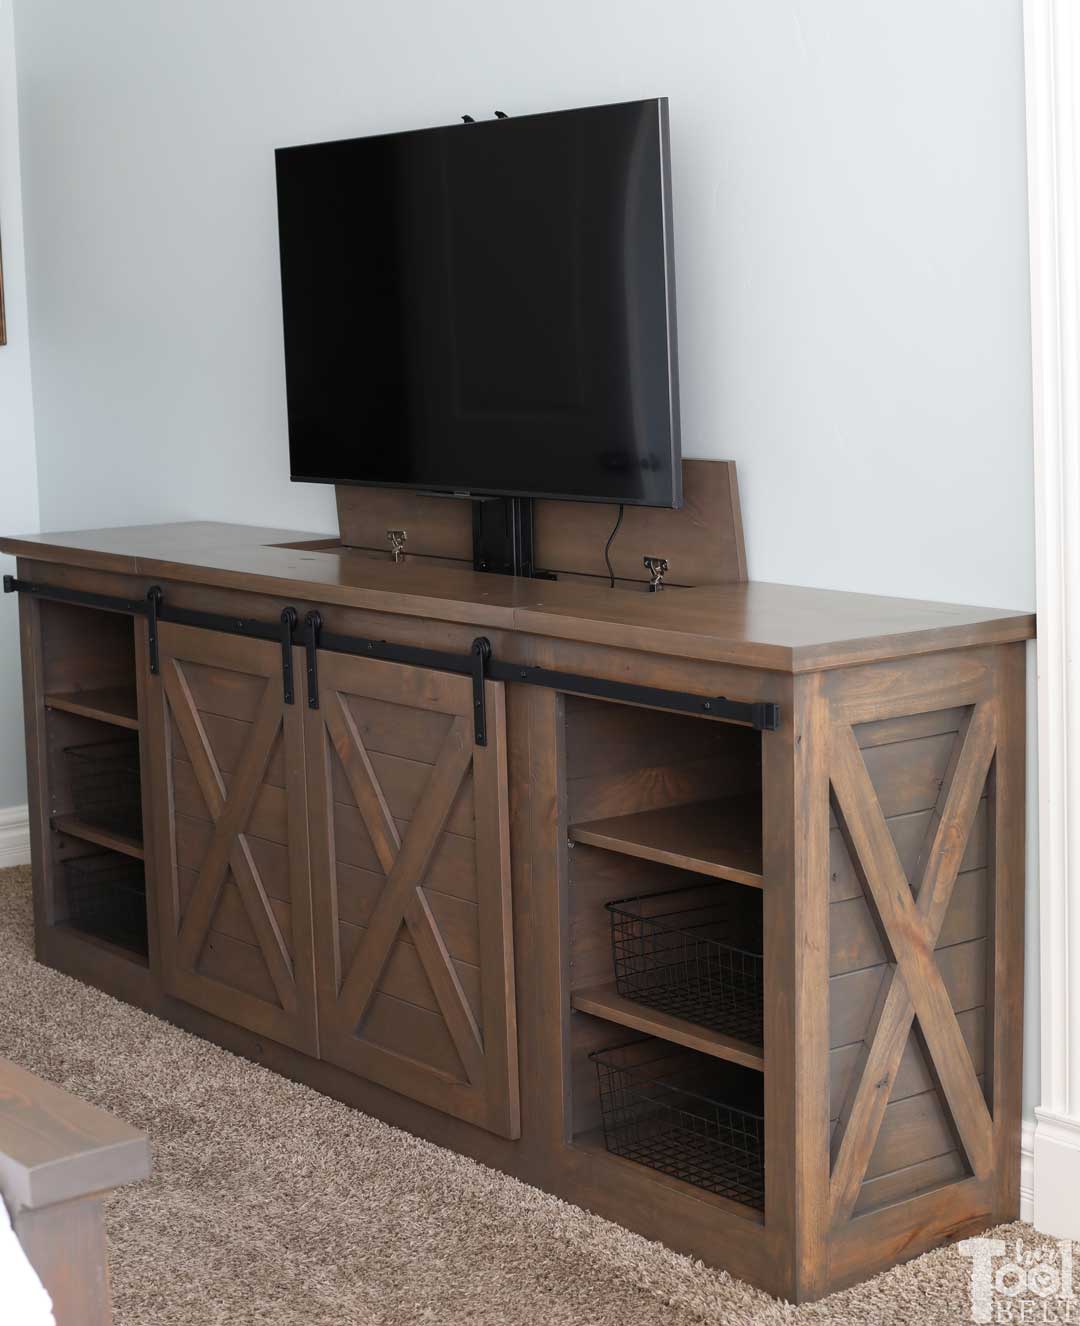
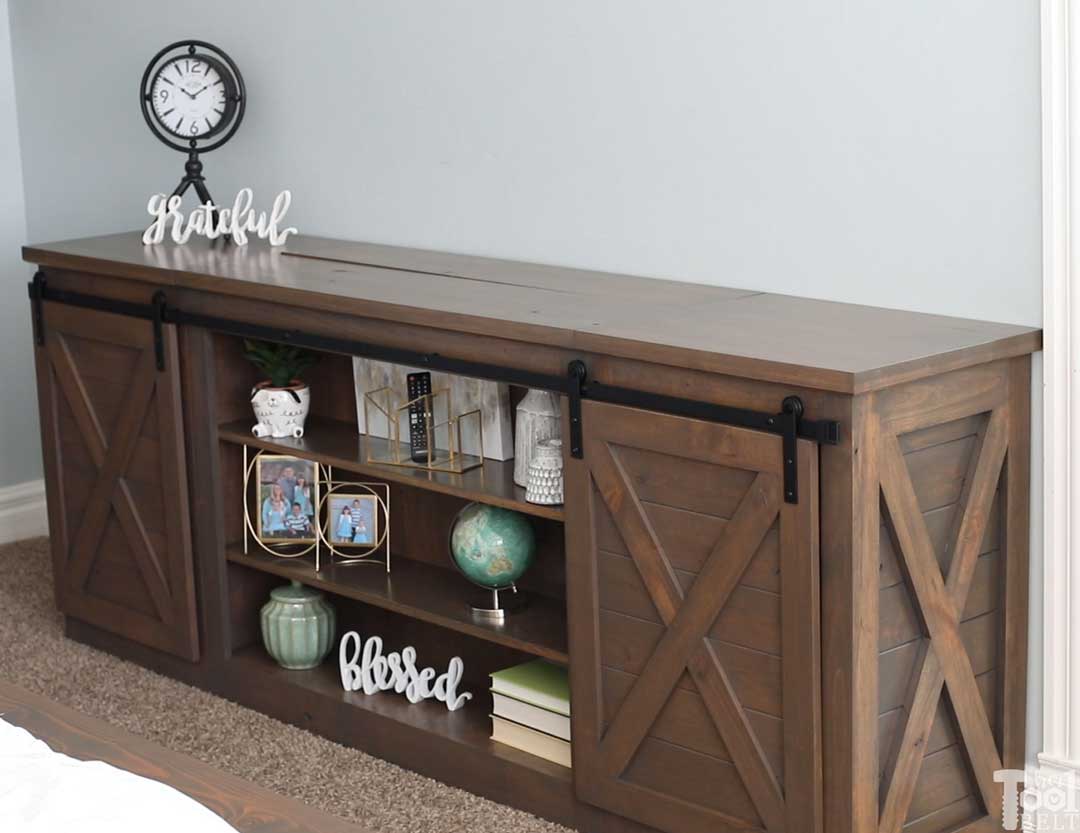
When the barn doors are shut, a shallow decor shelf area is visible. Then open the barn doors to reveal a deeper shelf area for media storage.
It really is a great solution to my problem. No TV permanently mounted to the wall, just a cut X Barn Door Console Table!
The Barn door console table with hidden TV lift looks great while not in use, it hides the electronics that I don’t want seen at all times…and is really cool.
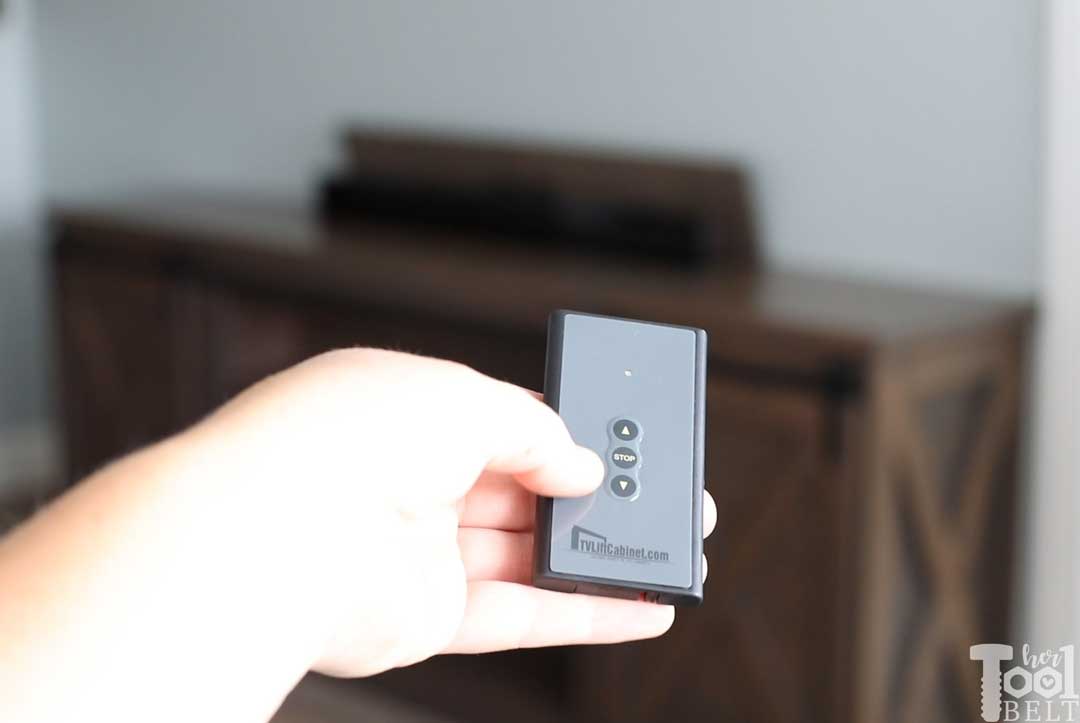
The TV lift cabinet mechanism and remote control are the key to this project – you can see more here.
Please Subscribe
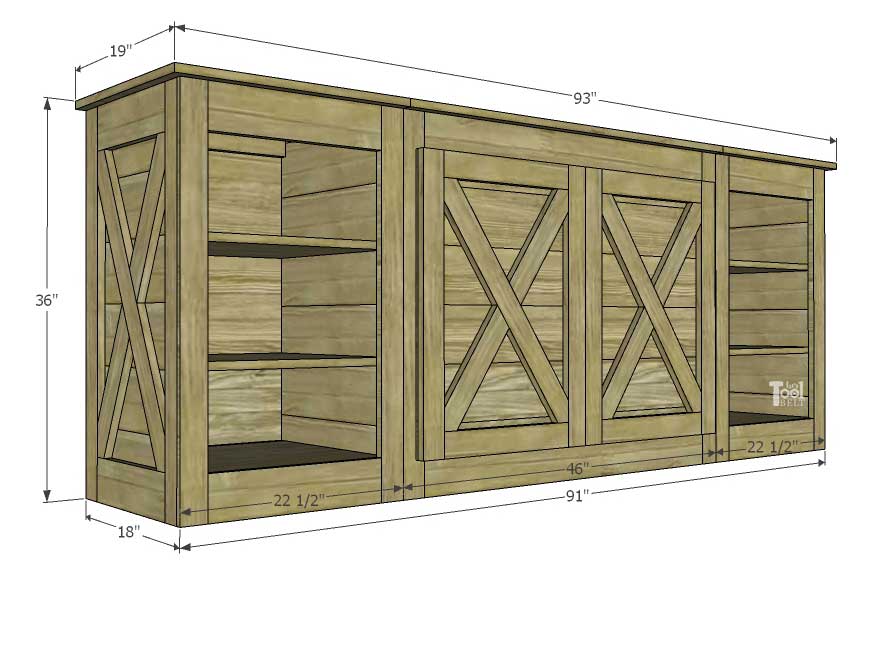
How to Build a Barn Door Console Table with Hidden TV Lift
Materials
- 35″ tall TV Lift Mechanism or smaller with either lid type – Hinged Lid or Fixed Lid
- Mini Barn Door Kit – 7 1/2 feet double door
- 4 – 1×10 x 8′ boards
- 1 – 1×8 x 8′ boards
- 11 – 1×6 x 8′ boards
- 1 – 1×4 x 8′ boards
- 14 – 1×3 x 8′ boards
- 1 – 3/4″ sheet of plywood
- 1/2 – 1/4″ sheet of plywood
- wood glue
- wood biscuits
- 1 1/4″ pocket hole screws
- 1 1/4″ brad nails
- hinges (if using hinge lid style – use either piano hinge or full overlay frameless euro hinges)
- sandpaper
- shelf pins
- wood filler
- stain – I used Briarsmoke
- top coat – I used polyurethane satin
The material list lumber is for common boards that can be bought at the hardware stores. I used alder hardwood that needed to be planed and were random widths.
This cabinet will fit a TV that measures 44″ wide or smaller. My TV is a 50″ Samsung (50 is the diagonal dimension).

Cut List
Center Cabinet
- 2 – 3/4″ x 4″ x 41″ – center cabinet front rails
- 2 – 3/4″ x 4″ x 44 1/2″ – center cabinet back support rails
- 2 – 3/4″ x 2 1/2″ x 35 1/4″ – center cabinet front stiles
- 3 – 3/4″ x 2 1/2″ x 30 1/4″ – center cabinet back support stiles
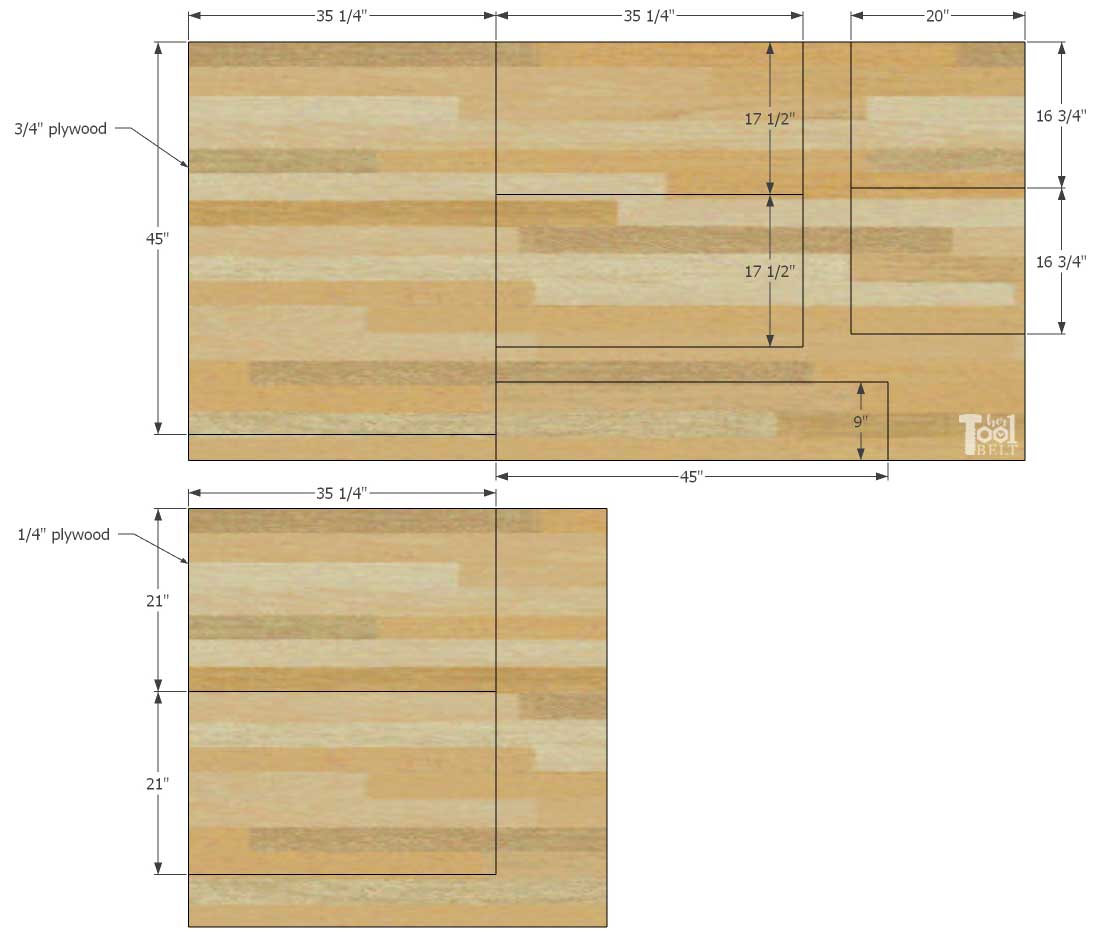
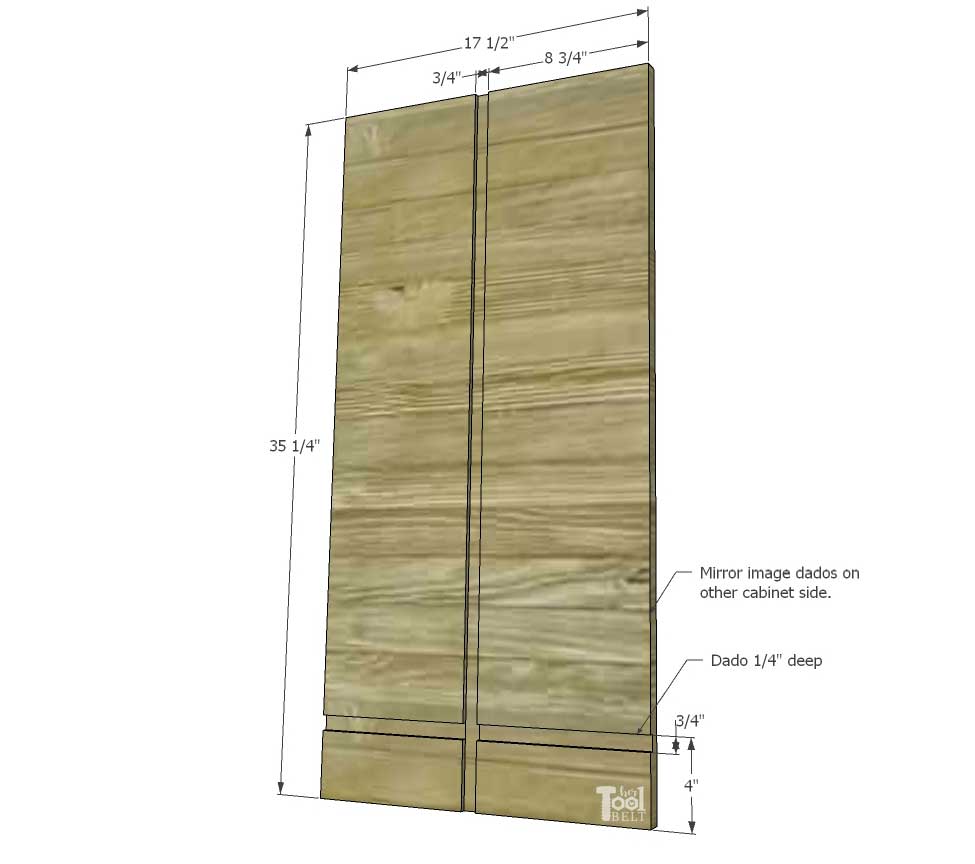
- 2 – 3/4″ x 35 1/4″ x 17 1/2″ plywood – center cabinet sides
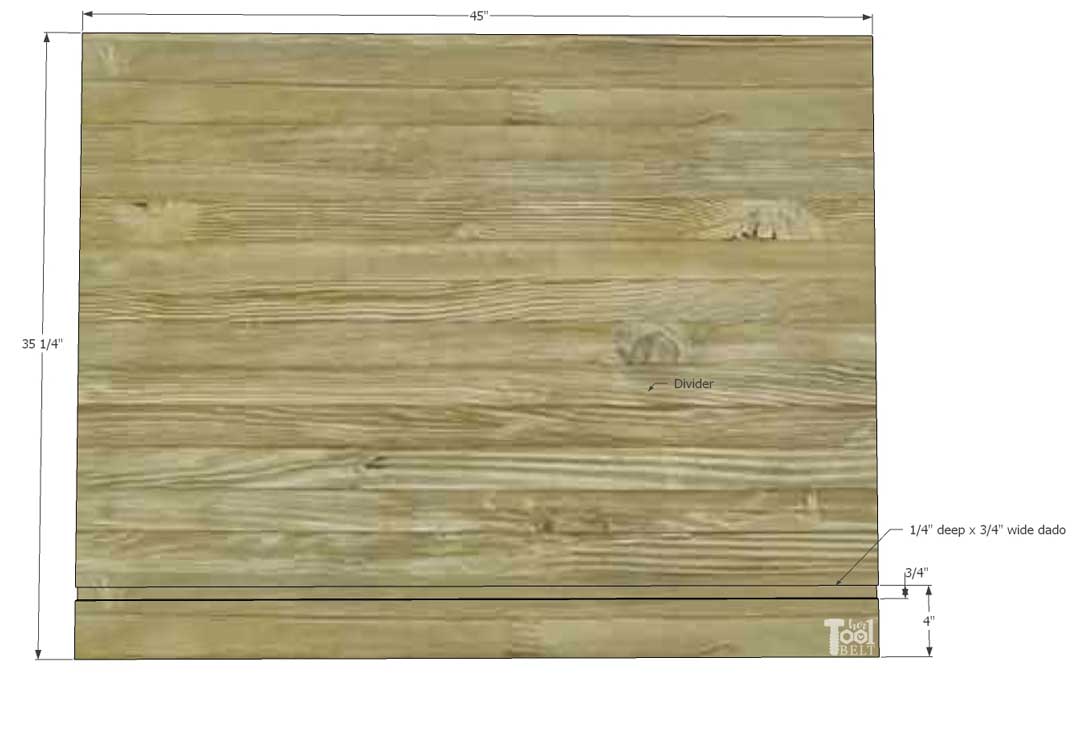
- 1 – 3/4″ x 35 1/4″ x 45″ plywood – center cabinet divider
- 1 – 3/4″ x 9″ x 45″ plywood – center cabinet bottom
- 2 – 3/4″ x 8 1/2″ x 44 1/2″ (a little less than) – center cabinet shelves
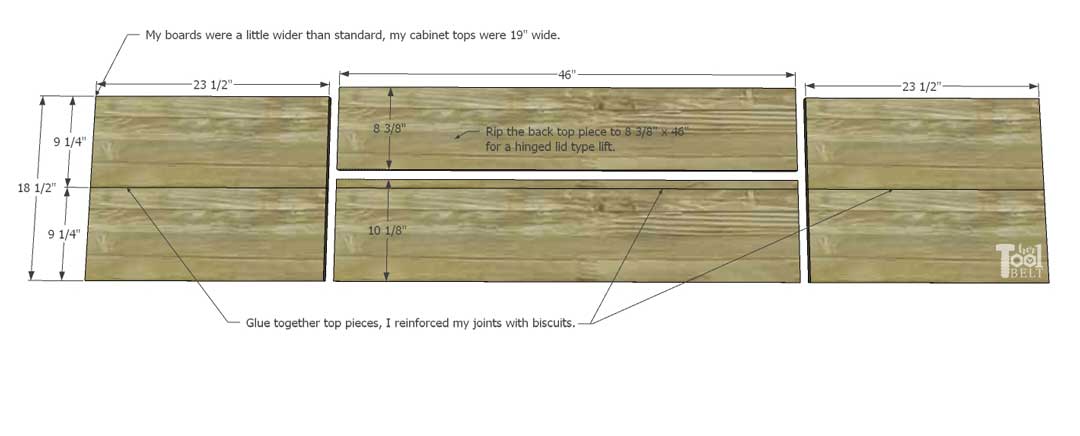
- 2 – 3/4″ x 9 1/4″ x 46″ – center cabinet top – rip one down to 8 3/8″ wide x 46″ if using the hinge lid
2 End Cabinets
- 4 – 3/4″ x 4″ x 17 1/2″ – end cabinet front rails
- 4 – 3/4″ x 2 1/2″ x 35 1/4″ – cabinet front stiles
- 8 – 3/4″ x 4″ x 13″ – end cabinet side rails
- 4 – 3/4″ x 2 1/2″ x 35 1/4″ – end cabinet side stiles back
- 4 – 3/4″ x 2″ x 35 1/4″ – end cabinet side stiles front
- 24 – 3/4″ x 5 1/2″ x 17″ – end cabinet side panels
- 4 – 3/4″ x 1 1/2″ x 17″ – end cabinet side panels
- 4 or 8 – 3/4″ x 2 1/2″ x 30 1/4″ – X pieces for end cabinets (the sides that face the center cabinet do not need X’s if you don’t want to add them)
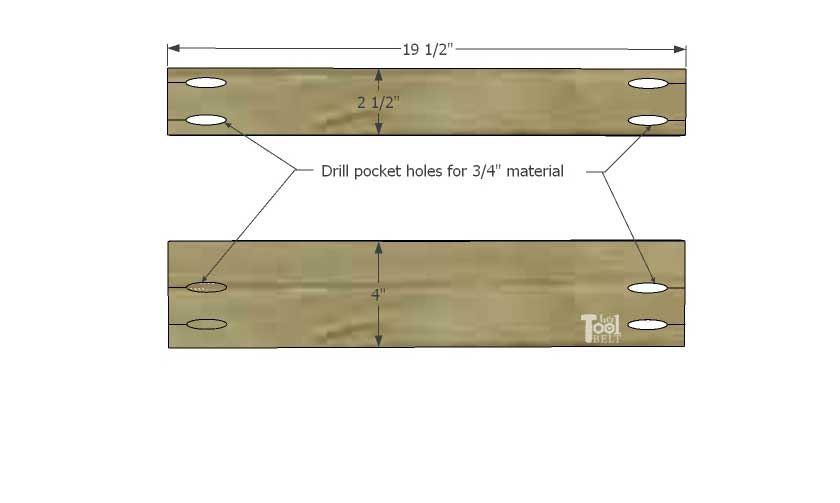
- 2 – 3/4″ x 4″ x 19 1/2″ – end cabinet bottom back
- 2 – 3/4″ x 2 1/2″ x 19 1/2″ – end cabinet top back
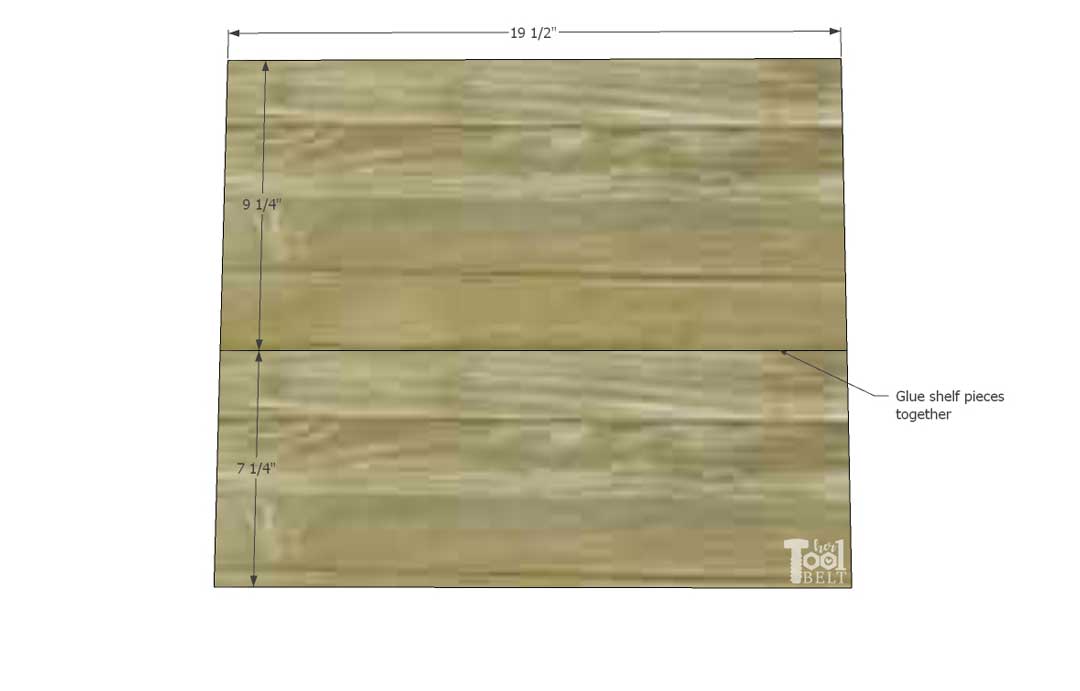
- 4 – 3/4″ x 9 1/4″ x 19 1/2″ – end cabinet shelves
- 4 – 3/4″ x 7 1/4″ x 19 1/2″ – end cabinet shelves
- 2 – 3/4″ x 16 3/4″ x 20″ plywood – end cabinet bottom
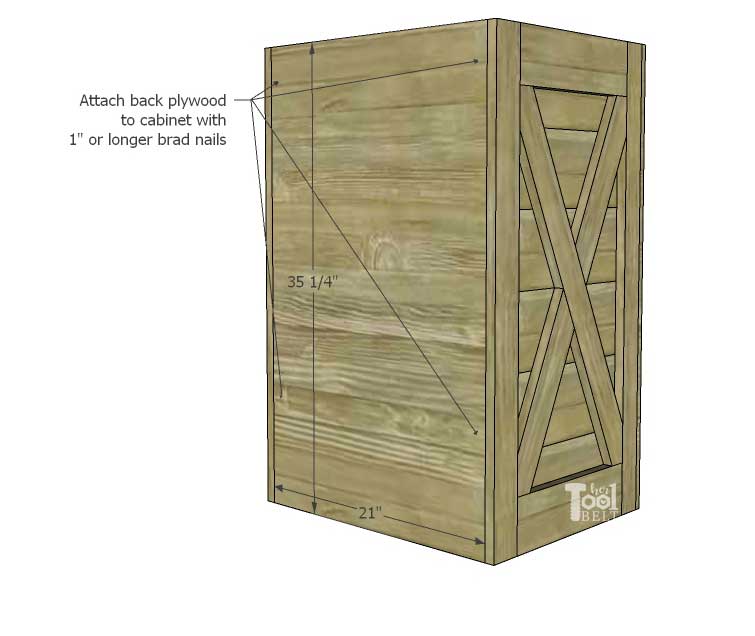
- 2 – 1/4″ x 21″ x 35 1/4″ plywood – end cabinet back
- 4 – 3/4″ x 9 1/4″ x 23 1/2″ – end cabinet top
2 Barn Doors
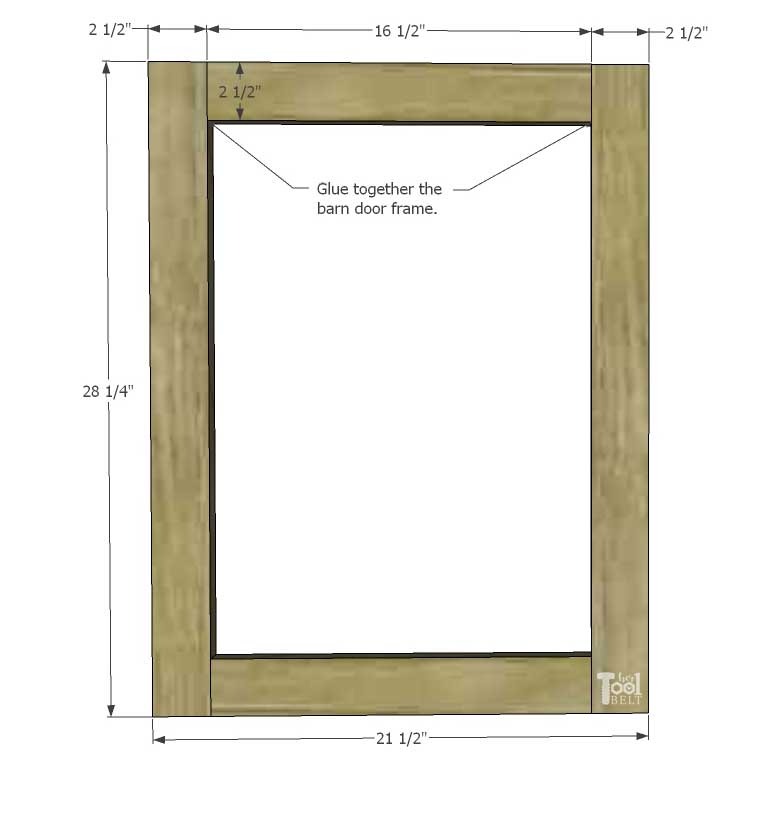
- 4 – 3/4″ x 2 1/2″ x 28 1/4″ – door stiles
- 4 – 3/4″ x 2 1/2″ x 16 1/2″ – door rails
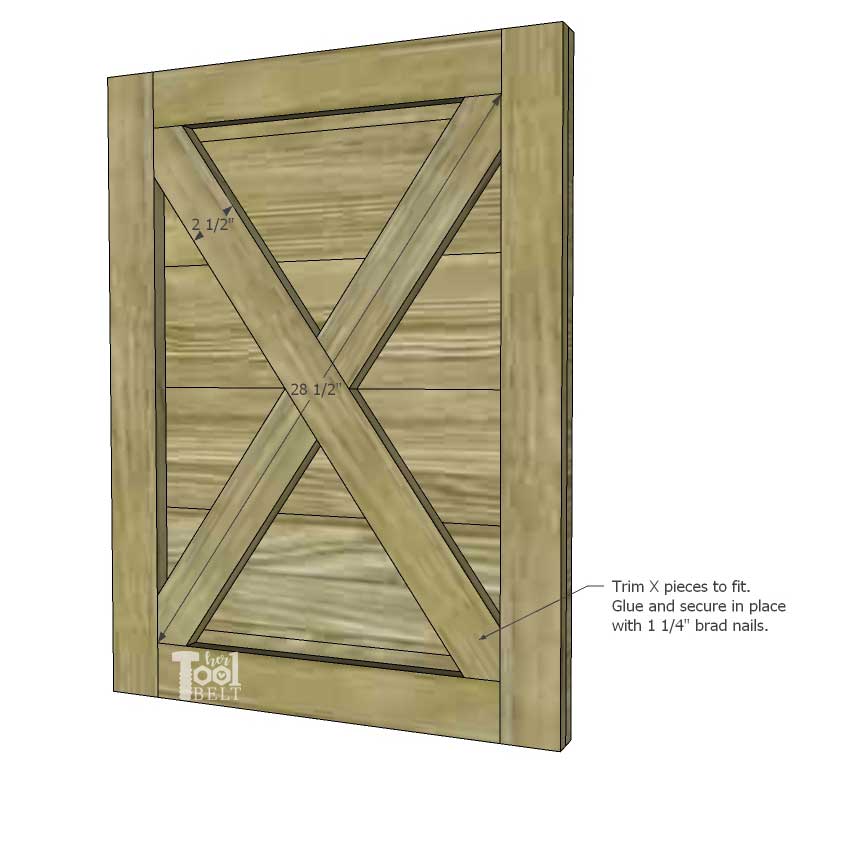
- 4 – 3/4″ x 2 1/2″ x 28 1/2″ cut to fit – door X pieces
- 8 – 3/4″ x 5 1/2″ x 21 1/2″ – door panels (may also be 1/4″ thick)
- 4 – 3/4″ x 3 1/2″ (trim to fit) x 21 1/2″ – door panels (may also be 1/4″ thick)
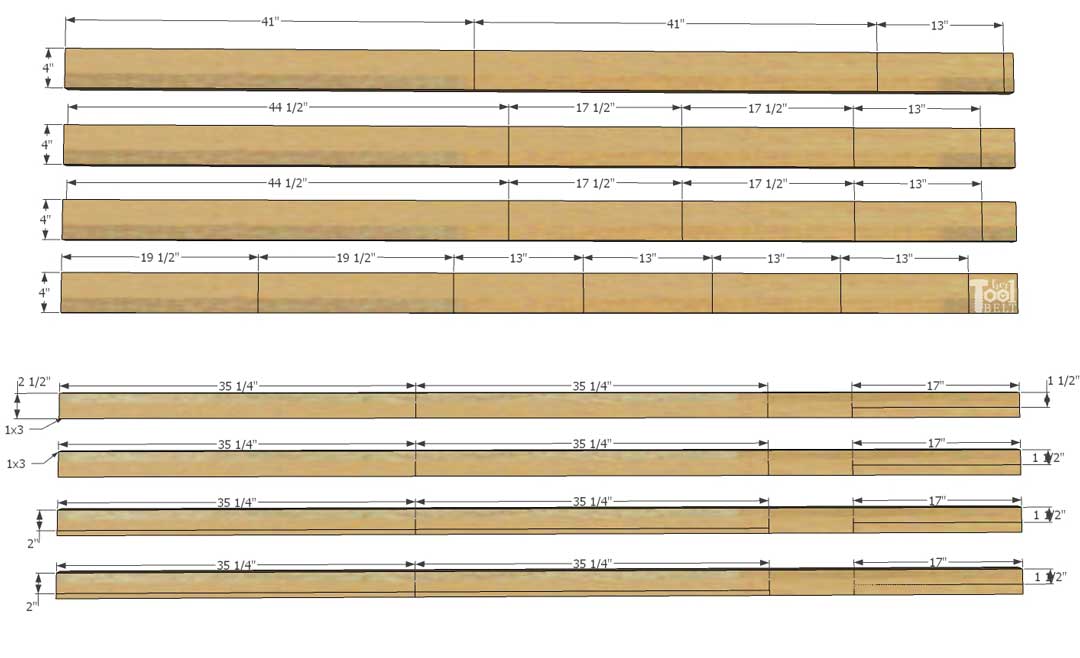
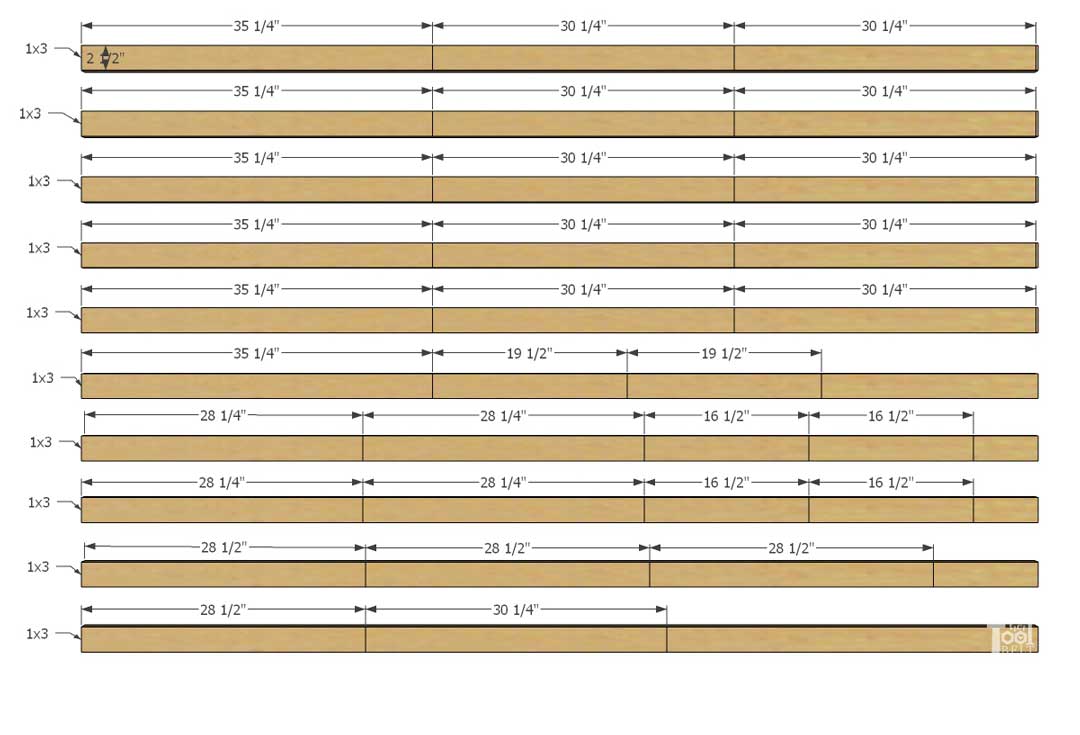
Cut Diagram
Boards
![]()
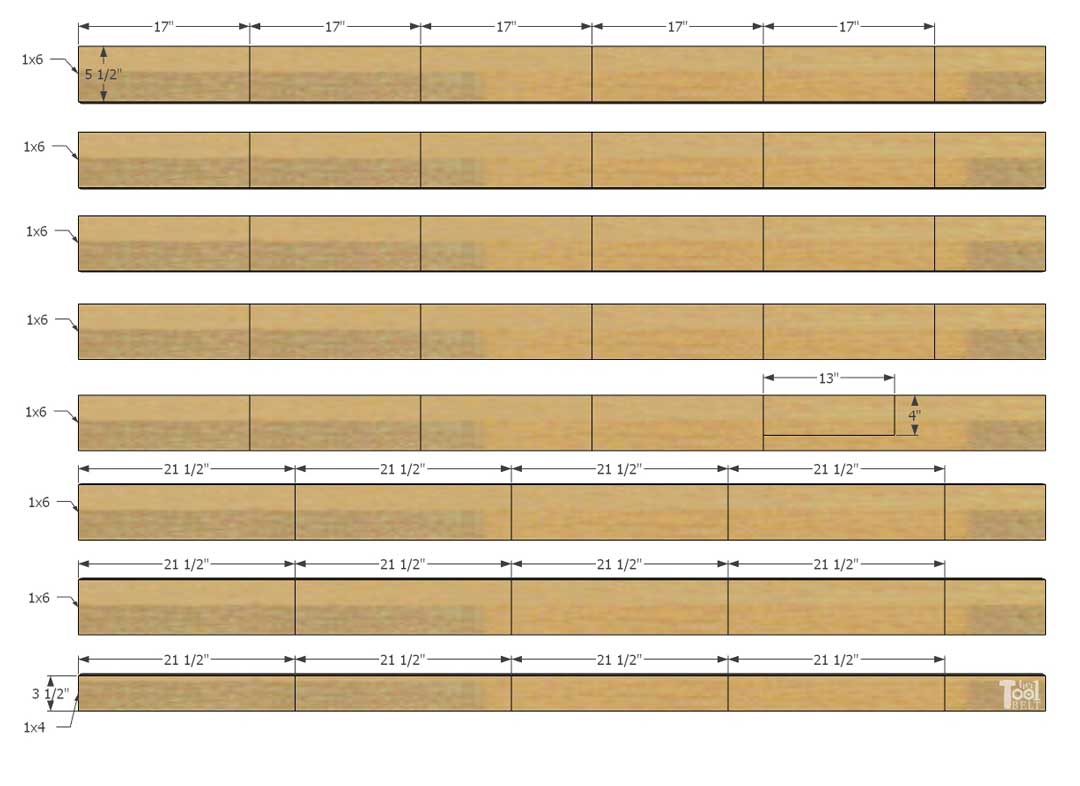
Plywood
Tools Used
- Miter Saw
- Table Saw or circular saw
- Table saw and dado set
- Drill
- Sander
- Biscuit jointer
- Kreg measuring tool
- Tape Measure
- Kreg Shelf pin jig
- Router
- Planer
- Pocket hole jig
- Brad Nailer
 |
 |
 |
 |
 |
 |
 |
 |
Center Cabinet Build
Cut the pieces for the center cabinet.
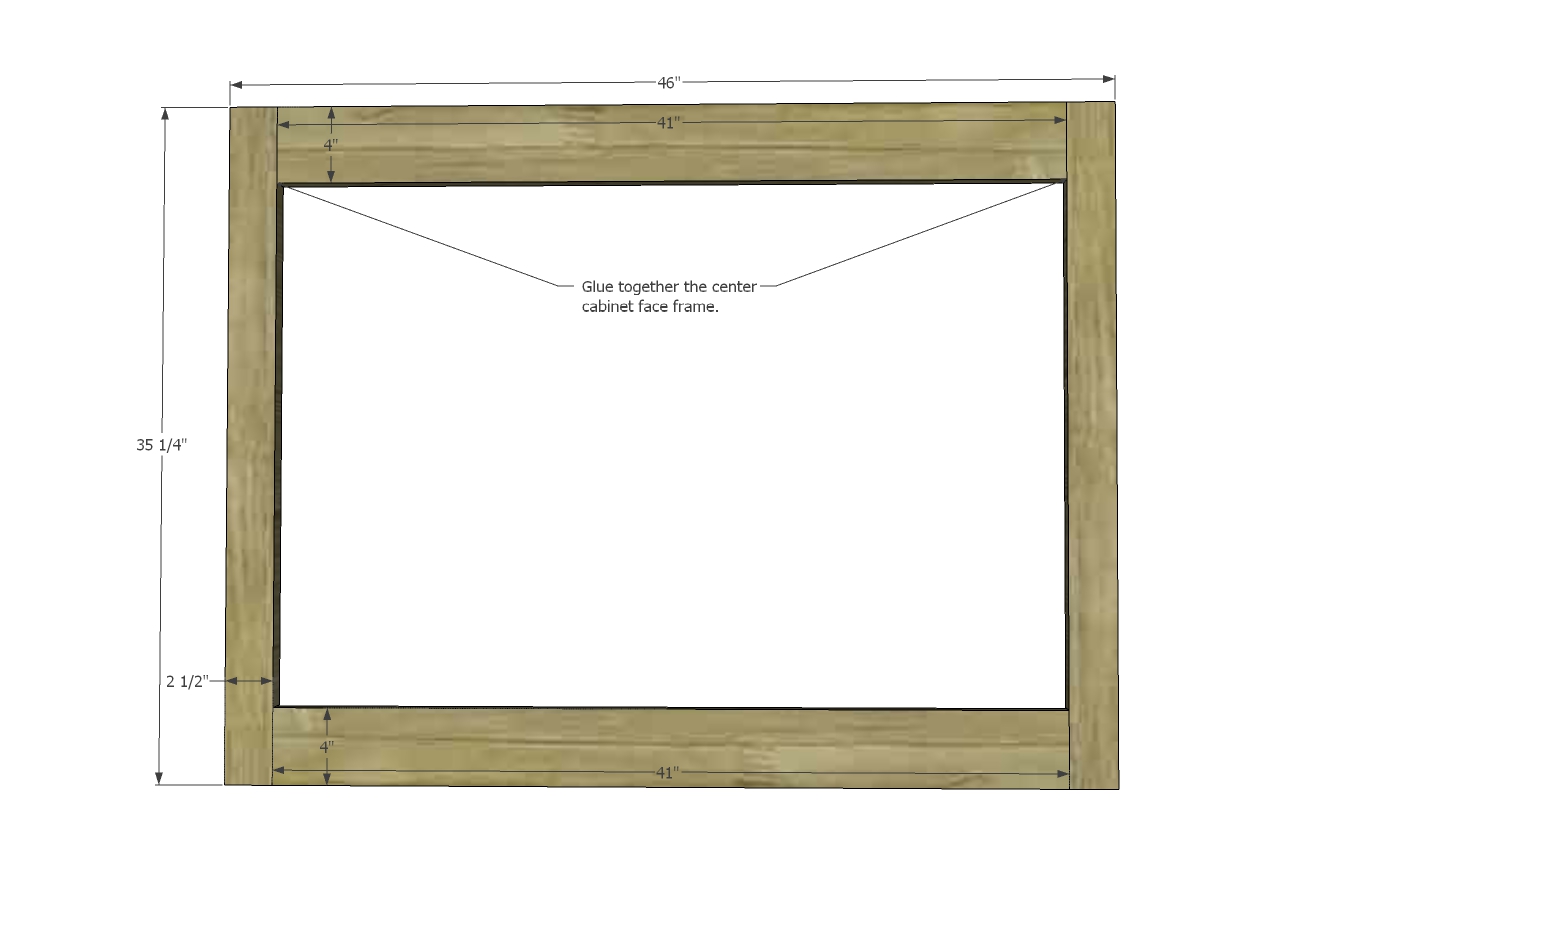
Frames
Glue together front face frame: 2 each 2 1/2″ x 35 1/4″ and 4″ x 41″ pieces. Check to make sure the face frame is drying square by measuring diagonal to diagonal and opposite diagonal to diagonal, the values should be the same.
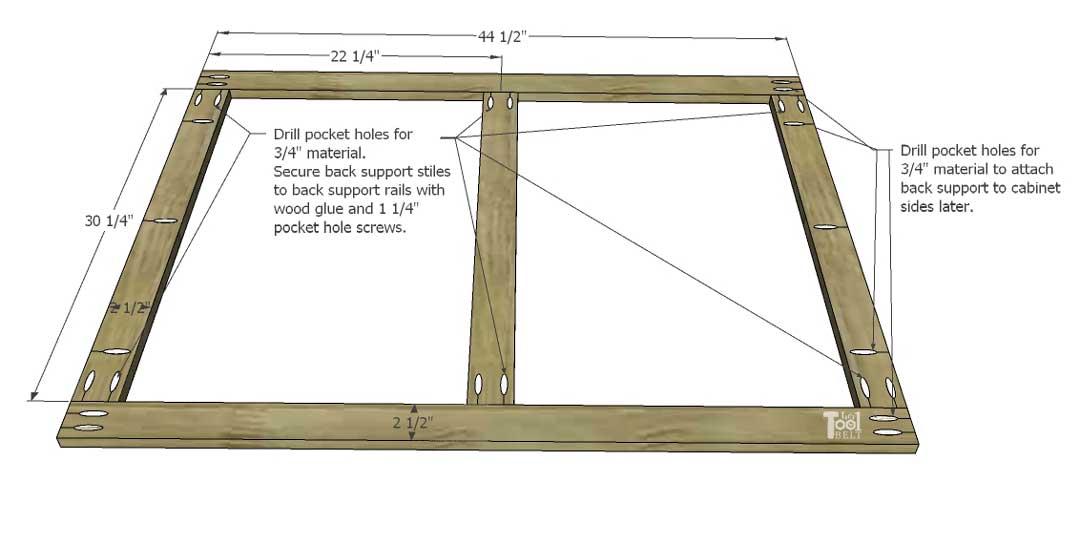
Drill pocket holes for 3/4″ material in the ends of the back support stiles and rails. Also drill pocket holes for 3/4″ material along the outer stiles to attach the back support to the side panels later.
Glue together back support and secure with 1 1/4″ pocket hole screws, attach the center stile in the center of the rails.
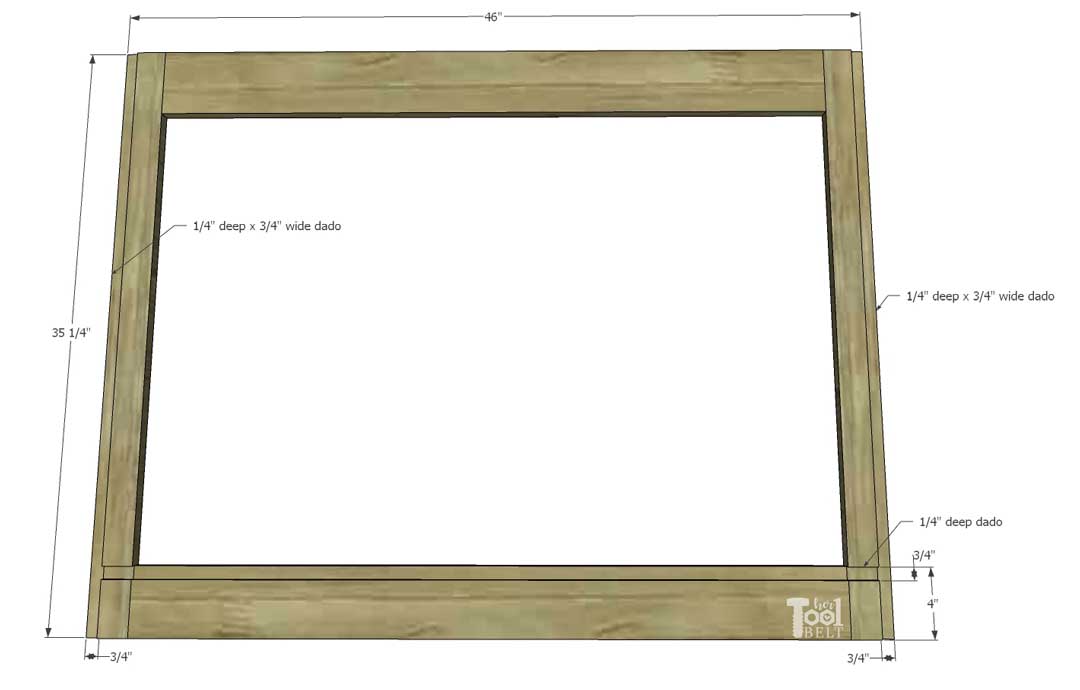
Dados
Once the face frame glue is fully dry, cut 1/4″ deep x 3/4″ wide dados on both edges and at 4″ up from the bottom.
On the side panel, cut a 1/4″ deep x 3/4″ wide dado 4″ from the bottom, also cut the dado 8 3/4″ from the front of the side panel. Note: make sure to make the side panel dado’s mirror image of each other.
On the divider panel, cut 1/4″ deep x 3/4″ wide dado 4″ up from the bottom.
Assembly
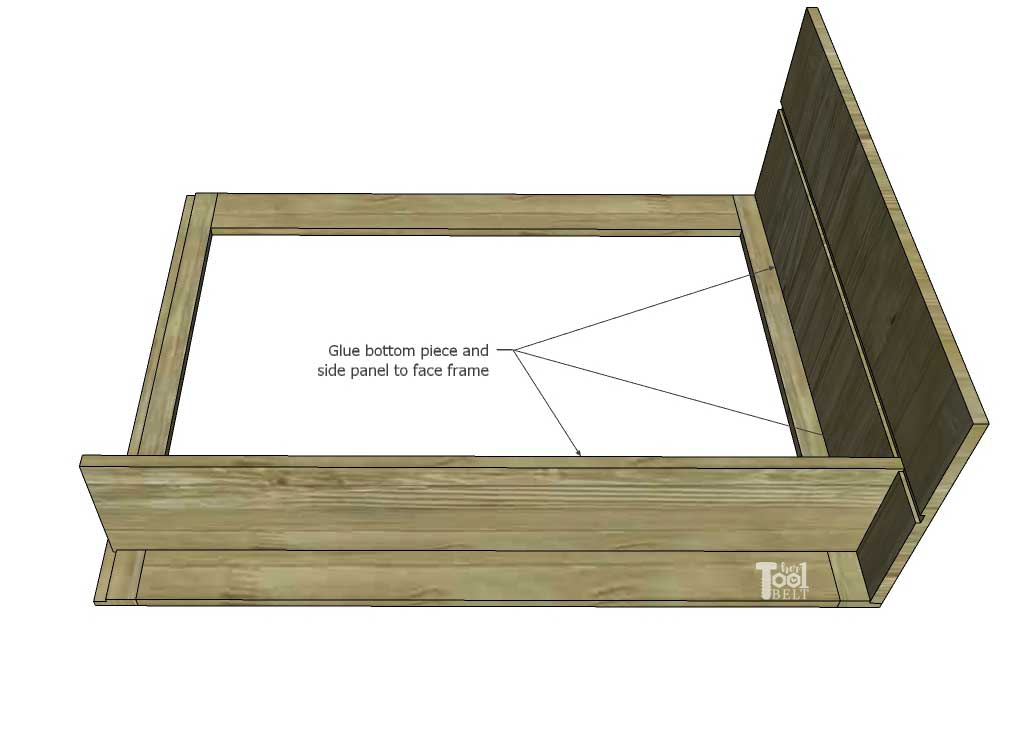
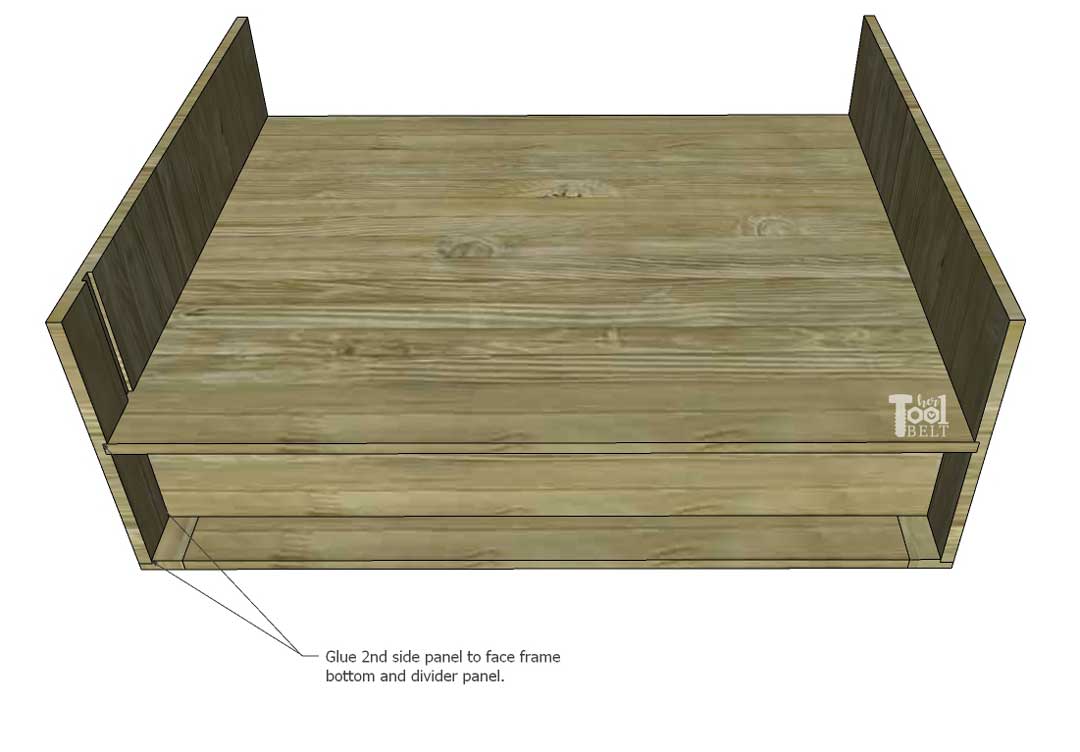
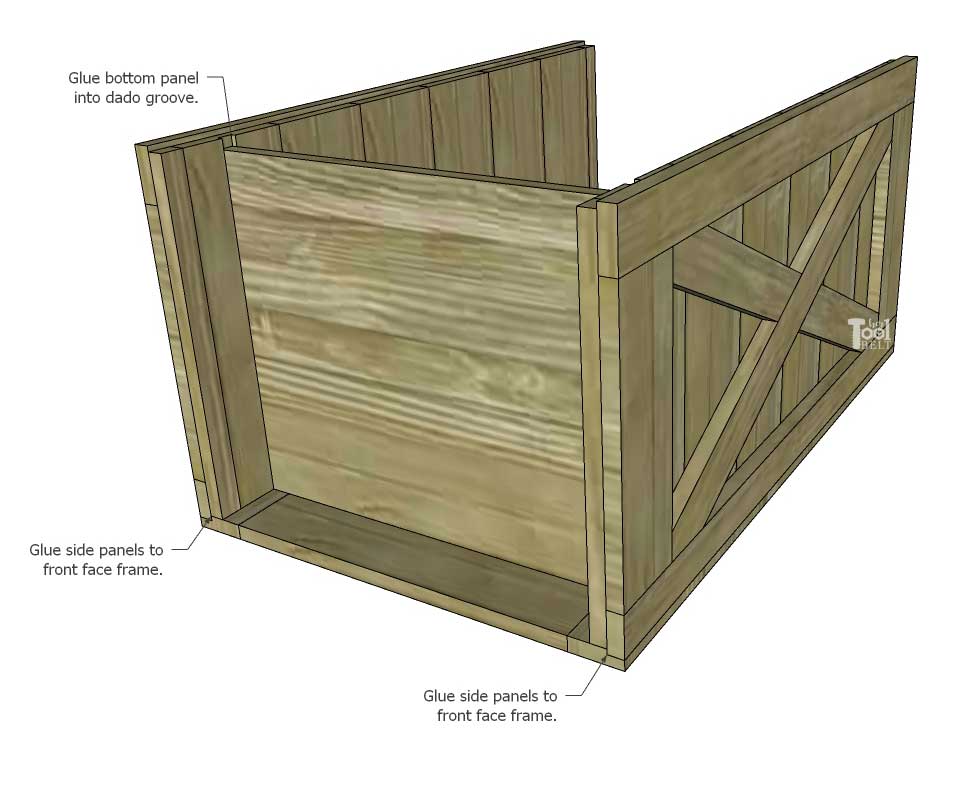
Glue the bottom piece to the face frame 4″ dado. Glue a side panel to the face frame and bottom.
Glue the divider panel to the side panel and bottom piece.
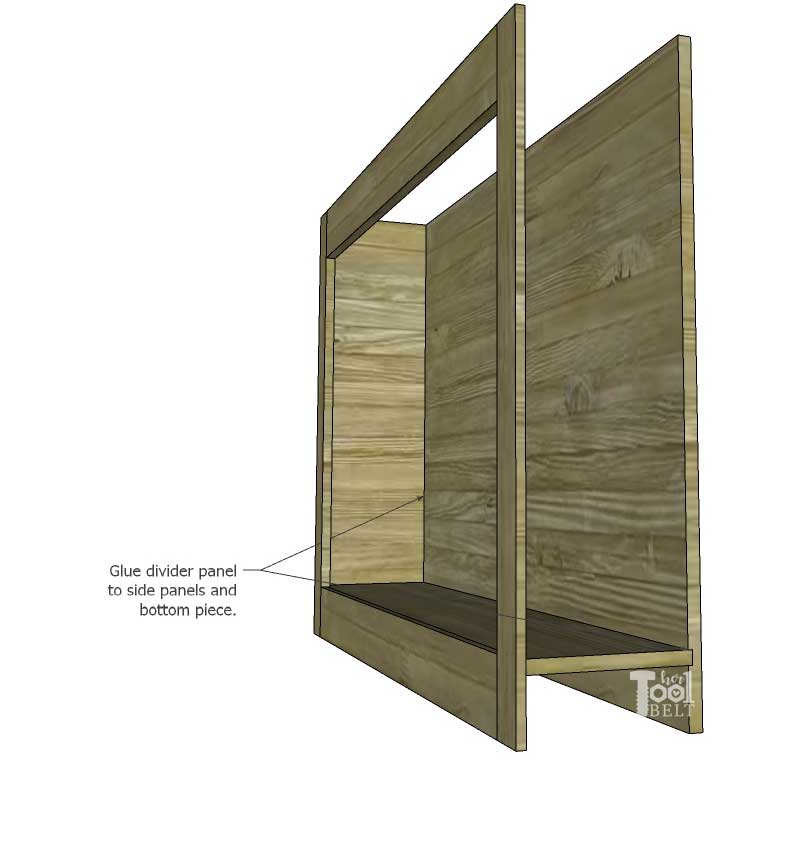
Then glue the other side panel to the face frame, bottom and divider. Use clamps to hold the panels in place while the glue is drying.
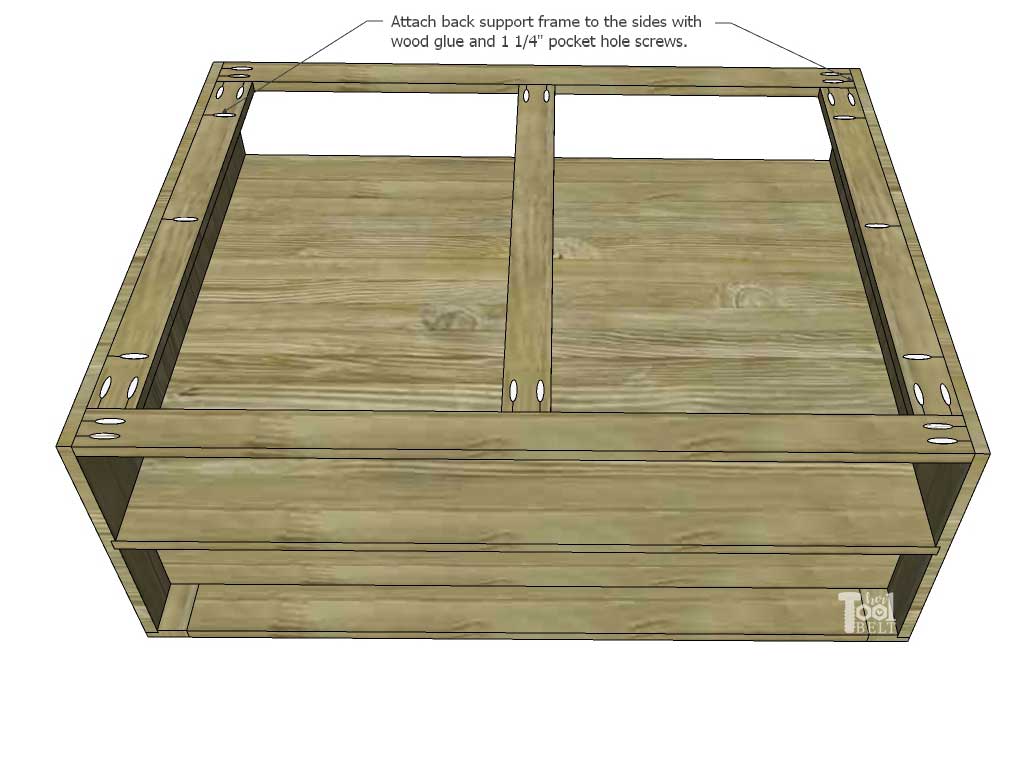
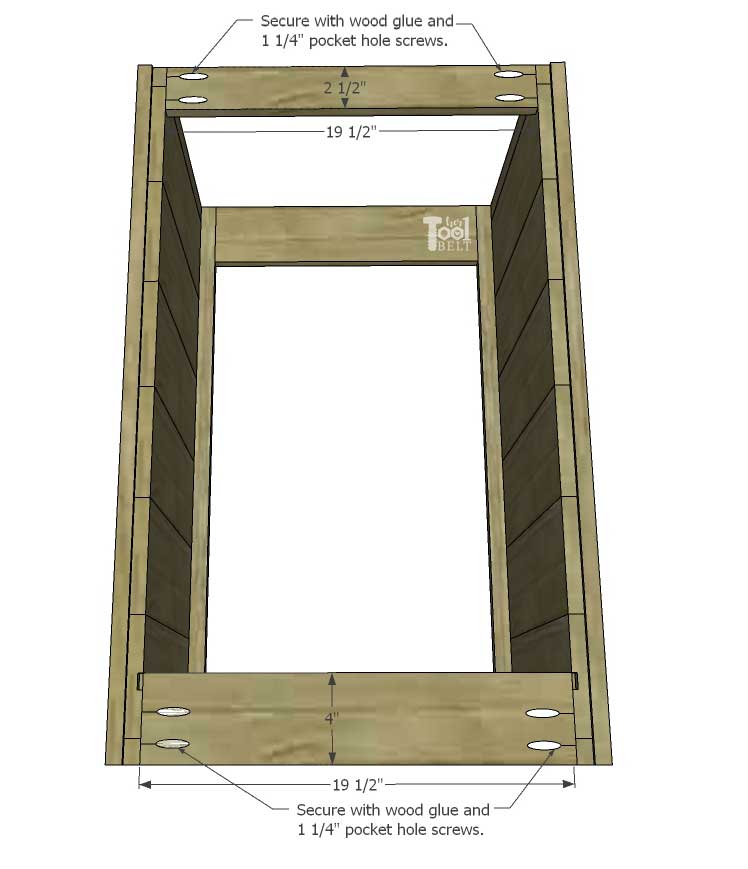
Secure the back support to the side panels with wood glue and 1 1/4″ pocket hole screws.
Make sure the center cabinet is drying square.
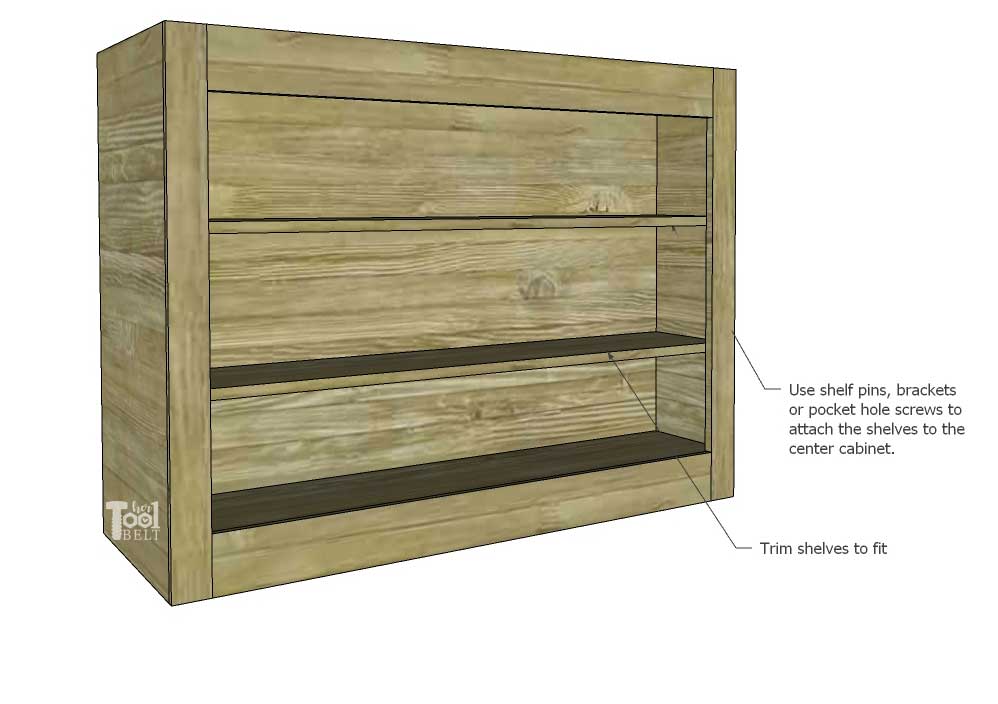
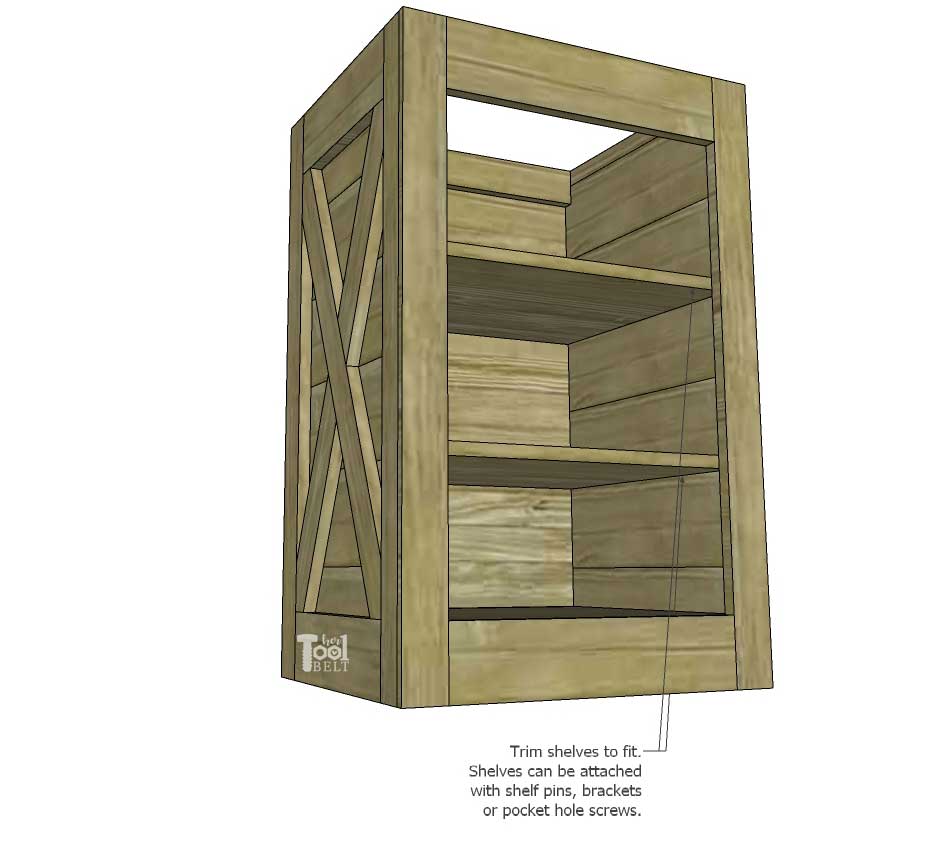
Trim the shelves to fit. Use shelf pins, brackets or pocket hole screws to attach the shelves to the center cabinet.
End Cabinet Build
Cut the pieces for the end cabinets.
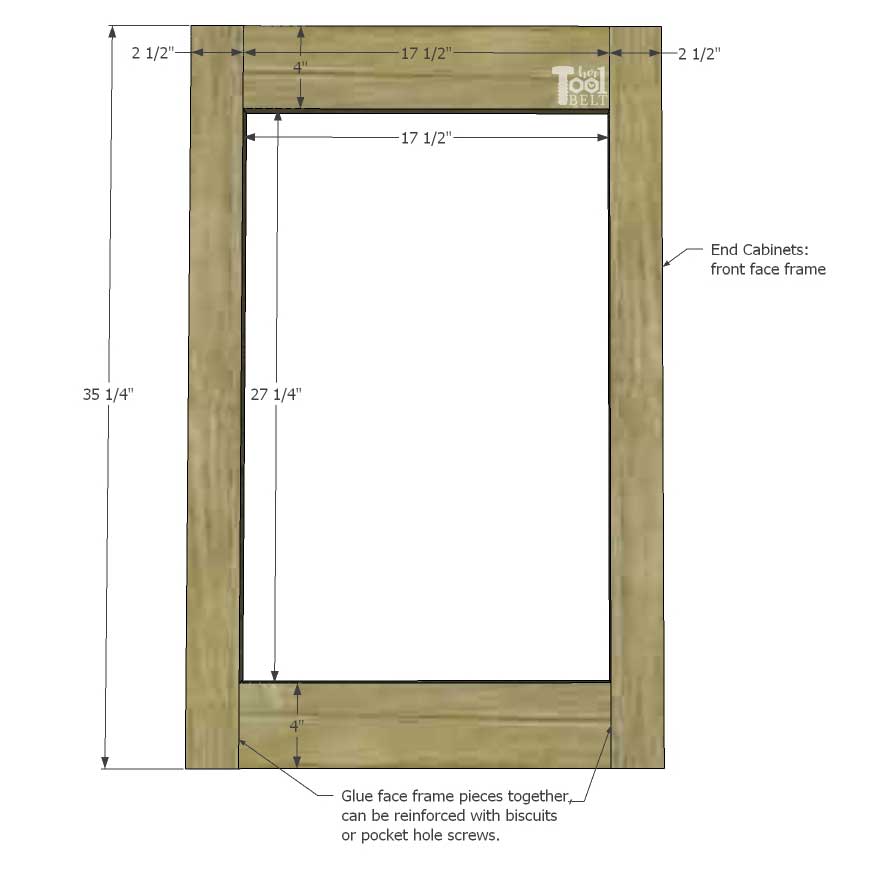
Glue together 2 front face frames: 2 each 2 1/2″ x 35 1/4″ and 2 1/2″ x 17 1/2″ pieces. Check to make sure the face frames are drying square by measuring diagonal to diagonal and opposite diagonal to diagonal, the values should be the same.
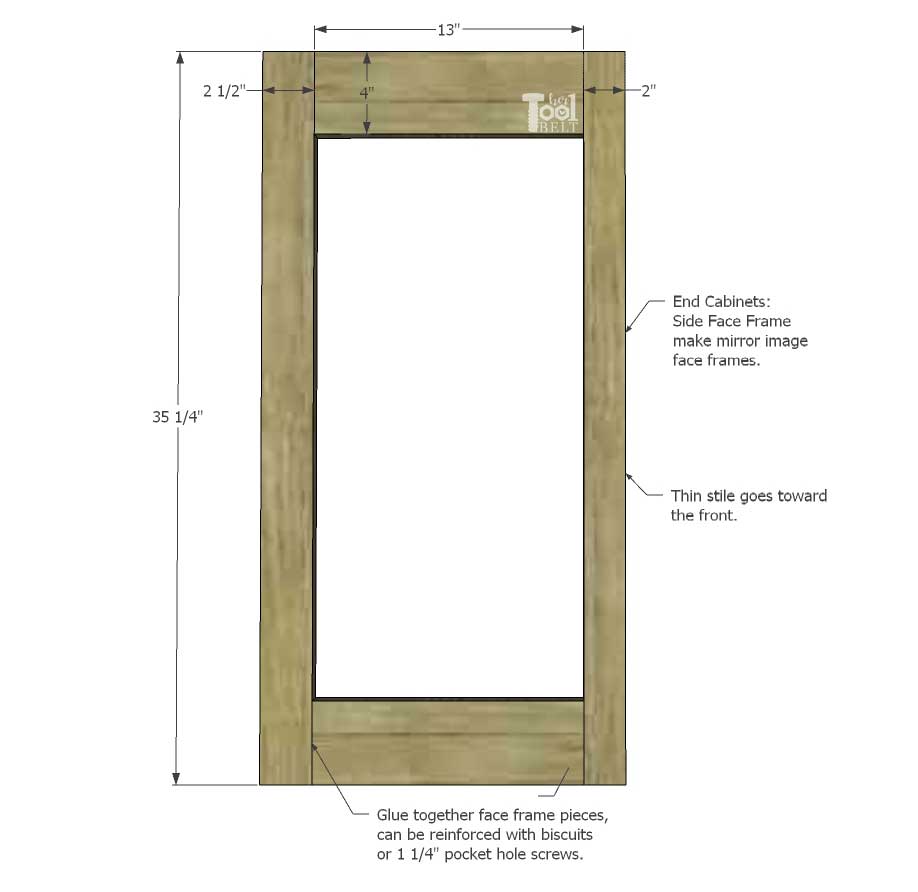
Glue together 4 side face frames: 2 each 4″ x 13″, 2 1/2″ x 35 1/4″ and 2″ x 35 1/4″ pieces. Check to make sure the face frames are drying square by measuring diagonal to diagonal and opposite diagonal to diagonal, the values should be the same.
Place X pieces under the dry side face frame and mark the angles that need to be cut for the X’s.
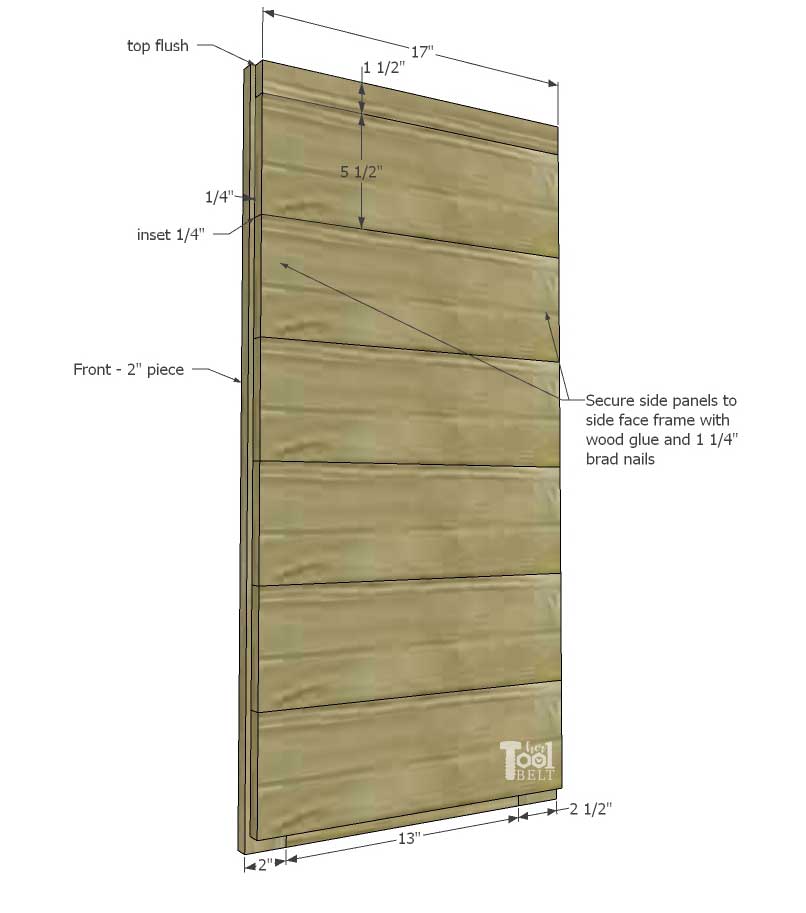
On the backside of the side face frame, mark 1/4″ inset on the 2″ stile side. Glue and secure the side panel pieces to the side face frame with 1 1/4″ brad nails. (A gap of side panel pieces at the bottom will not be seen.)
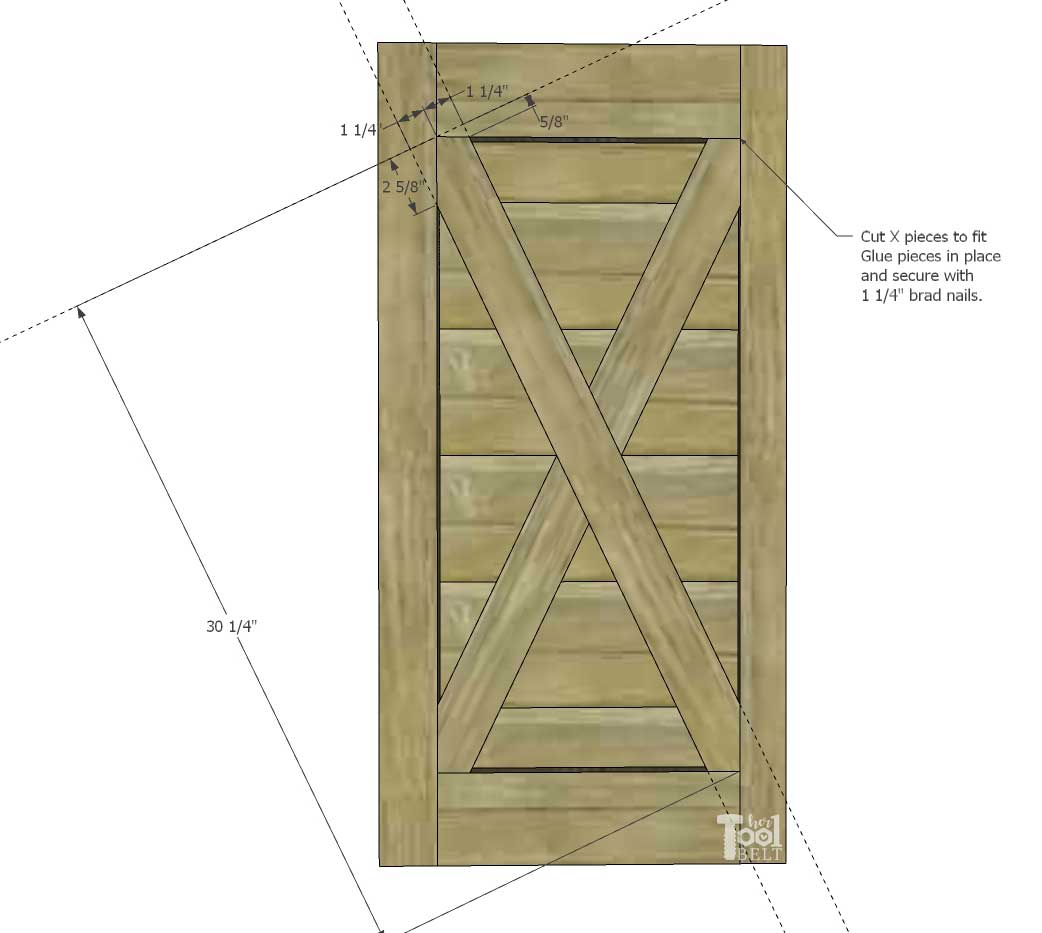
Cut X pieces to fit in the side face frame. Glue the X pieces in with 1 1/4″ brad nails. (Cut to fit, the measurements below are for reference only).
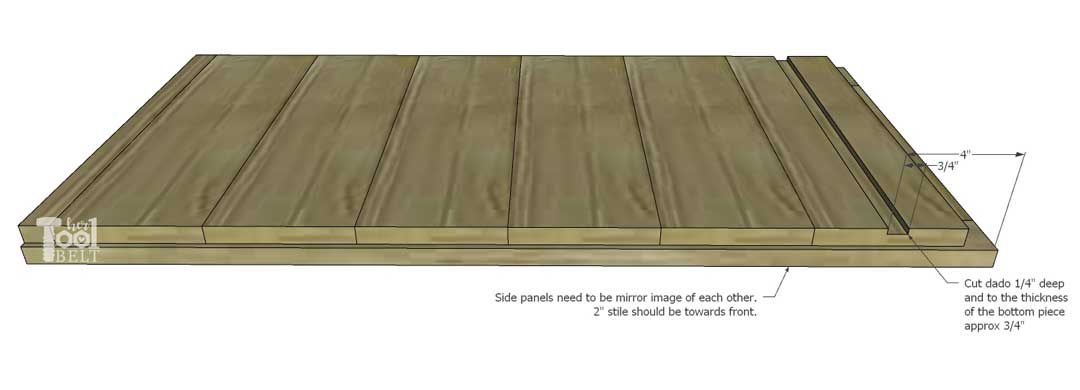
Cut a 1/4″ deep and 3/4″ wide (or the thickness of the end cabinet bottom plywood) that is 4″ from the bottom of the side panel. Remember the side panels need to be mirrored for each side of the end cabinets. The 2″ stile needs to be towards the front.
Once the face frames glue is dry, cut 1/4″ deep x 3/4″ wide dados along each outer side, and 4″ up from the bottom.

Drill pocket holes for 3/4″ material in both ends of the top and bottom support pieces.
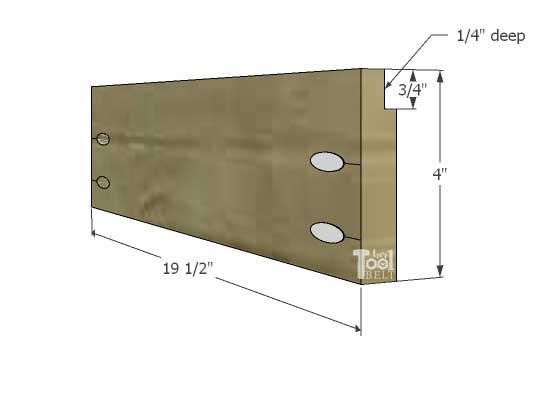
Then in the 4″ bottom support piece, cut a 1/4″ deep x 3/4″ wide dado at the top.
End Cabinet Assembly
Use wood glue and clamps to attach the side panels to the end cabinet front face frame. Then glue in the bottom plywood piece. Make sure the 2″ side panel stiles are towards the front and the side panels are flush with the sides of the front face frame. Brad nails can be used to help secure the side panels in place.
Attach the bottom and top support pieces with wood glue and 1 1/4″ pocket hole screws. Make sure the cabinet is drying square (diagonal to diagonal measurements), use clamps to hold it square during drying time if needed.
Attach the back 1/4″ plywood with brad nails.
Repeat for 2nd End Cabinet.
Shelves
Glue together boards for 4 end cabinet shelves.
Attach shelves to end cabinets, use shelf pins, brackets or pocket hole screws.
Barn Door Build
Cut the pieces for the barn doors. Glue together the face frame for each door. 2 each 2 1/2″ x 28 1/4″ and 2 1/2″ x 16 1/2″ pieces. Check to make sure the face frames are drying square by measuring diagonal to diagonal, the values should be the same.
Line up barn door panel pieces, trim pieces to be 21 1/2″ x 28 1/4″. Glue the panel pieces to the back of the barn door face frame. Secure panel pieces to the face frame with 1 1/4″ brad nails.

Cut the 2 1/2″ wide X pieces to fit into the door frame. Secure to the barn doors with wood glue and 1 1/4″ brad nails.
Cabinet Tops
Glue together the cabinet top pieces. My boards were a little wider than nominal board that you buy, my cabinet top ended up being 19″ wide. Each end cabinet needs a top that is 23 1/2″ x 18 1/2″(or 19″). The center cabinet needs a hinge piece of 8 3/8″ x 46″ and a front piece that is 10 1/8″ (or 10 5/8″) x 46″.
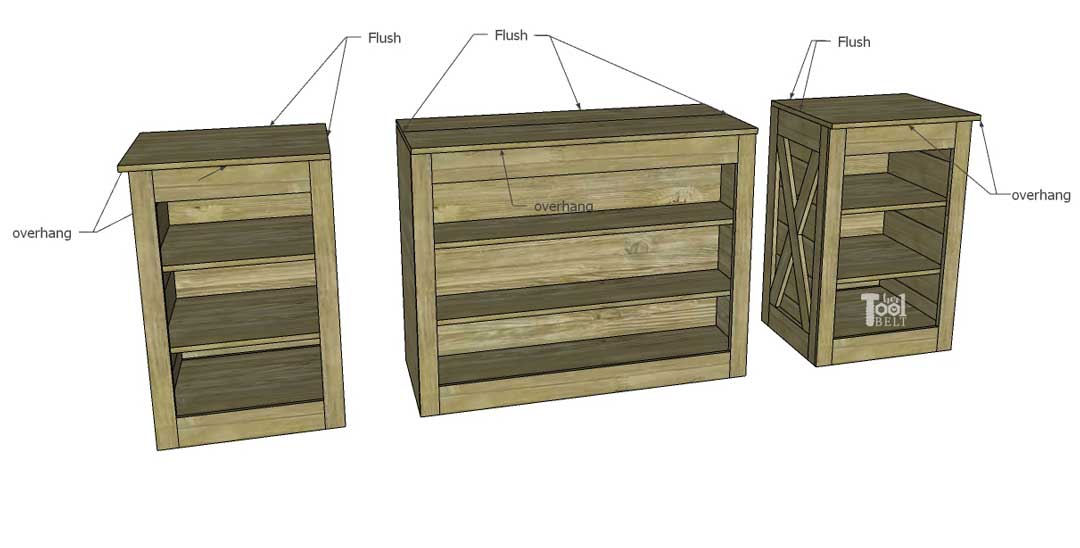
Attach the cabinet top pieces to the cabinets. Tops can be attached to cabinets with pocket hole screws, brackets or Z clips.
Finish
Fill all nail holes and blemishes with wood filler and allow to dry. Sand the barn door console table smooth, starting with 80 grit sandpaper and working up to 180-220. I stained the console table with Varathane Briarsmoke. Once the stain dried, I applied 2 coats of satin polyurethane, sanding lightly between coats.
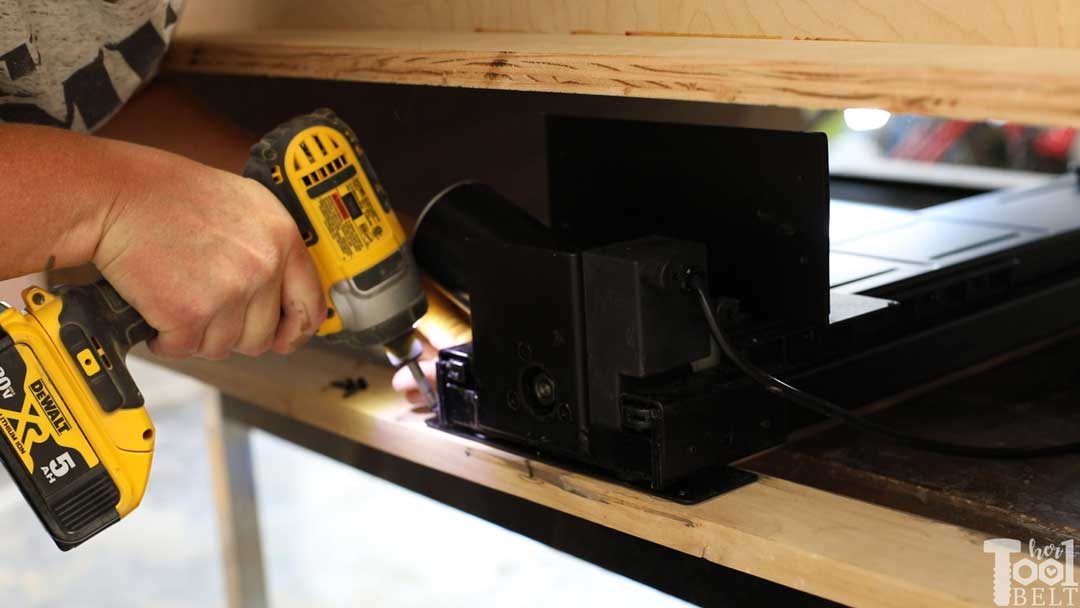
Install TV Lift
The TV Lift is easy really easy to install. The top of the TV lift mechanism is installed about 1/8″ from the top. Center the mechanism in the exact center of the back support. Secure the TV Lift Mechanism with the included screws.
Make sure the mechanism will be straight up and down, then secure the bracket at the other end.
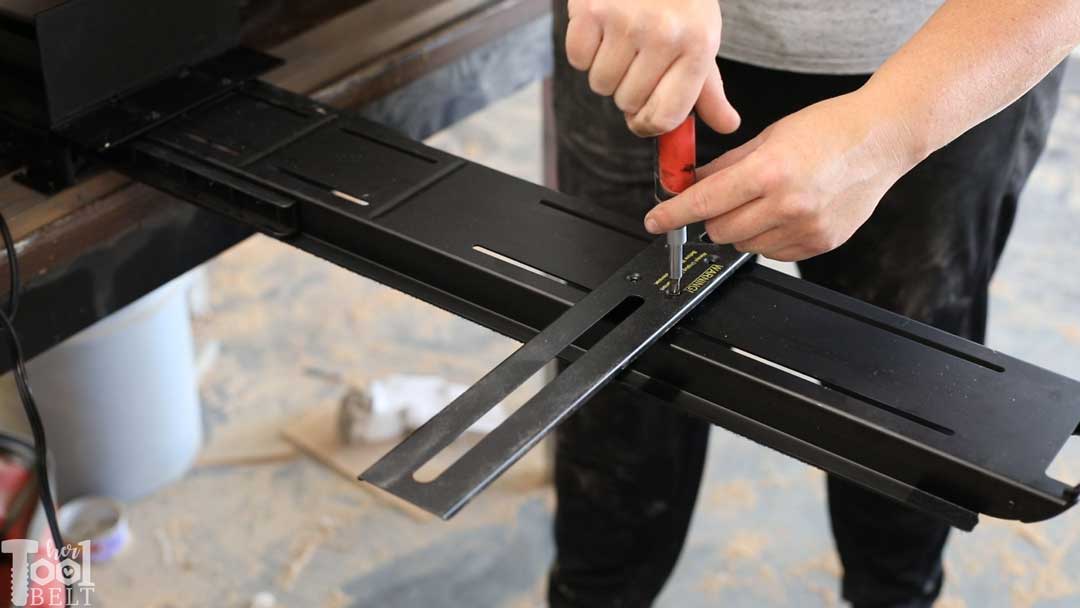
Activate the lift, then install the TV mount bracket.
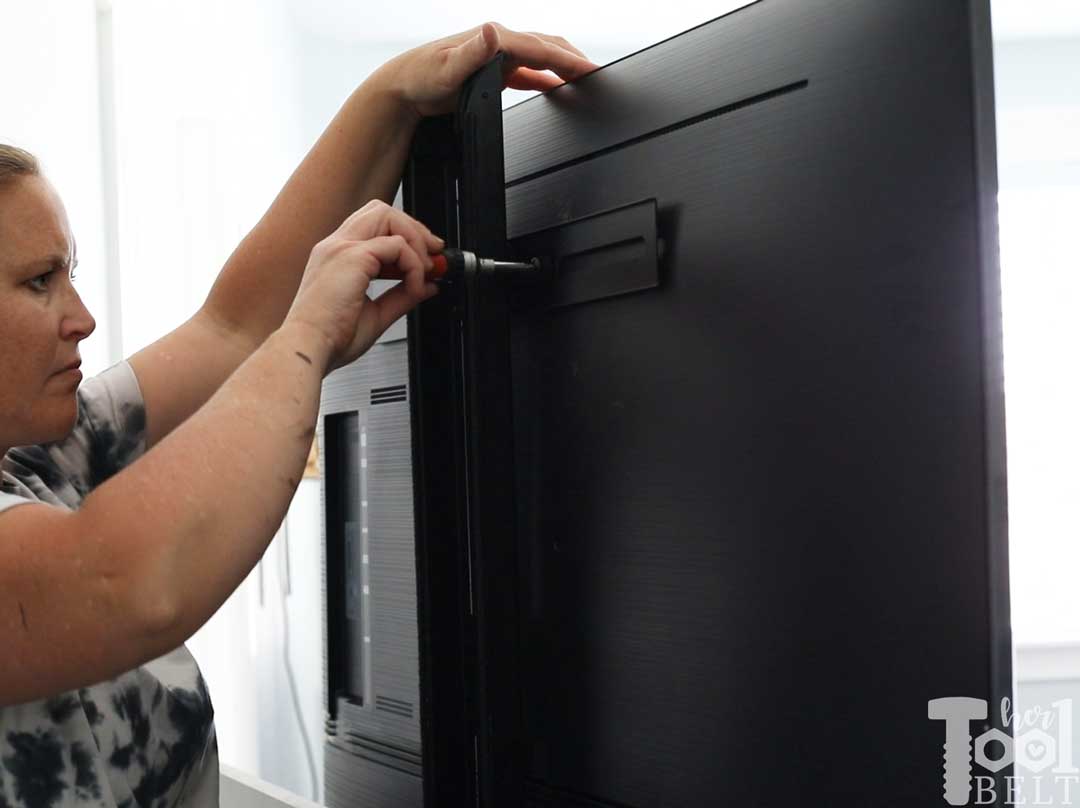
Finally the TV is attached to the TV bracket, and the bottom support plate is placed near the bottom of the TV.
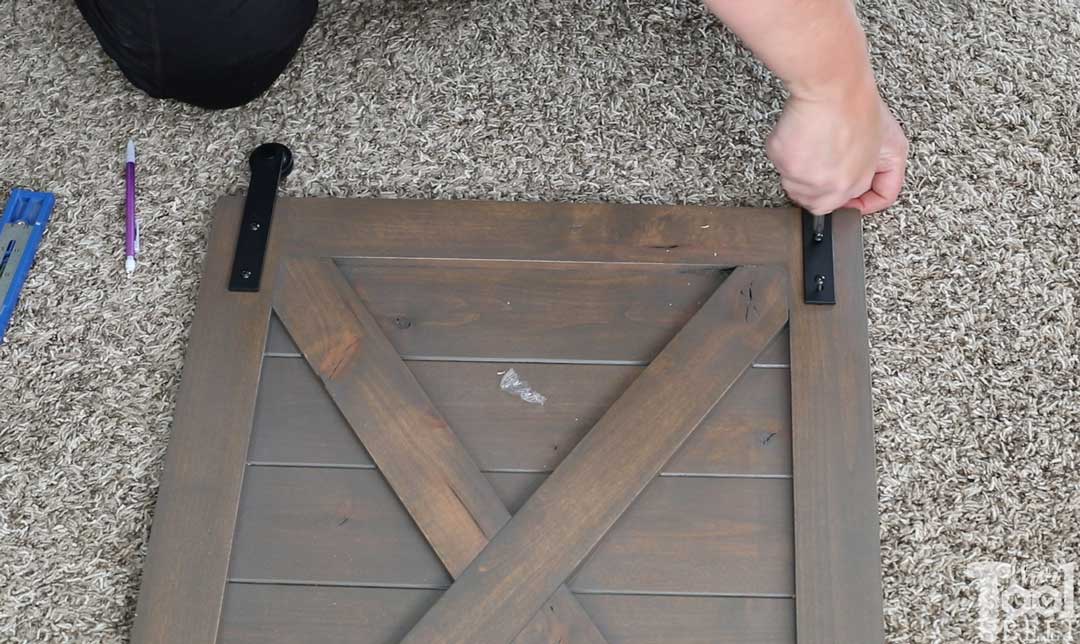
Install Barn Door Hardware
I centered and installed the barn door hardware bar with the included lag bolts, first predrilling the attach locations.

Then driving the lag bolts into the cabinets.

Attach the rollers to the door at the proper height and placement.
Download the plans to build the –> Barn Door Console Table with Hidden TV Lift <–
Thanks for pinning!
Leave a Reply