Hi! I’d love for you to follow me on Pinterest Her Tool Belt and if you love instagram, you can keep up with me there too!
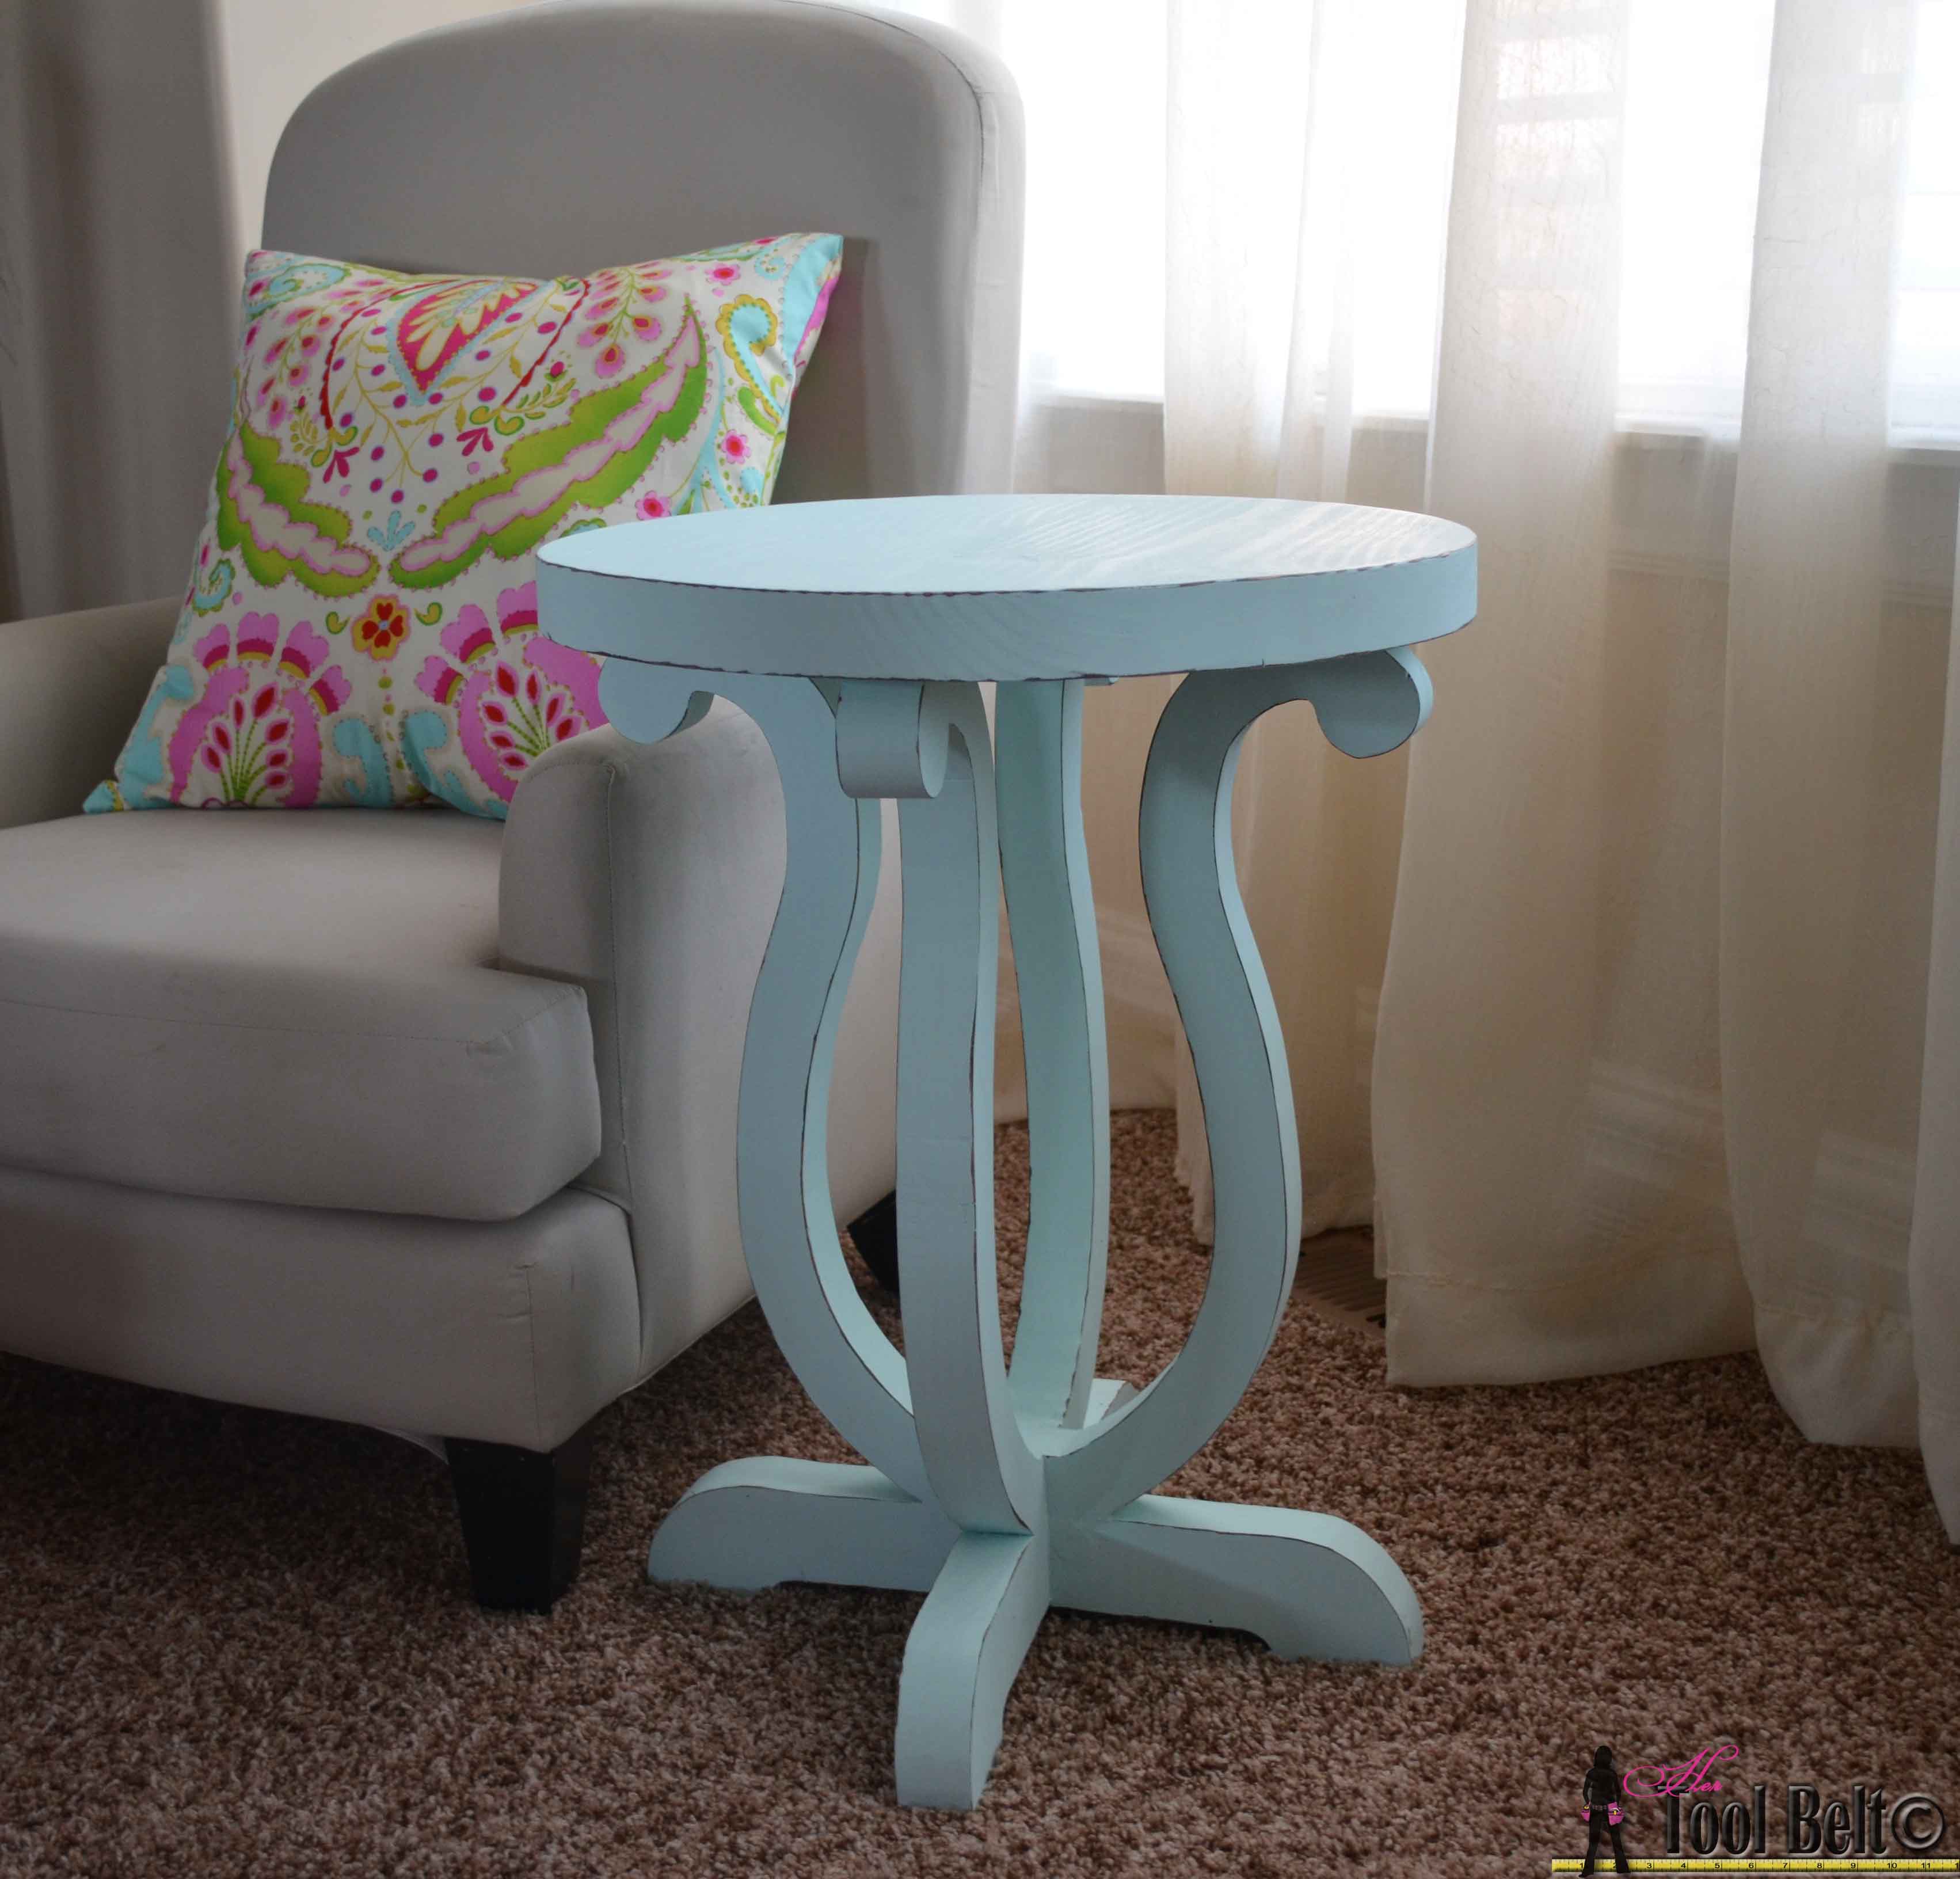
While flipping through the PBkids magazine, I saw the cutest little side table. I’ve also seen similar shaped tables at Pier 1.
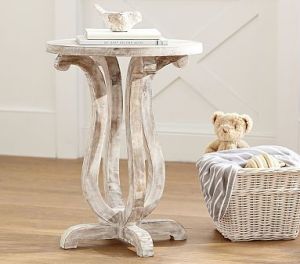
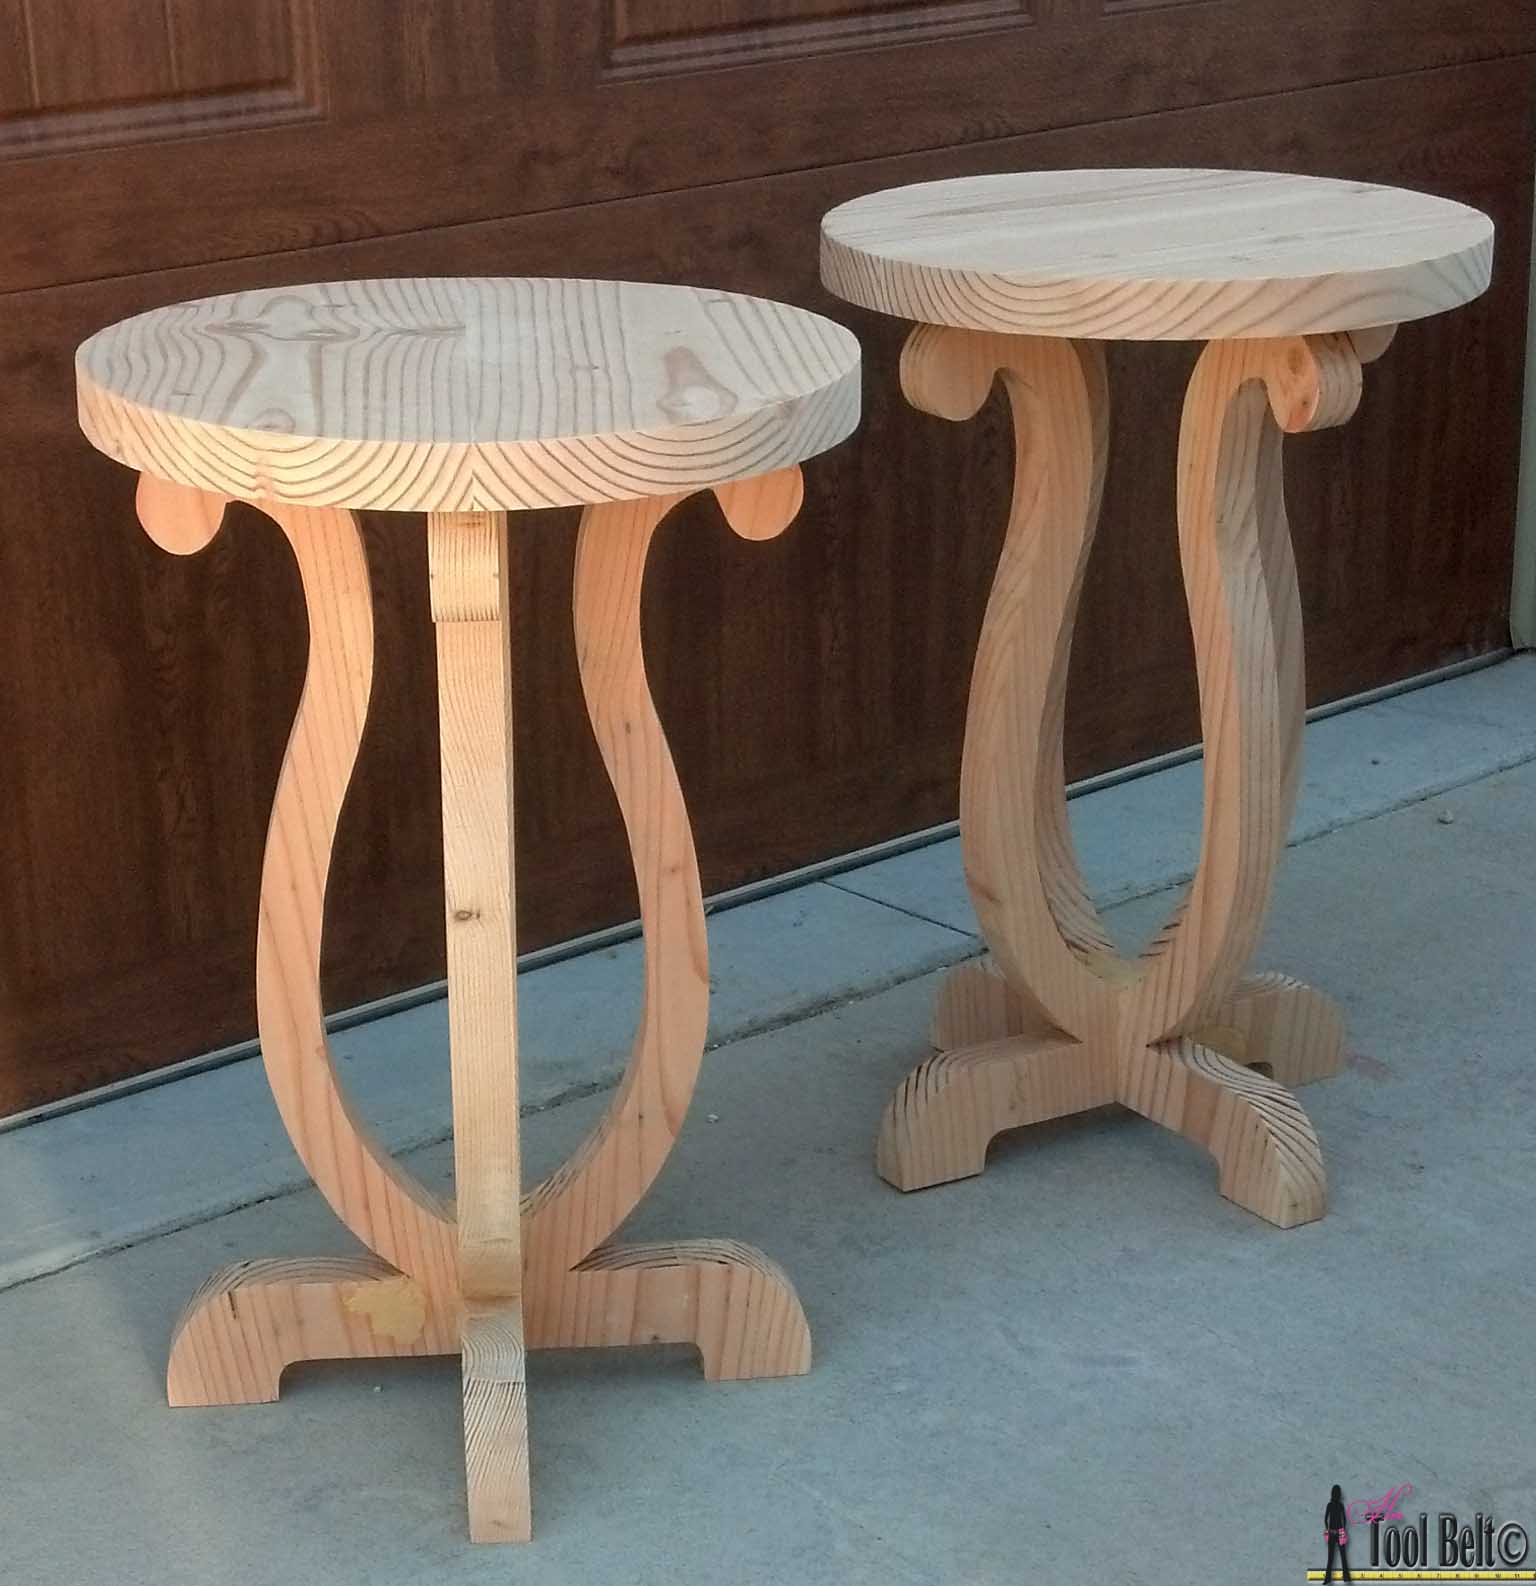
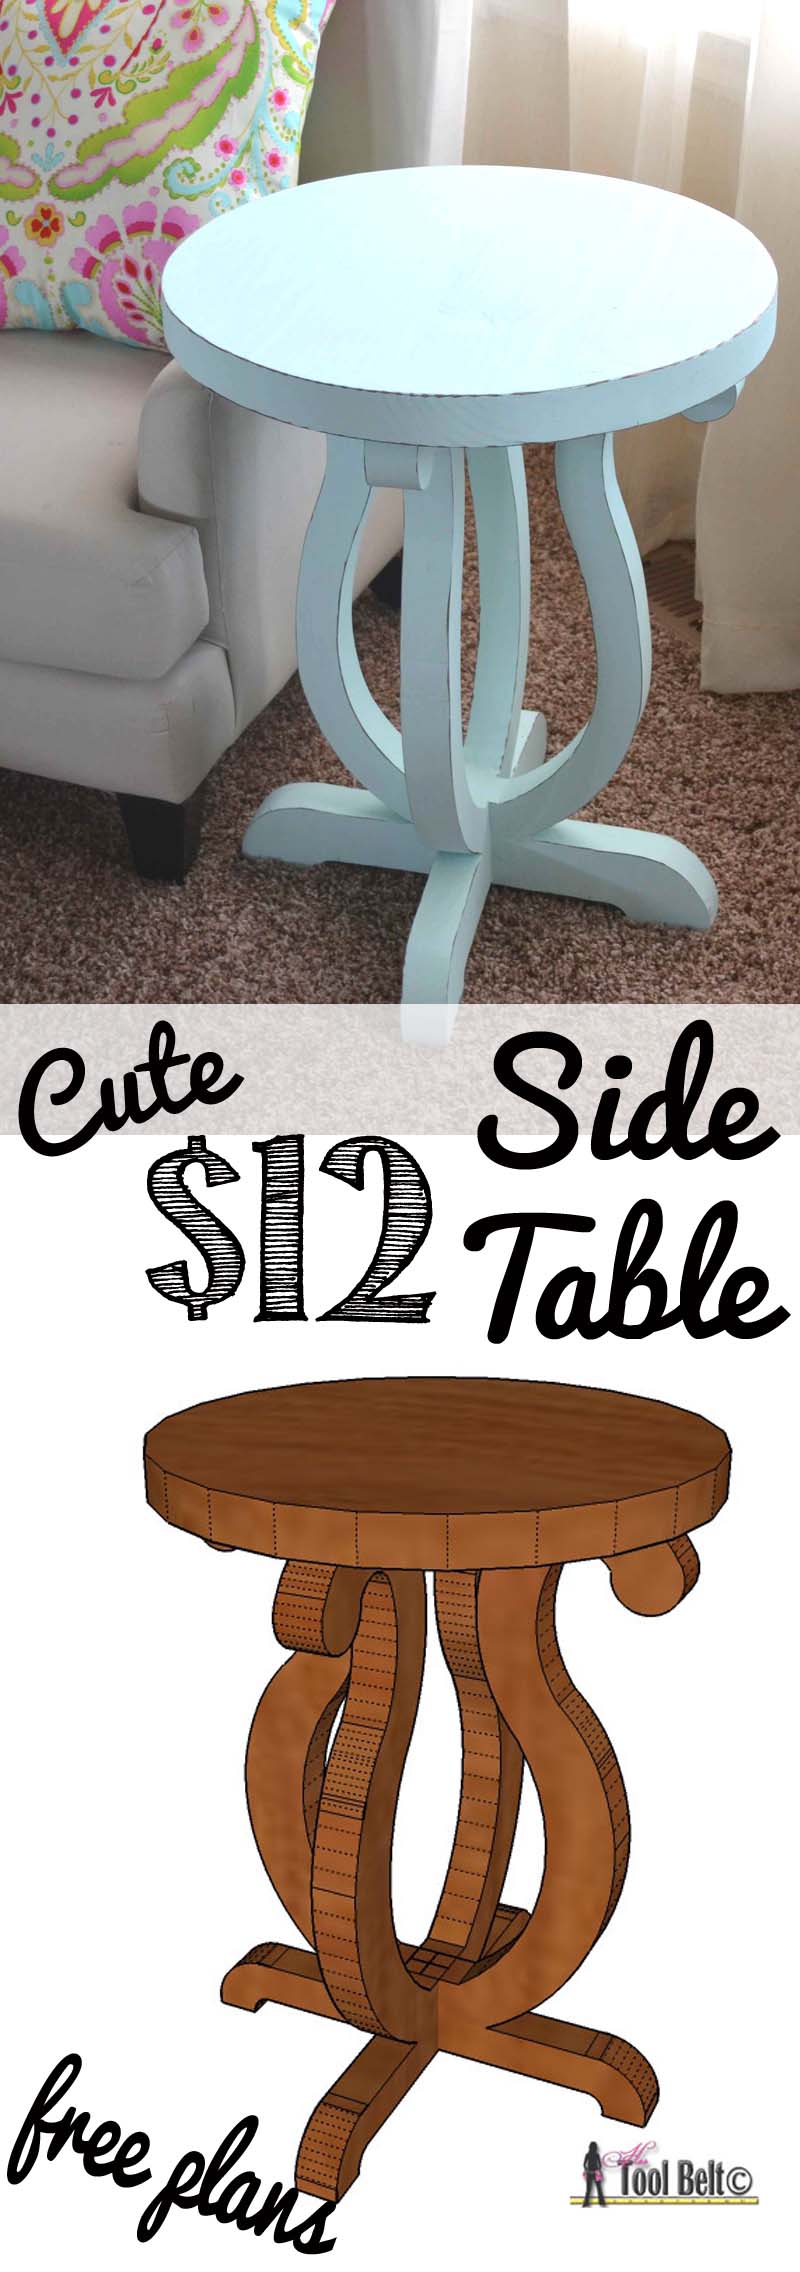
It went on my long to-do list for my daughter’s room. But then my Aunts decided to do an Extreme Room Makeover for my cousin – in glamorous and spicy style. As luck would have it, they had everything but the side tables/night stands. I showed them a pic of the PB side table and it was a hit. So I made 2 sizes of these tables, a 23″ for kids and 27″ for big people. One of my favorite things about this project is that it is constructed from a 2″ x 10″ board – so cheap about $12.
This post contains affiliate links noted by *
How to Build a Curvy Side Table
Materials Needed
- 1 – 2″ x 10″ x 10′ board
- 11 or more – 2 1/2″ pocket screws* (self tapping)
- wood glue
- wood filler *
- sand paper
- stain/paint
If you need to have your board cut to get it home from the lumber store, have 2 pieces cut at 18 1/2″ long and 2 pieces at 30″ long.
Step 1
Cut 2 pieces of 2 x 10 that are about 18 1/2″ long. Trim one of the long edges of each board about 1/4″ to give it a straight edge and to remove the round over. Make pocket holes for 1 1/2″ material along one of the long straight edges, about 5 pocket holes. I use a Kreg Jig® R3*
Join the 2 boards together with wood glue and 2 1/2″ screws. Allow the glue to dry.
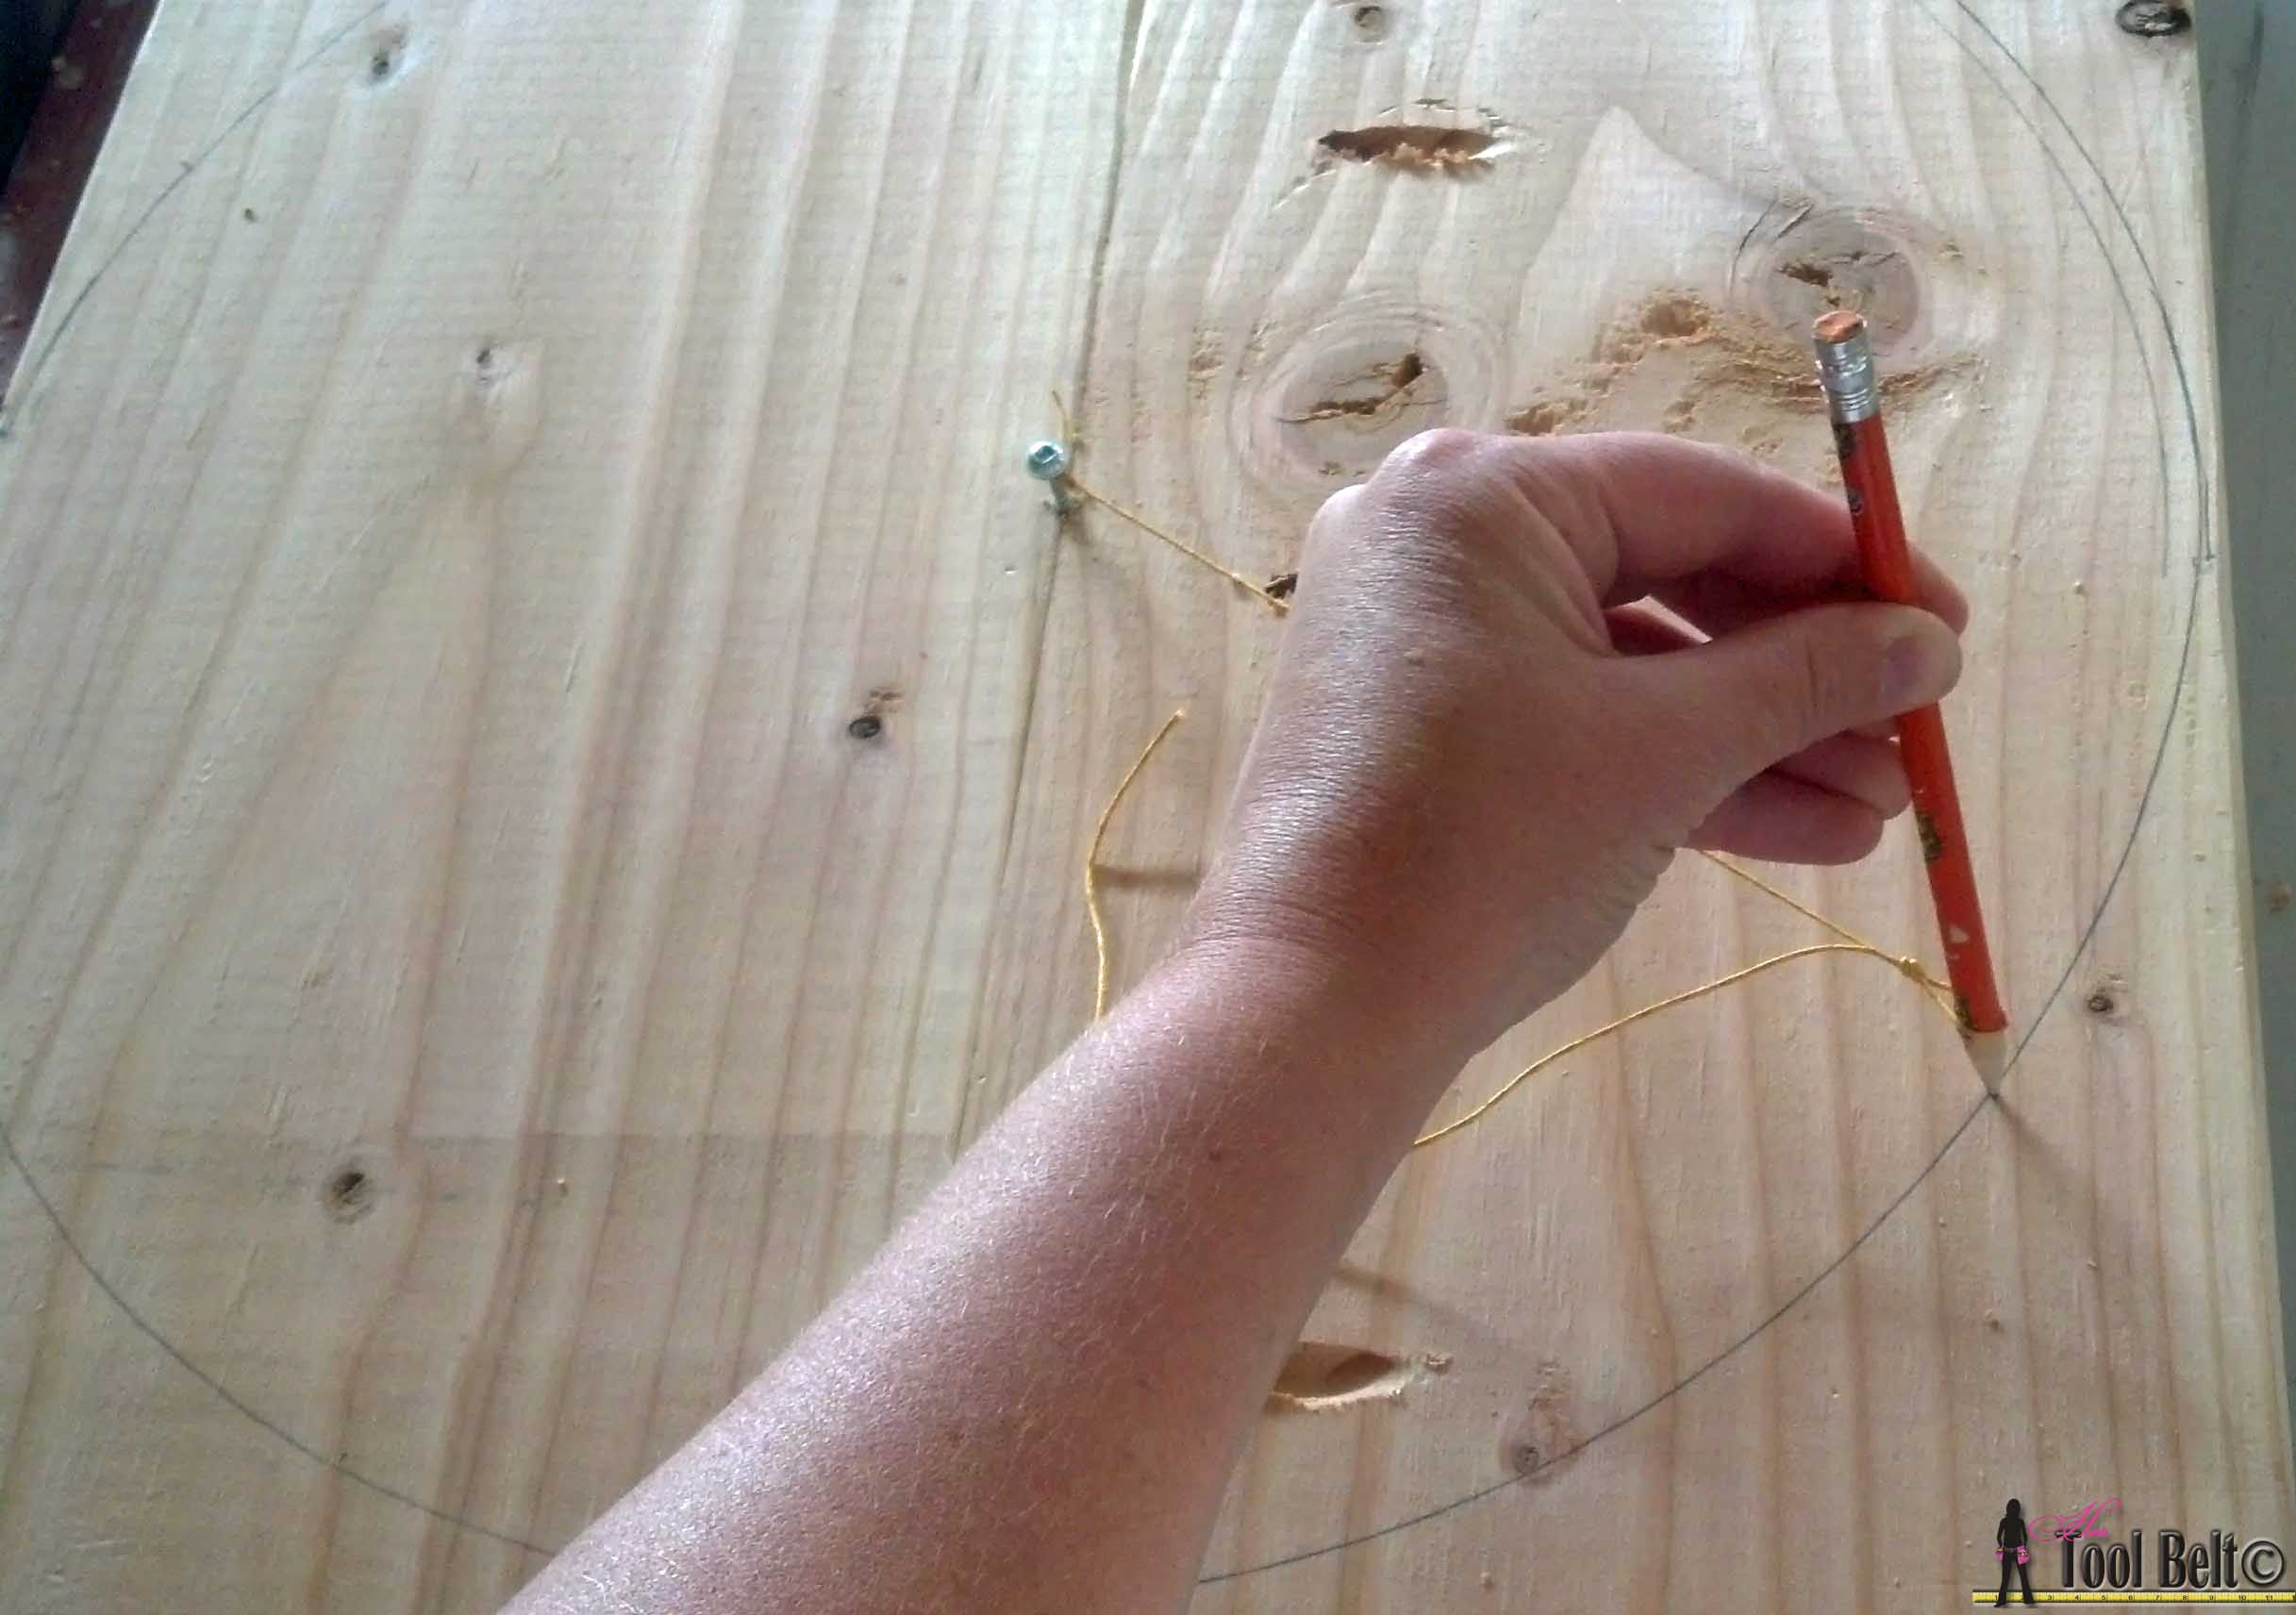
Trace about an 18″ circle on the boards. Place a screw in the center and tie a string to the screw and make a loop about 9″ out for a pencil.
Step 2
When printing the following patterns, make sure the PDF print settings are at 100% and not ‘fit to page’.
For the shorter 23″ table print the following pattern: 23″ leg template 1, 23″ leg template 2, 23″ leg template 3 (papers 2 and 3 overlap about 3″)
For the taller 27″ table print the following pattern: 27″ Tall leg template 1, 27″ Tall leg template 2, 27″ Tall leg template 3, 27″ Tall leg template 4
Print out and line up the patterns, tape the patterns together and cut out.
Trace 2 leg patterns on the 2 x 10, you can nest the legs together to get more use out of your wood. If you are making multiple tables, trace 2 of these legs for each table.
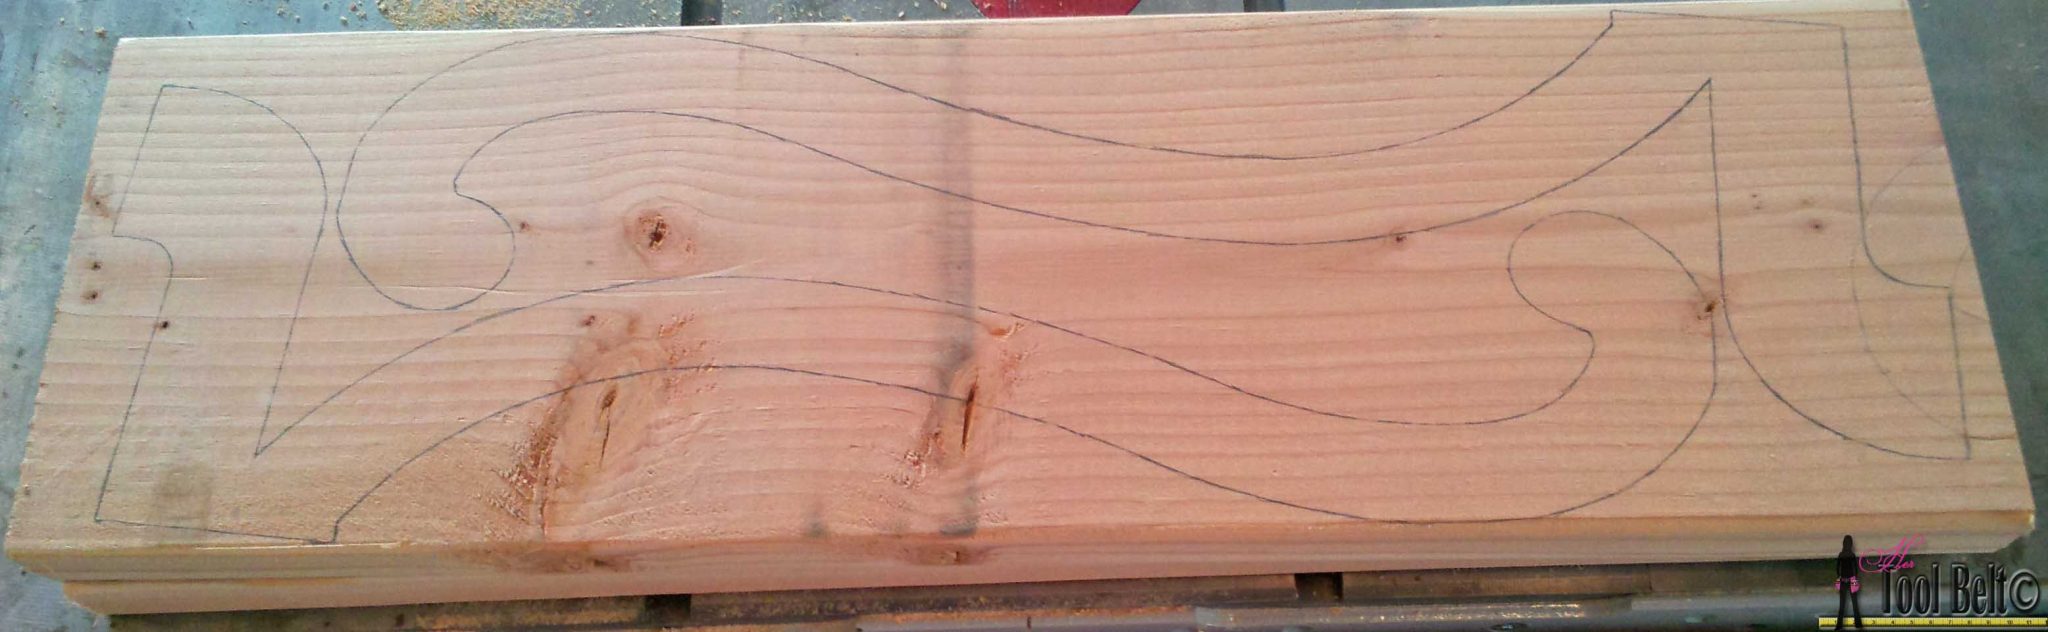
Next cut off a 3/4″ section from the butt end of the pattern. Trace 2 of these leg patterns for each table.

Step 3
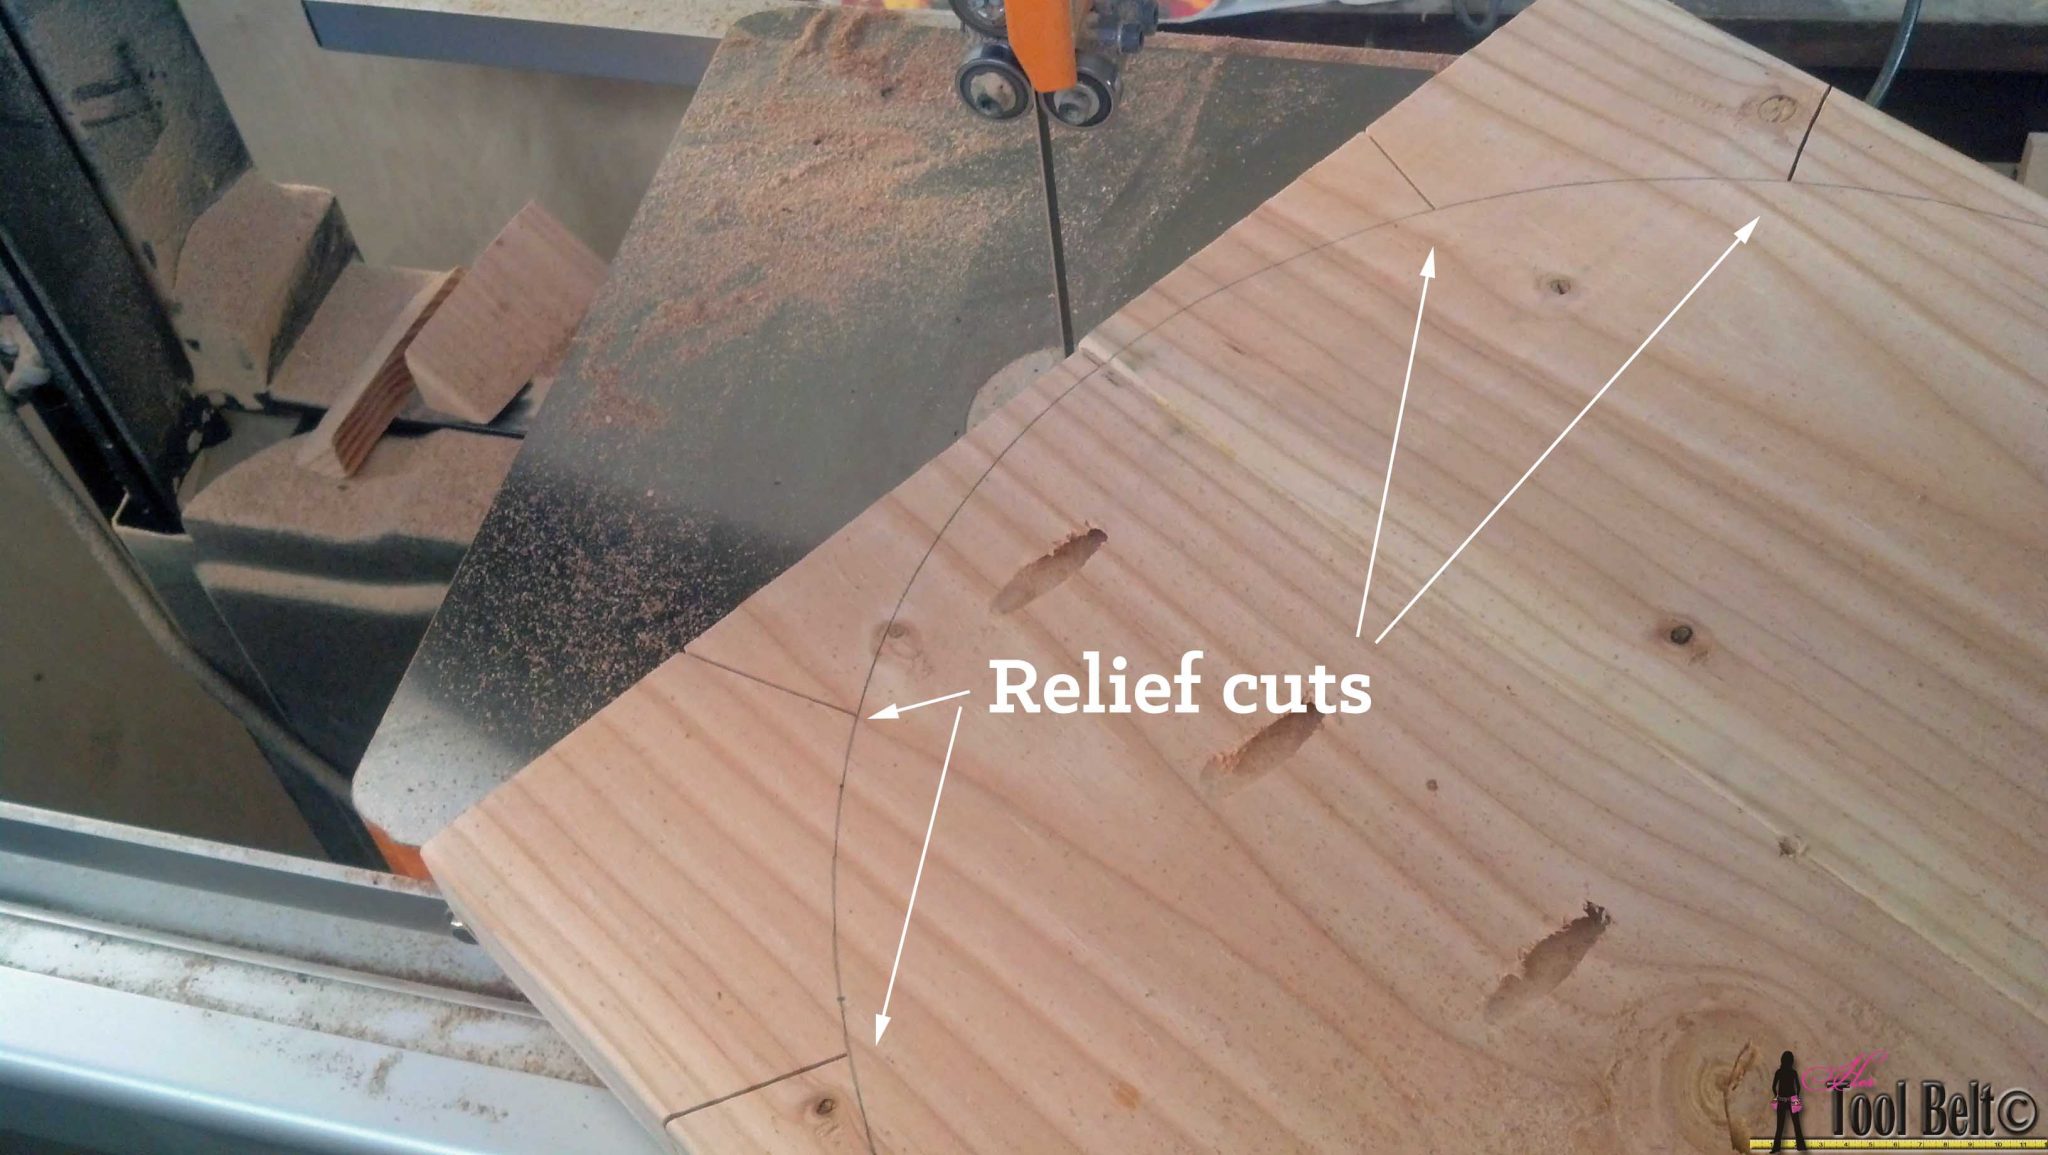
Use a band saw, scroll saw or jig saw and cut out your table top and legs. *I used a band saw, others have noted that it is difficult to nicely cut the legs out using a scroll saw and jig saw. When cutting curves, always make periodic relief cuts, so you have areas to get your saw blade out.
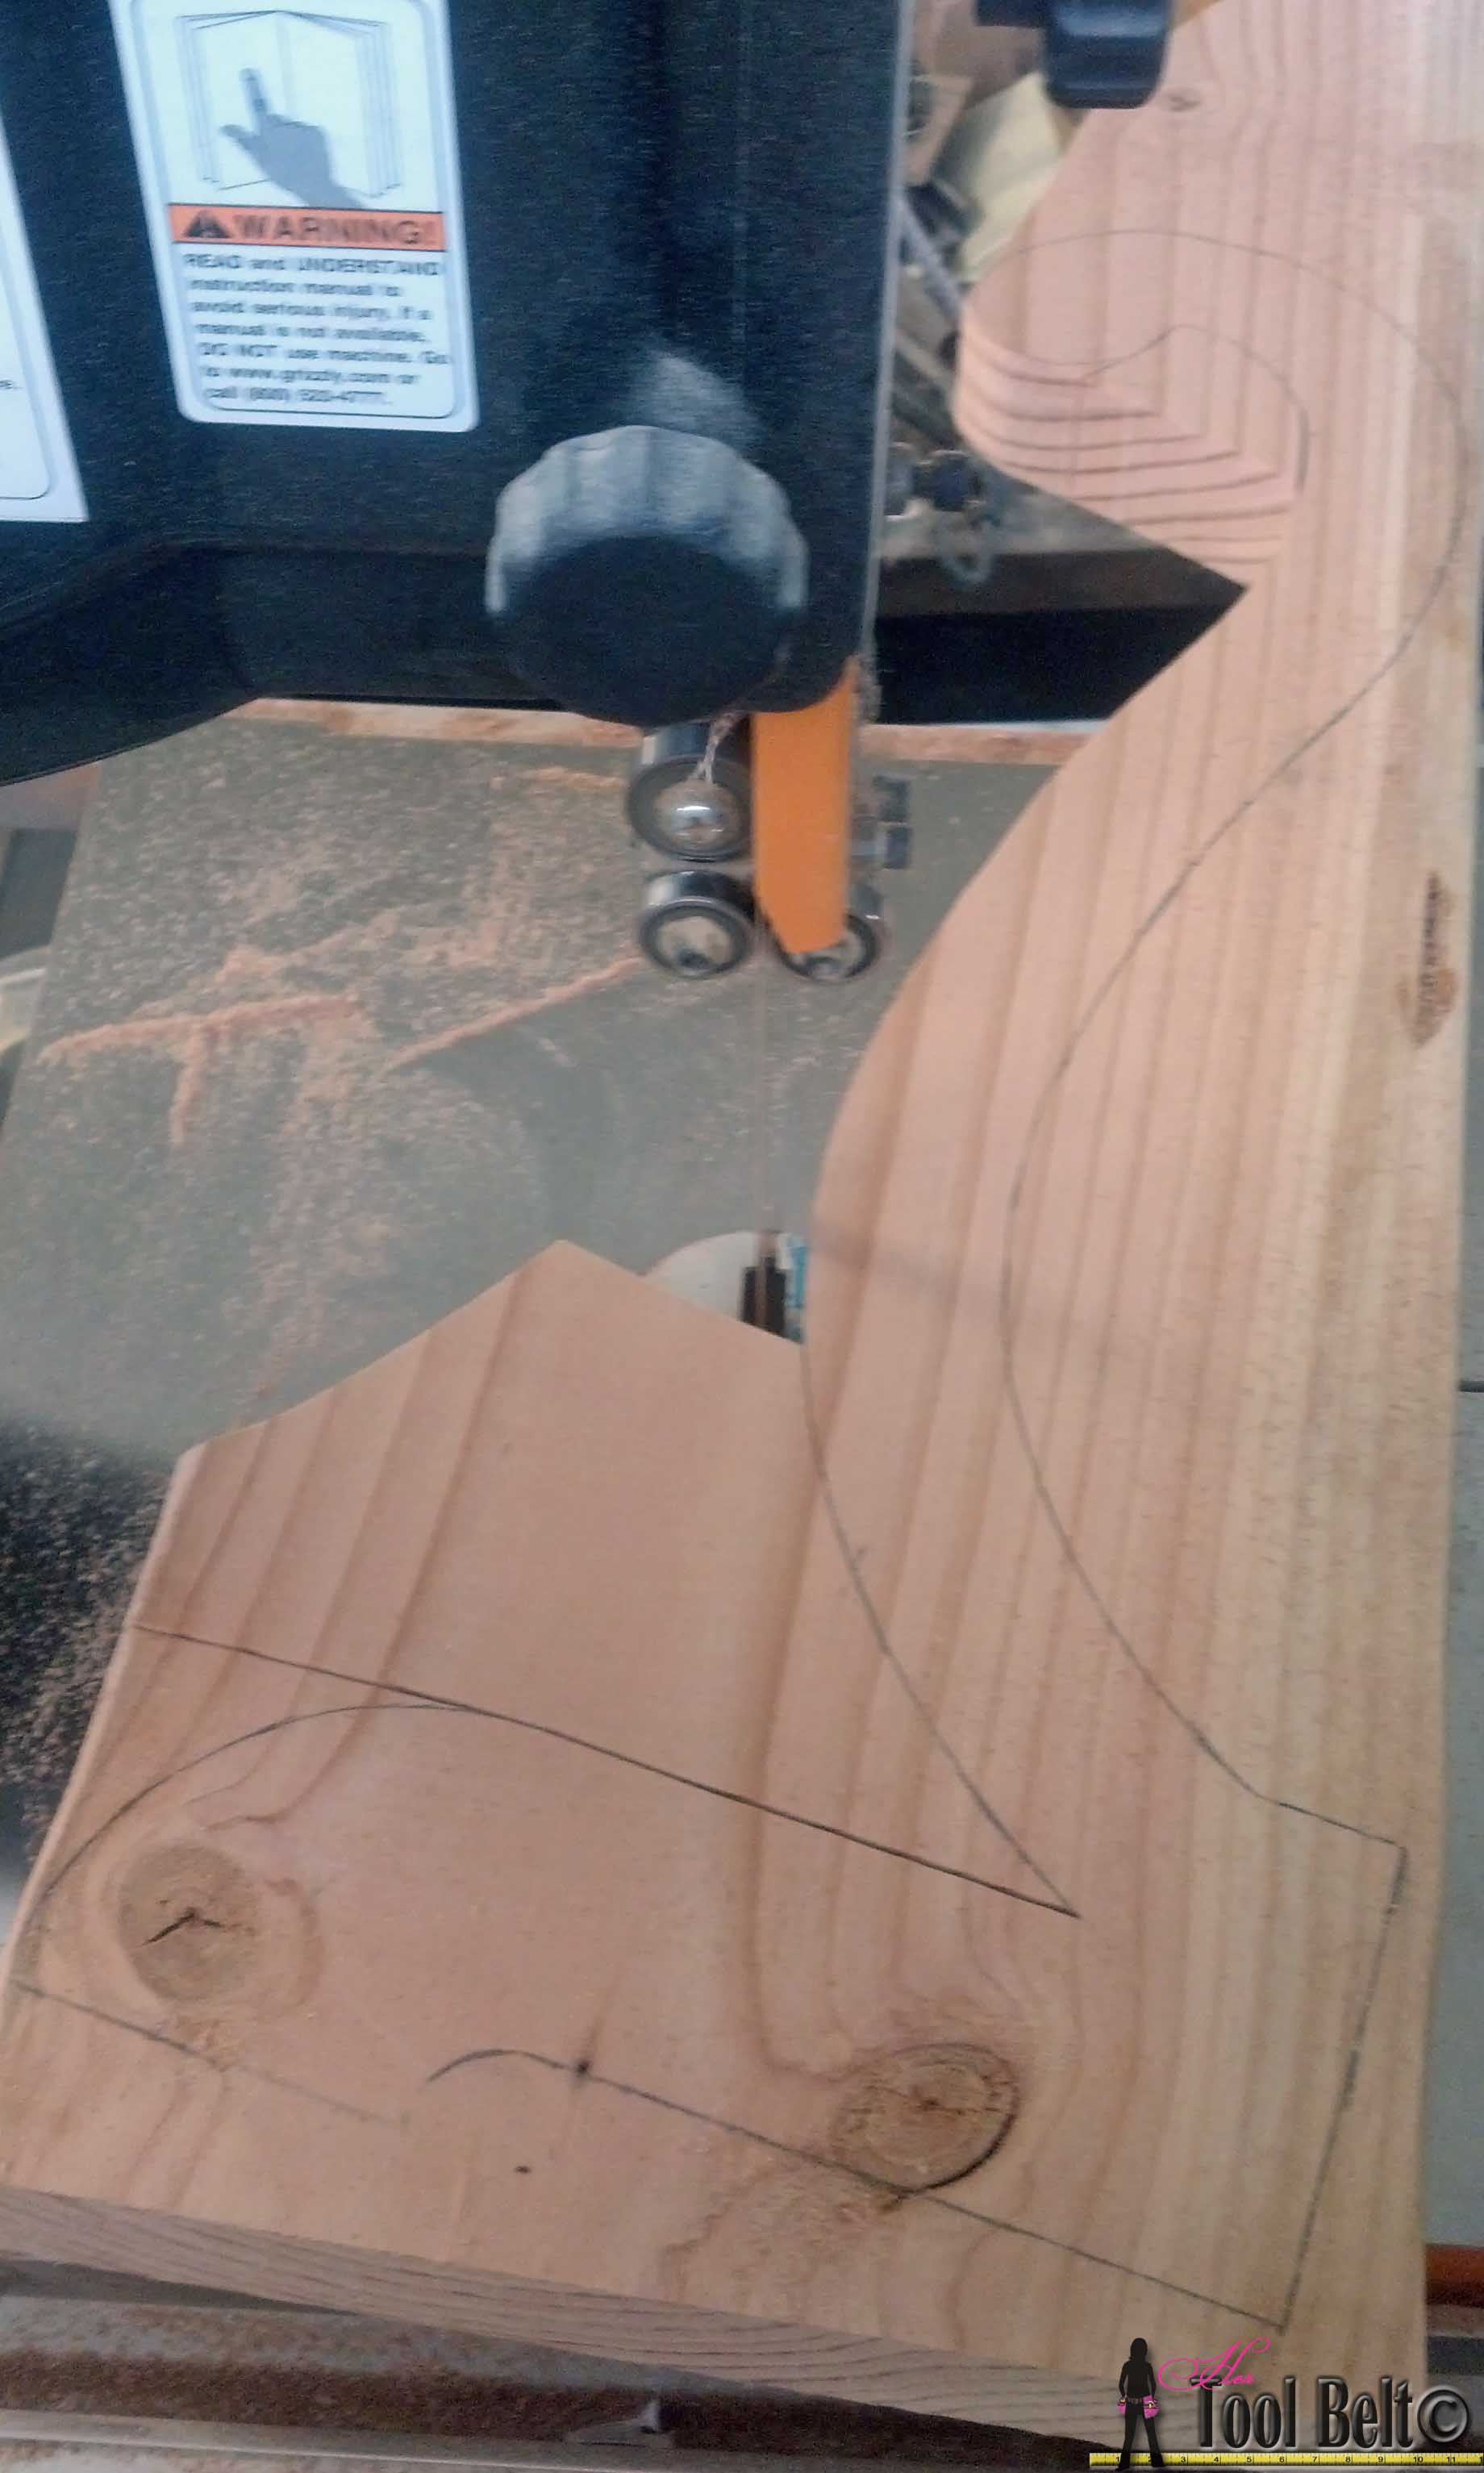
Once you finish cutting out your top and legs, sand the pieces to smooth out the ridges from cutting.
Step 4
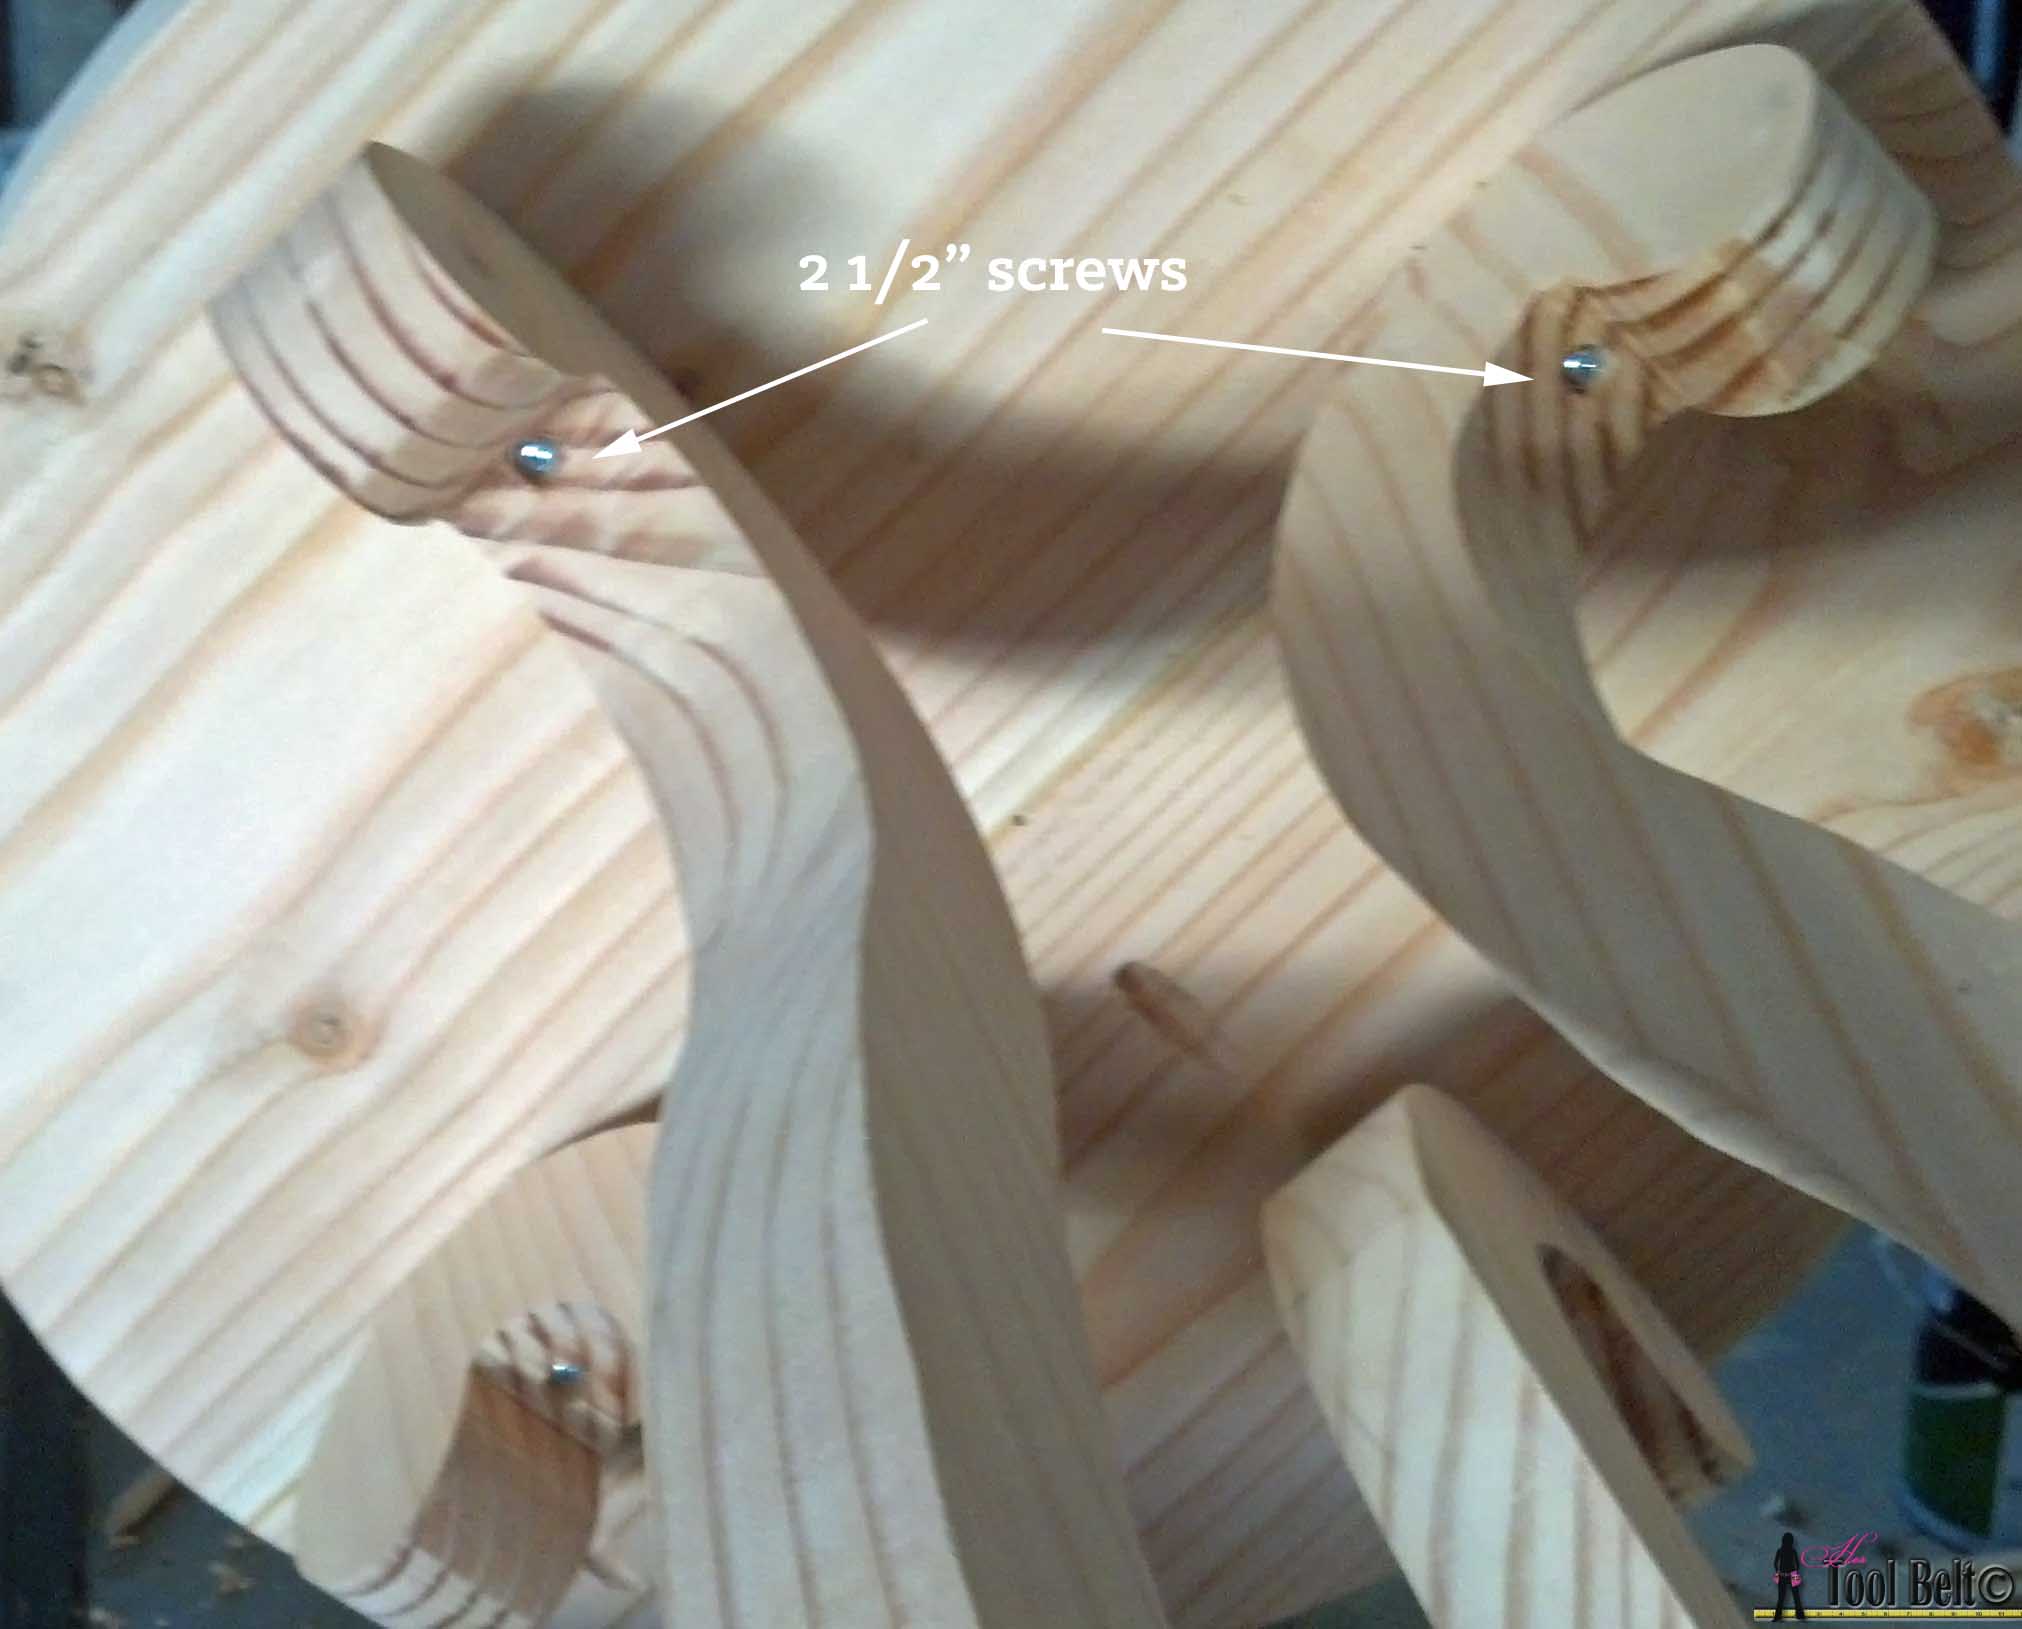
Get the 2 legs with the additional 3/4″ wood on the butt. Make pocket holes and use wood glue and 2 1/2″ pocket screws to join them together.
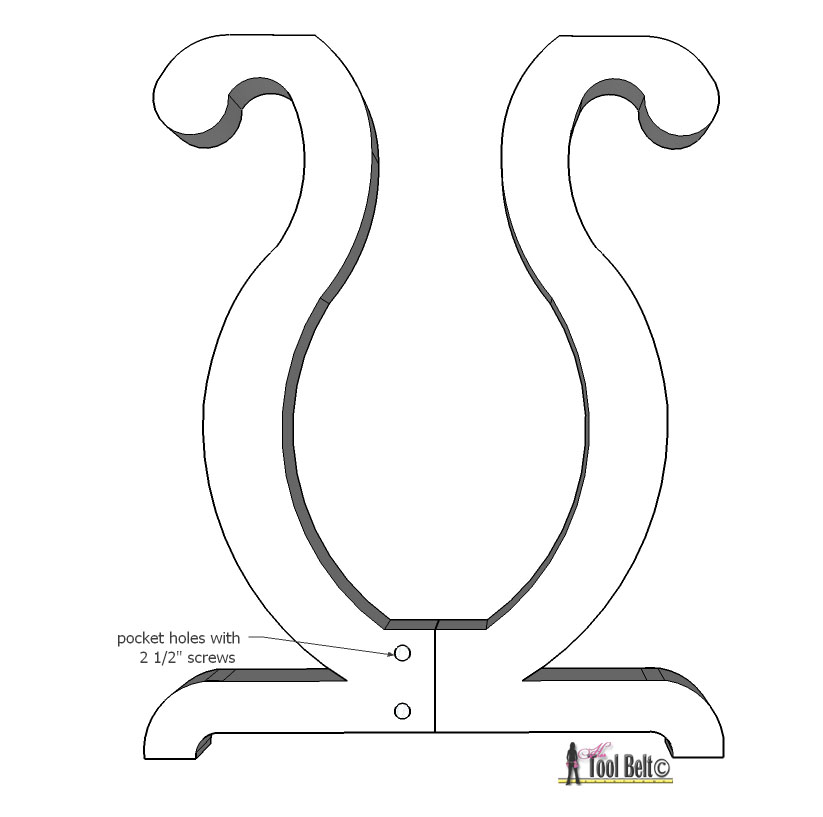
Grab one of the legs and with the 3/4″ wood removed. Make pocket holes and attach it to about the center of the other legs with wood glue and 2 1/2″ screws.
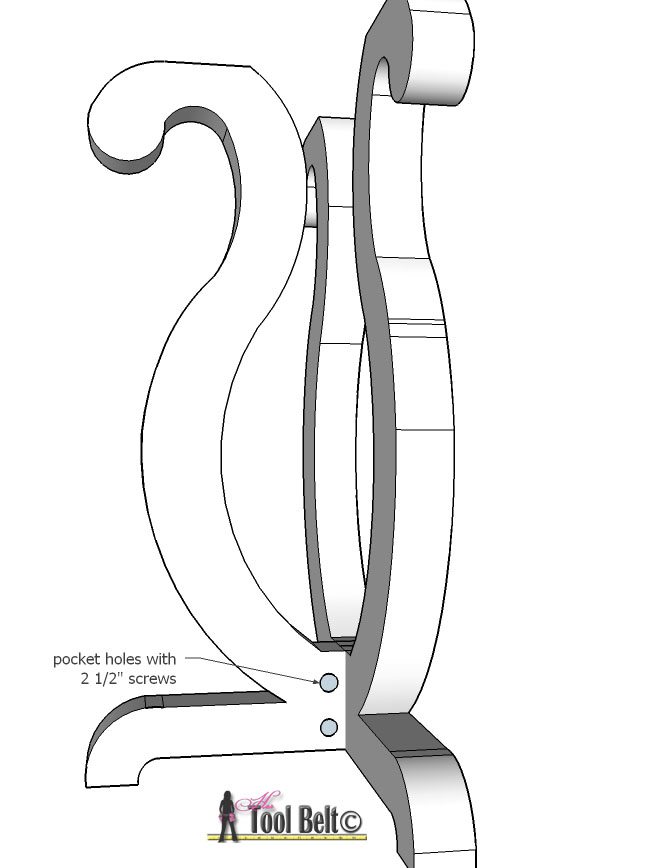
Repeat for the 4th leg. Make sure to vary where the pocket screws are, so the screws won’t hit the already installed ones.
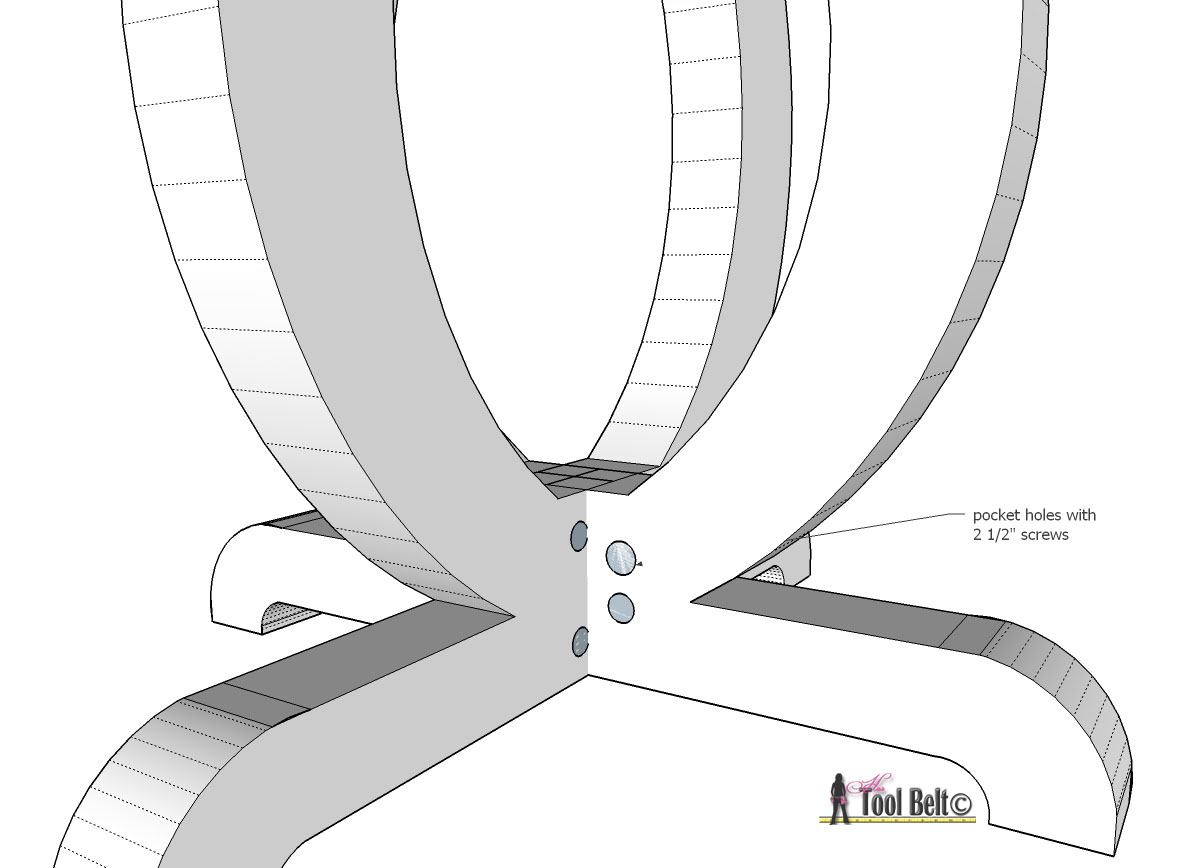
I used the tip of the pocket hole drill and made a small pre-drill (counter-sink) in the crook of the leg necks to attach the legs to the table. Center the legs on the table top and attach with 2 1/2″ pocket screws.
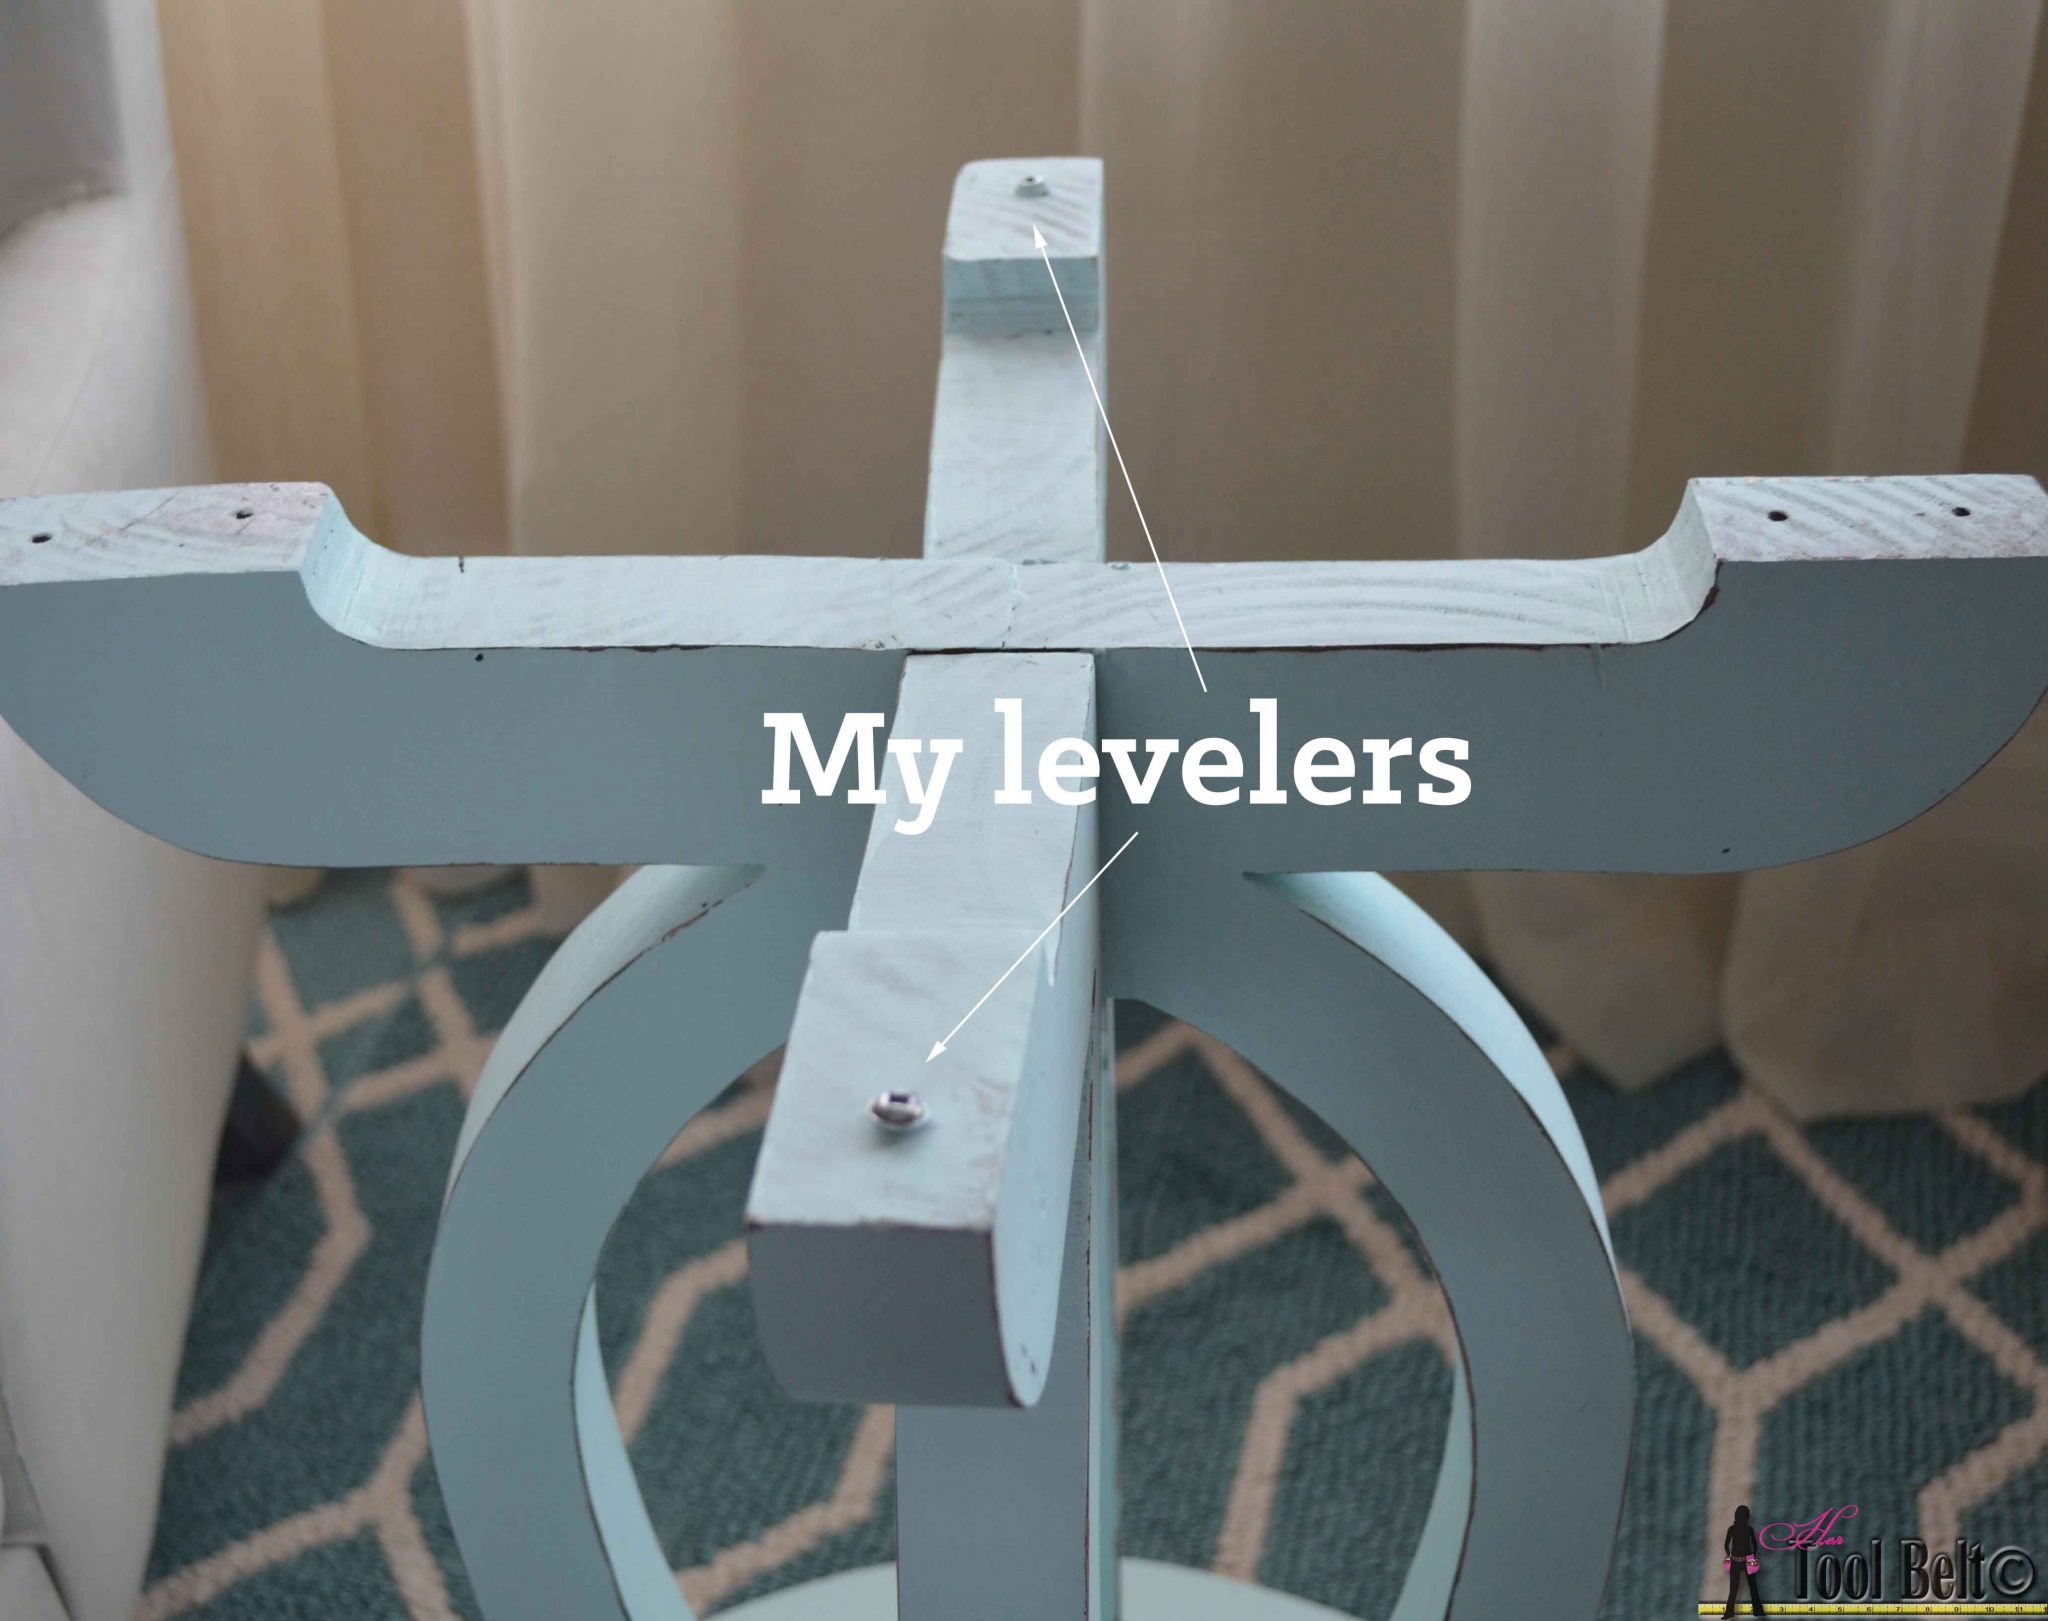
If your table happens to be a little off level, you can add cushion glides. I cheated and just added a couple of screws to the bottom 🙂
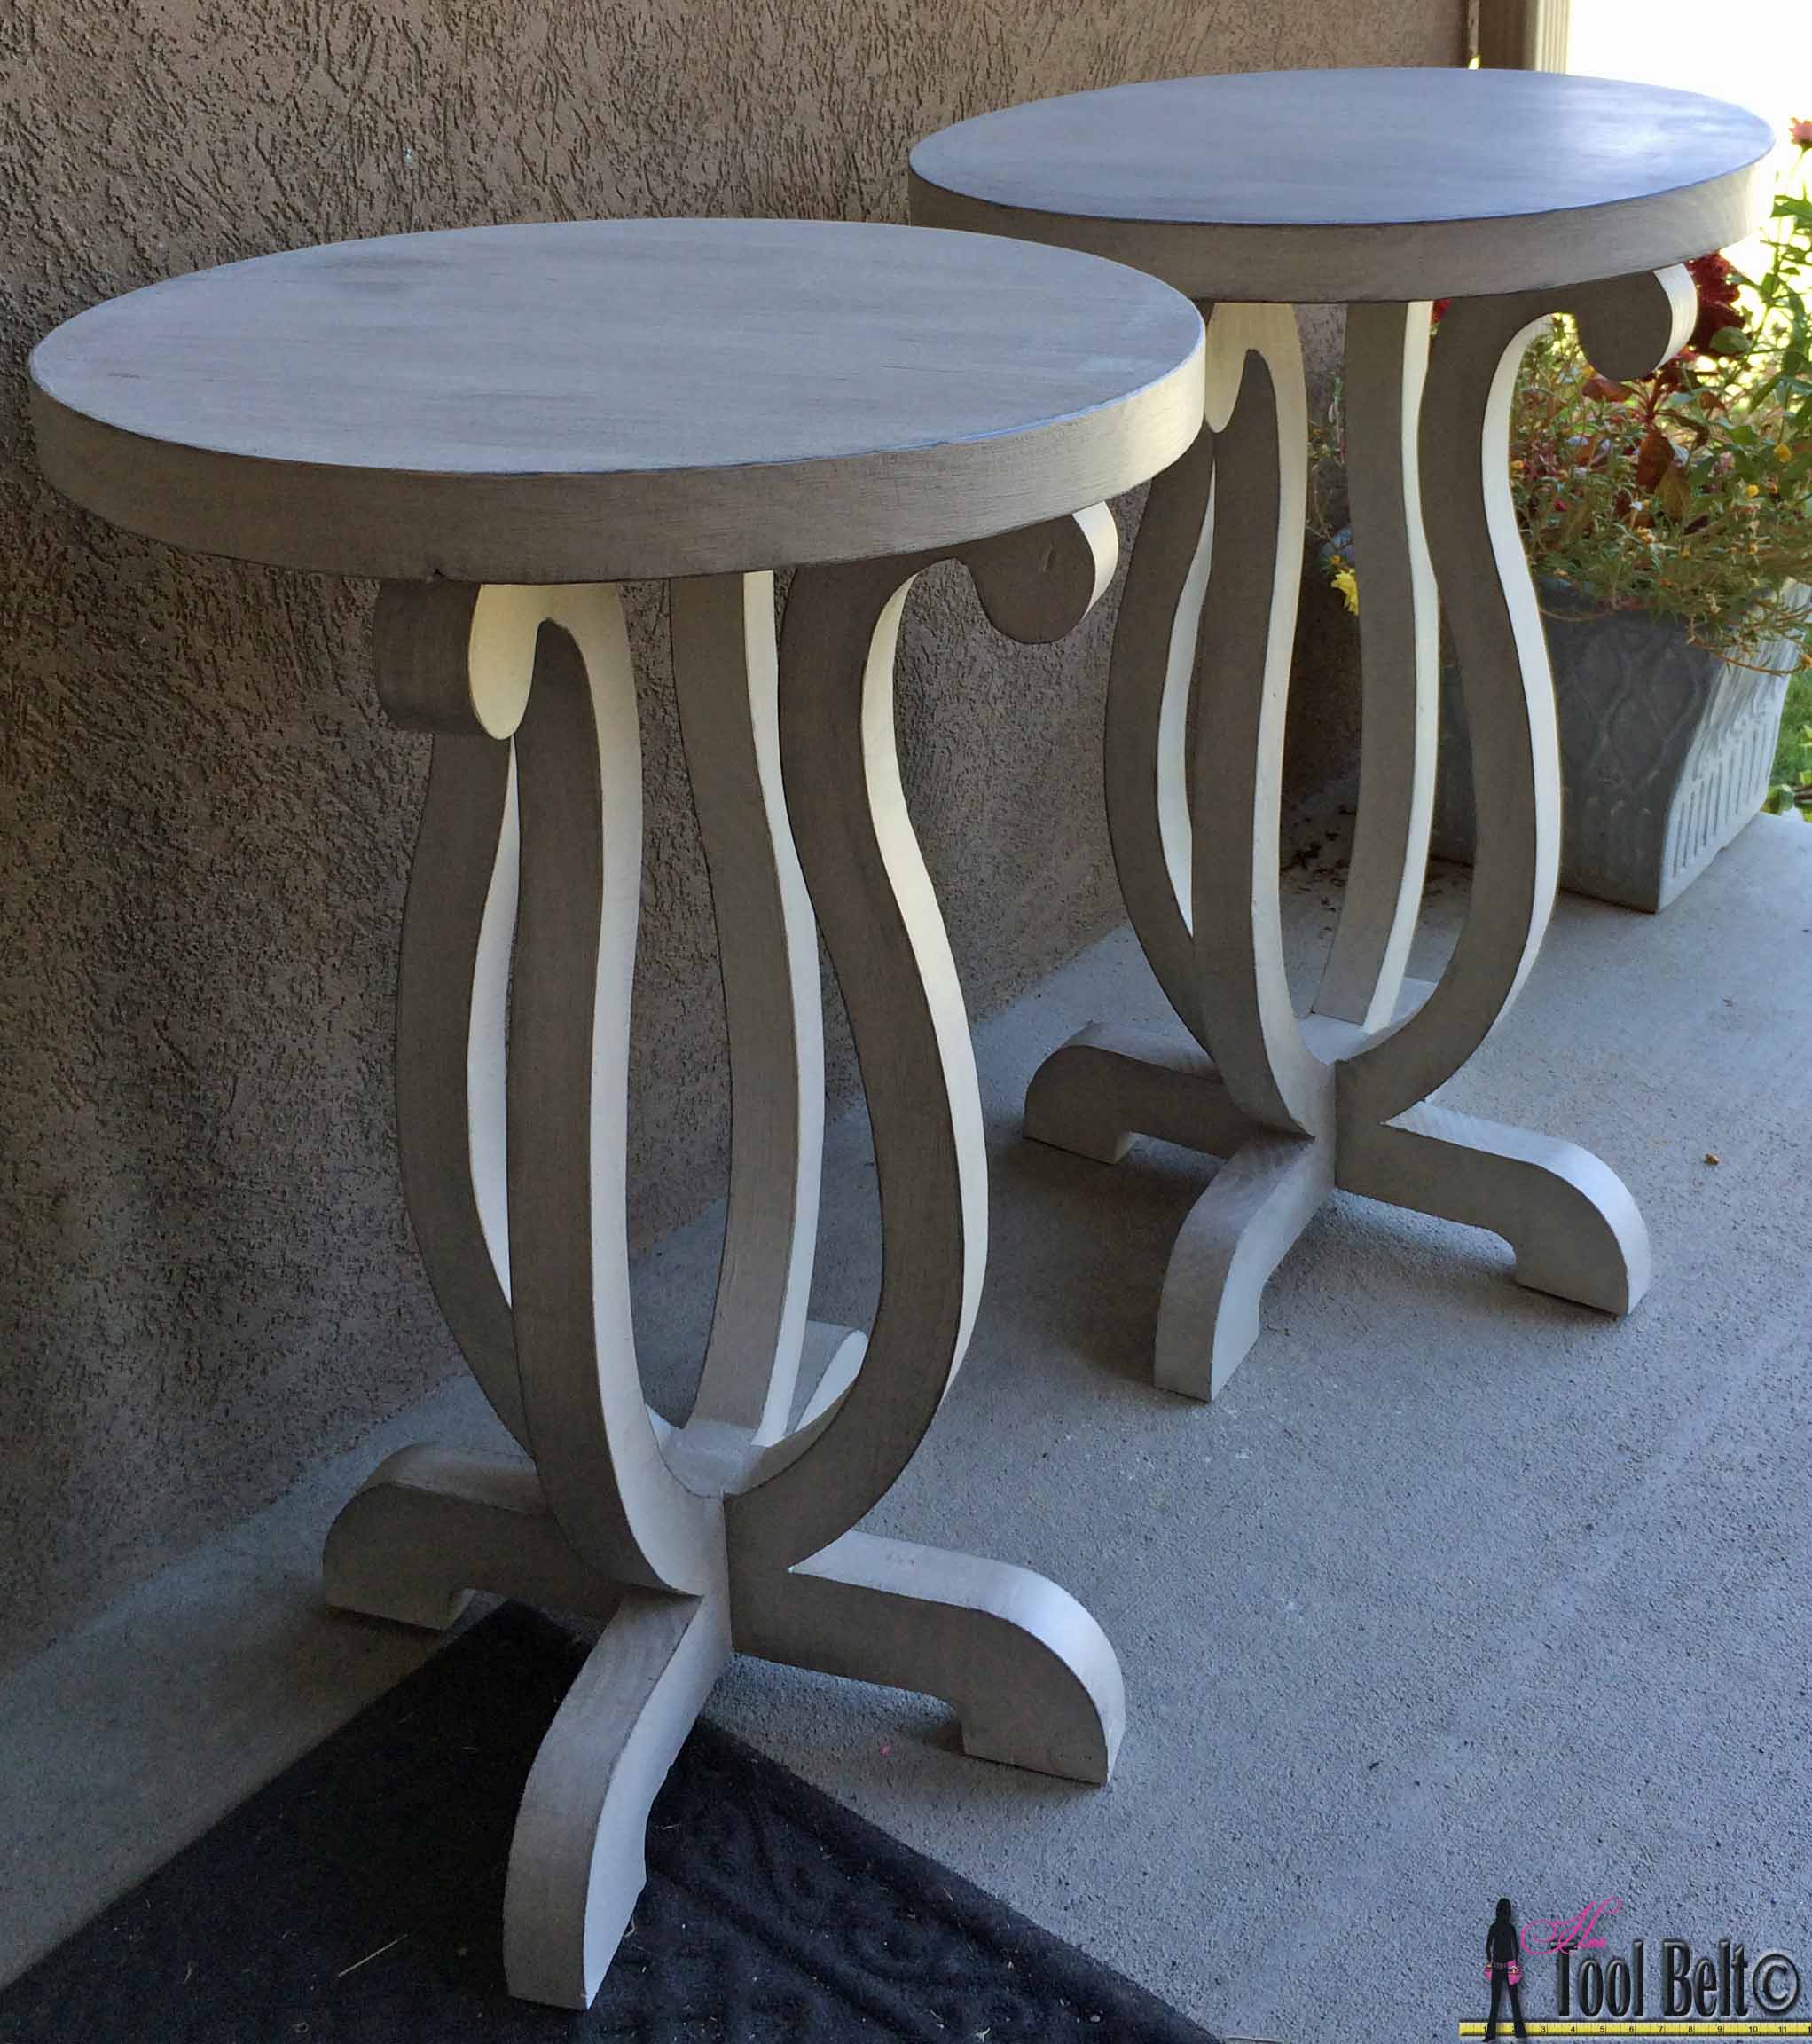
Cute tables – 27″
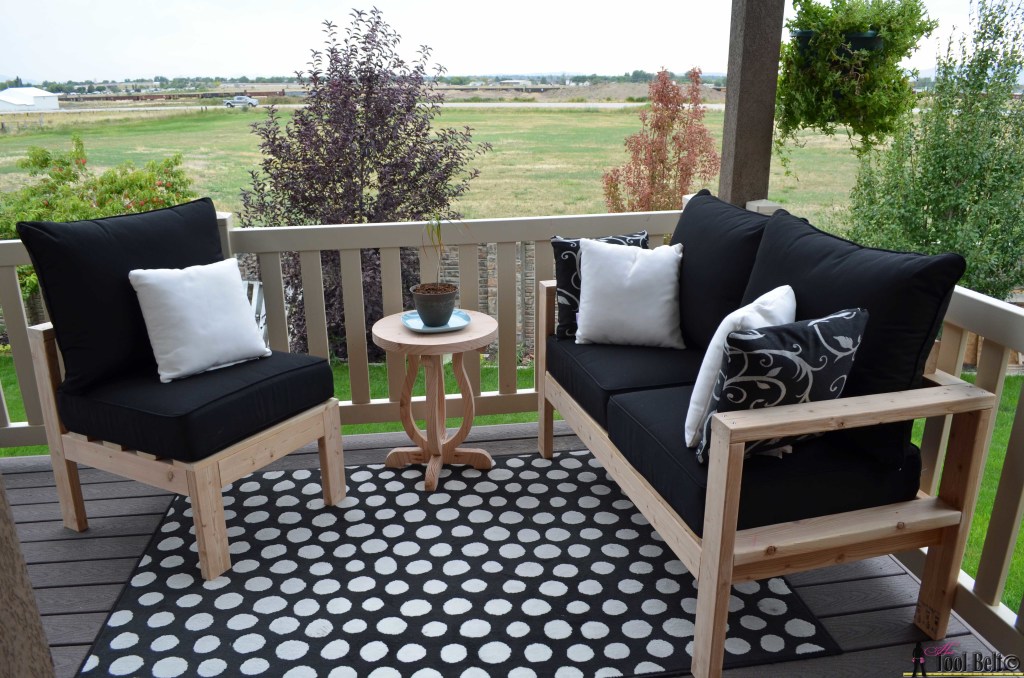
I think the unfinished version looks great with my 2×4 outdoor seating
Step 5
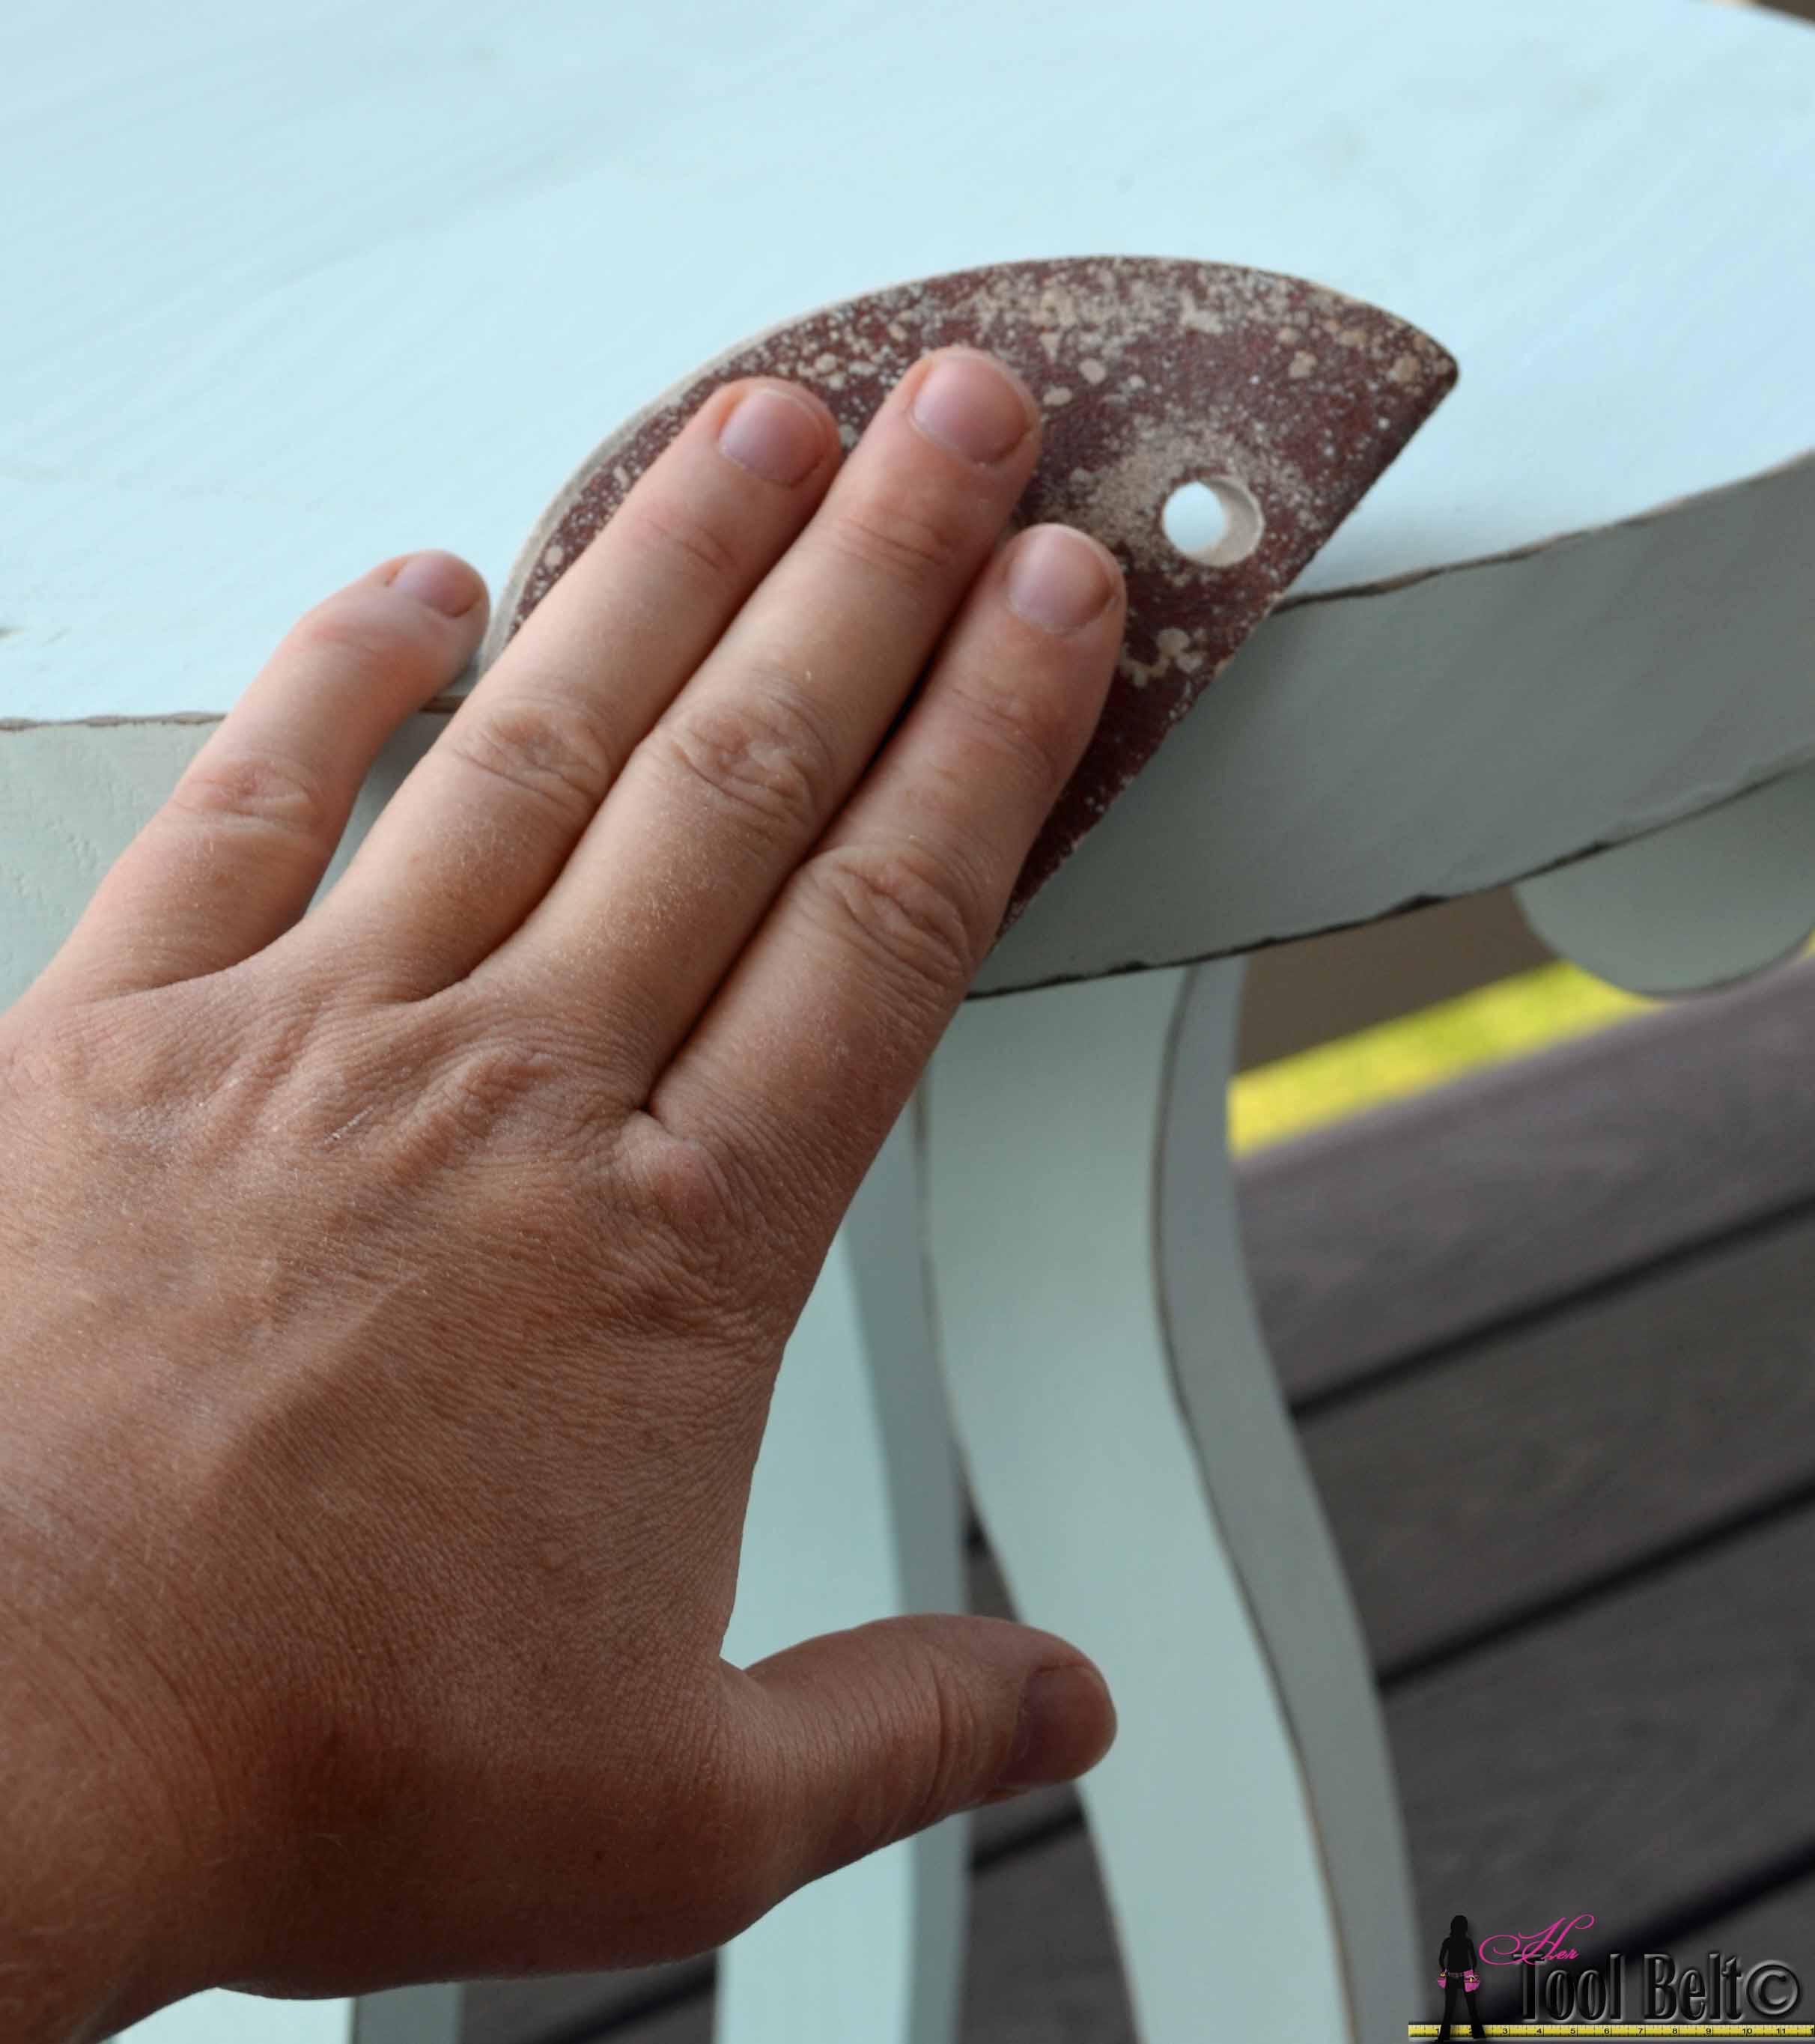
Fill the pocket holes, cracks and blemishes with wood filler and allow to dry. 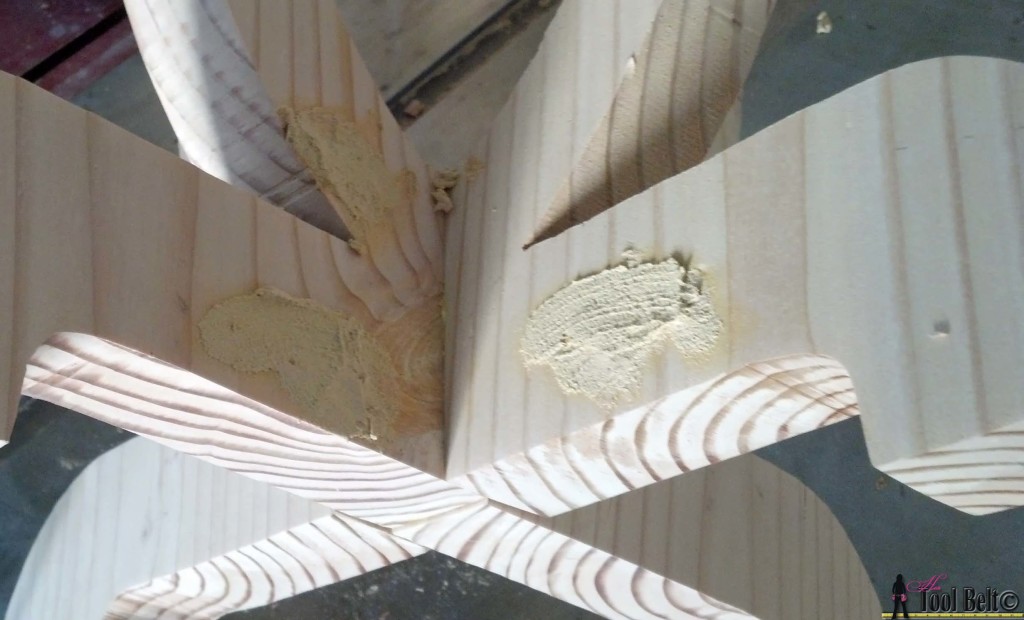 Sand the wood filler, table and legs smooth. Finish the tables however you want, but this is how I finished mine.
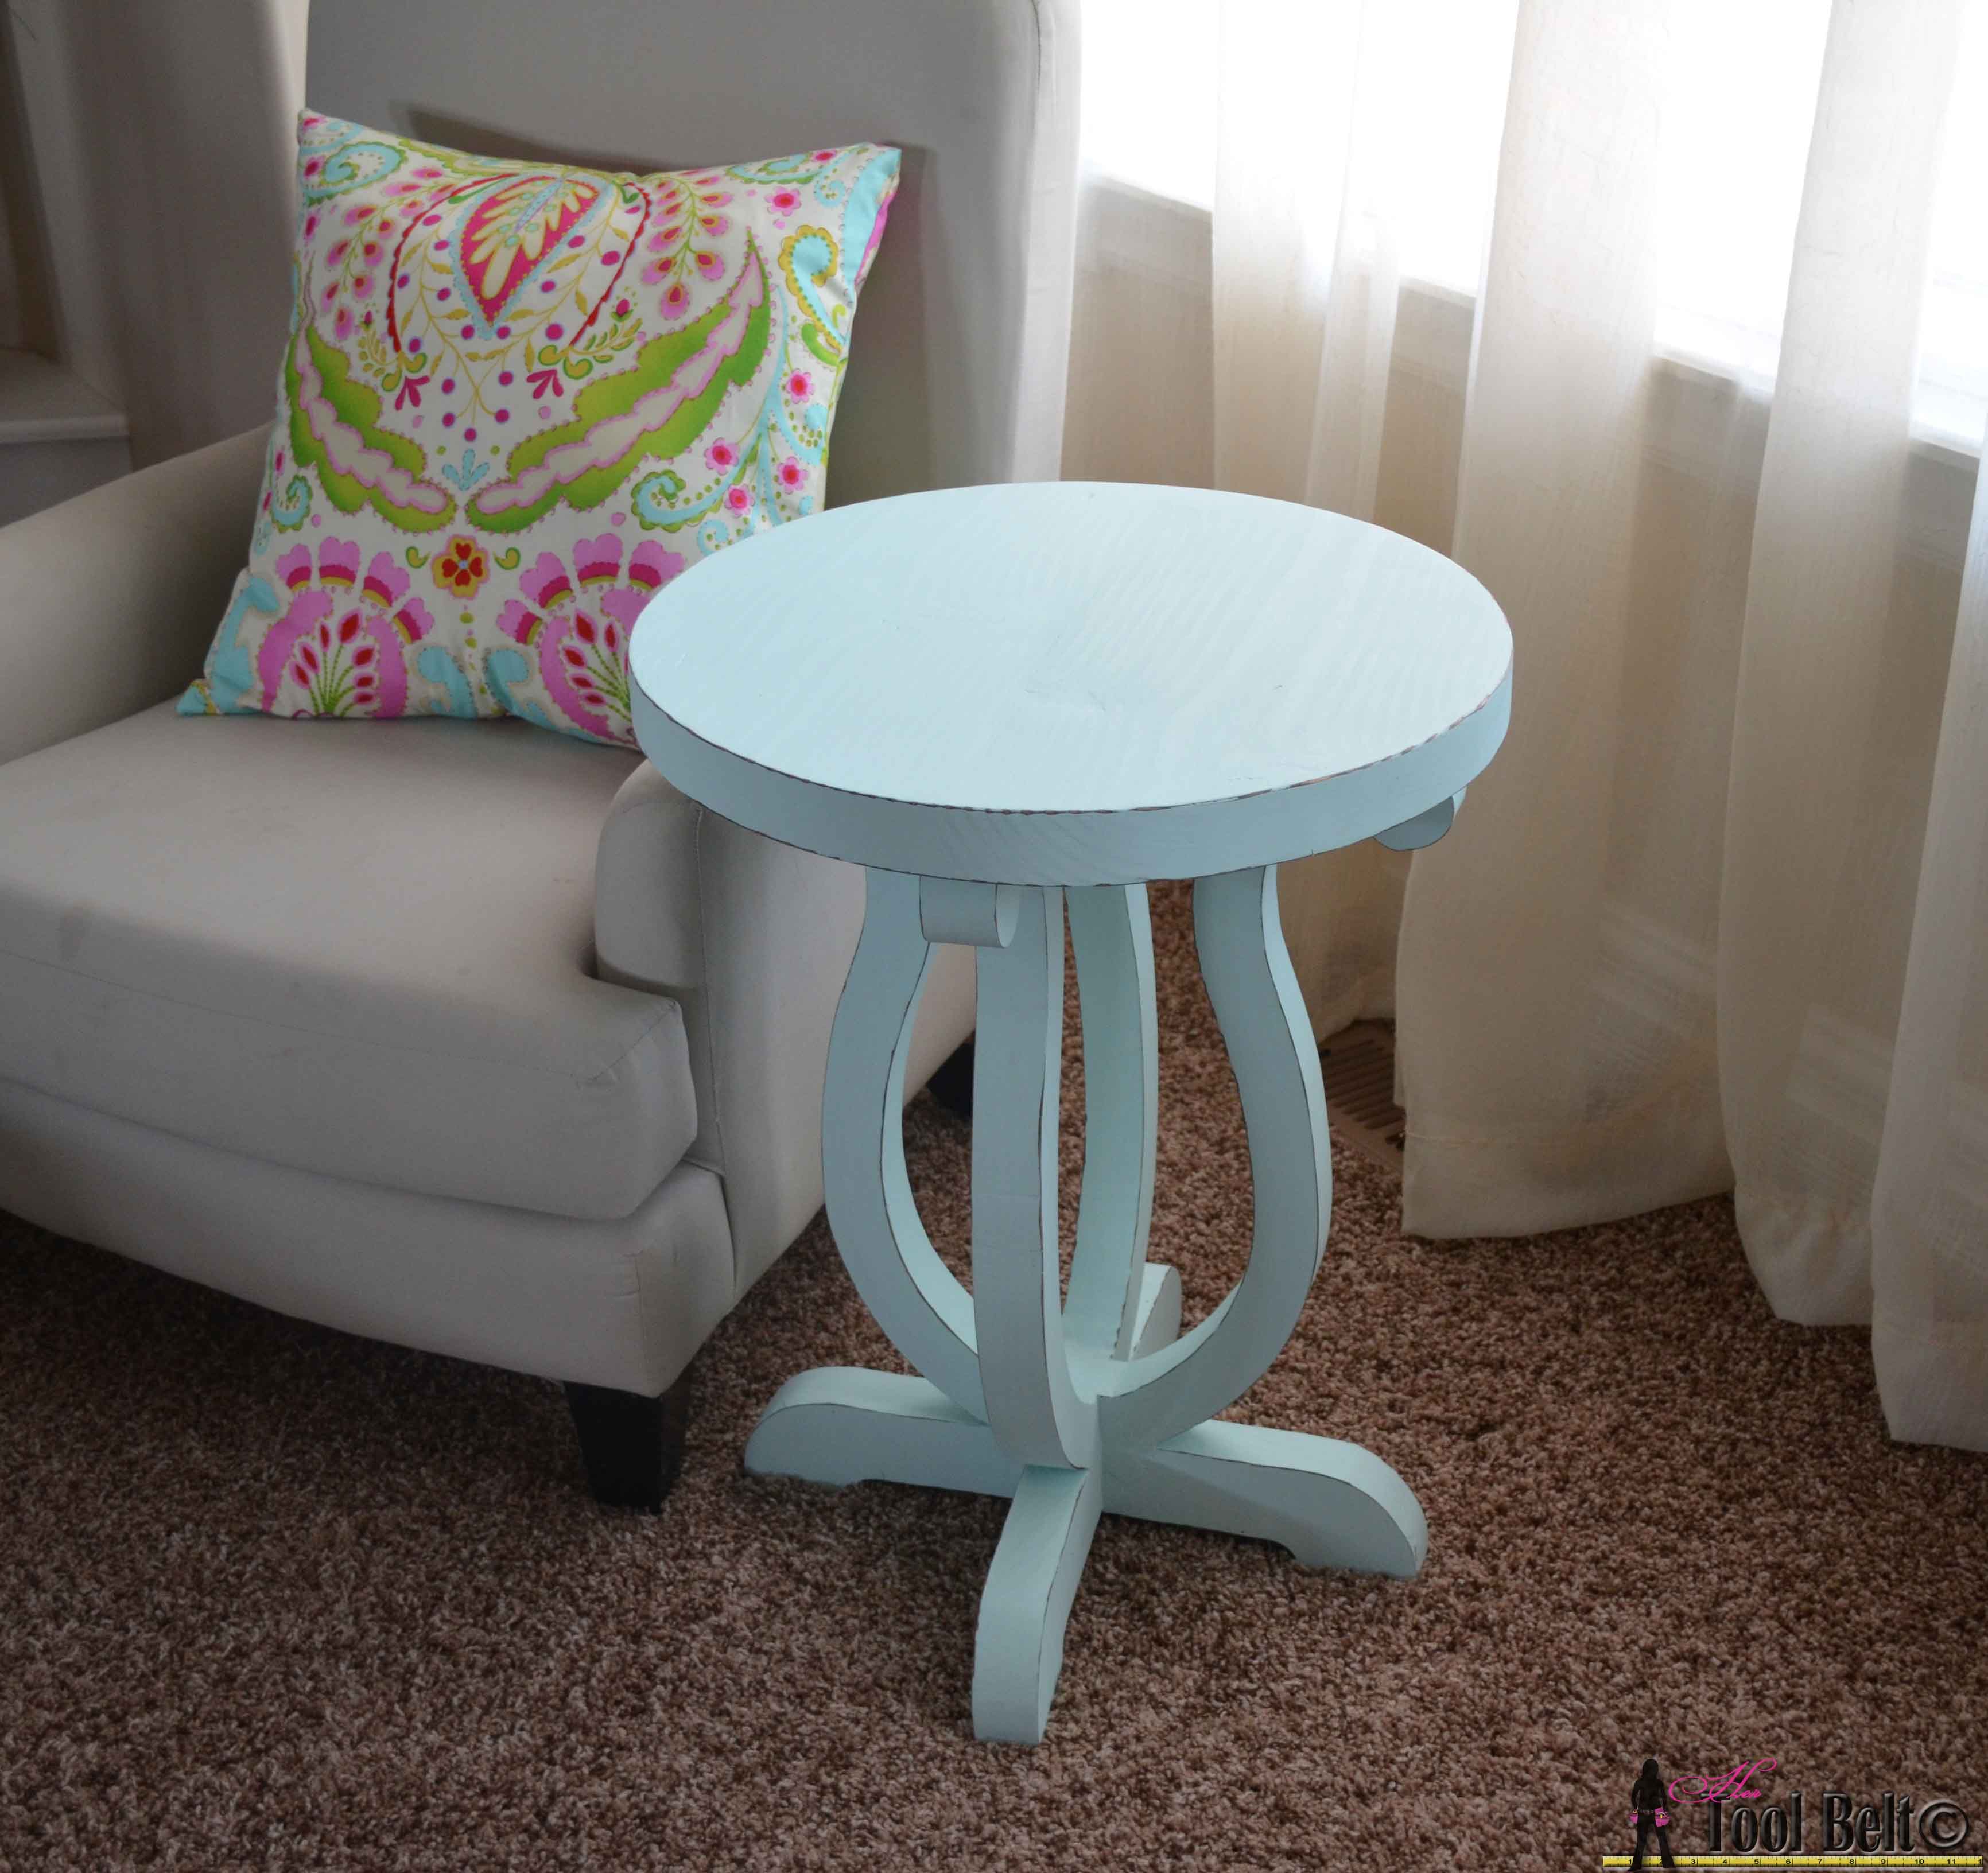
23″ table
I stained the table a dark color – Minwax Walnut. I allowed the stain to dry for a day or two. I made a DIY chalky paint with the Behr Spa color I used on the Gallery Style Command Center room.
DIY chalky paint recipe – 1/3 cup plaster of paris + 1/3 cup water, mix until smooth. Mix with 1 cup of latex paint.
This recipe made the paint very thin, 3 or so coats were needed. The paint dried very fast and turned out really great. I’ve used a baking soda chalky paint recipe before and it was gritty and weird. This plaster of paris recipe made for much nicer chalky paint finish.
Once the paint dried I distressed it a little. I’m not into a lot of distressing, but I like a little to accent the lines. I usually fold over one of my used sand paper disks and use that. Remove as much paint as you want. I plan on protecting the table with a coat of polycrylic.
27″ tables
I stained the tables Rustoleum Weathered Gray and allowed that to dry for a day or so. Then I painted over the stain with Americana Decor Chalky Finish Primitive – picked it up at Michaels with a coupon :-). Also available at Home Depot. This paint is thick, so only 1 coat is needed. I distressed the tables and added a coat of Americana Decor wax. I attempted a little faux finishing and mixed a small amount of Americana Decor charcoal with the wax and dry brushed it on the edges and wiped off extra.
I love how the tables turned out. BTW the chair is child’s size, the table really isn’t that big 🙂
 Pin for later:
Beautiful side tables and great tutorial. Pinned it for later.
Thanks!
These are amazing, what a great job!
Thank you
Amy,
This is a great table and you give amazing instructions. We are going to feature this post this Saturday on our Saturday Season Selections.
Awesome, thanks a bunch.
I am absolutely loving this! I’ve been looking for something with flair and I think this is it! Thanks so much for sharing!
Amy!!!
I love this, it reminds me of your corbels over on remodelaholic Those things won’t leave my mind, I love them so much! You rock!
Thanks Pauline. I love those corbels too, I need to figure out what I’m going to do with the back of my island so I can put them up.
I love this!! Thank you for the instructions. I’ve started building this today so hopefully it comes out as good as yours 🙂 Can I ask what kind of band saw you use? I’m new to DIY and I have a jig saw, but it’s really hard to cut this much with and my hand is killing me lol.
Cool! I have a 14″ Grizzly Bandsaw. I know what you mean with the jig saw. I cut part of mine out with the jig saw, but with the 1 1/2″ thick board it can be hard. Using a bandsaw or scroll saw is easier.
Love this! Just pinned and shared on my Facebook page. Found you at Inspiration Monday Link Party! Now I’m going to go work on my jigsaw cutting skills. 🙂
I’m giving you a standing ovation ! AMAZING! I absolutely love this…the table would look wonderful anywhere!!!
Pinning to 2 boards …I want everyone to see it! Thanks for linking to Twirl and Take a Bow my friend xo
Thank you Robin!
THIS IS AMAZING! I am always enthralled by a gal who can operate power tools with the best of them. You totally rocked this!
Thanks!
Girl….you never cease to amaze me with your mad skills! Thanks so much for sharing at the Twirl & Take a Bow Party! Love having you at the party! Have an awesome week. I’m pinning to our party board.
Leslie
Fancy! I don’t have fancy tools, want to come make me one, haha. Thanks for linking up to Snickerdoodle Sunday!
It turned out beautifully! Love how you phrased the cuts as “relief” cuts… I’m going to have to use that term next time I’m sharing a jigsaw tutorial. Pinning!
Wow.. That’s so cool to see that done! Great tutorial. Can’t wait to look at your other projects!
Wow! The tables look stunning. Excellent tutorial and well finished off project. Definitely a project for me to keep in mind this year.
I just love what you can do with a saw! This table is absolutely adorable! Thanks for sharing at my Creative Ways lInk Party!
Blessings,
Nici
Love this!!
I am totally inspired. I often feel a little apprehensive with power tools (probably because I don’t use them regularly enough) but your tutorials are excellent and make me feel like I could do this too. I’m pinning to our Show Me Saturday board.
Gorgeous table! Can’t believe it was only $12 with all your materials! I just had to feature it this week on Creative Spark Link Party. Hope you stop by again today to link up. http://bit.ly/CSLP23
you are sooo smart not to pay the PB prices and made something so fabulous!!!! I adore this.
Thanks
I love this table!!! Will you make one and sell it to me?!? 🙂
🙂
AWESOME table and tutorial!! Love it, I think I’m going to have to make one!!
I’m going to make a set of these for my wife. Am I right in thinking that you cannot get two of the 27″ tables out of one ten foot 2×10? I was thinking about buying a 12 foot 2×10 instead and according to my horrible math skills, should allow me enough material to make a matching set. Thanks in advance!
Hi Dominic,
She’ll love the tables! To make 2 27″ tables you need at least 16′ of 2×10. I’d grab 2 – 2x10x8′; or 2 – 2×10⁻¹⁰′ will give you a little more room for tracing and cutting. Happy Building!
Wow! You are talented! That is an amazing project. Thanks for sharing!
You did an amazing job and the tables are adorable! Thank you.
Thank you so much for the free plans! I just bought a saw and I’m going to give woodworking a try!
Amy,
I would like to thank you for sharing the leg design with us. they are absolutely beautiful and will be an excellent addition to all my patterns in my wood shop. In my journey to become green I have decided to repurpose wood for my furniture needs and it has some how turned into a little business that I have come to really enjoy. Thank you for sharing your talents. I love to see women helping other women.
Rena
This is awesome! Making it as we speak! One question though – do I need both 27″ inch templates 3 AND 4? They seem the same but one has more of a base to it. Thanks!
Yes, #4 has a little bit of the leg base that I couldn’t quite fit on #3.
I am trying this now with the longer leg template. The legs are too big to nest together and fit on the wood. I will need to either change the template or go back and get another board.
Hi Jane, The longer legs should fit by nesting them together. They will probably be snug. I made 3 sets of the longer leg tables and nested the legs together. One question, when you printed did you have the print settings on 100%, sometimes my printer will say ‘fit to page’ which will change the dimensions of the print out?
I got them all on thanks. I had to slightly bend the template back a bit. Maybe when I taped them all together I did not have them aligned correctly. I did print at 100 percent. Thanks for the quick response. She is a beauty of a table
I tried this project this week and have a few comments that might help others. I used my scroll saw to cut the legs and even though my saw says it will cut up to 2 inches thick, it was really a huge struggle. It took over 2 hours for me to cut the legs and they looked pretty bad. I just couldn’t get the nice lines I wanted even with a ton of sanding. I also tried my jig saw but it wasn’t much better. I think the band saw is the way to go. That may be the next tool I add to my collection. So in the end it didn’t quite work out. The legs were not the same size. All is not lost though..I stuck a plant on the top of the legs and it makes a great plant sand.
Thanks for the feedback Jane, I’ll make sure to note it above. I bet your plant stand is darling 🙂
It is so adorable! Now I am watching youtube videos on bandsaws and I must have one. Thanks for he plans.
that is awesome! enjoy.
b
I love this design and want to make these for my daughter’s rooms, but I am having a bit of trouble lining up the pattern. I’m not sure if anyone else ran into this. The bottom of the leg doesn’t line up exactly at the edge with the middle of the pattern, and I have to move it way way up to get it to line up and have the top and bottom of the leg to be even. I check my printer settings and it’s all good, am i doing something wrong? I’m trying to make the 23″ version. Thanks!
Hi Trish,
I probably should go back and put numbers by the lines or something. Pages 2 and 3 should overlap with each other about 3″.
I love this table!! My husband is making it for me as we speak!! He just happened to have 2-2x10x10 boards leftover from our old waterbed. Way to repurpose honey! I am so looking forward to having a little side table for my couch. 🙂 🙂 🙂
Wow it is meant to be for sure!
Just saw this table on a quick search for a bedside table and made one for myself for a total cost of 10.94 plus a couple screws I had in my shop. A friend saw it and what’s one made out of black walnut with a chess board top; totally excited to design that and that thanks for the pics!
Awesome! When you finish the walnut/chess version I’d love to see a pic.
Do you have any of these curvy side tables pre-made and for sale? Thanks, Isaac
Hi Isaac,
I’m sorry, I don’t have any for sale.
It looks great! What type of wood did you use?
Thanks, I just used pine.
Is it okay if I use thinner wood?
You bet! Make you adjust the screw length for the wood thickness that you use.
Just beautiful and I’m truly inspired! Bought my Kreg Jig this morning 😀 2 questions. I am assuming the minwax finish was oil-based. I have plenty of that around.. So, with the latex (water-based??) dyi-chalk mixture you have created, you have not had any troubles with it adhering to the stain? It’s my first go with the chalk technique. Just gorgeous! Second, was the paint a flat sheen that you used in your mixture to create your effects?
Thanks!!
Thank you! Yes the minwax was oil based, which they say not to mix oil and water based layers…but I did. I let the oil based stain dry really well before I painted it. I haven’t had any issues with the latex based (DIY chalk paint) paint peeling off or anything. Also you don’t need to do the DIY chalk version, you can use pre-made chalk paint too. The sheen on the latex paint was originally semi-gloss, but with the grit added in, it makes it really flat.
Thank you! Thank you! Thank you! Thank you! Thank you! Thank you! Thank you! Thank you!
In reference to your curved leg tables you have on your site. I have a friend who wants me to make three of them, but at 36″ height. Tried spacing the template sheets apart, but the curves just don’t match right. Any suggestions how I can make these leg templates longer? I can then trace them onto 1x lumber to use as permanent templates.
Thank you
Larry
Wahnsinnig schön!! (= amazing, wonderfull!!)
If I’d have a place for creating such wooden things, I´d build that immediately!
Greetings from Hamburg/Germany
Maike
Gorgeous, perfect for what I need! Just need a band saw now….
Has the grain orientation on the feet part proven strong enough? It isn’t the ideal grain direction for that section but if it works long term, it works.
You’re right, it’s not ideal, but it has been just fine and survived getting knocked around in many temper tantrums by my kids. The table itself is pretty light, so it doesn’t get a lot of stress.
I’m new to the woodworking, any chance I could get more explanation or pictures on how you put the top of this table together.
Made this table today! First time using a pocket hole jig so my holes aren’t perfect, but the table turned out great and it’s level to boot!! Made for my BFF for Christmas tomorrow. I think she’ll love it!