This post is sponsored by The Home Depot. I have been compensated for my time and provided with product. All ideas and opinions are my own. This post contains some affiliate links for your convenience. Click here to read my full disclosure policy.
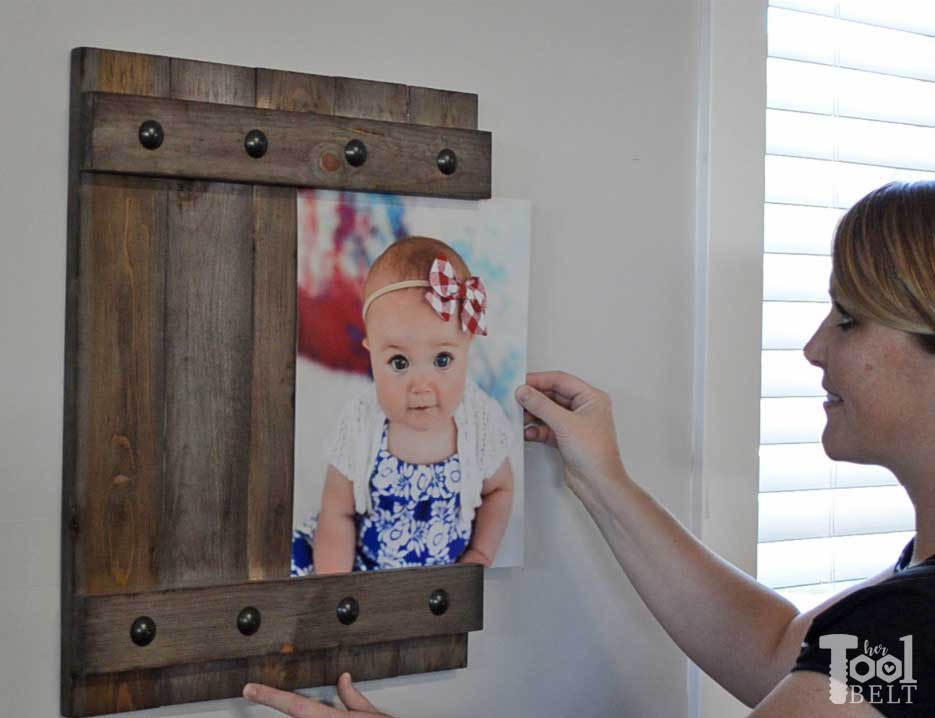
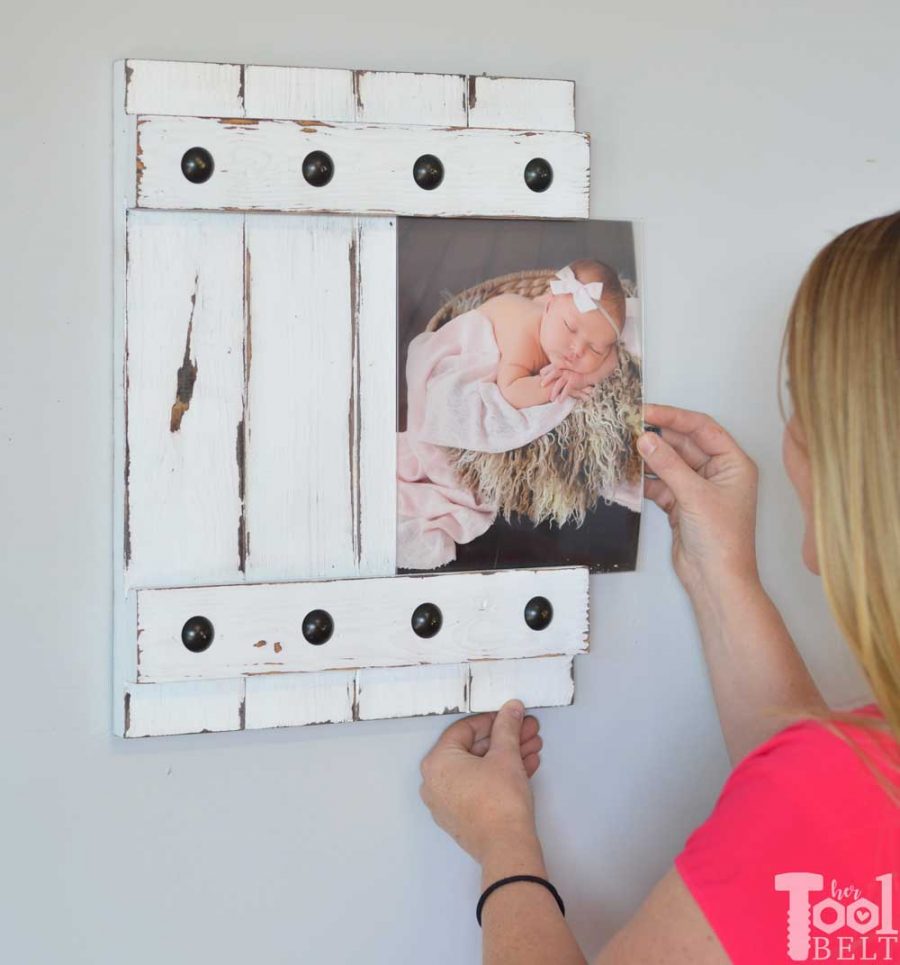
I have some old bead board frames that I want to update. They are cute but I don’t always like undoing the acorn nuts to put the new picture in and then realizing I didn’t center it after I hang it back up. 🙂 I want to be able to switch out pictures really easy.
Old bead board frames
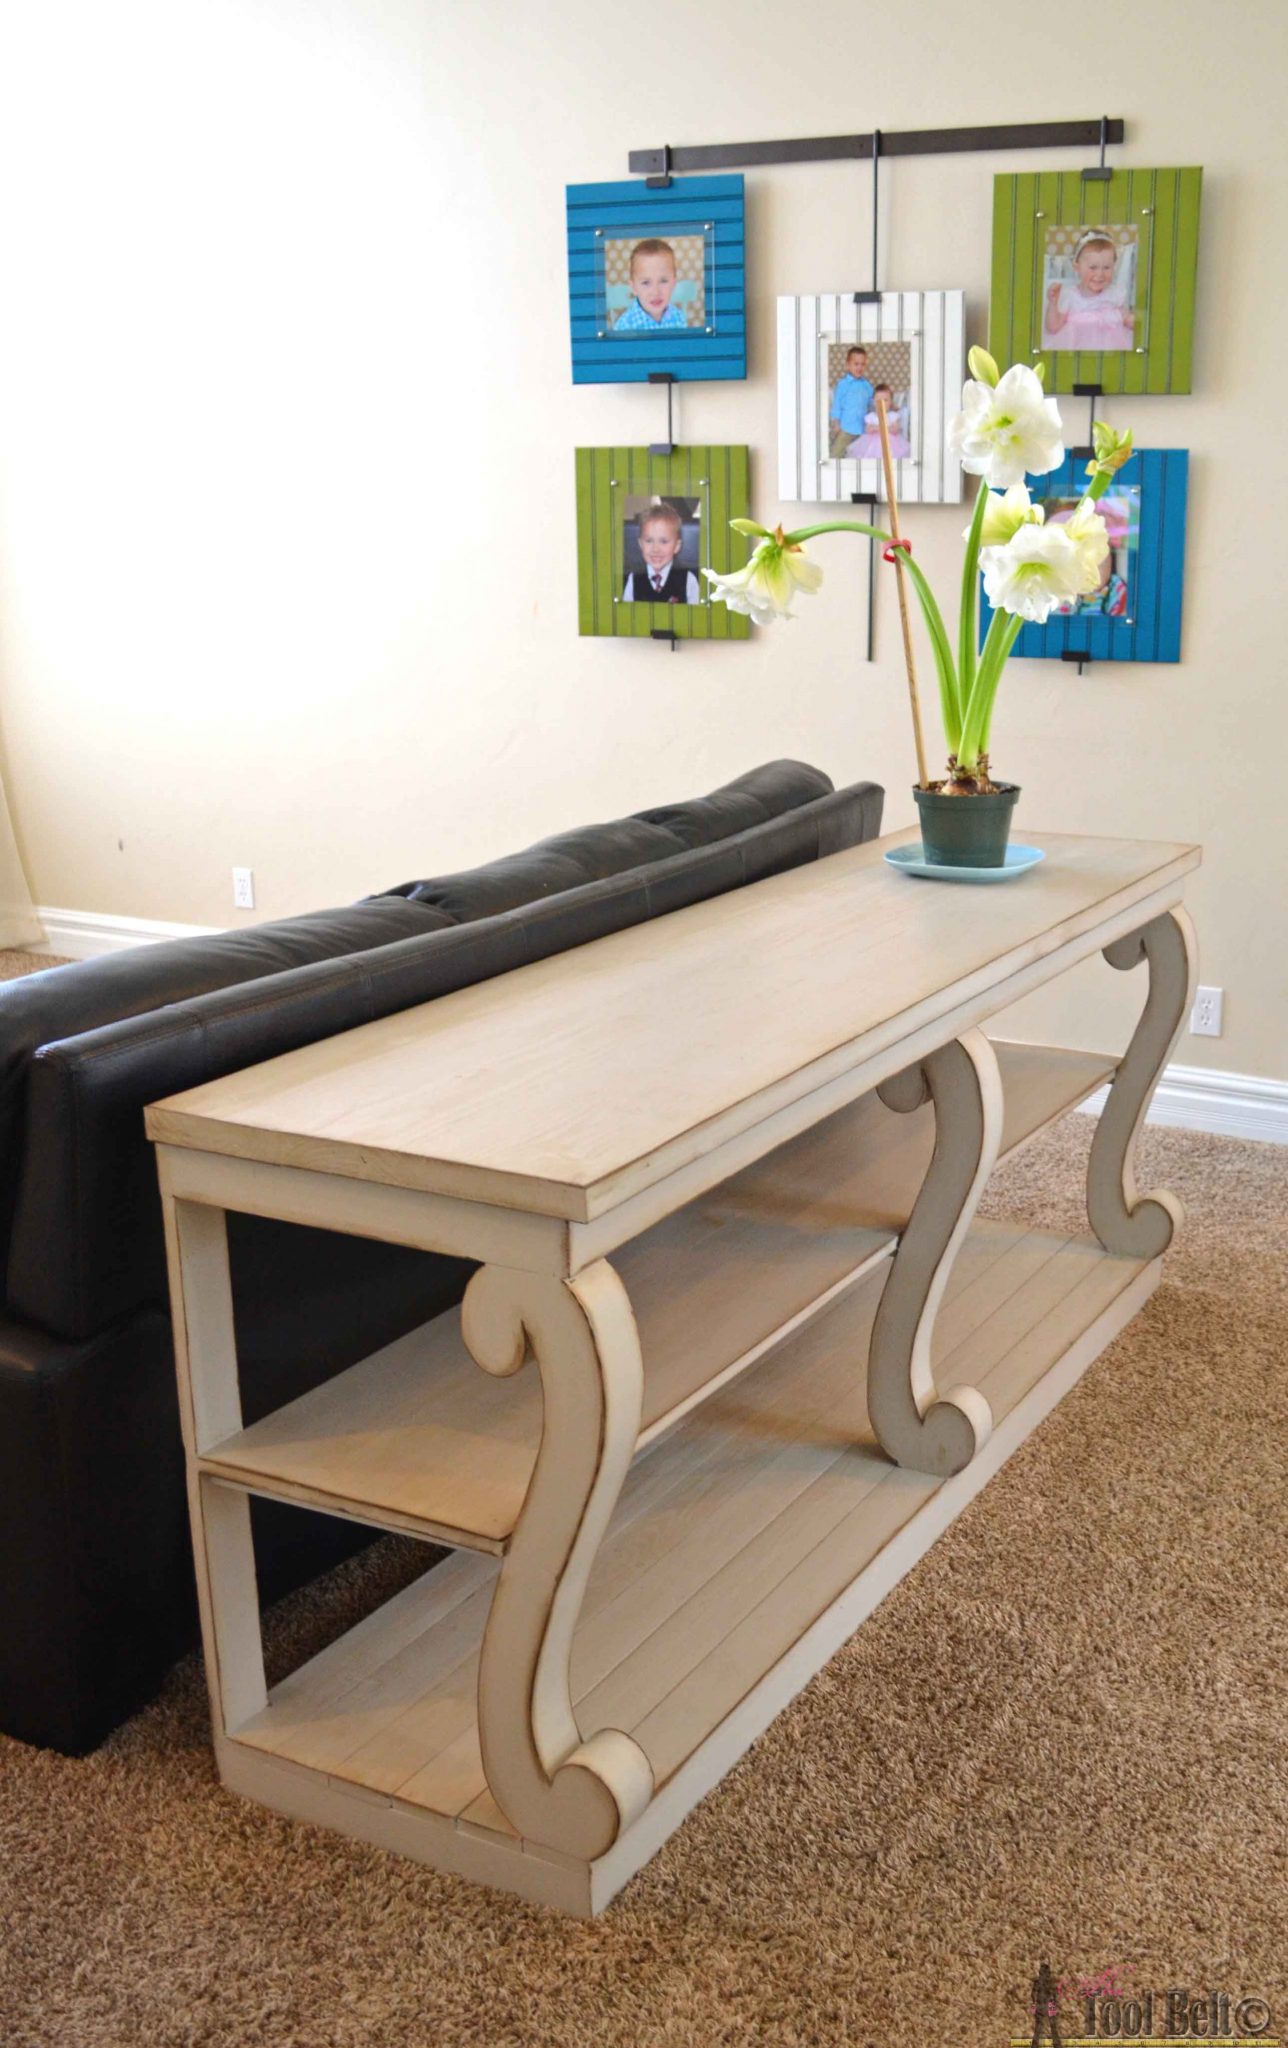
Free plans for the console table with scroll legs.
I would also like to transition some of the decor into more of a farmhouse style with reclaimed wood look. To make switching out the picture nice and easy, I’m going to use a similar idea to the sliding photo board. The top and bottom boards will have a little slot to allow the photo to slide in and out.
(This is the instructions for an 11″ x 14″, you can find the 8″ x 10″ here).
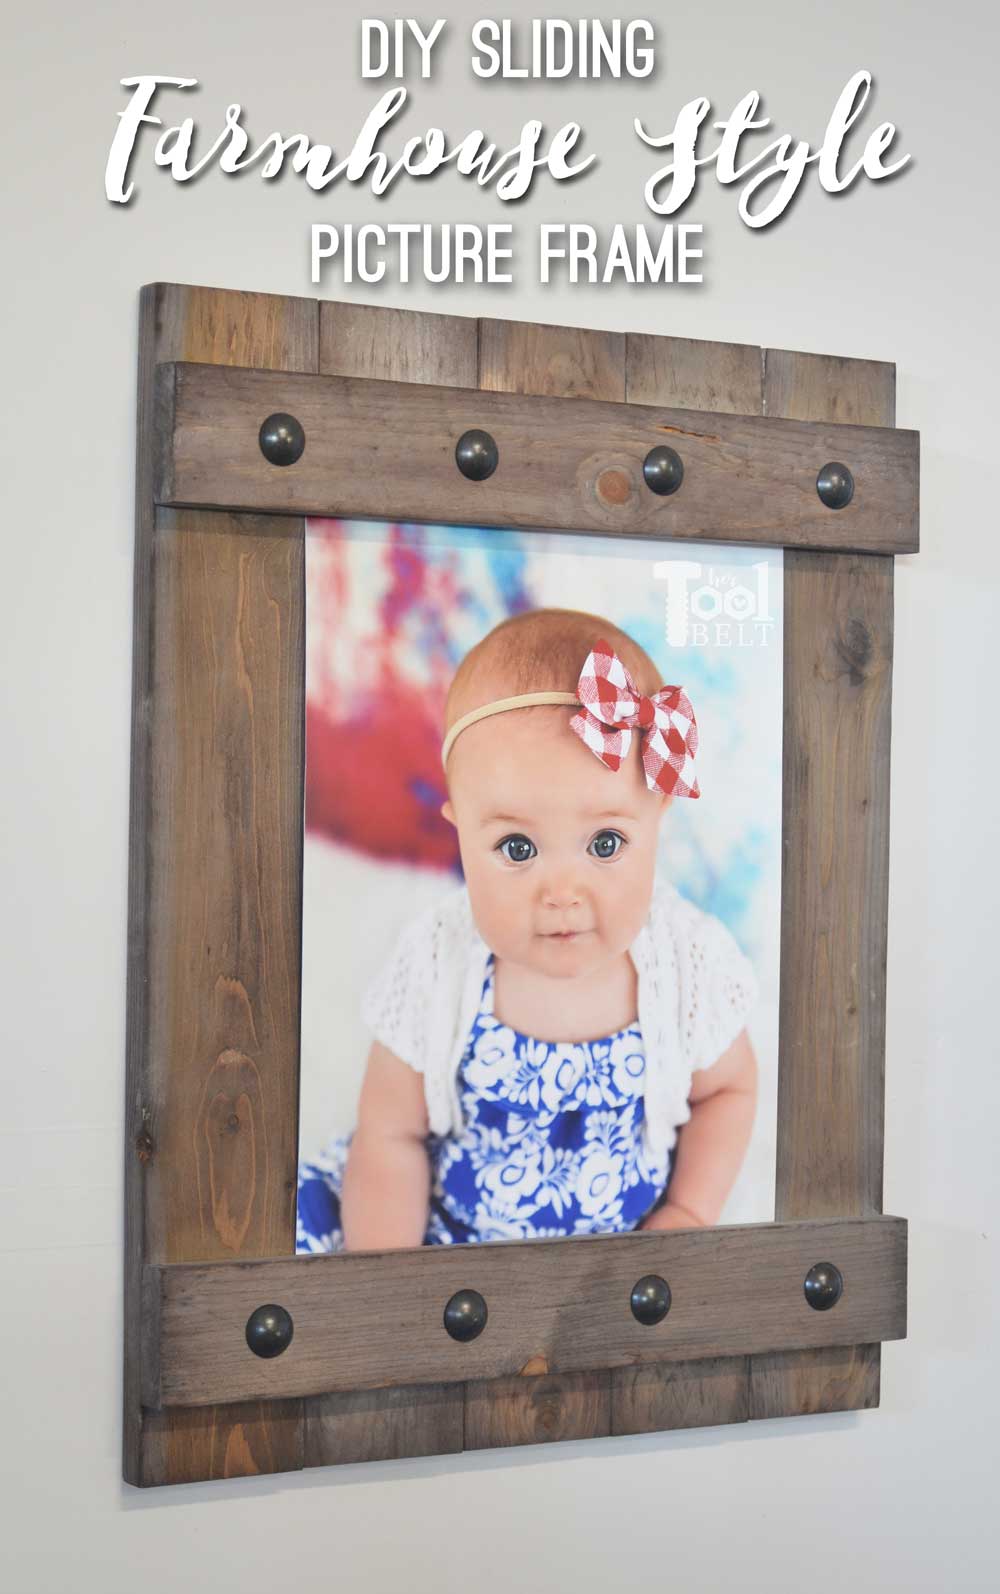
How to Make a Sliding Picture – Farmhouse Style Frame
For 11″ x 14″ photos
Materials
- 2 – 1″ x 4″ x 8′ boards (actual 3/4″ x 3 1/2″)
- 1 – 1″ x 3″ x 8′ or 6′ board (actual 3/4″ x 2 1/2″)
- 1 1/4″ pin or brad nails
- wood glue
- sandpaper
- stain (I used Varathane weathered accelerator, Varathane Kona and Minwax pre-stain conditioner)
- brush
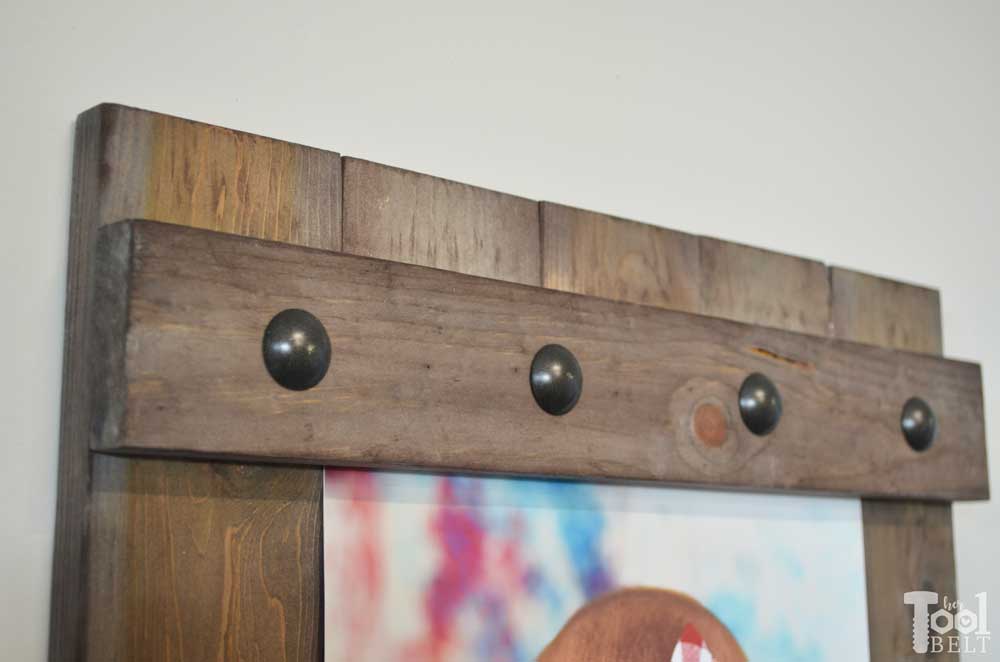
- 1″ decorative nail heads (amazon) (painted oil rub bronze) – optional
- picture hanger – optional
Tools Used
- Circular Saw
- Pin Nailer (alt brad nailer)
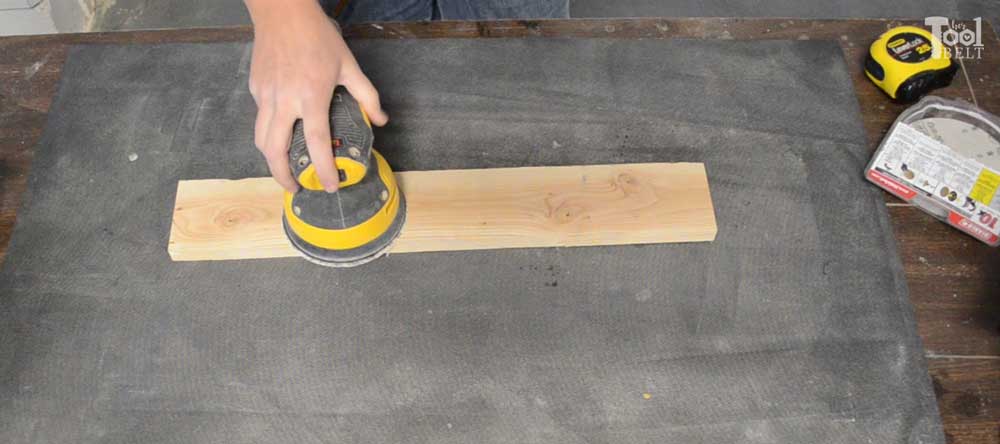
- Sander
- Tape Measure
- Table Saw (optional)
- Router (optional)
- Hammer (optional)
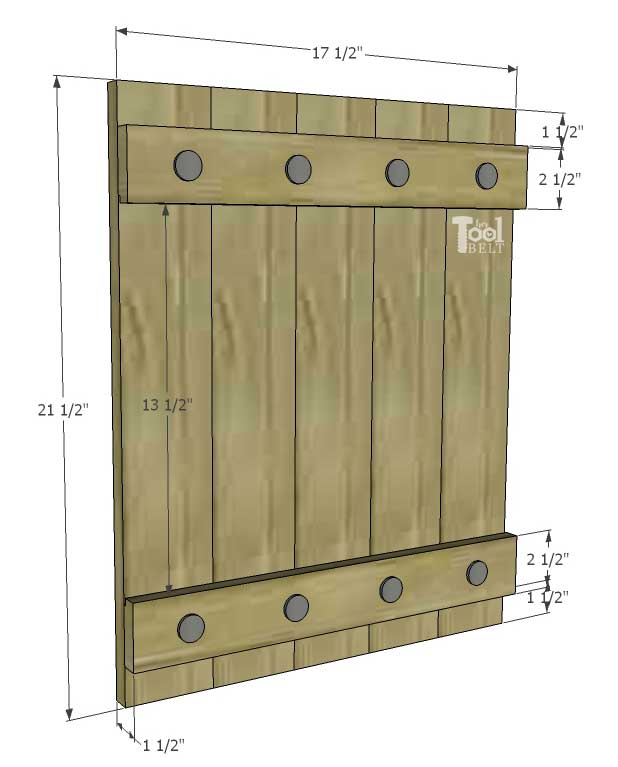
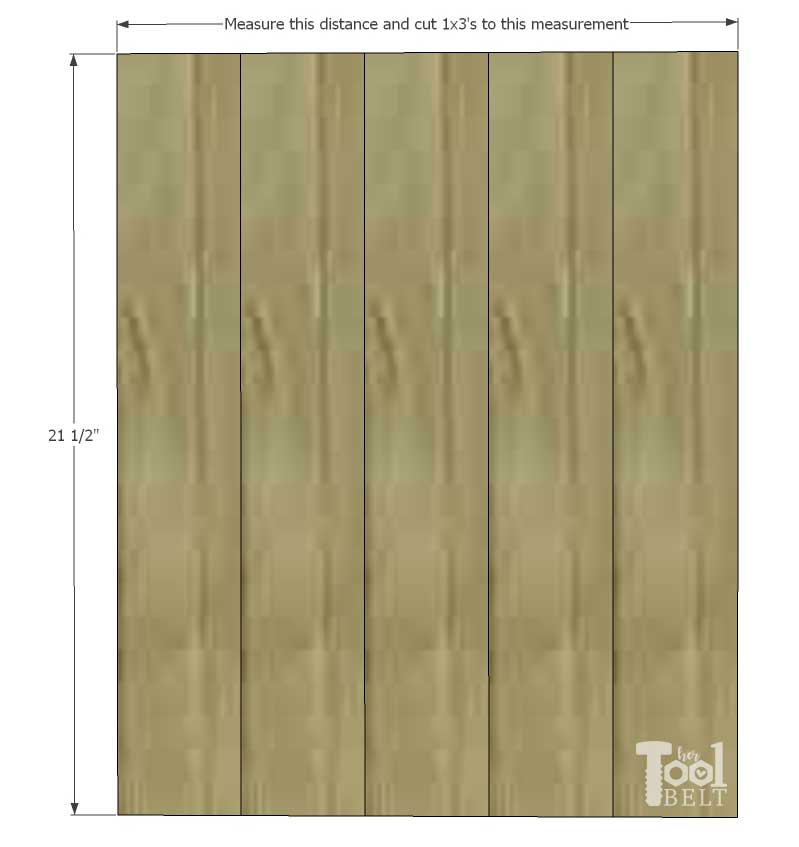
Cut List
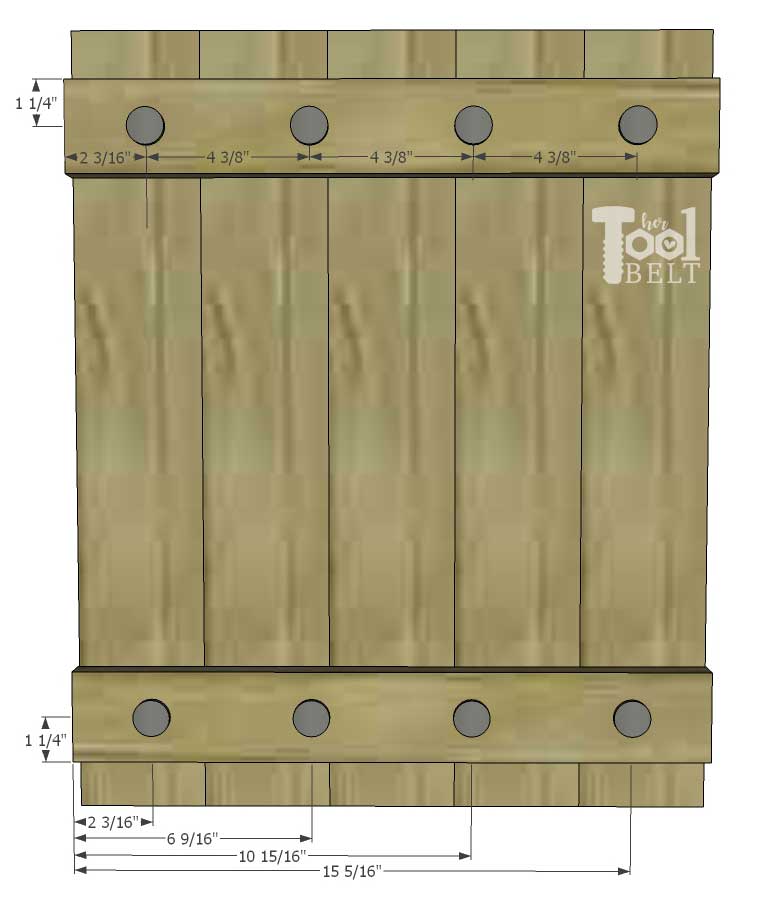
- 5 – 3/4″ x 3 1/2″ x 21 1/2″
- 2 – 3/4″ x 2 1/2″ x 17 1/2″ (cut to fit)
Cut Diagram

Step 1
Cut all of the boards according to the cut list. Place all of the 1×4 boards together and measure the width of the frame (approximately 17 1/2″) and cut the 1×3 board to that measurement.
Cutting boards to length. Tip using a speed square (carpenter’s square) with a circular saw is a quick way to make cross cuts straight/square. These cuts are also easily made with a miter saw.
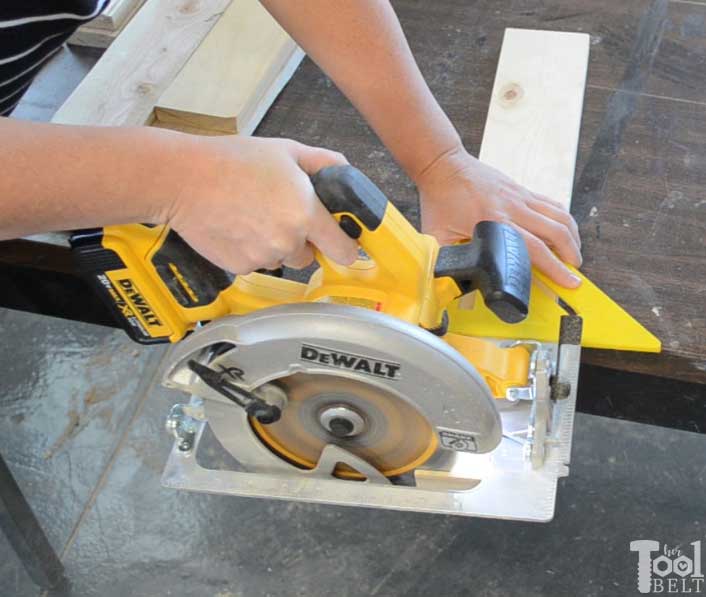
This DeWalt cordless circular saw is a new tool for me, and it is great. The motor is brushless, so it is more efficient and it is easy to adjust the depth of cut. Being cordless, I really like it to cut up plywood sheets.
Step 2
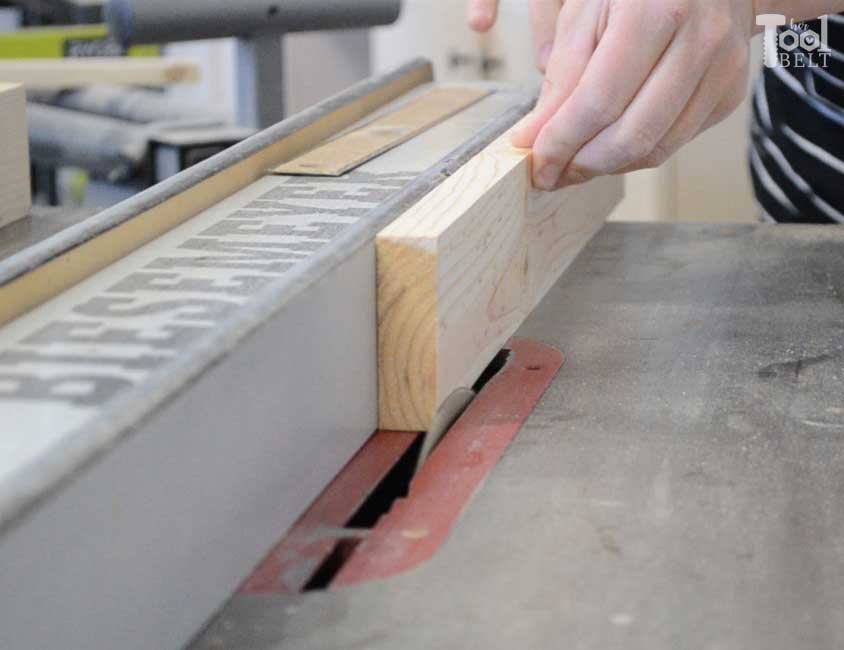
Cut a slot in each 1×3 for the pictures. The slot should be 1/4″ tall (or slightly more) and about 1/16″ – 1/8″ wide. (If you want to have glass with your picture, make sure it’s as wide as the glass/plexi and picture.)
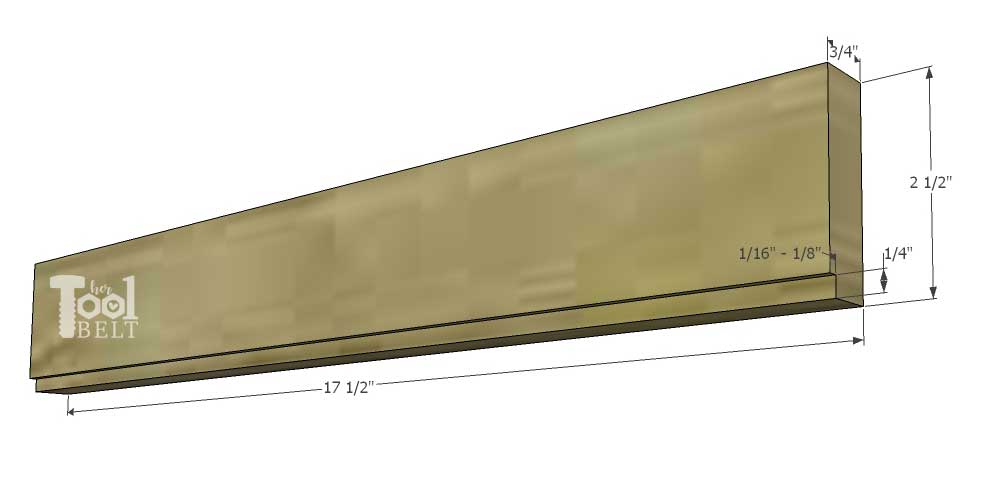
I used a table saw with the blade at 1/4″ high and fence about 11/16″ from the blade.
Alternate method – You can make the slot with a router and straight bit or even multiple passes with the circular saw (with the blade depth set at 1/16″ – 1/8″).
Sand all of the boards before frame assembly.
Step 3
Line up the 5 – 1×4’s and mark 1 1/2″ from each end. Make sure the tops of all of the 1×4’s are flush, use wood glue and 1 1/4″ nails to secure the top board and bottom board to the 1×4 slats. Important – The slots on the 1×3 both need to be towards the center of the frame.
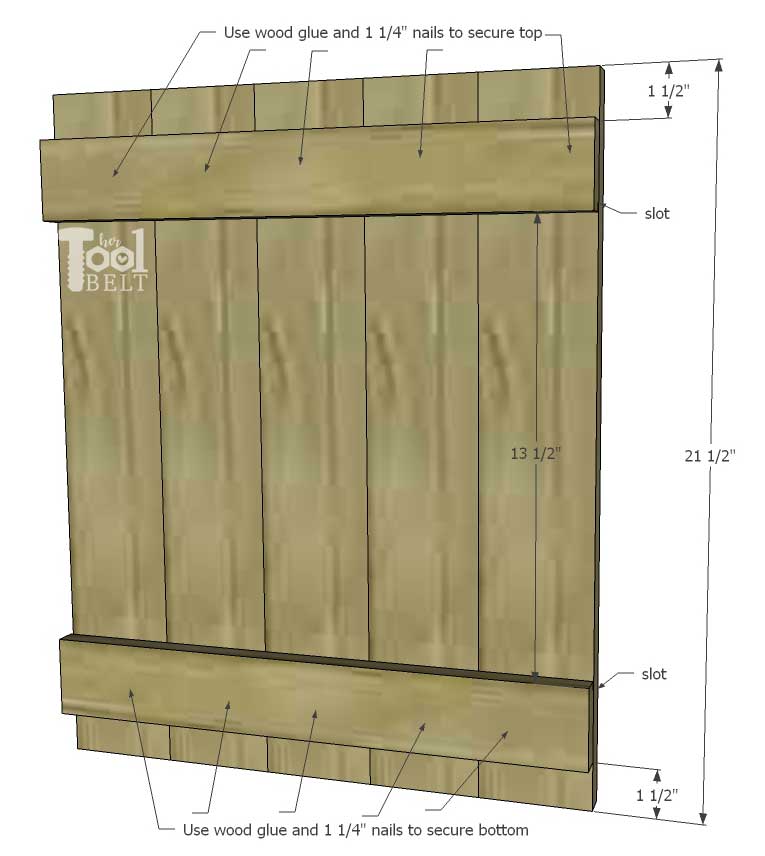
Glue top and bottom boards, don’t let the glue get in the slot of the 1×3!
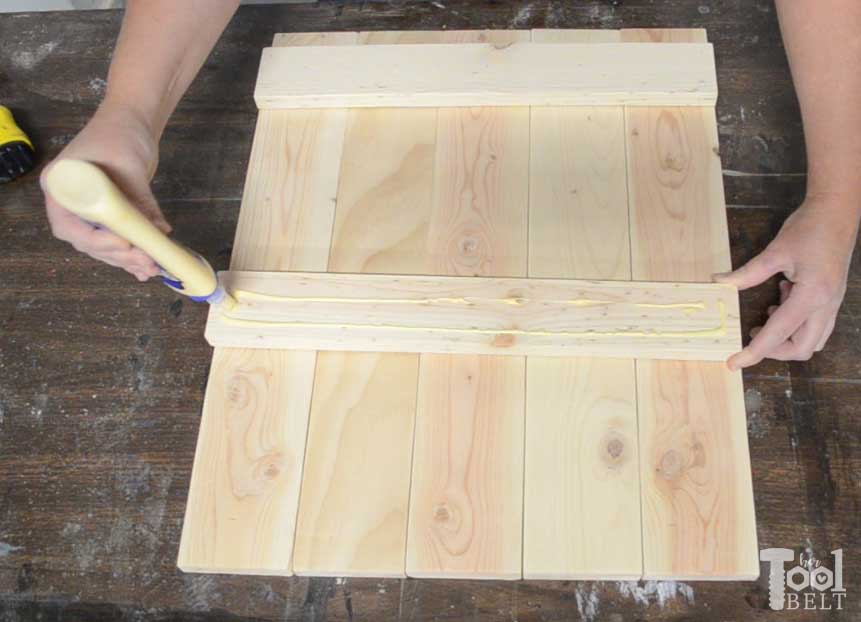
Nail the top and bottom boards to the 1×4 slats, put at least 2 nails into each 1×4 slat.
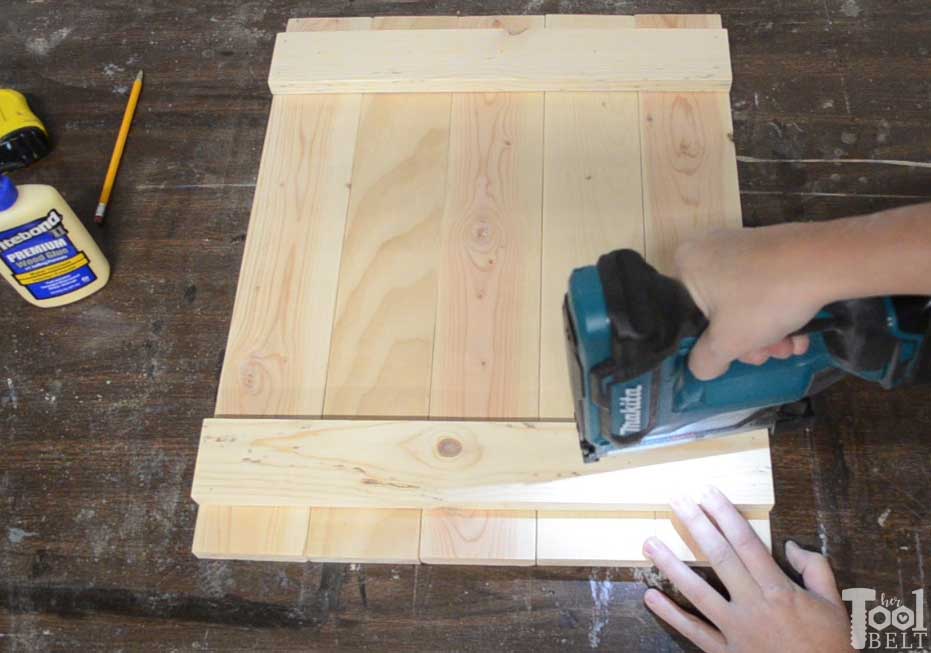
I used a pin nailer so I wouldn’t have large nail heads showing. This pins work great to hold boards/molding in place, but the frame isn’t really secure until the glue dries. (Alternate method – brad nails will hold the top and bottom in place, but will leave bigger marks.)
Step 4
Let the glue fully dry.
The Finish
For a grayish brown weathered wood / reclaimed wood look:
- I first applied a coat of Varathane Weathered Accelerator and let that fully dry.
- I applied a small amount of Kona to a bristle brush, dabbing off the extra and dry brushed it onto the frame lightly.
- The last step is to take a paper towel or rag and rub on some Minwax pre-stain conditioner and let it dry completely.
- Consider putting a clear coat finish (polyurethane) on to protect the wood.
Add a picture frame hanger to the back of the farmhouse style frame, or route one with a keyhole router bit.
If you want to add decorative nail heads, measure along the top and bottom boards 2 3/16″, 6 9/16″, 10 15/16″, and 15 5/16″ and center it at 1 1/4″.
See how small those pin nail holes are, you can barely see them. I didn’t fill the nail holes at all. The Makita does a great job and doesn’t mar the surface.
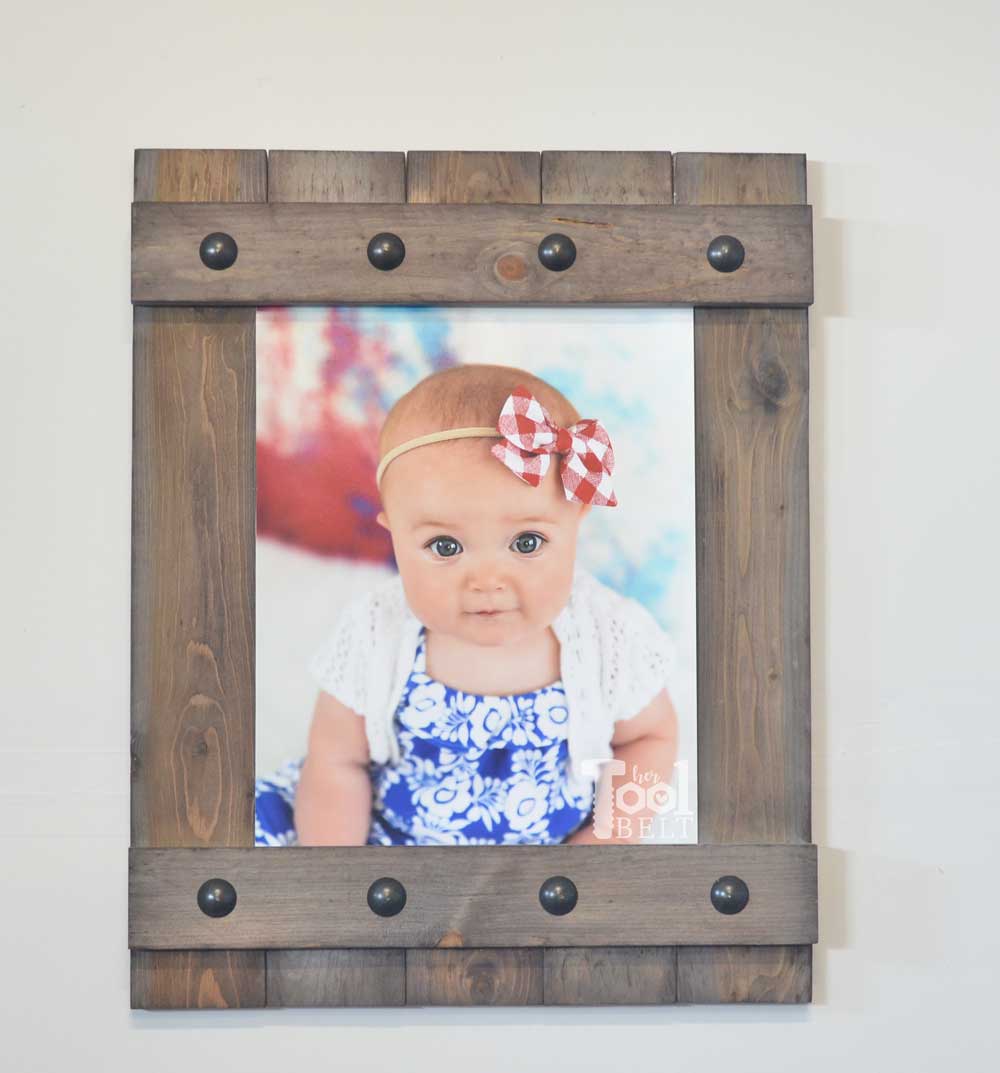
Front view of the farmhouse style frame.
Thanks for pinning!
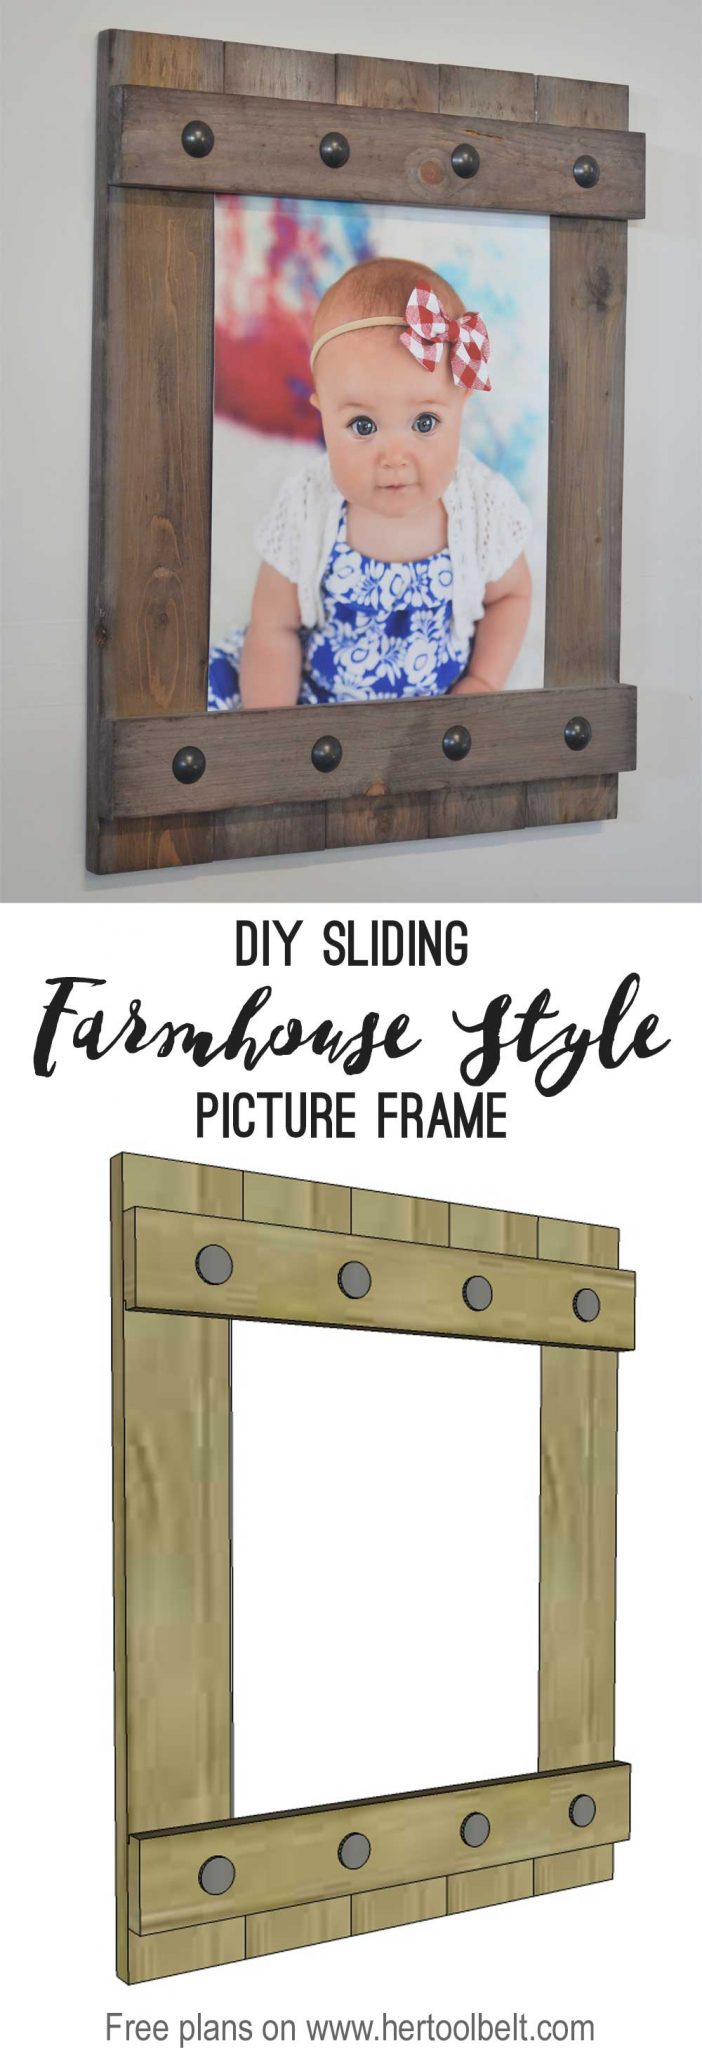
Download Free Plans
–> Sliding Picture Frame – 11×14 <– click
Find the 8″ x 10″ farmhouse frame here.
“I acknowledge that The Home Depot is partnering with me to participate in the Tool Review Program. As a part of the Program, I am receiving compensation in the form of products and services, for the purpose of promoting The Home Depot. All expressed opinions and experiences are my own words. My post complies with the Word Of Mouth Marketing Association (WOMMA) Ethics Code and applicable Federal Trade Commission guidelines.”
Adorable. But will the picture last as long without glass to protect it? I live in the country and dust collects on everything like crazy. I would worry that dusting the picture to often would damage it.
Oh, well I don’t dust 🙂
You can make the slot for the picture wide enough to accommodate the photo and glass/acrylic, then they would slide in together. I’m working on an 8×10 version that will do that.
I wonder if you could mount the glass so you would slide the picture behind the glass?!
Hi, photographer here that specializes in print! If you are printing through a high quality, professional lab (not Costco, Walgreen’s, Wal-Mart, etc.), then your prints should be able to be dusted with a dry rag and have no issues.
If you’re wanting to use glass or acrylic to prevent the photo from getting sun damage from directly sunlight, it is best practice to have the photo seated inside of a mat. This also means that an 11×14 frame now only houses an 8×10 or 8×12.
Just some things to take into consideration if longevity matters! 🙂
Thanks for your tips!
Amy, Do you sell them , if so how much?
If you get your image mounted on art board and add texture and a protective spray, it doesn’t need glass and you can do light dusting on it with a soft cloth. I would recommend you order your prints from your local professional photographer, but if you are printing your own, many online labs offer this service. It is a little bit extra, but is well worth it.
Do you have measurements for a 8 x 10 frame
It’s in the works, I’ll have 8×10 posted next week.
Where did you get the 1″decorative nail heads? I don’t see them on HD’s website.
I picked up the 1″ nails at Hobby Lobby.
Can you post a link for these?
You can purchase them either here
or here
Love, love, love this!!!! Thanks for sharing.
Do you mount the picture to anything before you slide it in? I would think the picture would eventually sag and fall out of the slot.
Thick prints work fine. Thin prints need to be supported. This picture was really flimsy, so I glued it to the cardboard that came with it from Costco.
What size pic did you put in this one?
11×14 size print
With so many grandkids (10 so far) we only get 5×7 pictures…we in process of remodeling our 3800 sq ft house in a rustic style…would love these frames for 5×7 pics…you are doing awesome work!!
Great project! Keep me posted on the 8×10 instructions.
Here is the post for the 8×10 frame. https://www.hertoolbelt.com/easy-farmhouse-style-picture-frame-8×10/ Thanks!
Am eagerly awaiting the plans for the 8×10. Want to make these for my granddaughters for Christmas.
Thank you, love this!
Here are the 8×10 frame plans! Happy Building 🙂 https://www.hertoolbelt.com/easy-farmhouse-style-picture-frame-8×10/
What hardware did you use so the frame could be hung on the wall?
I used my router to cut a keyhole slot to hang mine. The regular sawtooth hanger should work just fine.
What kind of sander was that?
It’s called a random orbital sander – http://www.anrdoezrs.net/click-8155799-10368321?url=http%3A%2F%2Fwww.homedepot.com%2Fp%2FDEWALT-3-Amp-5-in-Corded-Random-Orbital-Hook-and-Loop-Sander-DWE6421K%2F206036887&cjsku=206036887
Do you need to print the photo on thicker paper to prevent it from sagging in the frame?
Hi Stephanie,
Yes on the 11×14 my thin print would sag. I put a small piece of scotch tape behind it and it held fine. For the video I glued the print to the piece of cardstock that came in the envelope with the print and that worked good too. If you decided to put glass or acrylic in front of the print (like I show in the 8×10 https://www.hertoolbelt.com/easy-farmhouse-style-picture-frame-8×10/ ), then the glass or acrylic gives it the extra support. Hope that helps.
Hi , will you be selling these frames their beauiful❤️
Hi! Working on this for a Christmas gift and was wondering why you stain, then apply the pre-stain conditioner. Want to make sure I do everything in the correct order. Thanks!
Hi Barb,
My staining method was a complete accident, but I like how it turned out. I wanted grayish brown wood like reclaimed lumber. I started out with the wood accelerator and it turned it a nice gray, but it is too gray for my beige house. I added a little dry brushing of Kona to the edges and a little here and there. I wanted to blend the Kona into the gray, I grabbed a rag and rubbed a little pre stain conditioner on and it turned the gray into that nice brown color. I’m sure I didn’t do anything ‘right’, but I like the finished product :-).
Do you have instructions for holding a 12×12 ?
Not yet 🙂
How much did cost to make?
It depends on what grade of wood you buy. I bought the cheap furring strips. The wood cost me about $6, and the nail heads $3. I had the rest of the supplies.
What about for pictures that are Landscape? Any ideas for modifying this to support landscape photos vs portrait?
Thank you so much for this idea, I asked all my kids to send me 8×10 for Christmas and my husband to make them for me, I have to do 8×10 because there are 11 grandchildren and I want them on the same wall, I read the comments above I was also wondering about the glass so think my question was answered, my husband Christmas early Christmas presents were new tools to make then
That will be fun to have all of the grandkids up on one wall. Here’s the plan for 8×10, I used glass or plexiglass in the 8×10 post https://www.hertoolbelt.com/easy-farmhouse-style-picture-frame-8×10/
Amy,
Great project for all the free pallet lumber I have. One question! Where did you get the decorative nails? Or at the least what size are they. Keep up the great work and posts.
Hi Matt,
You can purchase them either here
or here
I am so excited about this project. We have 12 girls getting together this coming weekend to make these. Should be fun! Heading to Home Depot tomorrow to get some supplies.
Where did you get the decorative nail heads ?
Never mind! I read the comments second instead of first
My husband and I made this project and we actually finished it for a change! :-). It turned out great. Thanks so much for the instructions and link to the nail heads. We made ours much bigger, 25×36 and plan to put pictures from our adventures and change them up frequently. We made one for each side of our living room fireplace. Great project!! So happy with the results!
Thanks for this idea. My teens at church will be making this for there vbs project next summer.