• Home
  • Project Gallery
  • About me
    • Disclosure
    • Disclaimer
  • Blog

Her Tool Belt

DIY furniture plans, crafts, and home improvement tutorials to empower you!

  • Free Woodworking Plans
    • Bathroom Furniture
    • Bedroom Furniture
    • Entry
    • Family Room Furniture
    • Garage
    • Kitchen furniture
    • Laundry Room
    • Mudroom Furniture
    • Organization
    • Outdoor Furniture
  • Home Decor
    • Upcycle
  • Crafts
    • Holiday
  • Home Improvement
    • Cleaning
    • Fix IT
    • Paint
    • Tile
  • Tool Reviews
  • Tool Time Videos

Picture Board

August 5, 2013 by Amy 18 Comments

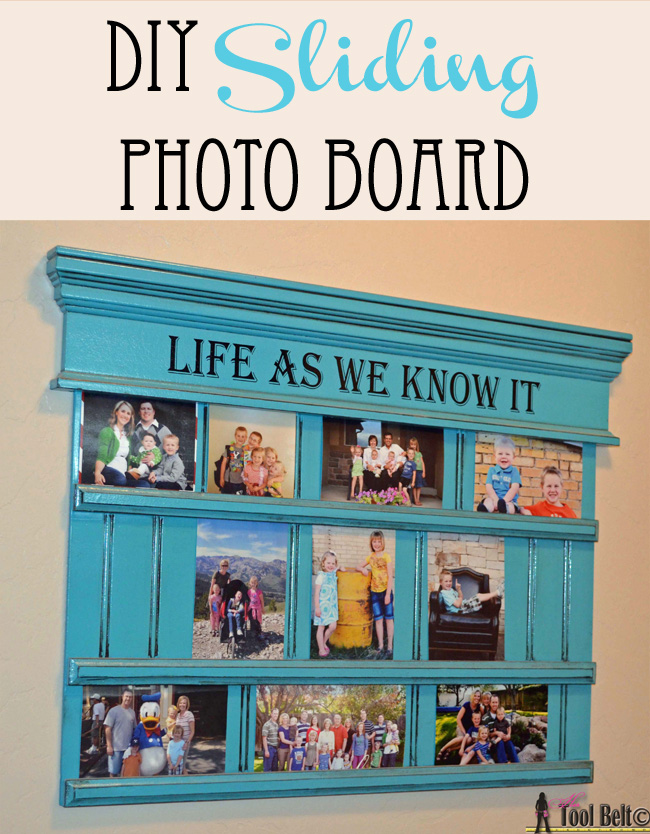
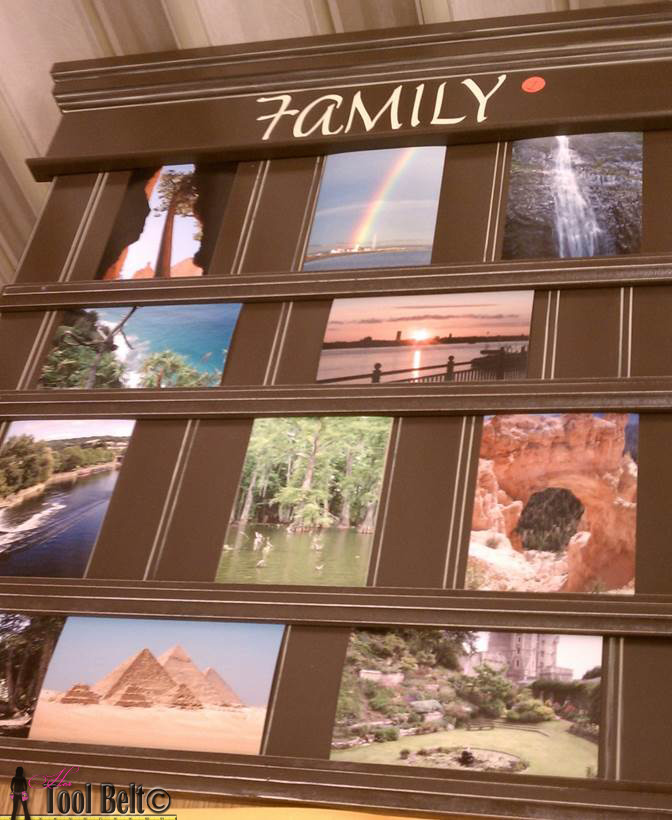
I  started seeing these photo display boards a few years ago at a craft fair.  Of course, they had to be next years Christmas projects, and they were a hit.  Here are the plans for my version.  There is a short and a tall board plan.

Short Board Cut List:

Qty         Measurement                                   Material

1              24” wide x 17” tall                            Bead board sheet

3              24” wide x 1” tall                               ½” mdf (or similar)

1              ~30”                                                 Door header RB4 Stock Building Supply

  1. Cut a piece of bead board 24” wide by 17” tall.
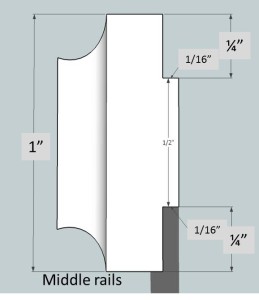
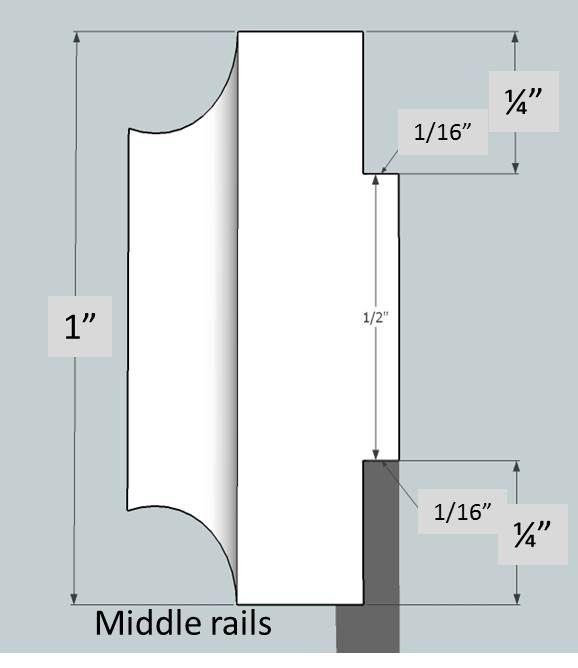
  2. Cut 3 pieces of ½” mdf (comes in a sheet at Home Depot around 2’ x 4’) for the picture rails that are 24” by 1”. In 2 of the rails cut rabbet joints 1/16” x 1/4” on 2 sides bot rail mid rails

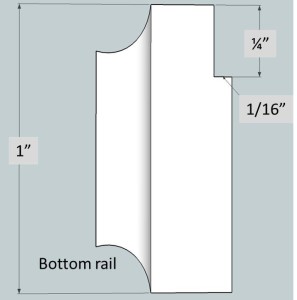
On the 3rd rail cut a rabbet joint 1/16” x 1/4” on 1 side (this is for the bottom rail).  Route around the opposite edge whatever shape you’d like, or round over with a sander.

3. (alternative rail) If you don’t have a router, you can buy 6’ of panel moulding similar to
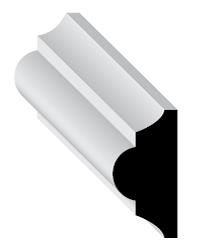
 panel moulding.
Cut 3 pieces 24” long and cut the moulding so it is 1” wide.  Make rabbet joints like in section 2.

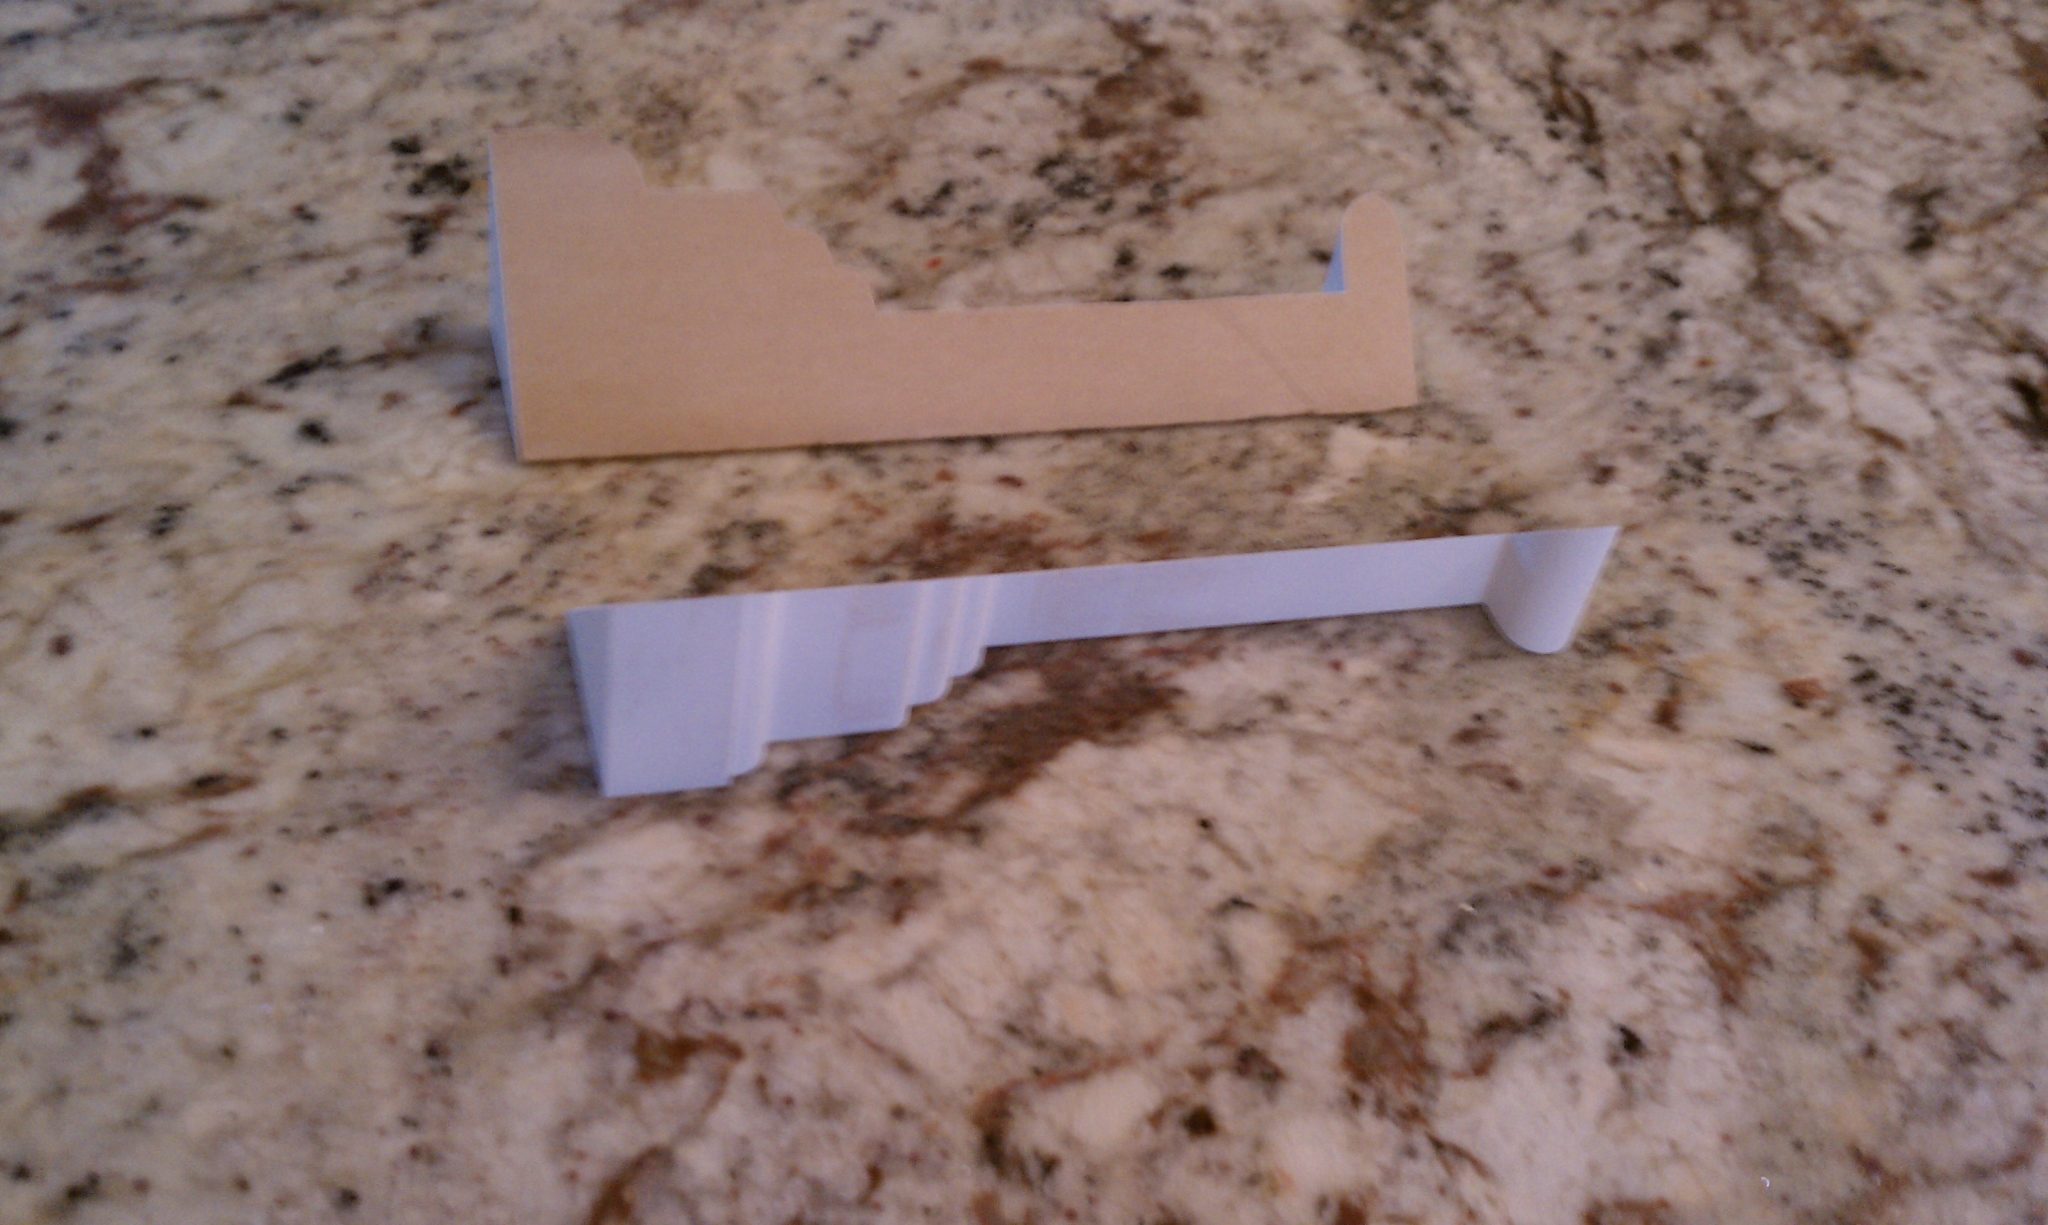
4.  My favorite molding for the top of the board is the RB4 door header from Stock building supply.  Lowe’s has a similar shape, but it is much shorter.  Cut the main piece of top molding on 45 deg angles.  The backside of the moulding should be 24” long.

cut top molding

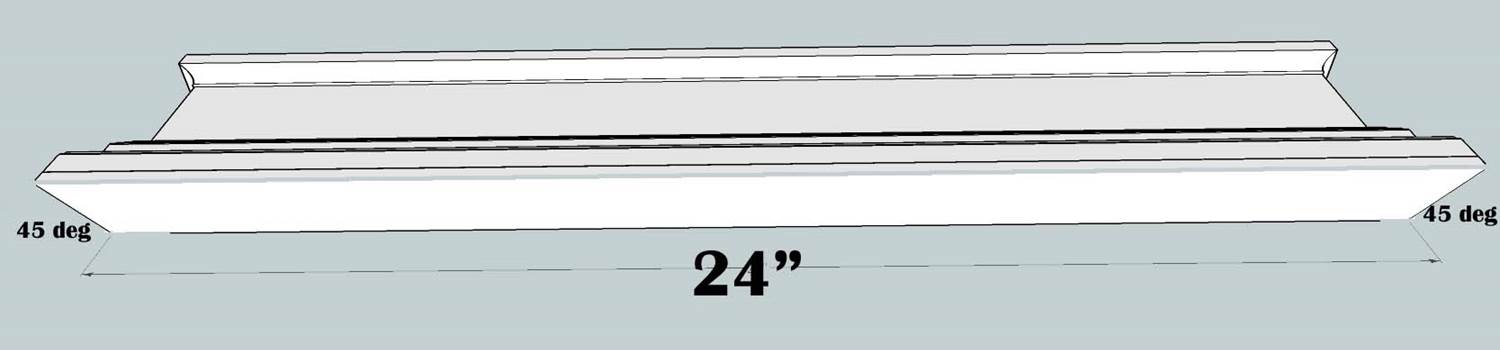
Cut 2 pieces for end caps at 45 deg.

IMAG0384 IMAG0389

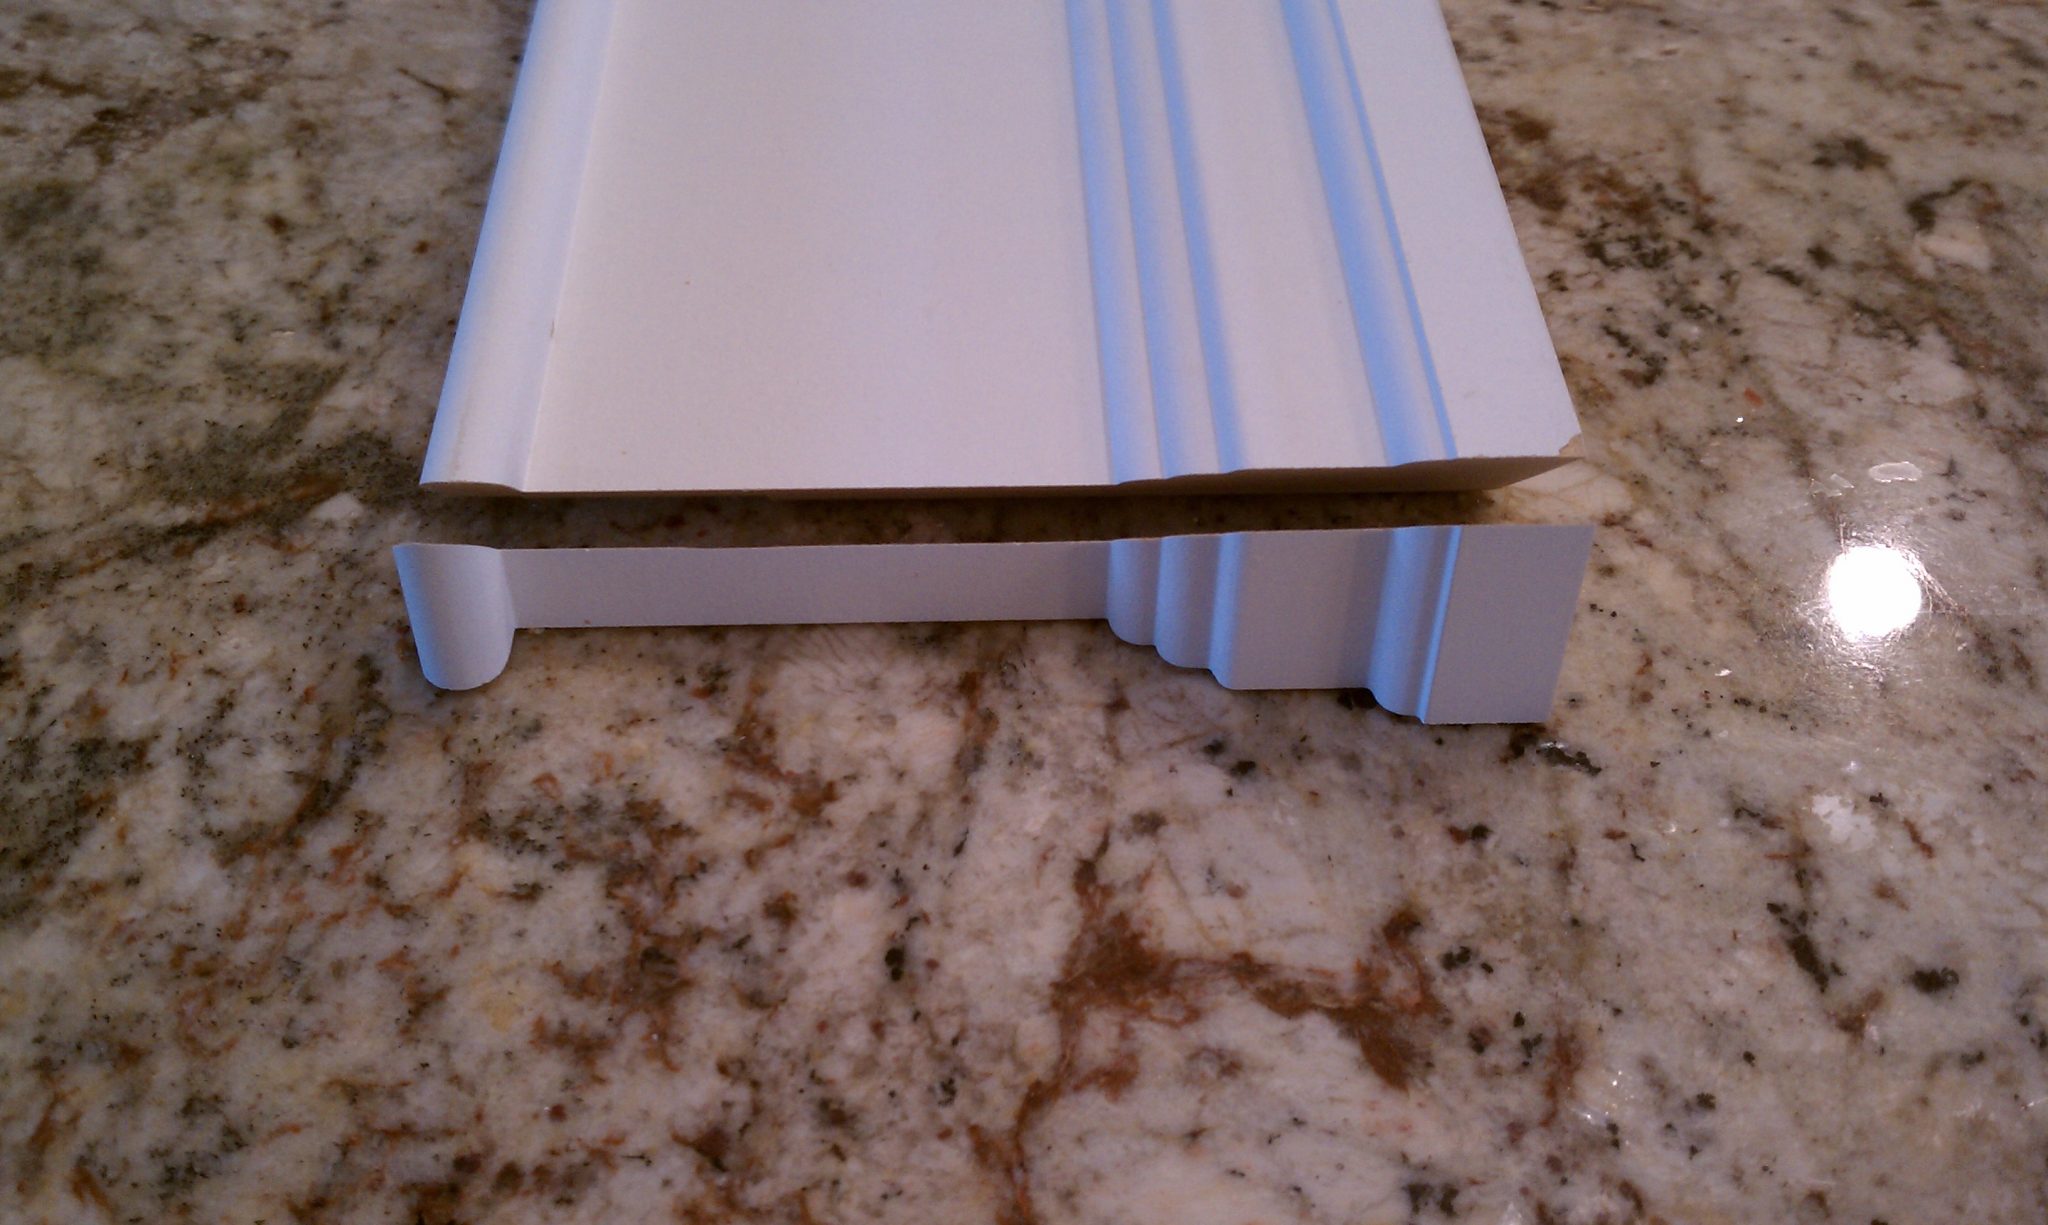
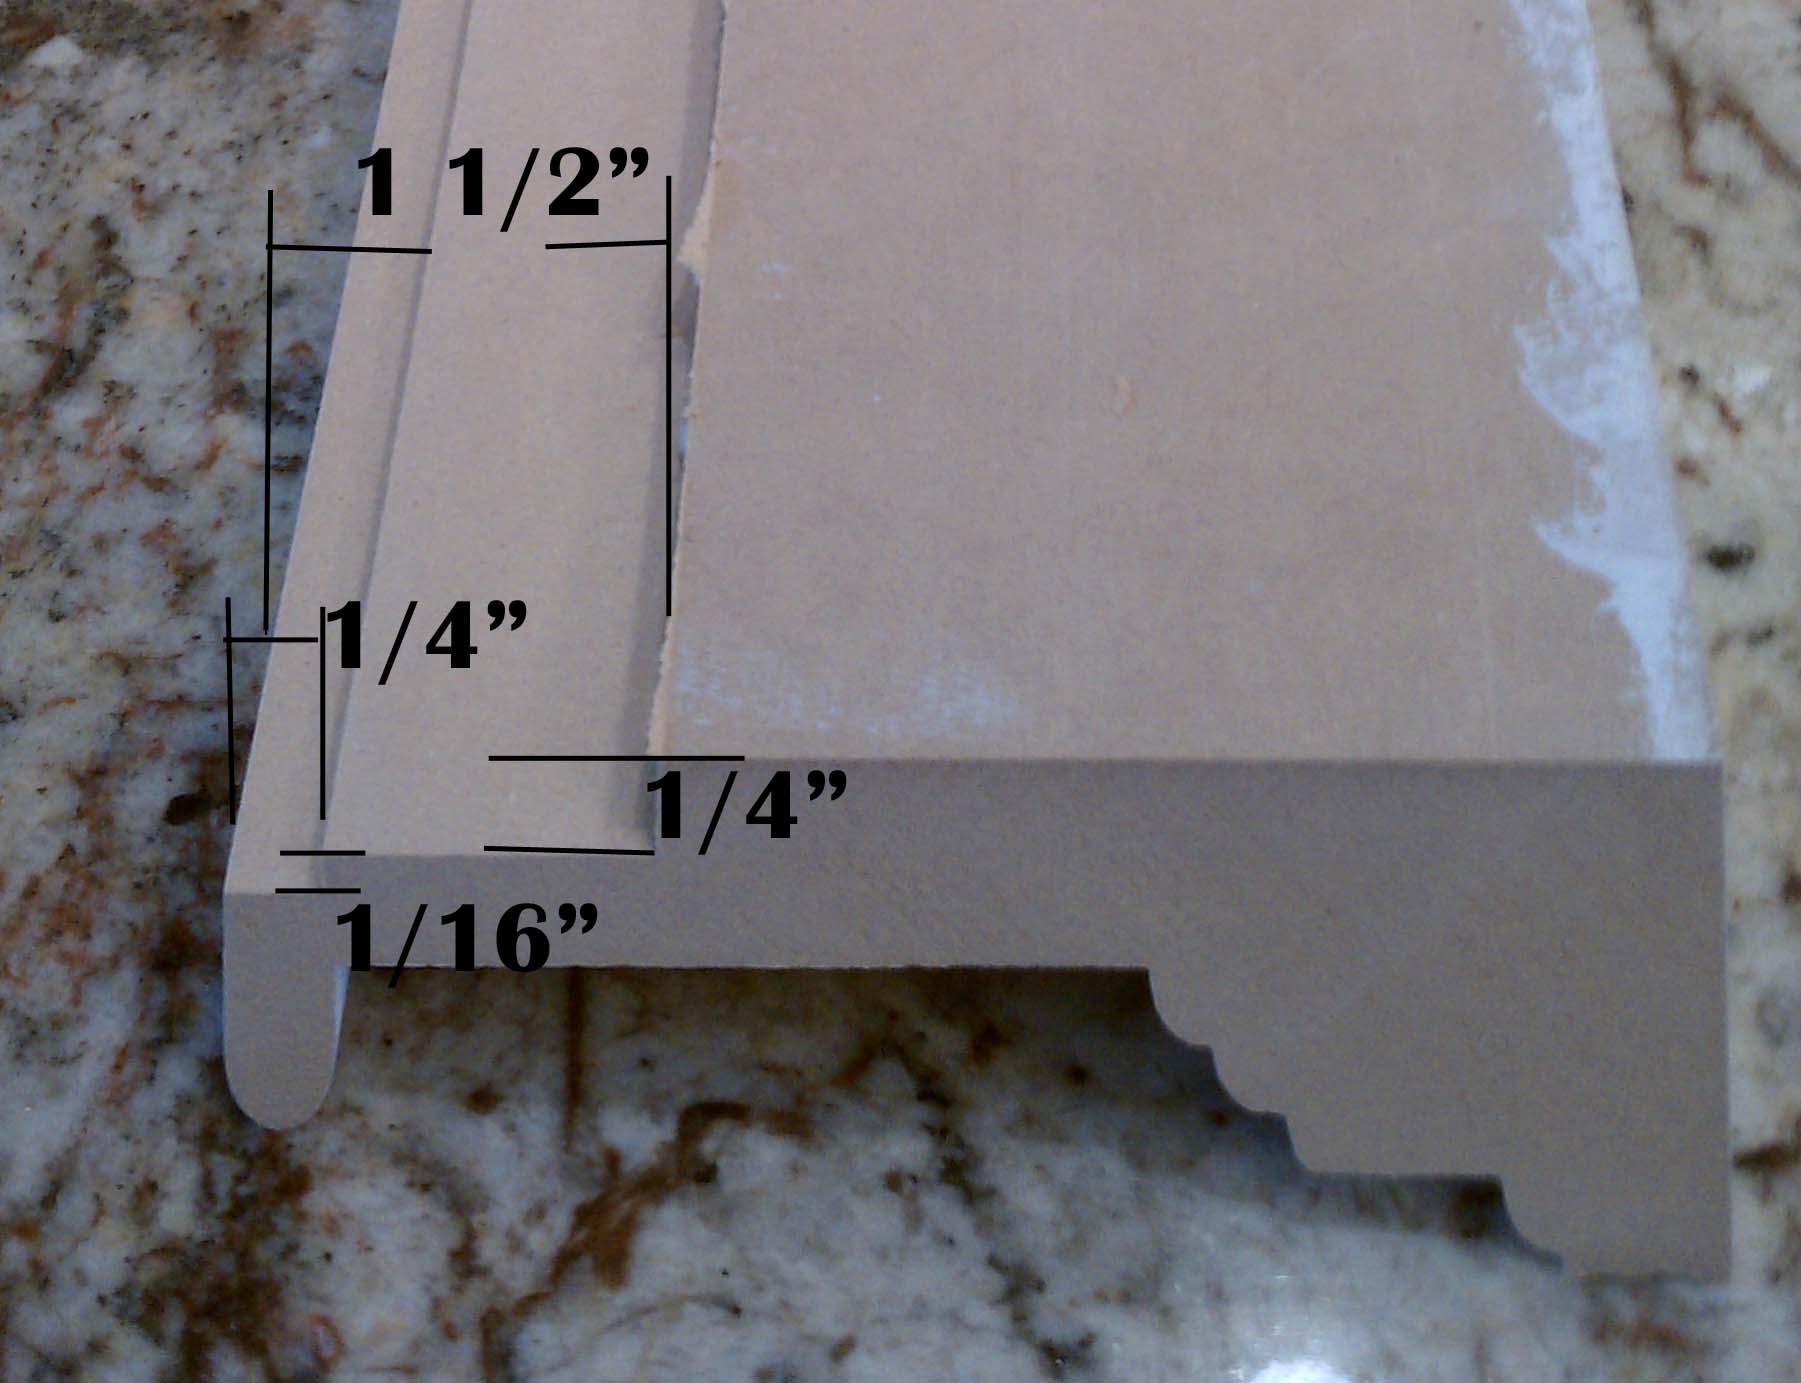
In the 24” top molding cut 2 rabbet joints. On the backside at the bottom, cut a rabbet that is ¼” deep and 1 ½” high.  Then another that is 1/16” deep and ¼” high.  (I usually cut these with multiple passes on the table saw.

top moulding rabbet

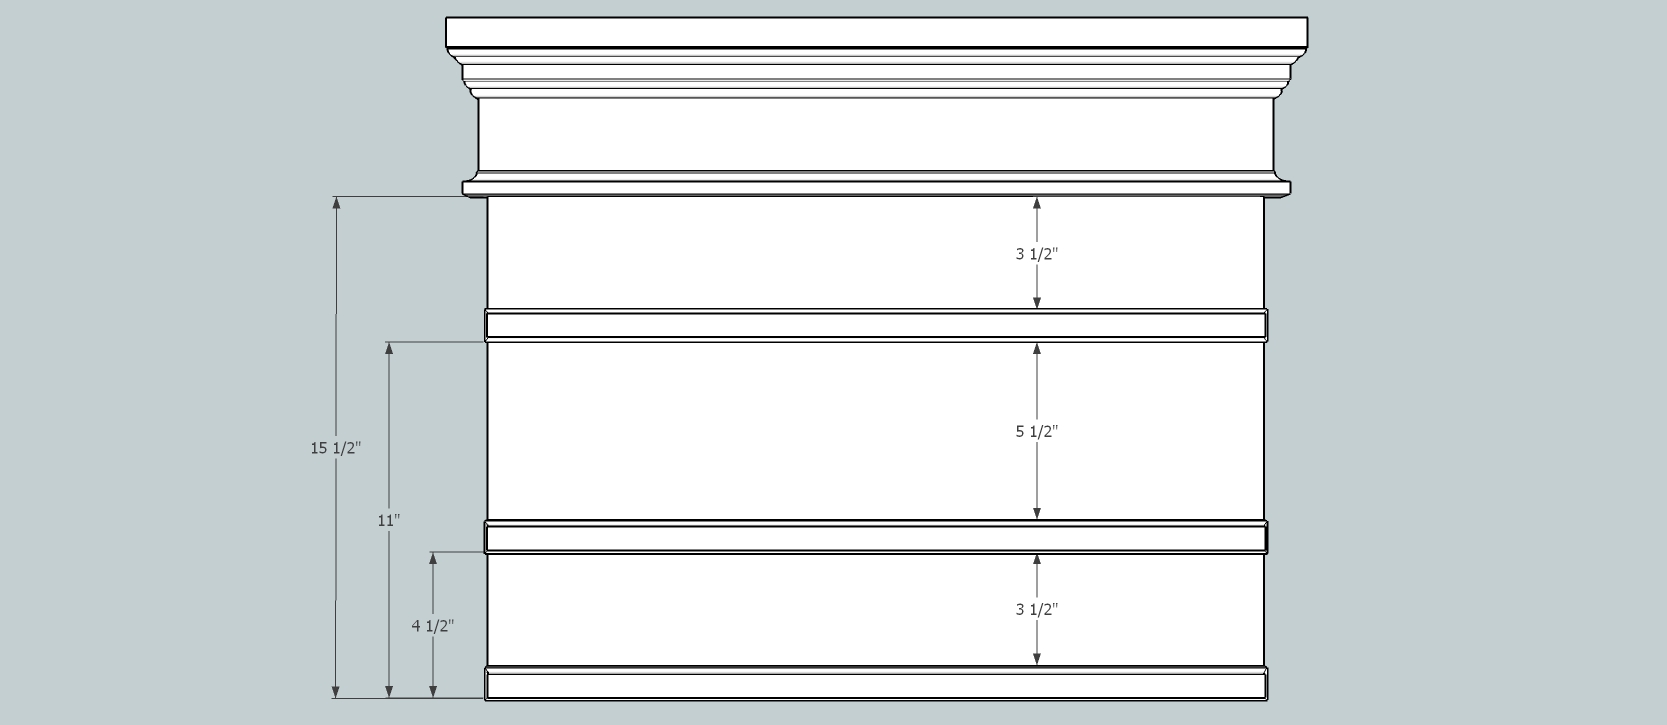
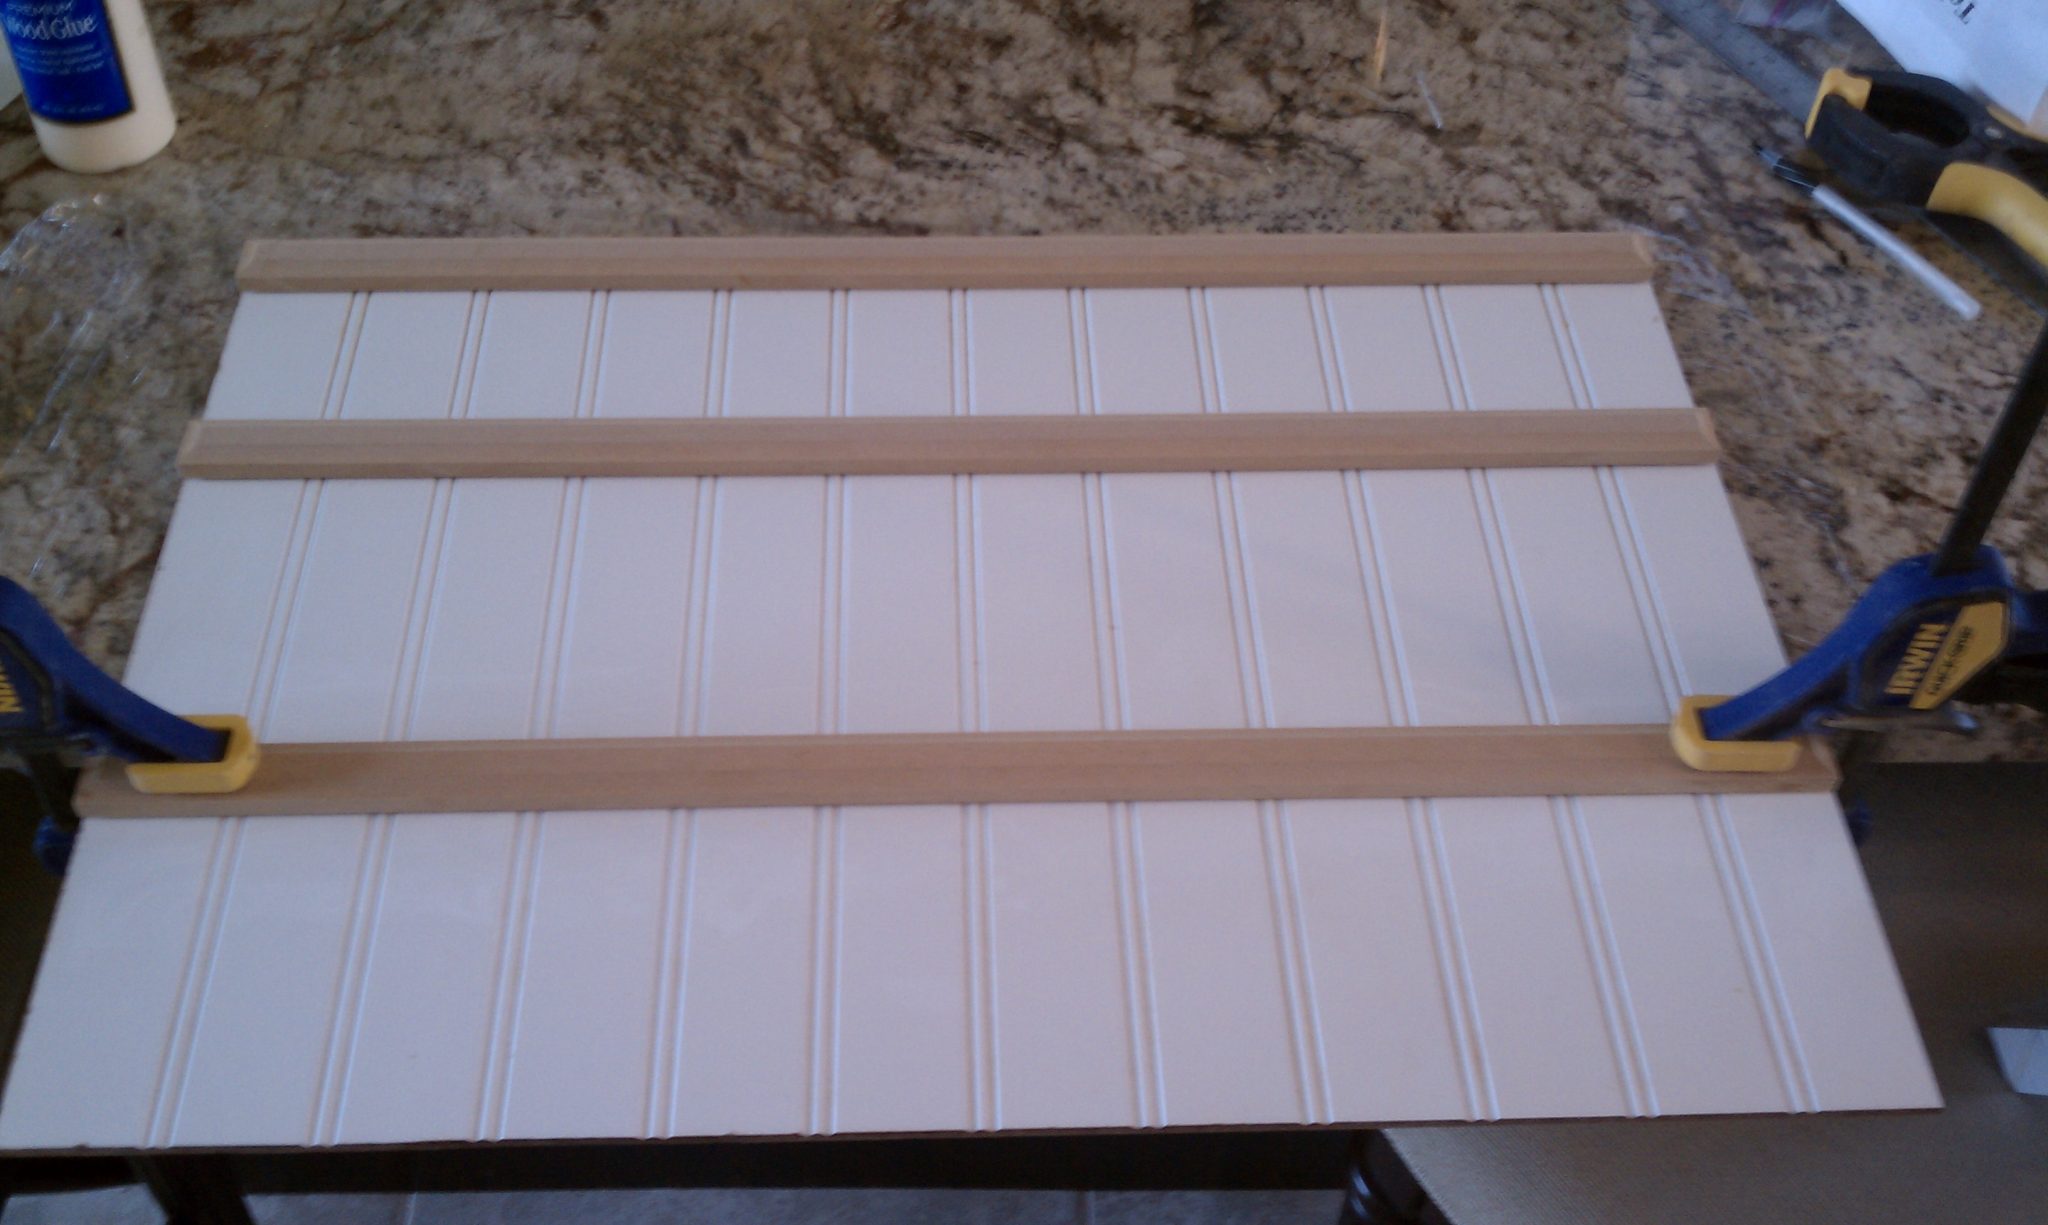
5.  Assembly time:  Make sure the bottom rail (with only one rabbet joint) goes on the bottom.
Try not to get glue in the rabbet joints (grooves) where the pictures slide.  Using the following dimensions and wood glue, glue and clamp each rail and top moulding in place.  Allow glue to dry, minimum 1 hr.

short assmebly dim

short glue and clamp

IMAG0391

6.  Glue the top moulding end caps on.  Allow glue to dry minimum 1 hr.  Clean off any excess glue.

7.  Time for painting.  Since the rails are made from mdf they Must be primed before painting.  MDF will soak up your paint, and the finish will look different than the rest of the board if not primed. Give the rails a couple of coats with latex primer.  Allow to dry.

8.  I highly suggest using spray paint.  Spray paint goes on smooth, and gives the board a nice finish.  Allow your spray paint to dry.

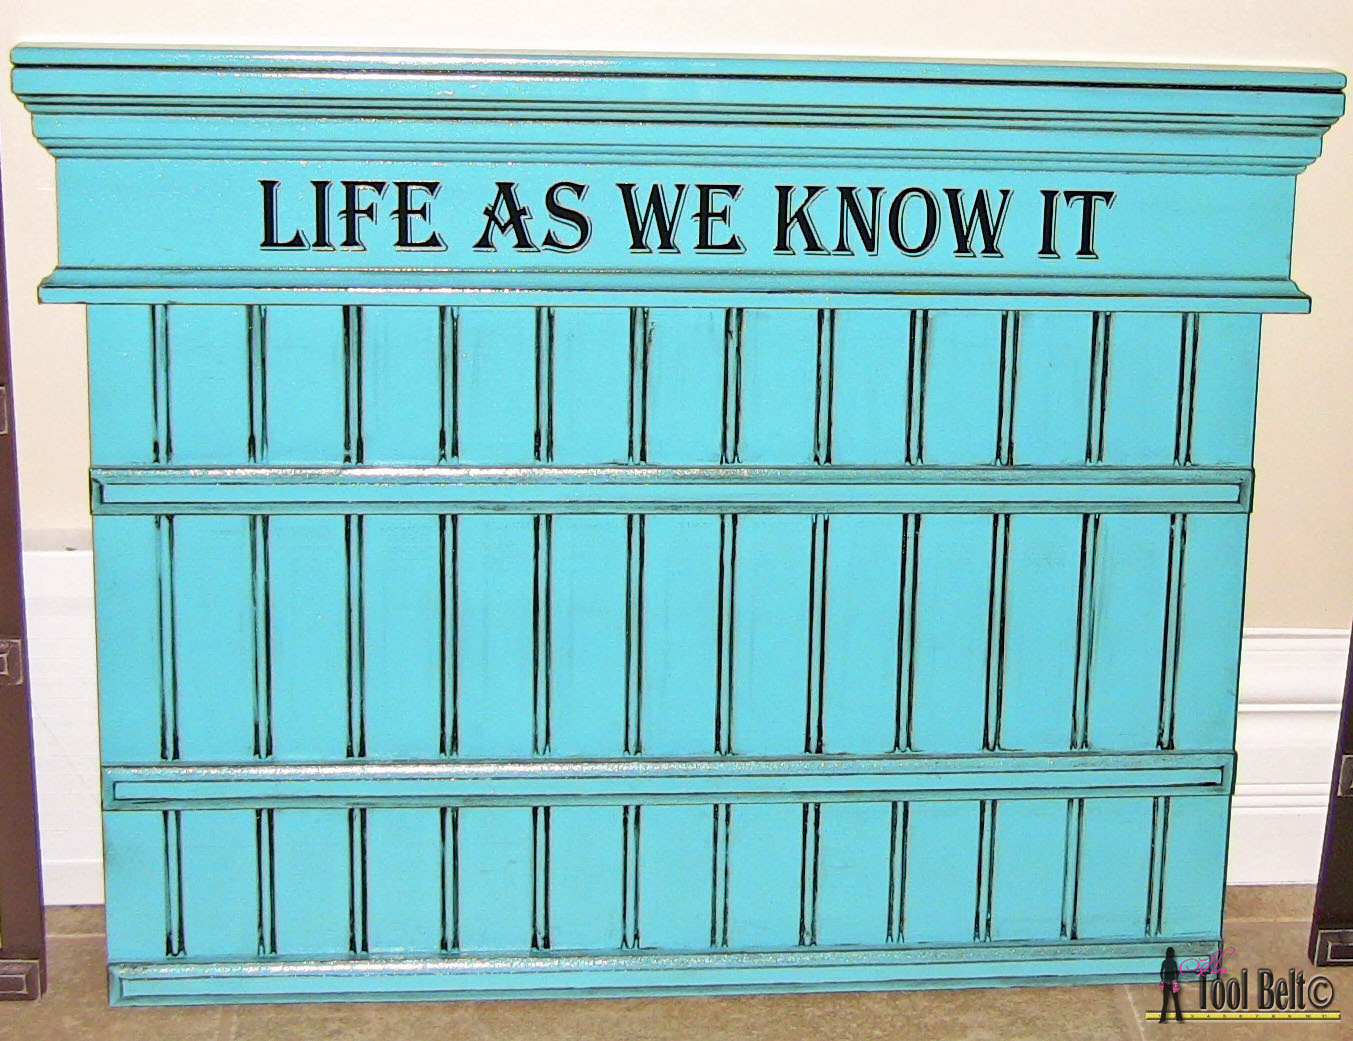
9.  Apply antiquing glaze.  With a foam brush, paint glaze into grooves and corners.  Use a damp rag/paper towel remove excess glaze, and a dry rag/paper towel to clean up surfaces leaving glaze where you want.  Allow the glaze to dry.

10.  Apply a vinyl saying.

11.  To hang the board, I like to use a keyhole router bit (so I’m not buying hanging hardware for each project).  But picture frame hangers will do.

12.  Show off your new picture board with your favorite 4×6, 6×4 prints.

Pin it for later

DIY sliding photo board for pictures on hertoolbelt

Blue picture board - no photosPDF Plans for Short Picture Board


brown sliding photo boardPDF Plans for Tall Picture Board


Related

Filed Under: Free Woodworking Plans, Home Decor, Organization Tagged With: bead board, frame, free plans, interchange, picture, picture display, vinyl

Attention: Any do-it-yourself project involves risk of some sort. Your tools, materials, and skills will vary, as will the conditions at your work site. Hertoolbelt LLC will not assume any responsibility or liability for damages or losses sustained or incurred in the course of your project or in the use of the item you create. Always follow the manufacturer's operating instructions in the use of tools, check and follow your local building codes, and observe all commonly accepted safety precautions.

Comments

  1. Pam Draper says

    October 10, 2013 at 10:55 am

    These are beautiful……thank you for publishing the directions !! Will make both, hopefully soon 🙂
    Thanks again. Pam

    Reply
  2. laurendaisycottage says

    July 28, 2014 at 12:43 pm

    Great idea! Thanks for the how-to! I’d be thrilled if you’d link up at this week’s Off the Hook!

    Reply
  3. kristi@ishouldbemoppingthefloor says

    July 28, 2014 at 3:53 pm

    This is really great, Amy! Such a neat way to display family photos! Thanks for the great tutorial!

    Reply
  4. bethany says

    July 29, 2014 at 9:25 am

    Ooo I love this so much! Turned out beautiful!

    Reply
  5. countrycottagemusings says

    July 29, 2014 at 2:10 pm

    Love this. Pinned!!

    Reply
  6. Bobbi - 3GLOL says

    July 29, 2014 at 3:02 pm

    How cool!! Never seen them before now!! Plus, your plans and stuff…all pro like!!

    Thanks for sharing!

    Reply
  7. Bernadyn Nettles (B) says

    July 30, 2014 at 8:27 am

    Wow, I love this idea and never seen these, either! You did a great job and included clear instructions. I could see why these are a hit! Found you at Creative Spark Linky Party and pinning. 🙂

    Reply
    • Amy says

      July 30, 2014 at 8:40 am

      Thank you!

      Reply
  8. melindacaldwell says

    July 31, 2014 at 7:00 pm

    Stopping by from Twirl & Take a Bow link party. This is such a great idea! It’s always nice to be able to change photos. Pinning!

    Reply
  9. Gina says

    August 2, 2014 at 2:26 pm

    Saw your post over at Strut your Stuff Saturday! I love this project! Thank you so much for posting the directions!
    Gina @ Always Savory

    Reply
  10. Bobbie says

    August 5, 2014 at 3:40 pm

    Love this idea! I shared it in my latest roundup and features on my blog today:
    http://www.avisiontoremember.com/2014/08/decorating-on-budget-ideas-plus.html

    Thanks again for linking up to the Creative Exchange link party! Hope to see you again this thursday!

    Reply
  11. mypapercraze says

    August 5, 2014 at 4:54 pm

    Both your picture boards are fabulous! Your tutorial makes me think I could actually pull this off. Thanks for sharing with Creative Spark Link Party, I hope you’ll join us again tomorrow.
    Glenna @ My Paper Craze

    Reply
  12. Gwen says

    March 8, 2015 at 8:44 pm

    i salvaged about 20 of these tops of doors and they are too shallow to put much on them as shelves – they will be perfect as the top of these photo boards! thanks for the idea!

    Reply
  13. Barb Schwarz says

    September 23, 2015 at 4:39 am

    I know there are sites you can order similar types of boards to be.made but I don’t have the names of those anymore. Do you have the names of any sites that make these type of boards???

    Reply
  14. Lacey Steward says

    December 29, 2015 at 1:34 am

    Anyway you could provide a link to the mdd panels and the door header? I’ve searched and can’t find the ones you used. Thank you.

    Reply
    • Amy says

      December 30, 2015 at 1:23 pm

      Here’s a link to the door header http://www.stockbuildingsupply.com/stock/Moulding-Millwork/Casing-Door-Window-Moulding/Primed-MDF-Casing-RB4-1-1-4-x-5-1-4/p/MDFCRB4PR

      You can get the 1/2″ mdf in small sheets 2’x4′ http://www.homedepot.com/p/Unbranded-1-2-in-x-2-ft-x-4ft-Medium-Density-Fiberboard-1508108/202089097 or by the full sheet 4’x8′.

      Reply

Trackbacks

  1. Thursday S.T.Y.L.E. Link Party #32 - Well-Groomed Home says:
    August 6, 2014 at 10:54 pm

    […] Picture Board […]

    Reply
  2. Thursday STYLE Link Party #32 - A Prudent Life says:
    August 7, 2014 at 7:00 am

    […] Pick:  Picture Board by Her Tool […]

    Reply

Leave a Reply Cancel reply

Your email address will not be published. Required fields are marked *

This site uses Akismet to reduce spam. Learn how your comment data is processed.

Search Her Tool Belt

Follow Me!

  • Bloglovin
  • Email
  • Facebook
  • Google+
  • Instagram
  • Pinterest
  • RSS
  • Twitter
  • YouTube

Top Posts & Pages

Custom Drill Storage and Charge Station - Easy
Cordless Drill Storage - Charging Station
Wood Bunny Easter Basket
Pallet Planter Box For Cascading Flowers
$5 Blanket Ladder
Wood DIY LOVE Marquee Letters
Kid's Step Stool
How to Build a Redwood Pergola with Arch Detail

Check out more projects

Copyright

Thank you for wanting to share my work! No need for my permission to pin my work or to feature 1 or 2 pictures with full watermarks intact that link back to the original project. Please do NOT copy tutorials.

Disclosure & Privacy Policy

Disclaimer

Copyright © 2023 · Magazine Pro Theme on Genesis Framework · WordPress · Log in

This website uses cookies to improve your experience. We'll assume you're ok with this, but you can opt-out if you wish.Accept Read More
Privacy & Cookies Policy

Privacy Overview

This website uses cookies to improve your experience while you navigate through the website. Out of these, the cookies that are categorized as necessary are stored on your browser as they are essential for the working of basic functionalities of the website. We also use third-party cookies that help us analyze and understand how you use this website. These cookies will be stored in your browser only with your consent. You also have the option to opt-out of these cookies. But opting out of some of these cookies may affect your browsing experience.
Necessary
Always Enabled
Necessary cookies are absolutely essential for the website to function properly. This category only includes cookies that ensures basic functionalities and security features of the website. These cookies do not store any personal information.
Non-necessary
Any cookies that may not be particularly necessary for the website to function and is used specifically to collect user personal data via analytics, ads, other embedded contents are termed as non-necessary cookies. It is mandatory to procure user consent prior to running these cookies on your website.
SAVE & ACCEPT