Hi! I’d love for you to follow me on Pinterest Her Tool Belt and if you love instagram, you can keep up with me there too!
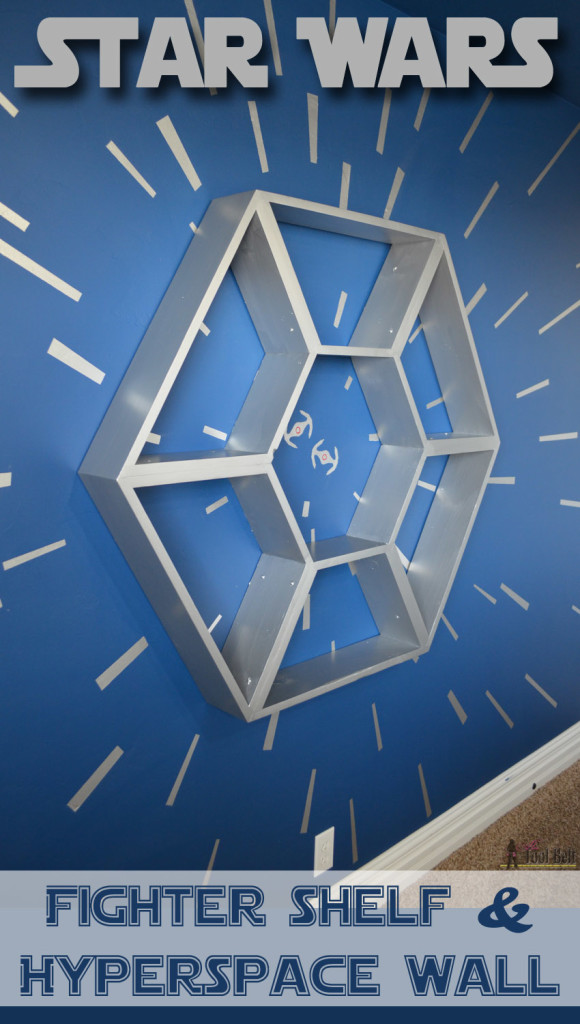
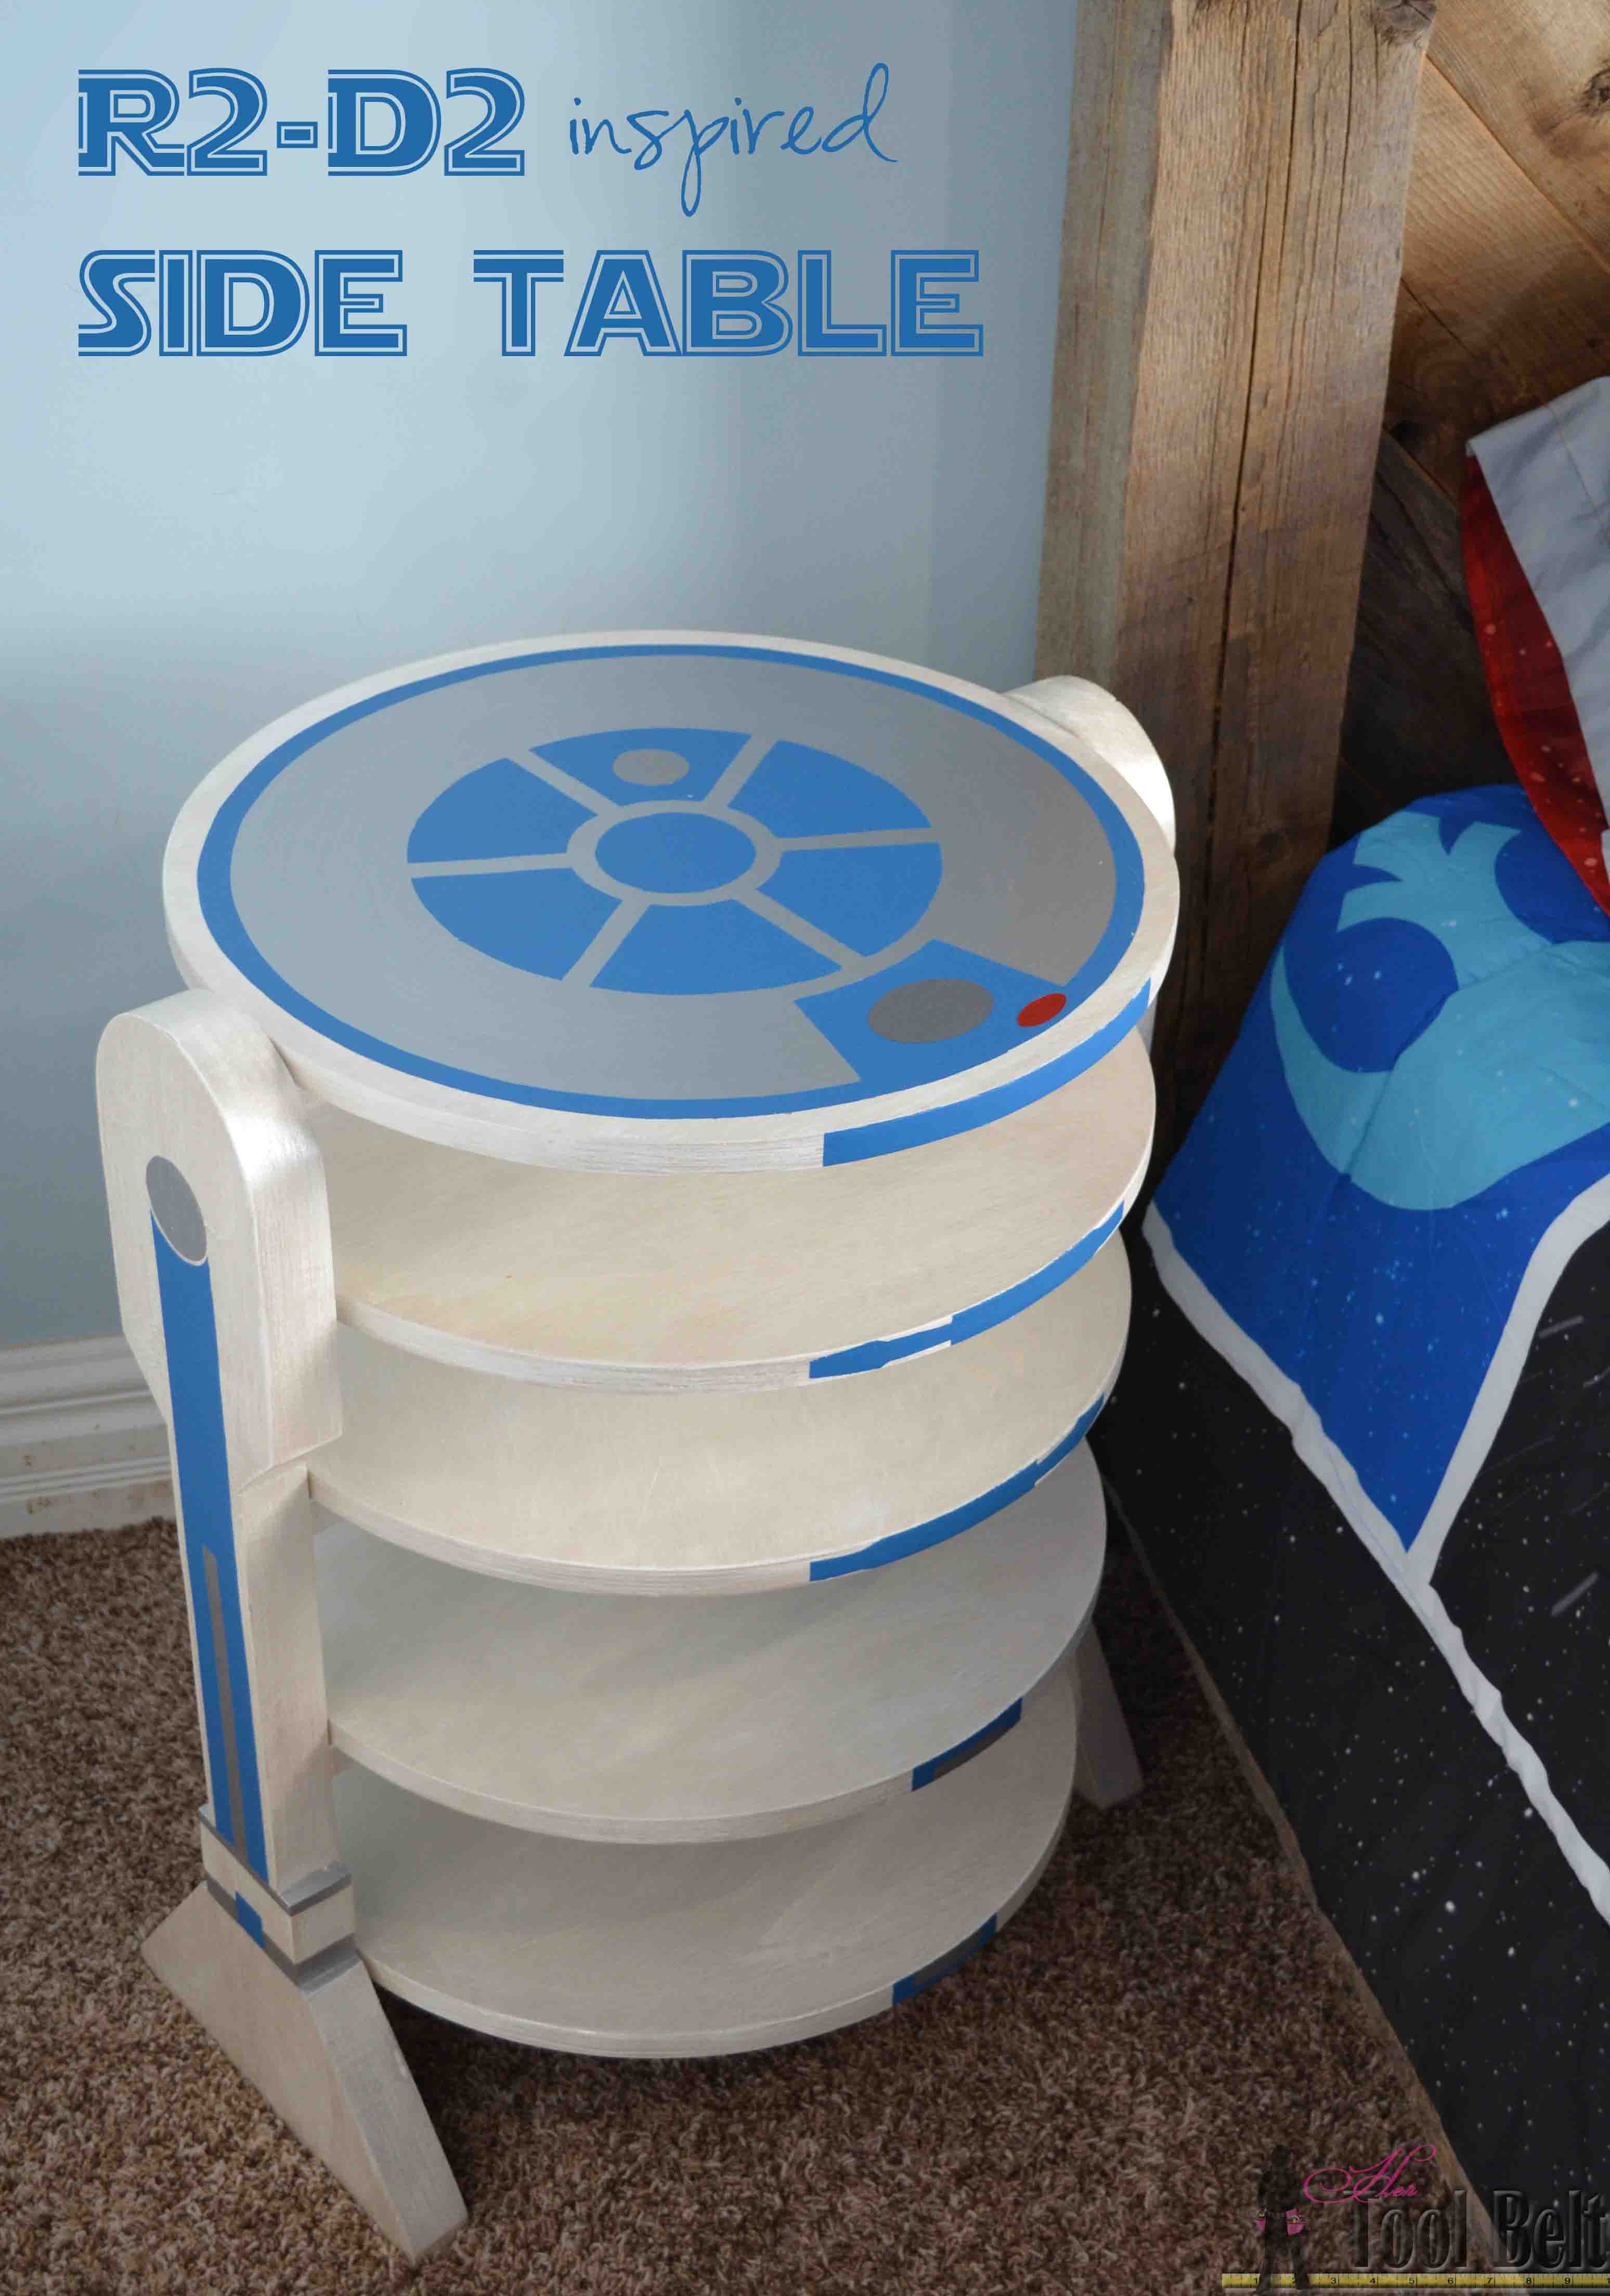
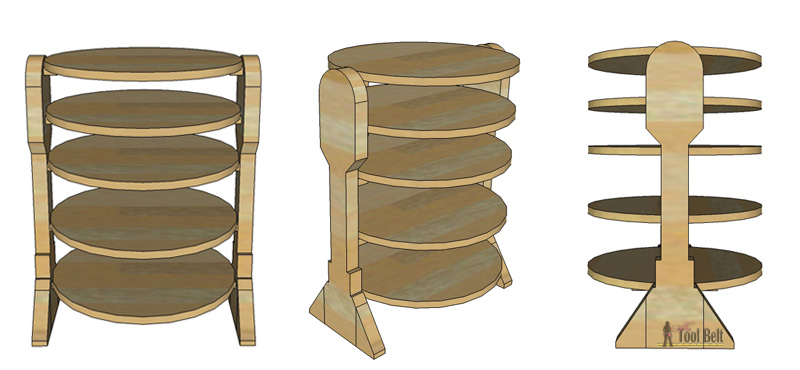
My little boy loves robots. Someday he hopes to design robots for fight bots (he’s 6). For years his very favorite robot has been R2-D2 (Artoo Detoo if you’re hardcore). A couple of years ago I got this idea for an easy R2-D2 side table, it’s not a replica by any means, just a novelty side table. It ties in really well with his Star Wars fighter shelf and hyperspace wall.
R2-D2 Side Table
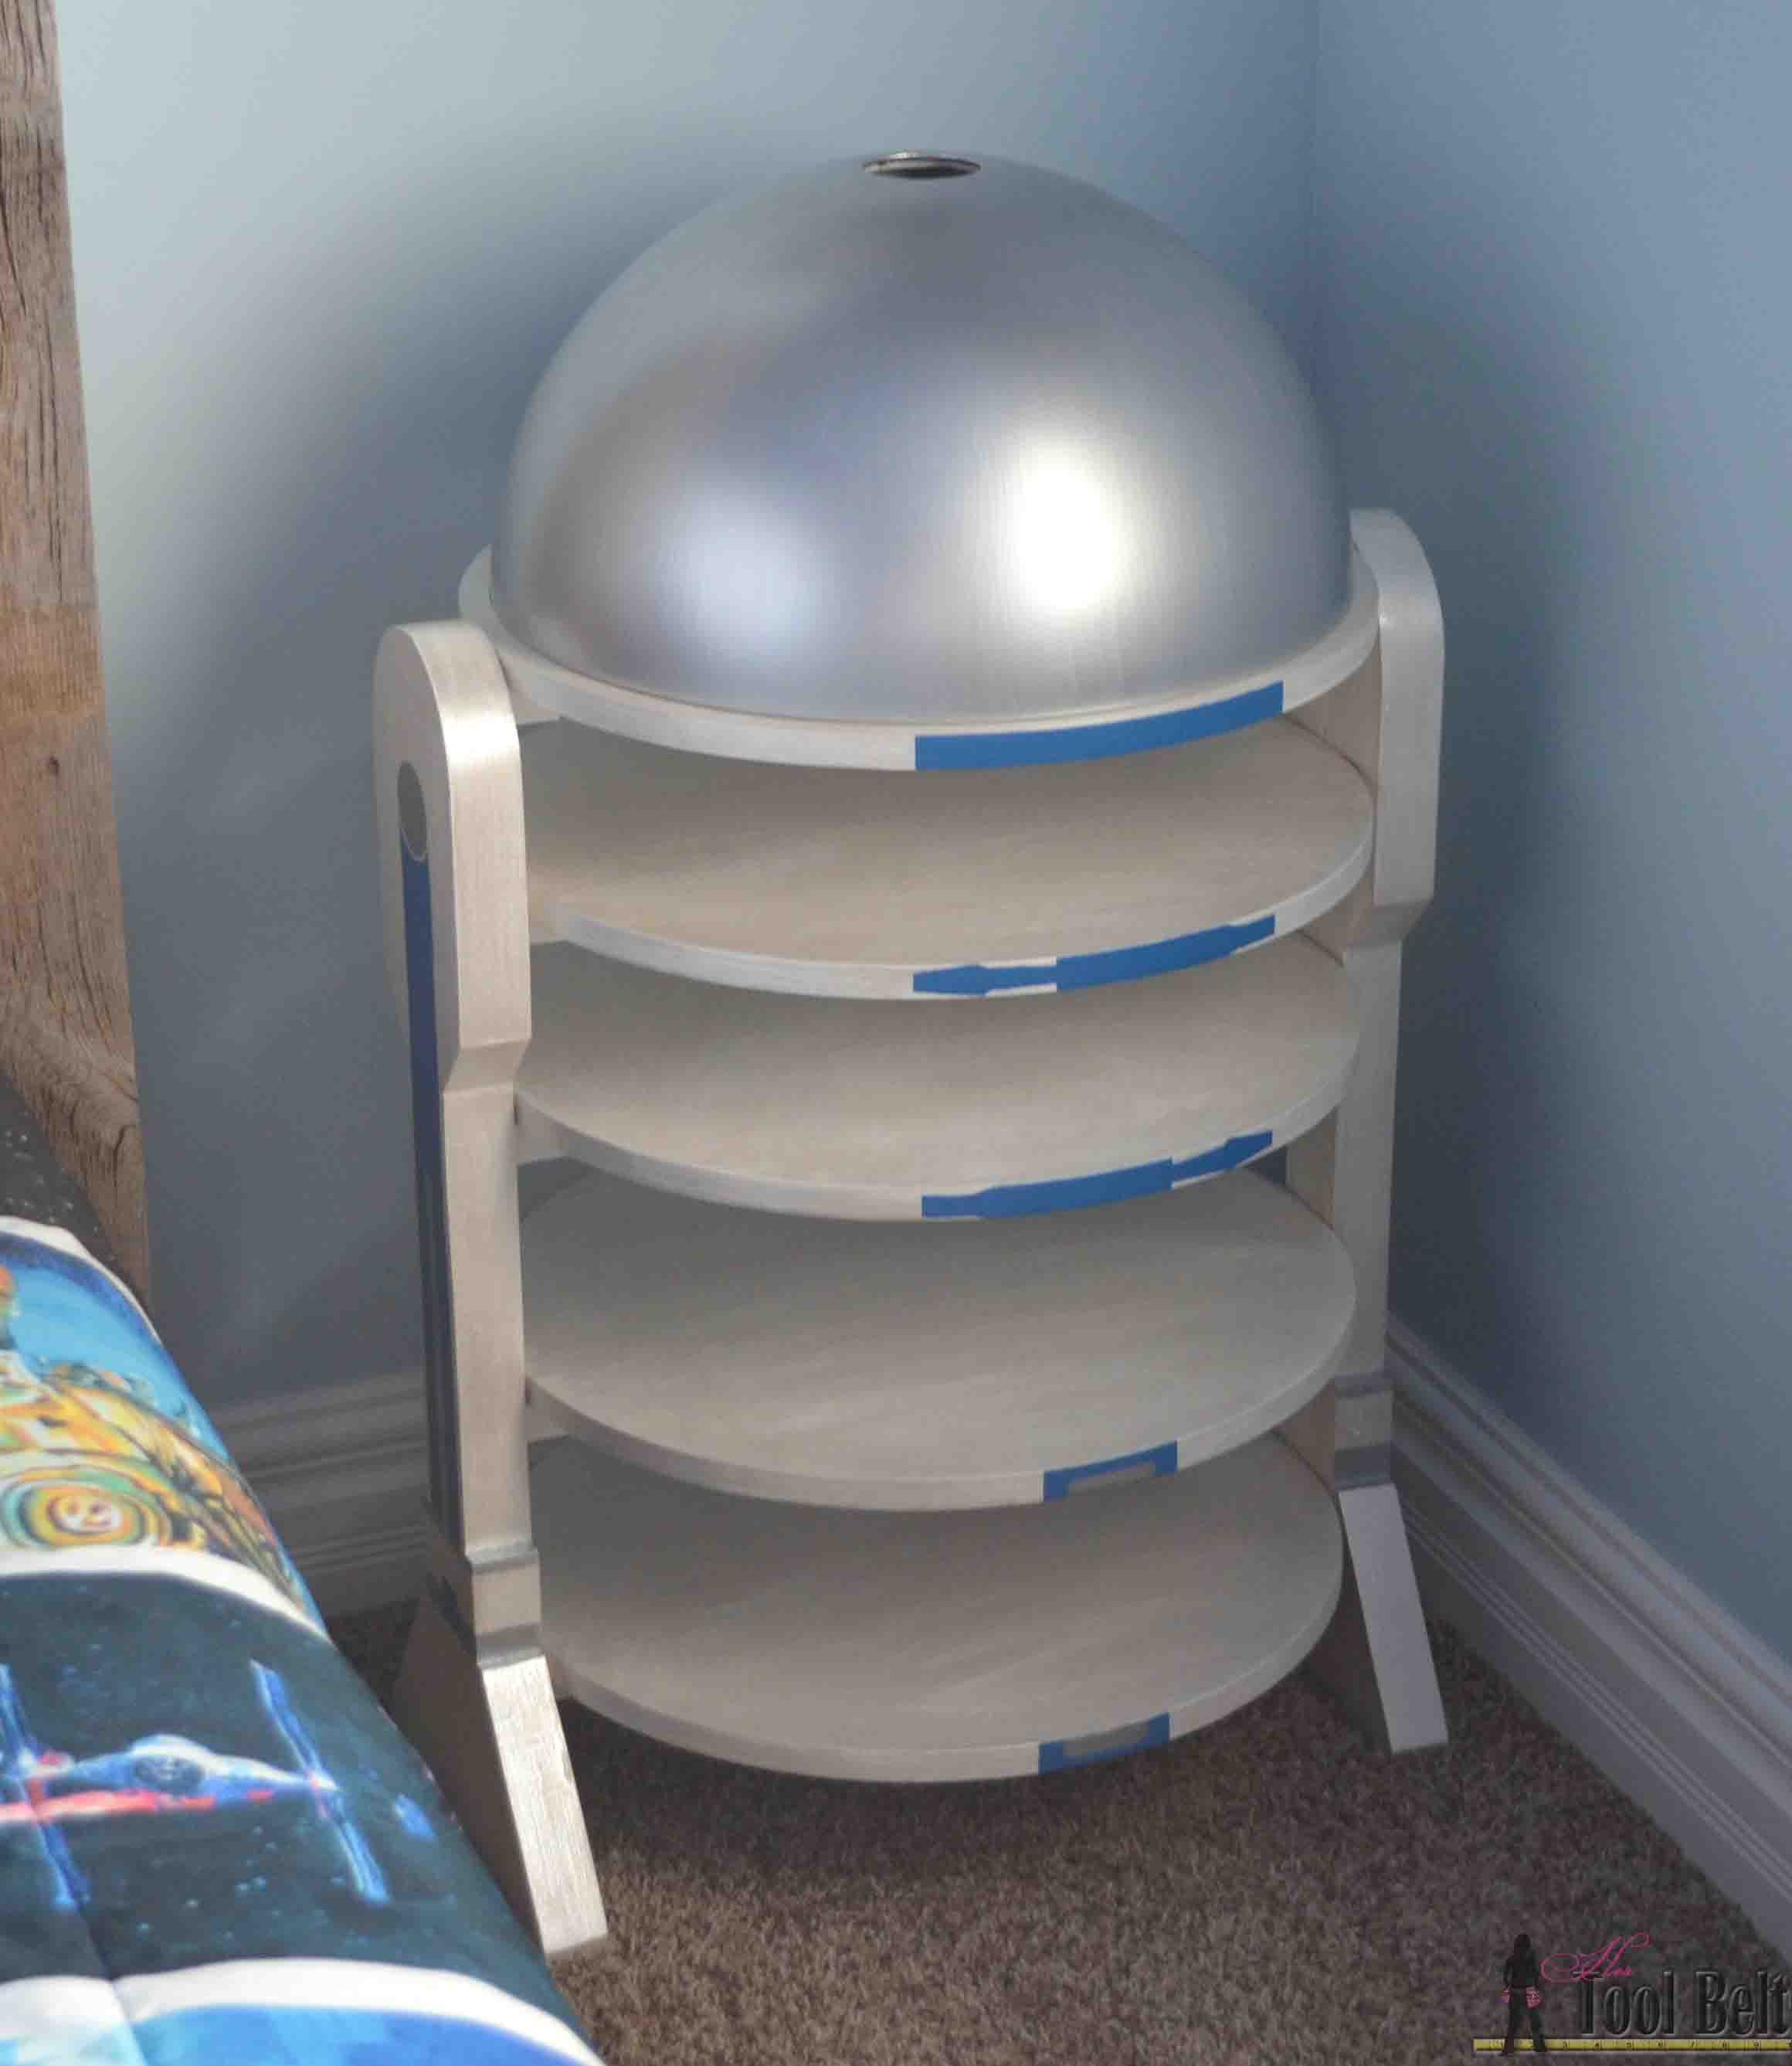
I’m still working on R2-D2’s head, which I’m planning on making a lamp.
Video of painting the details on R2-D2.
This post contains affiliate links noted by*.
How to Build a R2-D2 Side Table

Materials
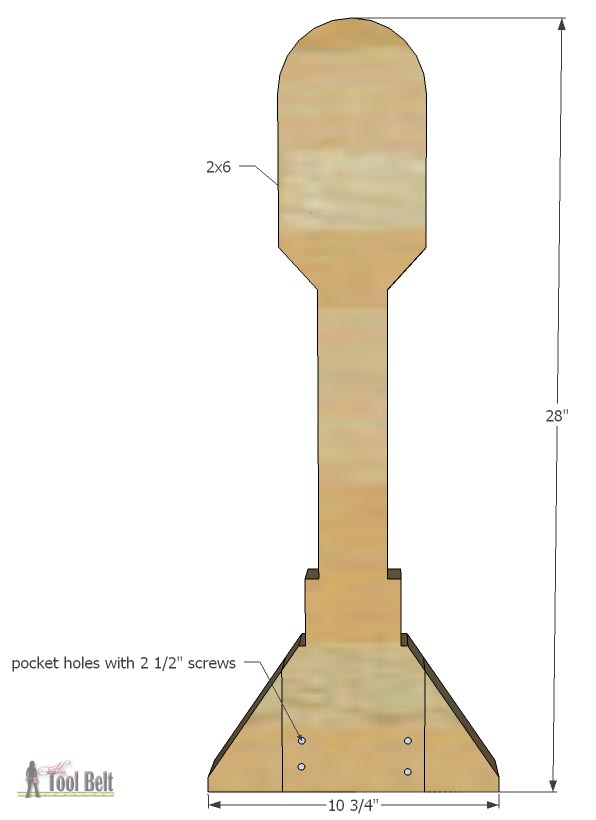
- 1 – 2″ x 6″ x 8′ board (actual 1 1/2″ x 5 1/2″)
- 1 – 1″ x 3″ x 6′ board (actual 3/4″ x 2 1/2″)
- 1 – sheet 3/4″ plywood (4′ x 8′) or 5 wood rounds (these are 17 3/4″ and should work fine, but a little smaller than what I did)
- 2 1/2″ screws (I like self tapping screws)*
- 1 1/4″ screws (I like self tapping screws)*
- wood glue*
- spackle*
- wood filler*
- sandpaper
- Paint (This is what I used: Primer – Zinsser, Paint – Behr ultra pure white, MM Oyster metallic* paint, MM Silver metallic* paint, MM Sashay red* metallic paint, Valspar midnight sonata (lightened a little), Americana Decor relic.) Most of these paints I had left over from the hyperspace wall.
Step 1
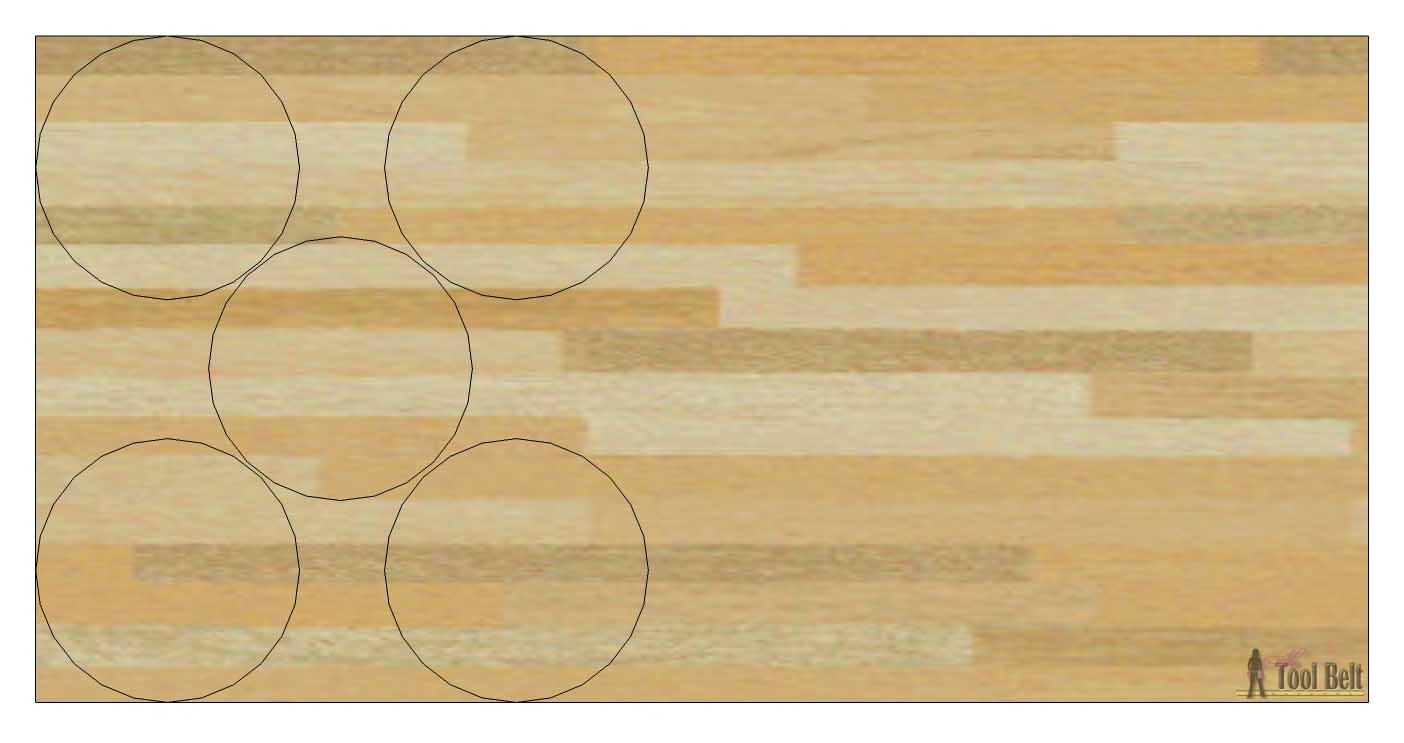
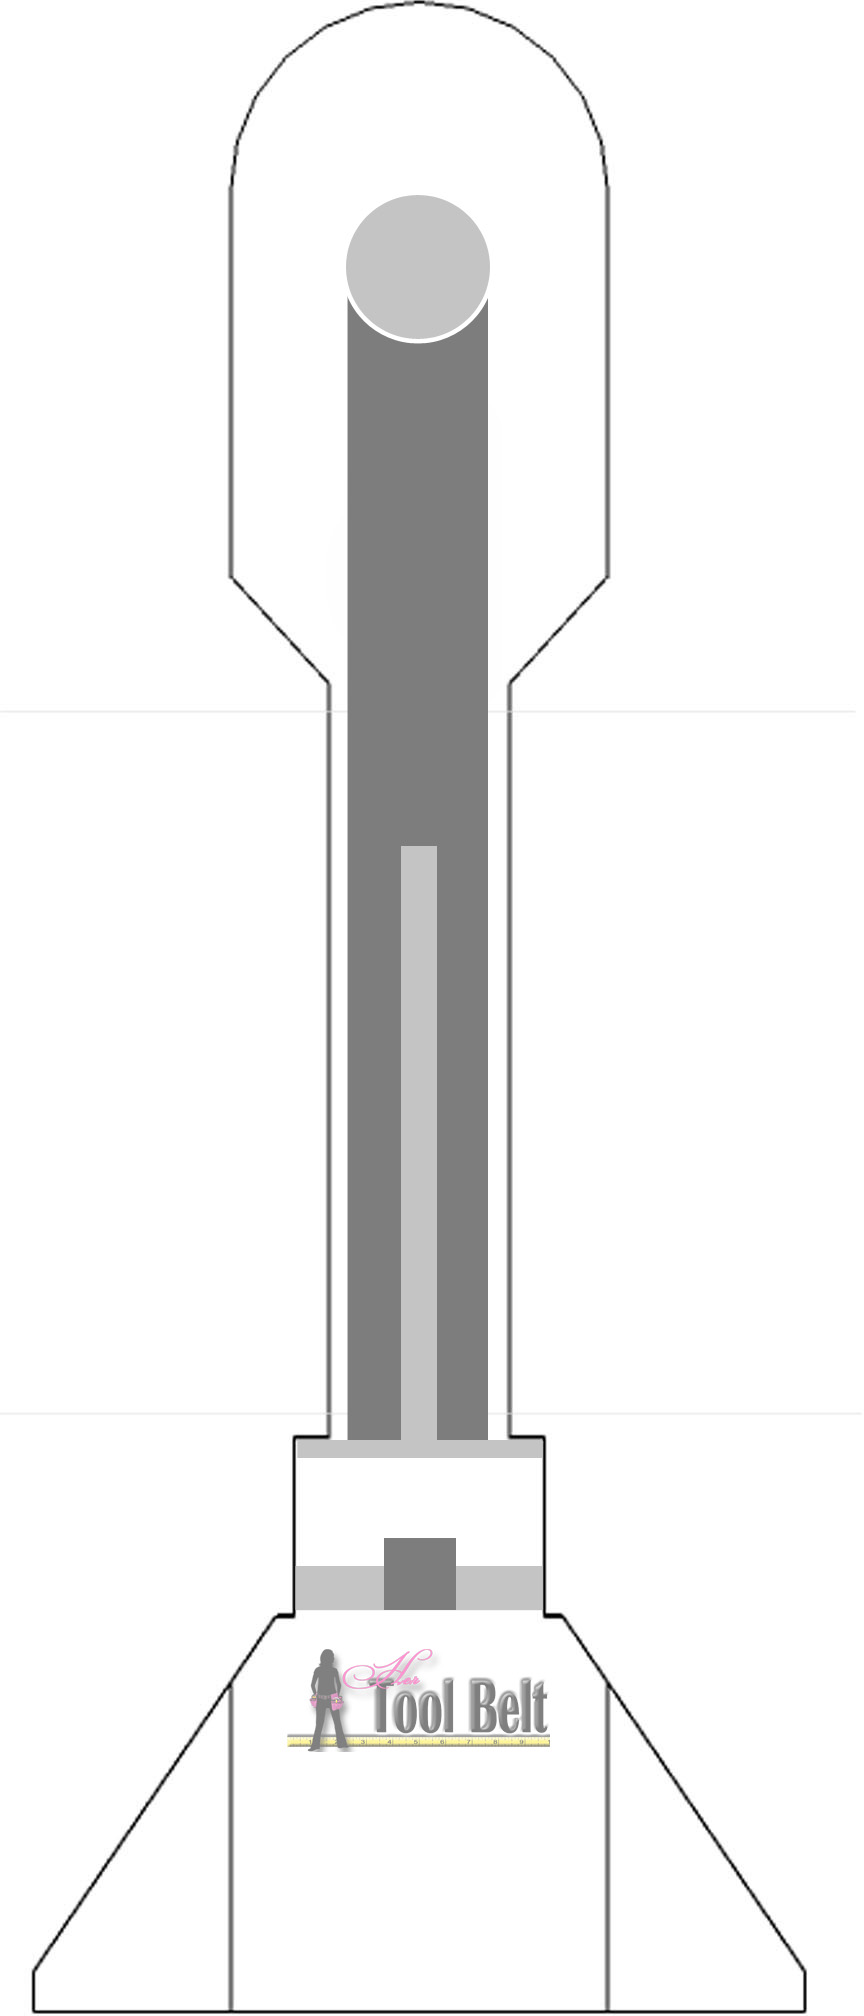
Download and print 19″ circle pattern (make sure the printer is set to 100%, not ‘fit to page’.) 2D R2D2-head pattern Line up the circle, tape together then cut out. Trace circles on the plywood and use a jig saw, scroll saw or band saw to cut out. (You can also use a router with a circle jig.) Sand the edges so they are smooth. When I’m painting plywood edges, I like to use my finger to make a skim coat of spackle to fill any voids. I let the spackle dry then lightly sand it. This will help give a nice smooth painted edge.
Step 2
Download and print the leg pattern R2D2 leg-pattern. Line up the pattern, tape together and cut out. Trace 2 leg patterns onto the 2×6, you’ll need to trace 4 of the triangle bases separately. Use a jig saw, scroll saw or band saw to cut out the leg pieces. Drill pocket holes* in the base of the legs to attach the extended triangle pieces. Use wood glue and 2 1/2″ pocket hole screws to attach 2 triangles to the base of each leg. Use wood filler to fill and pocket holes, cracks or blemishes and allow to dry. Sand the legs smooth.
Step 3
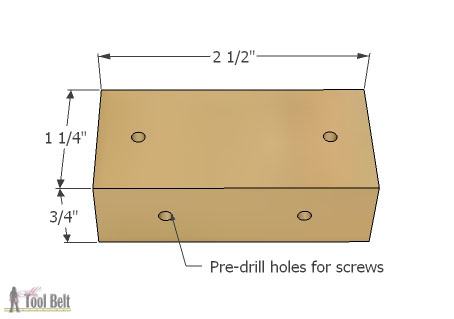
Cut 10 pieces of 1×3 at 1 1/4″ long. Drill pilot holes for the screws, 2 through the 3/4″ side and 2 through the 1 1/4″ side. Stagger the holes, so the screws won’t try and hit each other.
Attach the shelf supports to the legs. These are the measurements I used for the table, adjust as you’d like. If I were to build another one, I might try and make the top 3 shelves closer together??? Center each shelf support on the leg, and use wood glue and 2 1/2″ screws to secure on the leg.

Step 4
(You may want to prime and paint the table before assembly.)
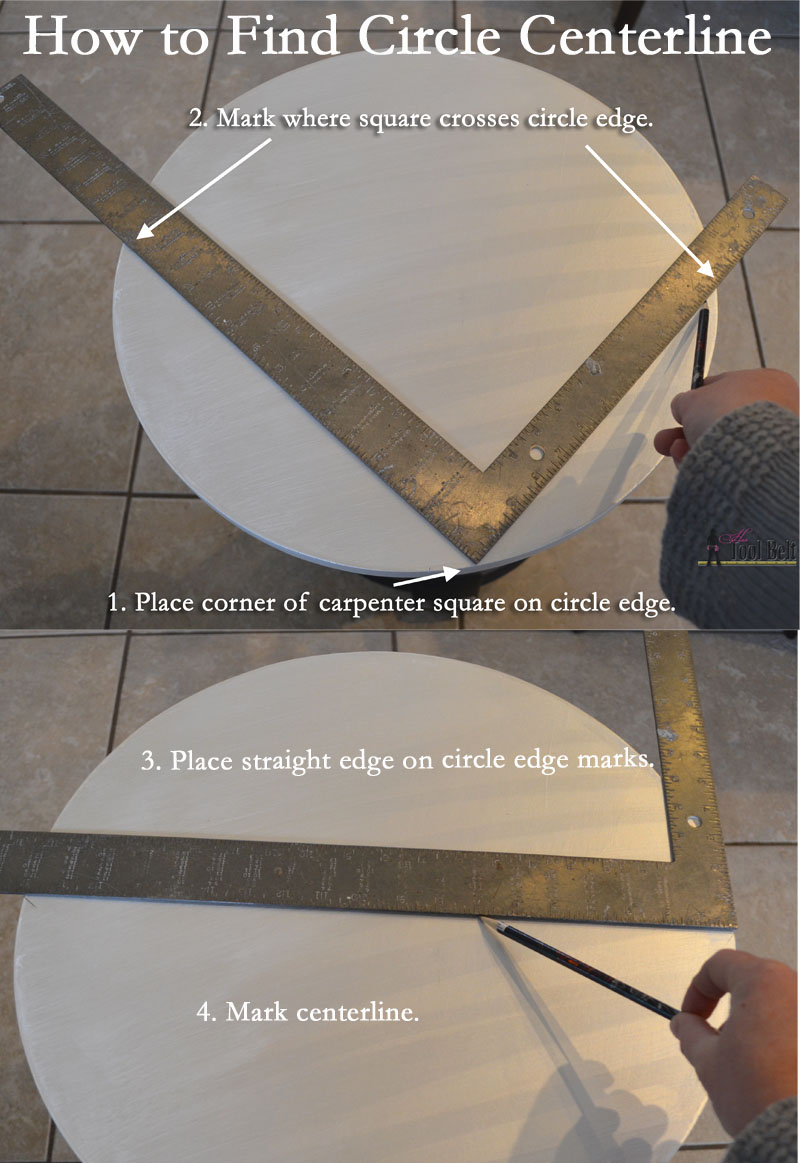
Find the center line of each round shelf. Here’s a quick tip for finding the centerline of a circle.
Turn the legs upside down, place the first shelf on the ground and use wood glue and 1 1/4″ screws to attach the shelf to the shelf supports.
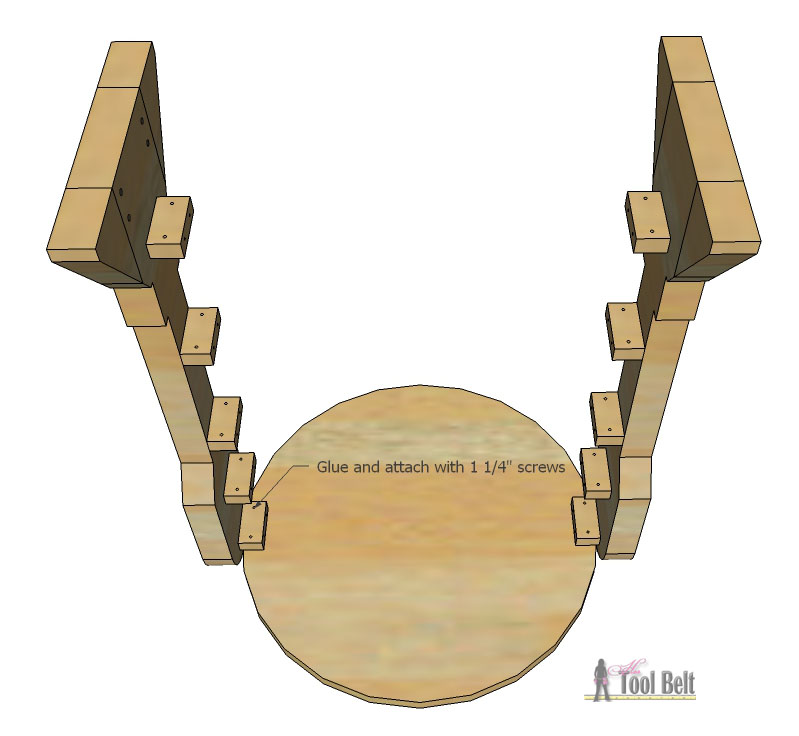
Repeat for each shelf.

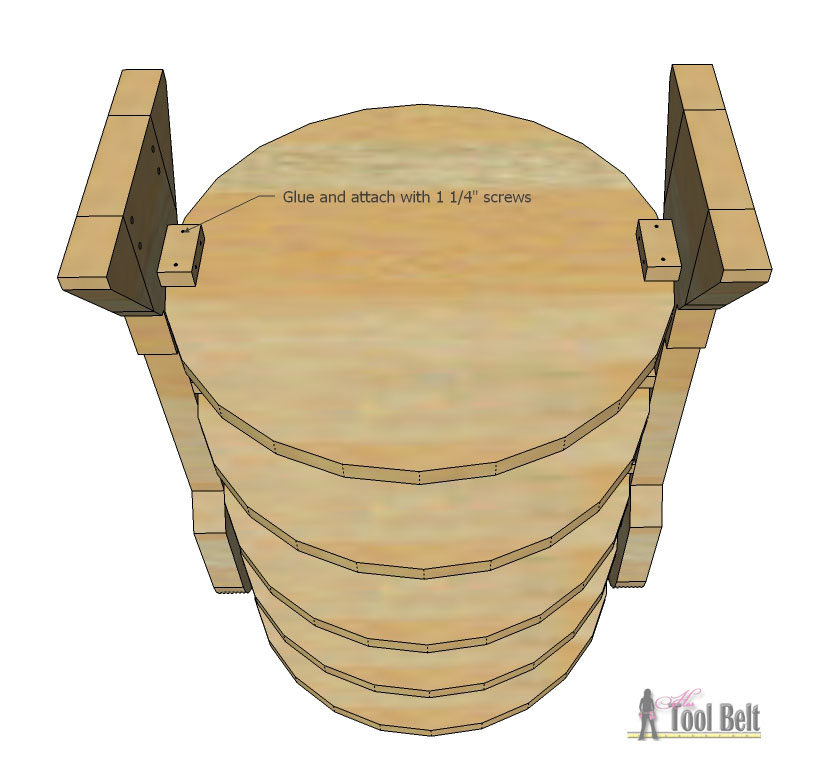
Remove any excess glue and you’re ready to paint.
Step 5
I used a Home Right paint sprayer* to prime and paint the R2-D2 side table white. I wanted to give the white paint a slightly metallic look and had been give a small bottle of MM Oyster semi-opaque metallic paint at a conference, so I used that on top of the white. It did give the white a nice pearl finish, but may have turned it more yellow than I was hoping for. I would probably skip this step next time, although I do like the metallic finish.
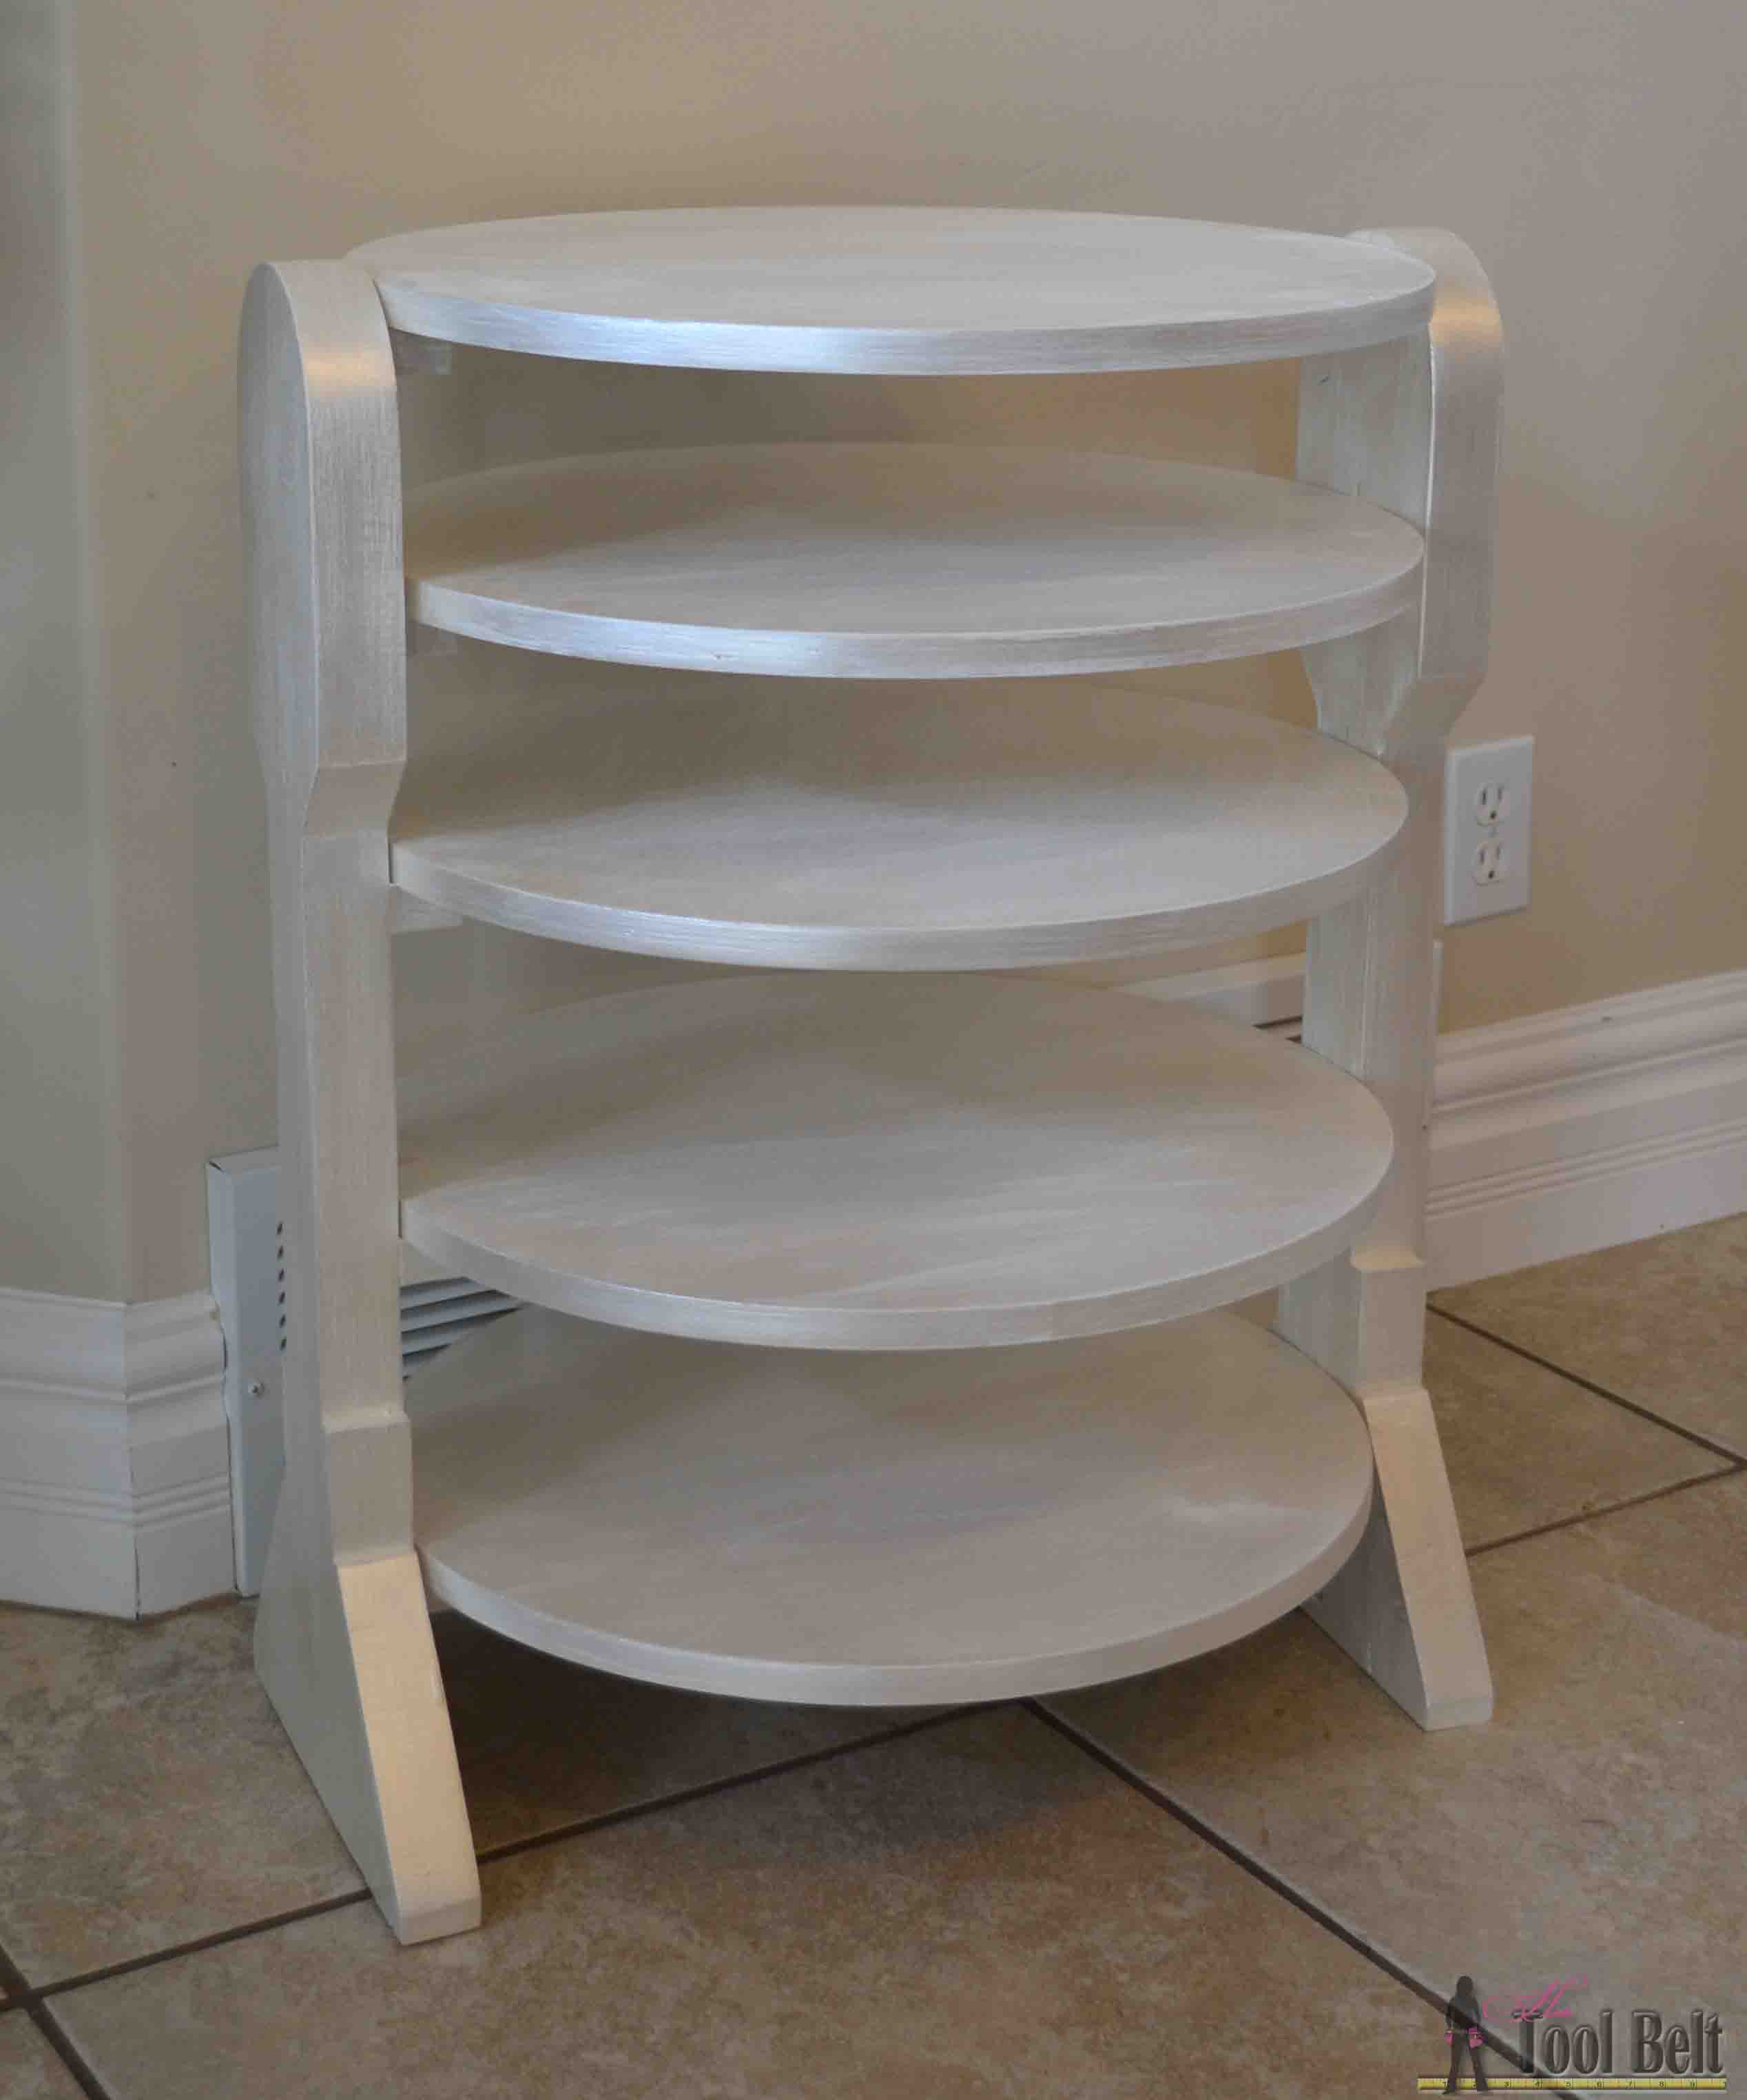
I followed the circle pattern for painting the top with silver, blue, red and dark gray. I love how the top turned out. 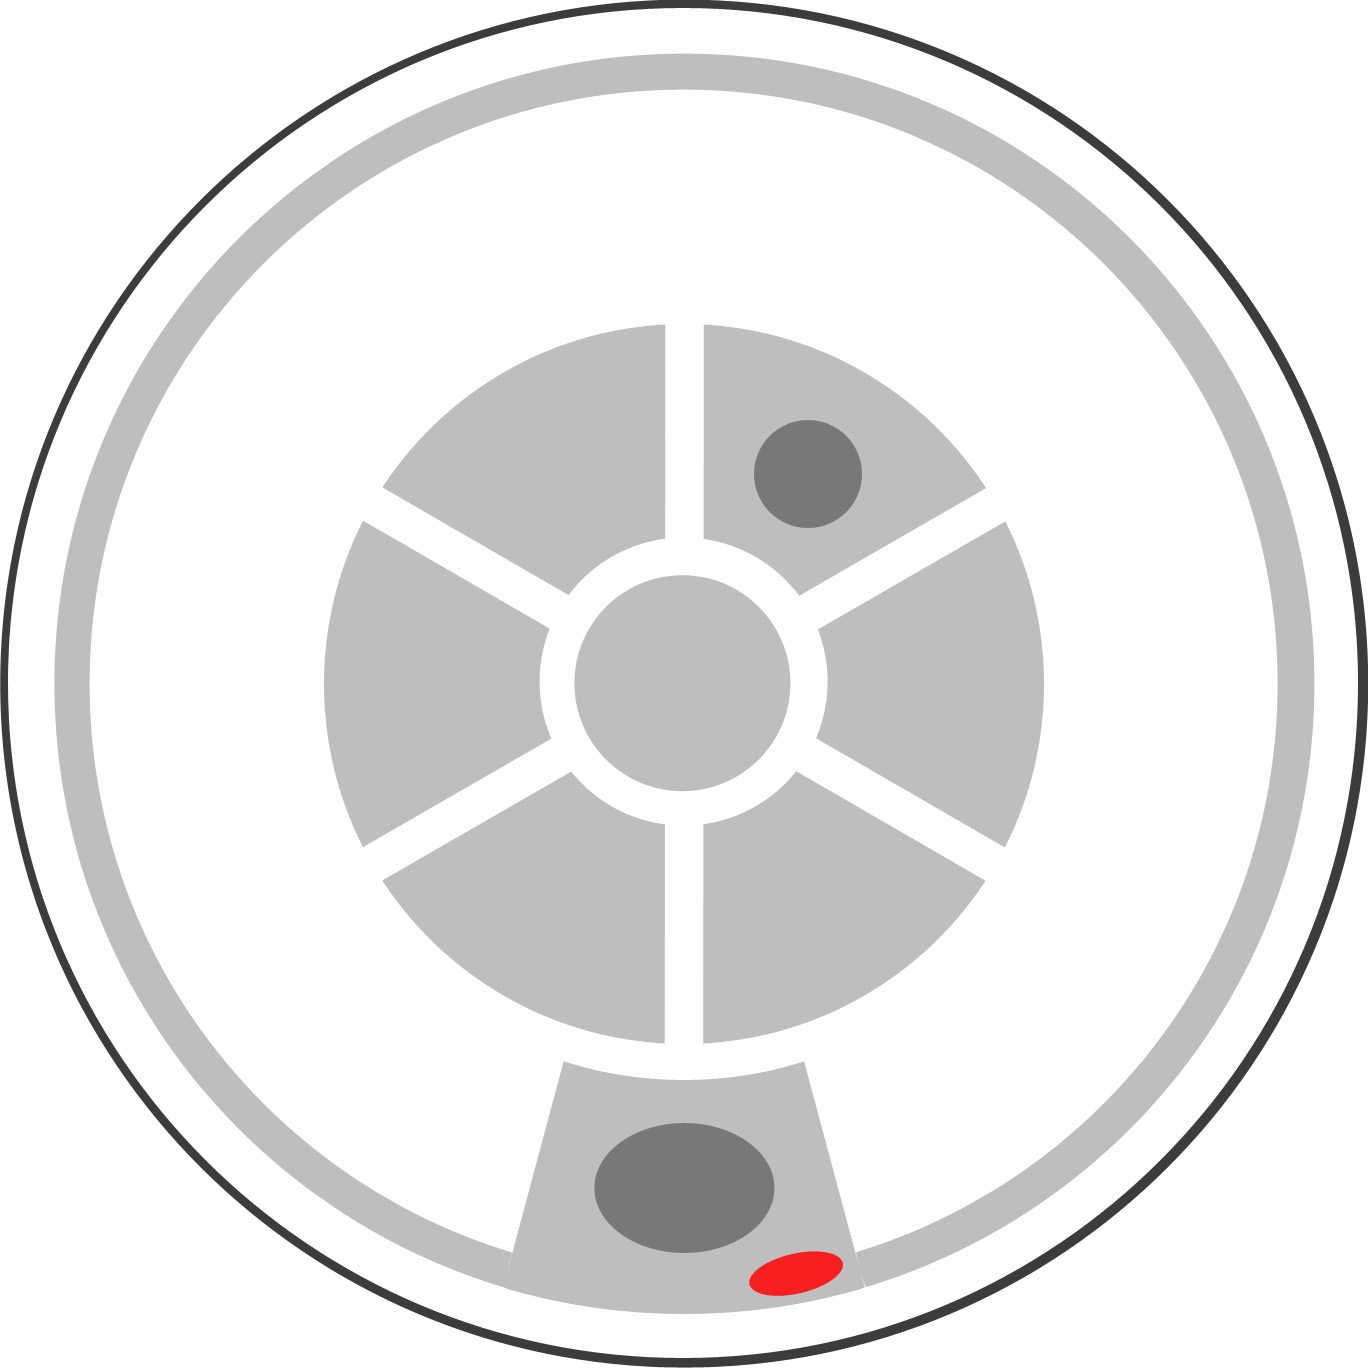
Painted the legs using the leg pattern. Then added a few details on the front with these patterns Front stripes.
Download and print plan
R2-D2 side table plans and patterns
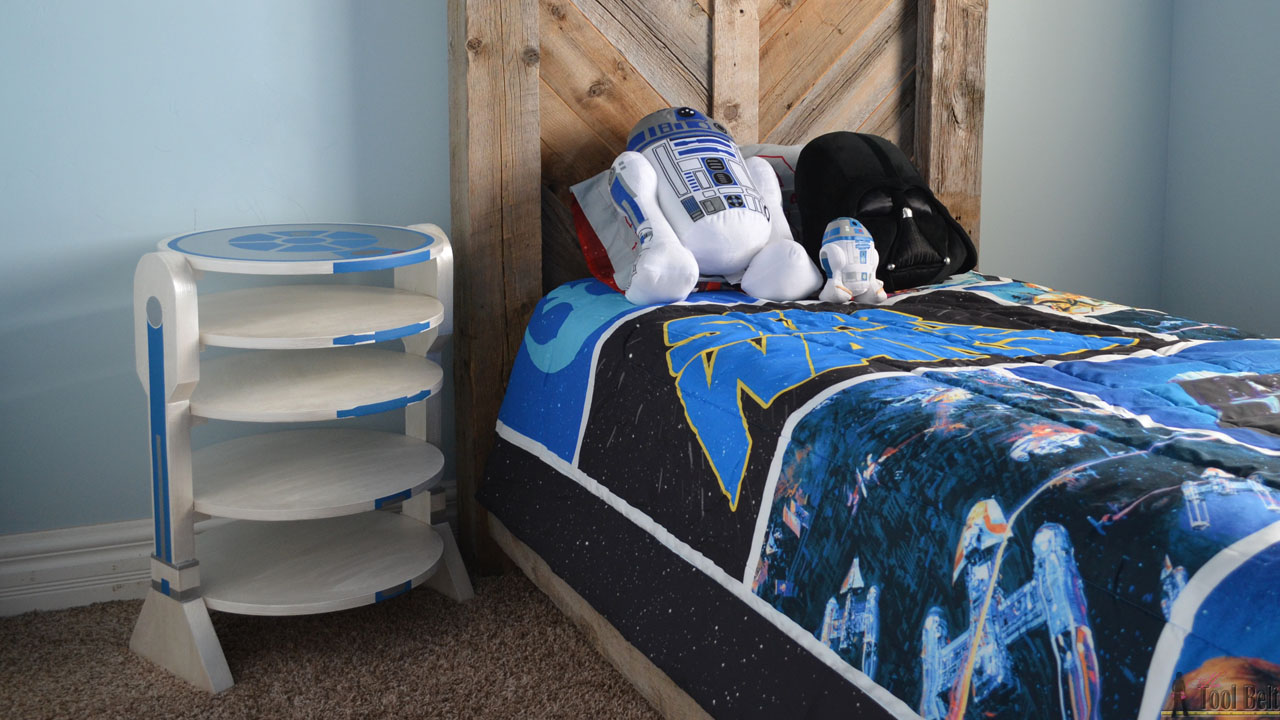
The Star Wars bedding and R2-D2 pillow is from JCPenney. The plans for the cool barn wood bed are here.
Linked to link parties, remodelaholic, savvy southern style Homestoriesatoz
That is adorable! Both my husband and son would be fighting over who gets one first. Love it!
Thanks Vineta
Amy you win major mom points there! Awesome build and even smarter to add the lamp, can’t wait.
Thanks Jaime
So cute!
Thank you!
Perfect for serving drinks! I just pinned your hyper wall shelf the other day. Our family loves Star Wars too! Thanks for sharing!!!
This is awesome! Too cute.
Thanks!
I have been waiting for this table since you sneak peeked it on instagram! It is AWESOME! Seriously so cute, you are such a great mom! Can’t wait to see the lamp! 🙂
Amy, that is seriously stink’n cute! I bet you’re the cool Mom amongst your son’s friends.
I love this table! I am curious to see how you turn the top into a lamp. Will it not cover the painting on the top? I will be showing my son this room as soon as I get home today!
This is super cool! Definitely going to have to attempt this project!
This looks so good! Pinned and tweeted. Thanks for coming to our party and sharing such an amazing masterpiece! I hope to see you next Monday @7 because we love to party with you! Happy Wednesday! Lou Lou Girls
This is awesome! Pretty sure this would be the best side table for my living room, ha! We’re big Star Wars fans and are lacking in the “real” furniture department…this would fill both “needs”! 😀 Thanks for sharing the plans!
OMG! This is the best thing ever!
I am featuring it this week on my linky party since Iove it! You’re amazing!
Thanks Kim!
Hello fabulous! I’m stopping by to let you know that your incredible R2D2 side table will be featured at our party tonight! Woo Hoo! Pinned and tweeted. Thanks for sharing this with us and we hope to see you tonight at the party! Lou Lou Girls
I pin this (in my gadgets and general geekery board)!
Love this, so well done. 😀
Came from loulougirls where you were featured.
Thanks!
That is adorable!!! I think my husband might want that, more than our son! 🙂
Hi there! I’ve been hunting for forever for an R2D2 table for my brother. Having seen this, I think I’m going to try to make one! It looks amazing, so thank you for the plans.
What type of weight can it bear? My brother drinks principally squash from a fairly hefty stein which holds about 1L. Would it be strong enough to hold that plus maybe plates or something?
Many thanks!
Hi the R2D2 table should be strong enough for drinks and plates. However you may need to add a support at the bottom of the front and back to make sure it doesn’t tip if the food/drinks is off center.
Hi Amy! Love your idea on this! I have to know what your using for the top or R2’s head? Is that an actual lamp shade? or? Thanks, Rick p.s. I am going to make this too and thanks for the in depth detail to plan and vid on painting it too. Excellent work!
Thanks Rick,
R2’s head is a lamp shade (Brasa) from IKEA. http://www.ikea.com/sg/en/catalog/products/80138414/
Lovely idea! Very clever, and it looks great. Quick questions: did you ever get around to the lamp part, and where did you get that dome?
Oops, I just read the other comments and saw that my question was already answered. Please disregard. 😉 But I would like to see a picture of it with the lamp added! One thing that’s neat about this project is that everybody wants to build an Artoo, but — what do you DO with it? The obvious garbage can isn’t very flattering, and there aren’t too many other excuses to have a big cylinder taking up space in your house.