Hi! I’d love for you to follow me on Pinterest Her Tool Belt and if you love instagram, you can keep up with me there too!
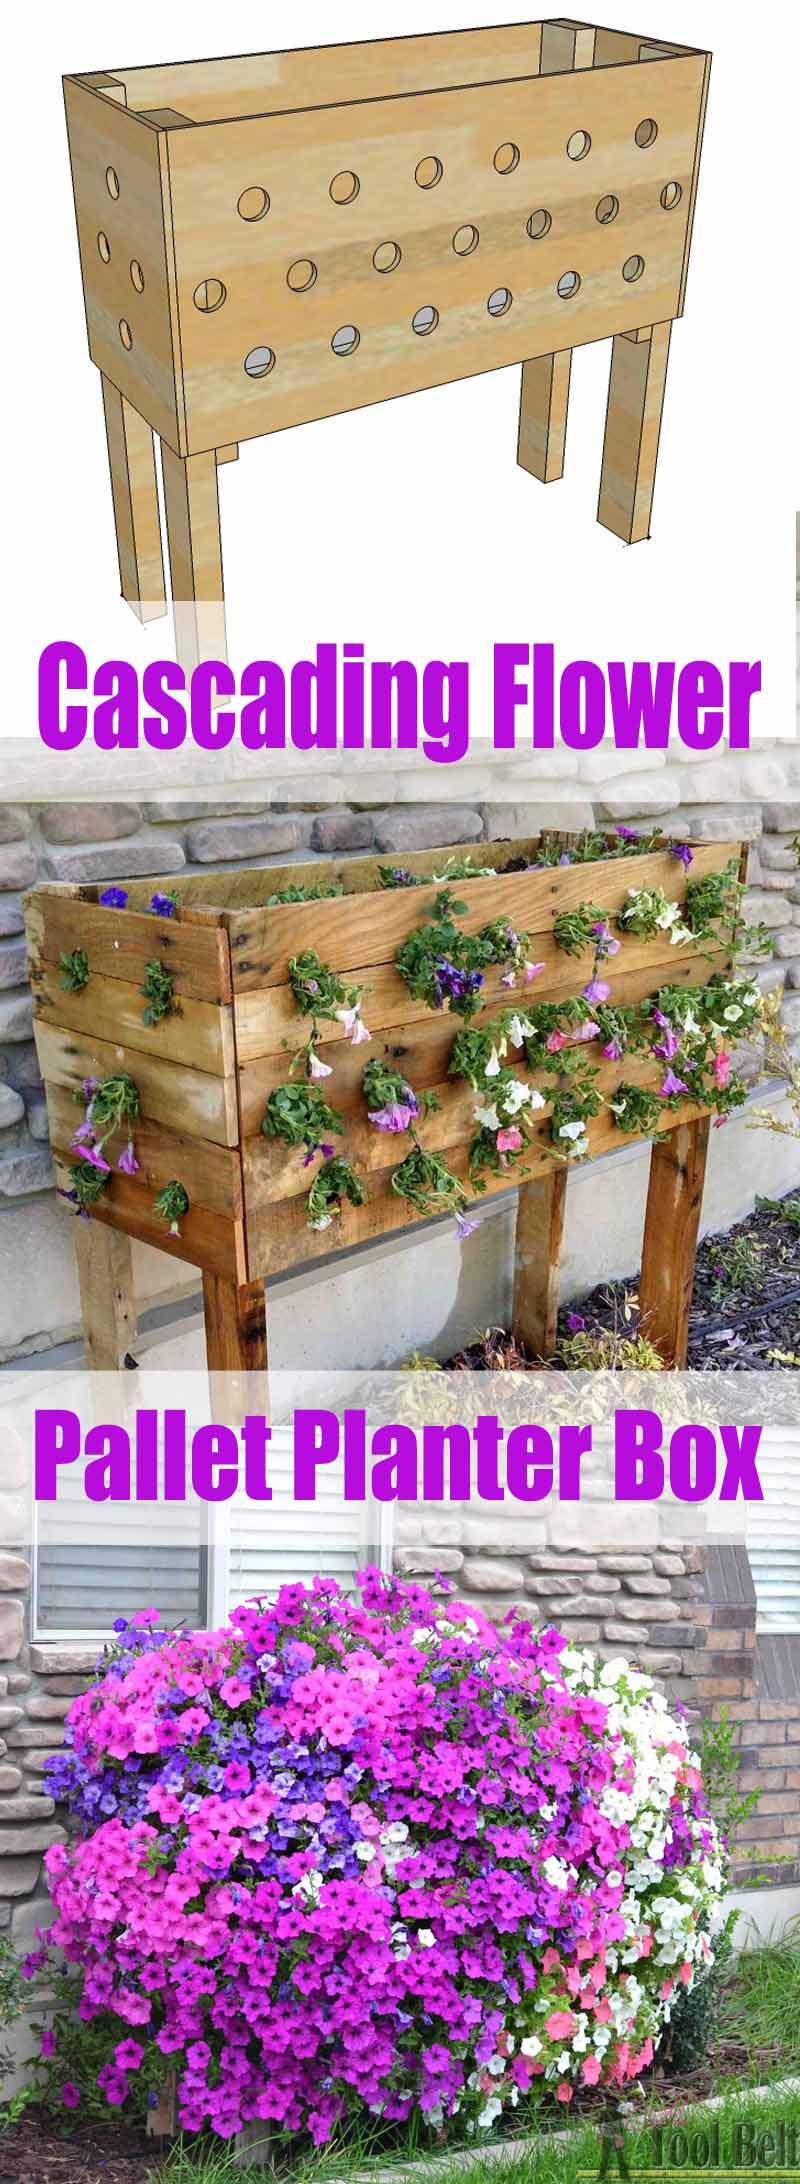
I have a dream… that some day I can grow those amazing cascading flower baskets like the ones from Bloom Master. My home town has been hanging those baskets for the last 5-10 years or so, and they make main street look amazing. My Mom plants them too, and her yard looks amazing. I bought some of the large Bloom Master pots years ago thinking the cascading flowers would look awesome hanging off the back deck. However the sun is really harsh during the afternoon, it gets overly windy, and every year I fail. My flower pots look ok, but not full and stunning. So this year, I’m trying it again but in the front yard where the flowers will be more protected. I also want to dress up a window that’s a little boring. I built a large planter box out of pallets, since it is made from pallets I won’t feel bad ruining the wood. I’ll post periodic updates to show the progress of the wave petunias, hoping for amazing!
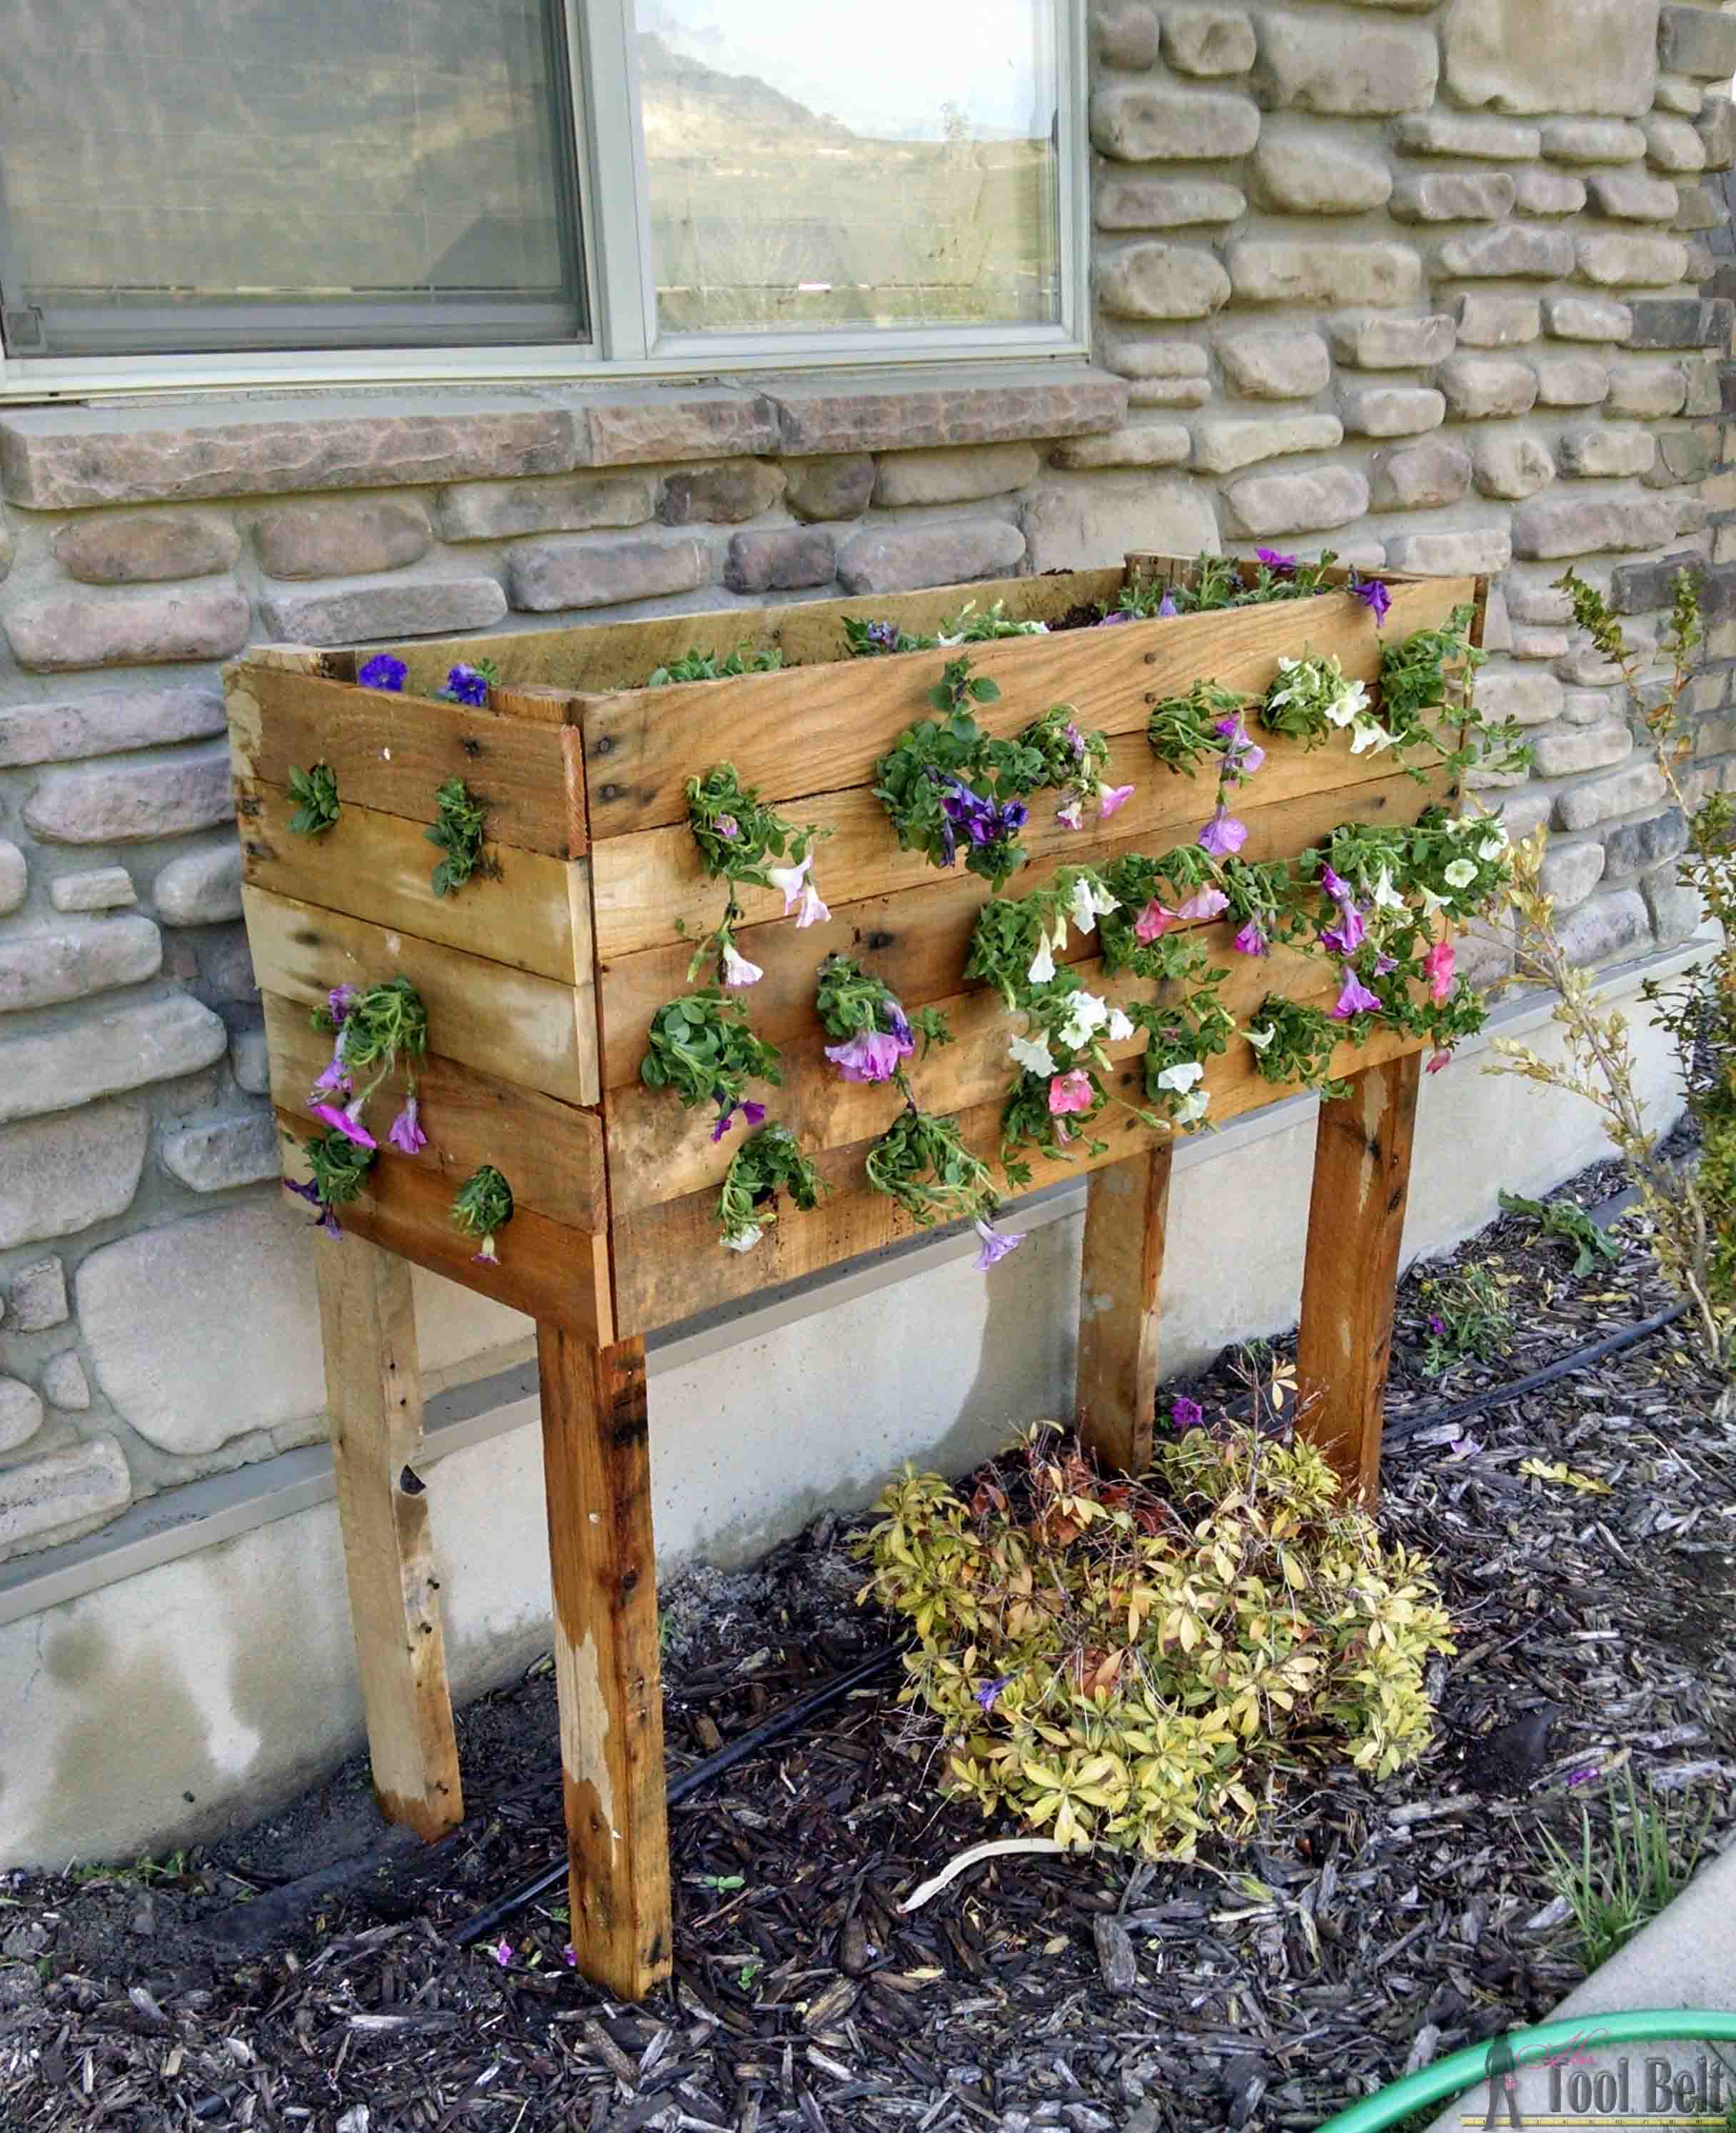
Planting the Pallet Planter Box with Wave Petunias
Please Subscribe
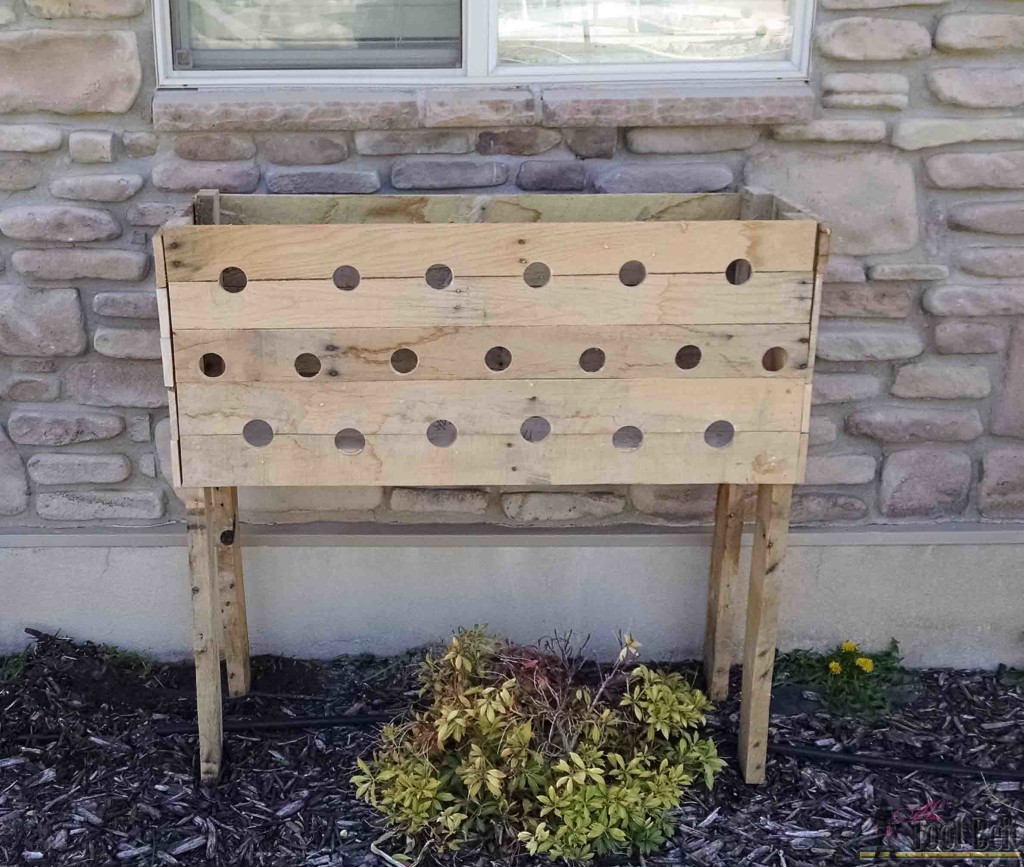
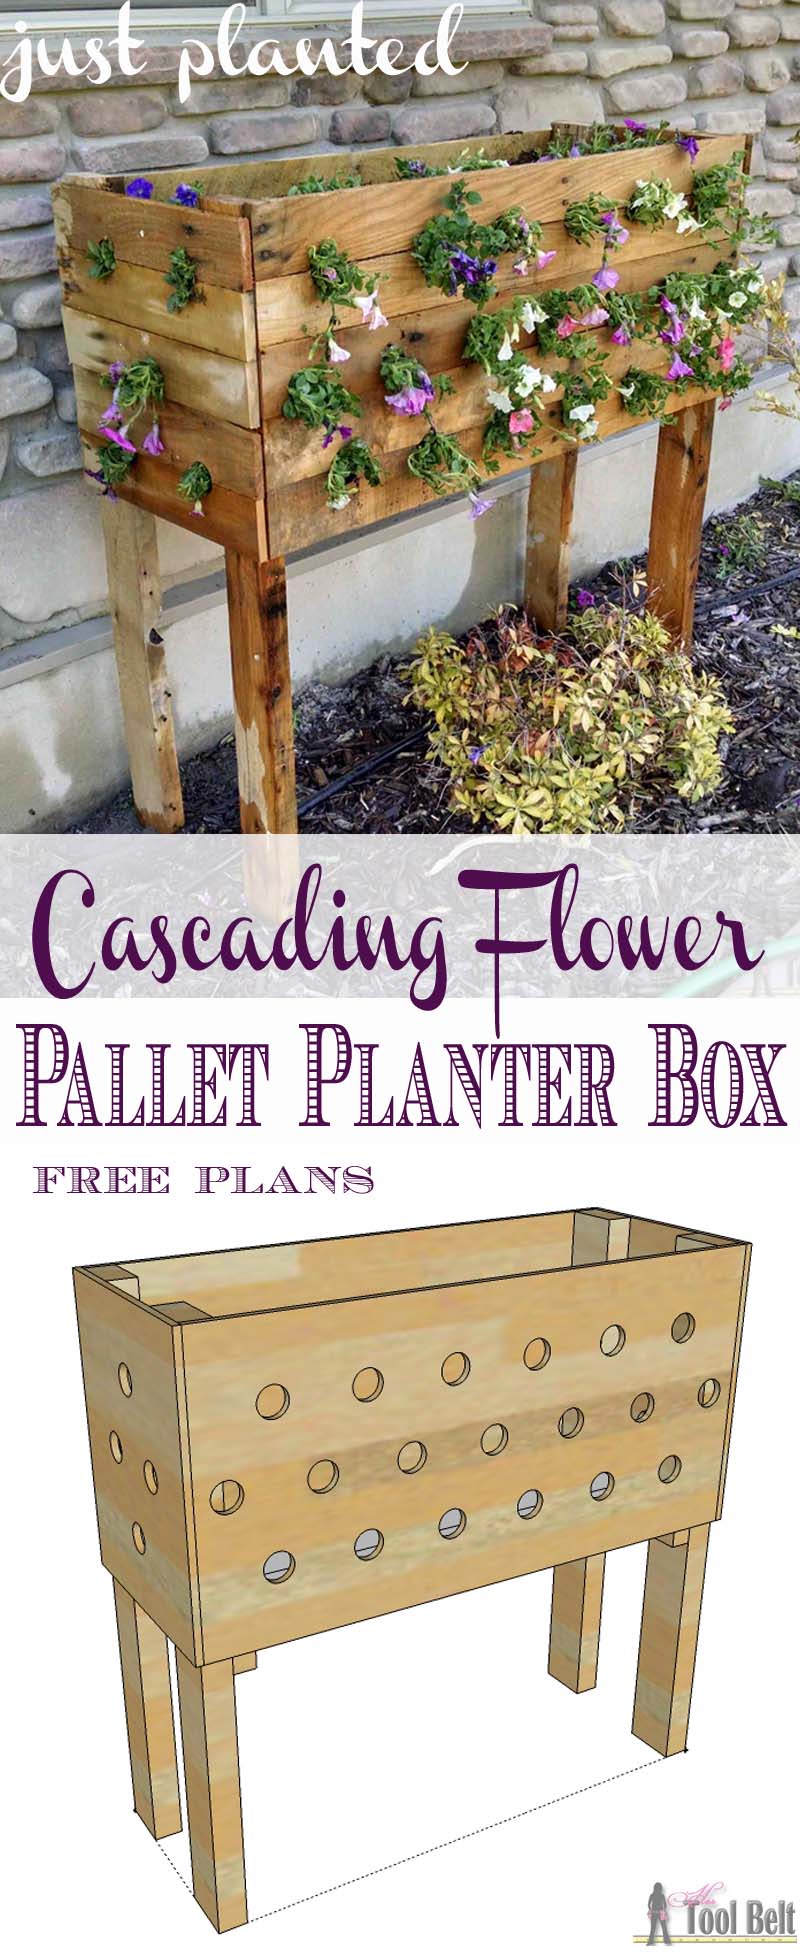
How to Build a Cascading Flower Pallet Planter Box
This post contains some affiliate links for your convenience. Click here to read my full disclosure policy.
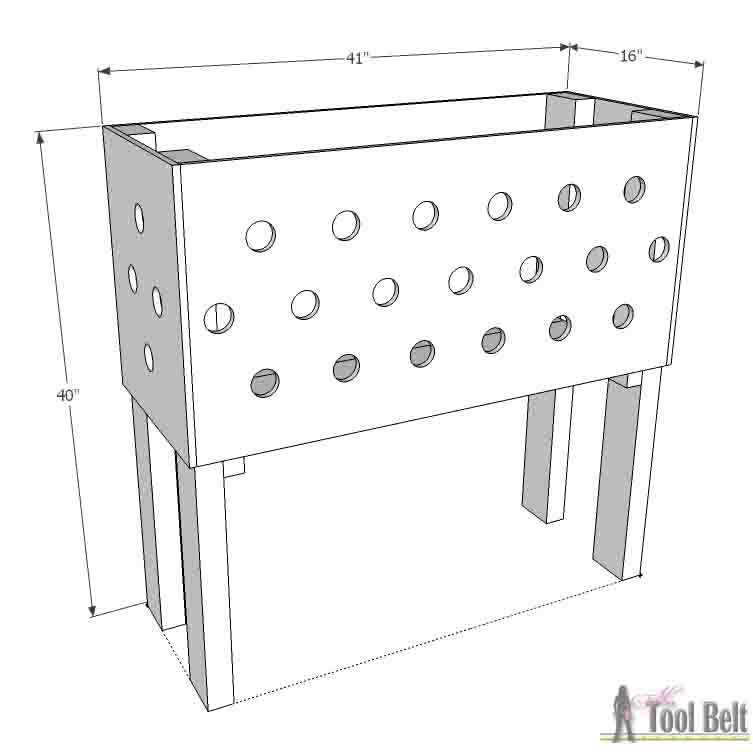
Cut List
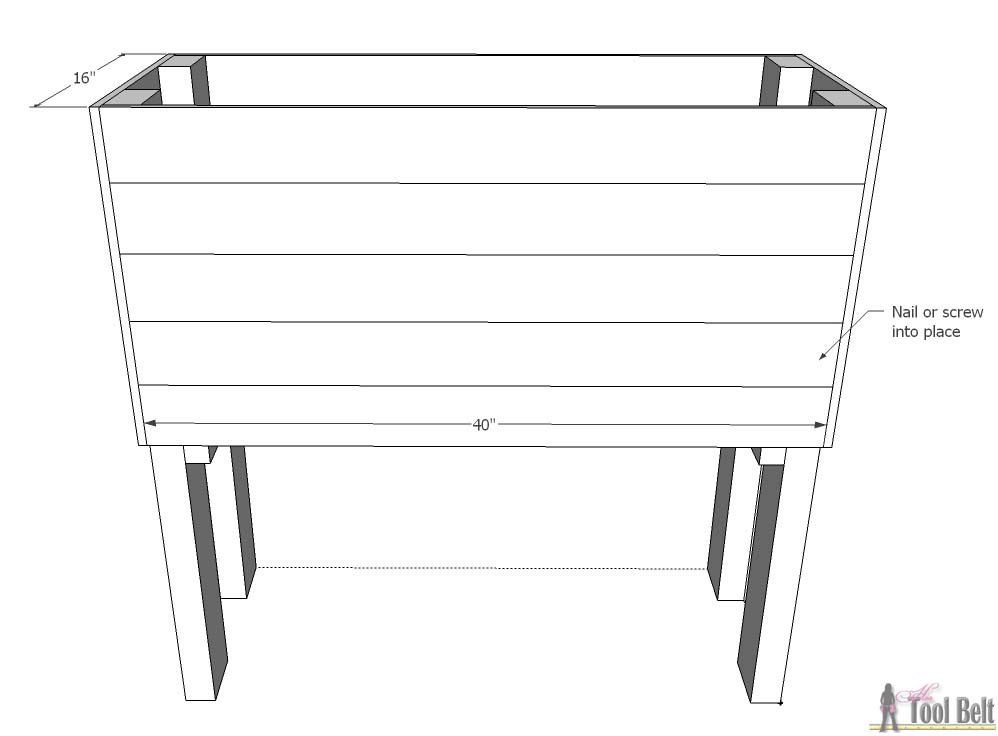
- 4 – 2″ x 4″ x 40″ – legs
- 2 – 2″ x 2″ x 15″ – bottom support
- 4 – 1″ x 4″ x 36″ bottom
- 1 – 1″ x 1 1/2″ x 36″ bottom
- 40″ long pallet slats as needed
- 16″ long pallet slats as needed
(Note: if you do not have access to pallets or are concerned about where the pallets have been, you can easily substitute pine 1×4’s or cedar pickets found at stores like Home Depot.)
Step 1
This planter box is made mostly from pallet wood, for tips on disassembling a pallet, check out this video.
Please Subscribe!
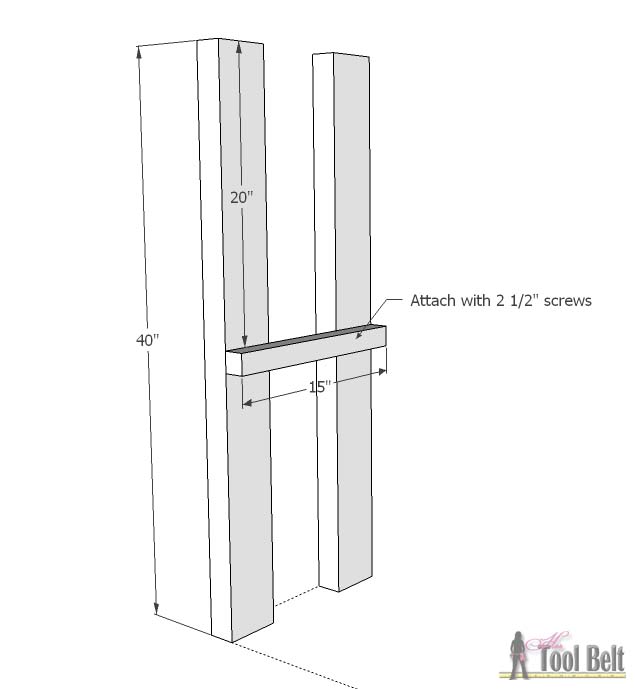
Measure and mark down 20″ from the top of the legs. Attach the 2×2 at 20″ with 2 1/2″ screws. Repeat for the other set of legs.
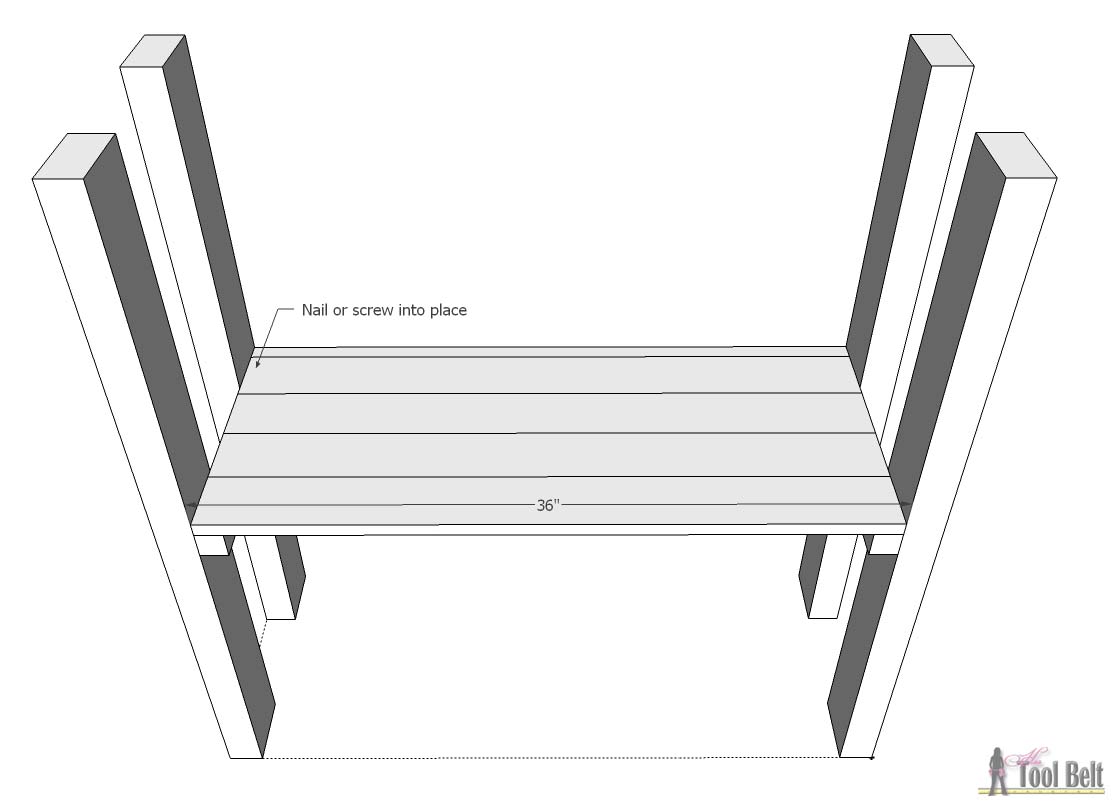
 Nail or screw the bottom pieces to the 2×2 supports.
Step 2
Cut pieces of pallet slat to 40″ and attach to the legs for the front and 16″ for the sides. I originally used a brad nailer, but some of the wood started to warp when wet and I went back and used 1 1/4″ screws.
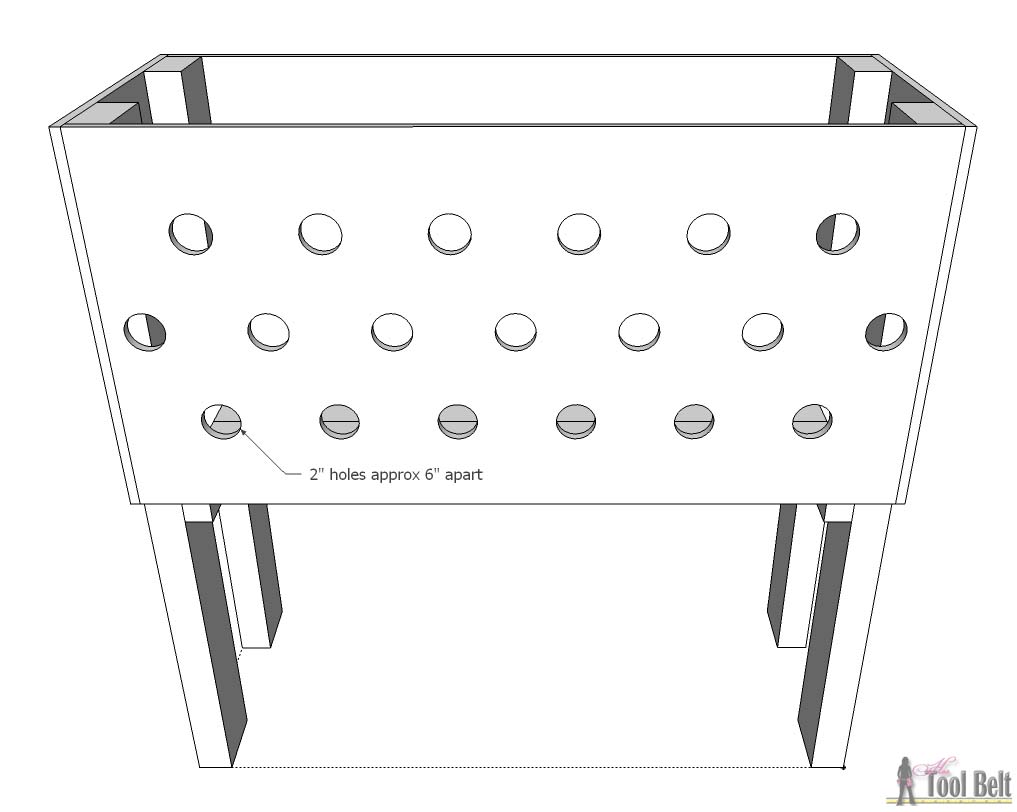
 I used a 2″ hole saw to drill holes for the petunias.
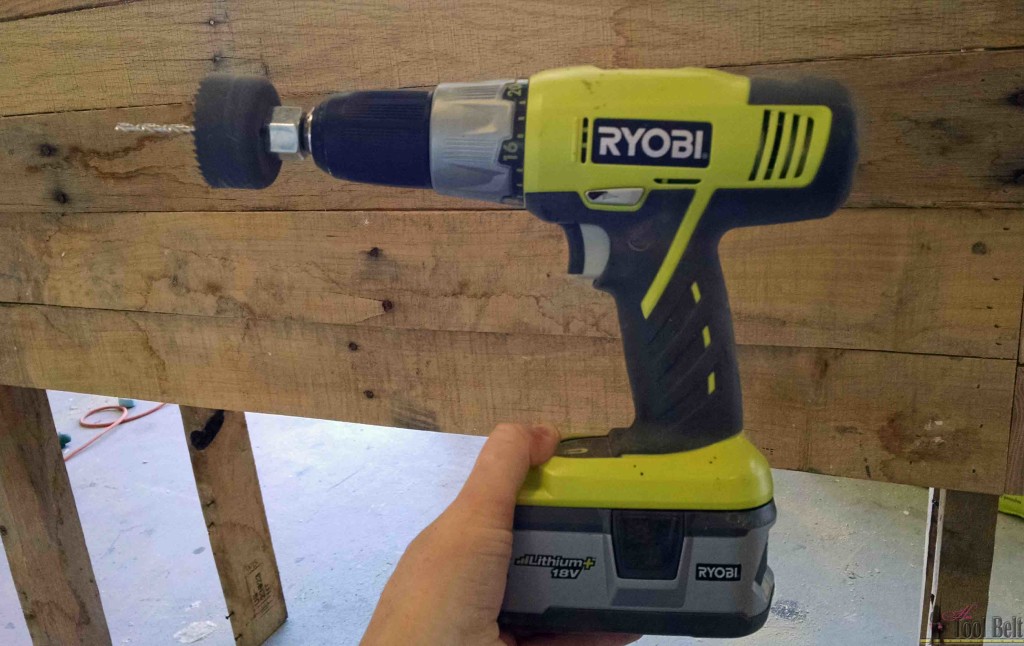 Spacing the holes about every 6″ or so.
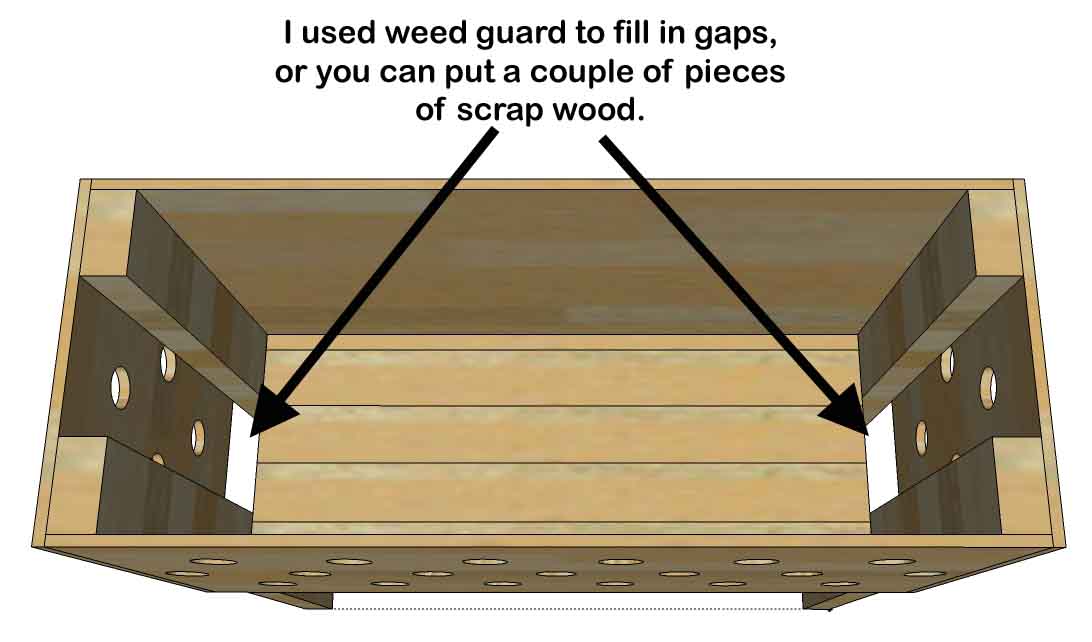
I ended up with a gap between the legs which I used weed guard to block. You can put a couple of pieces of scrap wood to fill the gap.
Download the –> Printable Plan <–
Step 3
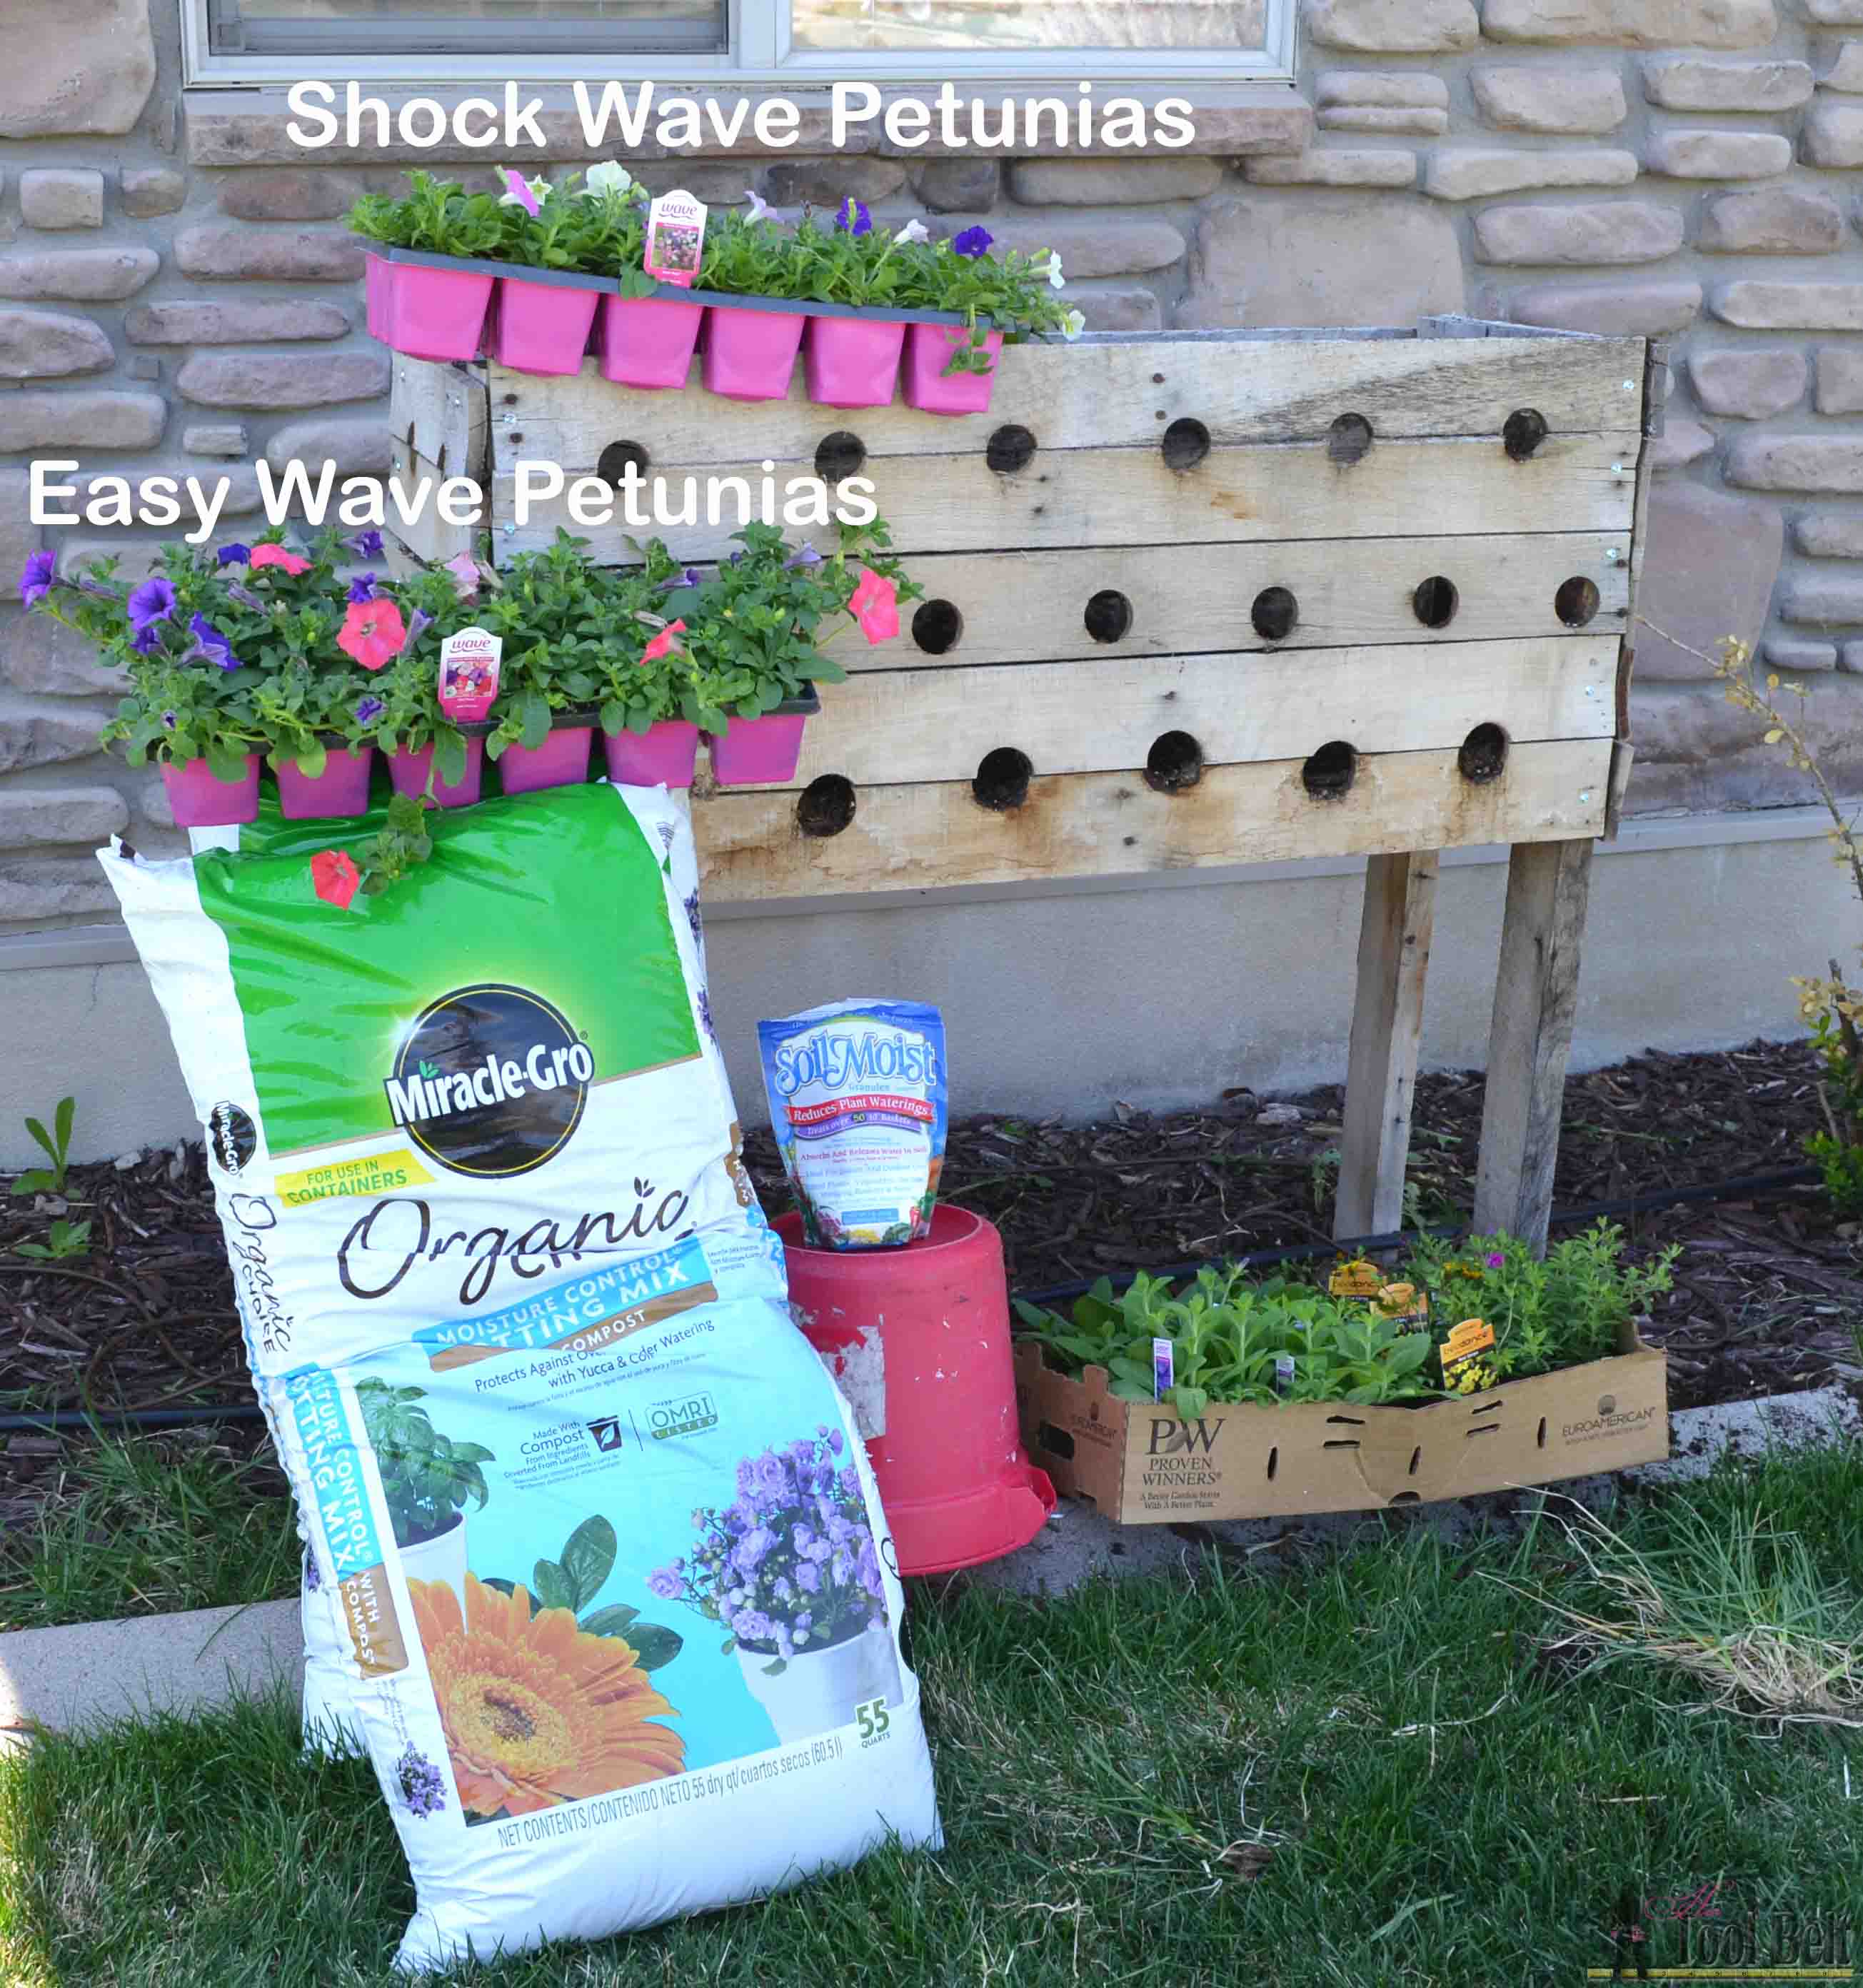
Now the fun part, planting the flowers. These flowers are Wave petunias that I got at Costco, you can also rotate the flowers between regular, cascade and wave petunias. You need good potting mix and you need to add Soil Moist

to help retain water. I put a layer of weed guard down on the bottom, because I had a few holes. You may have a little dirt wash out for the first little while, but once the plants start growing this will stop.
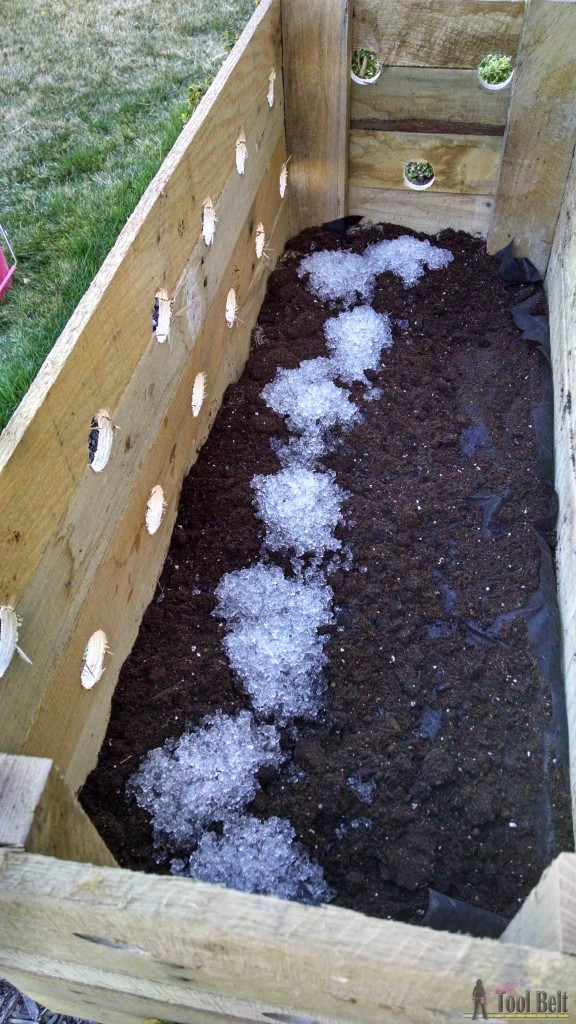 Add the first row of flowers, then cover with soil.
 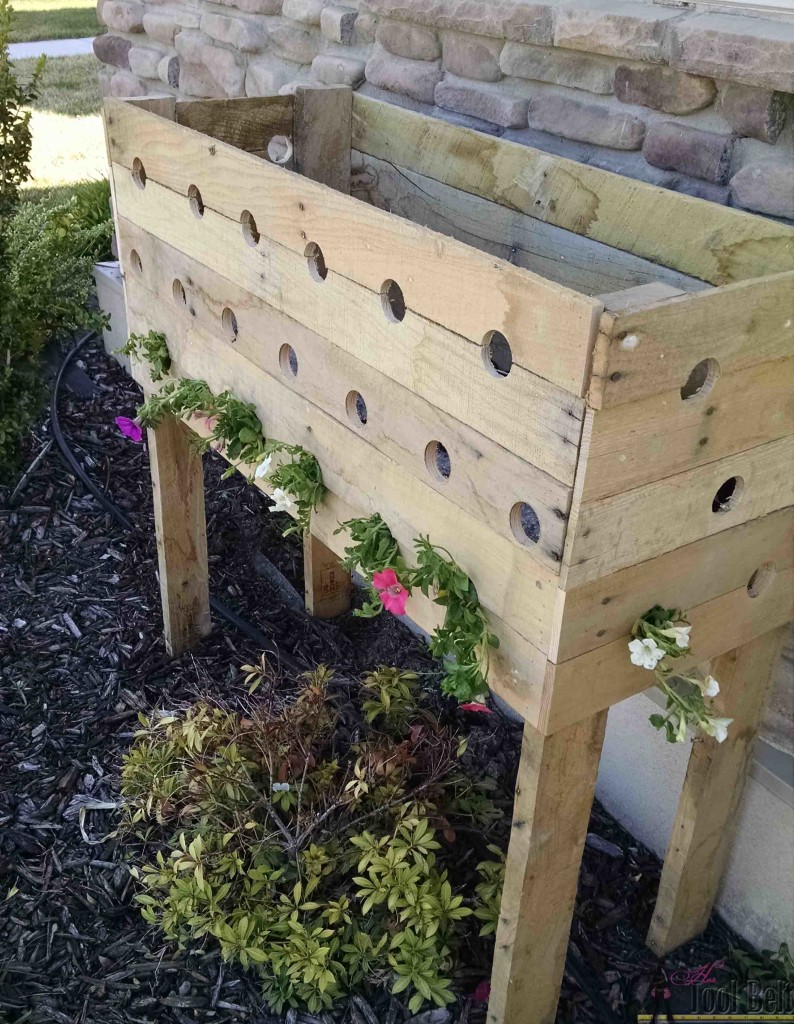 I realized that the box is kind of large and is going to use a lot of dirt (2 bags). I remember reading somewhere that you can use packing peanuts as filler, hope I remember that right. I put them in the far back where the flowers wouldn’t be planted.
Update: I only did the peanuts the first year, for years 2-4 I have put in pieces of scrap wood from the pile to add filler space. That’s worked great. 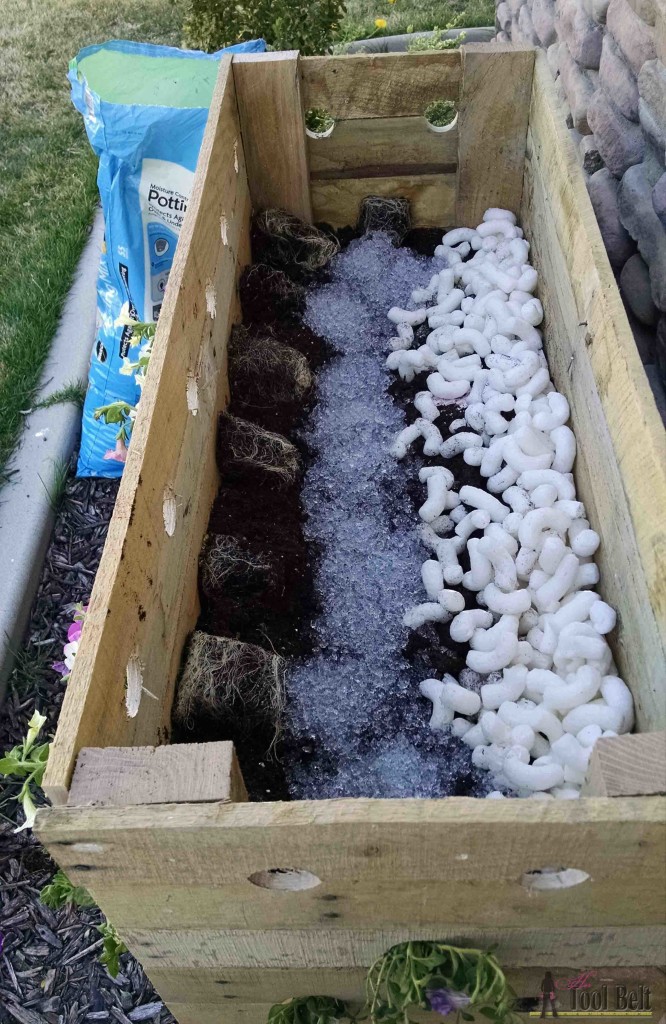 Then cover with more dirt.
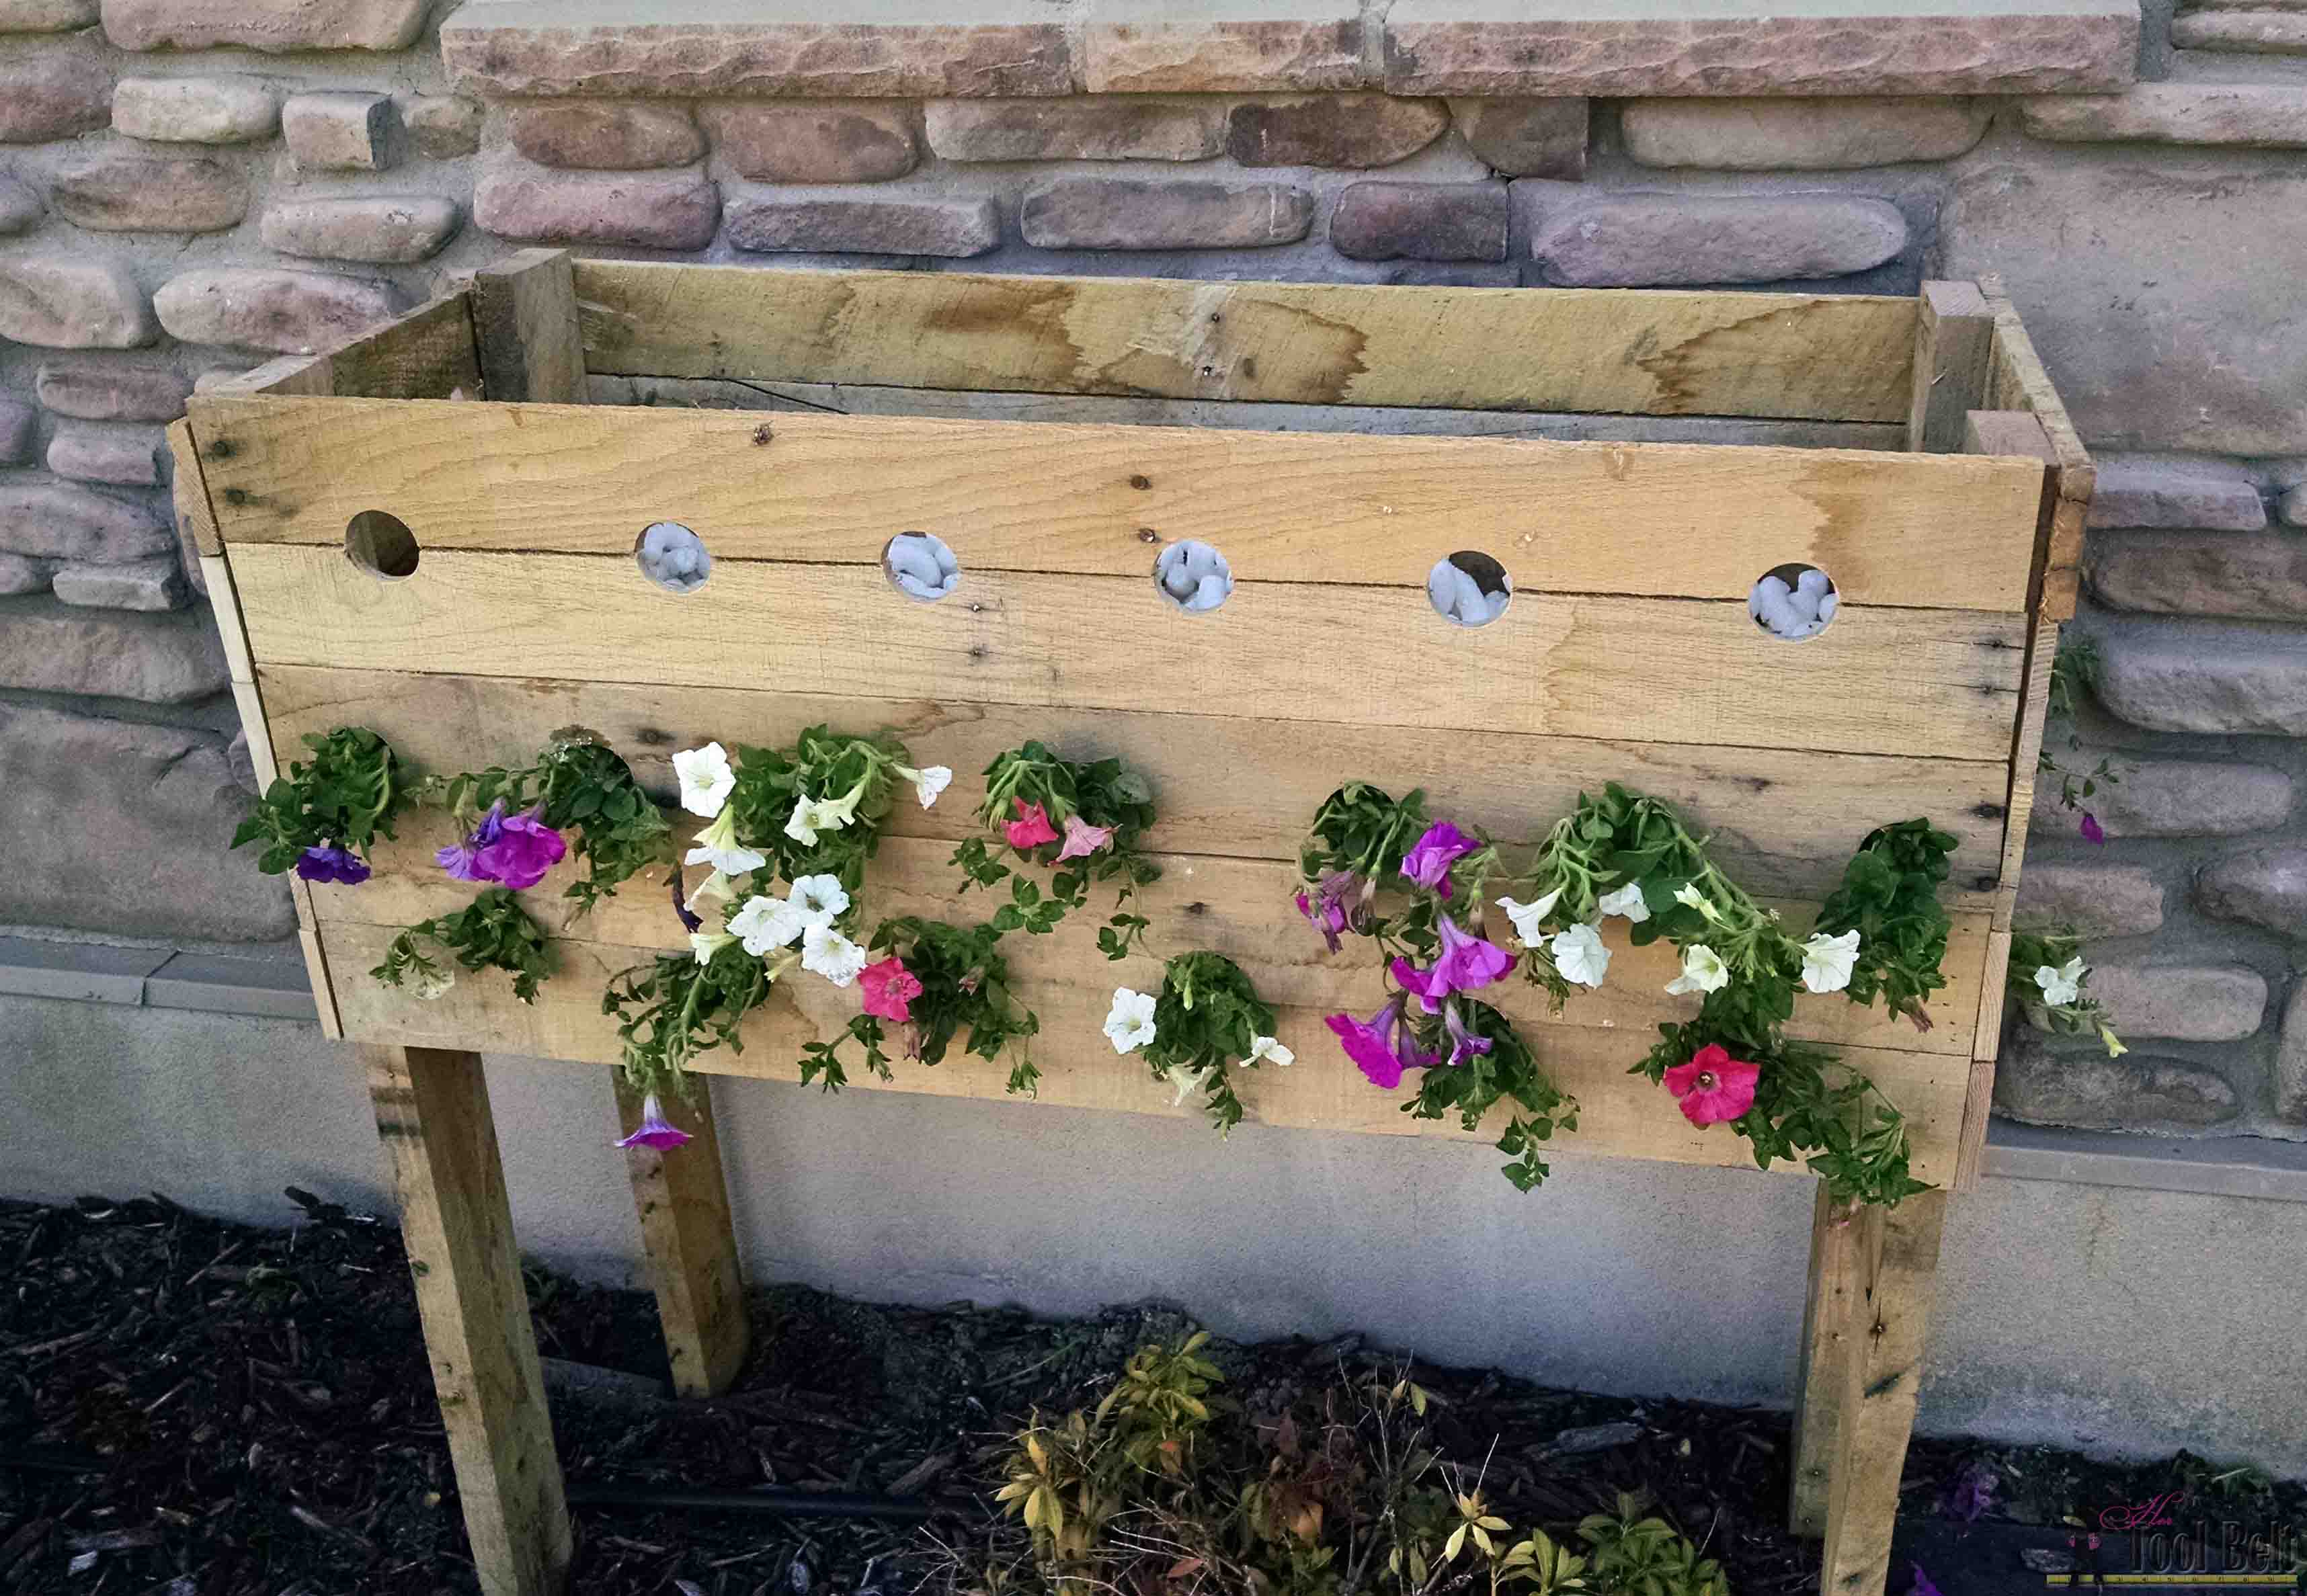
Add the third row of flowers, fill with dirt and plant flowers on top.
You need to water the flowers everyday, the holes let the dirt get dry. I usually water until the water leaks from the lower holes. I also fertilize 1/week.
April 13 – first planted
May 20 – starting to grow
I realized that the poor bush had been dead for some time, even though it had green on it.
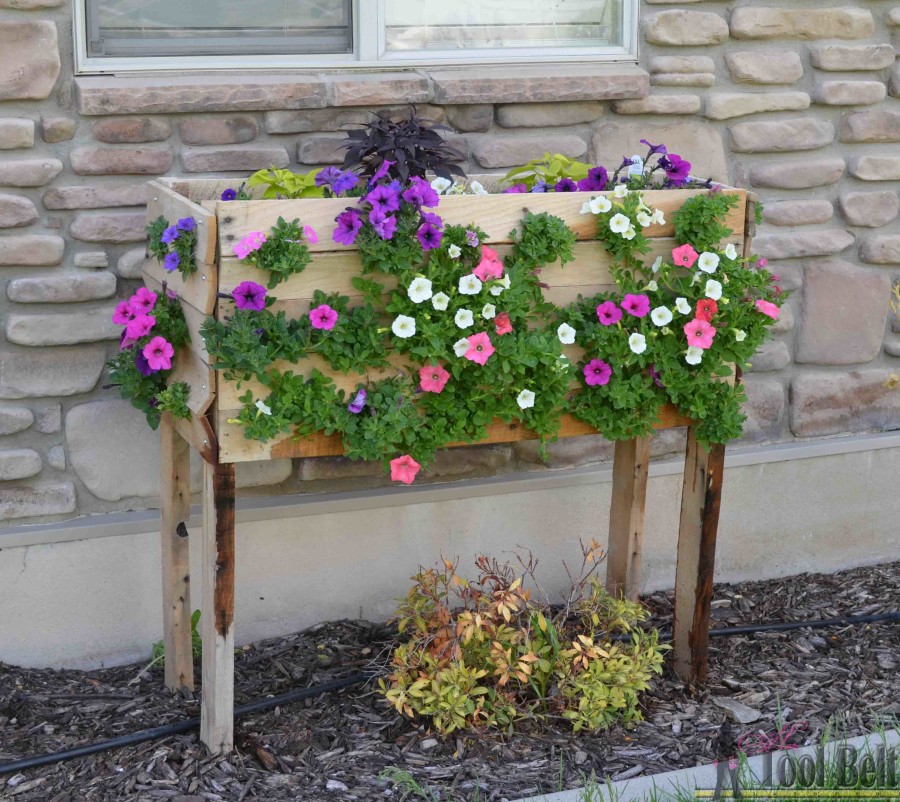
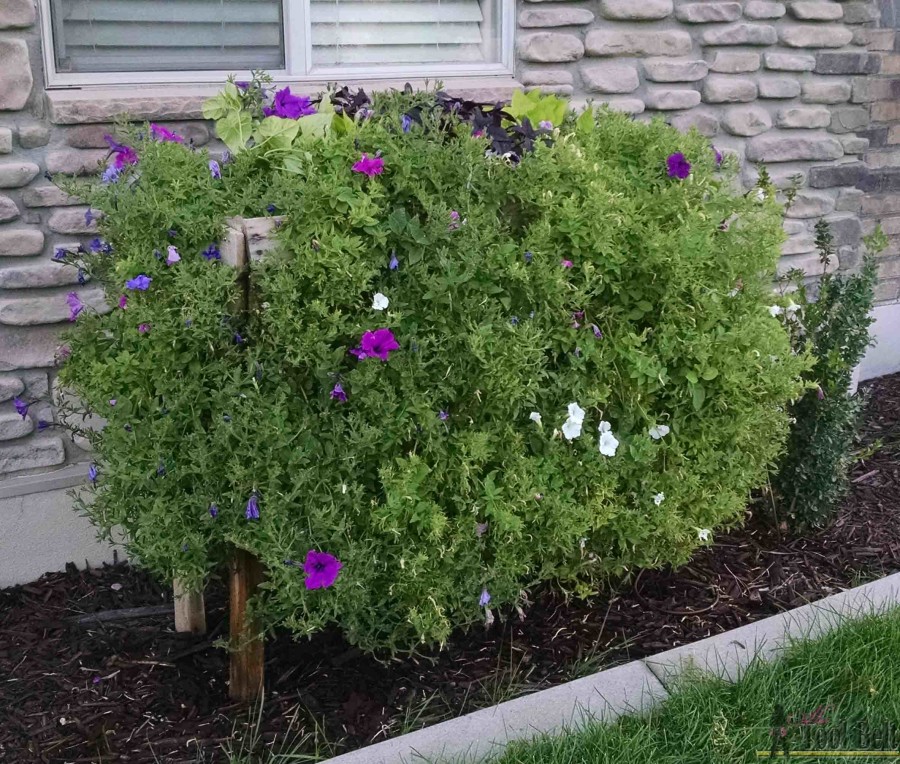
June 6 – filling in nicely
June 22 – tickled pink
July 24 – little set back
It was the really hot part of the summer and the foliage was very green and pretty, but no flowers. Realized I needed to spray for bugs and the flowers came back.
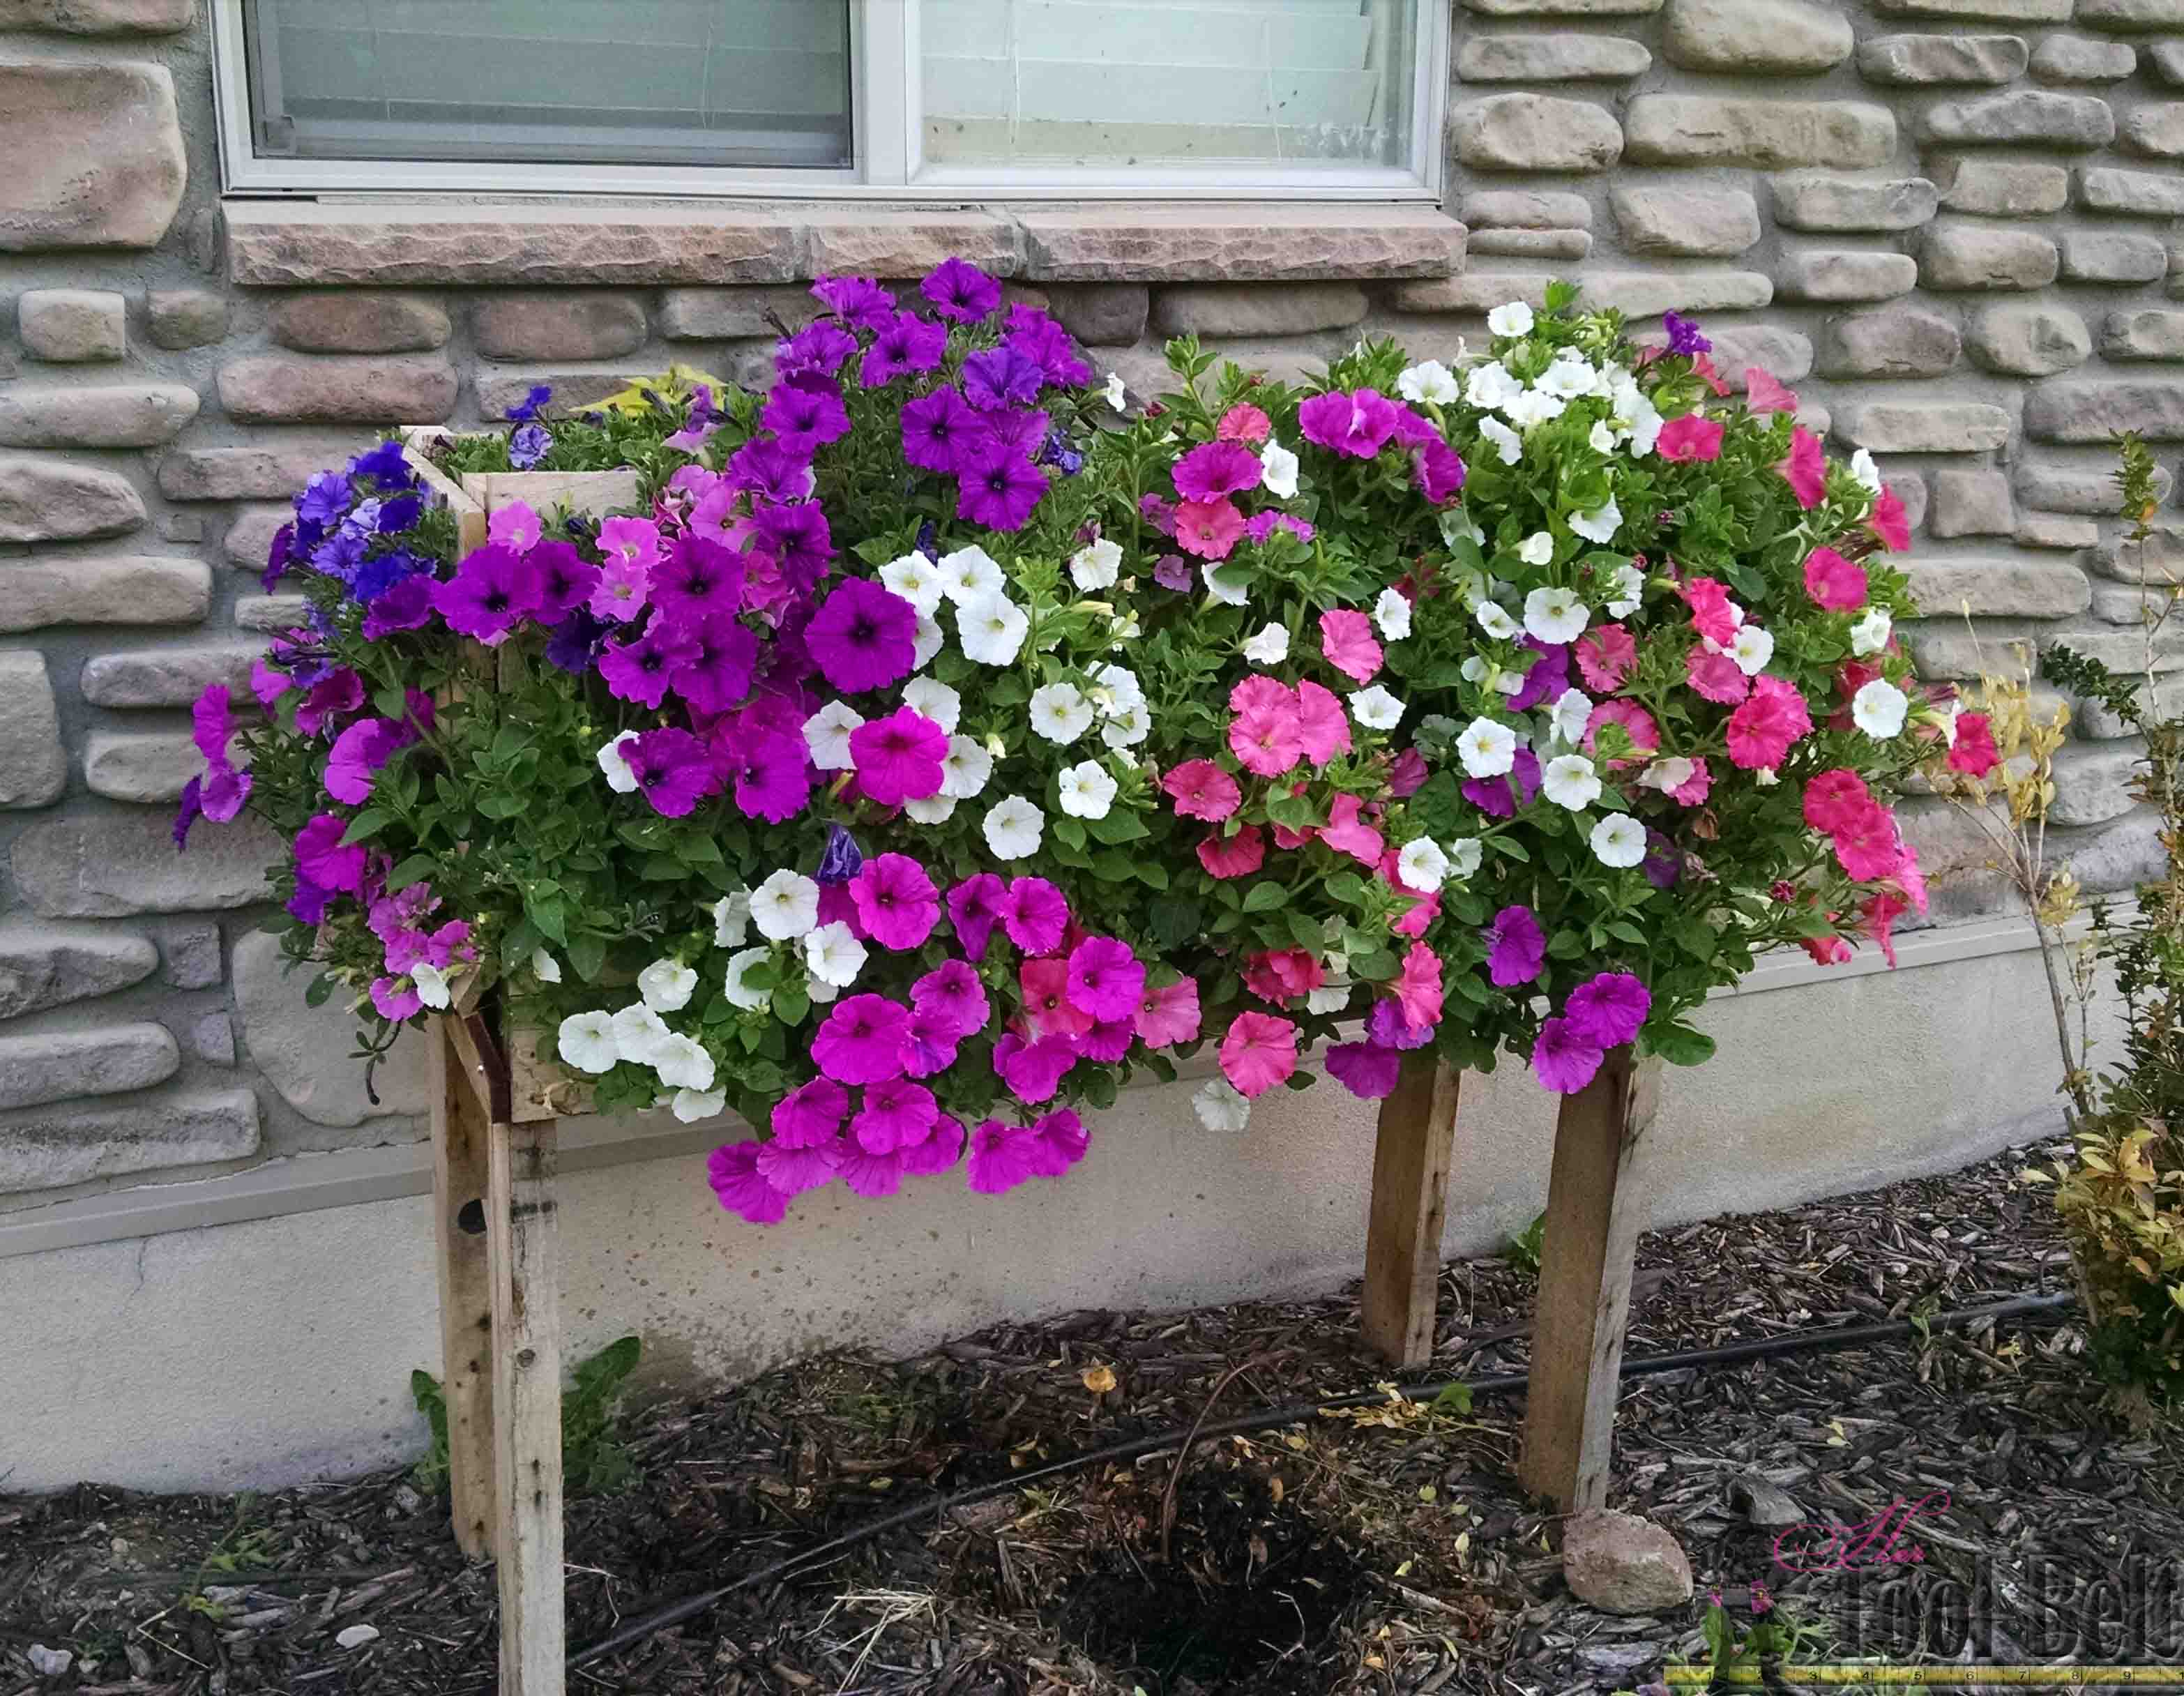
August 24 – looking good
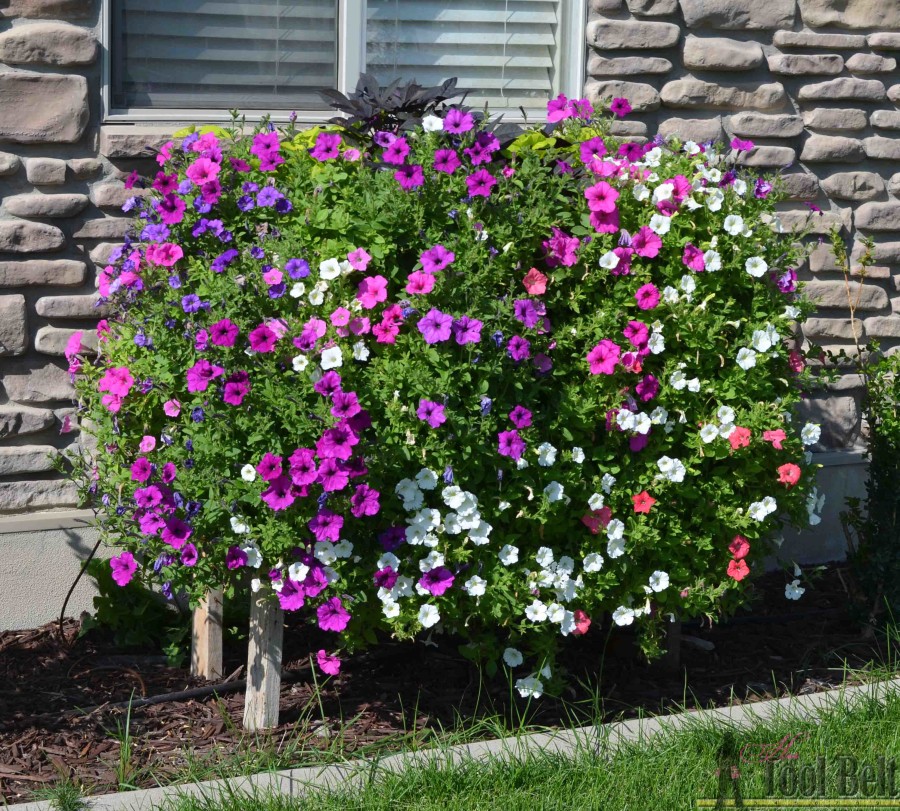
September 22
By this time I’m super excited it made it through the summer alive. I never made it through July with the baskets on the back deck.
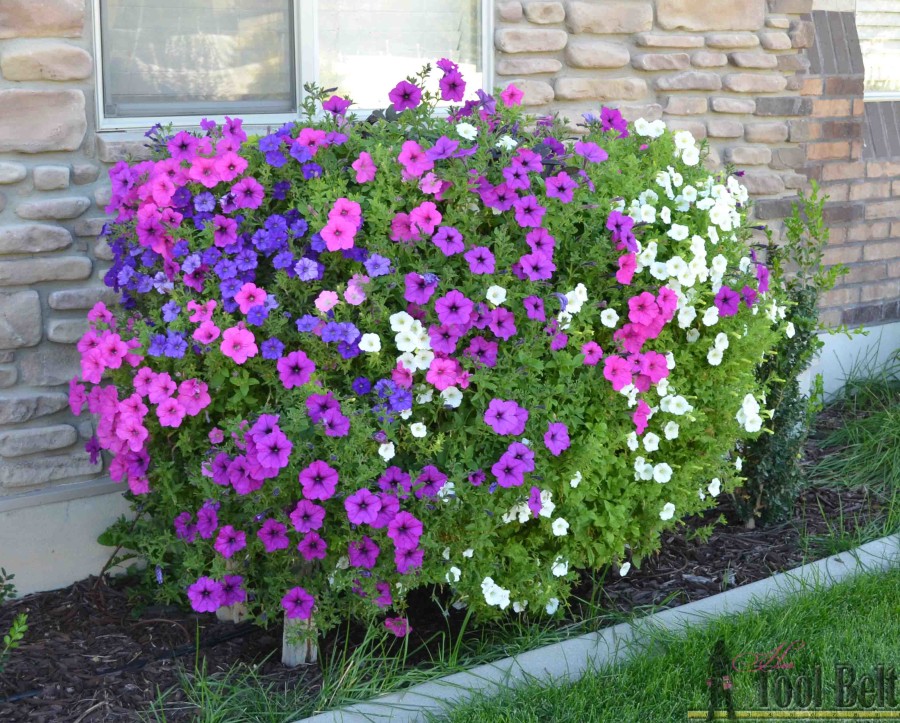
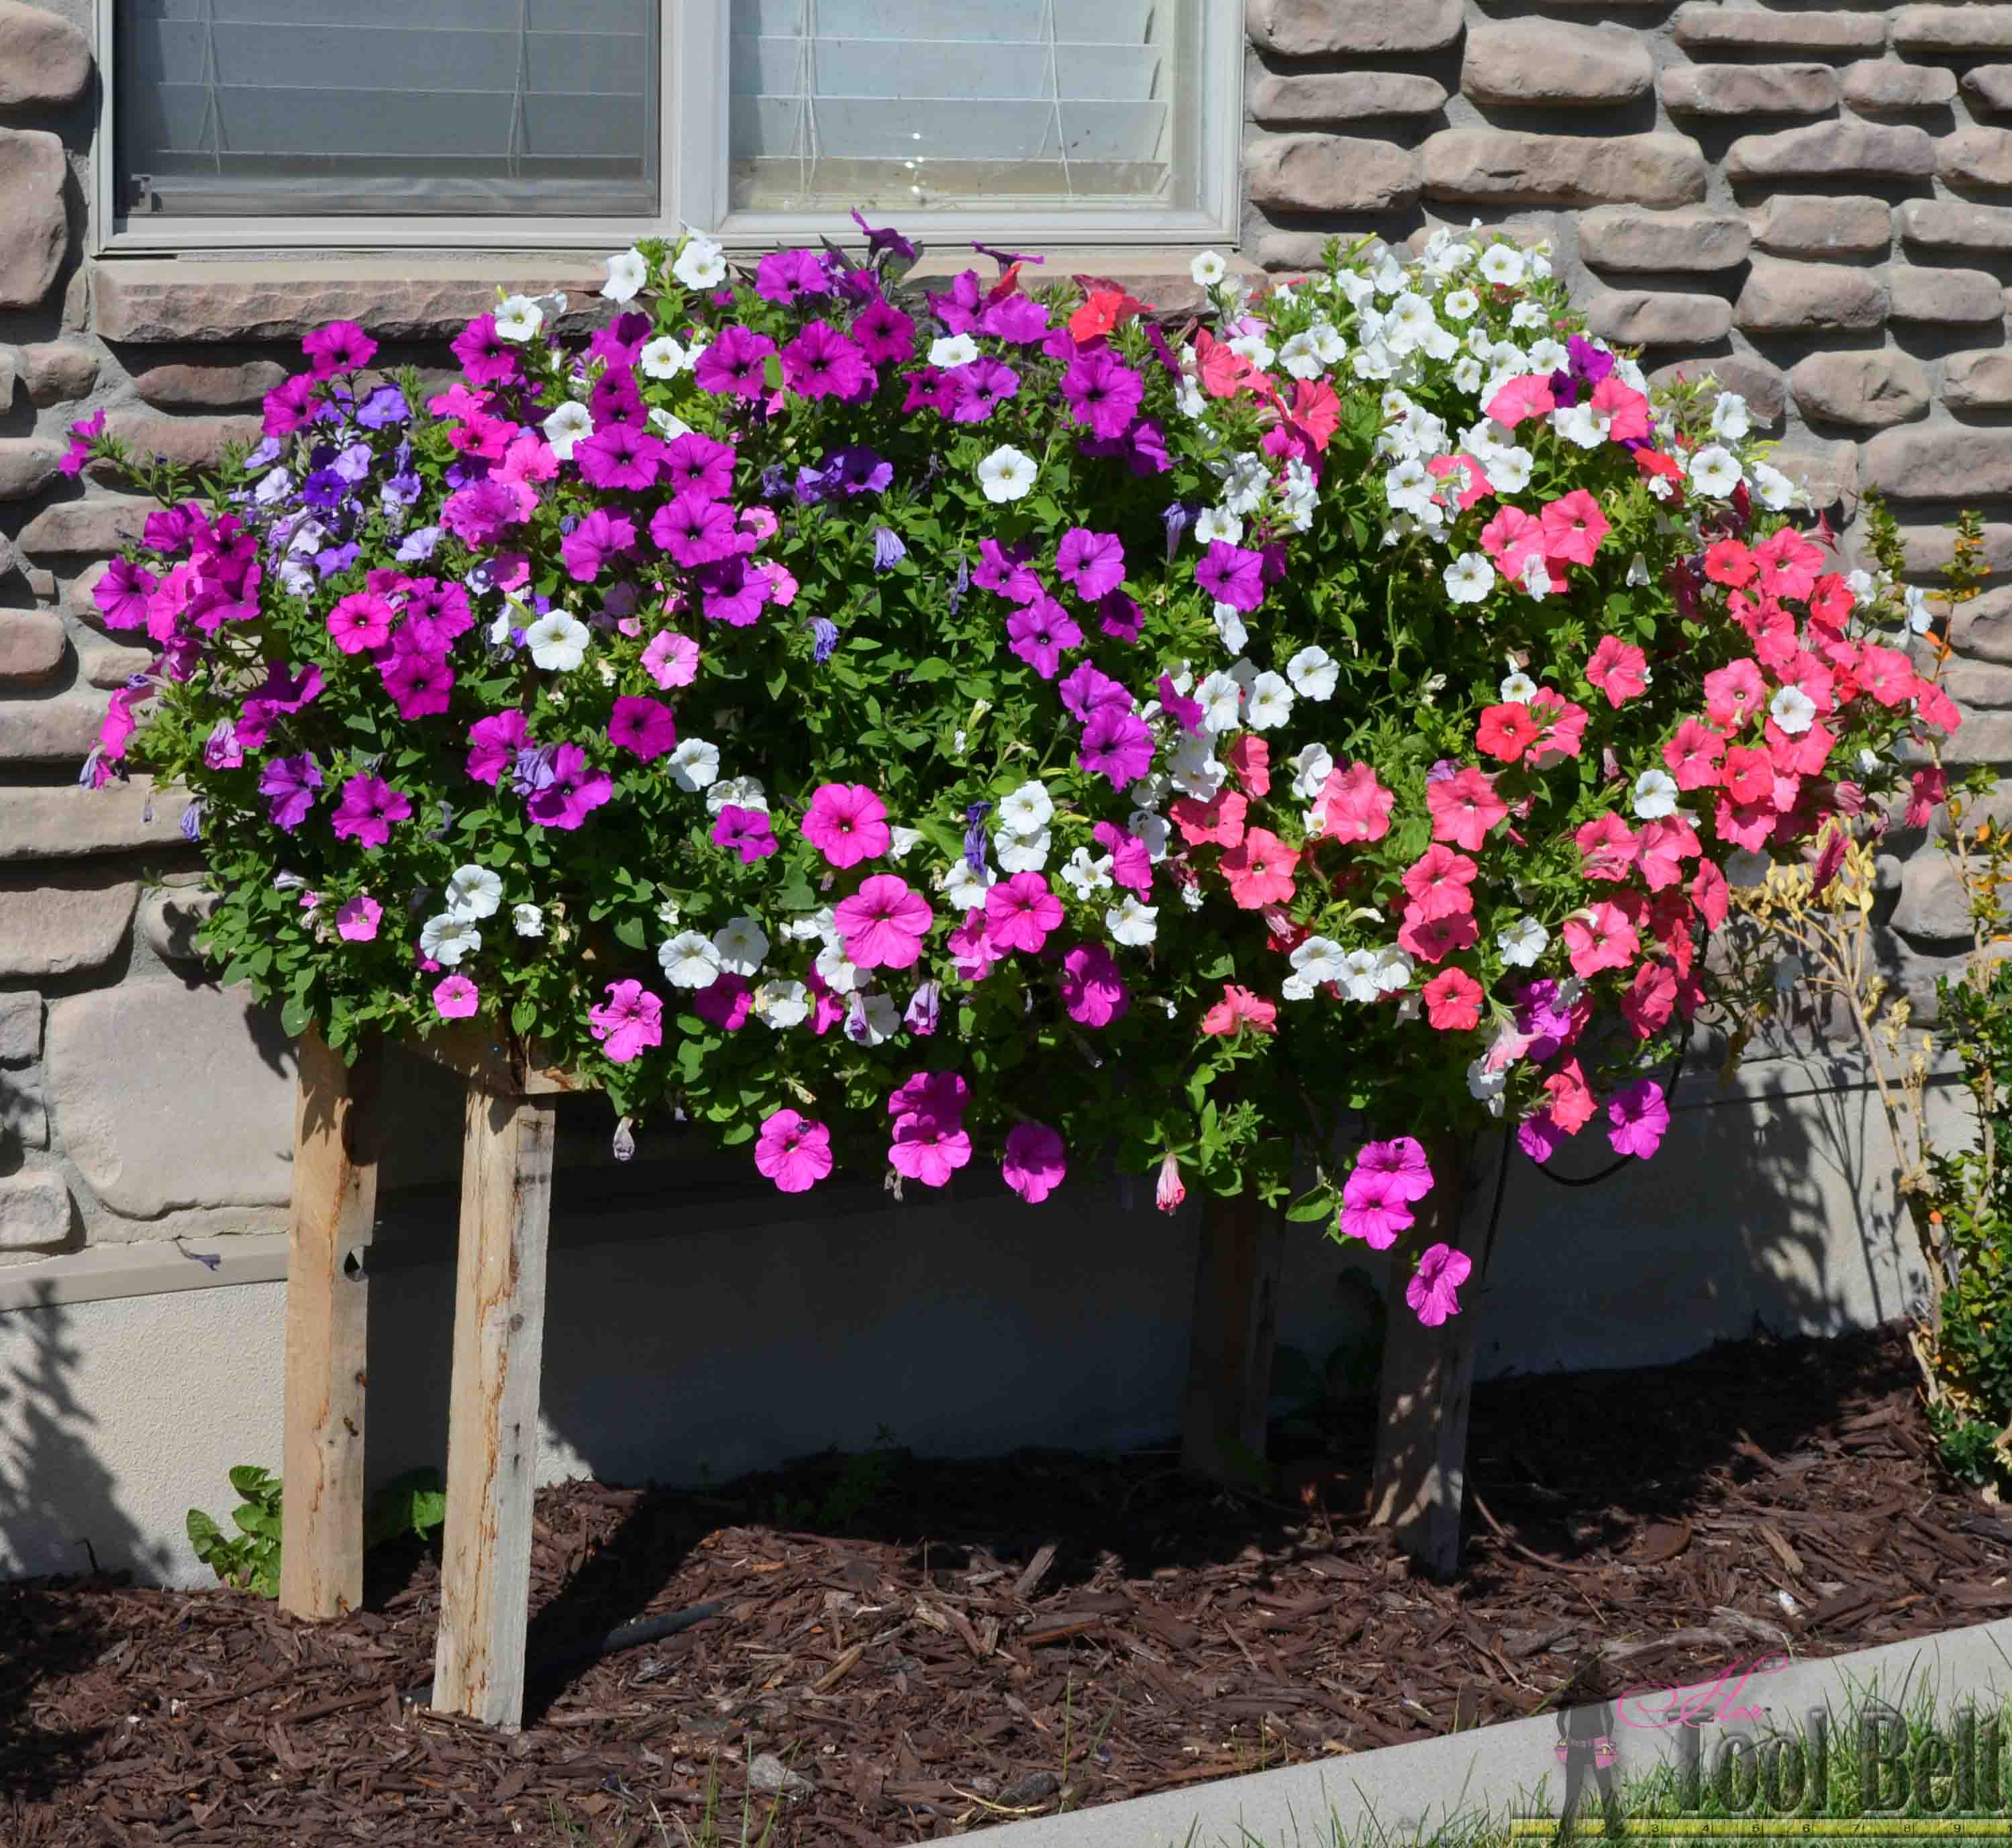
Sprayed it for bugs one last time, and one week later it looked amazing! Here is the result of the flower box in late September, gorgeous!
September 29 – Amazing!
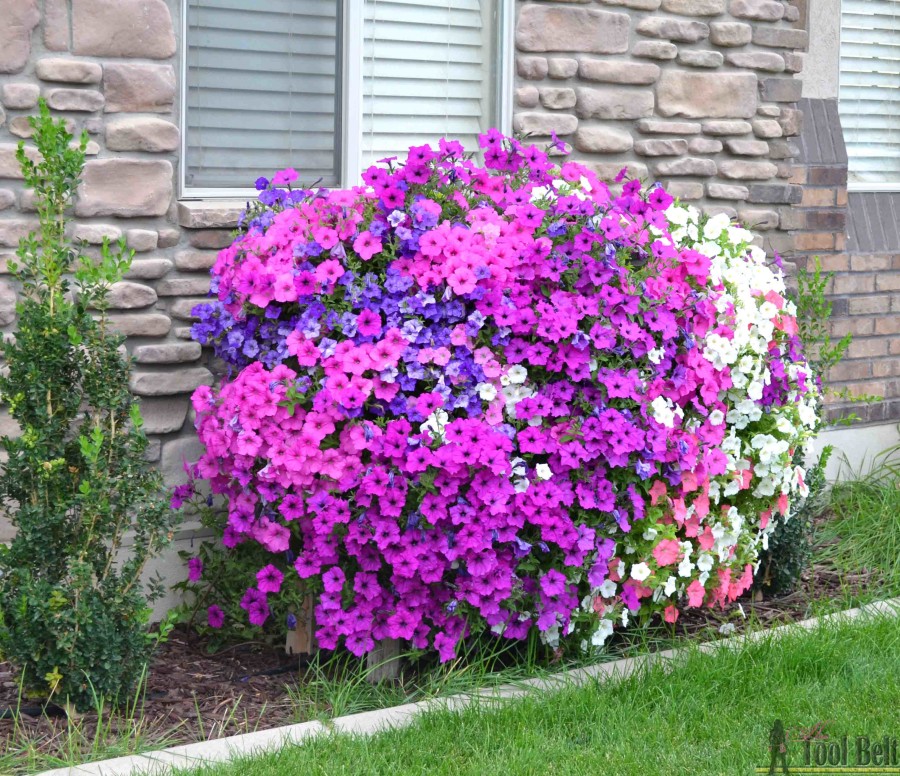
I can’t wait for next year! I think I’ll add a few more variations of plants next time. What are your favorite cascading plants? Maybe I’ll try a strawberry box too!
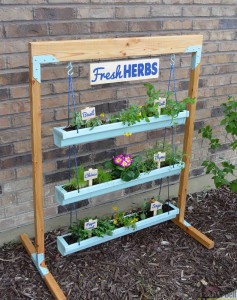
For another easy planter idea check out the Hanging Gutter Planter.
Supplies used for 2016
- 2 – 55 qt Miracle Gro Moisture control potting mix
- Soil Moist
- Shock wave petunias (18 pack Costco, 4 packs from local nursery)
- Easy wave petunias (18 pack Costco, 4 packs from local nursery)
- Used about 36-40 flowers in this box (the rest went in other pots).
If you are reusing this box from year to year, check the bottom boards between uses for rot. They will be easy to change out. After using this pallet box for 2 years as is, I plan on replacing the bottom slats and everything else should be good to go.
wow, what a neat idea.
enjoy!
b
I am in the process of making this point or not. My wife saw it and fell in love with it. So I guess that means we’ll be duplicating it!
I love the idea of the strawberries and I suggested it to her, but she wants the petunias so I guess it’ll be flowers or I’ll have to build two of them.
And I like the idea of using pallets, but Pilots are very hard to come by down here, but when I do find them they are free!!!
Great project these planters will make great Mother’s Day presents…. Now to get to work on them.
This plan is brilliant!! I’ve spent the last half hour trawling sites for a planter plan, so I can rustle up a couple for my daughters birthday, & this one is beautifully simple and re-sizeable
for different shapes!! Thank you 😀 xx
Thanks, happy building 🙂
trying to get it to print instructions but won’t let me
Could I please have a printable copy of this wonderful project? It looks wonderful!!! Julie
Hi, you can download them here https://drive.google.com/open?id=1VNEcnWvVddmTlr0l10miAmDjmw6WYtqc
Thanks,
Amy
Erm, just a quick query.
How thick are the pallet slats that you used
for this planter?
about 1/2″ thick
Thanks 😀
Do these flowers need full sun??? I plan on putting this on my porch?
The Wave people suggest 6 hours of sun. http://www.wave-rave.com/WaveRave/FAQ.aspx
This is an awesome idea! Just curious, what did you use to spray for bugs?
Just Malathion bug spray.
I bought Malathion spray for my petunias but unfortunately the directions say DO NOT USE ON PETUNIAS, Unfortunately it does not say that on the outside of the label its on the inside label so i did not know that til i got it home. Now wondering what I will use.
Well shoot, I’m sorry. Apparently I didn’t read the label (but it worked on mine). I’ll have to look around and see what is suppose to be ok to use on petunias.
Did you spray directly on petunias and leaves? Thinking about trying it on a small plant to see what happens
Thanks! I came beee to ask this exact question! Taking note of the bug spray /)
I love love this idea, I’m going to make a bunch of them to line my back fence and front of the house ♡ beautiful!!
What bug spray did you use?
Oh that will be sooooo beautiful! Just Malathion bug spray.
What side of house did you put box on?
The front which faces South East.
Was this built using one pallet or was more than one required?
I don’t know for sure, because I dismantled a few pallets and had them in a pile. I think it would probably take 2 depending on how many slats are on your pallets.
My problem is how to get the plant to go safely thru hole. when planting.
I have troubles with that too!
Wrap the roots of plant in a piece of flexible plastic, roots through the hole and release the plastic. Repeat for tge next plant. Its quick and easy. The plastic that some packages are mailed in is good.
Thank you for the great tip, I’ll have to try that.
This turned out so beautiful! How often did you water and feed the flowers because they are deep in the soil?
You have to water them everyday, because the holes let it dry out a lot faster than a normal pot. I usually water until it’s leaking from the bottom holes. I fertilized with Miracle Grow once/week. My mom uses a very diluted fertilizer/water every day. Whichever method works best for you.
I would love to reuse the box for several seasons.
Do you empty the box of the dirt at the end of each season?
Did you paint any sealer on the wood to protect the wood from rot?
Hi Donna,
I’m hoping to reuse it for several seasons too. After the plants died, I pulled the plant and root from the holes, they came out quite easily. I’m planning on removing about 1/2 the dirt (leaving the dirt in the back 1/2) and replanting and refilling with dirt. (I know some people would say it’s not good to reuse dirt from season to season, but I’m going to try.)
I didn’t put any sealer or anything on the wood and currently it looks great and ready for season 2.
FYI—Gardener’s Supply in Vermont offers a product to rejuvenate the previous years potting soil. My experience with it has been excellent. They also offer some other great products.
Thank you for responding to my question so quickly!
I love petunias, but you have to deadhead all the time and that is too much work for me. How did you keep up with deadheading all of these – how much time did it take?
I only got around to deadheading about every other week. I’m sure I should’ve done more…but I didn’t. 🙂
You can just work some of the dirt away from the root-bound stems, and loosen them up a bit to get them through. It won’t hurt them, and it actually helps them get stronger. It will work out fine.
You have to dead-head frequently. It only takes a few minutes, and it’s crucial to plant health. Use the time to just un-think everything and if that doesn’t work, pretend you’re pulling someone’s head off that perhaps cut you off in traffic that morning or stole your coffee order. Simple enough. Enjoy!
I know this reply is super duper late (I just came across this post on Pinterest) and probably won’t be seen by Deborah but Wave petunias do Not need to be deadheaded. Regular petunias yes, wave petunias no. That is the beauty of Wave petunias 🙂 Also if your petunias get leggy and blah looking feel free to trim them back a little. Think basil.
I’m going to use Proven Winners Vista petunias as they don’t need to be deadheaded. They are more of a mounding petunia and come in three colors – Bubblegum (light pink), Fushia (deep dark pink) and Silverberry (white with a pink center). Because of their mounding effect (one plant will cover a 3 ft. X 3 ft. Area, I plan on only drilling about 1/4 of the holes in the planter.
The secret to having petunias that do not need to be deadheaded is ,,,,, fertilize them at the outdoor rate with a high quality water soluble fertilizer, Peters, Jacks, Miracle Grow, every 5-7 days LIBERALLY meaning for this size planter I would use a minimum of 4 -5 gallons, secondly NEVER let them dry to the point of wilting, if using a sprayer on a hose be sure you know how much VOLUME you are applying,,, once again 4-5 gallons (any time the soil is slightly dry to the touch) to insure you are wetting the entire root zone. Buying a QUALITY peat lite container mix from a reputable garden center to plant them in is highly recommended. good luck
If you have a shady spot I’ve seen those flower pots filled with spreading impatiens. You might be able to plant them with portulaca, bacopa, alyssum…pretty much any shorter spreader, or anything you already see in a hanging basket.
I worry about the bottom flowers not getting enough fertilizer salts and the ones on top getting too much. I would probably mix granulated 3 month fertilizer in with the soil, or just use a potting soil with it already incorporated.
I’ve never used anythign like Soil Moist and school has made me suspicious of it.
It looks beautiful and I’m hoping to get some made for my mom. How many plants did you use? It looked to be about 50.
Thanks for the information.
I used about 40 plants.
Maybe use some pvc pipe (drilled holes) with coupler to hook up to a hose with fertilizer mix to reach all the plants?
What happens the next year tho….they are annuals…do you have to dig out all the dirt and roots….ugh?!
Yep! after the plants died, I pulled the plant and root from the holes, they came out quite easily. I’m planning on removing about 1/2 the dirt (leaving the dirt in the back 1/2) and replanting and refilling with dirt.
If you trim your petunias when they start slowing on the bloom time, they will come back full force and more. Also petunias are heavy feeders so your fertilizing is great.
Amy—–this was a great project for me. Rather than hassle the pallet I just went to Home Depot and bought a few 1X4’s I already had some 2X4’s laying around, I just finished it —- very easy to put together. Had to revise a few of the deminsions a 2X4 does not measure 2X4. No big deal easy fix. It’s a little early to plant here, so I think I will build a couple of more to fit across the back deck. Can not wait to see who this all comes out
Great, I bet it/they will look fantastic on your deck. Yes a store bought 2×4 isn’t 2×4, but the rough cut pallet boards are 2×4. I’m glad the build went well, enjoy!
Nooooo! Half the fun is tearing apart those pallets, especially with your husband. Easy peasy, and you learn some new words along the way. 🙂
Thank you for this beautiful idea! I want to make it and plant, I would want colorful flowers. Being from Utah, I used to plant all the time….Petunias and the like….all the spreading, creeping type which were mentioned here. I live in the Phx AZ area…..mostly rock and dirt yards….I don’t want to plant cactus type, or “occasionally flowering” plants…..do you have any ideas what might fillet and bloom as beautifully as what is shown? I would and could of course, water more often, we get 120 temps in hottest part of summer and full sun is everywhere. I live in a fairly newly constructed community, but back yards were dumped full of ONLY rock….I was shocked since I wasn’t informed during construction . I can face my boxes in any direction….I would like them front and back. I face east/west ugh, I know. But I can compensate with placement of these boxes. Our ground dirt is rock hard. I am a single, disabled 62 year old lady so ground planting is not an option. I’m so excited about this idea! I cannot sit nor stand or bend much…this is perfect for me and missing my Utah gardens. I’ve always been a flower garden person. Everything is brown and full of rocks, here in the outskirts of the Phx area. It is the desert. I crave color and life. Especially being ill and living alone. Any input from Amy or anyone living in full sun desert areas? PLEASE, does anyone have similar challenges…or Amy, or anybody have thoughts or ideas I haven’t thought of…..? I’ve spent 2. 1/2 years desperately trying to figure out a way to make my brown, typical AZ home-type yard, have some pops of color and flowers I can tend to. I miss it terribly. Each Town Home has one sapling, still supported tree, three orange, purple or pink zinnea-marigold type bushes in front yards. They’re destroyed during July-August monsoon season. Replanted etc. If it were a more mature community, with trees, bushes etc, perhaps some shade, and front yard planted bushes allowed to mature enough for these awful monsoons my area gets h season, so they’re not so easily uprooted and washed away. These planters, I could shelter in my garage during the worst part of the storms. Backyard has zero natural shade. I can provide canopies or come up with something. I have a large, empty wasted space yard…cinder block walls, private, new etc. I even thought about some sort of wall hanging planters. There are also the desert pests i.e.: scorpions, bugs I’ve never seen before, flying things which are the exact color of the stucco walls most homes are done in out here.. I may not have already thought of? This climate kills everything luscious or fragile…. ANYONE out there who can HELP me?? Another environmental negative, I live up almost against the Superstition Mountains, I’m, at the lowest point in my 84 home community, my home. Is next to a wash for overflow (monsoon seasons)…..and there are four lakes just over the mountains behind me. I’m almost ion a different climate than Phoenix proper, or the other suburbs nearer Phx, in the valley from me. Again, HELP!! ?????Thanks so much for reading my long writing, much appreciated!
Hi Sandy,
I’m so sorry about all of the environmental gardening challenges you are facing. I wonder if a local nursery would have some ideas on pretty flowers that might be able to withstand some of that brutal AZ heat. I’m in Ut, so we only get up to about 100. I placed my box on the east side of my house so it would be blocked from the really hot afternoon sun and wind, the flowers seemed to like that orientation. I came across a gardening calendar for Phoenix, looks like it has some ideas of plants and timing http://www.gardeninginarizona.com/calendar.html I don’t know if it will help, but it looks like it has some good info.
Hopefully someone else will chime in with ideas.
Good Luck!
Sandy, go to the web & try checking out other parts of the world that have fairly similar conditions, and see what grows well for them? (Spain & geraniums come to mind. Herbs/lavender/rosemary/bay/olive trees/Grasses ?) Google “what grows well in this “…” weather condition”, & see what comes up. Do Google Images with the same query, too, & see what comes up. Its amazing what info. you can come across on the web, Are you near countryside, to see what grows well out there? Garden centres? You might not end up with softies like petunias, but you could have a great mix of foliage shapes, sizes & shades. You could buy a Sherlock Holmes-style hat to do all this detecting in, & it’ll give you a bit of shade, too! Good luck 😀
Sandy I know this is 2 year later from when you posted your question, but I take it your in Apache Junction or Gold Canyon. Almost any plant will grow there, you just need to create shade for them. What you need to do is use 2×4’s that are 2 1/2 foot longer in the back and 2 foot longer in the from for the legs. Make sure the extra length extends to the top and build a frame around the top. Then use the pallet boards across that top frame as the shade for the planter box.
Then on the inside of the box before you put any soil mix in, line it with either white or clear plastic. Garbage bags work good for this. Staple it in and then line it with weed guard material. Cut out the holes to where the plants will come through and also put a few drain holes in the bottom. This will help with retaining the water more and less evaporation from the heat and wind.
You can use this same planter box for putting strawberries in the sides and other vegetables in the top for a raised garden. The garden I had in Apache Junction was beautiful and lasted most of the year using shade cloth over the top so the plants didn’t get burnt. Hope this helps.
Was wondering when you put all sides on did you have that gap at bottom between the sides and 2×2’s support.
Yes I did, that’s why I put weed guard down on the bottom and it has held well. But you can put a piece of scrap wood on each side to cover the gap and it should hold the dirt fine.
Awesome thank you
Hello me again how far up from the bottom did you start your first row of holes
Measuring from the bottom up to hole center: 1st row 4″, 2nd row 8 1/2″, 3rd row 14 1/2″ ish.
I just went &bought lumber… At the advice of the man who built mine… Hard to find heat treated palates… …turned out just fine… Looking better than used lumber…
I also thought of using begonias in mine…the trailing kind… Excited to get planting!!!
Oh that is going to look amazing!
Excellent plan. I went the way of simply purchasing treated lumber for two and it only cost about $38 for both. After one year no sign of wood rotting and it’s even added a green and brown aged touch. The box is rather large and takes quite a bit of Miracle-Gro Big Bloom Mix so I took the idea of a lightweight filler. I did substitute Swim Pool Noodles instead of packing peanuts. They were far less expensive, easier to keep in place, and when the season is over it’s easier to dig out the plants and reuse the soil elsewhere (Holes in the yard the dog has dug, other garden areas for next spring, etc.) without having to pick out individual packing peanuts. Instead of a fortune on Miracle-Gro I used a large bag of Epson Salt from Walgreens and mixed it in with the watering tank once a week to keep it blooming. Thank you for the great idea!
Thanks so much for the tips, I’m definitely going to try those out this year!
I love this idea. I have access to lots of pallets at my business. Is there a reason that the box needs to be 16″ deep? Couldn’t you make it 8″ instead and not have to use all the filler to take up space?
Just fasten the back boards to the inside of the 2×4 legs. This will eliminate the need for foam fillers .
great idea
We put empty clean gallon milk jugs in our boxes so we dont have to use as much soil.
Beautiful! Are those annuals or perennials? I would like to do it but my understanding is I would have to empty out planter and start again if I use annuals. What did you do after they stopped blooming?
Yes they are annuals. Once the plants died, I just pulled them out of the holes. I haven’t replanted yet this year, but I’m sure I will big digging out lots of dirt. The things we do for beautiful flowers 🙂
Most petunias are in fact tender perennials. If you have a greenhouse/polytunnel, you should be able to over-winter the plants. If you take cuttings in August and over-winter them indoors, they’re likely to bloom through the winter and be ready to start again in spring. There’s a very good tutorial I found here on doing that: http://www.agardenforthehouse.com/2013/07/how-i-propagate-petunias-for-winter-bloom/.
I’ve made your box this year, and I’m planning to take cuttings in this way in the hope I can start earlier for next year. Did you use the box this year or in 2016? I’d love to see more pics if you have a follow-up.
Did you just gently pull the flowers through the holes as you planted them.
Yes, I tried gather all of the stems of the plant together and stick them through the hole.
I love this idea. What kind of spray for bugs did you use.? When my plants stop blooming mid or late summer, I figure they need major dead heading or are root bound. If it is a bug problem, that is easier to deal with so what do you use?
Thanks for a great idea. Also, the hole saw is just attached to a drill?
I used malathion bug spray. The hole saw is an attachment that you can put on the end of your drill.
oh GORGEOUS !!! I can do that !!! Thx so much for the motivation 🙂 How can I get on your newletter or mailing list ???
Thank you! The email sign up is at the top of the right column. Have a great day.
If I was going to grow the plants from seed. How many packages of seed do you think I would need
I used about 40 plants. I’m not sure how many seeds are in a package, but I’d aim for 40 plants.
I ordered petunia seeds last yr and they have about 10 seeds in a package so they are fairly expensive.. Over last summer some of the plants dropped seeds on the ground ( that I didnt get dead headed) and tiny plants started to appear in late Aug. I pulled them up and potted them, leaving them in our cooler basement ( near a window). Those plants are now blossoming and we will put them in our flower boxes come May,. Free plants and the colors we like.
What size of container did the petunias come in? I’ve seen 1.25 quart size only i think … I wasn’t sure if that was bigger than you used.
Sorry for the delayed response. I finally picked up flowers for this year, I put a picture of the containers at the bottom of the post. I’m not sure what size they are, but they are larger than the normal petunias in the packs.
How big were the bags of potting soil that you used?
55 quart
I had this planter built for my mother, thank you for the wonderful idea! We are planting the Petunia’s today, we only have 24 holes on the side, the guy who built it forgot about 6 my question is how many plants did you use on the top?
Again, thank you for the beautiful idea, my mother is in love with it and we can’t wait to see it grow and in full bloom!
Hi Meagan,
Last year I planted 8 on top, this year I did 10. Good luck, it’ll be amazing!
I haven’t got to plant the flowers yet, I went to purchase them and the stores and garden centers only had pink! I am looking for a variety of colors! Any suggestions on where to find in northern Alabama?
Hi Meagan, here is a store locator for the Wave petunias. Hopefully that will help you find a better variety. http://www.wave-rave.com/WaveRave/WaveRetailers.aspx
Awesome idea!! I do have an idea that might make it even better! How about putting a divider in the top, long wise, and then growing some veggies in the back? Instead of using a filler, you can kind of separate the areas and grow some food!
That is a great idea, beautiful and useful!
My wife saw this planter box and she loved it so much I built it only took 2 hours total and she is planting tomorrow. Wish I could post pics. Thanks for something simple and easy and makes my wife happy.
Can I use Cascading Petunias? What is the difference between wave and cascading?
I’m not completely sure, but I don’t believe the cascading petunias will trail down as long as the ‘Wave’ petunias. The ‘Wave’ petunias are a branded petunia. I know a lot of people will intermix the waves and cascading petunias in their hanging baskets for variety. Here is a cool plantagram with different flower options. The ‘Vernal’ has super cascades with tidal waves. https://www.bloommaster.com/plantagrams
Hi again. Still having a dilemma over the type of petunia! I never realized they are so hard to come by!!! I have found what I guess one could say “”Baby Petunias” They are quite small! Wil they work for this?
I’m so sorry that the Wave’s are hard to find in your area. They are at all of the nursery’s around here. You can use regular petunias, but they won’t trail as long as mine in the photo. I think it would be fun to use regular petunias, for the summer long blooms and alternate in some other trailing types of flowers/plants.
Here are a few trailing flower types that would look fabulous. Verbena, Zinnia, Sweet potato vine (green or black), Coleus, Black eyed susan vine, Sweet alyssum, Yellow million bells, Cascade lobella, Licorice plant. I think a variety of flowers is fun.
I just made this over the weekend & I am so excited! Thank you for the great idea!
My husband is building a box to put inside for empty space so you don’t have to use much soil….thought I would share..
Great idea!
Hi I owned greenhouses for 20 years. The secret to growing great wave petunia baskets is to water them throughly every morning with a little fertilizer for blooming, once they start looming they don’t stop. They will grow faster & more beautiful everyday. You don’t have to pinch back the dead blossoms either. If your petunia is looking bad & your giving it enough water then give it a little more fertilizer. If it is raining everyday & it starts to look bad it might be getting to much water.
Thanks so much for sharing your knowledge!!!
I made mine and planted it the middle of May. It’s already starting to fill in. Love it. If you use packing peanuts you won’t want to use the ones she used. Those type are made from cornstarch and will disintegrate after the first water.
That’s great! Yes I got a lesson in packing peanuts after my photos last year…I used a different filler this year 🙂
Great will be making these for my wife for the house and camp. On question/suggestion, using pallet wood for he bottom I would expect it to fail withing a couple of years. I am going to use scrap Tek decking finish side up should last years I think.
Hi John,
I think that is a great idea. I’m on my second year with the pallet/pine wood bottom. I don’t think I dare chance it another year and will probably replace the bottom.
Did you replace the bottom, Amy? I’m going to make one of these this spring 🙂 Also, did you try out the Safer Brand bug spray like someone below suggested or are you still using malathion? I’m over here taking notes so I can have the best results 🙂 I’ve never done such a large planter but my smaller pots on the side of the house are so much to keep up with that I think this bigger planter is just the ticket! Plus, I can get pallets for free at work so it’ll be really affordable. Great idea!
Hi Sara,
I used my planter for 3 years, then I decided to make a new one. I could’ve just replaced the bottom because that is what was rotting, but I wanted to make a video of building one… 🙂 I haven’t tried the safer brand sprays yet because we haven’t run out of malathion. I’ll try and test some things this summer. Build it, you’ll love it! Happy planting.
I put 11/2 inch plastic pipe 4 inches from bottom added three veritcal pipes. drilled holes in bottom pipe. Worked great.
Is it possible to use Geraniums instead of Potunias
I believe geraniums will grow well in the box, but may not have the same cascading effect as the Wave petunias.
i would love to have one of these. i have no one to make one for me. would someone be able to make one for me and then i could put the legs on it when i get it. here is my email: tpetroske3937@comcast.net. i hope i can find someone to make one for me. i love unusual things in my flower garden.
The pests that eat your petunias are “tobacco budworms”. They nip the flower off right at the bud and leave tiny black specs on the leaves. They are rampant in my area and ALWAYS get them if I don’t spray. There is a natural solution which takes care of the problem without harming the good worms and bugs. Use this if you see any sign of them. Or just use it regularly, to prevent the problem. Saves a lot of agony watching your blossoms disappear… Don’t ask me how I know 😉
Any brand in the garden center that has BT (it’s a bacteria that kills the worms). No I don’t work for the company, but I feel my fellow gardener’s anguish and wanted to drop the info. You’re welcome!
http://www.saferbrand.com/safer-brand-caterpillar-killer-ii-with-bt-concentrate-16-oz-5163?gclid=CLf7ur7ysdICFQKUfgodq9cLxw
Thank you Kim, I’ll definitely try this product this year!
BTW, your planter is GORGEOUS! Great idea!
I am currently making 2at the same time. Played with the router as well. I will post pics if I can. I am giving the store that gives me all the free pallets one of them
We added some gerbena too;. dont need dead heading and cascade to fill in with the petunias. It is glorious.
Started African Sunset petunias in Feb. Bought one apricot colored gerbena plant. Rooted those branches and filled in the boxes. Added a few scented geraniums to the top for height as well as peach colored geraniums. People stop to look.
That sounds amazing, I need to add those to my flower list! Thanks for sharing.
What spray did you use for bugs?
I used malathion, but didn’t realize it says do not spray on petunias, although it works. 🙂
didnt use any.. Bugs did little damage; good soil; blend of pro mix and Miracle grow.
love this!!
That is a beautiful planter box. I would love too see more of your ideas.
Very beautiful can’t wait to try this….this year.?????
For the cascading planter box do you change the soil every year?
I’ve read that if you reuse the soil, you may be keeping plant diseases going??? I usually take that gamble and remove 1/2 the soil (where the flowers were growing) and replace with fresh soil while planting the new flowers. HTH