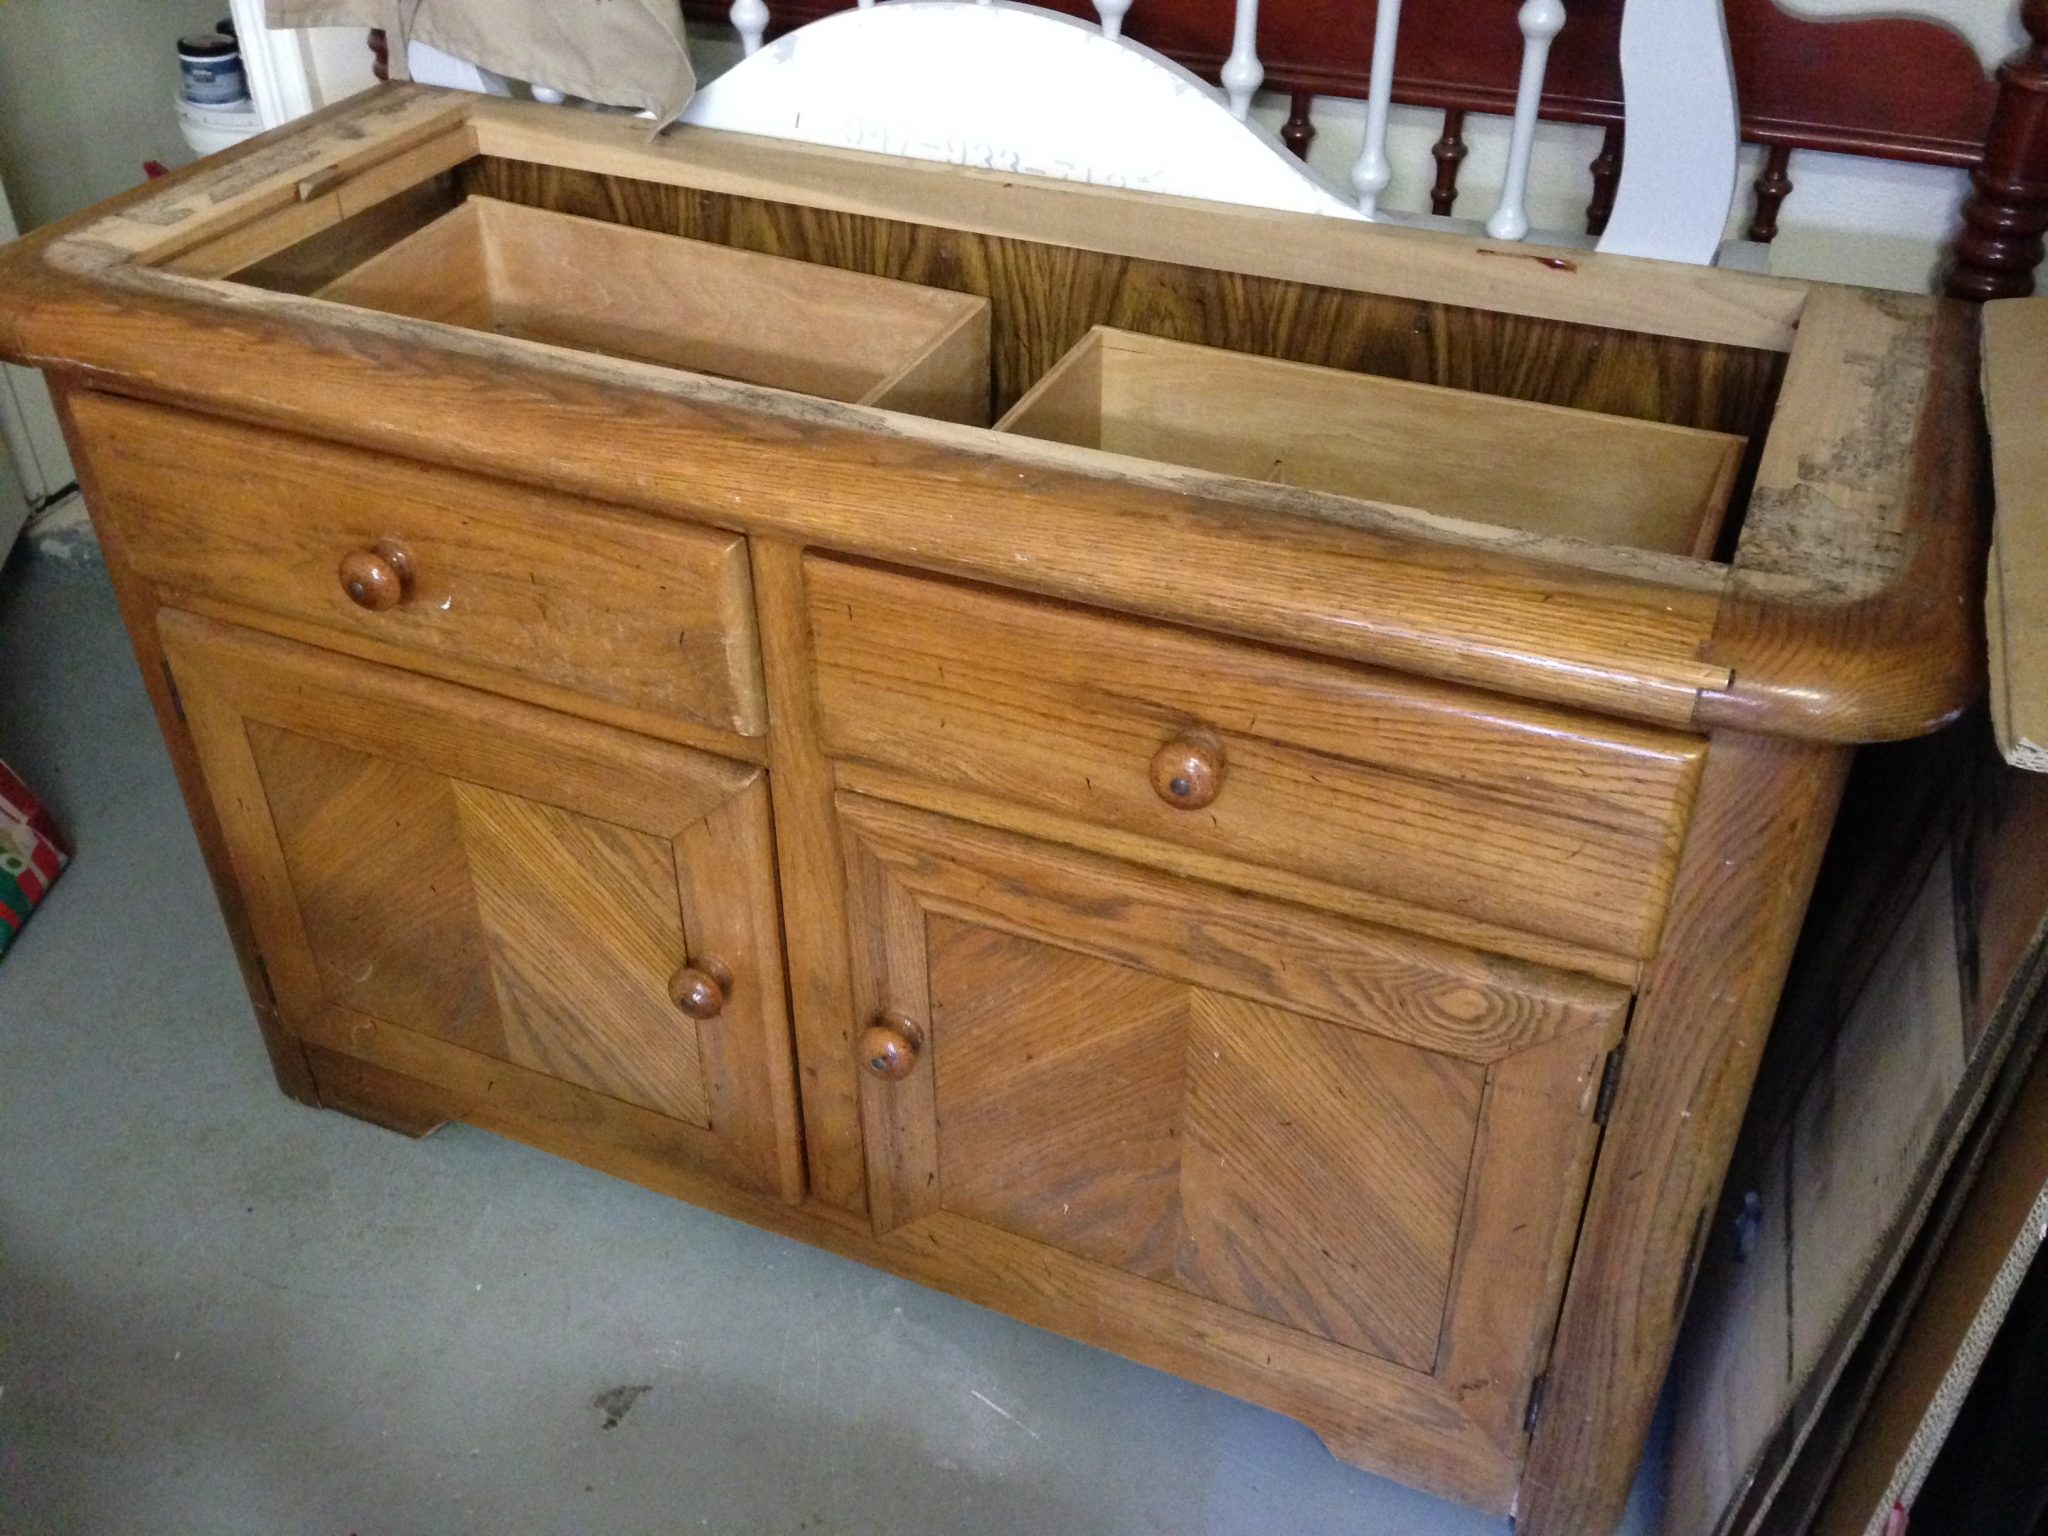
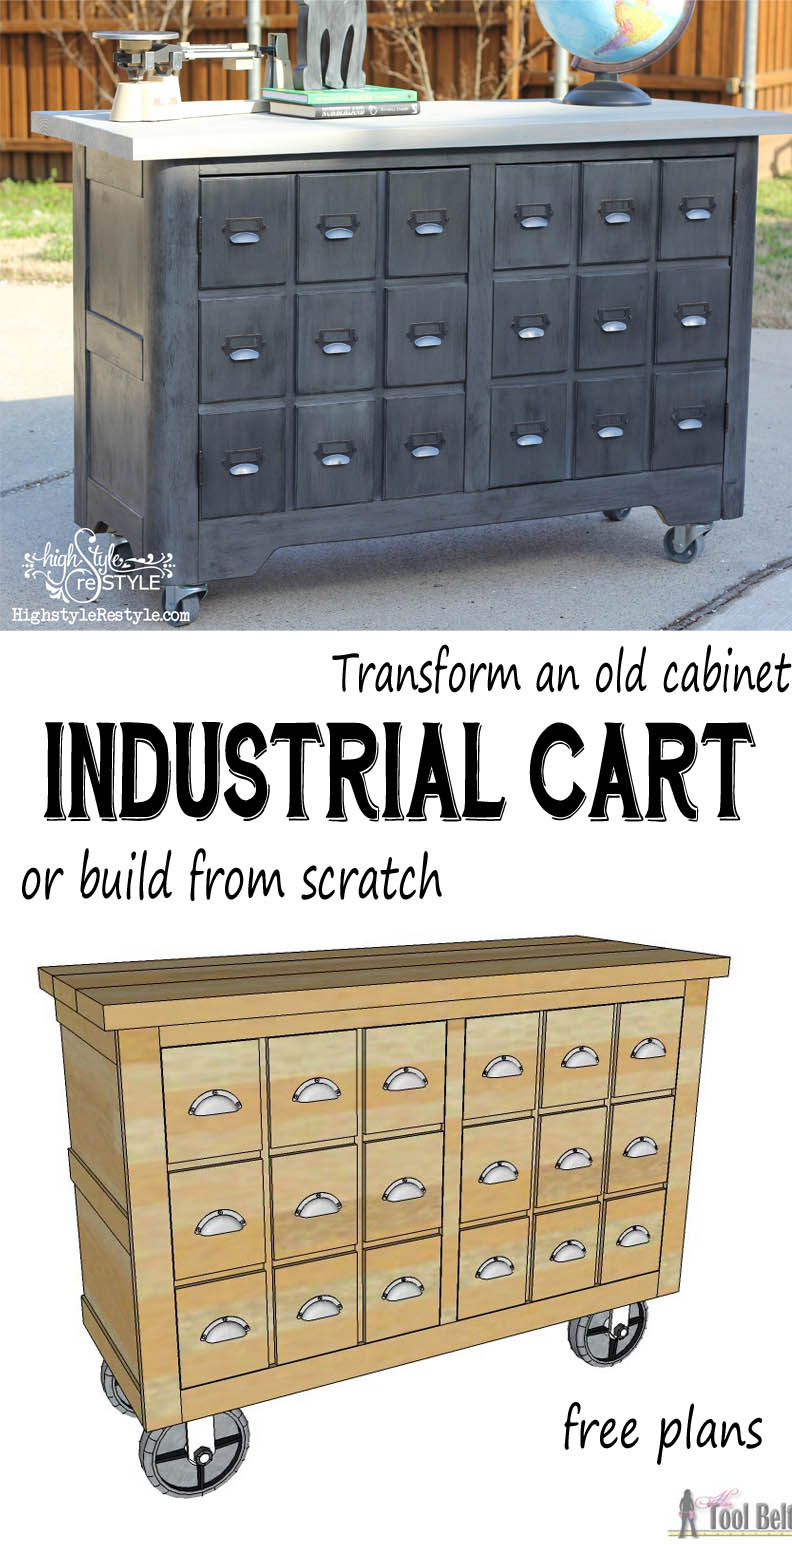
I’m excited about this project, I was able to collaborate with the talented Amy from High Style Restyle. Amy and her Dad picked up an awesome curb side find, an oak china cabinet headed for the dump. The top part of the hutch was transformed into a beautiful barrister style bookcase. For the bottom cabinet, she envisioned an industrial cart/ apothecary cabinet.
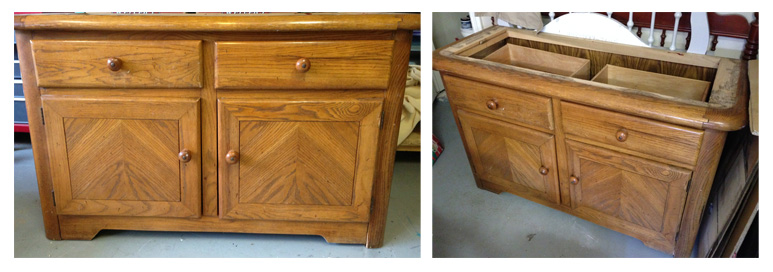 I’ve certainly got to hand it to Amy, I never would have thought of making an industrial cart out of a china hutch – some people just have all of the creativity! Amy contacted me to help with some plans and I was more than happy to help out. Her final product is way better than the plans I sent, and it turned out amazing! Can you even believe it’s the same cabinet?

Since we won’t all be lucky enough to find an oak china cabinet on the side of the road, I’ll share plans on how to make this industrial cart from scratch, then make sure you go visit Amy’s post for all the in process steps and to get that beautiful finish!
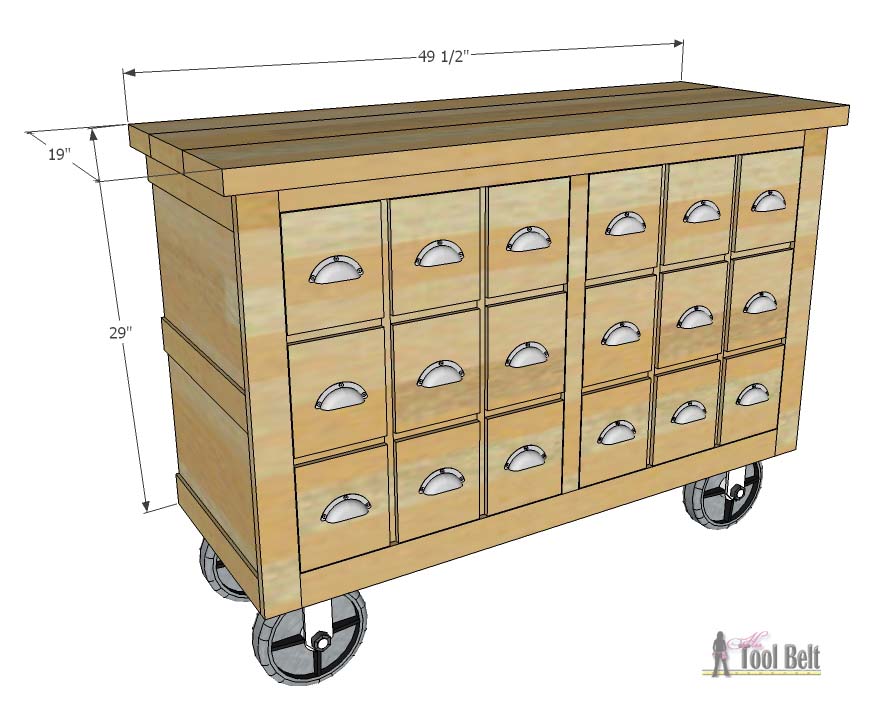
How to Build an Industrial Cart – Apothecary Cabinet
Materials
- 1 sheet 3/4″ plywood
- 1 – 1″ x 2″ x 8′ board
- 2 – 1″ x 3″ x 8′ board
- 1 – 2″ x 8″ x 10′ board
- 1 – 2″ x 6″ x 8′ board
- 3 – 1/4″ x 2 1/2″ x 4′ poplar hobby boards, or 1/4″ plywood
- 1 glued wood panel 3/4″ x 24″ x 60″ (or wood glued together)
- 1 – 1″ x 6″ x 8′ board – optional drawers
- 1/2″ sheet 5 mm sheathing, underlayment plywood – optional drawers
- 1 sheet 1/2″ plywood – optional drawers
- 1 – 2″ x 4″ x 8′ board – optional drawers
- 4 casters
- 4 inset hinges – optional drawers
- 18 cup label pulls
- 1 1/4″ pocket hole screws
- 2 1/2″ pocket hole screws
- 1″ pocket hole screws – optional drawers
- 3/4″ brad nails
- wood glue
- wood filler
- sand paper
- paint/stain/top coat
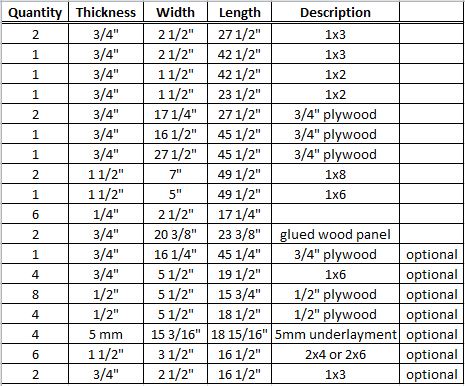
Cut List
Step 1
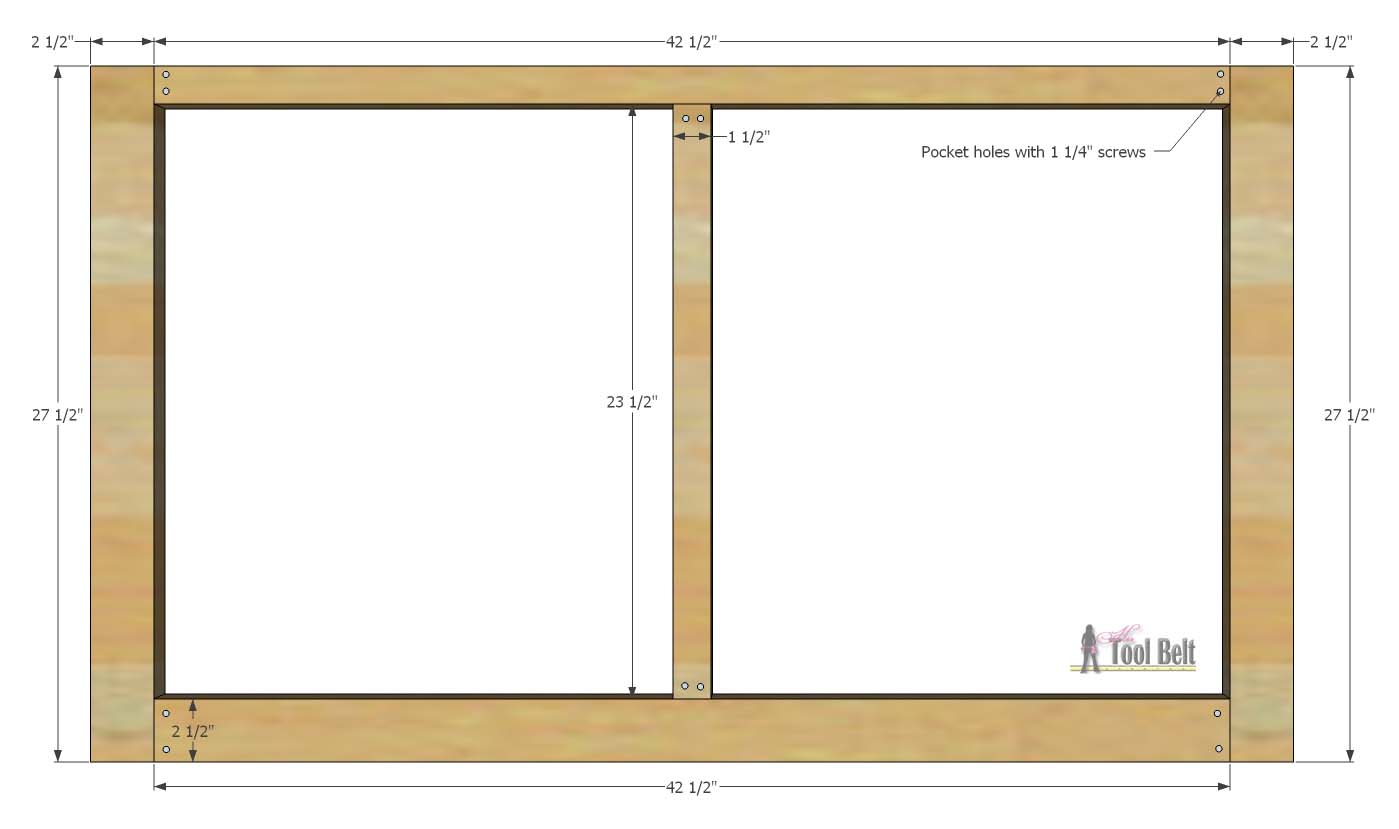
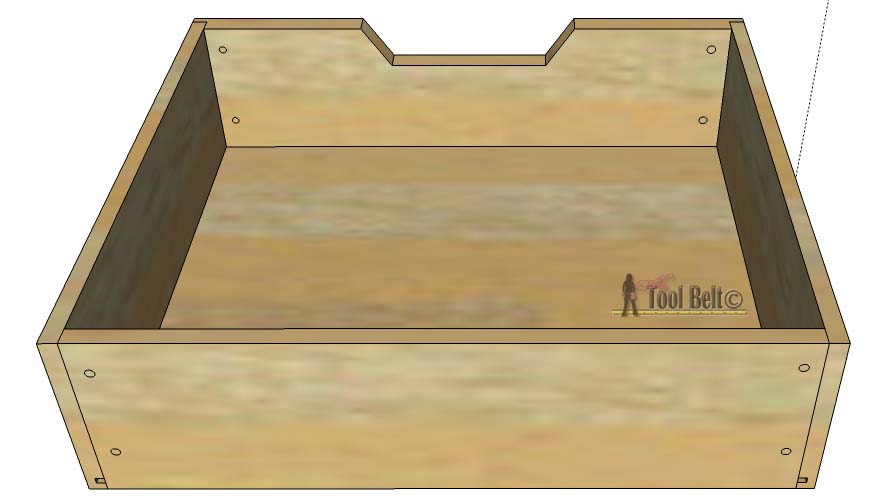
First we’ll build the face frame. Drill pocket holes in both ends of the 42 1/2″ pieces, and the 23 1/2″ piece. Use wood glue and 1 1/4″ pocket screws to assemble the face frame.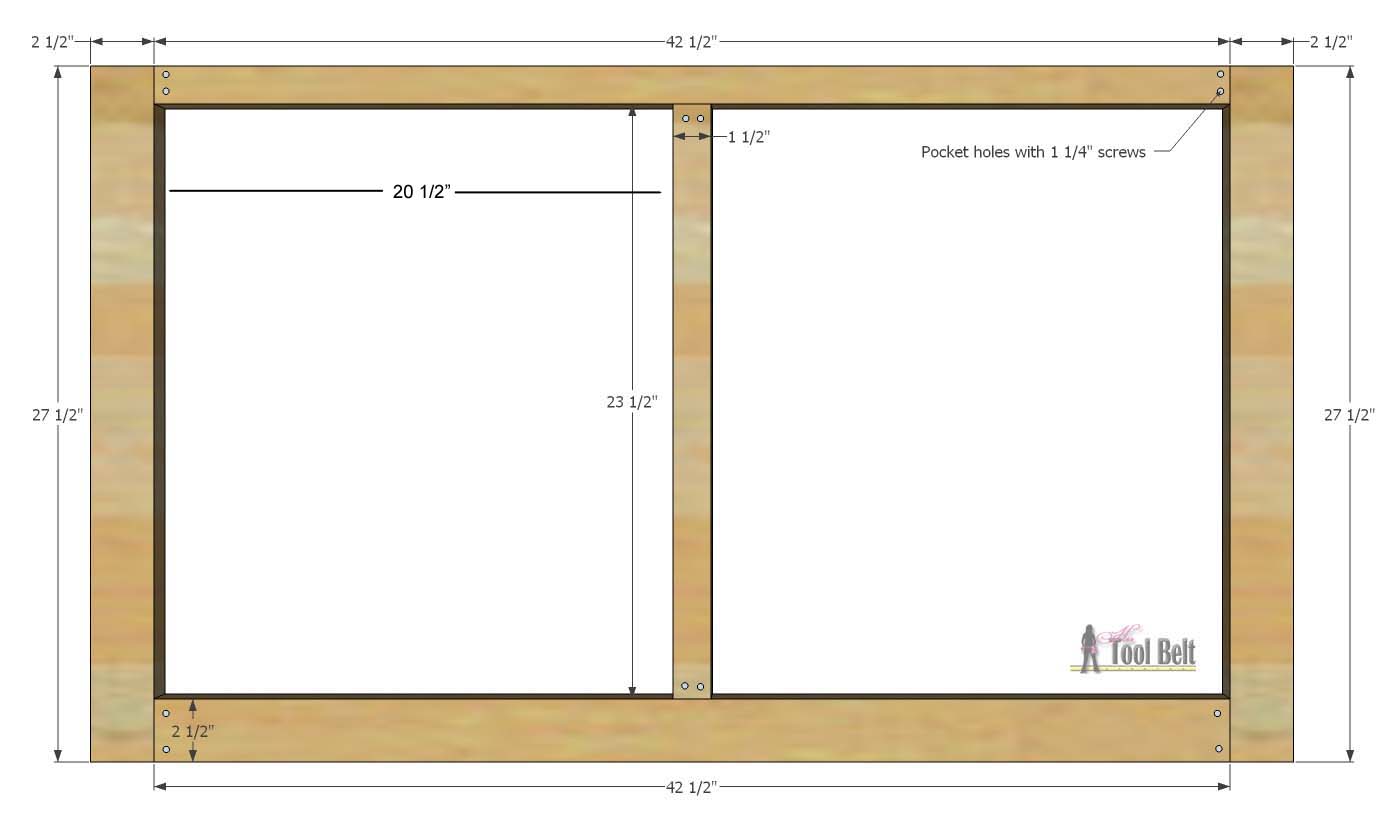
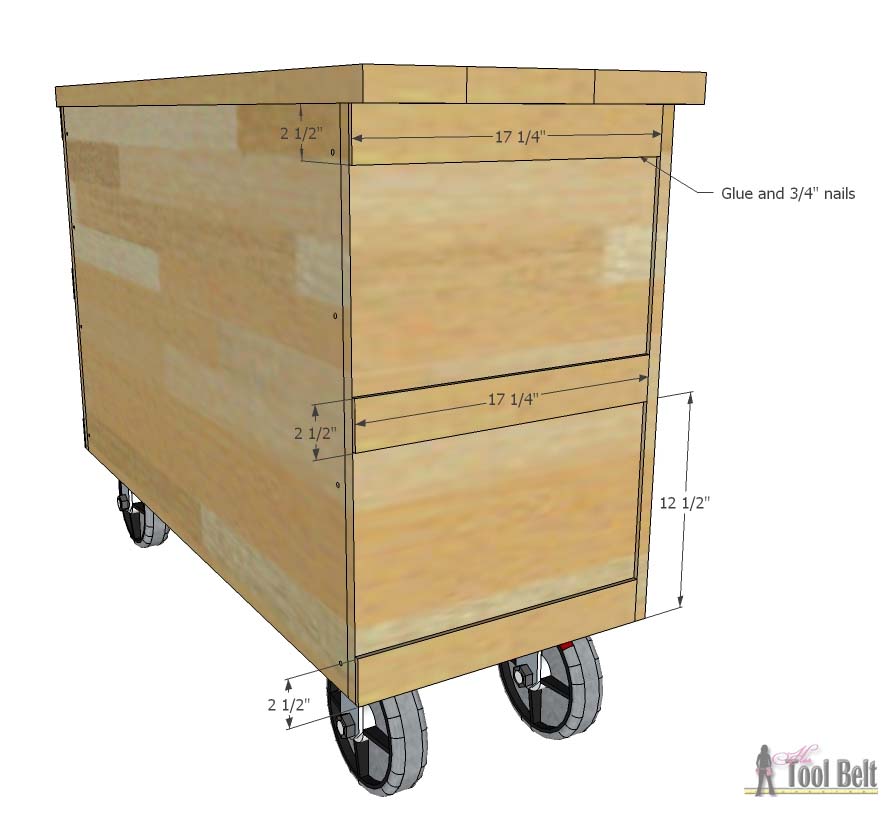
On the 2 side panels (3/4″ x 17 1/4″ x 27 1/2″) drill pocket holes on the inside face to attach to the face frame and to attach the top later. Inset the sides 1/4″ from the edge of the face frame and secure with wood glue and 1 1/4″ screws.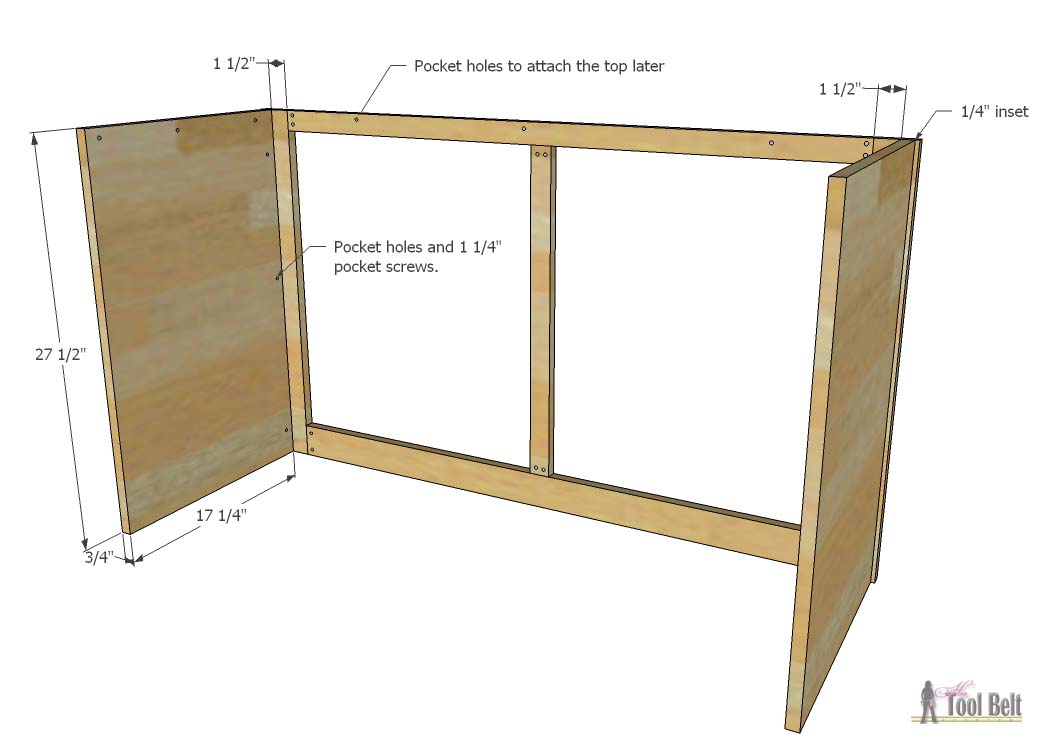
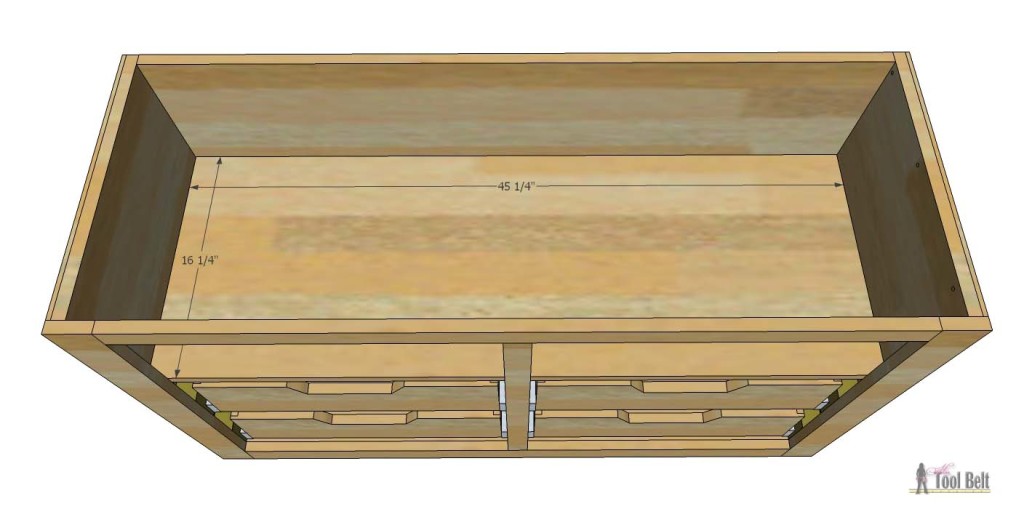
Drill pocket holes in the bottom piece (16 1/2″ x 45 1/2″) to attach to the face frame, sides and back. The bottom should be flush with the cabinet opening, and 1 3/4″ inset from the bottom. Secure the bottom with wood glue and 1 1/4″ screws.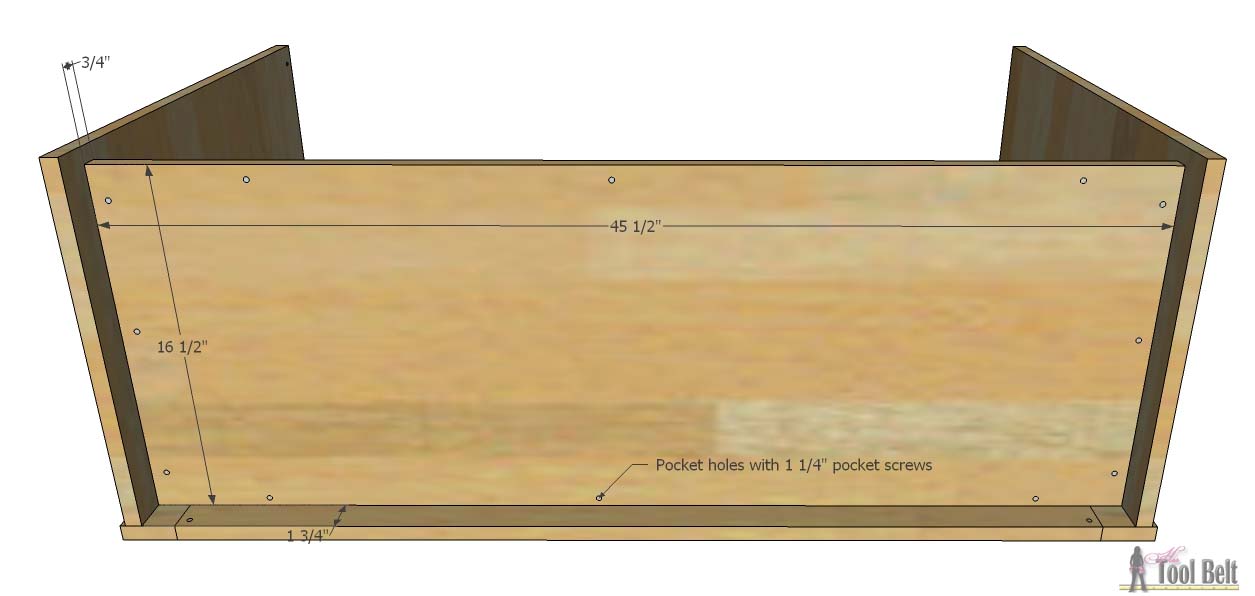
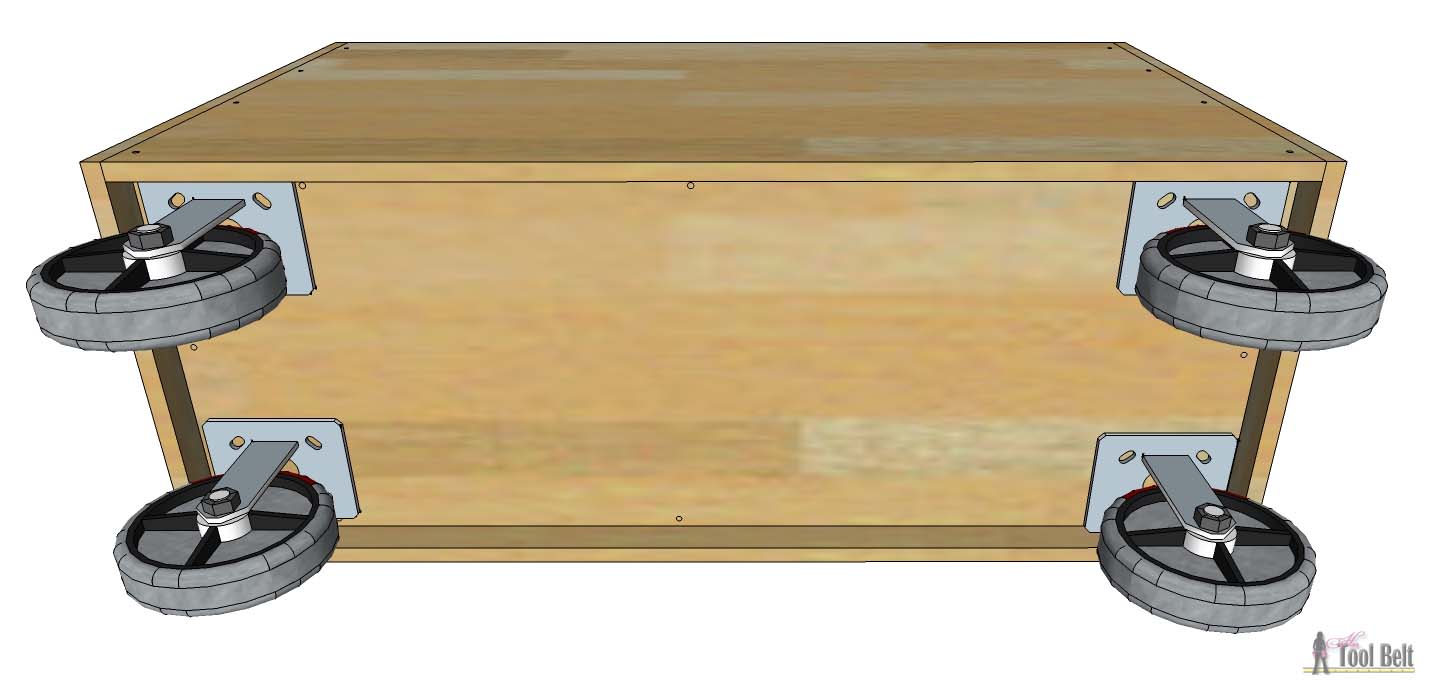
Drill pocket holes in the back piece to attach the sides. Use wood glue and 1 1/4″ screws to attach it to the sides and bottom.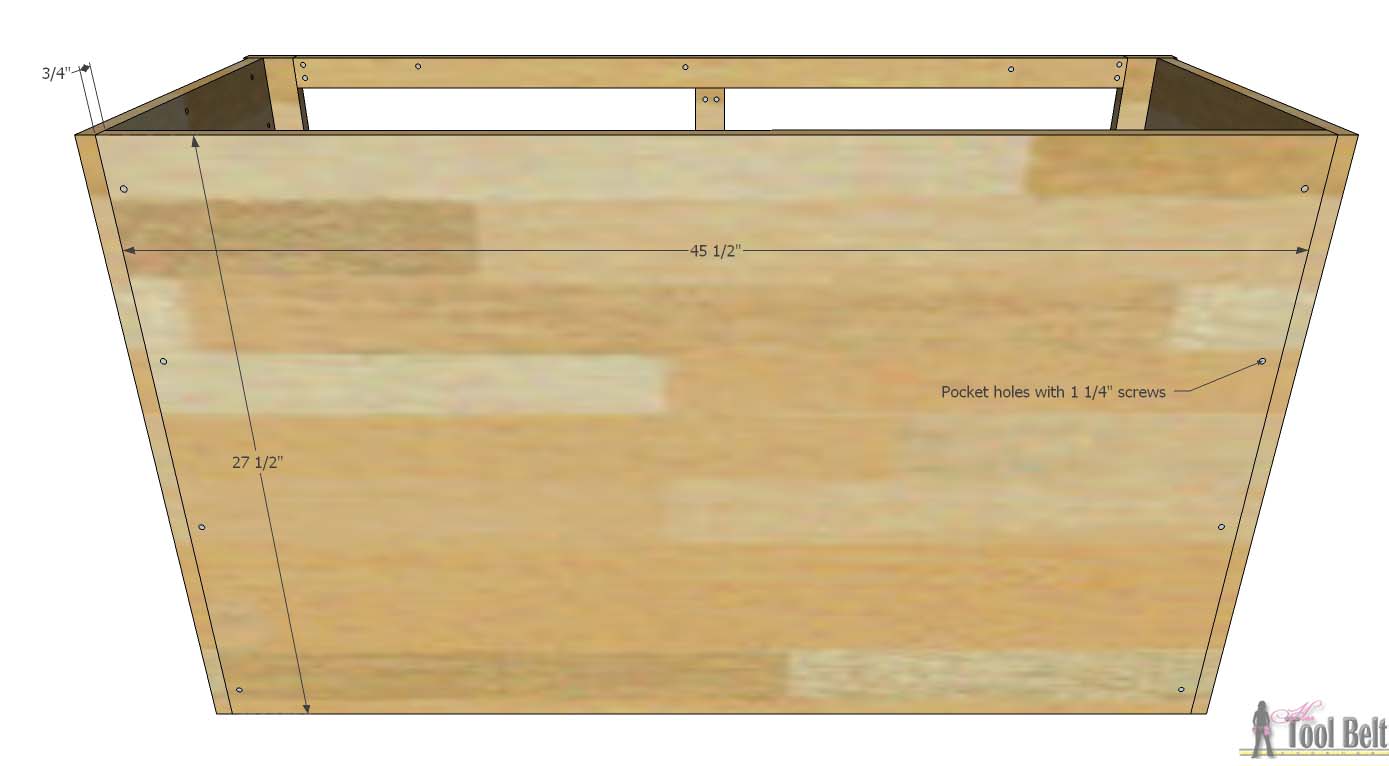 Install caster wheels on the bottom. The ones used in this model are 8”, but you can use whatever size you like and can afford (goodness they can get expensive 🙂 ).
Step 2
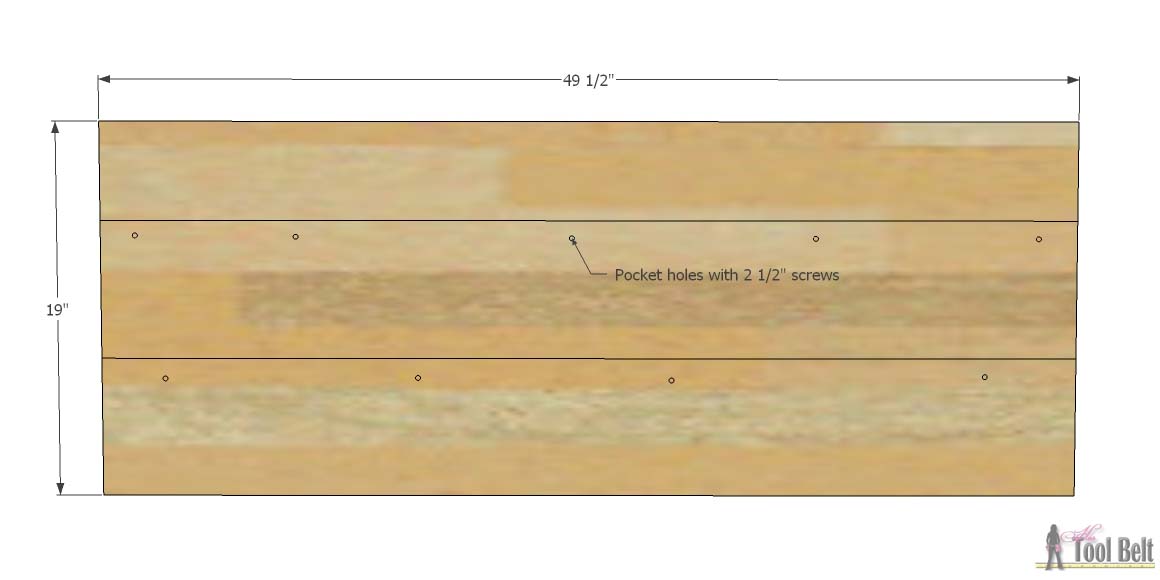
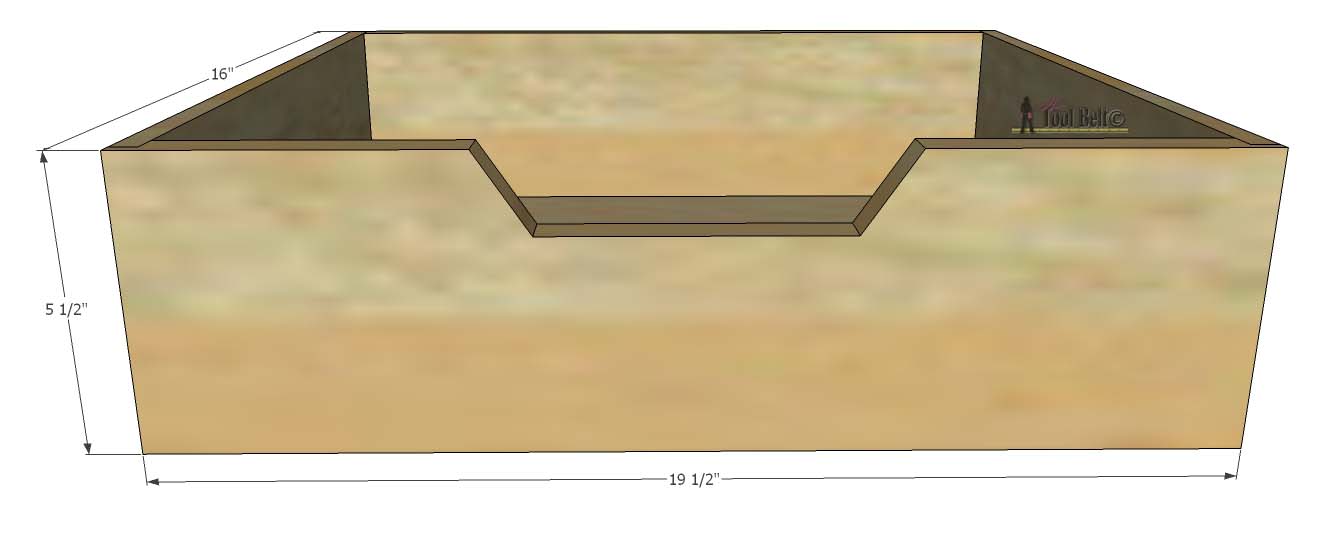
For the top, if you want the plank look leave the bevel on the 2×8’s and 2×6. If you want an flat look, trim down the sides of the 2×8’s and 2×6 to remove the bevel. Cut the boards to 49 1/2″ long and use wood glue and 2 1/2″ pocket holes and screws to join the boards together. Install the top on the cabinet with 1 1/4″ screws.
If you want to add a little trim detail, add 1/4″ x 2 1/2″ x 17 1/4″ boards to the sides of the cabinet. You can either purchase poplar boards in that size (they are a little pricey), or cut your own from 1/4″ plywood/mdf. Use wood glue and 3/4″ brad nails to secure in place.
Step 3
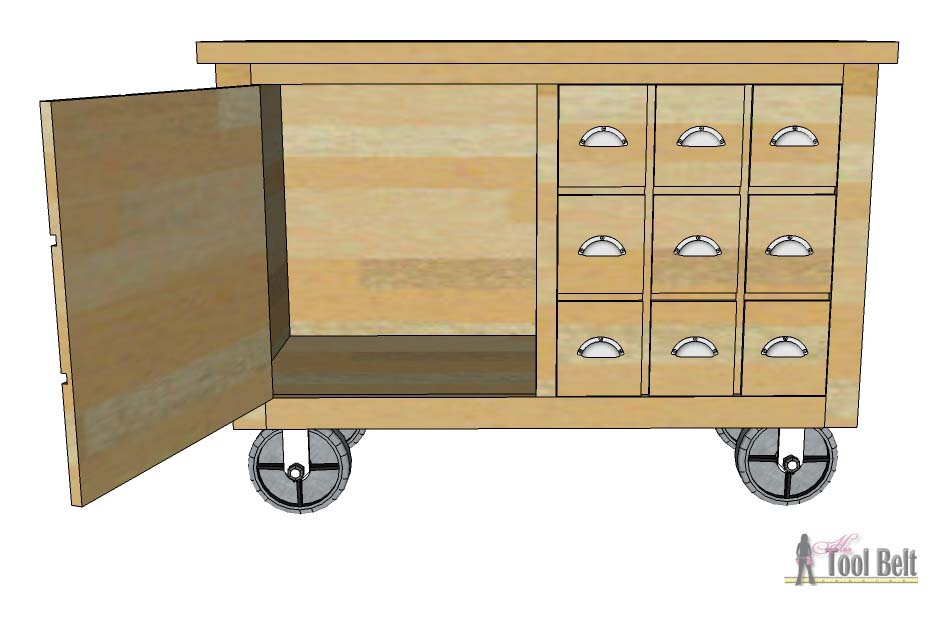
You have a few option on the doors. On Amy’s industrial cart the doors are routed to look like apothecary drawers. The door is 3/4″ glued wood panel with grooves routed 3/8″ deep. You can also use a 3/4″ piece of wood or plywood for the doors and attach ‘drawers’ or wood squares to look like apothecary drawers to the door. Whichever method you decided to use, here is a sketch of dimensions to give you an even spacing.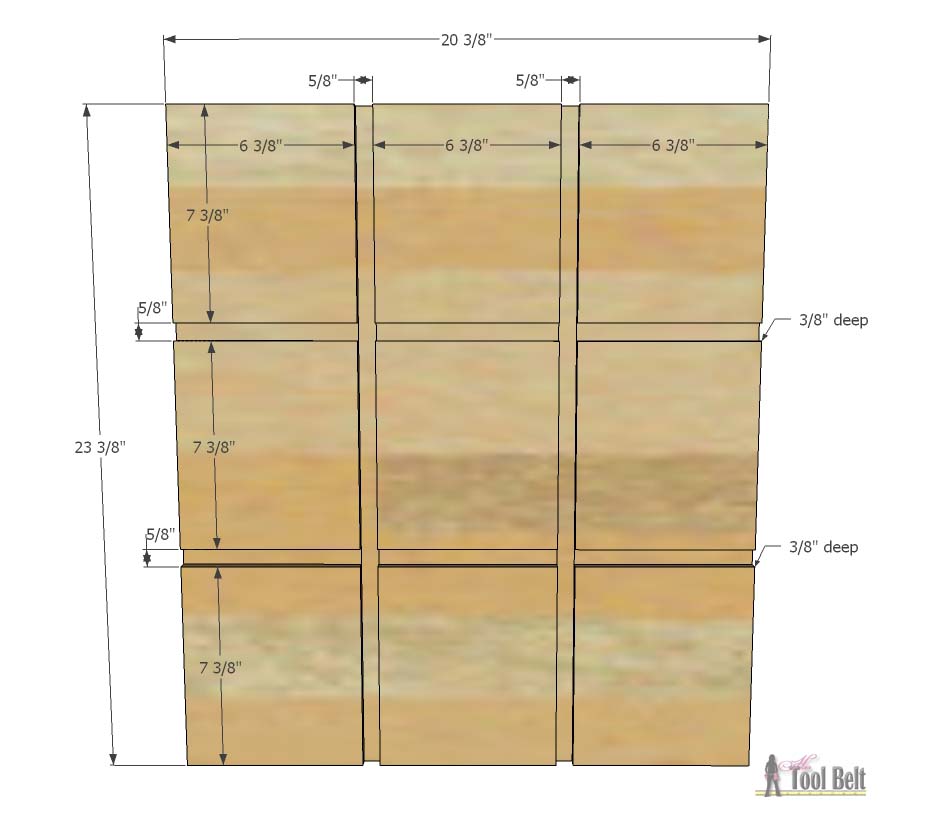 Use inset hinges to install the doors onto the cabinet. You may need to install them in an area that dodges the drawers (if installing drawers), depending on the style that you use. Install pulls on the ‘drawers’. The pulls in the model are cup pulls, and on Amy’s industrial cart they are cup label pulls.
 You are ready for sanding and finish. However if you’d like to add inside storage you can check out the following steps.
Step 4
Depending on what you want to use the cabinet for, you may want to add shelves and/or pull out drawers. This step will give you instructions if you want to add them.
Shelves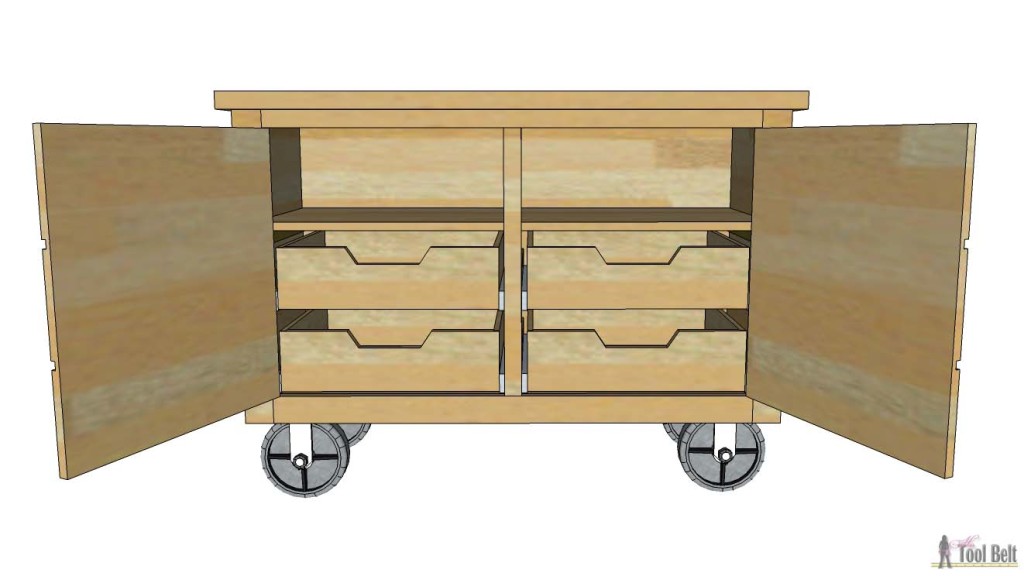

For any shelves you want to add, you’ll need to put supports on each end, an easy option is ¾” x 1 ½” x 16” (or left over 1×3) glued and nailed to the side. Or add holes for pegs if you want adjustable shelves.
Drawers
The drawers use 1×6 wood front, ½” plywood, 5 mm (3/16”) sheathing for the bottoms and 1” pocket hole screws. You don’t have to use this style of drawer, but they have worked well for me over the years. Here are the overall drawer dimensions.
Cut the 1×6 to 19 ½” long. If you want a handle, you make one however you want, but here are some dimensions for mine. 
Cut dados on each side of the drawer fronts that are ½” wide and ½” deep. Cut a dado that is ¼” from the bottom and 3/16” wide and ¼” deep. Drill pocket holes for ½” material to secure the sides to the fronts. 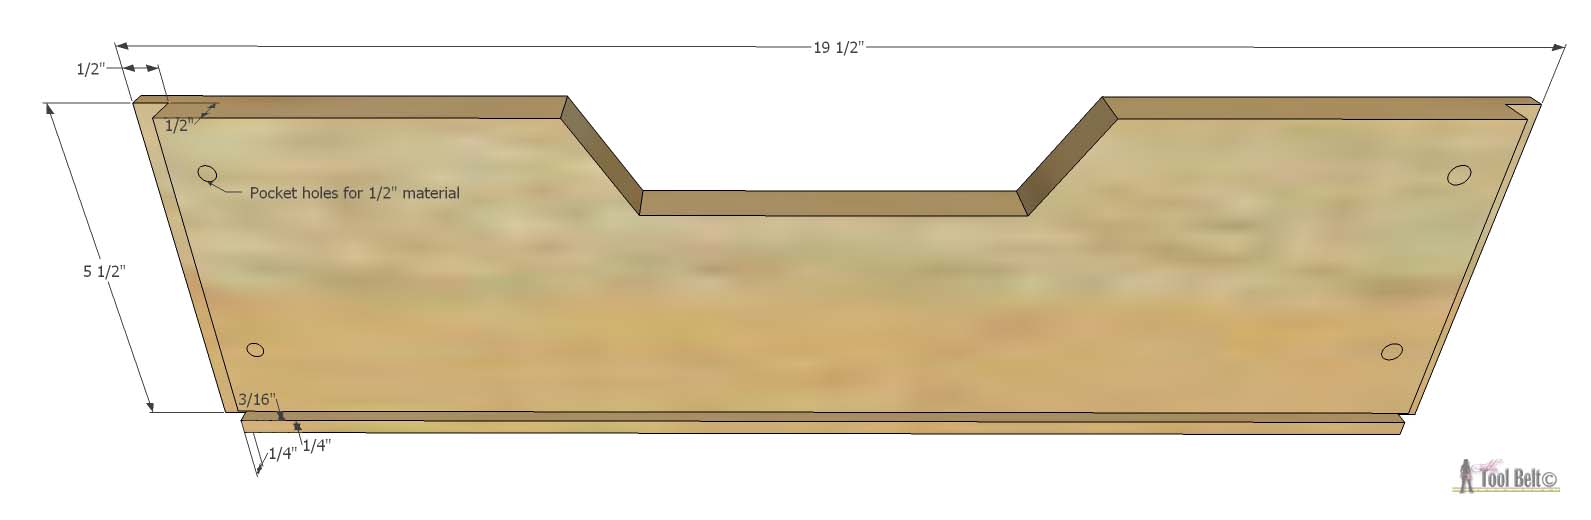
Cut 2 sides that are 5 ½” x 15 ¾” x ½”. Cut a dado 1/4″ from the bottom and 1/4″ deep that is the same width as the 5 mm sheathing plywood. 
Cut a back piece that is 5 ½” x 18 ½” x ½”. Cut a dado 1/4″ from the bottom and 1/4″ deep that is the same width as the 5 mm sheathing plywood. On the backside, drill pocket holes for ½” material to secure the sides to the back. 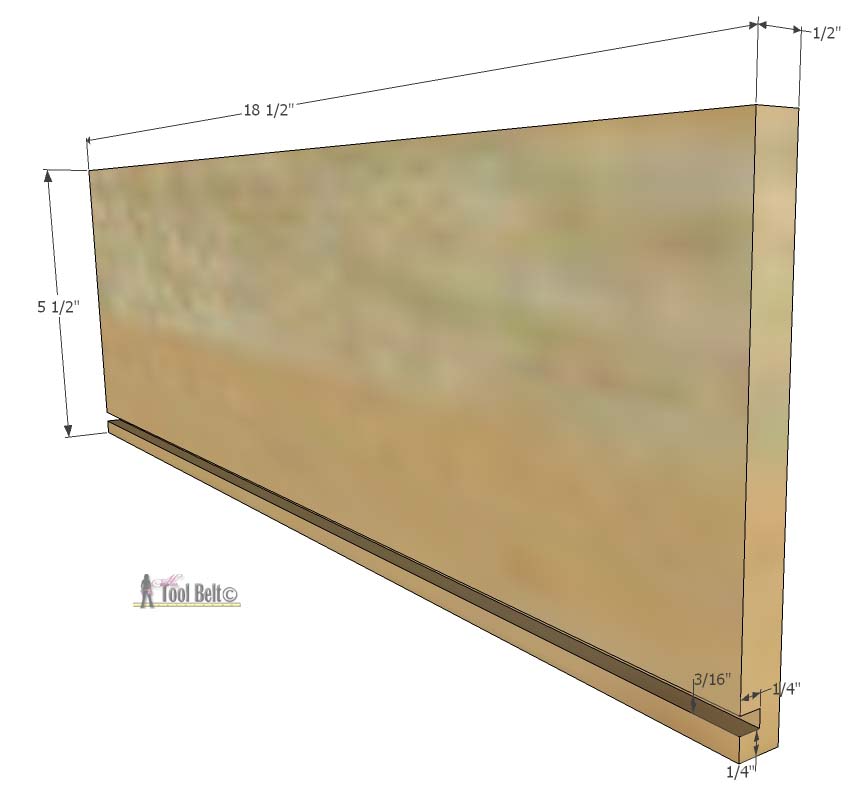
Cut a bottom piece from 5 mm sheathing (3/16”) that is 15 3/16” x 18 15/16”. 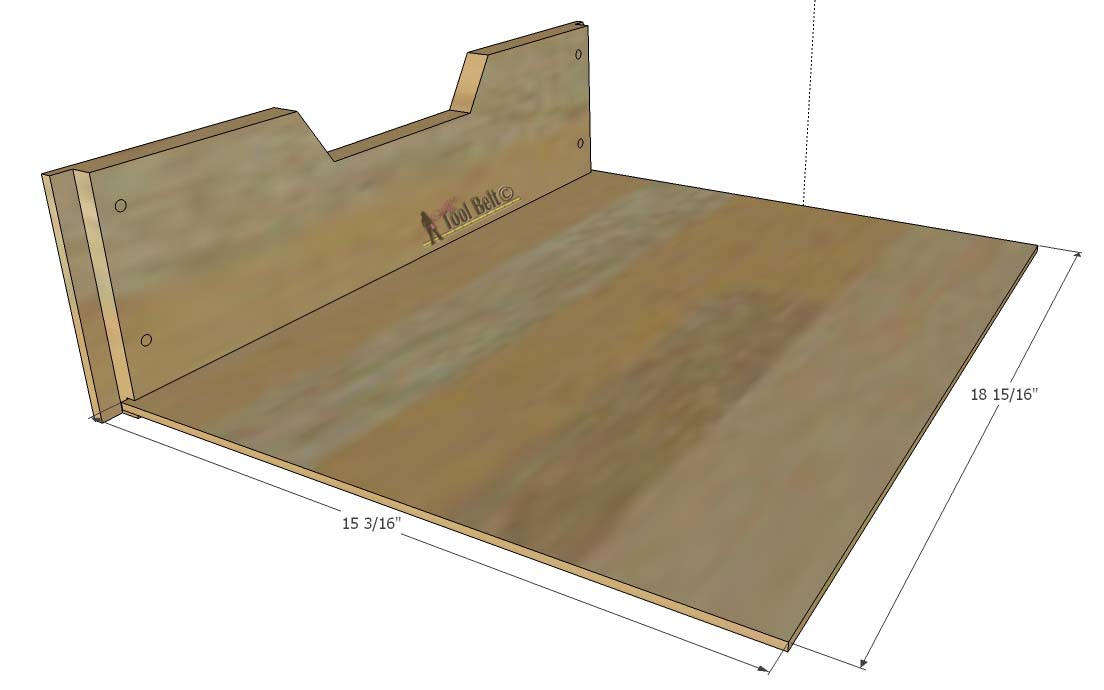
Apply wood glue to the side dados on the front piece and the sides of the back piece. Place the bottom in the bottom dados, place the sides on and secure with 1” or ¾” pocket hole screws.
For the drawers, you’ll have to put in rail supports, like 2×4’s. It’ll probably be easiest to use a Kreg pocket hole jig to secure them to the face frame, back and/or bottom. The boards need to be flush with the cabinet door openings and parallel to each other, or the drawer slides won’t work.

There are a few options for drawer slides, but I really like the ball bearing kind, here’s a cheap place to get them. You will need the 15 ¾” ones (the price is for 2 slides – 1 drawer). The regular drawer slides will work just fine too.
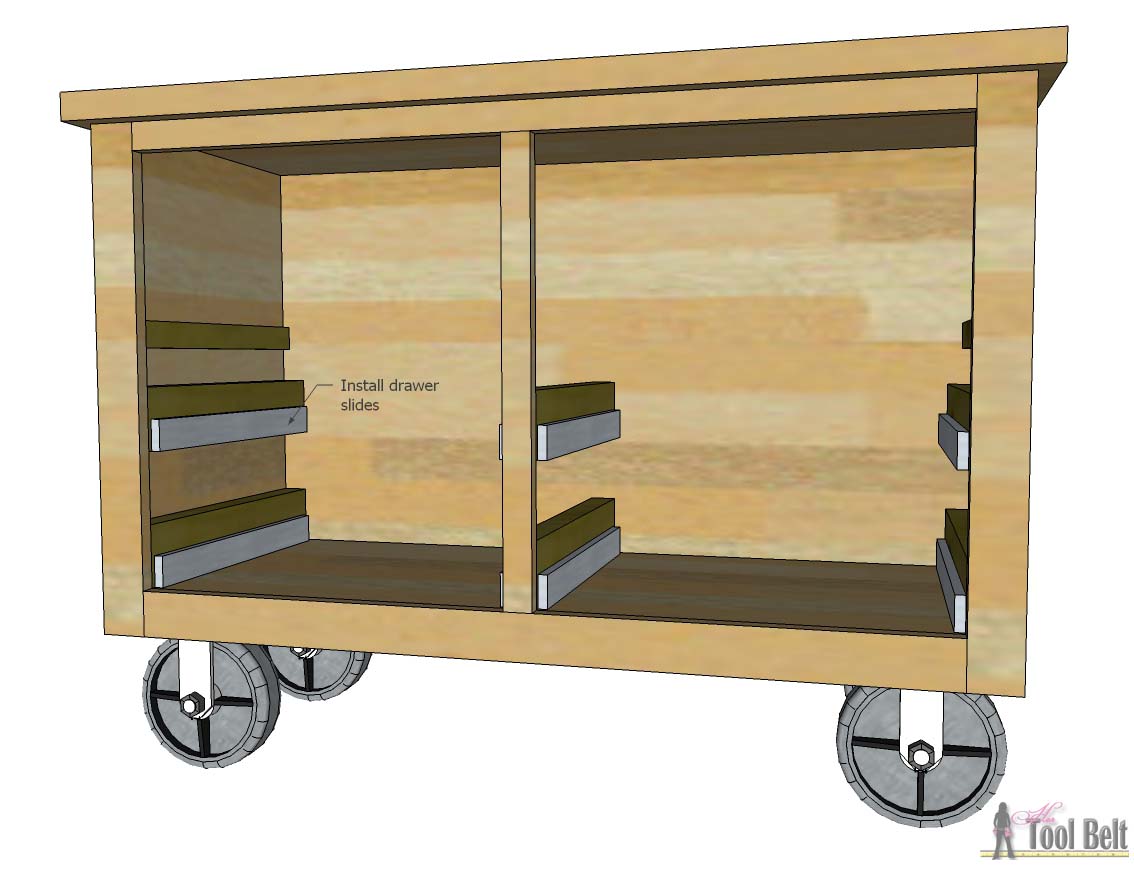
Install the other side of the drawer slides on the drawers and install them into the cabinet, make any adjustments/shim as necessary.
Step 5
Apply wood filler to any cracks, blemishes and holes as necessary, allow to dry. Sand the wood filler and the cabinet smooth, ending with 120-150 grit sand paper. If staining, start with wood conditioner, then stain according to the manufacturers directions and allow to dry. Finish the dresser with a 1-2 coats of polyurethane or your preferred top coat. Check out Amy’s finishing tips.
Once the top coat is cured, add pulls to the ‘drawers’.
Enjoy your industrial cart!
Download the Free Building plans
Industrial Cart Plans
Pin it!
Linked to: my favorite link parties, remodelaholic, savvysouthernstyle
Love love love this! Totally my style. Thanks for the plans!
Wow! Great tutorial, so detailed!
I have been trying to figure out a table for my entryway, and this would be perfect! I love it. Every bit of it! I am pinning for reference, thanks so much!
Awesome, thanks
Looks like I know what my husband will be doing this weekend!-lol! Thank you for the instructions!!
No Problem!
One trick to getting cheap casters is to buy the least expensive moving dollie at harborfreight.com and deconstruct it for the wheels. You end up with 4 3-4 inch casters for $8-12 total instead of each. Also, your local Habitat for Humanity Restore will likely have casters for WAY cheaper than your local hardware store.
Great tips, thanks for sharing!
This looks so incredible! I’m always so amazed by your talent. Pinned and tweeted. Please join us on Monday at 7 pm and party with us! It is so super fun to see what you have been working on! Lou Lou Girls
Thank you, but Amy at High Style Restyle is the real talent on this project…I just provided the plans 🙂
WOW, that cabinet is amazing, I have been looking for one….but you have inspired me to build one!! I am so lucky to be featured with you on MY Uncommon Slice of Suburbia
Brooke
Thanks Brooke, you can do it!
This will be heavy, especially when loaded. You’ll need at least a pair of wheels that swivel on one end or you can forget about moving it around if you needed to.
I’ve been wanting to create an Apothecary Cabinet for awhile now, and your tutorial is awesome! The wheels are genius. I’m always moving my furniture around so this would be so beneficial. Thanks!
Thanks, make sure to check out Amy’s finishing tutorial too!
Oh wow, Amy! You are truly talented! I absolutely love that you provide instructions for both options. Truly gorgeous 🙂
Thanks LZ, but Amy at High Style Restyle is the real rock star on this project. I just provided plans 🙂