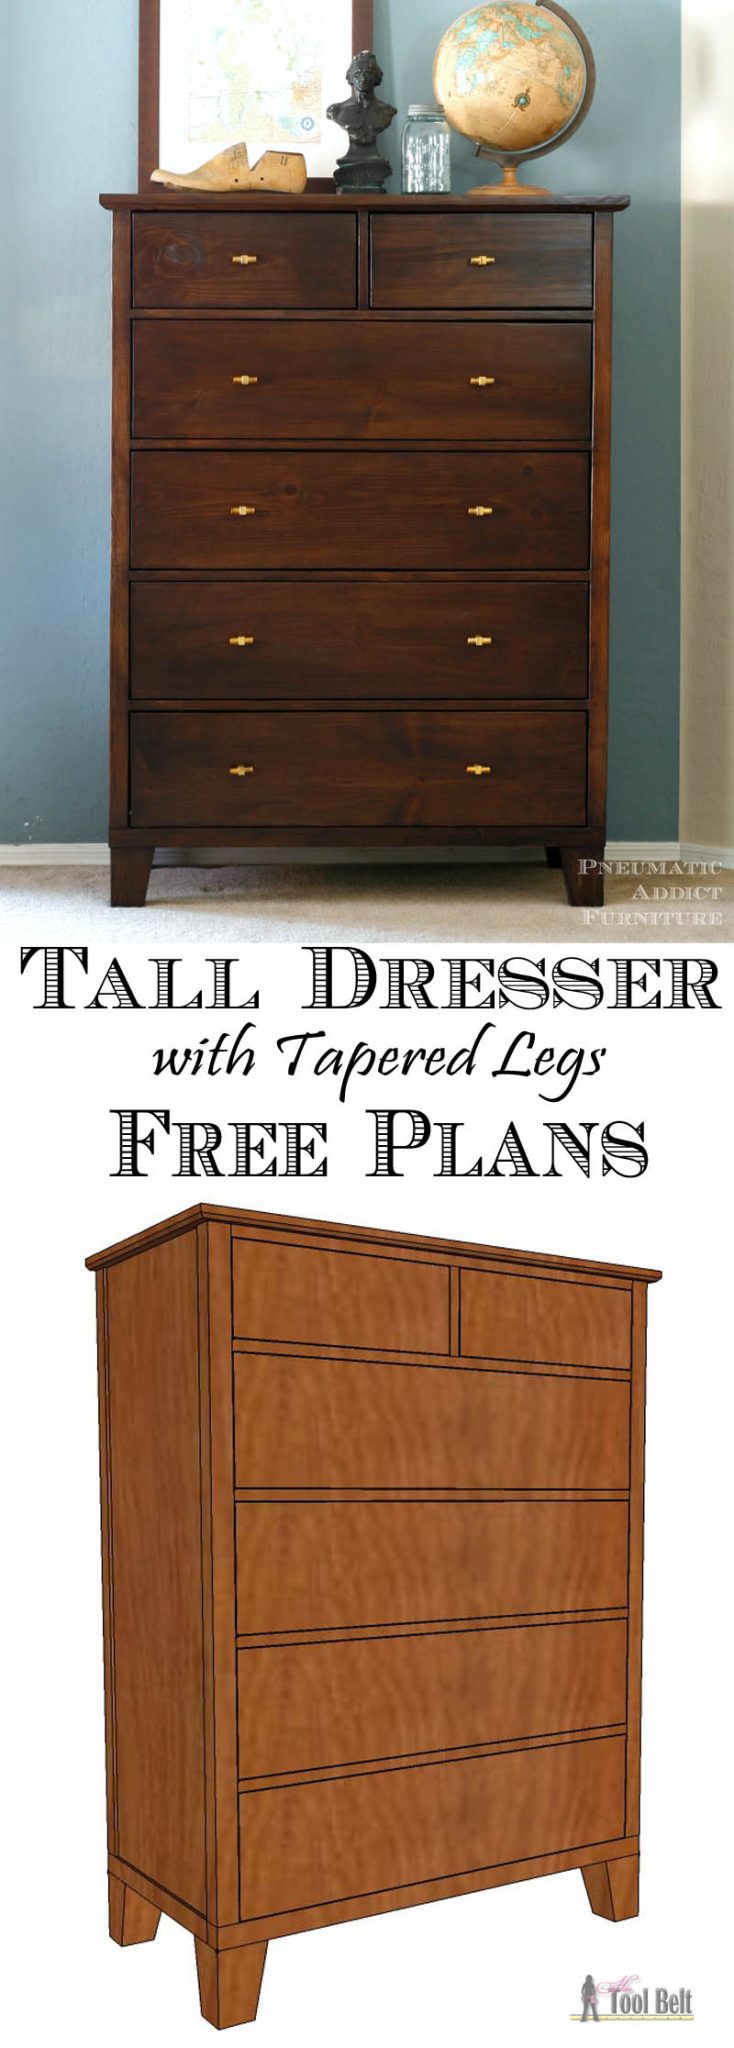
I am really excited to be able to team up with Elisha from Pneumatic Addict for a project, I’ve admired her work for a long time. She makes beautiful furniture and her finishing skills are superior. Her latest project is a Tall Dresser with Tapered Legs, a Pottery Barn knock off. I’ll provide the plans below, then make sure you go to Pneumatic Addict for the build process and finishing tutorial. (FYI the plans differ slightly from the build pics.)
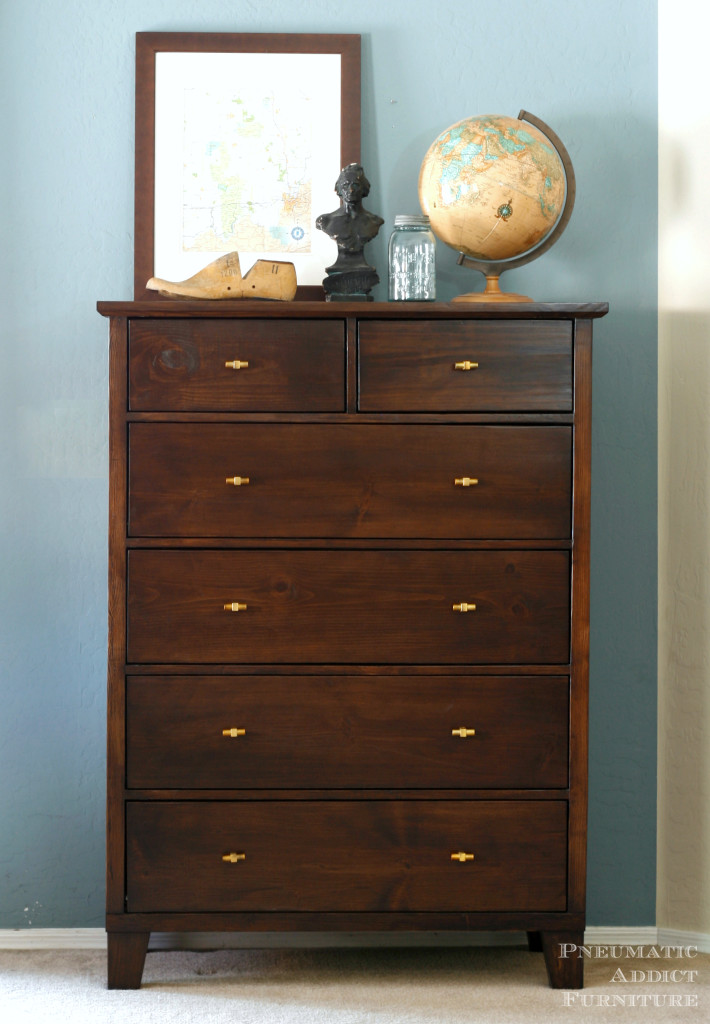
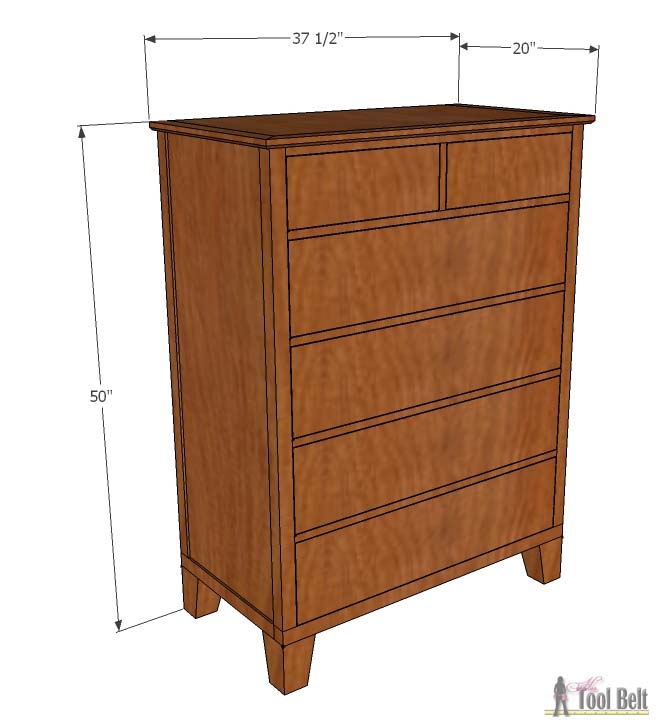
How to Build a Tall Dresser with Tapered Legs
Materials
- 2 sheets of 3/4″ plywood
- 3 – 2″ x 2″ x 8′ boards
- 4 – 1″ x 2″ x 8′ boards
- 2 – 1″ x 10″ x 8′ boards
- 1 – 1″ x 3″ x 8′ boards
- 1/2 sheet 5 mm underlayment sheathing (3/16″)
- 4 – 2 sided tapered bun feet
- 6 sets of 16″ drawer slides
- drawer pulls
- 1 1/4″ pocket hole screws (affiliate)
- 2 1/2″ pocket hole screws (affiliate)
- 5/8″ brad nails
- wood glue
- wood filler
- sandpaper
- wood conditioner
- stain
- top coat
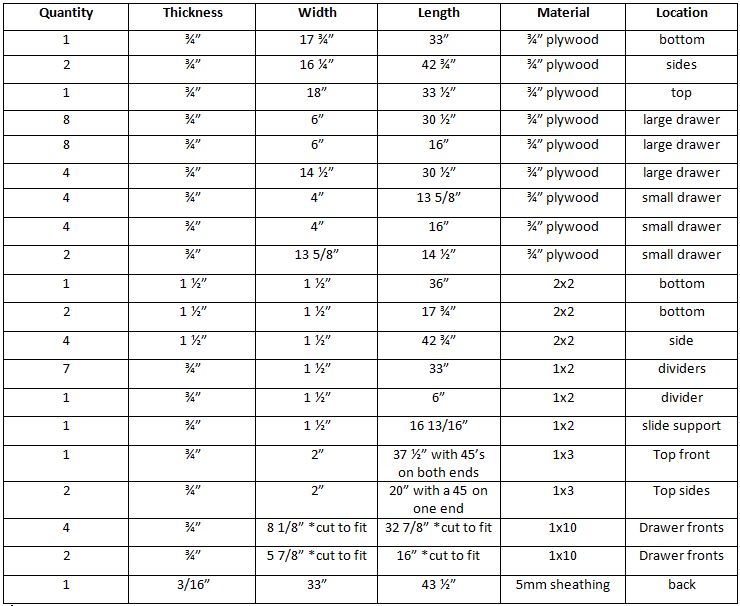
Cut List
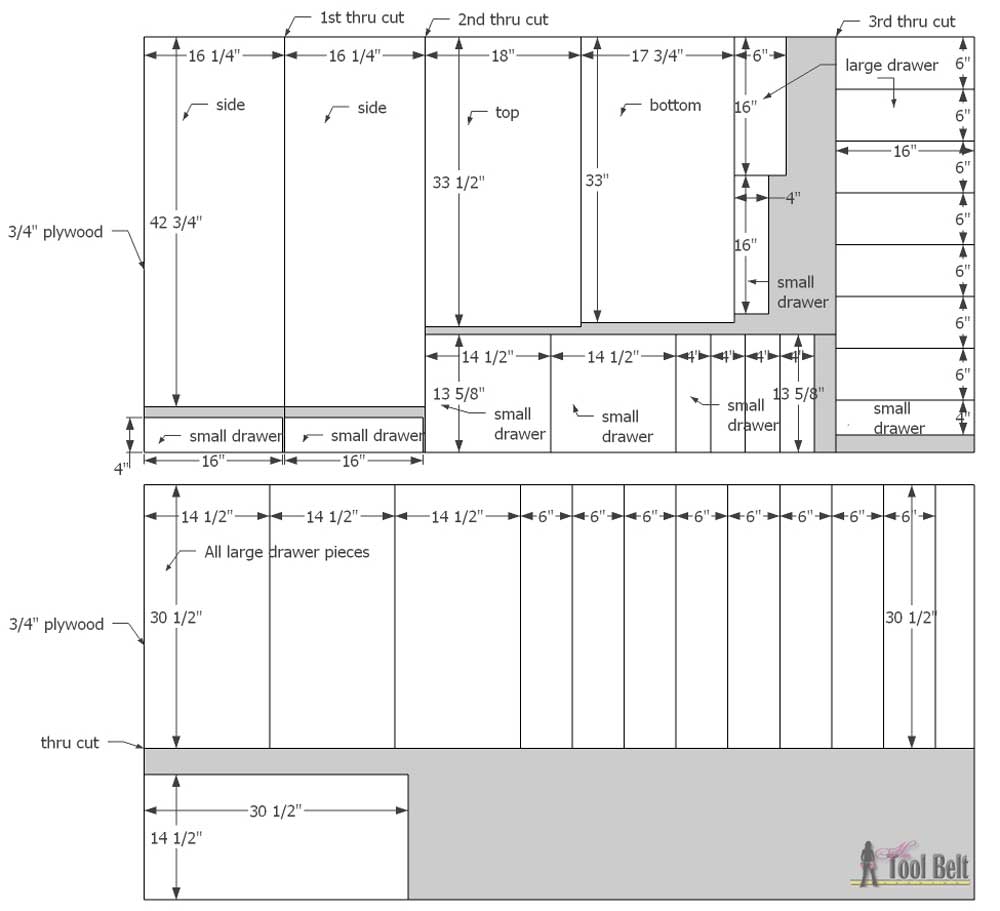
Board Cut Diagram
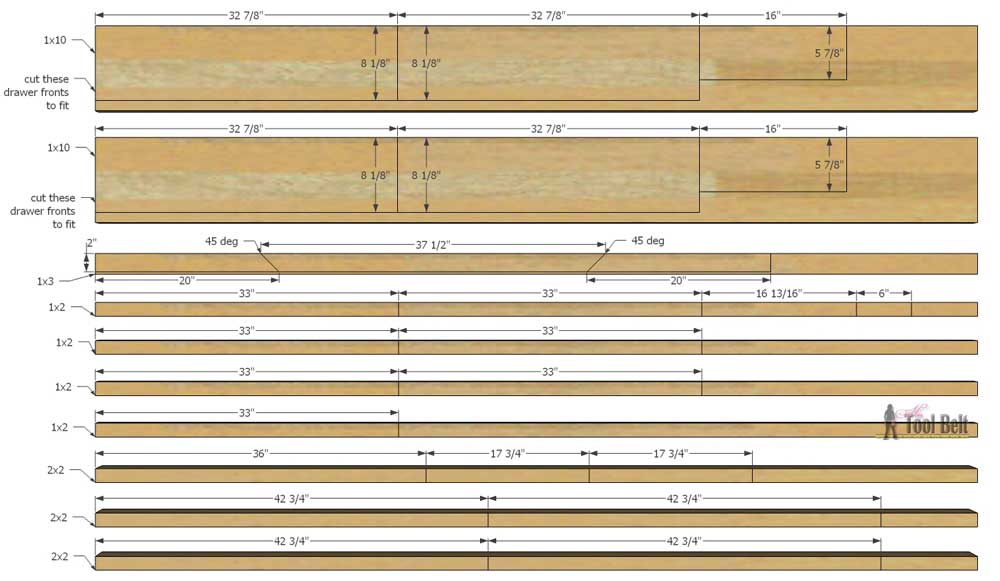
Plywood Cut Diagram
Step 1
On the bottom side of the bottom piece, drill pocket holes (affiliate) on 3 edges. Drill pocket holes in an end of the 2×2 x 17 3/4″. Attach the bottom panel to the bottom 2×2 pieces with wood glue and 1 1/4″ screws. Join the 2×2 pieces together with 2 1/2″ screws. Make all of the bottom faces flush.
Screw the feet/legs to the bottom panel.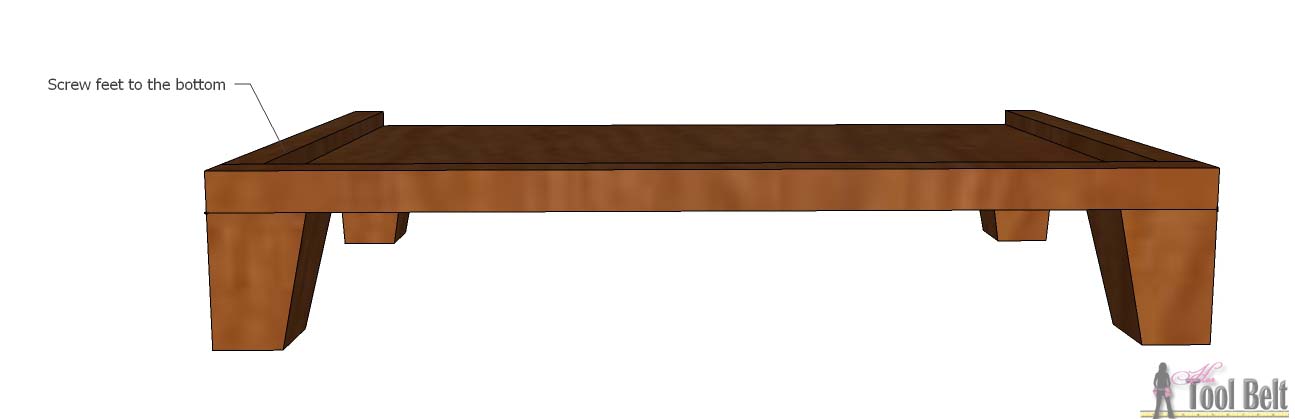
Step 2
Drill pocket holes around the inside of the side panels. Make sure to drill holes to attach the top later. Inset the plywood 1/2″ (on the inside, 1/4″ from the outside) and secure the 2×2’s to the plywood with wood glue and 1 1/4″ screws. Repeat for the other side panel. Attach the side panels to the bottom with wood glue and 1 1/4″ screws and 2 1/2″ screws as indicated.
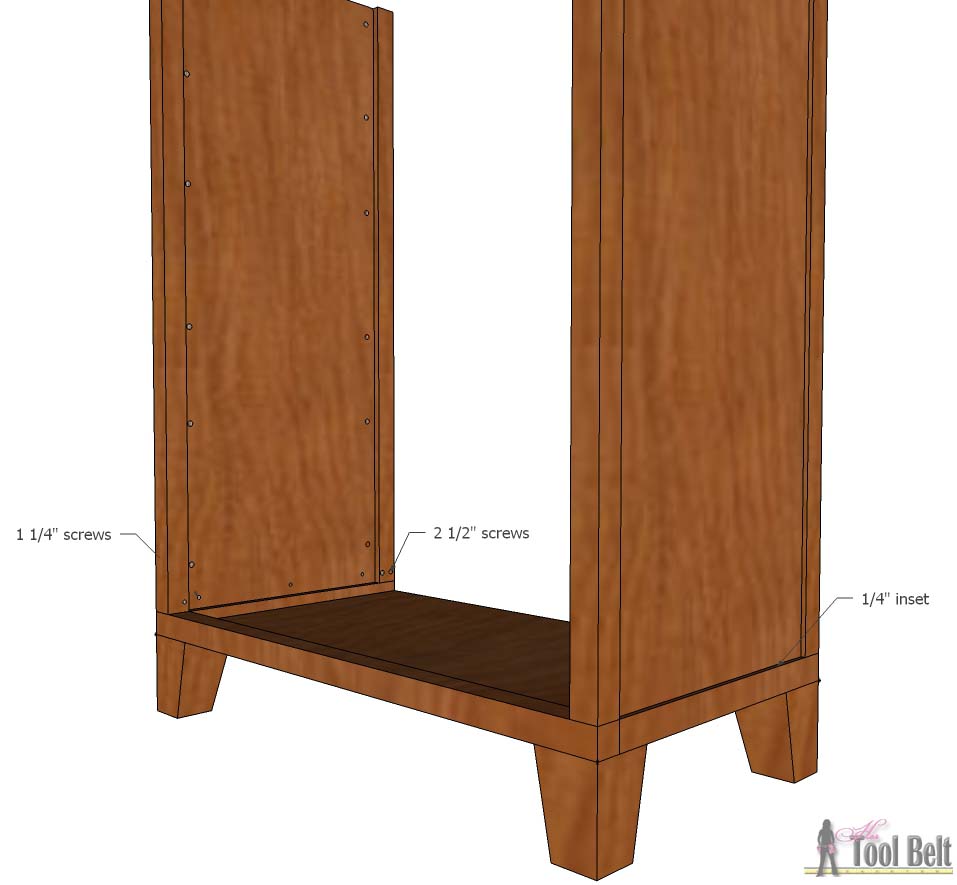
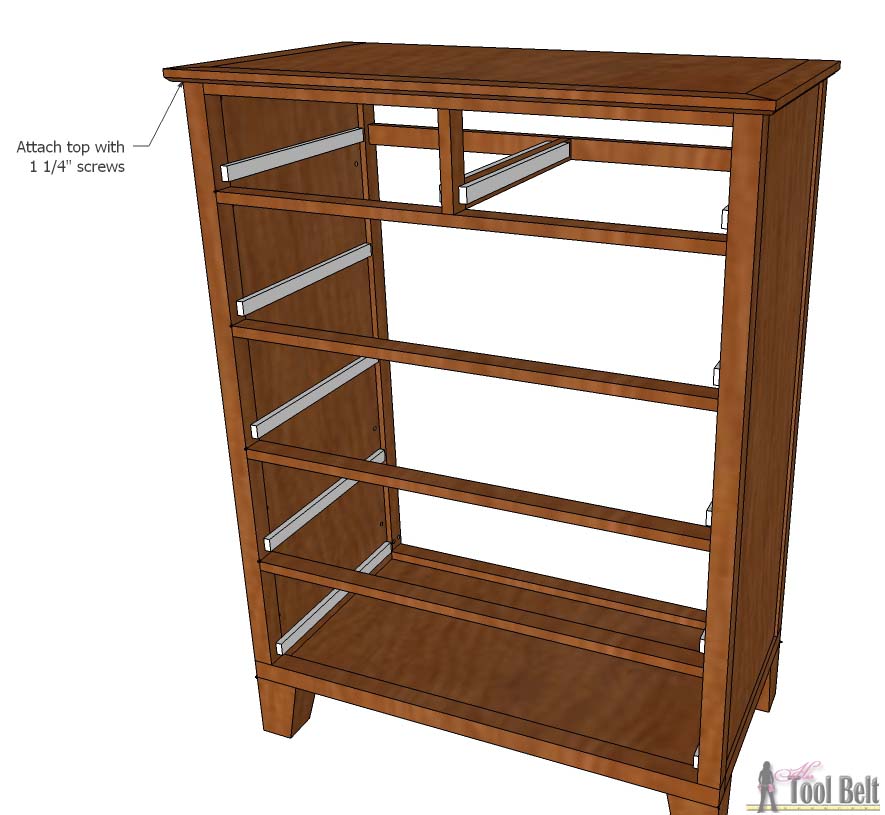
Step 3
Drill pocket holes in the bottom face of 6 of the 33″ dividers. Install the dividers between the front sides at the measurements indicated, try to install as accurately as possible. 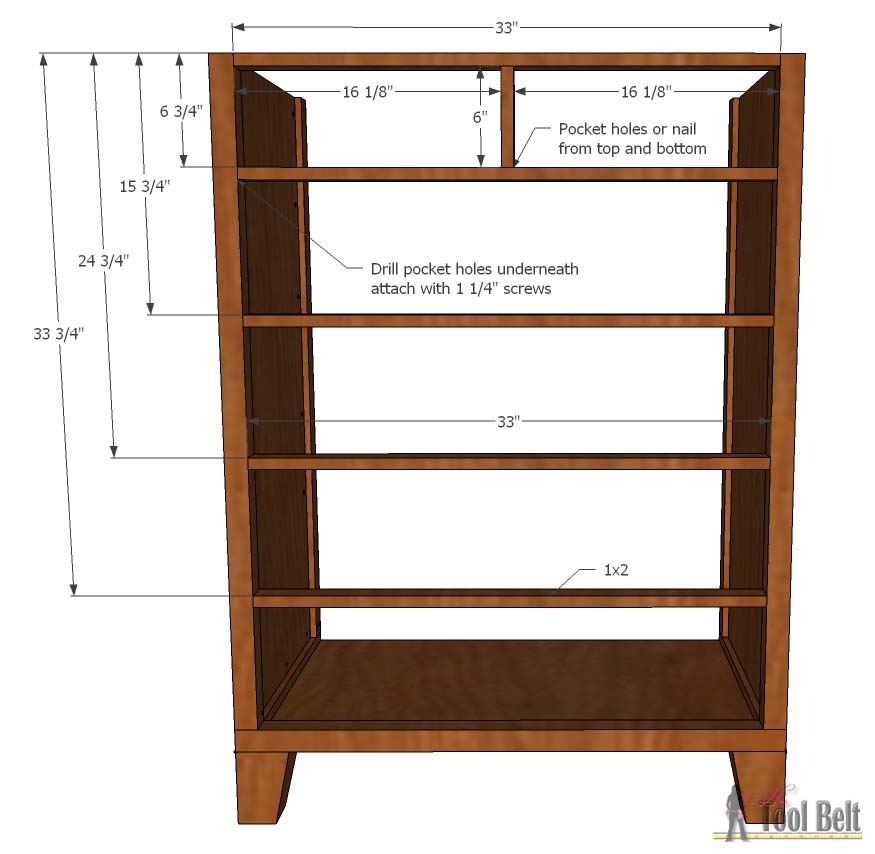 add another 33″ 1×2 to the back, secure with wood glue and 1 1/4″ screws. Drill pocket holes in the 16 13/16″ support and install between the front vertical divider and back support. Also place another 33″ 1×2 at the bottom, inset by 3/16″, screw or nail into place.
 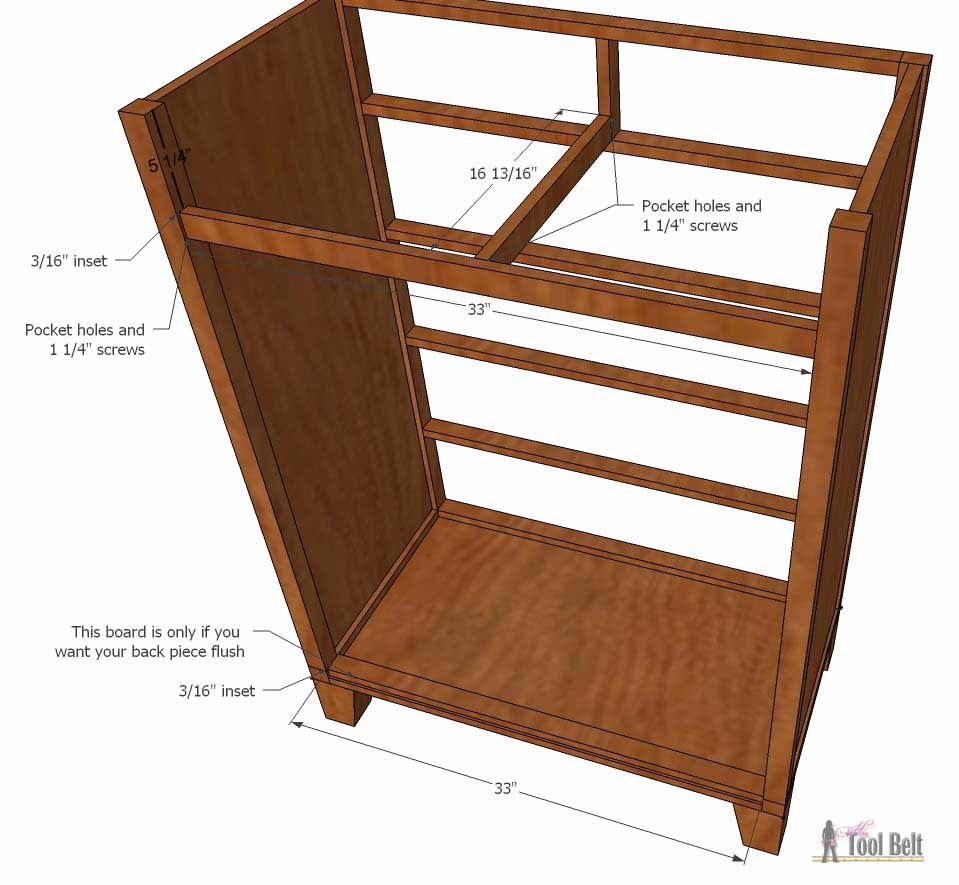 Time to install drawer slides, according to the manufacturers directions. The slides need to start 3/4″ from the front face of the dresser. You’ll need to take some scrap wood and make 1/2″ shims/spacers to make up for the 1/2″ inset on the side.
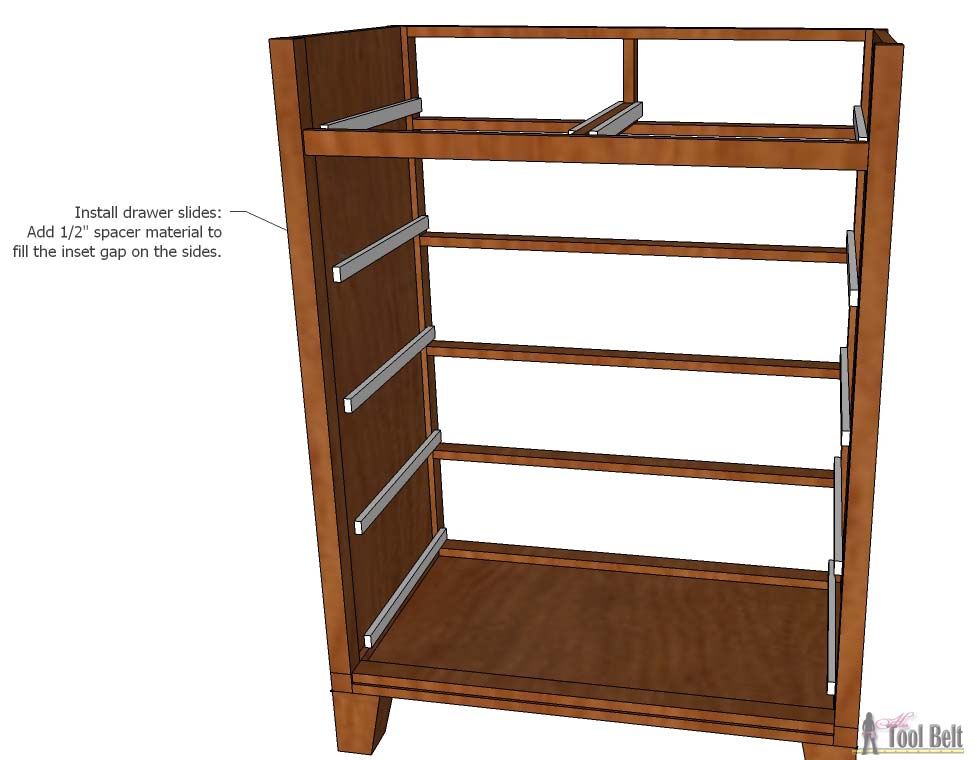
Step 4
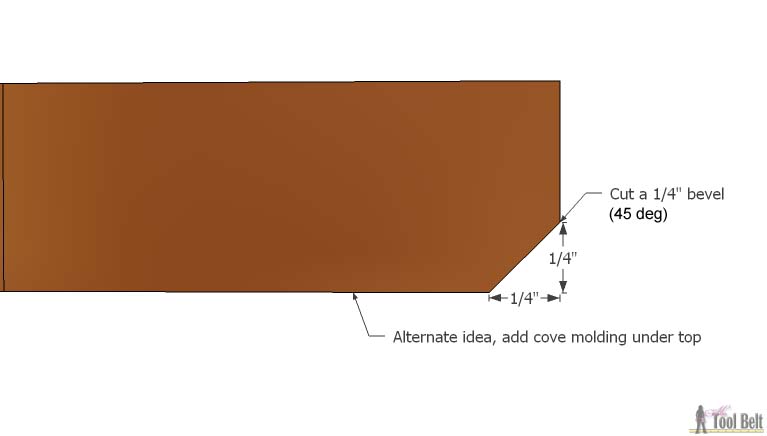
Trim the 1×3’s down to 2″ wide and cut a 1/4″ bevel. (If you don’t want to make a bevel, you can add detail with cove molding instead.)
 Cut a piece of the 2″ board that is 37 1/2″ with a 45 deg cut on each end, as shown. Cut 2 pieces that are 20″ long with a 45 deg cut on one end. Drill pocket holes in the top plywood piece and attach the plywood to the 2″ trim with wood glue and 1 1/4″ screws.
 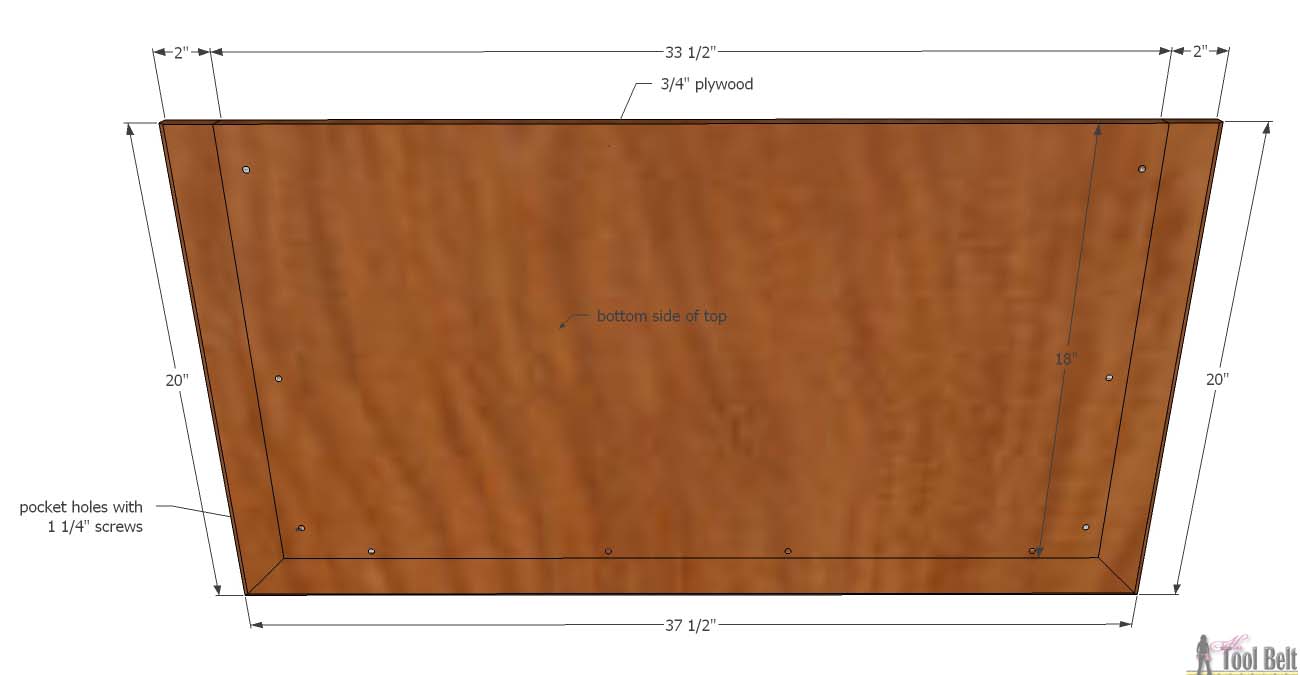 Attach the top to the dresser with 1 1/4″ screws.
Step 5
Drill pocket holes in the ends of the 4″ x 13 5/8″ plywood pieces, and around the bottom 13 5/8″ x 14 1/2″ pieces. Use wood glue and 1 1/4″ screws to assemble the drawers.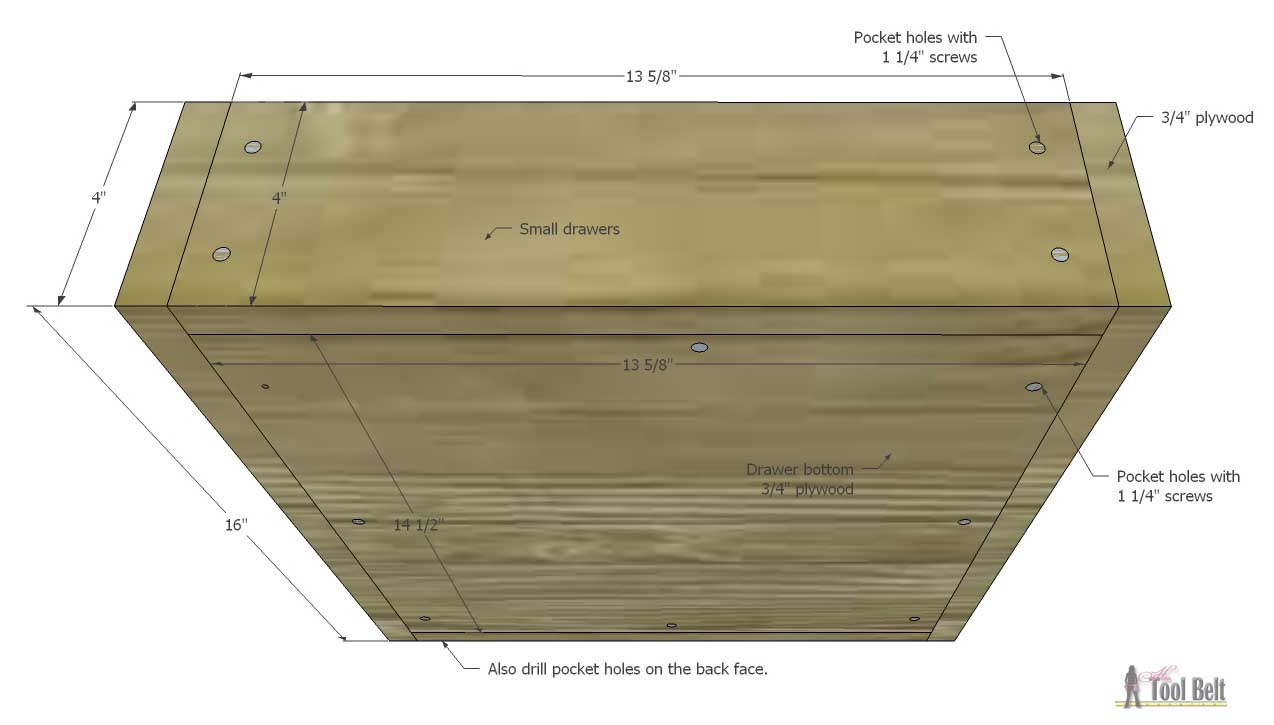 Drill pocket holes in the ends of the 6″ x 30 1/2″ plywood pieces, and around the bottom 30 1/2″ x 14 1/2″ pieces. Use wood glue and 1 1/4″ screws to assemble the drawers.
 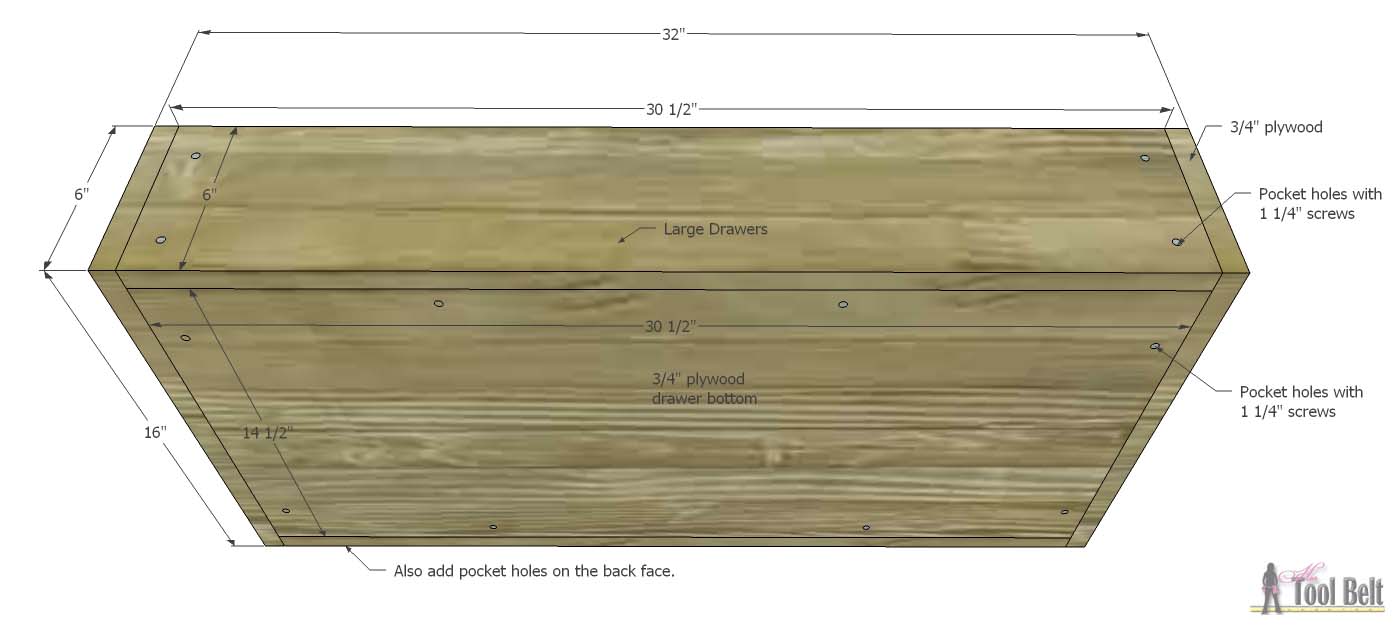 Attach the drawers to the slides, make sure all of the slides are working, and make adjustments as necessary.
Step 6
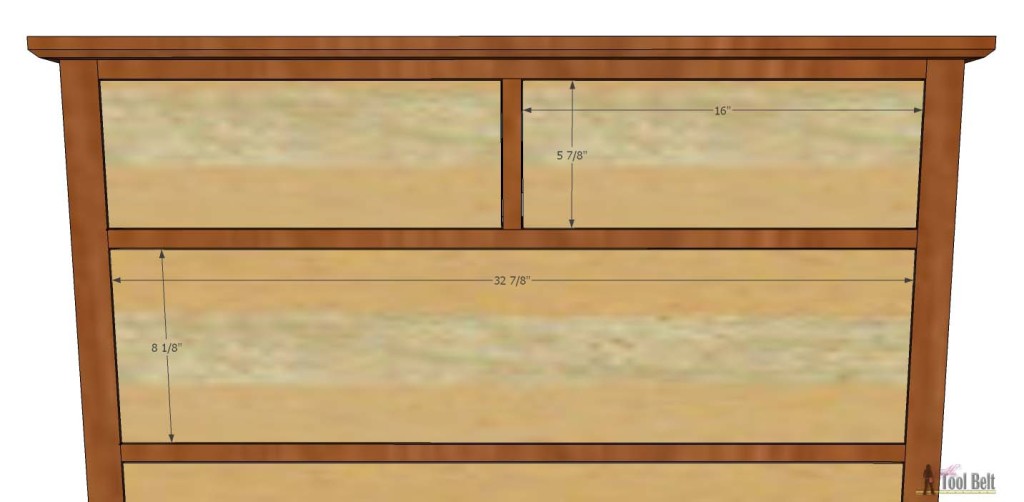
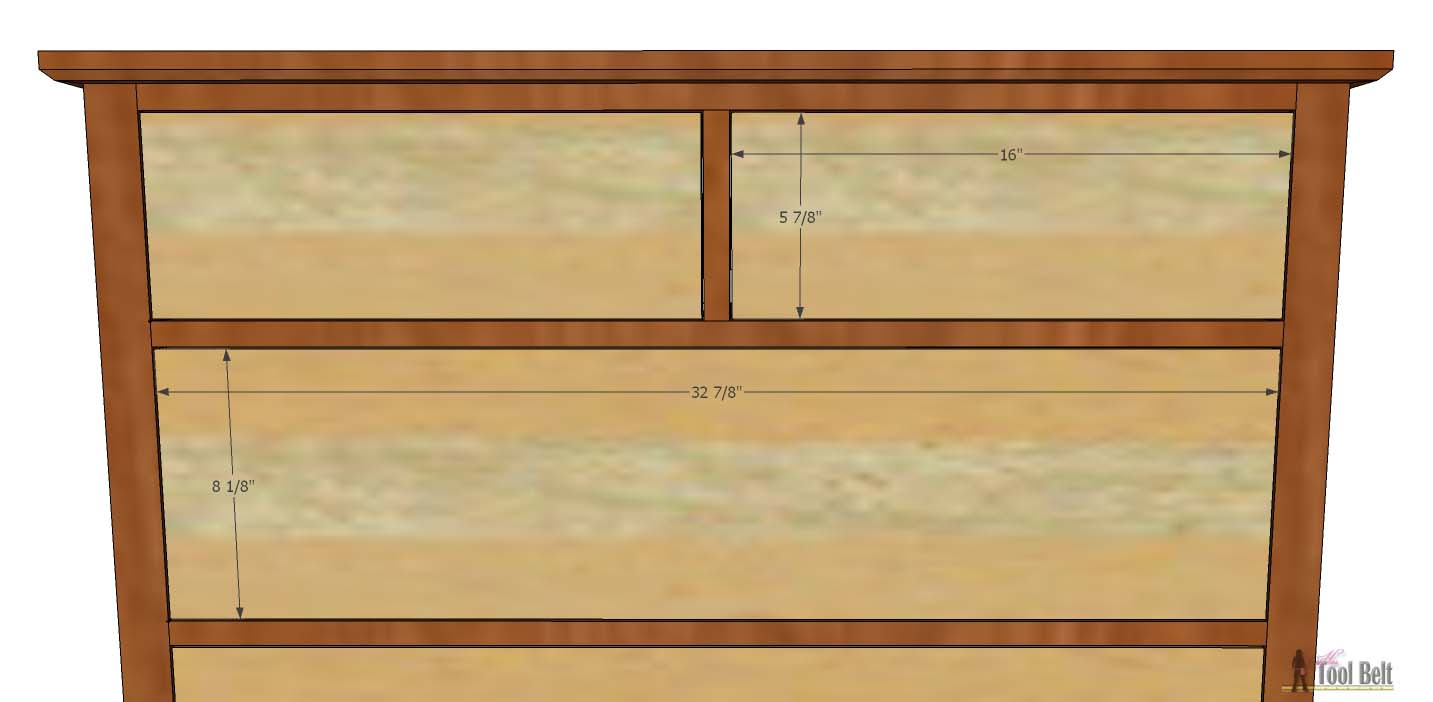
Cut the drawer fronts to fit the openings. You’ll want a small gap around the drawer front, about 1/16″ around, so cut the drawer front 1/8″ smaller than the measured opening. Attach the drawer fronts to the drawers with 1 1/4″ screws.
 Attach the back with 5/8″ brad nails, or screw into place.
 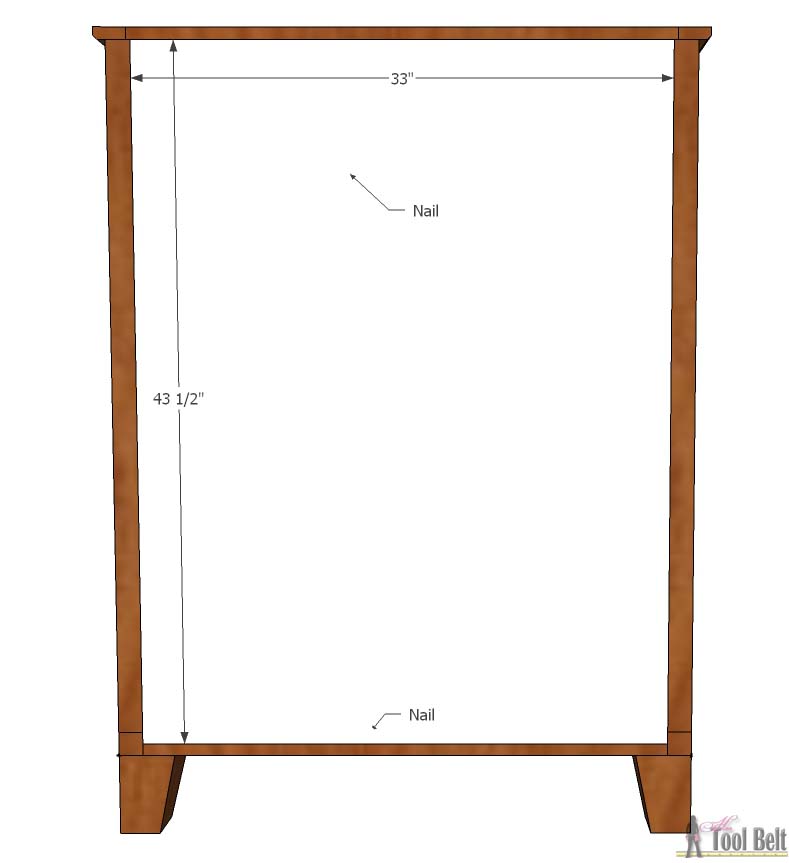 Step 7
Apply wood filler to any cracks, blemishes and holes as necessary, allow to dry. Sand the wood filler and the dresser smooth, ending with 120-150 grit sand paper. If staining, start with wood conditioner, then stain according to the manufacturers directions and allow to dry. Finish the dresser with a 1-2 coats of polyurethane or your preferred top coat.
Once the top coat is cured, add pulls to the drawers.
Enjoy your tall dressers!
Download the plans
Tall Dresser with Tapered Legs plan
Pin it:
Awesome plans Amy!!! Makes me want to build one!!
Love this, but it’s too wide for my space, and I need six shallow drawers instead of these deep drawers. How difficult would it be to modify these plans? I need the dresser to fit in a 34″ wide space. Depth doesn’t matter, and height has to be under 54″
It shouldn’t be to hard, maybe I can get you a marked up copy in a couple of days.
What was your cost on this build?
About $200
I’m making this dresser as a school cabinet making project, and I’m having some trouble understanding the 1/2″ spacer to fill the inset gap. Based on the drawing in the plans, I don’t understand how far the spacer should go in front of the dresser. It looks like on the drawing it overlaps. If it were to overlap the front beam, than there would be a gap because the back of the spacer is inside of the inset, whereas the front of the spacer is passed the inset and on the main beam in the front of the dresser.
I did my best explaining this, but if you have any questions feel free to ask them.
I’m probably missing something but I’m struggling to figure out what pieces to cut out of what piece of plywood. Other plans I’ve followed have had a cut break down that shows in what order the pieces are cut out of the plywood. Just a suggestion because I really want to do this plan!
Hi Q
In the cut list under material it designates what that piece is cut from. But you are right a cut diagram is helpful so I added one for the boards and for the 3/4″ plywood pieces. The back (33″x43 1/2″) is cut from 5mm sheathing (~3/16″ plywood). Hope that helps
Hey Amy,
This looks like a wonderful plan! If I were to make the front of the drawers larger than the hole so that they stay in front of the dresser instead of going inside, would this affect the function of the drawers? And would it give the drawers an extra inch or so in depth?
Hi Zach,
You can definitely change the plans to make the drawer fronts stay outside of the frame. You’ll gain about 3/4″ in depth.
Any suggestions on the type of wood for this project?