The Basement Playhouse Build includes tool reviews that are sponsored by The Home Depot. I have been compensated for my time and provided with product. All ideas and opinions are my own. This post contains some affiliate links for your convenience. Click here to read my full disclosure policy.
I have always loved those darling basement playhouses and under the stair play areas that you see in home shows and on Pinterest. My basement is unfinished and really is an open slate to do whatever I want to with it. I decided that instead of thinking about this project for a few years, like I usually do, I need to get it done while my girls are young and will still enjoy it.
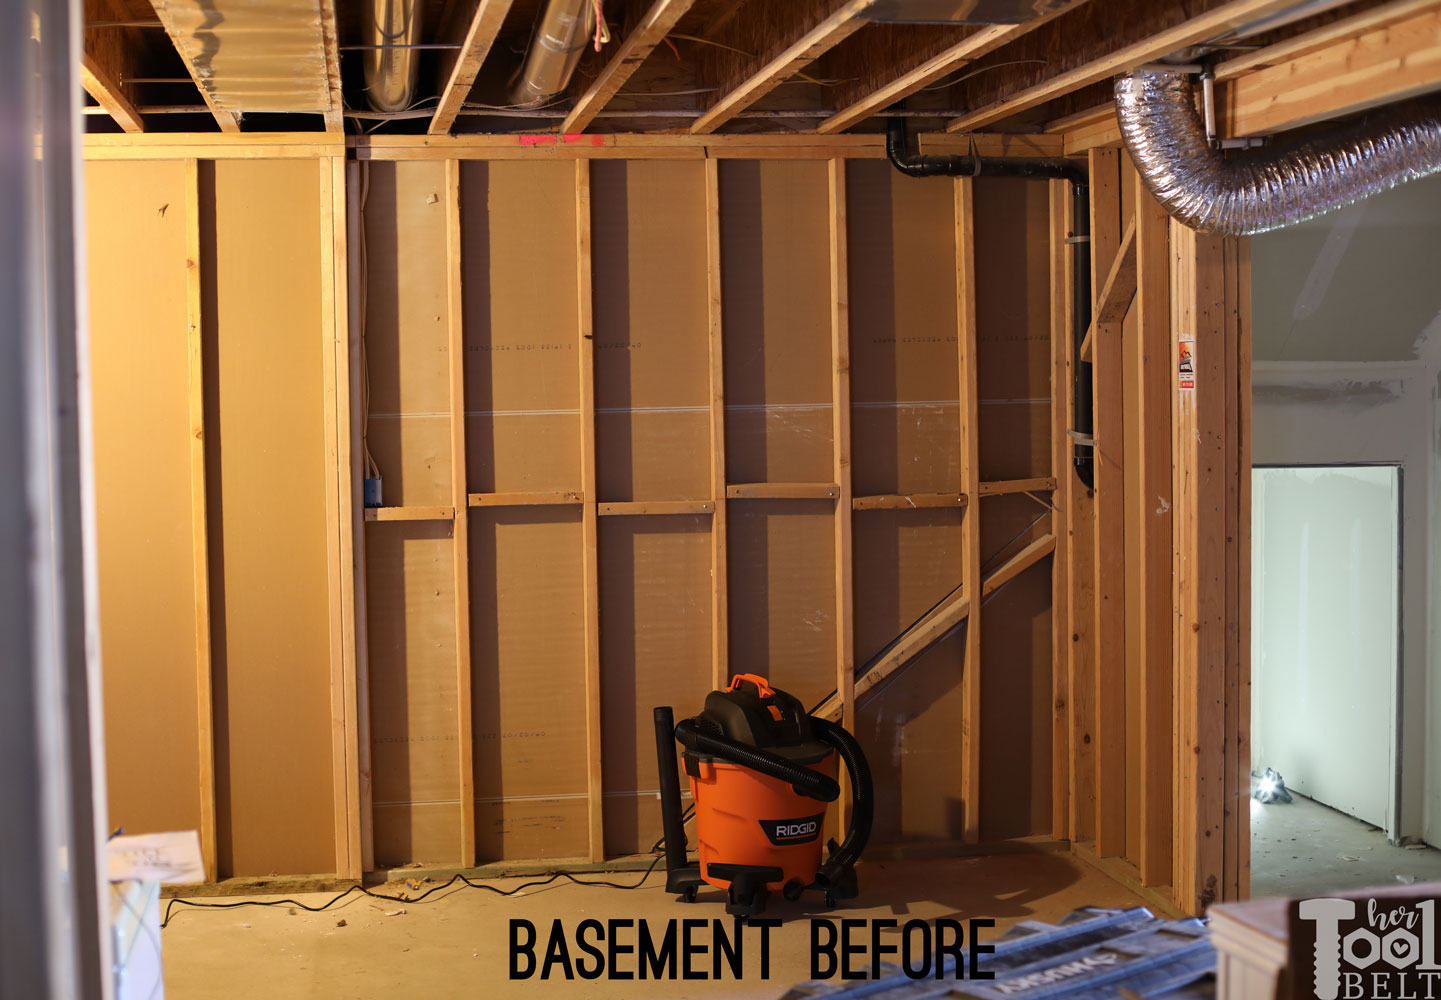
Here’s the space that I’ll be building the playhouse. The back of the playhouse will share the wall of the stairs leading to the basement.
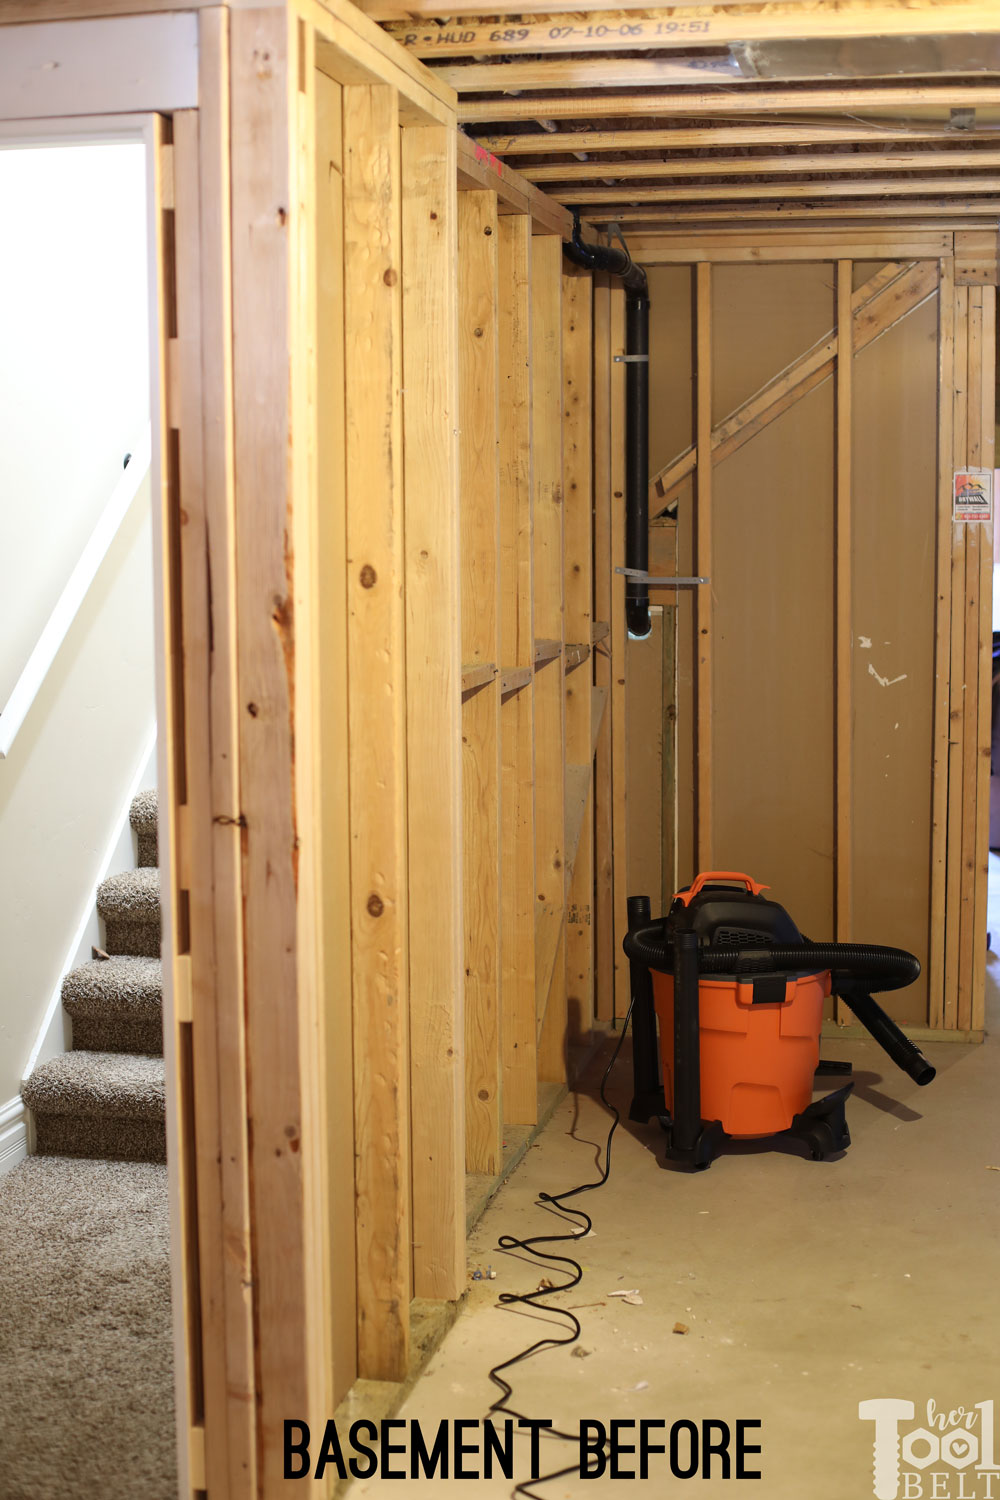
On the far right side, is a little under the stairs cove. On the left side of the wall is a little pop out from when I had to move the door location.
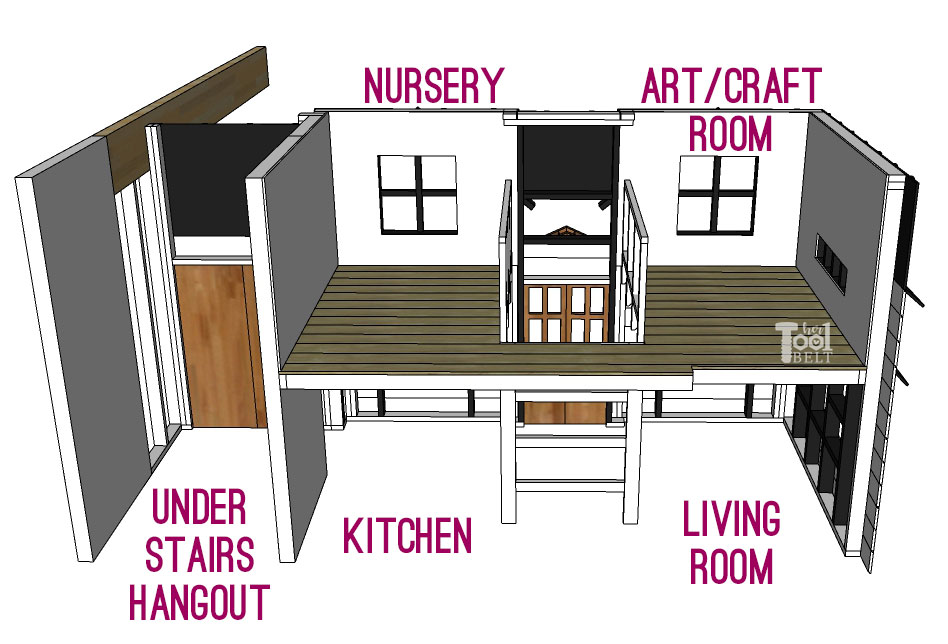
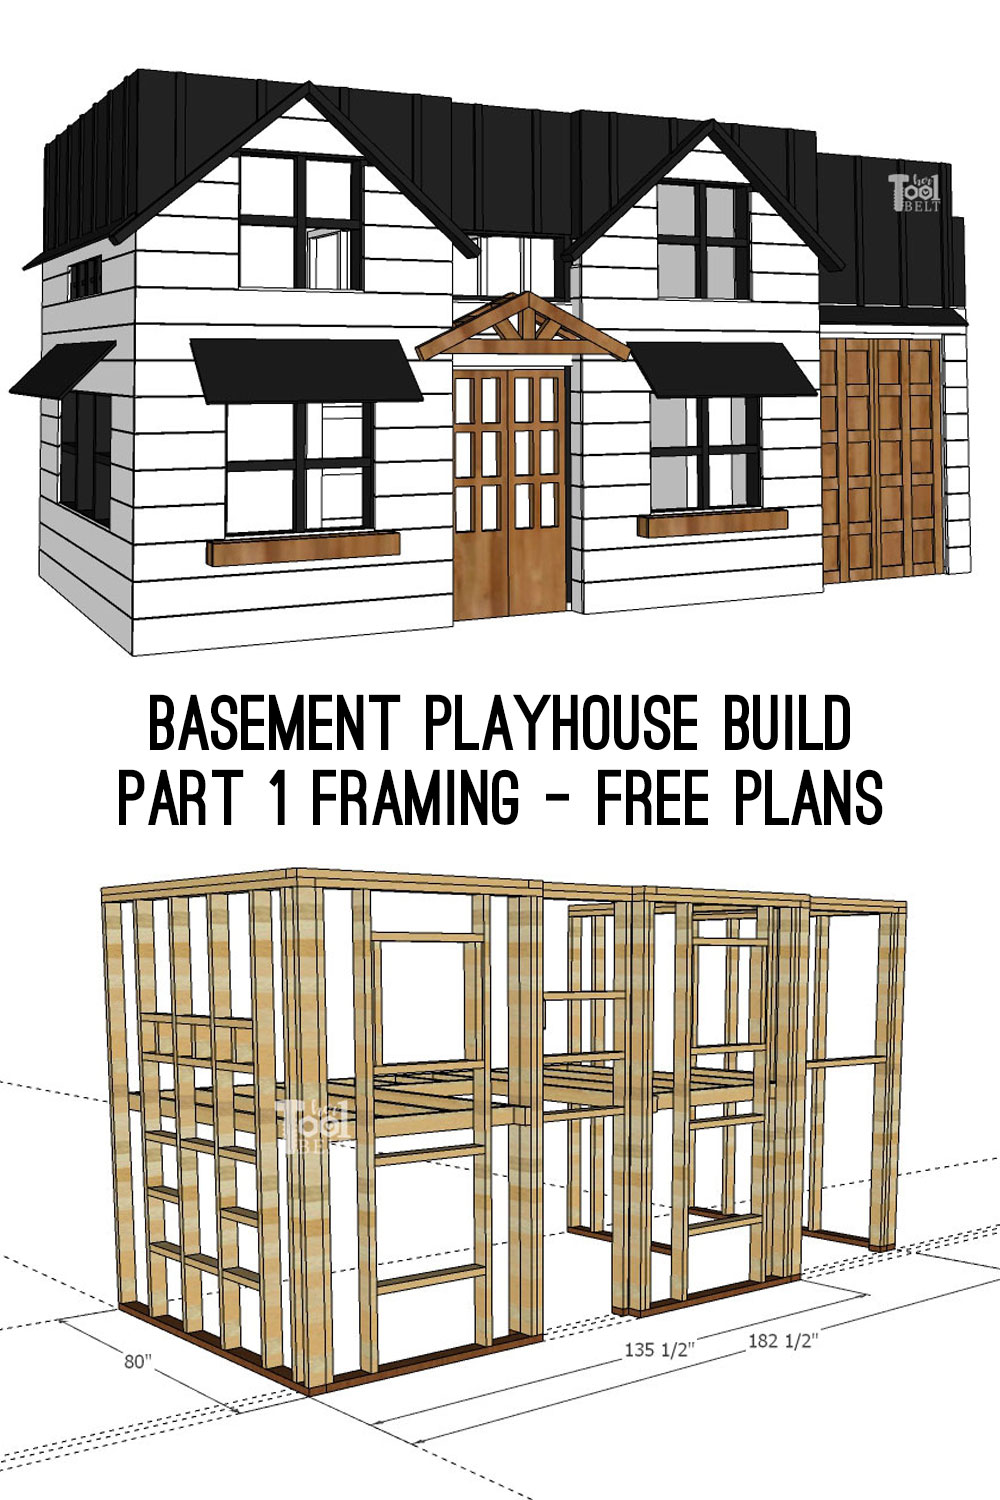
This is what I came up with for the space. The playhouse will come out from the wall about 6′, and the main portion of the playhouse will be about 12′ long.
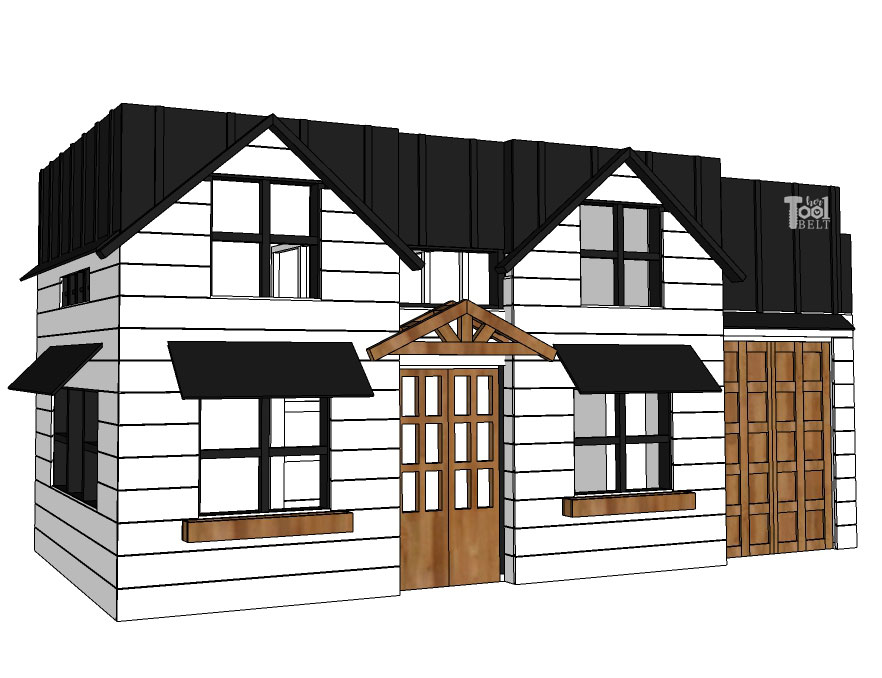
The playhouse will run along the wall of the stairs, and the ‘garage’ will go under the stairs. The main house will have 2 levels. On the main level will be the Kitchen and Living Room for ‘tea parties’ and such. Upstairs will have the Arts & Crafts Room and a Nursery for all of their stuffed animals that they love. Unfortunately my basement ceilings are only 7 1/2′ high, so it is a little squishy for my older daughter. But when both girls get too tall, I can remove the second floor if they want me too. I’m thinking that the under the stairs portion will just be a hangout place with big soft pillows and cushions.
I had to build around a number of odd things (multiple beams, walls, HVAC, plumbing) in my basement, which I’m sure every situation will be different. I’ll share the plans as if the playhouse is built along a flat back wall, then they’ll have to be adjusted as necessary.
You can check out the tutorials for the whole playhouse build:
- Part 1 – Basement Playhouse Build – Framing
- Part 2 – Basement Playhouse Build – Shiplap & Sheetrock
- Part 3 – Basement Playhouse Build – Trimming all the things
- Part 4 – Basement Playhouse Build – Cedar Doors & Accents
- Basement Playhouse Reveal!
- House Frame Doll Bed
- House Frame Doll Bunk Bed
With this build, I’m also reviewing a few tools as part of the #THDprospective program with Home Depot. I’ll be sharing my thoughts on these tools noted with *.
Basement Playhouse Build – Laying out and framing the playhouse
Materials Needed
- approx 65 – 2 x 4 x 8′ studs
- 5 – pressure treated 2×4’s
- 3″ framing nails (I use a 21 deg nailer, so I buy the 21 deg nails)
- 13 – 2×4 joist hangers
- Wiring materials are optional
- 14/2 romex wire
- Wire nuts
- Wire Staples
- 3 – Round Light Boxes
- 3 – Recessed Light Cans
- 1 – 1 gang electrical box
- 1 – 1 pole switch and cover
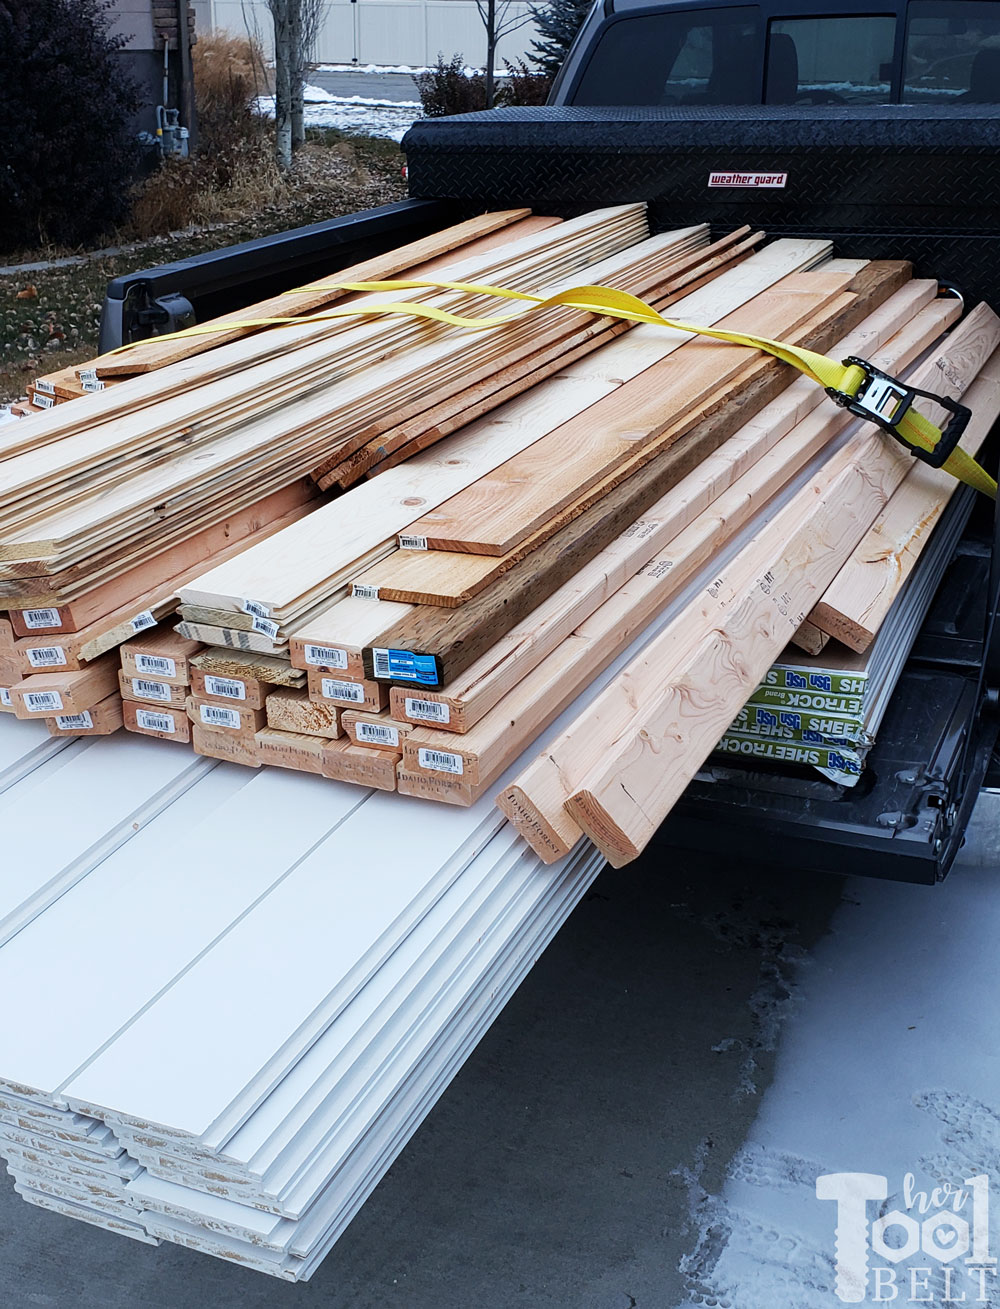
I have a Home Depot Credit Card and sometimes I get those 10% off coupons when you use your card. I waited for one of those coupons and bought most of the supplies in one shot. Thank goodness for the Husky ratchet strap to keep it all intact on the way home! The truck was pretty full, what I won’t do to save a buck 🙂
Tools Used
Room Layout
- Bosch GCL 2-160 S Laser Level with Plumb Points* or Bosch GLL 2 Cross Line Laser Level* with tripod or 4′ Level
- Chalk line
- Tape Measure
Wall Build Up
- DeWALT cordless 21 deg Nail Gun and battery
- Makita cordless Sub Compact Circular Saw with 6 1/2″ Diablo Demo Demon Blade* or miter saw
- Speed Square (rafter square) a straight edge for cutting
Electrical Installation
- Milwaukee Hammer Drill and Impact Driver Combo*
- Bosch Spade Bit Set*
- Hammer
- Wire Strippers
- Dremel rechargeable Screw Driver*
Support Tools
- Husky Heavy Duty Ratchet Tie Down* – for the truck load
- Husky 37″ Mobile Job Box* – makes a great mobile workbench
- Husky LED Utility Light*
- DeWALT cordless Oscillating Tool*
- Firm Grip Canvas Gloves*
- Ridgid NXT Shop Vac* for clean up
- Safety Glasses – these are definitely my favorite style, very light weight
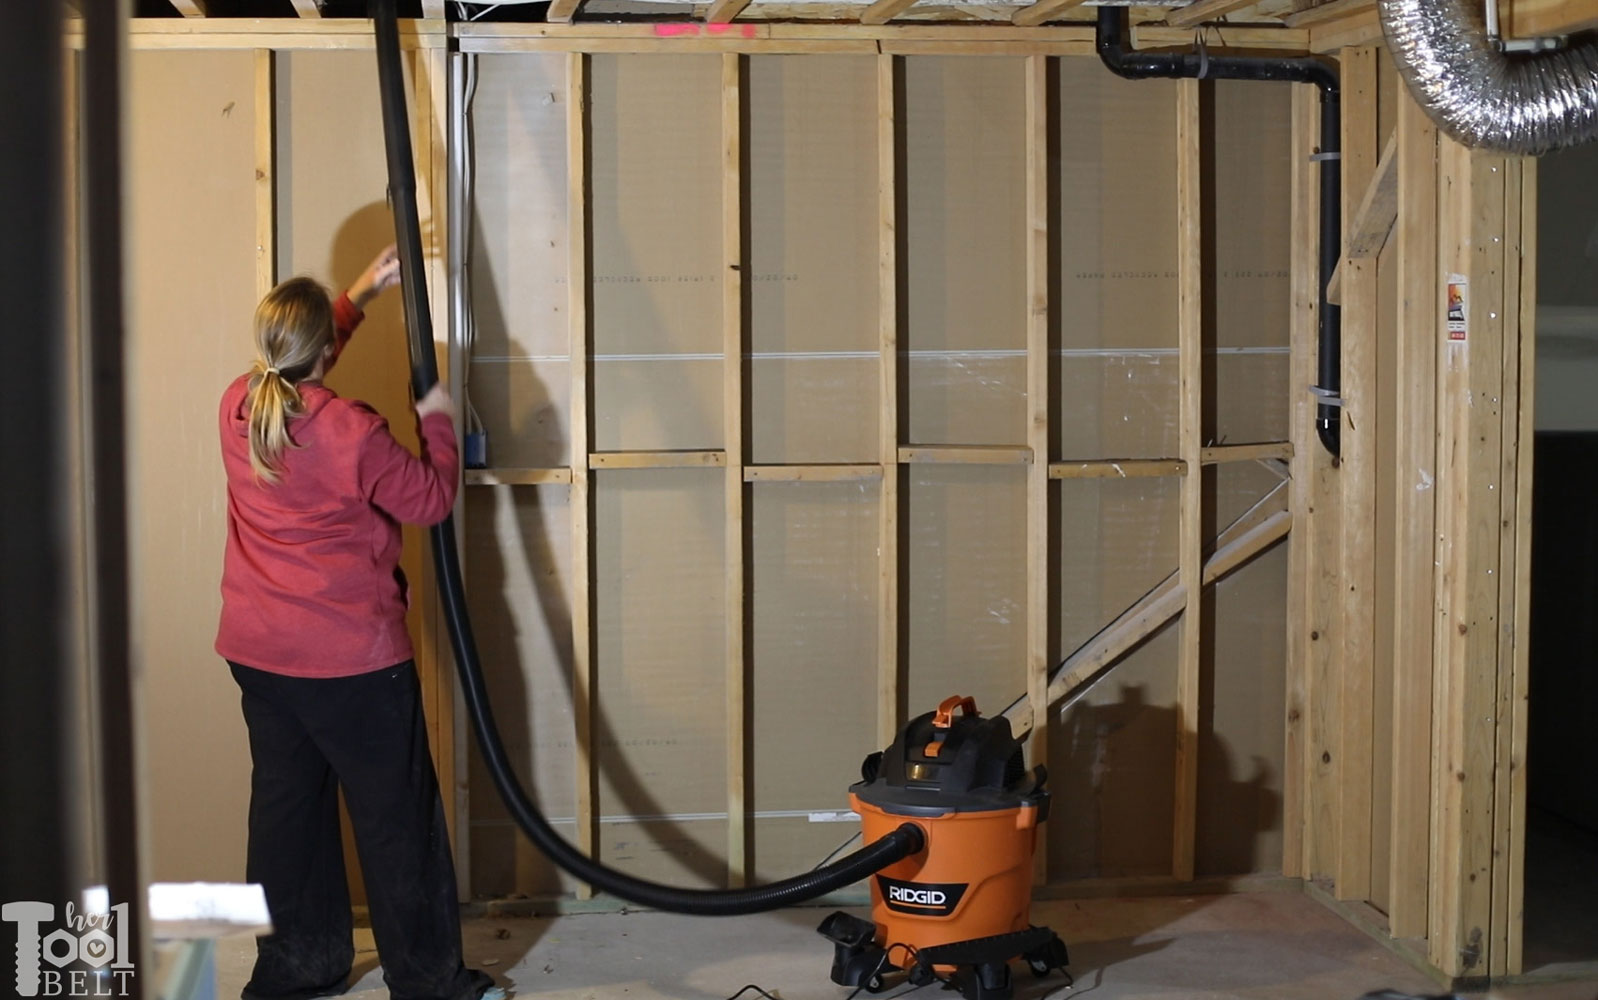
Step 1 – Clean Up and Layout Space
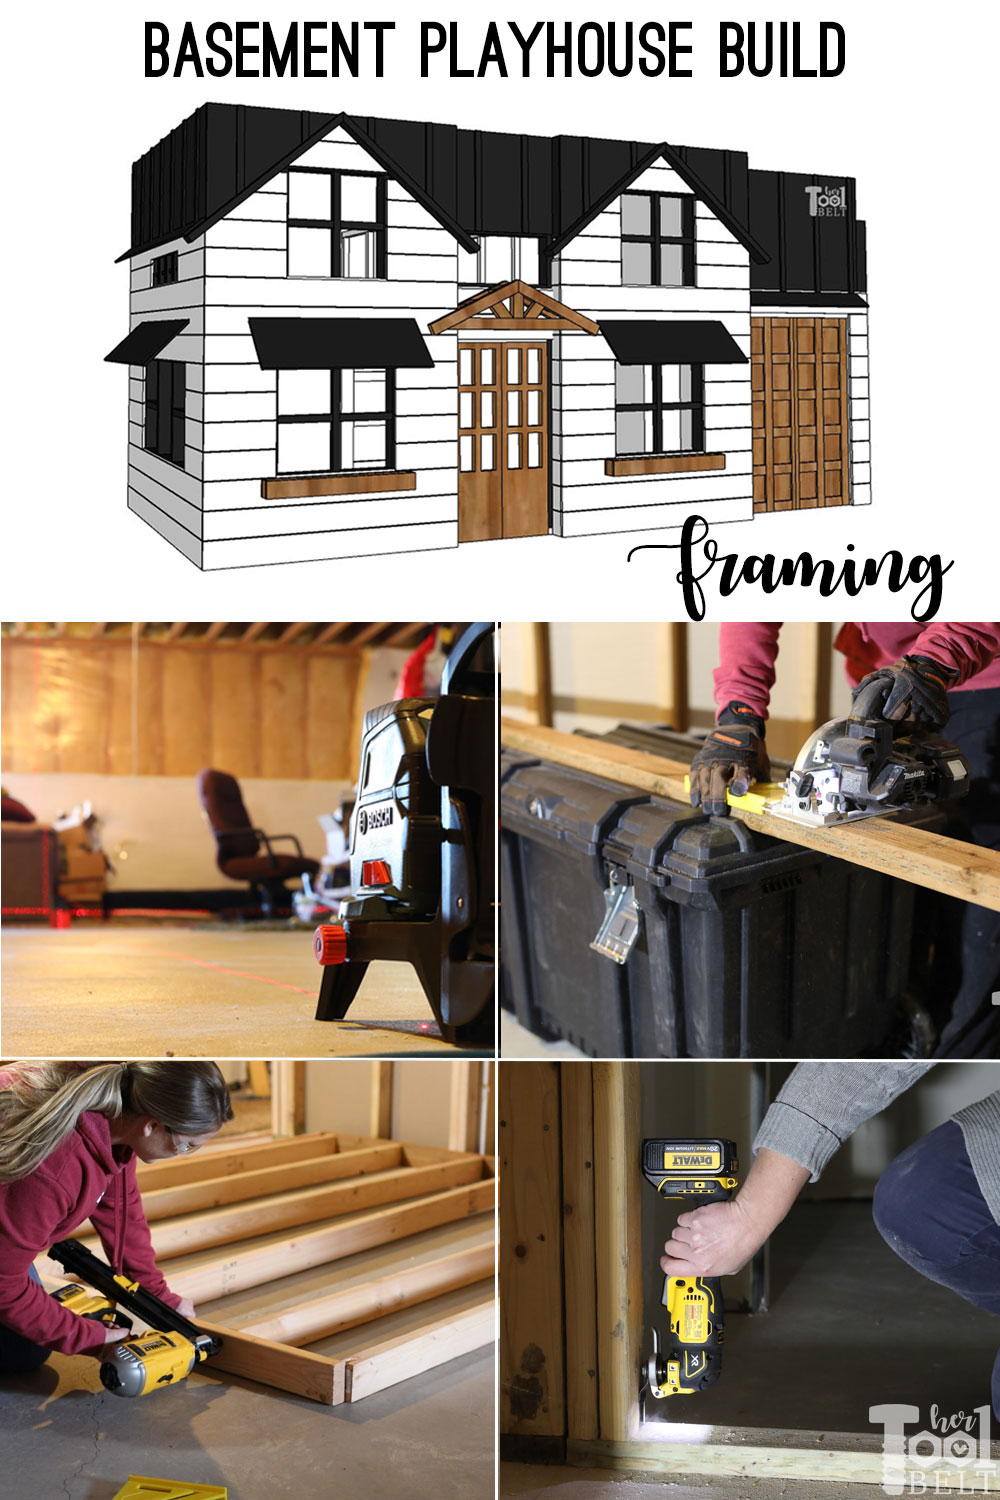
Before starting to build, I first had to clean up the space and the Ridgid shop vac worked great for this job. Just thought I better get any spider webs and dirt picked up, instead of hiding it in the walls :-). The 12 gal NXT Ridgid shop vac comes with a variety of accessories, a nice long cord and plenty of suction.
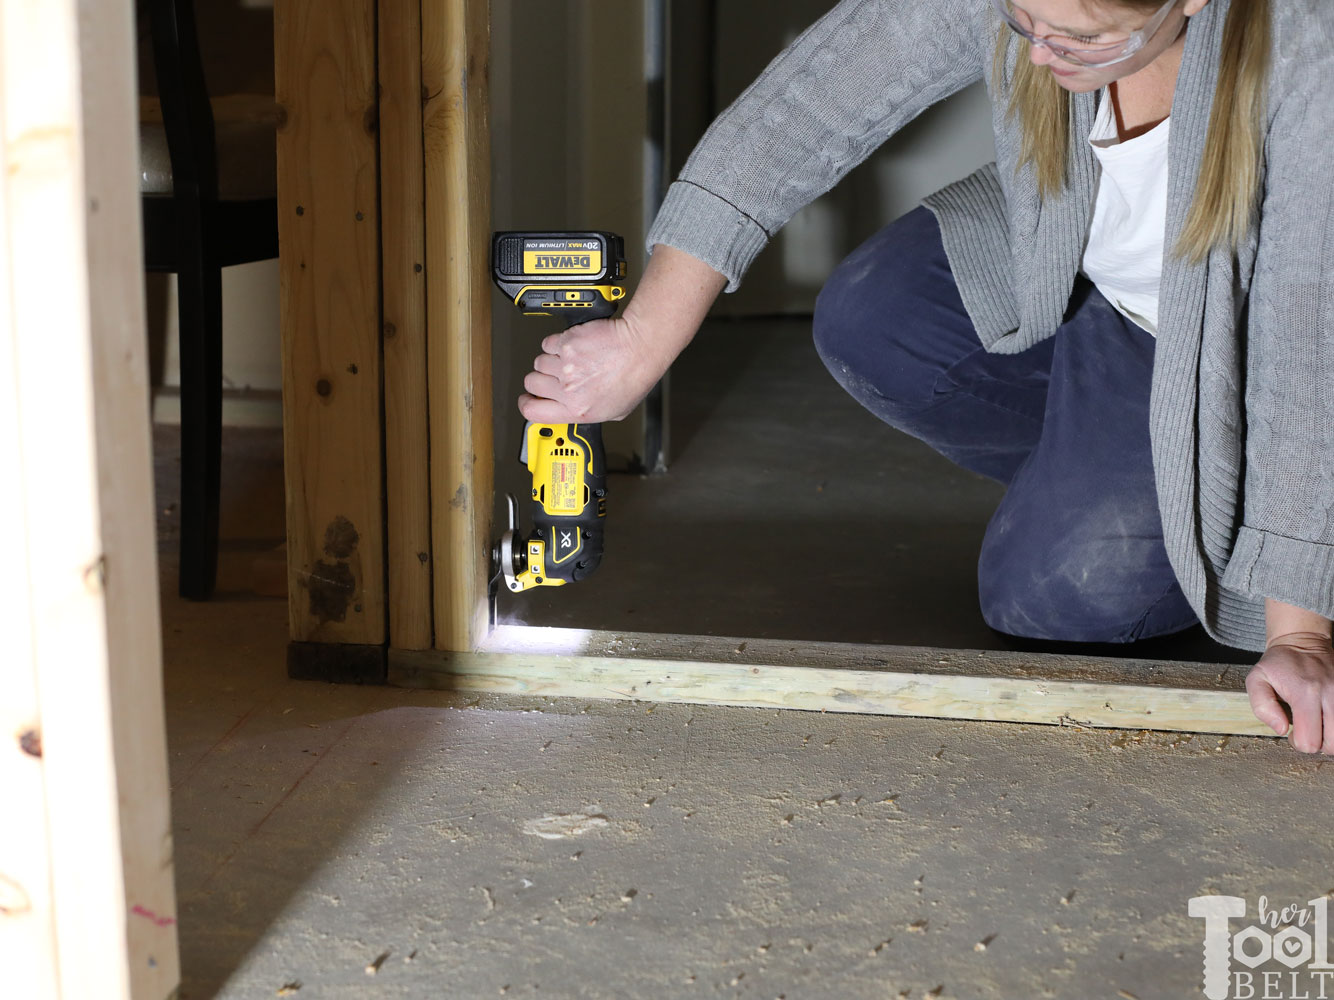
There were a few rogue boards in the basement that I needed to remove, the oscillating tool works fantastic for this type of work. The DeWALT cordless oscillating tool is probably the most comfortable grip I’ve seen with oscillating tools. With a push down lever, the blade is easily changed too. I frequently use it to cut wood, old nails and drywall, very handy.
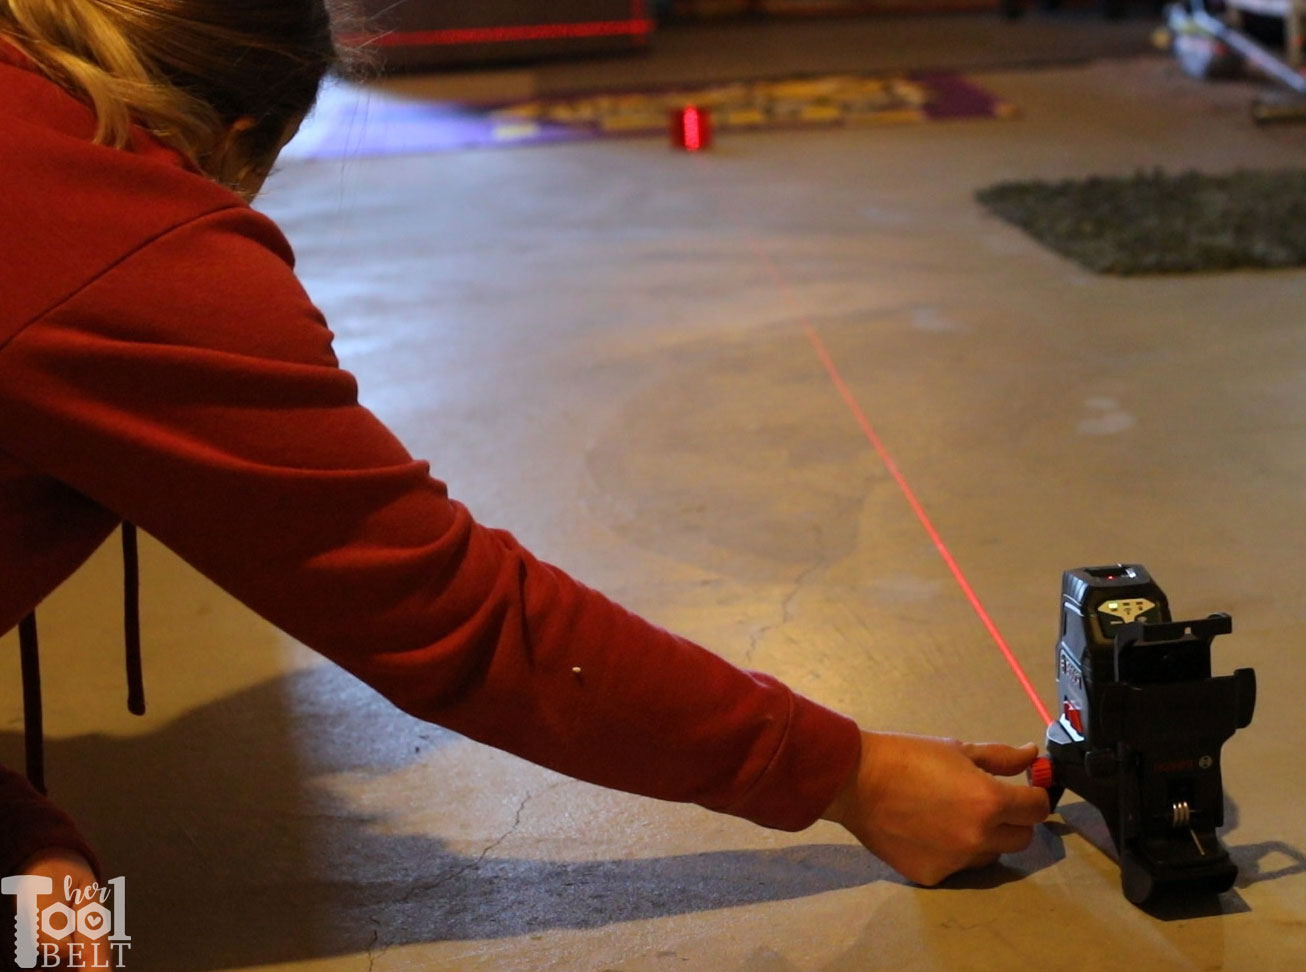
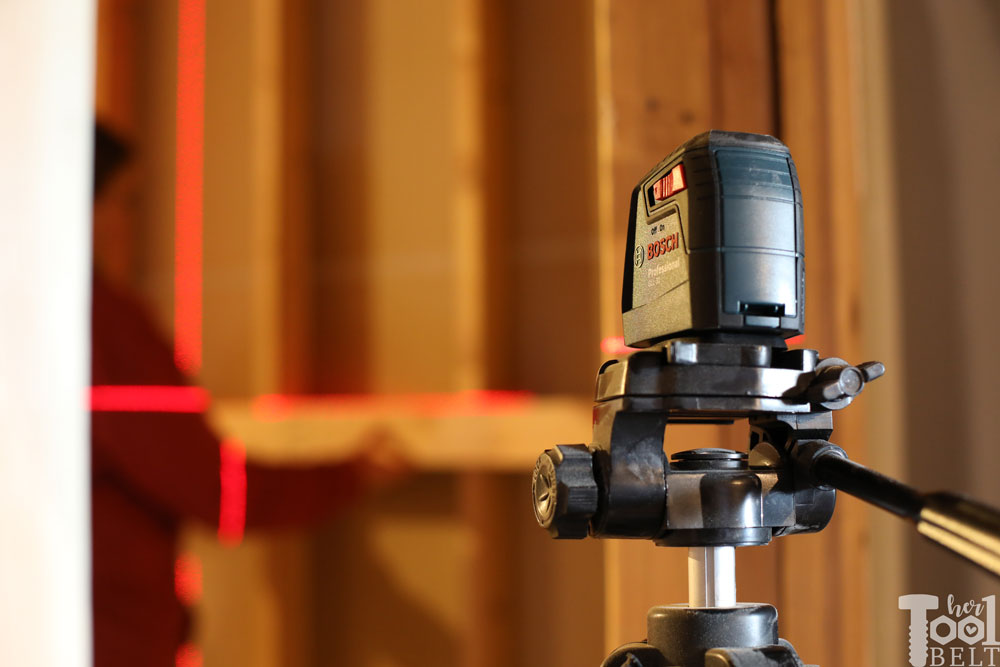
The next job is laying out the wall lines for the playhouse. This got a little tricky with all of the pop outs and such. But with the help of the laser levels, I got it done fairly quickly.
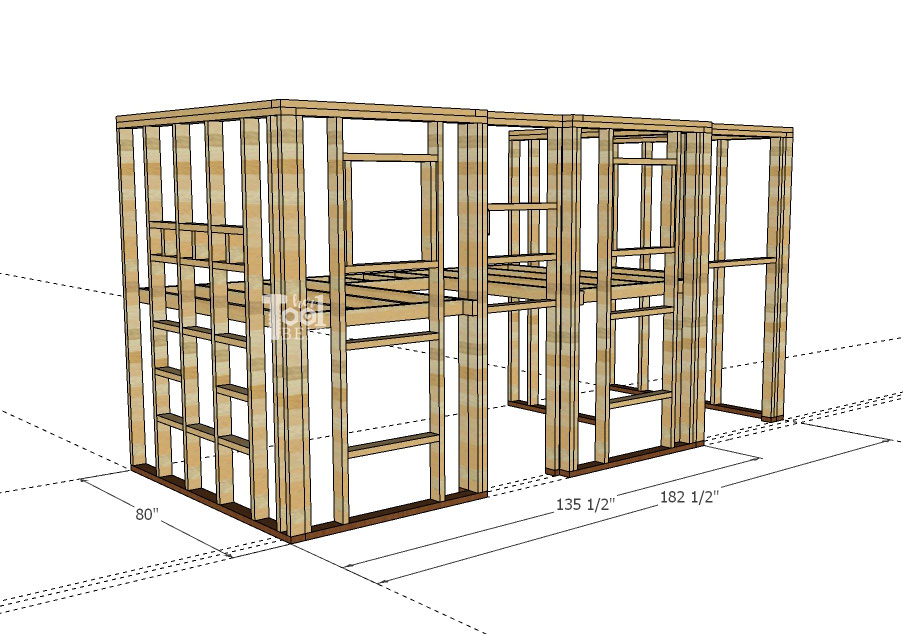
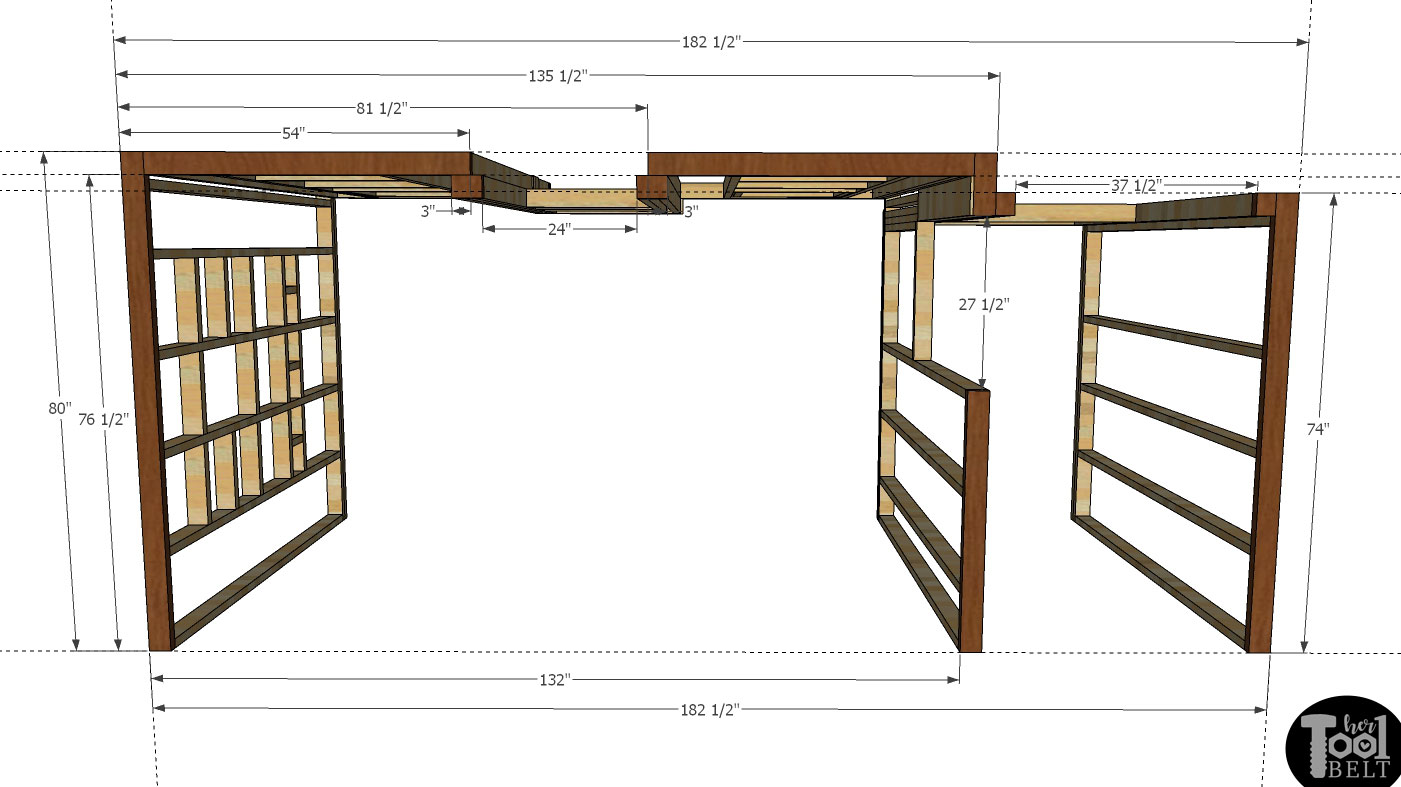
I measured off of the main back wall:
- 80″ for the front of the house
- 76 1/2″ for the front door inset
- 74″ for the garage
I measured from the left wall:
- 54″ for the front door inset
- 81 1/2″ for the right side of door inset
- 135 1/2″ for the garage inset
- 182 1/2″ for the far right wall
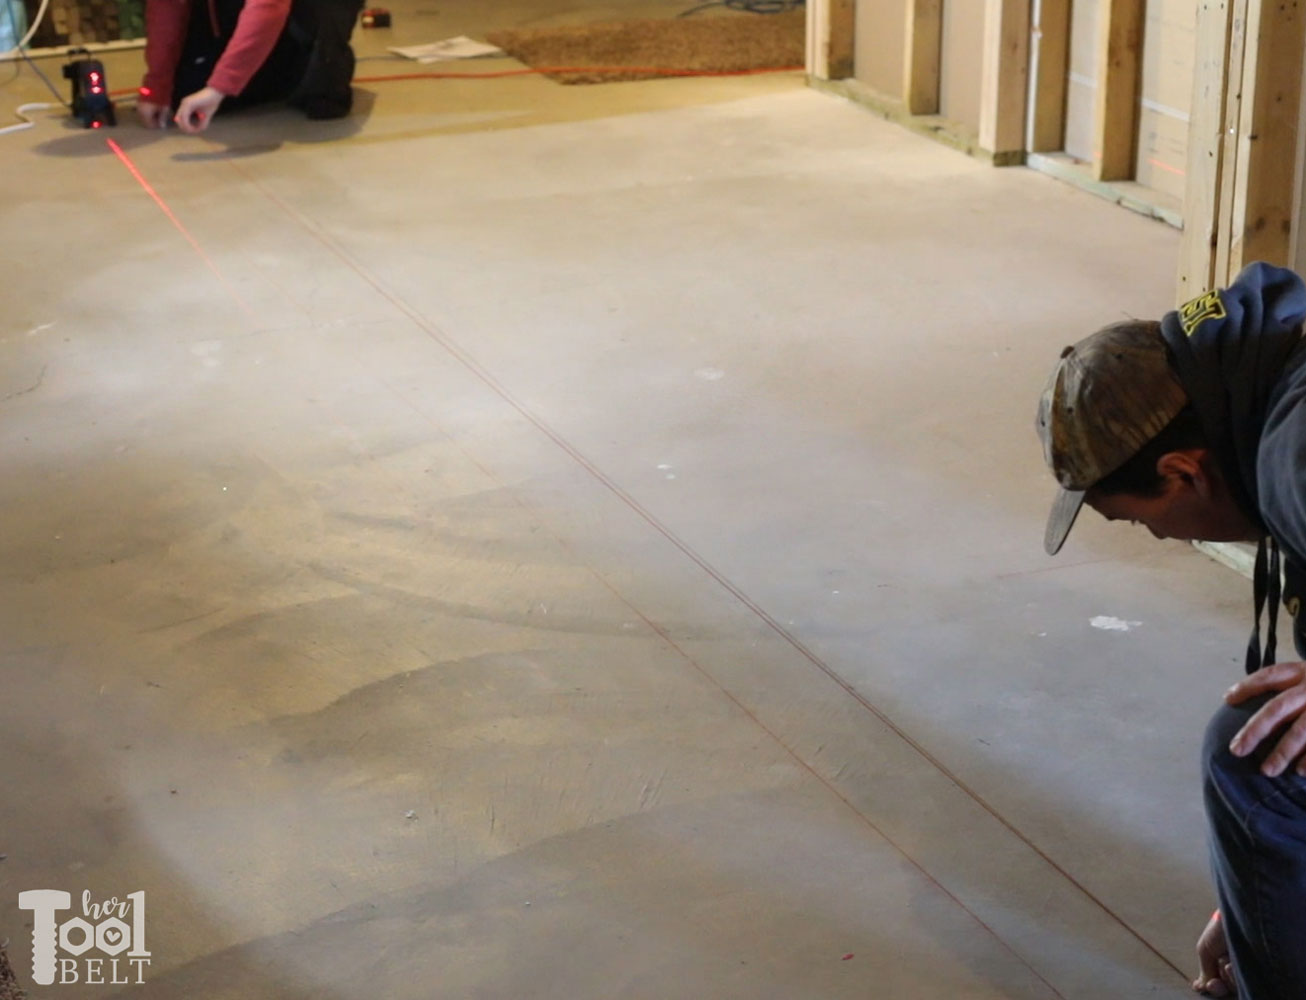
The Bosch GCL 2-160 S Laser Level with Plumb Points* made it nice to layout the straight lines, it is self leveling, although you can lock it if you don’t want it to level itself. The laser lines were bright and easy to see! I placed the target by where the far right wall will go and adjusted the laser line to go through my markings I made from the back wall.
Then I snapped chalk lines.
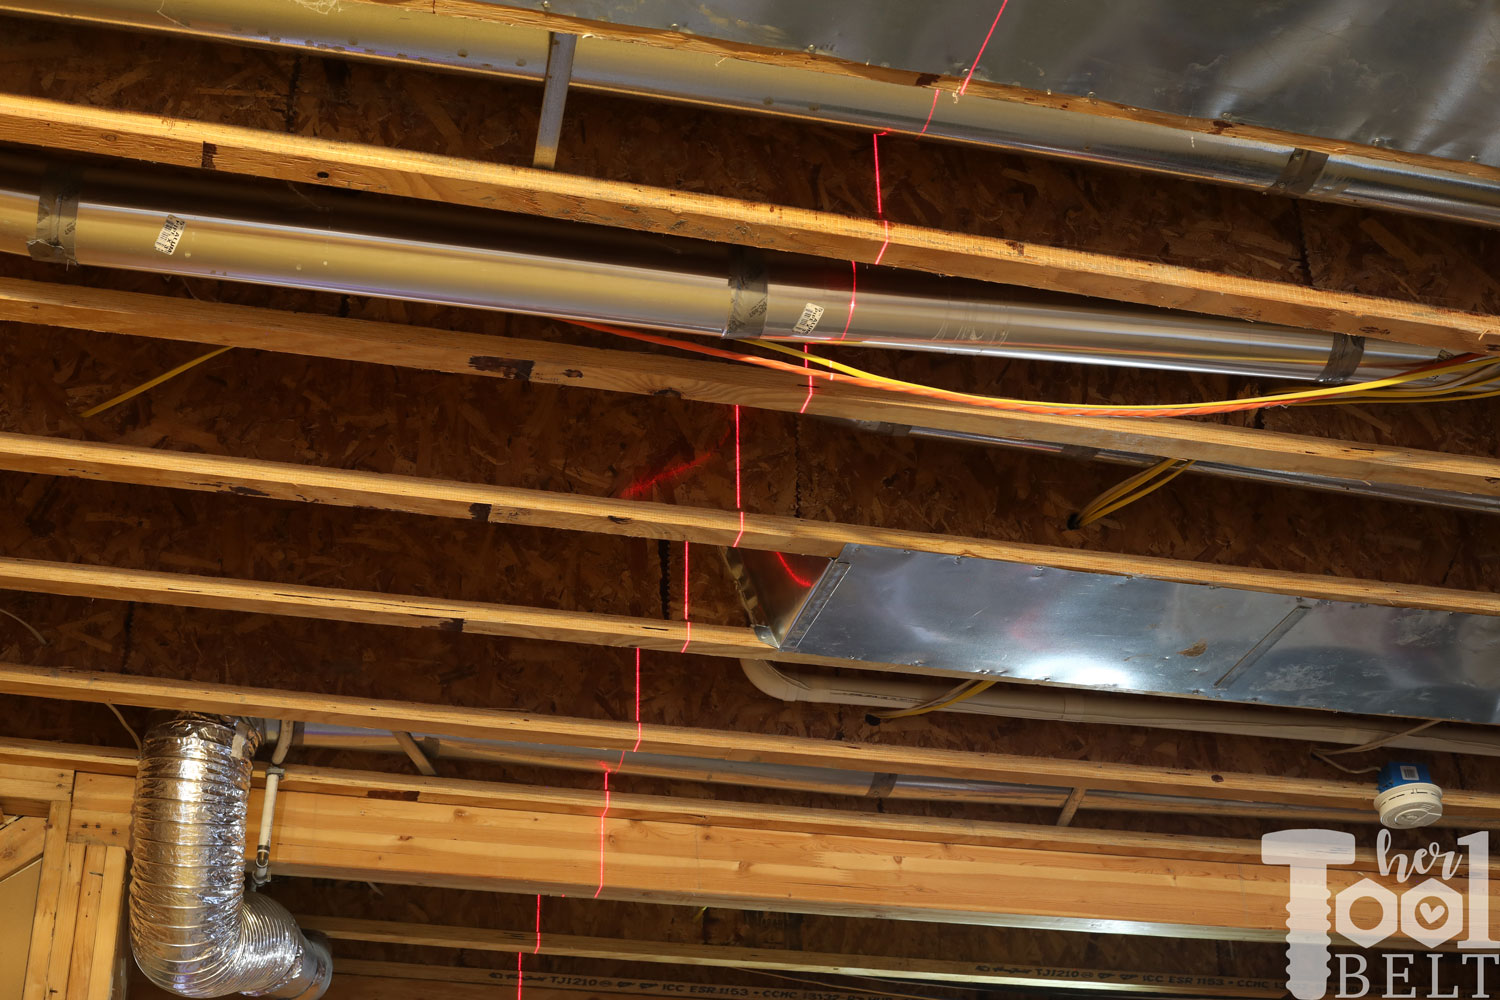
I really liked the plumb points that the GCL 2 160 produced, it made it easy to mark on the ceiling where the walls needed to go.
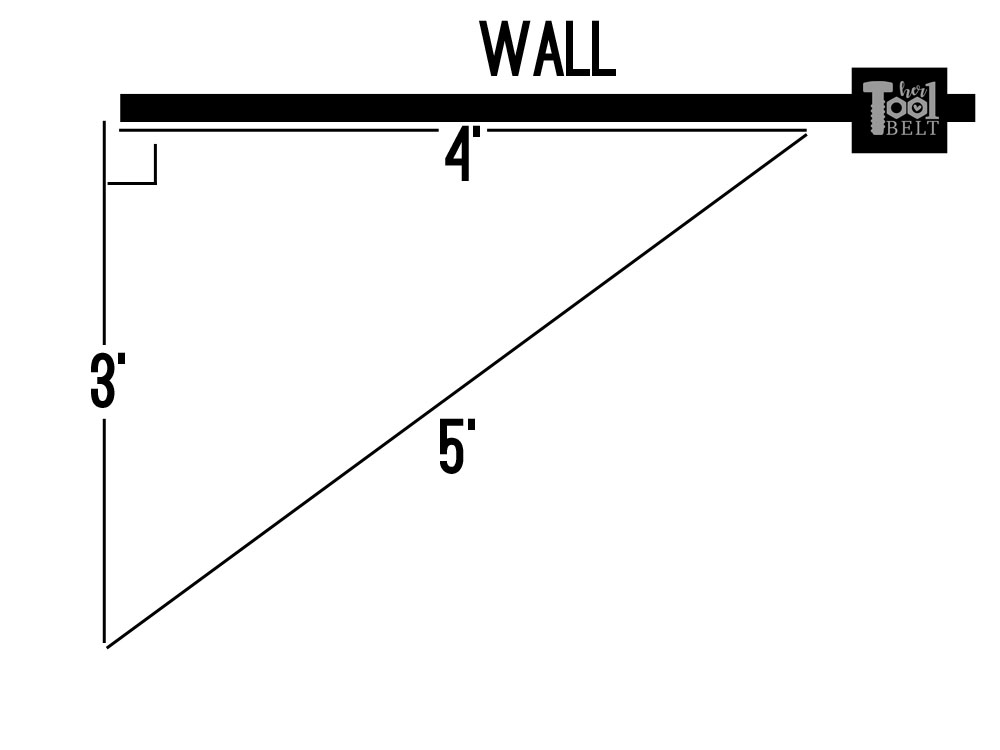
An easy trick to getting a perfect 90 deg for an adjacent wall is Pythagorean’s theorem. On a right triangle with sides a and b the hypotenuse (diagonal leg) is the square root of a^2 + b^2. The easiest way to use this is with increments of 3, 4 and 5.
Step 2 – Building the Basement Playhouse Walls
So I learned this the hard way…my floor and ceiling aren’t flat and level and change often…measure measure measure.
Decisions and Measurements
I decided to build my walls double plated (2 studs at the top) it was easier for me to build and put the walls up this way. You only need 1, so it’s up to you, the extra cost will be like $12 more. Also this playhouse isn’t that big, so I didn’t want to take the space to properly trim out the windows, so the studs are part of the window and door frames.
Stud Length
To get your stud length, measure from the floor to ceiling joist and we’ll call that X. For double plated X-4 1/2″= stud length. For single plate X-3″= stud length.
Time to build the walls. If building on cement, the bottom board needs to be pressure treated lumber.
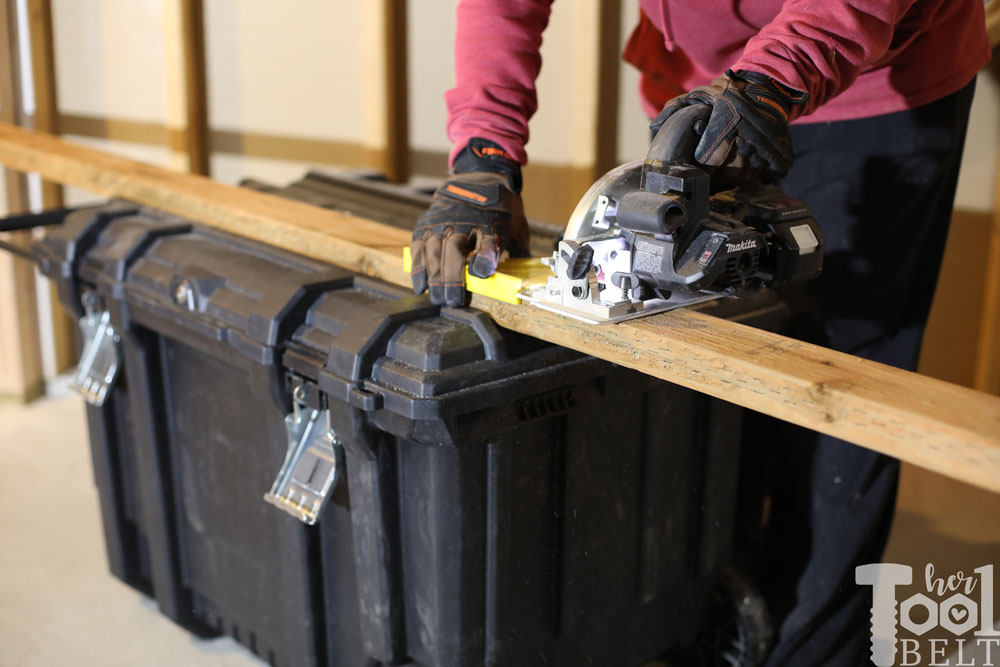
The Husky job box made a great mobile work bench, it has grooves in the lid to hold the studs while you cut. It also has tons of storage for the tools your not using at the moment. I used this Makita subcompact circular saw, square and Diablo demo demon blade to make all of the cuts quickly.
Far Left Wall
Cut List from 2×4’s
- 7 – stud length
- 1 – 80″
- 1 – 76 1/2″
- 1 – 80″ pressure treated 2×4
- 14 – 14 1/2″
- 3 – 6 1/2″
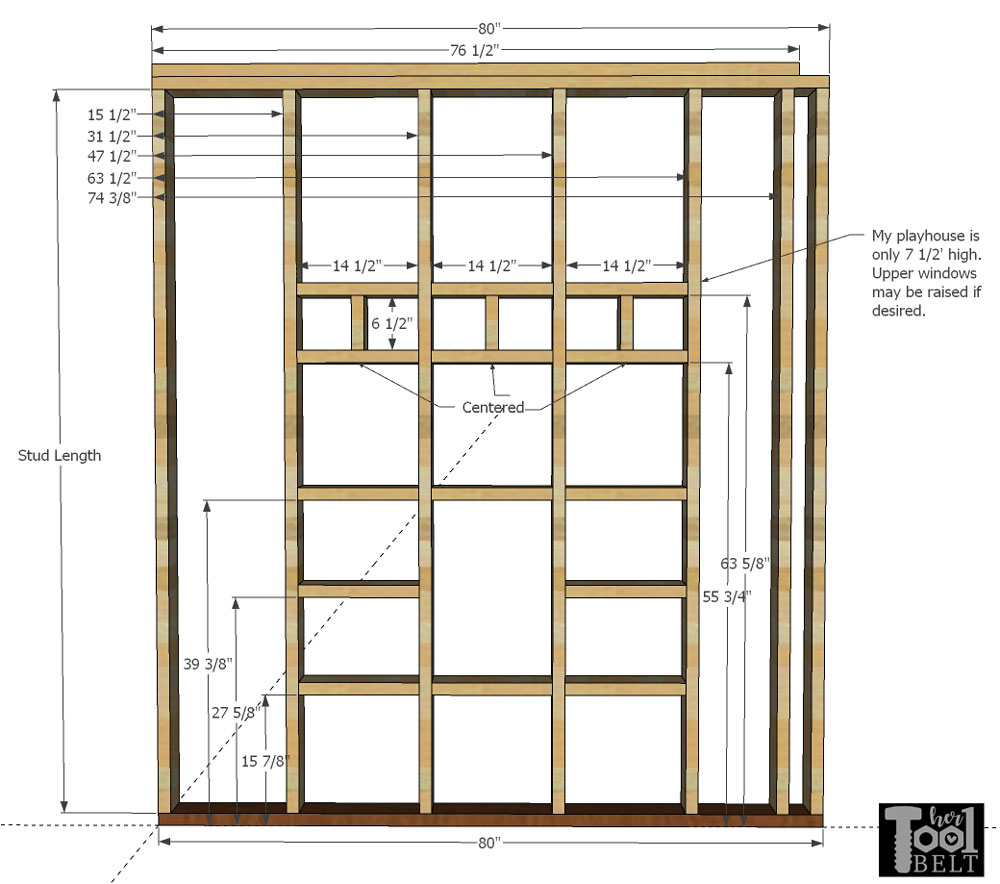
I marked all of the board locations on the top and bottom, then used a nail gun to nail the studs and boards in place.
I don’t know if this is right, but it worked for me. Using the laser level to mark on the ceiling where the wall top will go, I nailed the second top plate along that line. Then I stood the wall up and lined it up with my floor chalk lines and that upper top plate and nailed in place. It worked out well for me. I did have to shim sometimes if the floor changed a lot.
Playhouse Front Walls
The two front walls are the same except mirrors of each other.
Cut List from 2×4’s
- 2 – 50 1/2″ pressure treated 2×4
- 10 – stud length
- 4 – 50 1/2″
- 8 – 25″
- 4 – 22″
The top plates are offset 3 1/2″ to overlap with the other walls.
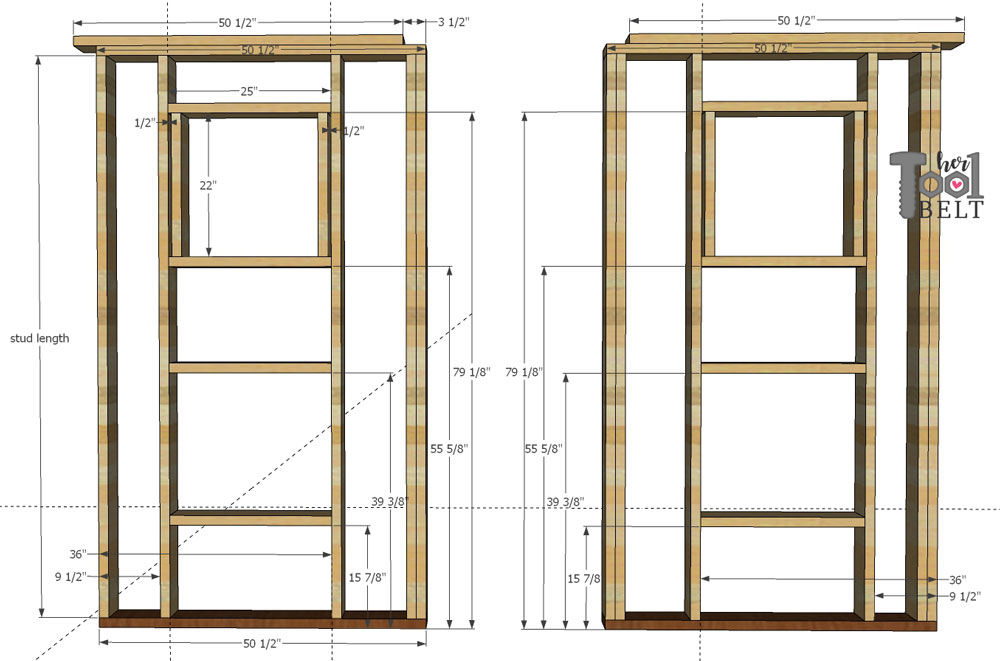
Marking all of the board locations on the top and bottom, then I used a nail gun to nail the studs and boards in place.
Playhouse Front Door Frame
I inset the front door to add dimension, I’m not sure this adds a ton, but I liked the look.
Cut List from 2×4’s
- 2 – 4 3/4″ pressure treated 2×4
- 4 – stud length
- 1 – 33 1/2″
- 1 – 27 1/2″
- 3 – 24″ (horizontal pieces)
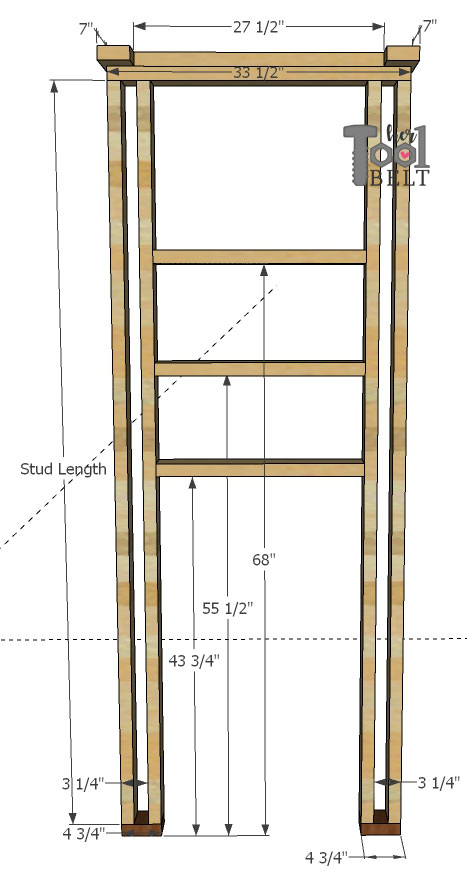
I marked all of the board locations on the top and bottom, then used a nail gun to nail the studs and boards in place.
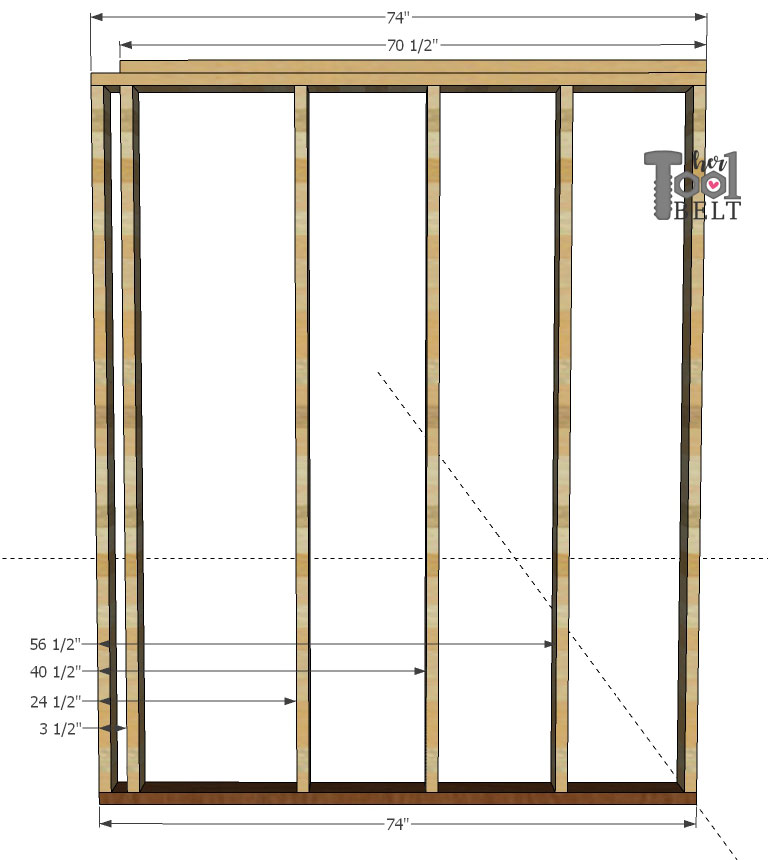
Playhouse Garage Front Wall
Cut List from 2×4’s
- 2 – 3″ pressure treated 2×4
- 4 – stud length
- 1 – 50 1/2″
- 1 – 43 1/2″
- 3 – 37 1/2″
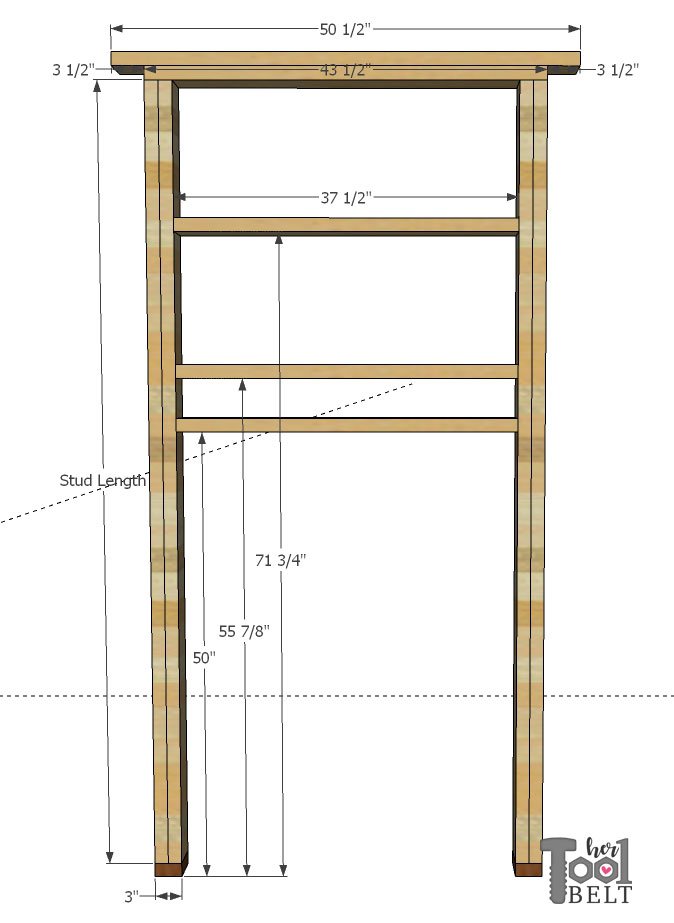
Marking all of the board locations on the top and bottom, then I used a nail gun to nail the studs and boards in place.
Playhouse In-between Wall
Cut List from 2×4’s
- 1 – 9 1/2″ pressure treated 2×4
- 1 – 43″ pressure treated 2×4
- 7 – stud length
- 1 – 80″
- 1 – 70 1/2″
- 2 – 39″
- 1 – 27 1/2″
I offset the top plates 3 1/2″ to overlap with the other walls.
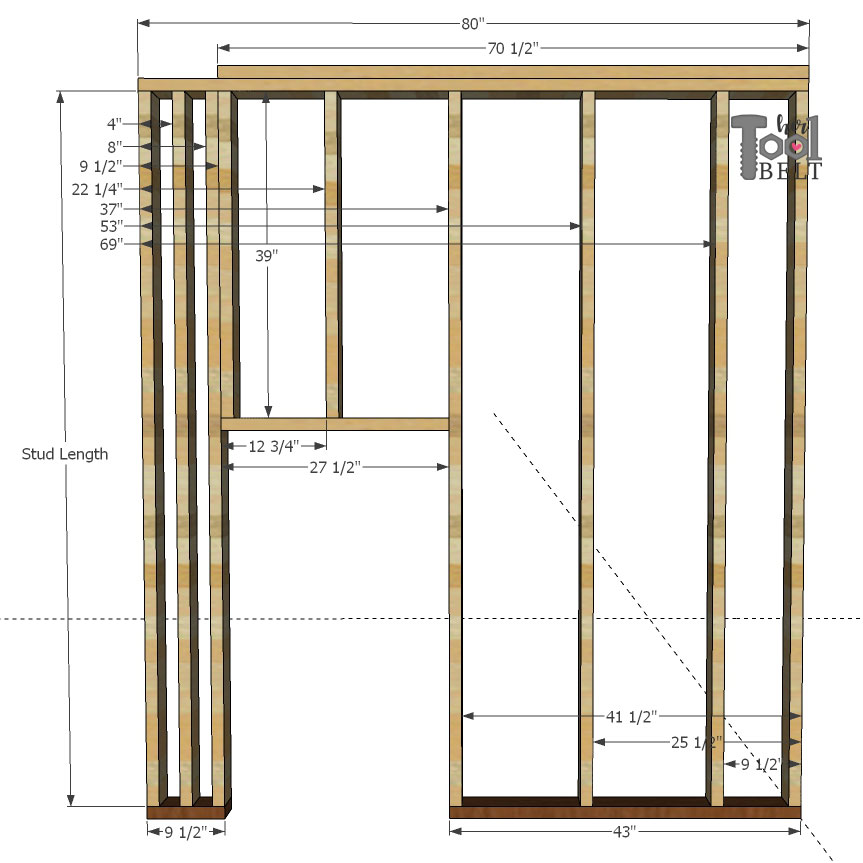
Marking all of the board locations on the top and bottom, then I used a nail gun to nail the studs and boards in place.
Playhouse Far Right Wall
Cut List from 2×4’s
- 1 – 74″ pressure treated 2×4
- 1 – 74″
- 1 – 70 1/2″
- 6 – stud length
I offset the top plates 3 1/2″ to overlap with the other walls.
Marking all of the board locations on the top and bottom, then I used a nail gun to nail the studs and boards in place.
I worked my way around the room assembling and securing the walls to each other and the ceiling, and tried to make the walls plumb.
Attaching the 2nd Floor Boards
To get the height of the 2nd floor:
- Measure floor to ceiling X
- X – 3 1/2″ = Y
- Divide Y/2 and that is the height the bottom of the floor boards should be.
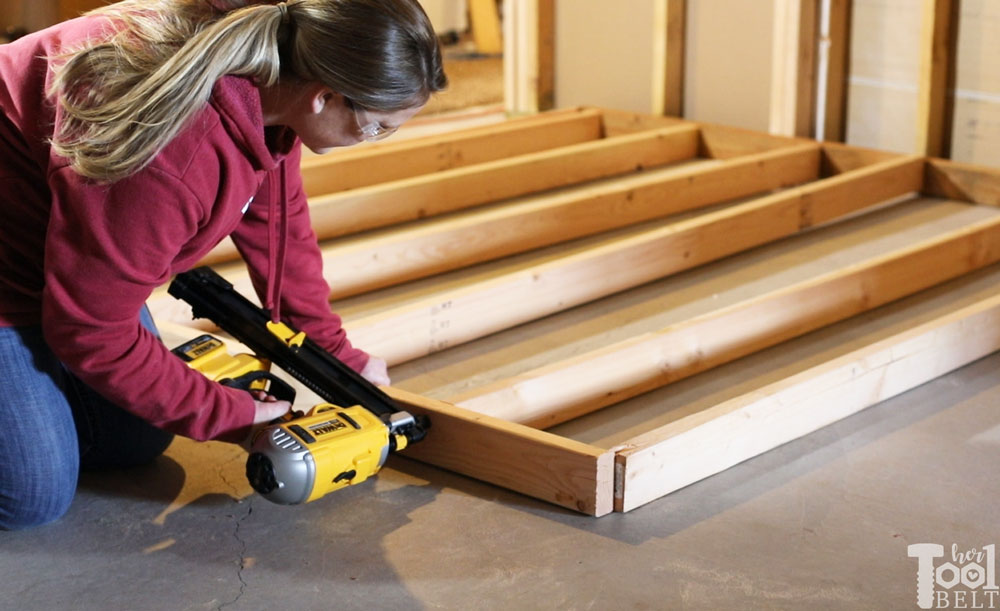
To make sure the 2nd floor was level, I projected a level laser around the room. Then I secured the outer 2nd floor boards to the perimeter of the playhouse inside.
Floor cut list
- Perimeter boards
- 2 – 46″
- 1 – 96″
- 2 – 75″
- 1 – 29 1/2″
- Floor joists
- 4 – 73 1/2″ (may need to trim a little)
- 2 – 78 1/2″
- 1 – 33 1/2″
- 2 – 20″ (may need to trim a little)
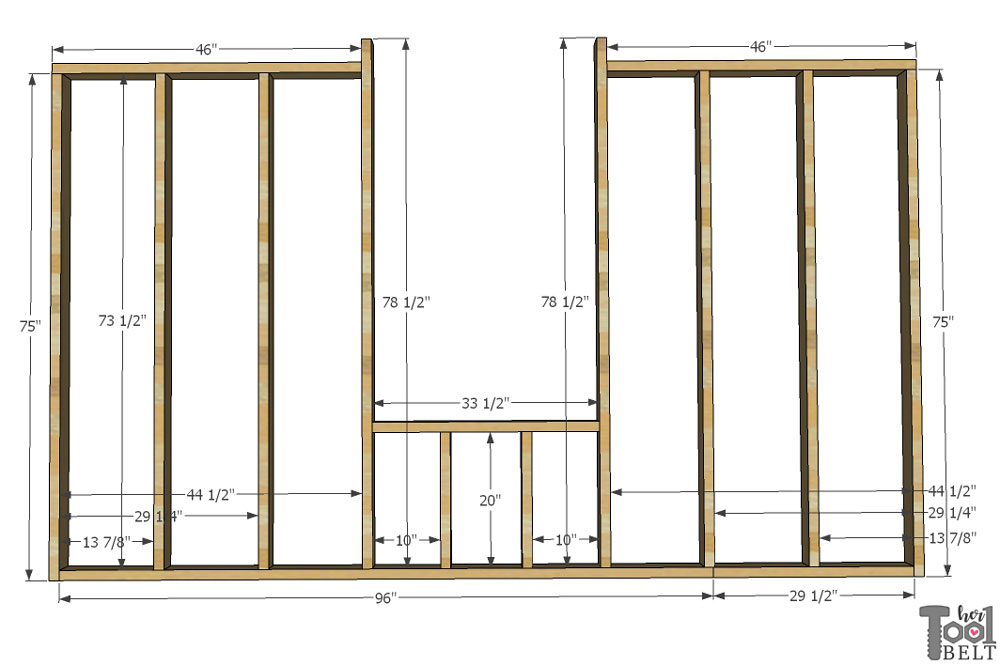
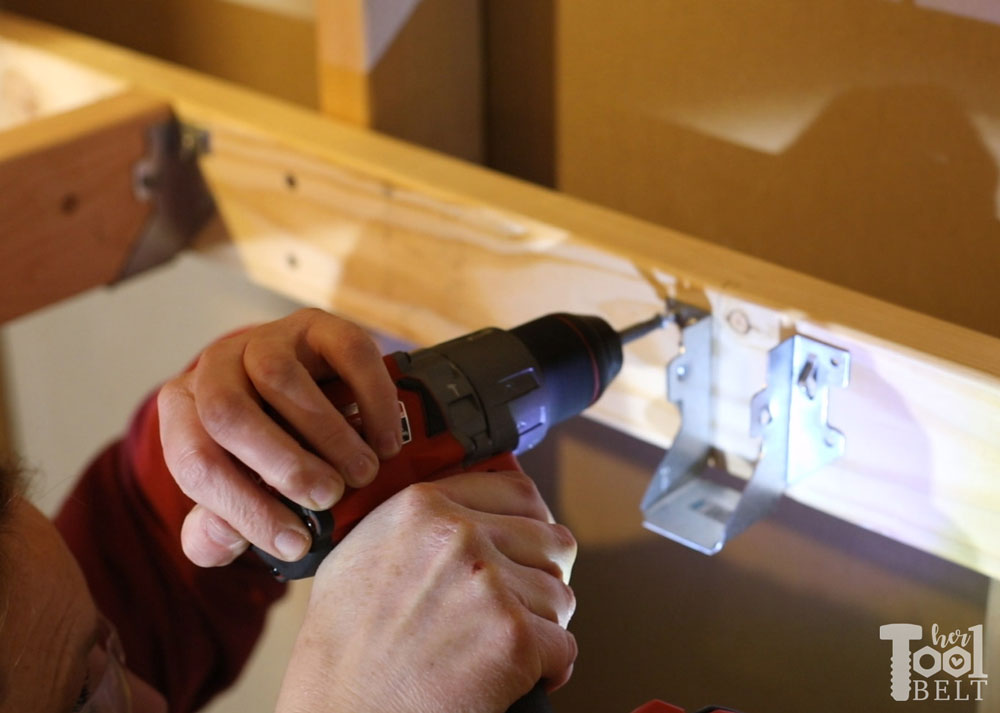
Then I installed the floor joists using Simpson Stongtie hangers, spaced per the above sketch. Looking back, I probably would wait to put the floor joists on until after drywall and shiplap…it caused for a lot of undue ducking :-).
Playhouse Electrical – optional
I was worried about it being to dark in playhouse, since it’s the dark and scary basement :-). So I added a number of lights, probably overkill but hey whatever. This is my sad attempt at an electrical schematic. Basically the power comes into my switch, then out to my sconce – chandelier box – splits to recessed can lights and one leg goes down to another sconce.

When the 14/2 romex needed to go through studs, I used the Bosch spade bits. These spade bits are nice because they grab the wood and pull themselves thru…super easy. Making sure I centered the hole in the middle of the stud, otherwise I’d need a metal plate to protect the wire. I also used staples to tack the romex within 8″ of every box.
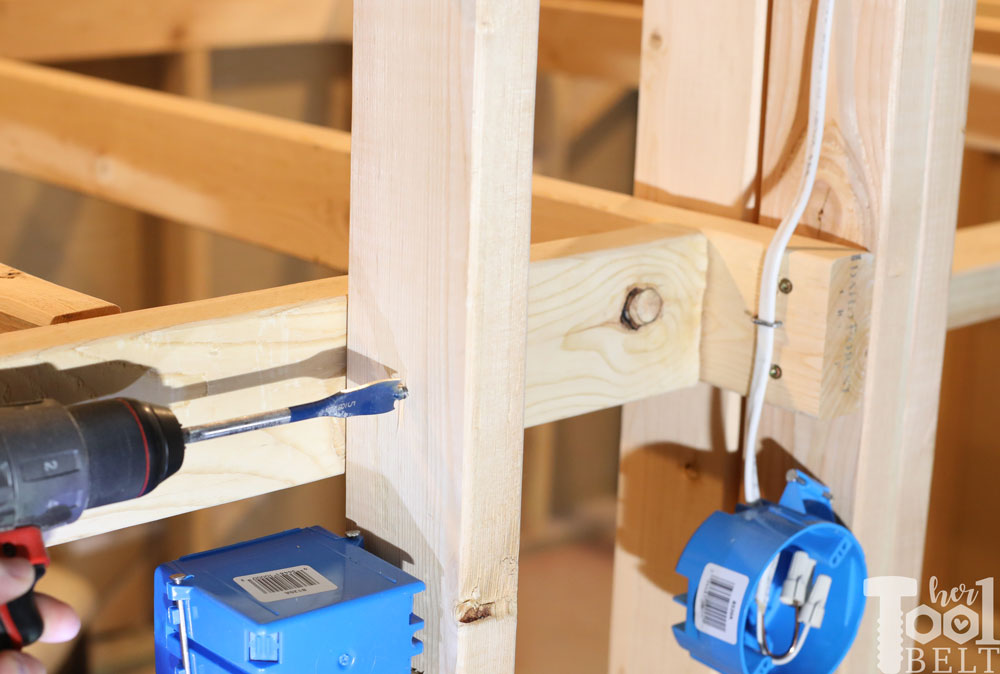
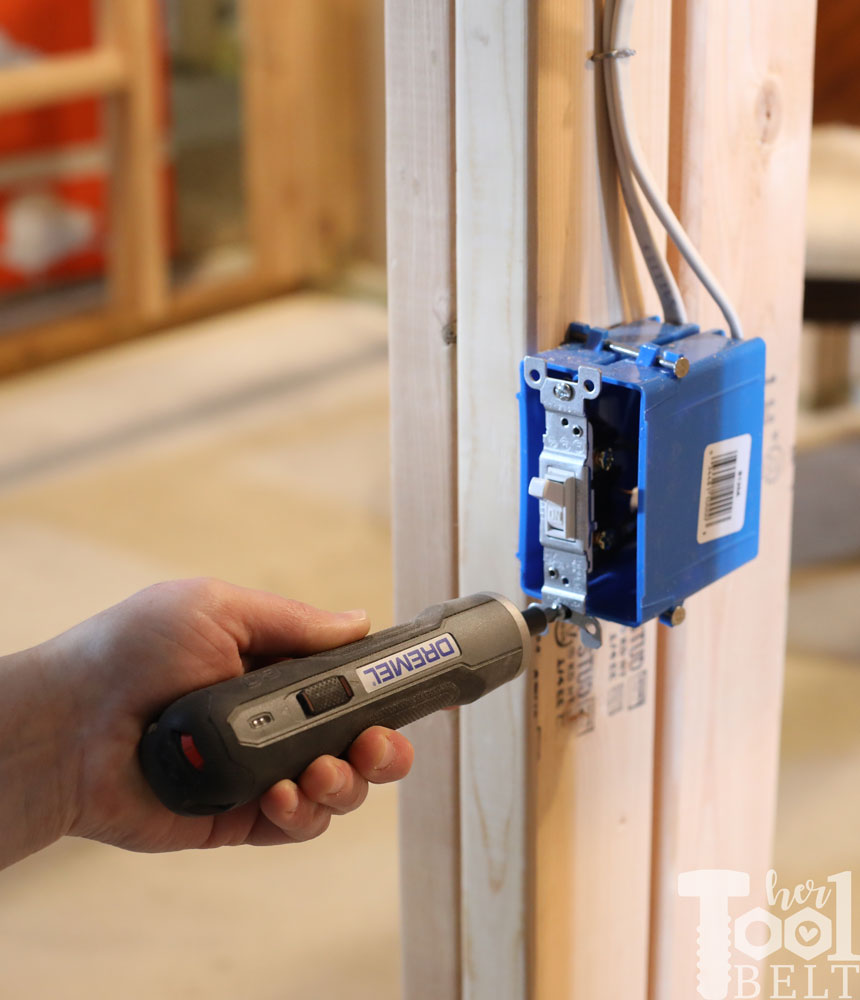
I tried out all of the electrical before closing up the walls just to check. The new Dremel rechargeable screwdriver was super handy to install the electrical hardware. It is really nice, because it doesn’t go until you push in on the screw, it is also variable speed. Super handy little tool!
Luckily my wiring was a success and everything worked!
Stay tuned for next week, where the playhouse will really start to take shape with sheetrock and shiplap!!! <– Part 2
Thanks for pinning!
“I acknowledge that The Home Depot is partnering with me to participate in the Tool Review Program. As a part of the Program, I am receiving compensation in the form of products and services, for the purpose of promoting The Home Depot. All expressed opinions and experiences are my own words. My post complies with the Word Of Mouth Marketing Association (WOMMA) Ethics Code and applicable Federal Trade Commission guidelines.”
Leave a Reply