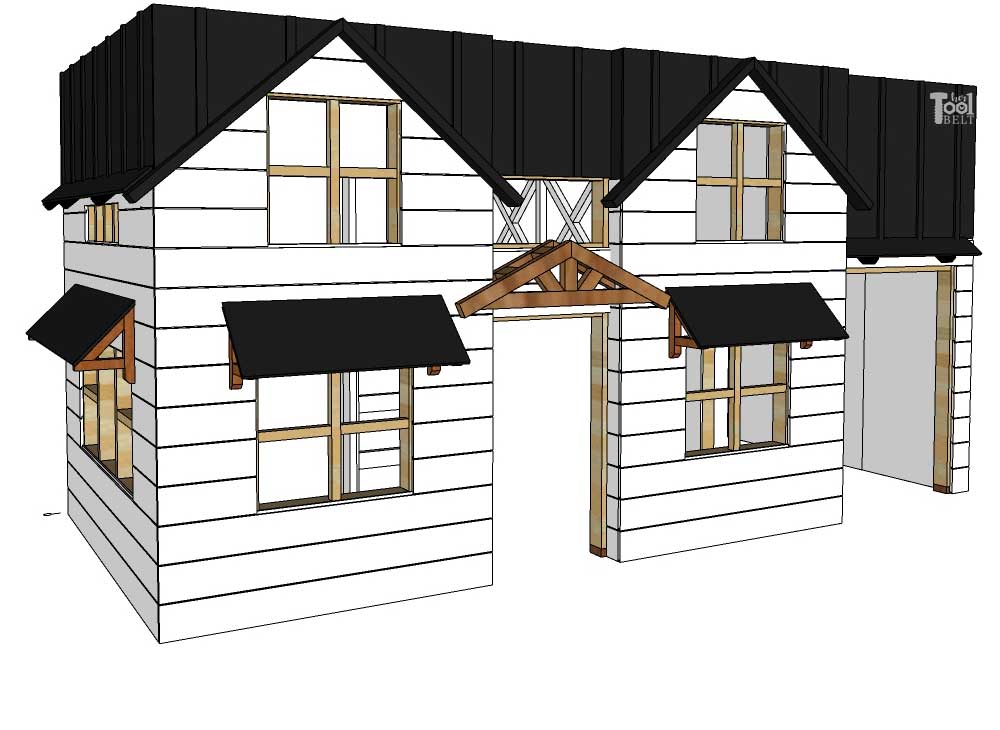
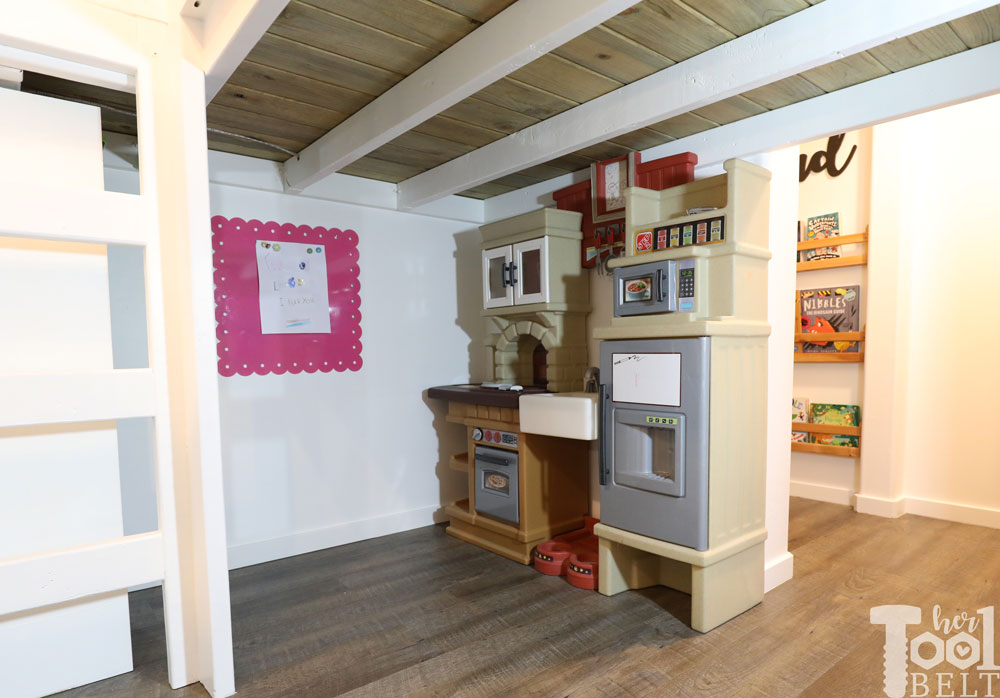
The basement playhouse is really taking shape now. Now it’s time to add the trim and finish painting. This post will cover building the playhouse ladder, railing, awnings and corbels, window trim, roof line and portico.
You can check out the tutorials for the whole playhouse build:
- Part 1 – Basement Playhouse Build – Framing
- Part 2 – Basement Playhouse Build – Shiplap & Sheetrock
- Part 3 – Basement Playhouse Build – Trimming all the things
- Part 4 – Basement Playhouse Build – Cedar Doors & Accents
- Basement Playhouse Reveal!
- House Frame Doll Bed
- House Frame Doll Bunk Bed
This post contains some affiliate links for your convenience. Click here to read my full disclosure policy.
Materials Used
- 7 – 2×4’s x 8′ (ladder and roof line)
- 2 – 2×3’s x 8′ (portico)
- 9 – 2×2’s x 8′ (railing, window +, corbels)
- 1 – 1/4″ or 5mm sheet plywood
- 8 – 1/2″ x 1 1/2″ x 8′ mdf trim (trim on roof)
- 13 – 1/2″ x 2 1/2″ x 8′ mdf trim (baseboard)
- cedar shingles, cedar pickets, shims or plywood (portico roof)
- 2 1/2″ pocket hole screws
- 2 1/2″ or 3″ wood screws
- 2″ brad nails
- 1″ brad nails
- wood glue
- golden pecan stain
- Black paint (black boudoir)
- White paint (Behr ultra pure white)
- caulk
- spackle
- sandpaper
Ladder Cut List
(My second floor height is 48 1/4″, if yours is higher adjust the 48 1/4″ ladder leg lengths and the 70″ lengths. The 70″ boards should be 21 3/4″ + 2nd floor height.)
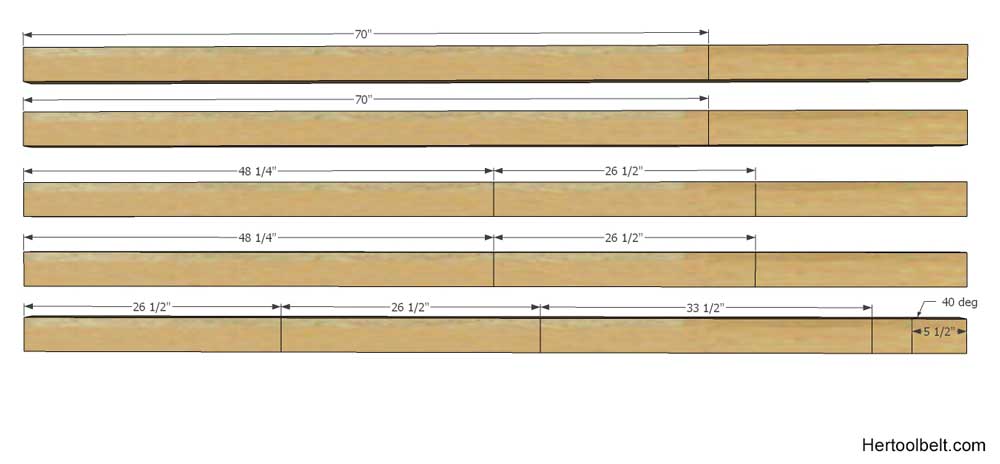
- 2 – 1 1/2″ x 3 1/2″ x 70″
- 2 – 1 1/2″ x 3 1/2″ x 48 1/4″ ladder legs
- 4 – 1 1/2″ x 3 1/2″ x 26 1/2″ ladder rungs
- 1 – 1 1/2″ x 3 1/2″ x 33 1/2″ top grip
- save the scraps for later
Ladder Cut Diagram
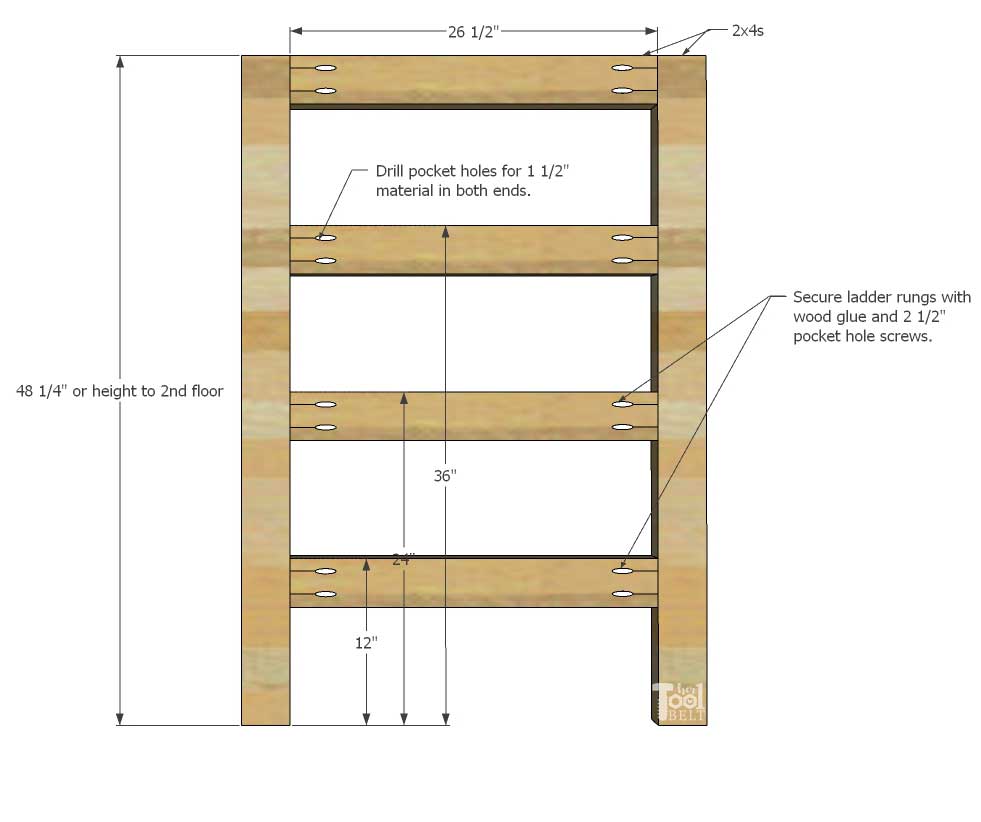
Ladder Assembly
In the 26 1/2″ pieces, drill pocket holes for 1 1/2″ material in both ends. On the ladder legs measure and mark 12″, 24″ and 36″ from the bottom. Secure the ladder rungs to the legs with wood glue and 2 1/2″ pocket hole screws at 12″, 24″, 36″ and flush with the leg tops.
Attach the ladder to the 2nd floor with 2 1/2″ screws. Butt the 70″ long boards up to the ladder and 2nd floor and secure to 2nd floor with 2 1/2″ screws.
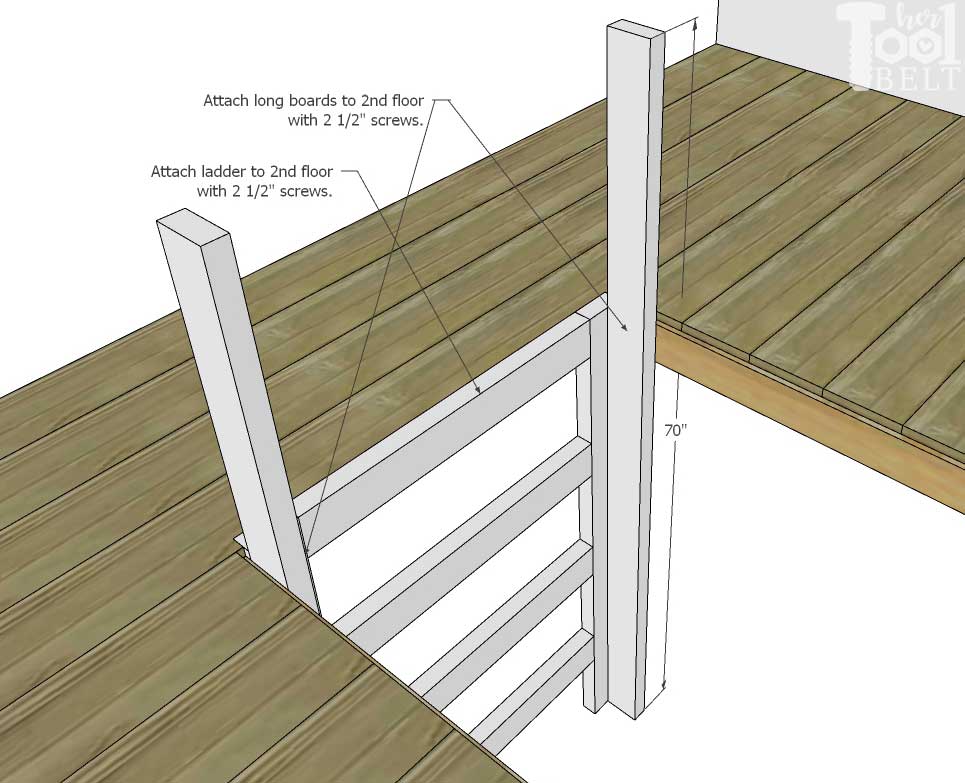
Secure the ladder to the 70″ long boards with 2 1/2″ screws along the legs of the ladder.
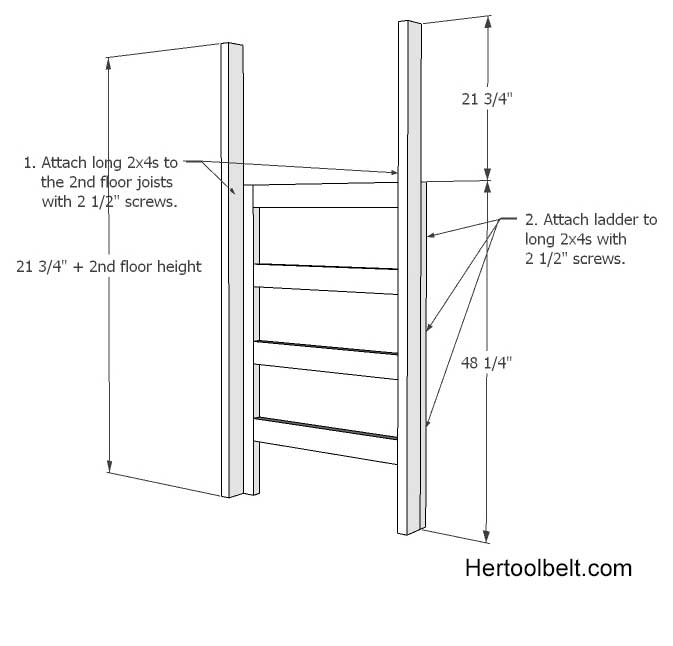
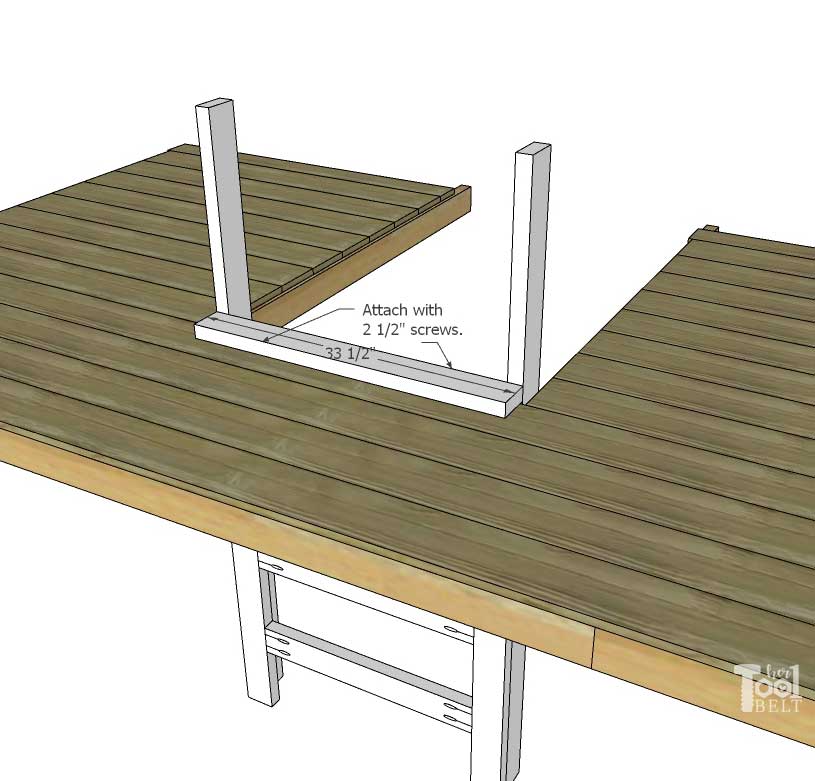
I added the 33 1/2″ board at the top of the ladder as a grip for the younger kids. Secure the 33 1/2″ board to the 2nd floor with 2 1/2″ screws.
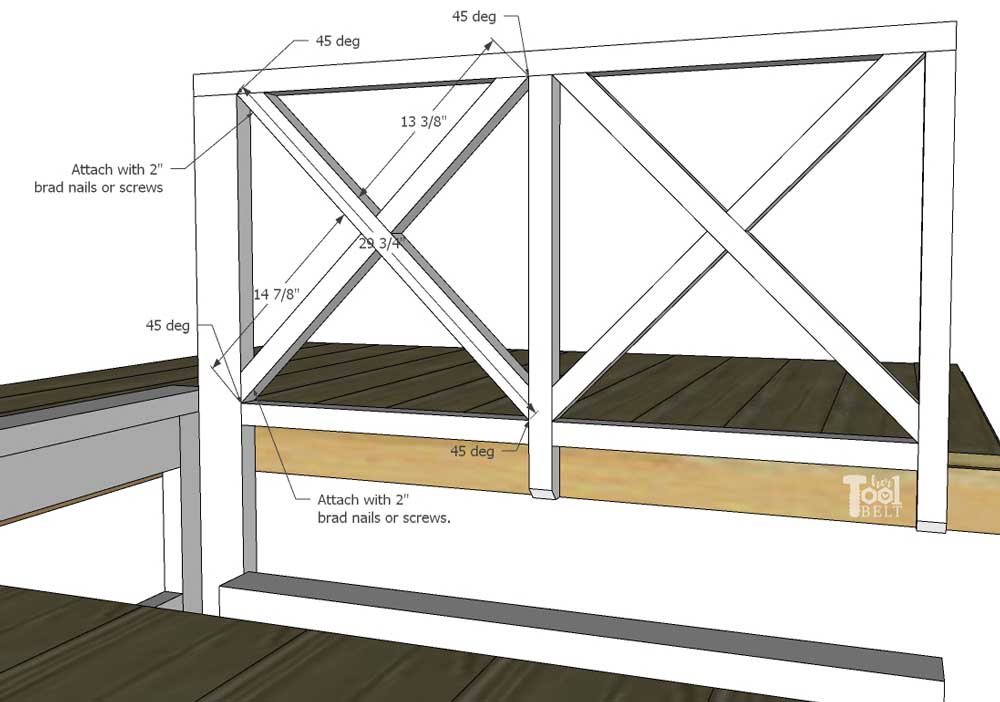
X Railings
Railing Cut List
- 2 – 1 1/2″ x 1 1/2″ x 48 1/2″ hand rail (top)
- 2 – 1 1/2″ x 1 1/2″ x 26″ posts
- 2 – 1 1/2″ x 1 1/2″ x 21″ bottom rail
- 8 – 1 1/2″ x 1 1/2″ x 29 3/4″ with 45 deg on both ends – X’s (approximate dimensions, cut to fit)
- the rest of the wood will be used later
Railing Cut Diagram

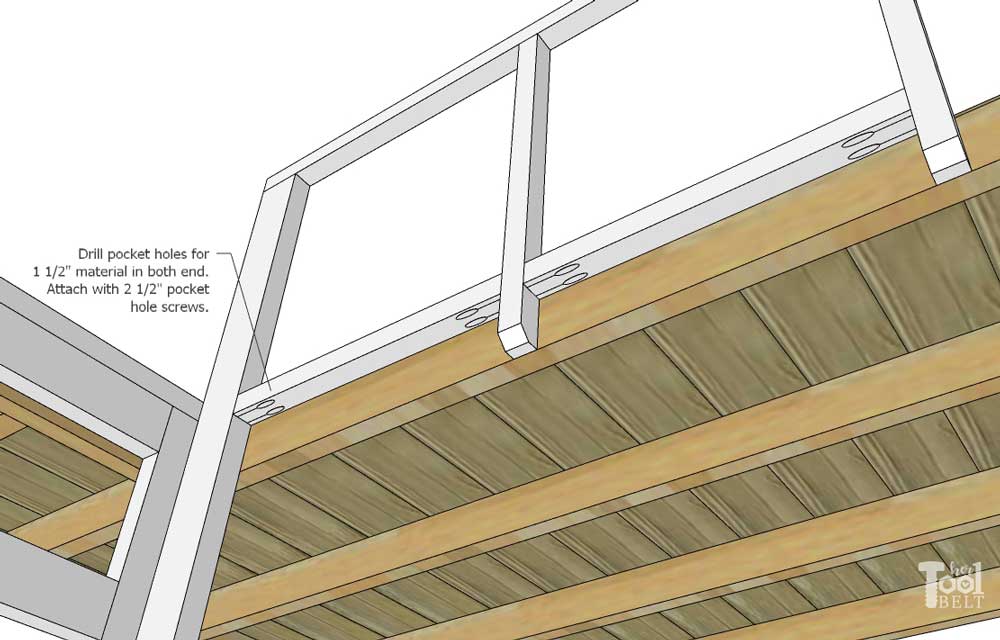
Drill pocket holes for 1 1/2″ material in both ends of the 21″ 2×2’s. If desired, cut 45 deg dog ears on one end of the 26″ 2×2 posts.
Measure over 21″ from the 70″ long board and secure the 26″ posts to the 2nd floor, repeat for the 2nd post. Attach the hand rail to the top of the posts with 2 1/2″ or 3″ screws (making sure to keep 21″ between posts.
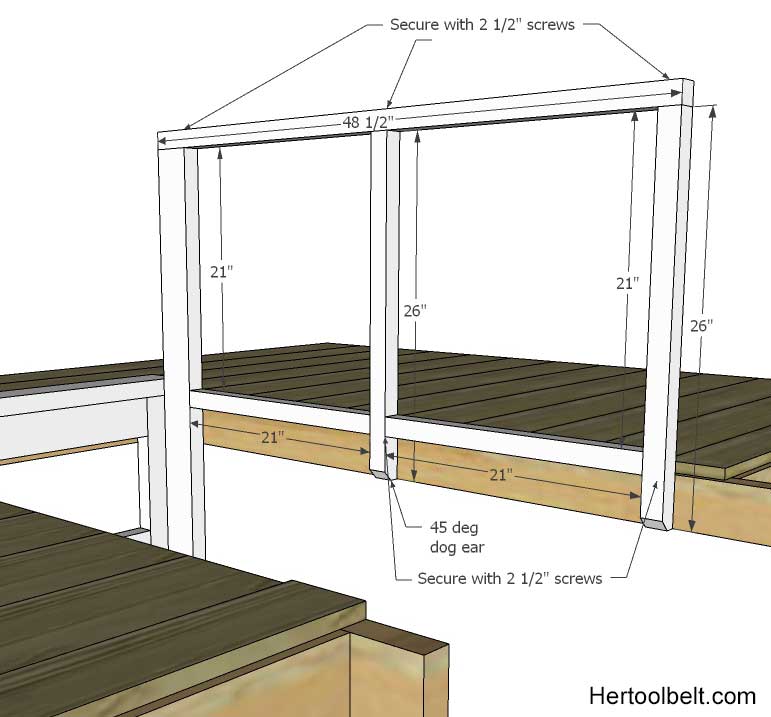
Mark down 21″ from the tops of the posts and secure the 21″ boards to the posts with 2 1/2″ pocket hole screws.
The X measurements are approximate, cut to fit. (It easiest to hold the X boards behind the railing and trace the cut lines on the X pieces, then cut.) Secure X pieces to railing with 2″ brad nails, glue and toe nail in place.
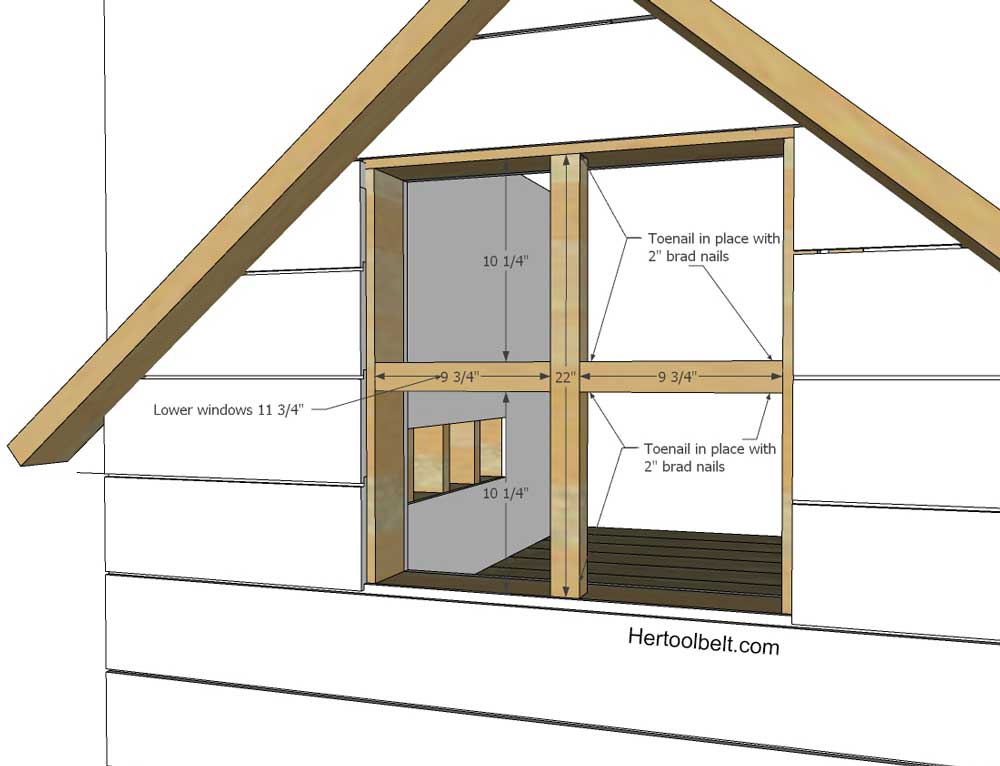
Window Trim
Window Trim Cut List
- 4 – 1 1/2″ x 1 1/2″ x 22″ window trim vertical
- 4 – 1 1/2″ x 1 1/2″ x 11 3/4″ lower window trim horizontal
- 4 – 1 1/2″ x 1 1/2″ x 9 3/4″ lower window trim horizontal
Window Trim Cut Diagram
Bottom 2 boards
Cut to fit the vertical window trim boards (about 22″). Center the 22″ boards in the window openings and secure to the window frame by toenailing with 2″ brad nails (or pocket holes).
Cut to fit the horizontal window trim boards (about 9 3/4″ upper window and 11 3/4″ lower windows). Center the horizontal boards in the window openings and secure to the window frame by toenailing with 2″ brad nails (or pocket holes).
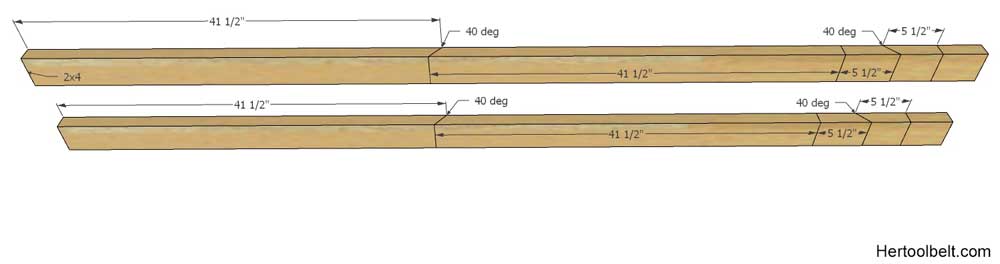
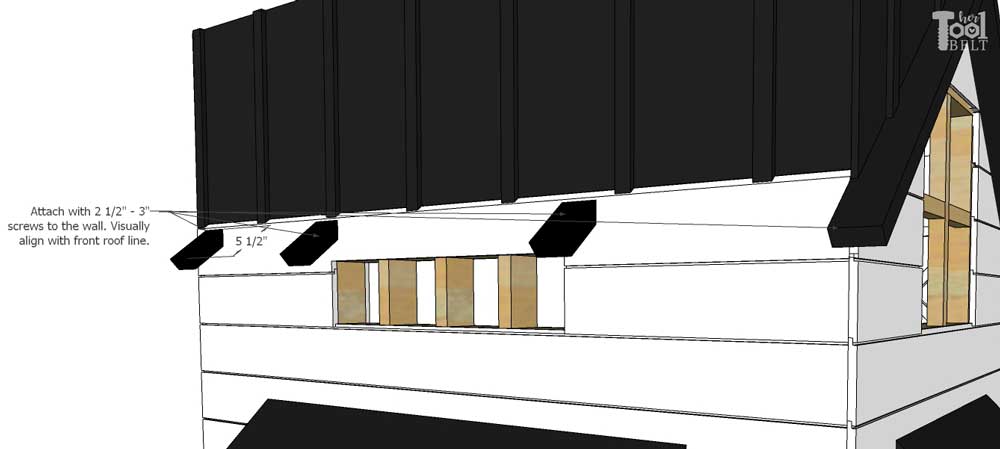
Roof Line
Roof line cut list
- 4 – 1 1/2″ x 3 1/2″ x 41 1/2″ with a 40 deg bevel on one end (see diagram)
- 5 – 1 1/2″ x 3 1/2″ x 5 1/2″ with a 40 deg bevel on one end (see diagram) (use scrap wood from the ladder for 5th)
Roof line cut diagram
Mark the centerline of the windows at the top of the playhouse. Drill pocket holes for 1 1/2″ material along a long side of the 41 1/2″ boards. Secure the roof line 2×4’s to the front of the playhouse with 2 1/2″ pocket hole screws.
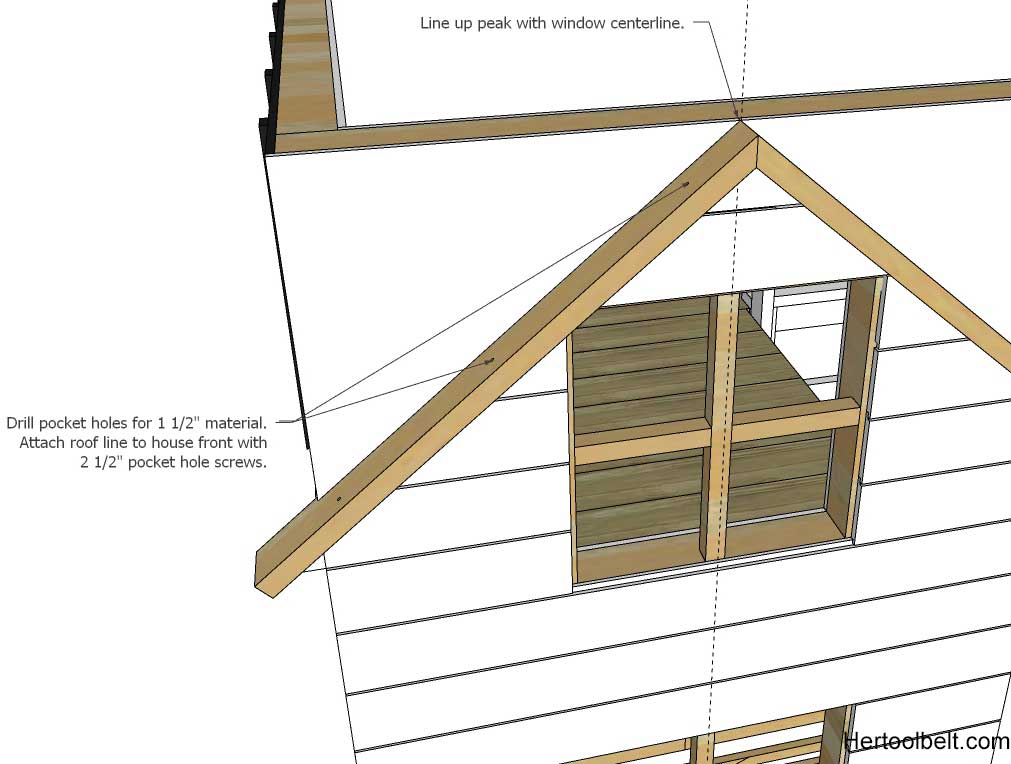
Space the 3 of the 5 1/2″ pieces along the side of the playhouse. Make them visually even with the front roof line board. Secure to the playhouse with 2 1/2″ or 3″ screws. Secure 2 of the 5 1/2″ pieces above the garage with 2 1/2″ or 3″ screws.
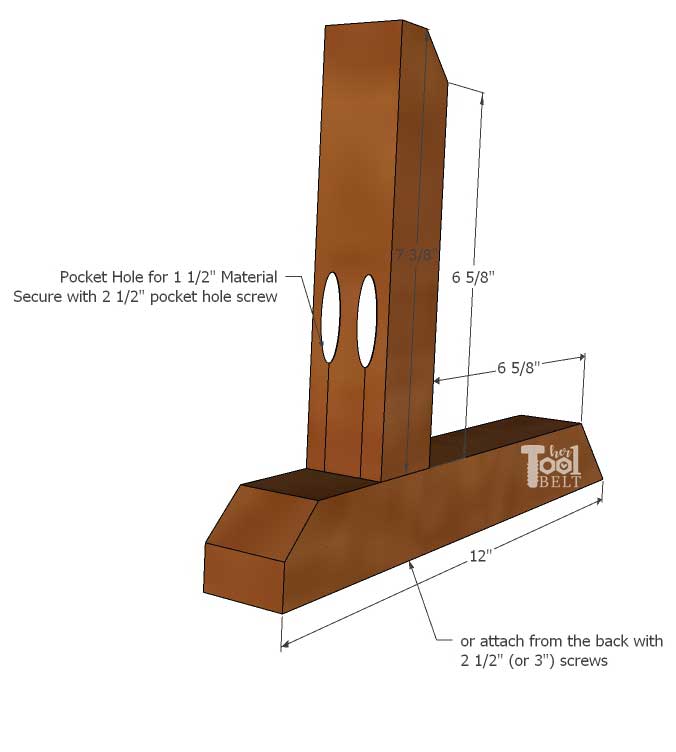
Corbels
Corbel Cut List
- 6 – 1 1/2″ x 1 1/2″ x 12″ with 45 deg on one end and a dog ear 45 on the other
- 6 – 1 1/2″ x 1 1/2″ x 9 1/4″ with 45 deg on both ends (see diagram)
- 6 – 1 1/2″ x 1 1/2″ x 7 3/8″ with a 45 deg ear starting at 6 5/8″ (see diagram) (use scrap wood from ladder/portico for the 6th)
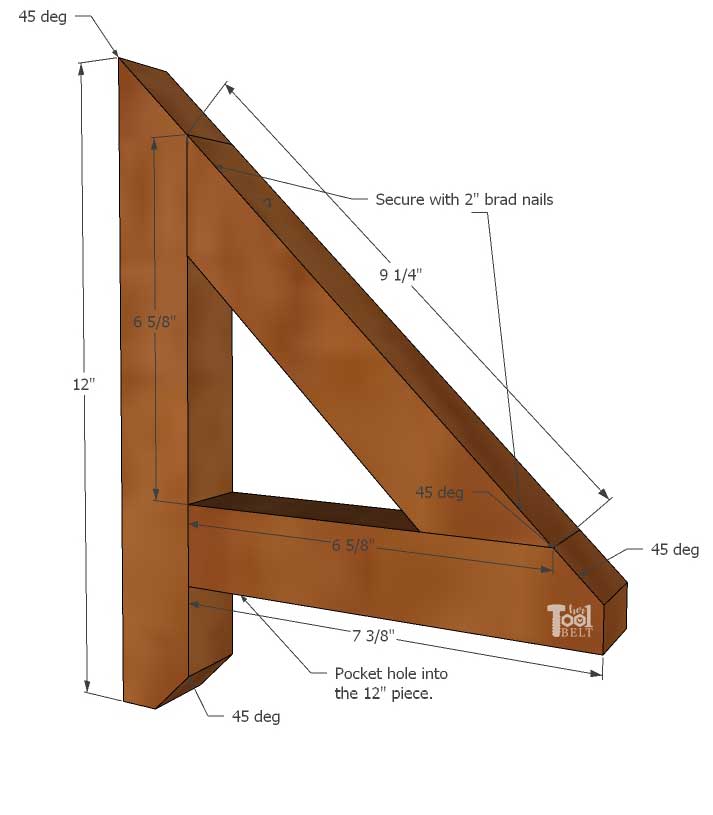
Corbel Cut Diagram
Drill pocket holes for 1 1/2″ material in the 90 deg end of the 7 3/8″ pieces. Mark down 6 5/8″ from the 45 on the 12″ pieces and attach the 7 3/8″ piece with 2 1/2″ pocket hole screws. Repeat for 6 corbels.
 Secure the 9 1/4″ pieces to the 12″ and 7 3/8″ with 2″ brad nails. Repeat for 6 corbels.
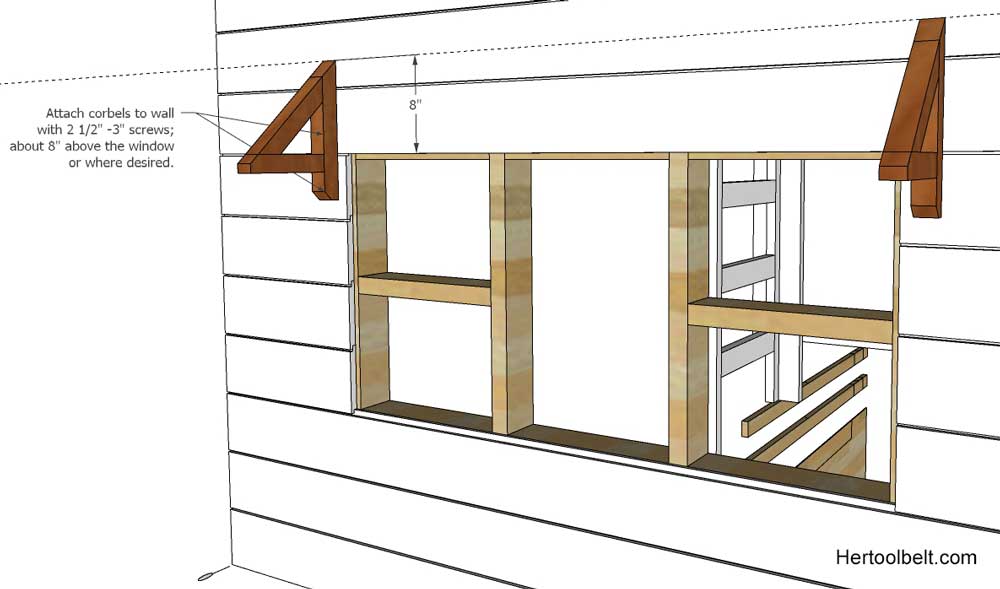
Attach the corbels to both sides of the 3 lower windows. Line up the corbels about 8″ up from the window openings, and attach the corbels with 2 1/2″ or 3″ screws.
Awnings
Awning Cut List
- 1 – 5 1/2″ x 80″ side roof line
- 1 – 5 1/2″ x 43″ garage roof line
- 2 – 13 3/4″ x 36″ front window awnings
- 1 – 13 3/4″ x 54″ side window awning
Awning Cut Diagram
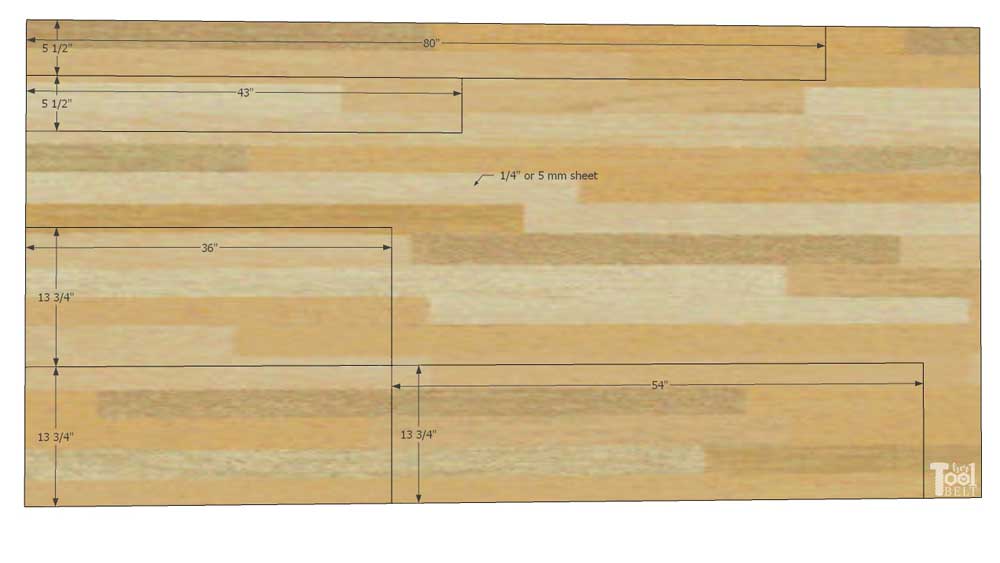
Attach the awnings to the corbels or the 5 1/2″ pieces with brad nails.

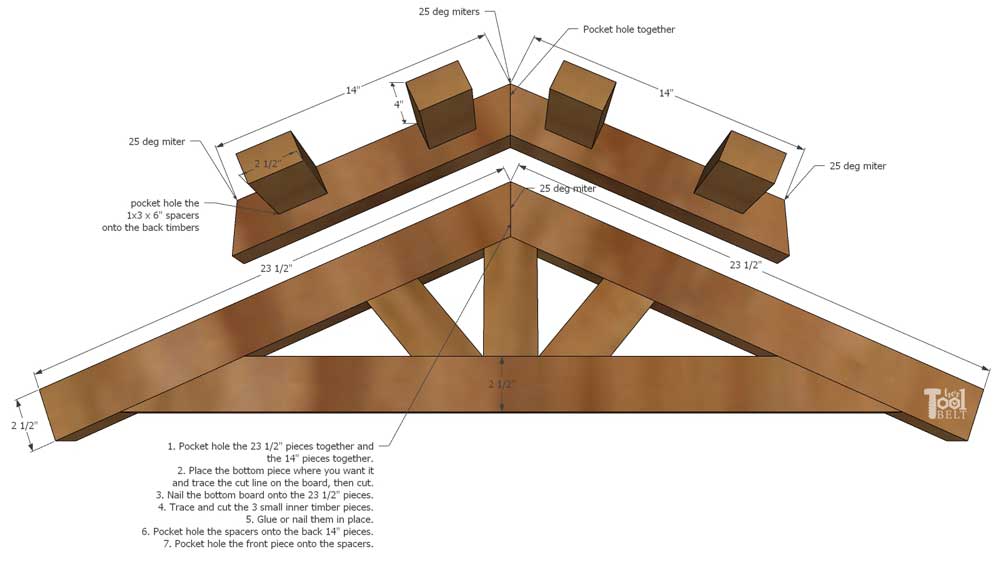
Portico
Portico Cut List
- 2 – 1 1/2″ x 2 1/2″ x 23 1/2″ with 25 deg miter on one end
- 1 – 1 1/2″ x 2 1/2″ x 35 1/8″ with 65 deg on each end
- 2 – 1 1/2″ x 2 1/2″ x 14″ with 25 deg miter on each end
- 4 – 1 1/2″ x 2 1/2″ x 4″ spacers
- 3 decorative center pieces, cut to fit
- 1 – 1 1/2″ x 2 1/2″ x 5 5/8″ with 25 deg miters creating peak in middle
- 2 – 1 1/2″ x 2 1/2″ x ~ 4 3/4″ with 15 deg on one end and approx 40 deg on other
Portico Cut Diagram

- Drill pocket holes for 1 1/2″ material in the 25 deg miter ends of one of the 14″ and 23 1/2″ pieces. Also drill pocket holes for 1 1/2″ material in the 4″ spacers, both ends.
- Use 2 1/2″ pocket hole screws to join the 14″ pieces together at the 25 deg miter.
- Use 2 1/2″ pocket hole screws to join the 23 1/2″ pieces together at the 25 deg miter.
- Place the 36 1/8″ bottom piece where you want it and trace the cut line on the board, then cut. (or cut at a 65 deg miter)
- Nail the bottom board to the 23 1/2″ pieces with 2″ brad nails.
- Trace and cut the 3 small inner timber pieces.
- Glue and nail them in place.
- Attach the spacer blocks onto the back 14″ pieces with 2 1/2″ pocket holes. Attach the spacer blocks to the 23 1/2″ pieces with 2 1/2″ pocket hole screws.
- Secure the portico above the front door with 2 1/2″ or 3″ screws, attaching through the 14″ pieces.
I had leftover cedar shingles from my outdoor playhouse, so I topped the portico with the shingles. Other options could be cedar pickets, shims, thin plywood or whatever you prefer.
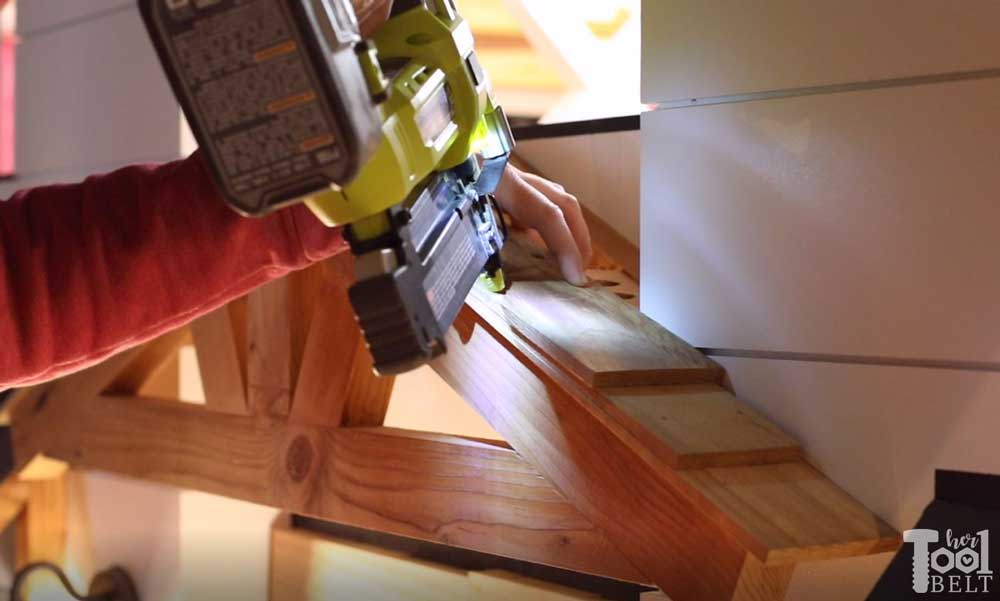
Roof Tin/Board and Batten
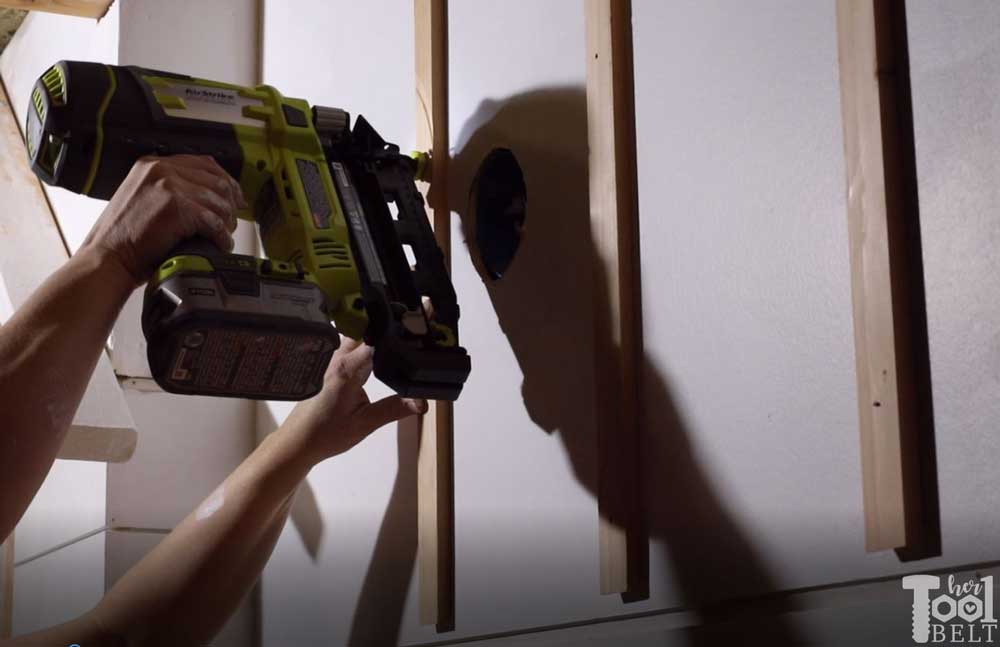
I trimmed the roof with vertical slats (1/2″ x 1 1/2″ mdf or boards) to mimic tin ribs. Space about every 12″, cut to fit.
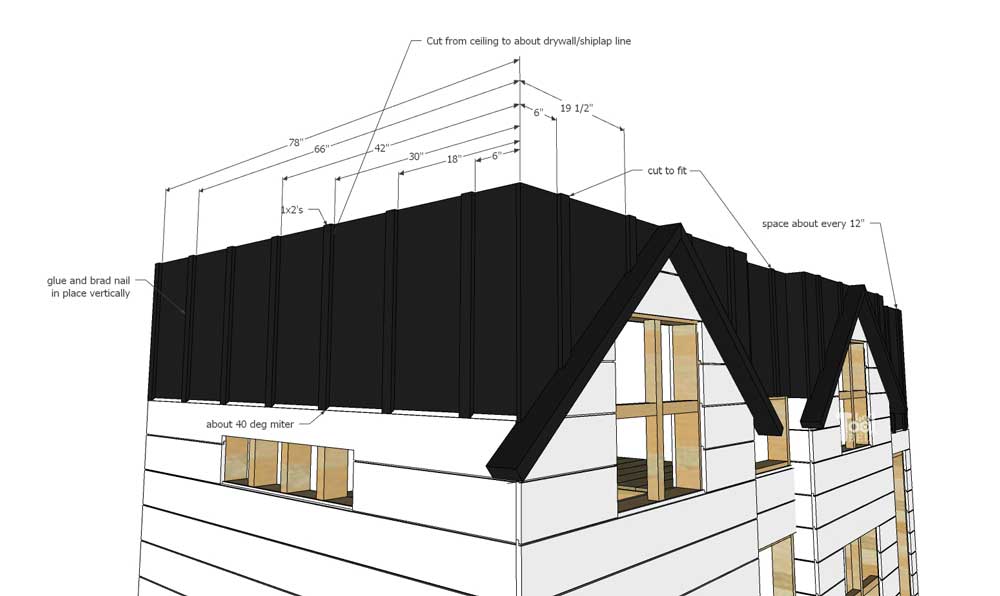
Attach with 2″ brad nails and glue.
Base boards
For baseboards on the upper and lower levels, I used 1/2″ x 2 1/2″ primed MDF.
Once everything was trimmed. I filled nail holes with spackle and caulked all of the boards. Then sanded the boards smooth and painted the black parts with Behr Black Boudoir and the white is Behr Ultra Pure White. The portico and corbels were stained with Varathane Golden Pecan, which is a similar color to natural cedar.
Download Instructions here
Leave a Reply