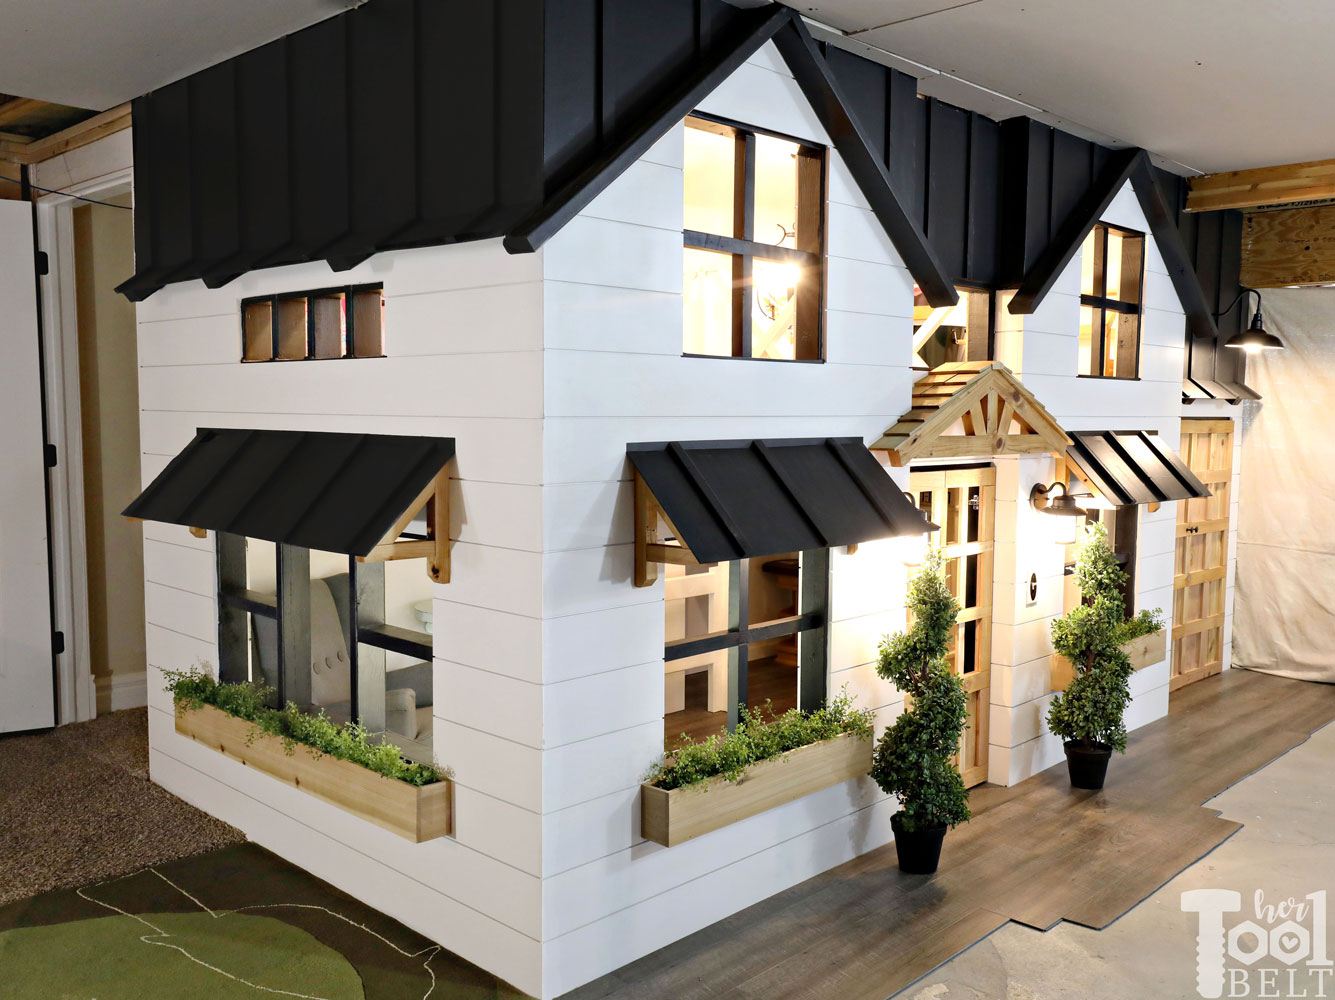
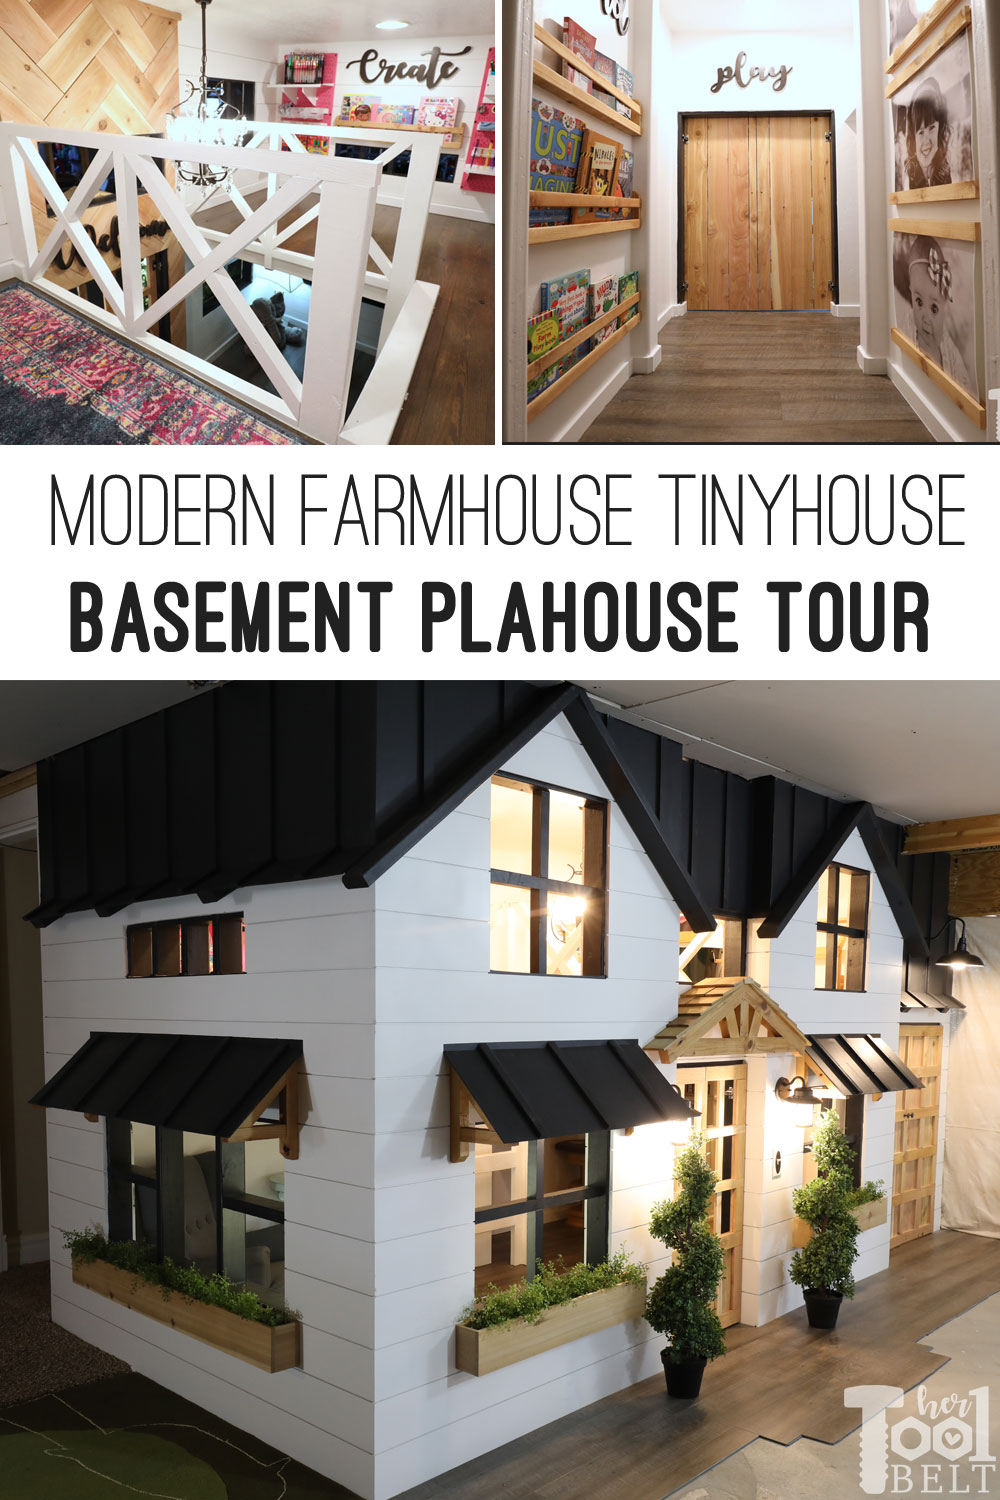
It took me about 6 weeks to chip away at this project, but I’m happy to say that the basement playhouse build (which is really a toy room shaped like a tiny house), is pretty much done! Yay! My kids are super excited and have been having fun inspecting everything as the project came together. My house may not be in style, but at least my playhouse is 🙂 I tried to make the playhouse in the modern farmhouse style…I love to drool over those houses on Instagram.
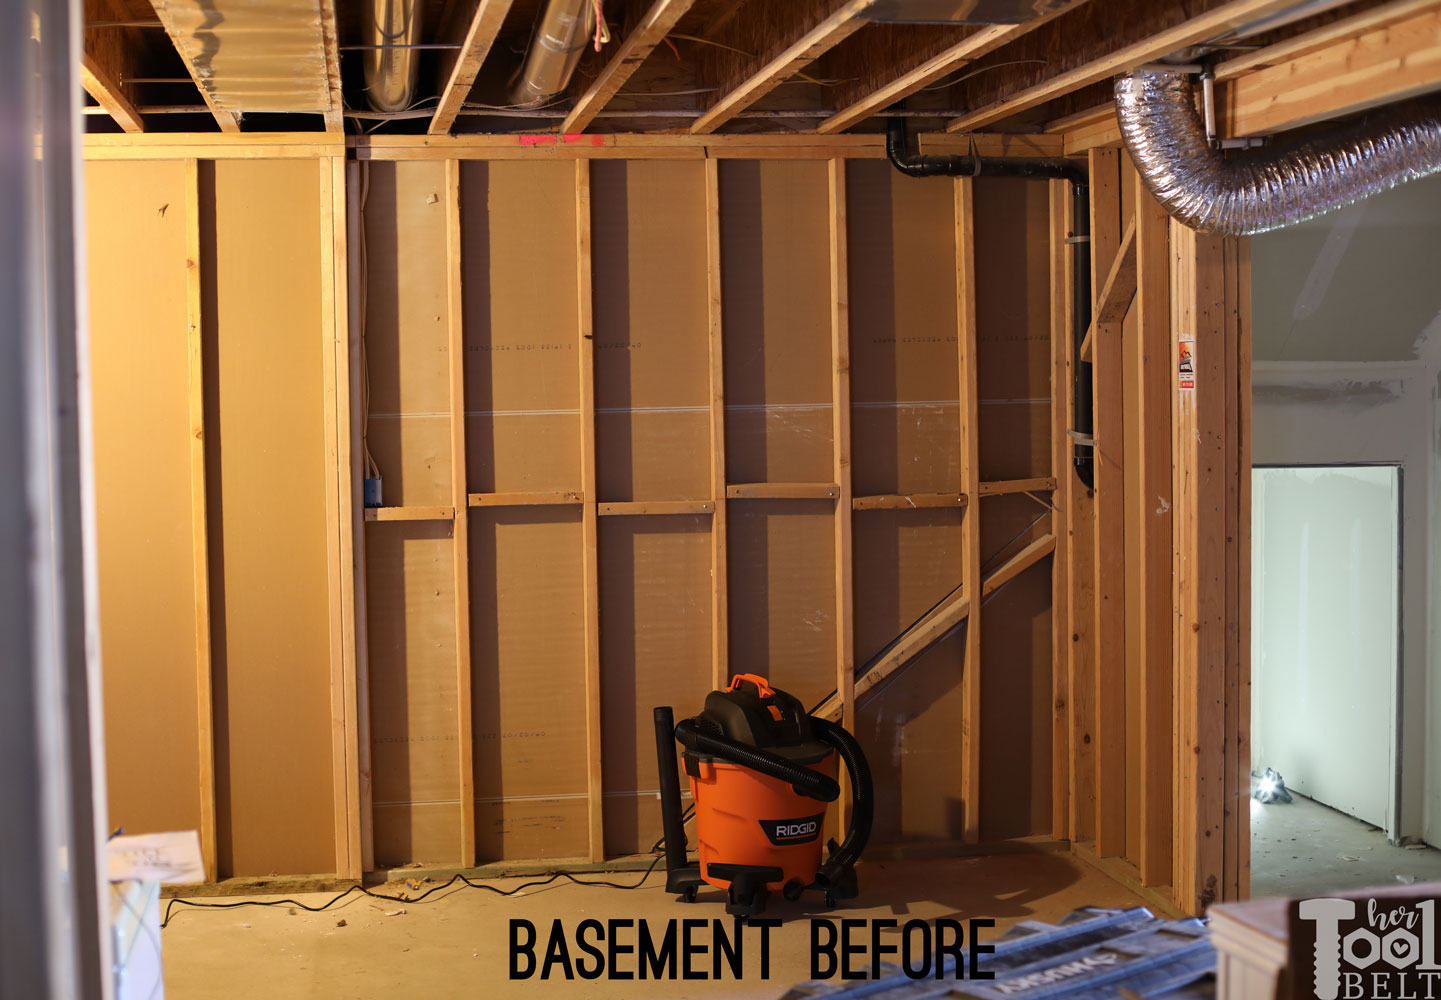
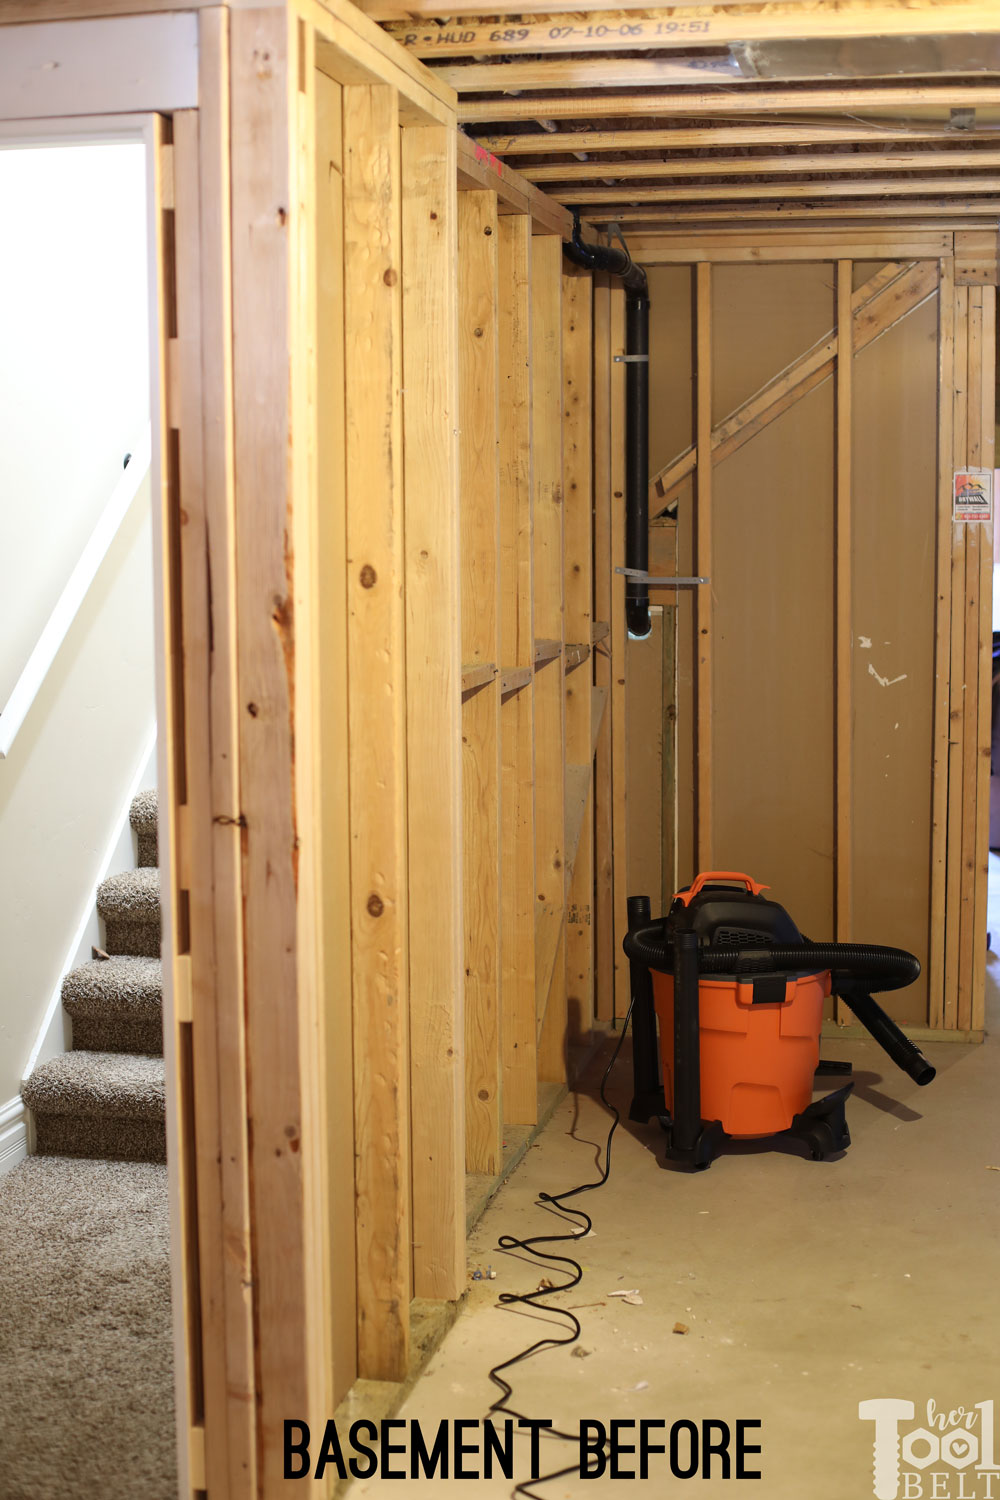
Remembering where I started…here’s the BEFORE.
Sideview
And the AFTER
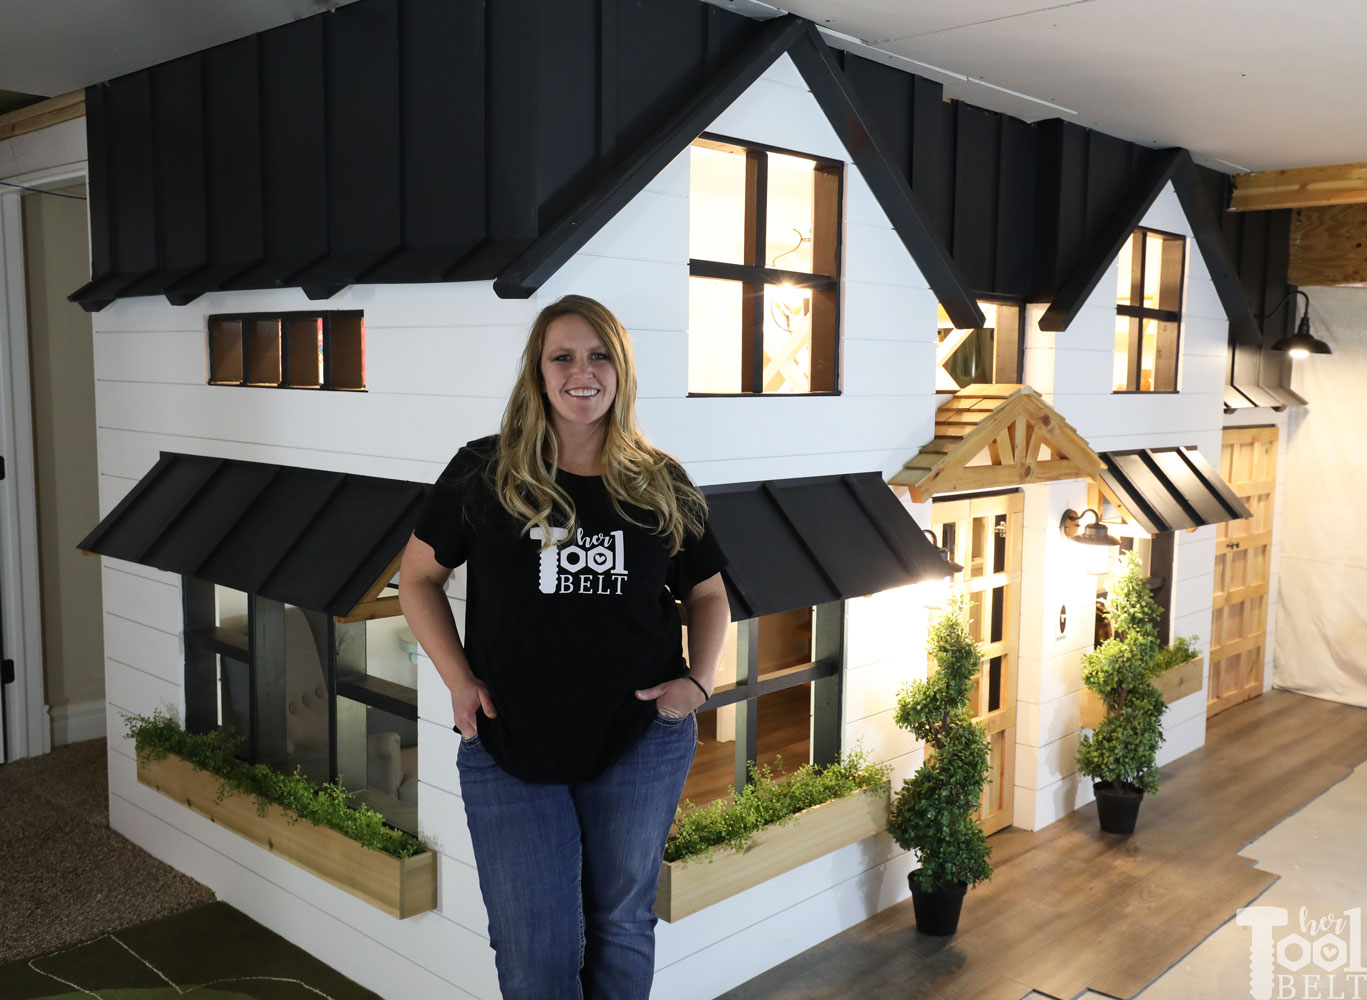
What do you think?
With me, for scale.
You can check out the tutorials for the whole playhouse build:
- Part 1 – Basement Playhouse Build – Framing
- Part 2 – Basement Playhouse Build – Shiplap & Sheetrock
- Part 3 – Basement Playhouse Build – Trimming all the things
- Part 4 – Basement Playhouse Build – Cedar Doors & Accents
- Basement Playhouse Reveal!
- House Frame Doll Bed
- House Frame Doll Bunk Bed
This post contains some affiliate links for your convenience. Click here to read my full disclosure policy.
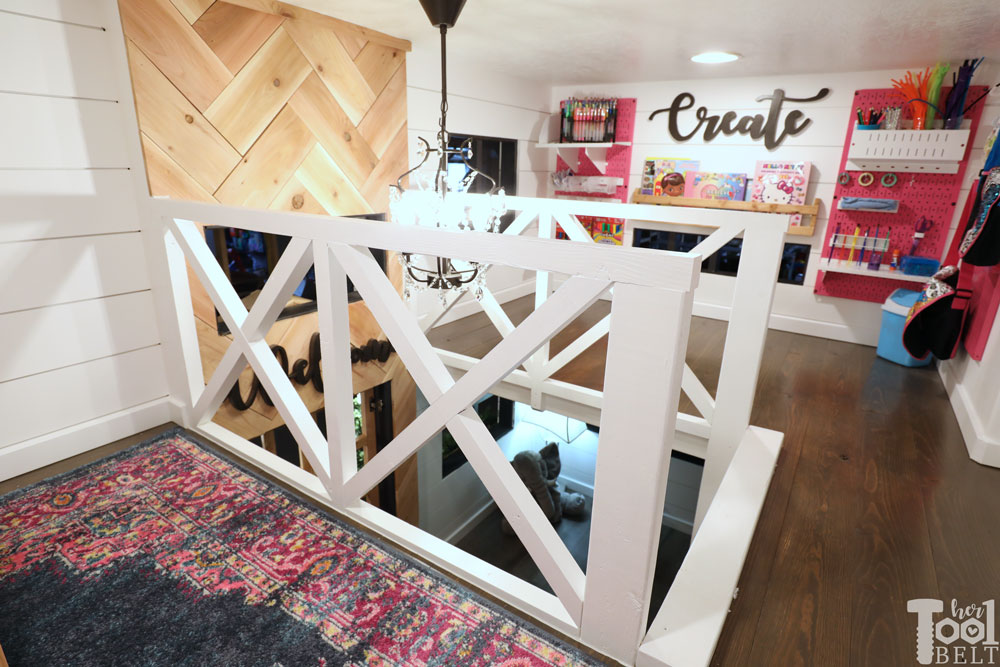
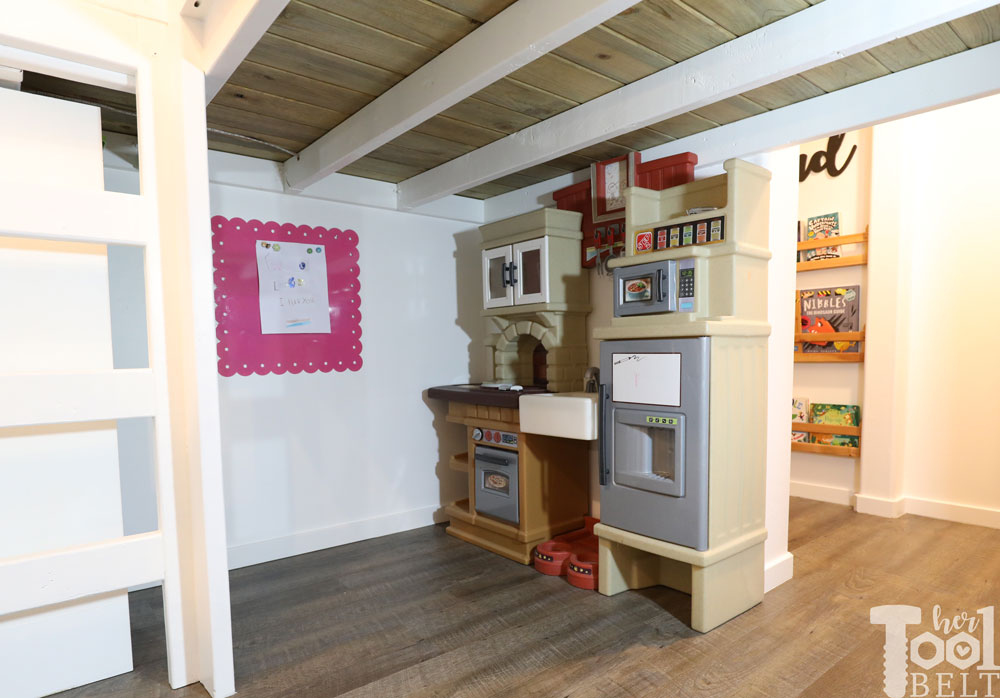
The layout of the playhouse has 5 areas to play, customized to how my kids currently play. The upstairs loft area has a nursery, my kids love to put the stuffed animals and dollies to sleep. Opposite of the nursery is a coloring area. Downstairs is a kitchen area, they love to have Tea Parties and a living room for general play. Under the stairs is a little reading nook and hangout…most likely going to be the tablet lounge.
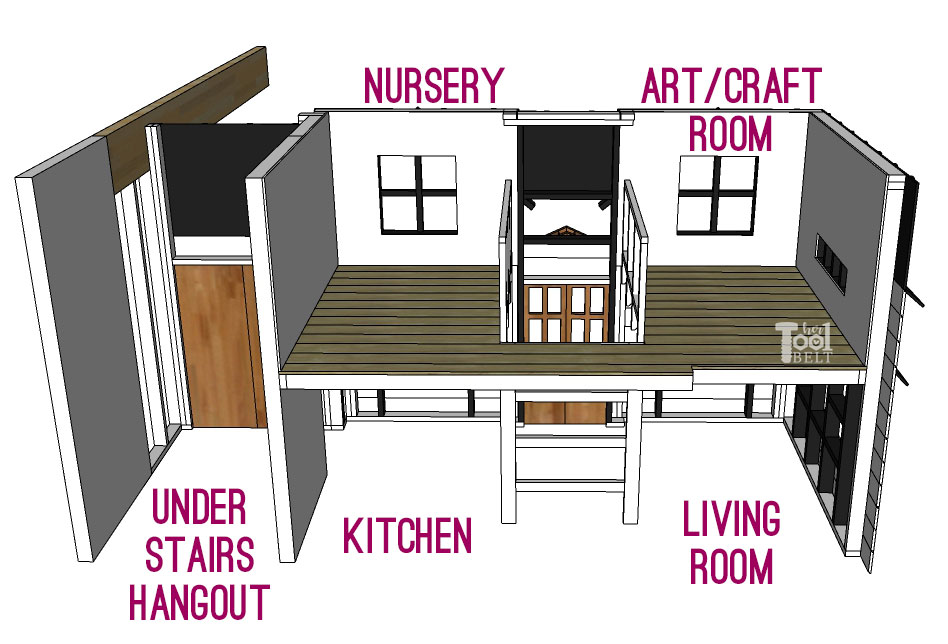
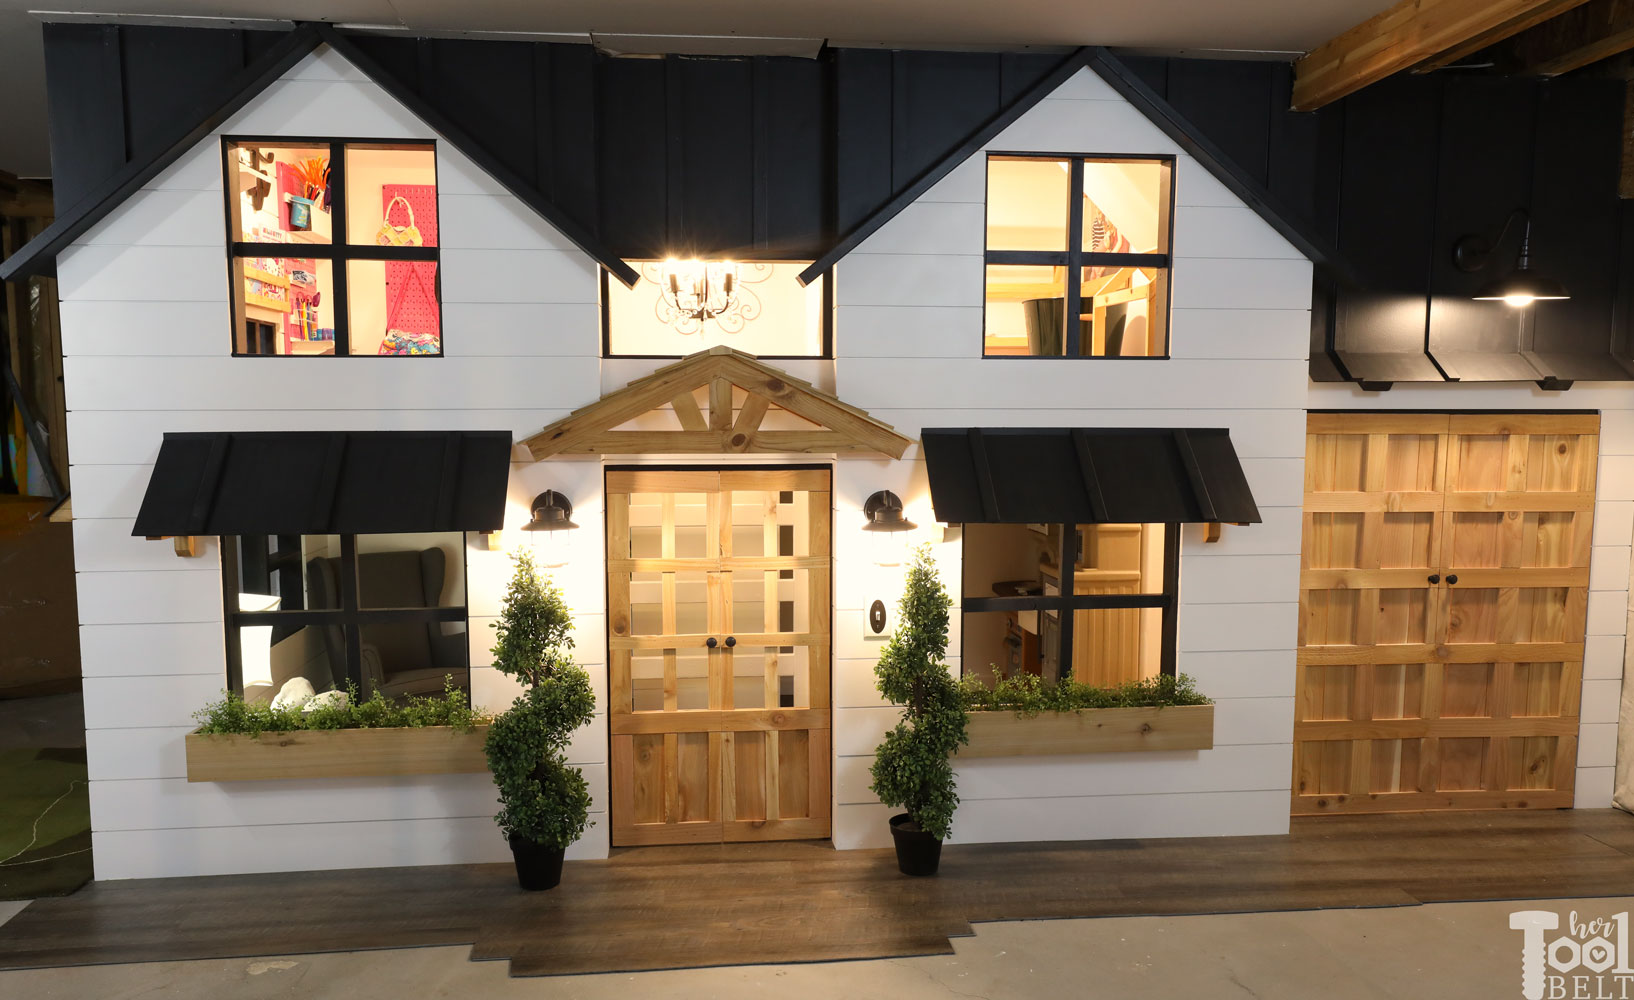
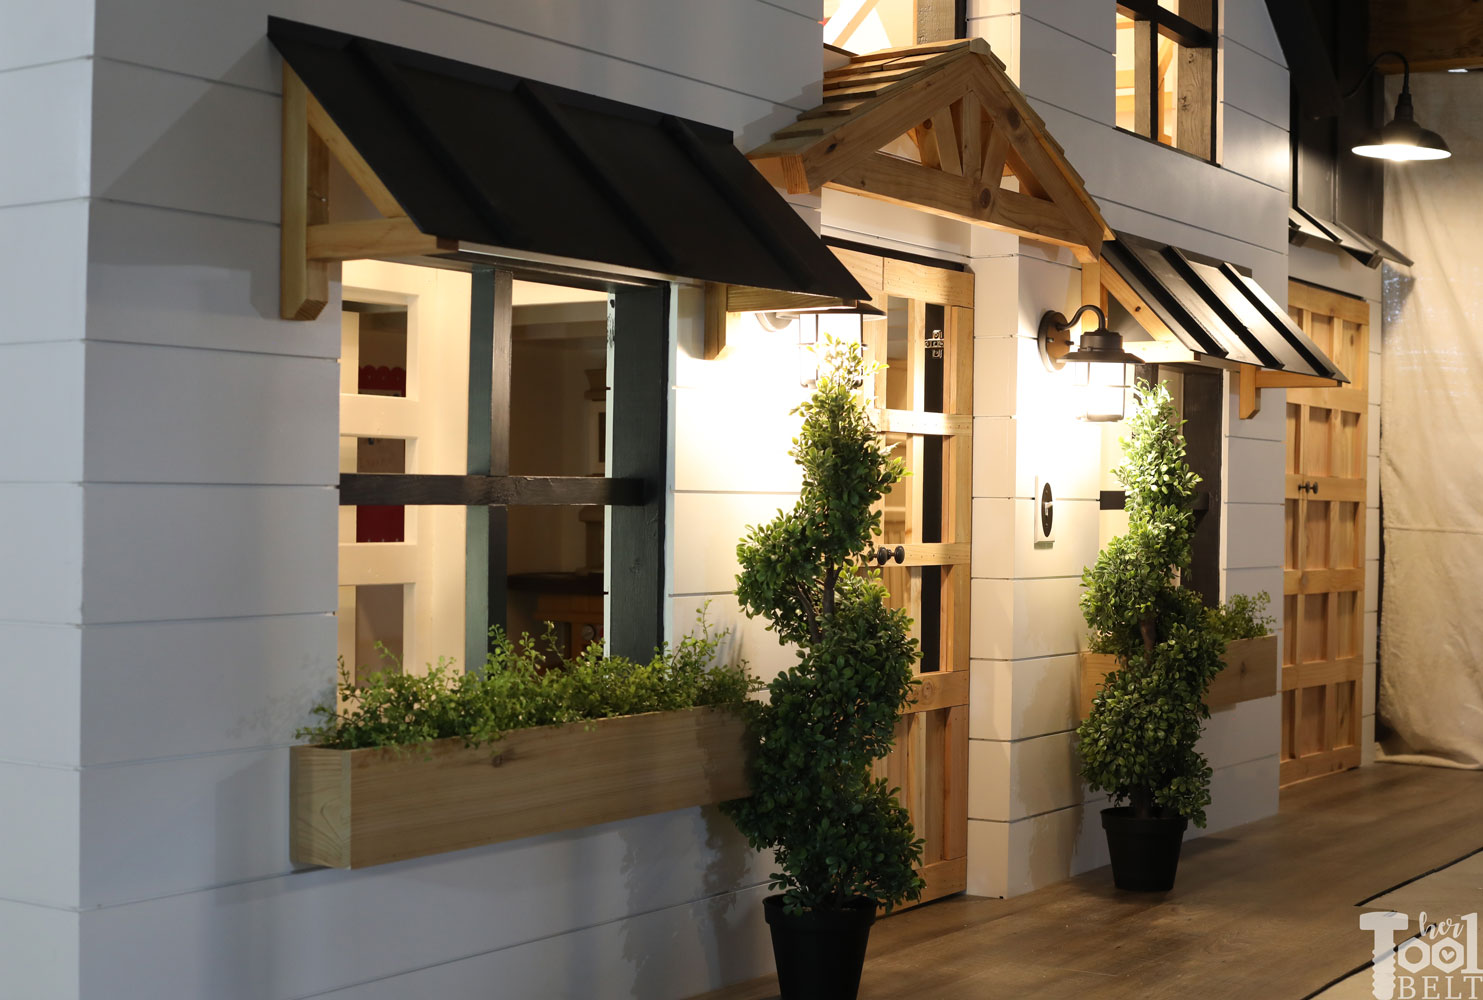
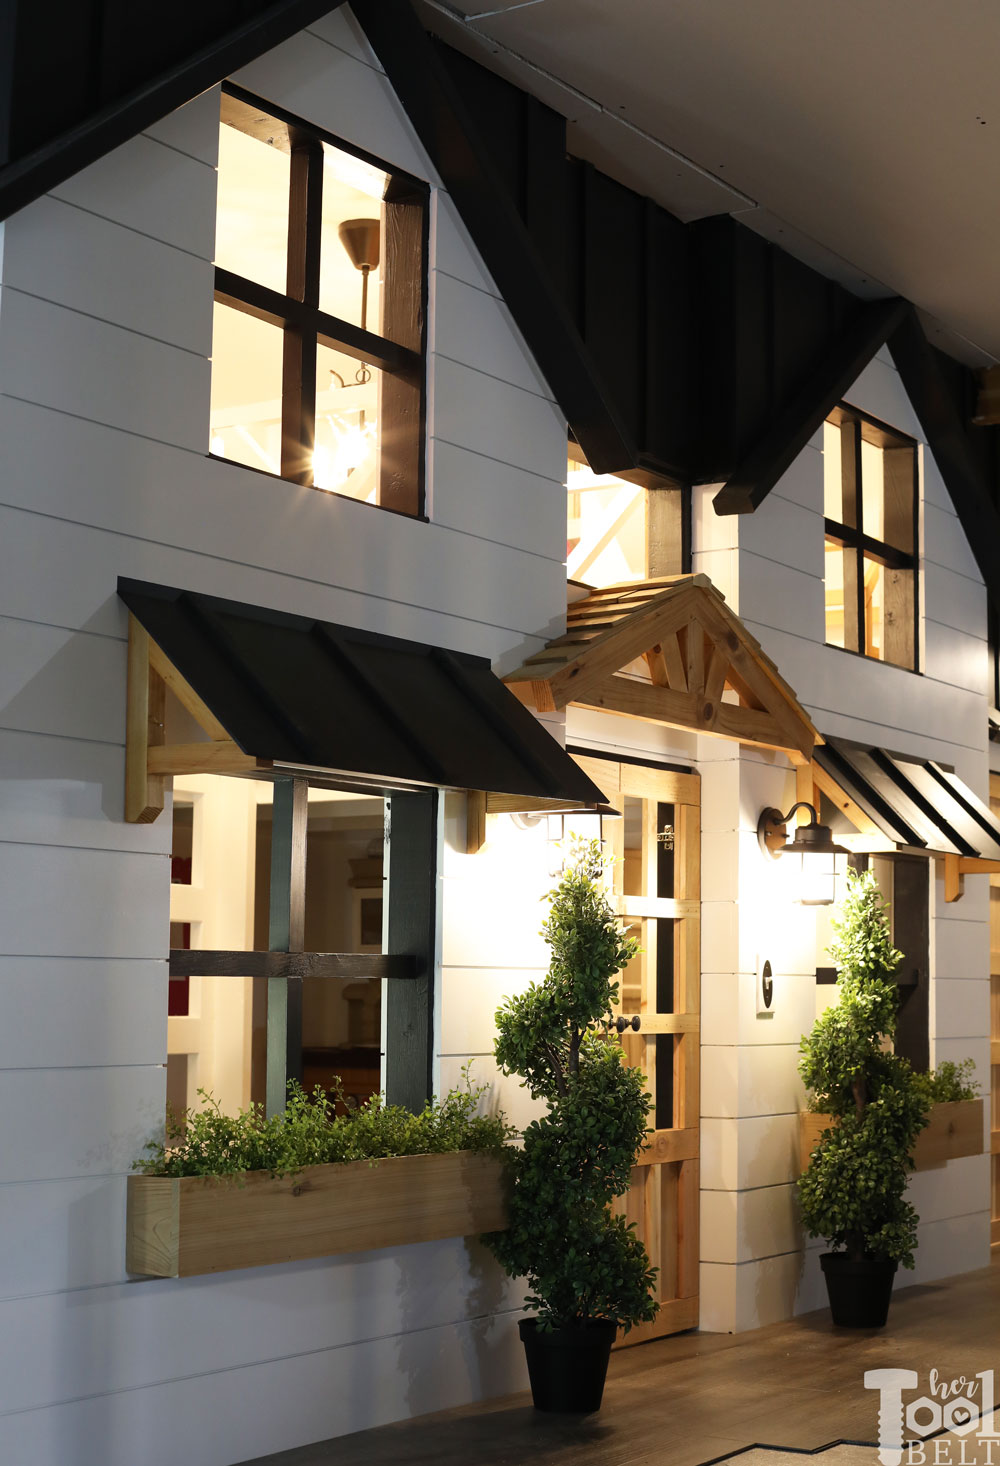
Here is the left side of the playhouse. The door to the left leads upstairs (and I still need to add the trim around the door). My basement ceilings are quite short, only 7 1/2′ high.
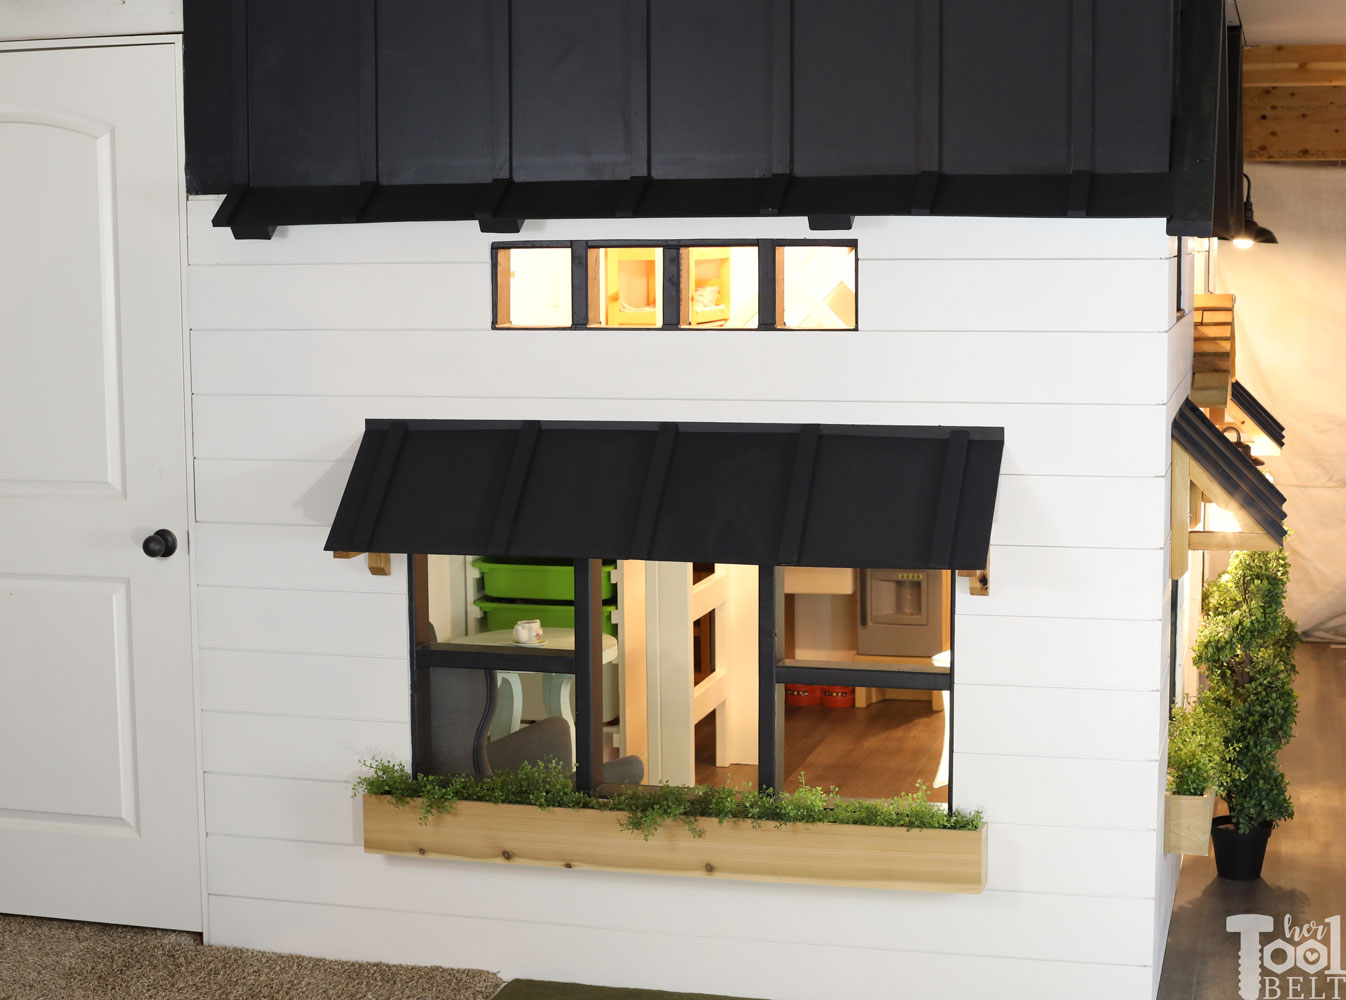
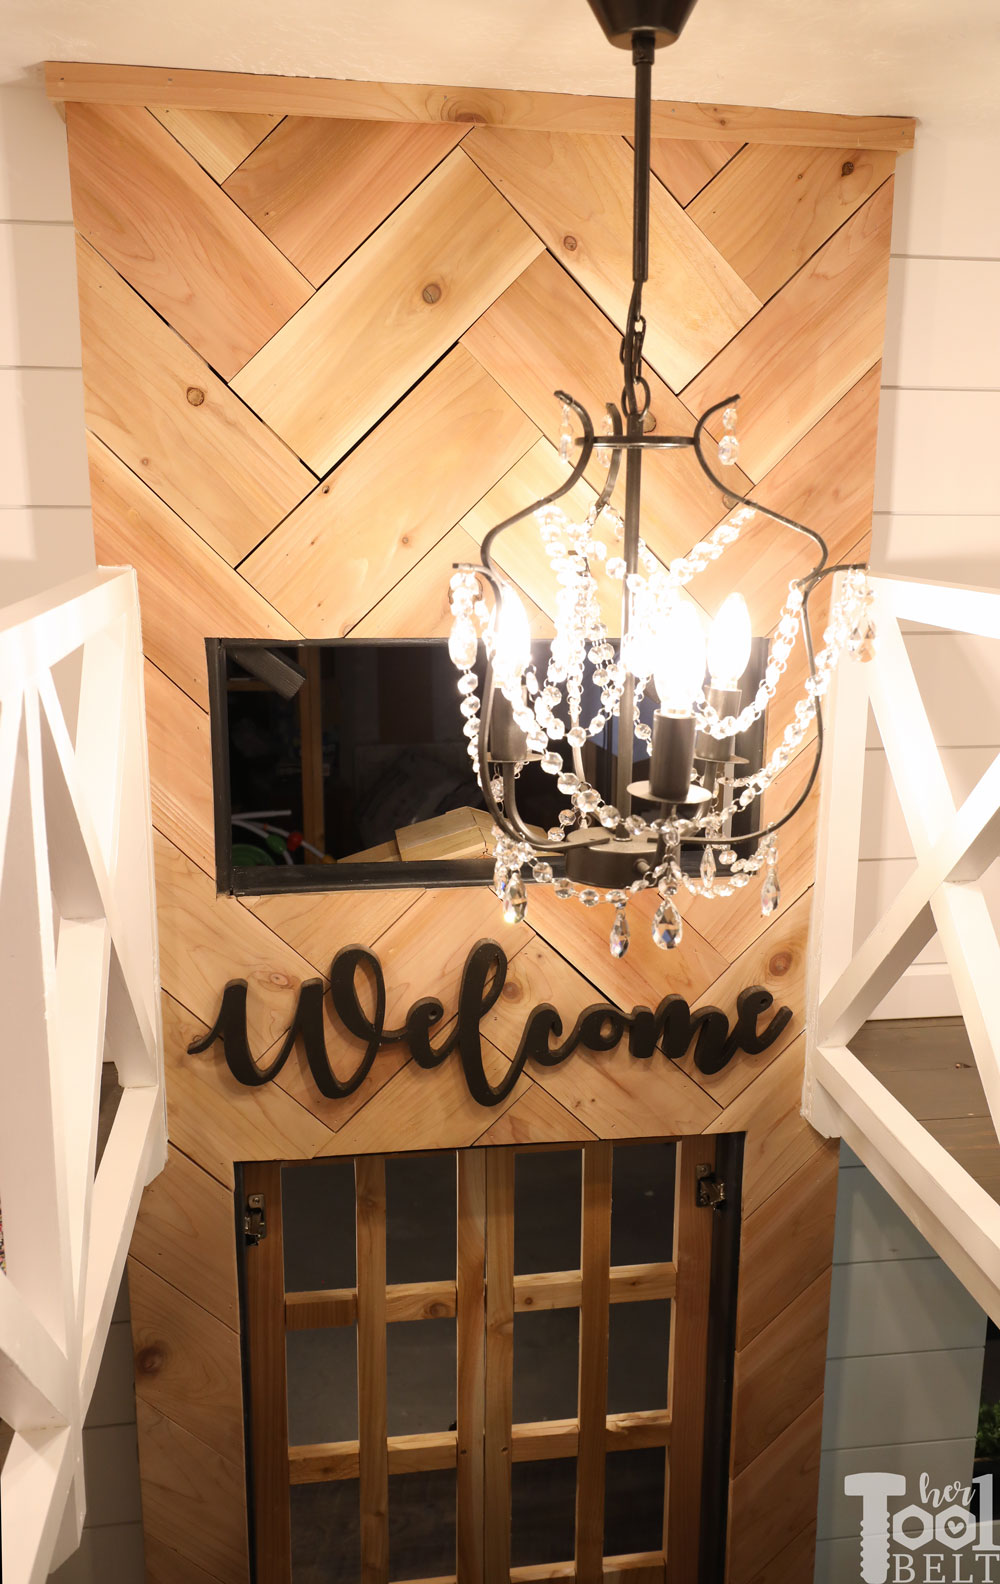
The siding for the playhouse is 6″ MDF shiplap, super easy to use, I highly recommend it. I was able to simply notch the shiplap ends to make it look like it wraps around to the front.
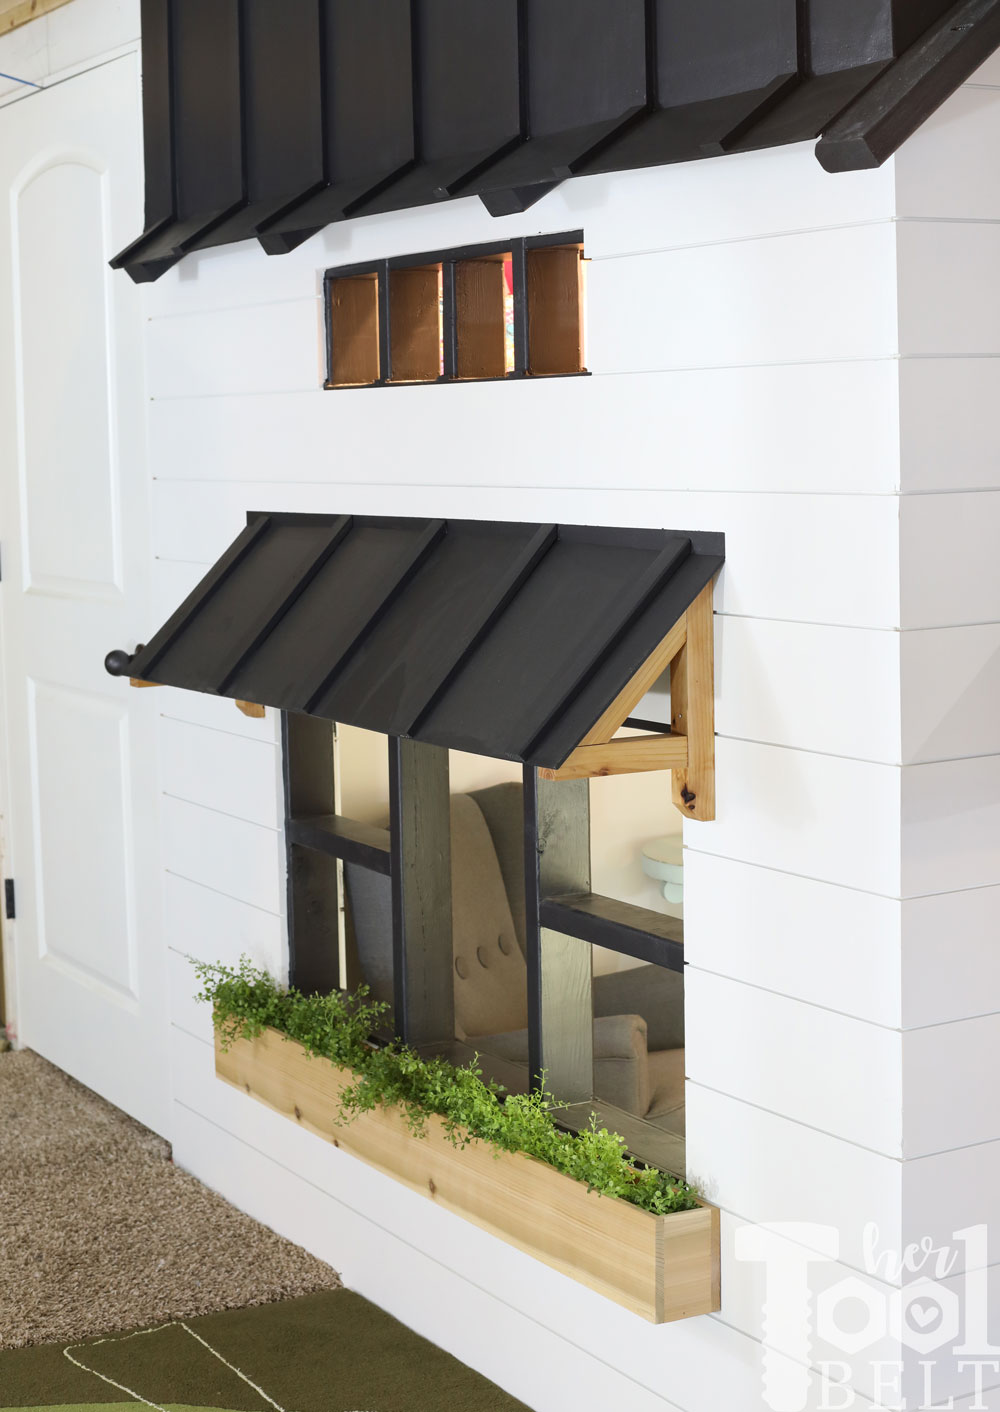
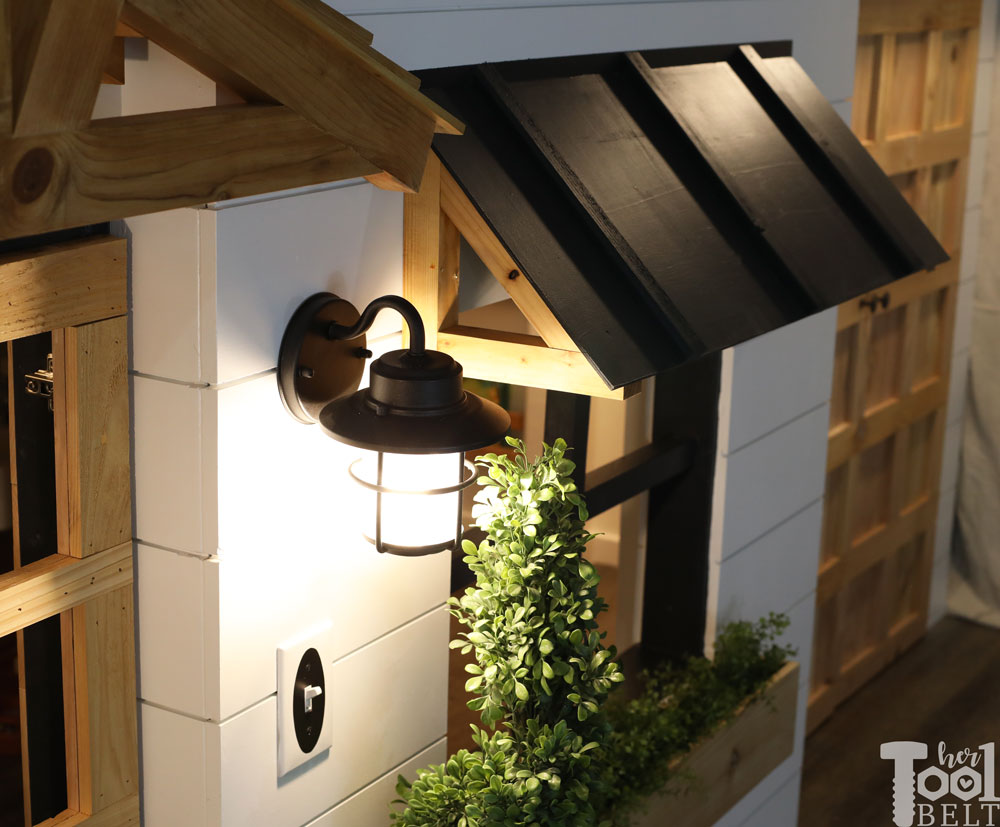
I faked black tin awnings with a little 1/8″ plywood and 1×2’s. The awning corbels are simply 2×2’s.
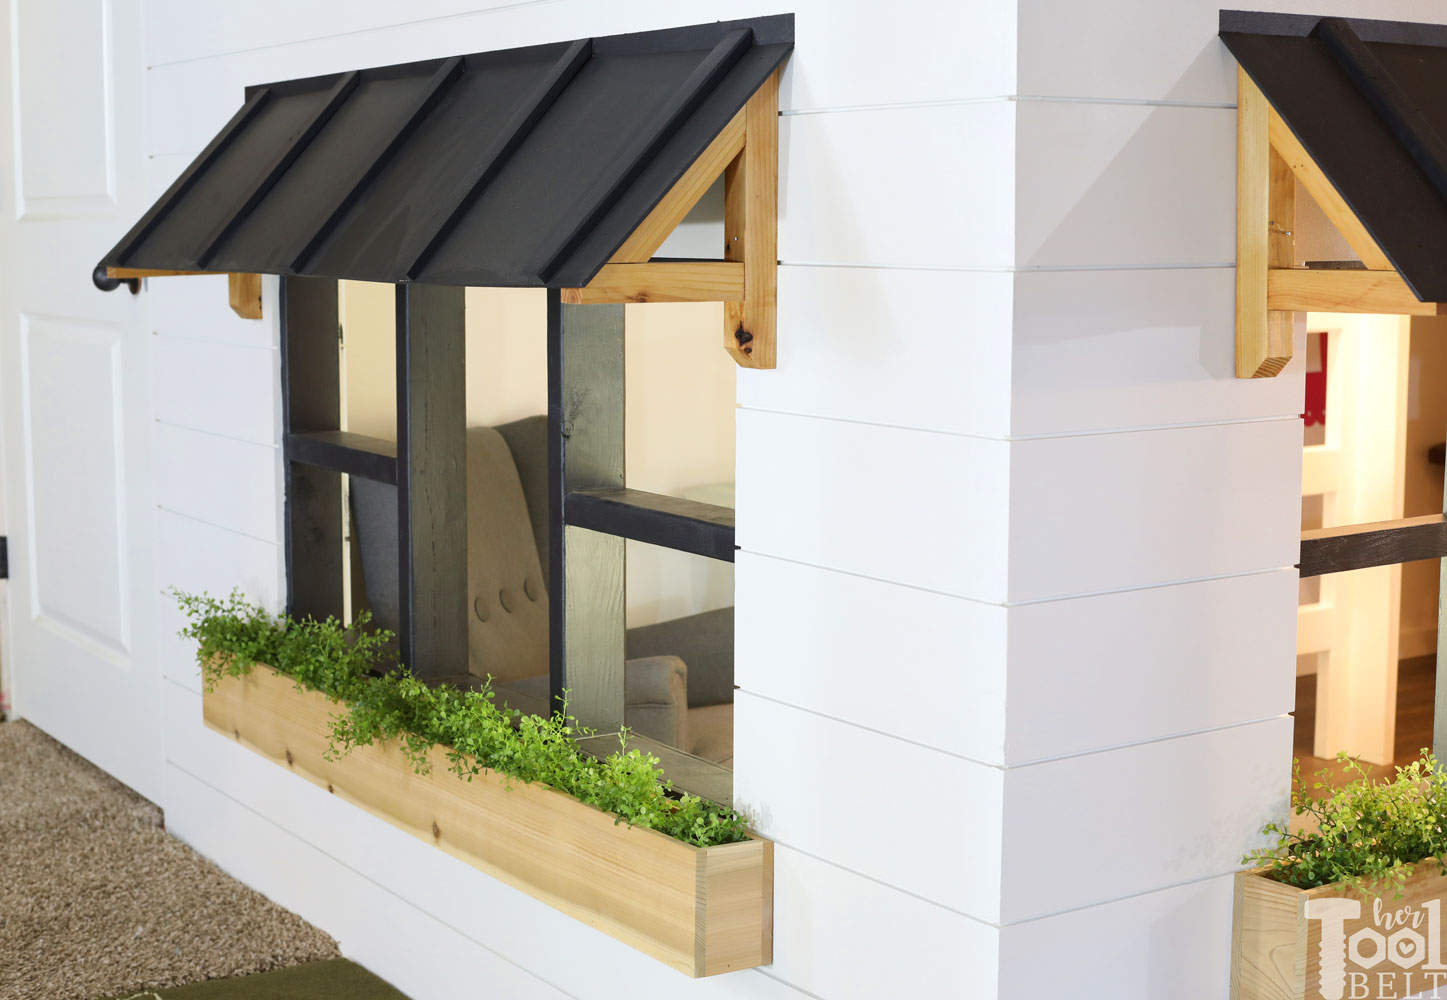
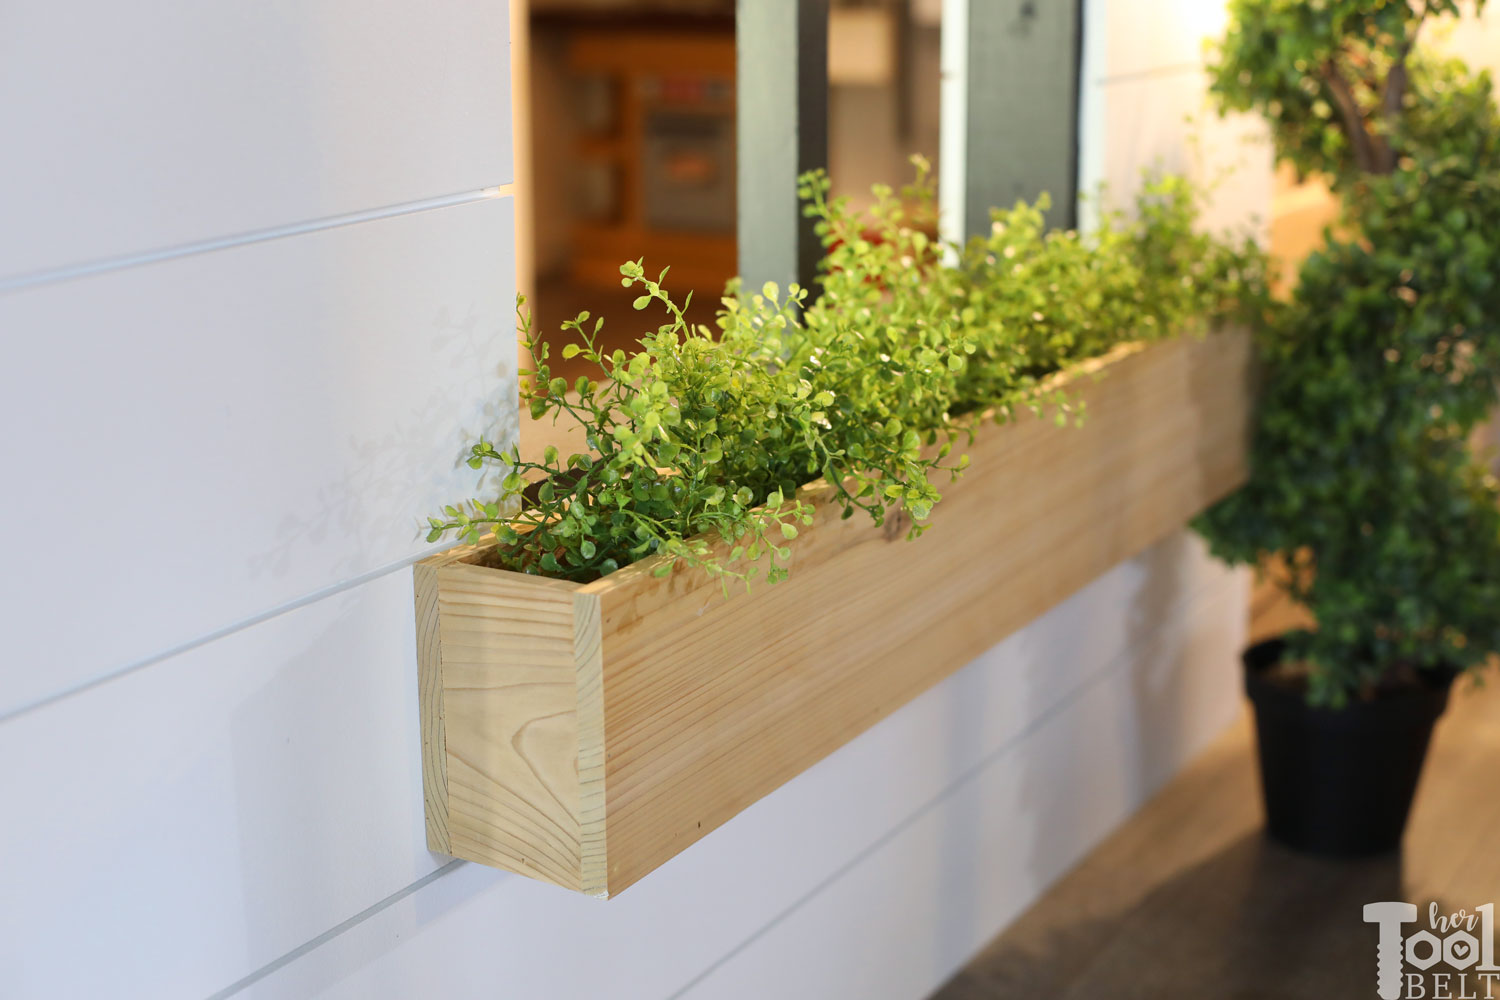
The window box planters are made from cedar fence pickets. The little green bushes are from Hobby Lobby.
This is the first ‘room’ finished in the basement. Hopefully the kids can play play play while I chip away at the rest of the dark scary basement. 🙂
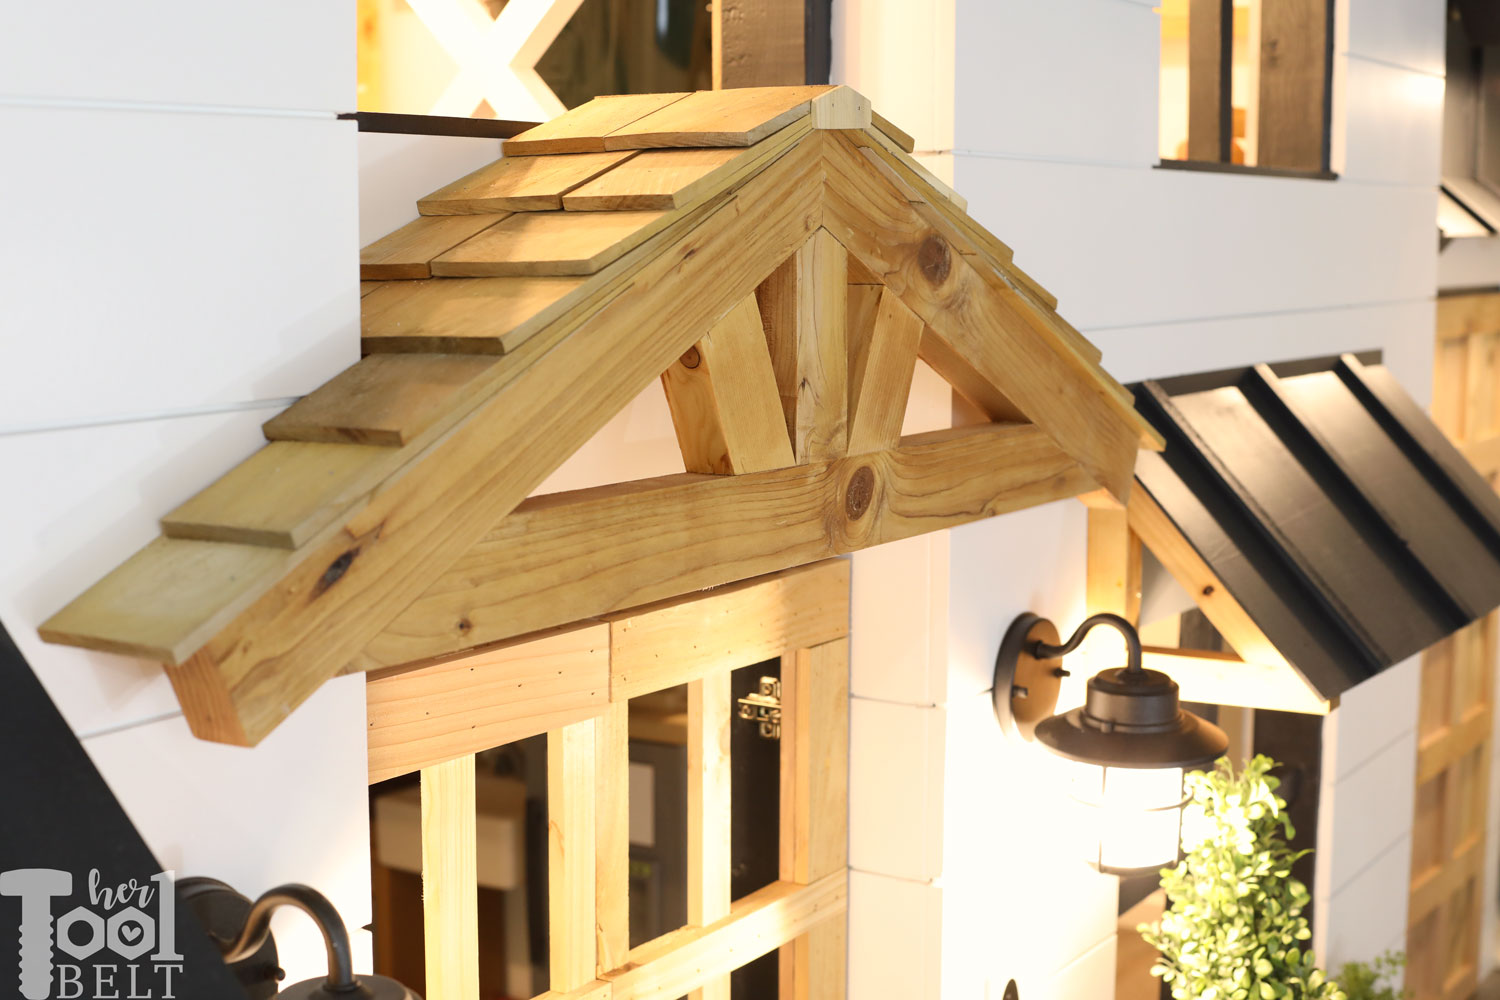
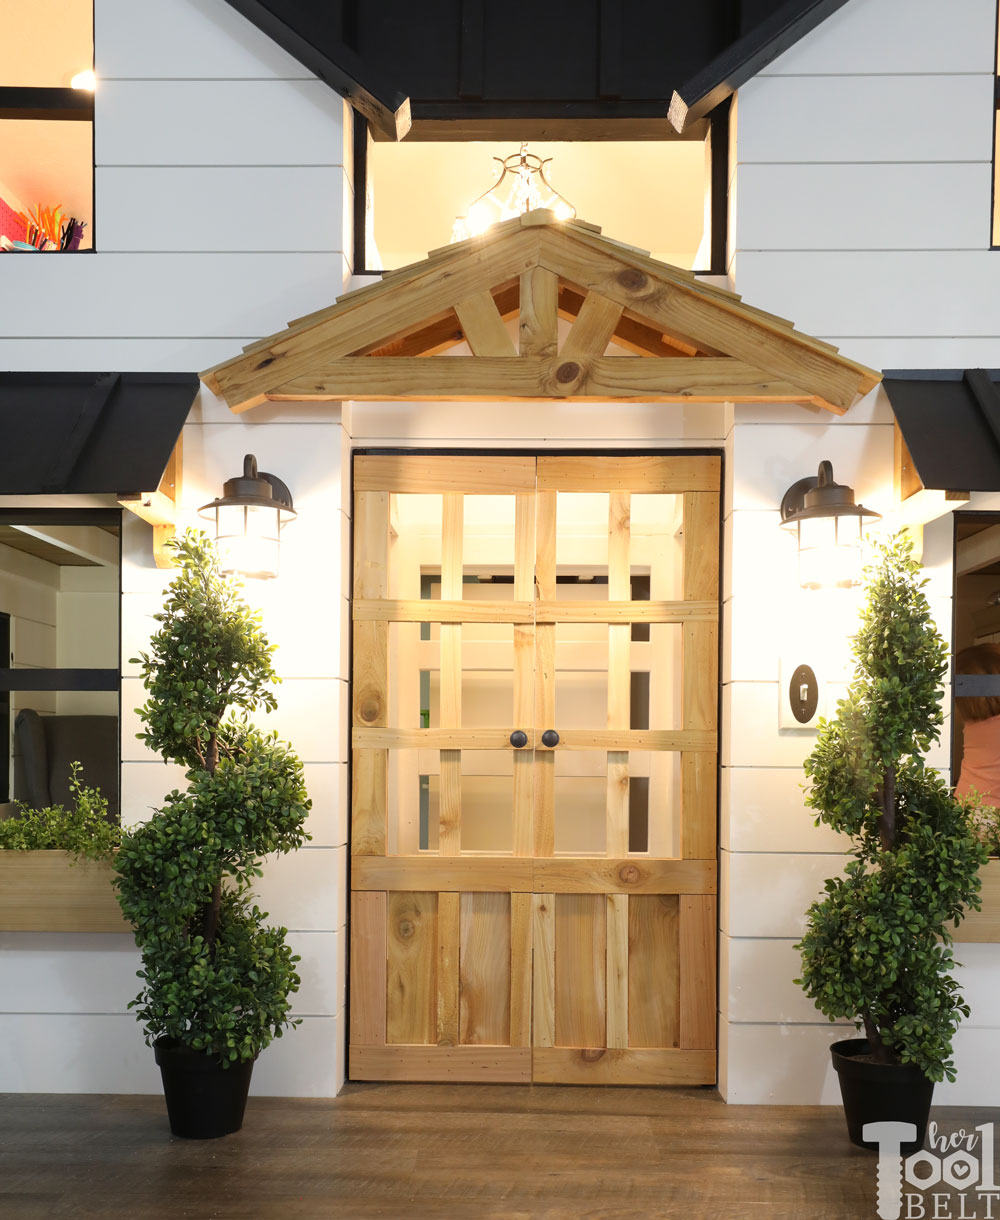
I used a lot of natural cedar (cedar fence pickets) for the wood, and luckily I found a stain that was a similar color for the parts made from pine. The stain on the pine is golden pecan, it’s a really light stain but looks very similar to the natural cedar. I had a handful of left over cedar shakes that I finally used up from my outside clubhouse years ago. They are perfect for my timber portico.
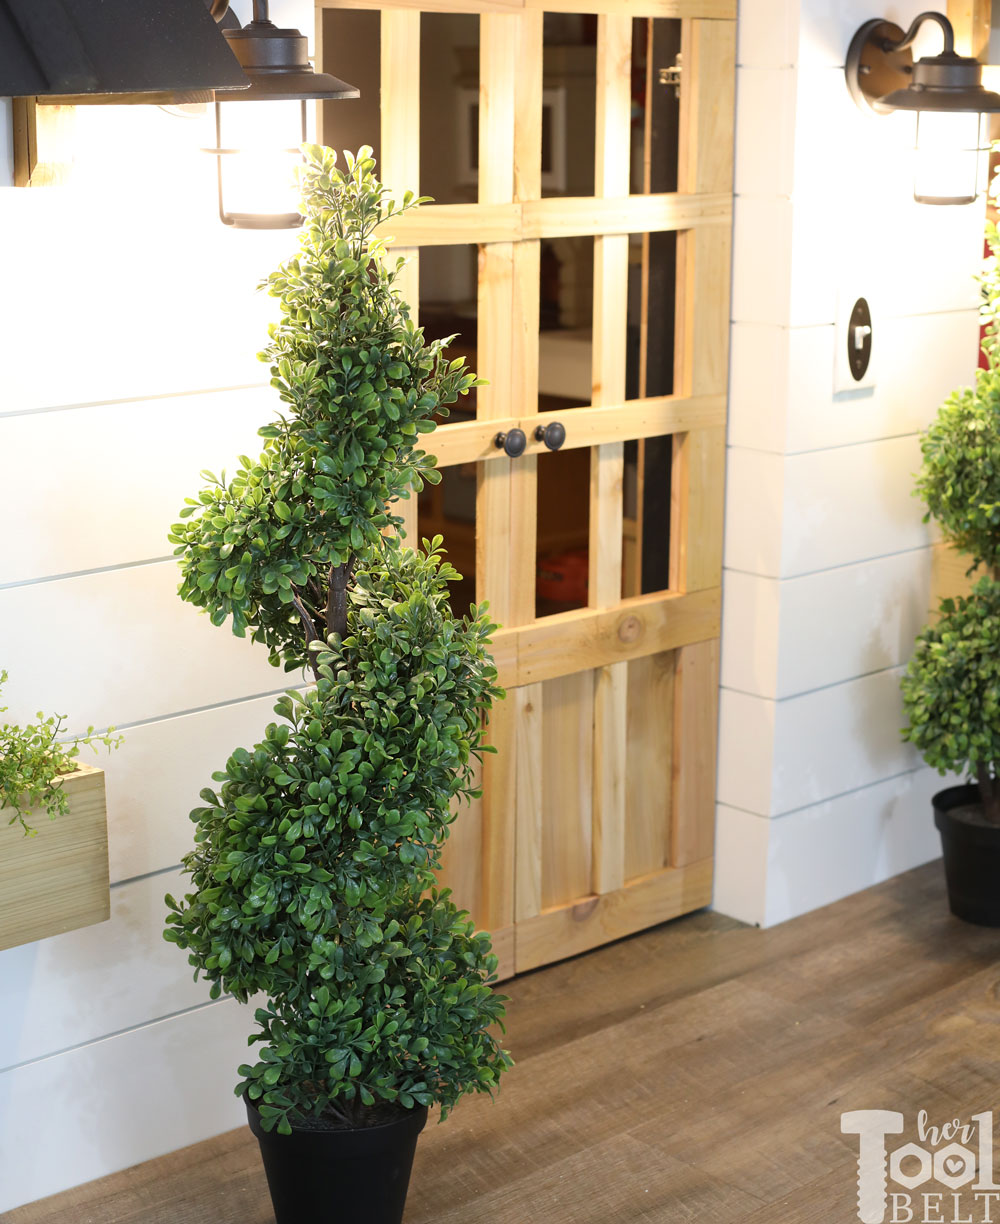
I found these cute little boxwood spiral topiaries at IKEA, they fit perfect in front of the house.
All of the light fixtures were different colors/finishes, so a quick coat of oil rubbed bronze and we’re good to go. I actually really liked the red goose-neck light, but I wasn’t sure it would go.
The light fixtures were all a pretty good deal.
- The wall mount lanterns are 2/$30 at Home Depot
- The goose-neck light over the garage is $16 at Amazon, but there was a $5 off coupon so $11
- The chandelier is $40 at IKEA.

I tried to make the light switch look like a door bell, this was a miss project, but oh well.
I made the front and garage doors open like cabinet doors. My thought was that the door frame can stop the doors from overextending backwards. Because you know kids are sooo careful.
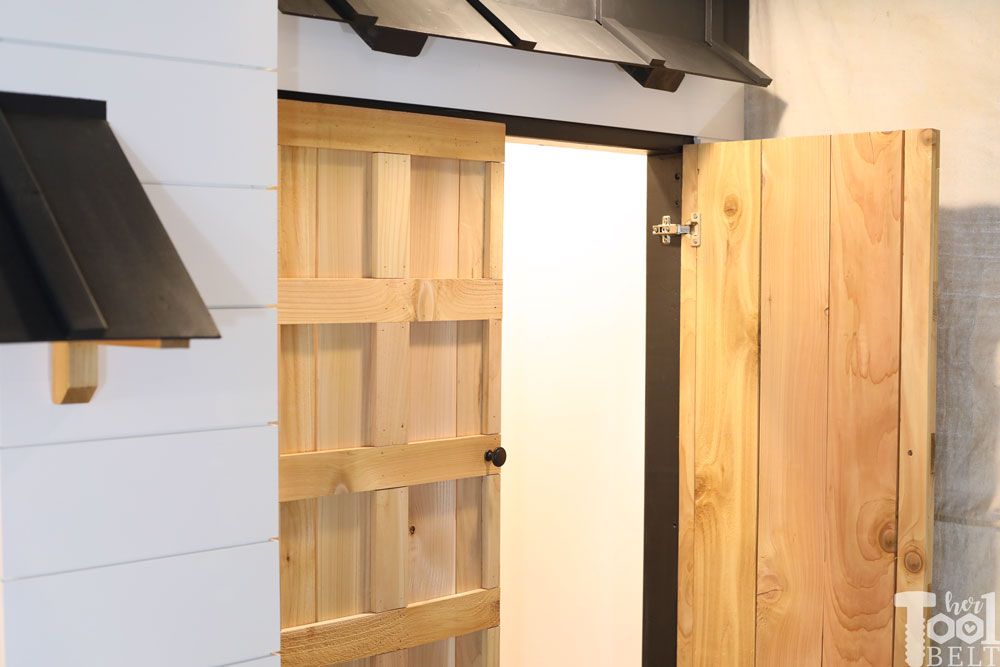
Both the garage and front doors are made from cedar pickets. They were very easy to make. Although I made a huge mistake that you can read about here.
I thought it would be fun to do a focal wall…mostly because I ran out of shiplap. I decided to do a cedar herringbone wall. When I first put the cedar up there were 0 gaps…however I guess my cedar was a little wet and after being inside for a few days, it dried and shrunk, uggg. Oh well.
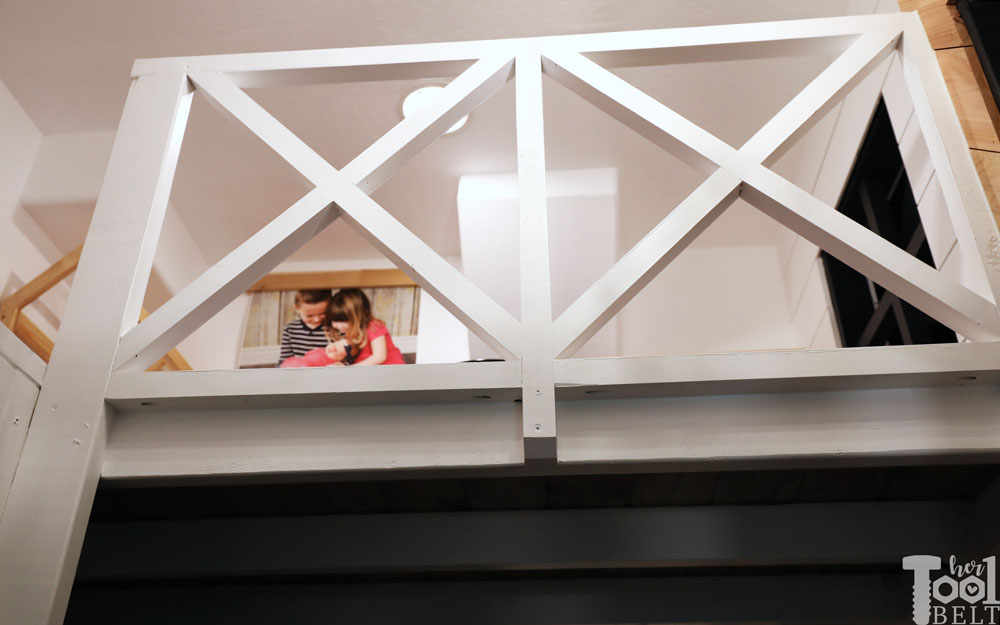
The railings are a simple X pattern made from 2×2’s.
For the nursery room, I found a little rug that matched the colors in the poster of my kids. The metal bucket was an impulse buy from IKEA, I thought they could put their extra stuffed animals and clothes in it.
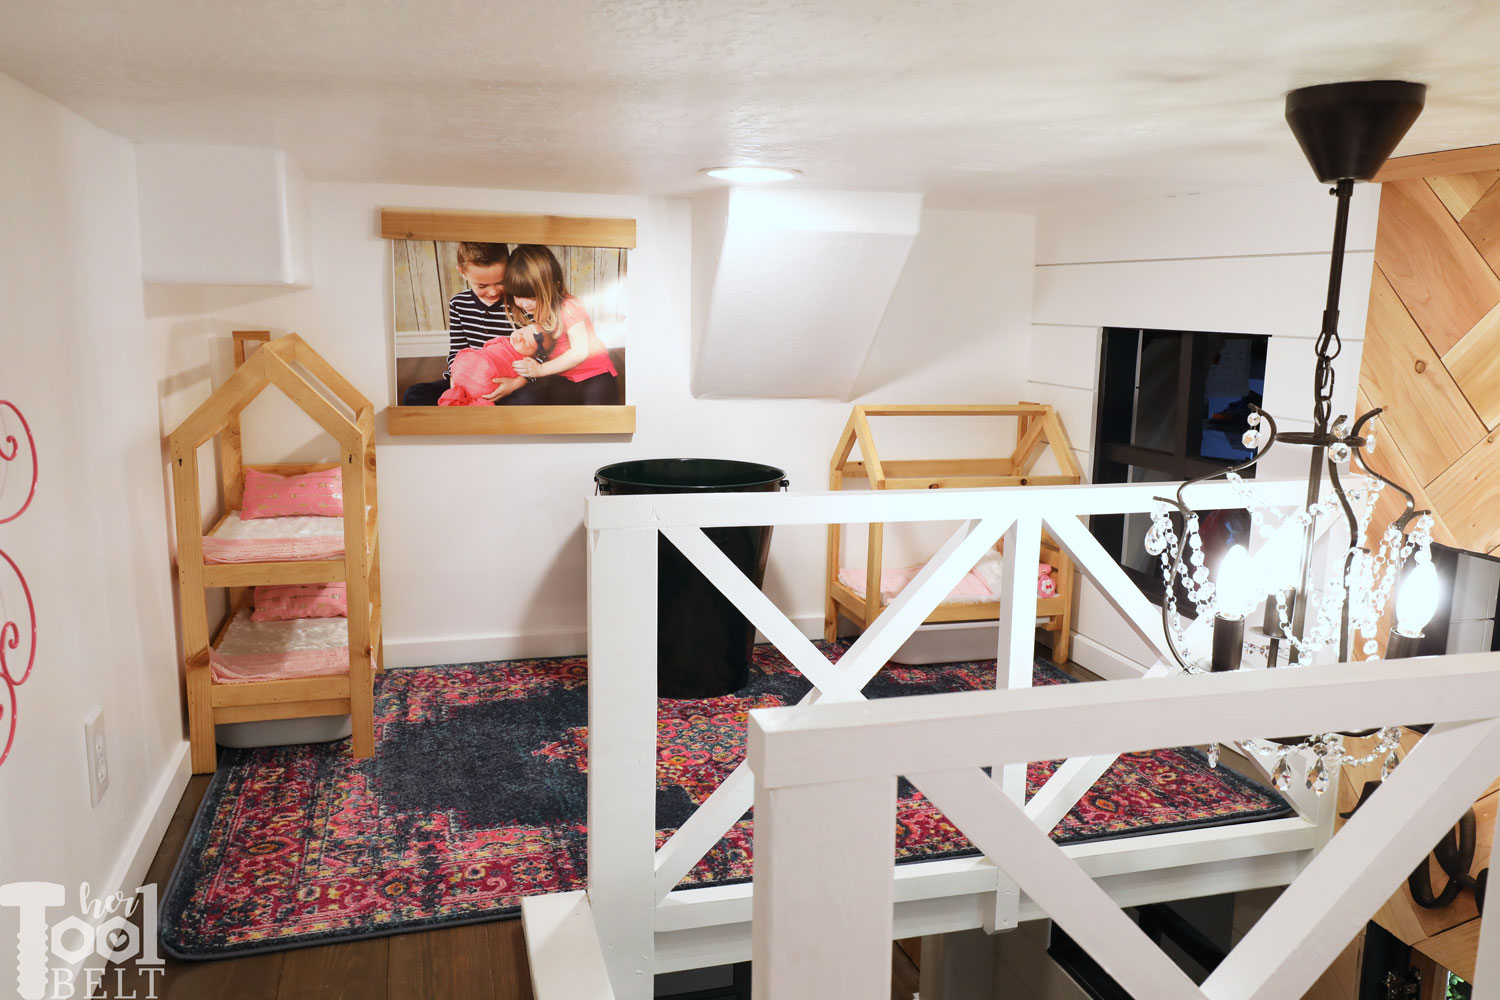
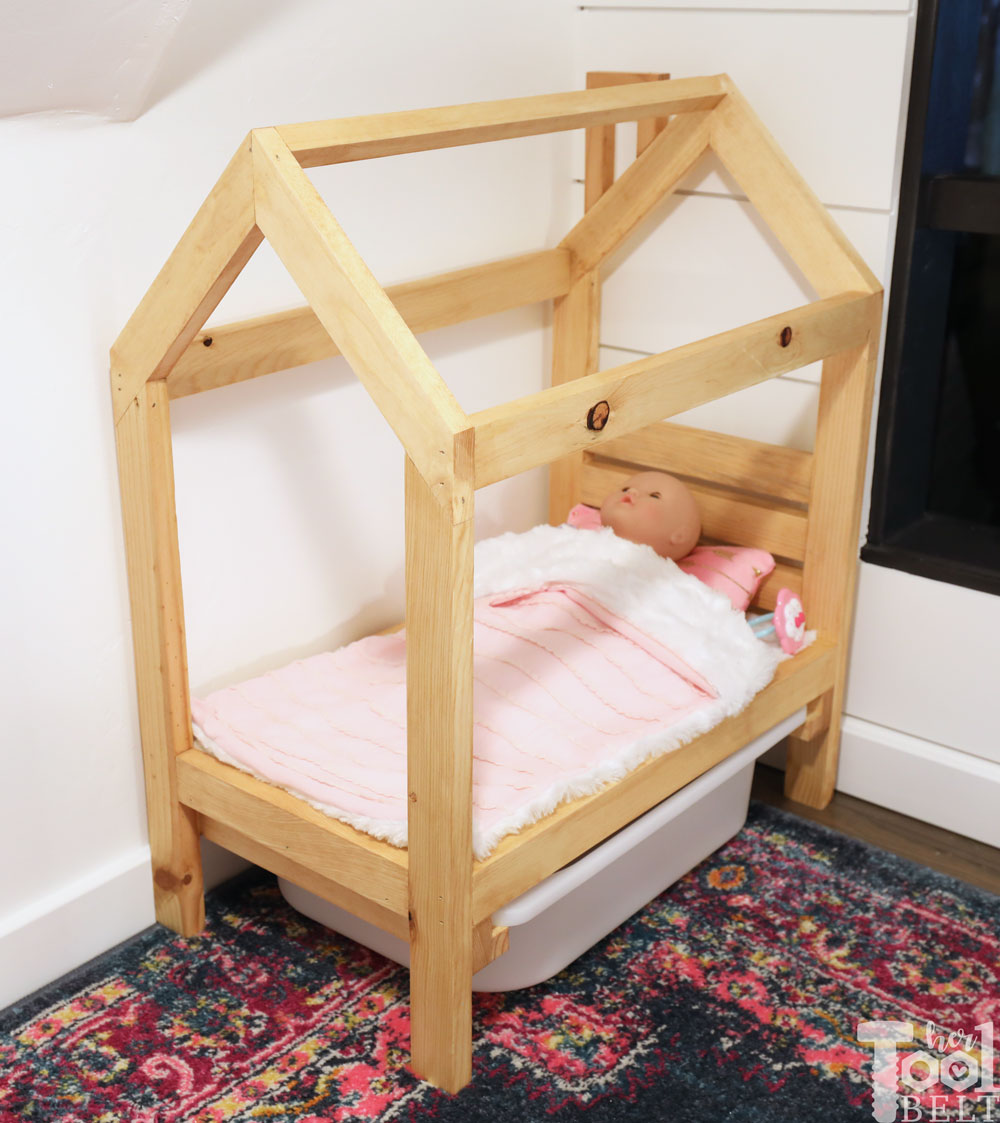
I made these cute little house frame doll beds from 1×2’s and scrap plywood. Under the bed fits a Trofast bin to store doll stuff. The beds fit 18″ dolls…or bears if your kids are like mine.
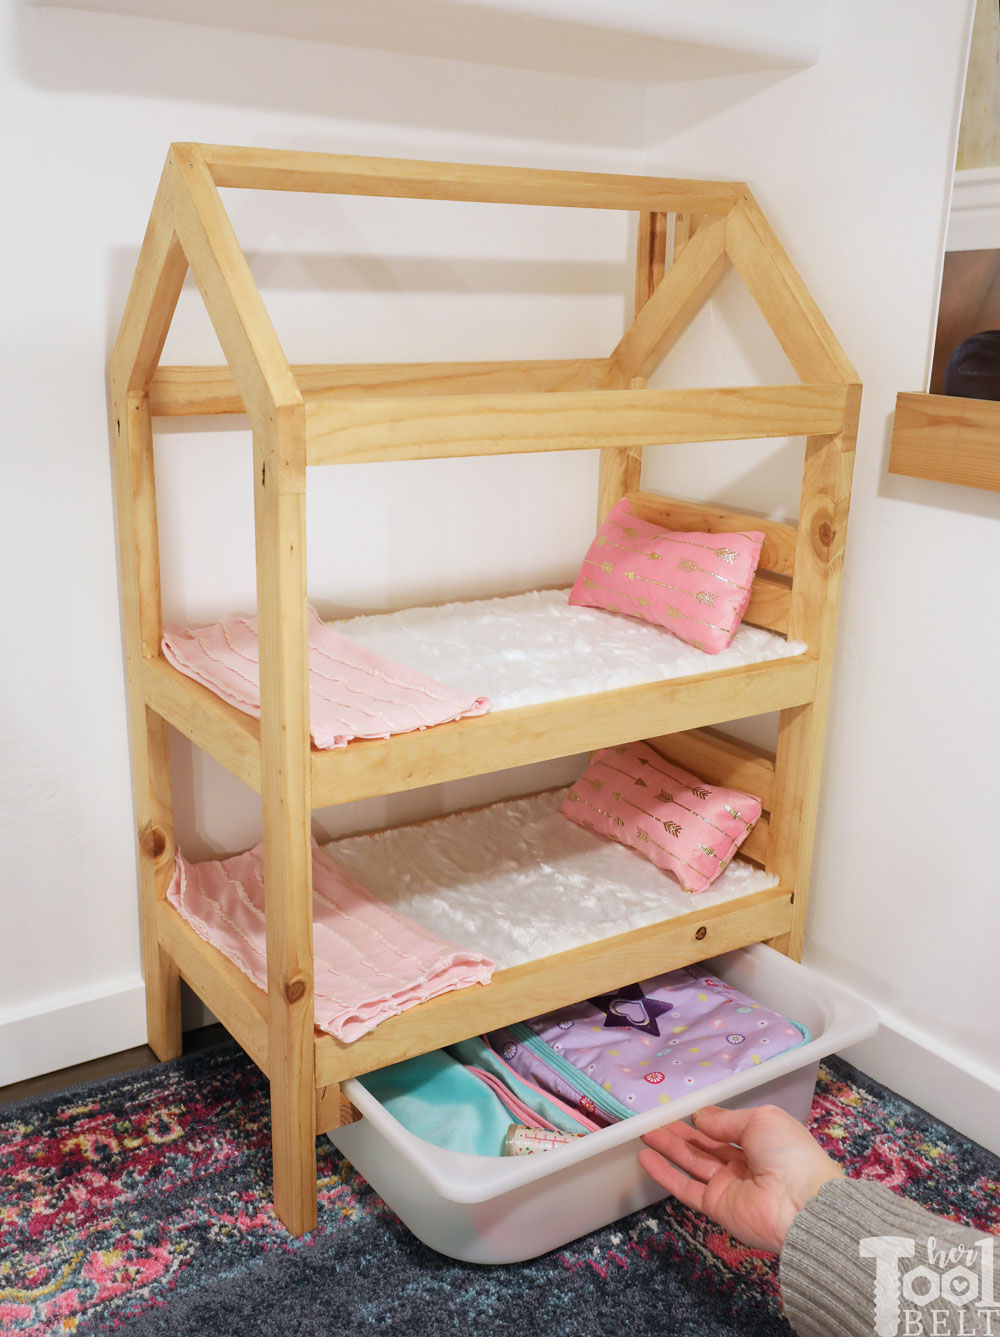
I made a bunkbed and single house frame doll bed.
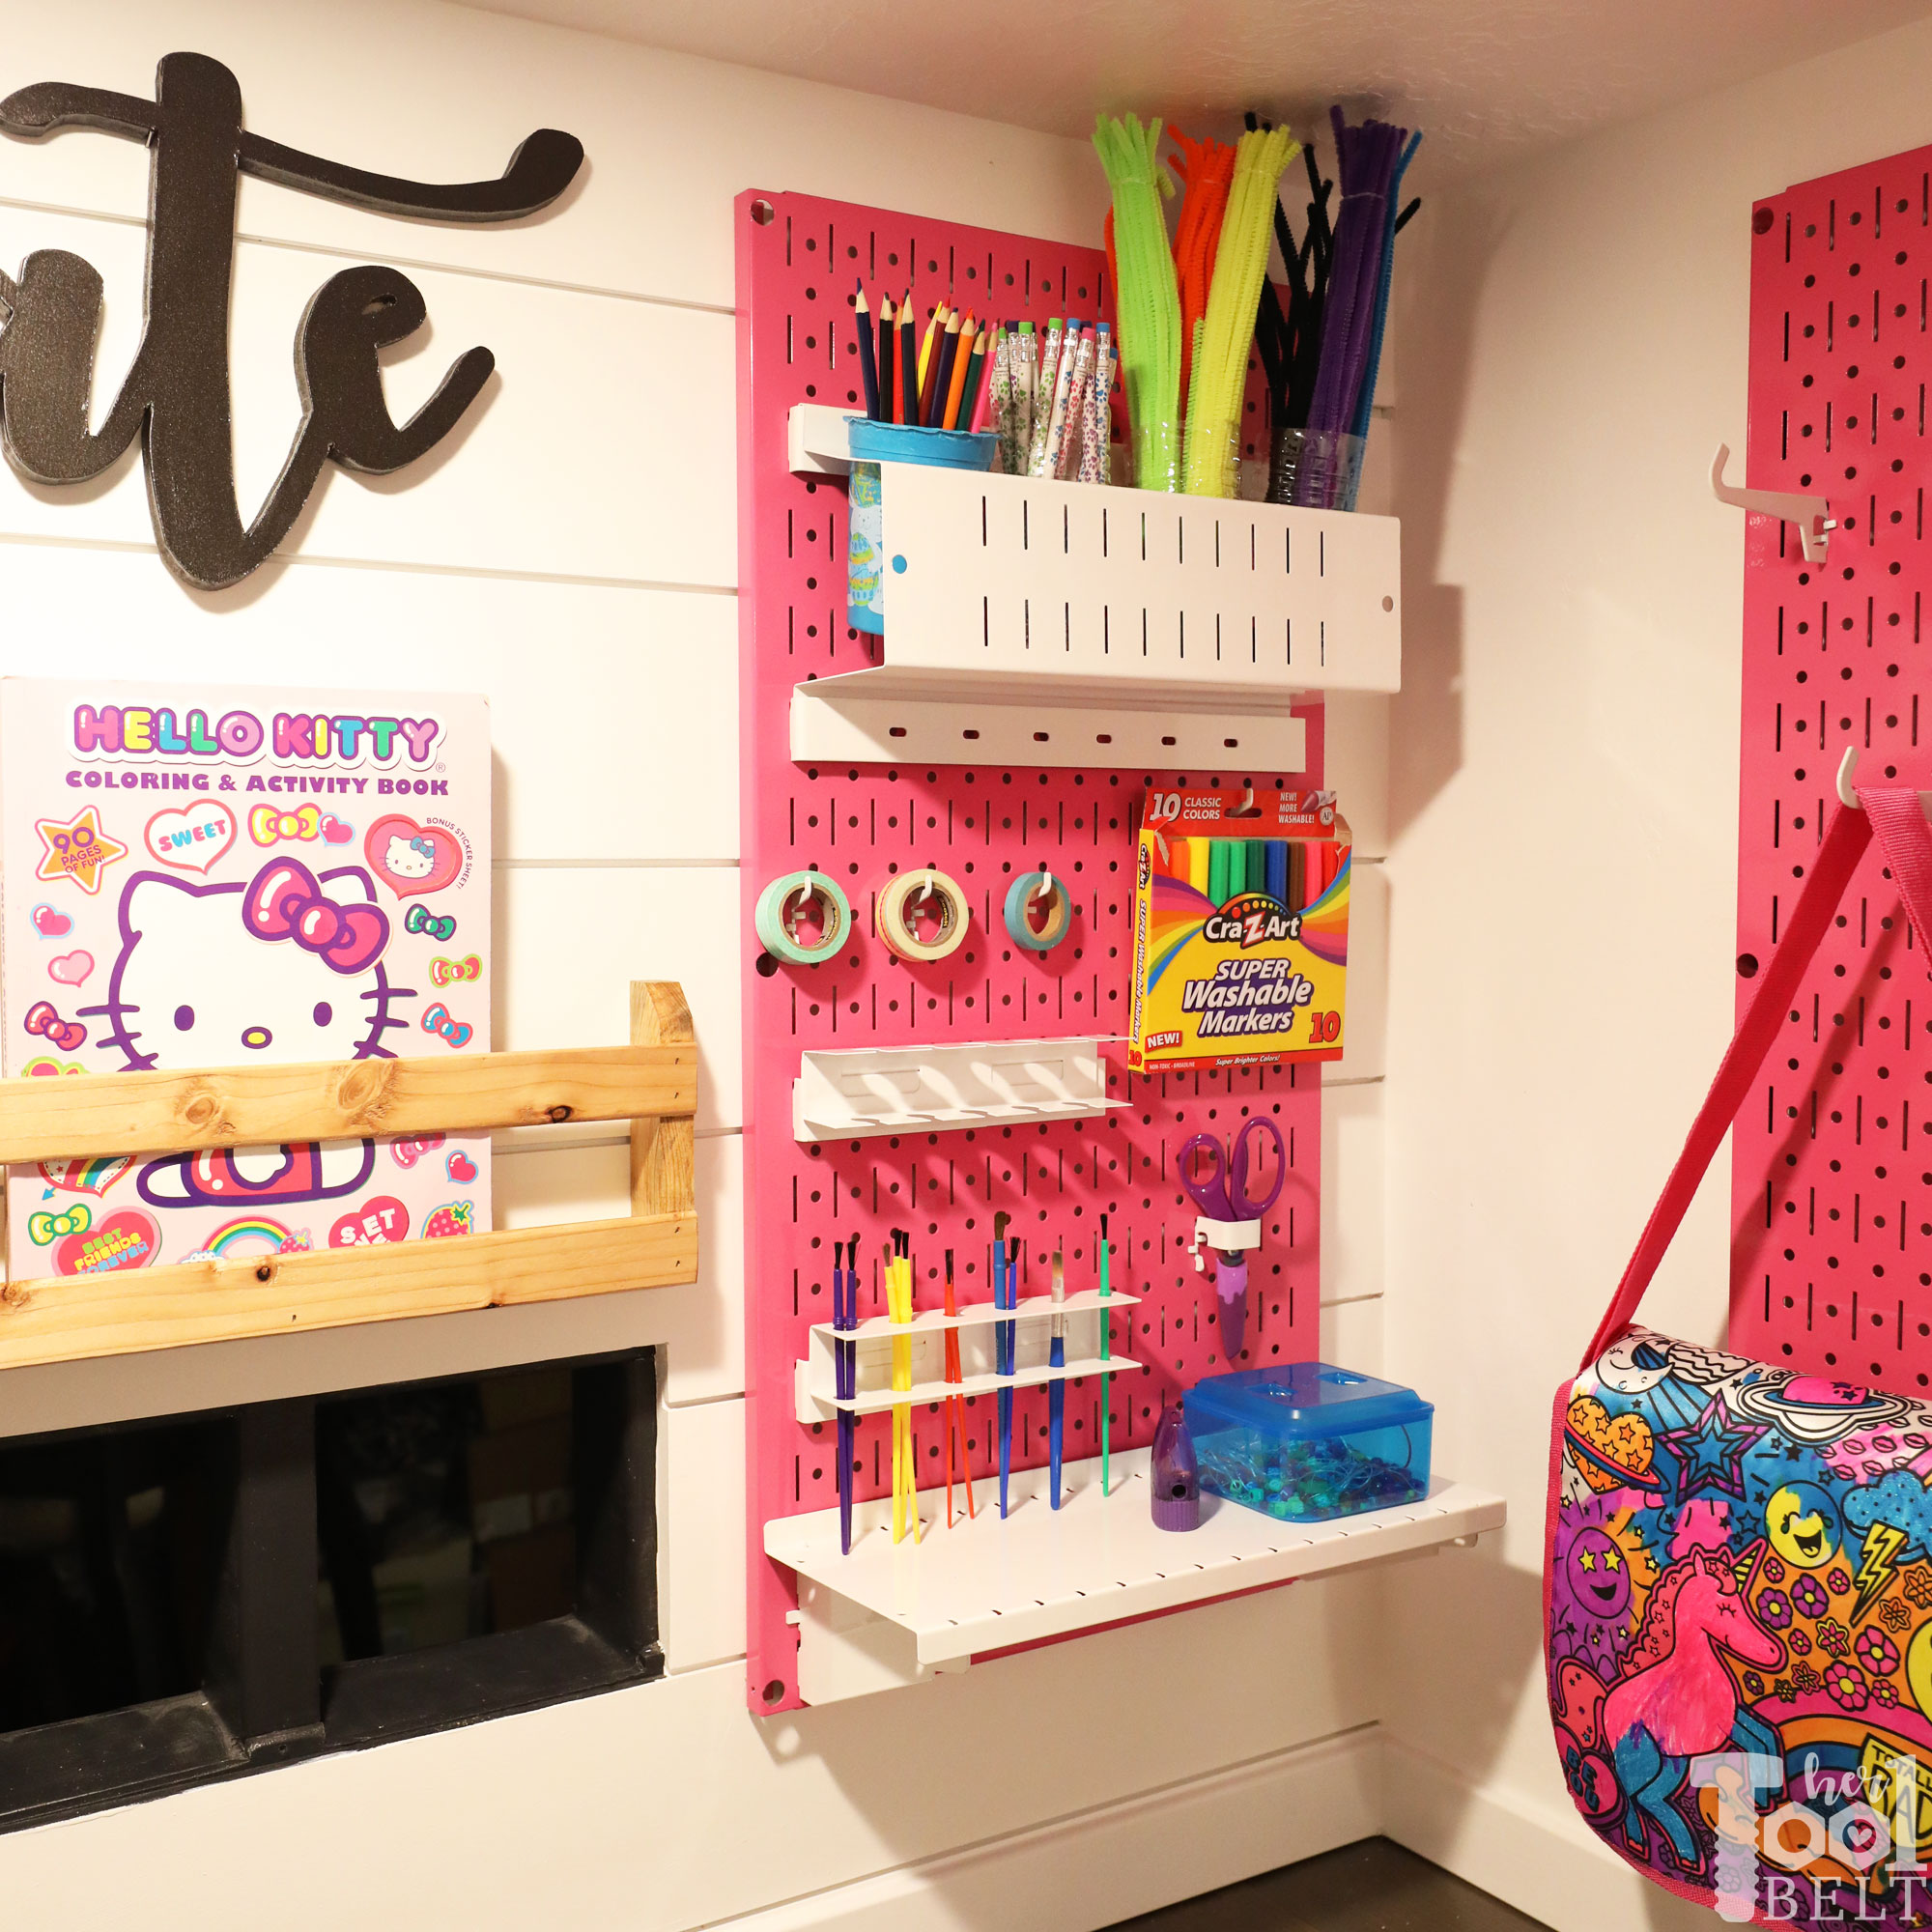
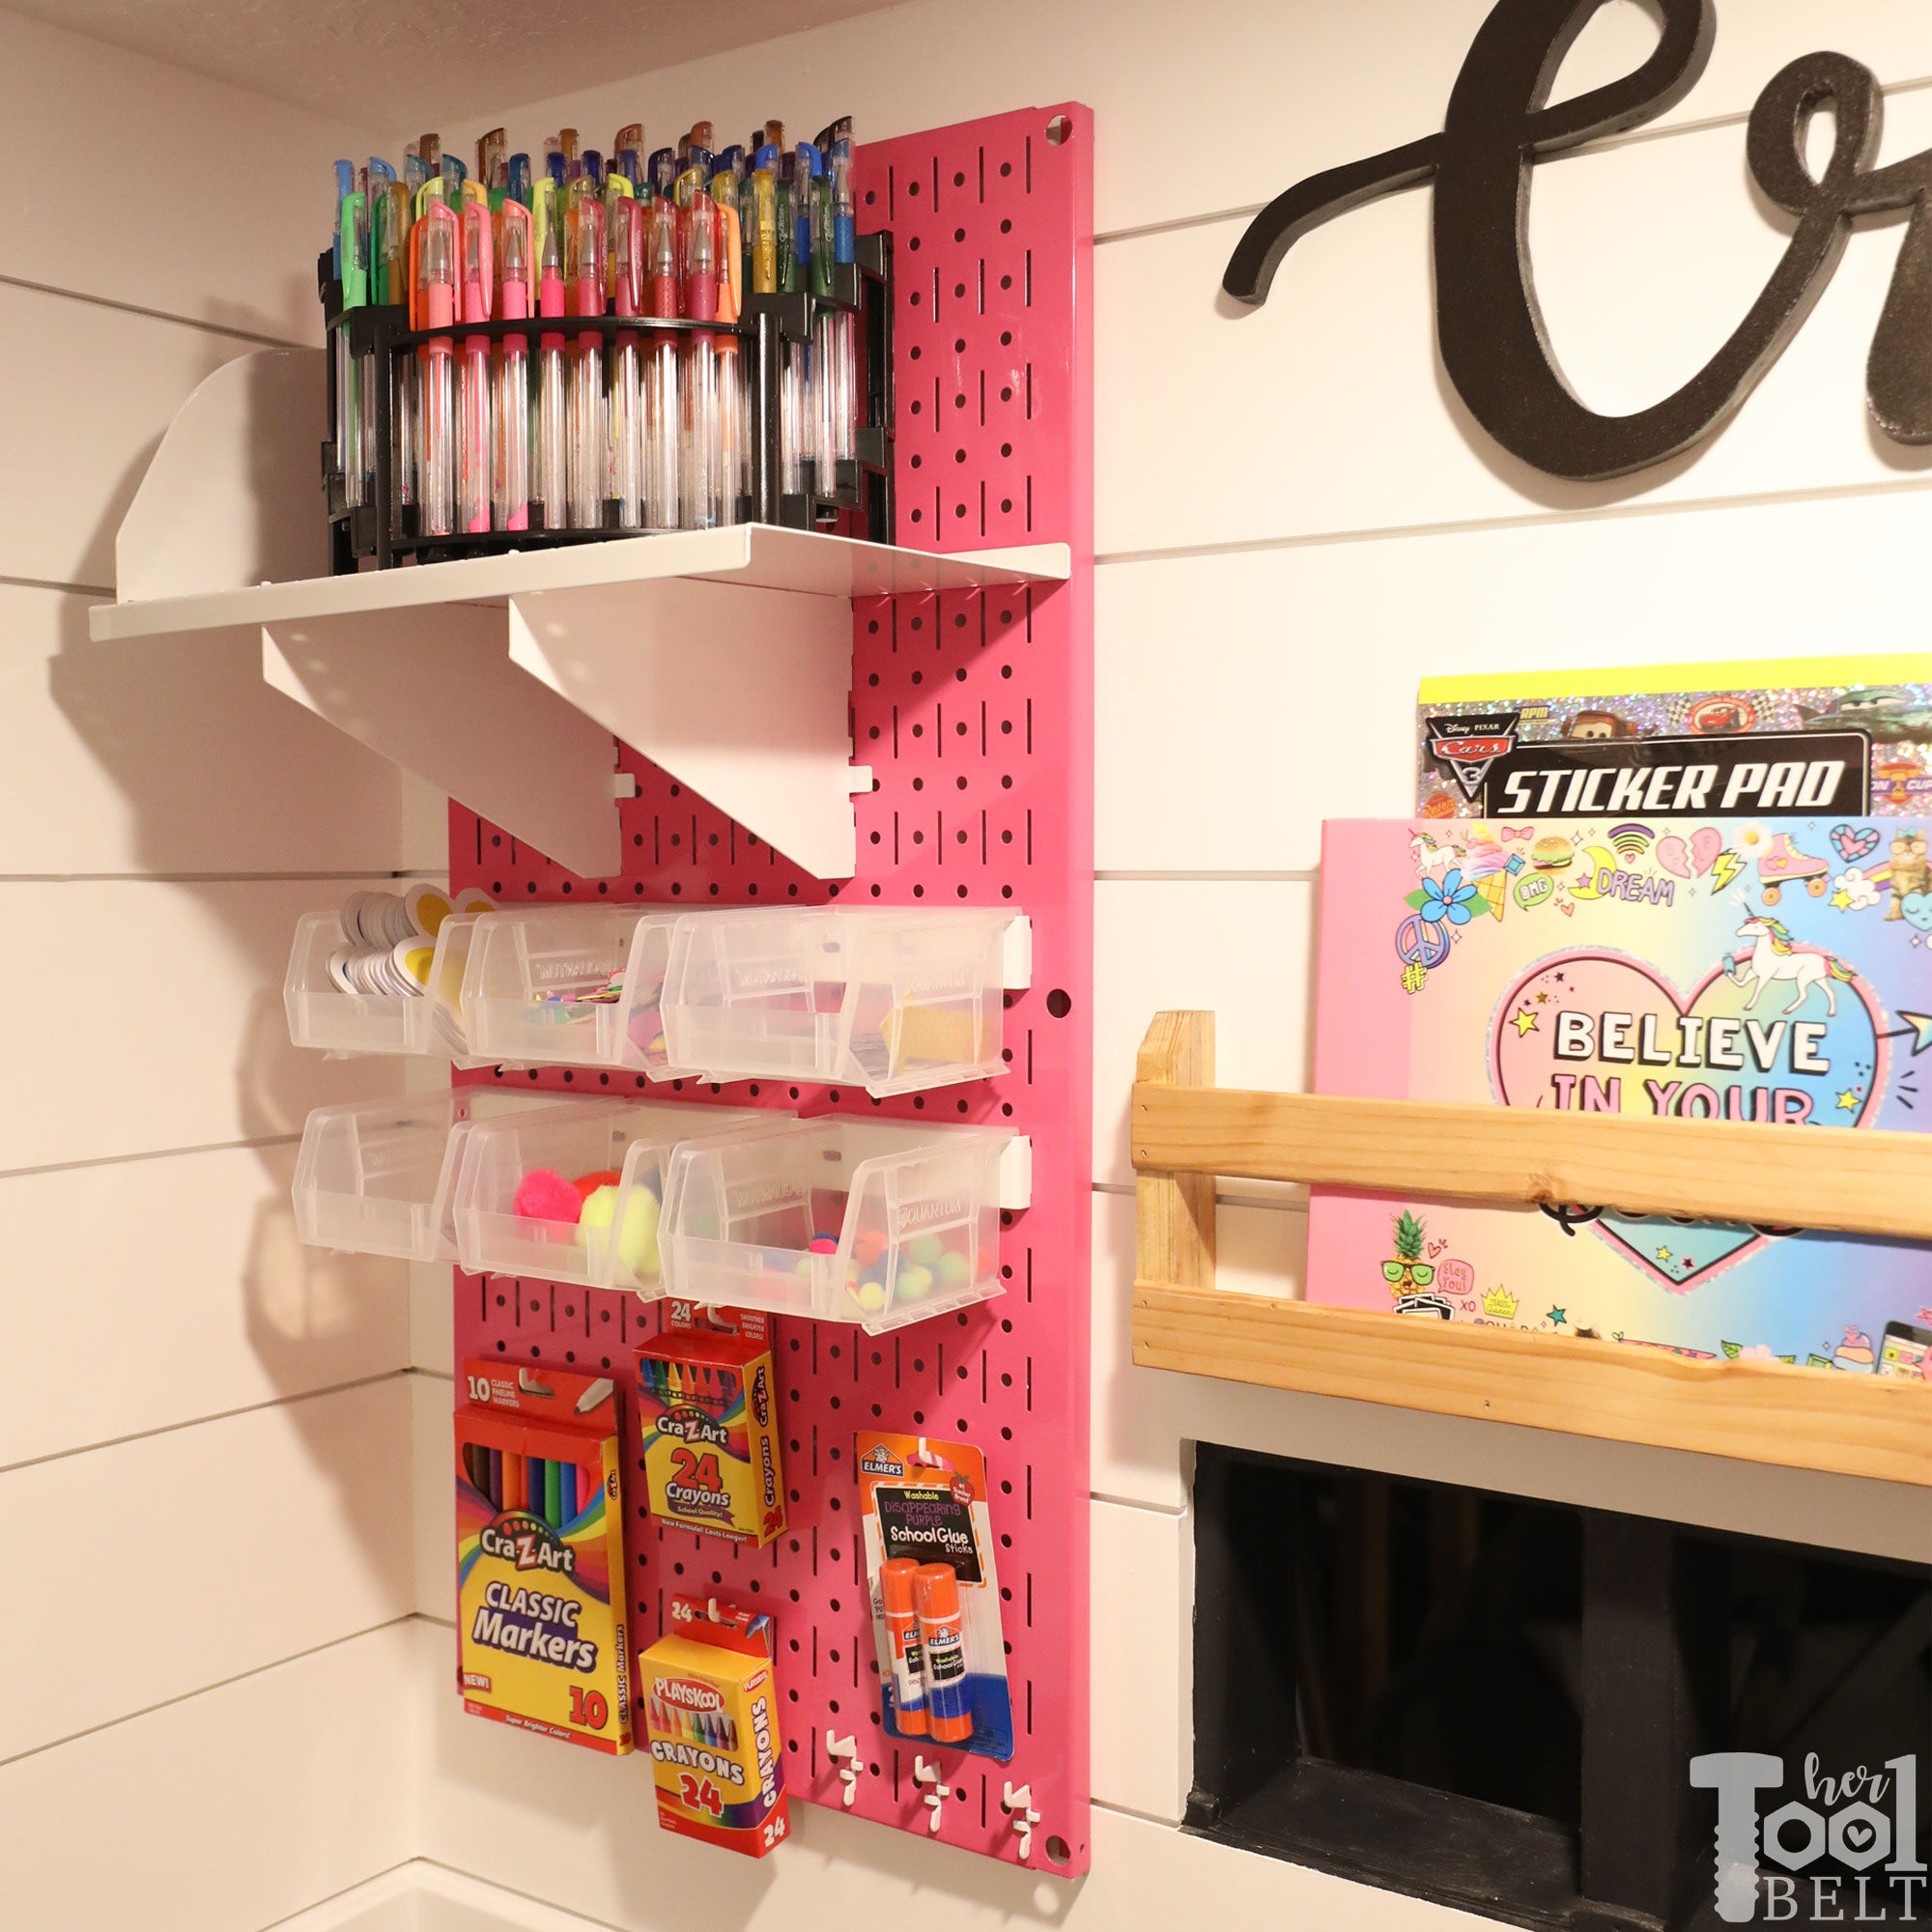
The arts and crafts room turned out really fun (pictures are pre-railing). I have used metal wall control pegboards in a number of places in my garage. BUT they just came out with PINK, so that was PERFECT for the playhouse! I like the wall control products because they are very sturdy, plus you can use their accessories and standard pegboard accessories.
The Create was cut from scrap mdf and painted in oil rubbed bronze. The coloring book holder is a super simple build made from scrap 1×2’s and lath or cut offs from 2×4’s.
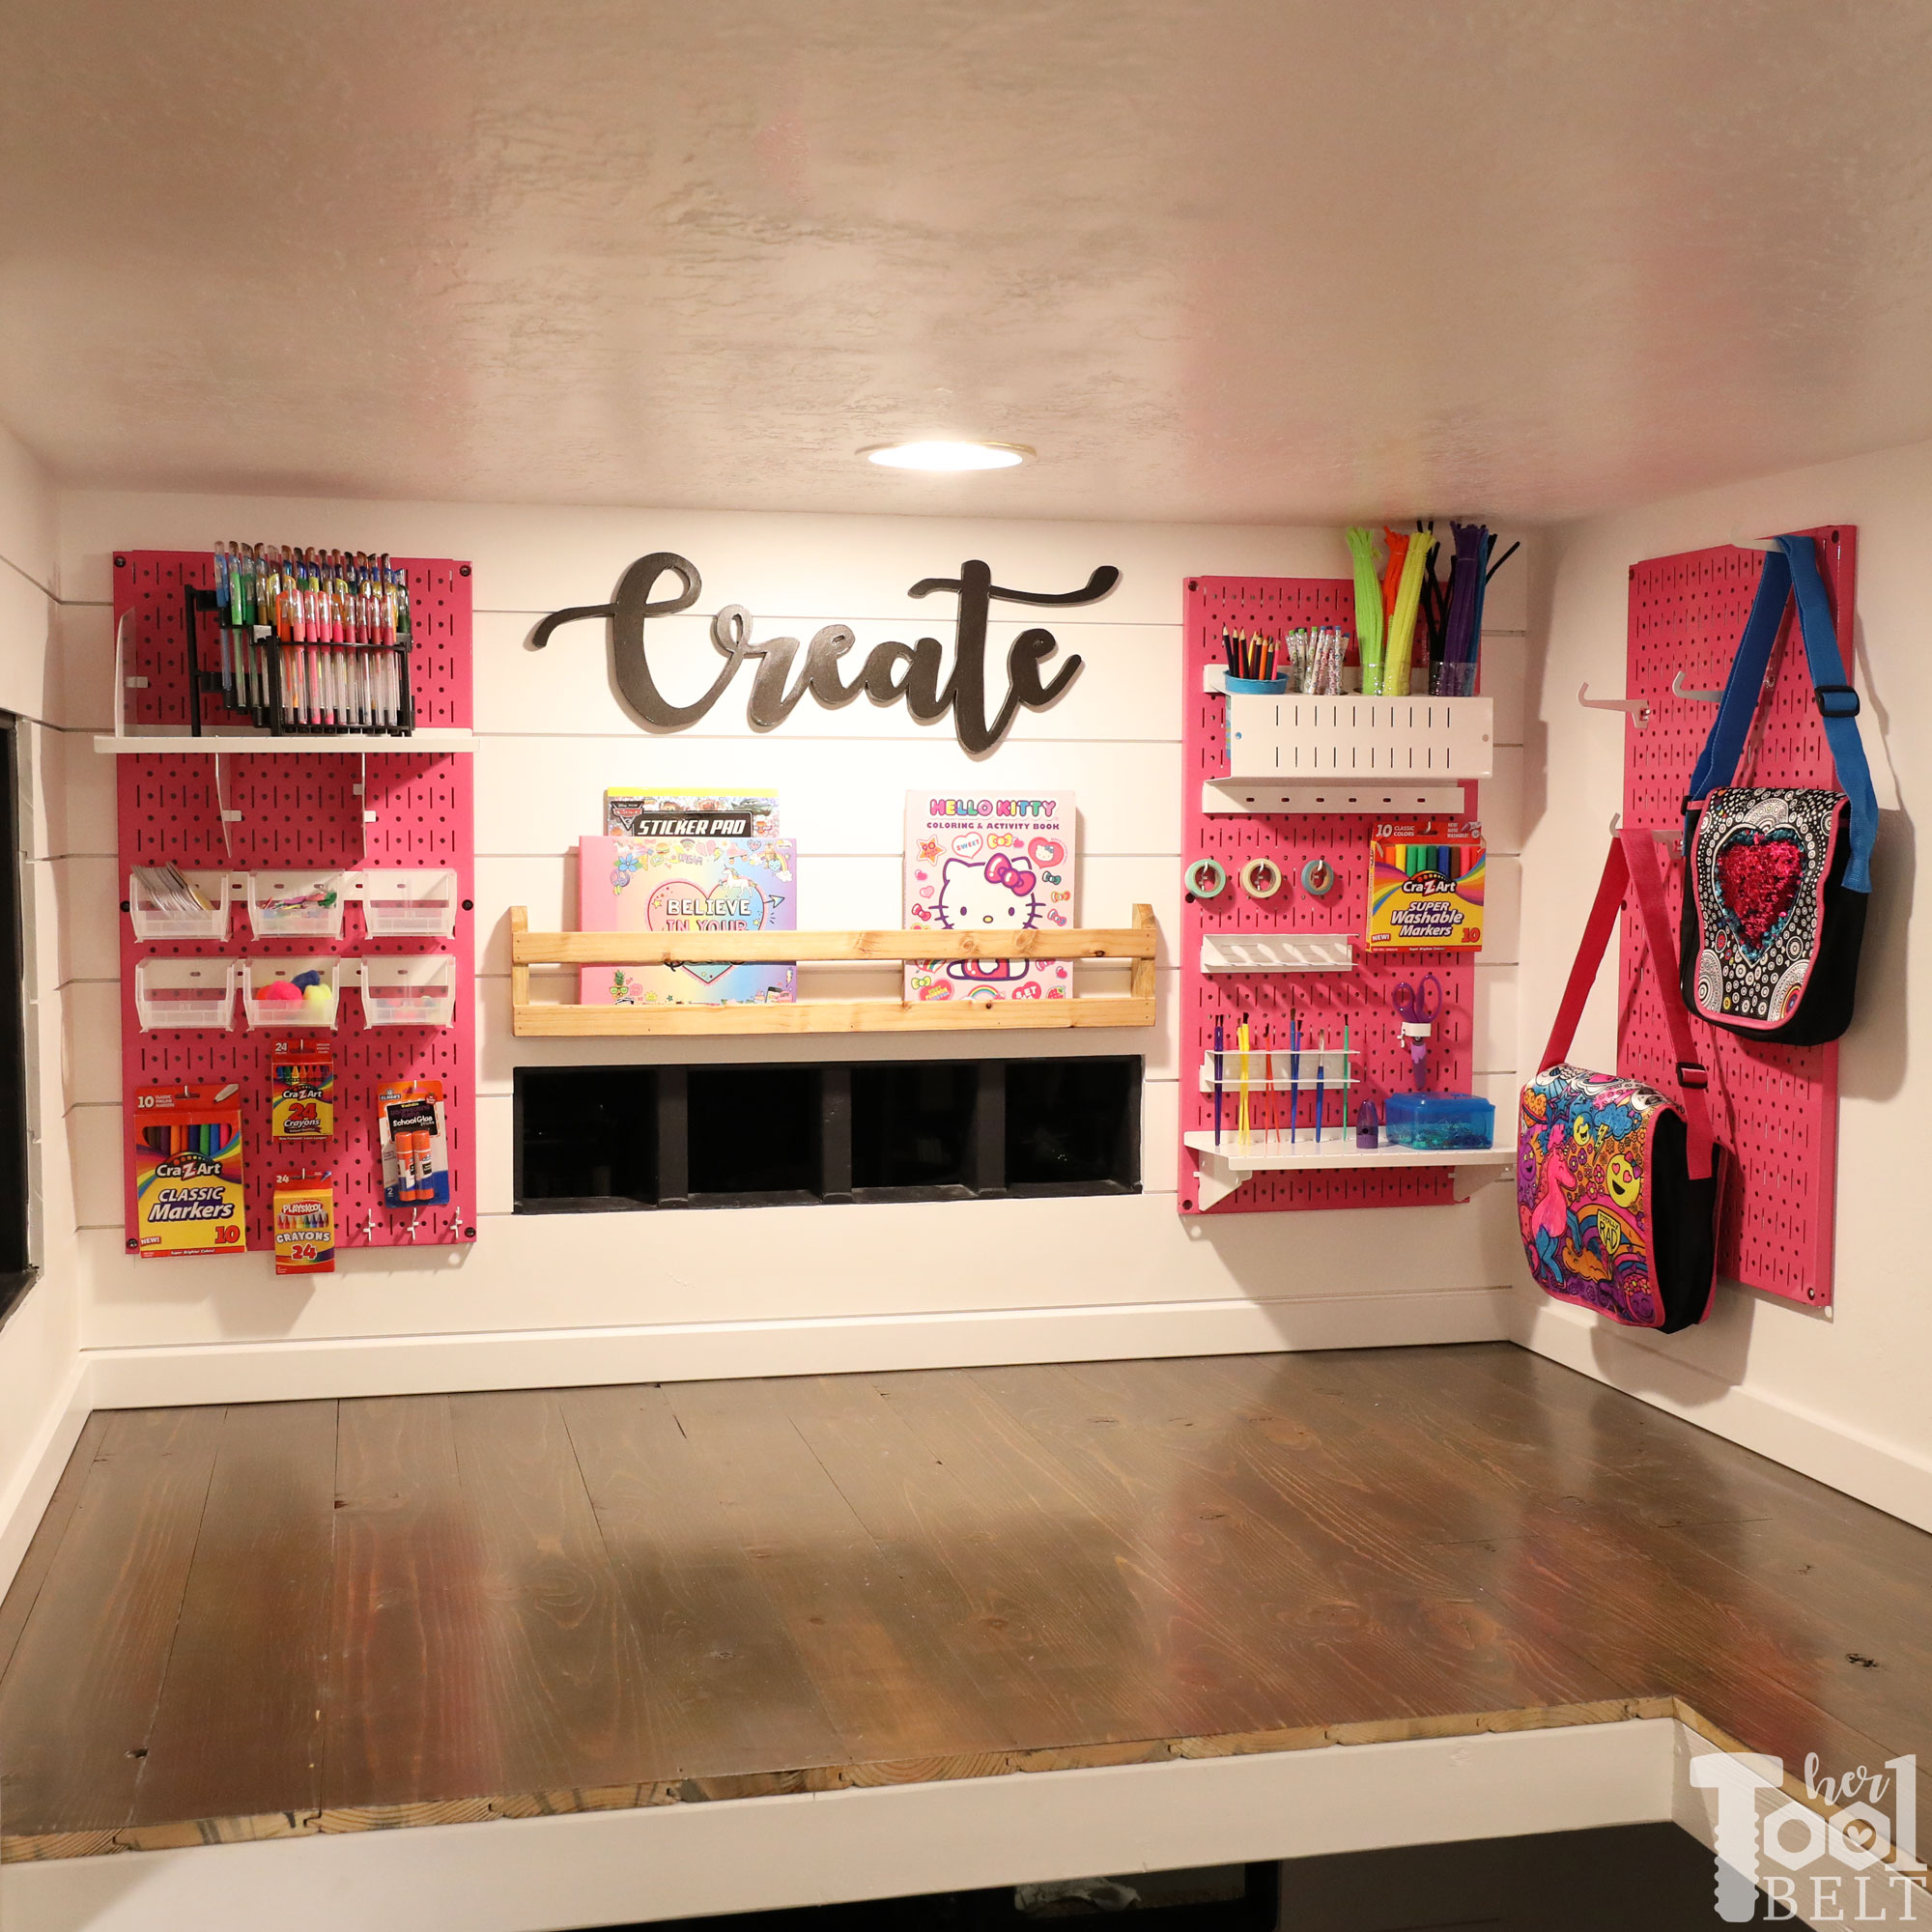
The nice thing about this system is that my kids have been using it for about 3 weeks and it looks just as good now as when I put it up. They can see where things go…and amazingly they’ve been putting stuff back. Well mostly the 6 year old, but the 2 year old has been doing pretty good.
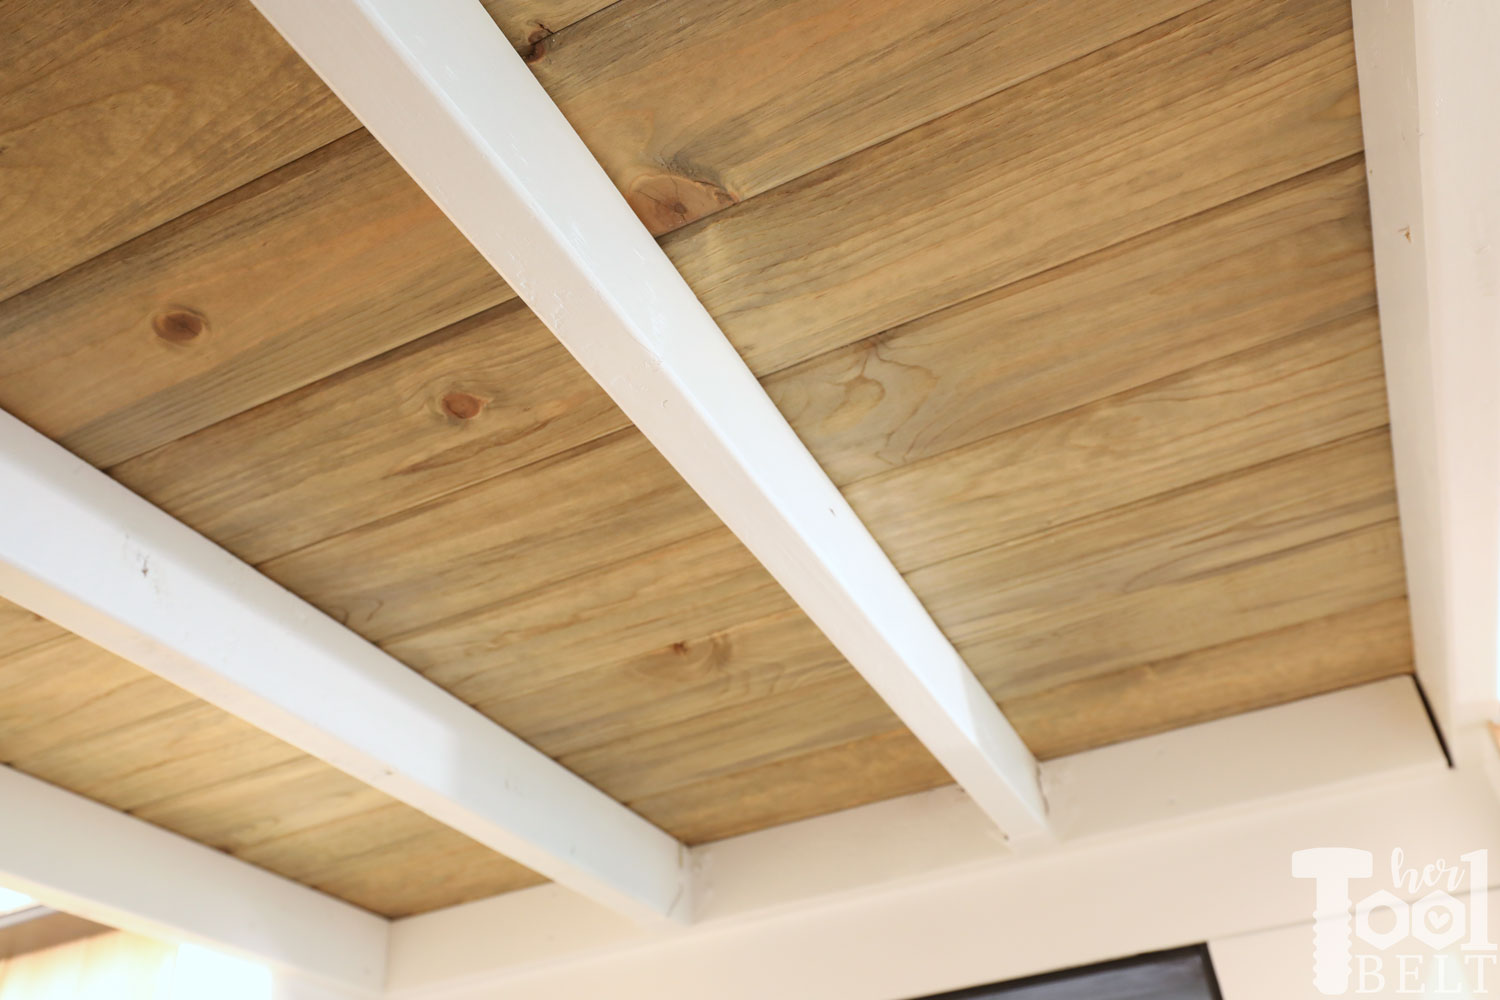
Here’s a look at the 1st level’s ceiling. I painted the floor joists (2×4’s) white and the ceiling is blue pine tongue and groove siding. When the kids get too tall to play in a cramped playhouse, I can easily take out the 2nd floor because it’s attached with joist hangers.
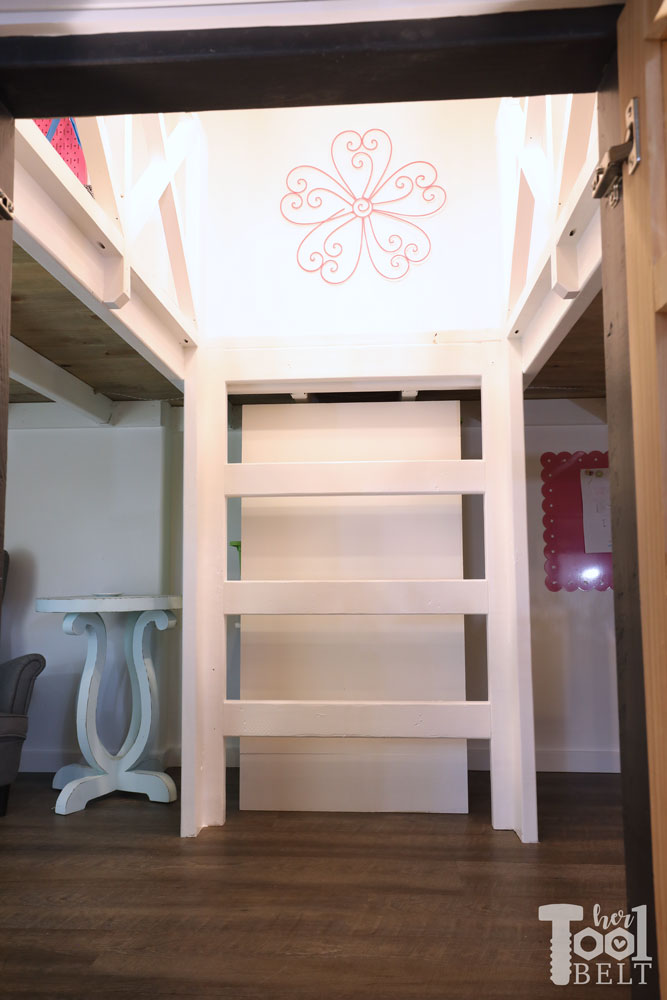
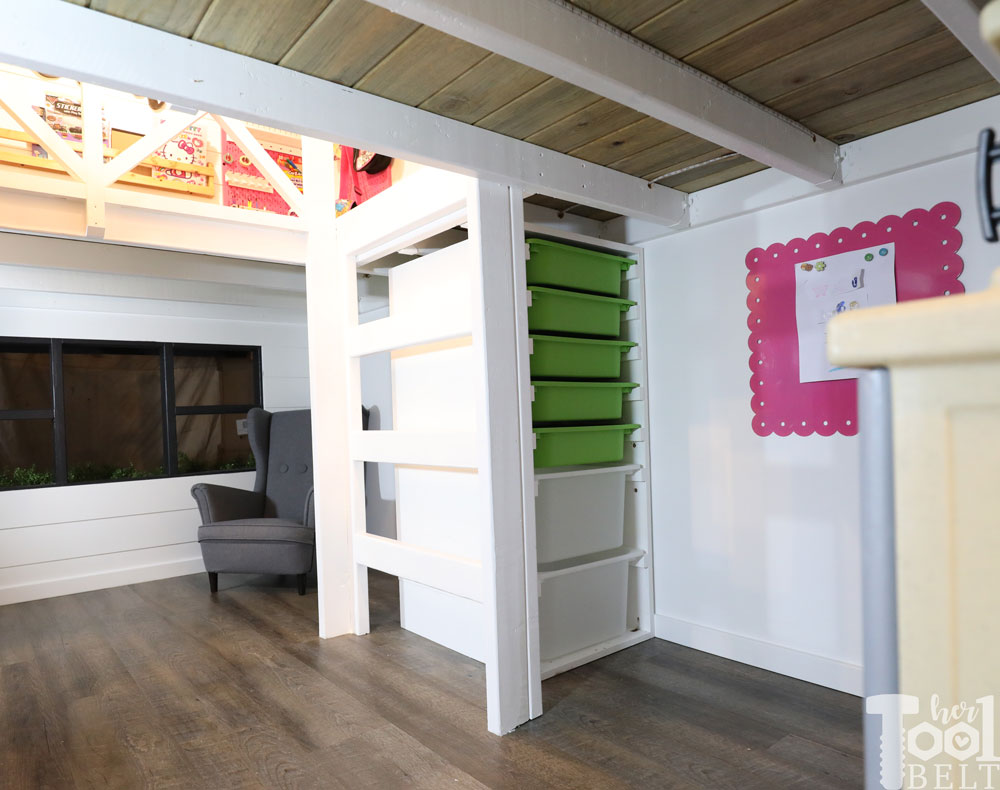
To get upstairs there is a simple 2×4 ladder.
Behind the ladder, I made a storage unit out of scrap plywood that uses those IKEA Trofast bins. The storage unit will hold 2 bins on each row, and the bins can be pulled out from either side. This is a great little system to hold a lot of their toys, trains, animals, tea party stuff, kitchen supplies and food, etc. The little chair in the corner is from IKEA too…another impulse buy!
We have a plastic kitchen set…I’d like to do a built in kitchen…we’ll see.
You can access the ‘garage’ from the kitchen, or thru the garage doors.
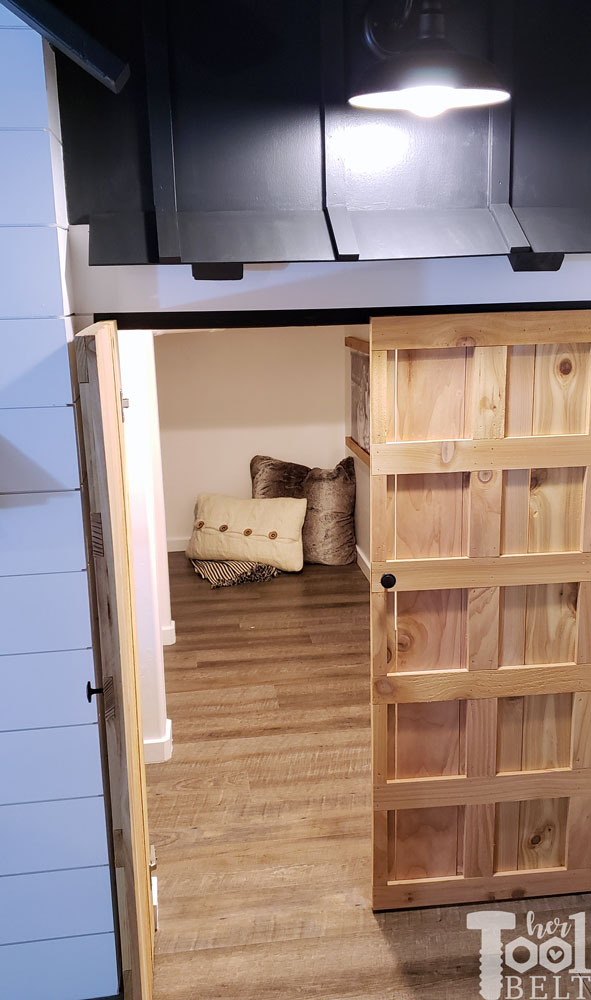
We’ve collected our soft pillows and gathered them under the stairs.

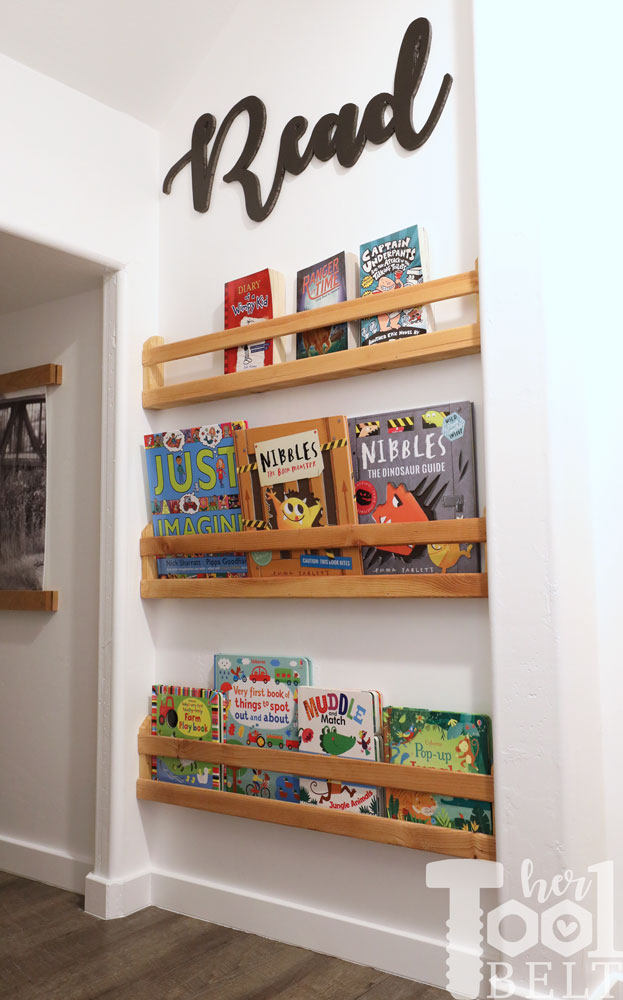
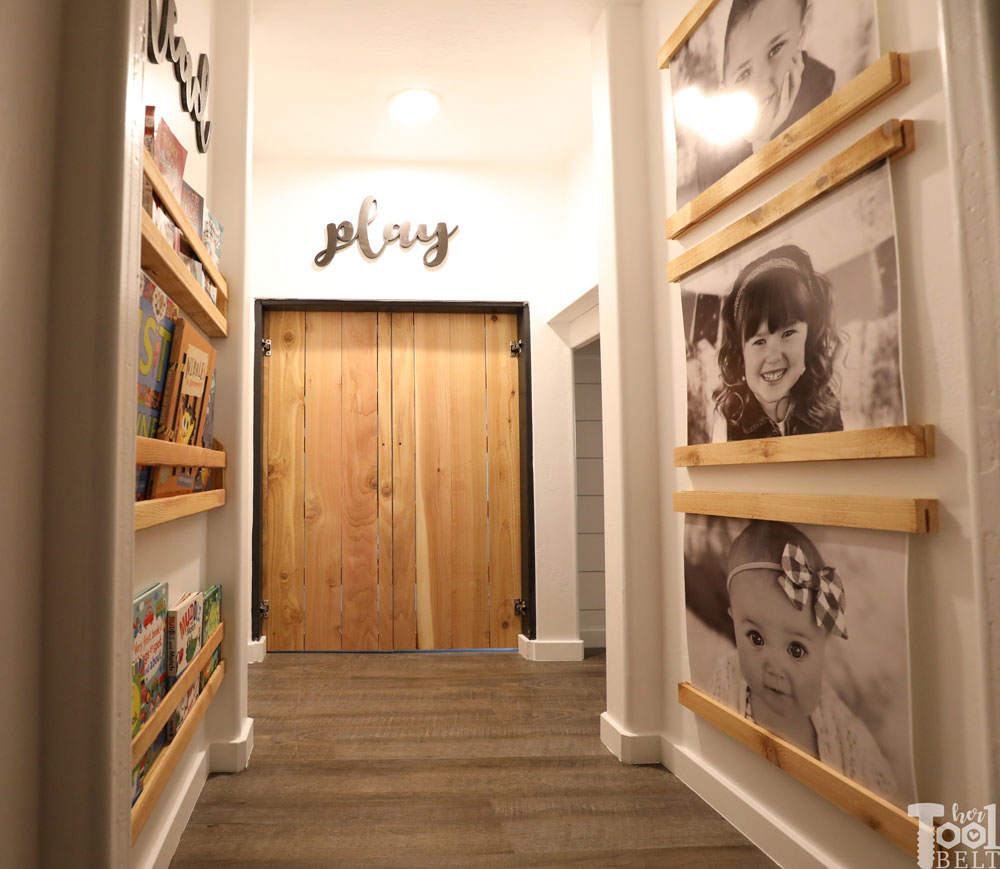
Even though I know they’ll probably be playing their tablets in the lounge area, I put up some scrap wood bookshelves with a not so subtle Read sign.
Opposite of the read are some simple cedar magnetic frames with poster pictures of the kids that I printed from Costco.
Well that’s about it. Thanks so much for stopping by. You can check out the tutorials for the whole playhouse build:
- Part 1 – Basement Playhouse Build – Framing
- Part 2 – Basement Playhouse Build – Shiplap & Sheetrock
- Part 3 – Basement Playhouse Build – Trimming all the things
- Part 4 – Basement Playhouse Build – Cedar Doors & Accents
- House Frame Doll Beds
If you’re interested in the Create, Read, Play and Welcome word art they can be downloaded below.
WOW!!! Just WOW!!! What an incredibly talented Mom you are!!!
My Mom would have thrown a quilt over a folding card table and called it good! Lol
Hey that works too! Thanks it was a really fun project.
Amy, this is so cool! All the finishes are so perfect. It was great to see you at Workbenchcon.
Thanks so much Vicki. It was great to see you too, such a fun conference.
This is fantastic. Such a beautiful space for the kids!
Thank you, they are loving it!
Absolutely A-A-Amazing!!! And even more unbelieavable in person. Nice Work Ame!!!
Thanks!!!
This is unbelievable!!! I can’t get enough
Thanks so much!
It’s possible that this is the most incredible thing I’ve ever seen! Your kids are SO lucky!! Just amazing!
Thank you Lindi! It was a really fun project…and hopefully they’ll use it for many years.
Amy, I have an addiction to all things tiny is this is phenomenal. All the details are perfect and you will even be the grandma of all time one day. Haha!
Thanks so much Larissa!
This is really amazing. You have mad skills. How long did it take to build?
Thank you. It took me about 6 weeks, working on it here and there.
I never have time any more to read blogs, or even do my own posts, but as soon as I saw your playhouse come across my IG feed I did a screen shot, sent it out in text to people, and headed directly over to read the posts from start to finish. It is fantastic, I will be dreaming about this, I’m totally inspired. I want to hear what your kids said and see some pics of them enjoying it. Again, TOTALLY love it!!!
Thanks so much! They are really loving it, and were there to do all the inspections along the way. 🙂 They made sure to have me add all the things during the build. Hoping for many hours of blissful, fight free playing!
Wow! Wow! WOW! That is amazing. Lucky little ones and very creative and talented mom!
Thank you, it was definitely a fun project!
This is amazing, great job!
Thank you!
This is one of the most incredible things I have ever seen! So much attention to detail! All the kids will want to play at your house ha ha! XO
Thank you! There have been a few more kids here lately 😉
speechless
🙂 Thank you!
Incredible! This is amazing!!! Can I ask how much this cost?? I didn’t read the step by step, if it was in there, as I won’t be building one! But holy socks Batman!!!! This is BEYOND FABULOUS!!!
Hi Summer,
Thank you! I haven’t added all of the Home Depot receipts up yet, but it is around $1,200.
BEAUTIFUL!!!!
BTW, how do you keep the children from hitting these edges of the window overhangs?
My kids would have poked their eyes out on the sharp edges because they run and play…splat. lol
Thank you! The youngest is short enough to be below the overhangings, the older ones are tall enough it’s not a problem. However my husband hit the upper one once…then he learned his lesson, whoops.
Shut the front door! This is beyond amazing!!!!
this is super classy… just loved each n everythng..hats off
Thanks so much!
So awesome!!! You did an amazing job, and I bet you kiddos have a ton of fun in their little house! Also, I LOVE all your Usborne Books you have in your book shelves. These truly are the BEST books for children!
By the way, I am an Usborne Independent Consultant and my boys very much enjoy our books ?
Thank you! Yes the Usborne books are great, one of my friend’s is a consultant and I have bought quite a few 🙂
I love that you thought ahead for how to make it still usable when your kids are taller!
Your playhouse is AMAZING!!! I just printed out pictures for my husband and his helper for our house we’re building so we can have a similar style on the exterior of our play space under the stairs. Thank you for your awesome tutorials and the step-by-step of your playhouse build. It looks like you were planning on having a Part 3 & Part 4. Are you still going to? Crossing my fingers in case I’m the one that needs to build the doors and accent pieces!
Hi Hillary,
Yes I’m still working on 3 and 4. Hopefully I’ll get those posted soon. I’m excited to see what you do with the playhouse!
This is so incredible! You did such an amazing job. I was wondering if you’re going to be posting plans for the bunk bed doll house? My little girl wants one for Easter, and I’m wondering if I should try and figure out the measurements on my own or not 🙂
Yes, I’ll be posting it really soon.
Here’s the plans https://www.hertoolbelt.com/house-frame-doll-bunk-bed-plans/
Happy Building
Thank you so much! My 3 year old will love it so much!
Love!!!! I need a basement. Do you have plans for the picture holders? I cannot tell you how inspiring this is to my creativity. Thank you.
Incredible!!!!!!!!
Woman I am in LOVE with you! Wow what an awesome mom and talent you are! With all the sniping on social media it was pleasant to have your project pop up. I WISH I had thought to do this for my grand daughters when they lived with us!
Thank you Barbara! Your grand-daughters would have loved it, I’m sure!
This is such an amazing project. Very inspirational! I plan to design something like this for my kids as well!! Are you still planning to post about the cedar door construction? I would be very interested in that information!
Hello,
Did you ever post the final two steps of construction?
I am very interested in replicating this!!
I can’t get over how AMAZING this is! You’re very talented! Kinda puts the “dream house” under our stairs to shame 😂 Well done!
This is amazing! My kids would love this, but they’re all wayyy too old. My 5 year old is tall for his age too, but this is a great playhouse, your kids are living it up!