• Home
  • Project Gallery
  • About me
    • Disclosure
    • Disclaimer
  • Blog

Her Tool Belt

DIY furniture plans, crafts, and home improvement tutorials to empower you!

  • Free Woodworking Plans
    • Bathroom Furniture
    • Bedroom Furniture
    • Entry
    • Family Room Furniture
    • Garage
    • Kitchen furniture
    • Laundry Room
    • Mudroom Furniture
    • Organization
    • Outdoor Furniture
  • Home Decor
    • Upcycle
  • Crafts
    • Holiday
  • Home Improvement
    • Cleaning
    • Fix IT
    • Paint
    • Tile
  • Tool Reviews
  • Tool Time Videos

11th Day of Christmas – wood sled ornament

December 11, 2013 by Amy 1 Comment

On the 11th Day of Christmas Hertoolbelt sent to you a wooden sled, another owl ornament, chunky Candy Cane, 3D Snowflake, Rudolph the White Stag Reindeer, People nativity scene, st-a-ck-ed snowman, peppermint candy, 3-tier felt tree, sweater owl, and mini-mittens on a little wooden tree.

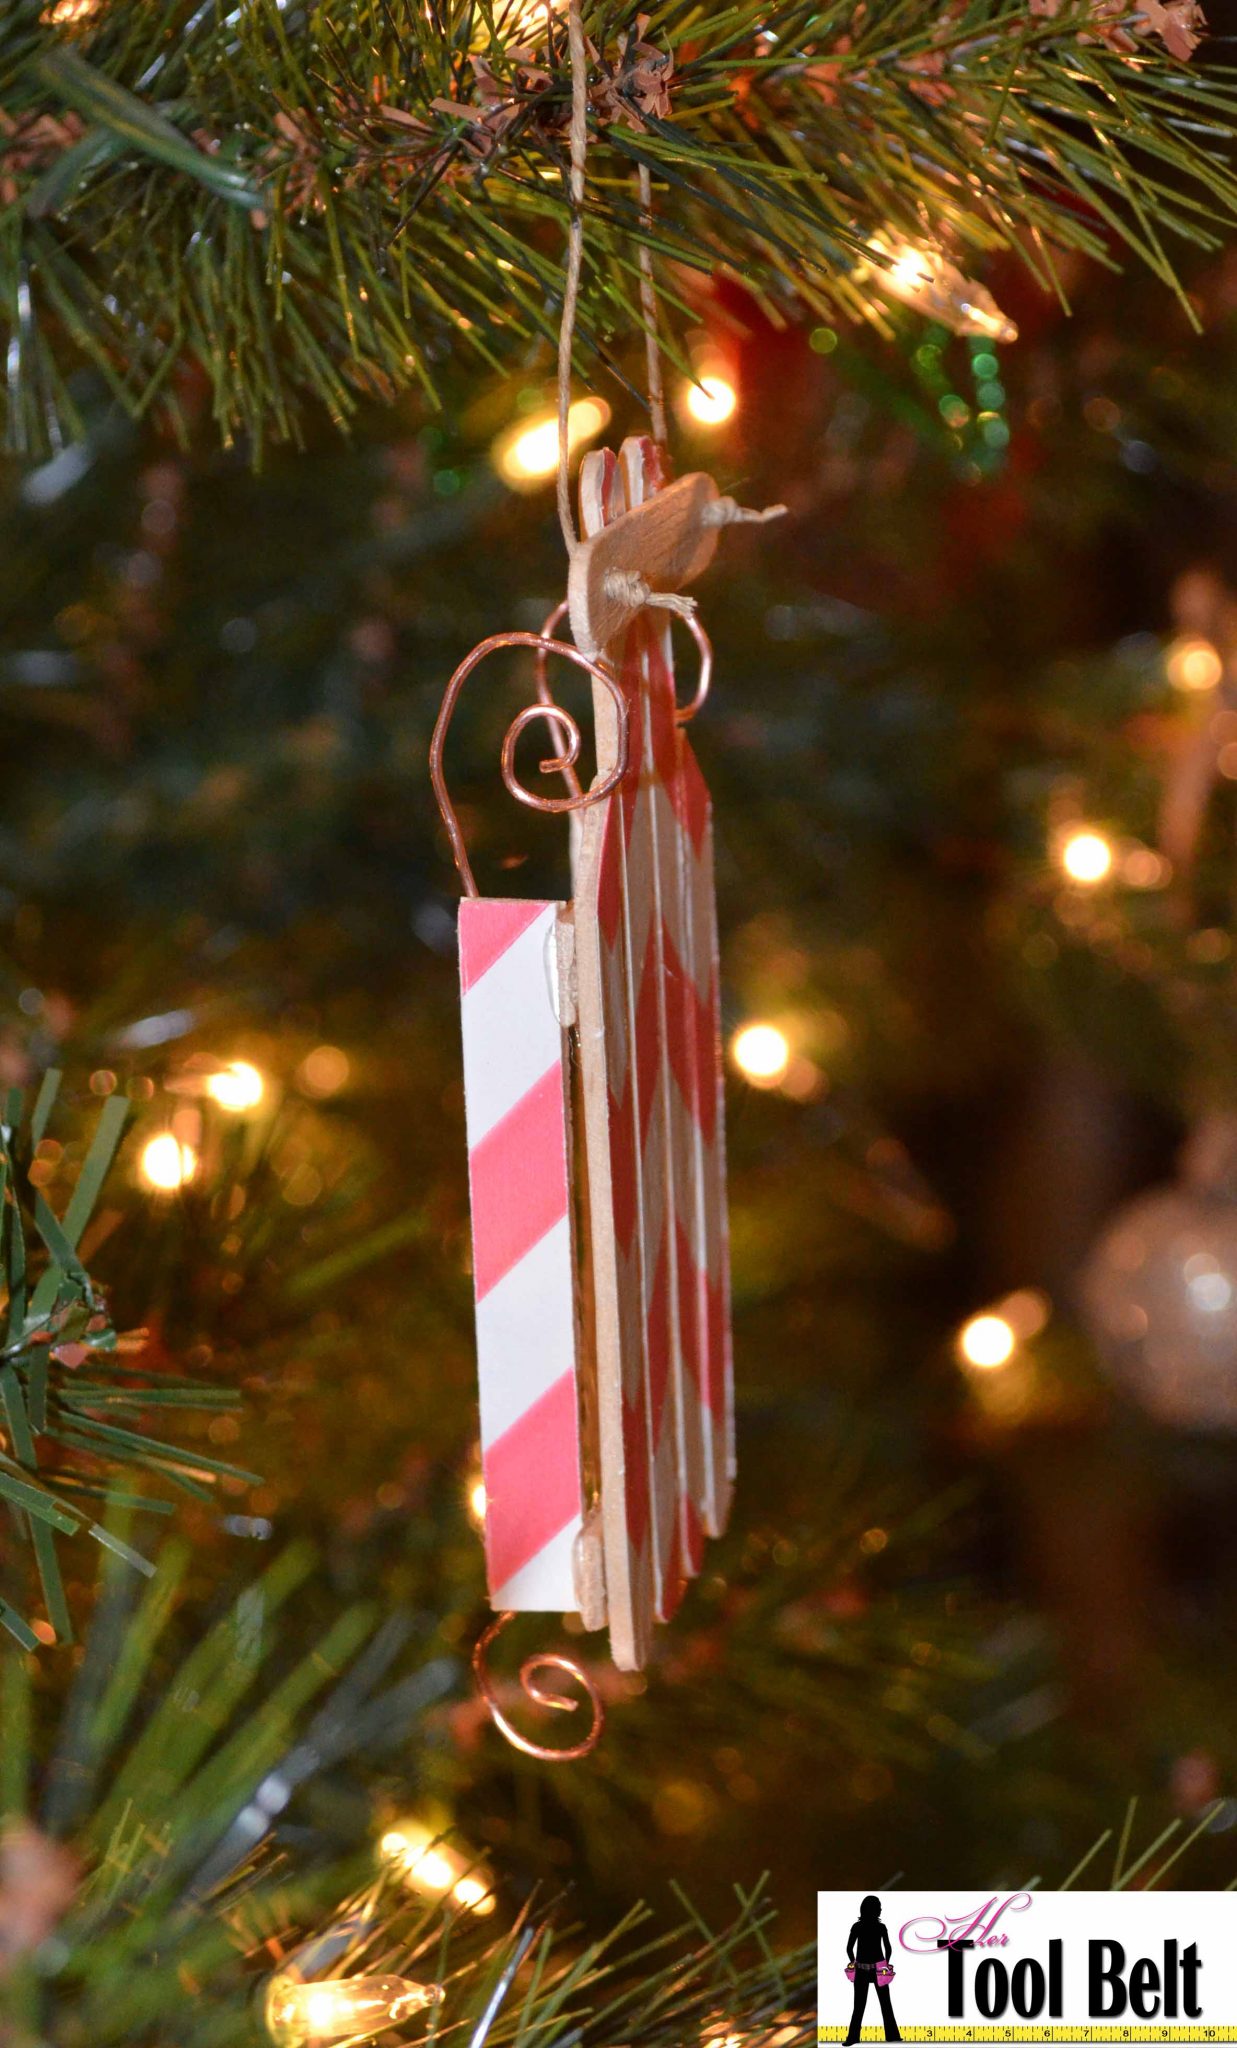
This DIY sled ornament is fun to do with kids.  I remember doing something similar in elementary school.  Of course you’ll probably want to run the hot glue gun, but the kids will have a blast decorating and making it their own.  For this sled, I have some fun chevron wrapping paper that I mod podged onto the popsicle sticks.  That was a fun and EASY way to add a little something to this ornament.chevron popsicle wood sled ornament

Start with 8 popsicle sticks.  If you want to mod podge paper onto the sticks, use 6 of your sticks.  Brush the mod podge onto the paper, and onto the popsicle stick and press firmly into place.  Let the mod podge dry sufficiently.  Break and cut the sticks from each other, and trim any extra paper.mod podge paper onto sticks

Leave your center 2 popsicle sticks at full length.  Cut the 2 popsicle sticks that surround your middle sticks to about 3 1/4″ and tapper off on an angle.  Cut the 2 remaining mod podged sticks to about 2 3/4″. From the plain popsicle sticks, cut 2 pieces that are 1 3/4″ each and 1 piece that is 2″.  Round the edges on the 2″ piece.

glue braces

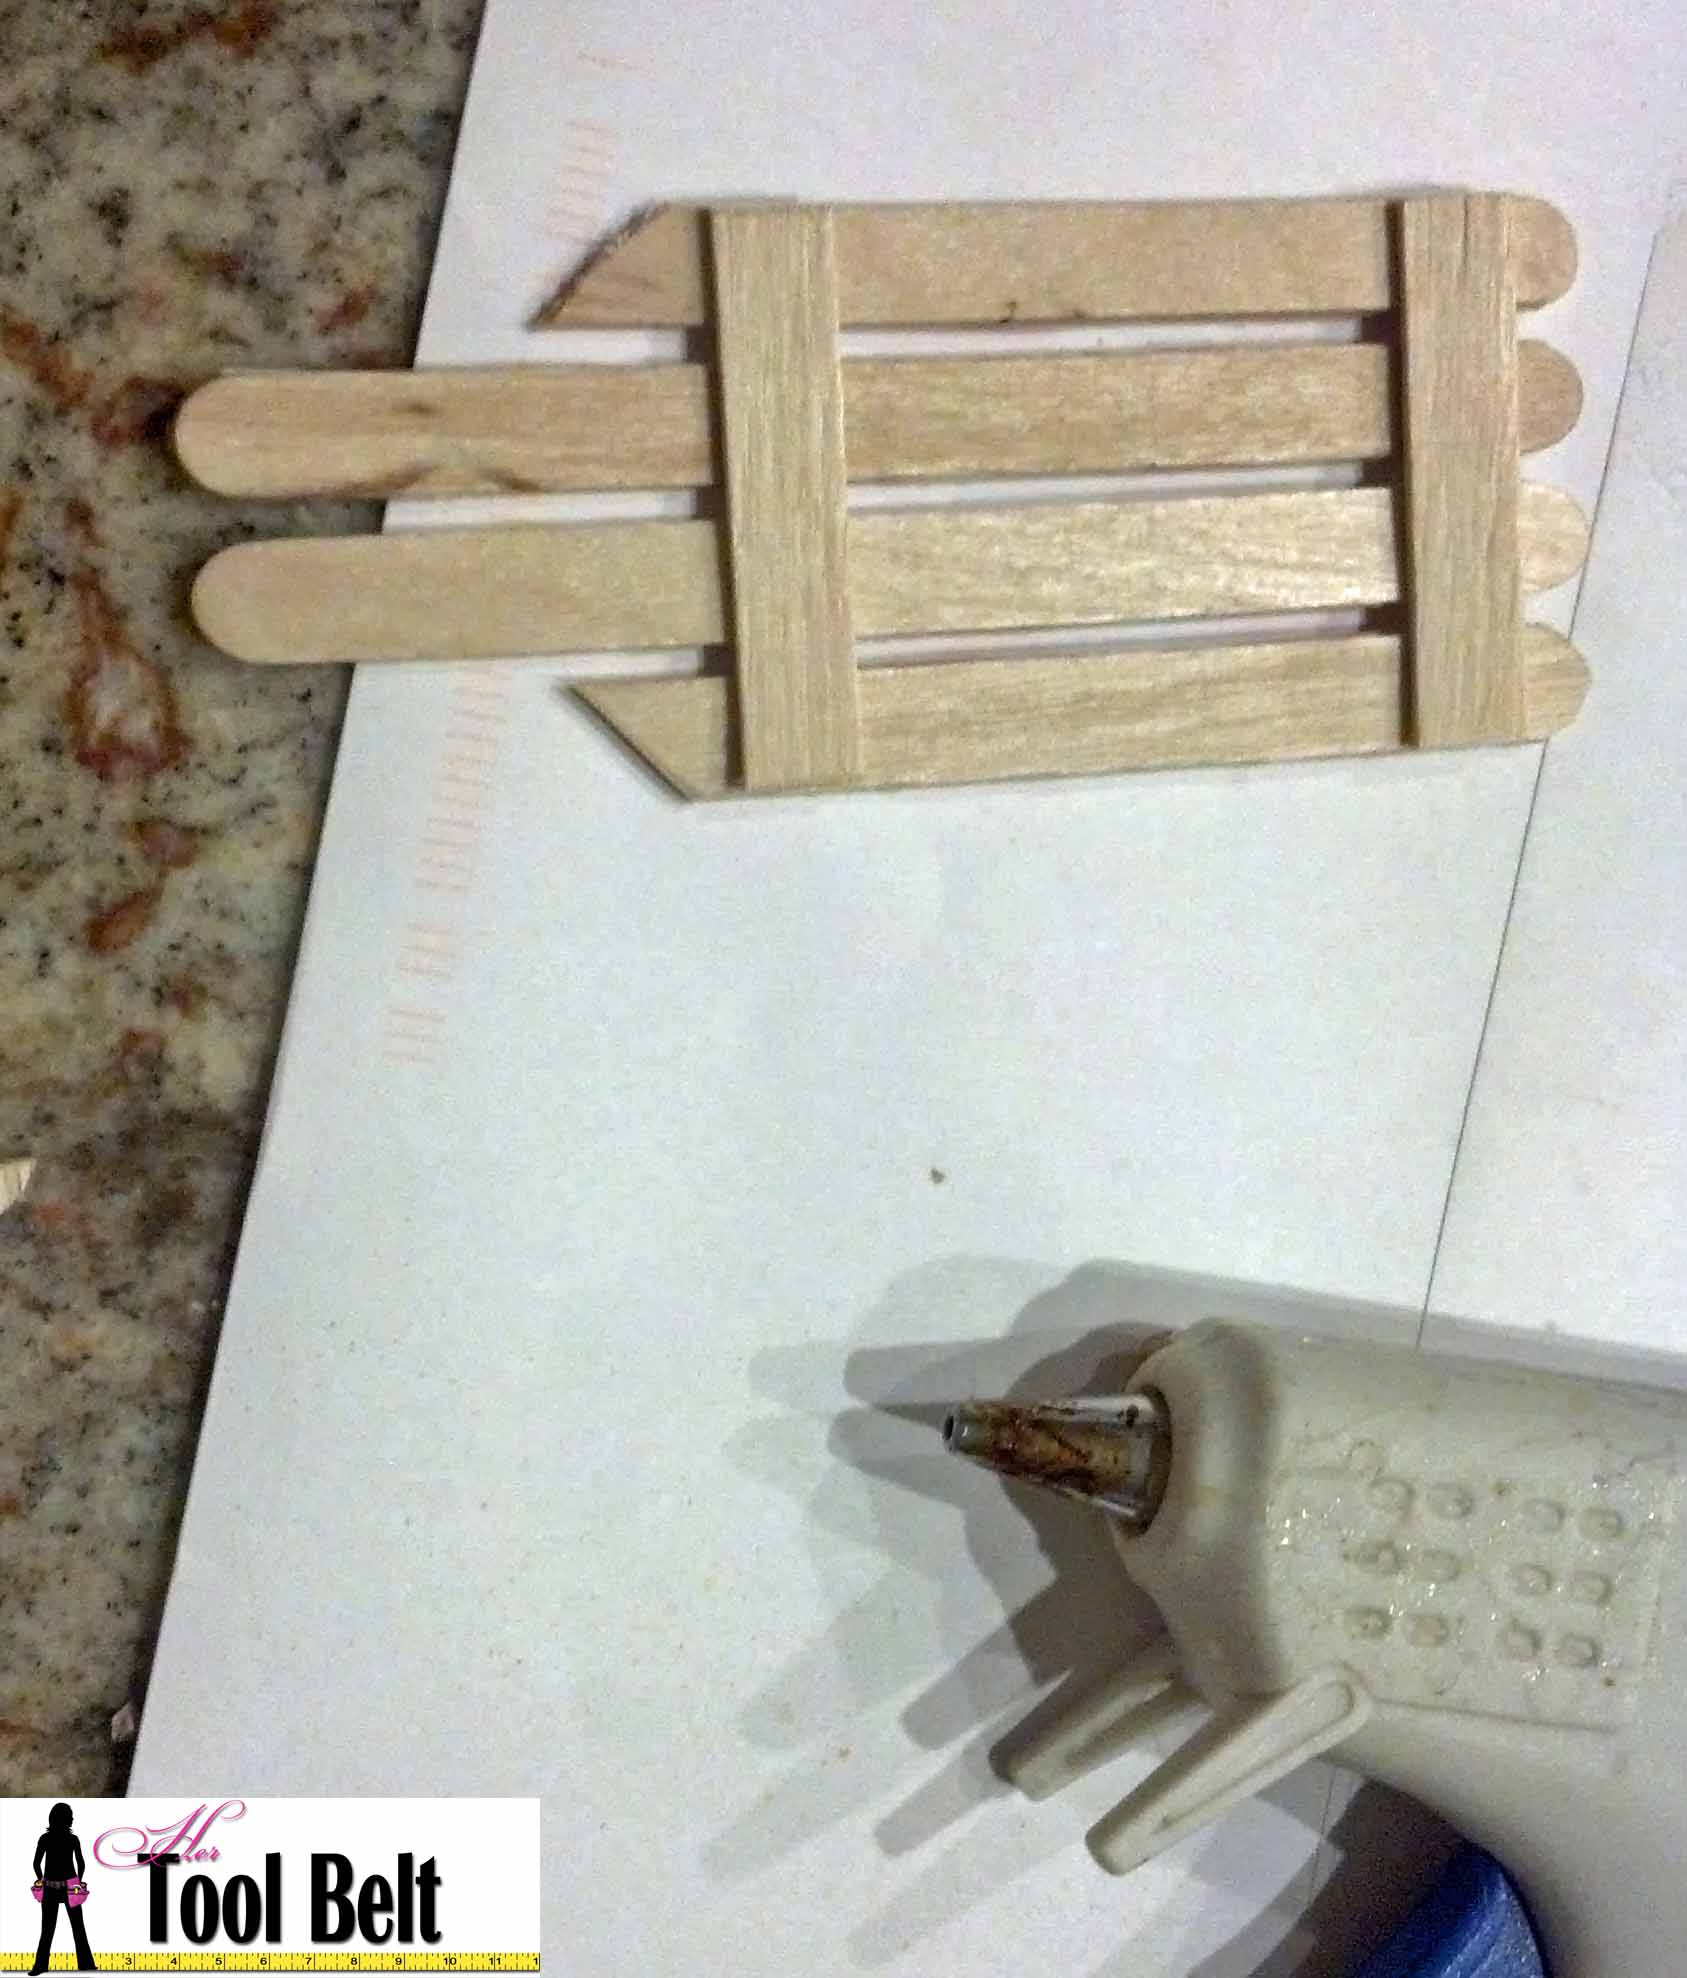
Next glue it up.  Start by turning the mod podged piece over and space the pieces evenly, glue them in place with the 2 (1 3/4″) support pieces, one near the bottom and the other near where the angle starts on the outer pieces.  Glue the 3 1/4″ pieces into place, they stand vertical like the runners would on a sled.  Turn the sled over and near the top of the full length pieces, glue the 2″ handle piece into place.  Drill 2 little holes for the rope handle.

If you have some extra wire on hand,  I thought it would be fun to add some little wire runners.  Obviously mine doesn’t represent the true wood runner sled, but it adds a little character.  Use the vertical runners as support and glue your wire runners into place, however you’d like.  Next cut a 5″-6″ piece of string.  Thread it through the holes in the handle and tie a knot large enough that the string will stay.  Add more decorations to the sled if you’d like and enjoy your handmade Christmas tree ornament.

popsicle wood sled ornament

Merry Christmas!

Check out the 12th Day of Christmas

rolled paper christmas tree ornament1

Related

Filed Under: Crafts, Holiday Tagged With: chevron, Christmas, christmas tree, decoupage, DIY, handmade christmas, homemade Christmas, mod podge, ornament, popsicle sled, wood sled

Attention: Any do-it-yourself project involves risk of some sort. Your tools, materials, and skills will vary, as will the conditions at your work site. Hertoolbelt LLC will not assume any responsibility or liability for damages or losses sustained or incurred in the course of your project or in the use of the item you create. Always follow the manufacturer's operating instructions in the use of tools, check and follow your local building codes, and observe all commonly accepted safety precautions.

Comments

  1. Kim says

    December 14, 2013 at 11:10 pm

    Love these! I remember my mom making something similar when we were little. I still have it. How did you have time to cut all our wood & get this done? 🙂

    Reply

Leave a Reply Cancel reply

Your email address will not be published. Required fields are marked *

This site uses Akismet to reduce spam. Learn how your comment data is processed.

Search Her Tool Belt

Follow Me!

  • Bloglovin
  • Email
  • Facebook
  • Instagram
  • Pinterest
  • RSS
  • Twitter
  • YouTube

Top Posts & Pages

Left Offset Bathroom Vanity

Check out more projects

Copyright

Thank you for wanting to share my work! No need for my permission to pin my work or to feature 1 or 2 pictures with full watermarks intact that link back to the original project. Please do NOT copy tutorials.

Disclosure & Privacy Policy

Disclaimer

Copyright © 2025 · Magazine Pro Theme on Genesis Framework · WordPress · Log in

This website uses cookies to improve your experience. We'll assume you're ok with this, but you can opt-out if you wish.Accept Read More
Privacy & Cookies Policy

Privacy Overview

This website uses cookies to improve your experience while you navigate through the website. Out of these, the cookies that are categorized as necessary are stored on your browser as they are essential for the working of basic functionalities of the website. We also use third-party cookies that help us analyze and understand how you use this website. These cookies will be stored in your browser only with your consent. You also have the option to opt-out of these cookies. But opting out of some of these cookies may affect your browsing experience.
Necessary
Always Enabled
Necessary cookies are absolutely essential for the website to function properly. This category only includes cookies that ensures basic functionalities and security features of the website. These cookies do not store any personal information.
Non-necessary
Any cookies that may not be particularly necessary for the website to function and is used specifically to collect user personal data via analytics, ads, other embedded contents are termed as non-necessary cookies. It is mandatory to procure user consent prior to running these cookies on your website.
SAVE & ACCEPT