• Home
  • Project Gallery
  • About me
    • Disclosure
    • Disclaimer
  • Blog

Her Tool Belt

DIY furniture plans, crafts, and home improvement tutorials to empower you!

  • Free Woodworking Plans
    • Bathroom Furniture
    • Bedroom Furniture
    • Entry
    • Family Room Furniture
    • Garage
    • Kitchen furniture
    • Laundry Room
    • Mudroom Furniture
    • Organization
    • Outdoor Furniture
  • Home Decor
    • Upcycle
  • Crafts
    • Holiday
  • Home Improvement
    • Cleaning
    • Fix IT
    • Paint
    • Tile
  • Tool Reviews
  • Tool Time Videos

A-frame Chalkboard Easel – small

October 8, 2015 by Amy 5 Comments

Earlier this summer I built a chalkboard easel to go with my lemonade stand for a summer social party.  The chalkboard easel ended up a little bit larger than I had anticipated (42″ tall), although perfect for the party.  Does that ever happen to you?  A project turns out bigger/smaller than you thought it would?

DIY chalkboard easel lemonade bar
Large chalkboard easel plans on Remodelaholic

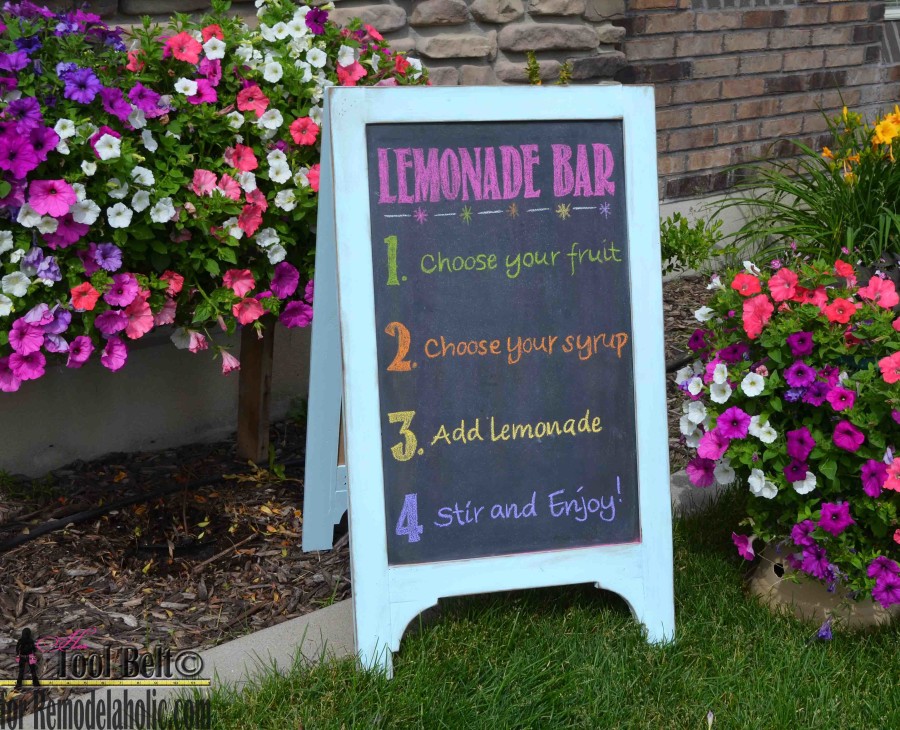
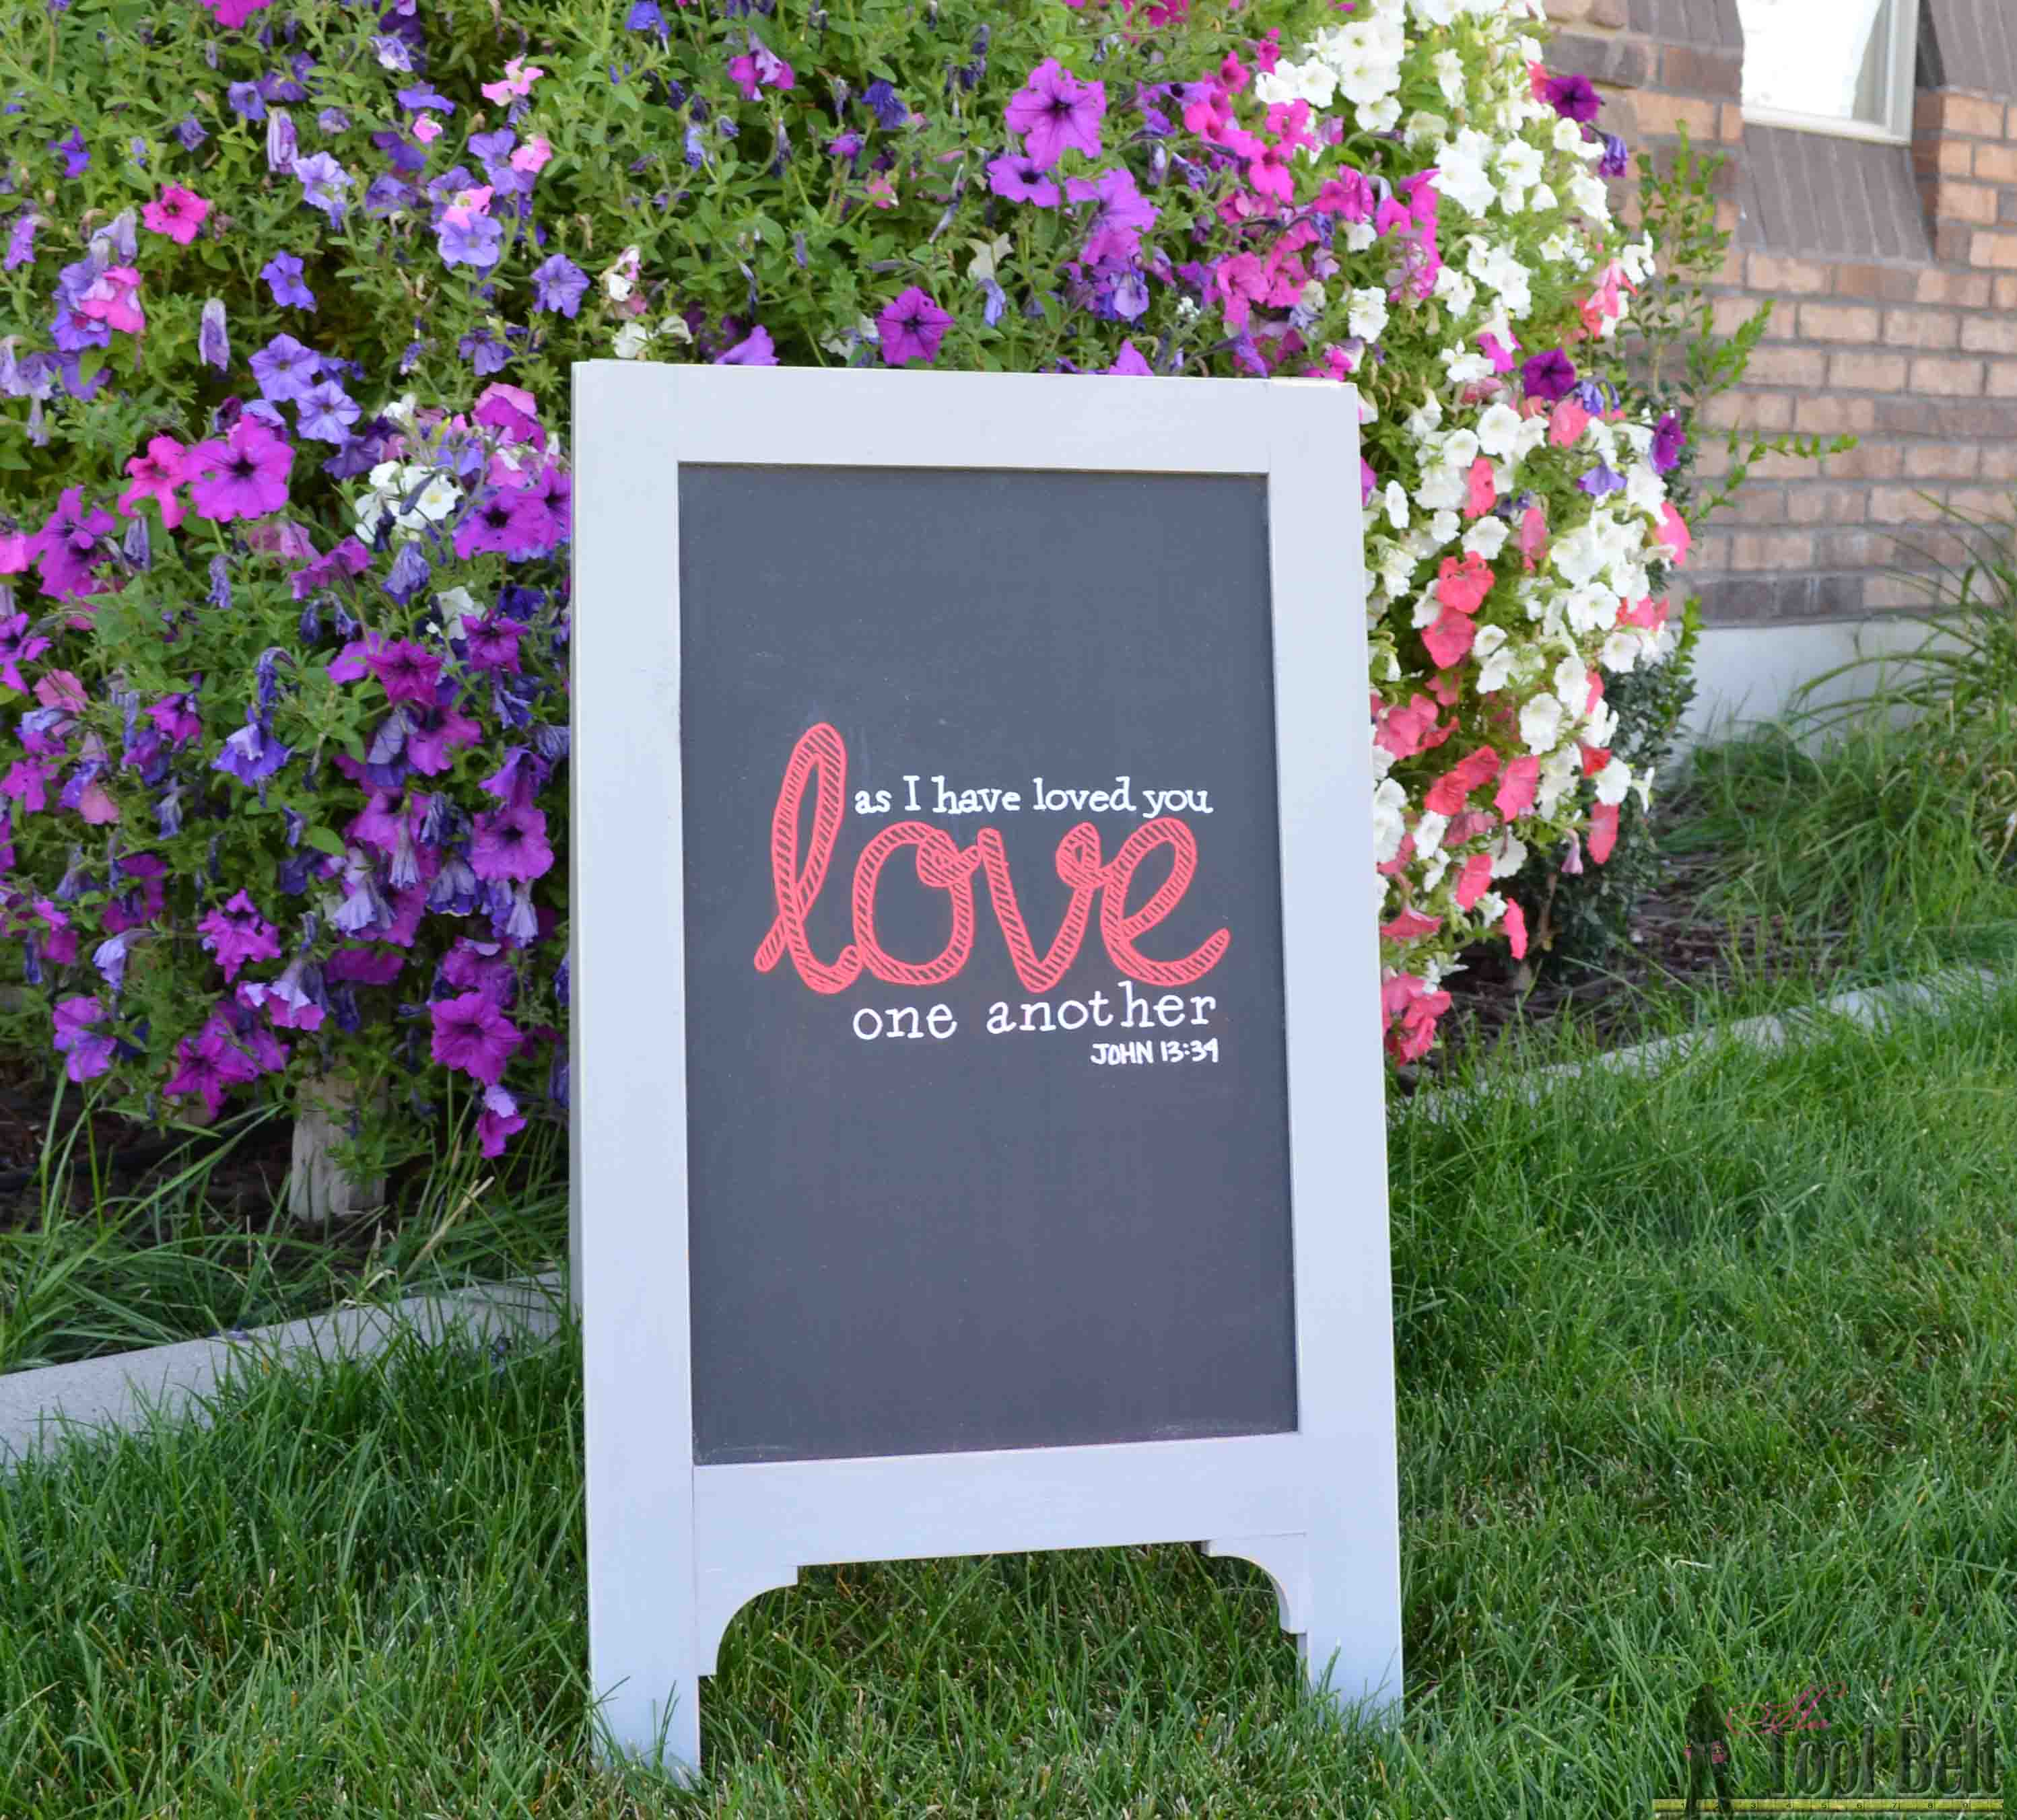
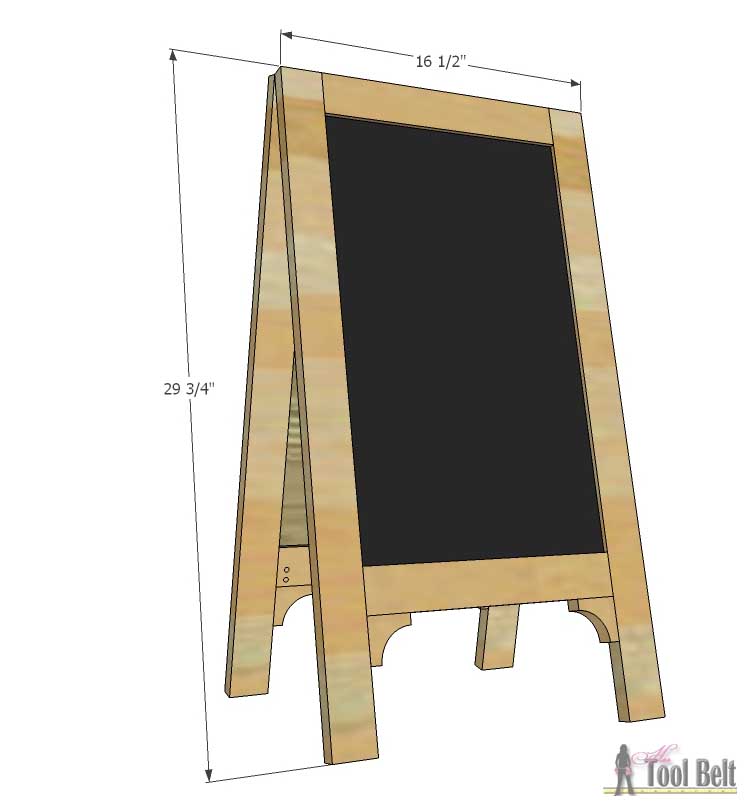
I decided to build another chalkboard easel, this time smaller to occasionally go on the front porch for holidays and such.  This smaller A-frame chalkboard easel is 29 3/4″ tall.

Chalkboard easels are so handy to have around for parties, holidays, weddings and for your budding little artist (kids). Free plans for a DIY A-Frame Chalkboard Easel.

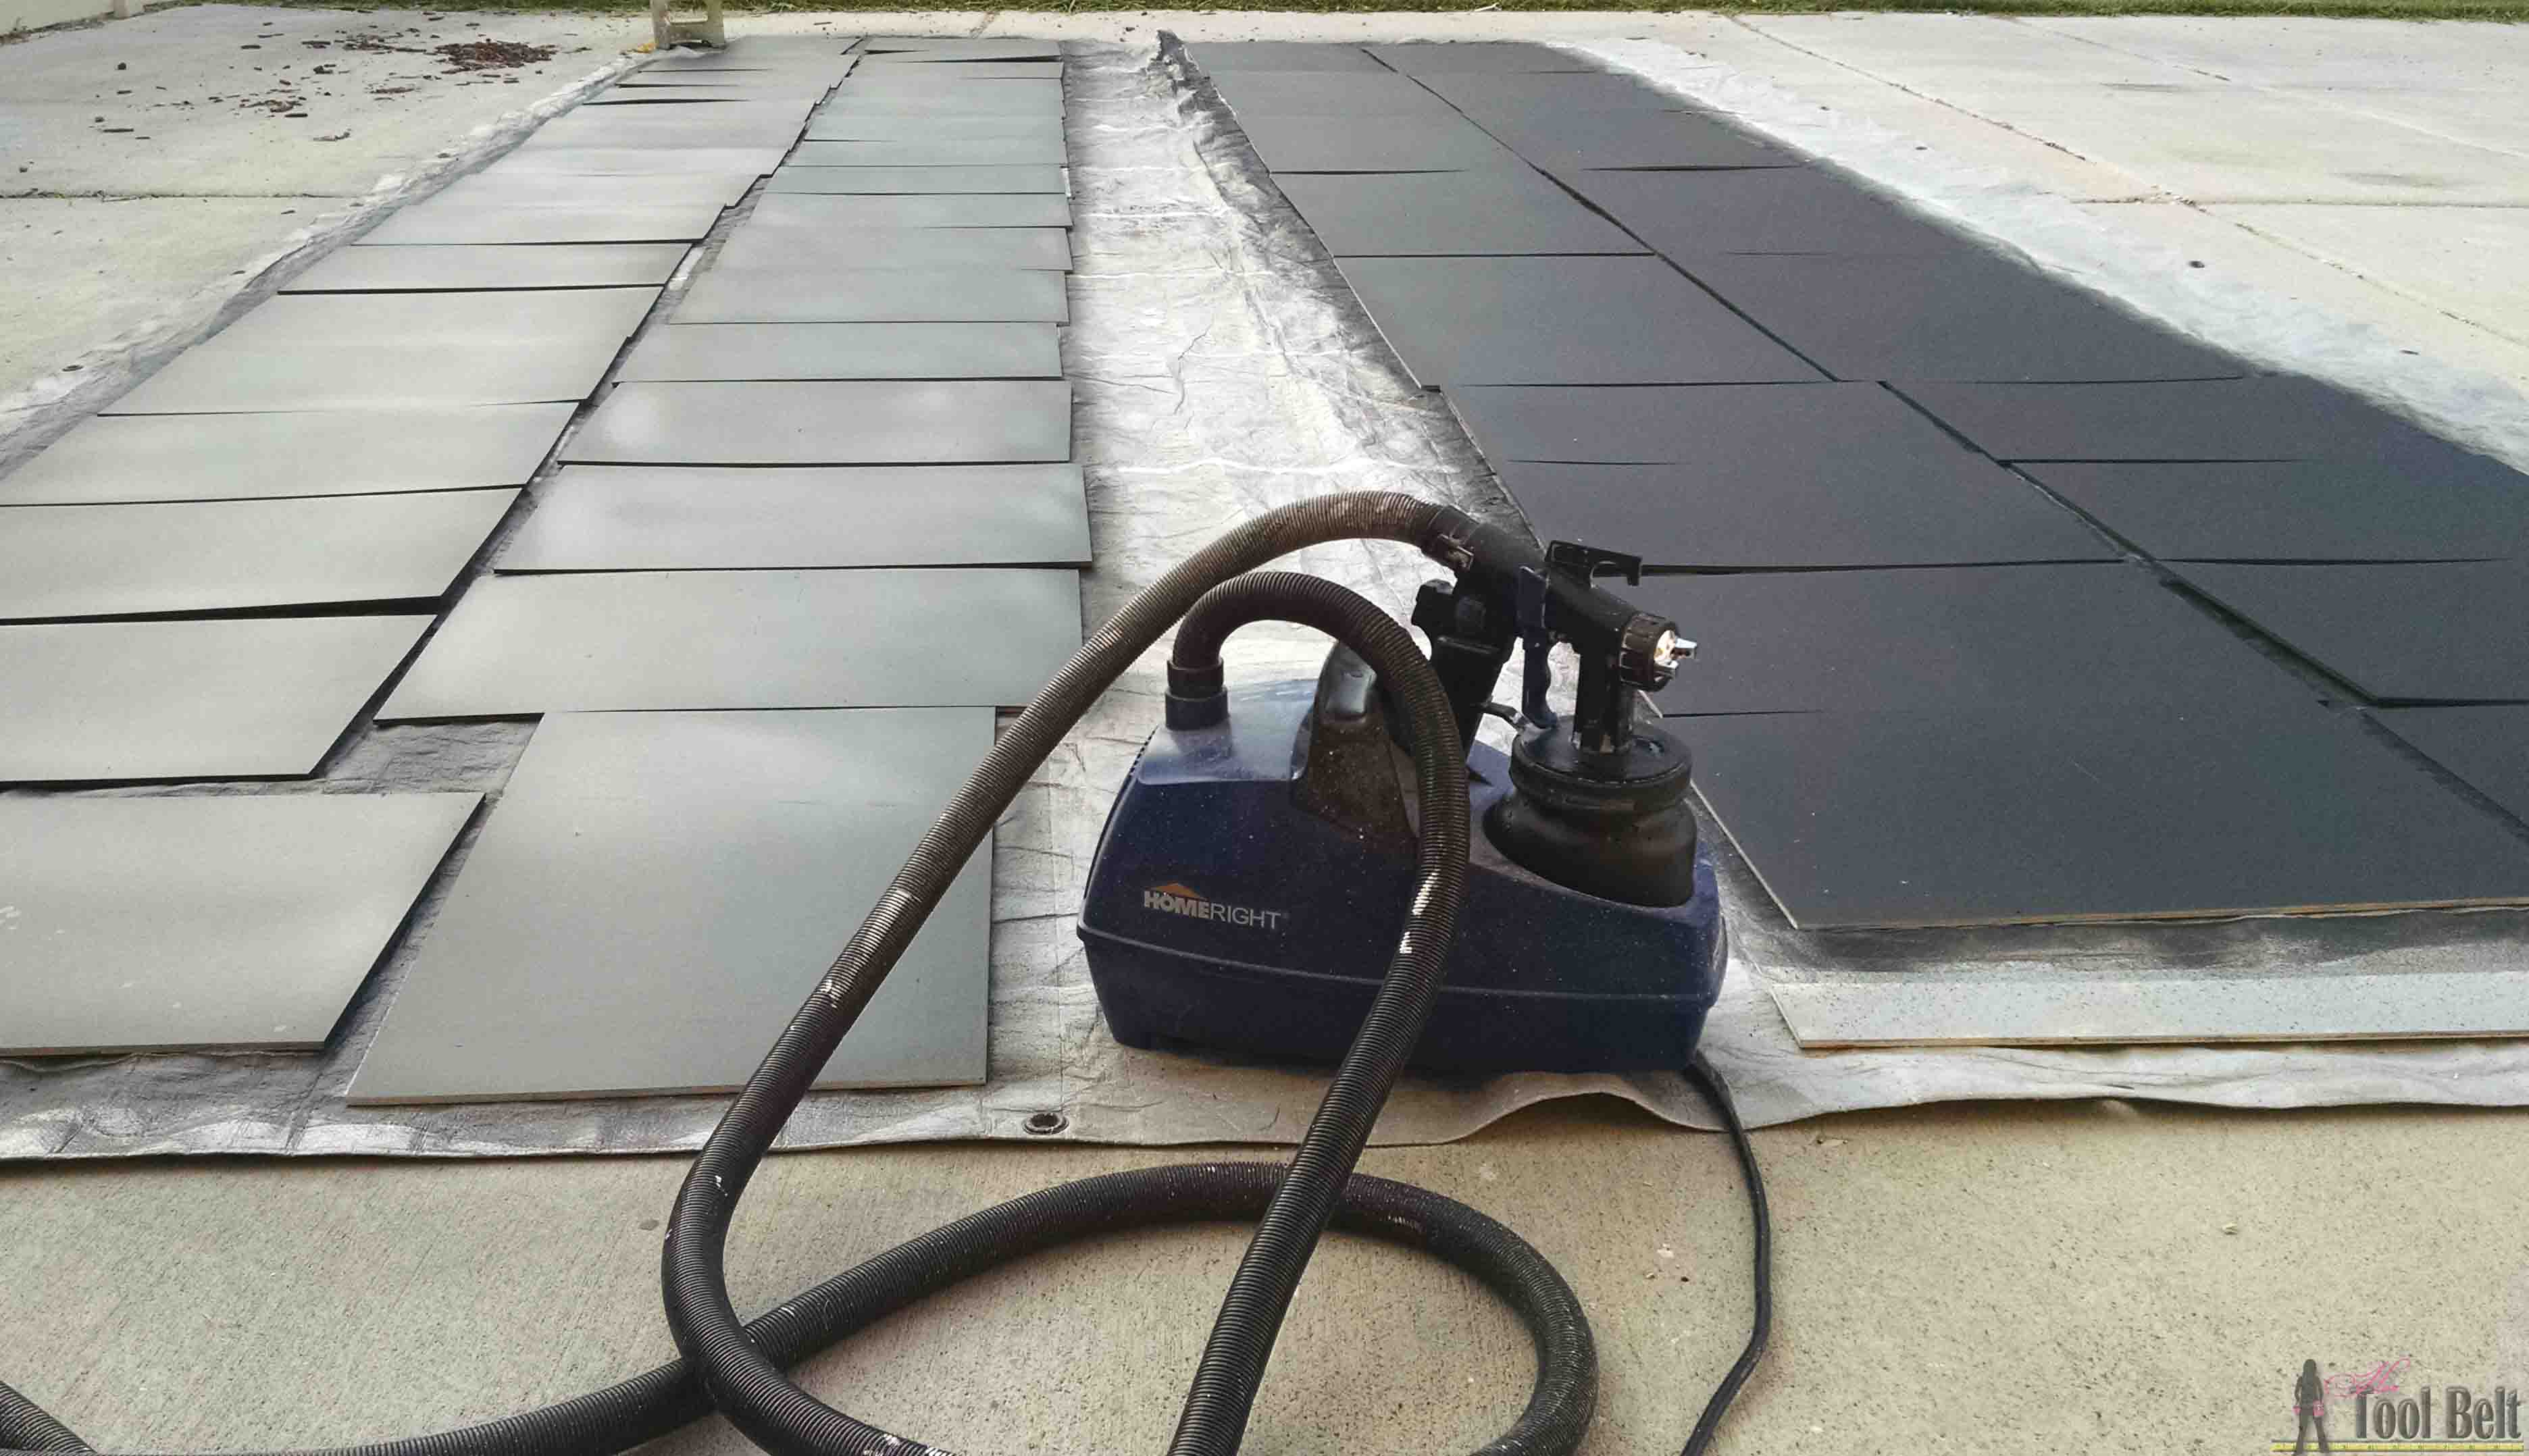
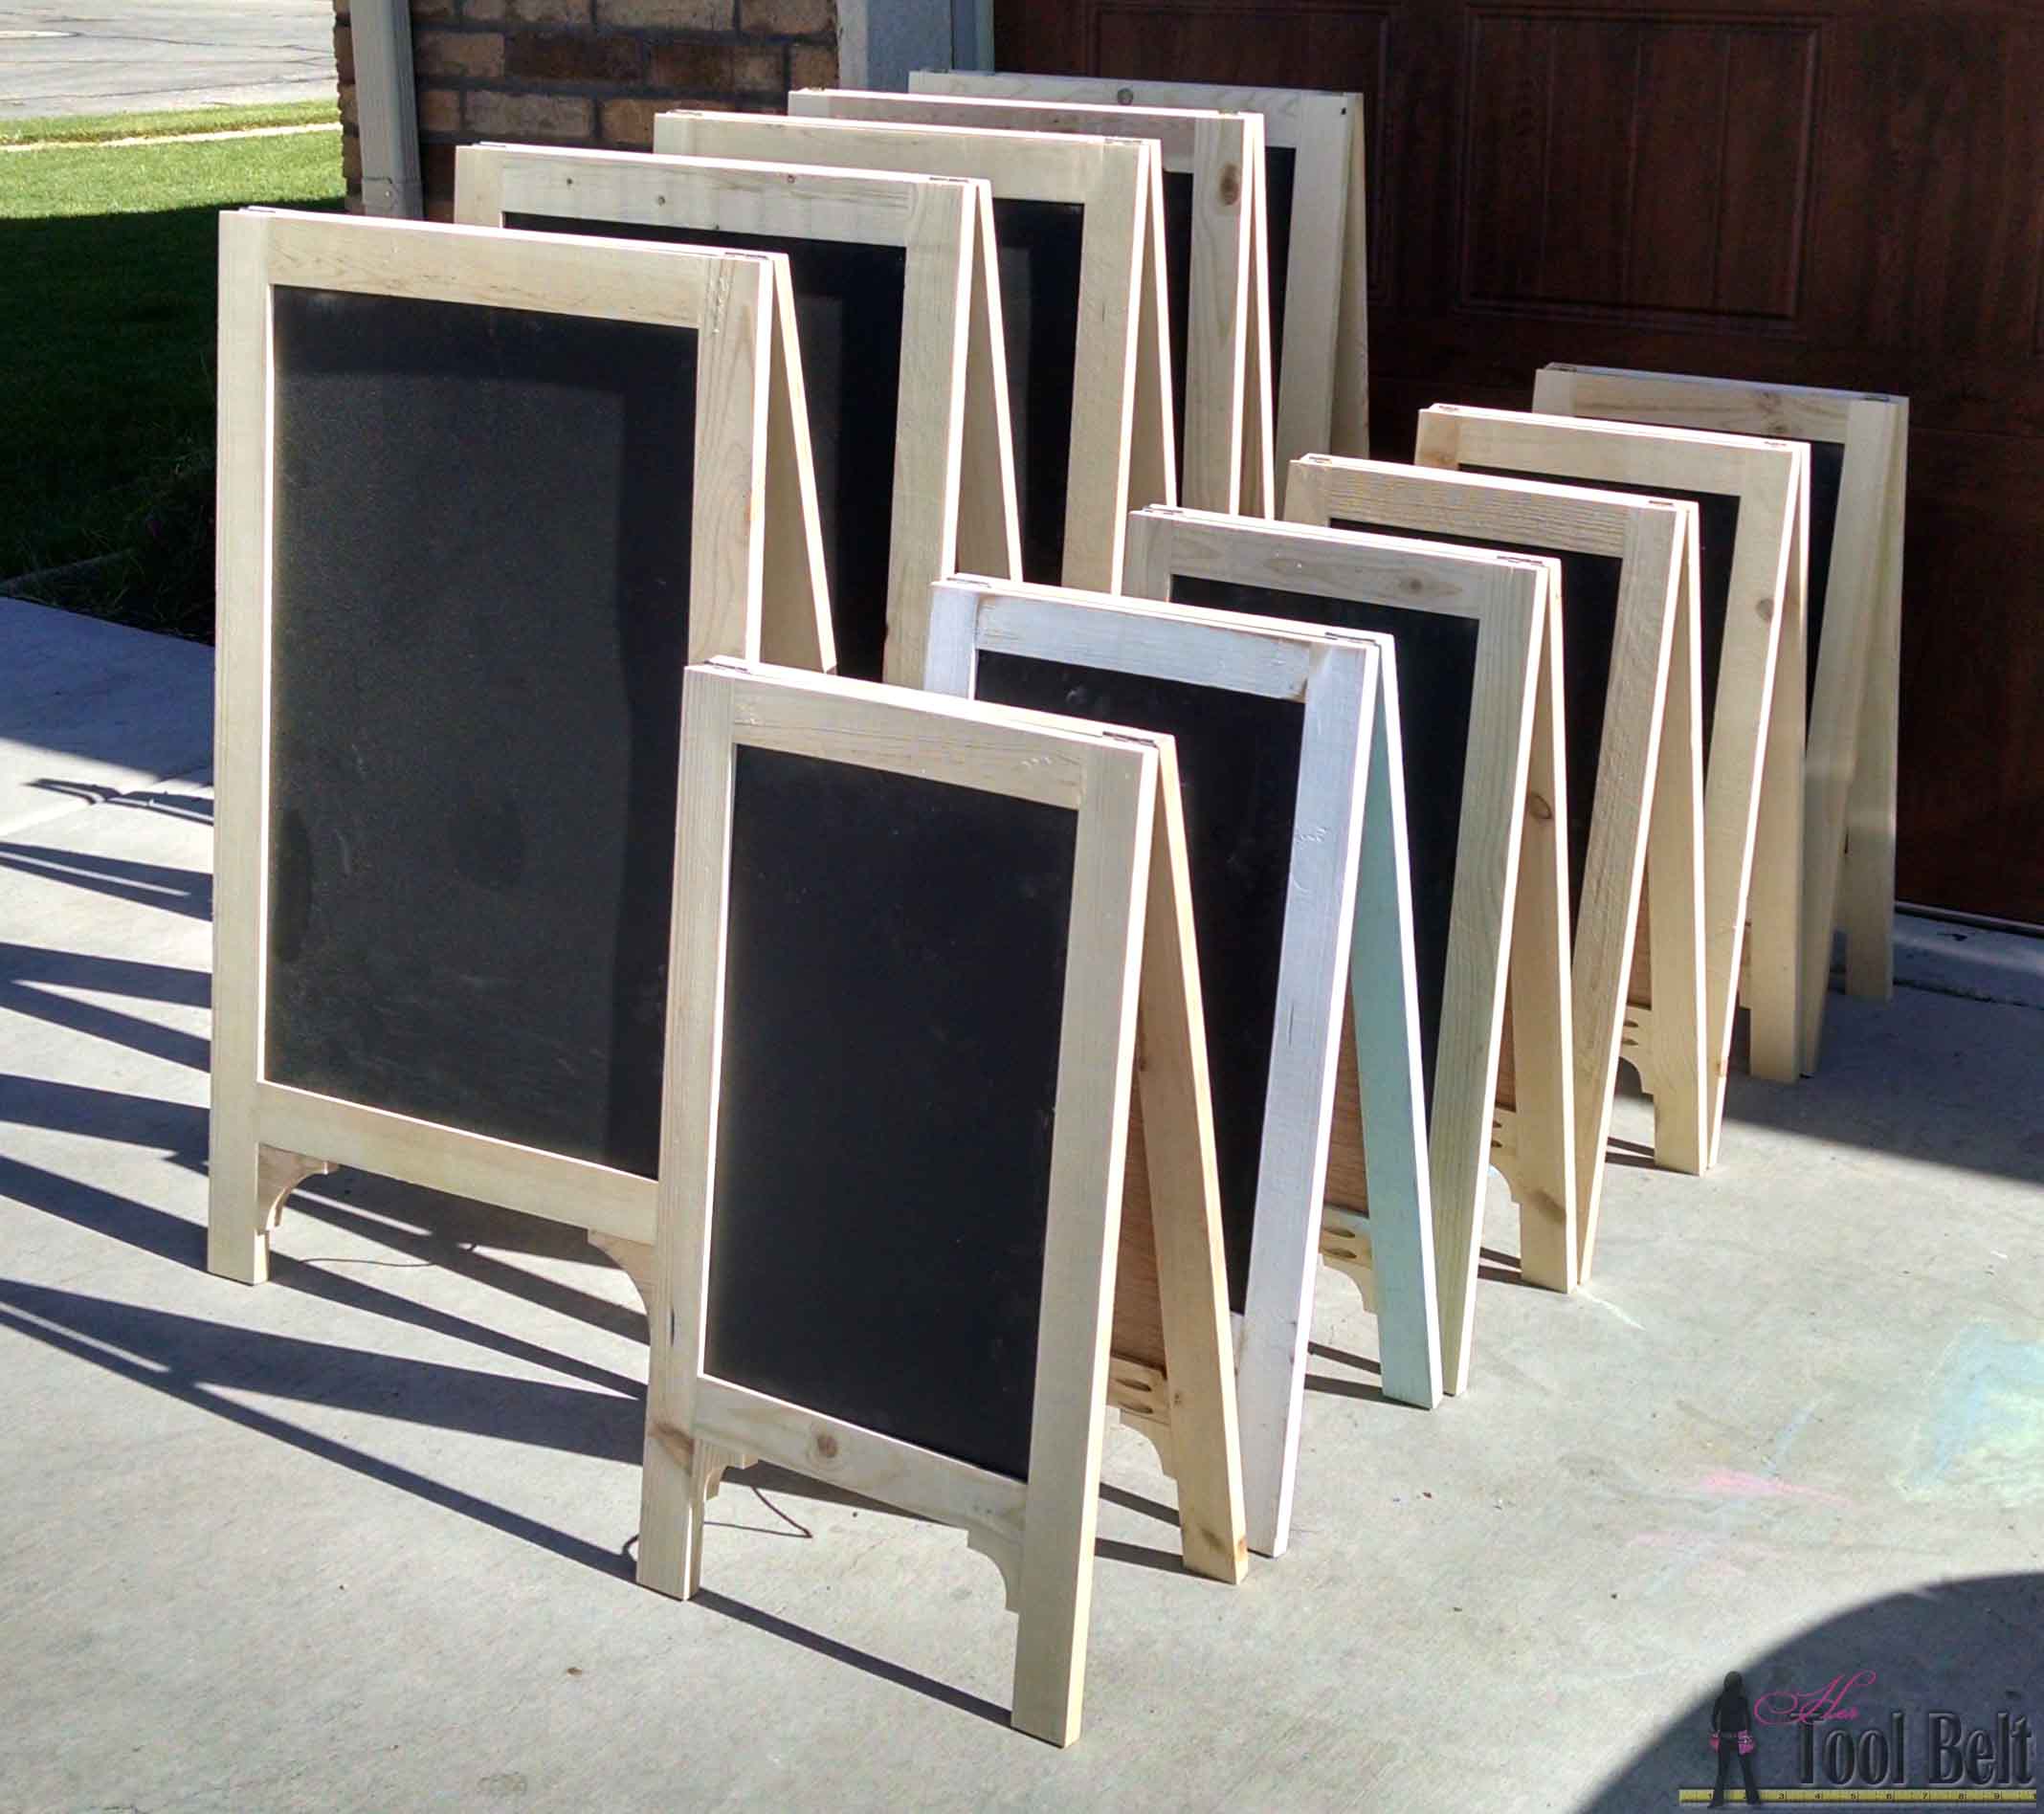
Each year we have an activity with the ladies in the neighborhood and I was in charge this year.  We made these chalkboard easels, it was fun and a lot of work. 🙂  So I did all of the cuts in major bulk, we made 41 chalkboard easels in all.

This post contains affiliate links noted by *.

How to Build an A-frame Chalkboard Easel

Chalkboard easels are so handy to have around for parties, holidays, weddings and for your budding little artist (kids). Free plans for a DIY A-Frame Chalkboard Easel.

Materials

  • 2 – 1″ x 3″ x 8′ boards (actual 3/4″ x 2 1/4″)
  • 1/2 sheet 5mm underlayment plywood (sheathing),  2′ x 4′ 1/4″ mdf, or already painted chalkboard sheet.
  • 1 1/4″ pocket hole screws*
  • wood glue
  • paint primer
  • chalkboard paint*
  • paint, I used Amy Howard Home Atelier
  • 2 – 1″ butt hinges or larger
  • 13″ string and 2 staples
  • 1 1/4″ brad nails
  • sandpaper

Cut List

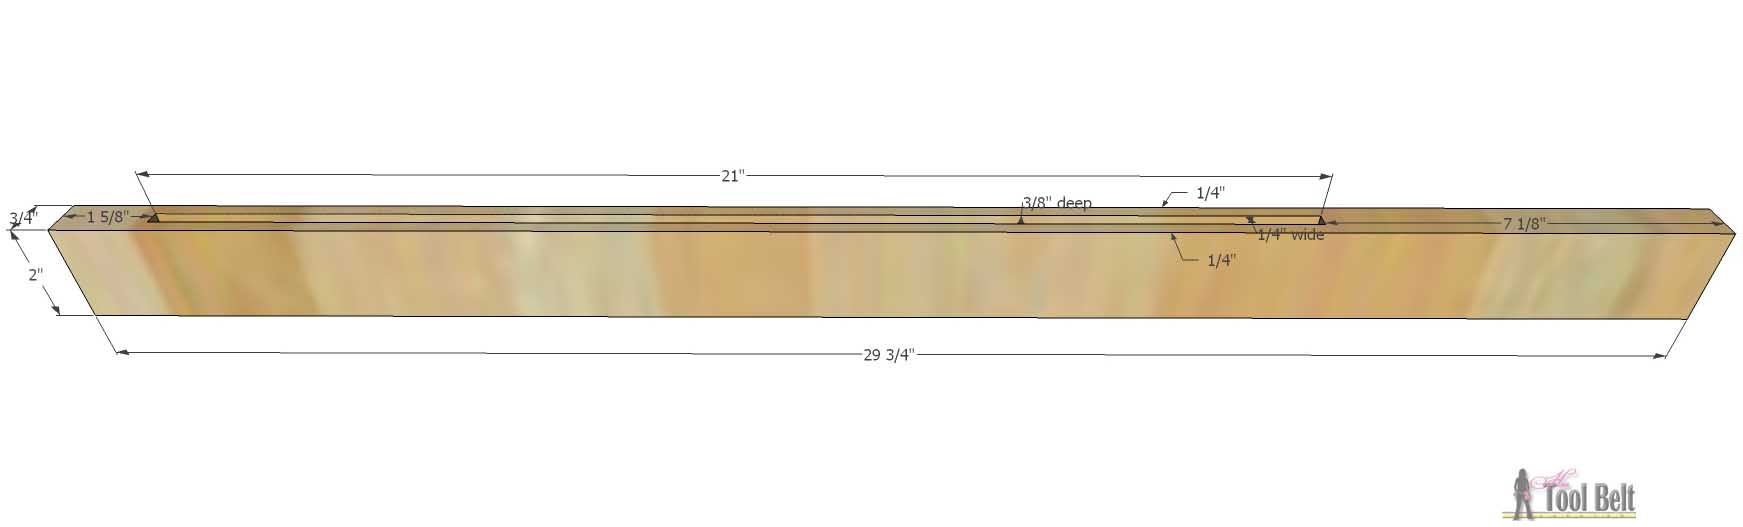
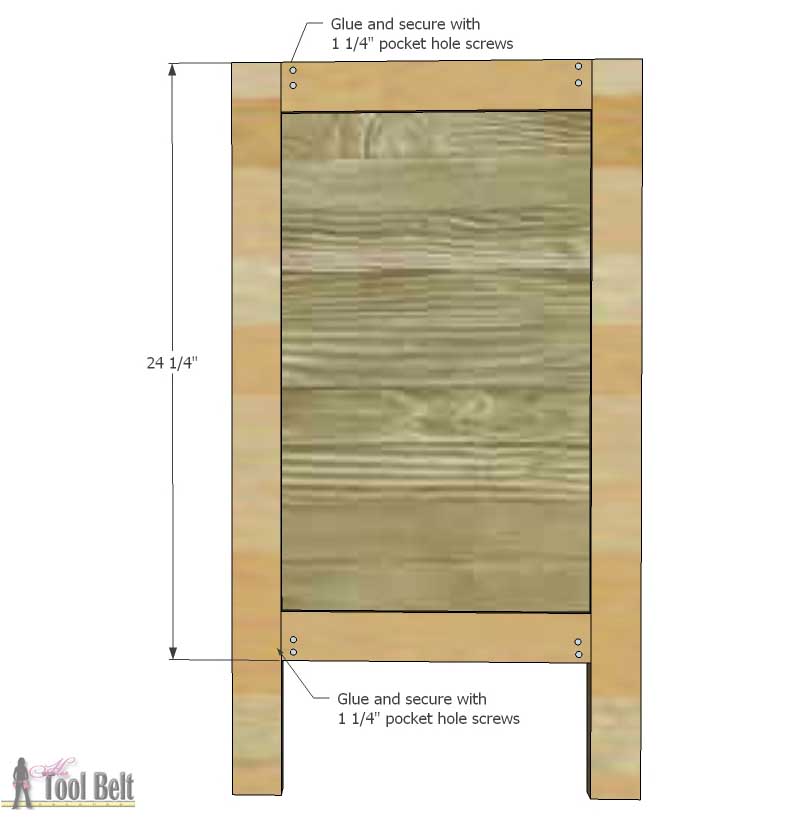
  • 4 – 3/4″ x 2″ x 29 3/4″ (from the 1×3) legs
  • 4 – 3/4″ x 2″ x 12 1/2″ (from the 1×3) rails
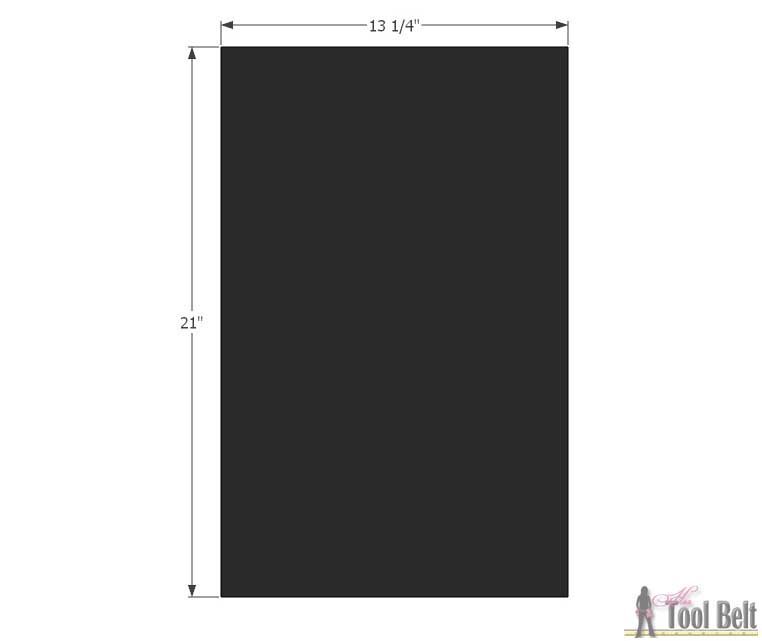
  • 2 – 3/16″ x 13 1/4″ x 21″ chalkboard
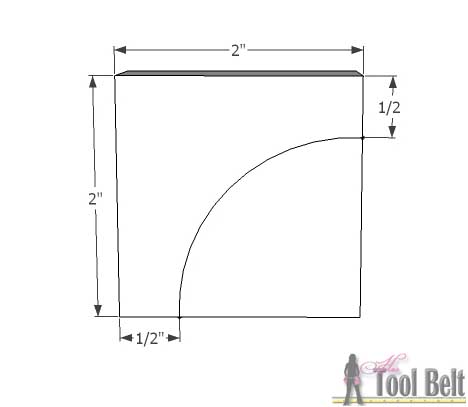
  • 4 – 3/4″ x 2″ x 2″ from (1×3) corbels

Step 1

Cut out the chalkboard plywood/mdf, 13 1/4″ x 21″.  Sand the good face of the plywood as necessary.  Apply paint primer to the plywood.  Follow the instructions on the chalkboard paint can to apply the chalkboard paint.

Chalkboard easels are so handy to have around for parties, holidays, weddings and for your budding little artist (kids). Free plans for a DIY A-Frame Chalkboard Easel.

Since I was making a bunch of these, it was so handy to use a paint sprayer.  This Home Right Finish Max Pro* worked great on both the primer and chalkboard paint, a real time saver.  FYI: The chalkboard paint is supposed to cure for 3 days before use.

Chalkboard easels are so handy to have around for parties, holidays, weddings and for your budding little artist (kids). Free plans for a DIY A-Frame Chalkboard Easel.

Step 2

When using the cheap 1×3’s I like to trim the edges on the table saw and hopefully end up with straight edges.  Trim the 1×3’s to 2″ wide.  Cut 4 legs at 29 3/4″ and 4 rails at 12 1/2″.

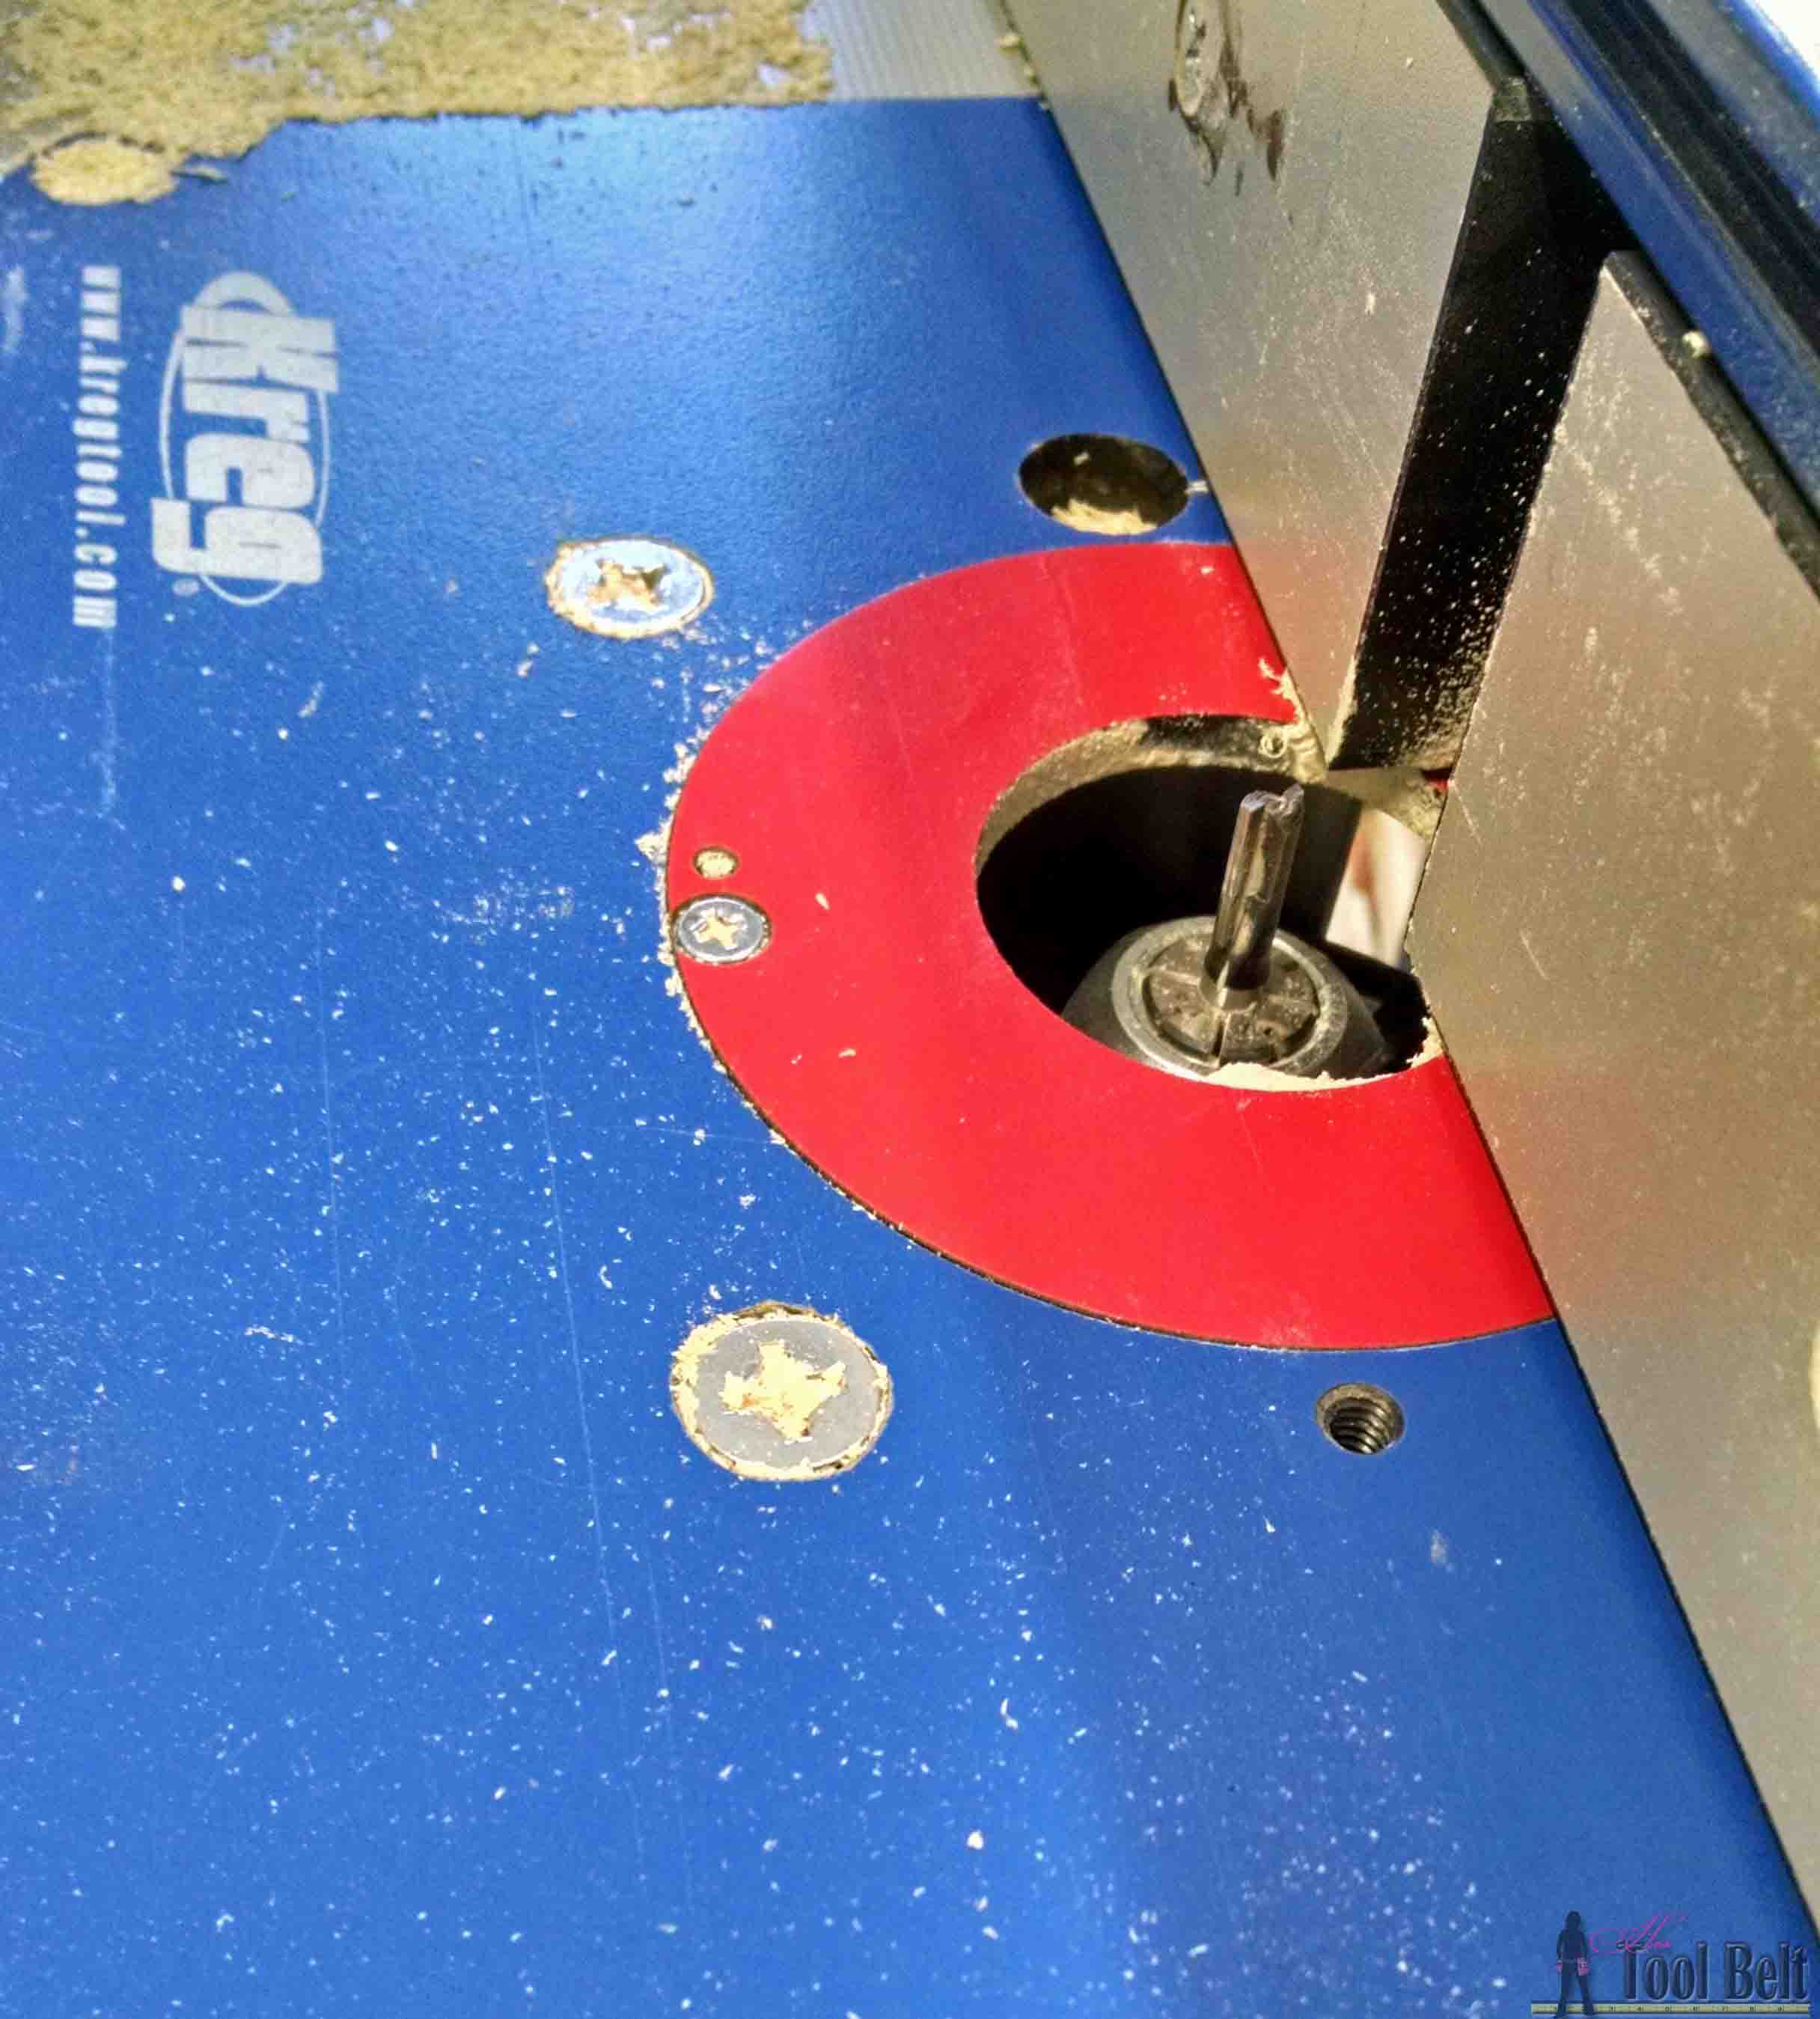
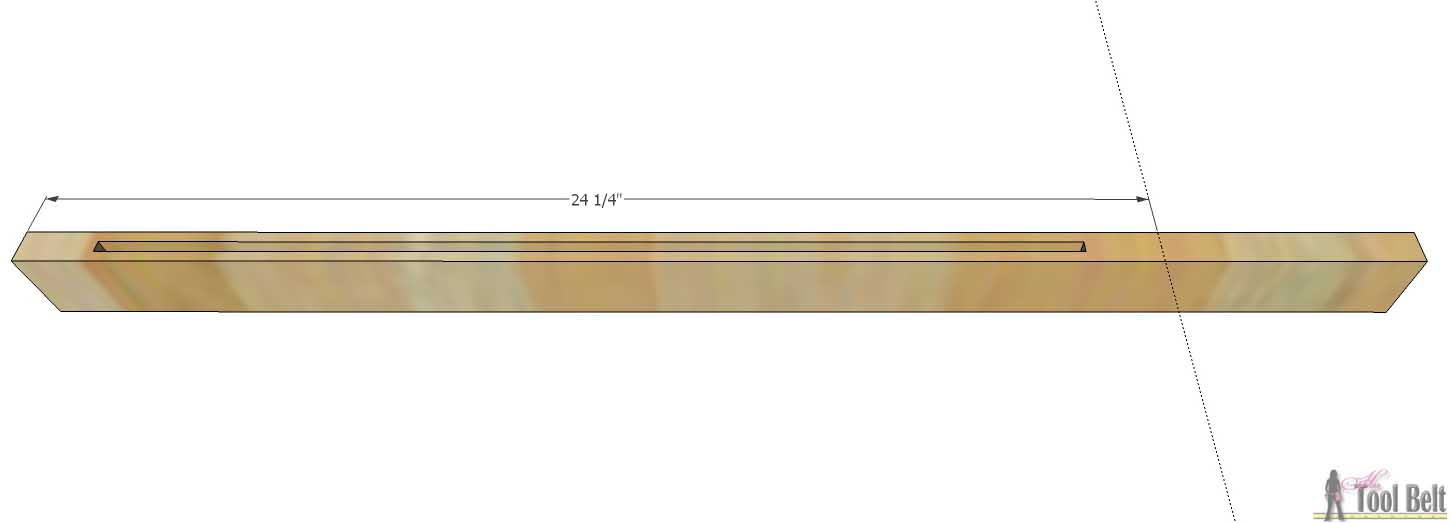
We need to cut a groove in the rails for the chalkboard to fit.  Down one of the long edges cut a groove in the middle that is 1/4″ wide and 3/8″ deep, feel free to do a little deeper to give yourself some wiggle room.  You can cut this groove on the table saw or with a router and a 1/4″ straight bit.  Repeat for each rail.

Chalkboard easels are so handy to have around for parties, holidays, weddings and for your budding little artist (kids). Free plans for a DIY A-Frame Chalkboard Easel.

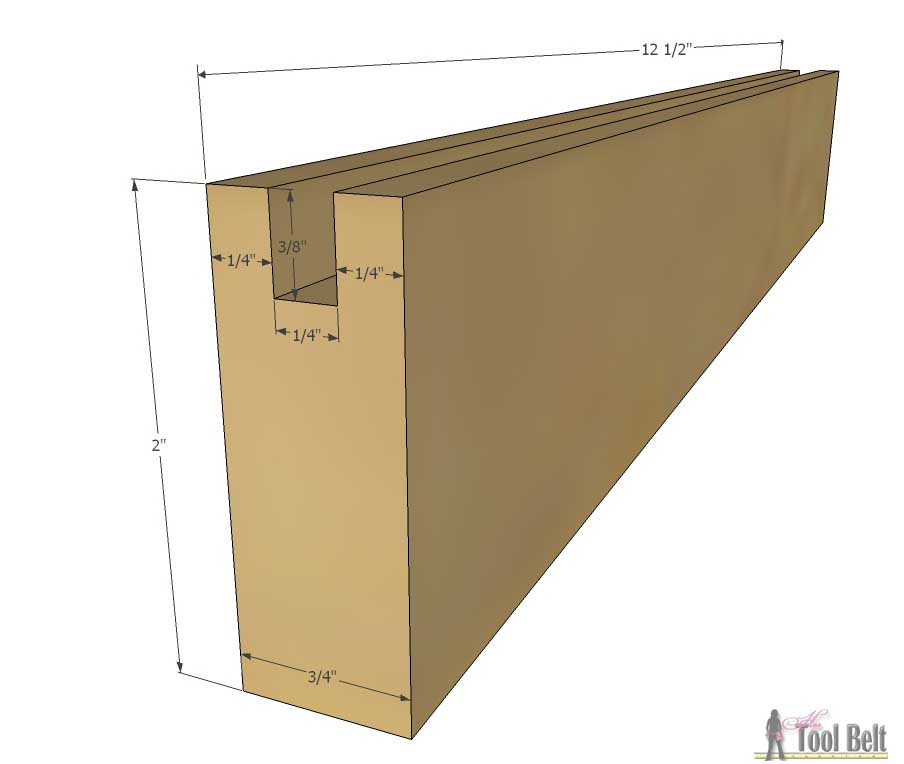
We also need to cut the groove in the legs, starting from 1 5/8″ from the top to 7 1/8″ from the bottom.  Center the groove and cut it 1/4″ wide and 3/8″ deep.  This is easiest done with a router and 1/4″ straight bit.  Dry fit the chalkboard and make sure it’ll fit in the groove.

Chalkboard easels are so handy to have around for parties, holidays, weddings and for your budding little artist (kids). Free plans for a DIY A-Frame Chalkboard Easel.

Router set up.

Chalkboard easels are so handy to have around for parties, holidays, weddings and for your budding little artist (kids). Free plans for a DIY A-Frame Chalkboard Easel.

Step 3

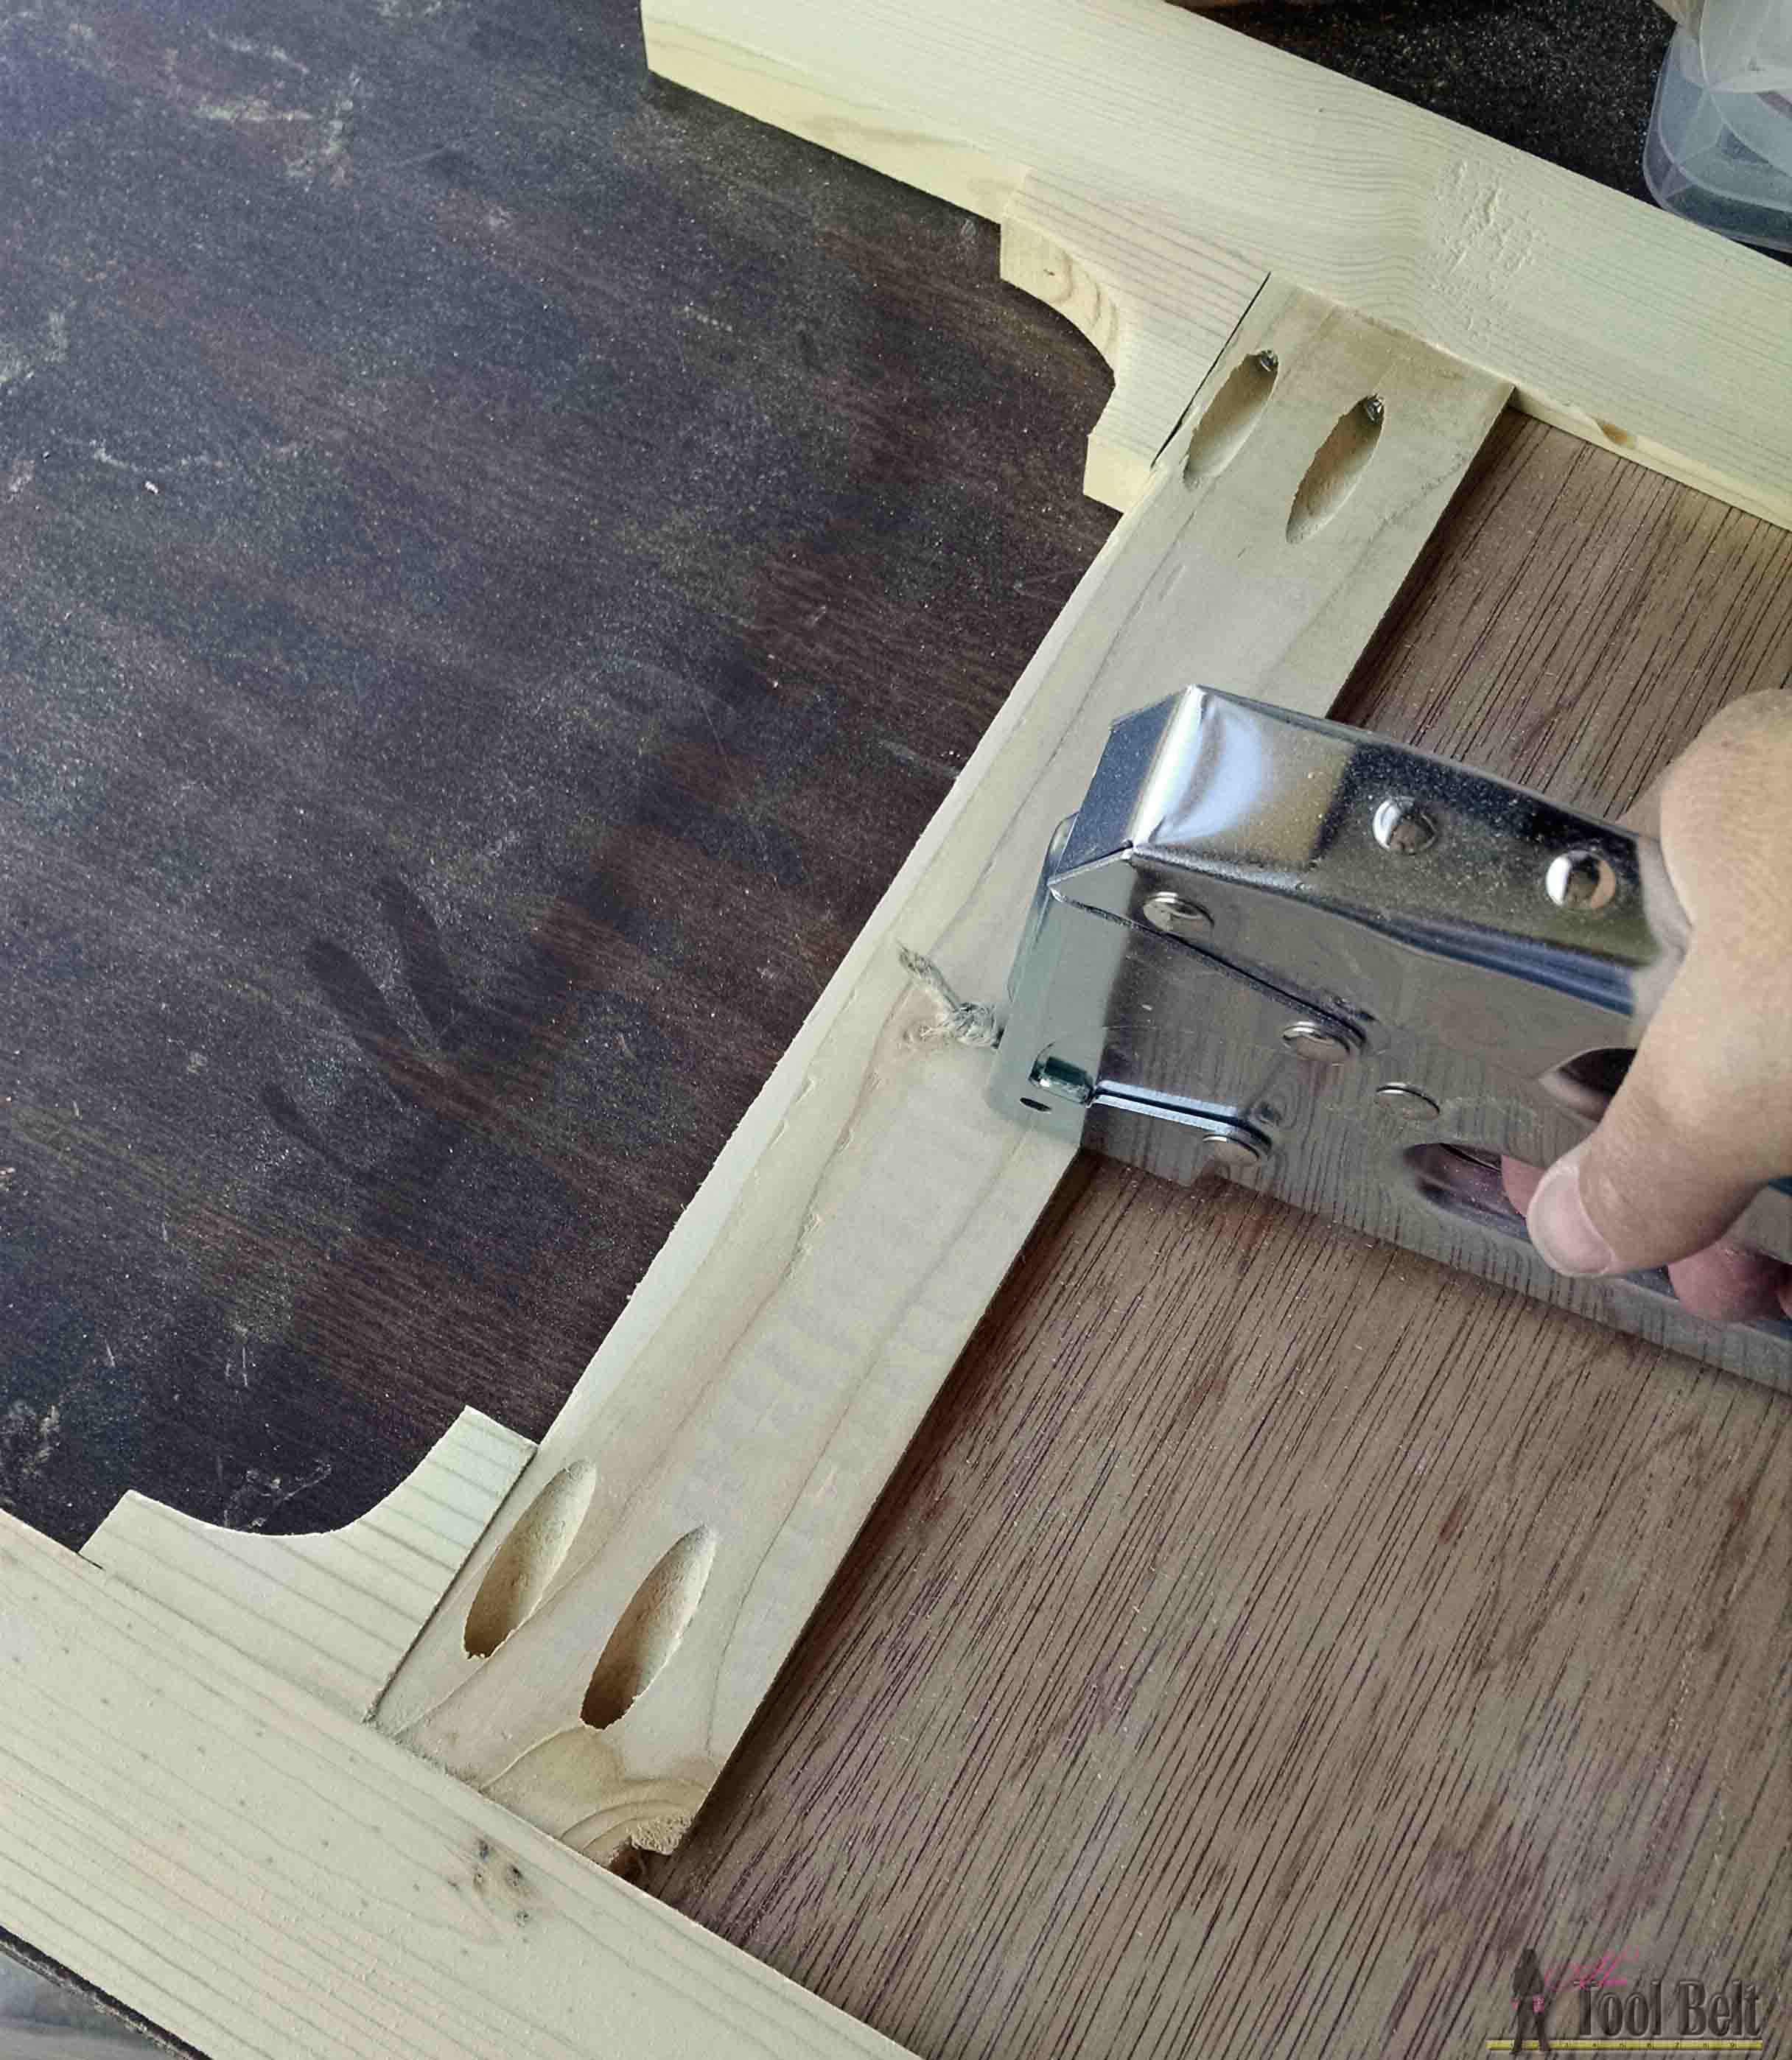
Drill pocket holes* in both ends of the backside of the rails.  You’ll want to try and keep the pocket holes away from the edge you cut the groove.

Chalkboard easels are so handy to have around for parties, holidays, weddings and for your budding little artist (kids). Free plans for a DIY A-Frame Chalkboard Easel.

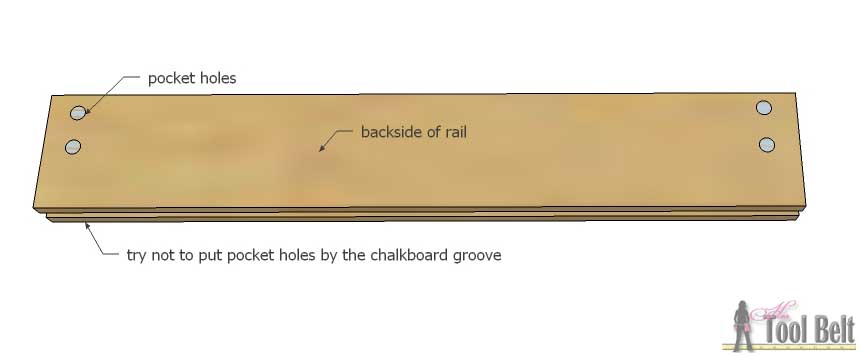
On each of the legs, measure and mark down 24 1/4″ from the top.  This is where the bottom rail will end.

Chalkboard easels are so handy to have around for parties, holidays, weddings and for your budding little artist (kids). Free plans for a DIY A-Frame Chalkboard Easel.

Note: you may want to consider painting the edges that have the chalkboard grooves before assembling the frame.

Step 4

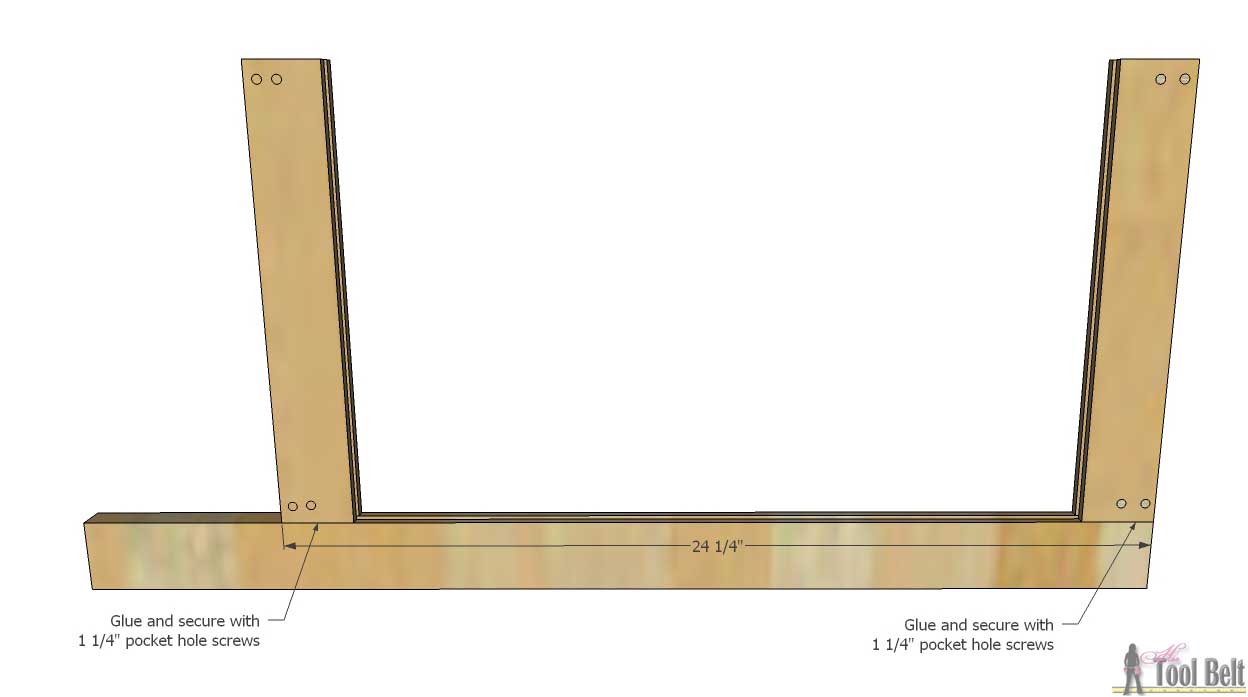
Glue and clamp a rail to the top of one of the legs.  Secure the rail with 2- 1 1/4″ pocket hole screws.  Glue and clamp another rail at the 24 1/4″ mark, secure with 2 – 1 1/4″ pocket hole screws.


Chalkboard easels are so handy to have around for parties, holidays, weddings and for your budding little artist (kids). Free plans for a DIY A-Frame Chalkboard Easel.

Slide the chalkboard into the slot.  Make sure the good side of the chalkboard is on the opposite side of the pocket holes.

Chalkboard easels are so handy to have around for parties, holidays, weddings and for your budding little artist (kids). Free plans for a DIY A-Frame Chalkboard Easel.

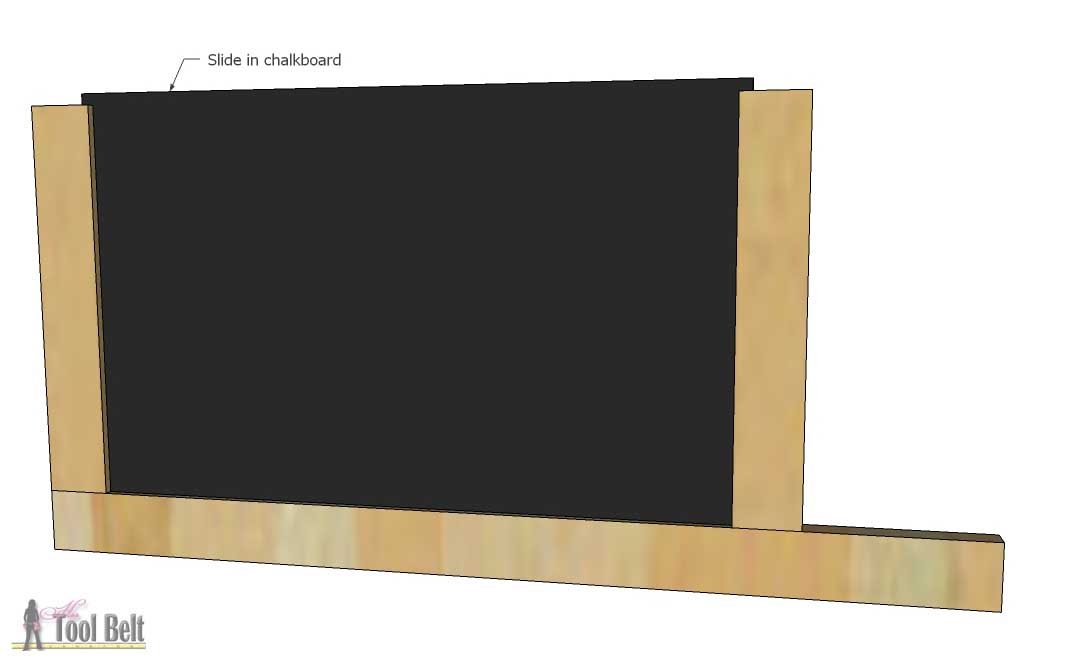
Glue and secure the other leg onto the rails.

Chalkboard easels are so handy to have around for parties, holidays, weddings and for your budding little artist (kids). Free plans for a DIY A-Frame Chalkboard Easel.

Step 5

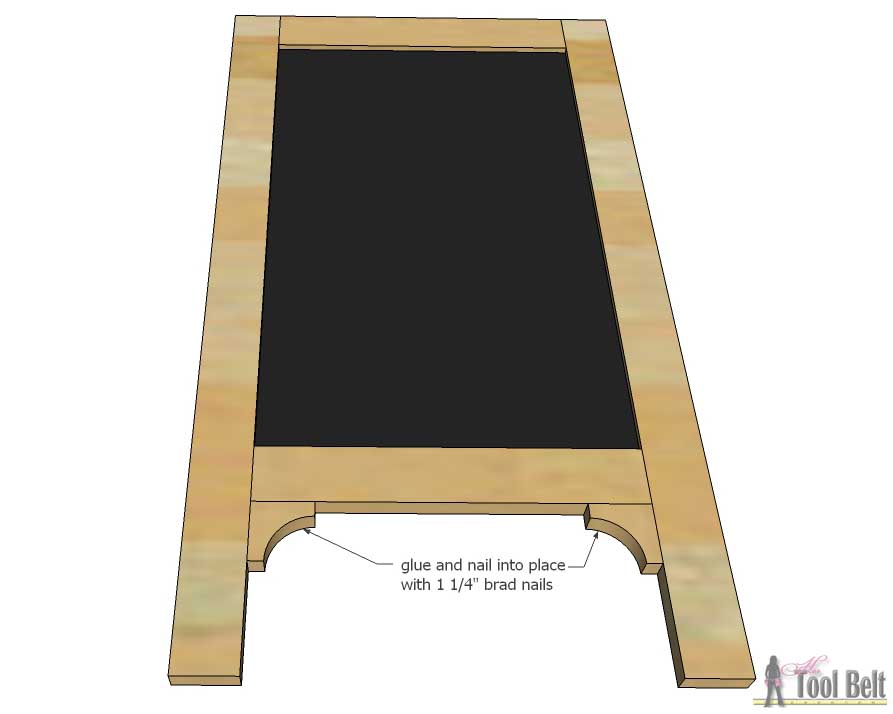
With some of the scrap 2″ piece, cut 4 pieces that are 2″ x 2″.  Mark about 1/4″-1/2″ from opposite corners and use a round object to trace a curve.  Use a band saw, scroll saw or jig saw to cut out the corbels.

Chalkboard easels are so handy to have around for parties, holidays, weddings and for your budding little artist (kids). Free plans for a DIY A-Frame Chalkboard Easel.

Glue and nail the corbels into the bottom corner of the frames.

Chalkboard easels are so handy to have around for parties, holidays, weddings and for your budding little artist (kids). Free plans for a DIY A-Frame Chalkboard Easel.

Step 6

To assemble the chalkboards, lay the board back face up.  Separate the boards about 1/4″.  Lay out the hinges and make sure you orient them so when installed, they will close.  Mark the hole centers and drill pilot holes for the small hinge screws.  Secure the hinges with the screws.

Chalkboard easels are so handy to have around for parties, holidays, weddings and for your budding little artist (kids). Free plans for a DIY A-Frame Chalkboard Easel.

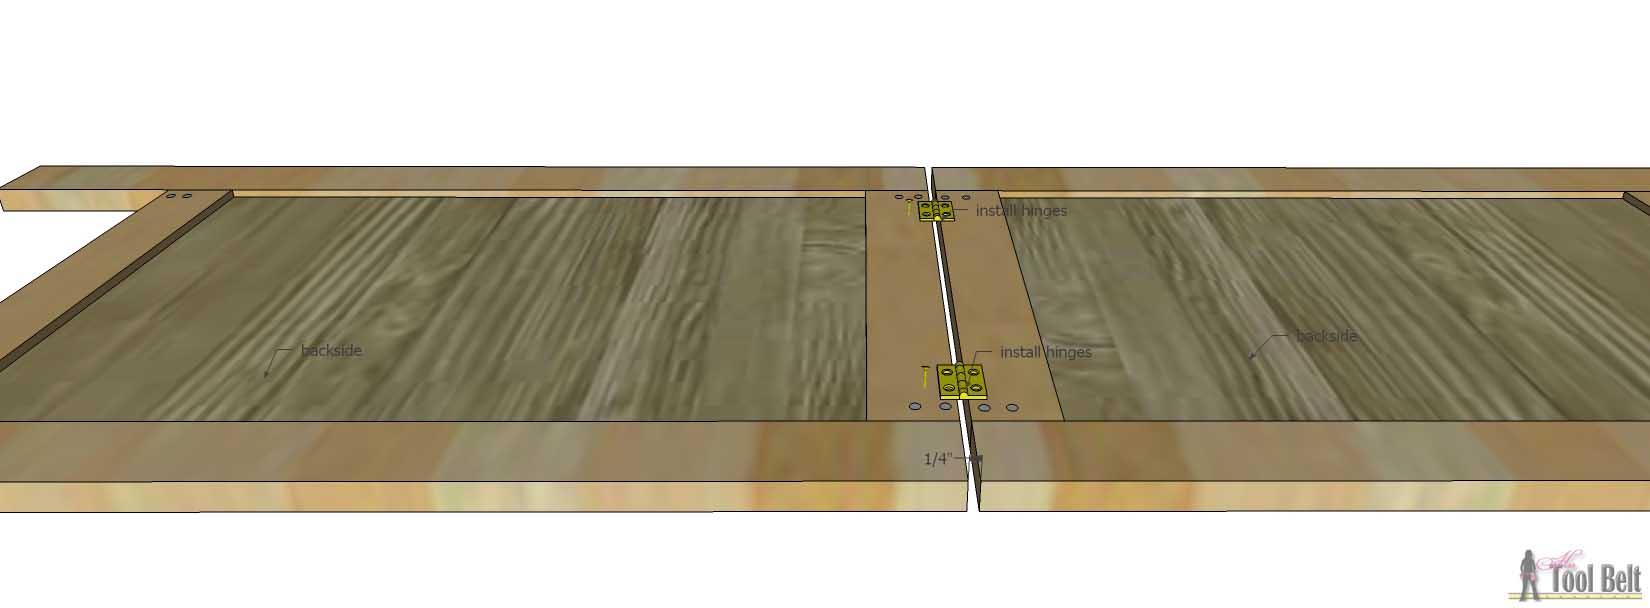
Tie a knot in each end of the string and staple to the inside of the chalkboard easel.

Chalkboard easels are so handy to have around for parties, holidays, weddings and for your budding little artist (kids). Free plans for a DIY A-Frame Chalkboard Easel.

Here’s a few of them assembled, large and small.  Fun Fun!

Lots of chalkboards

Step 7

Sand the chalkboard frame finish with 120-150 grit sandpaper.  I used Amy Howard at Home One Step Paint in Atelier (gray) to paint my frame.  Once the paint was dry, I lightly distressed the frame edges with sandpaper.

Download Plans

DIY A-Frame Chalkboard Easel plans

Chalkboard easels are so handy to have around for parties, holidays, weddings and for your budding little artist (kids). Free plans for a DIY A-Frame Chalkboard Easel.

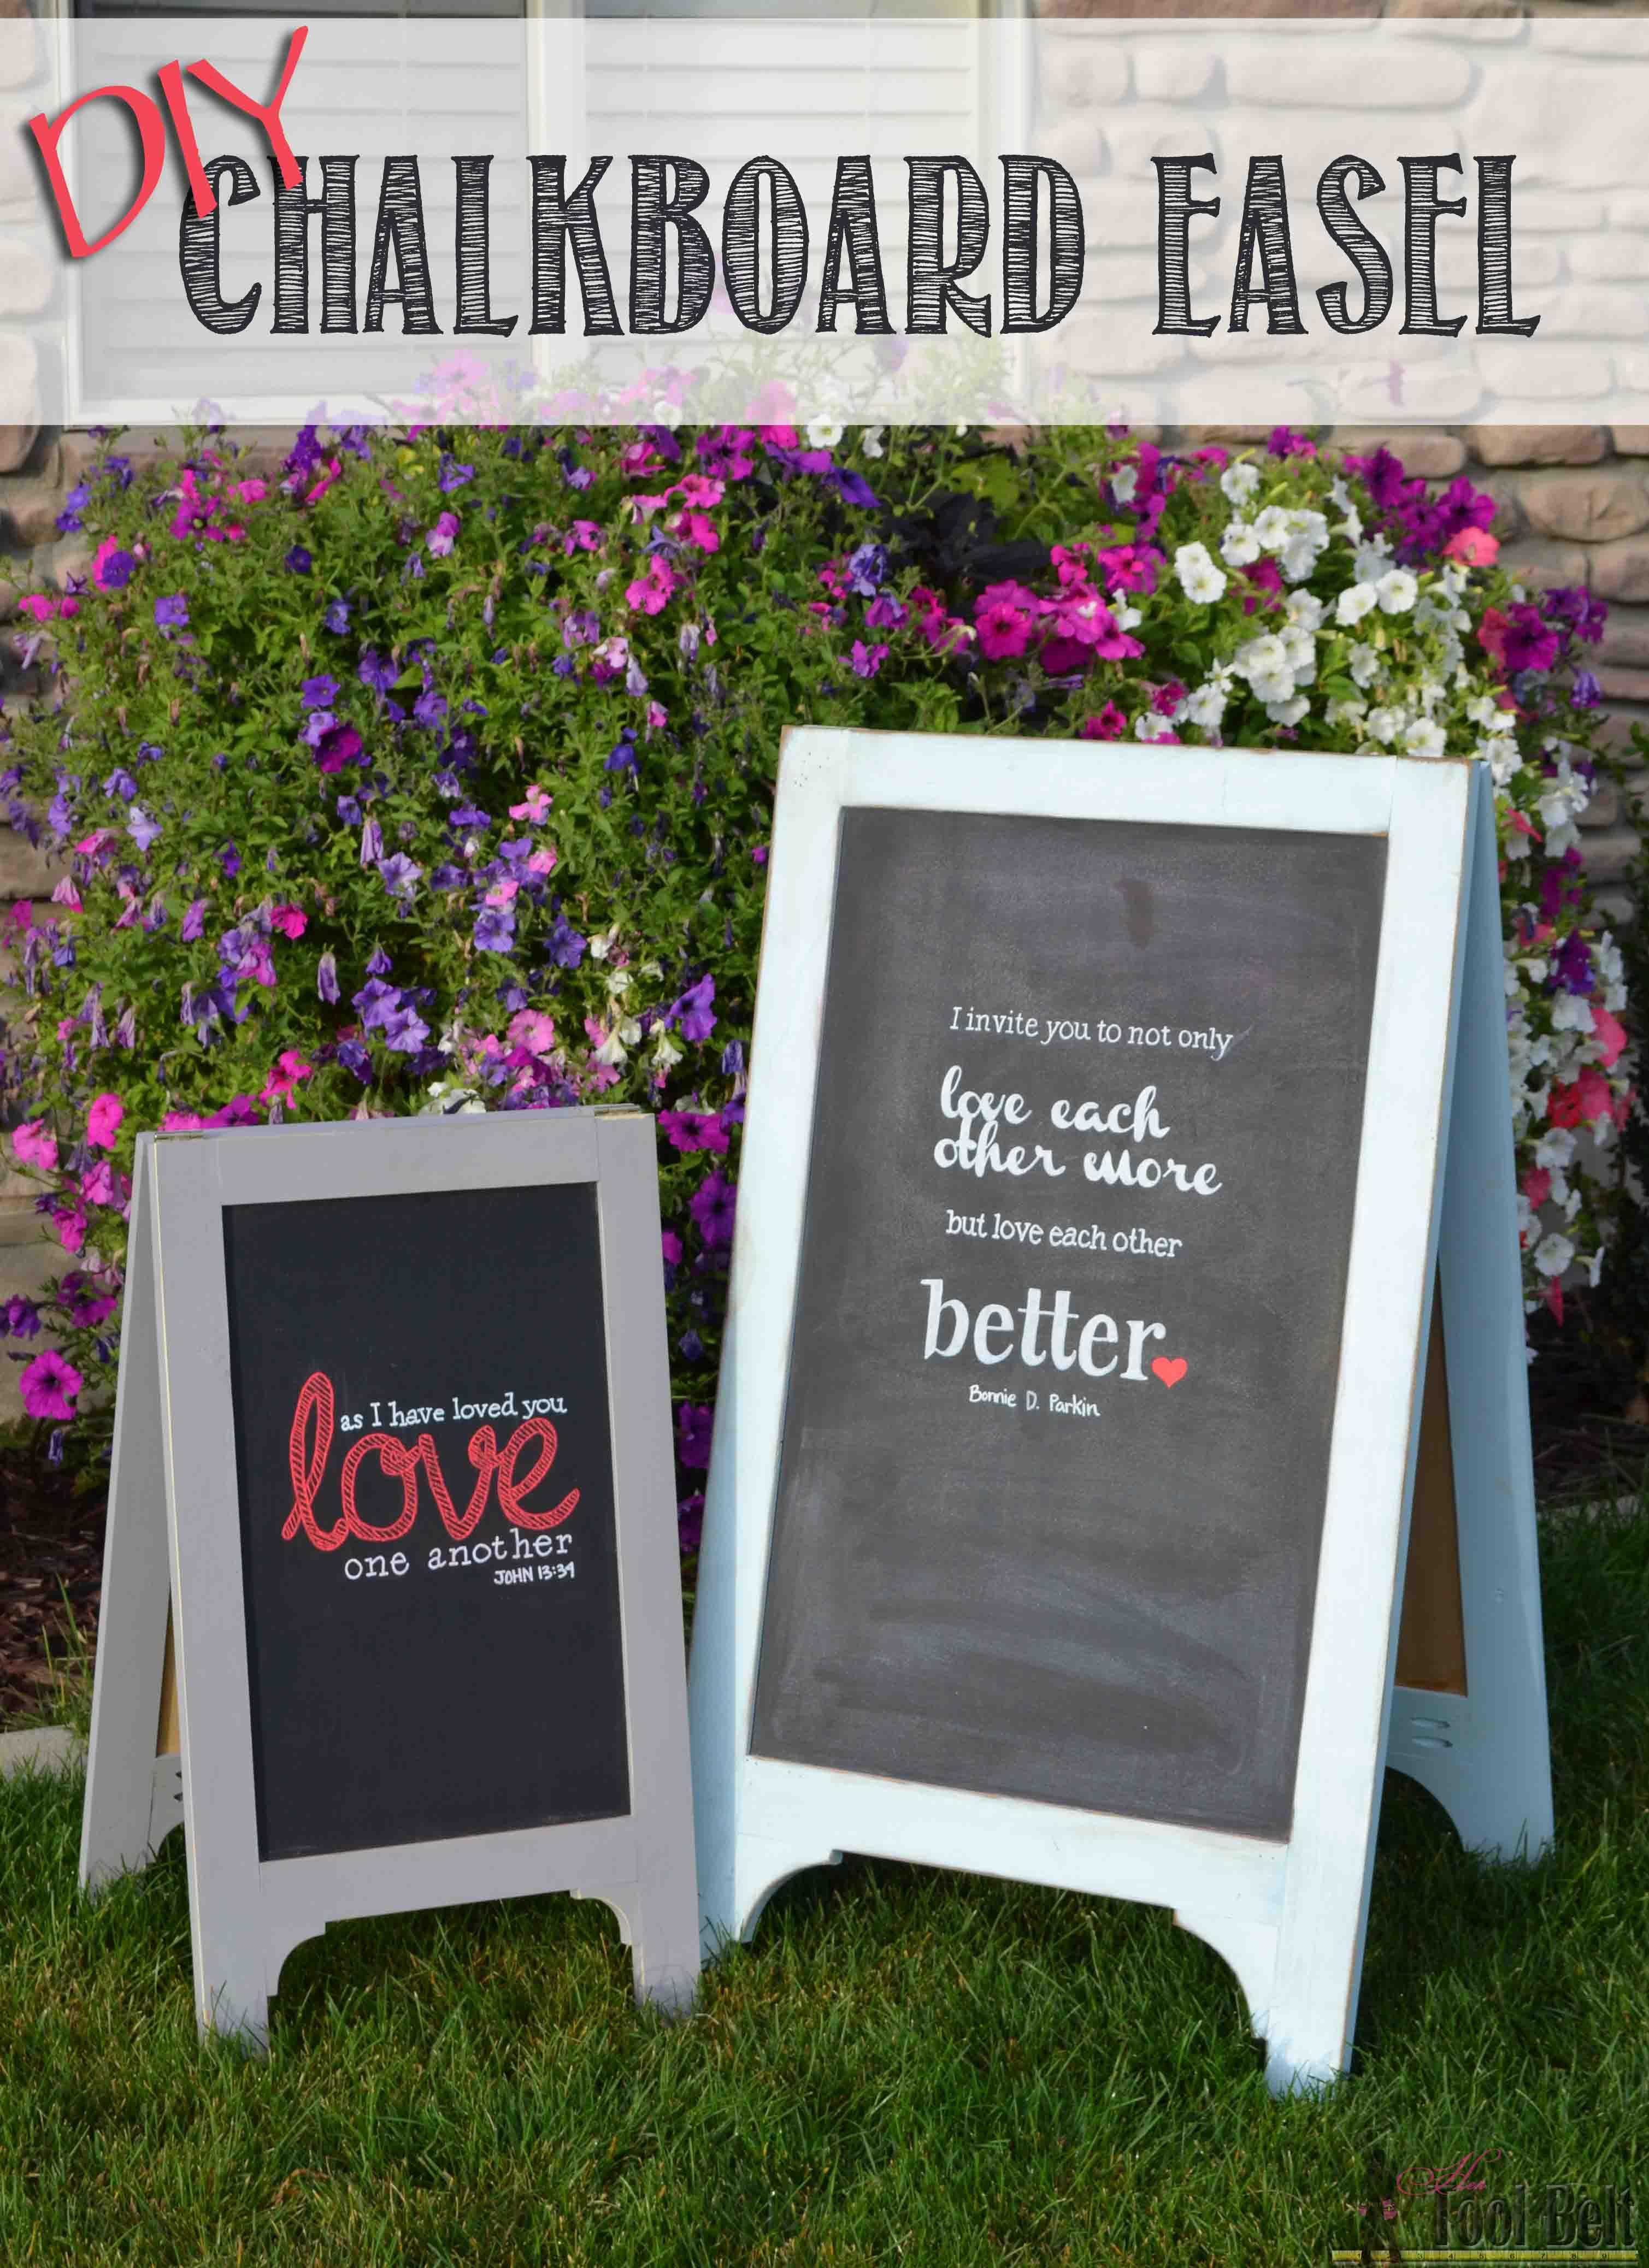
Thanks to my friend Wendy for doing the word art on these chalkboards!

Linked to Link Parties, savvysouthernstyle

Related

Filed Under: Built From Scratch, Home Decor Tagged With: chalkboard, easel, super saturday

Attention: Any do-it-yourself project involves risk of some sort. Your tools, materials, and skills will vary, as will the conditions at your work site. Hertoolbelt LLC will not assume any responsibility or liability for damages or losses sustained or incurred in the course of your project or in the use of the item you create. Always follow the manufacturer's operating instructions in the use of tools, check and follow your local building codes, and observe all commonly accepted safety precautions.

Comments

  1. Tagwatts2 says

    October 8, 2015 at 10:23 am

    First, let me compliment you on a well organized project and plan and the project layout. I had no use for a large sign like you built. So I shrunk it down to a board that I will now have my desk top. I would have never even thought to do this had I not seen your black board. I made one slight adjustment to your project. I used a piece of white board that I had left over. I just use the wipe away pens instead of chalk.

    Thank you for the idea.

    Reply
    • Amy says

      October 8, 2015 at 10:26 am

      That is a great idea!

      Reply
  2. Lisa says

    October 8, 2015 at 10:24 am

    You are amazing! I love all your projects!!!

    Reply
    • Amy says

      October 8, 2015 at 10:26 am

      Thanks Lis!

      Reply
  3. Mindi says

    October 9, 2015 at 12:00 pm

    Such great plans Amy! And I still can’t believe you “got” to make all these…..holy quac!! I love them!

    Reply

Leave a Reply Cancel reply

Your email address will not be published. Required fields are marked *

This site uses Akismet to reduce spam. Learn how your comment data is processed.

Search Her Tool Belt

Follow Me!

  • Bloglovin
  • Email
  • Facebook
  • Google+
  • Instagram
  • Pinterest
  • RSS
  • Twitter
  • YouTube

Top Posts & Pages

Custom Drill Storage and Charge Station - Easy
Cordless Drill Storage - Charging Station
$5 Blanket Ladder
Wood Bunny Easter Basket
King X Barn Door Farmhouse Bed Plans
Pallet Planter Box For Cascading Flowers
2x4 Console Table
Convertible Picnic Table and Bench

Check out more projects

Copyright

Thank you for wanting to share my work! No need for my permission to pin my work or to feature 1 or 2 pictures with full watermarks intact that link back to the original project. Please do NOT copy tutorials.

Disclosure & Privacy Policy

Disclaimer

Copyright © 2023 · Magazine Pro Theme on Genesis Framework · WordPress · Log in

This website uses cookies to improve your experience. We'll assume you're ok with this, but you can opt-out if you wish.Accept Read More
Privacy & Cookies Policy

Privacy Overview

This website uses cookies to improve your experience while you navigate through the website. Out of these, the cookies that are categorized as necessary are stored on your browser as they are essential for the working of basic functionalities of the website. We also use third-party cookies that help us analyze and understand how you use this website. These cookies will be stored in your browser only with your consent. You also have the option to opt-out of these cookies. But opting out of some of these cookies may affect your browsing experience.
Necessary
Always Enabled
Necessary cookies are absolutely essential for the website to function properly. This category only includes cookies that ensures basic functionalities and security features of the website. These cookies do not store any personal information.
Non-necessary
Any cookies that may not be particularly necessary for the website to function and is used specifically to collect user personal data via analytics, ads, other embedded contents are termed as non-necessary cookies. It is mandatory to procure user consent prior to running these cookies on your website.
SAVE & ACCEPT