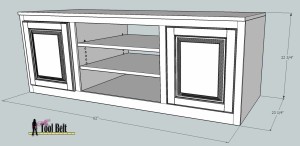
This is final part (part 5) in our PB media center build! Wahoo, we are making doors. We first built the TV Console, Cabinets & Toy Storage, Bookshelves and Bridge. We have a few options with our doors. In the PB magazine, they used inset doors. Inset doors are flush with the face frame. Overlay doors stand out from the face frame. I made the media center with inset doors, keeping with the design in the magazine.
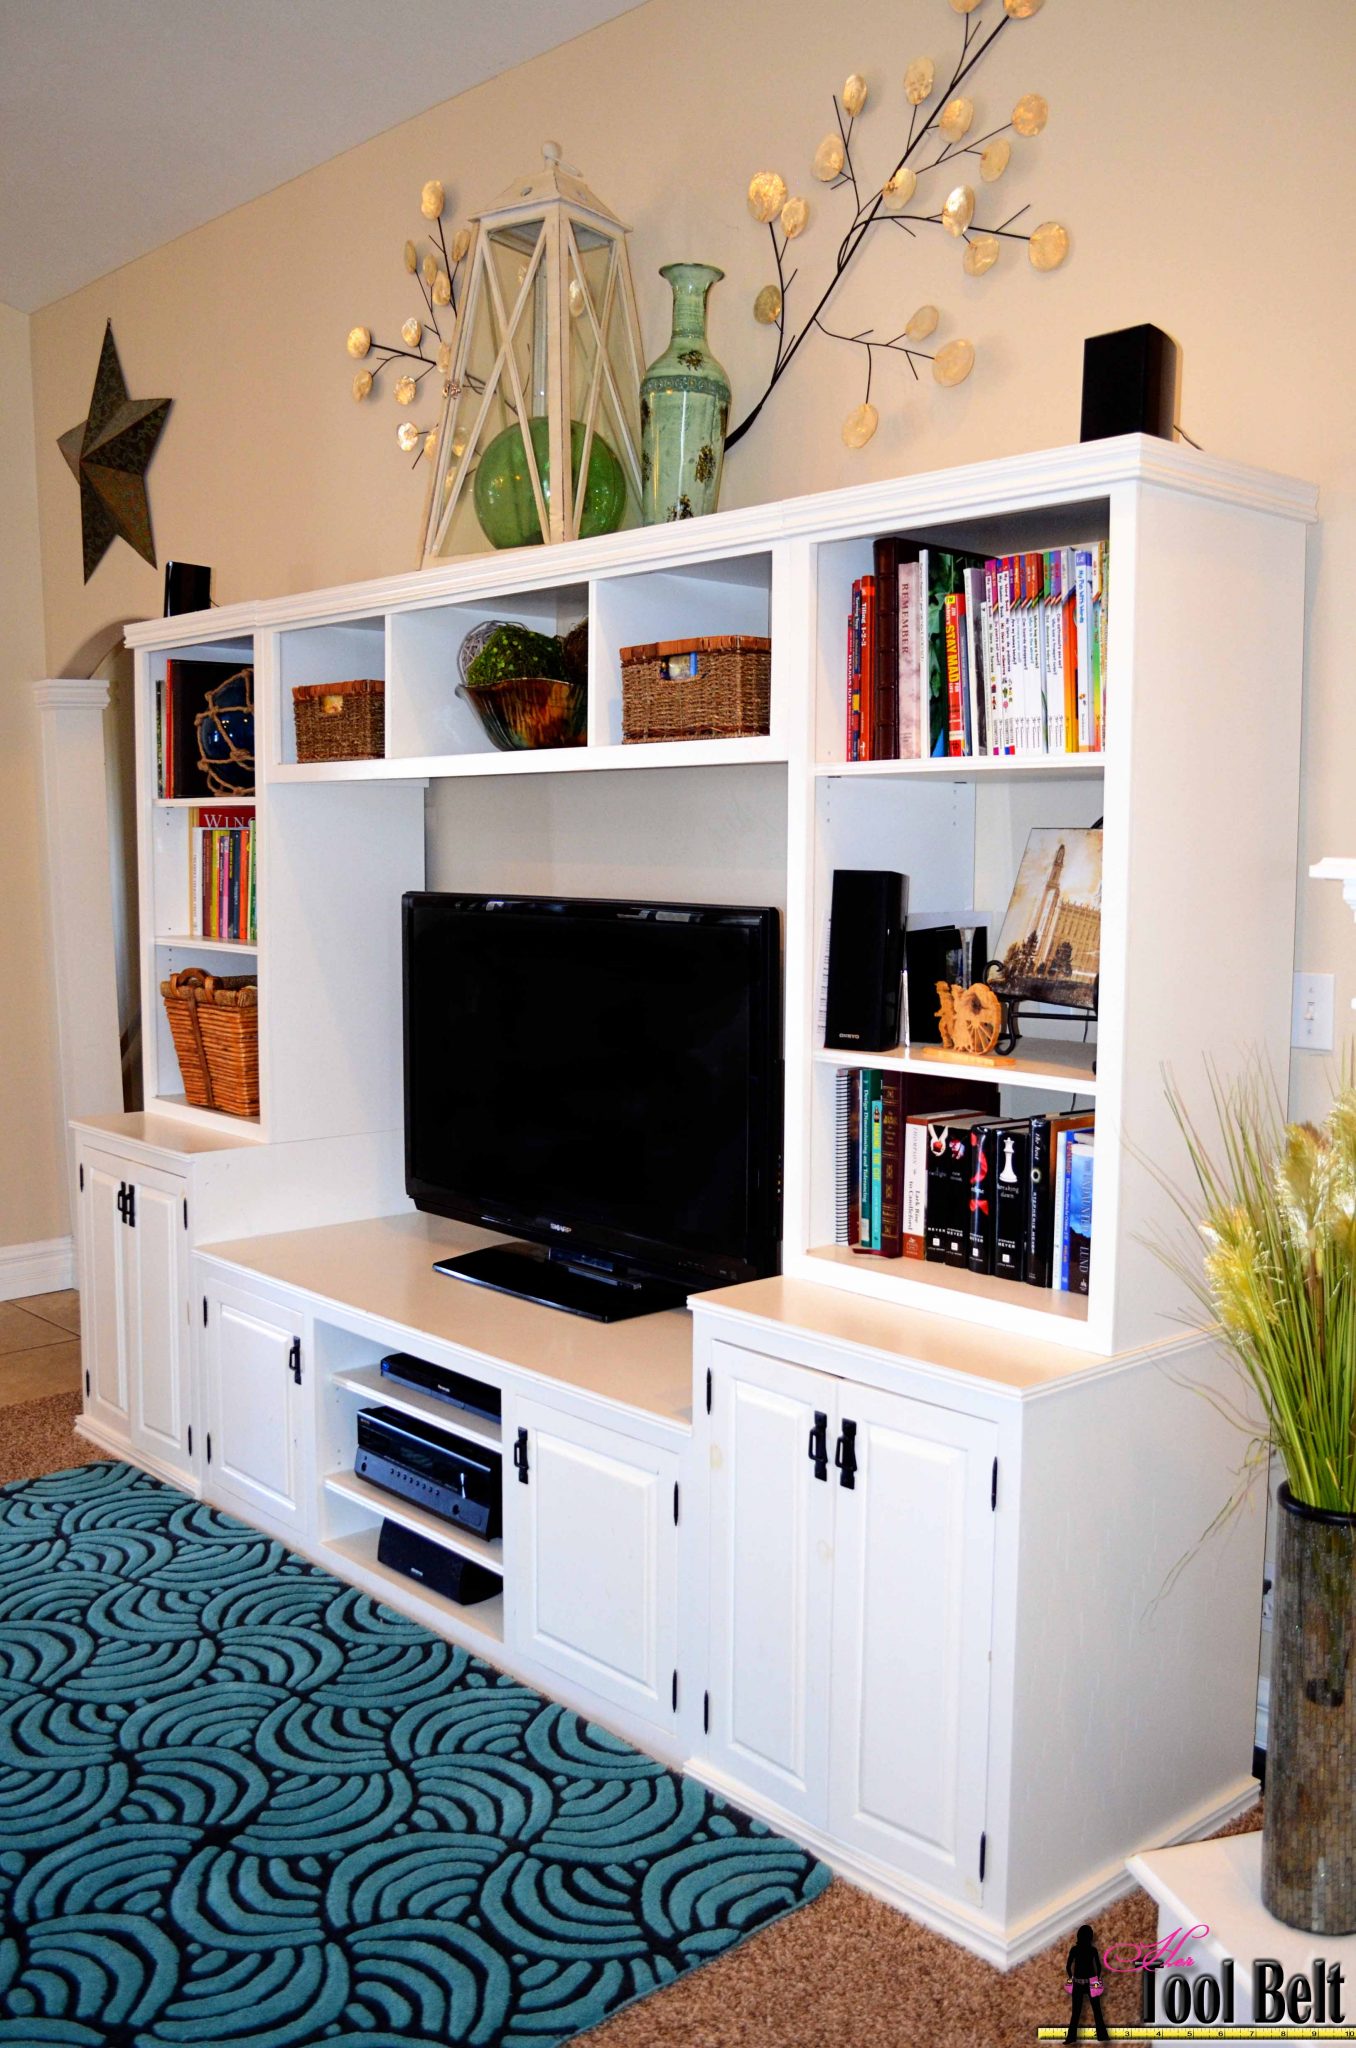 However now that my kids have used and abused the media center, I wish I would have made overlay doors. The only major issue is that with the inset doors, the doors on the cabinet have to be completely open (180 deg) to pull the drawers out. So when the kids aren’t careful and pull out the drawer quickly, they ding the inside of my doors. I’ll give you plans for both inset and overlay doors, then you can make what you want.
Also I know that not everyone has a router/router table to make raised panel cabinet doors. Another option is a fun bead board door, or a flat panel door that you can make easily with a table saw. Both of these options will look great on the media center. A great example of a simple bead board door is on the Paprika Vanity.
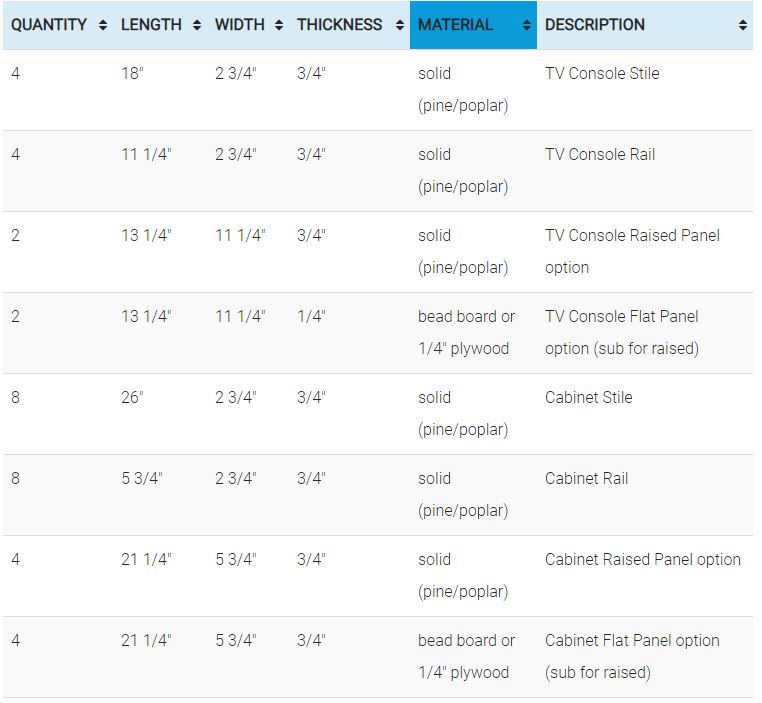
Media Center: Inset Doors
or use this cut list for the overlay doors
Media Center: Overlay Doors
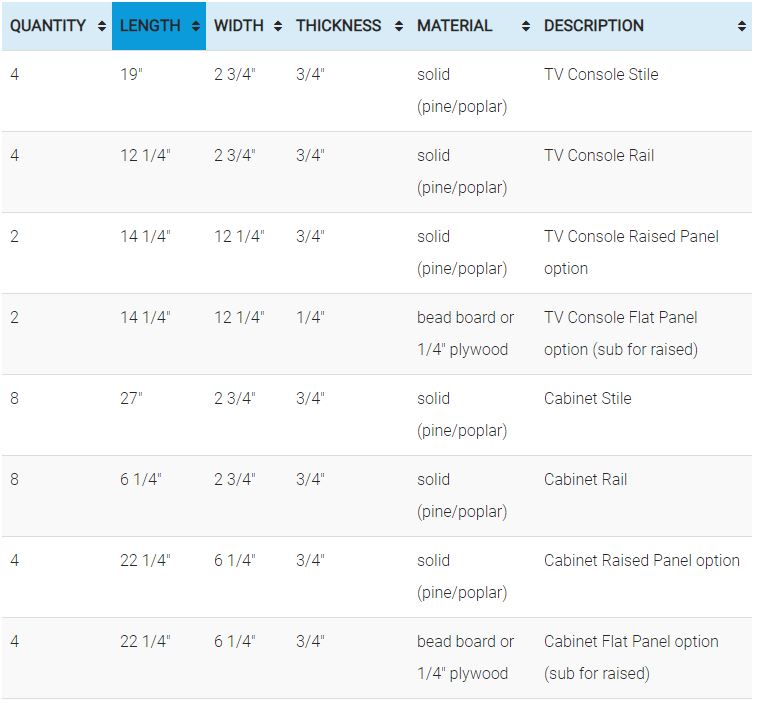
The cut list shows options for raised panel and flat panel, pick one or the other. If you are making the raised panel option, you may need to glue pieces of wood together to make a wide enough panel. Join the pieces with a biscuit cutter or dowels and glue together. Allow the glue to dry sufficiently.
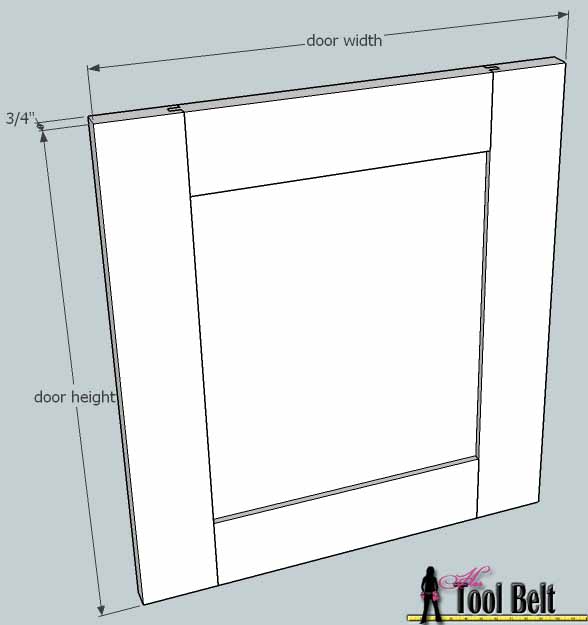
Cut the pieces for the doors. If you have a router and bits for making door joints, use it, or you can use your table saw for a similar look.
Cut the groove in the vertical stiles. Starting 1/4″ from an edge cut a groove that is 3/8″ deep and 1/4″ wide. Repeat for each stile.
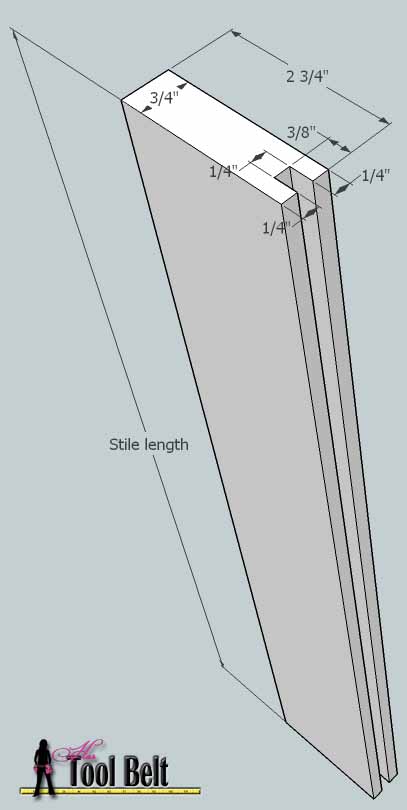
The rail pieces are a little more involved, but totally doable. The rail has the same groove as the stile. Starting 1/4″ from an edge cut a groove that is 3/8″ deep and 1/4″ wide. Repeat for each rail.
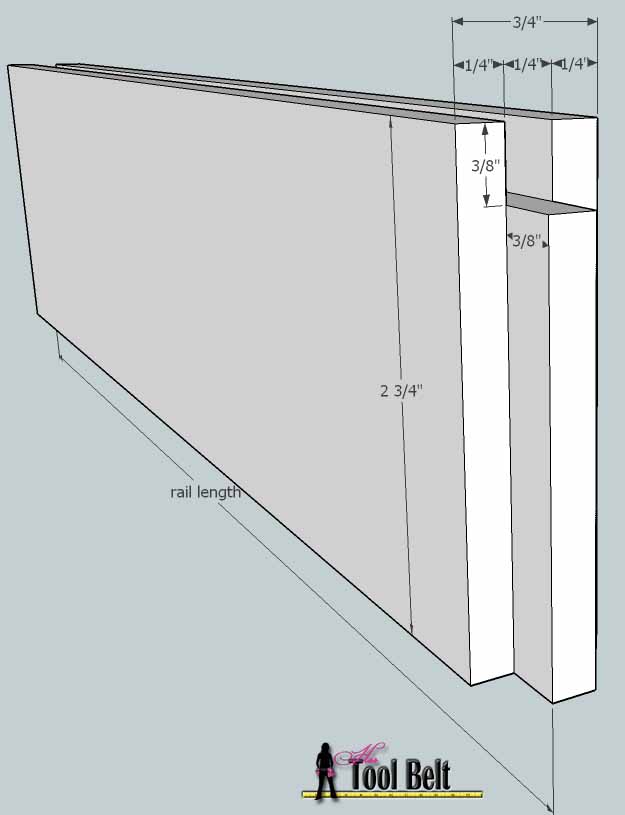
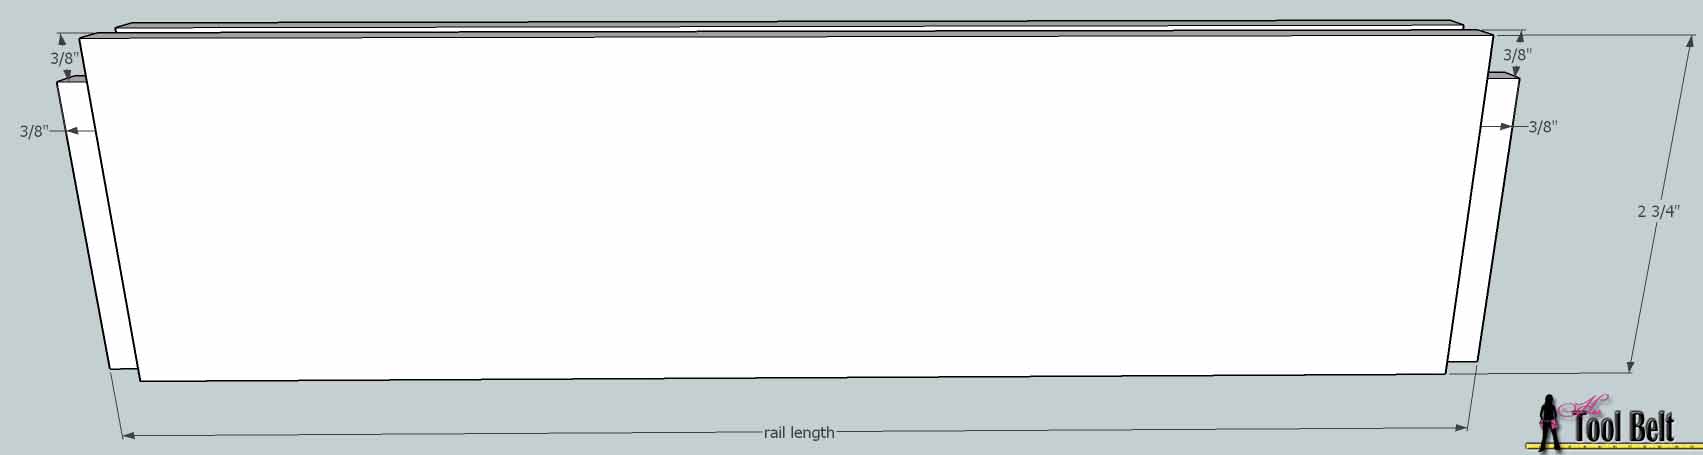
On each end of the rail pieces we are going to leave a tongue to fit into the stile groove. So cut 1/4″ wide x 3/8″ deep on both sides of the tongue. You may have to make one of the sides a hair larger, so the tongue will be just under 1/4″ and smoothly slide into the rail groove. Repeat for other end of rail and each rail piece.
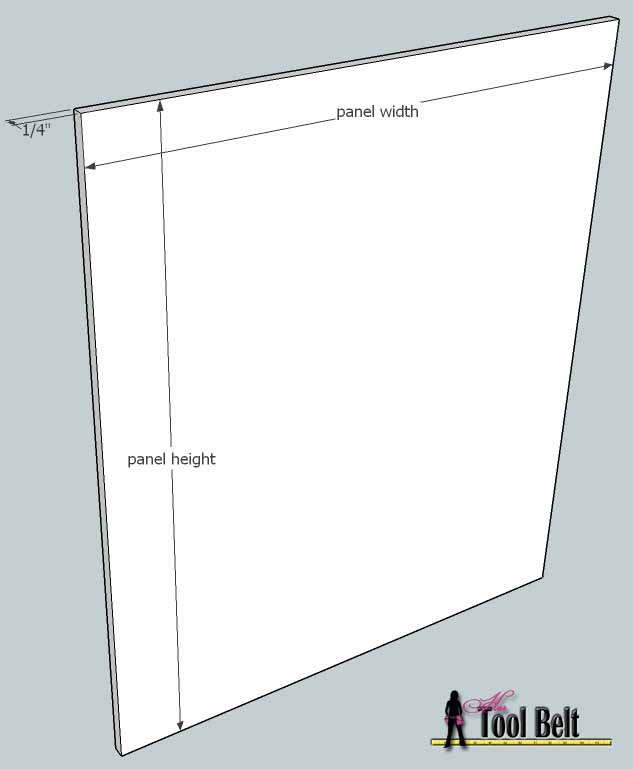
Cut the panel pieces whether from 3/4″ solid wood, 1/4″ bead board or 1/4″ plywood. If you’re making a raised panel. Set your router height so you are left with a hair under 1/4″ to fit in the stile and rail grooves. Route around 4 sides.
Door Assembly
Dry fit the door pieces together. If necessary, make any adjustments so all the pieces will snuggly, and smoothly fit together.
When gluing a cabinet door, generally you only apply glue to the tongue and groove parts where the stile and rails join, not along the panel groove. This allows for expansion and contraction of the panel.
Glue the cabinet doors and clamp together until dry. Check to make sure the doors are square by measuring the corners on the diagonal to make sure they are the same. Adjust as necessary. Remove any excess glue. Allow the glue to dry sufficiently.
If you are doing the inset door, dry fit the doors in place. You may have to trim the edges on the doors to fit the opening in your face frame. Make sure to account for the hinge thickness too.
Finish Work
Next fill any holes or gaps with filler. If you are painting, go ahead and use spackle or joint compound (for your walls). If you are staining, use the proper wood filler. Let the filler dry then sand the doors, make sure to get any excess glue and filler smooth. End sanding your project with 120 -150 grit sand paper. Remove excess dust. If painting, prime the doors and allow to dry. If staining, use wood preconditioner and stain as you like.
Once the primer is dry, apply the paint and let dry.
For the finish coat, coat doors with 1-2 coats of polycrylic (it dries crystal clear). And let dry sufficiently.
To mount the overlay cabinet doors you’ll need 12 – 1/2″ overlay hinges. I use the liberty 1/2″ overlay concealed hinges available at Home Depot. But there are lots of varieties to choose from. If you use concealed hinges you’ll need a little jig to install them. The drill bit and jig are only about $12. I really like these hinges because there are ways to adjust the straightness of the door using the adjustment screws on the hinge.
To mount the inset cabinet doors you’ll need 12 inset hinges. I used this type Full wrap inset hinge*, use whatever style that you like. Mount the hinges a couple inches from the top and bottom of the door.
Add door pulls or knobs as you like. I used this pull*. Enjoy your new DIY media center & way to go!
Click for plans to the other components of the media center:

I bet you are so excited to be at the end of this project! I’m impressed with how detailed the directions are. Thanks for sharing!
I sure am, thanks for visiting Carrie!
This is amazing!! Your DIY skills are incredible, and I’m sure this required a LOT of patience too. Very nicely done! Thanks so much for sharing at our party!! XO
Thanks Christy!
Hi! I am currently building this entertainment center according to your plans and I have a question on the cabinet door rail and stile width. Your cut list and models say the width is 2 3/4″. A 1×3 is only 2 1/2″ wide. So did you buy a 1×4 and cut it down to 2 3/4″ or did you actually use 2 1/2″ width and the instructions are wrong? The dimensions you call out for the door panels are if you use 2 3/4″ rails and stiles so I would probably need to recut my panels if I go with 2 1/2″ rails and stiles. With my calibrated eyes your rails and stiles look to be 2 1/2″ in your pictures because I modeled the whole thing in SketchUp using 2 3/4″ and my panels look smaller than yours. Thanks for the help!
Sorry this plan is old, so I’m a bit fuzzy on what I did. I think the 2 3/4″ is a traditional door stile size. Mine are actually 2″, and I really can’t remember why I did that, except trying to mimic what was done in the magazine. When I wrote the plan up, I think I changed the stile width to be the traditional dimension.
I probably bought 1×6’s and ripped them down to the right size. I have terrible luck trying to find the 1×2, 1×3 sizes that are straight.
Thanks for the quick reply! When I searched standard rail and stile width the consensus seemed to be 2” to 2 1/2”. I actually didn’t realize you had listed 2 3/4” instead of 2 1/2” so I bought 2 1/2”. I will make it using that and recut my door panels. Thanks for the clarification.