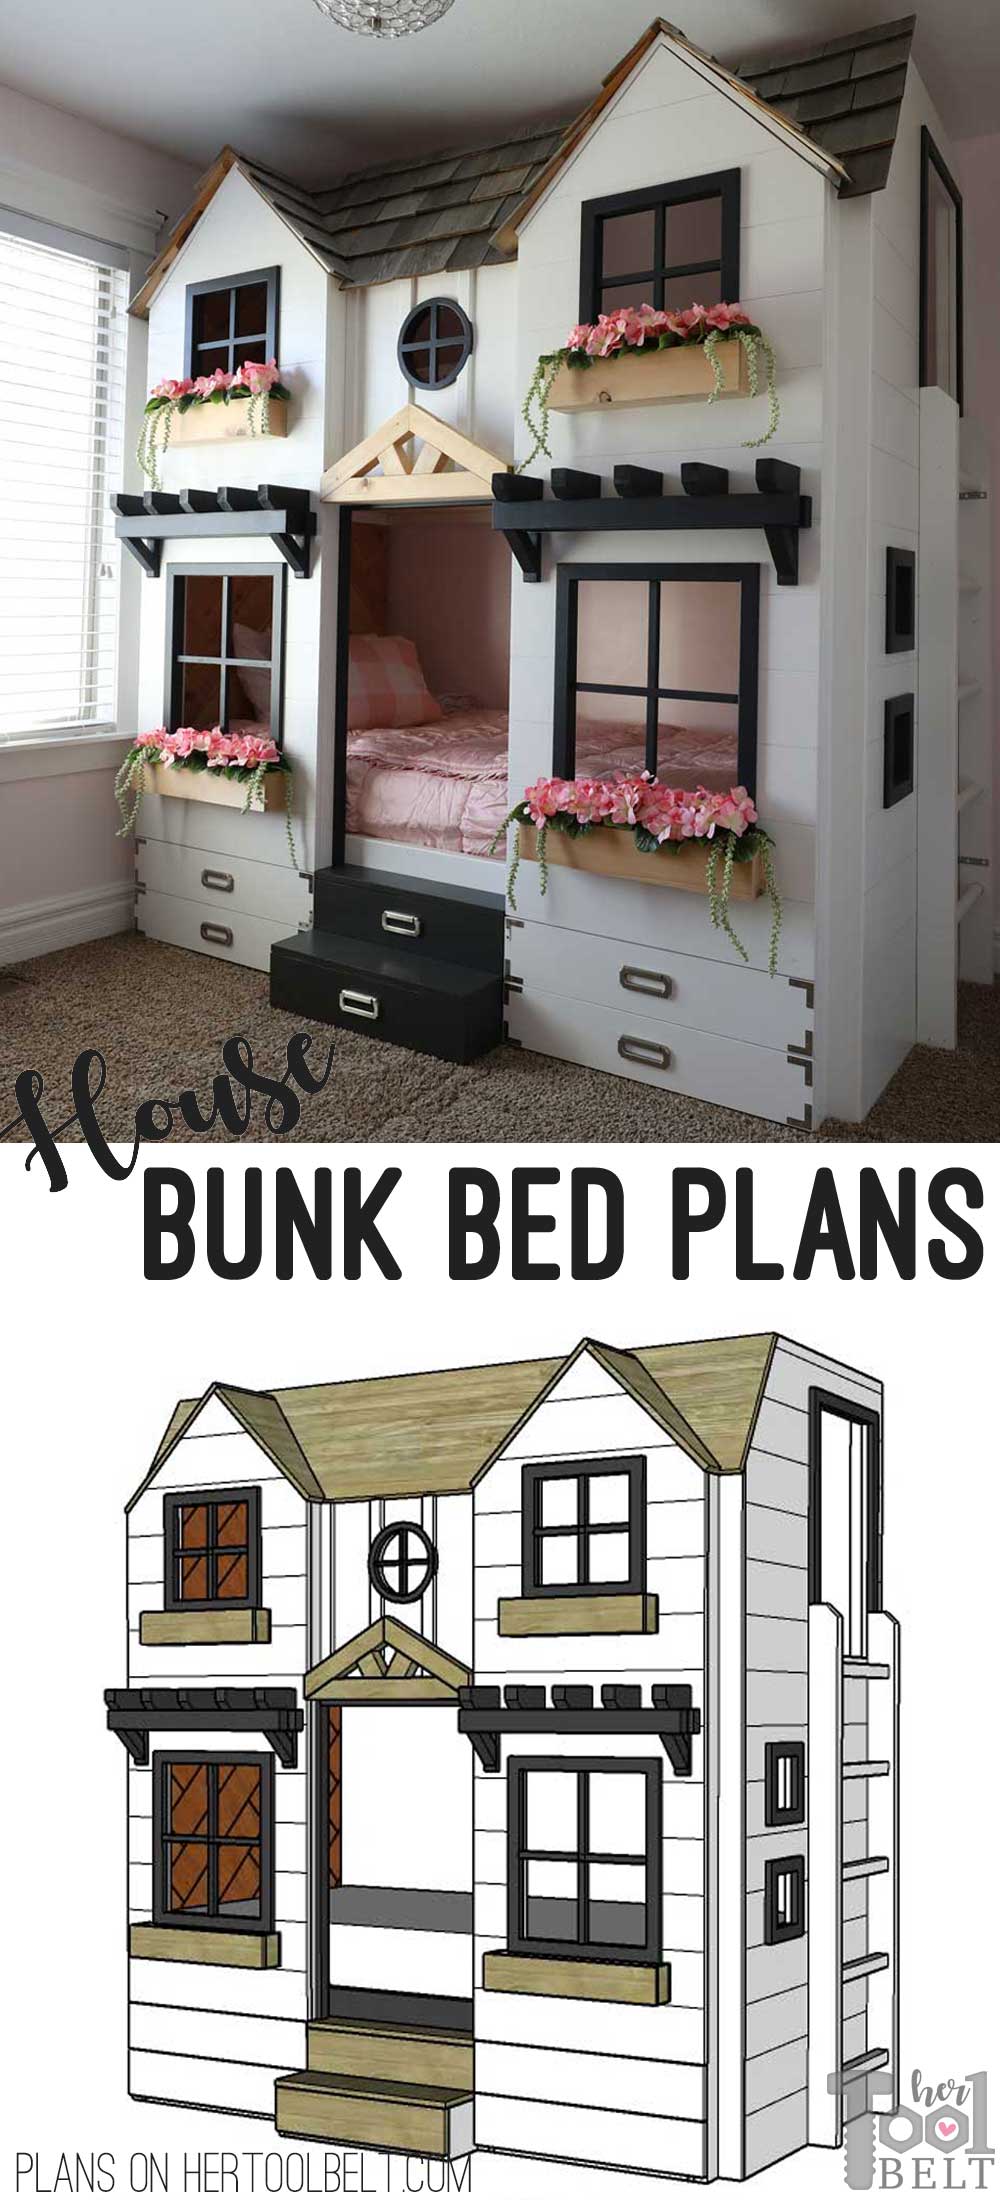
A couple of years ago I saw the most darling bunk bed that Farmstead On First made here. I made the mistake of showing my daughter the cute bunk bed and she’s been asking for one ever since. My youngest daughter has grown out of her cute house frame toddler bed, so now is the time to make them a fun house bunk bed.
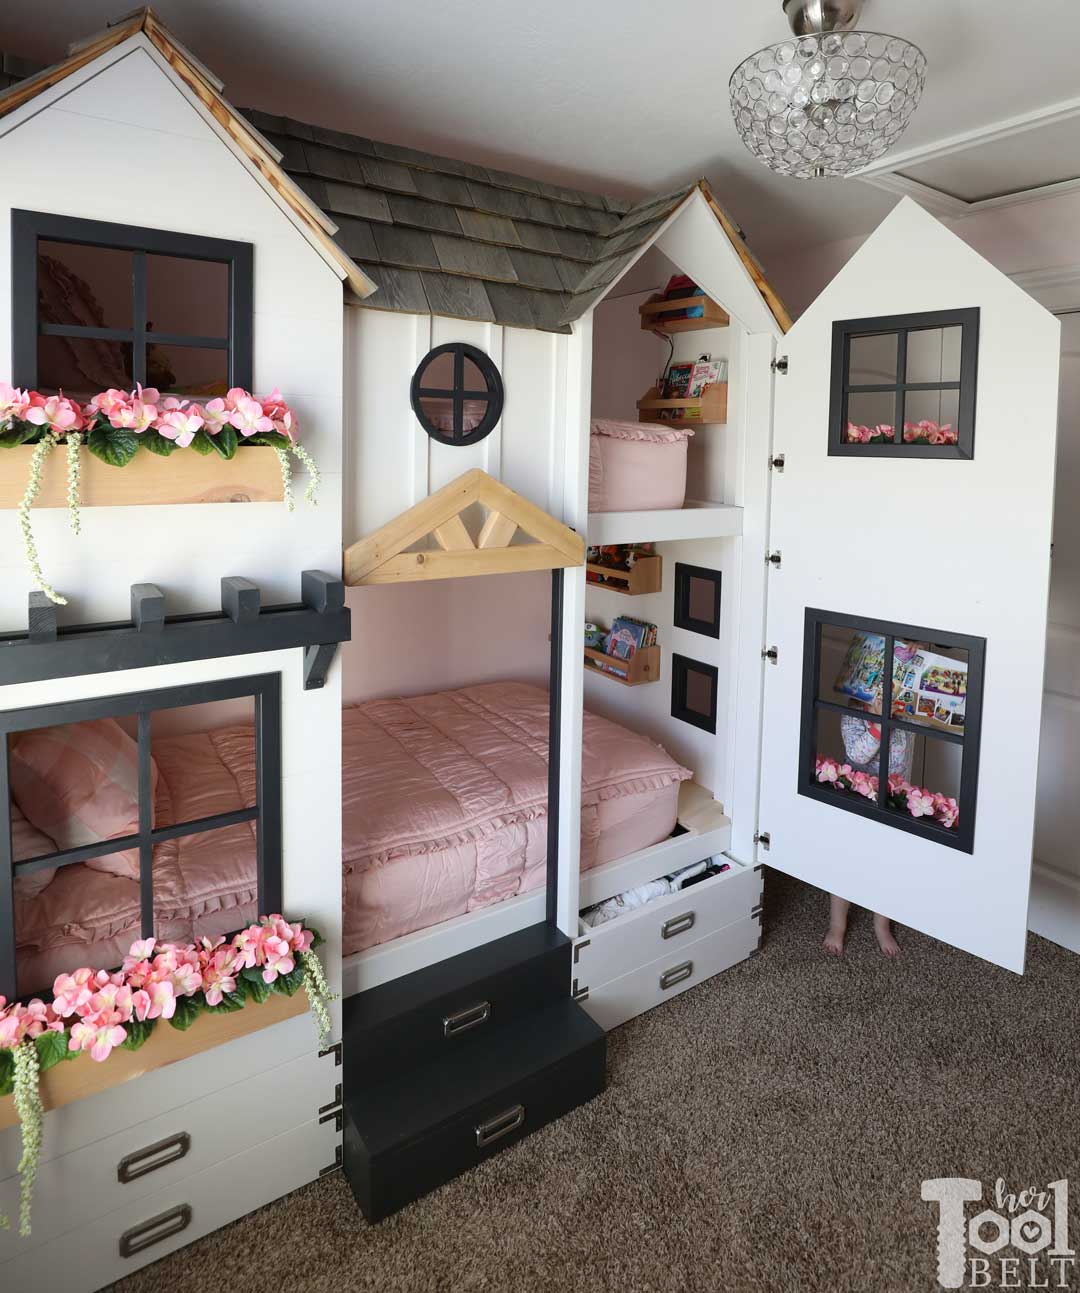
My girls are rollers in their sleep, so creating an enclosed bunkbed is a must. I also thought it would make sharing a small room more pleasant, if their bed was super cute. 🙂 The enclosed beds create their own tiny places.
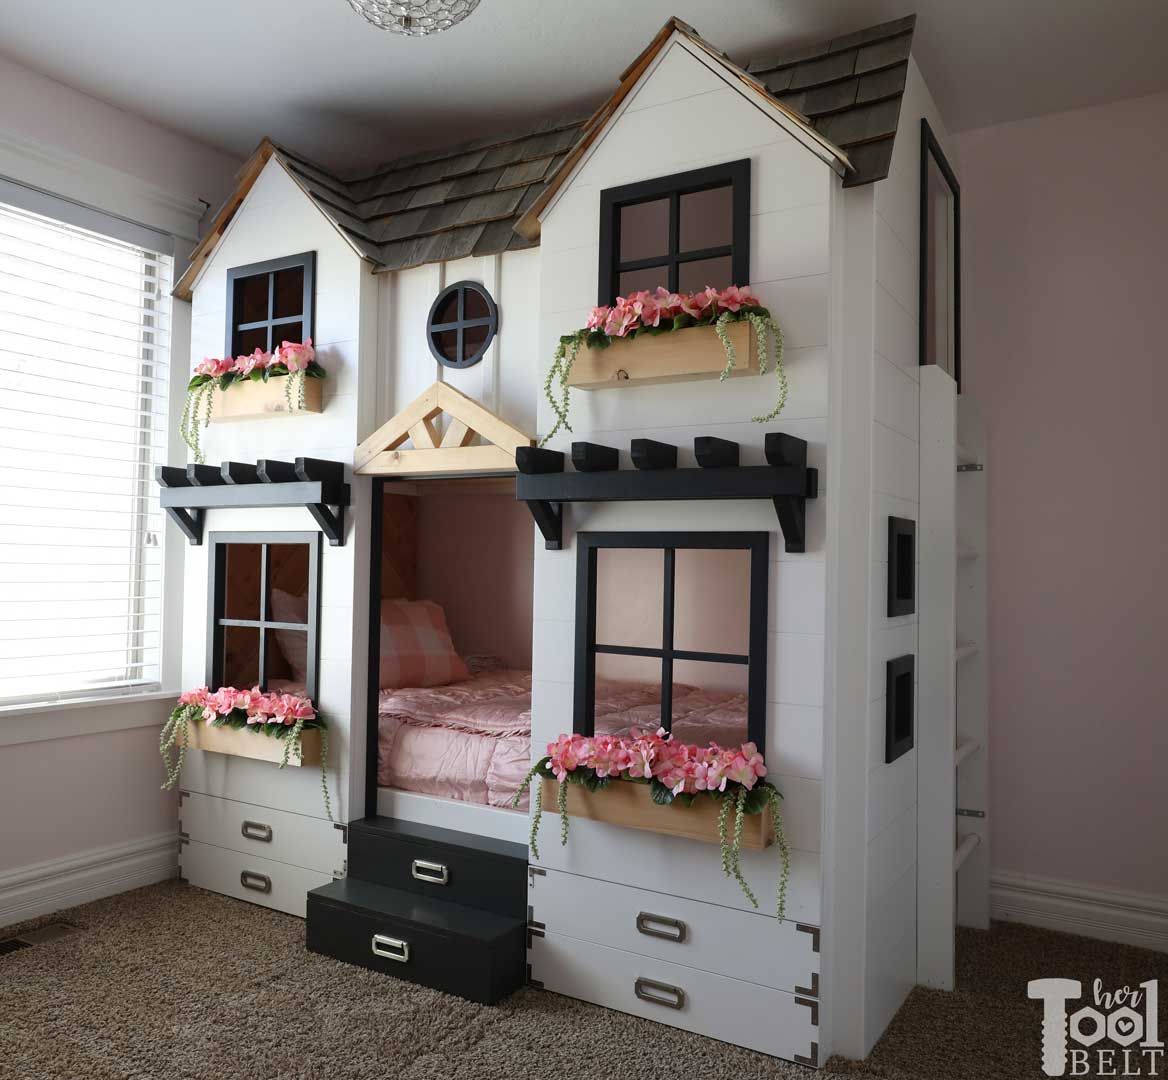
Our bedrooms are not very large, so I was limited on the space the bunk bed could take. Otherwise the closet doors could not open. 🙂
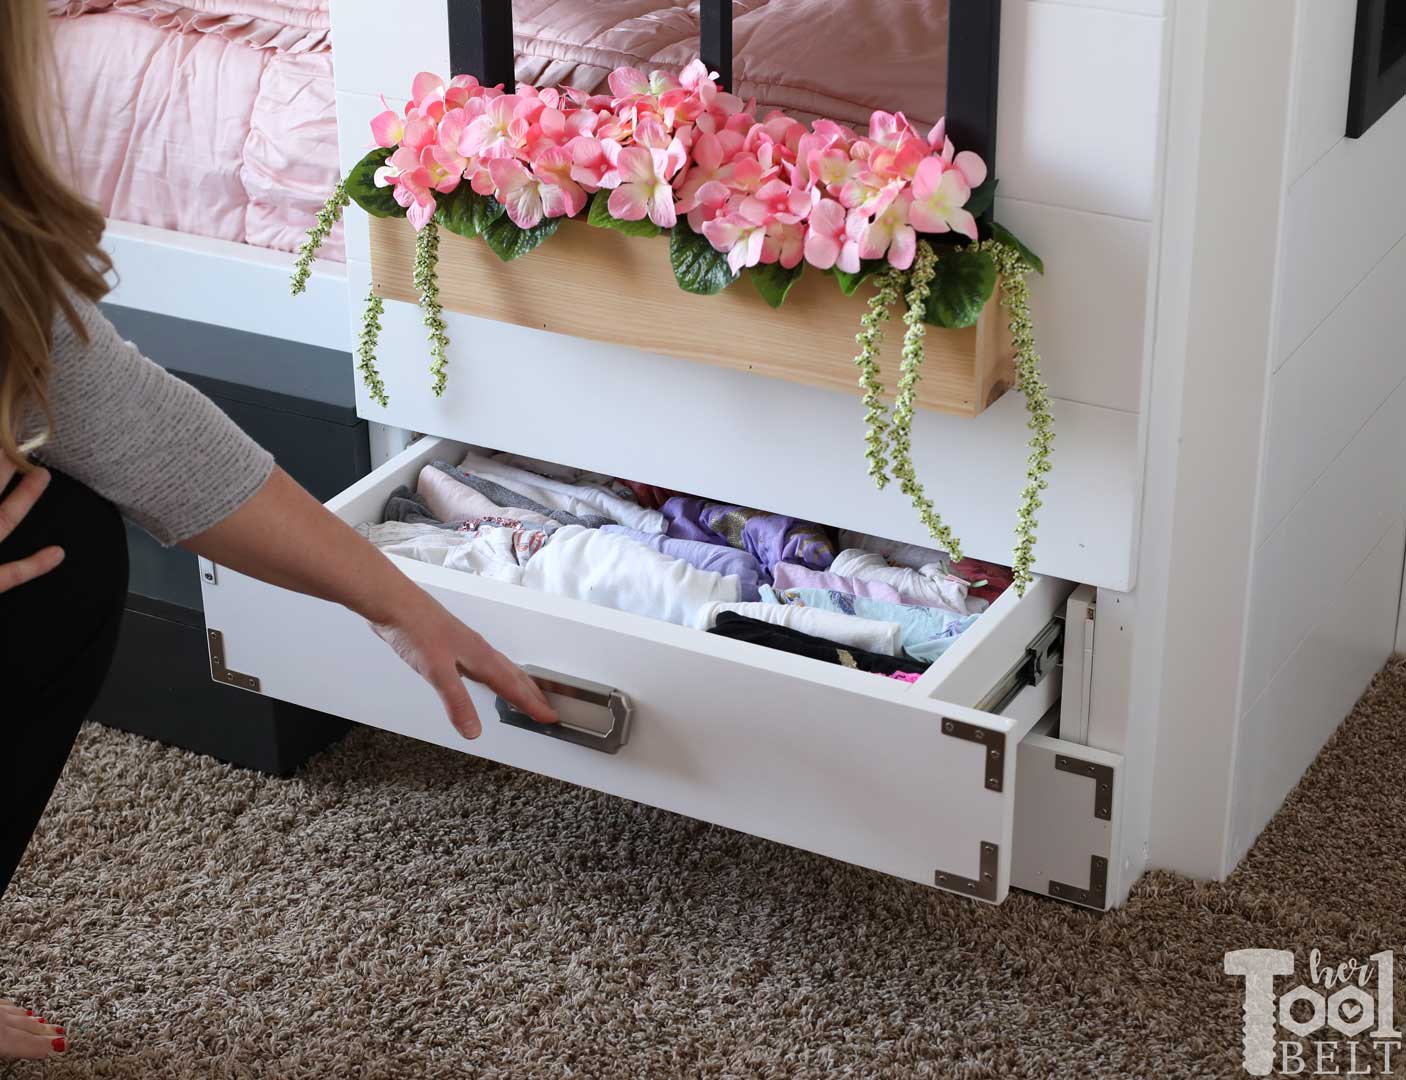
An optional feature for this bunkbed are drawers under the bed. We are definitely lacking for storage at our house, so I add storage options wherever possible. They each get 3 drawers. I’ve been trying to work on the Konmari method for folding, and these drawers work well for kids clothing.
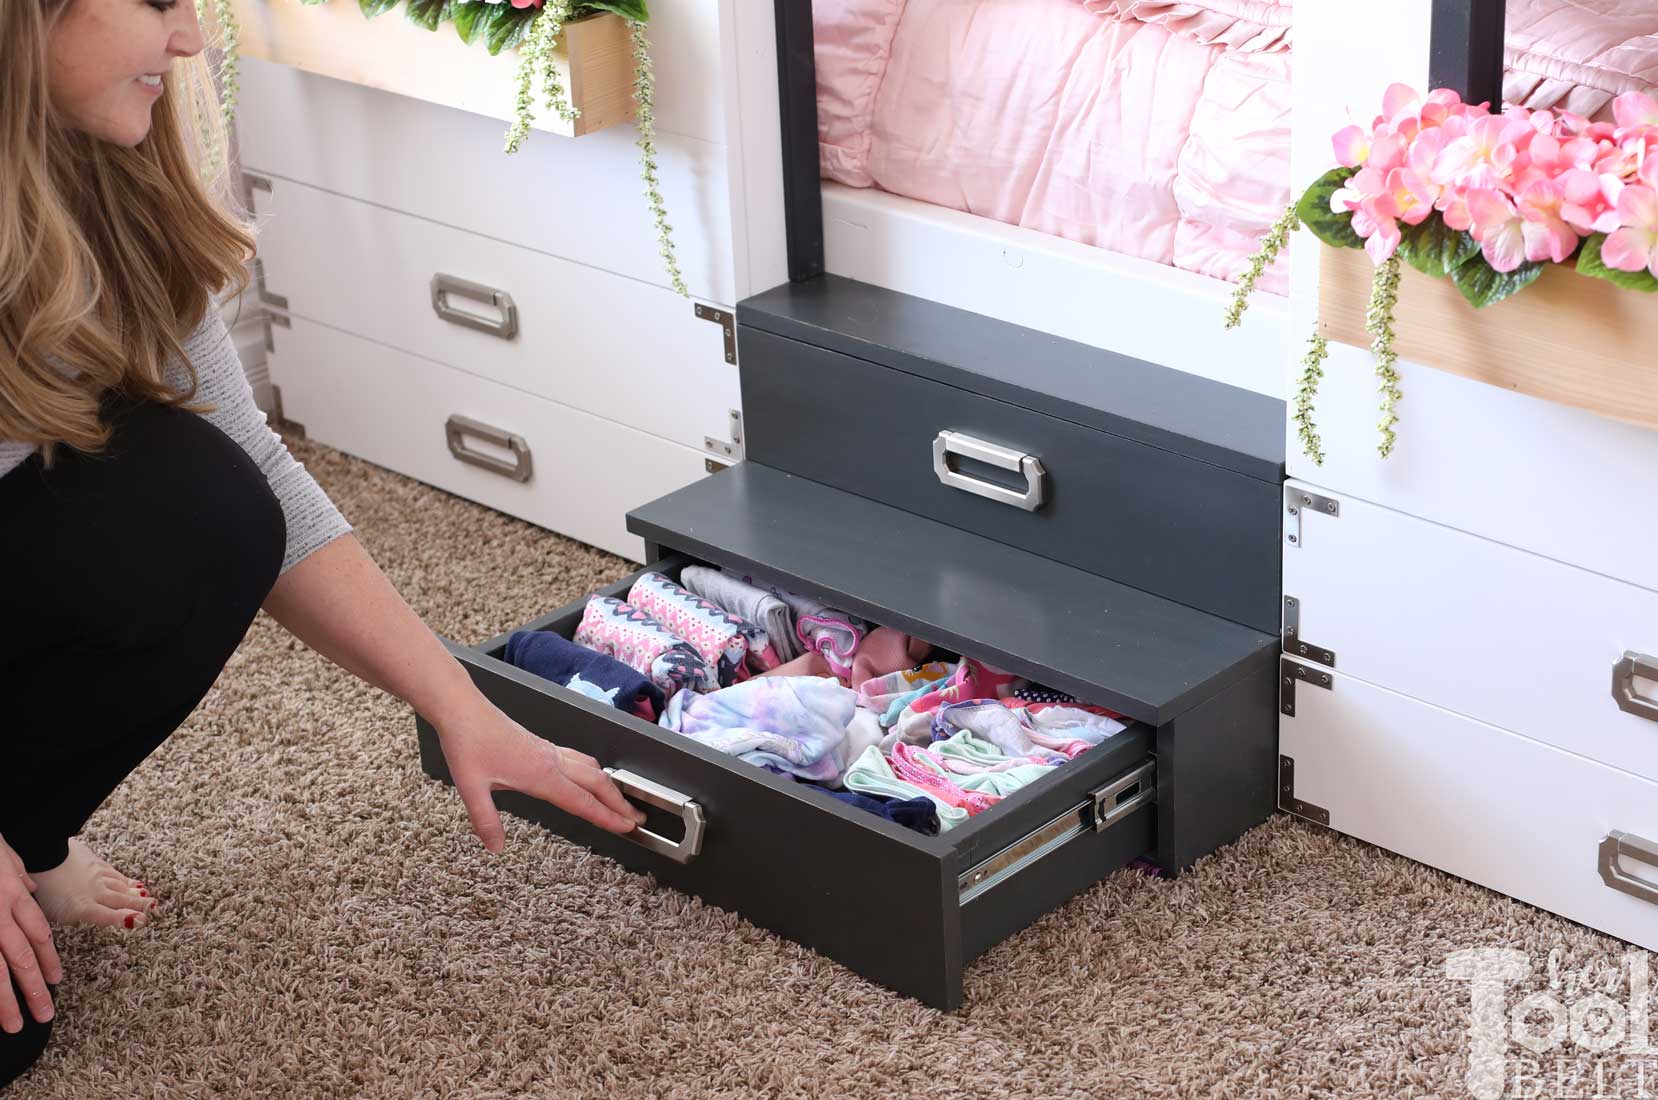
 Drawers in the stairs too.
I added simple book shelves (or Paw Patrol shelves) for story time.

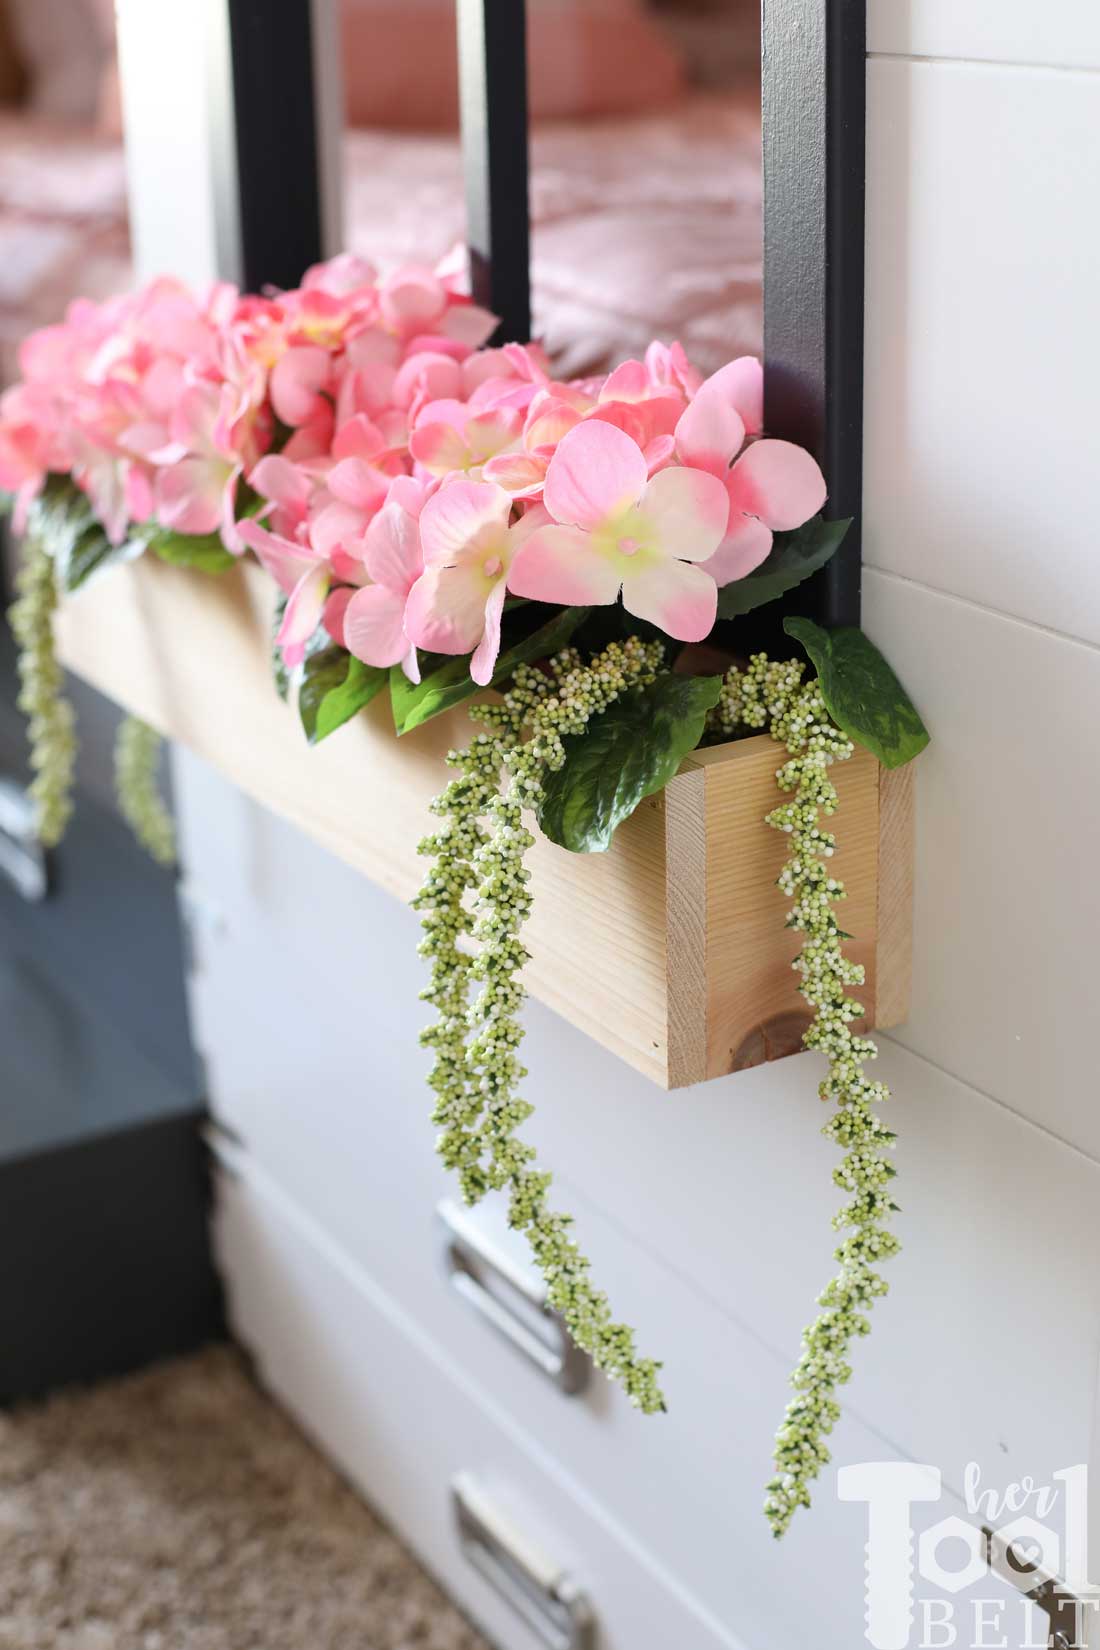
Cedar planter boxes with pink florals add some color and fun.
Ok, I know what you’re thinking. How do you change the bedding?
This is totally optional, but I put the front panels on hinges. This makes it easy to reach into the front and back of the bedding. But honestly with using zip up bedding, like Beddy’s, changing the bedding is easy enough that the hinging doors aren’t essential, but nice to have for Mom.
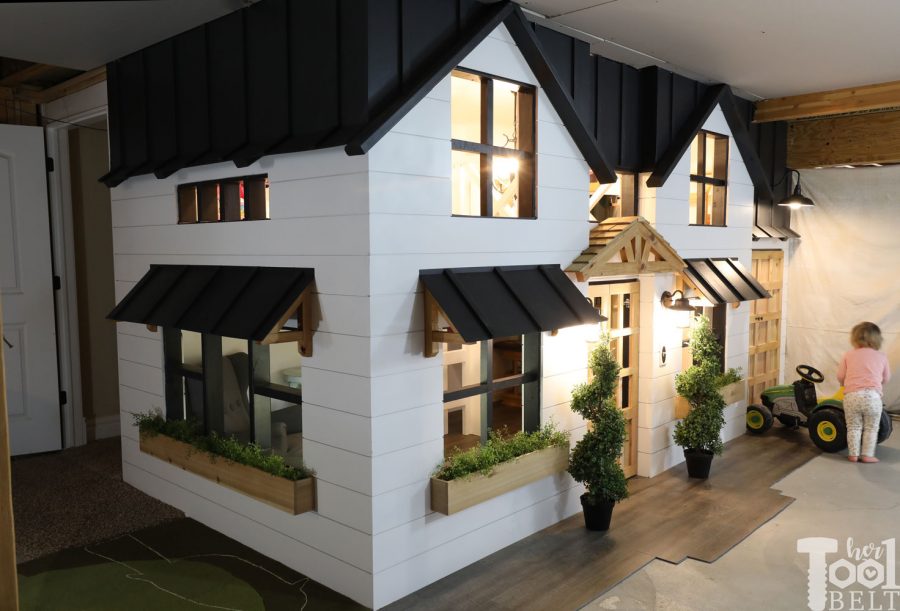
 Love tiny houses? Check out my fun basement playhouse.
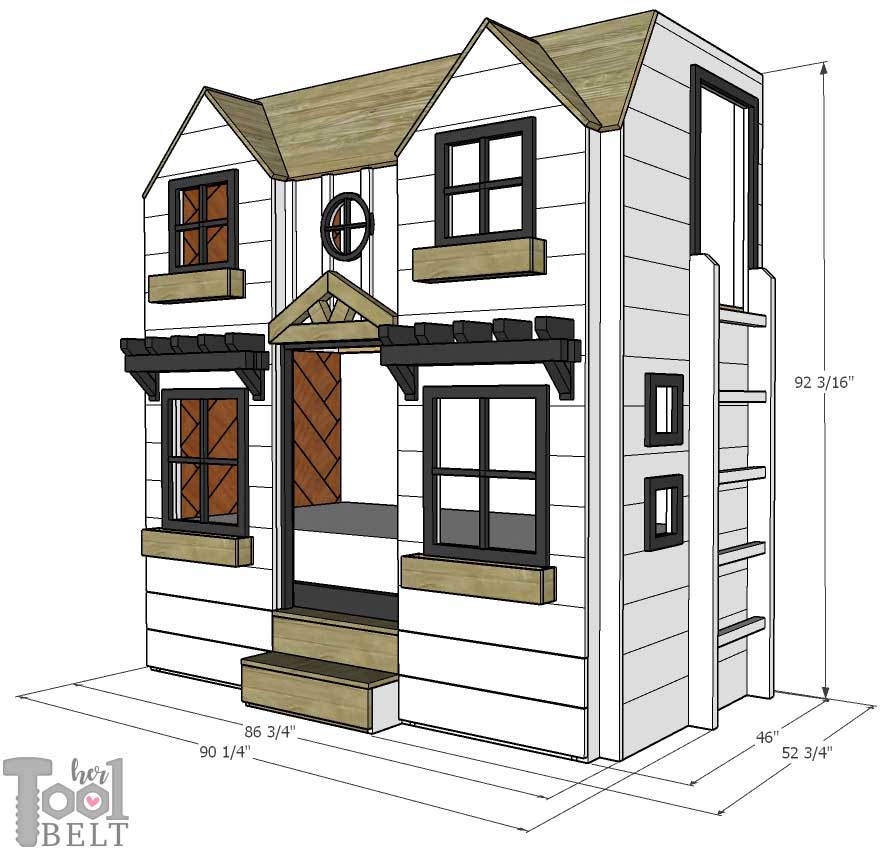
How to Build a House Bunk Bed
This post contains some affiliate links for your convenience. Click here to read my full disclosure policy.
Printable plans available to download at end of blog post.
Materials
(Links provided for convenience)
- 21 – 2×4 x 8′ studs
- 5 – 2×2 x 8′ boards (4 if doing dowels for ladder rungs)
- 3 – 2×3 x 8′ boards (optional for window pergolas and timber portico)
- 1 – 1×3 x 8′ boards
- 1 – 1×2 x 8′ board (optional for window pergola, only need about 18 1/2″ if you have scraps)
- 5 – 3/4″ sheets of plywood (4′ x 8′)
- 6 – 1×4 x 8′ boards (bottom mattress support)
- Upper mattress support, pick one of the following:
- 6 – 1×6 x 10′ Tongue and Groove Pine Siding (or 8 – 1×6 x 8′)
- 6 – 1×4 x 8′ boards
- 3/4″ plywood sheet
- 3 – 1 1/4″ diameter x 4′ hardwood dowels – Optional for round ladder rungs
- 16 – 19/32 in x 5-1/2 in x 6 ft. Cedar Wood Fence Picket (thickness isn’t very important) (9 – herringbone headboard, 4 – planter boxes, 3 – bookshelves)
- 1 – 1/2″ x 3 1/2″ x 8′ pre-primed MDF
- 1 – 1/2″ x 2 1/2″ x 8′ pre-primed MDF
- 10 – 1/2″ x 1 1/2″ x 8′ pre-primed MDF
- Cedar Shingle Siding – I used old weathered cedar shingles to create the roof from my old playset
- cut up pieces of Cedar Fence Pickets may give a similar look
- Wood Glue
- 1 1/4″ brad nails
- 2″ brad nails
- 1 1/4″ pocket hole screws
- 2 1/2″ pocket hole screws
- 3″ wood screws
- 22″ drawer slides
- 6 – drawer pulls
- 4 or 5 pair – cabinet hinges
- Corner brace for ladder
- 2 – latches
- Paint Primer
- White Paint
- Charcoal (blackish) Paint
- Gray stain (for stairs)
- Spackle
- Sandpaper
Cost Estimates
Wood cost can vary regionally, and may be high during the pandemic. I purchased the wood before the quarantine.
- The House Bunk Bed with the optional drawers/full extension drawer runners, hinging doors cost about $700 to build.
- The House Bunk Bed without drawers and hinging doors cost a little over $400 to build.
Tools Used
- Miter Saw
- Drill
- Circular Saw
- Rockler Straight Edge Clamp Guide (52″-104″)
- Tape Measure
- Brad Nailer
- Rockler Drawer Front Installation Clamps
- Jig It concealed hinge drilling system
- Sander
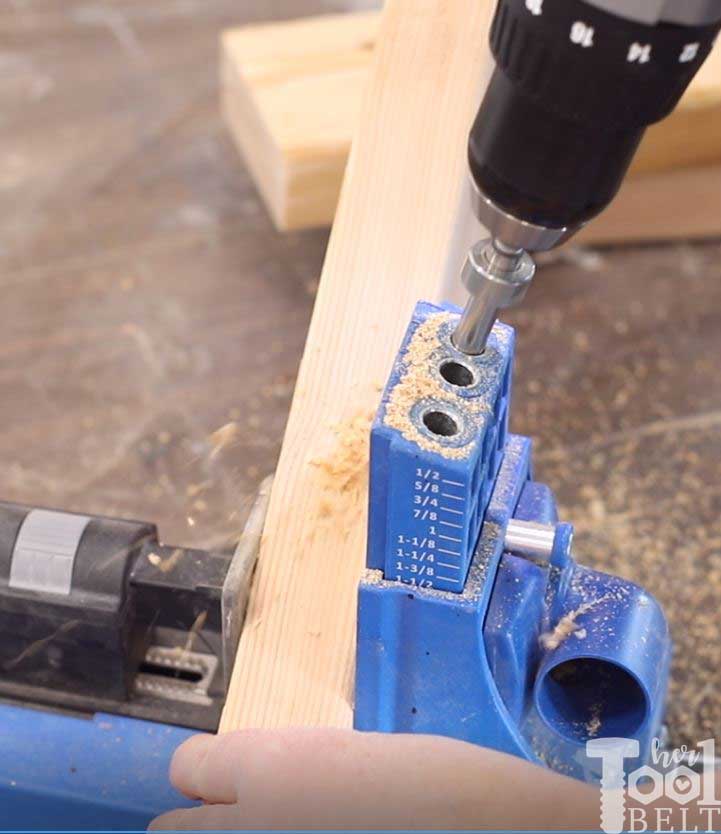
- Kreg pocket hole jig
- Clamps
- Square clamp
- Jig Saw or scroll saw
- Drill bits
- Spade bits
- Paint Sprayer
- Planer
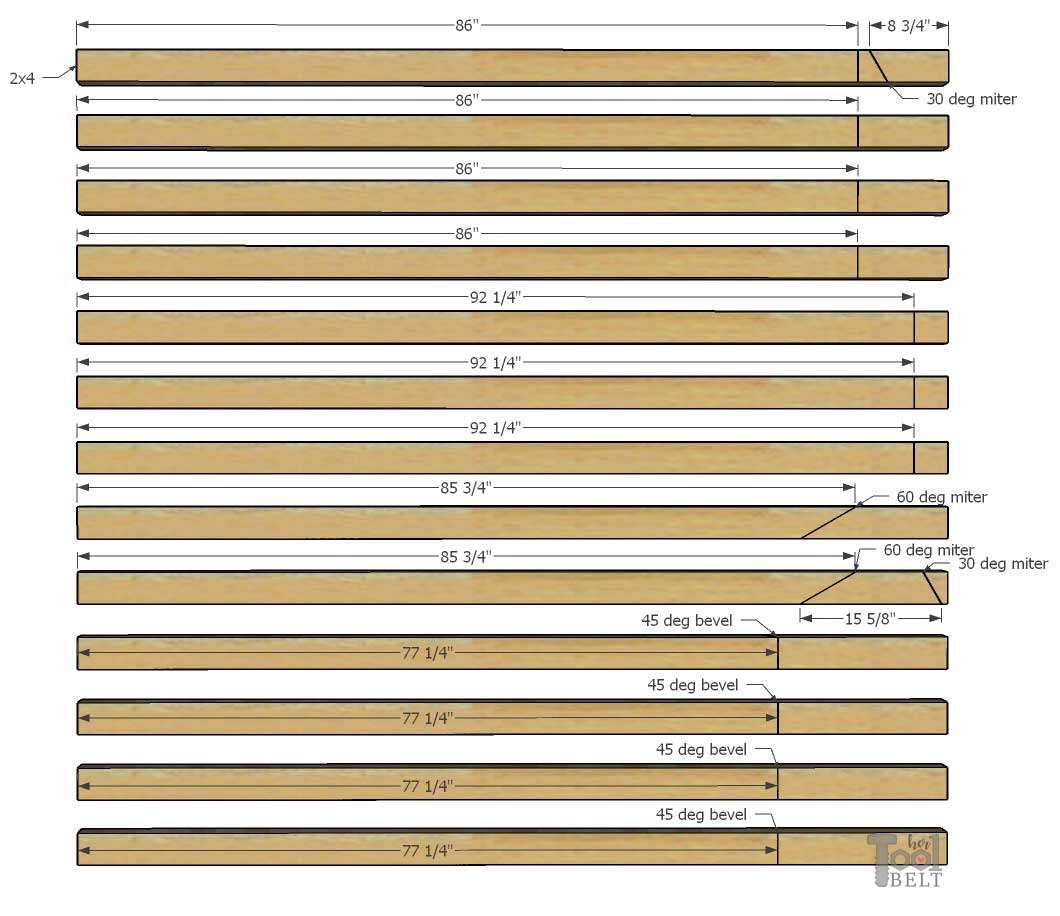
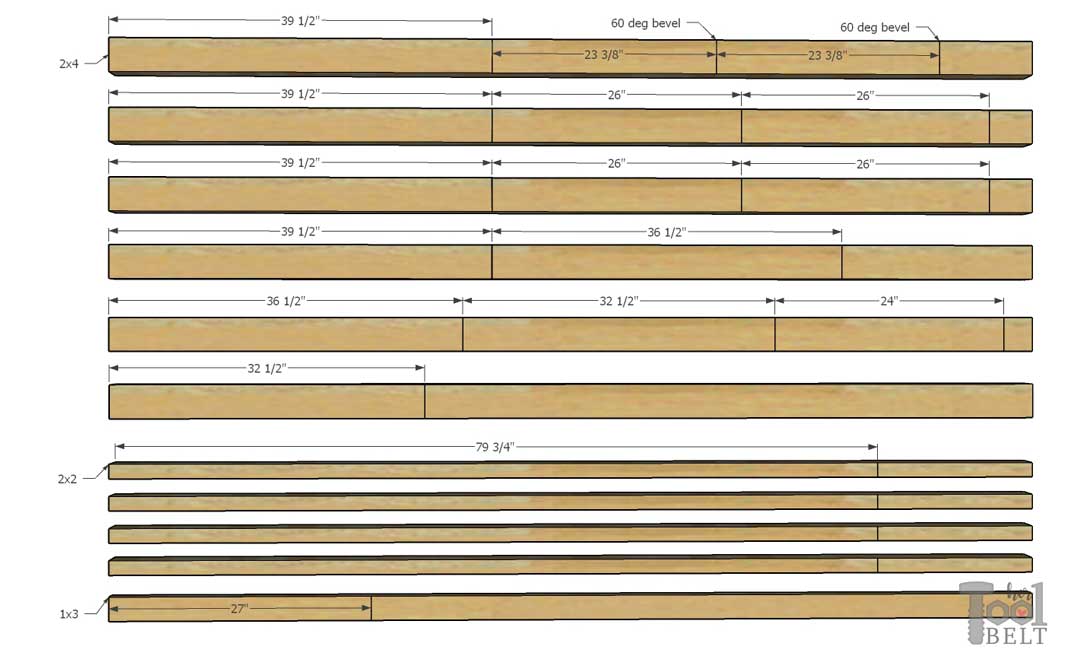
Bunk Bed Frame Cut List
The Materials list uses the common board names like ‘2×4’ , the cut list uses the actual dimensions like ‘1 1/2″x 3 1/2″‘.
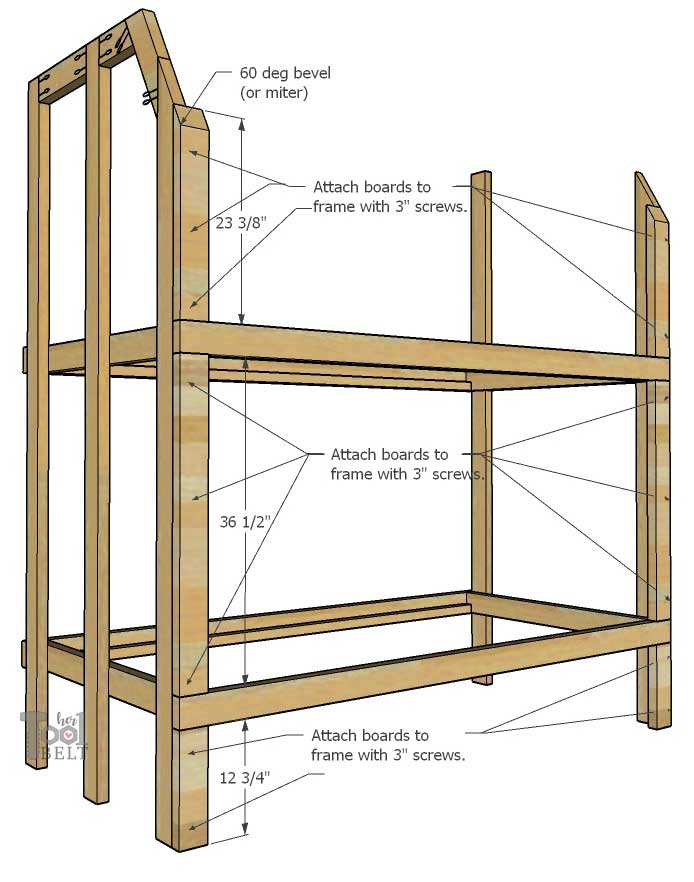
- 4 – 1 1/2″ x 3 1/2″ x 86″ (2×4)
- 1 – 1 1/2″ x 3 1/2″ x 8 3/4″ (2×4) – one end cut on a 30 deg miter
- 3 – 1 1/2″ x 3 1/2″ x 92 1/4″ (2×4)
- 2 – 1 1/2″ x 3 1/2″ x 85 3/4″ (2×4) – one end cut on a 60 deg miter
- 1 – 1 1/2″ x 3 1/2″ x 15 5/8″ (2×4) – one end cut on a 60 deg miter, one end cut on a 30 deg miter.
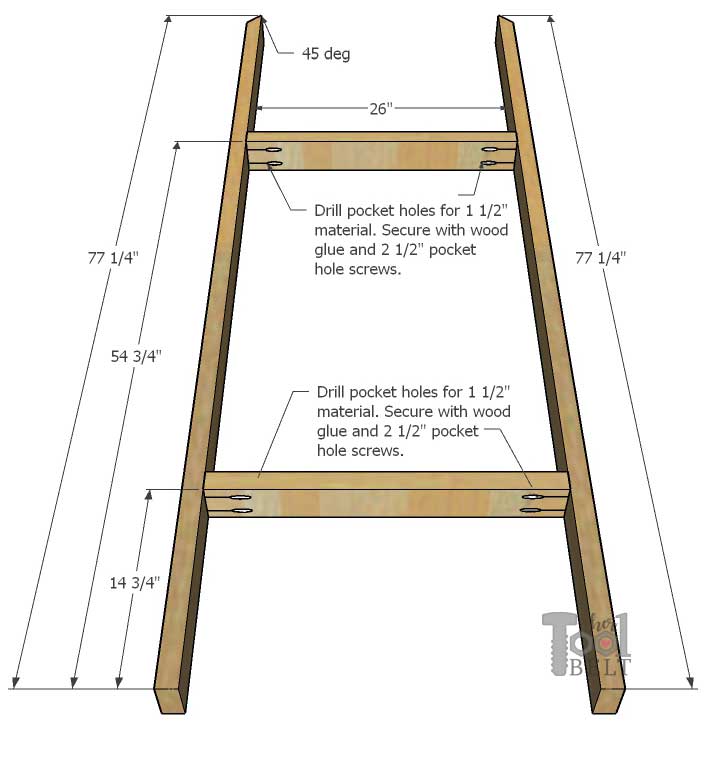
- 4 – 1 1/2″ x 3 1/2″ x 77 1/4″ (2×4) – one end cut on a 45 deg bevel
- 4 – 1 1/2″ x 3 1/2″ x 39 1/2″ (2×4)
- 2 – 1 1/2″ x 3 1/2″ x 23 3/8″ (2×4) – one end cut on a 60 deg bevel
- 4 – 1 1/2″ x 3 1/2″ x 26″ (2×4)
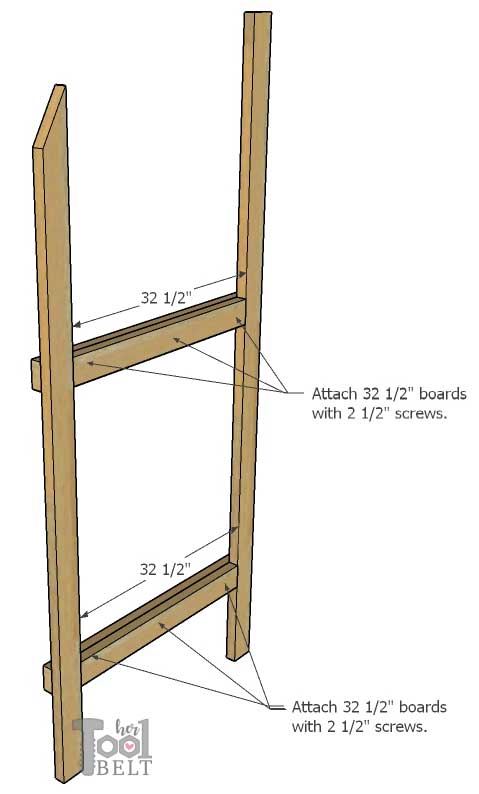
- 2 – 1 1/2″ x 3 1/2″ x 36 1/2″ (2×4)
- 2 – 1 1/2″ x 3 1/2″ x 32 1/2″ (2×4)
- 1 – 1 1/2″ x 3 1/2″ x 24″ (2×4)
- 4 – 1 1/2″ x 1 1/2″ x 79 3/4″ (2×2)
- 1 – 3/4″x 2 1/2″ x 27″ (1×3)
Bunk Bed Frame Cut Diagrams
How to Build the House Bunk Bed Frame
Cut the boards according to the cut list above.
Assembly Head End
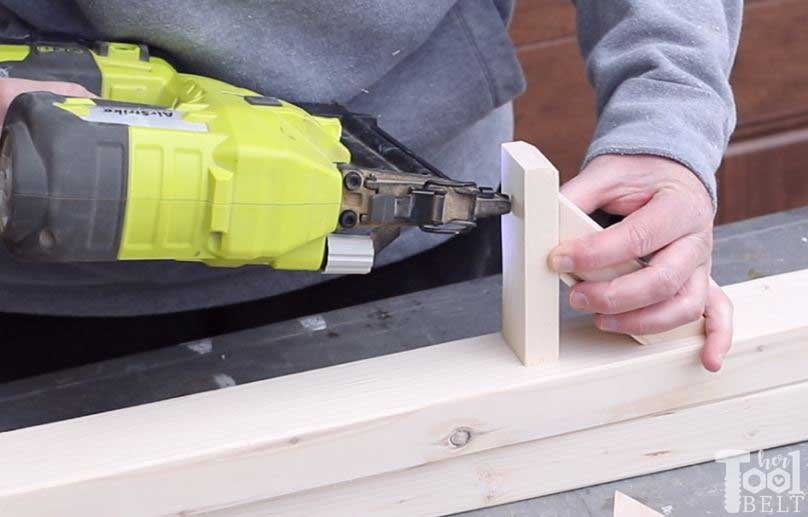
Drill pocket holes for 1 1/2″ material in both ends of the 14 1/2″ board, 8 3/4″ board with 30 deg miter. Drill pocket holes for 1 1/2″ material in the 60 deg miter side of the 15 5/8″ board (see orientation below). Note: sometimes pocket holes on angle boards will look like holes in the side of the board.
Use wood glue and 2 1/2″ pocket hole screws to attach the 14 1/2″ board flush with the top of two 92 1/4″ boards. Use wood glue and 2 1/2″ pocket hole screws to attach the 8 3/4″ board flush with the top of a 92 1/4″ board, and to the 15 5/8″ board making the 30 deg miter flush with the top. Also use wood glue and 2 1/2″ pocket hole screws to attach the 85 3/4″ 60 deg miter to the 15 5/8″ 60 deg miter as shown.
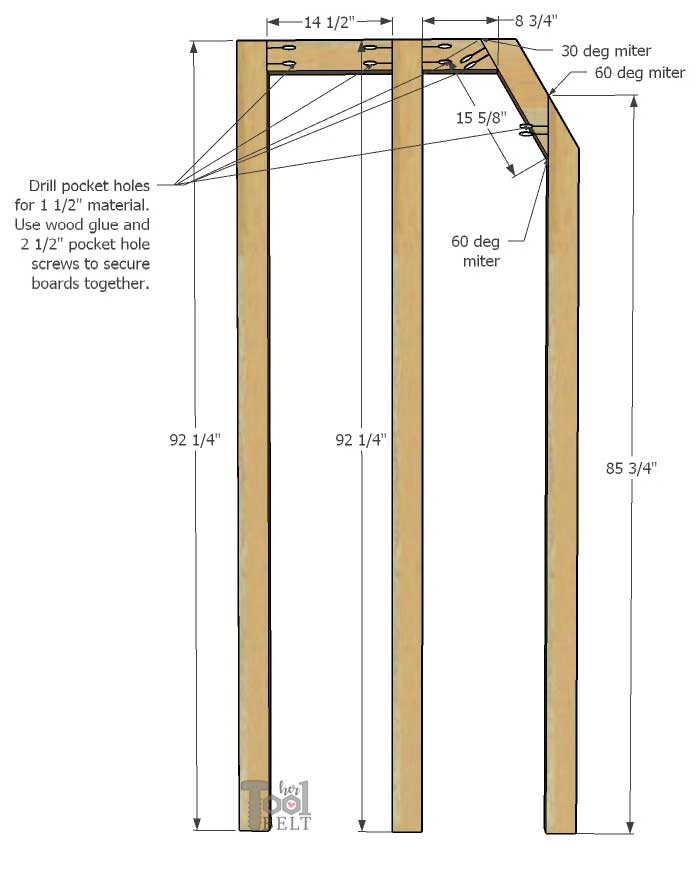 /
/Assembly Foot End
Flip the assembly over, so the pocket holes are facing the backside.
Measure and mark 52 3/4″ and 12 3/4″ up from the bottom of the 92 1/4″ boards. Secure a 39 1/2″ board to the 52 3/4″ and 12 3/4″ locations with (2 or 3) 2 1/2″screws into each leg. Bottom of board lines up with mark. Make sure to keep the leg spacing even, and square when attaching 39 1/2″ boards. 39 1/2″ board ends should be flush with sides of legs
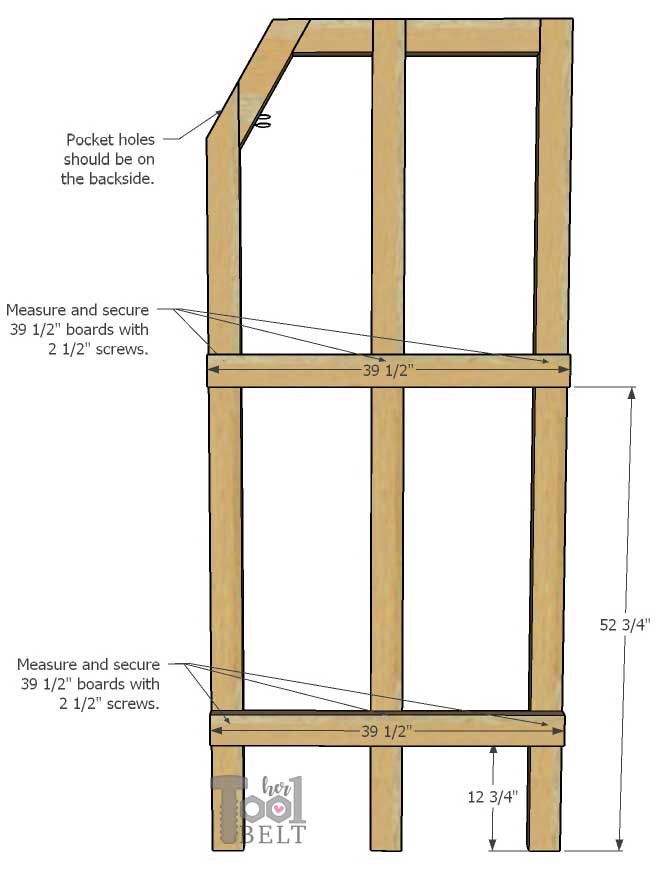
Get a 92 1/4″ and a 85 3/4″ (with 60 deg miter), measure and mark 52 3/4″ and 12 3/4″ up from the bottom of the boards. Orient the 85 3/4″ board as shown below. Secure a 39 1/2″ board to the 52 3/4″ and 12 3/4″ locations with (2 or 3) 2 1/2″screws into each leg. Bottom of board lines up with mark. Make sure to keep the legs and 39 1/2″ boards square when attaching 39 1/2″ boards. 39 1/2″ board ends should be flush with sides of legs.
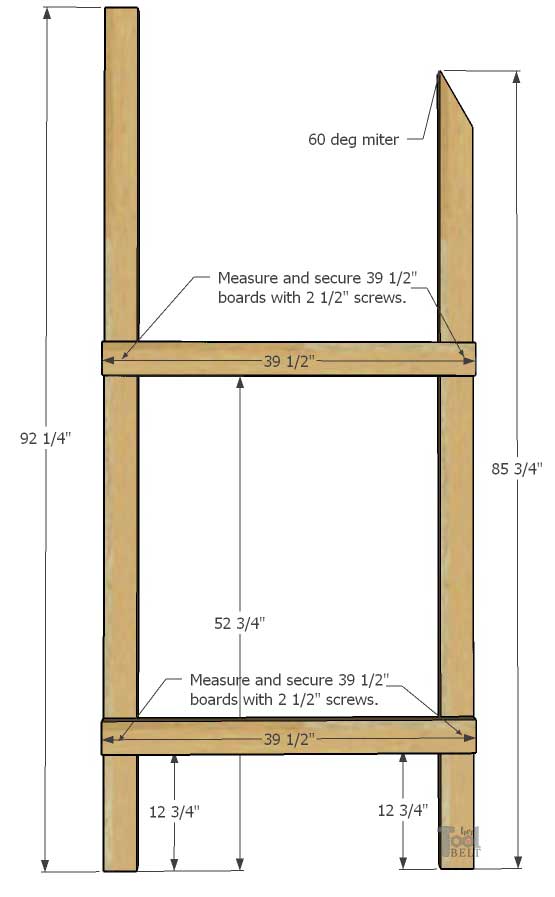
Secure a 32 1/2″ board (trim to fit as needed) to both 39 1/2″ boards with 2 1/2″ screws in a few places.
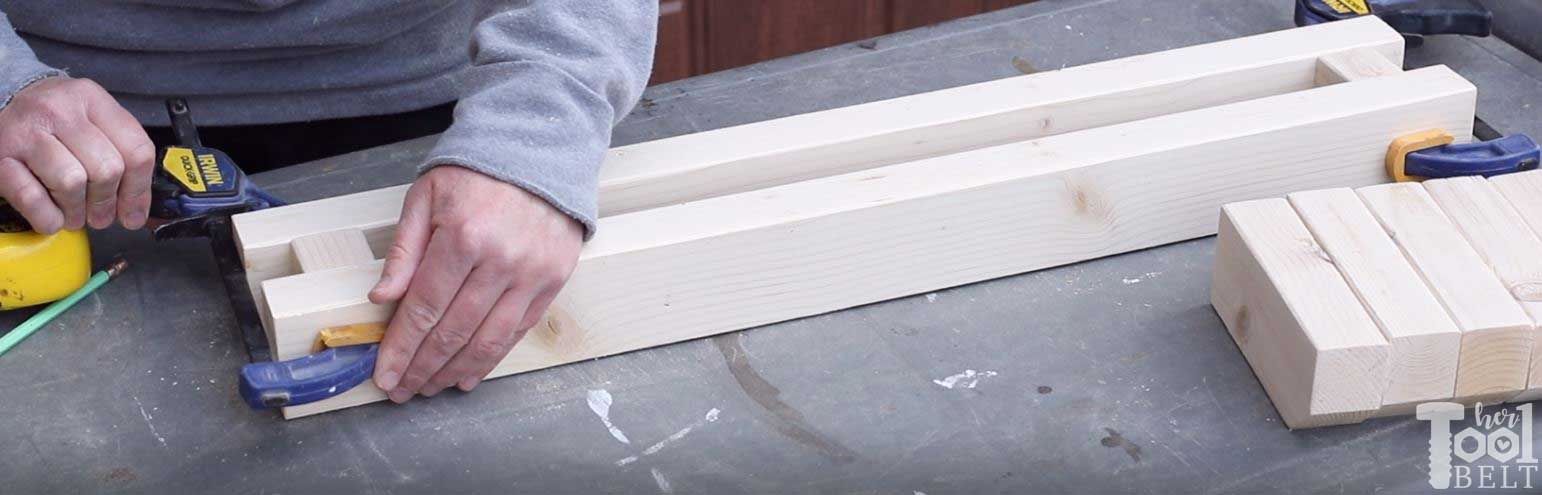
Assemble Bed Rail
Find the center of each 86″ board and the center of each 79 3/4″ (2×2) board. Use wood glue and 2 1/2″ screws to attach a 79 3/4″ (2×2) flush with the bottom of each 86″ board. Place a 2 1/2″ screw about every 10″-12″.

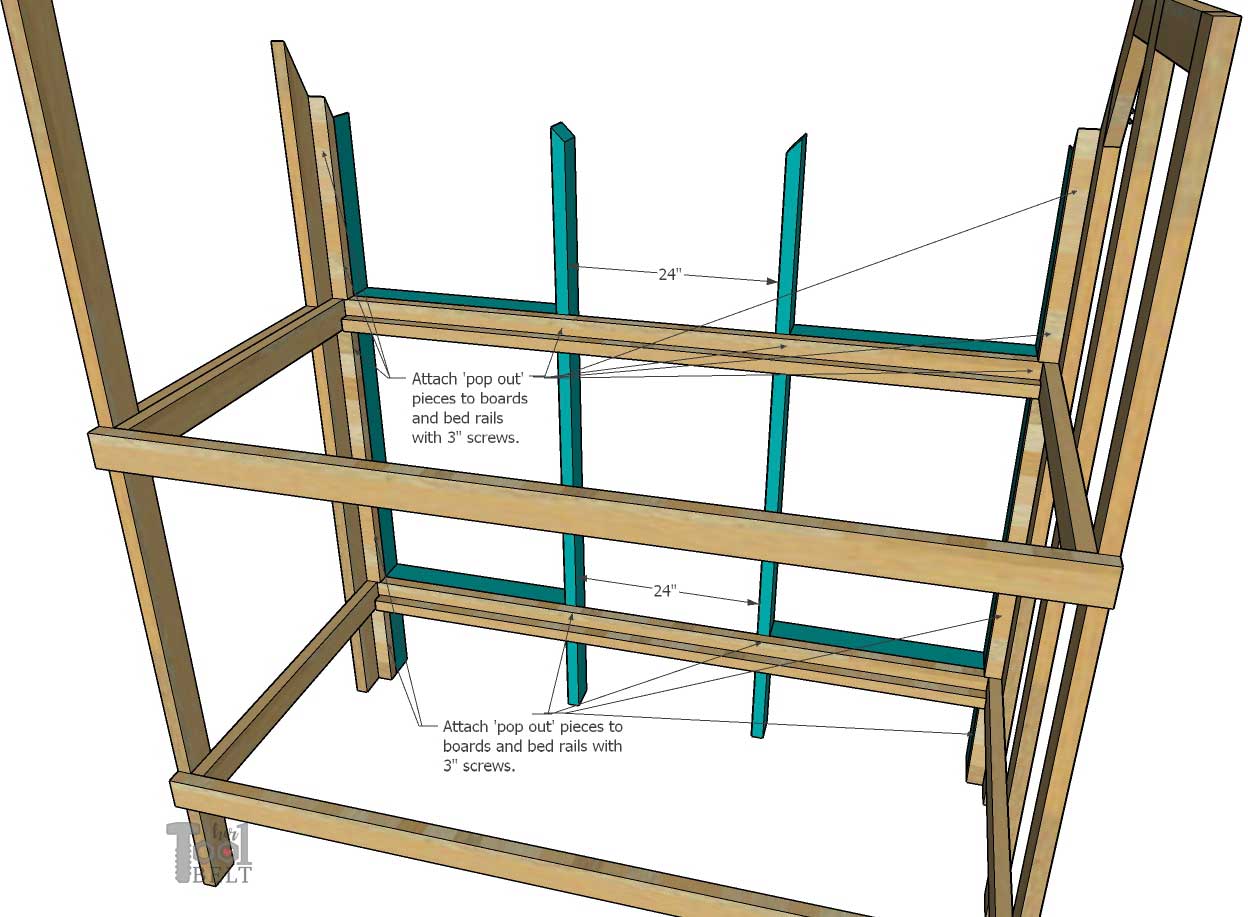
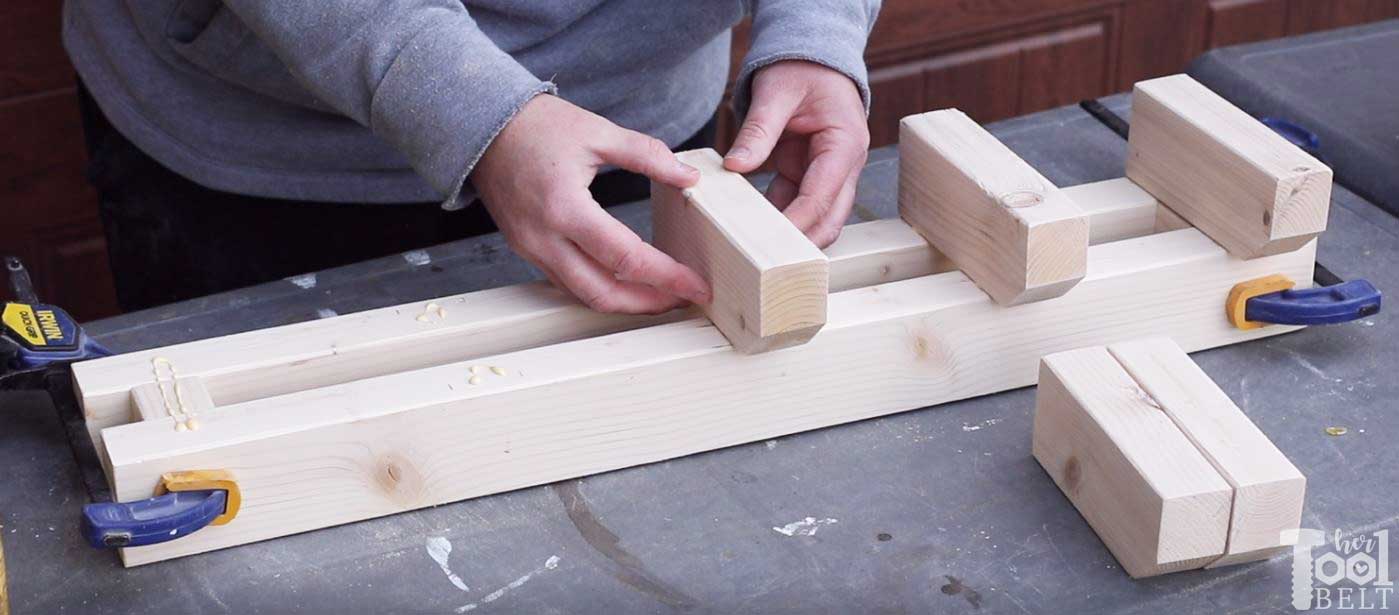
Assemble Pop Outs
Get 4 – 26″ boards, and drill pocket holes for 1 1/2″ material in each end.
Get 4 – 77 1/4″ boards with 45 deg bevels at the top. Measure and mark 54 3/4″ and 14 3/4″ from the bottom of the 77 1/4″ boards. Orient 2 of the 77 1/4″ as shown below, peaks on the inside. Use wood glue and 2 1/2″ pocket hole screws to attach a 26″ board at each mark (bottom of board lines up with mark).
Repeat to make 2 of pop out assemblies.
Assemble Bed Frame
Measure and mark 52 3/4″ and 12 3/4″ up from the bottom of the head end and foot end. Secure a bed rail at each mark (bottom of bed rail on mark), with (2 or 3) 3″ screws into each leg. If needed, drill pilot holes first to avoid splitting the bedrail boards.
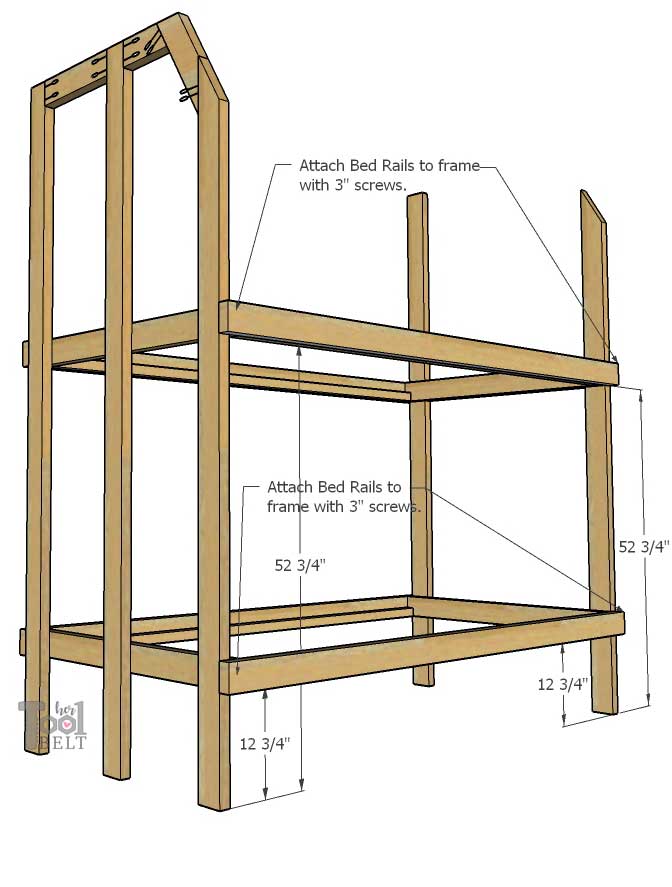
On the front side of the bed, attach the following boards on each corner with 3″ screws, it may be helpful to drill pilot holes to avoid splitting the boards. Attach a 12 3/4″ board below the bottom bedrail, 36 1/2″ between the bedrails and 23 3/8″with 60 deg miter above the top bed rail.
Line up the pop outs to be flush with the sides of the (12 3/4″, 36 1/2″ and 23 3/8″) boards. The space between the two pop outs should be 24″. Attach the pop out assemblies to the bed rails and (12 3/4″, 36 1/2″ and 23 3/8″) boards with 3″ screws.
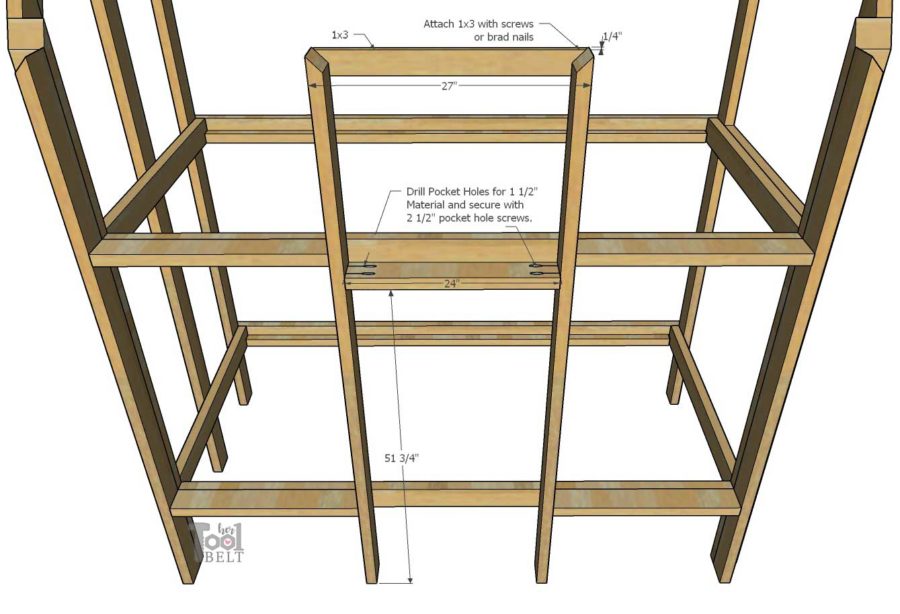
Drill pocket holes for 1 1/2″ material in each end of a 24″ board. ***If you are doing the timber portico, also drill a couple pocket holes going towards the front of the board (on the bottom side) to attach the portico later.***
On the 2 inside pop out legs, measure and mark 51 3/4″ up from the bottom. Use 2 1/2″ pocket hole screws to attach the 24″ board to the 2 inside pop out legs (bottom of board lines up with mark). Also attach a 27″ (1×3) about 1/4″ down from the peak of the 2 inner pop out legs with screws or brad nails (1 1/4″ minimum length).
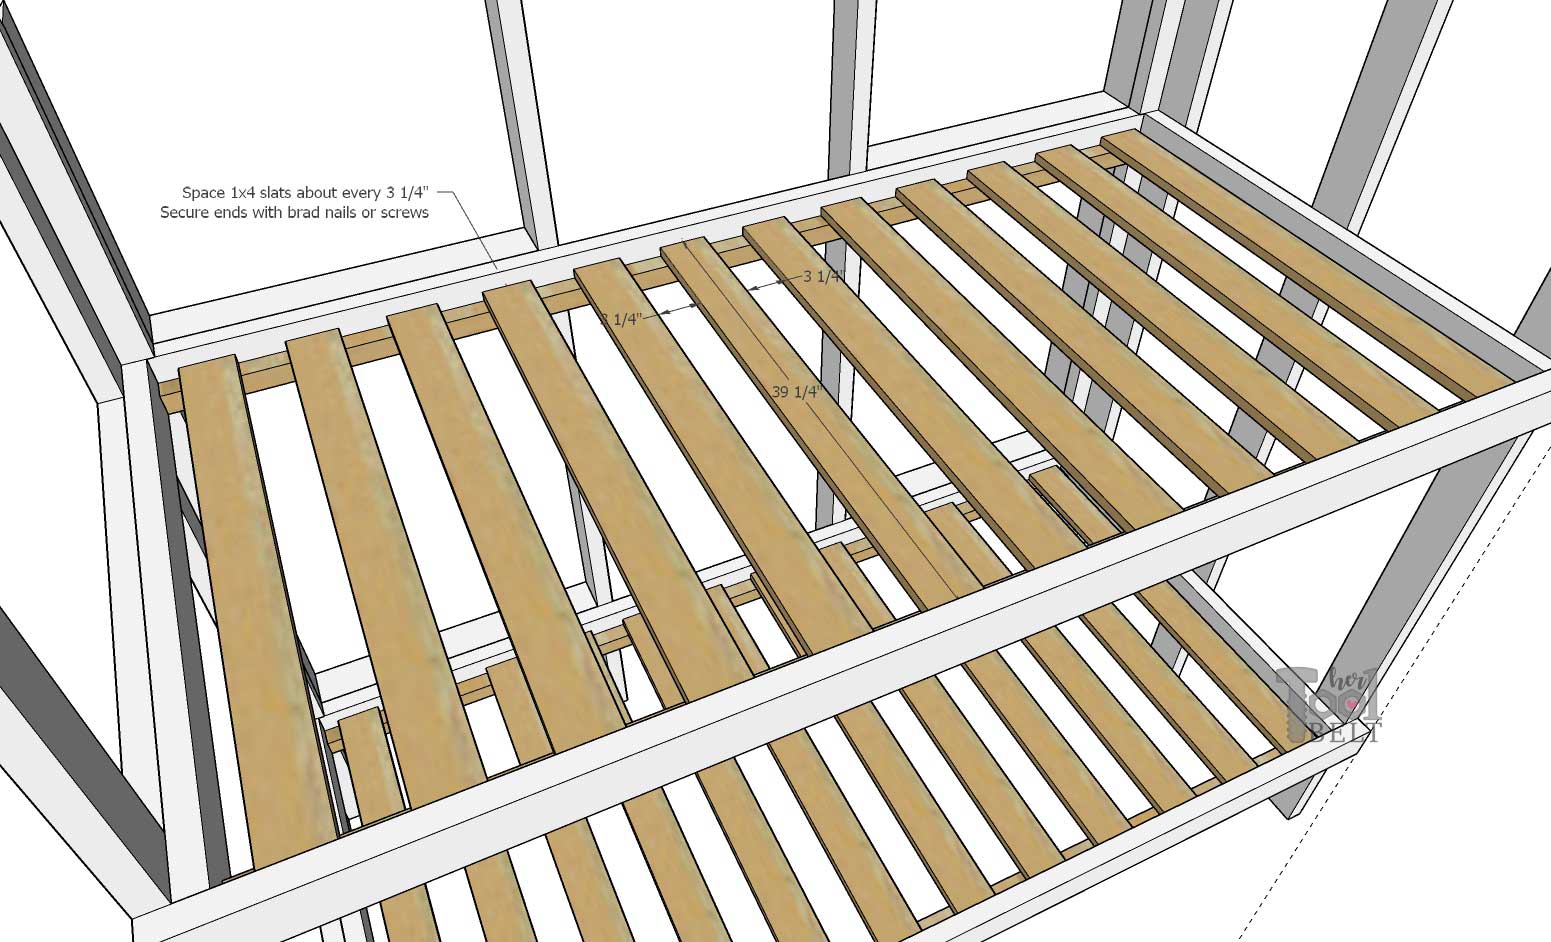
 Mattress Support Slats

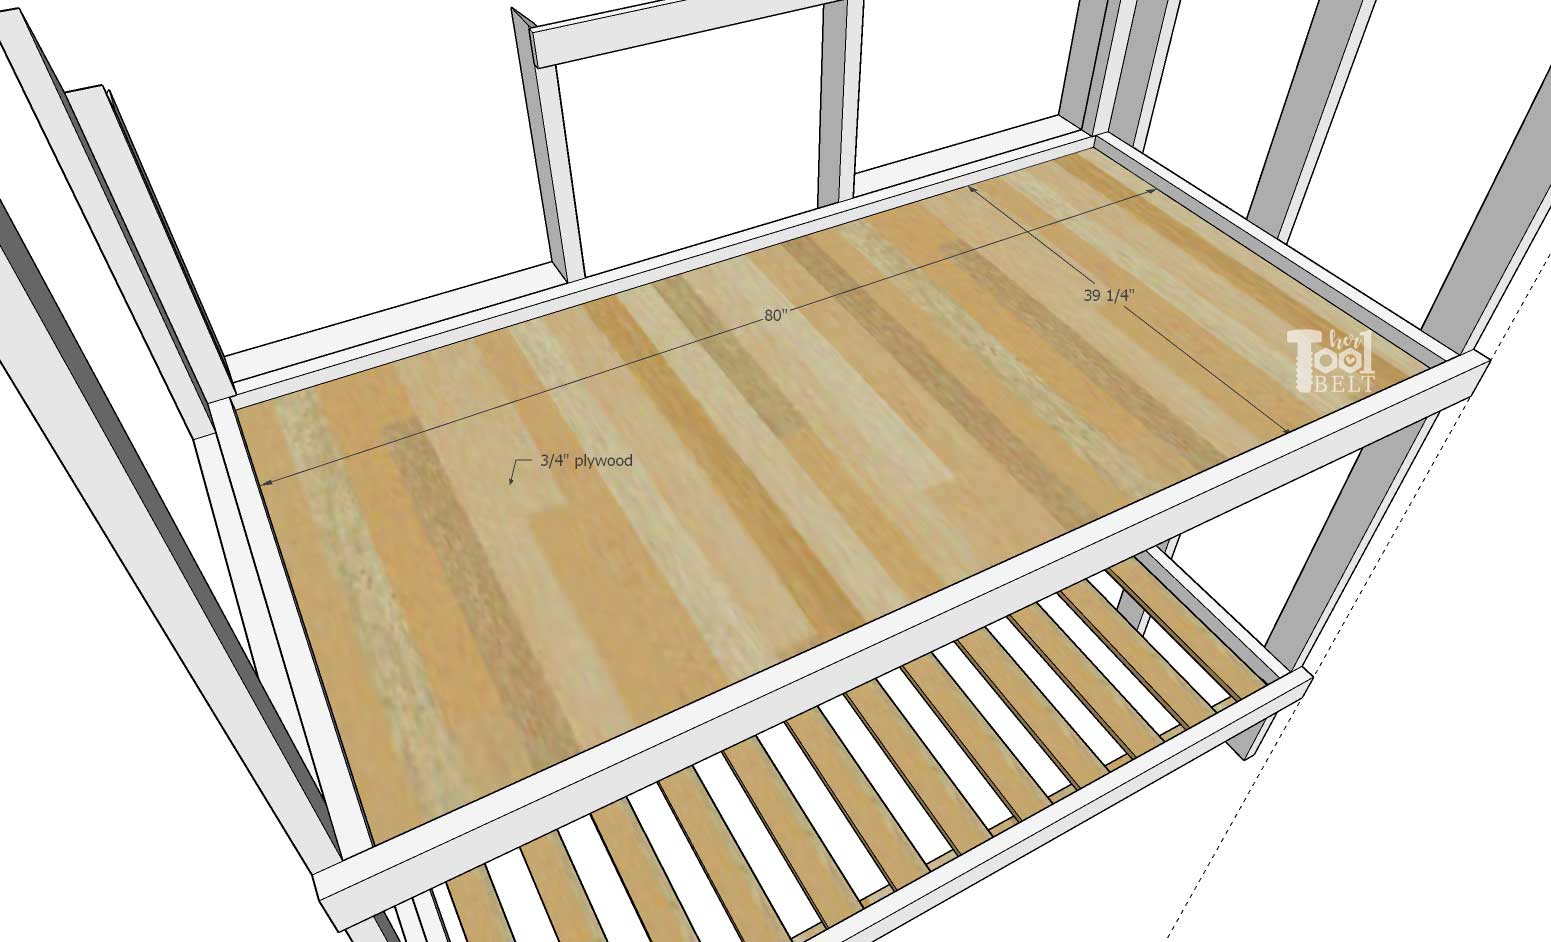
Various options are available to support the mattresses. On the bottom mattress, I used 1×4’s spread out ever 3 1/4″ or so. I wanted the bottom bunk ceiling to have a more finished look, so I used 1×6 tongue and groove to support the upper mattress. 3/4″ plywood is also a good option for supporting either mattress.
- Lower mattress support – cut 12 slat pieces 3/4″ x 3 1/2″ x 39 1/4″
- Upper mattress support, pick one of the following:
- cut 16 pieces 39 1/4″ long of (6 – 1×6 x 10′ Tongue and Groove Pine Siding (or 8 – 1×6 x 8′))
- cut 12 slat pieces 3/4″ x 3 1/2″ x 39 1/4″ ***cheapest option***
- or cut 3/4″ plywood sheet 39 1/4″ x 80″

Slat (1×4) Option
Space slats about every 3 1/4″ and secure to 2×2 support with brad nails or screws.
Tongue and Groove Option
Slide the tongue in the groove, if necessary cut the last board to fit.

Plywood Option
Cut a piece of plywood 39 1/4″ x 80″ or a little less, place on 2×2’s.
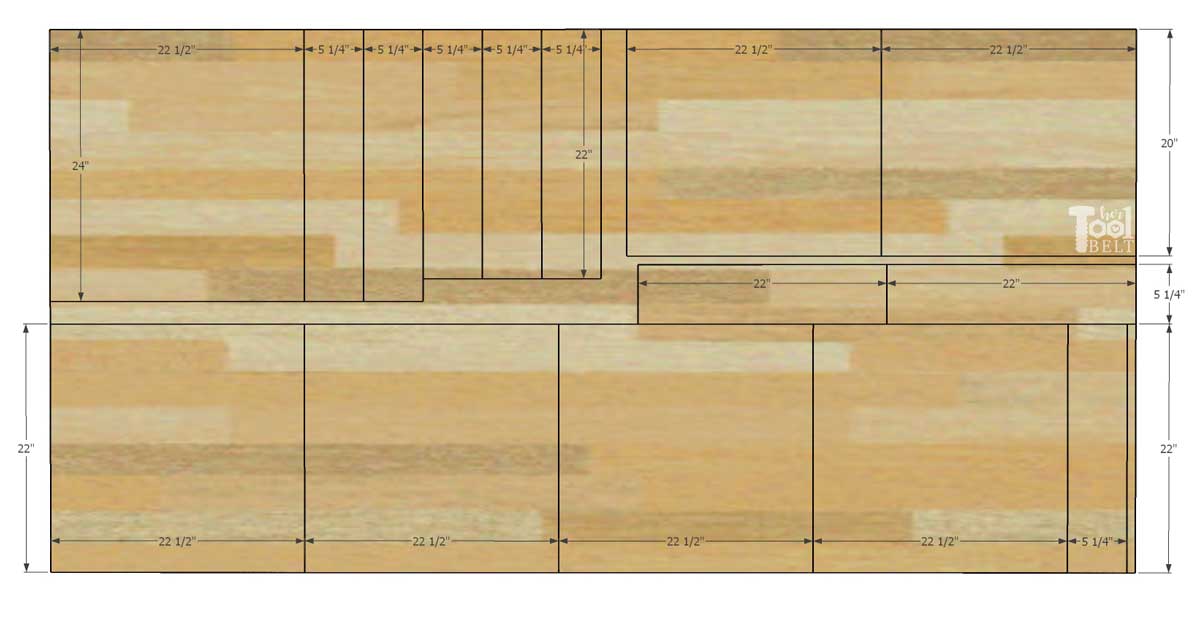
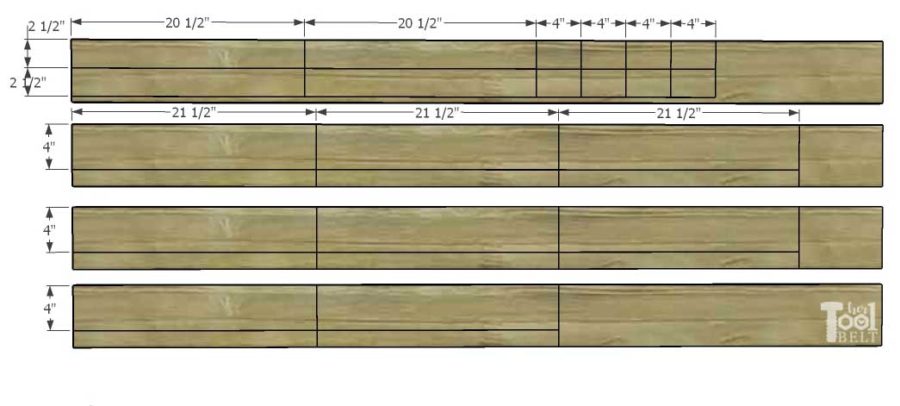
Bunk Bed Shell/Drawers Cut List
To make the most out of the plywood, the cuts get complicated. Make sure to reference the cut diagrams
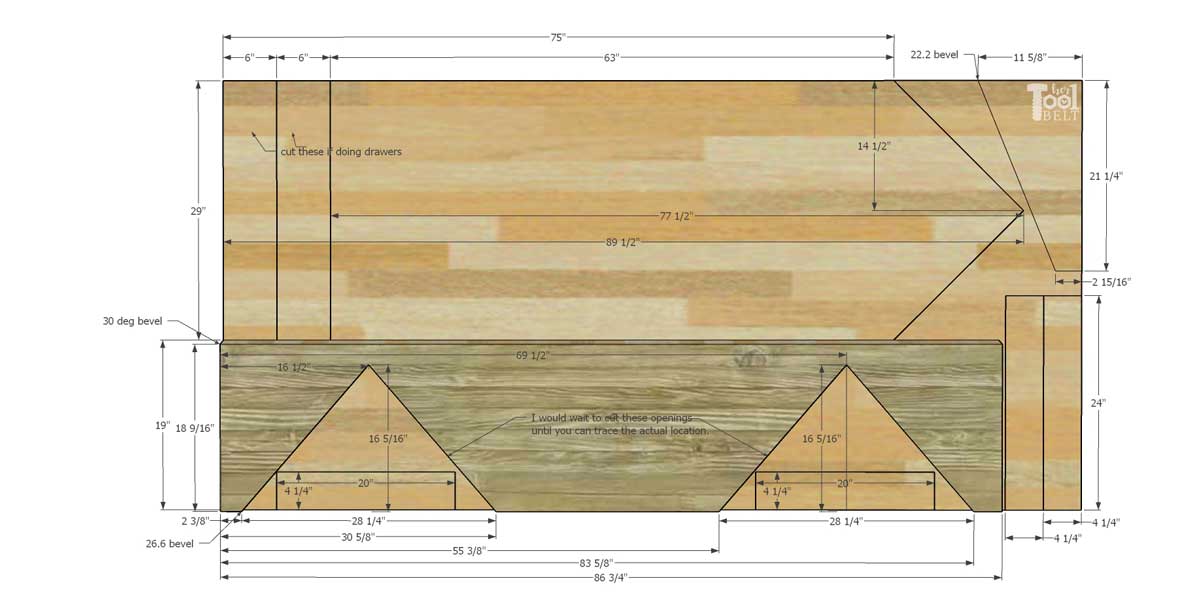
- 2 – 3/4″ x 29″ x 77 1/2″ (with triangle top) – Front Panel
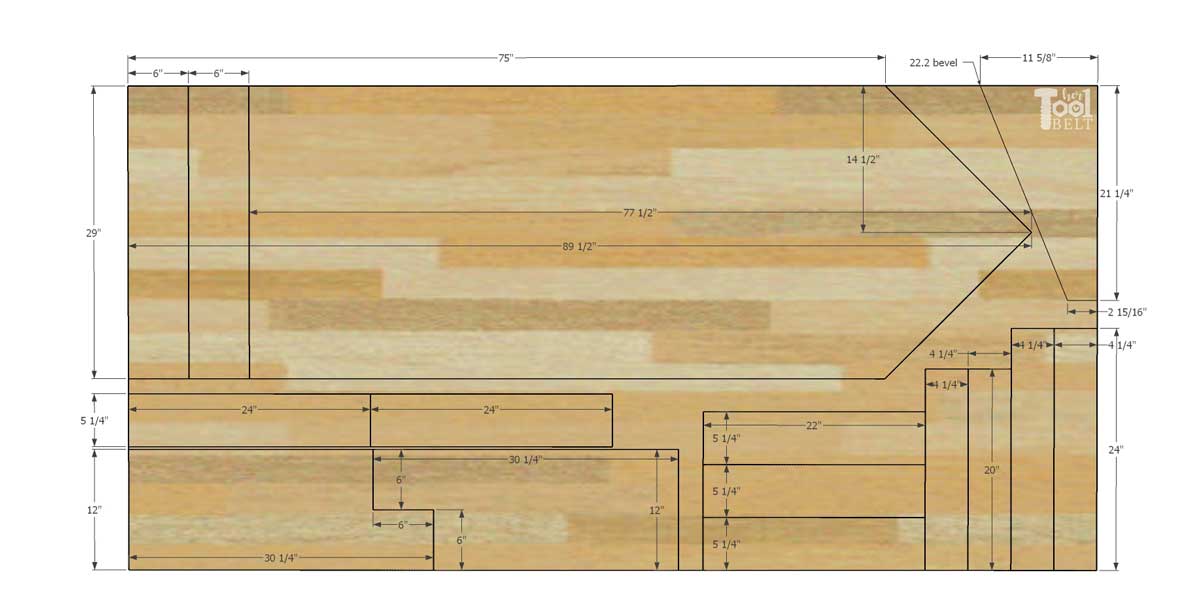
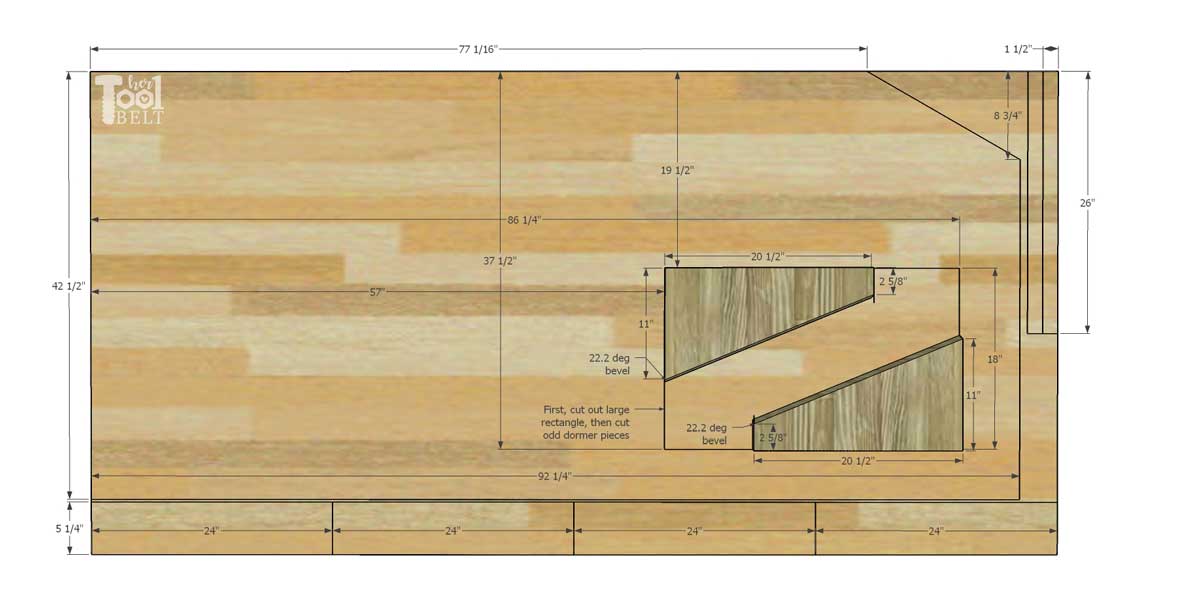
- 1 – 3/4″ x 42 1/2″ x 92 1/4″ with dog ear in front – Side Panel
- 4 – 3/4″ x 29″ x 6″ – Drawer Fronts
- 1 – 3/4″ x 19″ x 86 3/4″ (with a 30 deg bevel on one long edge) – Roof
- 2 – 3/4″ x 11 5/8″ to 2 15/16″ (22.2 deg bevel along diagonal) x 21 1/4″ – Dormer 1
- 2 – 3/4″ x 11″ to 2 5/8″ (22.2 deg bevel along diagonal) x 20 1/2″ – Dormer 2
- 5 – 3/4″ x 24″ x 4 1/4″
- 4 – 3/4″ x 20″ x 4 1/4″
- 10 – 3/4″ x 24″ x 5 1/4″
- 9 – 3/4″ x 22″ x 5 1/4″
- 1 – 3/4″ x 24″ x 6 3/4″
- 2 – 3/4″ x 12″ x 30 1/4″ with step – Stairs
- 4 – 3/4″ x 1 1/2″ x 26″
- 2 – 3/4″ x 1 1/2″ x 24″
- 1 – 3/4″ x 22 1/2″ x 24″ – Center Panel
- 2 – 3/4″ x 22 1/2″ x 20″ – Drawer Bottom Steps
- 4 – 3/4″ x 22 1/2″ x 22″ – Drawer Bottom
- 4 – 3/4″ x 11 1/4″ x 24 1/4″ – Drawer Side Support
- 3 – 3/4″ x 22″ x 3″
- 4 – 3/4″ x 24″ x 24 1/2″
Bunk Bed Shell/Drawers Cut Diagrams

How to Build the House Bunk Bed Shell
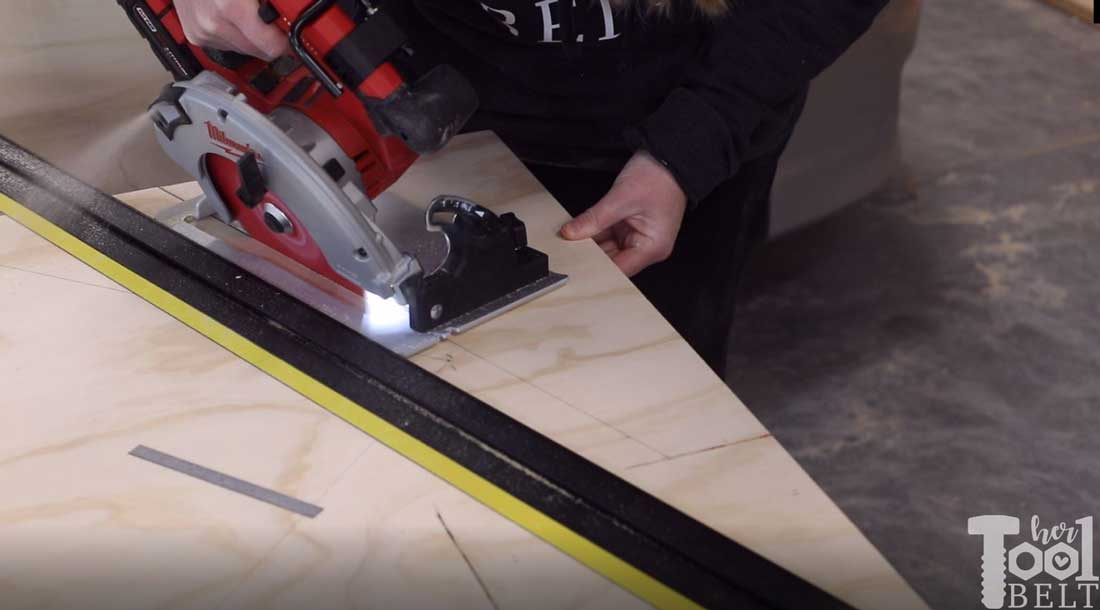
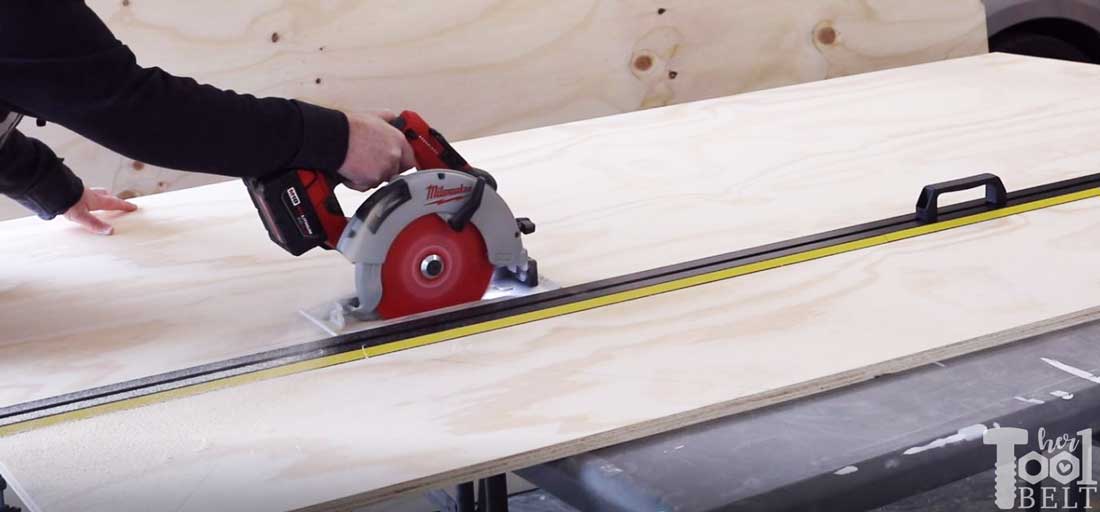
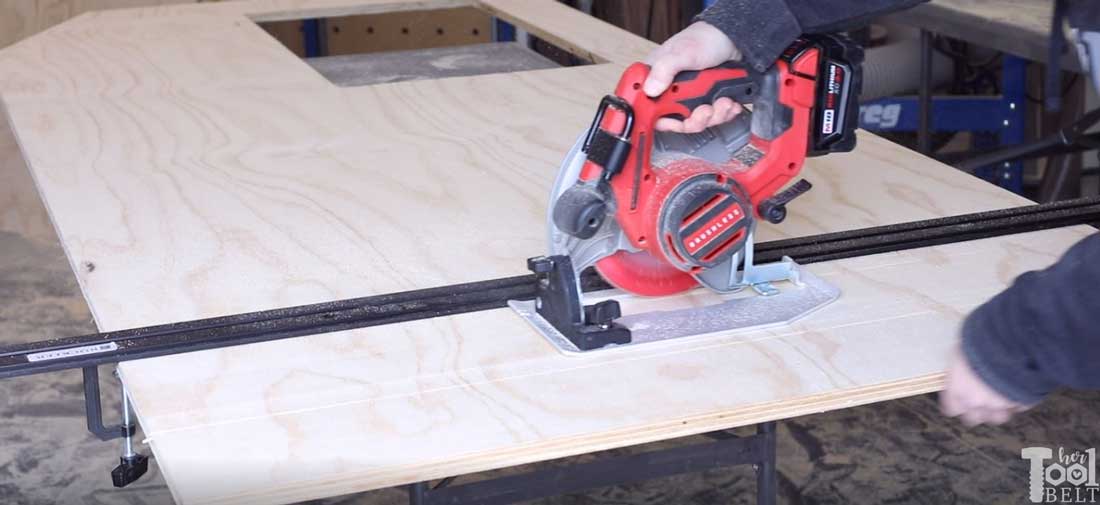
Cut the plywood according to the cut list/diagrams above. I tried to get the most out of the plywood, causing an interesting layout on the plywood. This clamping straight edge guide was super useful to cut all of the plywood down to size.
Cut Windows in Panels
On the 2 Front Panels, measure and mark the placement of the windows. Cut out the windows. I used a straight edge and a circular saw, it required a jig saw to cut the corners out.
Optional – I cut small grooves in the plywood to mimic shiplap siding. Starting at the bottom, I marked every 6″ up the Front Panel. I set my circular saw depth to about 1/8″. Then used a straight edge to cut the grooves every 6″.
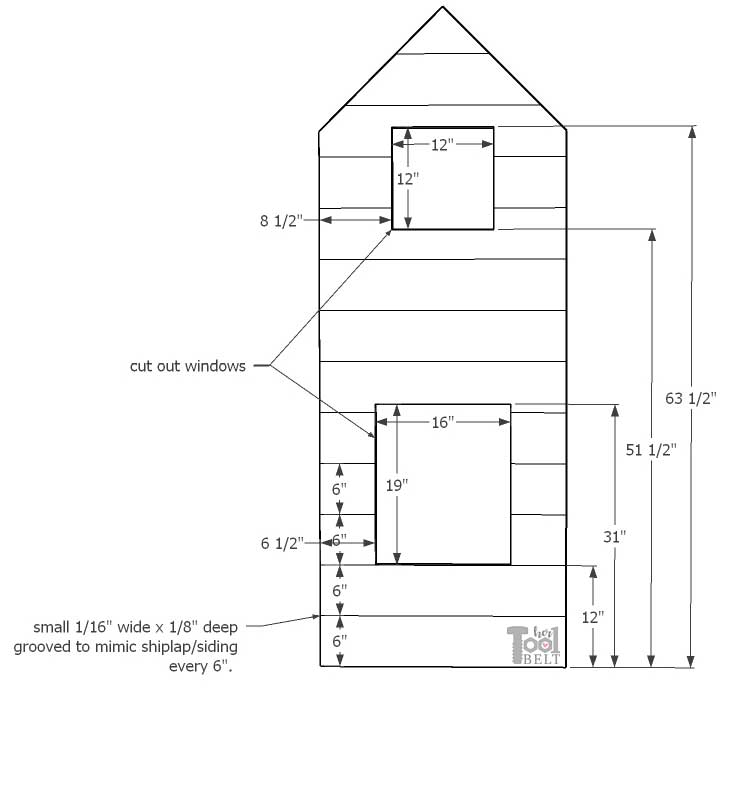
On the Side Panel, measure and mark the placement of the windows (optional) and top bunk opening. Cut out the windows/opening. I used a straight edge and a circular saw, it required a jig saw to cut the corners out. I also cut a 1″ x 6 3/4″ notch from the lower right side to fit over the base board in the bedroom.
Optional – I cut small grooves in the plywood to mimic shiplap siding. Starting 6 3/4″ from the bottom, I marked every 6″ up the Front Panel. I set my circular saw depth to about 1/8″. Then used a straight edge to cut the grooves every 6″. (Starting at 6 3/4″ from the bottom keeps the grooves lined up with the front panel grooves.)
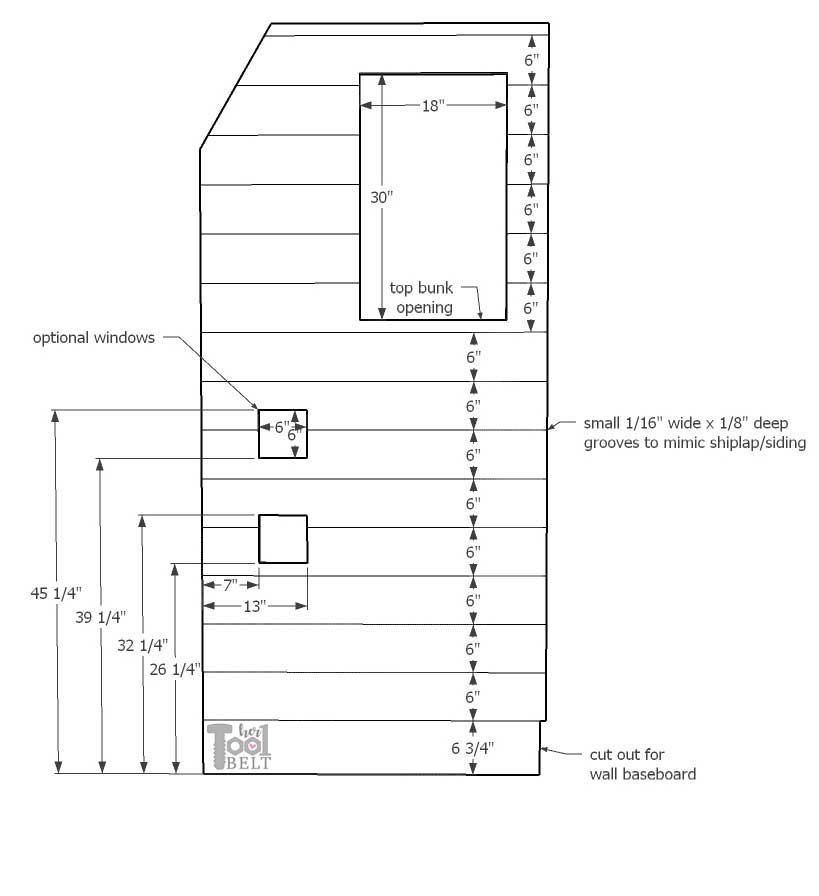
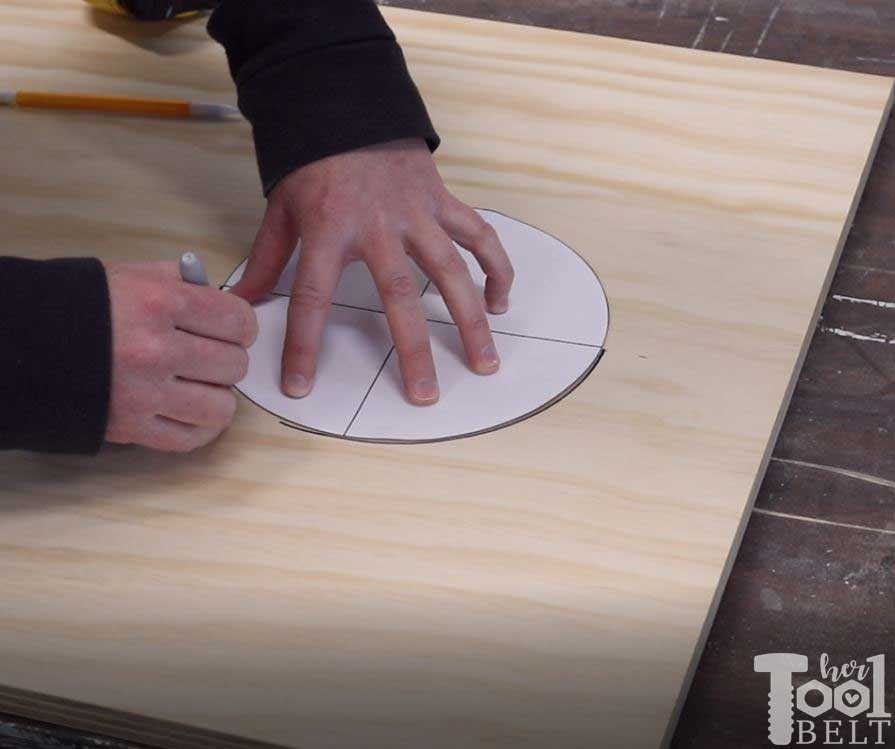
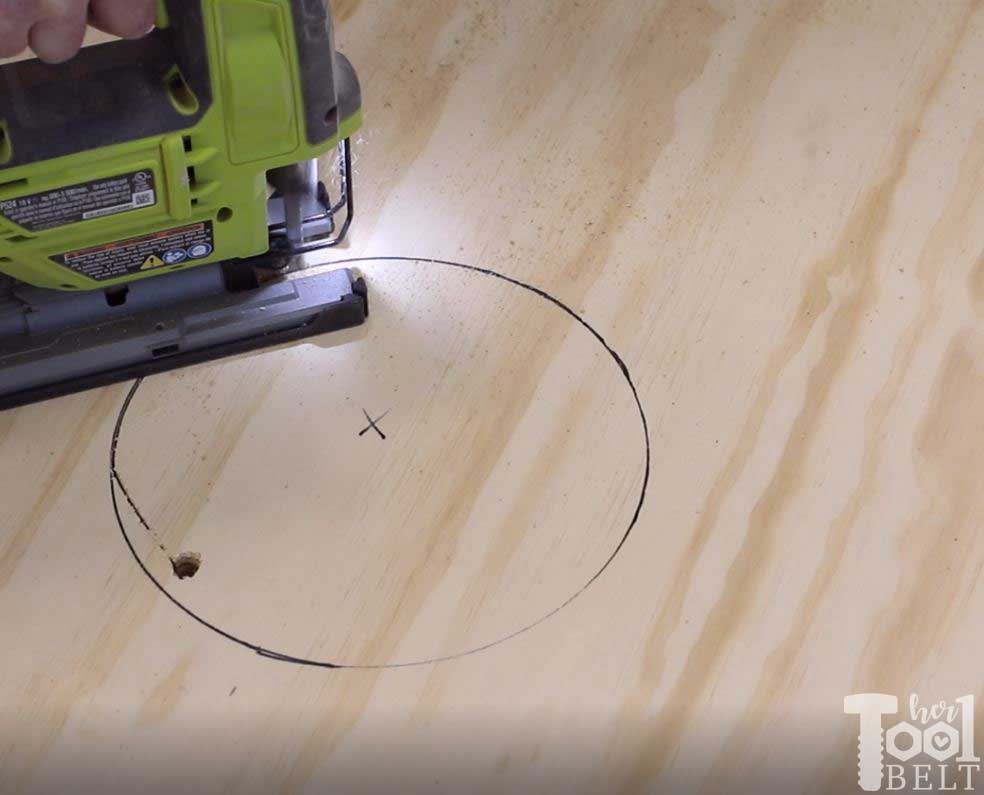
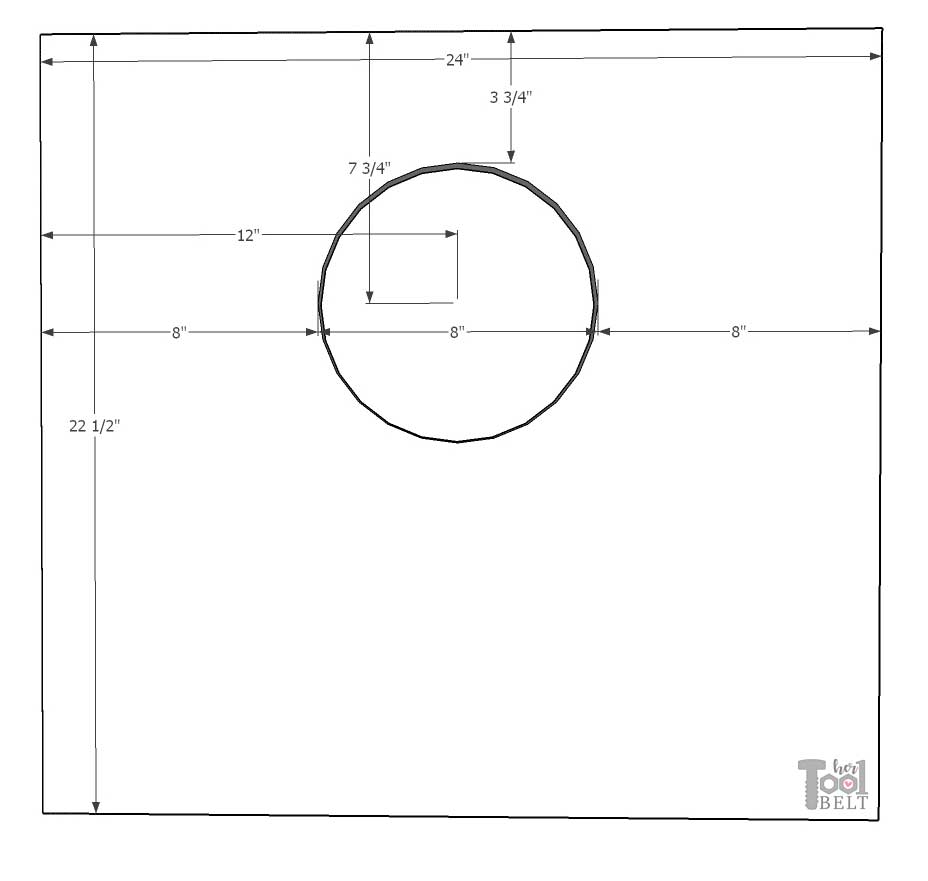
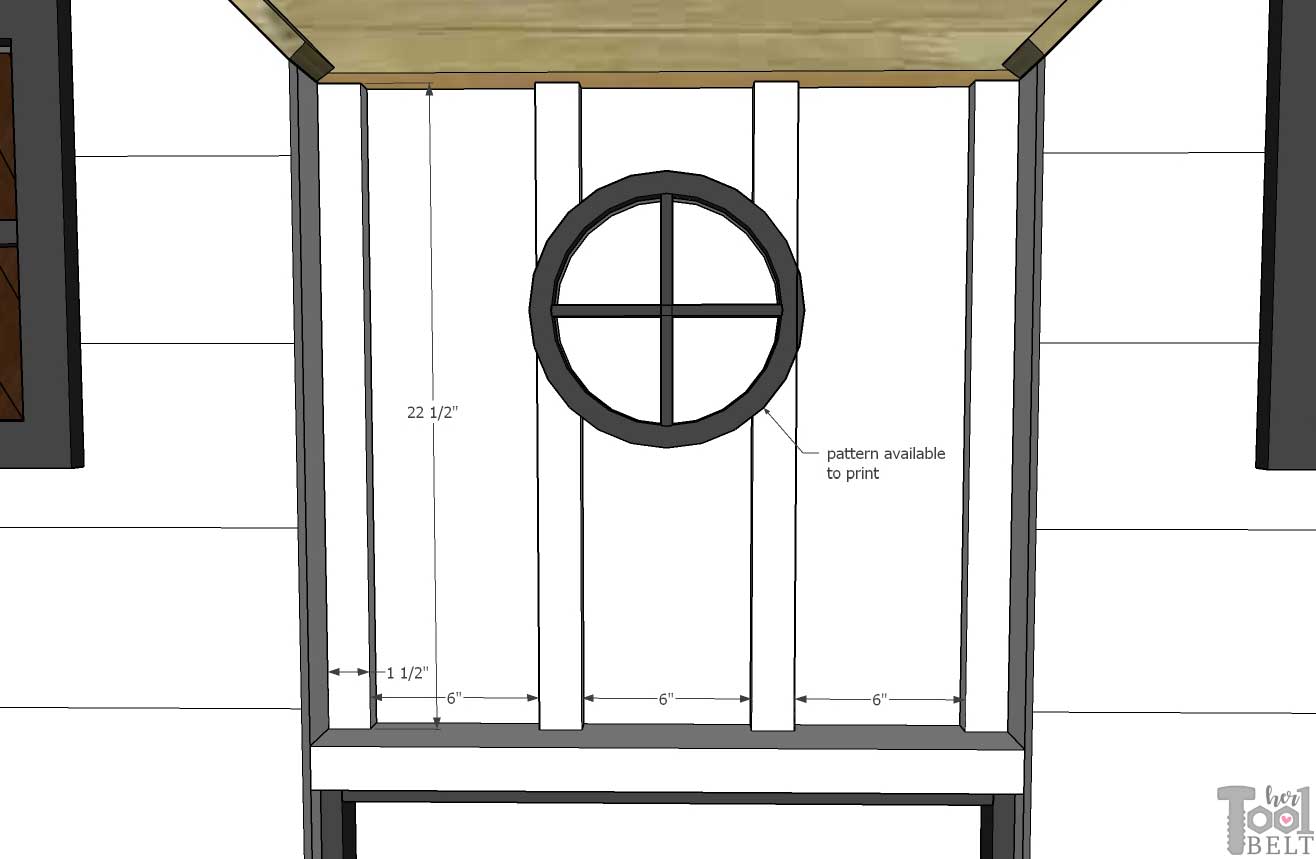
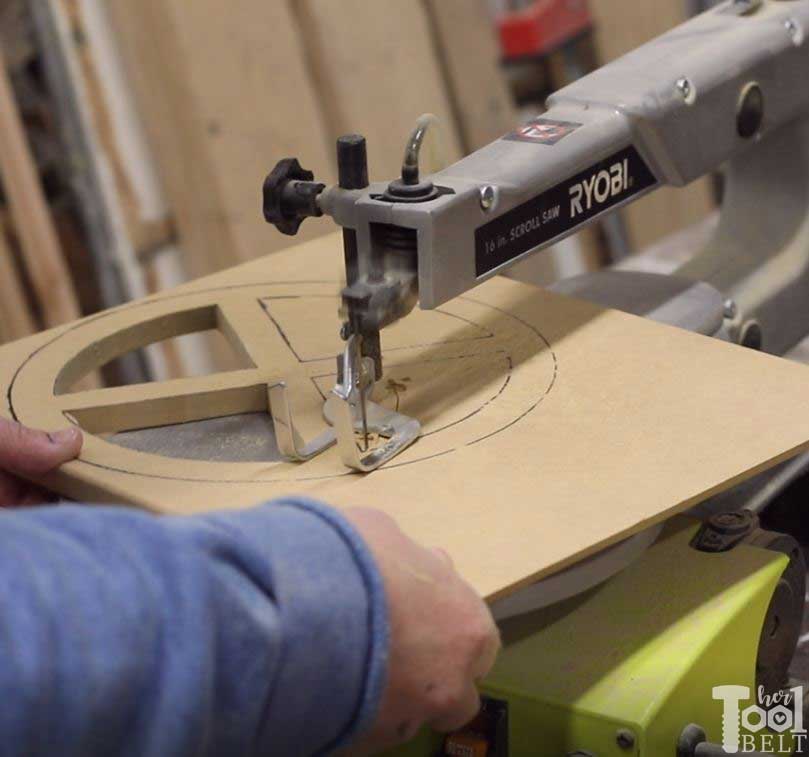
On the center panel, I cut an 8″ diameter circle. The circle center point is about 7 3/4″ down from the top and centered (12″ over).
–> 8 in circle and trim pattern <–
I did not add the grooves in this panel, I decided to give it a little board and batten look.
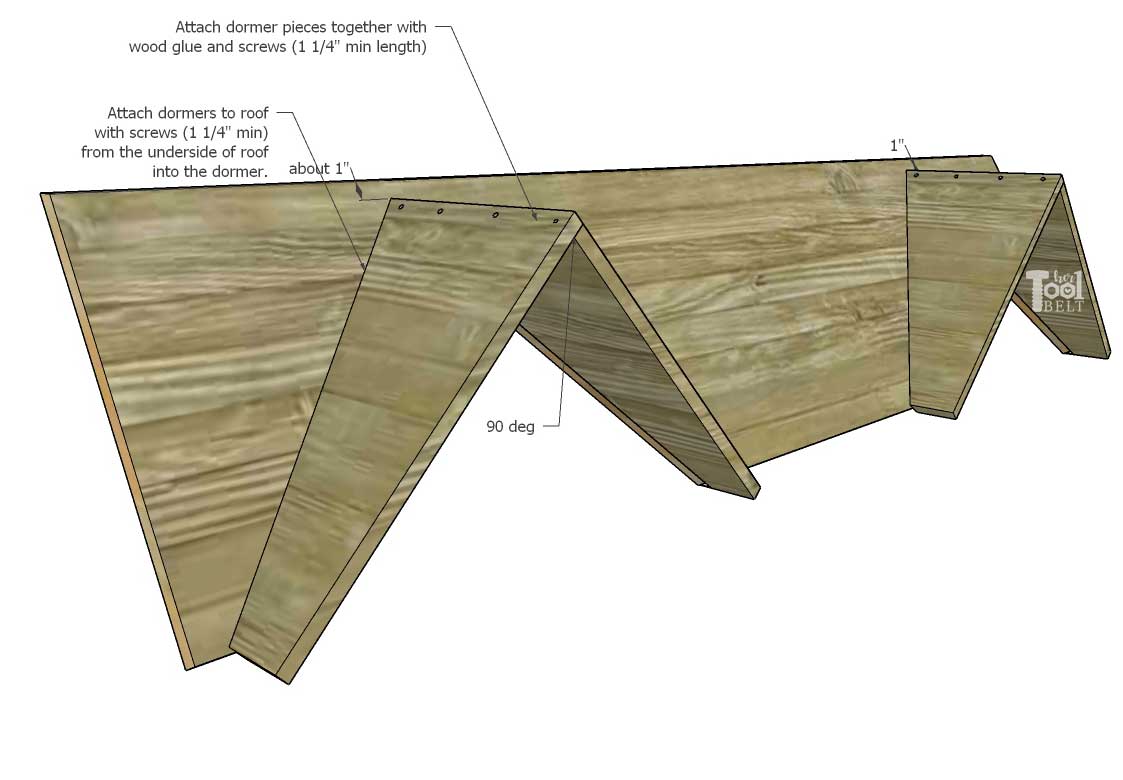
Drill 4 or so pilot holes 3/8″ down on the 11 5/8″ side of Dormer 1.
Secure Dormer 1 to Dormer 2 with wood glue and screws (1 1/4″ length or longer). The dormer pieces should be square (90 deg) at joint.
After the Front Panels are in place (a later step) on the Bunkbed frame, place the dormers over the Front Panel peak and mark on the Roof Panel (from the inside of the dormer) where the dormer cuts should be. Remove the roof panel and cut the marks for the dormer locations. Attach the dormers to the roof with screws (1 1/4″ min length) or brad nails from the roof into the dormer.
Note: I painted the frame and panel pieces with paint primer then white paint before assembly.
Assemble Panels to Frame
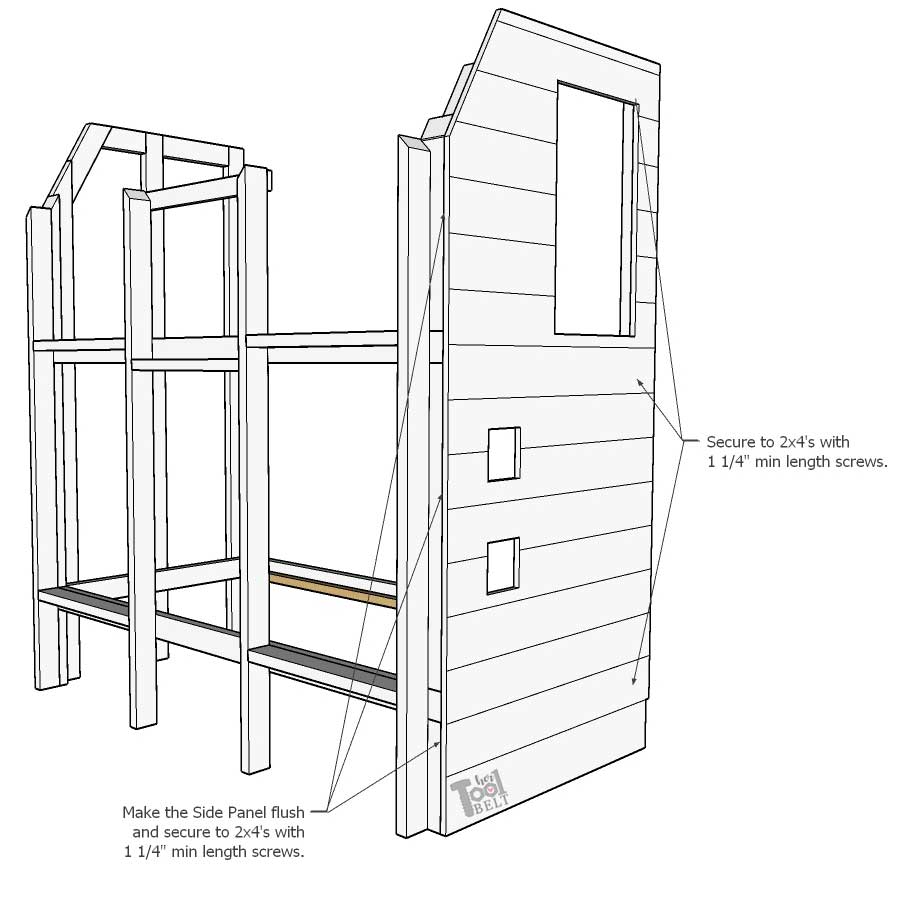
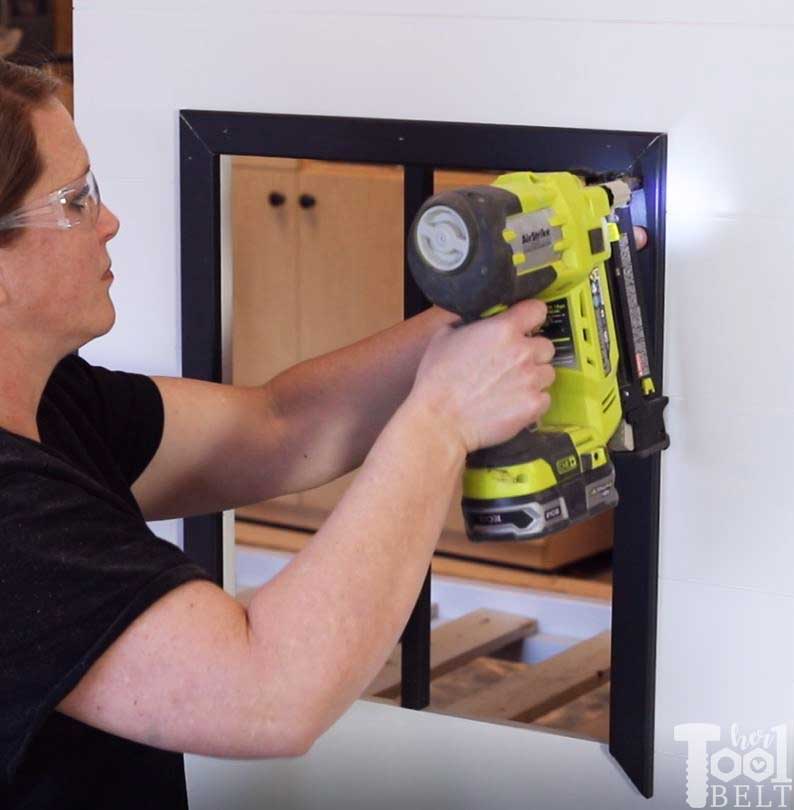
Line up the Side Panel to be flush with the front corner of the frame 2x4s. Secure Side Panel to the frame with 1 1/4″ screws or longer.
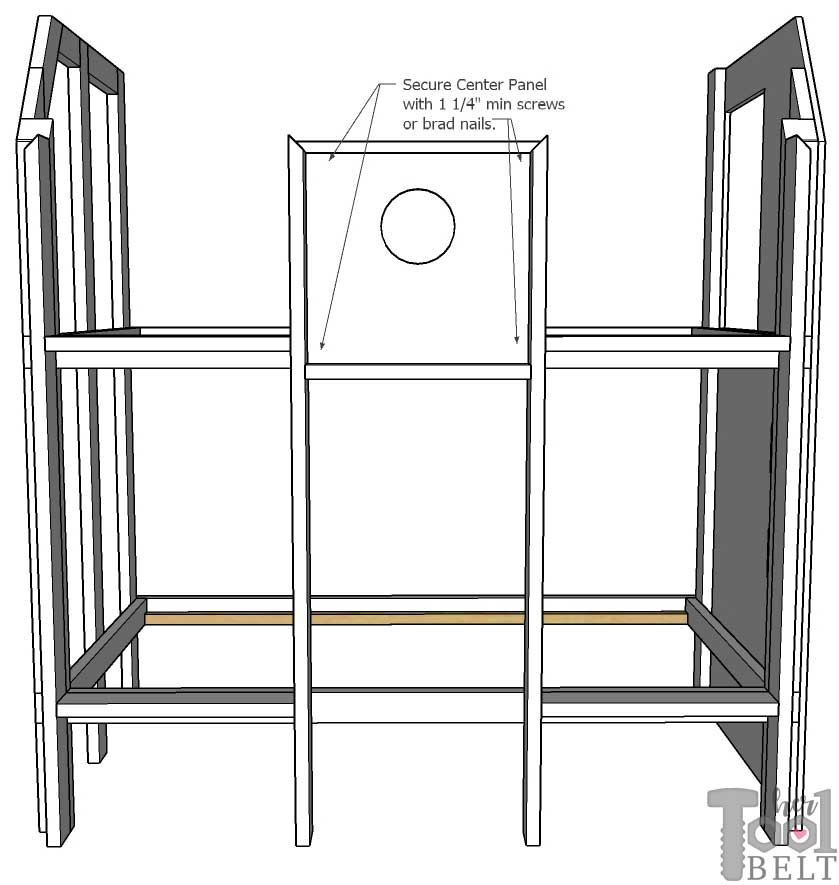
Place the Center Panel between the center pop outs, trim to fit if necessary. Secure the Center Panel to the bed rail and 1×3 with screws or brad nails.
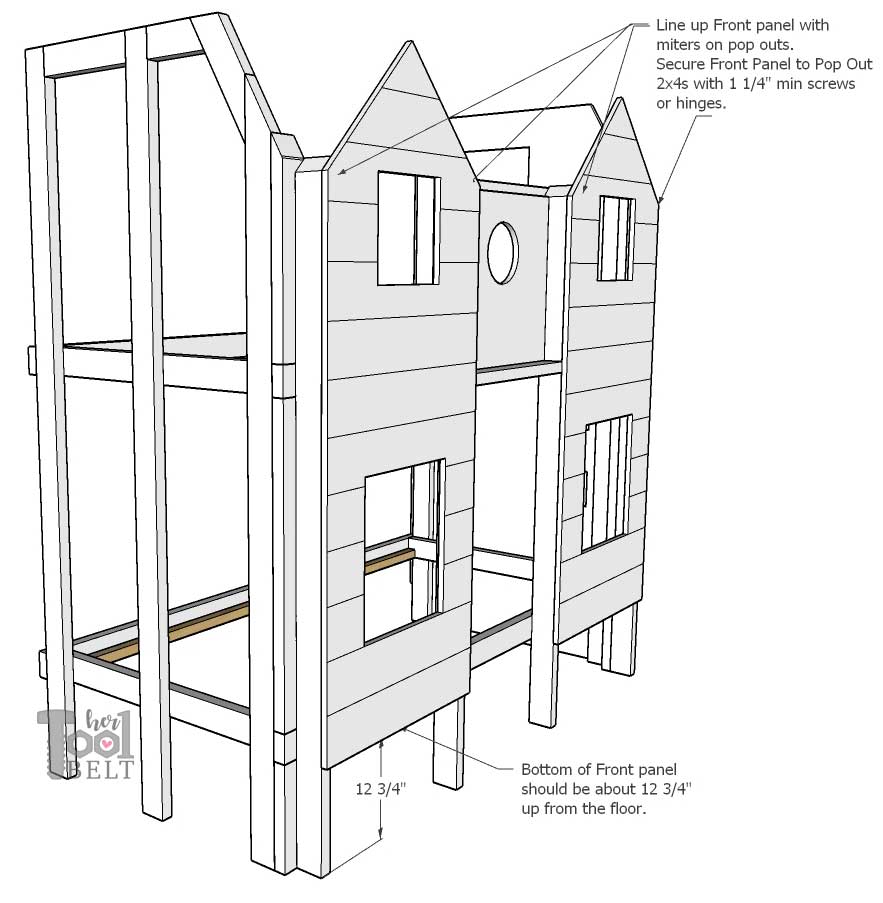
The Front Panels are attached to the pop outs, mounted about 12 3/4″ up from the floor, and should approximately line up with the miter corners.
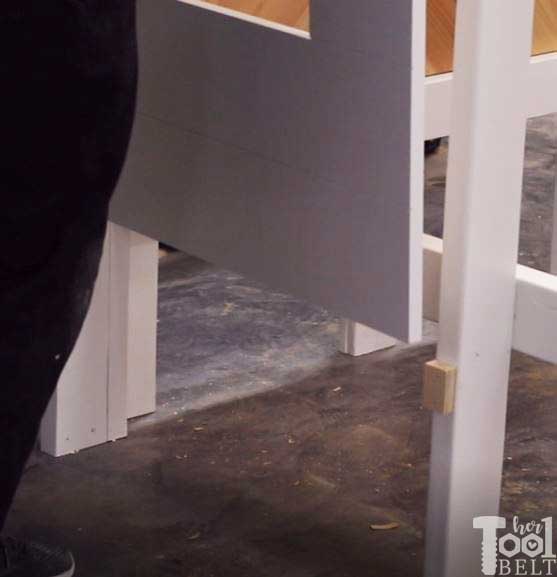
I placed little scrap wood blocks for the front panel ‘door’ to sit on while I secured the hinges.
Mounting Options:
- Mount the Front Panels to pop outs with 1 1/4″ screws (or longer).
- or Mount the Front Panels to the pop outs with hinges. I used 5 Variable Overlay Face Frame Hinges on each Front Panel, but I think 4 would be sufficient.

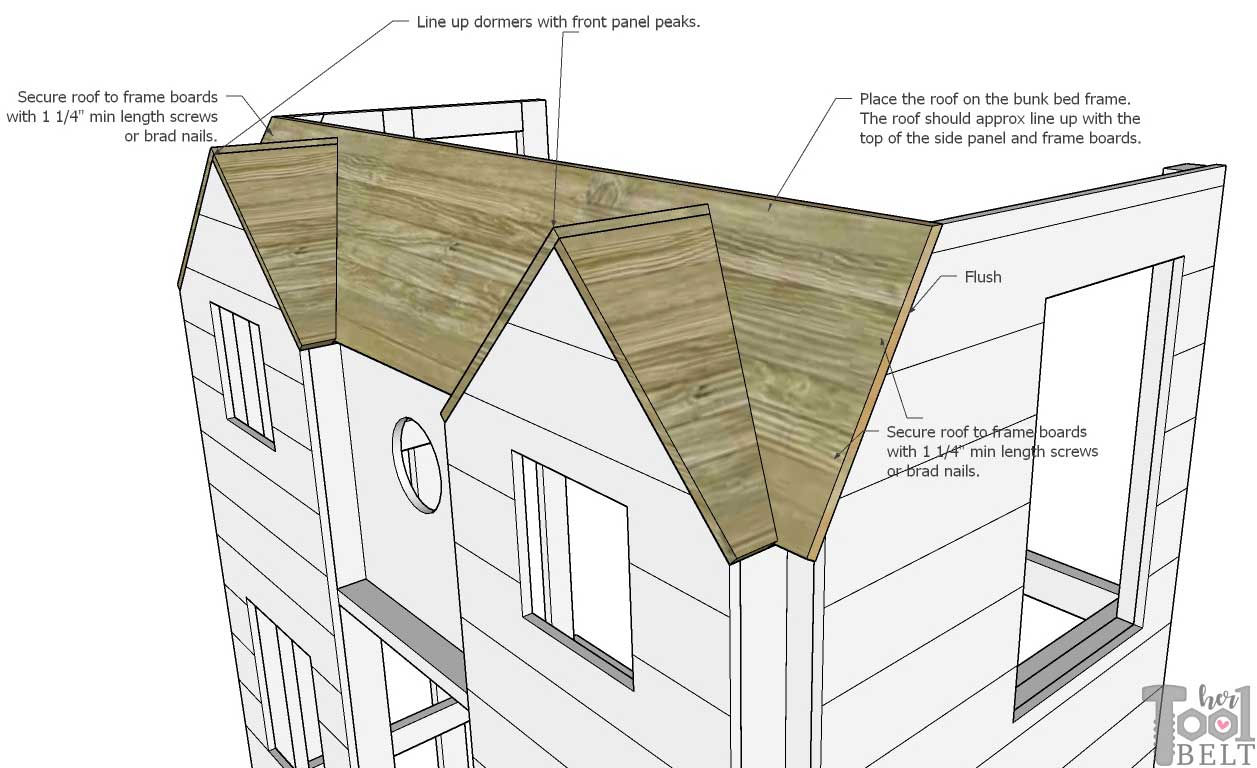
Attach the Roof
Place the roof on the bunk bed frame, it should line up with the top of the side panel/frame and the right edge should be flush with the side panel face. Secure the roof to the frame with 1 1/4″ min screws.
Line up the dormers with the front panel peaks. If your front panels will open (on hinges) leave enough gap between the front panel and dormer for the panels to open.
Mark the dormer placement on the roof. Then trace the inside surface of the dormer, where it meets the roof. Cut the roof panel, then attach the dormers to the roof with 1 1/4″ screws or brad nails.
How to Build the Drawers and Stairs
Assemble Drawer Boxes
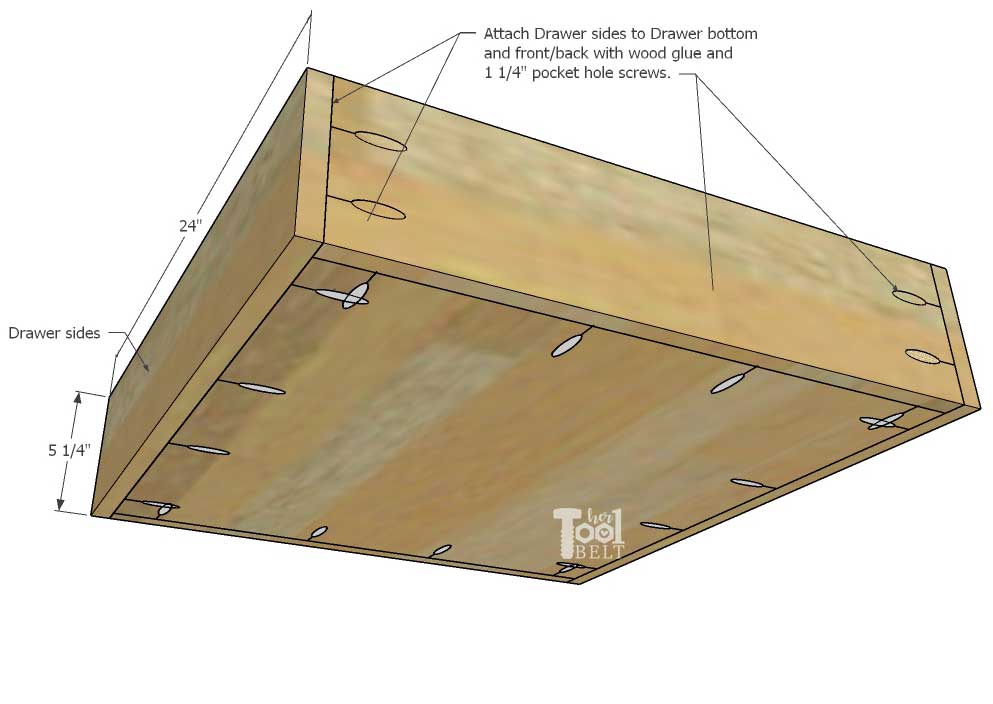
Each drawer has:
- Drawer Bottom – 3/4″ x 22″ x 22 1/2″
- 2 Drawer Front/Back – 3/4″ x 5 1/4″ x 22″
- 2 Drawer Sides – 3/4″ x 5 1/4″ x 24″
Drawer Assembly (repeat to make 4 drawers)
- Drill pocket holes for 3/4″ material in both ends of the drawer front/backs.
- Drill pocket holes for 3/4″ material around the perimeter of the drawer bottoms (about 4 or 5 pocket holes in each side).
- Attach the Drawer Front/backs to the 22″ sides of the drawer bottom with wood glue and 1 1/4″ pocket hole screws.
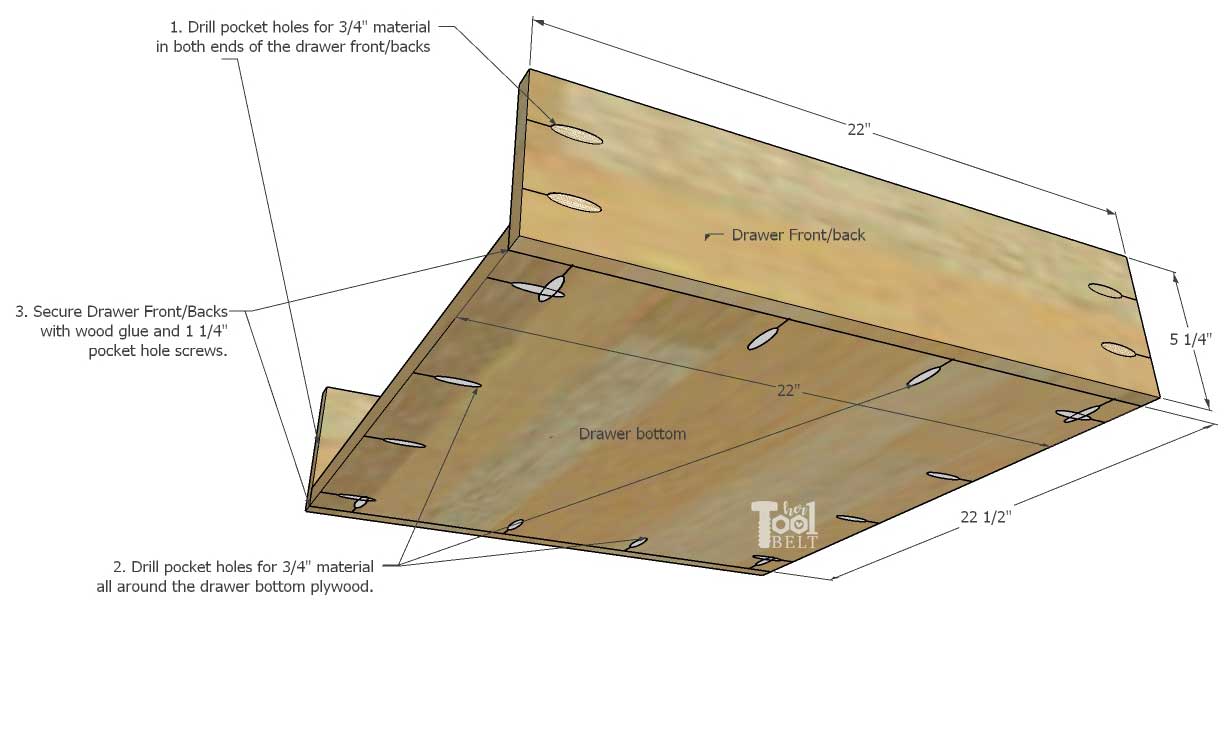
Attach drawer sides to drawer bottom and front/back pieces with wood glue and 1 1/4″ pocket hole screws.
Assemble Stair Drawer Boxes
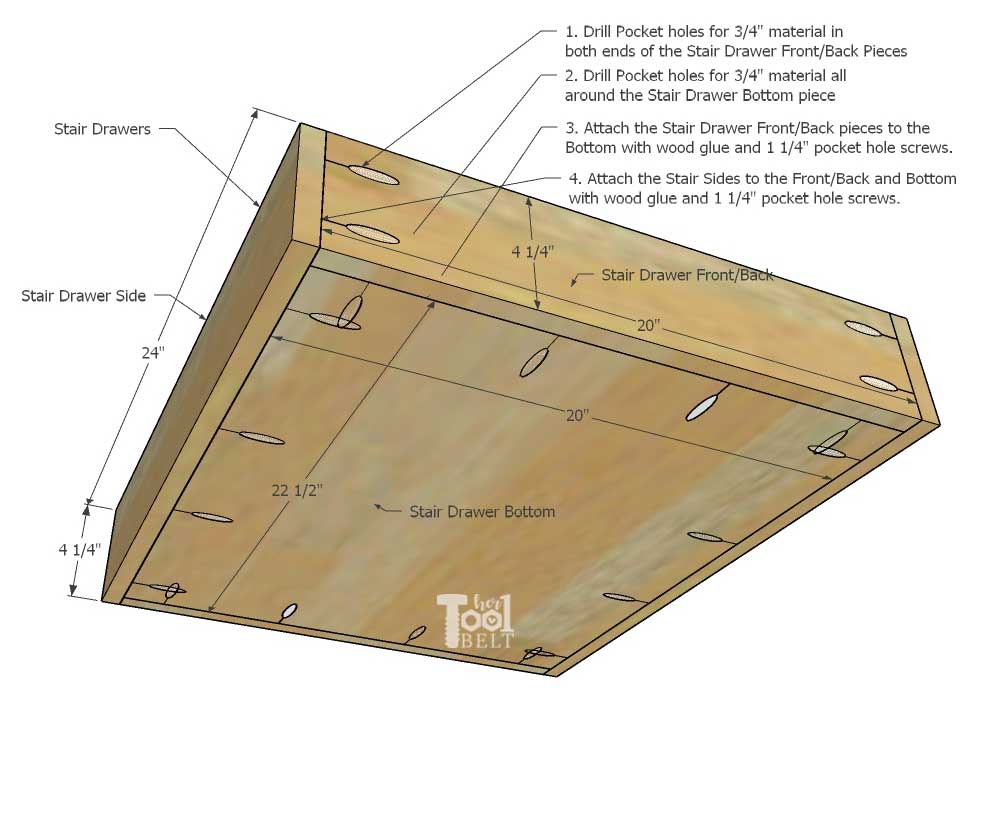
Each stair drawer has:
- Drawer Bottom – 3/4″ x 20″ x 22 1/2″
- 2 Drawer Front/Back – 3/4″ x 4 1/4″ x 20″
- 2 Drawer Sides – 3/4″ x 4 1/4″ x 24″
Drawer Assembly (repeat for 2 drawers)
- Drill pocket holes for 3/4″ material in both ends of the drawer front/backs.
- Drill pocket holes for 3/4″ material around the perimeter of the drawer bottoms (about 4 or 5 pocket holes in each side).
- Attach the Drawer Front/backs to the 20″ sides of the drawer bottom with wood glue and 1 1/4″ pocket hole screws.
- Attach drawer sides to drawer bottom and front/back pieces with wood glue and 1 1/4″ pocket hole screws.
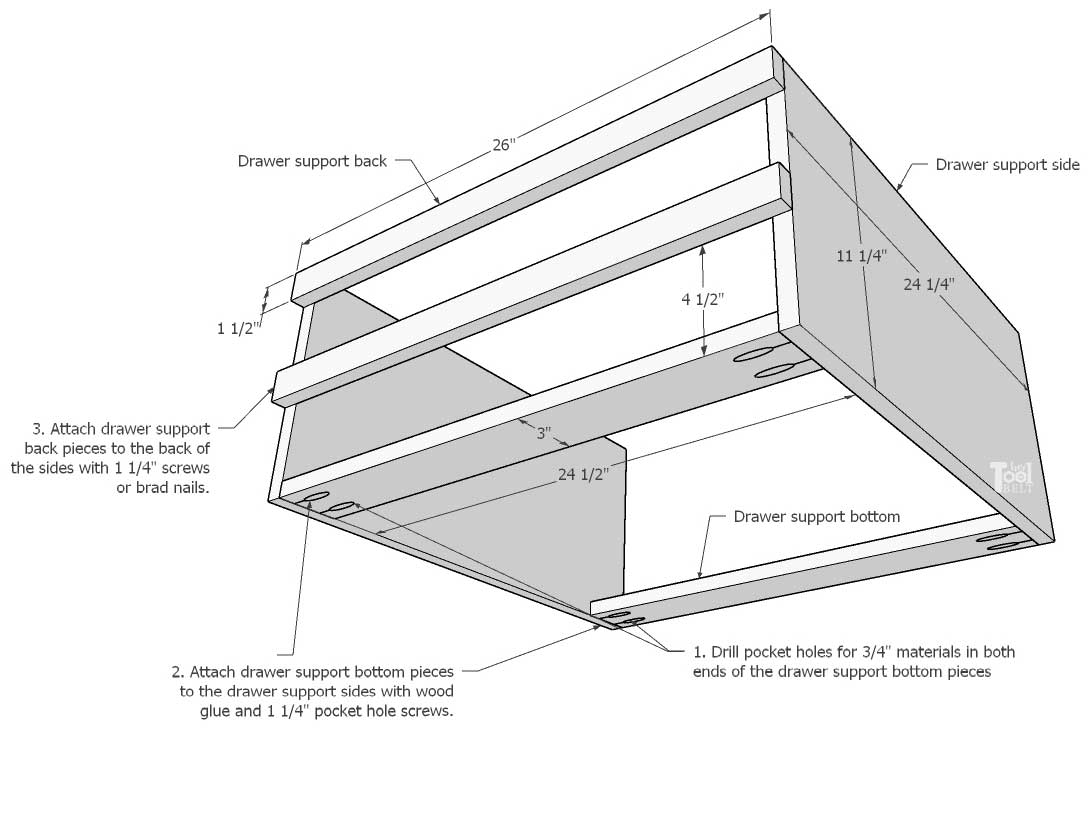
Assemble Drawer Supports
Each drawer support has:
- 2 Drawer support sides – 3/4″ x 11 1/4″ x 24 1/4″
- 2 support bottoms – 3/4″ x 3″ x 24 1/2″
- 2 support back – 3/4″ x 1 1/2″ x 26″
Drawer Support Assembly (repeat for 2 drawers supports)
- Drill pocket holes for 3/4″ material in both ends of the drawer support bottom pieces.
- Attach the Drawer support bottom pieces to the drawer support sides (flush with the bottom), with wood glue and 1 1/4″ pocket hole screws.
- Attach drawer support back pieces to the back of the support sides with 1 1/4″ screws or brad nails.
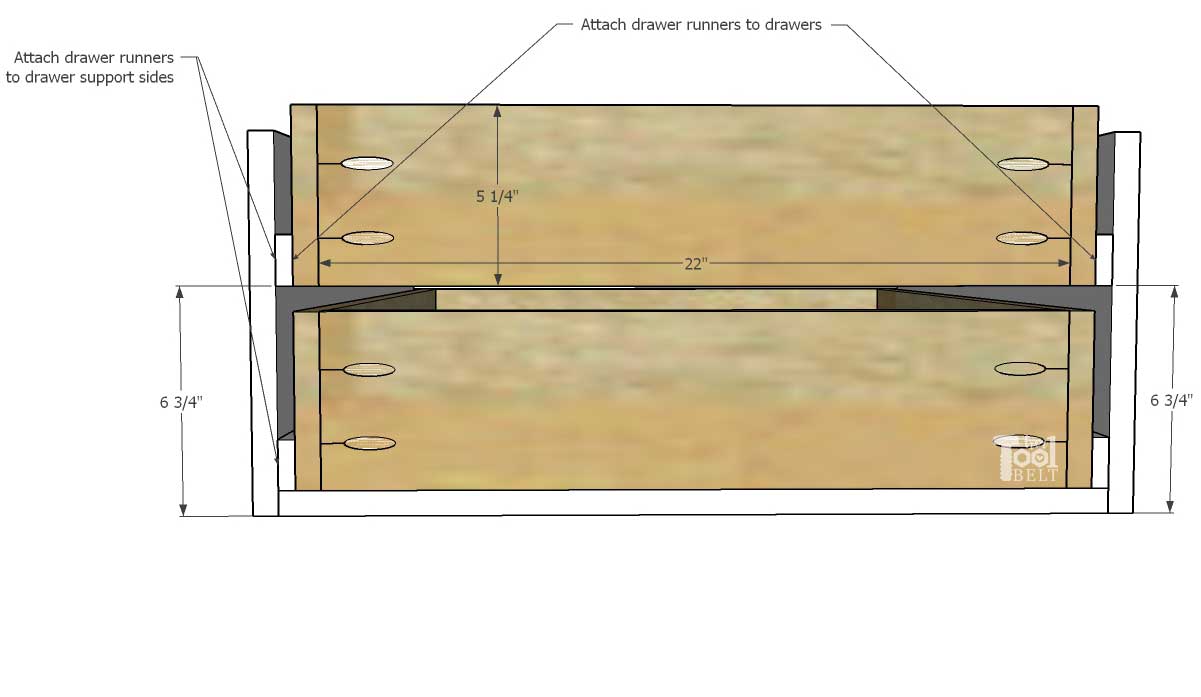
Install Drawers
Install drawer runners onto the drawer boxes, I used 22″ full extension drawer slides. Attach 1 set of drawer slides on top of the drawer support bottom pieces, and another set of slides 6 3/4″ up from the bottom of the support sides.
Assemble Stairs
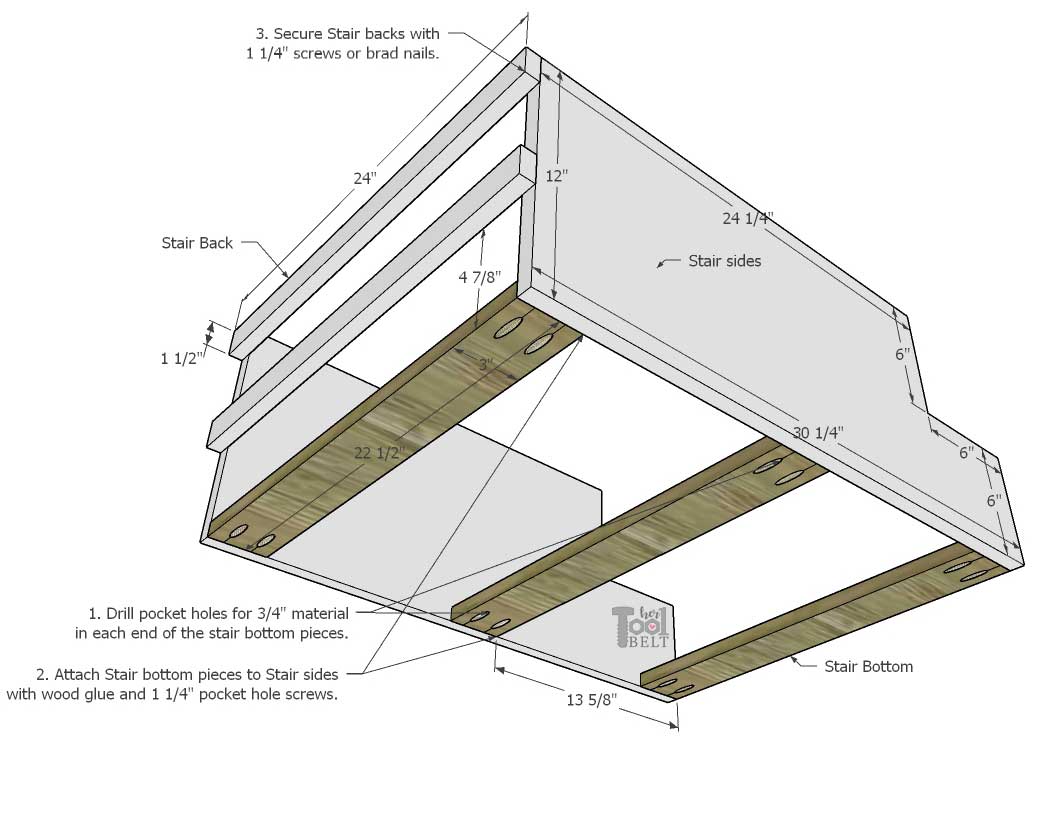
Stair parts:
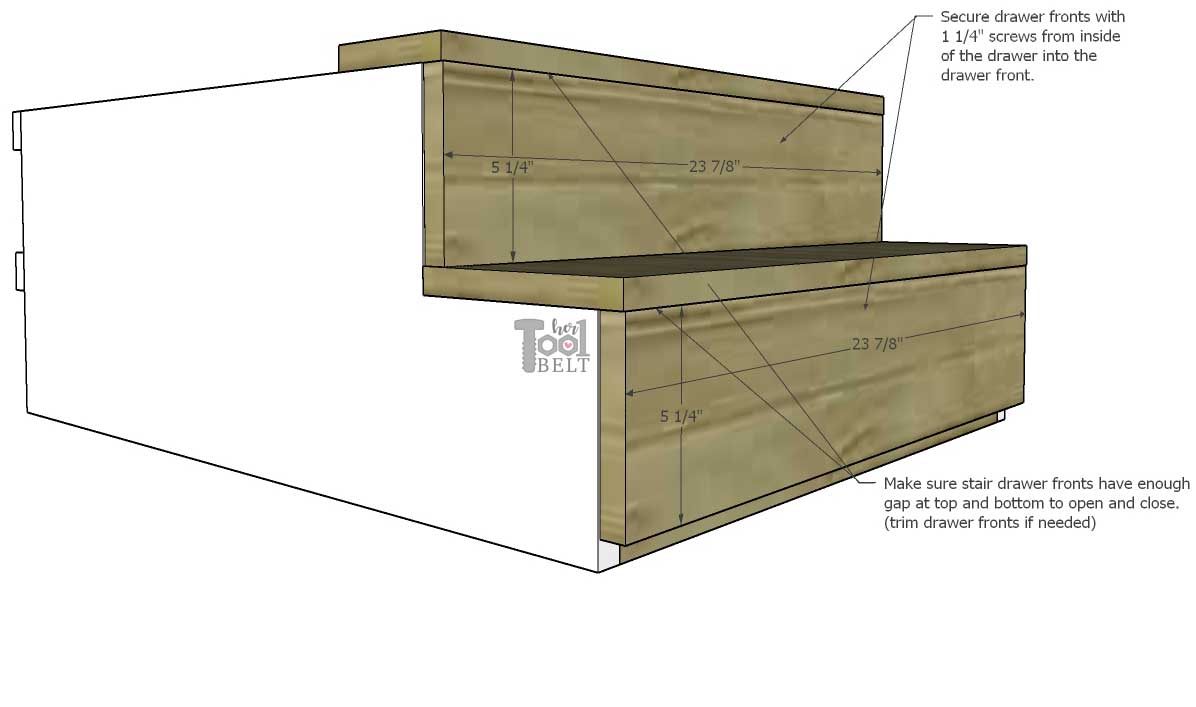
- 2 stair sides – 3/4″ x 12″ x 30 1/4″
- 2 stair bottoms – 3/4″ x 3″ x 22 1/2″
- 2 stair back – 3/4″ x 1 1/2″ x 24″
- stair tread small – 3/4″ x 4 1/4″ x 24″
- stair tread large – 3/4″ x 6 3/4″ x 24″
- 2 drawer fronts – 3/4″ x 5 1/4″ x ~24″ (trim if needed)
Stair Assembly
- Drill pocket holes for 3/4″ material in both ends of the stair bottom pieces.
- Attach the stair bottom pieces to the stair sides (flush with the bottom), with wood glue and 1 1/4″ pocket hole screws.
- Attach stair back pieces to the back of the sides with 1 1/4″ screws or brad nails.
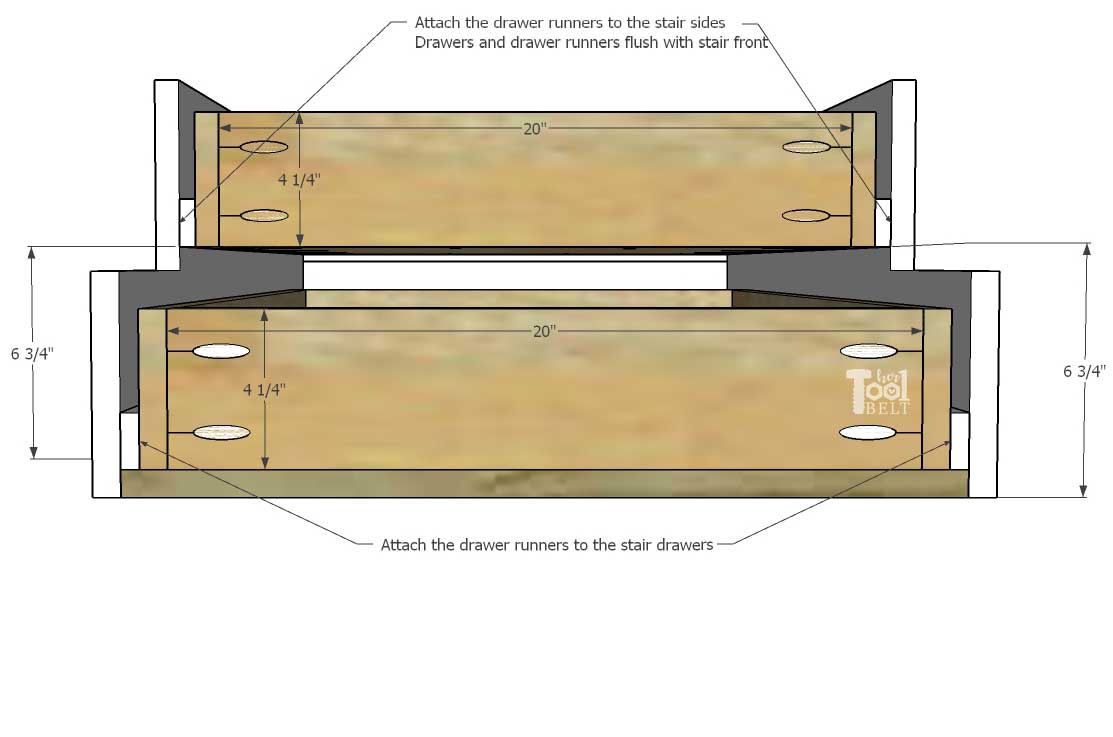
Install Drawers
Install drawer runners onto the stair boxes, I used 22″ full extension drawer slides. Attach 1 set of drawer slides on top of the stair bottom pieces, and another set of slides 6 3/4″ up from the bottom of the support sides.
Line up the top stair tread (small) with the sides of the stairs, and create a 3/4″ overhang. Secure the small stair tread to the stair sides with 1 1/4″ brad nails (or longer).
Line up the lower stair tread (large) with the sides of the stairs, and create a 3/4″ overhang. Secure the large stair tread to the stair sides with 1 1/4″ brad nails (or longer). (Raise the upper drawer if needed, mine didn’t need to be raised.)
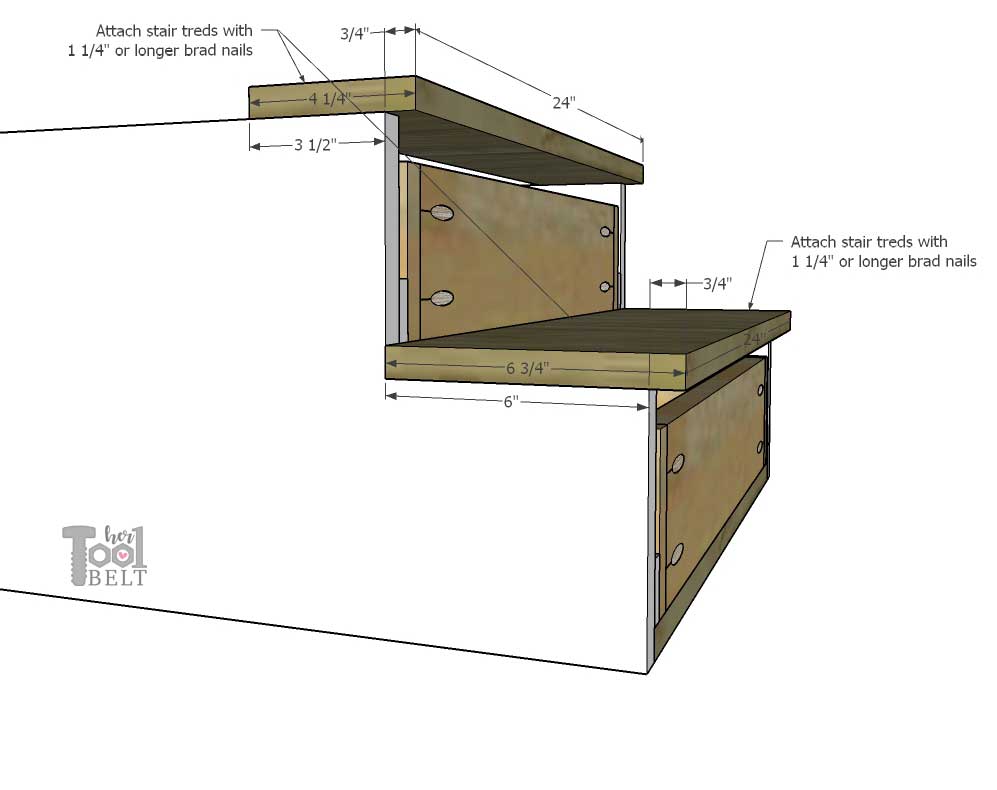
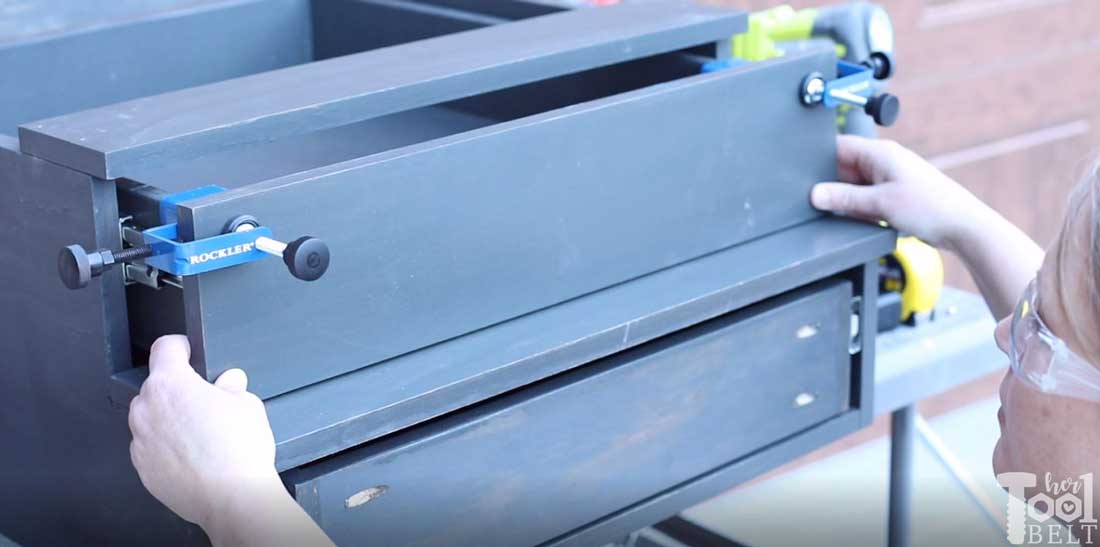
Center the stair drawer fronts on the drawers. Make sure the drawer fronts have a top and bottom gap to allow the drawer to open and close.
Secure the drawer fronts onto the drawers with 1 1/4″ screws, from inside the drawer into the drawer front board.
The drawer front installation jig was super helpful getting the drawer fronts on perfectly.
Install Drawer Sets
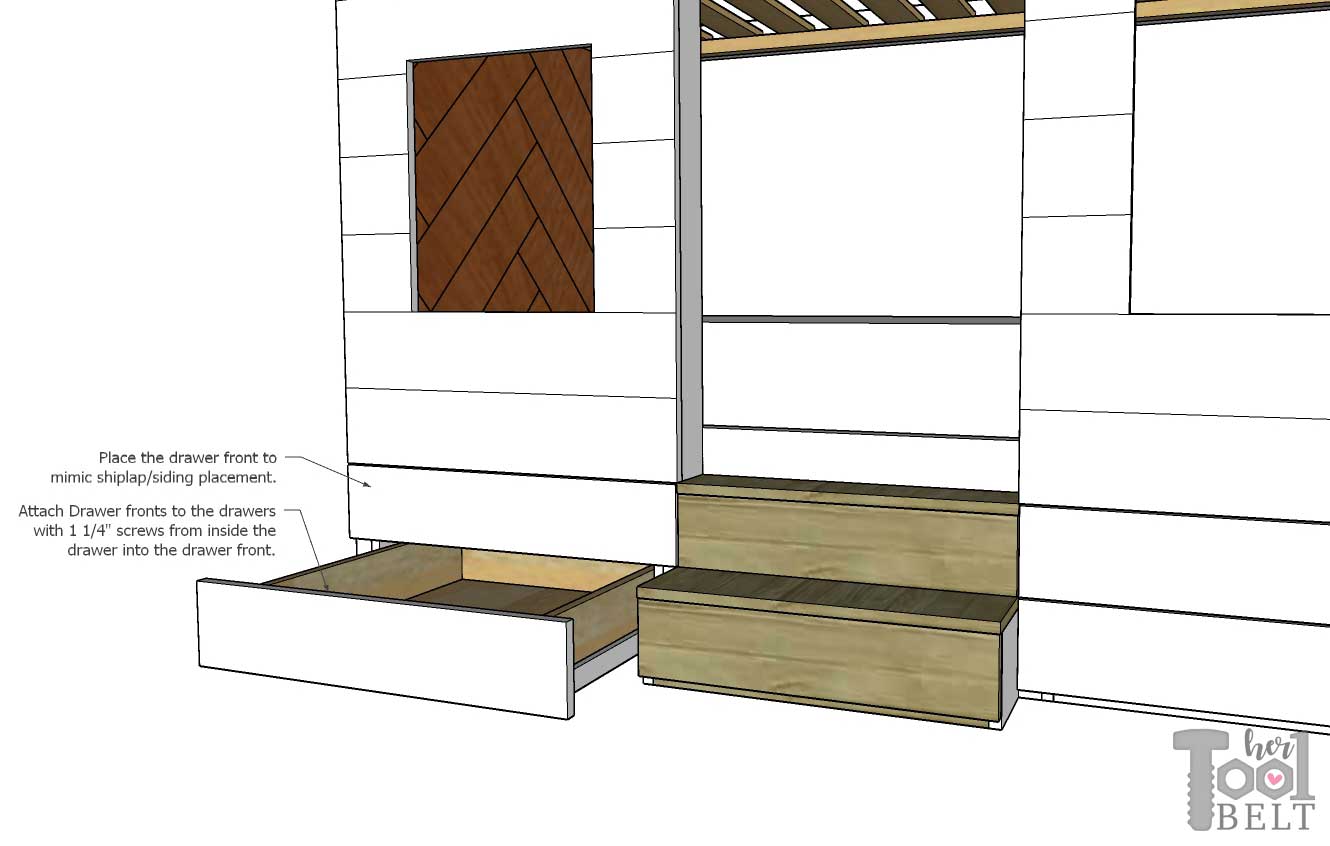
Slide the drawer sets into place in the bunkbed frame. The drawer support sides should be flush with the front face of the pop out 2x4s. Secure the drawer support sides to the pop out 2×4’s with 1 1/4″ screws or longer. Also secure the stair sides to the pop out 2×4’s with 1 1/4″ screws or longer.

The drawer fronts under the front panels should mimic the shiplap/siding and have small gaps under the front panel and between drawer fronts. Attach drawer fronts to the drawers with 1 1/4″ screws from the inside of the drawer into the drawer front. (I usually use 4 screws for each drawer front.)
How to Build the Ladder
The ladder rungs can be either made from square 2×2’s (cheaper) or round dowels. I used 1 1/4″ round dowels.
Ladder Cut Diagram
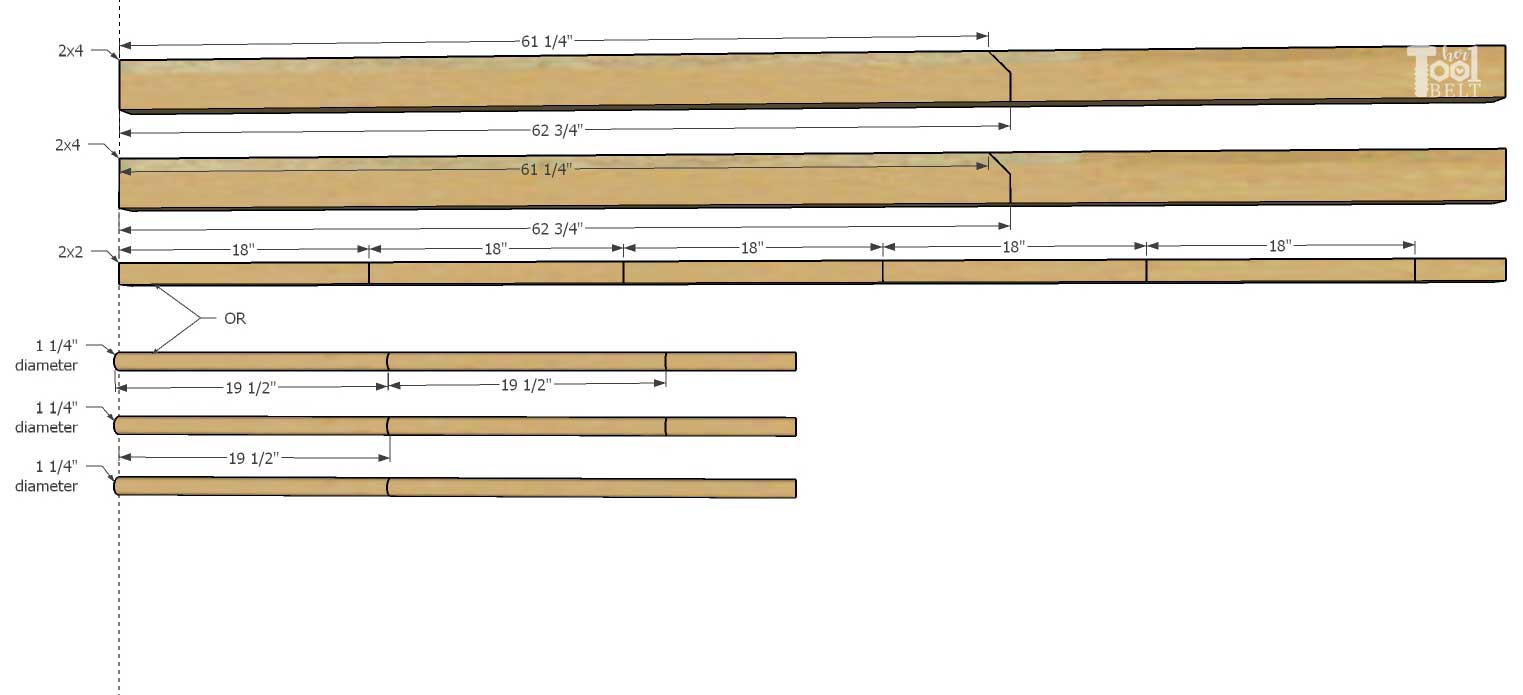
Ladder Cut List – 2×2 square rung ladder
- 2 – 1 1/2″ x 3 1/2″ x 62 3/4″ long with a 45 deg miter on front corner (at about 61 1/4″) (2×4)
- 5 – 1 1/2″ x 1 1/2″ x 18″ long (2×2)
In the 5 – 18″ ladder rungs, drill pocket holes for 1 1/2″ material in both ends. Mark the 2×4’s at 11 3/4″, 22 3/4″, 33 3/4″, 44 3/4″ and 55 3/4″ from the bottoms and 1 1/4″ from the back side. Secure the 18″ ladder rungs to the 2x4s with wood glue and 2 1/2″ pocket hole screws.

Ladder Cut List – 1 1/4″ dowel rung ladder
- 2 – 1 1/2″ x 3 1/2″ x 62 3/4″ long with a 45 deg miter on front corner (at about 61 1/4″) (2×4)
- 5 – 1 1/4″ diameter x 19 1/2″ long (dowel)
Mark the 2×4’s at 11″, 22″, 33″, 44″ and 55″ from the bottoms and 1 1/4″ from the front side (with the miter cut).
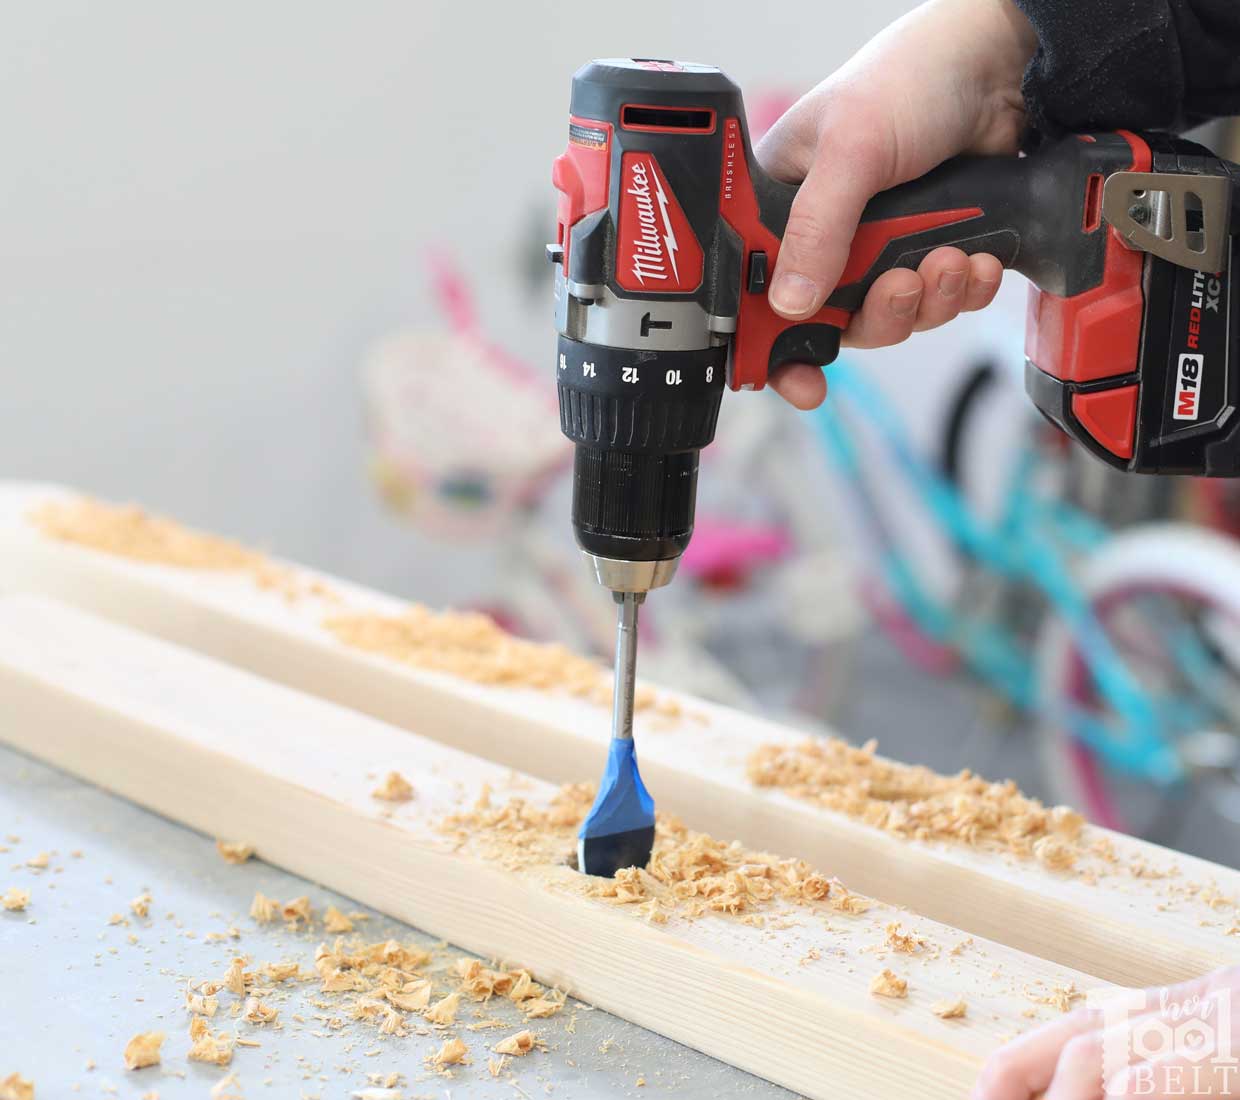
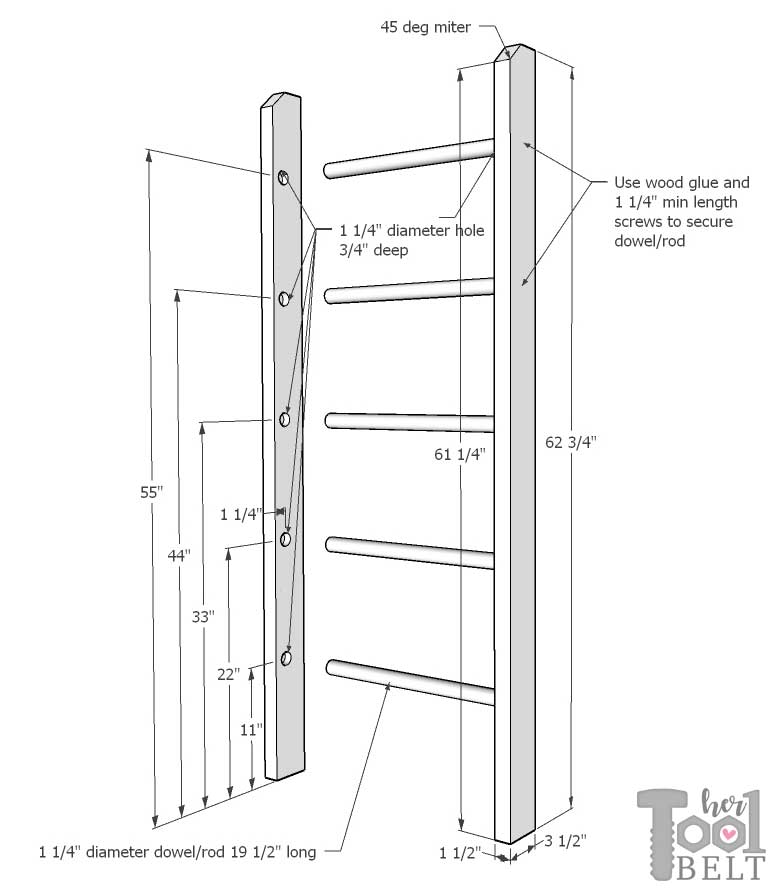 Drill 1 1/4″ holes approximately 3/4″ deep at each mark.
Secure the 19 1/2″ ladder rungs into the 2x4s with wood glue. Clamp the ladder rails (2×4’s) together until the wood glue dries. Add 3″ screws from the outside of the 2×4’s into the dowels to help secure the rungs, if needed.

Attach the ladder to the bunkbed under the top bed opening. Secure the ladder to bunk bed using 90 deg angle brackets and 1 1/4″ screws.
Trimming Out the House Bunk Bed
The best part of DIY is creating the look you want with your projects. This is how I trimmed the house bunk bed, feel free to insert your own style preferences.
Headboard
I decided to do another Cedar Herringbone project, like I did in the basement playhouse. Cedar fence pickets are fairly cheap and I like the color variation of cedar. The dimensions for the headboard are approximately:
- Upper Bed – 39 1/2″ wide x 36″ tall
- Lower Bed – 39 1/2″ wide x 36 1/2″ tall
You could really do anything with the headboard portion, here are a few ideas:
- Cedar picket herringbone 🙂
- Tongue and Groove pine siding (like I used for the upper mattress support)
- Shiplap
- Plywood
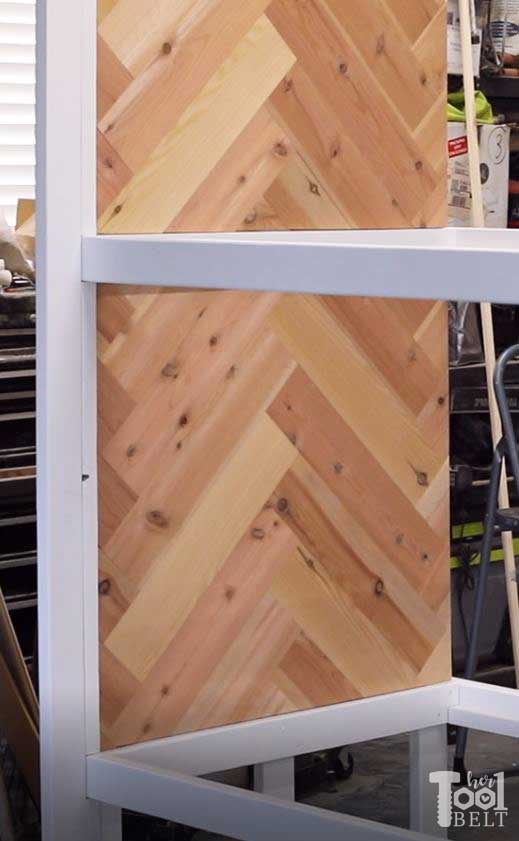
Cedar Herringbone Headboard
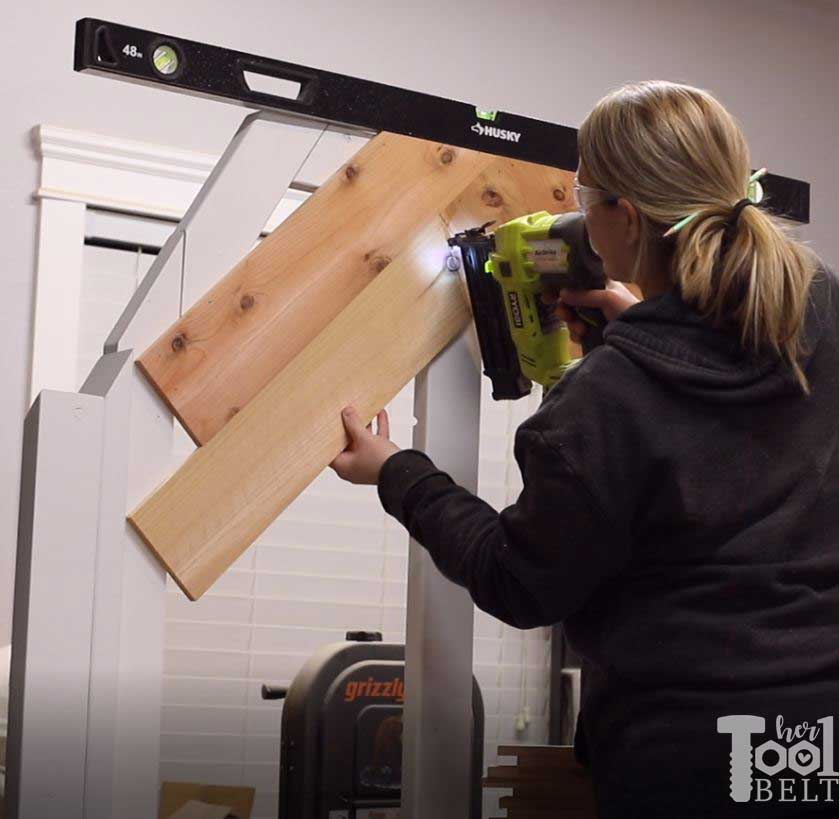
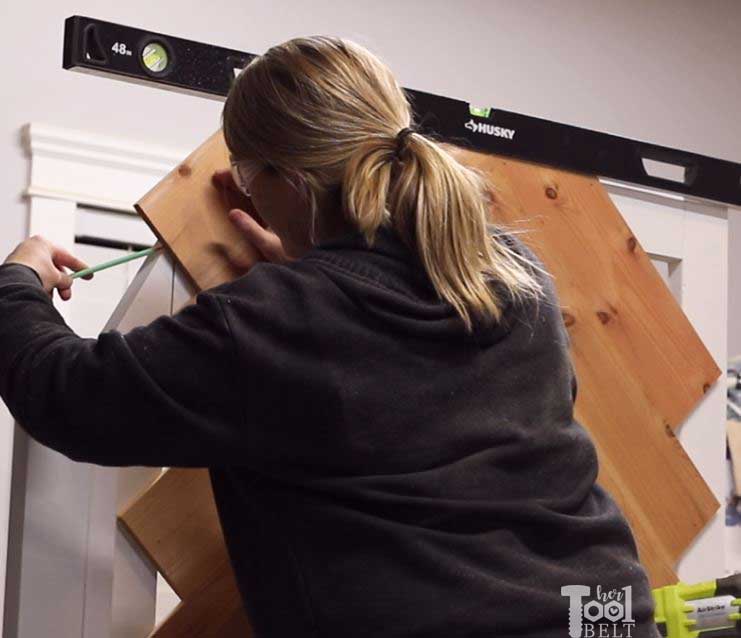
To prep the cedar pickets, I first ran them through the planer to make the boards smooth, then I trimmed the sides with the table saw (or jointer) to make the edges straight. The cedar picket prep is optional, just my personal preference. I made a mistake with the cedar pickets, the wood was a little green/wet when I bought it. I let the pickets dry in the garage for a few weeks (but it was cold and they didn’t dry enough). When I attached them to the headboard, all of my joints were super tight. …Then the garage got warmer and the pickets really dried and shrunk a bit, leaving gaps. It’s fine…we’re fine…it just looks like I did a shoddy job.
I cut 8 of the cedar pickets into about 5 1/4″ x 24″ pieces. The very top pieces are cut at 45 deg angle. This is really a cut to fit activity.
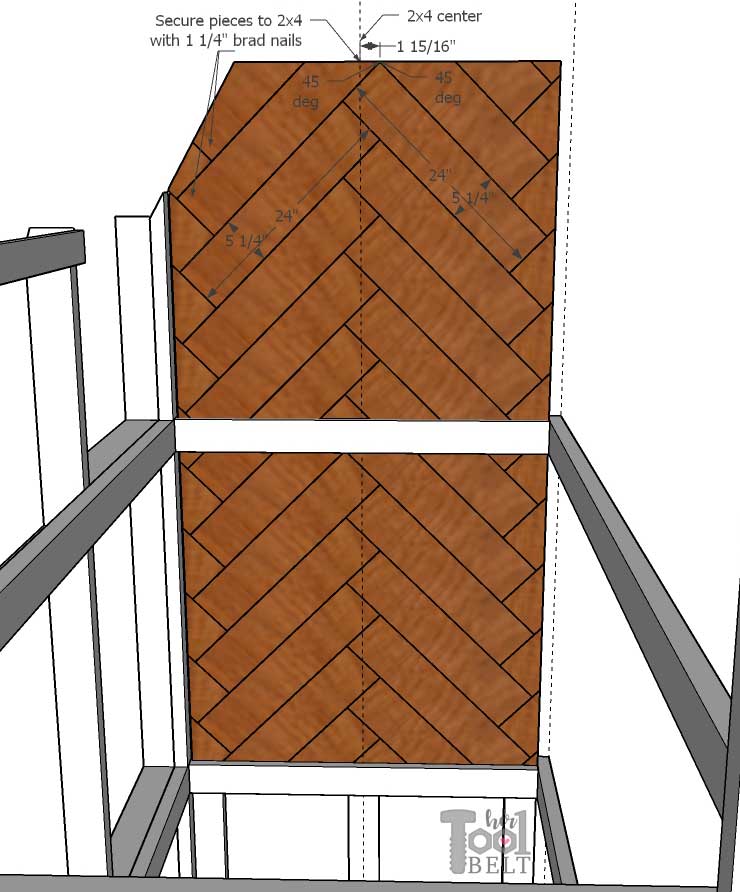
I attached each cedar piece with 1 1/4″ brad nails into the 2×4’s.
I traced the outer angles to cut on the edge pieces.
Door and Window Trim
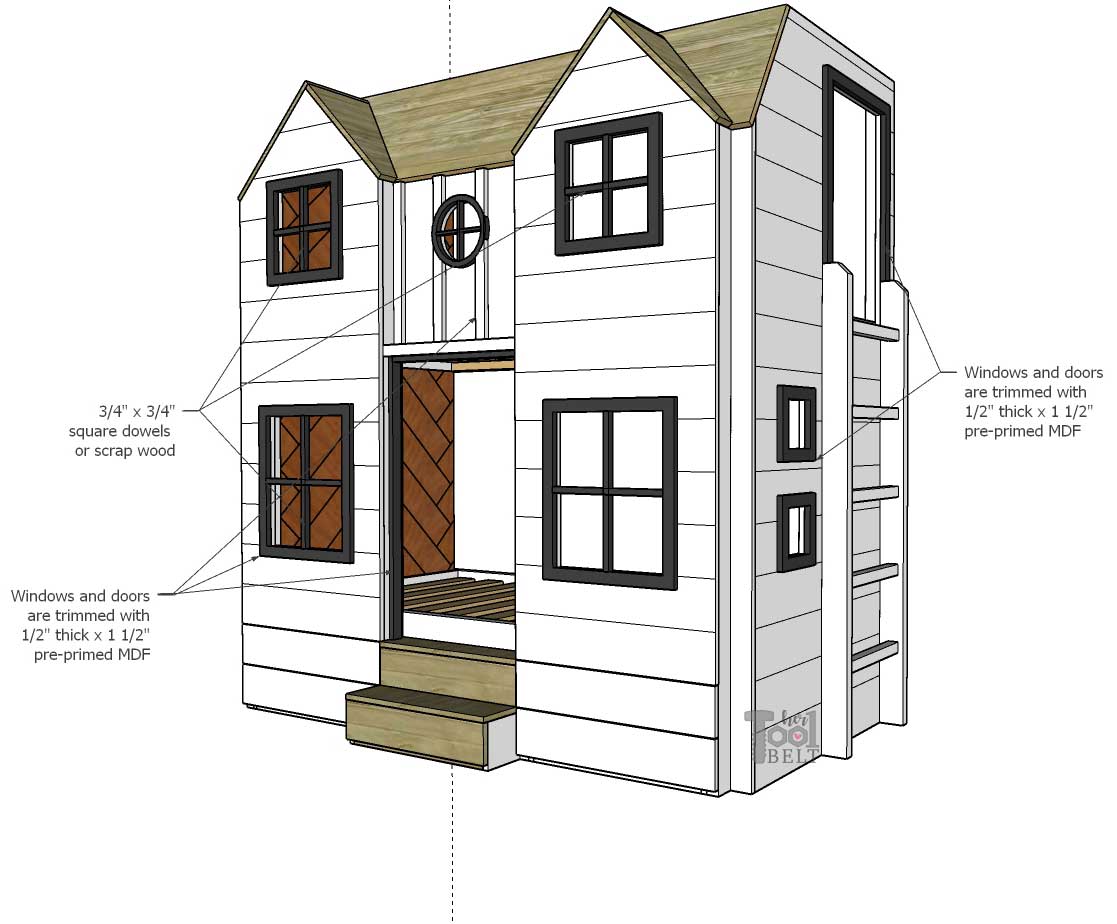
- The doors and windows are trimmed with 1/2″ thick 1 1/2″ wide pre-primed MDF that I painted charcoal/blackish.
- The window grid is 3/4″ x 3/4″ scrap wood painted charcoal. Grid pieces are glued in place, then tacked in place with brad nails.
- Center round window is trimmed with scrap 1/2″ MDF, but scrap 3/4″plywood would work too.
- Round Window Pattern found –> Here 8 in circle and trim<– Cut out, paint, and attach with 1″ brad nails.
- 1/2″ thick x 1 1/2″ wide pre-primed MDF cut 22 1/2″ long is used to make a ‘board and batten’ look. Attach with 1″ brad nails.
Cedar Planter Boxes
The cedar planter boxes use 4 – 6′ cedar pickets.
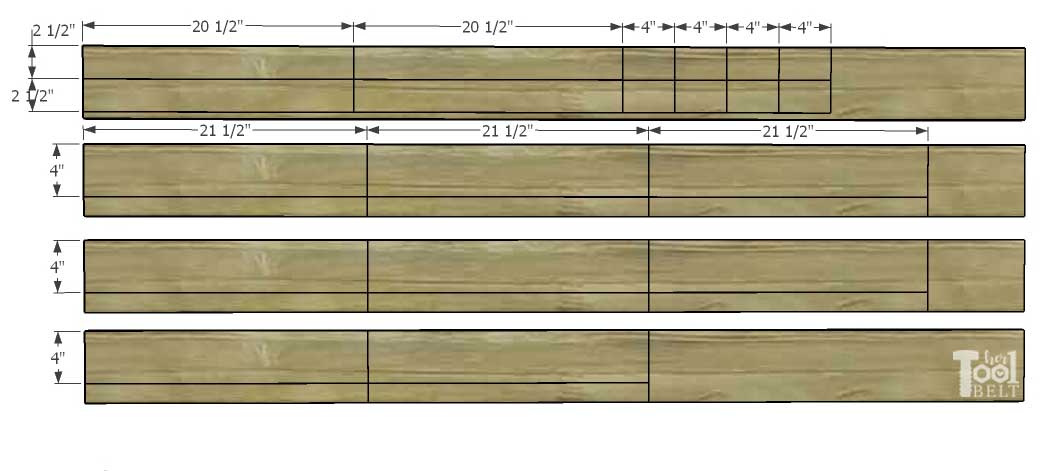
Cedar Planter Box Cut List (for 4 boxes)
- 4 – ~1/2″ x 2 1/2″ x 20 1/2″ (bottom)
- 8 – ~1/2″ x 2 1/2″ x 4 (sides)
- 8 – ~1/2″ x 4″ x 21 1/2″ (front and back) – if the cedar is thicker that 1/2″, then increase the length of the front/back pieces to fit.
Cedar Planter Box Cut Diagram
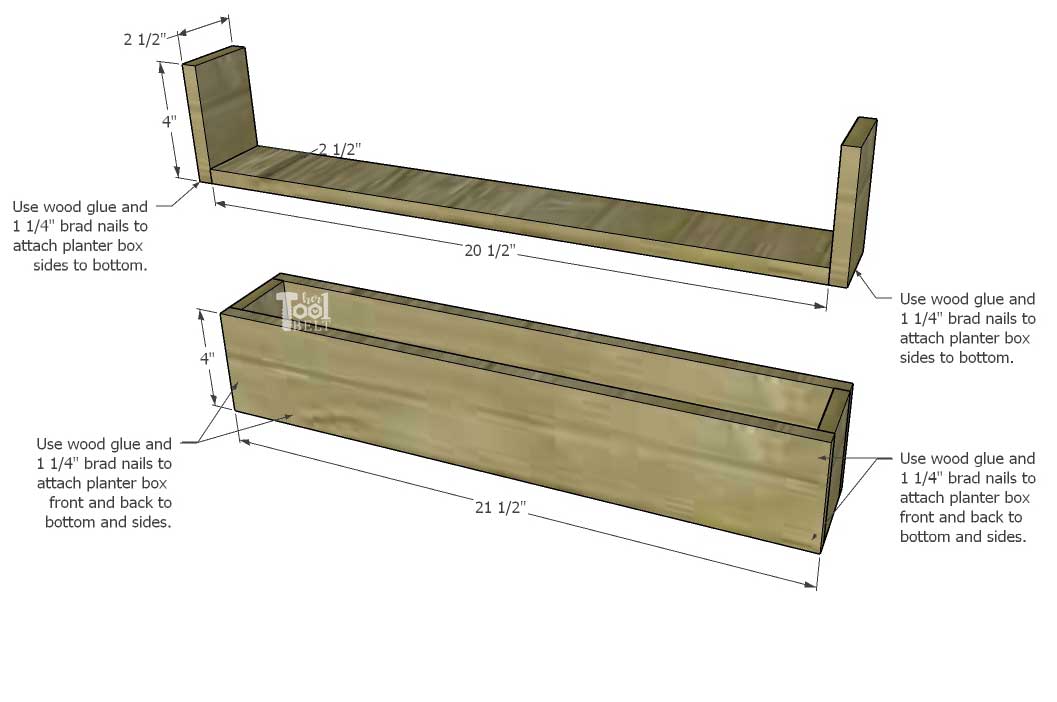
 Assemble Cedar Planter Box
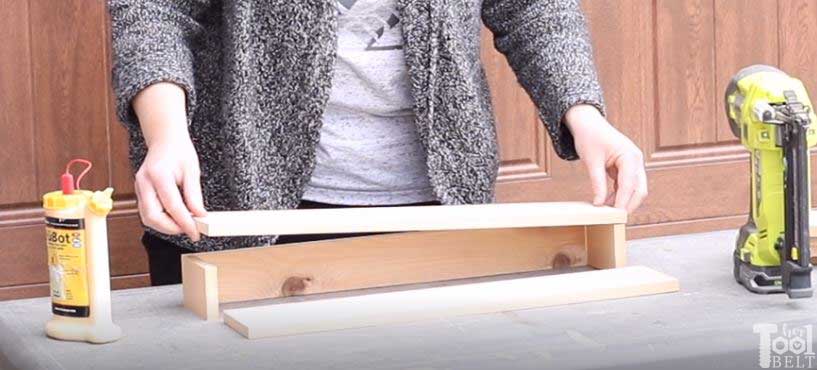
Use wood glue and 1 1/4″ brad nails to attach a side to each end of the bottom piece.
Use wood glue and 1 1/4″ brad nails to attach a front and back to the side and bottom pieces.
Attach planter boxes to Front Panel with 1 1/4″ brad nails or screws.
Window Pergolas
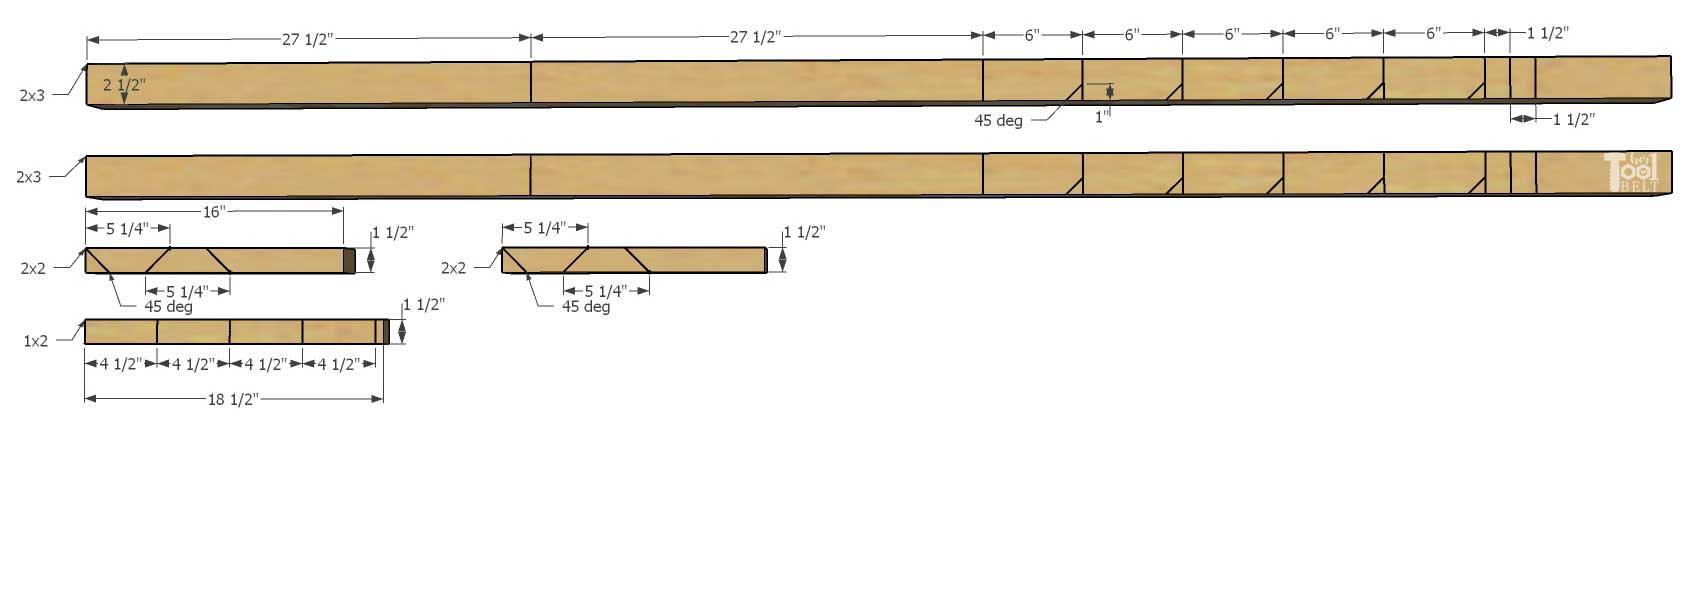
Window Pergolas Cut List (for 2)
- 4 – 1 1/2″ x 2 1/2″ x 27 1/2″ (2×3)
- 4 – 1 1/2″ x 2 1/2″ x 1 1/2″ (2×3)
- 10 – 1 1/2″ x 2 1/2″ x 6″ (2×3) with 45 deg miter on 1 corner
- 4 – 1 1/2″ x 1 1/2″ x 5 1/4″ (45 deg miter on both ends) (2×2)
- 4 – 3/4″ x 1 1/2″ x 4 1/2″ (1×2)
Window Pergolas Cut Diagram
Assemble corbels by placing 2×2 on a 45 deg angle, using wood glue and 1 1/4″ brad nails to attach 4 1/2″ piece to 2×2. (Keep fingers clear of potential nail paths).
For the pergola, I glued all of the pieces together and clamped until dry.

Place 2 of the 1 1/2″ spacers between 2 – 27 1/2″ boards (inset 1″). Glue and clamp in place.
Mark 1″, 7″, 13″, 19″, and 25″ on the 27 1/2″ boards. Glue the 6″ pieces on the marks as shown in the diagram. The flat side of the 6″ pieces should be flush with the back of a 27 1/2″ board.
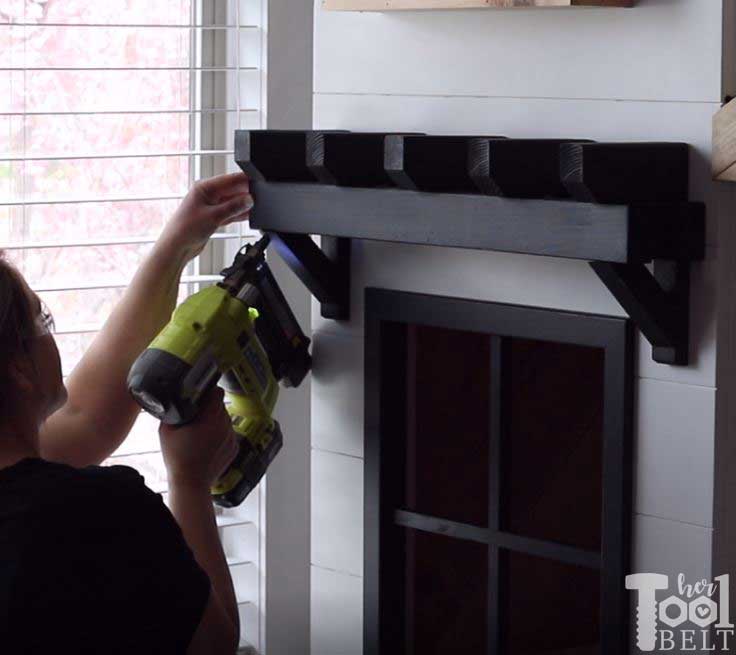
I attached the corbels to the front panel with 1 1/4″ brad nails. The corbel is placed about 1 3/4″ in from the side of the front panel.
Then attach the 2nd corbel on the other side of the window. The pergola is secured with screws thru the back side of the panel into the 2×3.
Timber Portico
Cut out the timber portico from 2×3 pieces.
Timber Portico Cut List
- 2 – 1 1/2″ x 2 1/2″ x 13 9/16″ with 30 deg miters on each end
- 2 – 1 1/2″ x 2 1/2″ x 3 11/16″ with a 30 deg miter on one end
- 1 – 1 1/2″ x 2 1/2″ x 23 1/2″ with 60 deg miters on both end facing each other

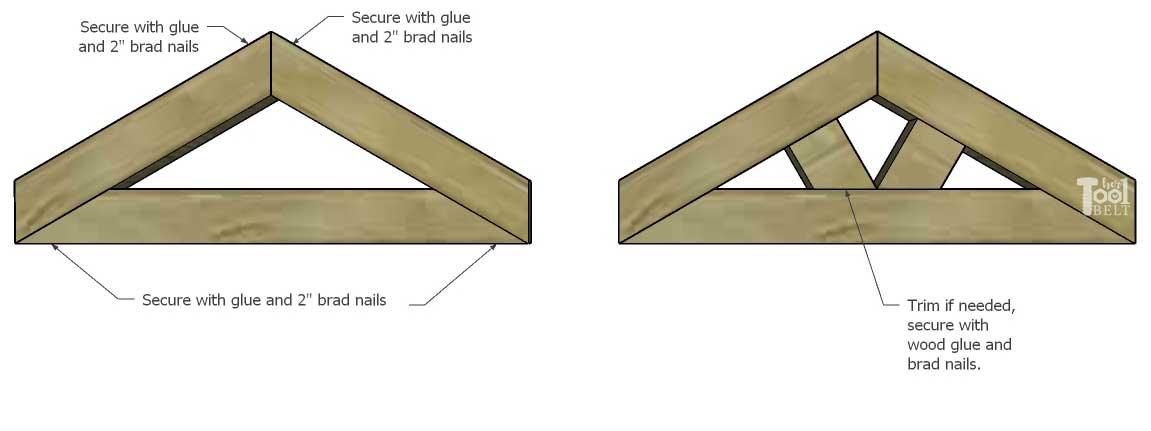
Assemble the outer portico in a triangle, use wood glue and 2″ brad nails to secure the triangle together. Slide the 2 short pieces into the triangle as shown and secure with brad nails.
Attach the portico to the door header with 2 1/2″ pocket hole screws.
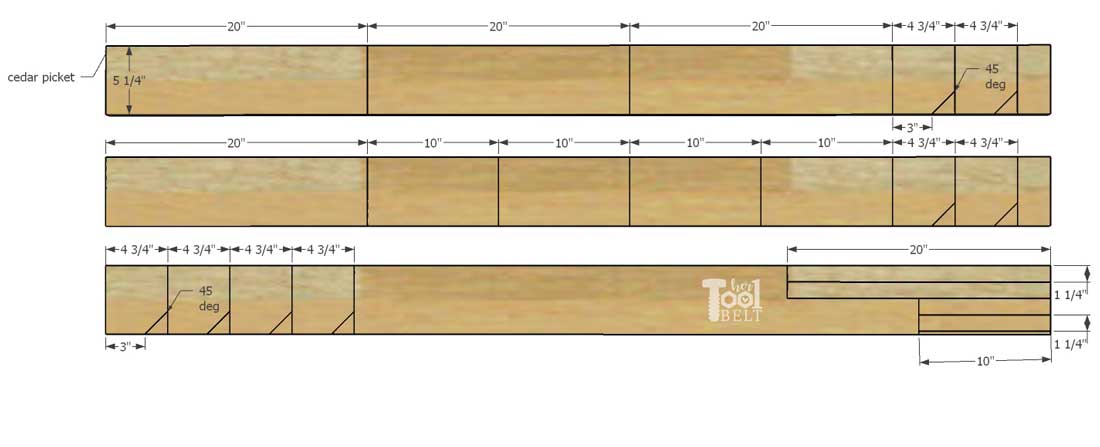
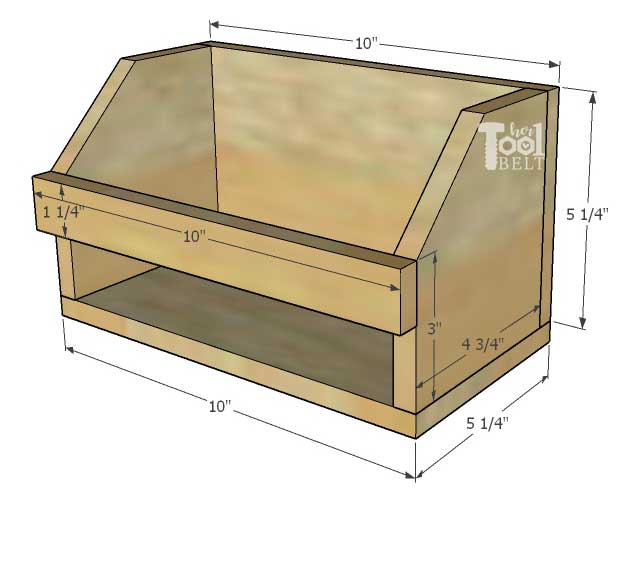
Cedar Bookshelves
I whipped together these little bookshelves also from cedar fence pickets. The top bunk has 2 – 10″ long bookshelves and the bottom bunk has 2 – 20″ long bookshelves. You’ll probably have plenty of scrap cedar pieces if you did the cedar herringbone headboard or planter boxes. If not, here is a cut list and diagram.
Cedar Bookshelf Cut List (2 large, 2 small)
- 4 – 1/2″ x 5 1/4″ x 20″
- 4 – 1/2″ x 5 1/4″ x 4 3/4″ with a 45 deg dog ear
- 2 – 1/2″ x 1 1/4″ x 20″
- 4 – 1/2″ x 5 1/4″ x 10″
- 4 – 1/2″ x 5 1/4″ x 4 3/4″ with a 45 deg dog ear
- 2 – 1/2″ x 1 1/4″ x 10″
Cedar Bookshelf Cut Diagram
Bookshelf Assembly
Secure the back piece onto 2 side pieces (5 1/4″ side) with wood glue and 1 1/4″ brad nails.
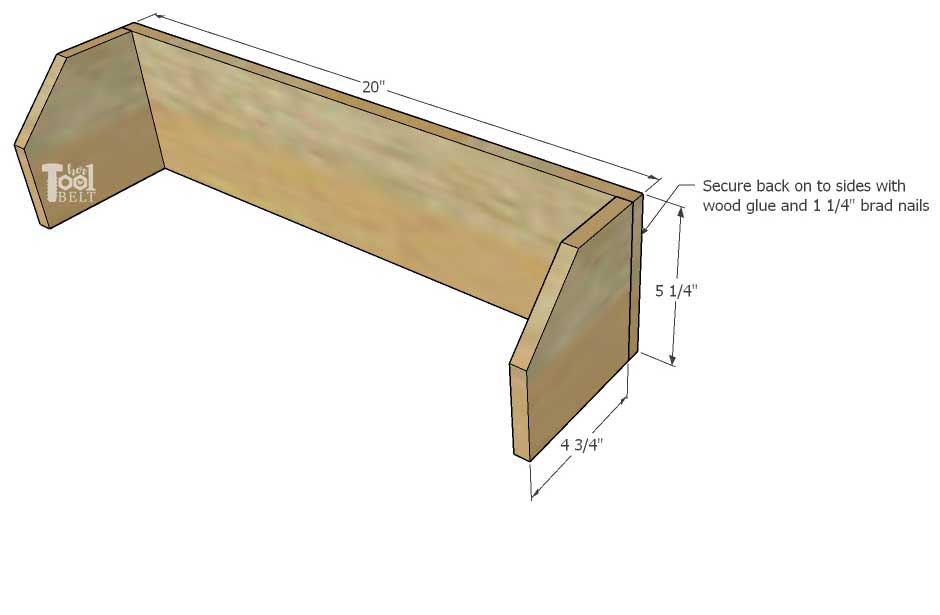
Then attach the bottom piece to the back and sides with wood glue and brad nails. Attach the front 1 1/4″ piece with brad nails.
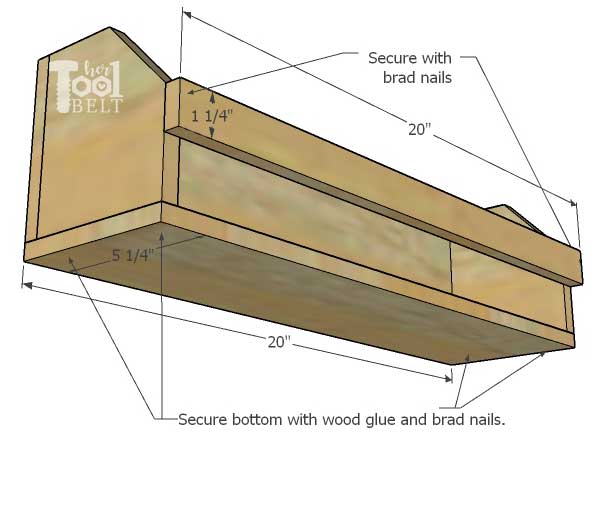
The small bookshelf assembly is the same as the large, except the length is 10″ instead of 20″.
Cedar Shingles
Possibly the most tedious task of this project was attaching my weathered cedar shake shingles to the roof. With such a small roof, it was a cut to fit project.
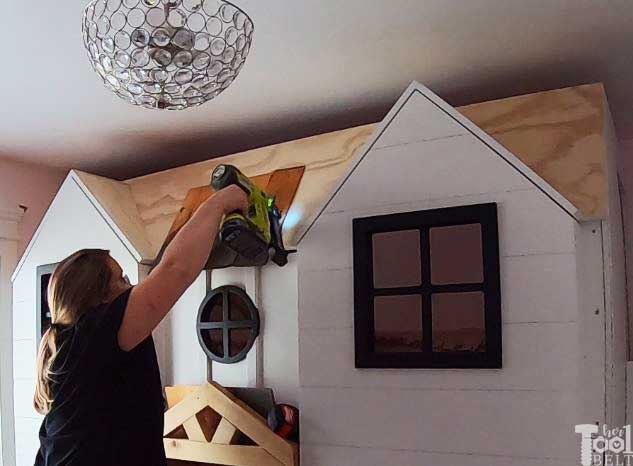
But I love how it turned out.
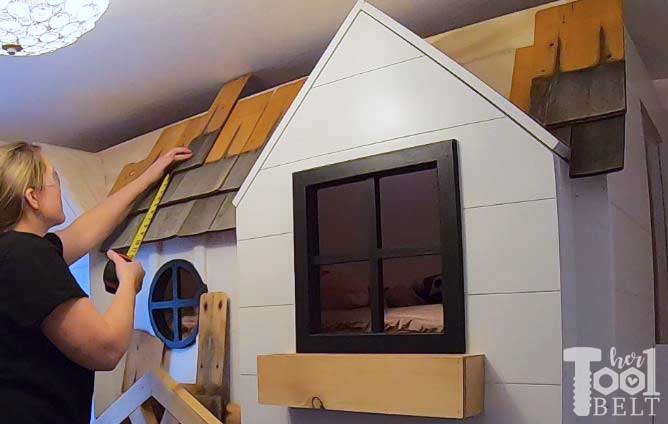
The girls are thrilled with their new bed, which makes all of the work worth it!!!
–>Download the House Bunk Bed Printable Plans Here <–
Thanks for pinning!
This is amazing!I love it!
You have seriously thought of everything! I have been wanting to build something like this for my girls but haven’t found any plans that were A- this detailed and B- this functional! I don’t plan on doing this yet but I am definitely saving and printing this off ASAP so I can start saving towards it!! Thank you so much for sharing!
Thanks Haylie
What about circulation? My daughter sleeps with the fan on… did u use portable ones? I’m going to try and build this! Ur direction make me think I can do it!
The upper bunk does get warmer than the lower, because heat rises. I don’t currently have a fan, but was thinking of getting a little clip on one for the upper bunk. The lower bunk is plenty open.